

Page 1

assembly instructions
sequel
®
6021
executive desk
Placement and Maintenance
Sequel® Home Office Furniture is designed for indoor use on level floors. Clean glass with glass
cleaner, and steel parts and wood veneer with a moist cloth. Your Sequel® Home Office Furniture
is engineered for easy assembly. Carefully follow this procedure to prevent any damage.
Do not use power tools for assembly of this product.
Step 1
Unpack and identify the parts listed below. The assembly workspace should be a non-marring
surface such as carpet. For missing hardware pieces, please contact BDI Customer Service at
customerservice@bdiusa.com. For all other concerns, please contact your BDI Retailer.
Component List
C - Wire Management Lid x 1
bdiusa.com customerservice@bdiusa.com
B - Top Glass x 1
D - Modesty Panel x 1
E - Wire Management Trough x 1
H - Removable Side Panel x 2
*Remove for Assembly
A - Drawer Assembly x 1
H - Removable Side Panel x 2
*Remove for Assembly
G - Right Leg x 1
F - Left Leg x 1
I - Glide x 4
Designed by Matthew Weatherly.
These distinctive product configurations
are protected by US and international
patents, trade dress, and/or copyright laws.
“Sequel” and BDI are trademarks of Becker
Designed, Inc. All Rights reserved. ©2014
Becker Designed, Inc.
Made in Taiwan. 6021REV082214v1
J - 4mm Hex Wrench x 1
K -1/4-20 x 12mm Screw x 3
L - Cam Bolt x 2
M - Cam Fitting x 2
N - 1/4-20 x 32mm Screw x 6
O -Confirmat Screw x 2
P - 1/4-20 x 15mm Screw x 4
Q -1/4-20 x 58mm Screw x 4
R -Rubber Stem Bumper x 5
S -Center Drawer Pad Insert x 1
T -Side Drawer Pad Inserts x 2
1
Page 2
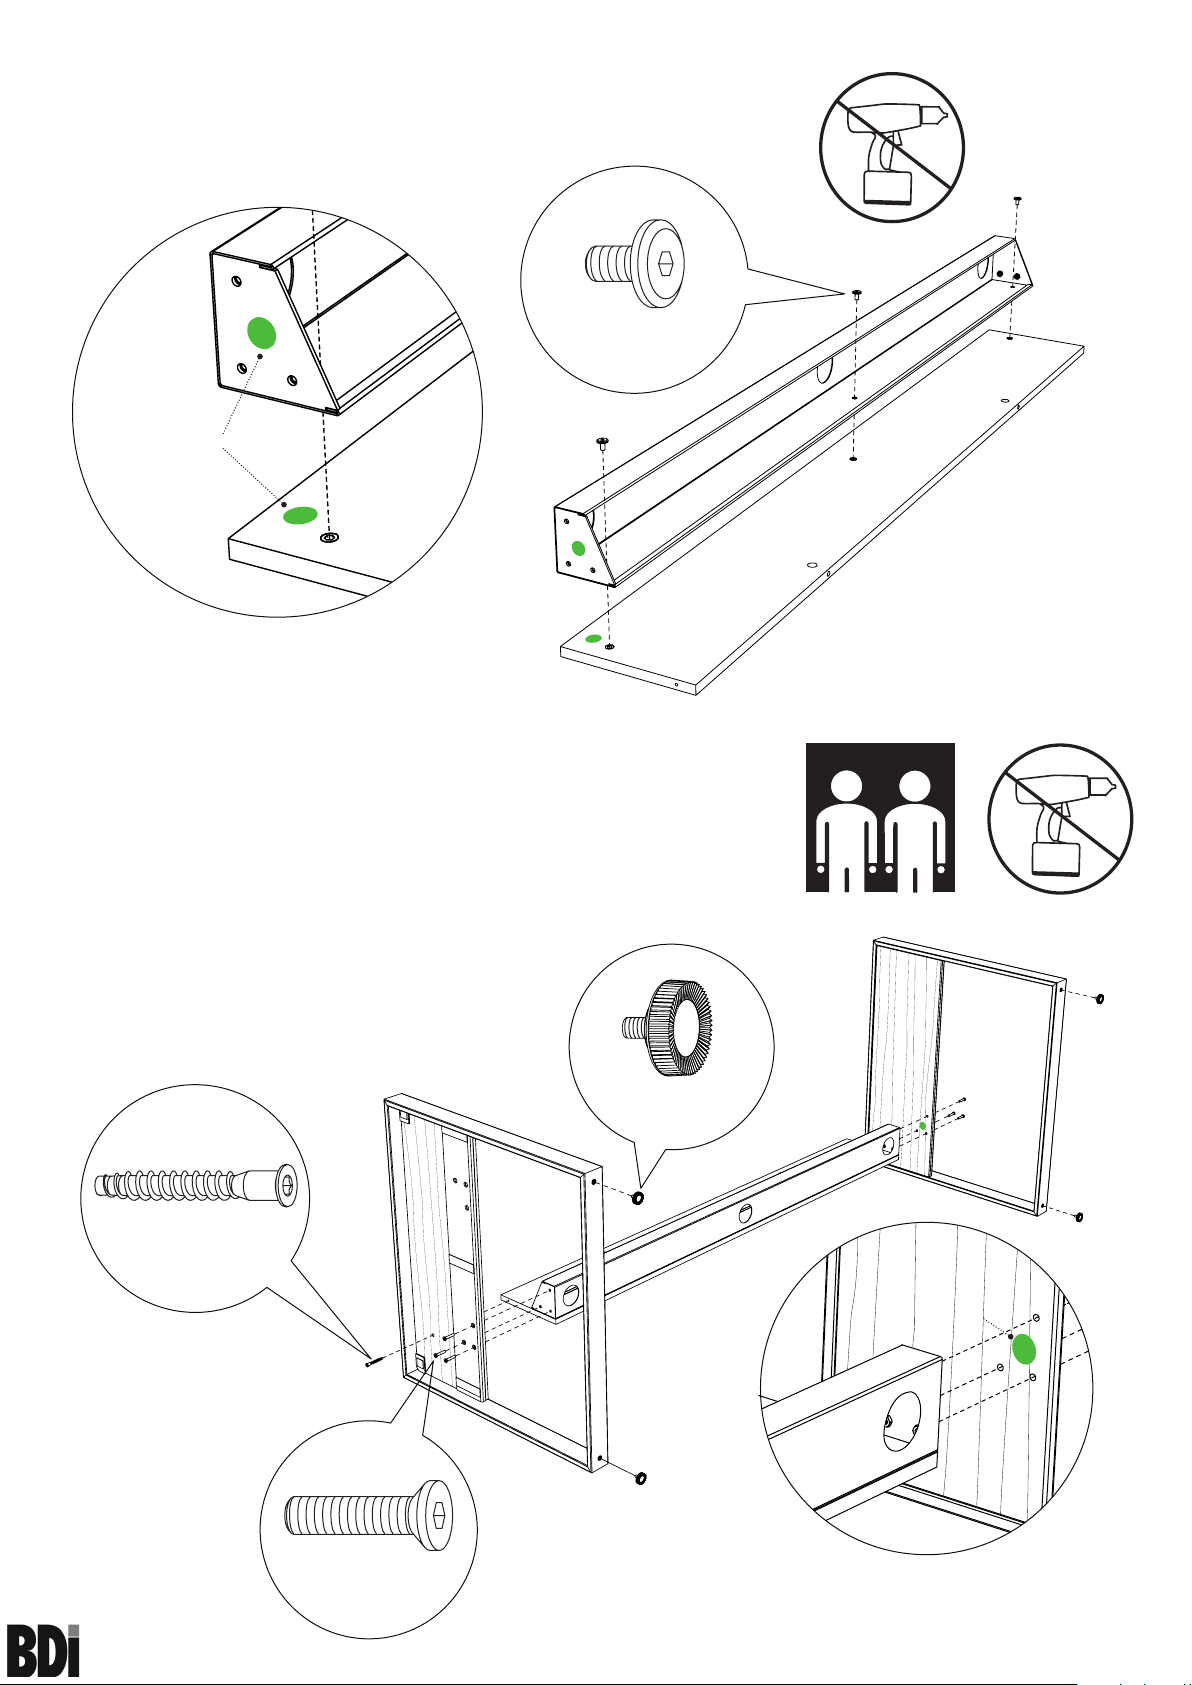
Step 2
Aligning the Colored Dots on the same side, attach Wire Management
Trough (E) to Modesty Panel (D) using Screw (K) and Hex Wrench (J).
K x 3
Colored Dots
E
D
Step 3
Match Colored Dot on Right Leg (G) with Colored Dot on
Modesty Panel Assembly and attach using Screws (N), Screws (O)
and Hex Wrench (J). Keep screws loose until Step 7. Repeat to
attach Left Leg (F) to Modesty Panel Assembly. Install Glides (I) to
the bottom of Legs (F, G). With the help of another person, turn
desk upright onto its base.
F
I x 4
O x 2
2 Person Task
G
N
sequel
60 21 ex ecu ti ve de sk
®
N x 6
Colored Dot
2
assembly instructions
bdiusa.com customerservice@bdiusa.com
Page 3

Step 4
With the Drawer Assembly (A) upside down, install and tighten Cam
Bolt (L) into corresponding holes near the back of the Assembly
using phillips screwdriver (not included). DO NOT OVERTIGHTEN!
L
L
A
L x 2
Step 5
With the help of another person carefully lower Drawer Assembly
(A) and align attached Cam Bolts (L) into their respective holes in the
Modesty Panel (D).
L
D
L
2 Person Task
sequel
60 21 ex ecu ti ve de sk
®
L x 2
D
3
assembly instructions
bdiusa.com customerservice@bdiusa.com
Page 4

Step 6
Secure Drawer Assembly (A) to Leg Assembly using Screw (P) and
Hex Wrench (J).
P x 4
Step 7
Insert Cam Fitting (M) into holes of Modesty Panel (D) with the arrow of
the Cam Fitting (M) pointing upward. Tighten Cam Fitting (M) clockwise
using phillips screwdriver (not included) until it no longer rotates. Fully tighten
all Screws that have been installed in previous steps using Hex Wrench (J).
A
M
D
M
Arrow must point upward
during insertion
M x 2
sequel
60 21 ex ecu ti ve de sk
®
4
assembly instructions
bdiusa.com customerservice@bdiusa.com
Page 5

Step 8
Insert Rubber Stem Bumpers (R) in the center hole and outer holes of
Drawer Assembly (A). With the grippy side facing down, insert Center
Drawer Pad Insert (S) into the center drawer and Side Drawer Pad
Inserts (T) into both side drawers.
A
R x 5
T x 2
S x 1
Step 9
With the help of another person gently lower Top Glass (B) onto
Drawer Assembly (A) and fasten into place using Screw (Q) and
Hex Wrench (J). DO NOT OVERTIGHTEN!
B
A
2 Person Task
sequel
60 21 ex ecu ti ve de sk
®
Q x 4
5
assembly instructions
bdiusa.com customerservice@bdiusa.com
Page 6

Step 10
Place Wire Management Lid (C) into opening in Top Glass (B). Attach
Removable Side Panels (H) to Legs (F,G) ensuring the top edge of
the Side Panel (H) sits against the top inside edge of Leg (F,G).
C
B
H
2 Person Task
H
G
F
Step 11
Place AC power strip/surge protector (not included) into wire
Management Trough (E).
E
sequel
60 21 ex ecu ti ve de sk
®
E
6
assembly instructions
bdiusa.com customerservice@bdiusa.com
 Loading...