

Page 1
ASSEMBLY INSTRUCTIONS
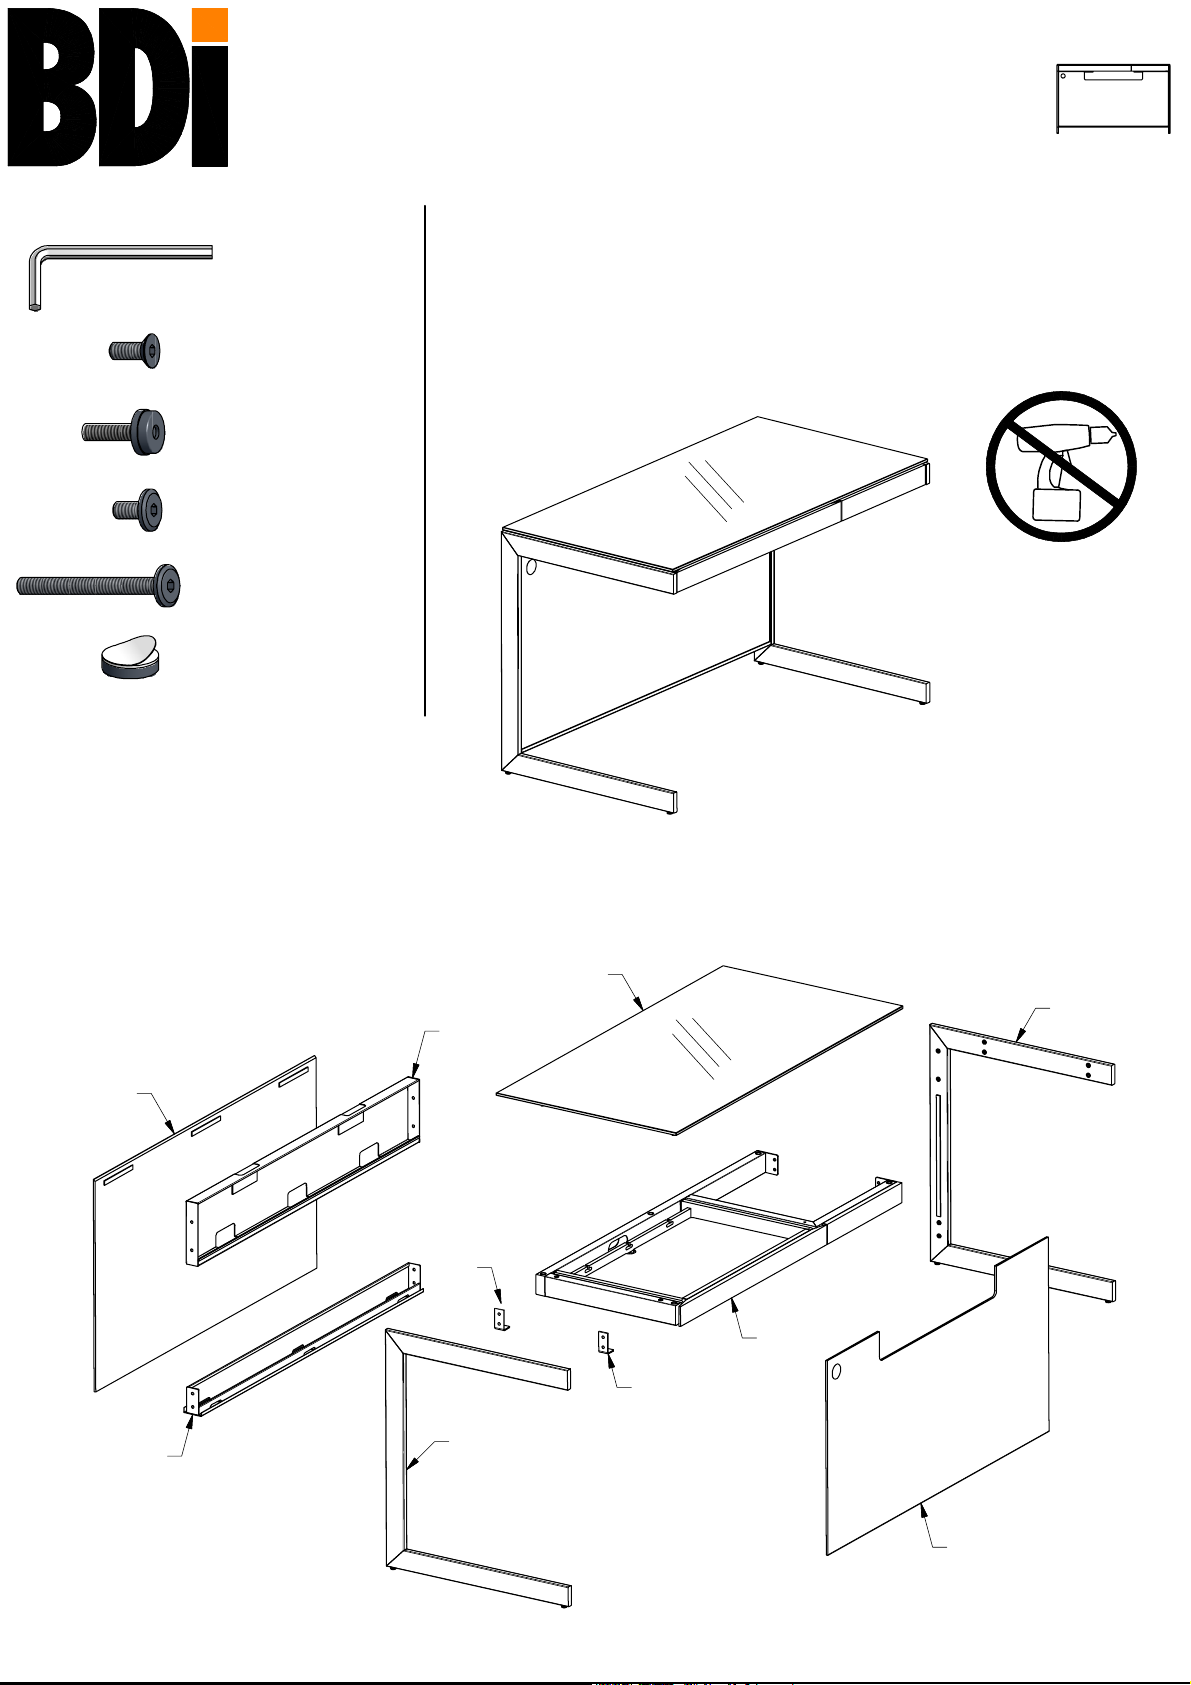
Component List
SEQUEL
6003 Compact Desk
A - 4mm Hex Wrench
B - 1/4-20 x 1/2"
Flat Head
Machine Screw x 6
C - Leveler Glide x 4
D - 1/4-20 x 1/2"
Machine Screw x 12
E - 1/4-20 x 63mm
Machine Screw x 5
F - Adhesive Magnet x 4
™
BDIUSA.COM CUSTOMERSERVICE@BDIUSA.COM
Sequel™ is engineered for easy assembly. Carefully follow this procedure to
prevent any damage.
Placement and Maintenance
Sequel™ Home Office Furniture is designed for indoor use on level floors. Clean
glass with glass cleaner, and steel parts and wood veneer with a moist cloth.
CAUTION: Do not use power tools for assembly of this product.
Leg Brackets x 2
G -
H - Left Leg x 1
I - Right Leg x 1
J - Drawer Assembly x 1
K - Upper Horizontal Beam x 1
L - Lower Horizontal Beam x 1
M - Glass Top x 1
N - Front Kick Panel x 1
Back Panel x 1
O -
(Sequel 6008 sold seperately)
K
O
G
M
I
L
Designed by Matthew Weatherly
These distinctive product configurations are protected by US and international
patents, trade dress, and/or copyright laws.
BDI and 'Sequel' are trademarks of Becker Designed, Inc.
All Rights reserved. © 2011 BDI
Made in Taiwan. 6003 Compact Desk Revision: 062311
J
G
H
N
1
Page 2

Step 1
Choose Drawer Position - Left or Right
Sequel 6003 Compact Desk
For Left Drawe
For Right Drawer Position, install
r Position, install
features a Left or Right Drawer position.
Leg Brackets (G) onto Left Leg (H).
Leg Brackets (G) onto Right Leg (H).
To Remove Drawer
Open Drawer fully and
press levers, 1 up and
1 down, on both sides
of Drawer, and pull
Drawer out.
Left Drawer Position
Install
Step 2
Attach Leg Brackets to Leg
Identify Left and Right Legs. Attach Leg
Brackets (G)
depending on Drawer Position. Attach
Leg Brackets (G) using Screws (B) and
tighten with
Step 3
Install Leveler Glides
Install Leveler Glides (C) into the bottom
Left Leg (H) and Right Leg (I).
of
to Left or Right Legs
Hex Wrench (A).
Leg Brackets (G) onto Left Leg (H)
Left Leg (K)
Right Drawer Position
Leg Brackets (G) onto Right Leg (I)
Install
B
G
Leg Bracket (G)
Right Leg (I)
C
SEQUEL
6003 Compact Desk
Foam Strip Faces Inside
Leveler Glide (C)
2
Leveler Glide (C)
ASSEMBLY INSTRUCTIONS
BDIUSA.COM CUSTOMERSERVICE@BDIUSA.COM
Page 3

Step 4
Attach Legs
With Drawer Assembly (J) upside down,
Attach Leg with
Assembly (J)
Hex Wrench (A).
with
Attach Leg without Leg Brackets to
Assembly (J)
Hex Wrench (A).
with
Recommended
2-person Step
Leg Brackets (G) to Drawer
using Screws (B) and tighten
Drawer
using Screws (D) and tighten
B
Leveler Glides (C)
Foam Strips
Face Inside
D
Upper Horizontal Beam (K)
Step 5
Attach Upper Horizontal Beam
Attach Upper Horizontal Beam (K) to inside
of Left and Right Legs using
tighten with
3 slots in
toward
Hex Wrench (A). Make certain
Upper Horizontal Beam (K) face
Leveler Glides (C).
Screws (D) and
Drawer Assembly (J)
Upside Down with
D
Drawer Bottom Facing Up
If necessary, remove Drawer
and flip over for correct position
See detail in
removal.
Step 1 for Drawer
Leveler Glides (C)
D
SEQUEL
6003 Compact Desk
Drawer Assembly (J)
ASSEMBLY INSTRUCTIONS
3 BDIUSA.COM CUSTOMERSERVICE@BDIUSA.COM
Page 4

Step 6
Attach Lower Horizontal Beam
Attach Lower Horizontal Beam (L) to inside
of Left and Right Leg using
tighten with
Turn unit over.
Hex Wrench (A).
Screws (D) and
L
D
Short side of
Lower Horizontal Beam (L)
faces front of Desk
L
D
Recommended
2-person Step
Step 7
Attach Glass Top
With the help of another person, gently lower Glass Top (M) onto
Drawer Assembly (J). Fasten Glass Top (M) using Screws (E) and
tighten with
Hex Wrench (A). DO NOT OVERTIGHTEN!
Glass Top (M)
Glass Top (M)
E
SEQUEL
6003 Compact Desk
4
E
ASSEMBLY INSTRUCTIONS
BDIUSA.COM CUSTOMERSERVICE@BDIUSA.COM
Page 5

Step 8 (optional)
Attach Magnets to AC power strip/surge protector
Remove Adhesive Magnets (F) from the Upper
Horizontal Beam (K).
Peel film from side of the Adhesive Magnets (F) and
attach to clean, dry back side of AC power strip (not
included). Cleaning of power strip surface with
rubbing alcohol will ensure best adhesive bond.
CAUTION: UNPLUG POWER STRIP
FROM POWER SOURCE BEFORE CLEANING
Adhesive Magnet (F)
1.
Adhesive Magnet (F)
2.
Step 9 (optional)
Attach Power Strip / Surge Protector
Attach AC power strip /surge protector to inside of Upper Horizontal
Beam (K)
Use the slot holes provided to run all wires to and from the desk. Keep
all wires inside Upper
of
Front Kick Panel (N) and/or optional Back Panel (O).
as shown in illustration below.
Horizontal Beam (K) to allow proper attachment
Upper Horizontal Beam (K)
SEQUEL
6003 Compact Desk
5 BDIUSA.COM CUSTOMERSERVICE@BDIUSA.COM
ASSEMBLY INSTRUCTIONS
Page 6

Step 10
Install Front Kick Panel
Place Desk in desired location. Once all of the electrical wires are
routed, install
Front Kick Panel (N) into Lower Horizontal Beam (L). Tilt Front Kick
Panel (N)
Note:
The Sequel™ Desk is designed to permit placement in front of an
electrical outlet for easier wiring access.
Front Kick Panel (N) as shown. Insert bottom edge of
back until magnets hold panel in place.
Front Kick Panel (N)
Step 11 (optional)
Attach Back Panel
Back Panel (O)
to conceal wire management if desk is located in the middle
of a room.
Insert bottom edge of
Beam (L)
panel in place.
Top edge of
Back Panel (O)
is angled
Sequel™ 6008 (sold seperately) is designed
Back Panel (O) into Lower Horizontal
. Tilt Back Panel (O) foward until magnets hold
Back Panel (O)
Sequel™ 6008
(sold seperately)
Lower Horizontal Beam (L)
SEQUEL
6003 Compact Desk
Lower Horizontal Beam (L)
ASSEMBLY INSTRUCTIONS
6 BDIUSA.COM CUSTOMERSERVICE@BDIUSA.COM
 Loading...