

Page 1
COSMO™ 5729
CONSOLE
Product Registration
Registering your new BDI product allows us to send you important
product updates, service information and helpful hints related to your
BDI products. Register today, and you will be entered to win free a
BINK table from BDI: www.bdiusa.com/register
Placement and Maintenance
Your Cosmo Console is designed for indoor use on level floors.
Clean wood, metal, and porcelain surfaces with a damp cloth.
Cosmo is engineered for easy assembly. Carefully follow this
procedure to prevent any damage. Do not use power tools for
assembly of this product.
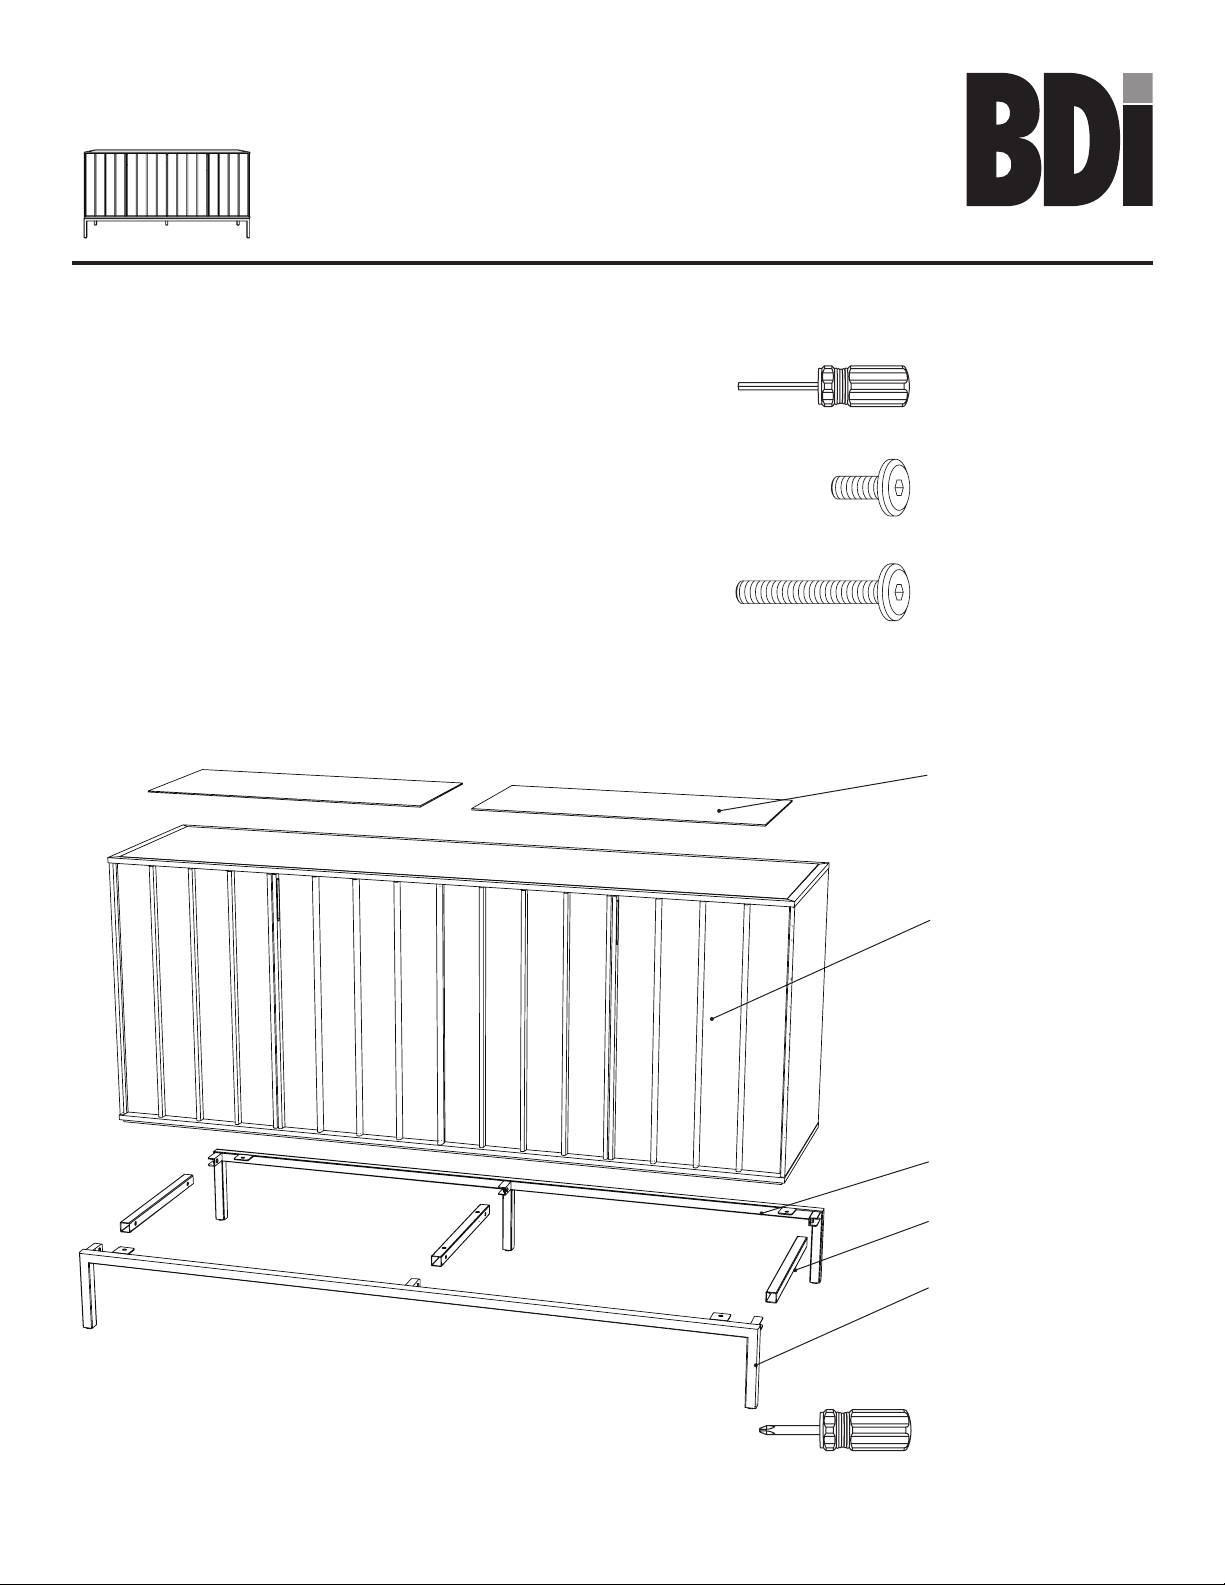
Step 1
Unpack and identify the parts listed below. The assembly workspace
should be a non-marring surface such as carpet. For missing
hardware pieces, contact BDI Customer Service at:
customerservice@bdiusa.com.
For all other concerns, please contact your BDI retailer.
bdiusa.com
customerservice@bdiusa.com
Tool Provided:
T1 Hex Driver x 1
H1 M6 x 12mm
Screw x 10
H2 M6 x 35mm
Screw x 2
C5 Drawer liner x 2
Designed by Matthew Weatherly.
These distinctive product configurations are protected by US and international patents, trade dress,
and/or copyright laws. Cosmo & BDI are trademarks of Becker Designed, Inc. All rights reserved.
©2019, BDI Made in China. 07.15.2019
A1 Cabinet x 1
C1 Back Base Frame x 1
C3 Connector Tube x 3
C2 Front Base Frame x 1
Tool Required:
Phillips Driver x 1
Page 2

Step 2 - Base Assembly
Position the front and back base frames C1 and C2 as shown. Position the connector tubes C3 as
shown (no holes should be visible on the outside ends). Slide the metal tabs into the ends of the connector
tubes. Attach base frames to connector tubes using 6 screws H1. Tighten with hex driver T1.
C3
C2
No holes
here
H1
C1
C3
Metal tabs
C3
T1 H1 x 6
Step 3 - Base Attachment
Make sure the packing material bracing the 2 inner shelves is still in place before rotating the cabinet. With
help from another person, carefully position cabinet A1 on its back. Attach the base as shown using 4
screws H1 (at the corners) and 2 screws H2 through the middle connector tube. Tighten all screws
using hex driver T1.
2 Person Ta sk
A1
H1
H1 x4
H1
H2 x 2
2
COSMO 5729
CONSOLE
H2
H1
H1
bdiusa.com
customerservice@bdiusa.com
Page 3
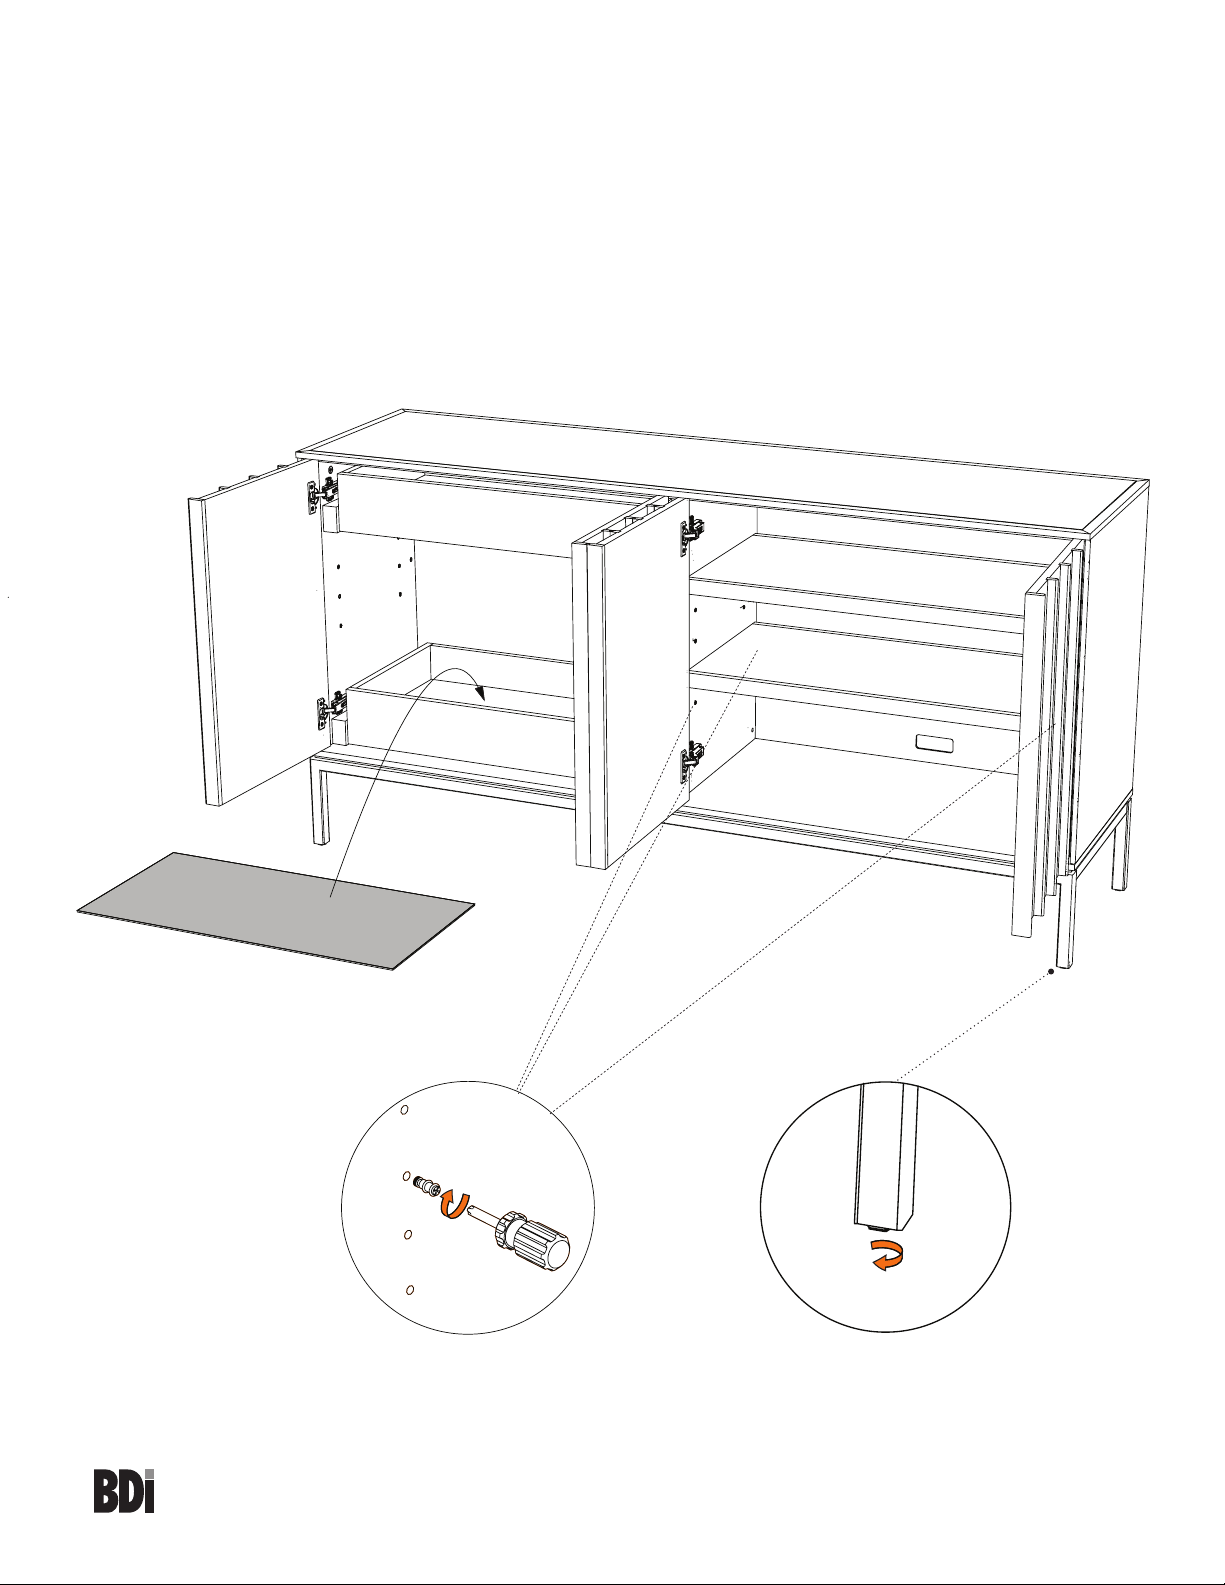
Step 4 Drawer liner Installation
Place one drawer liner C5 into each drawer.
Step 5 Cabinet Leveling
Check to make sure your Cosmo Console is level. Levelers are located underneath each leg and can be
dialed up or down to level the unit if necessary (see below).
Step 6 Shelf Positioning
The shelves may be positioned at any of the available locations corresponding with threaded inserts inside
the cabinet by moving the shelf pins. Use a Phillips driver to loosen, reposition, and re-tighten the shelf
pins.
C5 Drawer liner x 2
down
Reposition shelf pins
(if needed)
3
COSMO 5729
CONSOLE
Level the cabinet
(if needed)
bdiusa.com
customerservice@bdiusa.com
Page 4

Fine tuning your new BDI Cosmo Console
These steps are to be followed after you have unpacked and completed the simple assembly instructions
for your Cosmo Console. Due to jostling in freight or perhaps an uneven floor, the doors on your Cosmo
console may not appear to be in perfect alignment. Making a few minor adjustments can rectify this
situation. Be aware that depending on your situation, patience and a bit of trial and error are required. The
high-quality European hinge hardware is infinitely adjustable, but changing one element can cause the need
for further adjustments. Through a little adjustment, you can modify the orientation of the cabinet doors to
make sure that they are sitting perfectly.
INCORRECT! Door is
out of alignment with
the rest of the unit.
CORRECT! Door is
sitting squarely and evenly
spaced on tops and sides.
Adjust Door Hinges (if needed)
The doors on your cabinet should be evenly spaced and the doors should open and close freely without rubbing
against the door frame.
If the cabinet’s doors appear out of alignment, this condition can be corrected with minor adjustment to the
European hinges on each door.
Because these hinges are infinitely adjustable, adjusting one
hinge element can sometimes cause the need for adjustments
to other elements. But with a few adjustments, you can modify
the orientation of the cabinet doors to make sure that they hang
perfectly within your cabinet.
Use a Phillips Screwdriver to adjust Corridor's door hinges:
2
within the frame. Make minor adjustments at both top and
1
• By adjusting Screw 1, the door will move LEFT or RIGHT
bottom hinges for best results.
• By adjusting Screw 2 the entire door will move IN or OUT,
opening or closing the gap between the door frame and
cabinet. (This screw rarely needs adjustment.)
2
1
4
COSMO 5729
CONSOLE
customerservice@bdiusa.com
bdiusa.com
Page 5

Porcelain Top Removal
Your Cosmo Console features a durable, heat resistant porcelain top. The top may be cleaned with mild
soapy water on a damp cloth. If liquid spills into the seam, the porcelain top may be removed for cleaning
purposes, or may be replaced in case of damage.
To remove the porcelain:
1) open all 4 doors, partially open the upper left drawer.
2) Using a Phillips screwdriver, remove the screw (indicated below) from each front corner of the drawer.
3) To remove the drawer, place your fingers under each front corner of the drawer and pull the orange
lever towards you while lifting upward. Continue on next page.
Removing
drawer to be removed
screw allows the
this
After removing the screw, reach
below the front corners of the
drawer and pull levers towards
you to lift the drawer out
Page 6

Porcelain Top Removal (cont.)
4) locate the 4 metal plates that connect the porcelain to the cabinet.
5) Use Hex driver T1 to remove all screws holding the metal plates.
6) Once all four metal plates are removed, the porcelain top may be lifted out by pushing up from below as
shown (arrow #2).
After cleaning, re-insert the porcelain top and re-attach the 4 metal plates.
To reattach the drawer, place the drawer directly on top of the metal drawer slides and slowly push the
drawer all the way in until it "snaps" back on.
Metal plates
(2 of 4)
2
1
6
COSMO 5729
CONSOLE
customerservice@bdiusa.com
bdiusa.com
Page 7

Drawer Adjustment (if needed)
The 2 drawers on your Cosmo Console are adjustable as much as 2mm up, down, left, right, back or forward. If the drawers are out of alignment, follow the steps below:
Removing
screw allows
this
the drawer to be adjusted (or
removed)
Backward
Rotating the
1)
Forward
wheel towards the inside of
black
the drawer moves the drawer backward, deeper
into the cabinet.
Left
Right
Rotating the
2)
wheel towards you moves the
white
drawer to the left. Rotating away moves it right.
7
COSMO 5729
CONSOLE
Down
Up
Pushing the
3)
orange
lever towards the outside
wedges the drawer up. Pulling it towards the
middle of the drawer makes the drawer drop.
bdiusa.com
customerservice@bdiusa.com
 Loading...