

Page 1
COSMO™ 5720
BAR
Product Registration
Registering your new BDI product allows us to send you important
product updates, service information and helpful hints related to your
BDI products. Register today, and you will be entered to win free a
BINK table from BDI: www.bdiusa.com/register
Placement and Maintenance
Your Cosmo Bar is designed for indoor use on level floors.
Clean wood, metal, and porcelain surfaces with a damp cloth.
Cosmo is engineered for easy assembly. Carefully follow this procedure
to prevent any damage. Do not use power tools for assembly of this
product.
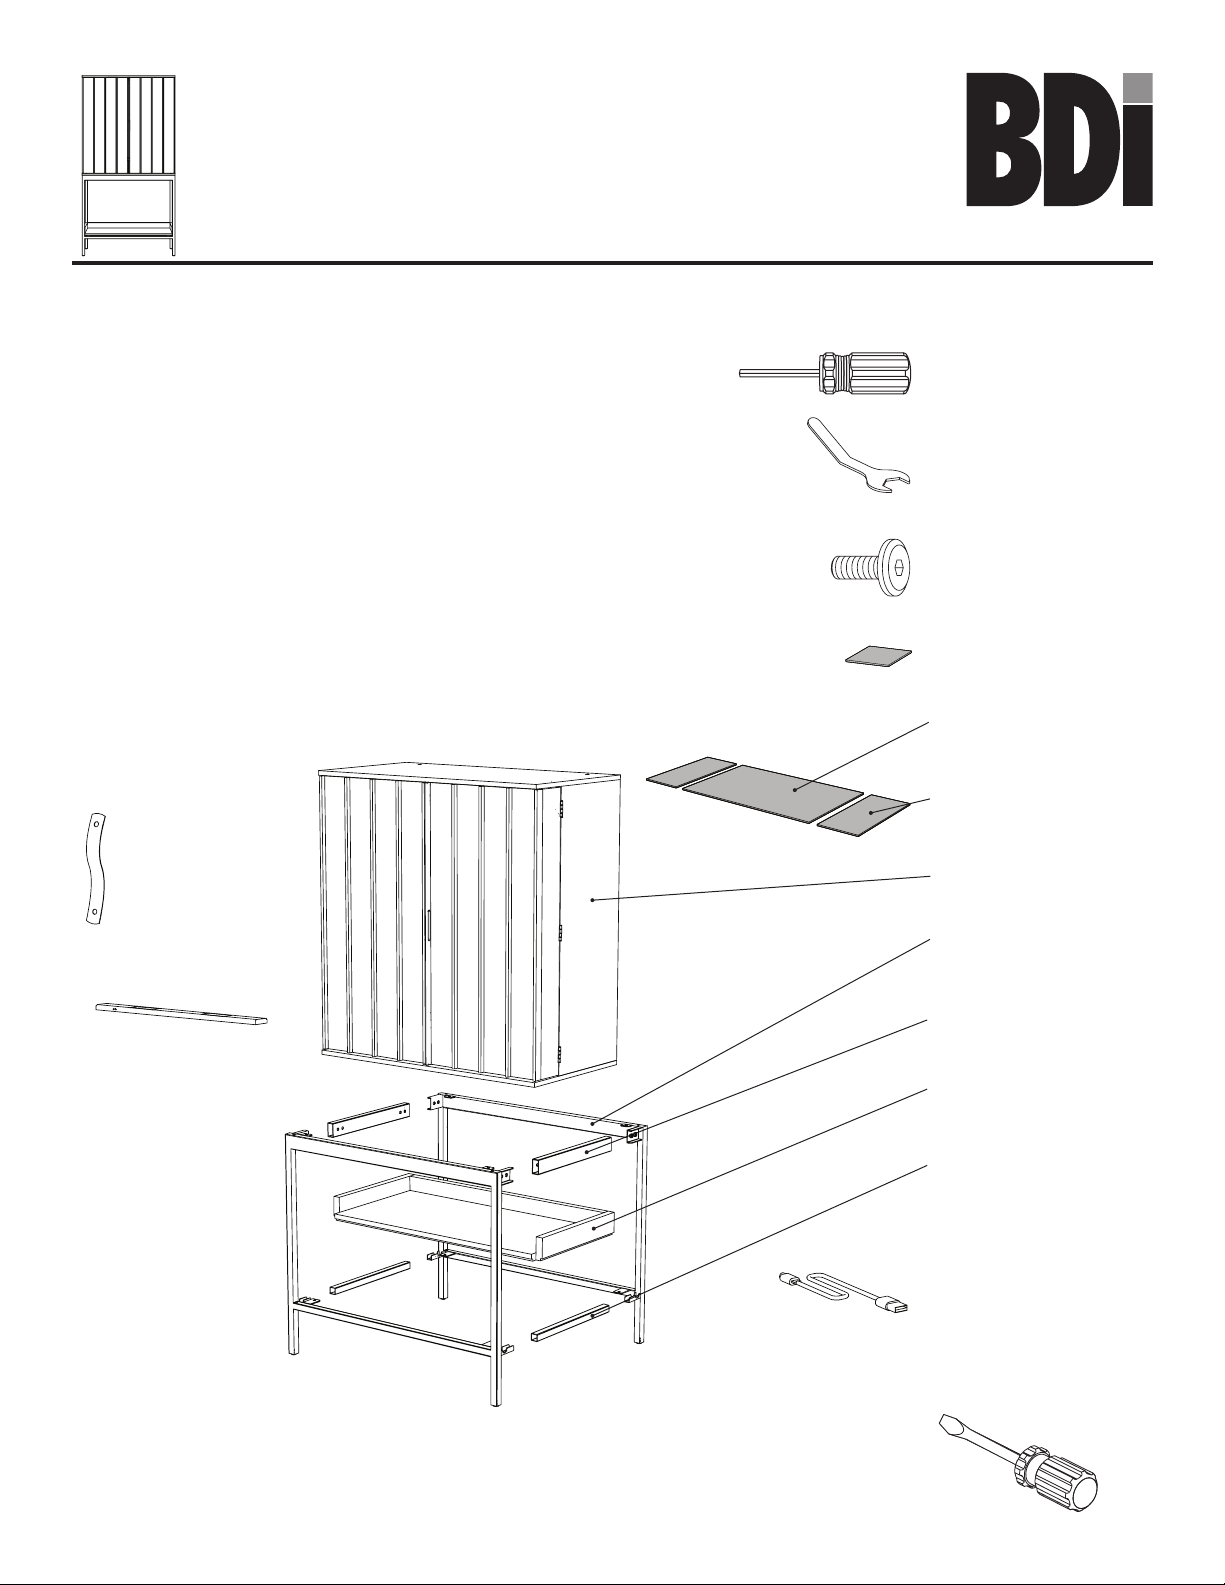
Step 1
Unpack and identify the parts listed below. The assembly workspace
should be a non-marring surface such as carpet. For missing hardware
pieces, contact BDI Customer Service at:
customerservice@bdiusa.com.
For all other concerns, please contact your BDI retailer.
H3 Wall Anchor
Strap x 2
bdiusa.com
customerservice@bdiusa.com
T1 Hex Driver x 1
T2 Leveler Wrench x 1
H1 M6 x 12mm Screw
x 26
C5 Anti-skid Pad x 2
C6 Middle Drawer
Liner x 1
C7 Side Drawer
Liner x 2
A1 Cabinet x 1
H4 Rechargeable
Strip Light
Designed by Matthew Weatherly.
These distinctive product configurations are protected by US and international patents, trade dress, and/or
copyright laws. Cosmo & BDI are trademarks of Becker Designed, Inc. All rights reserved. ©2019, BDI
Made in China. 12.05.2019 V3
C1 Base Frame x 2
C2 Top Connector Tube x 2
A2 Lower Shelf x 1
C3 Bottom Connector
Tube x 2
H5 Micro HDMI/USB
charge cord x 1
Tool Required:
Slotted Screwdriver
Page 2
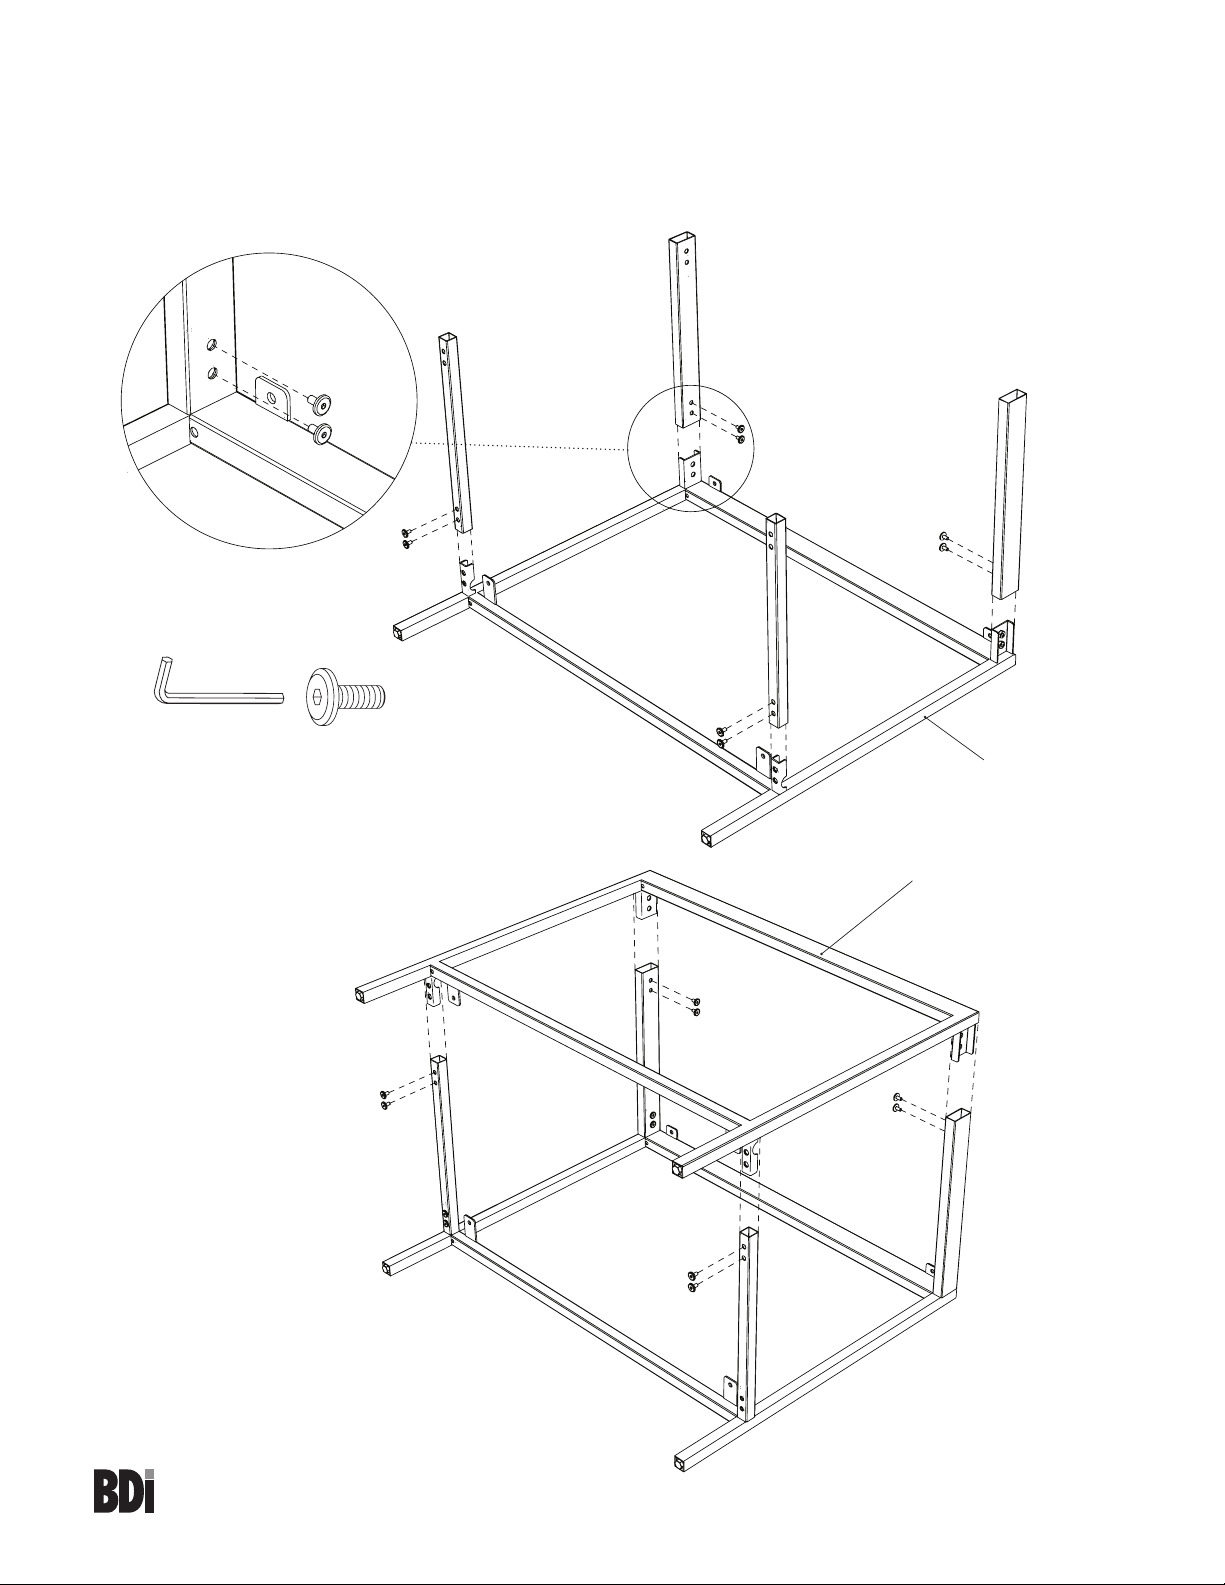
Step 2 - Base Assembly
Position base frame C1 on the floor with tabs facing up. Slide both top connector tubes C2 onto the 2
large U shaped tabs of base frame C1 making sure the holes are facing inside. Slide both bottom con-
nector tubes C2 onto the 2 small U shaped tabs of base frame with holes facing down. Attach connector tubes using 8 screws H1. Sleeve the other base frame C1 over the assembly as shown below and
tighten all 16 screws H1 with hex wrench T1.
C2
C3
T1
H1
H1 x 16
H1
C2
H1
C3
H1
C1
C1
H1
H1
H1
2
COSMO 5720
BAR
H1
bdiusa.com
customerservice@bdiusa.com
Page 3
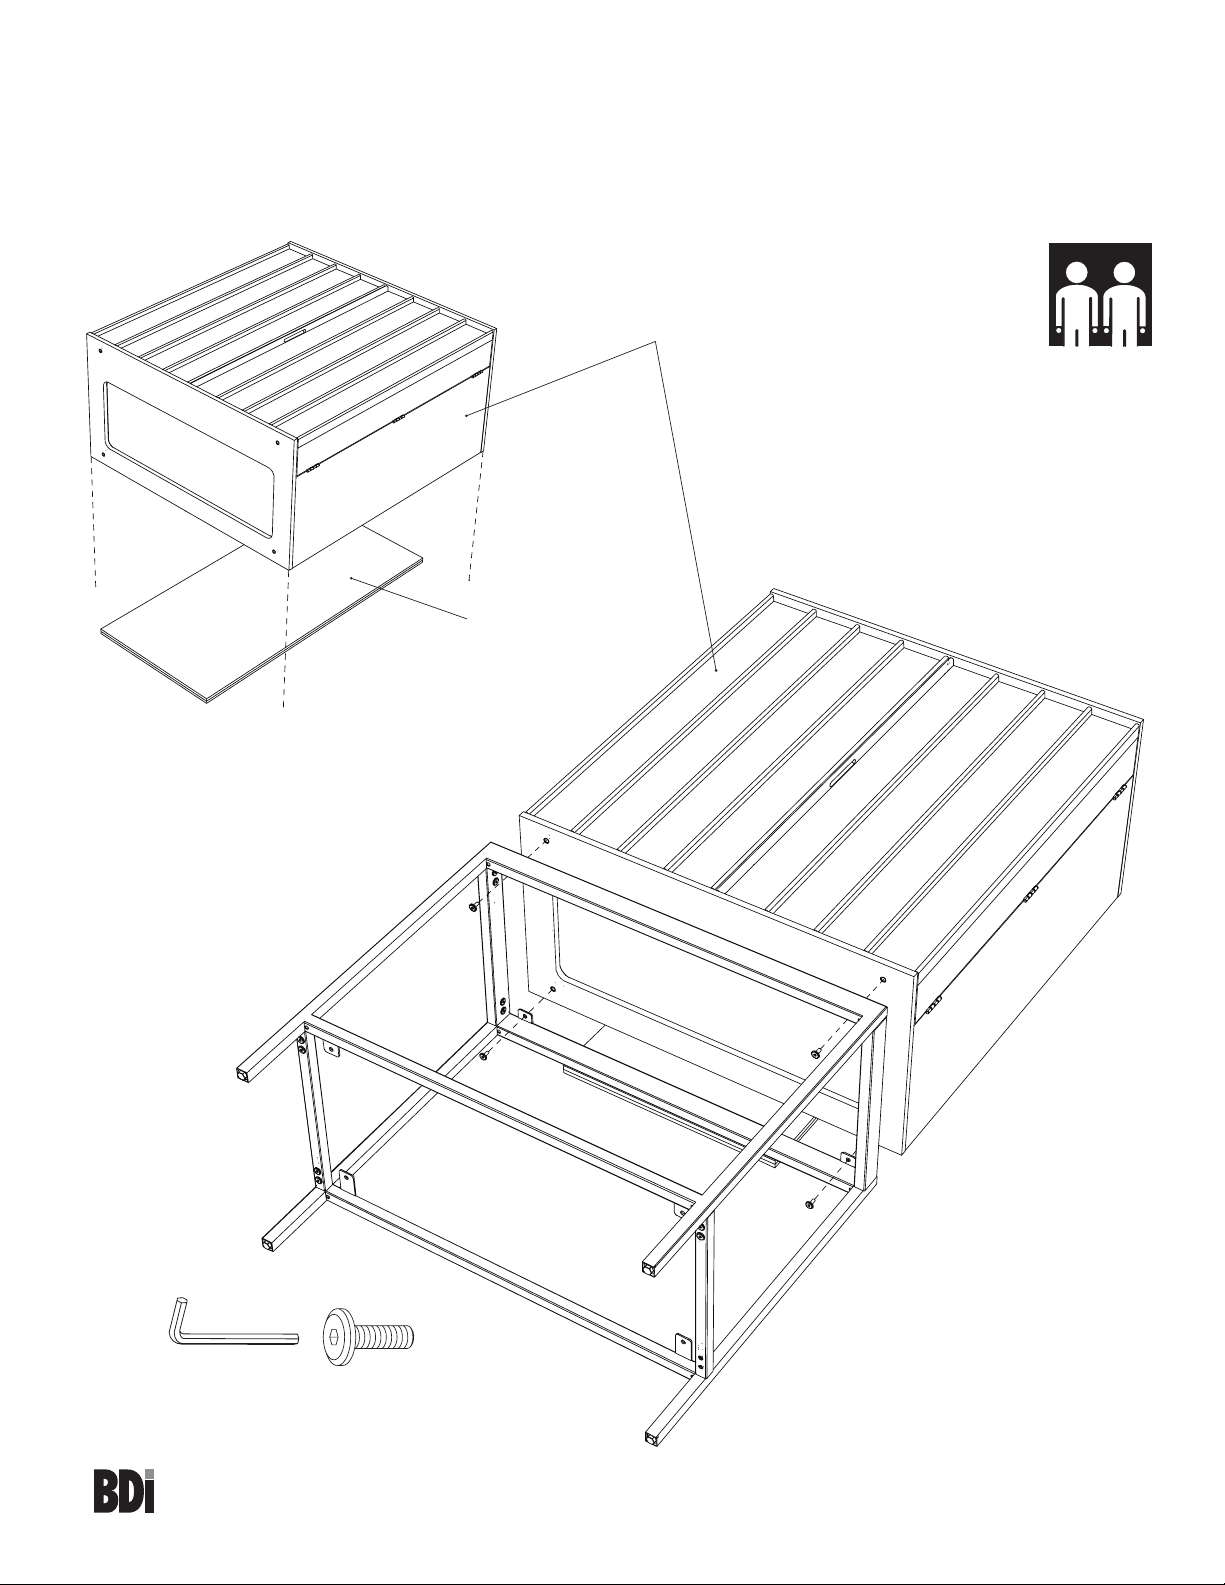
Step 3 - Base Attachment
With help from another person, carefully position the cabinet A1 onto at least two layers of packing
material and orient on its back as shown. Note: the packing material creates finger space to lift the
cabinet after attaching the base. Position the base as shown and attach with 4 screws H1 and tighten
with hex wrench T1.
2 Person Ta sk
A1 Cabinet x 1
2 layers of honeycomb
packing material
H1
H1
T1
3
COSMO 5720
BAR
H1 x 4
H1
H1
bdiusa.com
customerservice@bdiusa.com
Page 4

Step 4 - Standing the Unit
Position the anti-skid pads C5 under the back legs as indicated with arrow #1 making sure that the
pads are centered on the end of the legs. With 2 people (1 person on each side) carefully and slowly
lift the cabinet with hands placed along the edges of the cabinet indicated with arrow #2.
2 Person Ta sk
Leg centered on Anti-skid pad
C5
Lift
1
1
C5 Anti-skid pad x 2
2
Recommended hand
positions (both sides)
2
4
COSMO 5720
BAR
customerservice@bdiusa.com
bdiusa.com
Page 5

Step 5 - Wall Preparation
CAUTION! DO NOT allow children to swing on the open doors.
It is strongly recommended that you anchor your Cosmo Bar cabinet to the wall using two anchor
straps H3 included. Determine the desired location of your Cosmo Bar and then position the bar 24" in
front of the wall. Mark the wall and insert 2 wall inserts (not included) in the position indicated below.
H3 Anchor
Strap x 2
wall anchors
(not included)
71cm71cm
28"28"
175cm175cm
69"69"
61cm61cm
24"24"
5
COSMO 5720
BAR
customerservice@bdiusa.com
bdiusa.com
Page 6

Step 6 - Wall Attachment
Attach 1 end of the anchor straps to the wall. Carefully move your Cosmo bar close to the wall and
attach the loose end of the anchor straps to the top of the cabinet using screws H1 going into the
threaded inserts as shown. Tighten with hex wrench T1.
H1
H3 Anchor
Strap
T1
H1 x 2
Step 7 - Lower Shelf Installation
Tilt the lower shelf as shown, insert the shelf into the front opening of the base and rotate carefully down
onto the lower cross bars of the frame. Attach the lower shelf with 4 screws H1 and tighten with hex
wrench T1.
H1 x 4
T1
H1 x 4
1 2 3
6
COSMO 5720
BAR
customerservice@bdiusa.com
bdiusa.com
Page 7

Step 8 - Light Installation
Find the rechargeable strip light H4. Using the Micro HDMI/USB charge cord H5, charge the light for
6 hours. Once charged, install it onto the metal strip (it is held with magnets) located in the angled recess
towards the top front of the cabinet. Make sure the proximity sensors are facing forward and the light
switch is turned on. The light is designed to turn off automatically when the cabinet doors are closed.
H4 Rechargeable
Strip Light
Micro HDMI / USB
Proximity Sensors
charge cord H5
On/Off
Step 9 - Drawer Liner Installation / Magnetic Door Catch
Open the push-open drawer and install middle drawer liner C6 and both side drawer liners C7.
Using a slotted screwdriver, unscrew the magnetic door catches a few turns until they make contact
with and hold the doors shut.
C7
C6
7
COSMO 5720
BAR
C7
customerservice@bdiusa.com
bdiusa.com
Page 8

Step 10 - Shelf Adjustment
Adjust the height of the adjustable shelf if needed by moving the positions of the shelf pins.
Mirror
Adjustable Shelf
Bottles and cans
Porcelain
Surface
Wine Bottle
Storage
8
COSMO 5720
BAR
Wine Glass
Storage
Reposition Shelf Pins
(if needed)
bdiusa.com
customerservice@bdiusa.com
Page 9

Step 11 - Leveling and Adjusting the Door Gaps
With both doors closed, check to see if the top corners of the doors align. If not, dial out the corresponding front leveler under the door that is sagging.
Example:
If the door on the right is low, dial out the right front leveler to raise the door back into alignment with the
left door.
To move the right door up, dial
the front, right leveler out.
To move the left door up, dial the
left, front leveler out.
Note: To hold the doors in an open position, partially extend the
two (2) front levelers. This action will tilt the cabinet back slightly,
preventing the open doors from swinging towards their closed
position.
9
COSMO 5720
BAR
Dial out
bdiusa.com
customerservice@bdiusa.com
Page 10

Cleaning
If a spill occurs, the porcelain surface on your Cosmo Bar may be removed for cleaning. To remove, open
the drawer about 8", reach inside and find the 60mm disc just under the front center edge of the porcelain.
Rotate the disc 180 degrees. Lift the porcelain out by pushing up from below.
Rotate Disc to Unlock Unlocked Position
DiscPorcelain surface
10
COSMO 5720
BAR
bdiusa.com
customerservice@bdiusa.com
 Loading...