

Page 1
MARGO
Console
™
5211
Product Registration
Registering your new BDI product allows us to send you important
product updates, service information and helpful hints related to your BDI
products. Register today, and you will be entered to win free a BINK table
from BDI: www.bdiusa.com/register
Placement and Maintenance
Your Margo Console is designed for indoor use on level floors.
Clean wood veneer and steel parts with a moist cloth.
Margo is engineered for easy assembly. Carefully follow this procedure to
prevent any damage. Do not use power tools for assembly of this product.
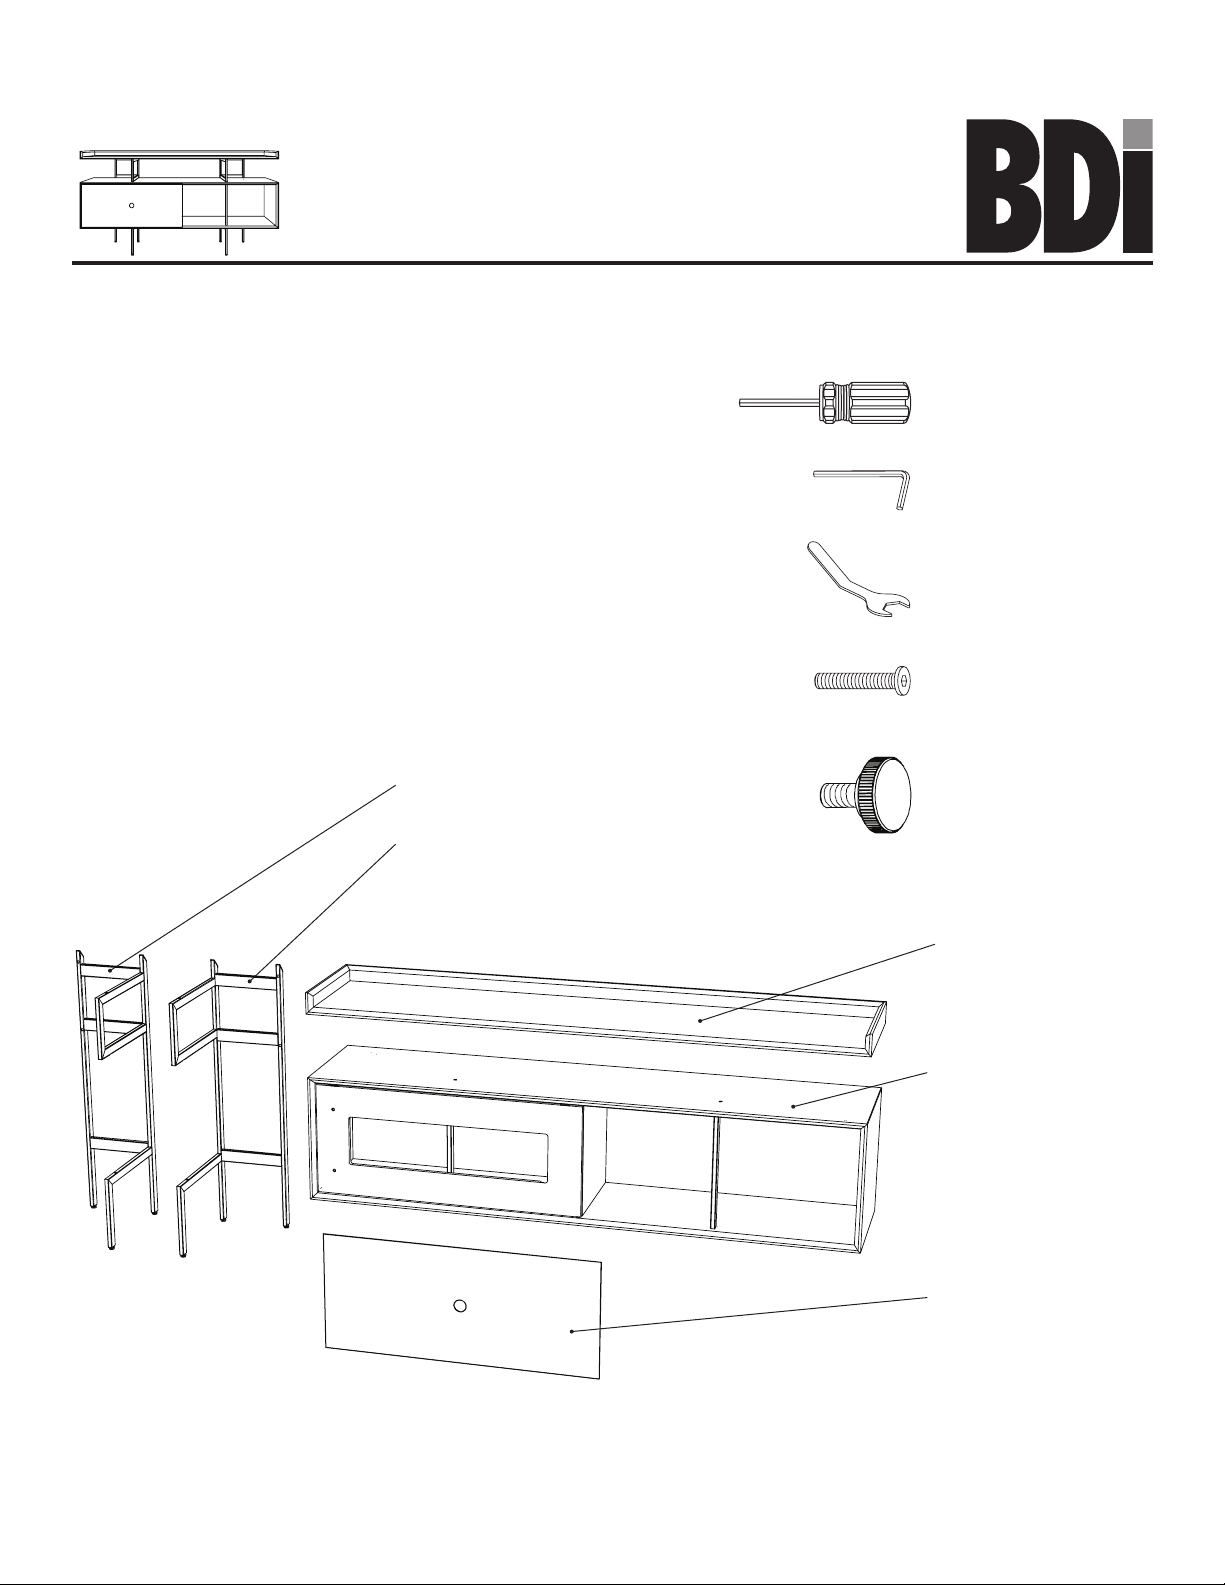
Step 1
This unit ships in 3 cartons (metal frames, cabinet & shelf, and sliding door
front) Unpack all cartons and associated hardware bags. Identify the parts
listed below. The assembly workspace should be a non-marring surface
such as carpet. For missing hardware pieces, contact BDI Customer
Service at: customerservice@bdiusa.com. For all other concerns, please
contact your BDI retailer.
A1 Left frame x 1
A2 Right frame x 1
bdiusa.com
customerservice@bdiusa.com
T1 Hex Driver x 1
T2 Small Hex wrench x 1
T3 Leveler wrench x 1
H1 M6 x 38 mm
Pan Head Screw x 10
H3 Thumb Screw x 2
Designed by Jeff Bare.
These distinctive product configurations are protected by US and international patents, trade dress, and/or
copyright laws. Margo & BDI are trademarks of Becker Designed, Inc. All rights reserved. ©2019, BDI
Made in China. 08.06.2019 V4
C1 Shelf x 1
C2 Cabinet x 1
C3 Door Facia x 1
Page 2
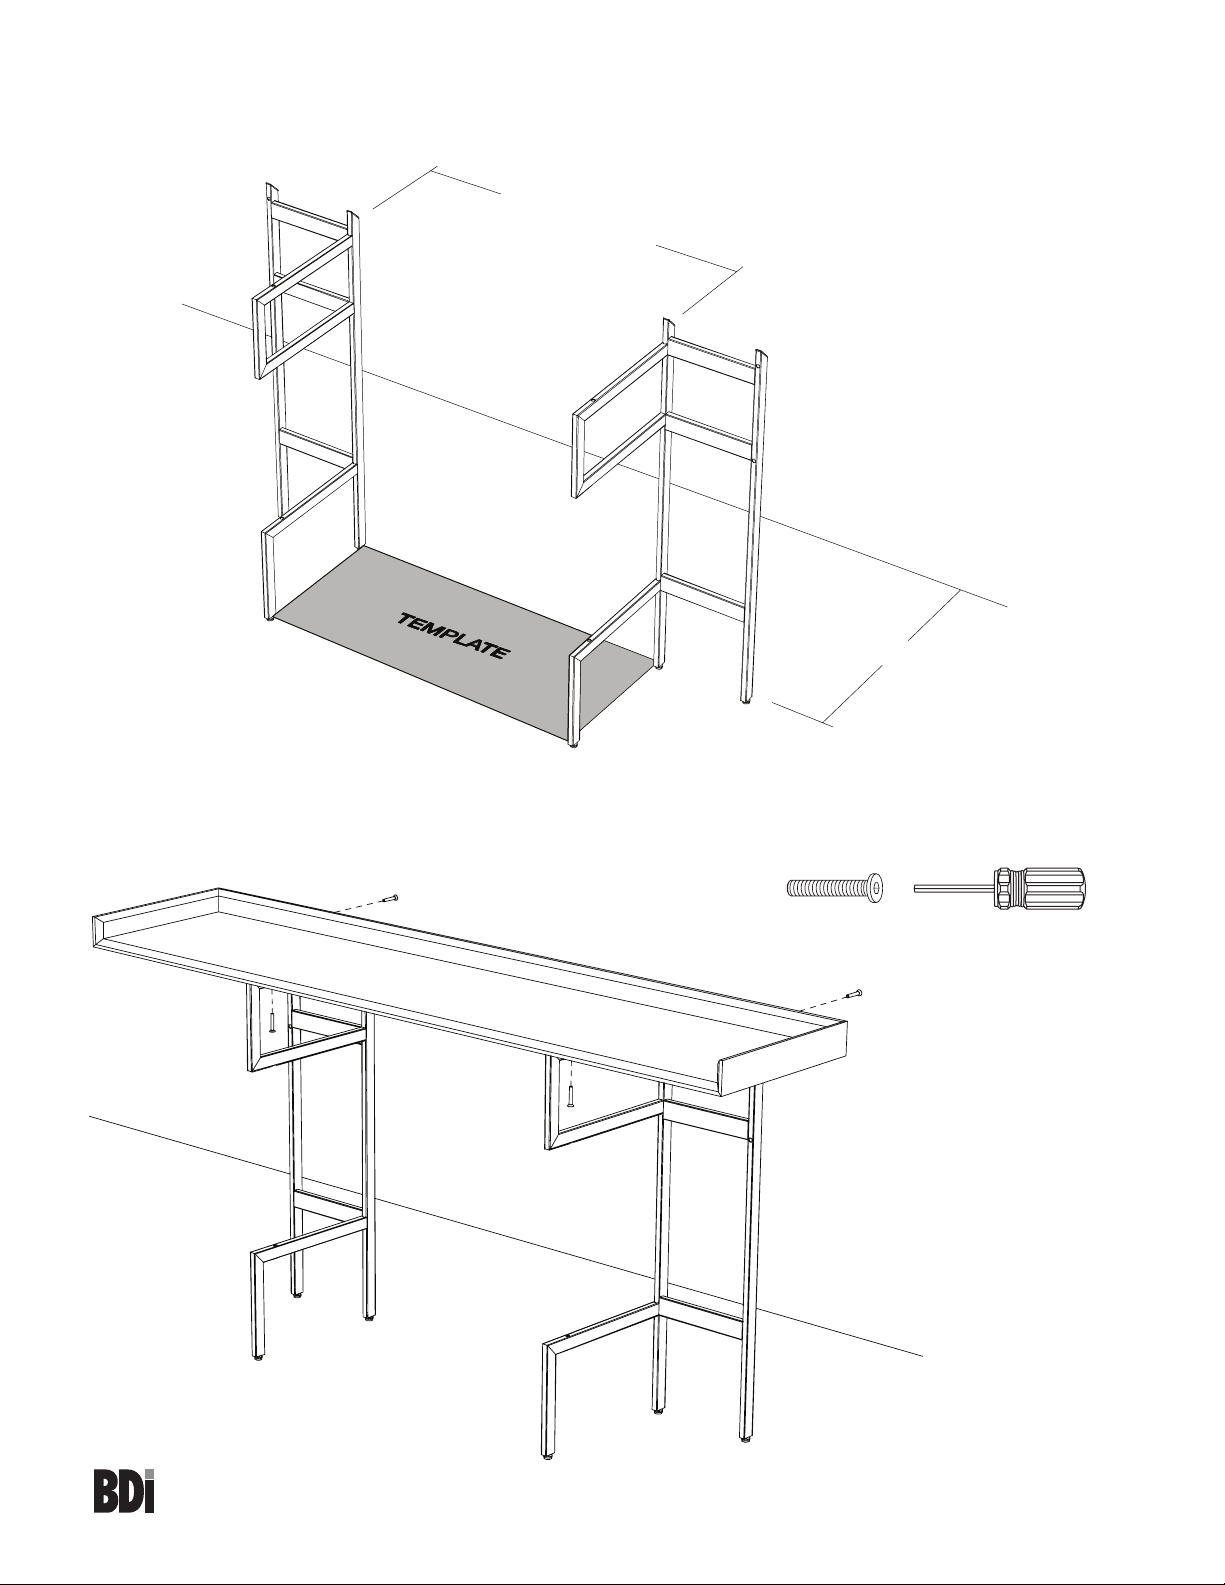
Step 2 - Making sure the levelers are facing down, place the left and right frames at least 2' off the wall and
30.5" (78cm) apart in the orientation shown below. Use the provided template to accurately space the frames.
30.5" (78cm)
at least 2 feet
Step 3 - Carefully place shelf C1 on top of the frames. Attach shelf C1 to each frame with pan-head screws
H1 and partially tighten with hex driver T1. DO NOT tighten the screws completely until the cabinet is
also positioned and installed.
H1 x 4
T1 Hex Driver
2
MARGO 5211
Console
customerservice@bdiusa.com
bdiusa.com
Page 3

Step 4 - Make sure the cabinet is oriented right side up with door track on top. With help from another person,
carefully slide the cabinet into the opening in the frame and center it so that the 2 holes on top of the cabinet
are directly under the frame. Slide the cabinet all the way back and attach to the frame as shown using pan-
head screws H1 and partially tighten with hex driver T1. DO NOT tighten screws completely yet.
2 Person Ta sk
Holes on left
Door track
on top
H1 x 4
T1 Hex
Driver
Step 5 -Secure the back of the cabinet to the 2 frames using pan-head screws H1 and hex driver T1.
Tighten ALL SCREWS for the shelf and cabinet at this time.
H1 x 2
T1 Hex driver
3
MARGO 5211
Console
customerservice@bdiusa.com
bdiusa.com
Page 4

Step 6 - Slide the door frame towards the middle. Orient the door facia C3 as shown with the threaded
holes behind the left side. Position the door facia C3 into the door frame and shift it to the right while hold-
ing the left edge of the door frame to prevent it from sliding. Secure the left side of the door fascia to the door
frame with 2 thumb screws H3 going into the holes on the back of the door frame and into the threaded
holes on the back of the door facia C3.
Check to make sure the door facia is level with the cabinet and the gaps along the top and bottom edges of
the door are even with no rubbing between the door and cabinet. If not, proceed to step 8.
slide to the right
to lock
Door frame
H3
H3
C3 Door facia
4
MARGO 5211
Console
customerservice@bdiusa.com
bdiusa.com
Page 5

Step 7 - Level the console
Levelers are integrated into each leg assembly and are accessed at the bottom of each leg. If your floor is
uneven, you may extend one or more levelers to attain a level, stable position. Use leveler wrench T3.
Step 8 - Adjust sliding door if needed
If your sliding door is not hanging evenly, or rubs at the top or bottom, it can be adjusted up or down by turning one (or both) adjustment wheels inside the cup (located behind each upper corner of the door). To move
the door frame up turn the wheel towards the left. To move the door frame down, turn the wheel towards the
right. Lifting the door frame up with your other hand allows the adjustment wheel to turn more freely.
adjustment
wheel
door direction
wheel
direction
Levelers
T3
Leveler
wrench
lift here while
adjusting the
door
5
MARGO 5211
Console
customerservice@bdiusa.com
bdiusa.com
Page 6

Step 9 - Door Stops
Your Margo Console sliding door has 2 green door stops located at each end of the upper aluminum track.
The door stops are preset to allow the door to stop in the correct position. If your door(s) do not stop at the
preset position indicated below, it is likely they may have moved during transit and handling. You will need
to reposition and tighten the door stop using Small Hex Wrench T2. The end of the door stops should be
exactly 19mm (3/4") away from the end of the track.
Correct Door Stop
Position
should be 19mm (3/4") away
Use Small Hex Wrench T2
to tighten door stop in correct
Incorrect Door Stop
Position
Door Stop
Edge of green door stop
from end of track.
3/4"
19mm
position.
T2
6
MARGO 5211
Console
customerservice@bdiusa.com
bdiusa.com
 Loading...