

Page 1

XELA
1140 and 1142
ASSEMBLY INSTRUCTIONS
BDIUSA.COM CUSTOMERSERVICE@BDIUSA.COM
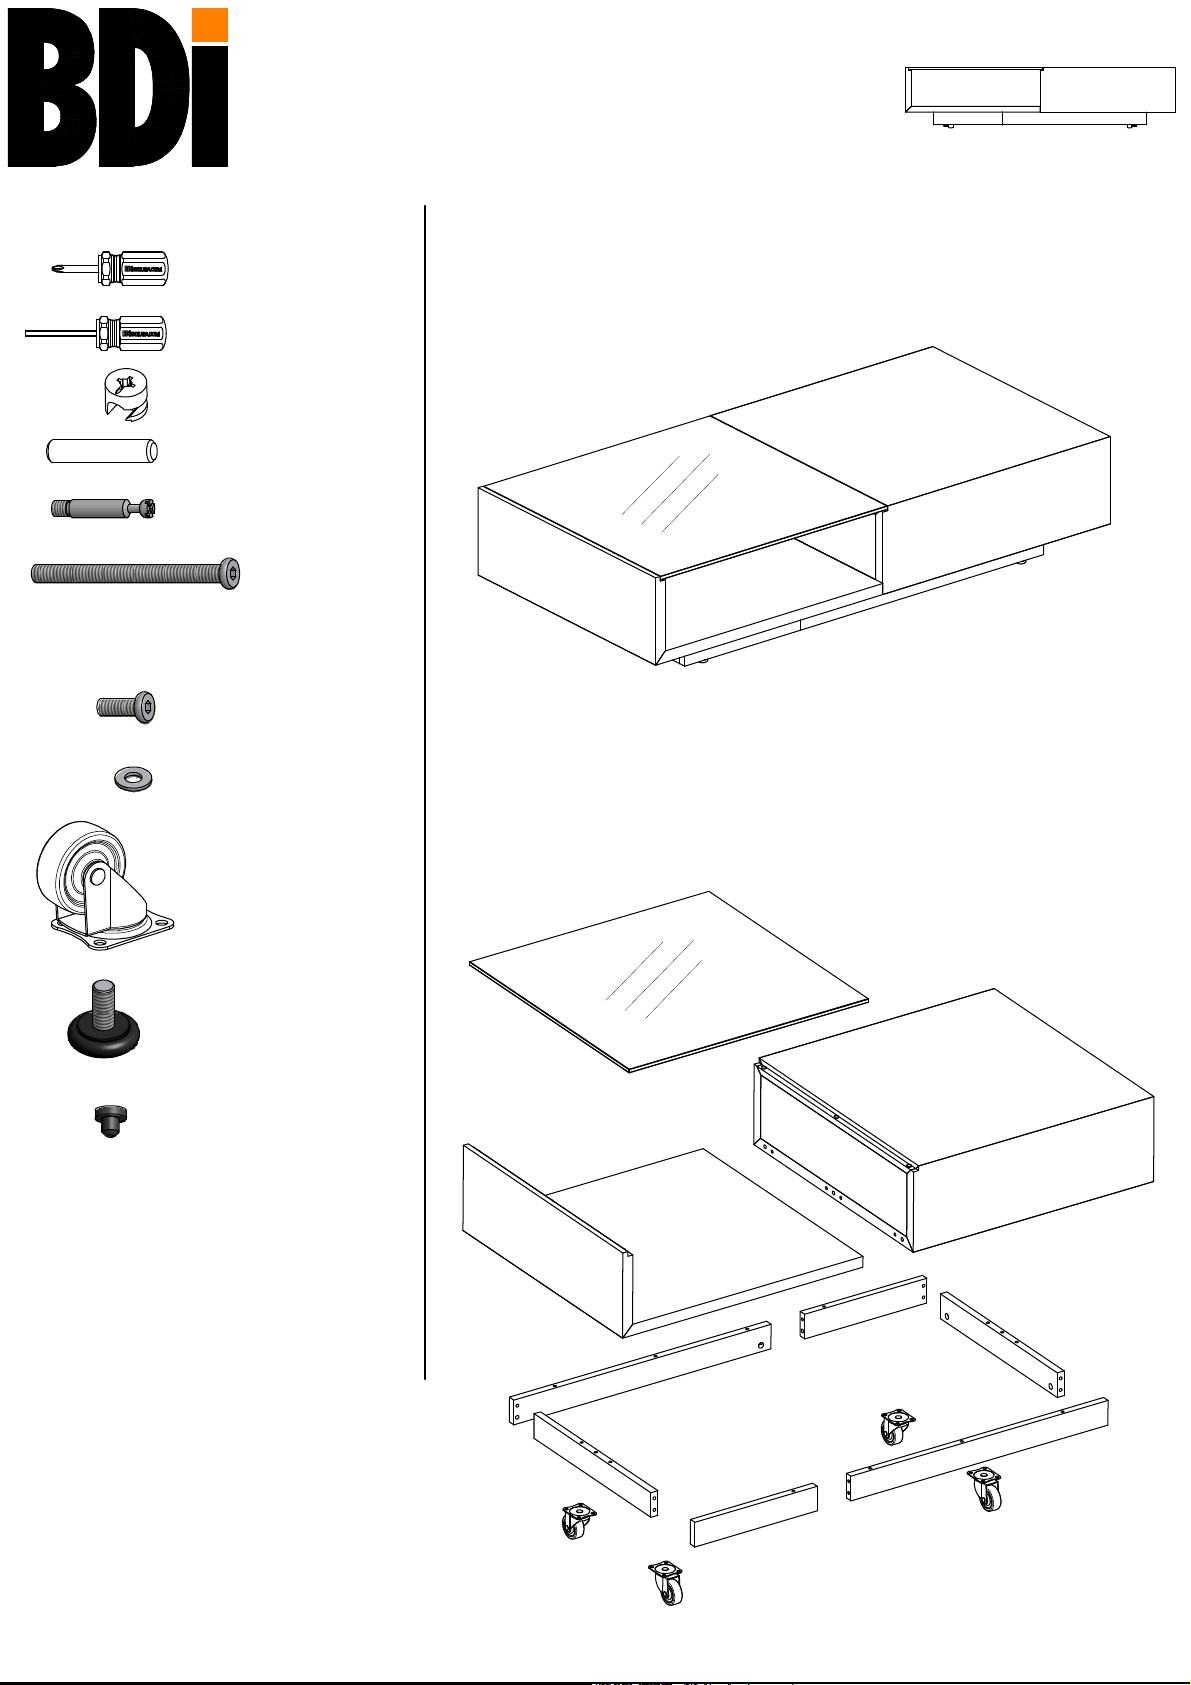
Component List
A - Phillips Screwdriver
B - 4mm Hex Driver
C - Cam Fastener
1140 x 8 1142 x 7
D - Dowel Pin x 14
E - Cam Bolt
1140 x 8 1142 x 7
F - 1/4-20 x 80mm
Machine Screw x 10
G - 1/4-20 x 20mm
Machine Screw x 16
H - Washer x 10
I - Swivel Caster x 4
Xela is engineered for easy assembly. Carefully follow this procedure to
prevent any damage.
Placement and Maintenance
Xela is designed for indoor use on level floors. Clean glass with glass cleaner,
and wood veneer with a moist cloth.
1140
1142
Step 1
Unpack and Identify
Unpack and identify the components at left. Note that some components
are shipped inside the
non marring surface such as carpet. For missing hardware pieces, please
contact BDI Customer Service at customerservice@bdiusa.com. For all other
concerns, please contact your BDI Retailer.
Box Section (M). The assembly workspace should be a
J - Leveler x 4
K - Rubber Bumper x 6
L - Glass Top x 1
M - Box Section x 1
N - L Section x 1
O - Short Base Rail x 2
P - Long Base Rail x 2
L
M
N
O
P
I
O
I
P
I
Designed by Al Glass
These distinctive product configurations are protected by US and international
patents, trade dress, and/or copyright laws.
BDI are trademarks of Becker Designed, Inc.
All Rights reserved. © 2010 BDI
Made in China. 1140 and 1142 Revision: 03-16-10
1
I
Page 2
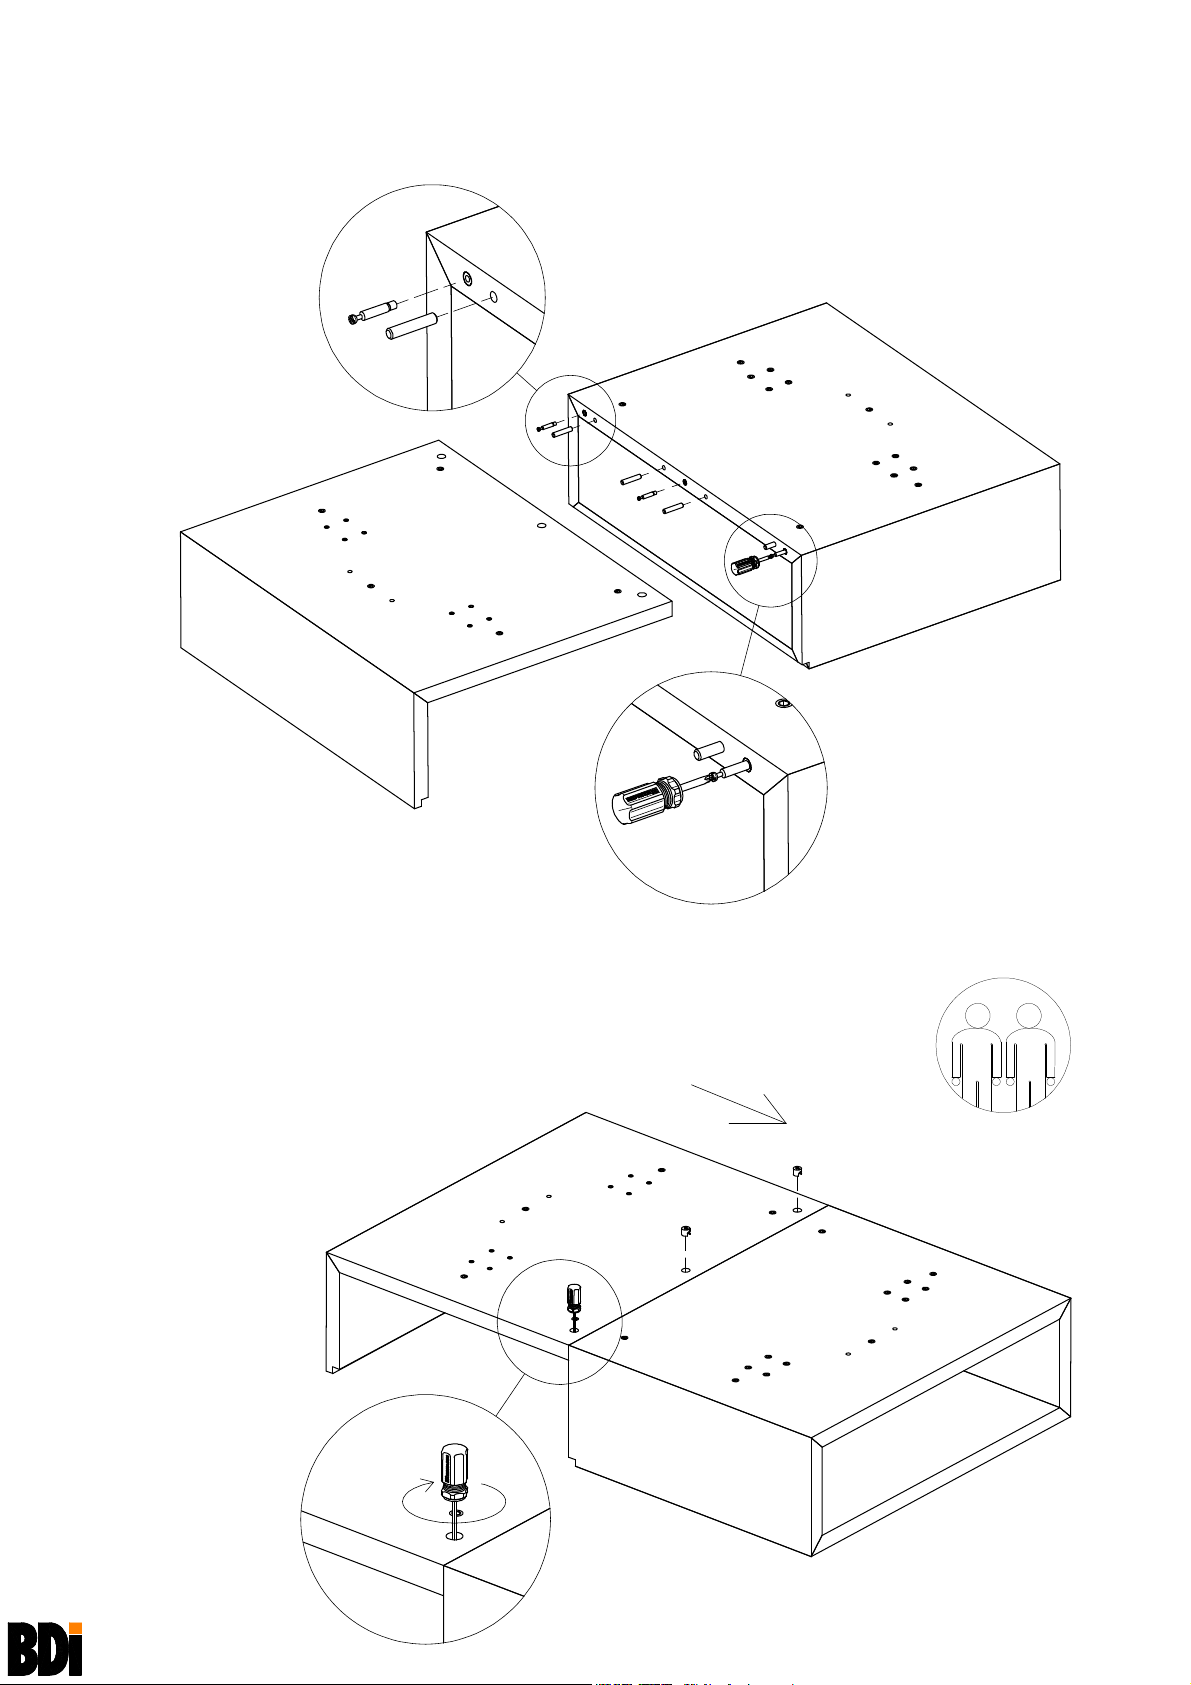
Step 2
Prepare Table Sections for Assembly
Place L Section (N) and Box Section (M) top side down with insert holes facing up as shown.
Install 3
Cam Bolts (E) with Phillips Screwdriver (A) and install 4 Dowel Pins (D) into Box Section (M).
E
D
N
M
D
E
D
D
E
A
Step 3
Assemble Table Sections
Guide L Section (N) onto Dowel Pins (D) and Cam Bolts (E) in Box Section (M).
Insert and tighten 3 Cam Fasteners (C) with Hex Driver (B) into L Section (N).
N
C
B
B
M
Recommended
C
2-person Step
for easy
installation
XELA
1140 and 1142
2
ASSEMBLY INSTRUCTIONS
BDIUSA.COM CUSTOMERSERVICE@BDIUSA.COM
Page 3
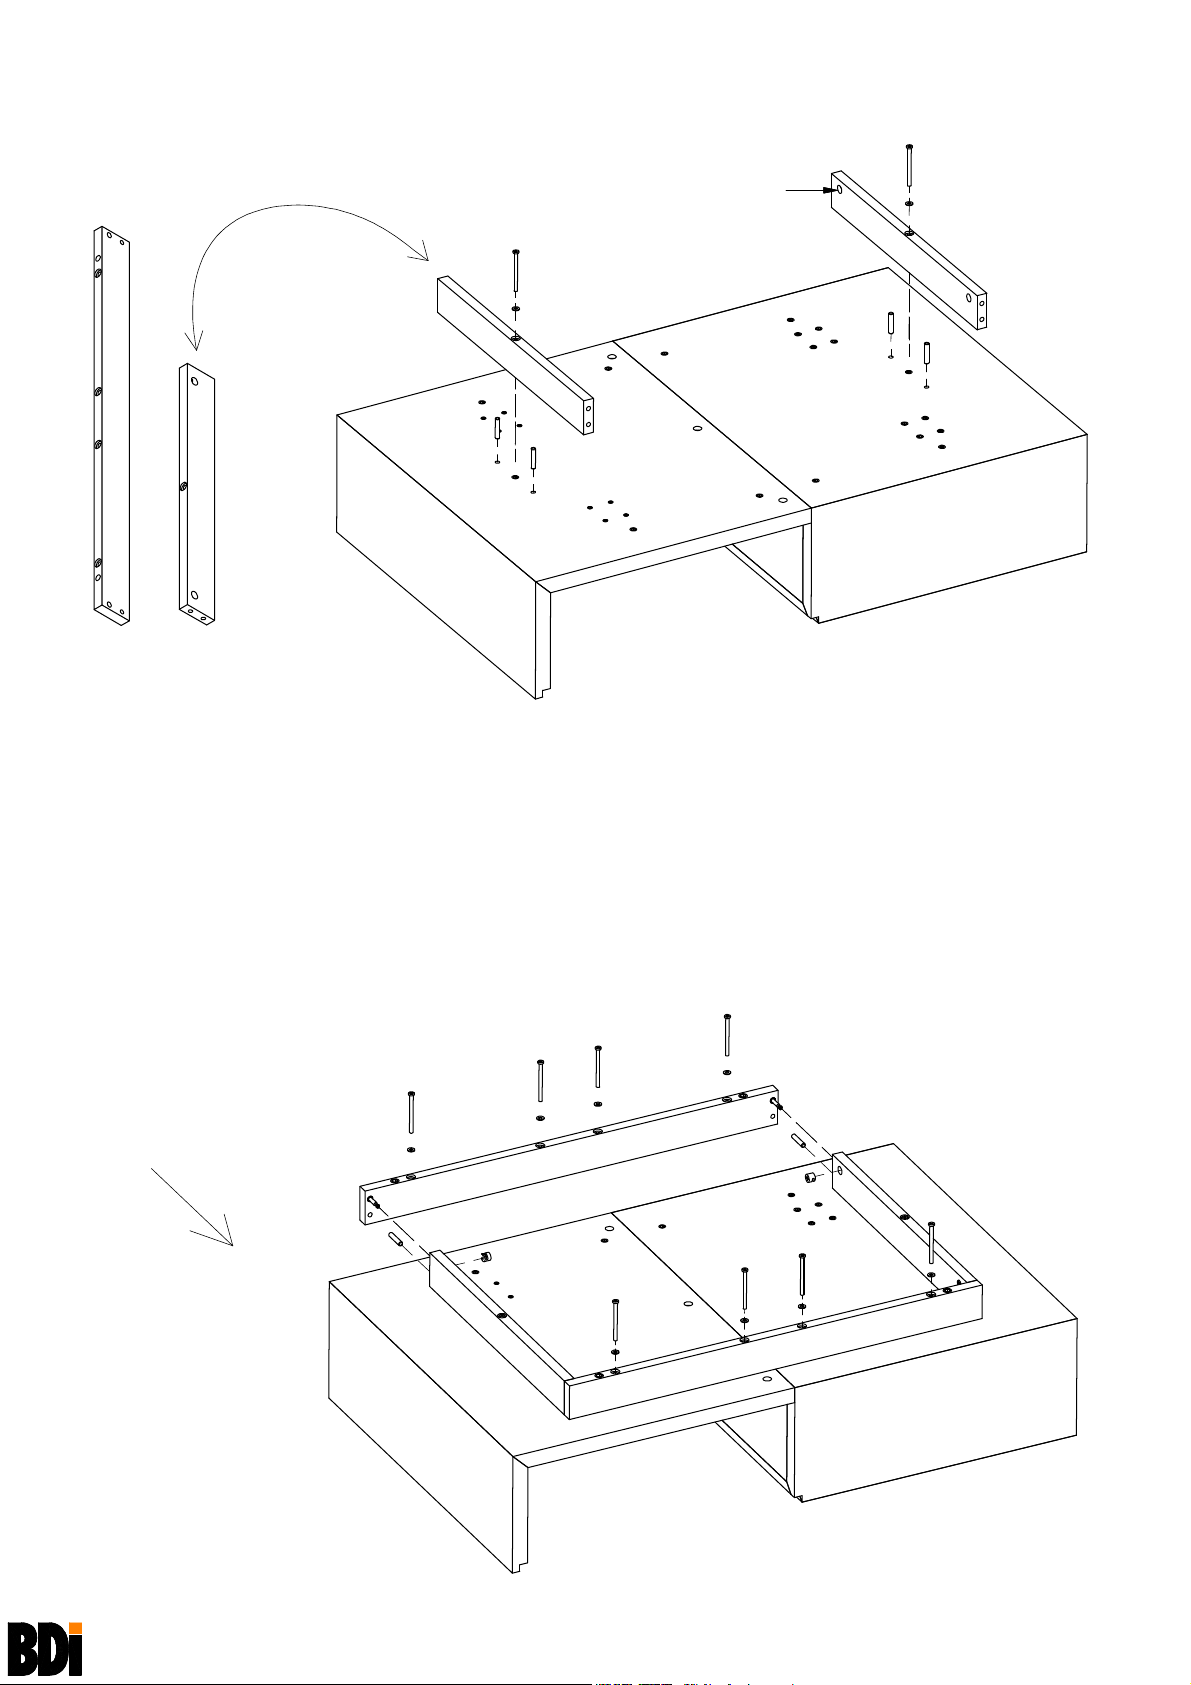
Step 4
Attach Base Ends to Table Bottom
Identify Base Rails Short, Medium and Long. Attach the Short Base Rails (P) to
Table Bottom using
and tighten with
P
O
Dowel Pins (D) and Machine Screws (F) and Washers (H)
Hex Driver (B).
Face Cam Holes towards center
F
O
D
H
D
F
H
O
D
D
Step 5
Attach Base Rails to Table Bottom
Attach Long Base Rails (P) to Table
Bottom using
Machine Screws (F) and tighten with
Hex Driver (B).
Dowel Pins (D) and
D
F
H
P
C
D
C
F
XELA
1140 and 1142
H
P
ASSEMBLY INSTRUCTIONS
3 BDIUSA.COM CUSTOMERSERVICE@BDIUSA.COM
Page 4
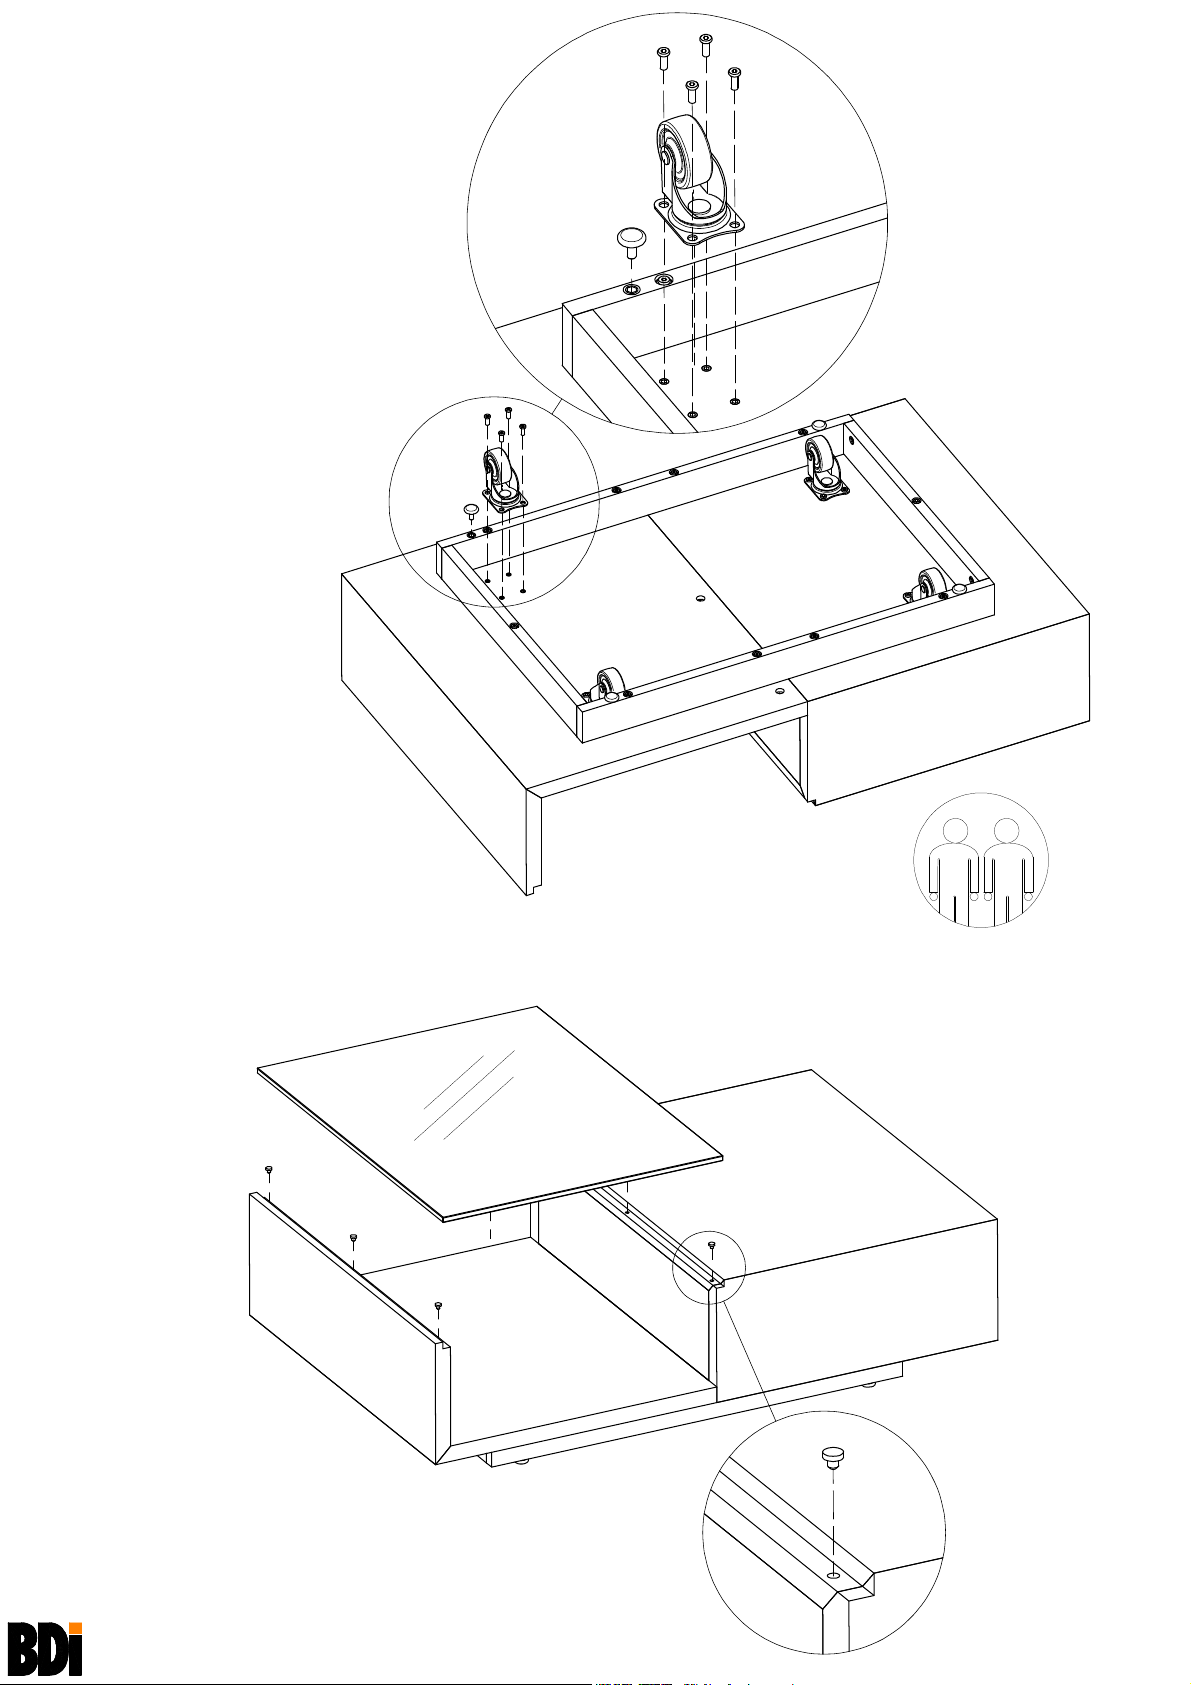
Step 6
Attach Casters and Levelers
Attach Casters (I) to Table Bottom
with
Machine Screws (G) and
tighten with
Attach
tighten by hand. After turning table
right side up and placing table in
desired position, adjust
as necessary,
Hex Driver (B).
Levelers (J) to Base Rails
Levelers (J)
G
I
J
Step 7
Install Rubber Bumpers and Glass Top
Install Rubber Bumpers (K) into pre-drilled
holes in Table recess.
Glass Top (L) by lowering into
Install
position.
K
K
K
Turn Table over right side up
Recommended
2-person Step
for easy
installation
L
K
XELA
1140 and 1142
4
K
ASSEMBLY INSTRUCTIONS
BDIUSA.COM CUSTOMERSERVICE@BDIUSA.COM
Page 5
XELA
1141
ASSEMBLY INSTRUCTIONS
BDIUSA.COM CUSTOMERSERVICE@BDIUSA.COM
Component List
A - Phillips Screwdriver
B - 4mm Hex Driver
C - Cam Fastener x 9
D - Dowel Pin x 14
E - Cam Bolt x 9
F - 1/4-20 x 80mm
Machine Screw x 10
G - 1/4-20 x 20mm
Machine Screw x 16
H - Washer x 10
I - Swivel Caster x 4
Xela is engineered for easy assembly. Carefully follow this procedure to
prevent any damage.
Placement and Maintenance
Xela is designed for indoor use on level floors. Clean glass with glass cleaner,
and wood veneer with a moist cloth.
Step 1
Unpack and Identify
Unpack and identify the components at left. Note that some components
are shipped inside the
non marring surface such as carpet. For missing hardware pieces, please
contact BDI Customer Service at customerservice@bdiusa.com. For all other
concerns, please contact your BDI Retailer.
Box Section (M). The assembly workspace should be a
J - Leveler x 4
K - Rubber Bumper x 6
L - Glass Top x 1
M - Box Section x 1
N - L Section x 1
O - Short Base Rail x 2
P - Medium Base Rail x 2
Q - Long Base Rail x 2
L
M
N
P
O
Q
P
I
O
I
Q
I
Designed by Al Glass
These distinctive product configurations are protected by US and international
patents, trade dress, and/or copyright laws.
BDI are trademarks of Becker Designed, Inc.
All Rights reserved. © 2010 BDI
Made in China. 1141 Revision: 03-16-10
1
I
Page 6

Step 2
Prepare Table Sections for Assembly
Place L Section (N) and Box Section (M) top side down with insert holes facing up as shown.
Install 3
Cam Bolts (E) with Phillips Screwdriver (A) and install 4 Dowel Pins (D) into Box Section (M).
E
D
M
D
E
D
N
D
E
A
Step 3
Assemble Table Sections
Guide L Section (N) onto Dowel Pins (D) and Cam Bolts (E) in Box Section (M).
Insert and tighten 3 Cam Fasteners (C) with Hex Driver (B) into L Section (N).
N
C
B
M
Recommended
2-person Step
C
for easy
installation
XELA
1141
B
ASSEMBLY INSTRUCTIONS
2
BDIUSA.COM CUSTOMERSERVICE@BDIUSA.COM
Page 7

Step 4
Attach Base Ends to Table Bottom
Identify Base Rails Short, Medium and Long. Attach the Medium Base Rails (P) to
Table Bottom using
and tighten with
Dowel Pins (D) and Machine Screws (F) and Washers (H)
Hex Driver (B).
Face Cam Holes towards center
F
F
P
D
H
P
D
O
P
Step 5
Assemble Base Rails
Install Cam Bolts (E) with Phillips Screwdriver (A) and install
Dowel Pins (D).
Assemble Short Base Rail (O) and Long Base Rail (Q) using
Cam Fasteners (C)
Q
and tighten with Hex Driver (B).
O
E
E
H
D
E
D
D
Q
C
C
Q
E
D
E
E
O
Step 6
Attach Base Rails to Table Bottom
Attach assembled Base Rails to Table
Bottom using
Machine Screws (F) and tighten with
Hex Driver (B).
Dowel Pins (D) and
O
D
F
H
Q
D
C
F
C
H
XELA
1141
3 BDIUSA.COM CUSTOMERSERVICE@BDIUSA.COM
ASSEMBLY INSTRUCTIONS
Page 8

Step 7
Attach Casters and Levelers
Attach Casters (I) to Table Bottom
with
Machine Screws (G) and
tighten with
Attach
tighten by hand. After turning table
right side up and placing table in
desired position, adjust
as necessary,
Hex Driver (B).
Levelers (J) to Base Rails
Levelers (J)
G
I
J
Step 8
Install Rubber Bumpers and Glass Top
Install Rubber Bumpers (K) into pre-drilled
holes in Table recess.
Glass Top (L) by lowering into
Install
position.
K
K
K
Turn Table over right side up
Recommended
2-person Step
for easy
installation
L
K
C
XELA
1141
4
K
ASSEMBLY INSTRUCTIONS
BDIUSA.COM CUSTOMERSERVICE@BDIUSA.COM
Page 9

Component List
XELA
1146
A - Phillips Screwdriver
B - 4mm Hex Driver
C - Cam Fastener x 4
D - Dowel Pin x 2
E - Cam Bolt x 4
ASSEMBLY INSTRUCTIONS
BDIUSA.COM CUSTOMERSERVICE@BDIUSA.COM
Xela is engineered for easy assembly. Carefully follow this procedure to
prevent any damage.
Placement and Maintenance
Xela is designed for indoor use on level floors. Clean glass with glass cleaner,
and wood veneer with a moist cloth.
F - 1/4-20 x 38mm
Machine Screw x 6
G - Rubber Bumper x 4
H - Leveler x 4
I - Glass Top x 1
J - Table Top x 1
K - Right Leg x 1
L - Left Leg x 1
Step 1
Unpack and Identify
Unpack and identify the components at left. The assembly workspace should be
a non marring surface such as carpet. For missing hardware pieces, please
contact BDI Customer Service at customerservice@bdiusa.com. For all other
concerns, please contact your BDI Retailer.
I
L
K
Designed by Al Glass
These distinctive product configurations are protected by US and international
patents, trade dress, and/or copyright laws.
BDI are trademarks of Becker Designed, Inc.
All Rights reserved. © 2010 BDI
Made in China. 1146 Revision: 03-16-10
J
H
H
H
H
1
Page 10

Step 2
Prepare Table for Assembly
Install Dowel Pins (D) and Cam Bolts (E) into
Table Top (J) using Phillips Screwdriver (A).
E
J
A
D
E
Step 3
Prepare Legs for Assembly
Identify Table Legs Left and Right as shown.
Cam Fasteners (C) into Legs as shown,
Install
align arrow on
Cam Fastener (C) to point up.
Cam Fastener (C)
Arrow to point up to start
E
D
E
Table Bottom
L- Left Leg
C
C
C
K - Right Leg
C
XELA
1146
2
ASSEMBLY INSTRUCTIONS
BDIUSA.COM CUSTOMERSERVICE@BDIUSA.COM
Page 11

Step 4
Install Legs onto Table Top
Carefully place Table Top ( J) on its back on a carpet
or a blanket to prevent damage. Align holes in Leg with
Cam Bolts (E) and Dowel Pin (D) in Table Top (J), then
slide leg into place until top of Leg is flush with Top of
Table. Tightening
components together.
Cam Fasteners (C) will draw
L- Left Leg
J - Table Top
Step 5
Tighten Cam Fasteners
Tighten Cam Fasteners (C) with Hex Driver (B).
Tightening Cams will draw
components together flush.
Table Top (J) and Leg
K - Right Leg
B
XELA
1146
ASSEMBLY INSTRUCTIONS
3 BDIUSA.COM CUSTOMERSERVICE@BDIUSA.COM
Page 12

Step 6
Install Screws and Levelers
Install Machine Screws (F) into underside of
Table with
Install Levelers (H) into Table Legs by hand
tightening. After Table is in position, adjust
levelers as necessary.
Hex Driver (B).
F
B
F
F
H
F
H
B
F
H
Step 7
Install Rubber Bumpers and Glass Top
Turn Table over right side up.
Rubber Bumpers (G) into pre-drilled holes in recessed area.
Install
Glass Top (I) by lowering into position on top of Rubber Bumpers (G).
Install
H
F
F
Table Top (J) on its back
H
I
G
XELA
1146
G
G
G
G
G
4
ASSEMBLY INSTRUCTIONS
BDIUSA.COM CUSTOMERSERVICE@BDIUSA.COM
Page 13

Component List
XELA
1148
A - Phillips Screwdriver
B - 4mm Hex Driver
C - Cam Fastener x 4
D - Dowel Pin x 2
E - Cam Bolt x 4
F - 1/4-20 x 38mm
Machine Screw x 6
ASSEMBLY INSTRUCTIONS
BDIUSA.COM CUSTOMERSERVICE@BDIUSA.COM
Xela is engineered for easy assembly. Carefully follow this procedure to
prevent any damage.
Placement and Maintenance
Xela is designed for indoor use on level floors. Clean glass with glass cleaner,
and wood veneer with a moist cloth.
G - Rubber Bumper x 6
H - Leveler x 4
I - Glass Top x 1
J - Table Top x 1
K - Right Leg x 1
L - Left Leg x 1
Step 1
Unpack and Identify
Unpack and identify the components at left. The assembly workspace should be
a non marring surface such as carpet. For missing hardware pieces, please
contact BDI Customer Service at customerservice@bdiusa.com. For all other
concerns, please contact your BDI Retailer.
I
L
K
J
Designed by Al Glass
These distinctive product configurations are protected by US and international
patents, trade dress, and/or copyright laws.
BDI are trademarks of Becker Designed, Inc.
All Rights reserved. © 2010 BDI
Made in China. 1148 Revision: 03-16-10
H
H
H
H
1
Page 14

Step 2
Prepare Table for Assembly
Install Dowel Pins (D) and Cam Bolts (E) into
Table Top (J) using Phillips Screwdriver (A).
J
E
D
E
A
Step 3
Prepare Legs for Assembly
Identify Table Legs Left and Right as shown.
Cam Fasteners (C) into Legs as shown,
Install
align arrow on
Cam Fastener (C) to point up.
Table Bottom
E
D
E
Cam Fastener (C)
Arrow to point up to start
L- Left Leg
C
C
C
C
K - Right Leg
XELA
1148
2
ASSEMBLY INSTRUCTIONS
BDIUSA.COM CUSTOMERSERVICE@BDIUSA.COM
Page 15

Step 4
Install Legs onto Table Top
Carefully place Table Top ( J) on its back on a carpet or a blanket to prevent damage. Align holes in
Leg with
flush with Top of Table. Tightening
Cam Bolts (E) and Dowel Pin (D) in Table Top (J), then slide leg into place until top of Leg is
Cam Fasteners (C) will draw components together.
L- Left Leg
Step 5
Tighten Cam Fasteners
Tighten Cam Fasteners (C) with Hex Driver (B).
Tightening Cams will draw
components together flush.
Table Top (J) and Leg
J - Table Top
K - Right Leg
Flush Table Top with Legs.
Tightening Cams will draw components together.
XELA
1148
B
ASSEMBLY INSTRUCTIONS
3 BDIUSA.COM CUSTOMERSERVICE@BDIUSA.COM
Page 16

Step 6
Install Screws and Levelers
Install Machine Screws (F) into underside of
Table with
Install Levelers (H) into Table Legs by hand
tightening. After Table is in position, adjust
levelers as necessary.
Hex Driver (B).
F
B
F
F
B
H
H
H
F
Table Top (J) on its back
Step 7
Install Rubber Bumpers and Glass Top
Turn Table over right side up.
Rubber Bumpers (G) into pre-drilled holes in recessed area.
Install
Glass Top (I) by lowering into position on top of Rubber Bumpers (G).
Install
F
F
F
H
H
I
Recommended
2-person Step
G
G
G
G
G
G
G
G
XELA
1148
4
ASSEMBLY INSTRUCTIONS
BDIUSA.COM CUSTOMERSERVICE@BDIUSA.COM
 Loading...