

Page 1
SIP | User Manual
v1.0 September 2015
Page 2

Page 3

Table of Contents
Product Description 4
General Information 5
Technical Data 5
Safety, Cleaning & Support 6
Safety Instructions 6
Cleaning Instructions 6
Technical Support 6
Scope of Delivery
& Mounting Instructions 7
Desk-Device 7
Wall-Device 7
Your bctone terminal 8
Functions 10
Home Screen 10
Home Button 11
Status Bar 11
Volume Button 11
Background 11
Menu Bar 11
Notifications 11
Volume Control 12
Device Information 13
Call-App 14
Make a Call 14
Incoming Calls 17
Multiple Incoming Calls 18
Forward Calls 18
Active Calls 20
Camera 21
Call Overview Options 22
Screens (Dashboards) 24
Door Communication 25
Address Book 26
Call History 30
Configurations in ConfigWeb 31
Manufacturer’s Reference 32
Class-B Statement 32
bctone | User Manual
Page 4

Product Description
bctone combines telephony & various applications into a multifunctional communication de-
vice. Its innovative audio processing enables the simultaneous handling of calls. The touch
display makes operation a breeze and allows video communication due to an optional integrated megapixel camera.
Page 5

5
General Information
• SIP RFC3261 compatible IP phone (VoIP)
• Microphone array with digital MEMS microphones
• Camera for video calls incl. SIP video
• Possibility of two conversations at the same time
• HiFi audio quality up to 20 kHz
• GestureControl
• Configuration via web interface
• Support of different languages
• Password protection for WebConfig
• Desk (polycarbonate) and wall version (polycarbonate, aluminium)
Technical Data
• Certificates: CE, FCC Class B
• Display: 7“ TFT color display with 800x480 pixels and IPS technology
• Touchscreen: Capacitive multitouch screen
• Camera: color camera
• Network: 1 x RJ45 (10/100 Mbit)
• Power Supply: bct Power Supply (Art.: 1030001) or Power over Ethernet (PoE-PD, IEEE
802.3af, Class 3)
• Temperature range: 0- 60°C
• Relative humidity: up to 95 % non condensing
• Protection type: IP20
• Handheld: 4P4C socket
• Headset / Line: 4P4C socket
• USB: 3 x Type A, USB 2.0 host interface, WLAN ready
• Memory extension: MicroSD Slot
• In: 2 x active or passive, analog or digital (configurable via software)
• Out: 2 x digital
• Call indicator: multicolor LED
• Color: black
bctone | User Manual
Page 6

6
Safety, Cleaning & Support
Safety Instructions
Failure to follow the instructions provided in this document may cause hazards and/or may
violate existing laws. Please read this document carefully and keep it for future reference.
When you hand your bctone to third parties, always include the operating instructions:
• Ensure that all cables are plugged only into their intended flush-mounted box and do
not modify the connectors.
• Installations and repairs may only be performed by an appropriately qualified expert.
• The bctone should only be operated at ambient temperatures between 0 °C and +60 °C.
• Avoid direct exposure to sunlight and other heat sources.
• Protect the bctone against humidity, extreme dust, aggressive liquids and vapours.
Cleaning Instructions
Please follow the cleaning tips below to avoid damages to your bctone:
• Use only a soft, lint-free cloth. Abrasive cloths, towels, paper towels, and similar items
may cause damage to your device.
• Disconnect your bctone from any external power sources before cleaning.
• Disconnect any external devices and other cabling from your bctone.
• Keep liquids away from your bctone.
• Don‘t get moisture into any openings, and don‘t use aerosol sprays, solvents, abrasives
or corrosives.
• Do not spray cleaners directly onto the device.
Note: If liquid does make its way inside your bctone, seek assistance from bct as soon as
possible. Liquid damage is not covered under the bct product warranty.
Technical Support
If any errors occur please contact your IT department or technician who set up your telephone
or intercom network.
Page 7

7
Scope of Delivery
& Mounting Instructions
Desk device
Scope of Delivery
bctone terminal, pedestal, handset (optional), network cable; Accessories: bctone power
supply (Art.No. 1030001)
Mounting Instructions
1. Connect bctone terminal to pedestal.
2. Connect the network cable to the bctone.
3. If no PoE is available, connect the 24V power supply as well. (Art.No. 1030001) Connect
the handset (optional). Place the handset as far to the left until it is automatically (magnetic) held in place.
4. Your bctone should be set up and configured by a technician. Please contact your
IT-department or technician if that is not the case.
Wall-Device
Scope of Delivery
bctone terminal, wall mount kit, handset (optional), network cable; Accessories: bctone po-
wer supply (Art.No. 1030001)
Mounting Instructions
1. Attach the wall mount to the wall.
2. Connect the network cable to the bctone. If no PoE is available, connect the 24V power
supply as well. (Art.No. 1030001)
3. Connect the handset (optional). Place the handset as far to the left until it is automatically (magnetic) held in place.
4. Slide the bctone from the top onto the wall mount until it locks into place.
5. Your bctone should be set up and configured by a technician. Please contact your
IT-department or technician if that is not the case.
bctone | User Manual
Page 8
8
Your bctone Terminal
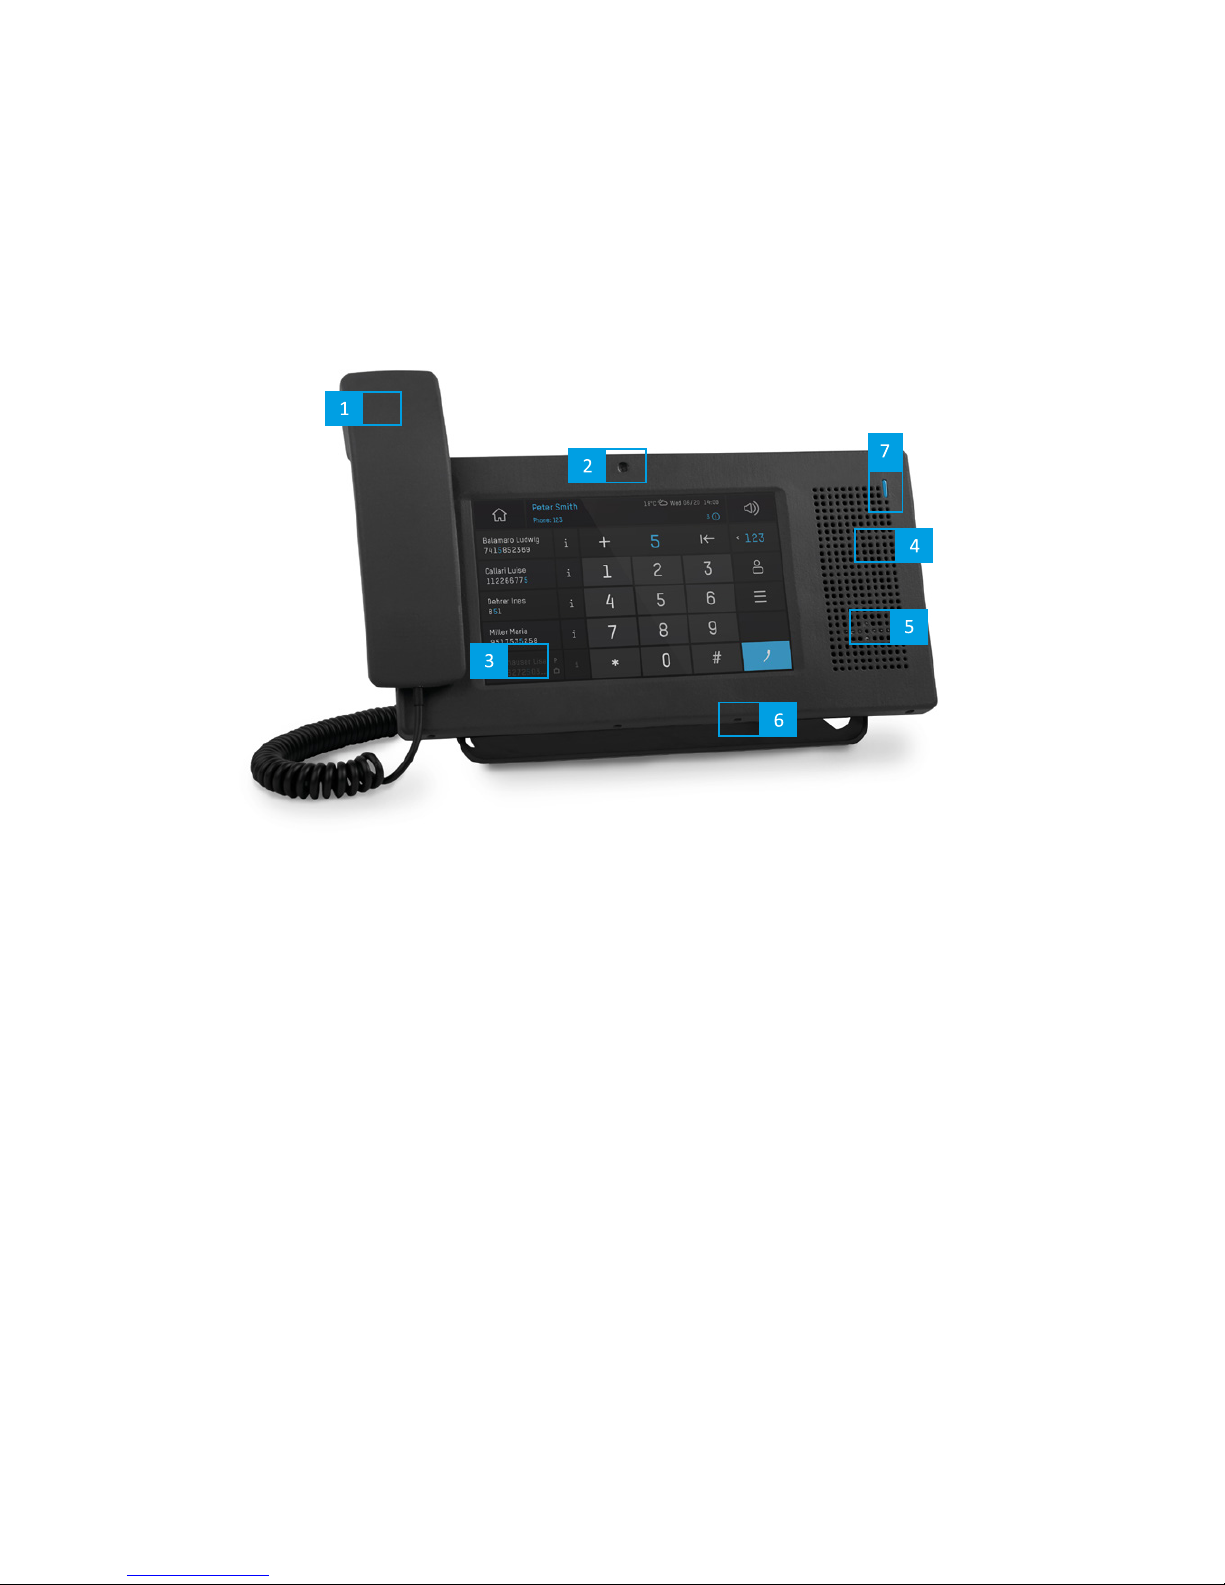
(1) Handset: automatically (magnetic) held in place
(2) Camera: color camera
(3) Display: 7“ Multi-Touchscreen
(4) Speaker: HiFi audio quality up to 20 kHz
(5) GestureControl: sensor for touch-less operation
(6) Microphone array: 4 digital MEMS microphones
(7) Status LED
Page 9
9
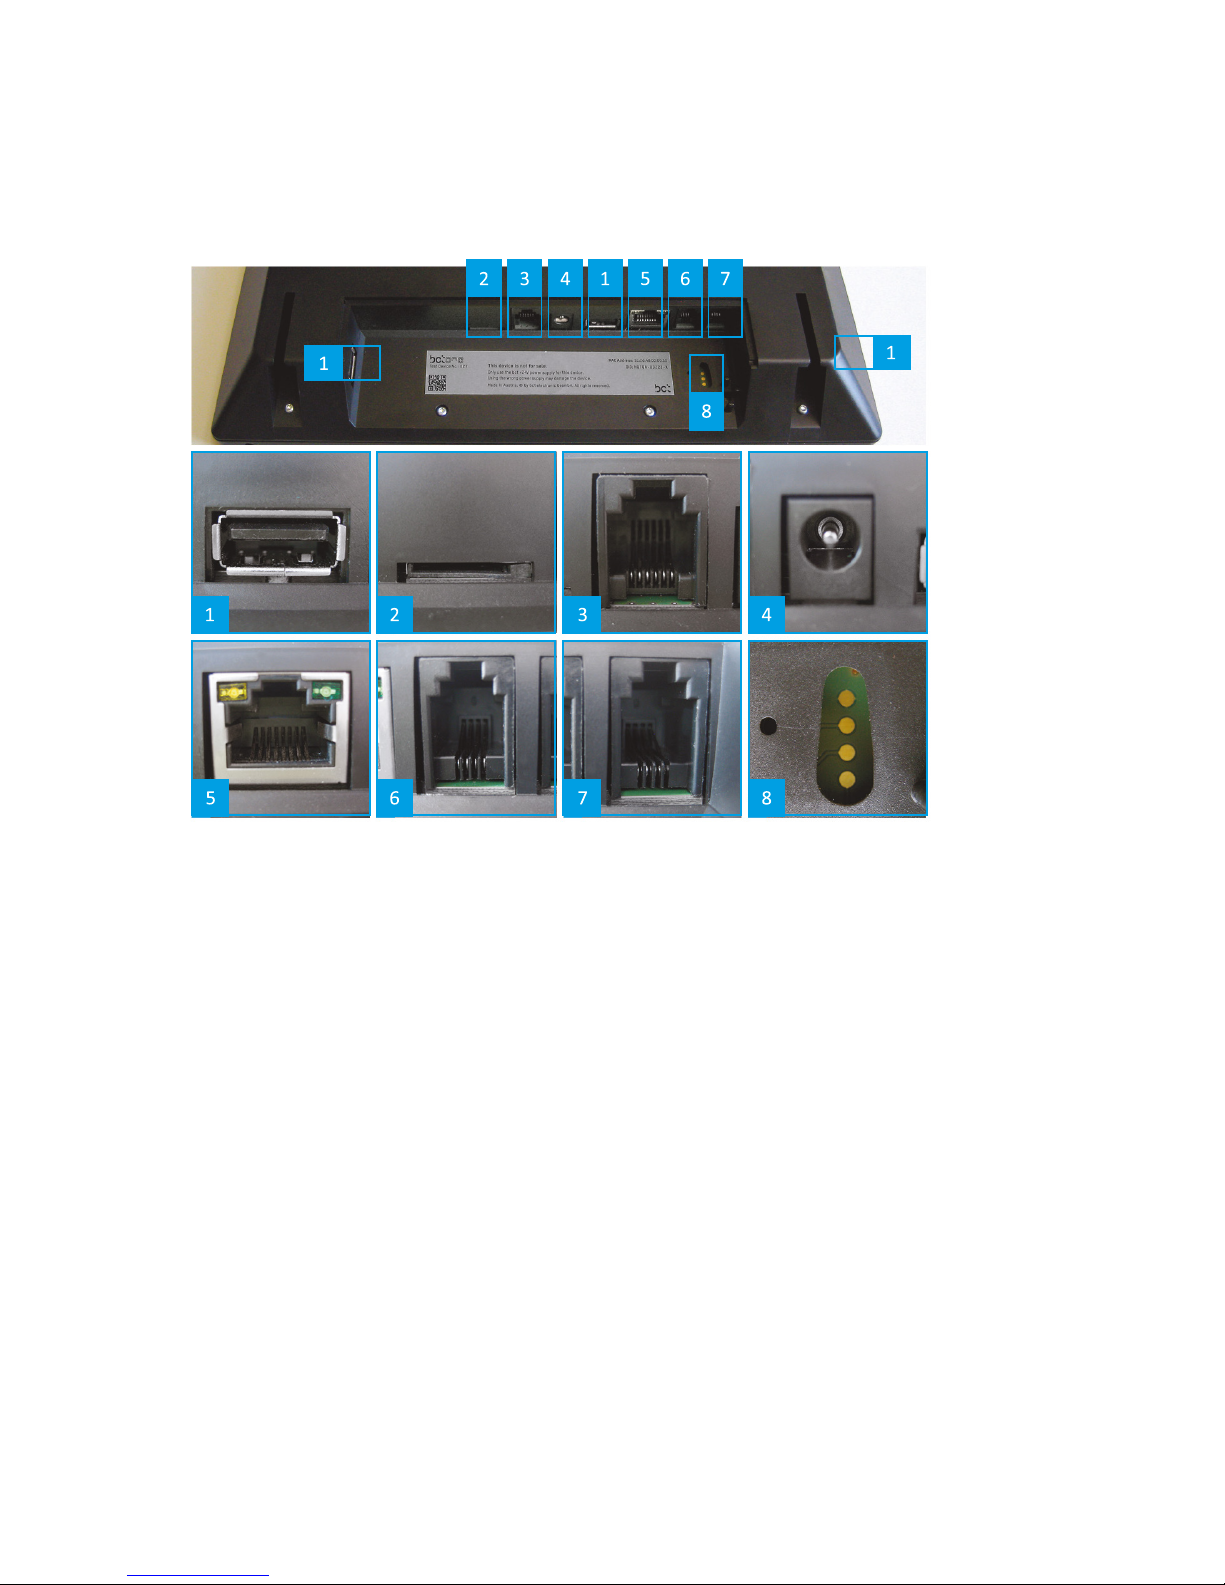
(1) USB 2.0: Host connection
(2) MicroSD slot: For future extensions
(3) I/O: Digital input/output
(4) DC: Connection for external power supply
(5) Network: RJ45 Ethernet network connection
(6) Headset: Input (4P4C connection)
(7) Handset: Input (4P4C connection)
(8) Service connection: For internal purposes
bctone | User Manual
Page 10
10
Functions
Information on the version of your firmware of your bctone can be found by pressing the
information-icon on the button in the left corner of your bctone.
The latest version of this user manual can be found here:
http://support.bct-electronic.com
Home Screen
Your bctone should be set up and configured by an IT technician. With default settings your
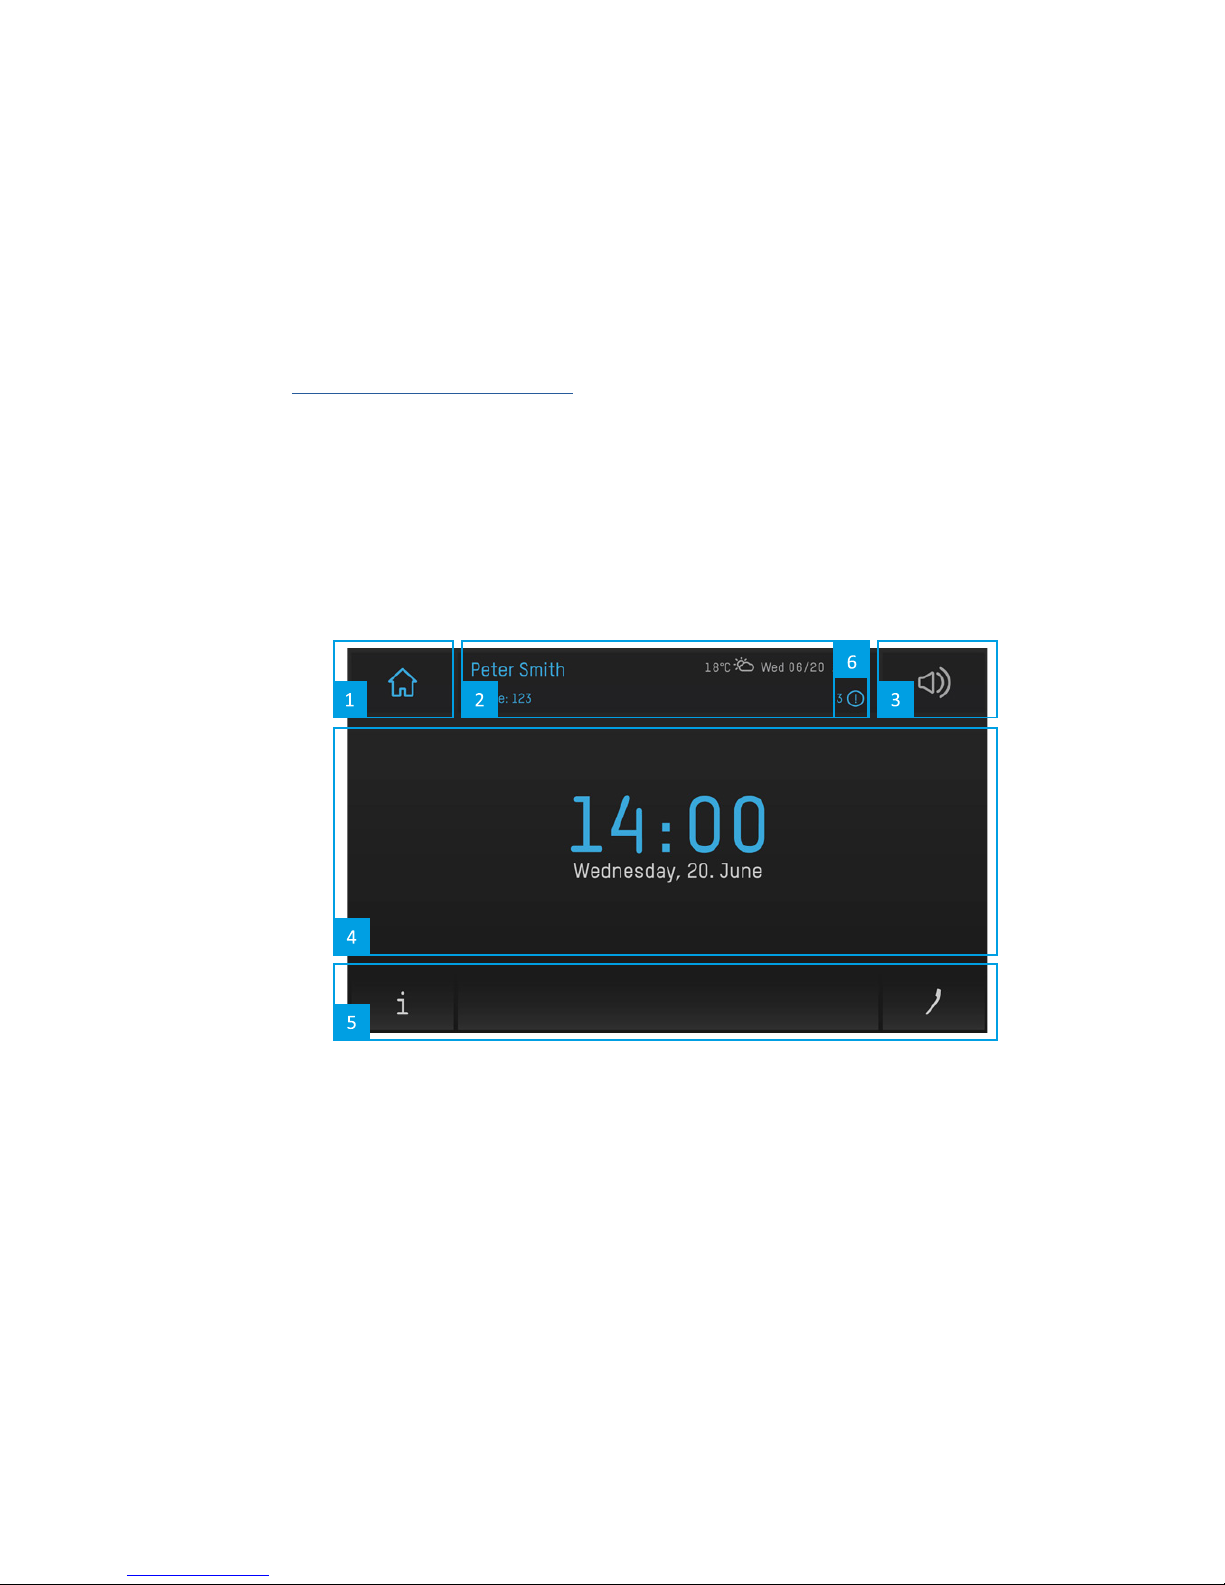
bctone home screen can look like this:
Page 11

11
(1) Home Button
The home button (1) on your bctone always leads you back to the home screen, even if you
are in an active call. In case of inactivity for 15 seconds your bctone returns to the call
overview automatically.
(2) Status Bar
The status bar contains information such as the registration name and the corresponding
intercom/phone number. Furthermore the local temperature, date and time are shown if
your bctone is connected to the internet and set up accordingly.
(3) Volume Button
By touching the speaker symbol you can adjust the volume of the currently used audio
source of your bctone. In case of an active call the adjustments will automatically affect
the currently used audio channel (handset, headset or speaker). Otherwise it will change
the volume of your ringtone.
(4) Background
According to your preferences you can choose between a static image or a slideshow as your
background. These settings can be configured in the ConfigWeb – please see the according
chapter.
(5) Menu Bar
The menu bar always shows the handset-symbol which leads you to the call-app. The
i-symbol leads you to more detailed information about your device. The menu bar can be
set up with shortcuts to applications according to your wishes. This has to be done by your
technician.
(6) Notifications
The exclamation mark symbol shows notifications such as missed calls – touch this icon to
read the notifications.
bctone | User Manual
Page 12
12
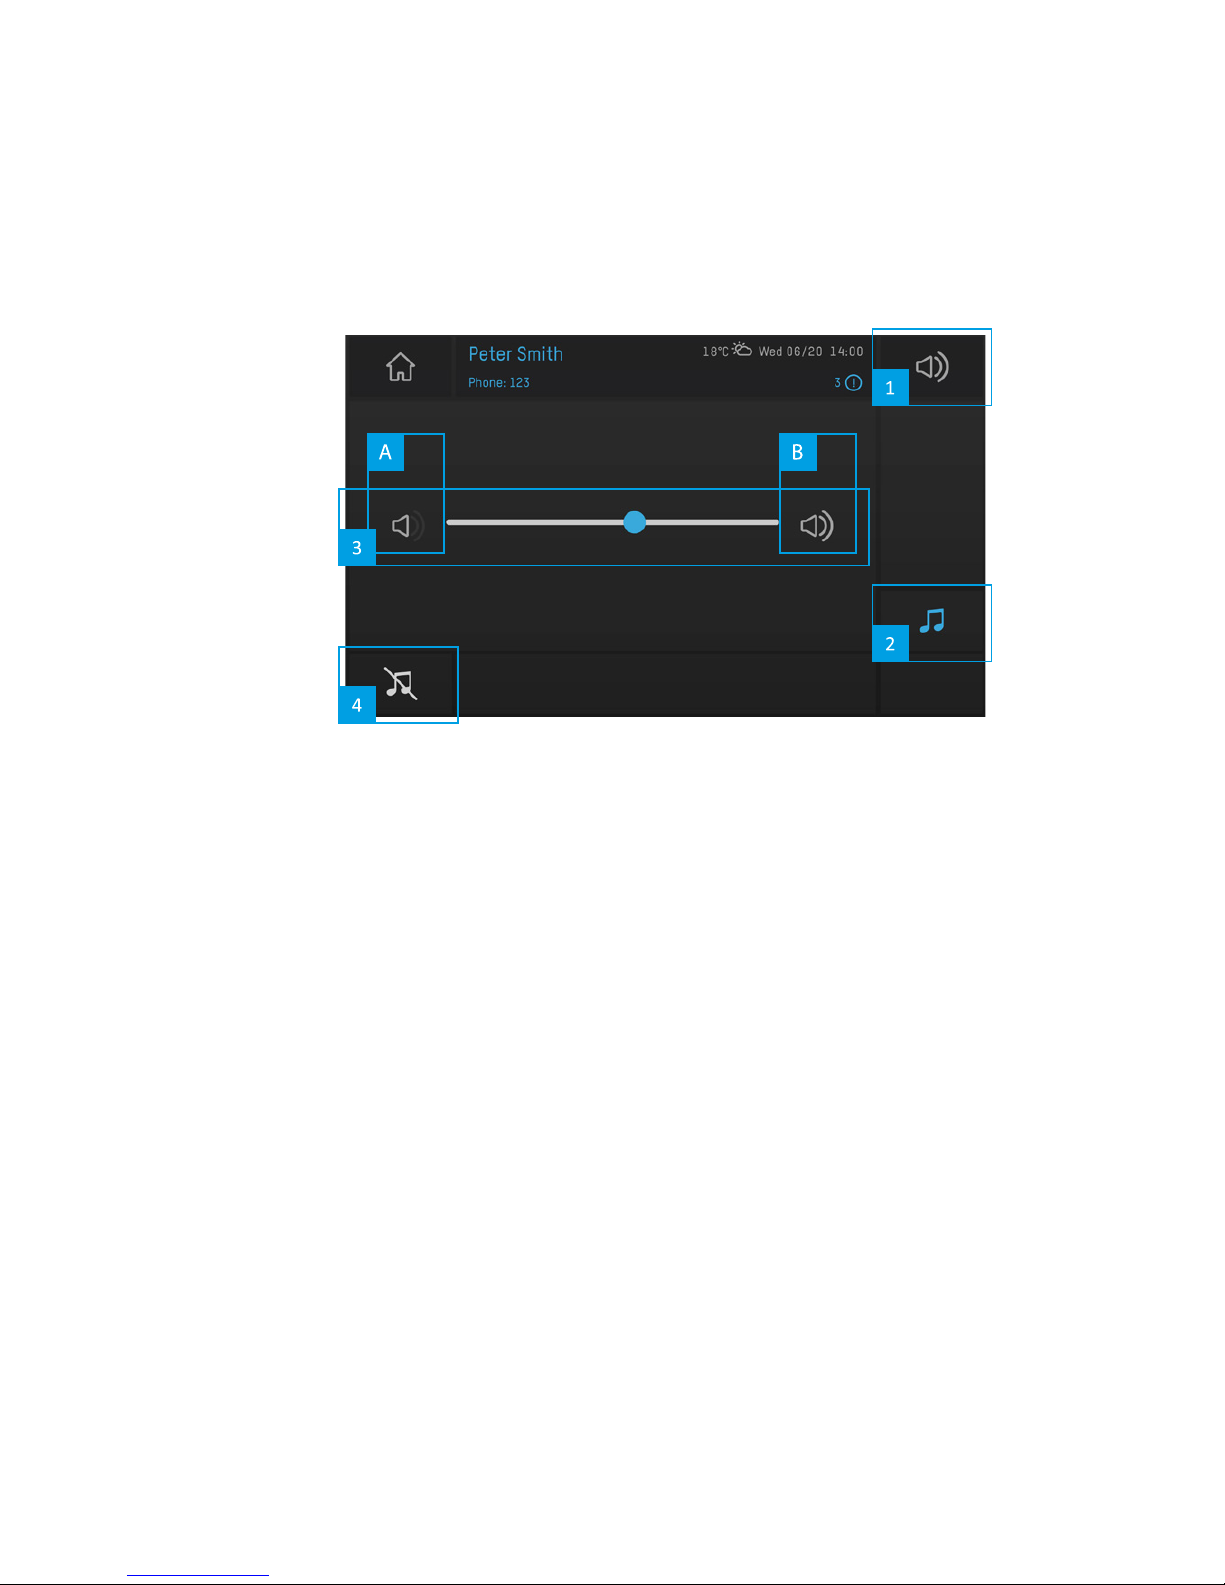
Volume Control
(1) By touching the volume symbol in the status bar of your bctone you’ll start the volume
control dialog.
(2) Audio Source
This symbol shows which audio source can be adjusted.
Ringtone: if there is no call active at this very moment, you can adjust the volume of
your ringtone.
Handset/Headset/Speaker: If you are entering the volume control dialog during an active call, any of your adjustments automatically affect the currently used audio source.
(3) Slider
You can easily adjust the volume by touching the slider and slide towards A to turn
down the volume or towards B to turn up the volume.
(4) Silent
By touching the crossed out note symbol the ring tone is turned to silent mode. If your
ringtone is on silent this symbol is displayed in red in the status bar in the top right
corner.
Page 13
13
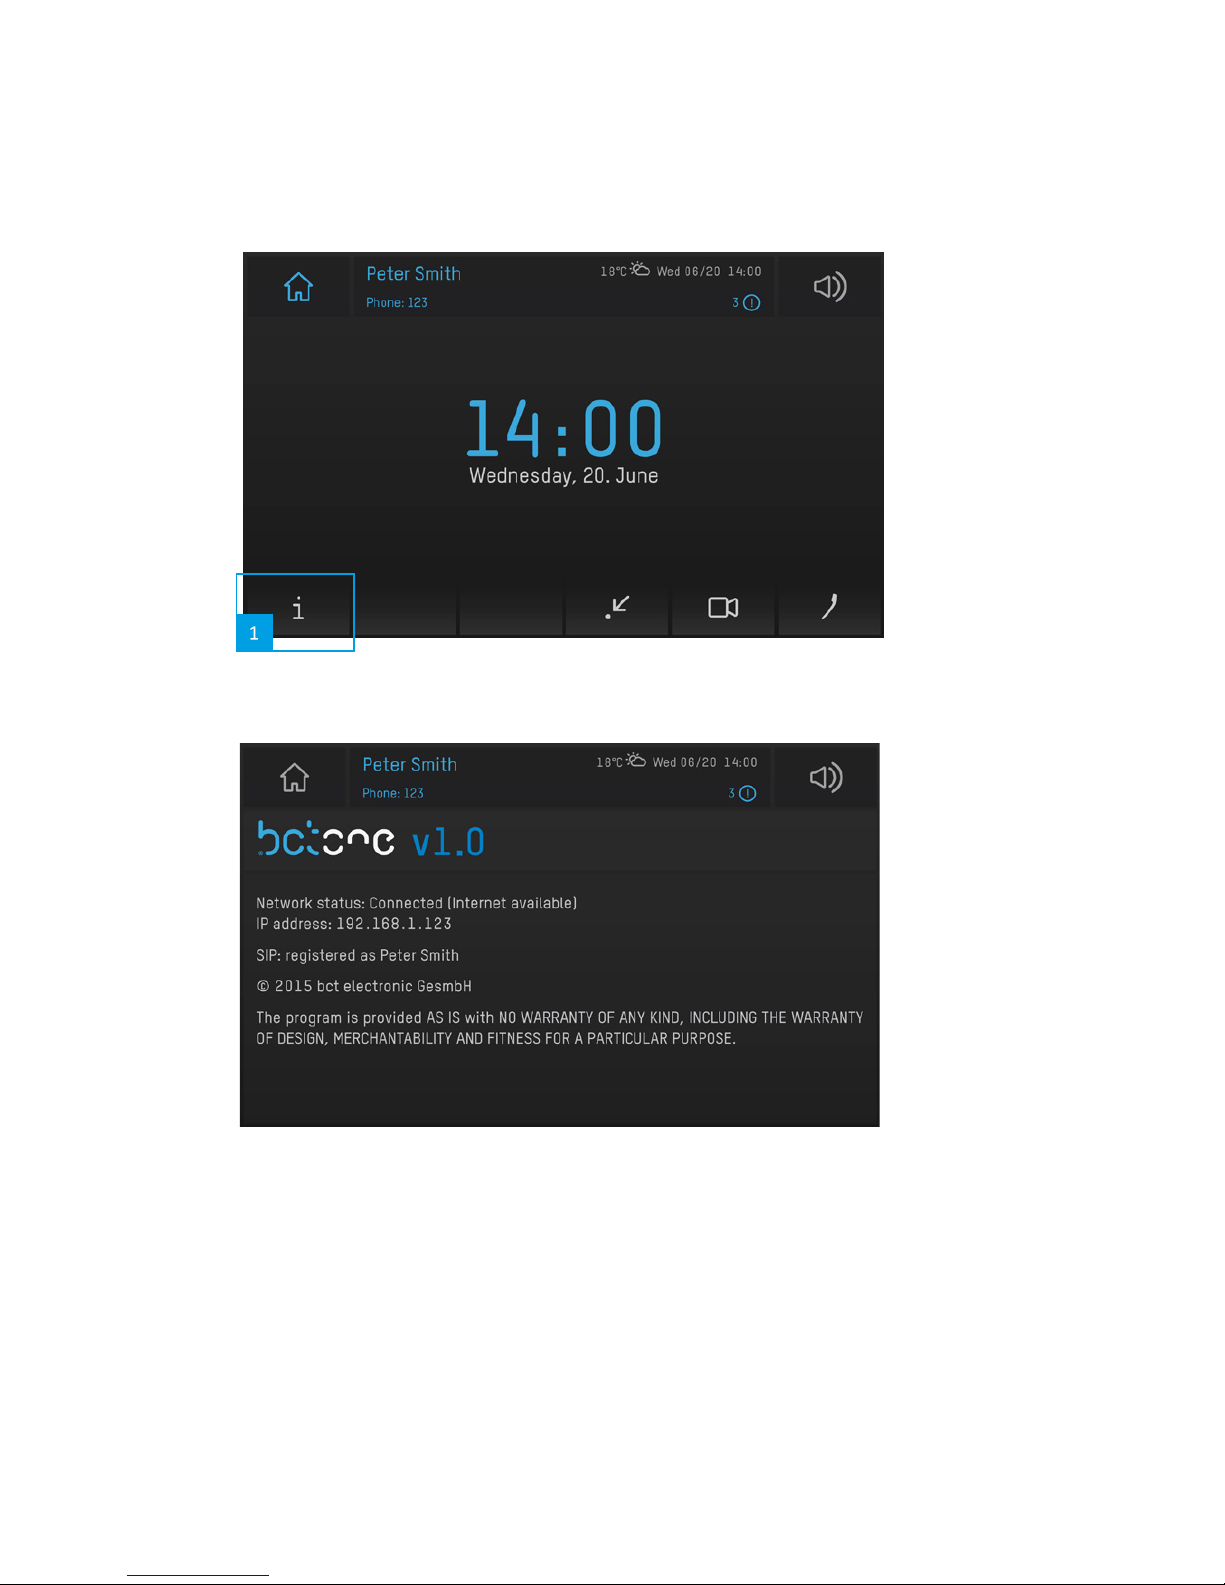
Device Information
(1) By touching the info-icon you are prompted to the device information of your bctone.
The info screen shows your network status, IP address and registration details.
Possible network status messages are:
• No network connection - device is not connected to a network
• Local network available - device is connected to a local network but not to the internet
• Internet can be reached - device is connected to a local network and the internet
bctone | User Manual
Page 14
14
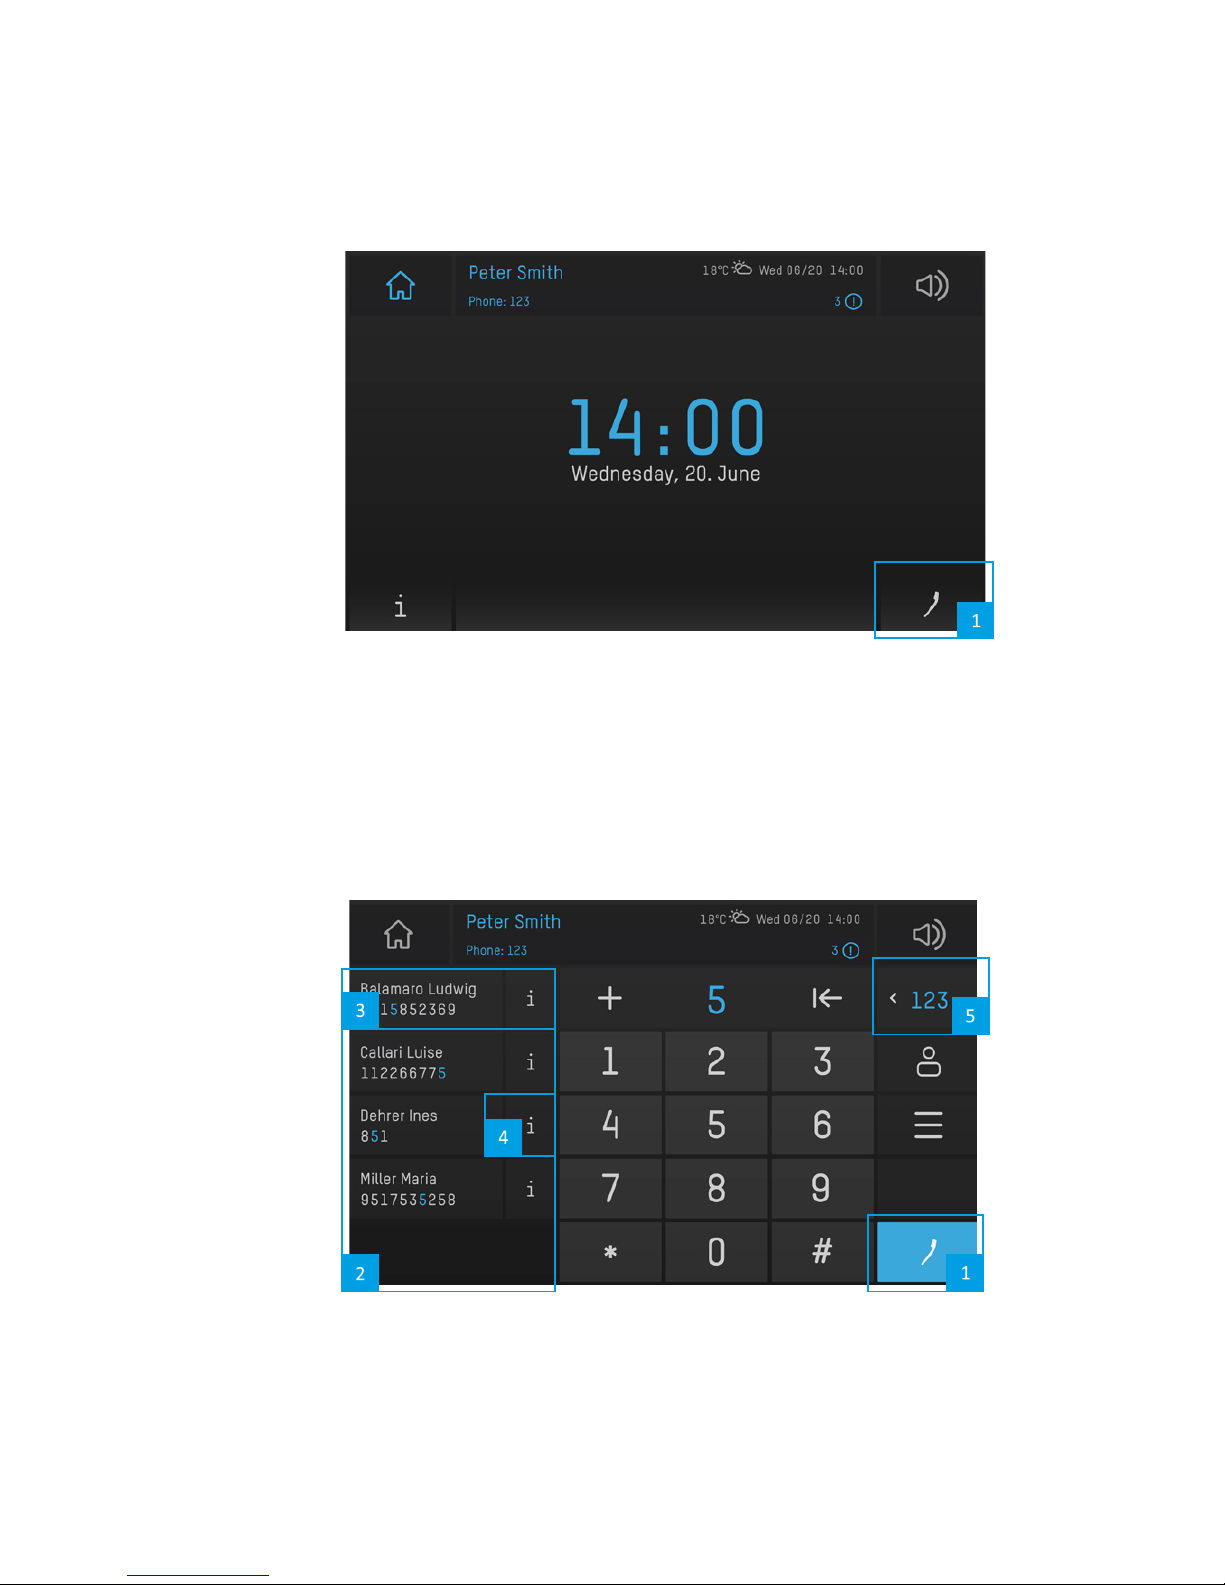
Call-App
By touching the handset-icon (1) on your home screen you‘ll reach the call-app of your
bctone.
Make a Call
Depending on the configuration (to be configured by your technician in the ConfigWeb) of
your bctone, the call app offers a keypad or keyboard.
Numeric Keypad
Page 15
15
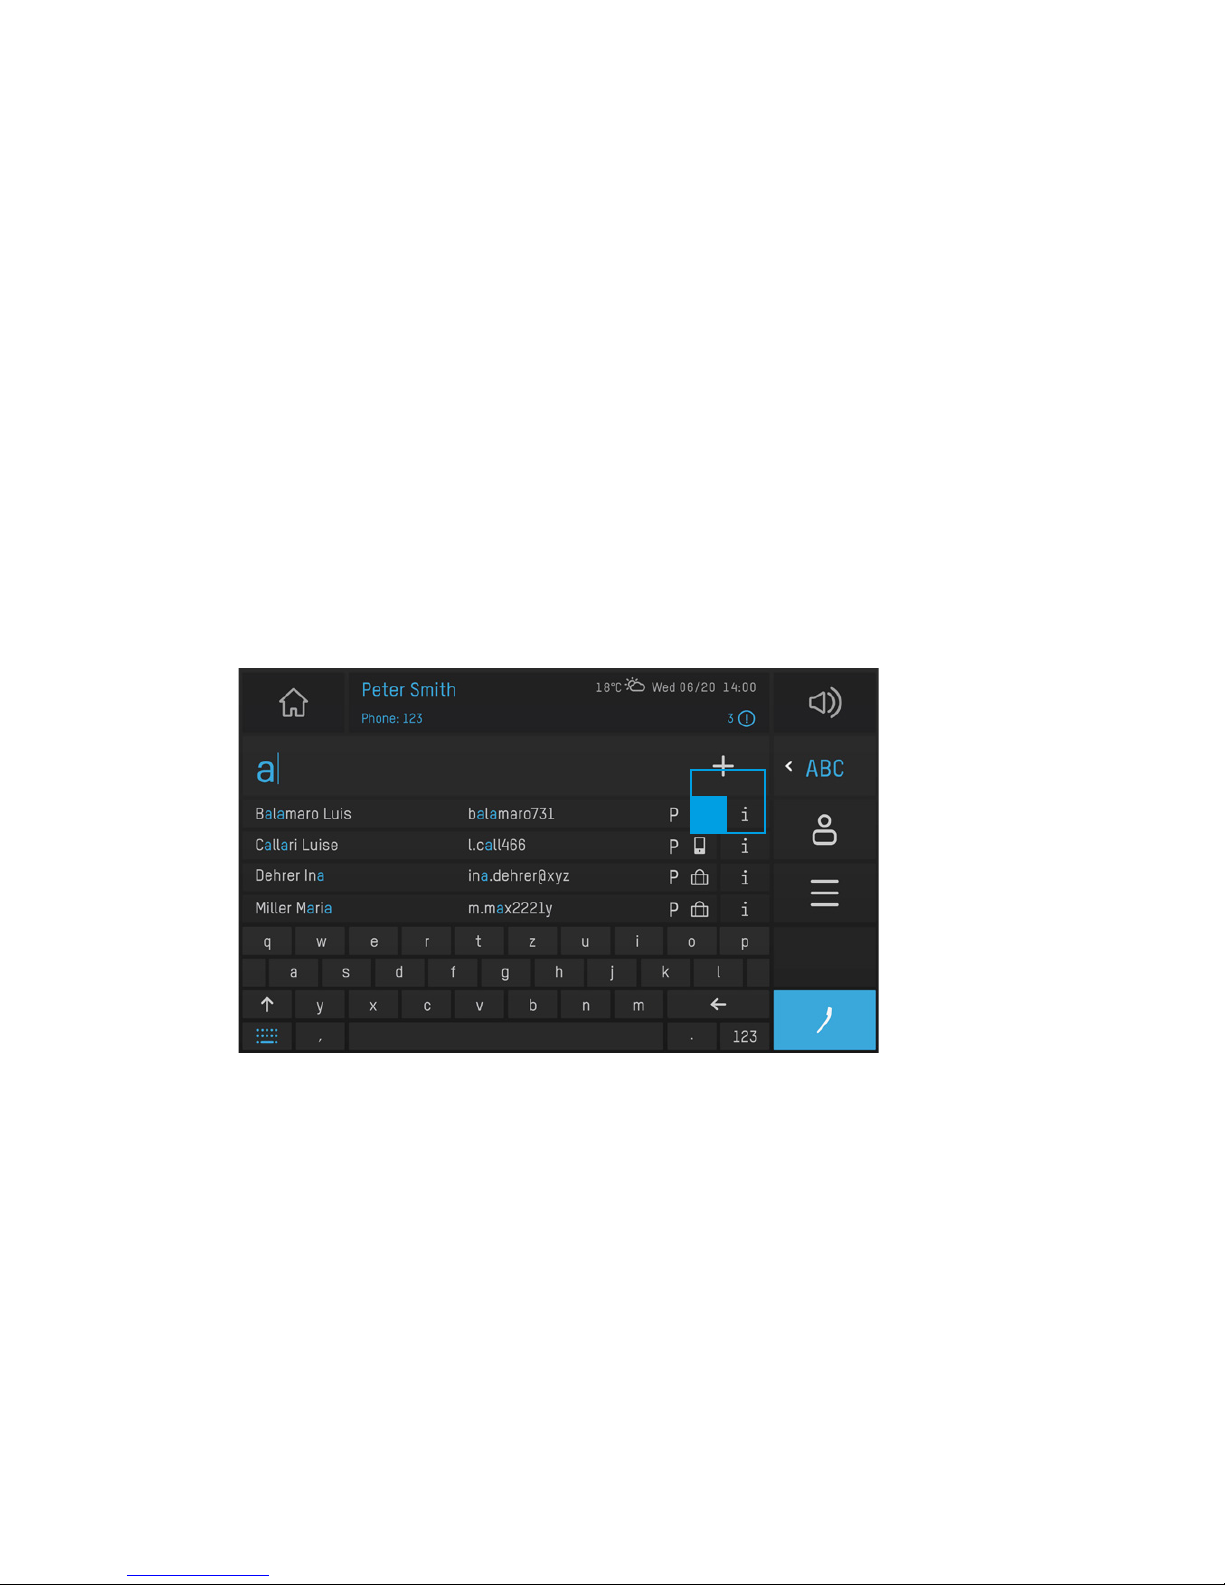
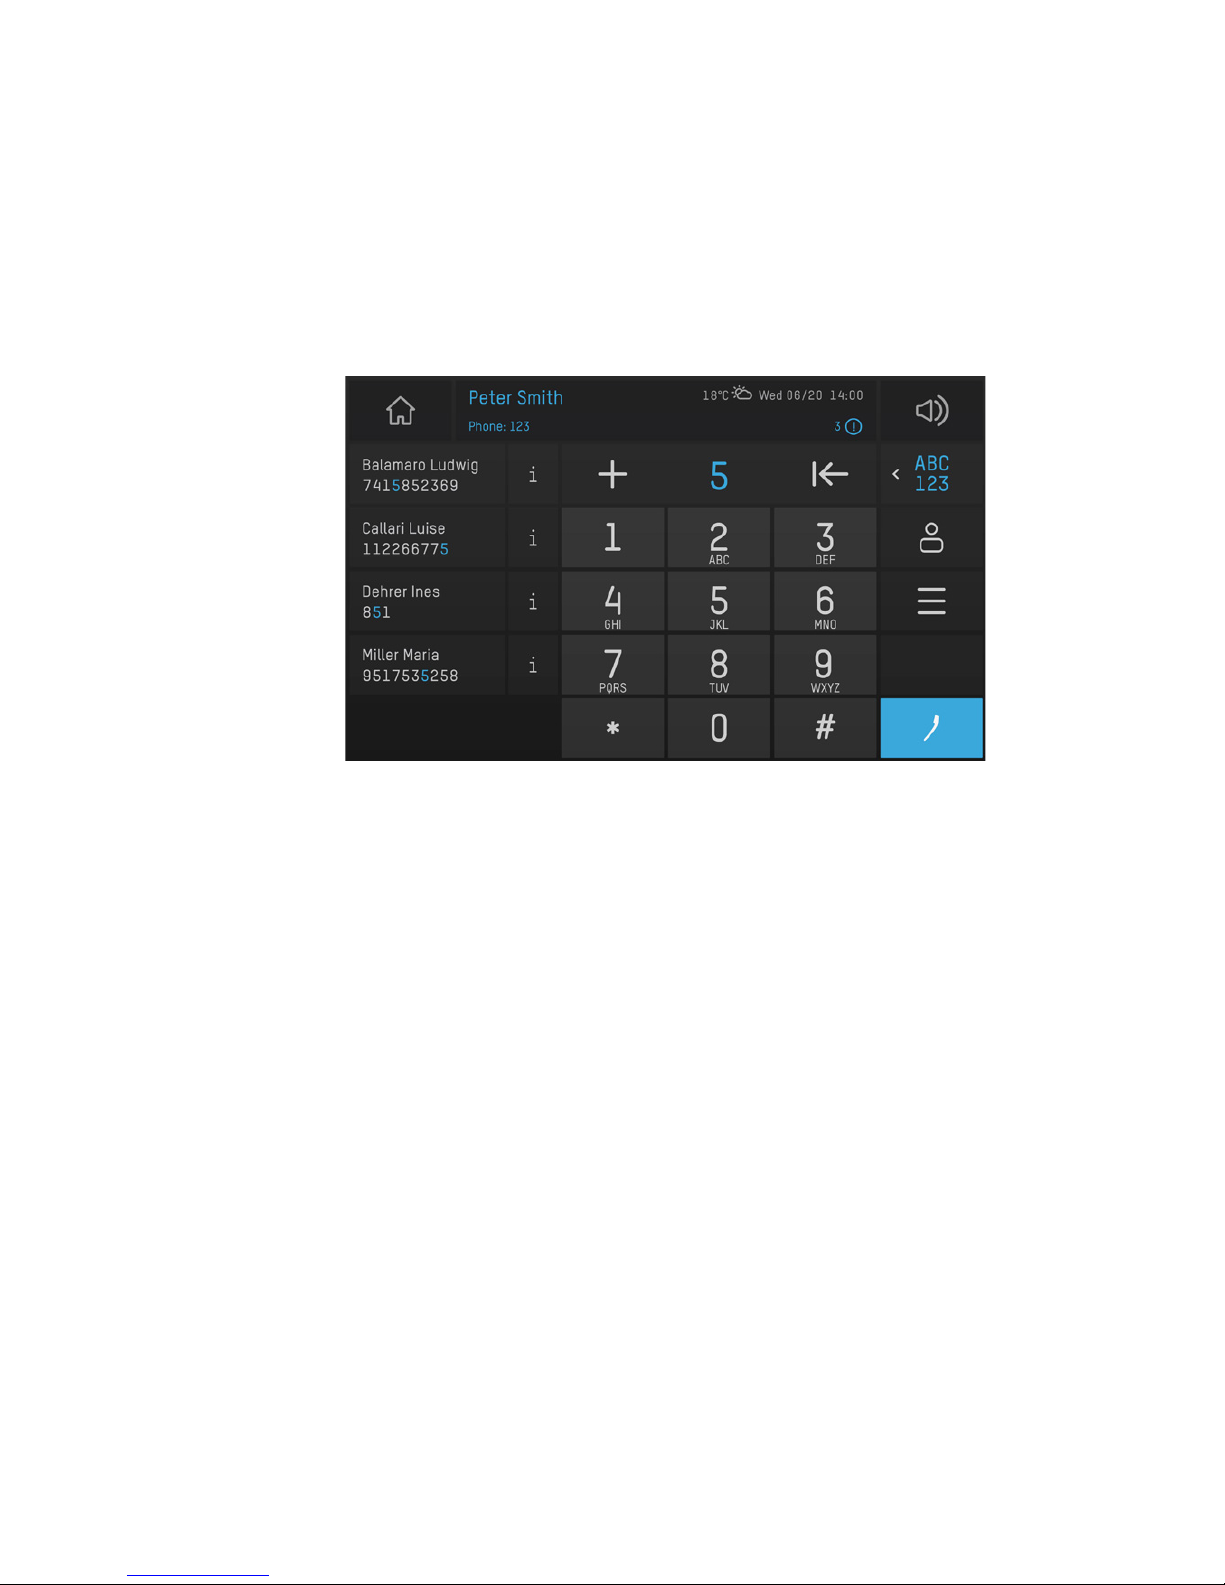
(1) Enter the recipient‘s number and touch the blue highlighted handset symbol (1) to initi-
ate the call. Depending on the configuration (to be configured by your technician in the
ConfigWeb) of your bctone, the call app offers a numeric or alphanumeric keypad (5).
(2) The keyboard offers quick-search functionality. As soon as you enter a digit or charac-
ter all address book that match your entry are displayed.
(3) By touching a number/address book entry a call is directly initiated (independent of the
currently selected service).
(4) By touching the info icon next to an address book entry the according details are dis-
played.
(5) You can change between (alphabetic) keypad and keyboard by touching the icon, de-
pending on what is currently active.
Keyboard
To search for names or a SIP-URI in your address book, switch to the keyboard. By touching
the entry you automatically start a call to this recipient.
(1) By touching the info icon next to an address book entry the according details are dis-
played.
You can initiate a call directly in the address book – for more details please read the chapter Address Book.
bctone | User Manual
1
Page 16
16
Alpha-Numeric Keyboard
If you prefer to have the alpha-numeric keypad set up as default, your technician can make
this configuration in the ConfigWeb for you.
This keypad is only different to the numeric keypad in appearance, not in functionality.
Page 17
17
Incoming Calls
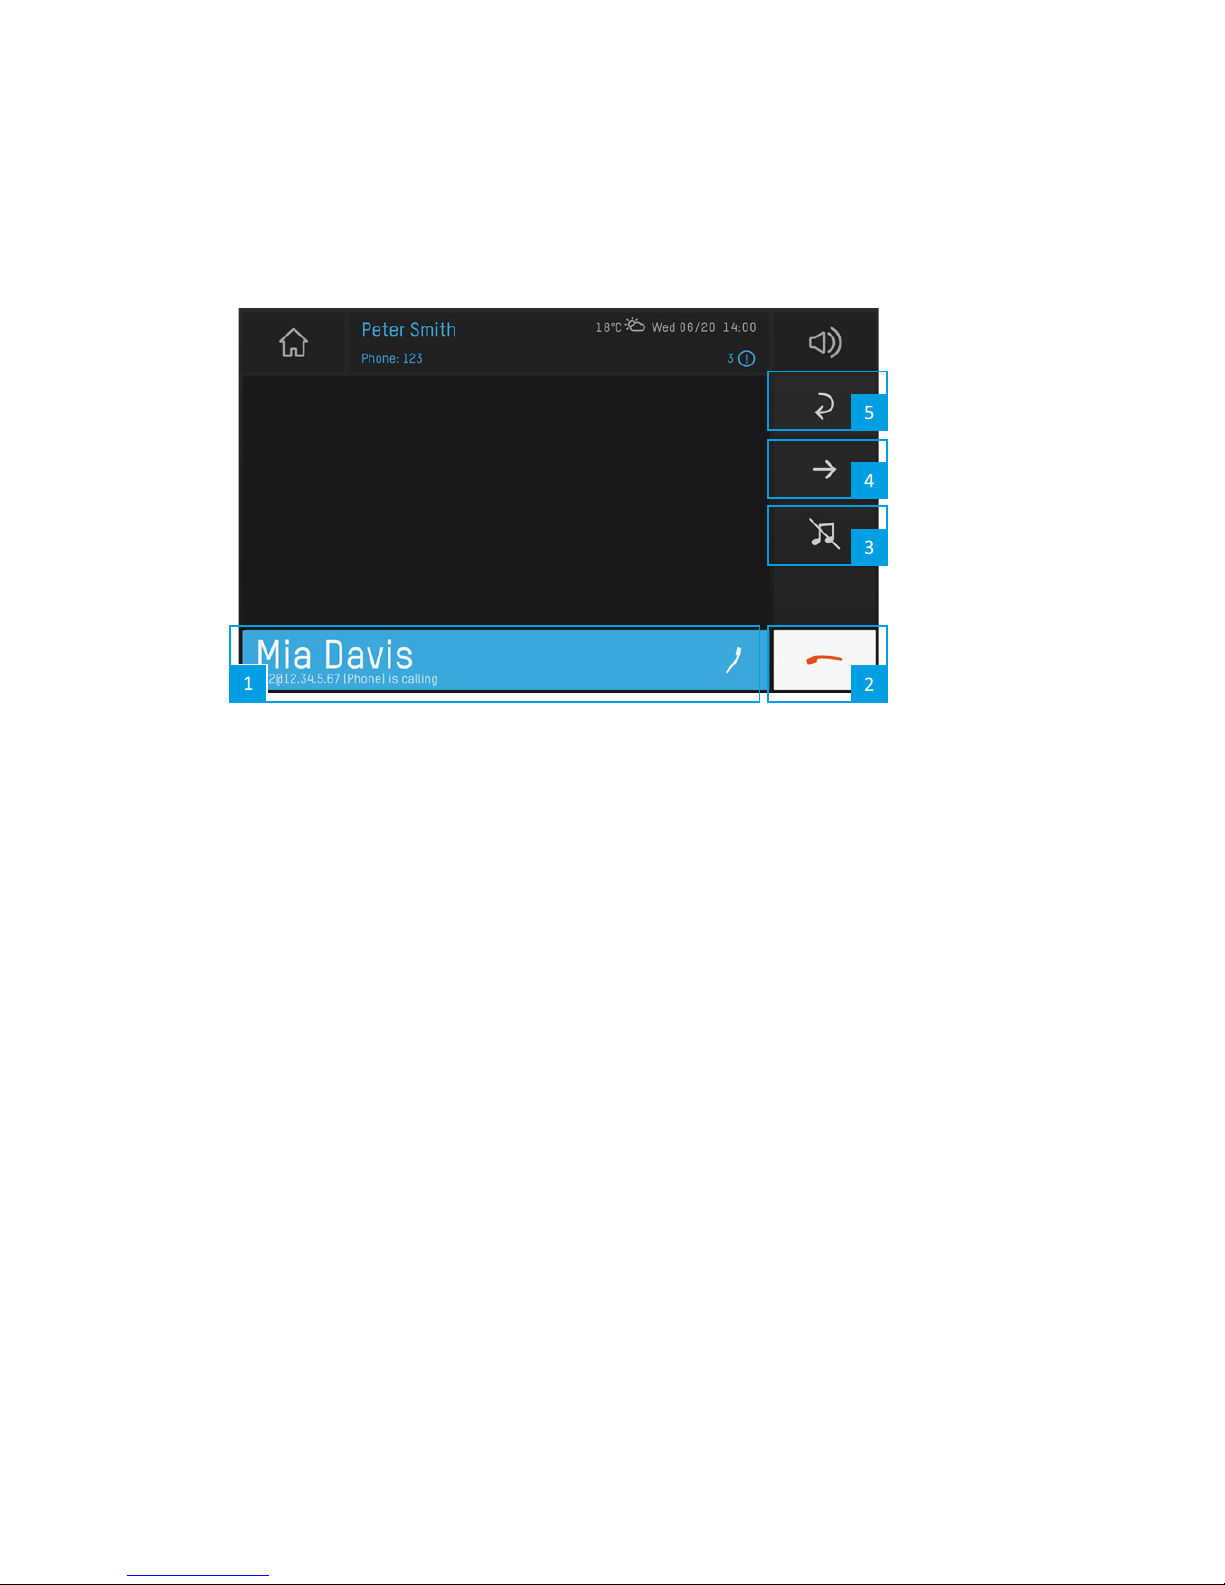
(1) Accept Call: Take calls by touching the blue highlighted bar (call notification) (1) appea-
ring. Calls can also be accepted directly by picking up the handset (if attached).
(2) Decline Call: Press the red handset icon (2) to decline a call.
(3) Ignore Call: By touching the symbol showing the crossed out note (3) your ringtone is
turned to silent but your call is not declined.
(4) Transfer a Call: You can transfer a call while it is incoming or already active by touching
the arrow icon (4).
(5) Return to list view: If you are in an active call and have several calls pending, the return
icon leads you back to the list overview without cancelling the active call.
bctone | User Manual
Page 18
18
Multiple Incoming Calls
If during an active call (A) an additional call (B) is coming in, a notification will be displayed
on your screen. By touching the notification you‘ll reach the call overview and can accept
call (B) by touching the blue highlighted handset icon. If the additional call (B) is accepted
the originally active call (A) will automatically be paused. After ending call (B) the original
call (A) has to be reactivated manually.
Forward Calls
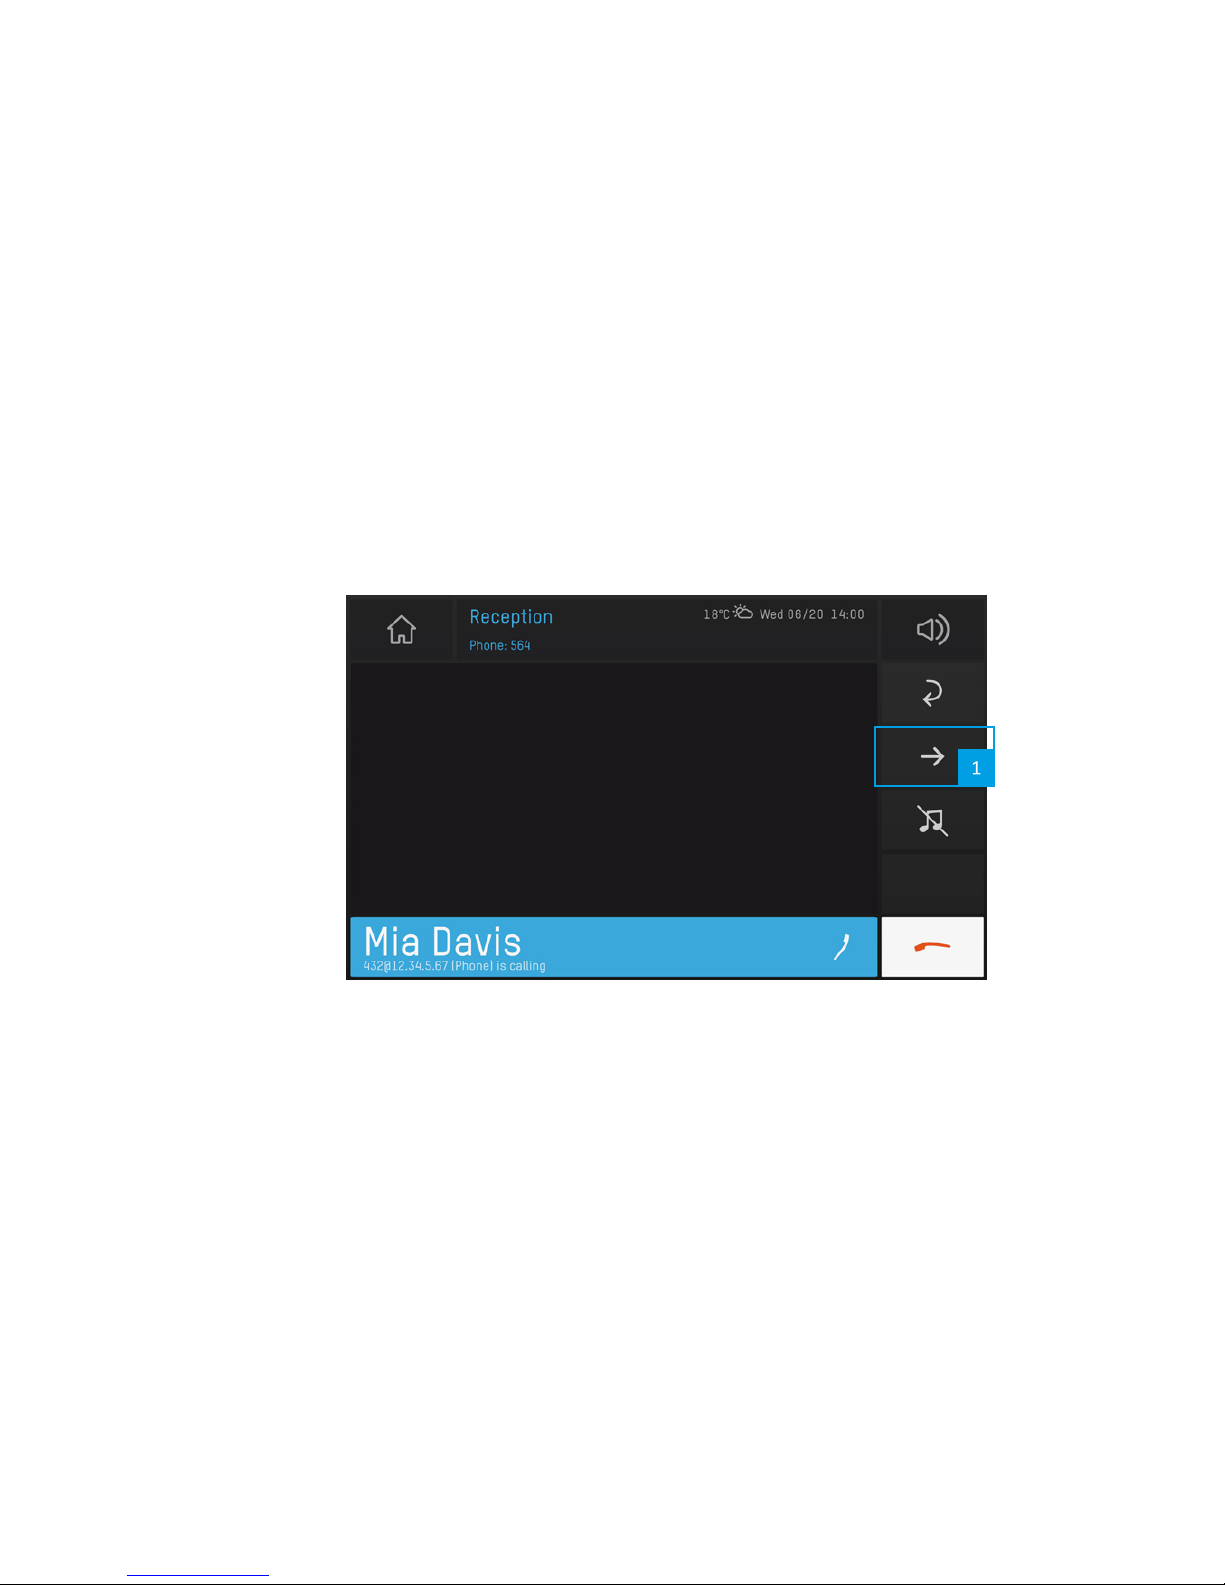
Calls can be forwarded directly when coming in or while active.
The arrow icon (1) leads you to the forward dialog.
The following screens demonstrate the process of forwarding a call using the numeric keypad,
however you can also switch to the address book or call history to select the number you’d
like to transfer the call to.
Page 19
19
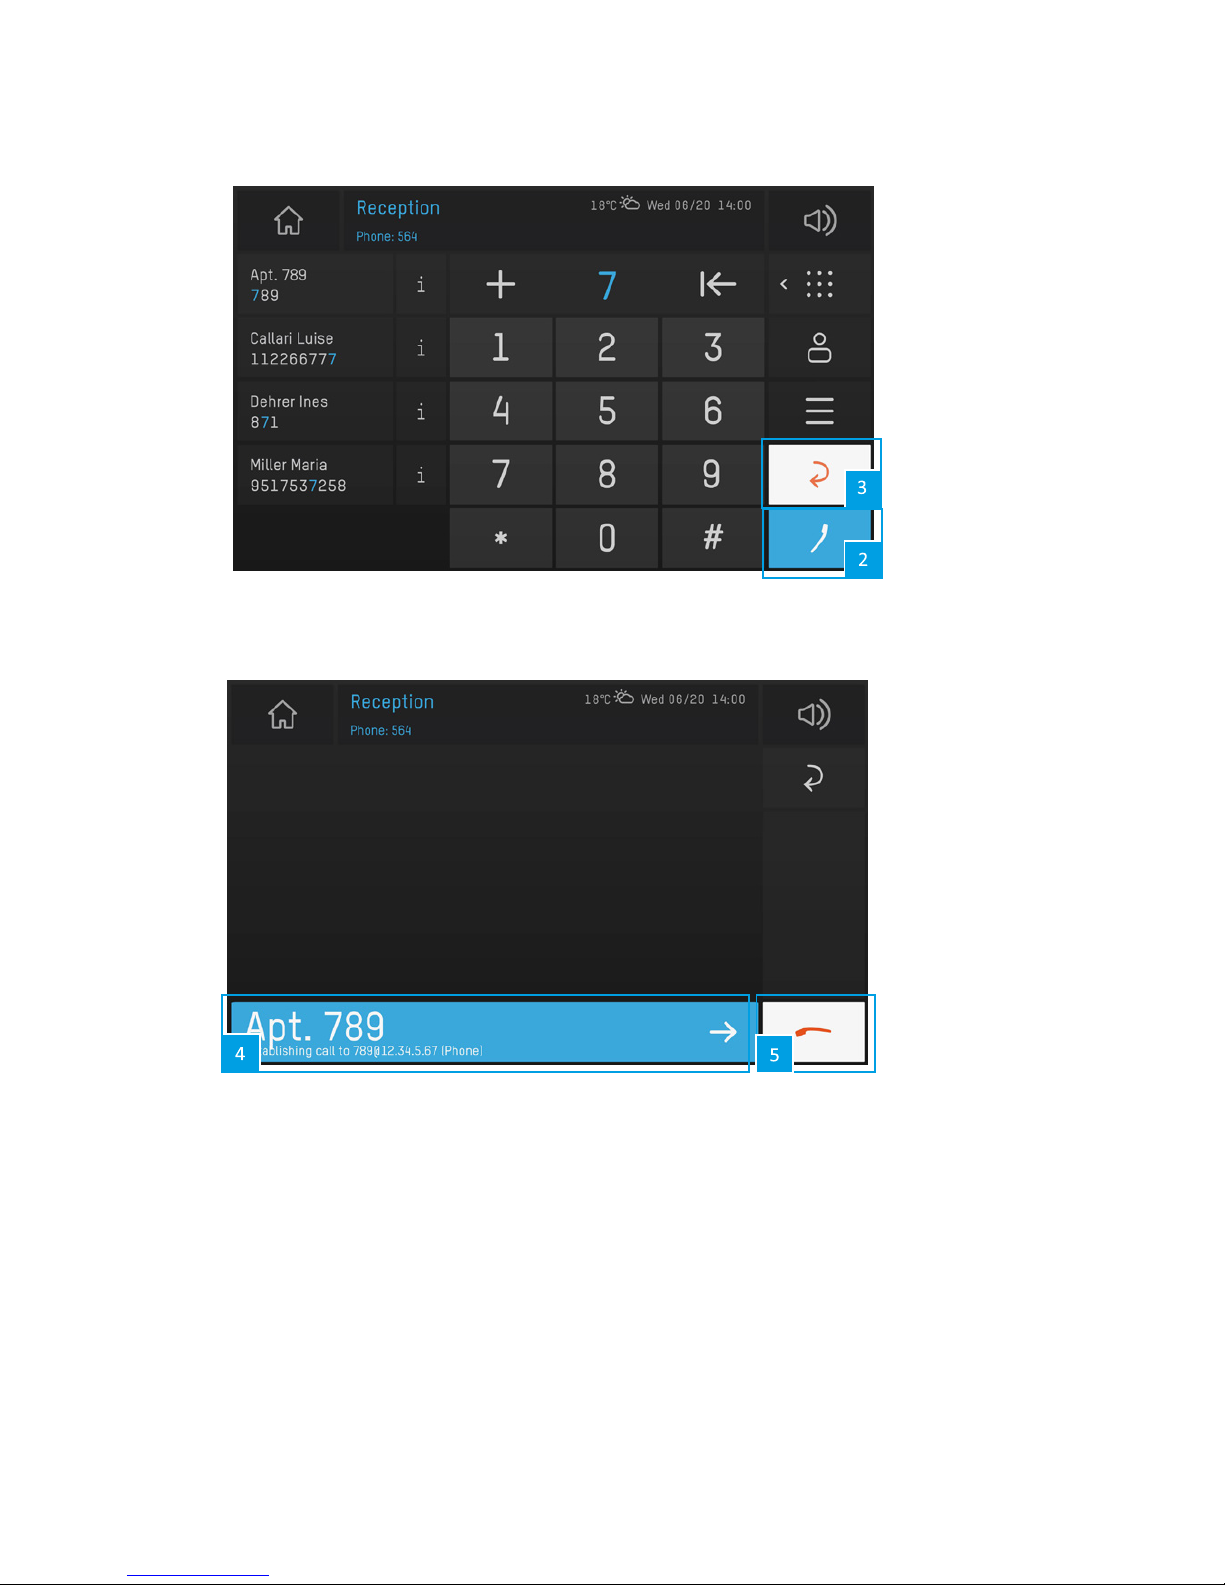
(2) Enter the number to which you want to forward the call and touch the blue highlighted
handset icon (2).
(3) To cancel the transfer, touch the red return icon (3).
Wait until the recipient picks up if you want to speak to him before you transfer the call, or
transfer it directly by touching the blue highlighted notification bar. (4) The transferred call
is cancelled at your end automatically as soon as the third participant accepts the call. If
the third participant does not pick up / accept the call, it will automatically be transferred
back to you. If you want to cancel the transfer or retrieve the call, touch the red handset
icon (5).
bctone | User Manual
Page 20
20
Active Calls
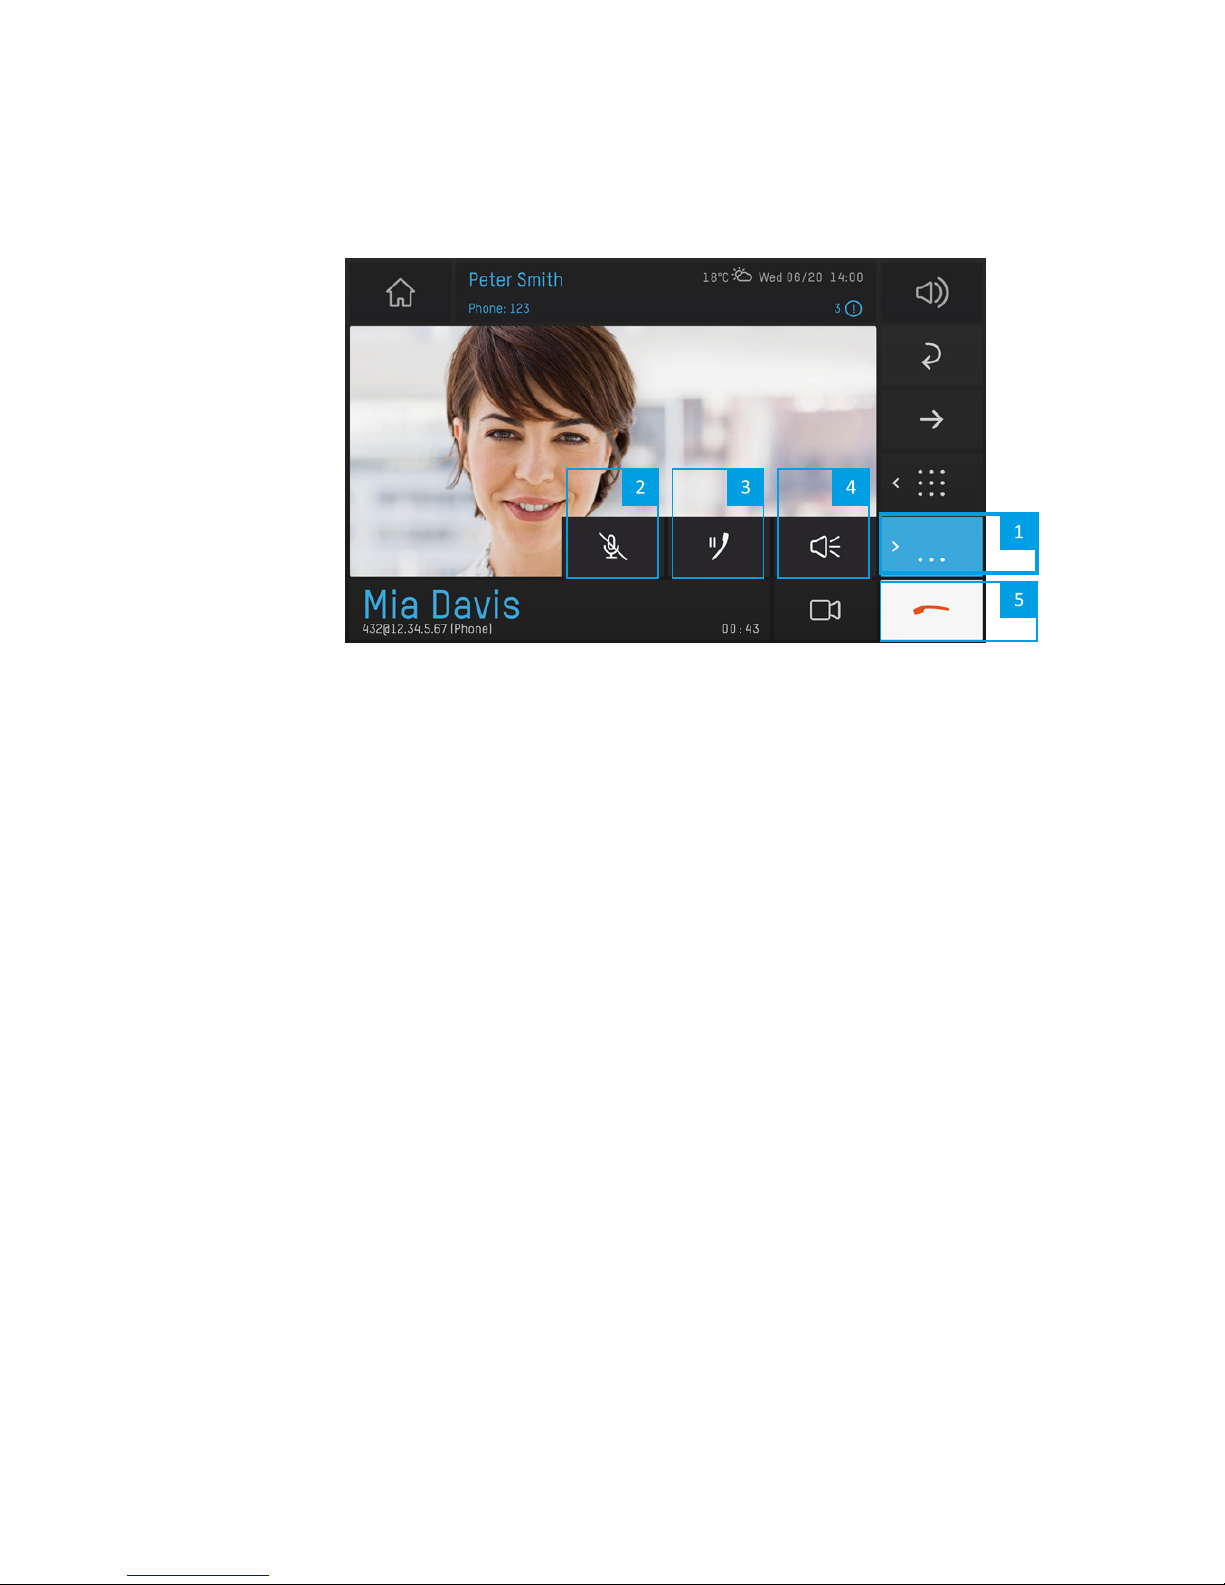
(1) For further option during active calls touch icon (1).
(2) Mute Microphone/Call
Touch the crossed out microphone icon (2) to mute the microphone during a call. The
symbol is now shown red. By touching it again the microphone is reactivated.
Note: the mute function only effects the currently active call.
(3) Pause Call
To pause a call touch the pause icon (3). You can keep multiple calls paused at the
same time.
(4) Change Audio Source
If you want to change the audio source during a call (handset, speaker, headset) touch
the speaker symbol (4). By picking up the handset before or during a call, it is automatically activated as audio source to be used.
Note: if you pick up the handset before or during a call, the handset is automatically chosen as audio source.
(5) To end the call at any point simply touch the red handset icon (5).
Note: if you would like to hang up the handset and continue the call using the speaker, please change the
audio source in the menu before hanging up (see point 4 of this description).
Page 21
21
Camera
You can make video calls using your bctone if:
• your bctone is equipped with an integrated camera and configured accordingly in the
ConfigWeb by your technician.
• a compatible USB webcam is attached to your bctone and configured accordingly in the
ConfigWeb by your technician.
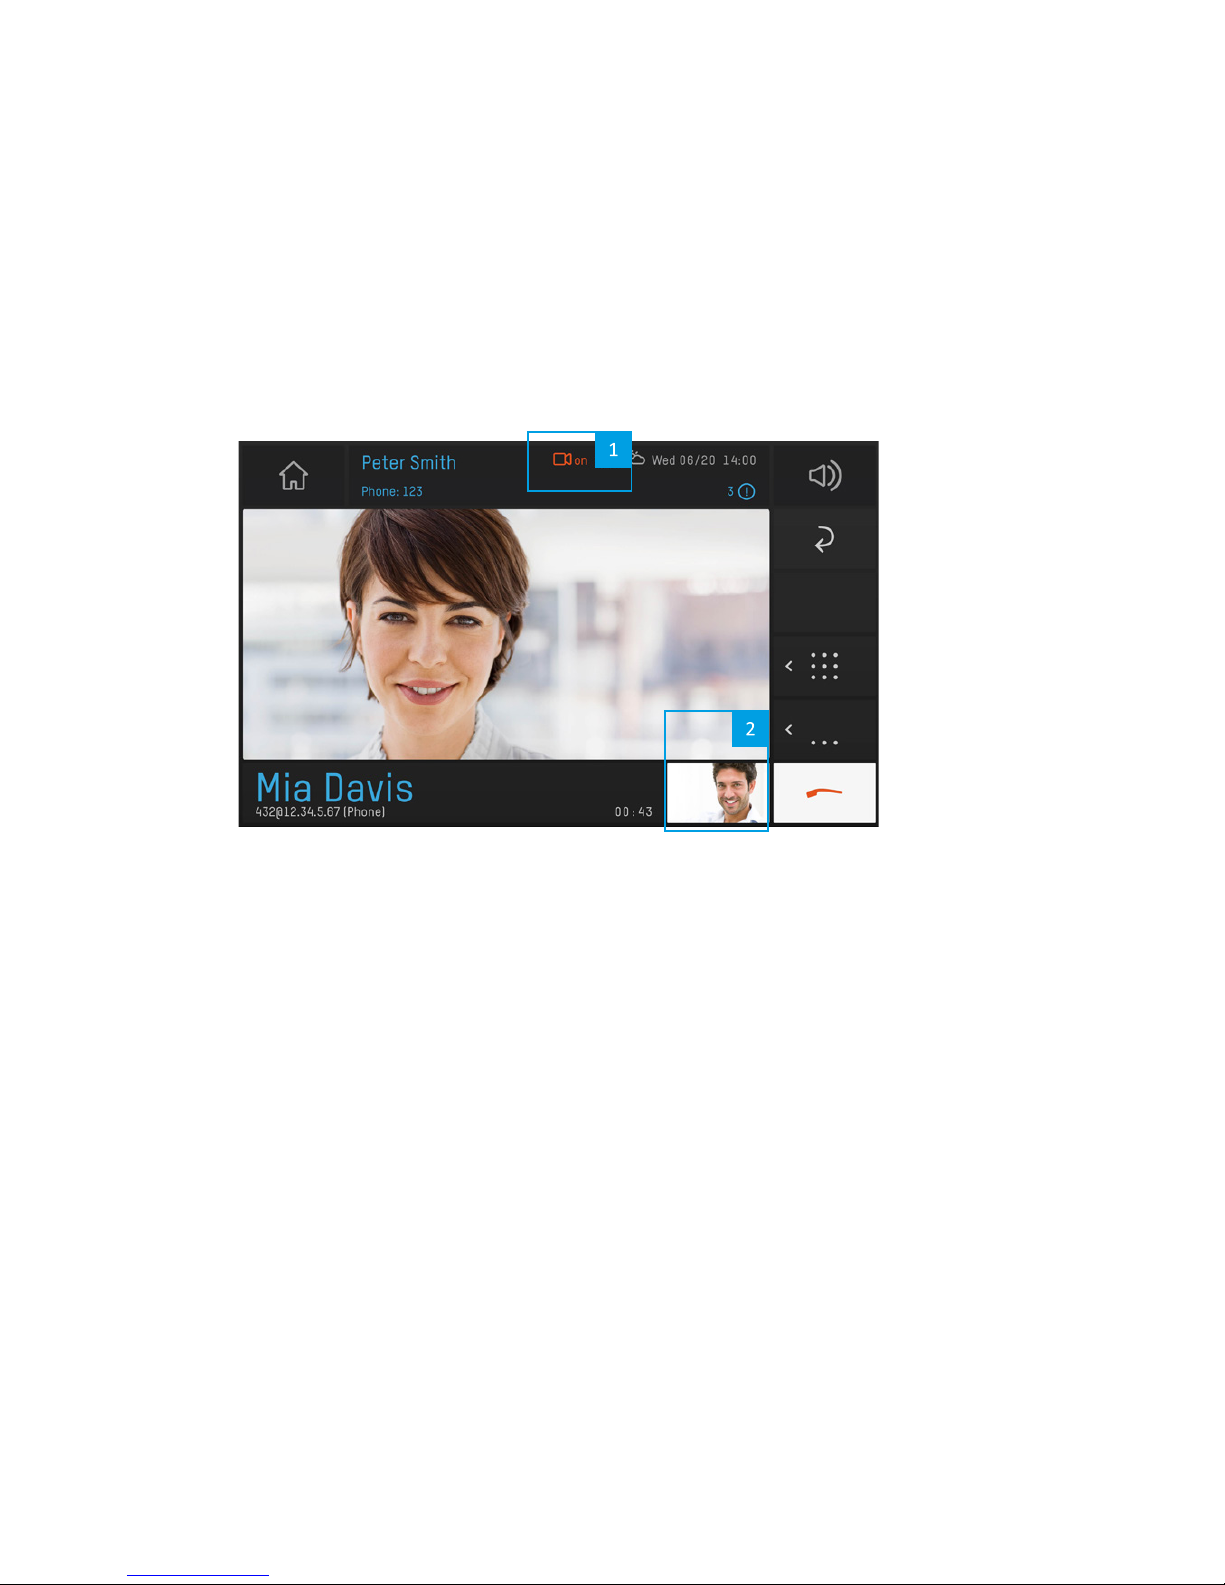
(1) The red camera symbol (1) displayed in the status bar indicates that your camera is
active.
Note: in case this symbol (1) is displayed yet no video call is active intentionally, it indicates your camera video
is displayed somewhere.
(2) To switch off your camera during a call touch the miniature of your video image (2). The
miniature will be replaced by a red camera symbol.
bctone | User Manual
Page 22
22
Call Overview Options
There are two different types of views for your calls, which can be chosen in the ConfigWeb
(see chapter ConfigWeb Configuration > Settings).
Irrespective of the default view chosen, you can switch between both views during a call. The
views offer the following in-call-functions:
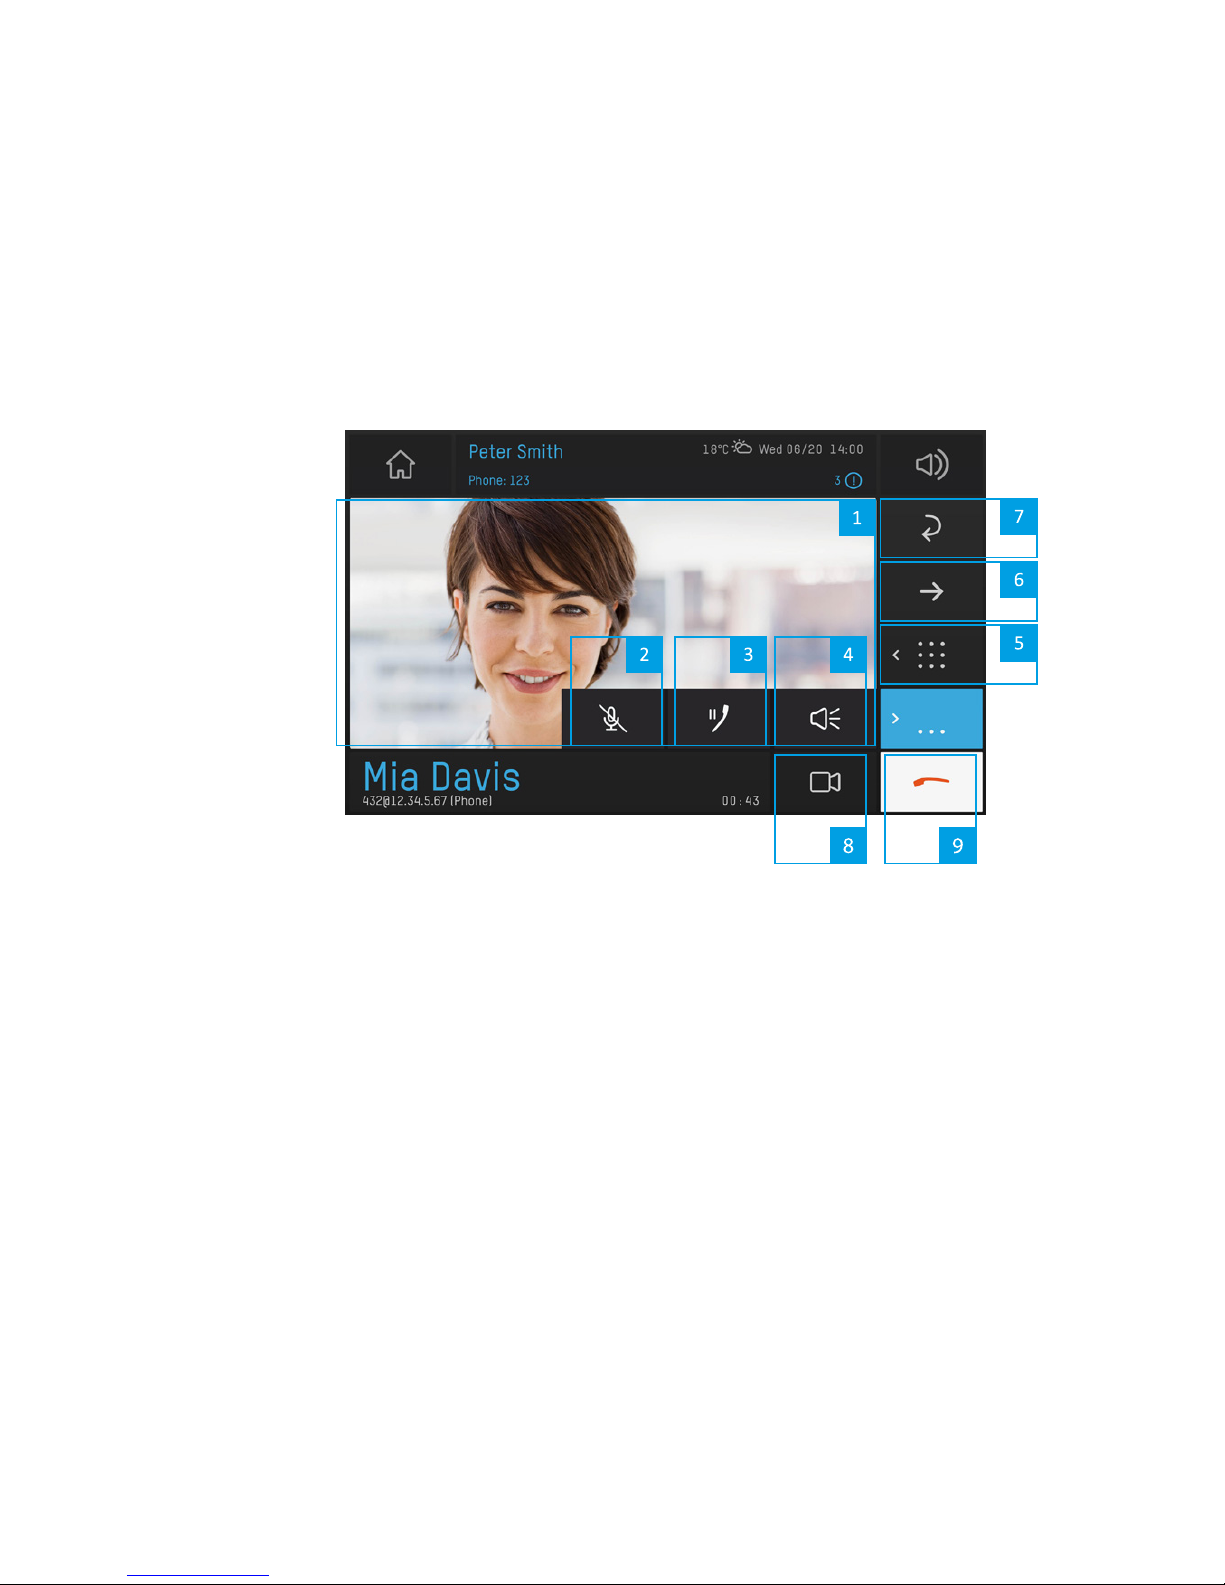
Detail View (default)
(1) Full screen video view
(2) Mute microphone
(3) Pause call
(4) Change audio channel
(5) Show numeric keypad
(6) Transfer call
(7) Return to list view
(8) Disable / enable camera
(9) End call
Page 23
23
List View
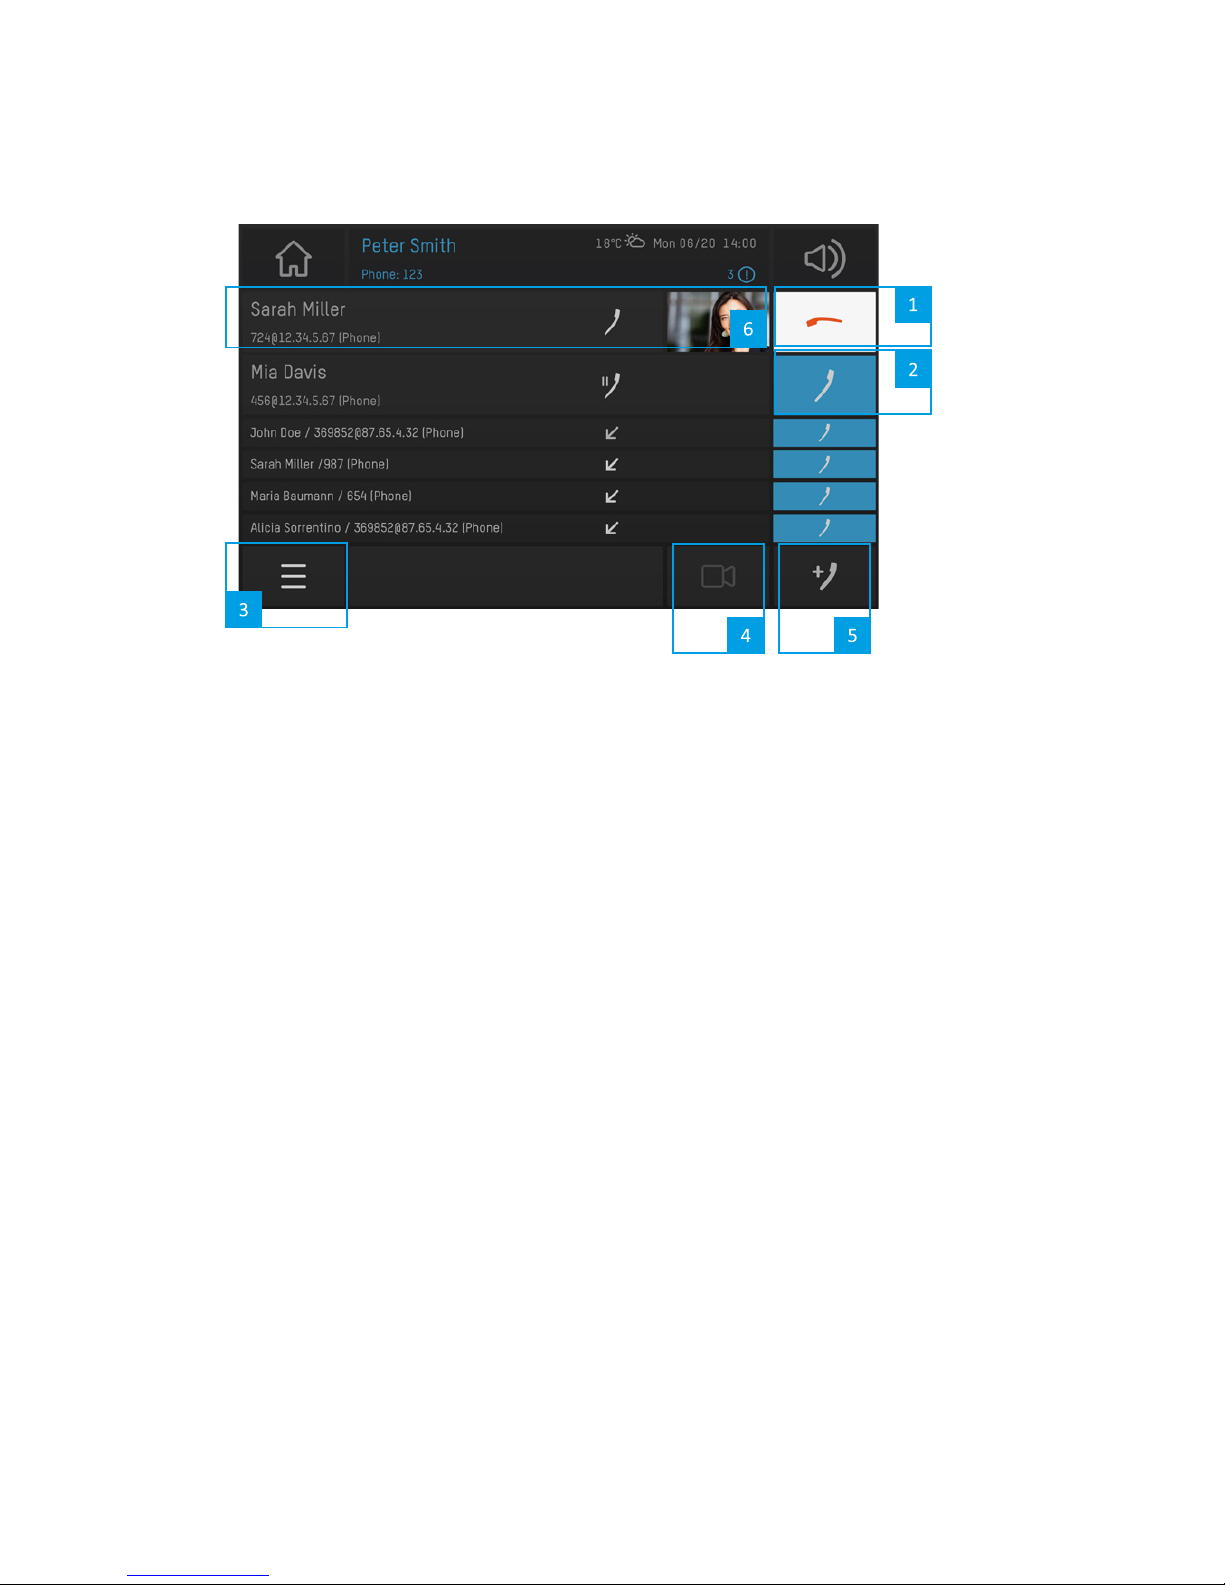
All active and incoming calls are displayed.
(1) End call
(2) Accept or continue call
(3) Filter calls: active, incoming, paused
(4) Video overview (currently to be implemented for future firmware versions)
(5) Switch to call-app
(6) Switch to detail view
By touching the call notification/information in the list view the selected call will be
automatically displayed in the detail view. Touch the return icon to go back to list view
without ending the call.
bctone | User Manual
Page 24
24
Screens (Dashboards)
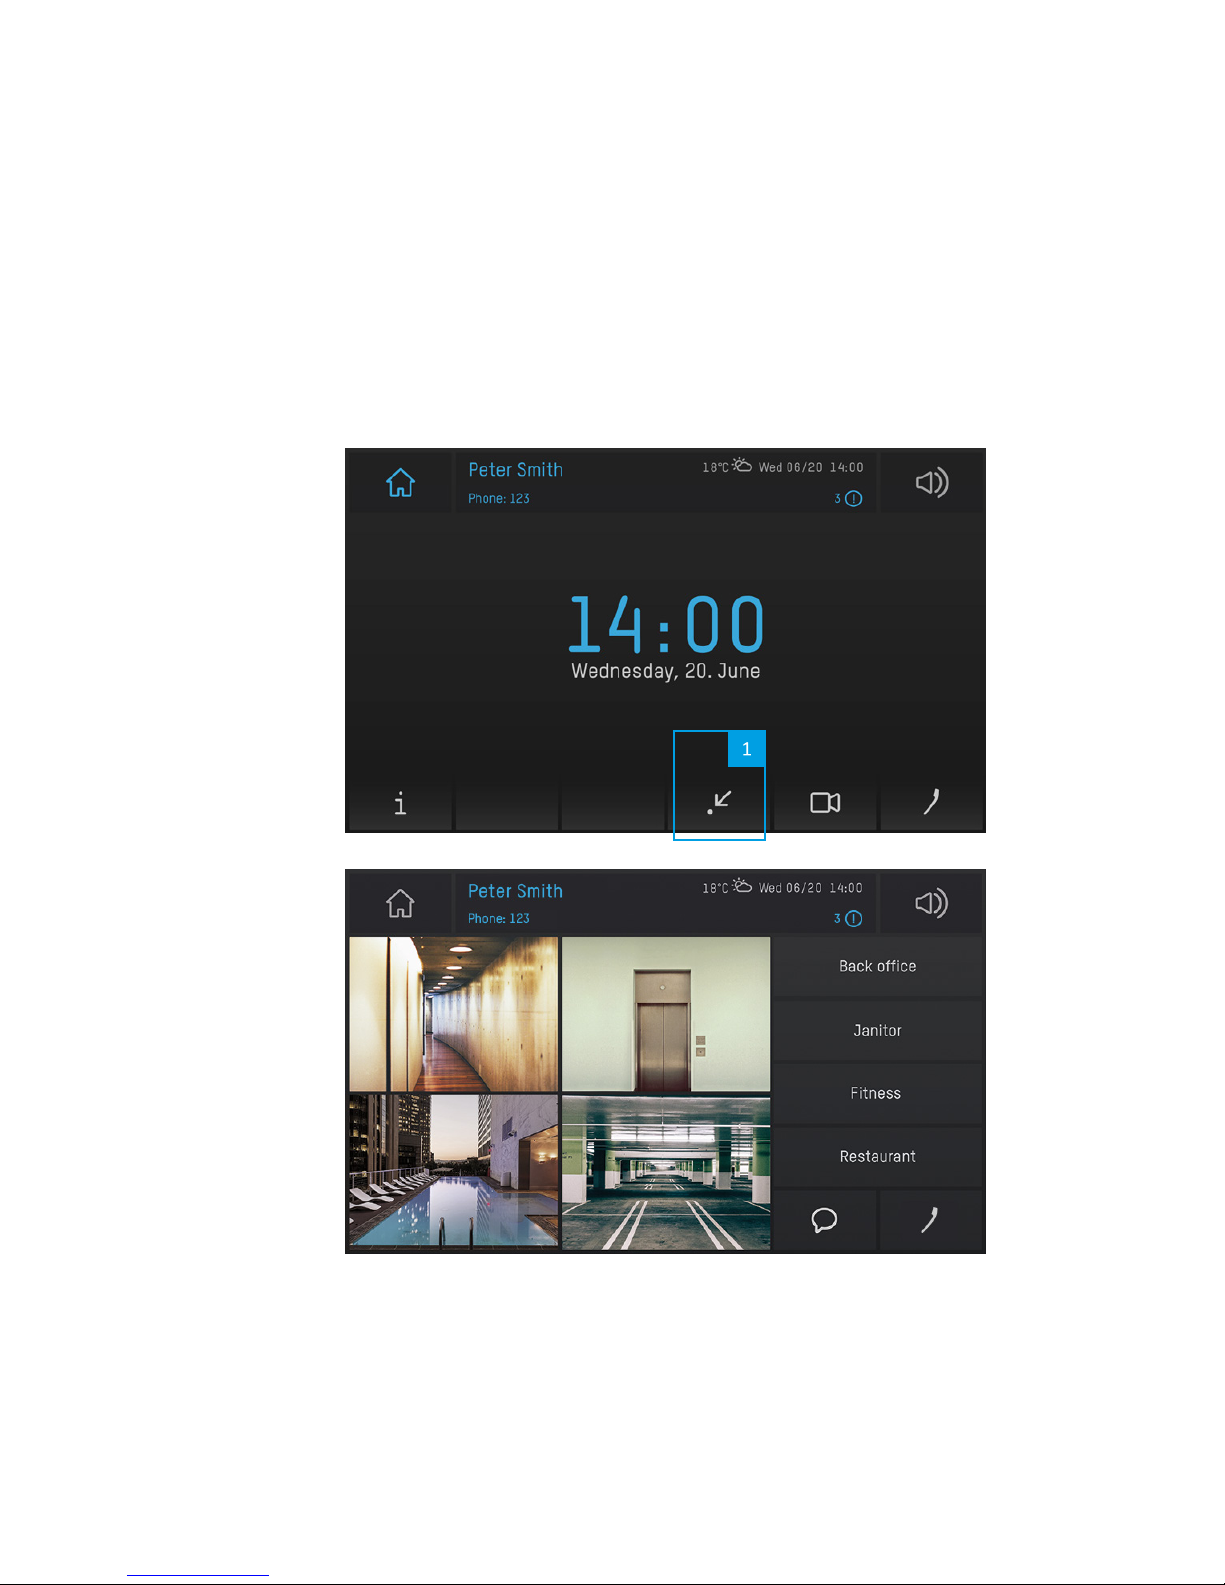
Just like dashboards, customizable screens can be set up individually with command buttons or camera views. Opening a barrier, initiating a call, viewing a camera feed – all can be
done at a glance with one single touch.
The bctone can be set up with 100 different screens with up to 144 buttons on it.
The configuration of the “Screens” has to be carried out by a technician via the ConfigWeb
in advance.
(1) Select the direct dialling icon (1) in the main menu to view your individual screens.
You can now trigger several actions with only one touch.
Page 25
25
Door Communication
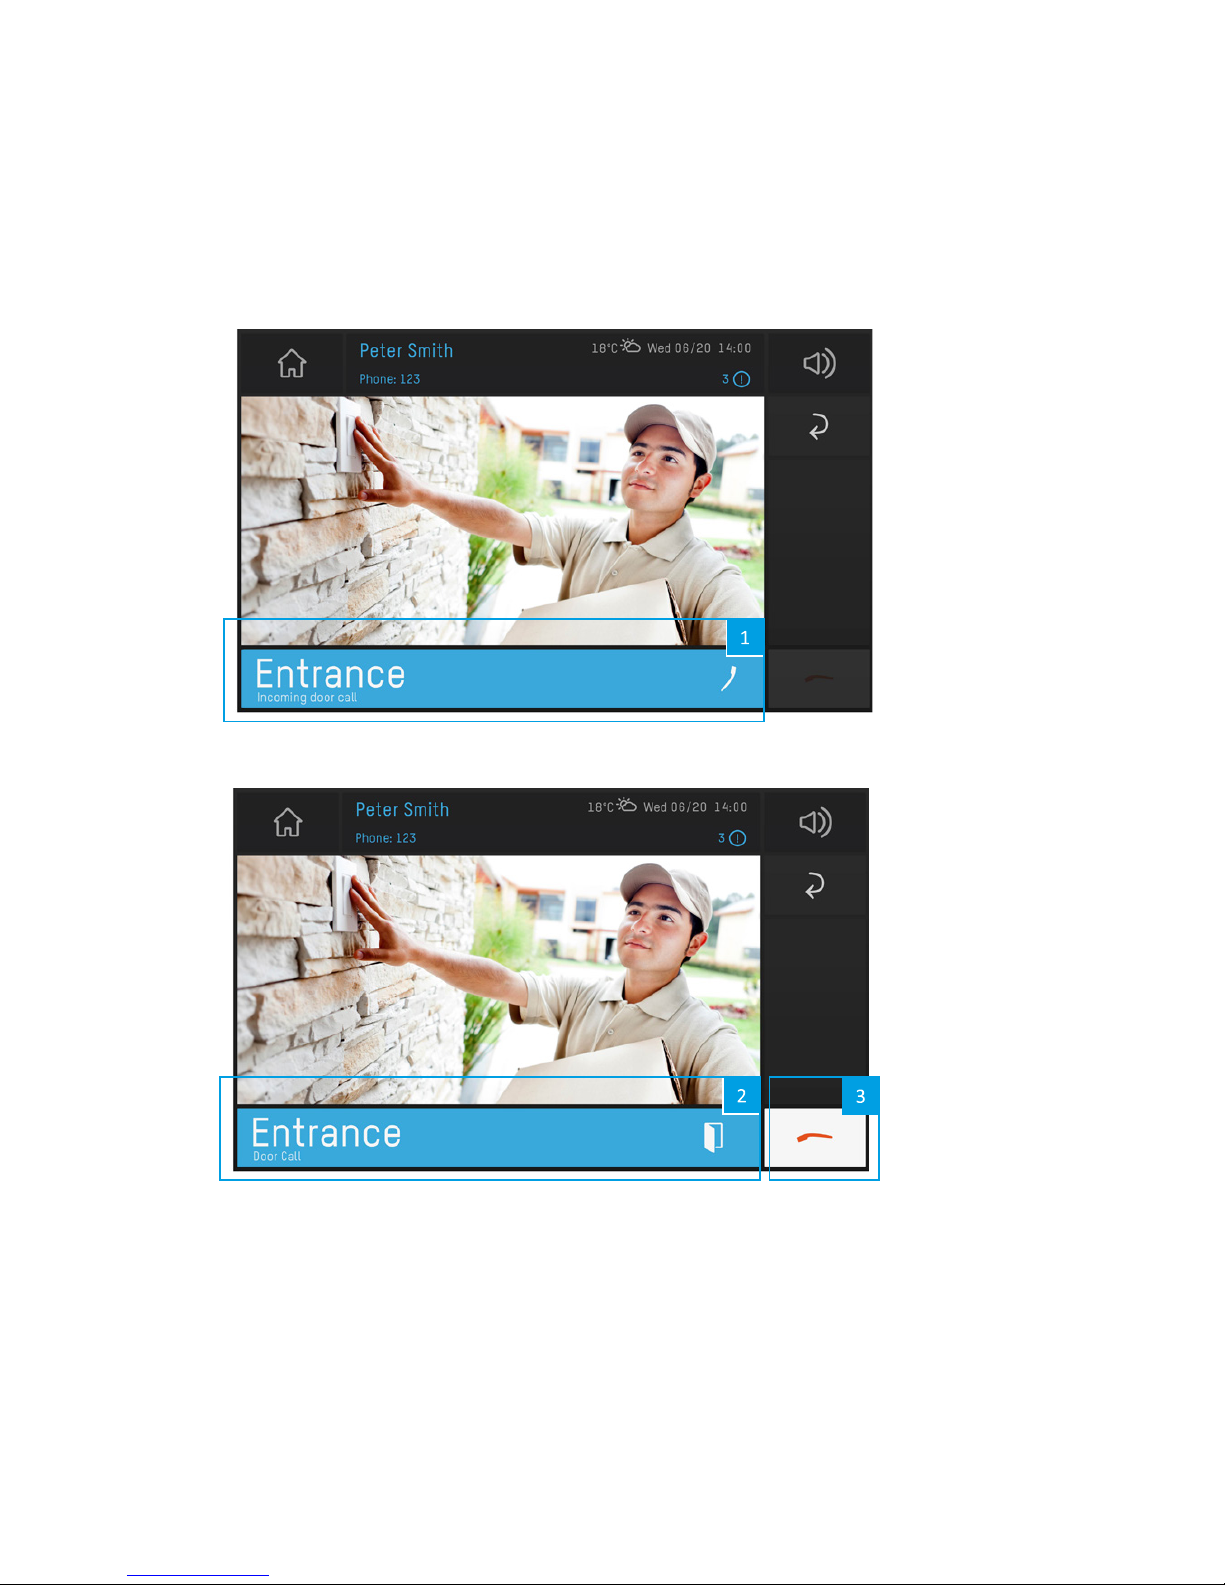
Note: Only applicable if your bctone is connected to a door phone system.
(1) Press the blue call notification bar (1) to accept door call.
(2) Press the blue door opener bar (2) to open the door.
(3) Touch the red handset (3) to decline/end door call.
bctone | User Manual
Page 26
26
Address Book
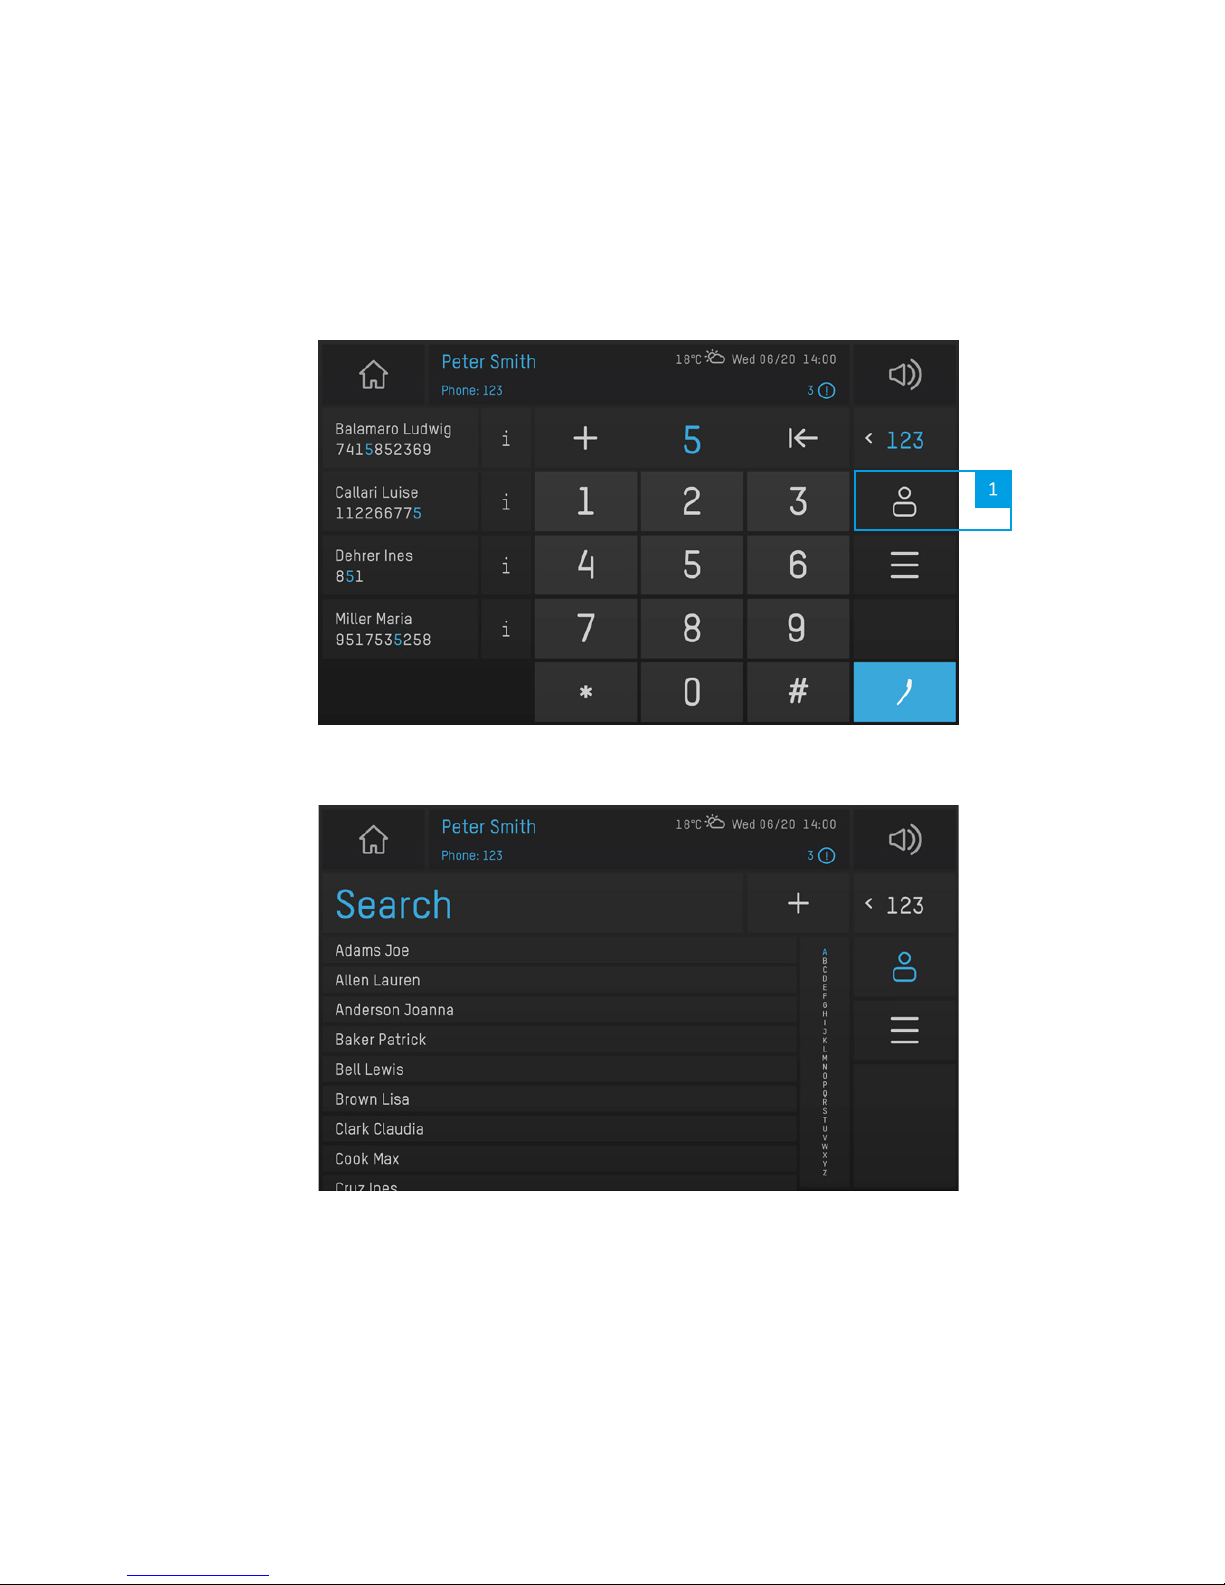
To manage your contacts the bctone comes with an easy to handle address book.
(1) As soon as you are in the call-app (enter by touching the handset icon) access the
address book by touching the contacts (1) icon.
Page 27
27
Search for Contacts
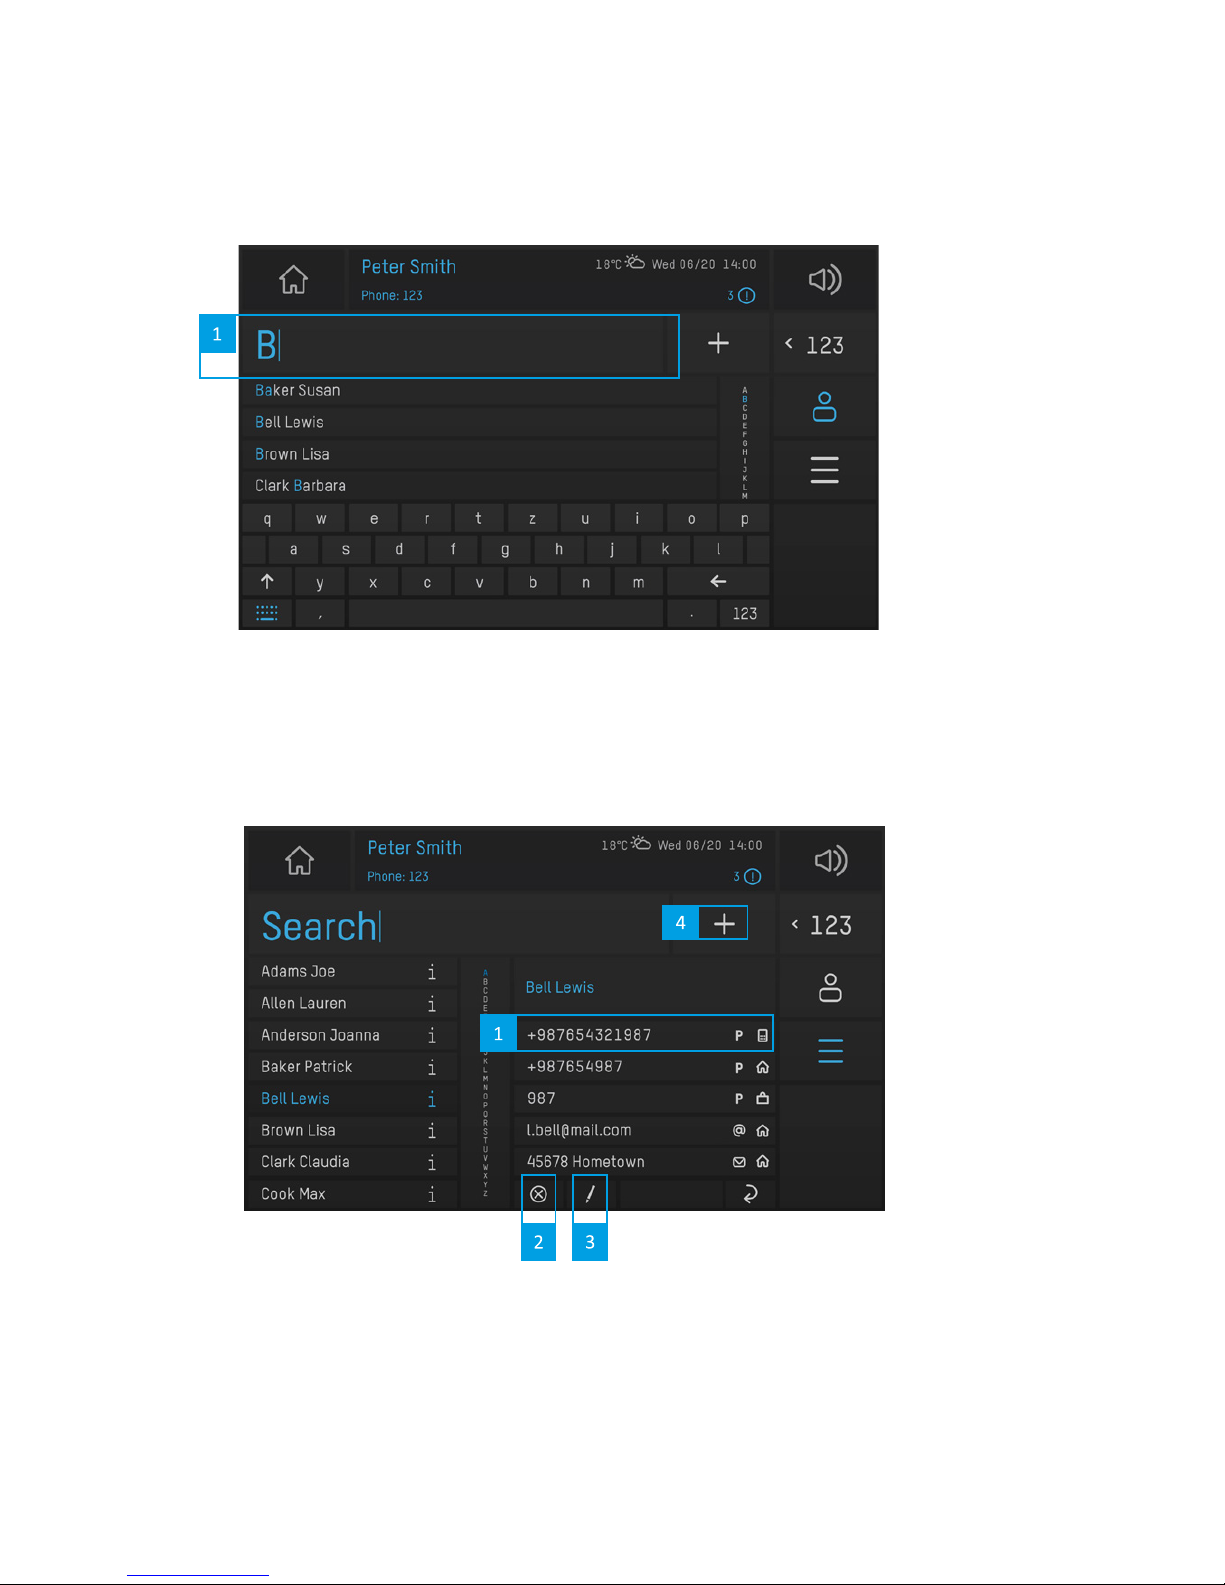
(1) Touch the edit line to switch to the keypad and enter the name you are looking for. You
can also flick through the whole address book by scrolling.
Contact Details
By touching the desired contact in your address book the contact details are displayed.
bctone | User Manual
Page 28
28
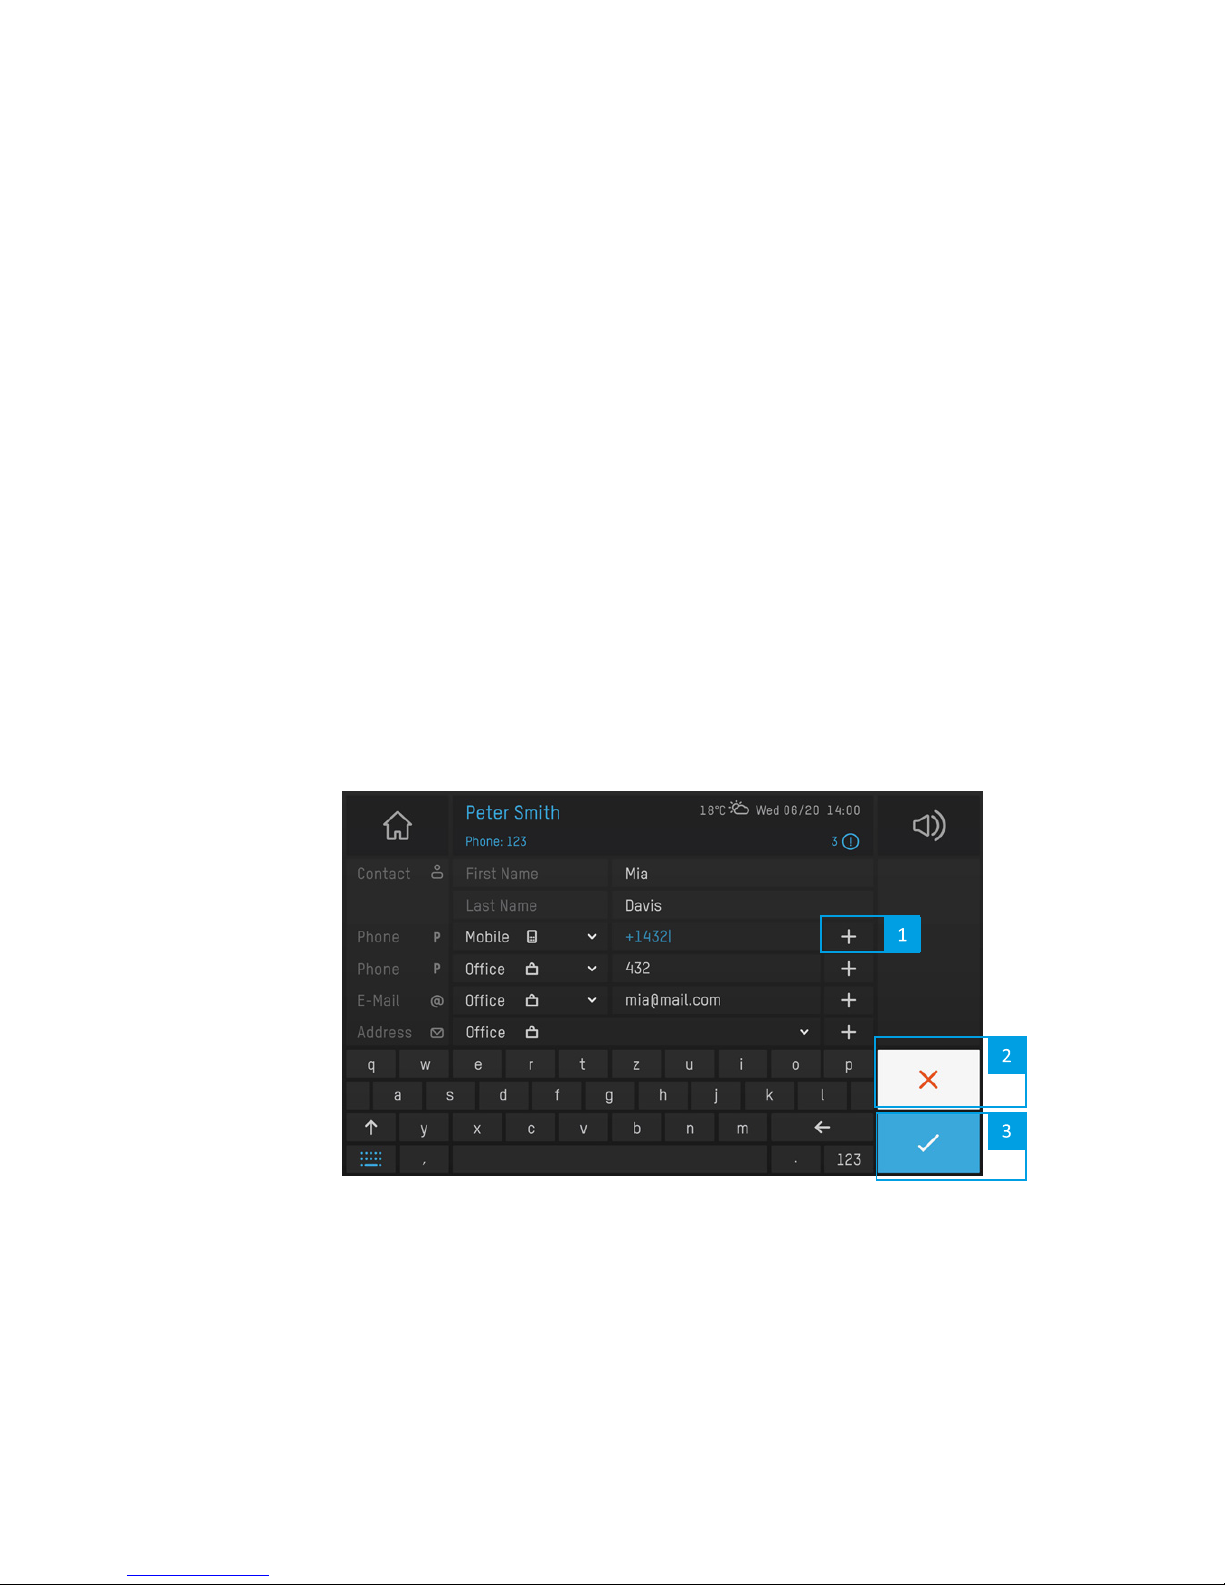
(1) Call Contact
By touching the number of the selected contact a call will automatically be initiated.
(2) Delete Contacts
To delete a single entry from your address book select the relevant contact and press X
(2). Confirm to finally delete the contact. You can delete all address book entries (irrevocably) in the ConfigWeb.
(3) Edit Contacts
To edit an existing contact select the relevant entry to access the detail view of it. By
touching the pencil icon (3) the contact details become editable. Chose the line you
want to edit by touching the according entry field.
(4) Add Contact
If you touch the + icon (1) an empty address book form will appear to be edited.
Address Book Form
If you edit or add a contact (described previously) the detail view within the address book will open. As soon as you touch the edit line the keypad will appear.
By default the address book offers one line each for phone number/SIP-URI, intercom, email
and postal address.
By pressing + (1) at the end of the relevant line, you can add an additional line if needed. To
save your entry press (3). To reject your changes press X (2).
Page 29

29
Import Contact
You can import a whole list of contacts via the ConfigWeb. Please see the according chapter.
bctone | User Manual
Page 30
30
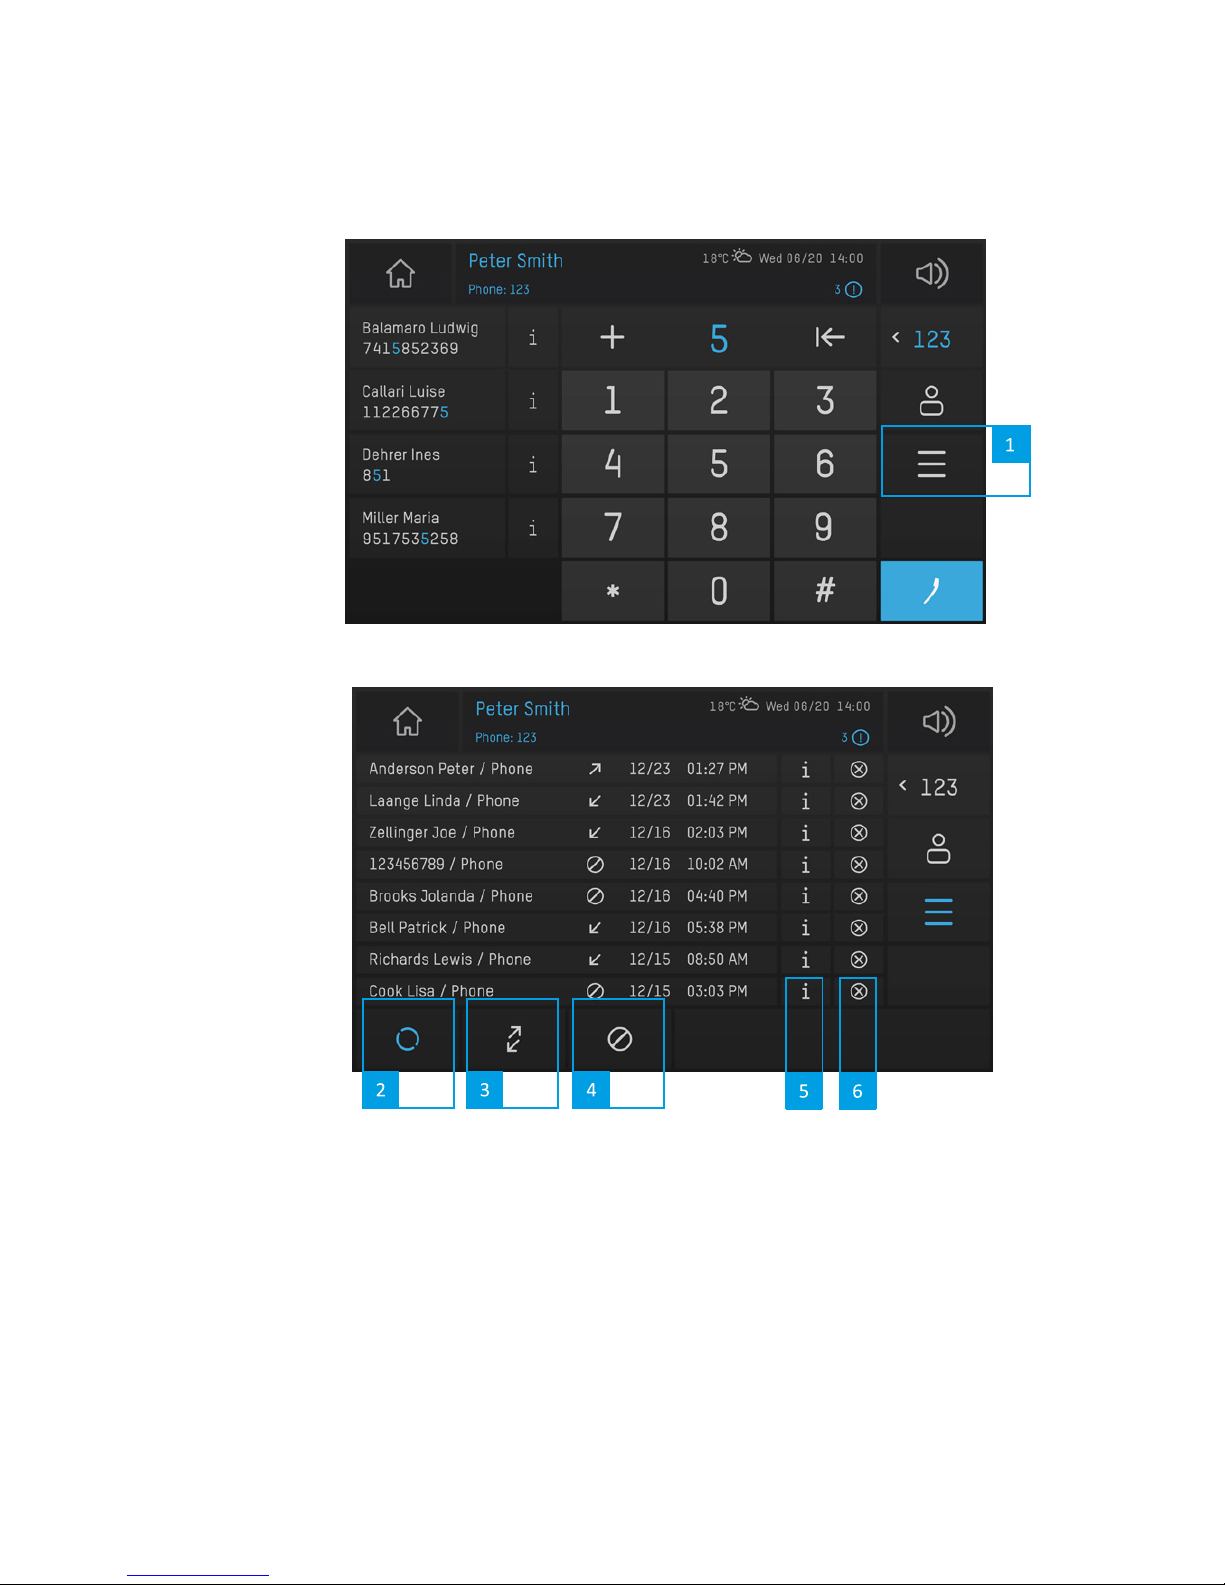
Call History
(1) You can see a list of all past calls by touching the list symbol (1) in the Call-App. All
calls are listed by default but you can filter the displayed calls
(2) for all calls
(3) for incoming and outgoing calls
(4) for missed calls
(5) touching the i-symbol will lead you to the complete call history list of this contact
(6) touching the x-symbol will delete the complete list of this specific contact. You can call
back/redial a contact out of this list simply by touching it.
Page 31

31
Configurations in ConfigWeb
Note: some configurations cannot be made directly on your bctone terminal but have to be done in ConfigWeb.
Open the internet browser on your PC and enter the IP address of your bctone terminal followed by :8080. Example: https://111.111.111.111:8080
Username: user
Password: password
Note: login details are case sensitive. Please change the login details for your ConfigWeb after your first login
under “Tasks > Password”.
All configurations and functions are explained directly in the ConfigWeb. To make changes
to your settings and configurations please follow the instructions in the ConfigWeb in the
according chapter.
Configurations
• Display
• Address Book
• Import Contacts
• Delete Imported Contacts
• Delete All Contacts
Attention: this can’t be reversed
Customization
• Call Interface
• Slide Show
Tasks
• Reboot
• Remote Connection
• Camera
• Screenshot
• Password
• Bug Report
bctone | User Manual
Page 32

32
Manufacturer’s Reference
This equipment fulfils the requirements of the EU standard 89/336 EEC in the current version (EN 55022, EN 55024). Therefore the equipment is CE-labelled. Please keep this description in safe custody.
Class B Statement (FCC)
This equipment has been tested and found to comply with the limits for a Class B digital device, pursuant to part 15 of the FCC Rules. These limits are designed to provide reasonable
protection against harmful interference in a residential installation. This equipment generates, uses and can radiate radio frequency energy and, if not installed and used in accordance with the instructions, may cause harmful interference to radio communications.
However, there is no guarantee that interference will not occur in a particular installation. If
this equipment does cause harmful interference to radio or television reception, which can
be determined by turning the equipment off and on, the user is encouraged to try to correct
the interference by one or more of the following measures:
• Reorient or relocate the receiving antenna.
• Increase the separation between the equipment and receiver.
• Connect the equipment into an outlet on a circuit different from that to which the receiver is connected.
• Consult the dealer or an experienced radio/TV technician for help.
Page 33

33
bctone | User Manual
Page 34

developed and manufactured by
bct electronic gesmbh, saalachstraße 86a, 5020 salzburg, austria
t +43 662 423518-0 | of[email protected] | www.bct-electronic.com
 Loading...