


INSTRUCTION
MANUAL
10ft Solar Oset Patio Umbrella with Cover
Ver. 1
SKY5248 + SKY5249 + SKY5250 + SKY5251 +SKY5252
SKY5253 + SKY5254 + SKY5255 + SKY5256
Solar panel
requires 6 to 7
hours of direct
sunlight to
fully charge.
Pg. 2

NOTICE
• Firmly secure all bolts, screws and knobs before use.
• Reconfirm that all bolts, screws, and knobs are secure every 90 days.
• Fasten screws loosely during initial assembly. Do not firmly tighten the screws until the item is
completely assembled.
• Be aware that some parts are heavy and have sharp edges.
• If any parts are missing, broken, damaged, or worn, stop using this product until repairs are made
and/or factory replacement parts are installed.
• Do not use this item in a way inconsistent with the manufacturer’s instructions as this could void the
product warranty.
Please retain these instructions for future reference.
TOOLS REQUIRED
WRENCH
(PROVIDED)
HARDWARE
1
M8x14mm
SCREW
8 PCS
2 PERSON
ASSEMBLY
2
M8 WASHER KNOB
8 PCS
3
APPROXIMATELY
30 MIN.
ASSEMBLY
1 PC
| 3

PARTS
A
UPPER CROSSBAR
D
POLE
G
UMBRELLA
1 PC
1 PC
B
LOWER CROSSBAR
E
BASE COVER
H
CRANK
1 PC
1 PC
C
ROTATING BASE
F
SLEEVE
I
COVER POLE
1 PC
1 PC
4 |
J
COVER
1 PC
1 PC
K
SOLAR PANEL
1 PC
1 PC
L
1 PC
LIGHT
1 PC

BEFORE FIRST USE
1. Hold the umbrella upside down and shake gently to separate the umbrella ribs. If necessary, carefully
pull the ribs apart to free them.
2. Slowly turn the crank to open the umbrella. Make sure that the ribs are not stuck together.
PRODUCT ASSEMBLY
Place the part A upper crossbar on the
part B lower crossbar.
1
Attach the part C rotating base to the
crossbars with four part 1 screws and four
2
part 2 washers.
1
A
C
B
Place the part D pole on the rotating base and attach it with four part 1 screws and four part 2
3
washers. Slide the part E base cover over the pole.
E
x4
x4
2
x4
1
x4
2
D
| 5

PRODUCT ASSEMBLY
Slide the part F sleeve onto the pole.
4
F
6 |
Insert the connector from the part G
5
umbrella into the part K solar panel.
Screw the solar panel clockwise until it
locks in place.
K
G
Firmly insert the umbrella onto the pole
6
and secure it with the part 3 knob.
3

PRODUCT ASSEMBLY
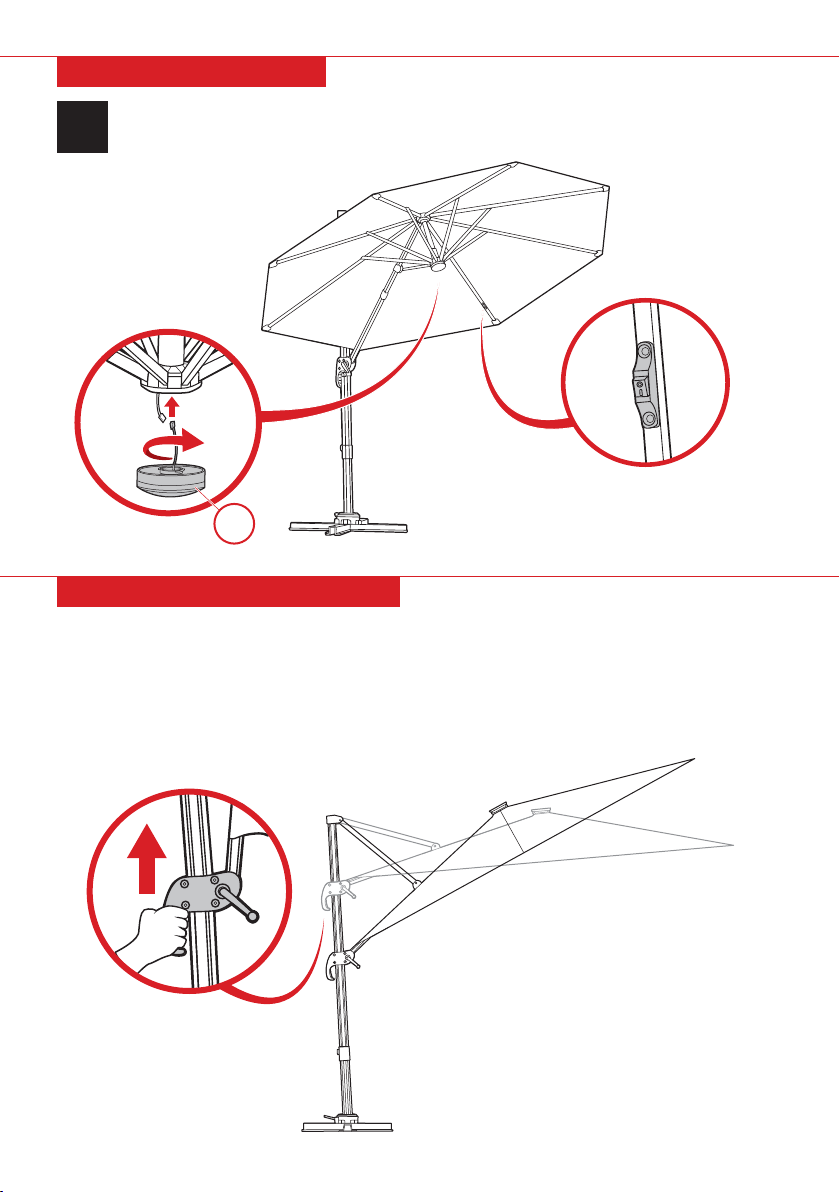
Insert the part H crank. Compress the handle and move the arm up.
Release the handle to lock it in your desired position.
7
Slowly turn the crank clockwise to open the canopy.
H
| 7
PRODUCT ASSEMBLY
Insert the connector under the canopy into the corresponding connector on the part L light.
Screw the light clockwise until it locks in place.
8
LIGHT SWITCH
L
OPERATING INSTRUCTIONS
Opening Canopy
1. Compress the handle and move the arm up.
2. Release the handle to lock it in your desired position.
3. Slowly turn the crank clockwise to open the canopy.
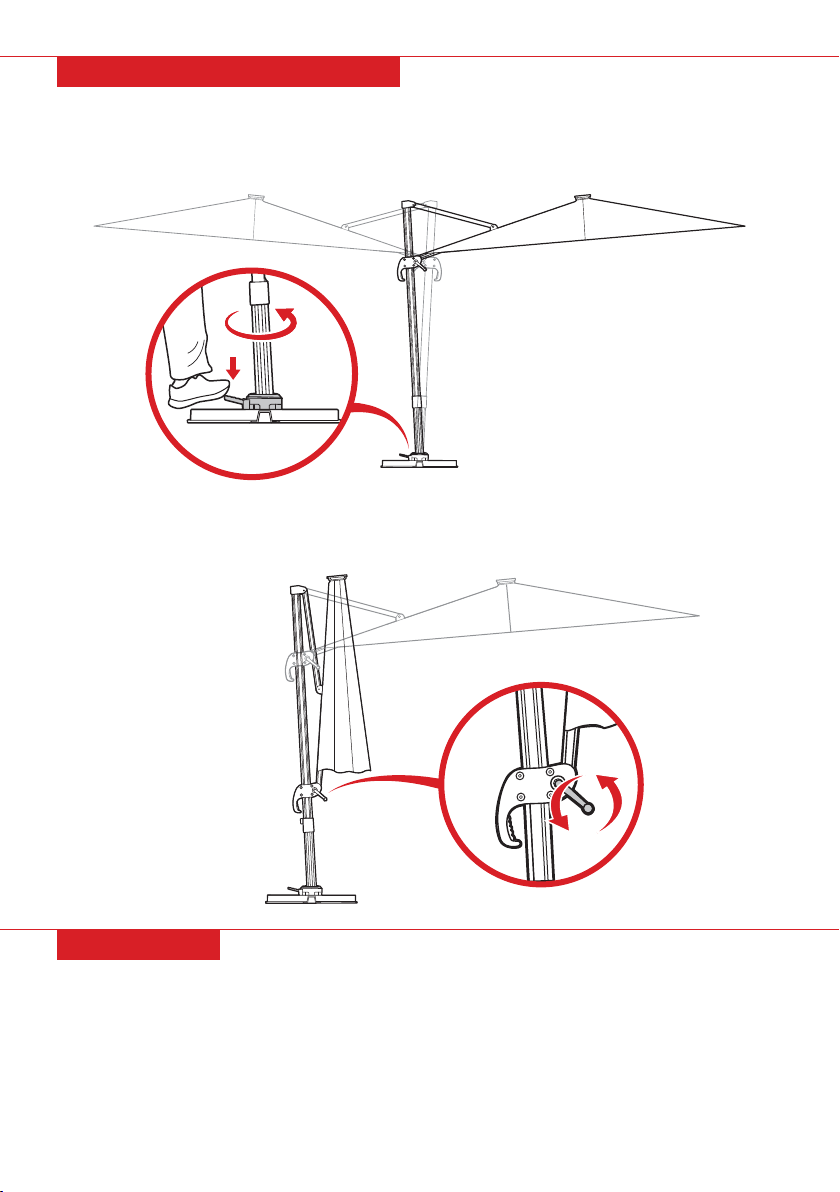
Adjusting Tilt
1. Compress the handle and move the arm up/down to adjust the tilt angle of the umbrella.
2. Release the handle to lock it in your desired position.
8 |
OPERATING INSTRUCTIONS
Rotating Canopy
• Compress the pedal on the rotating base to rotate the canopy.
Closing Canopy
• Turn the crank counterclockwise to close the canopy.
USAGE TIPS
• Umbrella base weights are not included. Do not use this umbrella without umbrella base weights.
• Place umbrella on a stable and level surface.
• Umbrella is suitable for rain showers and light wind.
• Do not use umbrella in inclement weather, such as snow, heavy rain, thunderstorms, or strong wind.
• Close the canopy when umbrella is not in use.
| 9
LED LIGHTS
• Light switch is located under the canopy (see step 8).
• Solar panel requires 6 to 7 hours of direct sunlight to fully charge.
• LED lights last for 6 to 7 hours on a single charge.
• For better charging eciency, make sure lights are switched o when charging.
• If lights are not working, fully charge the solar panel and try again.
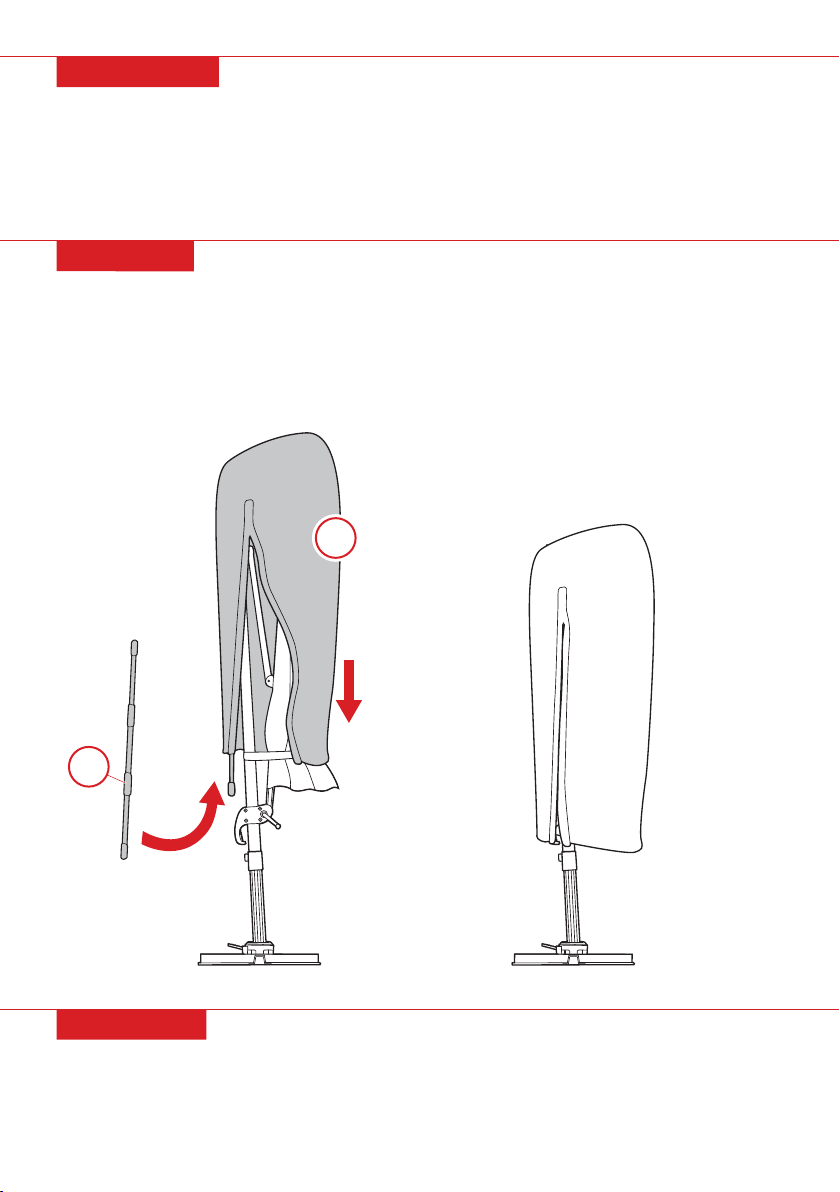
STORAGE
1. Close the canopy. Compress the handle and move the arm all the way down.
2. Fasten the strap around the canopy.
3. Assemble the part I cover pole. Slide the pole into the part J cover.
4. Place cover and pull the string to close the zipper. Remove the cover pole.
5. Store umbrella in a dry area shielded from the weather.
J
I
CLEANING
• Wipe clean with mild detergent, warm water, and a soft cloth.
• Do not clean with abrasive materials, harsh detergents, or corrosive liquids like gasoline or acetone.
10 |

Earn points while you shop. Join today!
Give your friends 15% o their first order! For each
successful referral you’ll receive 100 points.
bestchoiceproducts.com
HELP CENTER
Question about your product? We're here to help. Visit us at:
help.bestchoiceproducts.com
CHAT
US!
Product InquiryChat Support
Orders FAQ
Product Assembly
Returns & Refunds
PRODUCT WARRANTY INFORMATION
All items can be returned for any reason within 60 days of the receipt and will receive a full refund as long
as the item is returned in its original product packaging and all accessories from its original shipment are
included. All returned items will receive a full refund back to the original payment method. All returned
items will not be charged a re-stocking fee.
All returned items require an RA (Return Authorization) number, which can only be provided by a Best
Choice Products Customer Service Representative when the return request is submitted. Items received
without an RA may not be accepted or may increase your return processing time. Once an item has been
received by Best Choice Products, refunds or replacements will be processed within 5 business days.
All returns must be shipped back to the Best Choice Products Return Center at the customer’s expense. If
the reason for return is a result of an error by Best Choice Products then Best Choice Products will provide
a pre-paid shipping label via email. Boxes for return shipping will not be provided by Best Choice Products,
and is the customer’s responsibility to either use the original shipping boxes or purchase new boxes.
Pictures may be required for some returns to ensure an item is not damaged prior to its return. Items
returned are not considered undamaged until they are received by Best Choice Products and verified as
such. All damages to items are the customer’s responsibility until the item has been received by and
acknowledge by Best Choice Products as undamaged.
WARNING
Manufacturer and seller expressly disclaim any and all liability for personal injury, property damage or
loss, whether direct, indirect, or incidental, resulting from the incorrect attachment, improper use,
inadequate maintenance, or neglect of this product.
 Loading...