

Page 1

- R19 -
User Manual
User Manual 1
Page 2

Contents
Introduction
Warranty
Conformity
Specifications
IDEX / FFF Technology
Safety
Safety Signage
Setting Up Your Printer
Unboxing
Contents
Set up
Getting started
Setup Assistant
Mirror and Duplication modes
Installing shims
First Printing
Starting Out With BCN3D Cura
Your first dual print
First Mirror/Duplication print
Firmware Upgrade
Functionalities
3
3
7
8
9
9
11
12
12
13
14
20
20
23
25
27
28
28
32
33
35
Operation and maintenance
Change hotend
Clean and lubricate axes
Hotend cleaning
Filament
Maintenance Plan
BCN3D Technologies Technical Assistance Services
Diagram Of The Sigma R19
Terms And Conditions
Open Source
37
37
43
47
49
52
53
54
56
58
User Manual 2
Page 3

Introduction
Warranty
BARCELONA THREE DIMENSIONAL PRINTERS,S.L.
provides this Warranty to the consumers of the BCN3D
brand products included in the sales package (“Product”).
This Warranty will be valid only in the country in which
the sale of the Products has been made. BARCELONA
THREE DIMENSIONAL PRINTERS,S.L. hereby guarantee
that, within the warranty period, BARCELONA THREE
DIMENSIONAL PRINTERS,S.L. or an authorized service
company will correct, within a reasonable period of time,
the defects of materials or manufacturing detected in the
Products, according to the clauses set out below.
Technical Support
For any questions or problems with
BCN3D Products, please contact us at:
c/ Esteve Terrades, 1
Edifici RDIT del PMT, 2a Planta, oficina 212
08860 Castelldefels, Barcelona (España)
email: support@bcn3dtechnologies.com
Tel: +34 934137088
BARCELONA THREE DIMENSIONAL
PRINTERS,S.L.
VAT: ESB67235069
List of Consumable components
This document lists the Consumable
components that, due to their natural
detoriotation, are excluded from the
Warranty: Hotends, Teflon Tube, Glass
printing surface, Filament Spools,
Printing adhesive (glue stick), Printed
Parts, Calibration Gauges, Shims,
Lubrication Kit.
All the products purchased at BCN3D Technologies are
covered by the Law 23/2003 of July 10 of Warranties
on the Sale of Consumer Goods (consolidated in
Royal Legislative Decree 1/2007). Also covered by the
Directive 99/44 /CE of the European Parliament and of
the Council of 25 May 1999 on certain aspects of the
sale and warranties of consumer goods, as amended by
the Directive 2011/83/UE of the European Parliament
European Parliament and the Council of 25 October
2011 on the rights of consumers.
The products acquired to integrate them in a productive
or commercial process, will have a warranty period of not
less than six months as provided in the articles 1484 to
1491 of the Civil Code for hidden defects or defects.
Product Warranty Period
As previously stated, all products purchased directly
from BCN3D Technologies will have a 24-month
warranty for all those purchases made within the
European Union, and 12 months for the rest of the
countries. The warranty will come into force from the
date on which the product was purchased for the first
time by the end customer (invoice date). If you do not
have the purchase invoice, the manufacturing date of
the product registered by BCN3D Technologies will be
considered as the beginning of the warranty period.
User Manual 3
Page 4

Warranty
Conditions to exercise the warranty
The BCN3D warranty is granted under the following
conditions:
1 Acquire the product through BCN3D Technologies
or one of its authorized resellers (See https://www.
bcn3dtechnologies.com/en/reseller/ to see the
addresses of authorized BCN3D Distributors).
2 Be within the established deadlines, which are:
• 2 years from the invoice date for
purchases within the EU.
• 1 year from the invoice date for
purchases outside the EU.
3 The product must be packed in its original packaging.
Otherwise, BCN3D Technologies reserves the right
to accept or reject the return, or if it is estimated, a
depreciation of the product.
4 The product has been sold as new, not as
reconditioned or used.
5 The serial number of the product to be returned
will have to correspond to the one in the BCN3D
Technologies records.
6 Unless specifically requested by BCN3D
Technologies, nothing else should be sent apart
from the Product. All accessories and removable
storage devices such as SD memory cards must be
removed from the product. BCN3D Technologies is
not responsible for the loss, damage or destruction
of accessories or removable storage devices, unless
caused intentionally or negligently by BCN3D
Technologies.
8 If a part of the Product is repaired or replaced during
the warranty period, the remaining warranty period
for the entire product will apply to this part. However,
repairing and / or replacing a part will not extend the
warranty period.
BCN3D Technologies official Distributors are
responsible for the warranty on behalf of BCN3D
Technologies. Therefore, any warranty notification must
be made directly to the BCN3D Technologies official
Distributor where the product was originally purchased.
Any warranty claim must first be acknowledged
and accepted, either by BCN3D Technologies or by a
Distributor of BCN3D Technologies. The Distributor
is obliged to rectify any damage for free according to
this guarantee. In the event that the defect can not be
repaired, the Distributor, within the warranty period,
will replace the Product for an identical product, or if the
product is no longer manufactured, for a similar product
of the same value or offer an adequate refund.
Depending on the country, the warranty may not
automatically include the costs incurred for the shipping
of the defective Products for repair or replacement.
How to exercise the warranty?
In order to exercise the warranty, you will have to contact
us to support@bcn3dtechnologies.com.
1 You will receive a document by email to be completed
(RMA), so that we can authorize the reparation.
2 Once the RMA is completed, you must send it to
support@bcn3dtechnologies.com duly completed.
7 Customers are allowed to use third-party materials,
accessories, etc, since that does not cancel the
warranty. As long as the use of these elements does
not cause damage to the Product, the part (s) affected
by this damage will be excluded from the warranty.
3 The technical support department will assess the
situation and within 48 hours will tell you whether or
not we accept your return request. If accepted, it will
assign you an RMA number with a validity of 30 days.
User Manual 4
Page 5

Warranty
4 The product must be sealed in its original packaging.
In the case of not returning the order in its original
and sealed packaging, BCN3D Technologies reserves
the right to accept or reject the return or establish a
depreciation of the product.
5 Once the product has been packed, we will send a
transporter that will pick up the goods to be returned
perfectly packed, being able to desist from the
collection in case of improper packing. It is important
that you place the RMA number visible on the package.
6 Once the goods are received in our facilities, our
technical service will inspect them and determine
whether the product is covered by warranty or not.
7 If the user does not accept the reparation, BCN3D
Technologies will return the product by the agreed
method of RMA. If the user does not collect the product,
or if it can not be sent to the address provided by the
user, BCN3D Technologies will contact the user by the
means that he considers convenient and previously
provided. If the user does not collect the product during
the 90 days following the moment of sending the
information, BCN3D Technologies reserves the right
to invoice the cost of storage, disposal of the product
according to the applicable laws and regulations, and
any law for non-payment .
3 The damages caused by the non-compliance of the
maintenance plan exposed in the User’s Manual of the
Product.
4 The malfunctions or damages caused by
modifications, alterations or repairs carried out by any
individual or company not authorized by BARCELONA
THREE DIMENSIONAL PRINTERS,S.L., being
excluded from this assumption the replacements of
consumables.
5 Damages caused by unusual failures in the electrical
network.
6 Damage caused by abuse, misuse, accident or
negligence when using the Product.
7 Effects derived from the Product’s exposure to
floods, fire, humidity, spillage of food or chemical
compounds, corrosion, oxidation, extreme atmospheric
conditions or any other agent external to the Product.
8 Damages derived from the use of Software other
than that recommended by BCN3D Technologies.
9 Damages caused by not using materials
recommended by BCN3D Technologies.
10 The components considered as Consumables, listed
in the attached document.
Warranty exclusions
This Warranty does not cover:
1 Defects caused by inappropriate transportation
(without original packaging) or handling of the Product
(including without limitation, defects caused by sharp
elements, cutting, bending, compression or fall).
2 The wear and tear caused by the use of the Product,
including, but not limited to, the wear of moving parts,
control panels or elements that interact with the
operation of the Product.
11 Any product in which the serial number is not
visible.
User Manual 5
Page 6

Warranty
Limitations and liability exemptions
This Warranty is the sole and exclusive Warranty of
BARCELONA THREE DIMENSIONAL PRINTERS,S.L. and
the sole and exclusive responsibility of BARCELONA
THREE DIMENSIONAL PRINTERS,S.L. for the defects
present in its Products. Therefore, this Warranty
replaces any other guarantee issued by BARCELONA
THREE DIMENSIONAL PRINTERS,S.L., whether oral or
written on any method.
However, this Warranty does not limit either the
consumer’s rights, specified in current legislation, or the
rights against the seller, also set out in the legislation.
BARCELONA THREE DIMENSIONAL PRINTERS,S.L. is
not responsible in any case for the loss of business,
loss of contracts, loss of profits, loss of savings,
increase of costs or expenses for the use of its
Products. In the same way, BARCELONA THREE
DIMENSIONAL PRINTERS,S.L. rejects the responsibility
of any indirect, accidental or collateral damage caused
by the use of its Products.
User Manual 6
Page 7
Conformity
The BARCELONA THREE DIMENSIONAL PRINTERS,S.L. declares that the Sigma R19 printer complies with the
essential requirements and any other applicable or mandatory provisions of the Directives.
It complies with the essential requirements of the European Directives:
2006/42/CEE Machinery Directive
2014/35/UE Low Voltage Directive
2014/30/UE Electromagnetic Compatibility Directive (EMC)
2011/65/UE Restrictions on the use of hazardous substances in electrical and elec-
tronic equipment (RoHS)
The Sigma R19 printer has been manufactured in compliance with the following harmonised standards, and consequently conforms to the essential requirements established by the Directives:
2006/42/CEE UNE-EN ISO 12100:2012; UNE-EN ISO13732-1 :2008; EN ISO 7010:2012
2014/35/UE UNE-EN 60204-1;UNE-EN 60947-3:2009
2014/30/UE UNE-EN 55022:2011; UNE-EN 55024:2011; UNE-EN 61000-4-3-2:2007
Changes / modifications not approved by the responsible party could void the user’s authority to operate the
equipment.
This equipment has been tested and found to comply with the limits for a Class B digital device, pursuant to part
15 of the FCC Rules. These limits are designed to provide reasonable protection against harmful interference in a
residential installation. This equipment generates, uses and can radiate radio frequency energy and, if not installed
and used in accordance with the instructions, may cause harmful interference to radio communications.
However, there is no guarantee that interference will not occur in a particular installation. If this equipment does
cause harmful interference to radio or television reception, which can be determined by turning the equipment off
and on, the user is encouraged to try to correct the interference by one or more of the following measures:
• Reorient or relocate the receiving antenna.
• Increase the separation between the equipment and receiver.
• Connect the equipment into an outlet on a circuit different from that to which the receiver is connected.
• Consult the dealer or an experienced radio/TV technician for help.
REI-RAEE: 6989
BARCELONA THREE DIMENSIONAL PRINTERS,S.L.
Edif. PMT - RDIT, Carrer d’Esteve Terradas, 1, 08860 Castelldefels, Barcelona
Tel: +34 934 13 70 88
www.bcn3dtechnologies.com
User Manual 7
Page 8

Specifications
Manufacturing technology
Architecture
General dimensions
Weight
Printing volume
Number of extruders
Nozzle diameter
Layer height
Positioning resolution
Operating temperature
Maximum extruder temperature
Maximum printing surface temperature
Filament diameter
Fused filament fabrication (FFF)
Independent dual extruder (IDEX)
465 mm x 440 mm x 680 mm (fully assembled)
15 kg (without filament spools)
210 x 297 x 210 mm
2
0.3 / 0.4 standard / 0.5 Special / 0.6 / 0.8 / 1mm
0.05-0.5 mm (depending on the nozzle diameter)
Axis X: 0.0125 mm
Axis Y: 0.0125 mm
Axis Z: 0.001 mm
15 ºC - 35 ºC
290 ºC
100 ºC
2.85 ± 0.05 mm
Compatible material
Electronics
Connectivity
Firmware
Operating sound
Compatible files
Software preparation files
Power supply
Electrical energy consumption
PLA / ABS / Nylon / PET-G / TPU / PVA / Composites / Others
BCN3D Electronics
SD card (autonomous operation), USB
BCN3D Sigma - Marlin
50 dBA
gcode
Recommended: BCN3D Cura
Compatible: Slic3r, Simplify3D,...
AC 84–240 V, AC 3.6-1.3A, 50–60 Hz
240W
User Manual 8
Page 9
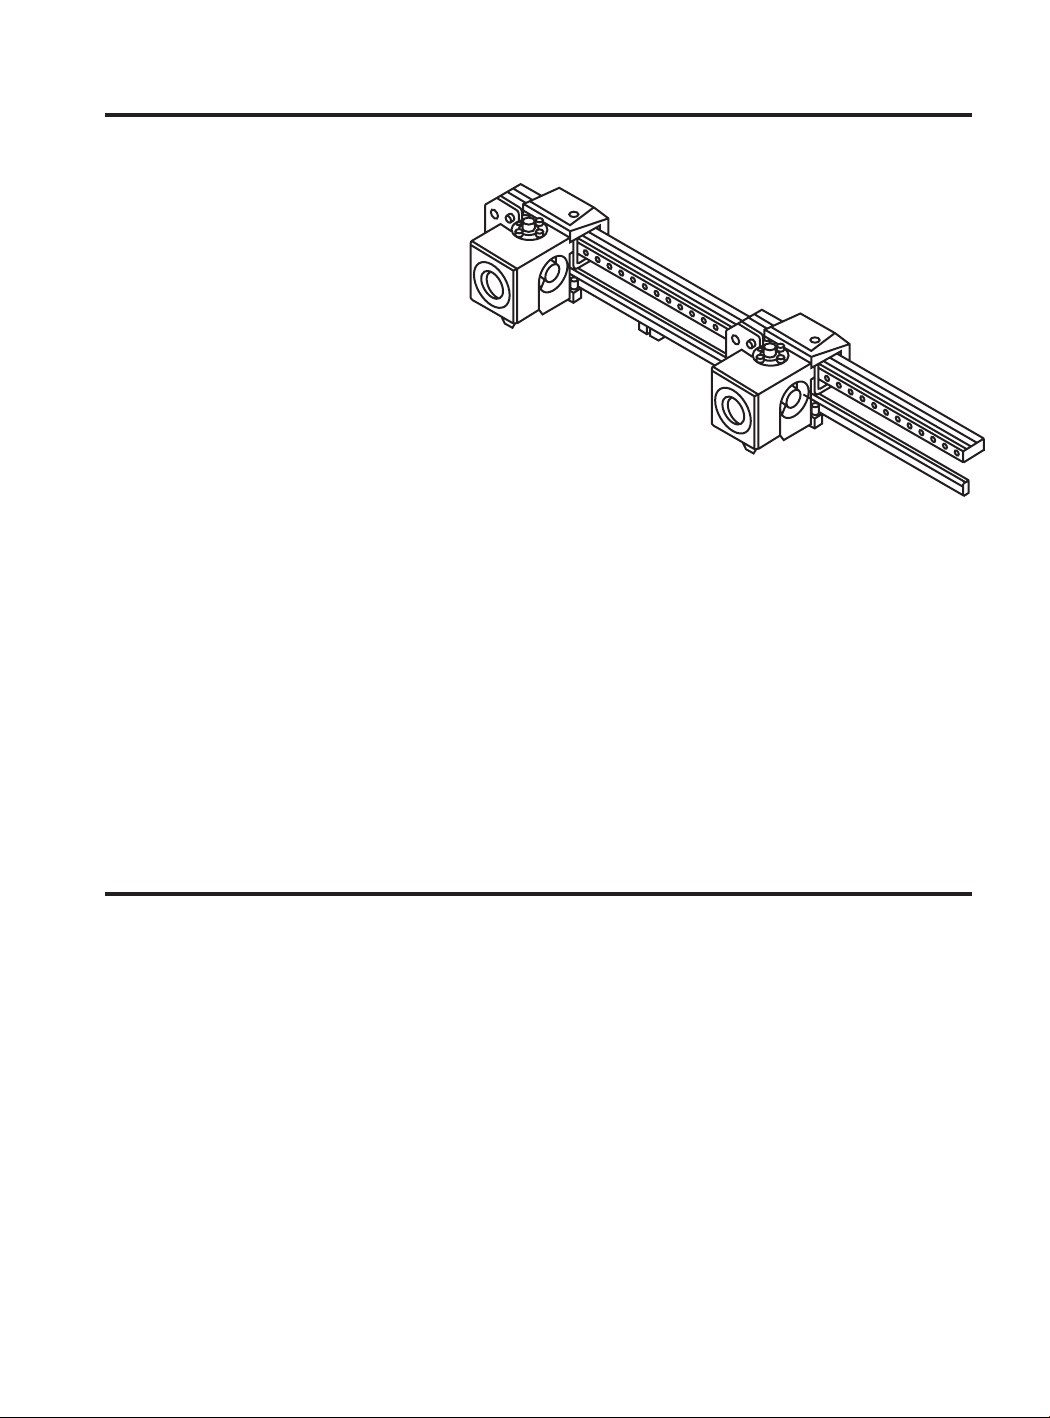
IDEX / FFF technology
The Sigma R19 is a 3D printer which uses
fused filament fabrication (FFF) technology,
which manufactures objects by depositing
molten material in a series of layers. Objects
are created using a digital model of the object,
which is sliced into thin layers. When printing
the extruder print head moves along the axis
to deposit the material for one layer at a time,
before moving slightly upwards to begin printing
a new layer. This process is repeated until the
object has been completed.
Since FFF technology requires deposite material on top of plastic previously
extruded, certain complex geometries with overhangs require additional support
structures to be successfully printed. However, printing supports with the same
material of the model can result in many post-processing problems.
The Independent Dual Extruder System (IDEX) is BCN3D’s unique approach to avoid this issue and also offers a
bunch of new key features. The two extruders are controlled independently, so that when one extruder is not being
used it can be kept away from the printing area to prevent the plastic from oozing onto the object and spoiling the
final result.
Having two independent extruders offer the user the ability to print, not only with soluble supports, but also multimaterial objects, print in two different colors or even combine different nozzle sizes to get more resistant parts or
cut down the printing process.
Safety
To avoid potential residual risks the user should read and understand the following safety measures (you are
strongly advised to read this before using the machine).
To highlight the areas where extra care should be taken, safety alert stickers have been affixed to the relevant parts
of the machine to warn the user of potential hazards.
Any modifications made to the machine without the manufacturer´s approval will invalidate the product´s
Declaration of Conformity (CE) and warranty.
Consequently, the BARCELONA THREE DIMENSIONAL PRINTERS,S.L. ARE EXEMPT FROM ANY LIABILITY IF THE
USER DOES NOT FOLLOW THE INSTRUCTIONS FOR USE:
User Manual 9
Page 10
Safety
Very important. As with any other appliance, do not touch the terminals of the mains, the
switch, or the power supply. There is a risk of electrocution. The other cables of the machine
operate at 24V and there is no risk whatsoever.
Connect the machine to an electrical outlet according to the current legislation.
Do not connect or disconnect any device and/or electrical connector when the machine is
connected to the power supply.
Keep all of your body and all objects away from the moving parts of the machine when they are
moving.
Do not touch the hot parts (heated bed and hot-ends) when the machine is switched on, and
wait 15 minutes after it has been switched off before touching them.
Handle the glass printing surface with care. Make sure it is not dropped or hit with anything as
this could seriously damage it.
The printing materials are not innocuous and emit toxic fumes. Always print in open or wellventilated spaces and use a protective mask.
Do not breathe closer than 25 cm from the tool head when printing.
Supervise the printer while it is printing to make sure it is working properly.
In the event of emergency, stop the machine immediately by pressing the switch, and
disconnect the power supply.
This device is not a toy. It should only be used by minors under 16 under the supervision of an
adult.
The spatula is a dangerous tool that can cause injuries. Use it only to remove plastic rests
when running the calibration assistant.
User Manual 10
Page 11
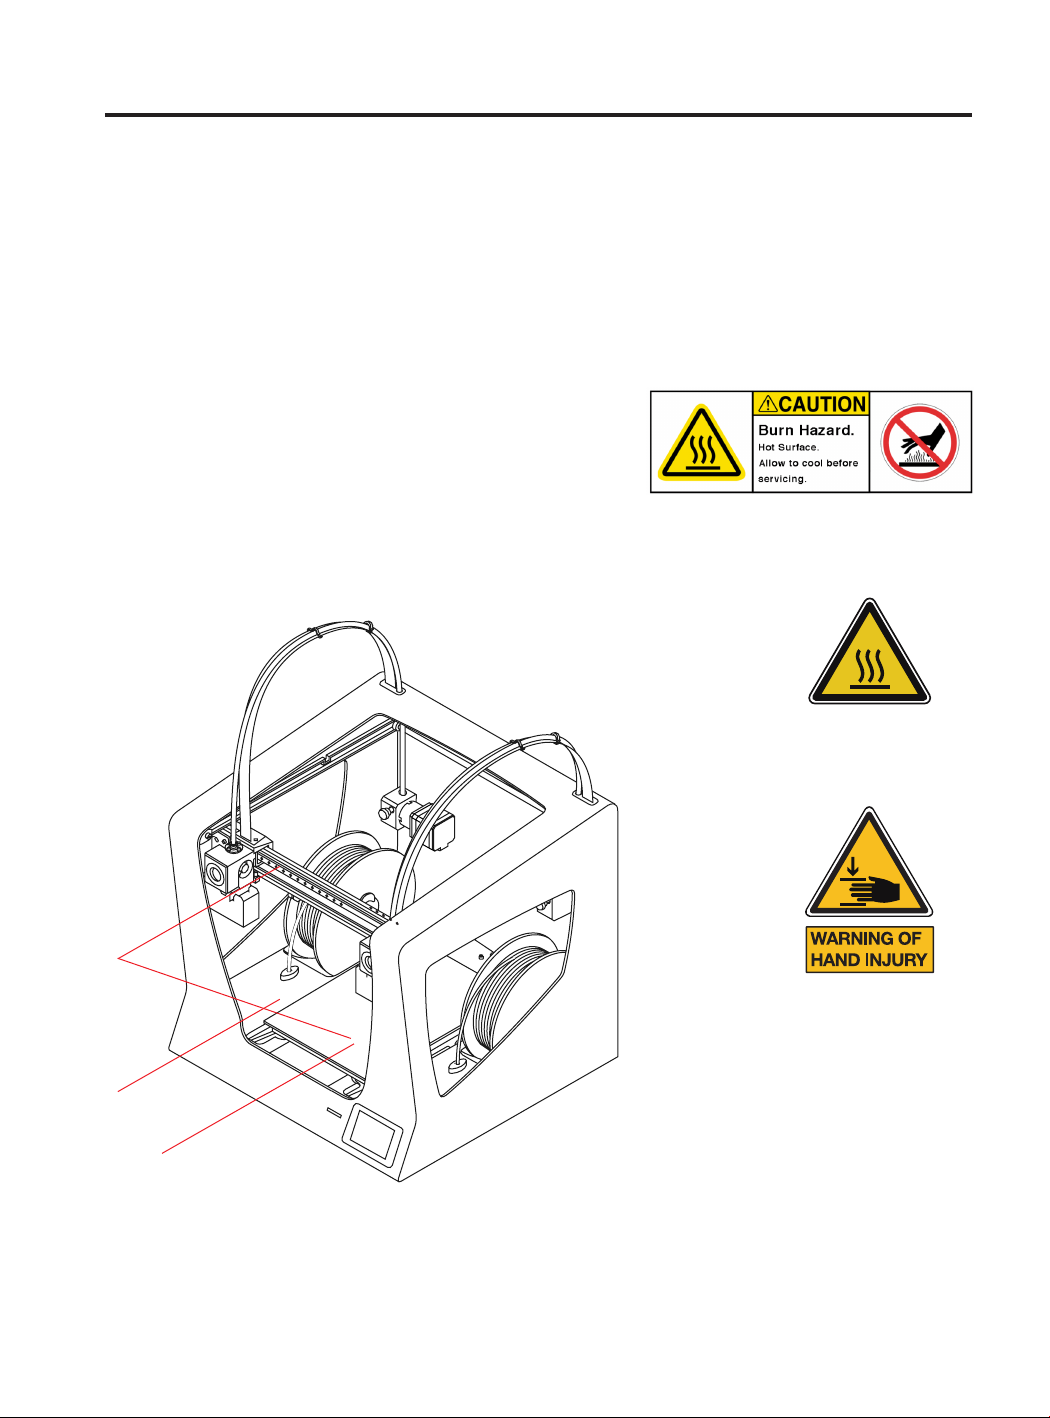
Safety signage
The following stickers have been affixed to the printer
to warn users about the hazardous areas of the
machine, and actions which are not recommended as
they will stop the machine from working properly.
1 Pictogram: Danger. Hot
surface.
2 Pictogram: Danger. Will
cause burns.
3 Pictogram: Risk of trapped hand/ finger.
2
3
1
User Manual 11
Page 12
Setting up your printer
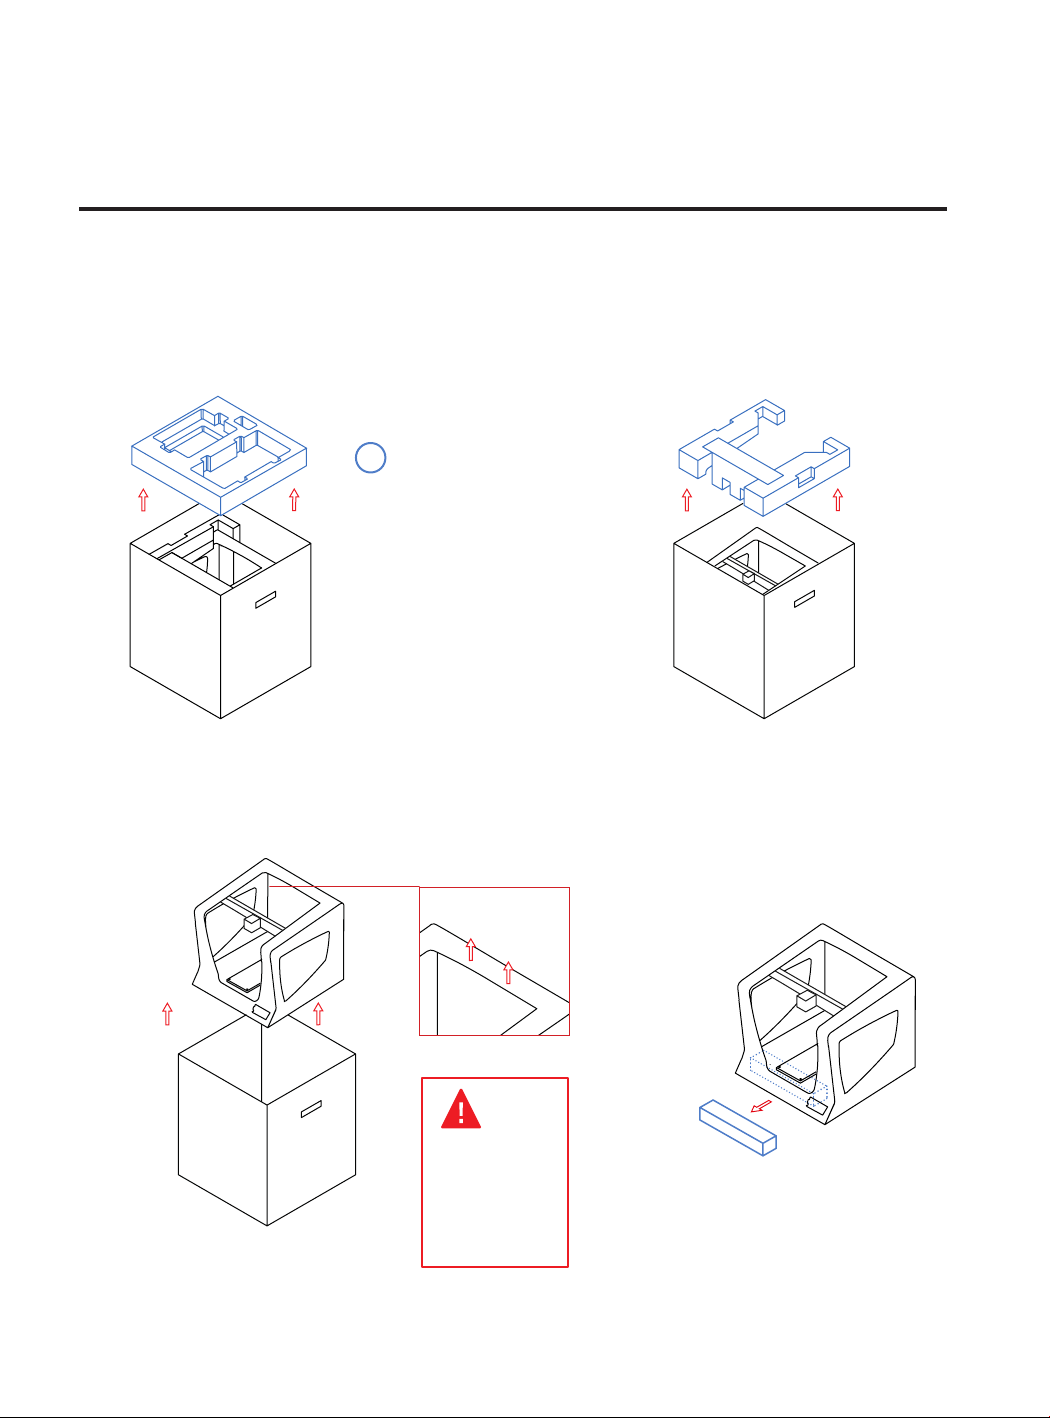
Unboxing
The Sigma R19 is delivered in a well-secured cardboard box which measures 550 x 660 x 570mm. We recommend
you to follow the steps below in order to unpack your 3D printer correctly:
1. 2.
i
Retain packaging for
warranty service.
3. 4.
Take out the printer with the plastic bag. Finally, remove the plastic bag,
the foam under the platform and
the Silica Gel bag fastened on the
right side.
Proper zone
to take out the
printer with
your hands.
User Manual 12
Page 13
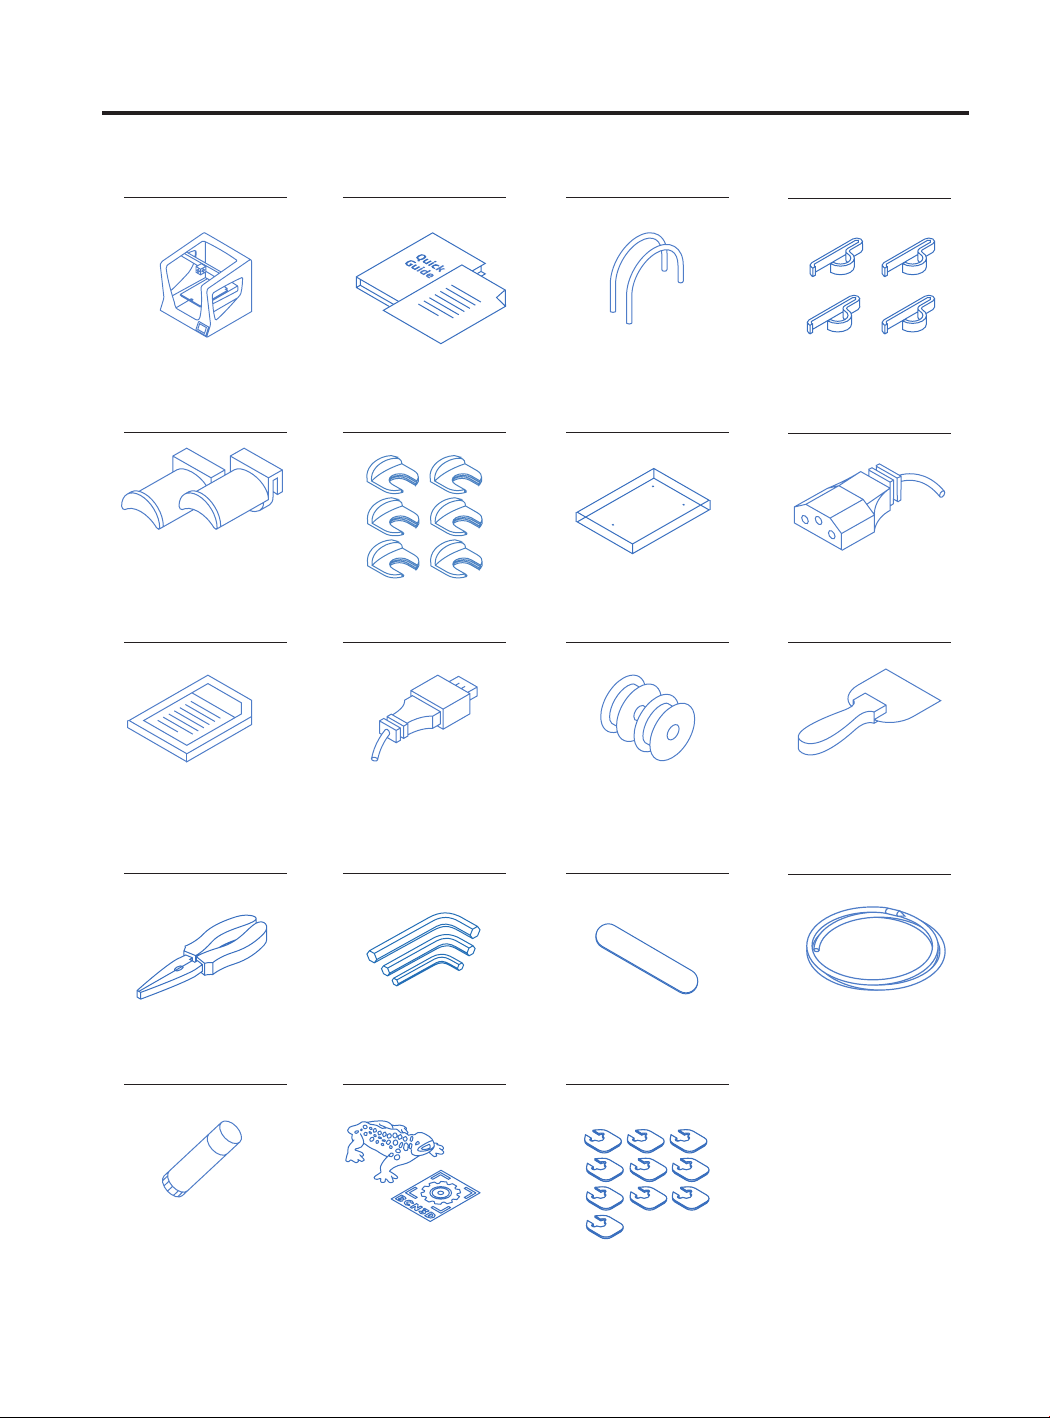
Contents
Sigma R19:
with 0.4mm hotends
Quick start guide and warranty
2 Teflon tubes
4 Flat cable clips
2 Spool holders
SD card
Pliers
6 Clips
USB cable
3 Allen keys
Glass printing surface
2 PLA spools
1 Calibration gauge
Power Cable
Spatula
Nylon cleaning filament
Printing adhesive (glue stick)
Sample print/Sticker
10 Shims
User Manual 13
Page 14
Set up
In order to ensure the safe packaging and transport of
your printer some of the components have been sent
unassembled. Before starting to print with the Sigma
R19 printer you need to assemble them in order to
complete the setting up process.
If you have any queries while assembling the machine,
please contact BCN3D Technologies technical service at
support@bcn3dtechnologies.com.
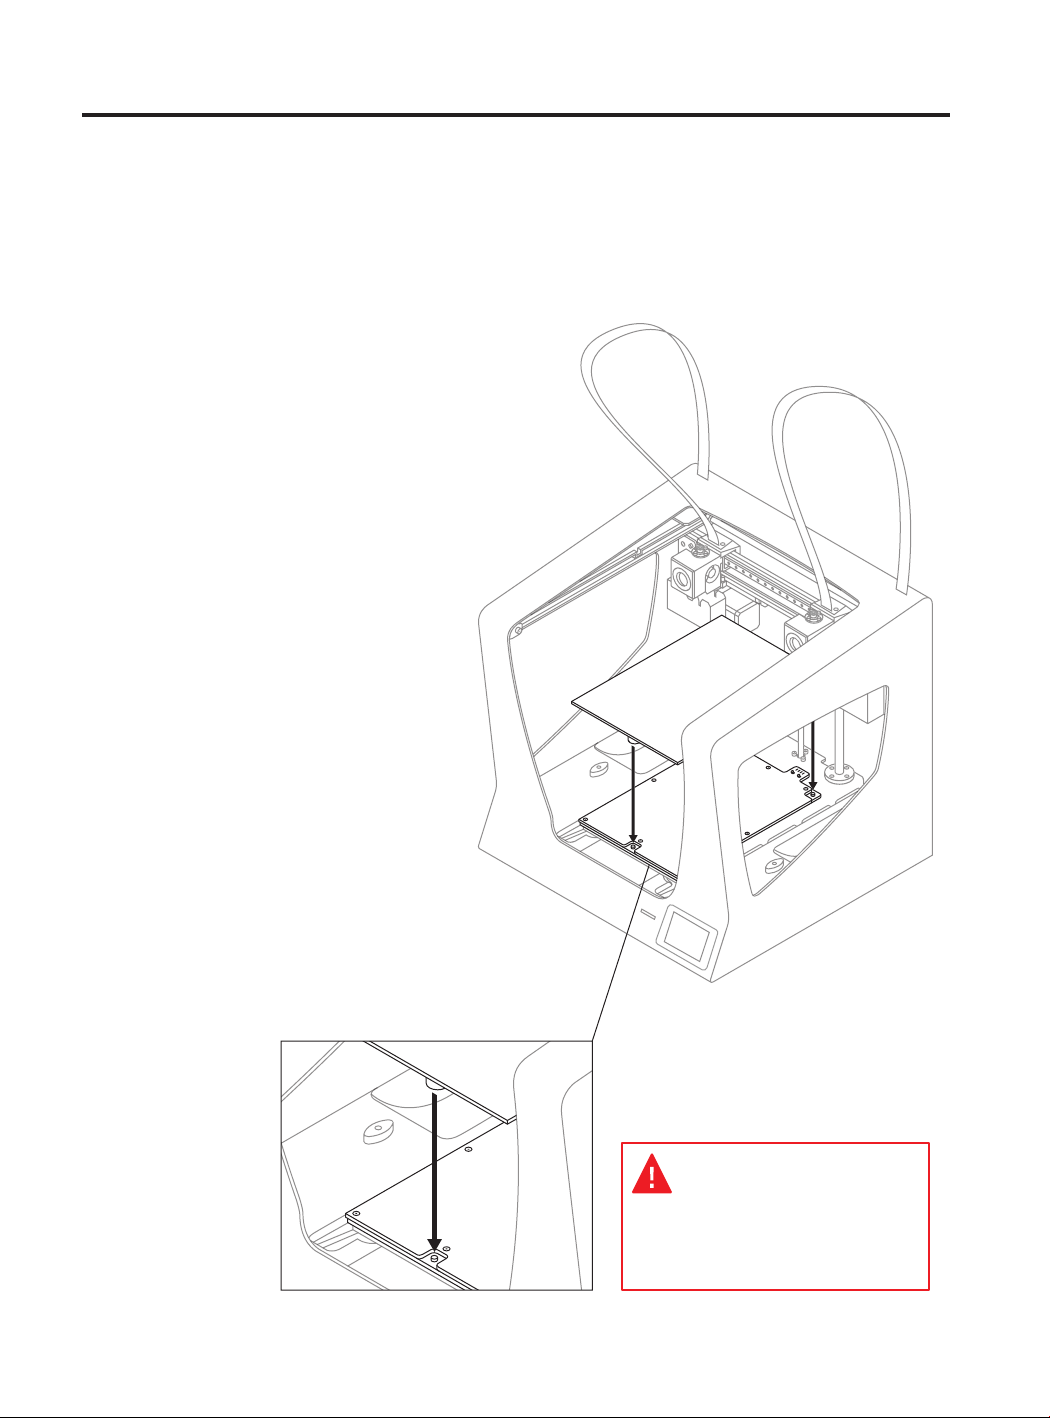
Follow the steps below to prepare the printer:
1.
Place the glass printing
surface on the platform. The
slots must match.
The glass printing surface must be
handled with care. In case of breakage,
may cause injuries.
User Manual 14
Page 15
Set up
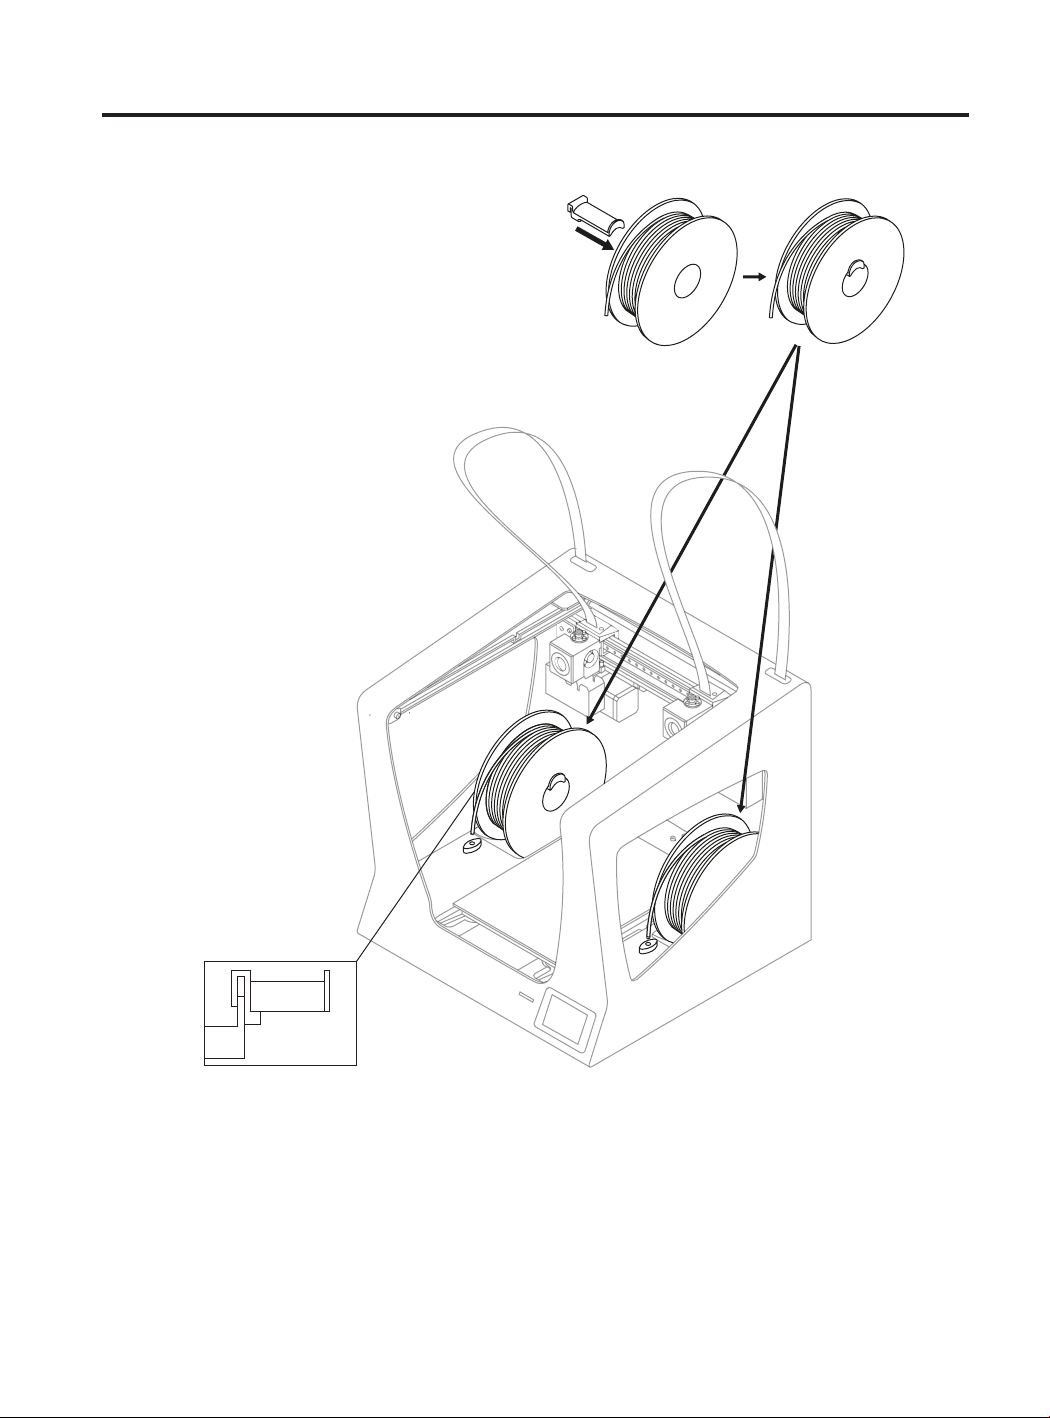
2.
Place the spools holders into the spools.
3.
Fit them into the indicated holes.
User Manual 15
Page 16
Set up
4.
Move Y axis manually
towards the front in order to
work more comfortably.
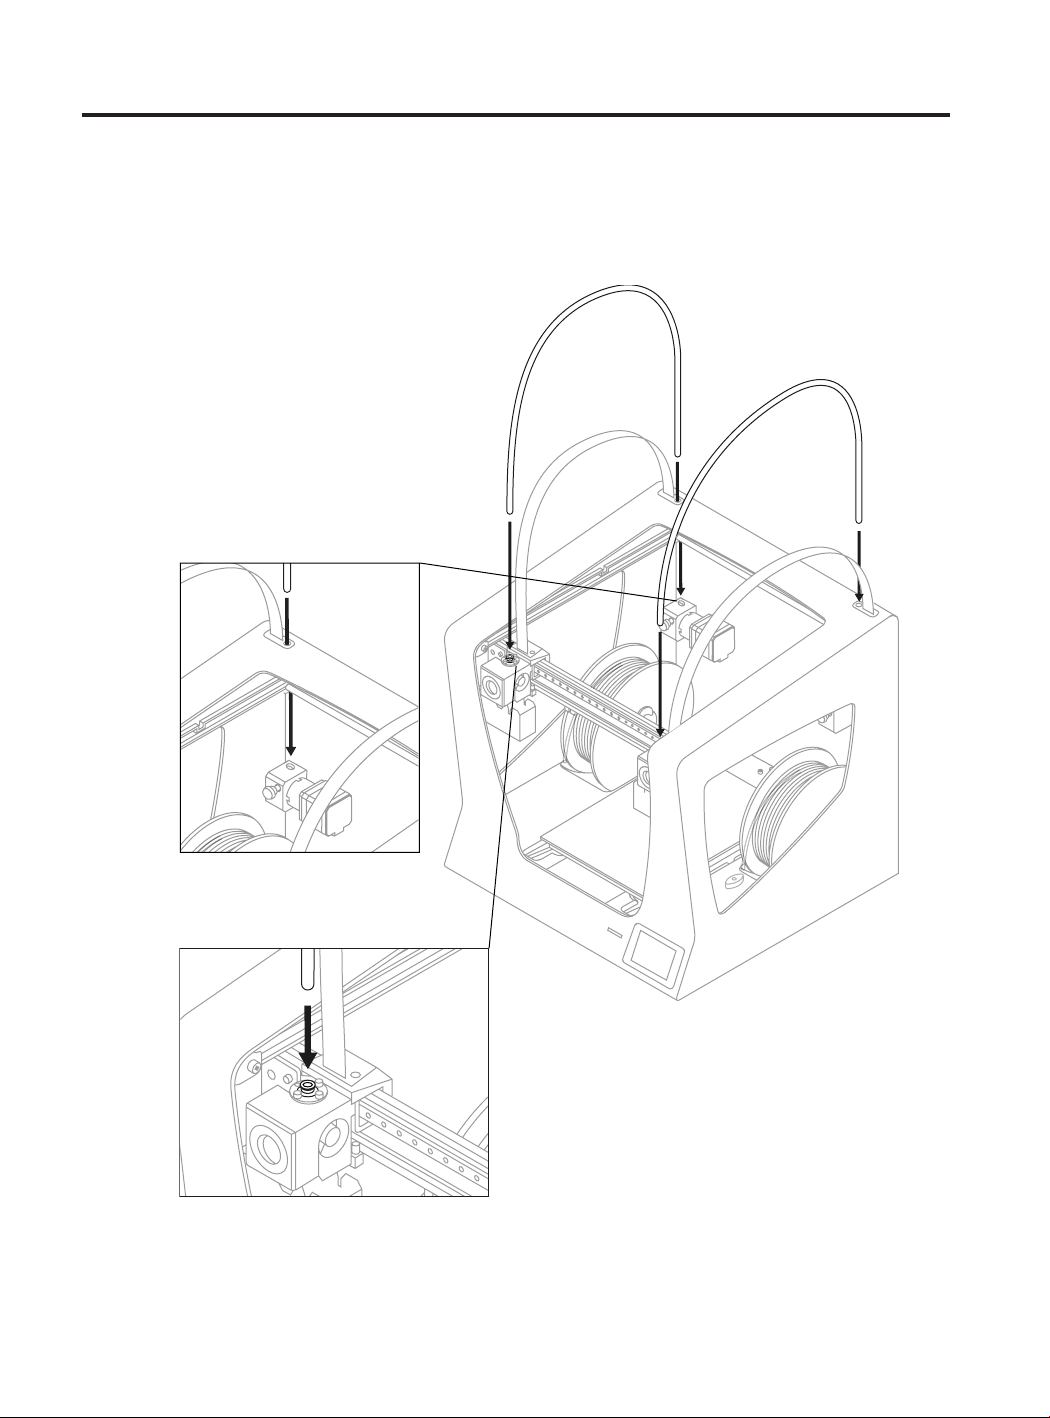
5.
Insert the teflon tube until it
stops.
6.
Insert the opposite end
of the teflon tube into the
hotend’s hole until it stops.
User Manual 16
Page 17
Set up
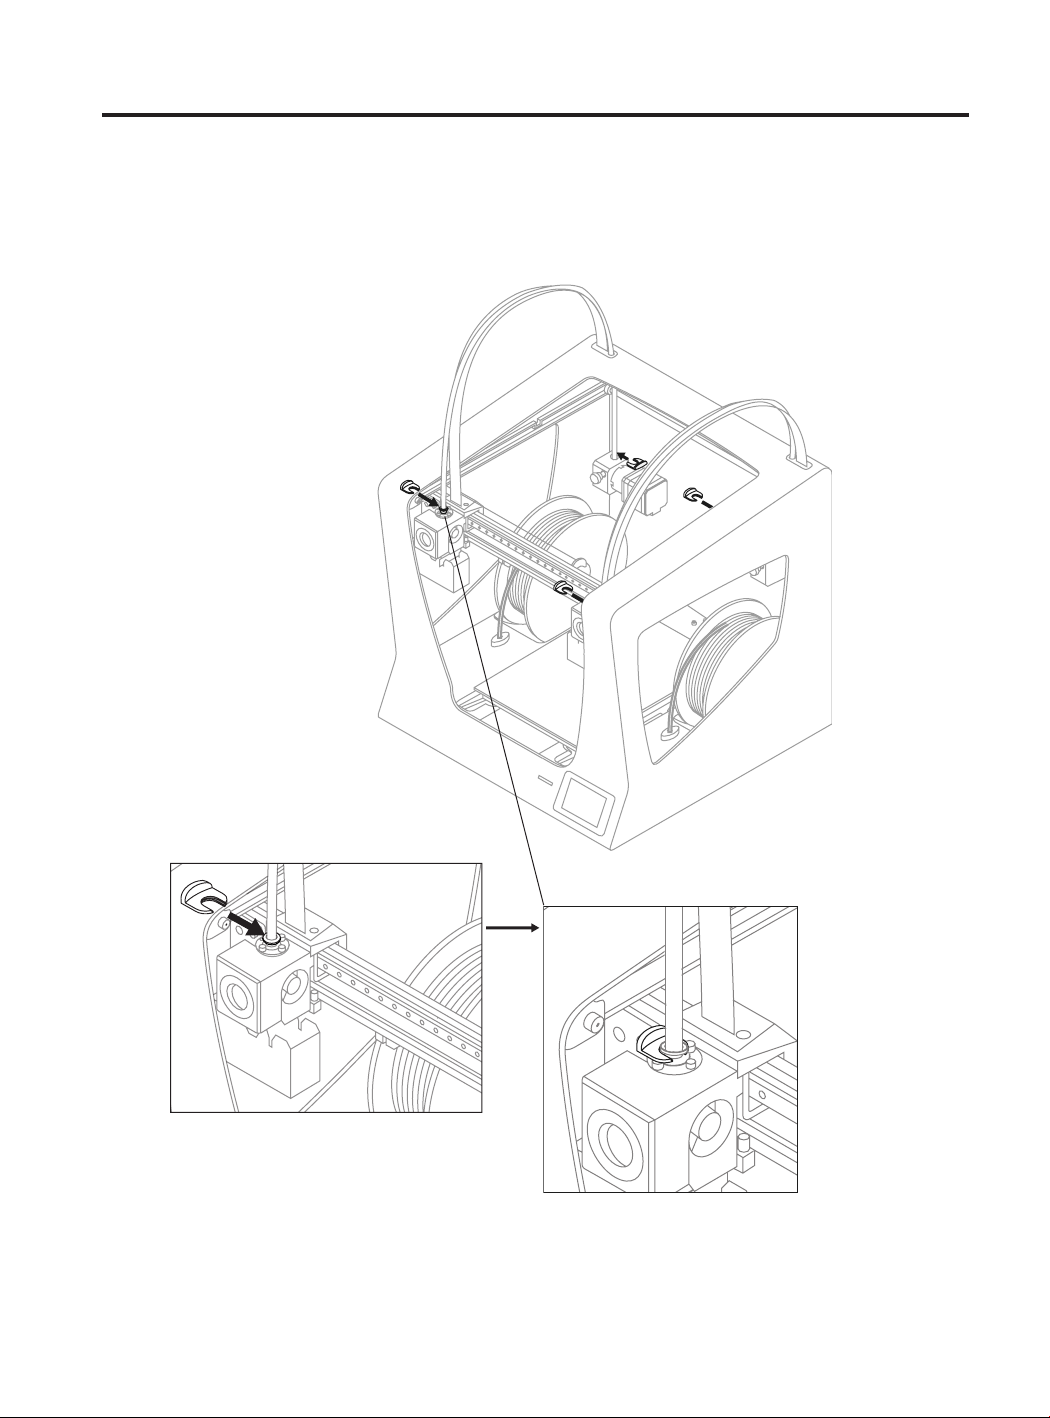
7.
Attach the teflon tubes with
the clips.
User Manual 17
Page 18
Set up
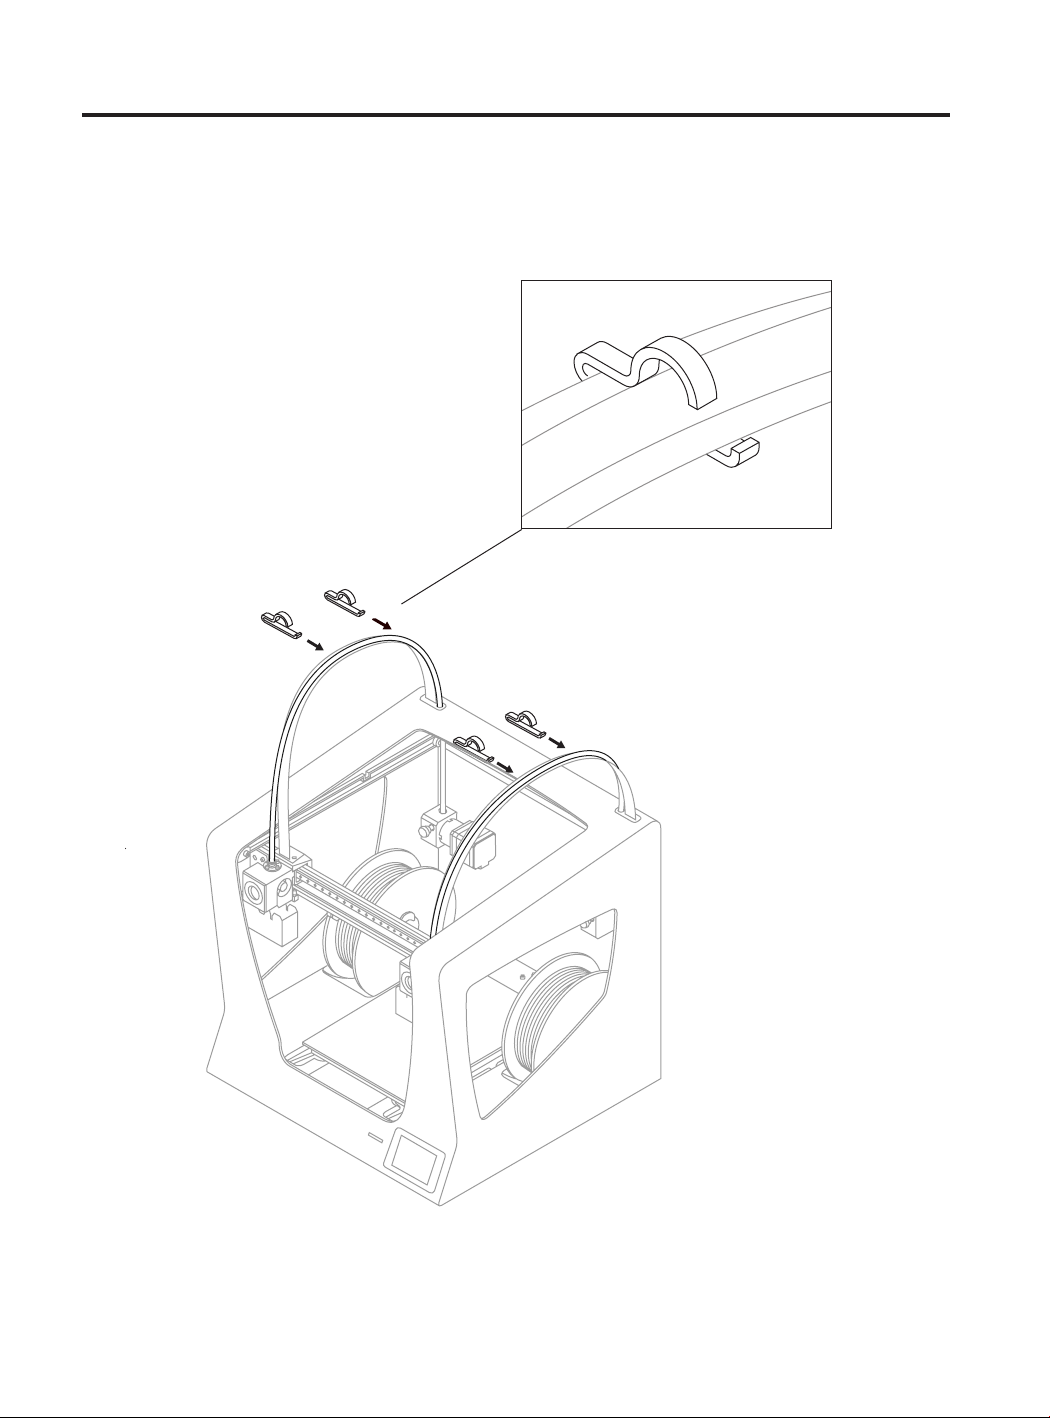
8.
Put together the teflon tube with the
hotend cable using the flat cable clips.
User Manual 18
Page 19

Set up
9.
Connect the power supply
cable. The plug is located at
the rear of the machine.
10.
Insert the SD card into the reader.
User Manual 19
Page 20

Getting started
Setup Assistant
1. Welcome
4. Enter the registration
number obtained.
2. Register 3. Enter the serial number that appears
on the screen in the link.
Let’s register your 3D
printer in order stay
up to date and enjoy a
better user experience.
SERIAL
NUMBER
Do you want to register your BCN3D P rinter?
It’s recommended in order to stay up to date
and enjoy a better user experience.
RegisterLater
5. Setup Assistant
6. Load filament
Press Next.Press Accept.
7. Select material
Choose PLA.
8. Follow screen’s instructions
in order to load the material.
Cut the filament at 45º to
ease the insertion.
Warning: Extruders
will be heated up. This
process could take 1
or 2 minutes.
9. Repeat the process for the second
extruder.
User Manual 20
Page 21

Setup Assistant
10. Printer calibration
Press Next.
13. Z Axis calibration
When indicated on the screen,
apply a thin and uniform layer
of printing adhesive (glue
stick) on the entire printing
surface glass to ensure a
better calibration.
11. Glass printing surface calibration. 12. Turn calibration screw
as indicated in the touchscreen.
14. Place the Calibration Gauge between the nozzle and the
printing surface glass. Hold the gauge by the end and move
it back and forth, without pressing the platform. Raise the
platform until you feel some resistance while sliding the
gauge. The gauge should not flex.
test to validate the previous
process.
1 5
16. Select the best line. 15. The printer will print a
· If the nozzle is too close
to the glass, the line will be
transparent or non-uniform.
· The line must be adhered to
the printing glass and with
no gaps.
· If the nozzle is too far to
the glass, the line won’t
be properly adhered to the
printing glass and will be
gaps in it.
User Manual 21
Page 22

Setup Assistant
17. Repeat processes 11-13
for the second extruder.
18. X Axis calibration
The printer will print vertical
lines.
NOTE: Depending on the
Z axis calibration, it may
appear this recommendation
screen.
19. Choose the best aligned
couple of lines.
If so, please check next
section: “Installing shims”
(page 25) for a detailed
explanation of the reason,
benefits and procedure to
perform this operation.
20. Y Axis calibration
The printer will print
horizontal lines.
1
1 10
21. Choose the best aligned
couple of lines.
10
Congratulations! Your printer has been calibrated and it is ready to print.
User Manual 22
Page 23

Mirror and Duplication modes
The Sigma features two new printing modes:
Mirror and Duplication. In these modes both
toolheads work simoultaniously.
To do it successfully it is key important to make
sure both nozzle tips are exactly at the same
height. However, due to manufacturing and
assembly tolerances the offset between tips
can be up to 0.5mm.
The Sigma automatically corrects the offsets
when printing in Duplication/Mirror modes.
However, this correction distorts the first layer
of the model by repeating it as many times as
needed.
User Manual 23
Page 24

Mirror and Duplication modes
To avoid such distortion there are different options:
1. Enable raft in BCN3D Cura.
The offset will be corrected in the first layers of the raft,
so the model won’t be affected by any Z offset.
2. Install shims to mechanically correct the Z offset.
Printing a raft takes time and spends material. For
those users planning to use frequently the Mirror or
Duplication modes, it is highly recommended to install
the shims when it is suggested during the Printer Cali-
bration process.
User Manual 24
Page 25

Installing shims
During the Printer Calibration process or before printing
a job with Duplication or Mirror mode, the Sigma may
suggest you to install shims to correct the Z offset
between nozzle tips.
Once you confirm you want to install the shims,
remember de number of shims to install on which hotend and just follow the screen instructions:
1.
Wait until the printer cools
down to avoid any dangerous
manipulation.
3.
Unscrew the 2 bolts at the
specified hotend .
2.
Turn off the machine.
4.
Install as many shims as
were indicated in the screen.
User Manual 25
Page 26

Installing shims
5.
Screw the bolts again.
6.
Turn on the machine and
follow the instructions on
the screen.
User Manual 26
Page 27

First print
After the calibration process has been completed, you can access the printing menu. The first object you will print
with the Sigma R19 is the Draudi figure, as it will allow you to check that everything is working properly and you
are now ready to start printing your own objects. Make sure that the glass is clean, and apply a small amount of the
included printing adhesive (glue stick). Learn how to usethe slicing software BCN3D Cura and how to print your own
objects in the next chapter.
Print --> Sample Parts --> Dual --> Dual Draudi --> SR19_DualDraudi
User Manual 27
Page 28

Starting out with BCN3D Cura
BCN3D Cura is a free and easy-to-use 3D printing software that prepares your digital model for 3D printing. Such
a complex process has been carefully optimized and tested for BCN3D products. As a result, the user enjoys a
flawless 3D printing experience while increases the reliability of the process.
BCN3D Cura takes profit easily of all the benefits of IDEX system: simply merge multi-material or multi-colour
models or generate customized support structures. It includes validated printing profiles to increase the printing
success rate.
Visit https://www.bcn3dtechnologies.com/documents/BCN3D_Technologies_BCN3D_Cura_User_Manual.pdf and
download the suitable version of BCN3D Cura for your Operative System. Once downloaded, follow the installation
wizard.
Your first dual print
1. Open BCN3D Cura previously downloaded and installed.
2. Select Sigma R19 in the
menu Add printer.
User Manual 28
Page 29

Your first dual print
3. Click Open File. 4. Select files to print.
5. Click the model and
assign the extruder to
print with.
i
e3D - 0.4mm - Brass
User Manual 29
Page 30

Your first dual print
6. Select the models by Shift+Left Click. Selected mo-
dels will be highlighted with a blue outline.
Right click on any of the selected models, and select
Merge Models.
e3D - 0.4mm - Brass
e3D - 0.4mm - Brass
7. Select profile.
i
e3D - 0.4mm - Brass
e3D - 0.4mm - Brass
8. Click Prepare to generate the printing file.
9. Insert the SD card in your computer and
save the file.
10. Safely remove the SD card from the com-
puter and insert it in the printer. After that,
turn it on.
User Manual 30
Page 31

Your first dual print
11. Select Print in the main menu of Sigma’s
touchscreen.
Congratulations! You have started printing your first 3D part with the Sigma R19.
Download BCN3D Cura Manual for more information about the program.
12. Before selecting the file to print, remember to apply
a uniform amount of the included printing adhesive
(glue stick) on the glass printing surface. Then, select
the file to print.
User Manual 31
Page 32

First Mirror /Duplication print
1. Load files to print and move, scale or rotate the
models as needed.
3. Select the desired printing mode in the
drop-down list.
i
e3D - 0.4mm - Brass
2. Select the printing profile for the Left Extruder. Make
sure the hotend and material loaded at Right Extruder
are the same than in the Left Extruder.
4. Note how the available printing volume is reduced
and the loaded models automatically move to the left.
These models can still be modified. A preview of the
duplicated or mirrored parts is available at the right.
5. Click Prepare, save the file and print it. Before se-
lecting the file to print, remember to apply a uniform
amount of the included printing adhesive (glue stick) on
the glass printing surface.
i
e3D - 0.4mm - Brass
Contact us if you have any questions about this process: support@bcn3dtechnologies.com
User Manual 32
Page 33

Firmware upgrade
At BCN3D Technologies we want you to have a great printing experience, and to achieve this we are continually
working to create new firmware upgrades for our printers. Follow this process through BCN3D Cura for checking if
the latest firmware version is installed on your printer. If not, it will get the latest firmware and it will be installed.
1. Use the USB cable to connect the Sigma to the computer.
2. Open BCN3D Cura. Go to Settings --> Printer --> Manage Printers
3. Select Upgrade Firmware. 4. Click Automatically upgrade Firmware to download
and install the latest version available.
User Manual 33
Page 34

Firmware upgrade
may take a few minutes to complete.
6. Once the process is completed, close the window.5. Wait until the firmware is installed. The process
¡Congratulations! You have upgraded the firmware of your Sigma R19.
34 User Manual
Page 35

Functionalities
This section contains a description of Sigma R19
functionalities. The main menu is divided into three
large groups: print, utilities and temperatures. The first
covers all the standard printing functions. The second
includes functions such as calibration, maintenance,
settings. Finally, the third allows to preheat the printer.
Print
Located on the left-hand side of the main menu, select
a print job to start the printing process. You can control
some of the parameters of the settings while the object
is being printed from here.
Select object: When you access the printing function a
screen appears with a list of files and folders. Use the
onscreen arrows to navigate and then click on the
selected file to confirm your selection.
Print: This screen displays the progress of the printing
process and show the basic information about time left,
file progress and temperatures.
Press the Pause button to move the extruders
away from the object and stop the printing process.
When the printjob is paused it is possible to load/unload
or purge filament, adjust the light intensity as well as
cancel or resume the print.
The Stop button let’s you whether cancel the printing
process and take you back to the main menu or save
the printjob.
Settings: This option bring you a new menu:
–Temperatures: Adjust the hotend and heated bed
temperatures by using the arrows.
–Advanced settings: Adjust the speed, fan and
flow-rate values by using the arrows.
Utilities
Situated at the center of the main menu, allows you to
operate and maintain your printer.
Filament: this menu allows you to manage the filaments of the printer. The menu functions are:
–Load: This is for loading filament into one of
the extruders. You should first select the side where
you want to load the filament. Next, you should insert
the filament into the extruder following the onscreen
instructions (the extruder should first reach the right
temperature, which may take a few minutes). Once you
have inserted the filament the extruder can be adjusted
slightly to allow you to load the rest of the filament.
When purging we recommend you pull out a generous
amount of filament to ensure the extruder is purged
correctly.
BCN3D Filaments presets are offered, but it’s possible
to load different materials. Just select Custom and set
the 2 temperatures demanded. Follow the manufacturer indications to set the Printing Temperature and the
Heated Bed Temperature.
–Unload: This operation is the opposite of the
operation described above, although it is performed
in a similar way. After you have selected which side
you want to remove the filament from, wait until the
hot-end has reached the right temperature and then
remove the filament.
–Purge: This menu allows you to control the
temperature of the two hot-ends, and extract or
dislodge clogged filament. In order to be able to move
the filament, the temperature difference between the
objective temperature (under the thermometer) and the
actual temperature (under the extruder icon) should be
less than 10º C.
–Light intensity: Use the toggle to adjust the LED
luminosity.
35 User Manual
Page 36

Functionalities
Calibrate: This menu allows you to calibrate the Sigma
R19 printing surface glass and extruders. This process
should be performed when components are replaced,
and during standard printer maintenance (described in
this manual).
–Printing Surface Calibration: This option allows
you to level the printing surface. The process is performed by an onscreen self-test run by the printer,
followed by instructions to correct the position. The
screen displays how many turns (in eighths of a turn)
each of the levelling screws should be turned, and in
which direction.
–Printer Calibration: This option allows you to
perform a full calibration, where the heated bed and the
relative positions of the extruders are calibrated. You
will be guided by onscreen instructions, and the aim is
to select the best of the different test prints performed
by the printer.
–Manual Fine Calibration: This option lets you to
manually modify the calibration values found in the
Printer Calibration process. On the left menu, select
the axis to adjust and press the arrows to correct the
calibration value.
Printer Setup
- Change hotend: Start a guided process step by
step to change and calibrate a hotend.
- Printing Components Setup: Manually set up the
nozzle sizes installed in the printer and the use of the
Filament Runout Sensor.
- Light intensity: Use a toggle to adjust the Light
Intensity.
- Run Setup Assistant: A step by step process to
calibrate the printer, as it was straight out of the box.
Temperatures
Placed on the right-hand side of the main menu, lets
you to preheat or cooldown the hotends and the heated
bed. The preheat temperatures will be set depending on
the filaments loaded.
Maintenance
–Move Printing Surface: This option lets you to
move the platform up and down.
–Hotend Cleaning Assistant: Perform this operation to clean the hotend. Just follow the instructions
of the screen. This operation is recommended when
you notice any sign of underextrusion, when switching
materials and after printing with soluble or special
materials.
–Autotune hotends: Select this operation every time
you change the hotend. The internal routine will check
the thermal behaviour of the hotends installed and will
allow the printer to have a better temperature control.
User Manual 36
Page 37

Operation and maintenance
Change hotend
By default, the Sigma is equipped with 0,4 mm hotends, but is possible to change them to tackle different
print jobs.
Changing the hotend is an easy operation that can be performed in a few minutes. You will need:
- Scissors or cutting pliers
- 2,5mm hex key
- Pliers
- Zip ties
1. Operating the printer via the LCD screen, go to Utilities --> Printer setup --> Change hotend.
2. Select the hotend to change and unload the filament (in case there’s some loaded).
3. Wait while the hotend cools down.
User Manual 37
Page 38

Operation and maintenance
4. Turn off the Sigma when the LCD indicates it.
5. Remove the black clip. Then hold down the coupling collet and pull out the teflon tube.
User Manual 38
Page 39

Operation and maintenance
6. Unscrew the cover and remove it.
7. Unscrew the hotend.
8. Cut the zip tie and remove it.
User Manual 39
Page 40

Operation and maintenance
9. At the back of the toolhead carriage, press the connector to remove the cable of the hotend.
10. Remove the old hotend and place the new one, connecting it at the back of the toolhead carriage.
User Manual 40
Page 41

Operation and maintenance
11. Place and adjust the zip tie, cutting off the excess.
12. Screw the hotend, place the cover and screw it.
User Manual 41
Page 42

Operation and maintenance
13. Insert the teflon tube until it stops, making sure it is well placed. Put back the black clip.
14. Turn on the Sigma and follow the screen
instructions. Select the hotend size you have installed.
15. Load filament and perform an autotune operation.
16. Finally, calibrate the offset between hotends.
User Manual 42
Page 43

Operation and maintenance
Clean and lubricate axes
Periodically, according to the Maintenance Alerts via LCD screen, it is recommended to clean and grease the axes
of the Sigma with the lubrication kit to ensure smooth and precise performance of its mechanical components. You
can purchase the Lubrication Kit in BCN3D website.
Follow these steps:
1. From the LCD screen, go to Utilities --> Maintenance --> Move printing surface. Lower the platform to the lowest
position to work more comfortably. Then turn off the machine
2. With absorbent paper or a cloth, remove any trace of dirt or dust at the two Z shaft bars. Next, clean the shaft
bars with the solvent pencil, making sure that it does not drip. Clean again the shaft bars with paper or a cloth.
User Manual 43
Page 44

Operation and maintenance
3. Apply the lubricating oil pencil along the Z shaft bars,
making sure that it does not drip.
5. Apply the grease along the spindle of the Z-axis motor.
4. Clean grease and dust from the Z-axis motor spindle
with paper or a cloth. Turn the spindle manually to
access its rear.
6. Turn on the Sigma and from the LCD screen, go
to Utilities --> Maintenance--> Move printing surface.
Raise and lower the platform twice to evenly distribute the oil and grease. Finally, remove the remnant
grease.
User Manual 44
Page 45

Operation and maintenance
7. Once the process for the Z axis is finished, let’s clean and lubricate X and Y linear guides. First of all, turn off
the Sigma. During this process it’s recommended to manually move the axes in order to reach all the guide.
8. From the center towards the ends of the linear guides of the X and Y axes, remove dirt with an absorbent
paper or a cloth.
9. Clean the guides with the solvent pencil, making sure that it does not drip with special emphasis on the supe-
rior and inferior faces.
User Manual 45
Page 46

Operation and maintenance
10. Clean again the X and Y guides with an absorbent paper or a cloth.
11. Apply the lubricating oil pencil along the linear guides of the X and Y axes, with special emphasis on their
superior and inferior faces. Make sure there is no excess oil dripping.
User Manual 46
Page 47

Operation and maintenance
Hotend Cleaning
It is recommended to clean the hotend periodically and, especially, every time you switch materials. Ideally, use a
piece of nylon filament to perform this operation.
1. Operating the printer via the LCD screen, go to
Uilities --> Maintenance --> Hotend cleaning assistant.
3. Remove the top teflon tube. First of all remove the black clip and then remove the top teflon tube by holding
down the cupling collet and pulling out the tube.
2. Select the hotend to clean and, in case there’s
material loaded, press NEXT. Otherwise, select SKIP.
User Manual 47
Page 48

Operation and maintenance
4. Wait until the hotend heats up. 5. Push the nylon filament through the hotend until it
comes out clean of residues.
6. Press NEXT and keep pushing until new notice. 7. Wait while the hotend cools down.
8. Finally, when indicated in the screen, pull out the
piece of filament.
9. Repeat the process until the removed filament tip
comes out clean. Once it is clean, remember to put back
the teflon tube and the black clip.
User Manual 48
Page 49

Filament
The Sigma R19 printer gives the best printing results
when printing with BCN3D Filaments, although it
accepts many other materials from other
manufacturers.
BCN3D Filaments are industrial-grade materials
designed to deliver outstanding results for BCN3D
printers. BCN3D Filaments, formulated to ensure the
highest print quality, are common polymers in several
industries and cover the majority of the technical
applications. Those filaments are: PLA, ABS, Nylon,
PET-G, PVA, TPU and Composites. Visit our
dedicated website for detailed information about each
one. Furthermore, you will find the Technical and Safety
Datasheets of all of them.
https://www.bcn3dtechnologies.com/en/3d-printer/
filaments/
A brief description of those materials is given below:
PLA
PLA (Polylactic Acid) is a biodegradable, sustainable and
food safe polymer made from organic sources.
It is the most common used filament in FFF 3D printers
for its ease of use and wide range of applications,
specially those not mechanically or thermally
demanding. Definitely a good starting point to learn
about the 3D Printing manufacturing process.
PLA is compatible with PVA supports.
Printing overhangs is easier if the layer fan is used.
It has average mechanical properties, although it
becomes slightly brittle when printing irregularlyshaped objects. At operating temperatures of 50º C
or more, the mechanical properties and rigidity of the
objects may decrease.
ABS
ABS (Acrylonitrile Butadiene Styrene) is one of the
most common technical materials in several industries
around the globe. Its great mechanical and thermal
behavior make ABS the ideal polymer for countless
applications.
Traditionally a challenging material to print with FFF
printers, it has been re-formulated to ensure good
interlayer adhesion and to reduce warping. Printing with
ABS is more complex, and requires a certain amount of
care: it is not recommended for non-experienced users.
Once printed, ABS parts withstand operating
temperatures up to 85°C.
To ensure good bed adhesion use Dimafix.
Do not use layer cooling fans and avoid drafty or cool
rooms for best results.
For a better print quality use the BCN3D enclosure for
the Sigma.
Once printed, PLA parts can withstand operating
temperatures up to 50ºC.
To ensure good bed adhesion use 3DLac, Dimafix or
Glue Stick.
User Manual 49
Page 50

Filament
PVA
PVA (Polyvinyl alcohol) is a water-soluble polymer,
ideal to work as support material for multi-material 3D
Printing.
Optimized for the FFF manufacturing process, our PVA
works seamlessly with PLA, TPU, PET-G and Nylon,
becoming a reliable universal support material to print
complex geometries, large overhangs or intricate
cavities.
PVA supports allow to achieve better surface quality, to
orientate the part to get better mechanical properties
and even to print multi-component models and
mechanisms.
To ensure good bed adhesion use 3DLac, Dimafix or
Glue Stick.
PET-G
PET-G (Polyethylene terephthalate glycol-modified) is a
globally used co-polyester, from plastic water bottles to
cloth fibers and it is 100% recyclable.
As a technical material, PET-G provides good
mechanical properties and improved chemical and
thermal behaviors than PLA but with similar ease of
use.
Nylon
Nylon (polyamide) is an extensively used material for its
unique mechanical and chemical properties.
Thanks to characteristics like durability, flexibility and
resistance to corrosion, Nylon is ideal for multiple
applications in the 3D printing field, like end-use parts
or custom jigs and fixtures. It is compatible with PVA
supports.
Once printed, nylon parts can withstand operating
temperatures up to 50ºC.
To ensure good bed adhesion use Dimafix or Glue Stick.
For a better print quality use the BCN3D enclosure for
the Sigma.
TPU
TPU (Thermoplastic Polyurethane) is a versatile rubberlike flexible material.
With Shore-A hardness of 95, TPU is a resistant
material for several industrial applications, both
mechanical or chemical. Moreover, it’s been especially
designed to improve the 3D printing experience.
Once printed, TPU parts withstand operating
temperatures up to 60ºC
It has an outstanding chemical resistance, a great
dimensional stability and toughness and a good glossy
surface quality. PET-G also offers a good abrasion
resistance, a high humidity resistance and it withstand
operating temperatures up to 70°C. It is compatible
with PVA supports.
To ensure good bed adhesion use 3DLac, Dimafix or
Glue Stick.
For a better print quality use the BCN3D enclosure for
the Sigma.
To ensure good bed adhesion use 3DLac, Dimafix or
Glue Stick.
Composites
Composites are materials with a polymeric base infused
with other particles or fibers in different proportion.
From wood to metal particles to achieve an aesthetic
and attractive finish to carbon fibers to combine
lightness and mechanical performance, composite
materials for FFF printers unleash creativity.
User Manual 50
Page 51

Filament
General considerations
To ensure good adhesion between the printing surface
and the 3D printed part, you will need to use an
adhesive product that will be applied to the printing
surface before start printing. For general materials,
we recommend using the printing adhesive (glue stick)
included with the printer or a generic lacquer. If your
printed part has adhesion problems with the glass
printing surface, we recommend using alternative
adhesives, such as 3DLac or Dimafix. Dimafix is ideal for
technical materials or complex prints. You can find them
on our website https://www.bcn3dtechnologies.com/
en/3d-printer-spare-parts/
We recommend using an enclosure when printing with
technical materials such as ABS, Nylon or PET-G. It
provides a constant interior temperature to prevent
warping and protects your working environment from
potentially harmful particles thanks to the HEPA filter.
More information at our website.
Nylon and PVA plastic are hygroscopic, that means
it readily absorbs water from the air. Make sure they
are dry before printing. Place them in an oven or in a
dehydrator at 50 ºC for 6 to 8 hours. After drying, store
it in an airtight container with desiccant.
User Manual 51
Page 52

Maintenance Plan
We recommend you carry out the maintenance procedures described in the table below in order to keep your printer running optimally. The procedures are grouped depending on frequency they should be performed is shown on
the right.
ACTION TO PERFORMFREQUENCY
Daily
Weekly
Monthly
Quarterly
Keep the printer free of dust and in a dry, cool place
Storage the spools in a dry, cool place
Remove the filament inside the Purge Tank
Remove the filament leftovers spread inside the printer
Clean the glass printing surface with warm water and soap
Clean the nozzles
Level the printing surface glass (also after a transportation)
Clean fans dust
Printer calibration (also after a transportation or replacing a hotend)
Check firmware updates
Check bolted and threaded joints
Clean and lubricate axes
Check tension of extruder springs
Check X/Y belt tension
Check connections of moving cables
52 User Manual
Page 53

BCN3D Technologies
Technical Assistance Services
If you do not find a solution to your problem in this
manual, please contact the BCN3D Technologies team
through any of the following channels:
Technical Assistance
You can contact the technical assistance services by
email, and we will answer you as quickly as possible.
Please remember to include your phone number so we
can contact you.
support@bcn3dtechnologies.com
Email
If you have a question that is not related to technical
assistance, please send us an email to the address
below. A BCN3D Technologies expert will contact you as
quickly as possible.
info@bcn3dtechnologies.com
You can find all of this information in the Contact
Section of our website:
www.bcn3dtechnologies.com/en/sigma-contact
Be sure to include the serial number of your computer
whenever you send us a query to help us provide the
best possible services.
53 User Manual
Page 54

Diagram of Sigma R19
1 Teflon tube
2 Extruder
3 Hot-end cable
4 Spool mount
5 0.4mm Hotend
6 Purge chamber
7 Glass printing surface
8 SD Card reader
4
9 Touchscreen
10 Filament input hole
11 Filament Spool
12 Switch
13 Platform
14 Power supply socket
15 USB port
16 Filament Runout Sensor
23
1
5
6
11
7
10
8
9
54 User Manual
Page 55

Diagram of Sigma R19
5
13
16
12
15
8
1
14
User Manual 55
Page 56

Terms and conditions
Overall Vision
The terms “we”, “us” and “our” refer to BCN3D Technologies. The terms “you” and “your” refer to the person
or entities that purchase any service or product. BCN3D
Technologies offers all the information about products,
tools, and services available, always conditioned to the
acceptance of all the terms, conditions, policies and
notices that are specified below.
By purchasing one of our products, you will be accepting our terms and conditions, including the additional
terms and conditions and the policies mentioned in this
document.
Return policy
BCN3D accepts returns for refunds or exchanges, subject to the following:
1 Withdrawal right
You have 14 days from the date of reception of the
product to execute the right of withdrawal. In order
to request a return, the product must not have been
opened, it should be closed and sealed inside its original
box. If you have opened the product, it will not be eligible for a refund.
This said, the transport costs (both shipping and return,
in addition to possible customs fees if the merchandise comes from outside the European Union) will be
responsible of the customer and deducted from the
amount to be returned.
Requirements:
• Having acquired the product through BCN3D
Technologies
• Be within the established deadline, which is 14
calendar days from the reception of the order.
2 Defective goods
If you detect any defect in the operation of the product,
you have 7 working days from the reception of the
product to communicate this defect and proceed to its
return.
You should contact the sales department by email
through sales@bcn3dtechnologies.com or by phone
+34 934137070, to notify this incident.
In this case, BCN3D Technologies will be responsible for
all the transportation costs.
In cases of wear or tear of the product due to causes
that are not exclusively of its use, BCN3D Technologies
reserves the right to accept or reject the return of the
product, in addition to establishing the conditions of
such return or substitution of the product.
3 The product received has been damaged during
transport
The client will have 24 hours to verify and communicate
the integrity of all the components of the order and
verify that all the pertinent goods are included within
the total set of the demanded product. An order will be
considered delivered when the delivery receipt is signed
by the customer.
Upon receiving the goods, you must ensure the external
package is in good conditions and shows no symptoms
of having received a blow. If the package has any sign of
having received a blow or any other damage, you must
reject it, reflecting it on the delivery note of the carrier
and notifying the logistics department by email (logistics@bcn3dtechnologies.com) during the following 24h.
User Manual 56
Page 57

Terms and conditions
How to make a return?
In order to make a return first, you will have to contact
us to sales@bcn3dtechnologies.com, explaining the
reason of your willingness to return or substitute one
or more products.
• You will receive a document by email to be completed (RMA), so that we can authorize the return.
• Once the RMA is completed, you must send it to
sales@bcn3dtechnologies.com duly completed.
• The after-sales department will assess the situation and within 48 hours will tell you whether or
not we accept your return request. If accepted, it
will assign you an RMA number with a validity of
30 days.
• The product must be sealed in its original packaging. In the case of not returning the order in its
original and sealed packaging, BCN3D Technologies
reserves the right to accept or reject the return or
establish a depreciation of the product.
• The refunds will be carry out between the 1st and
10th of the month according the return acceptance. For example, if the return becomes effective
on April 15, the money will be paid between May 1
and May 10.
• In case of not accepting the return for damages
produced outside BCN3D Technologies responsibility, you will be given the option to repair the
product or return it as it is. Both the repair and
shipping will be borne by the customer.
• Once the product has been packed, we will send
a transporter that will pick up the goods to be
returned perfectly packed, being able to desist
from the collection in case of improper packing. It is
important that you place the RMA number visible
on the package.
• You will not have to pay anything to the courier,
except if the withdrawal right is applied (first case),
where the cost of the carriage will be deducted
from the amount to be returned; or in case the damages produced in the products are not caused by
the transport or are not a manufacture defect. In all
these scenarios the customer will be responsible
for the shipping costs.
• Once the goods are received in our facilities, our
technical service will inspect them and determine
whether the return is accepted or not.
User Manual 57
Page 58

Open source
Open source is a development model that promotes universal access by granting software licenses free of charge,
and also universal distribution, including subsequent improvements.
We believe that adopting an open source philosophy offers many advantages:
• More control: We can see everything that is happening with the source code, designs etc., and modify them to
suit our needs.
• It helps us learn: We can see and read the software designs that other people have made, which helps us to
become better programmers and engineers.
• Safety: Since the designs are open designs, a lot more people can modify and/or correct any errors that the
original programmer may have made.
• Making improvements quickly: The open source community provides a lot of information about how to improve the product. This helps us to fix errors and update programmes much more quickly.
Using open source licenses for the products we develop is a way of expressing our willingness to share, to collaborate with other people in a transparent way (so that others can see what we are doing and join in), to embrace
failure as a means of improving, and to expect, even encourage, everyone else to do the same.
BCN3D Technologies and its products would not be where they are today without the RepRap project and its open
source community. The RepRap project started out as an initiative whose objective was to develop a 3D printer
which could print most of its own components and be a low-cost printer. As an open source project, all of the designs produced by the project have been released under a free software General Public License (GPL).
This project does not only include hardware, but has been conceived as a complete ecosystem of tools for printing,
from the CAD/CAM software to the code read by the machine to print physical objects.
Sigma R19 printers use many open source tools and technologies, such as Marlin software and the Cura pre-processed software. The first controls all the printer´s components, while the second converts the 3D file into G-code,
a language the machine is able to understand.
Marlin firmware is published under a GPL license. This means that we must keep Marlin open, and must provide
our source code to end users. For this reason we have our repository on the Github platform, where we post all the
changes we make.
Cura software is published under an AGPLv3 license. This is the same as the GPLv3 general license but a paragraph
has been added to Section 13 which makes it obligatory to provide source code to those who use software through
a network. We therefore have repositories for each operating system so that users can access the source code.
Open Source is not only used for code, but also covers hardware. In our case all the mechanical and electronic parts
are published under a GPLv3 license.
BCN3D Technologies is firmly committed to open source initiatives, and we believe that with the help of the community we will be able to make better products.
User Manual 58
Page 59

MS-R19-2019-7
 Loading...