

Page 1

WLAN660
Wireless IP Phone
Administrator’s Guide
Trademark Acknowledgement
All brand names are trademarks or registered trademarks of their respective companies.
Disclaimer
This document is supplied by BCM Communication Co., Ltd. No part of this document may
be reproduced, republished or retransmitted in any form or by any means whatsoever,
whether electronically or mechanically, including, but not limited to, by way of photocopying,
recording, information recording or through retrieval systems, without the express written
permission of BCM Communication Co., Ltd.
BCM Communication Co., Ltd. reserves the right to make changes, without notice, to any
product, including circuits and/or software described or contained in this manual in order to
improve design and
/
or performance. BCM Communication Co., Ltd. Assumes no
responsibility or liability for the use of the described product(s), conveys no license or title
under any patent, copyright, or mask work rights to these products, and makes no
representations or warranties that these products are free from patent, copyright, or mask
work right infringement, unless otherwise specified. Applications that are described in this
manual are for illustration purposes only. BCM Communication Co., Ltd. Makes no
representation or warranty that such application will be suitable for the specified use without
further testing or modification.
October 2004, Rev: 2.2_WLAN660
Page 2

2
FEDERAL COMMUNICATIONS COMMISSION
This device complies with Part 15 of the FCC Rules. Operation is subject to the following two conditions: (1)
this device may not cause harmful interference, and (2) this device must accept any interference received,
including interference that may cause undesired operation.
NOTE
This equipment has been tested and found to comply with the limits for a Class B digital device, pursuant to
Part 15 of the FCC Rules. These limits are designed to provide reasonable protection against harmful
interference in a residential installation. This equipment generates, uses and can radiated radio frequency
energy and, if not installed and used in accordance with the instructions, may cause harmful interference to
radio communications. However, there is no guarantee that interference will not occur in a particular
installation If this equipment does cause harmful interference to radio or television reception, which can be
determined by turning the equipment off and on, the user is encouraged to try to correct the interference by
one or more of the following measures:
- Reorient or relocate the receiving antenna.
- Increase the separation between the equipment and receiver.
- Connect the equipment into an outlet on a circuit different from that to which the receiver is connected.
- Consult the dealer or an experienced radio/TV technician for help.
Changes or modifications not expressly approved by the party responsible for compliance could void the
user‘s authority to operate the equipment.
The antenna(s) used for this transmitter must not be co-located or operating in conjunction with any other
antenna or transmitter
This EUT is compliance with SAR for general population /uncontrolled exposure limits in ANSI/IEEE
C95.1-1999 and had been tested in accordance with the measurement methods and procedures specified in
OET Bulletin 65 Supplement C
SAR compliance for body-worn operations is restricted to belt-clips, holsters or similar accessories that have
no metallic component in the assembly and must provide at least 1.5 cm separation between the device,
including its antenna, and the user's body.
This device and its antenna(s) must not be co-located or operating in conjunction with any other antenna or
transmitter
Page 3

3
Contents
1. Introduction ...................................................................... 5
2. Getting Started ................................................................. 6
2.1. Package Contents..................................................................... 6
2.2. Keypad ...................................................................................... 6
2.3. Turn On/Off the Power .............................................................. 7
2.4. Load Default IP Address ........................................................... 7
2.5. Enter Administrative Mode ....................................................... 8
2.6. Locking & Unlocking the Keypad ............................................. 8
2.7. Adjusting the Speaker Volume ................................................. 9
2.8. Selecting the Character Mode.................................................. 9
3. Configuring Network Environment ..................................10
3.1. Network Configuration ........................................................... 10
3.1.1. Fixed IP ....................................................................... 10
3.1.2. DHCP ........................................................................... 11
3.1.3. PPPoE .......................................................................... 12
3.2. Wireless Configuration ........................................................... 13
3.2.1. Wireless LAN Settings ................................................ 13
3.2.1.1. Wireless LAN ...................................................................................................................................13
3.3. SIP Configuration .................................................................... 16
3.3.1. Registrar IP Settings................................................... 16
3.3.2. Outbound Proxy Settings ............................................ 17
3.3.3. SIP Proxy Server Settings........................................... 18
3.3.4. Setting up the User Account ...................................... 19
3.4. Using the Phonebook.............................................................. 20
3.4.1. Searching Phonebook Entries - Edit Entry ................. 20
3.4.2. Searching Phonebook Entries - Erase Entry .............. 21
3.4.3. Searching Phonebook Entries – Speed dial Entry ...... 22
3.4.4. Adding a Phonebook Entry ......................................... 23
3.4.5. Erasing Phonebook Entries - One By One................... 24
3.4.6. Erasing Phonebook Entries - All ................................. 25
3.5. Call History ............................................................................. 26
3.5.1. Missed Call.................................................................. 26
3.5.2. Received Call .............................................................. 27
Page 4

4
3.5.3. Dialed Call ................................................................... 28
3.5.4. Erasing Call ....................................................................... 29
3.6. Settings ................................................................................... 30
3.6.1. Setting the Ring Melody.............................................. 30
3.6.2. Setting the Vibration Mode......................................... 31
3.6.3. Adjusting the Ring Volume ......................................... 31
3.6.4. Setting the Time ......................................................... 32
3.6.5. Setting the Date.......................................................... 32
3.6.6. Setting the Banner ...................................................... 33
3.6.7. Setting the Key Lock .................................................. 33
3.6.8. Don’t Disturb ............................................................... 34
4. Web Configuration ...........................................................35
4.1. Login Password....................................................................... 35
5. Basic Phone Tasks ..........................................................36
5.1. Dialing a Phone Number ......................................................... 36
5.2. Redialing a Phone Number ..................................................... 36
5.3. Answering a Call ..................................................................... 36
6. Display Messages ............................................................37
6.1. Error Messages....................................................................... 37
6.2. Warning Messages .................................................................. 38
Page 5
5
1. Introduction
This is an Administrator’s manual describing the wireless IP phone WLAN660 running in
Administrative mode. Before using WLAN660, some setup processes are required to make
the phone work properly. You should at least setup the IP address of WLAN660 and router
when DHCP is disabled. When DHCP server is available, you can skip the process of setting
up the WLAN660 IP address.
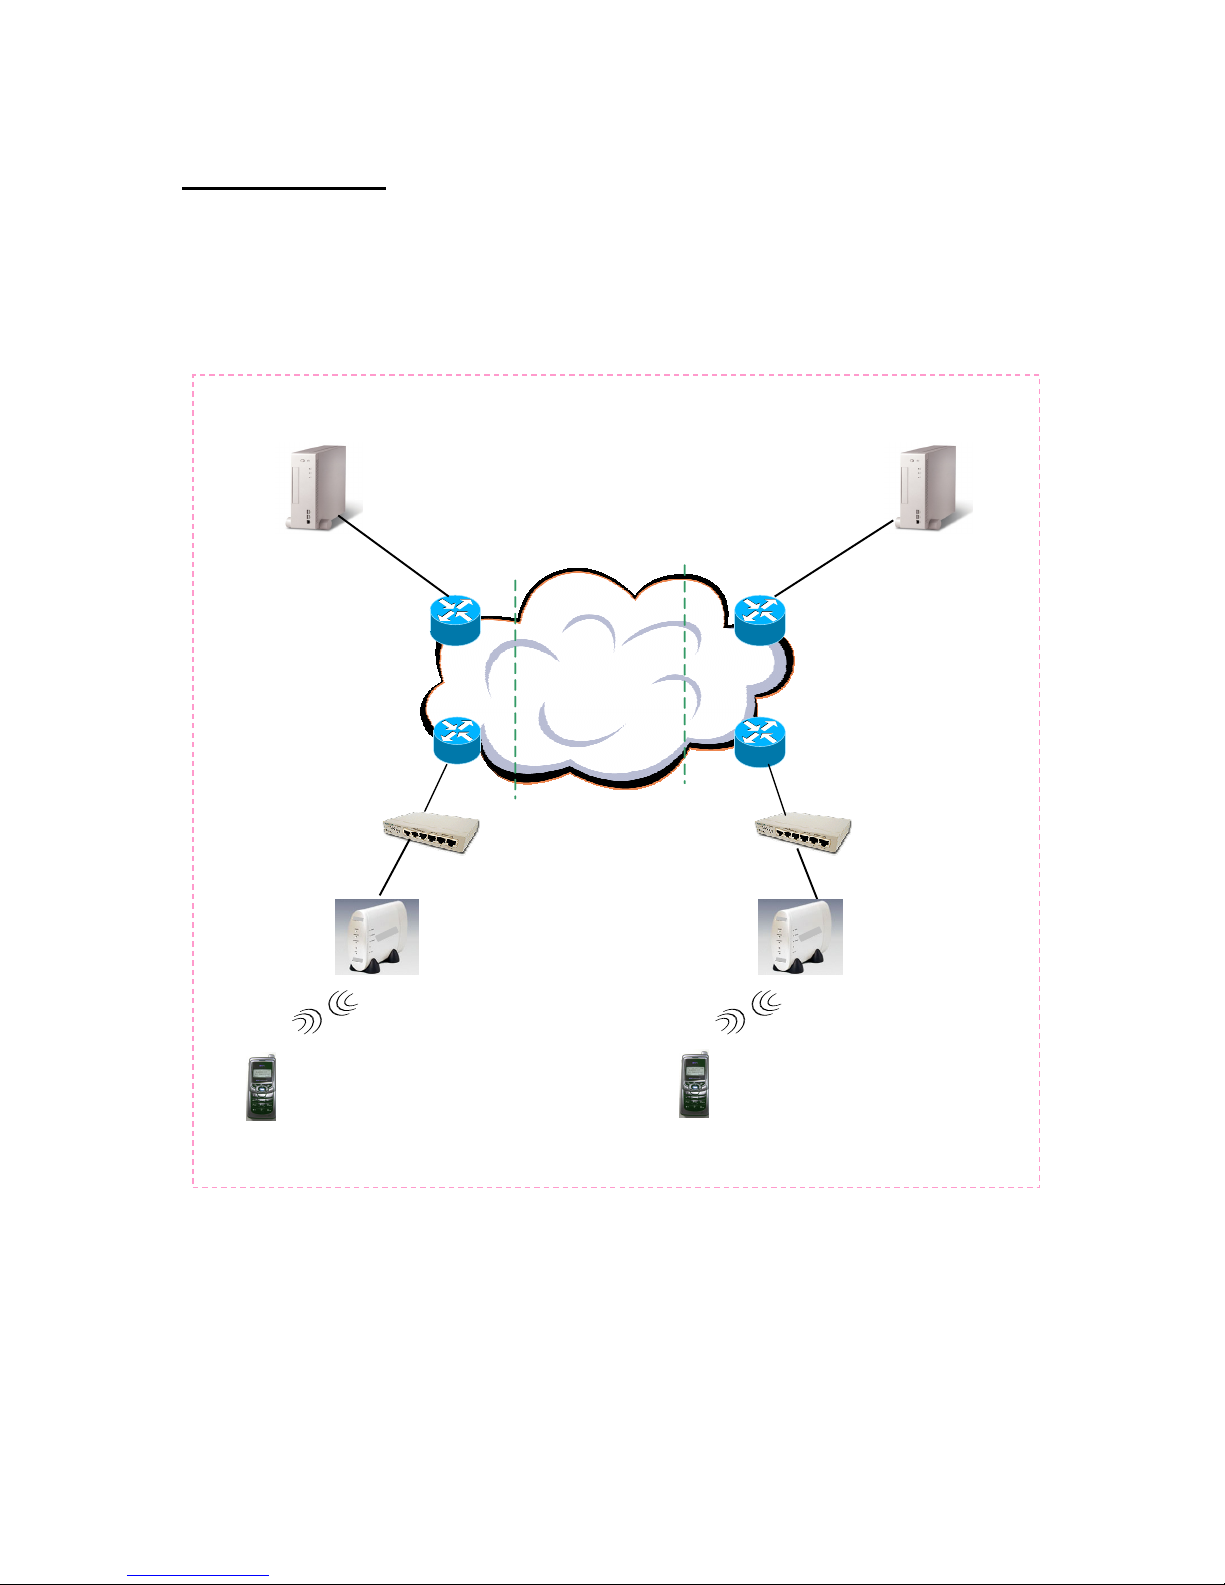
Figure 1.1 Network connections for WLAN660
Internet
Proxy Server Proxy Server
AP
ADSL Modem
AP
ADS
L M
ode
m
WLAN660
WLAN660
Page 6
6
2. Getting Started
Please check the following before using the WLAN660:
Package contents
How to install and remove the battery
How to charge the battery
How to turn on/off the device
2.1. Package Contents
You should find the following contents in your WLAN660 package:
WLAN660 Wireless IP Phone x1
Standard battery x1
WLAN660 Wireless IP Phone User’s Guide x1
Power Supply (AC adapter) x1
If any of these items are missing or damaged, please contact your distributor or sales
representative immediately.
2.2. Keypad
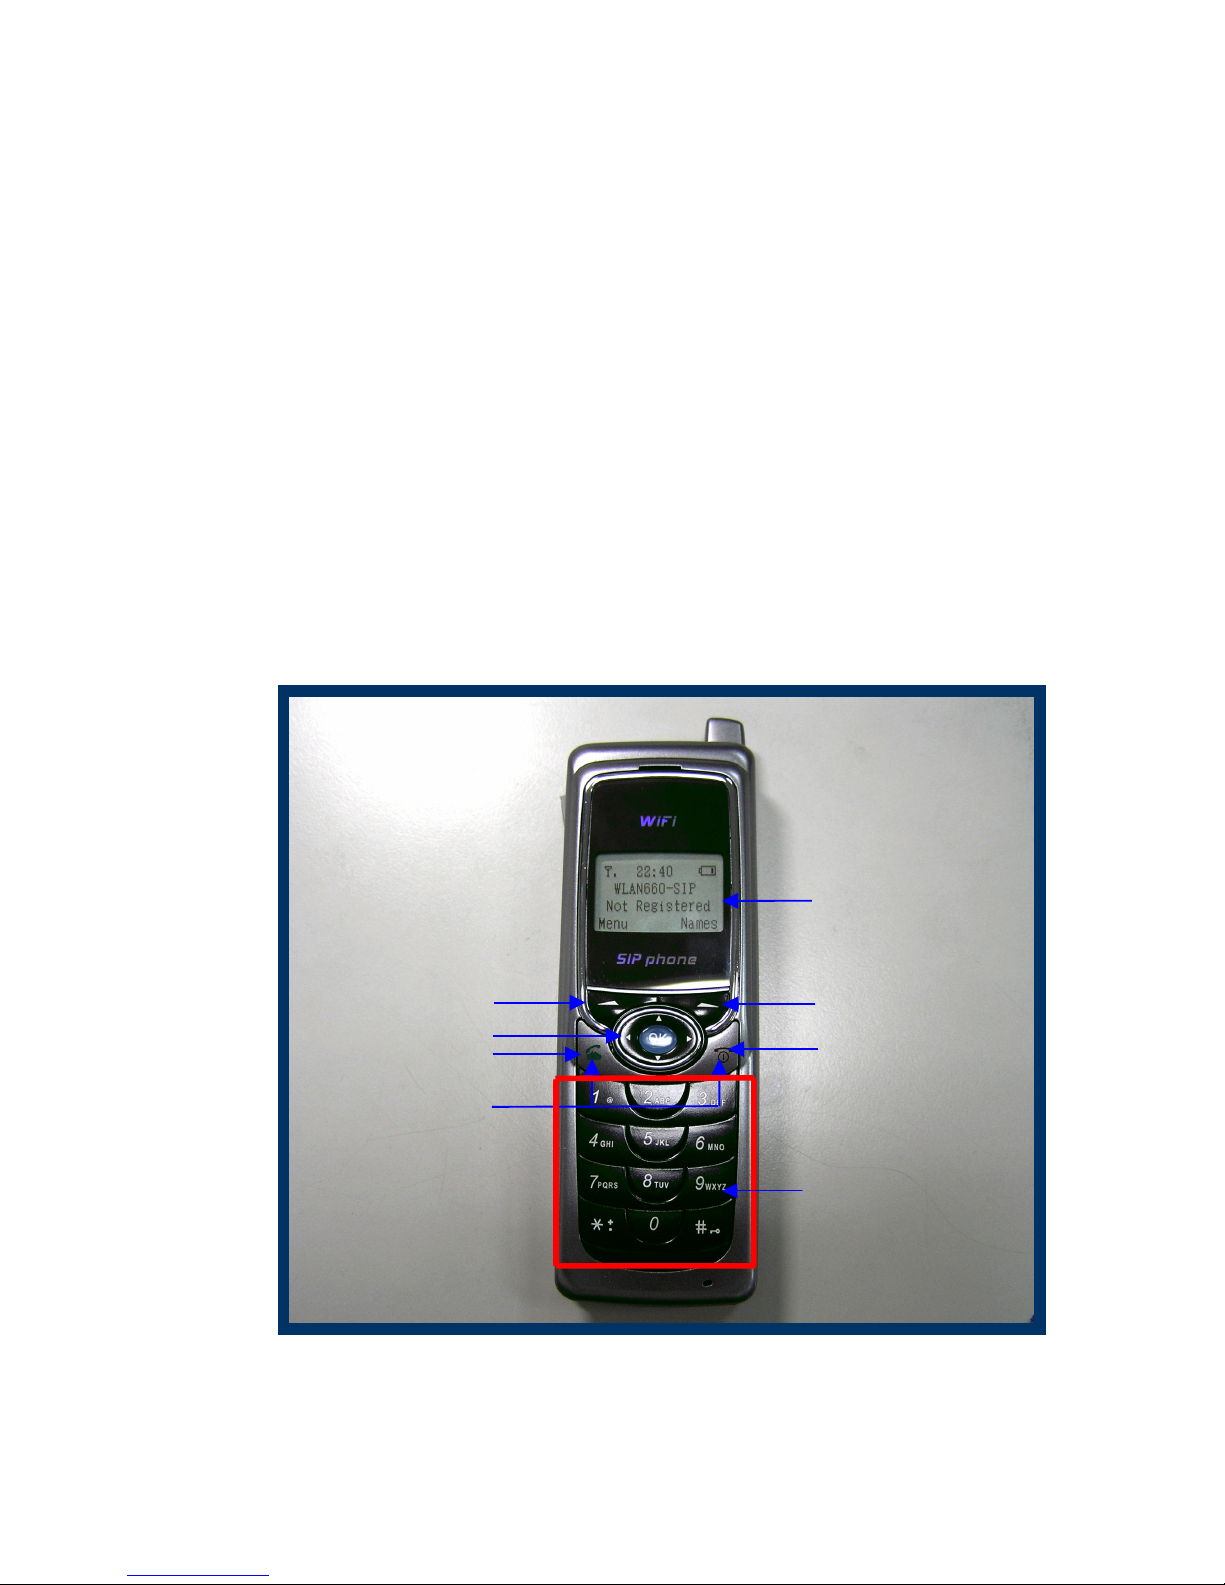
Figure 2.2-1 WLAN660 Wireless IP Phone
Mono Graphic LCD
Soft Key 2
● End key
● Power key
Soft Key 1
Load Default IP
(192.168.0.6)
Numerical keys &
special keys: @, *, #, etc.
Tal k Ke
y
A
rrow Keys
Page 7
7
KEY DESCRIPTION
Soft key 1
This key is used for making selections on the bottom left side of the
phone LCD, such as: Menu, Select, OK... Its current function is
indicated by the word appearing above the key.
Soft key 2
This key is used for making selections on the bottom right side of the
phone LCD, such as: Names, Back, Clear... Its current function is
indicated by the word appearing above the key.
Arrow keys
Use the arrow keys to navigate through your phone’s menus and
submenus, as well as your Phonebook. The up / down arrow keys are
also used for selecting the character mode: A, a, 1, @.
Talk Key Use this key to answer a call or make a call.
End Key / Power Key
Use this key to end a call, reject a call or return to Standby mode. Press
and hold this key for two seconds to switch off / switch on the phone.
Numerical / special keys Use to enter numbers, characters or special characters.
2.3. Turn On/Off the Power
To turn on/off the power, press and hold the “
”
key for approximately
2 seconds.
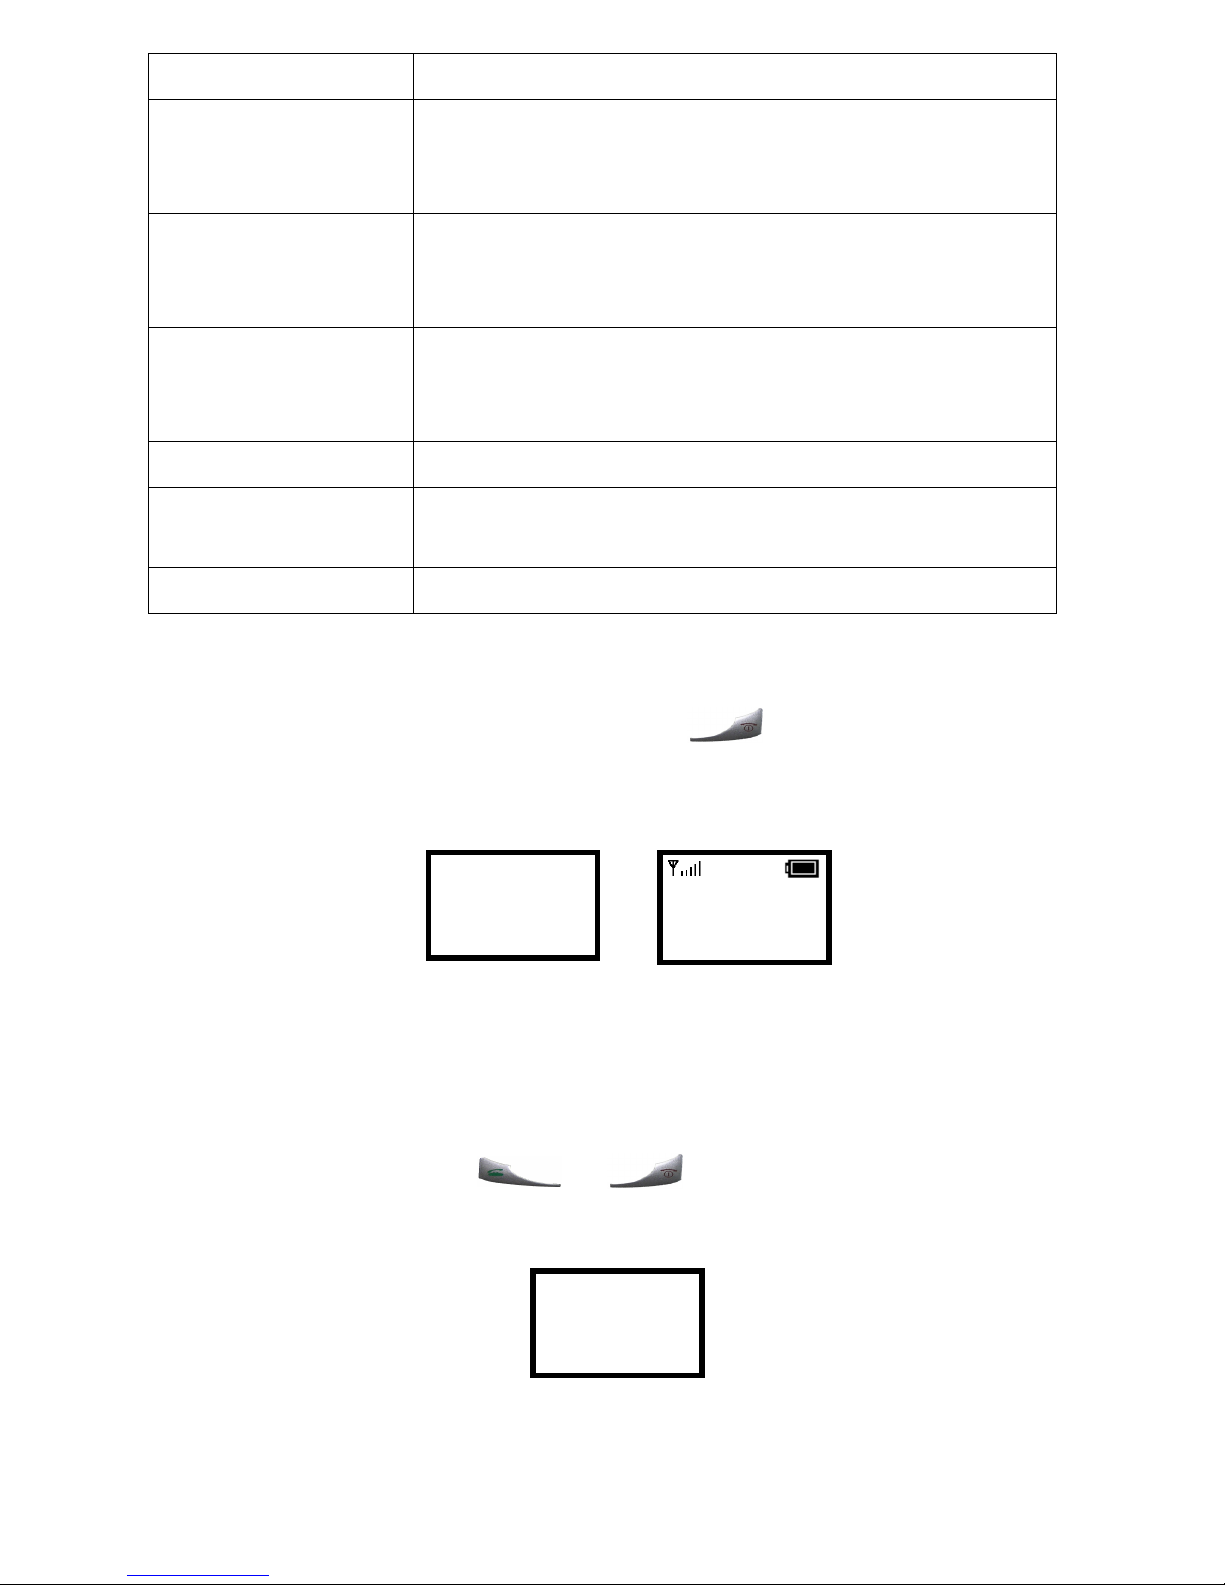
The phone enters the “standby” mode; Main Screen is displayed as shown in Figure
2.3-1
Figure 2.3-1 Standby Mode
2.4. Load Default IP Address
1. Turn of the power.
2. Press and hold the “ ” + “
” keys for about 2 seconds to load the
default IP address. WLAN660 will reset to the default IP address (192.168.0.6).
Figure 2.4-1 Load default IP
12:00
WLAN660-user
Not Registered
Menu Names
Initializing...
>>Please Wait!<<
Load Default IP
<<Release key!>>
Page 8
8
2.5. Enter Administrative Mode
1. Turn of the power.
2. Press the “ ” + “
” + ”
” keys and hold till the
<ENGINEER MENU> is shown on the LCD screen. Then release the keys.
3. In approximately 10 seconds, you will enter the main screen of the administrative
mode.
Figure 2.5-1 Administrative Mode
2.6. Locking & Unlocking the Keypad
Follow these steps to lock & unlock the keypad:
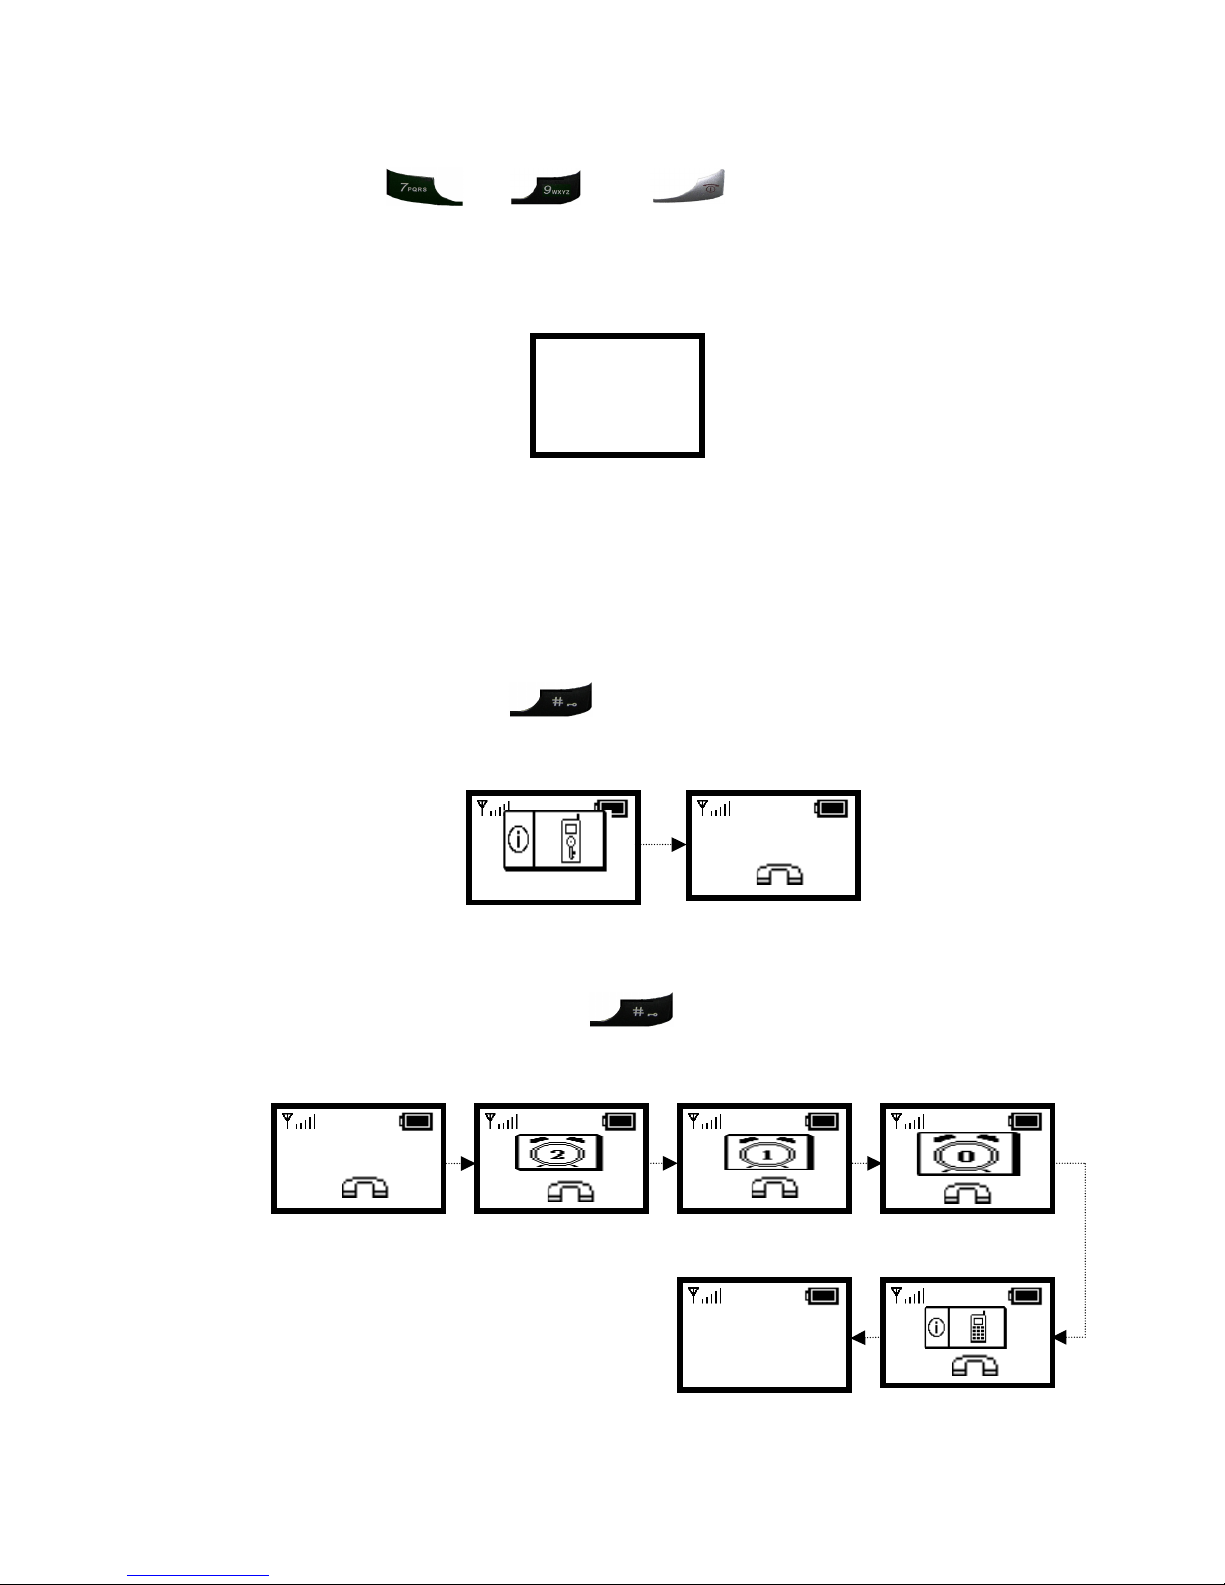
1. In idle state, hold the key over 2 seconds or wait over 1 minute.
The keypad will be locked, as shown in Figure 2.6-1.
Figure 2.6-1 Keypad Locked
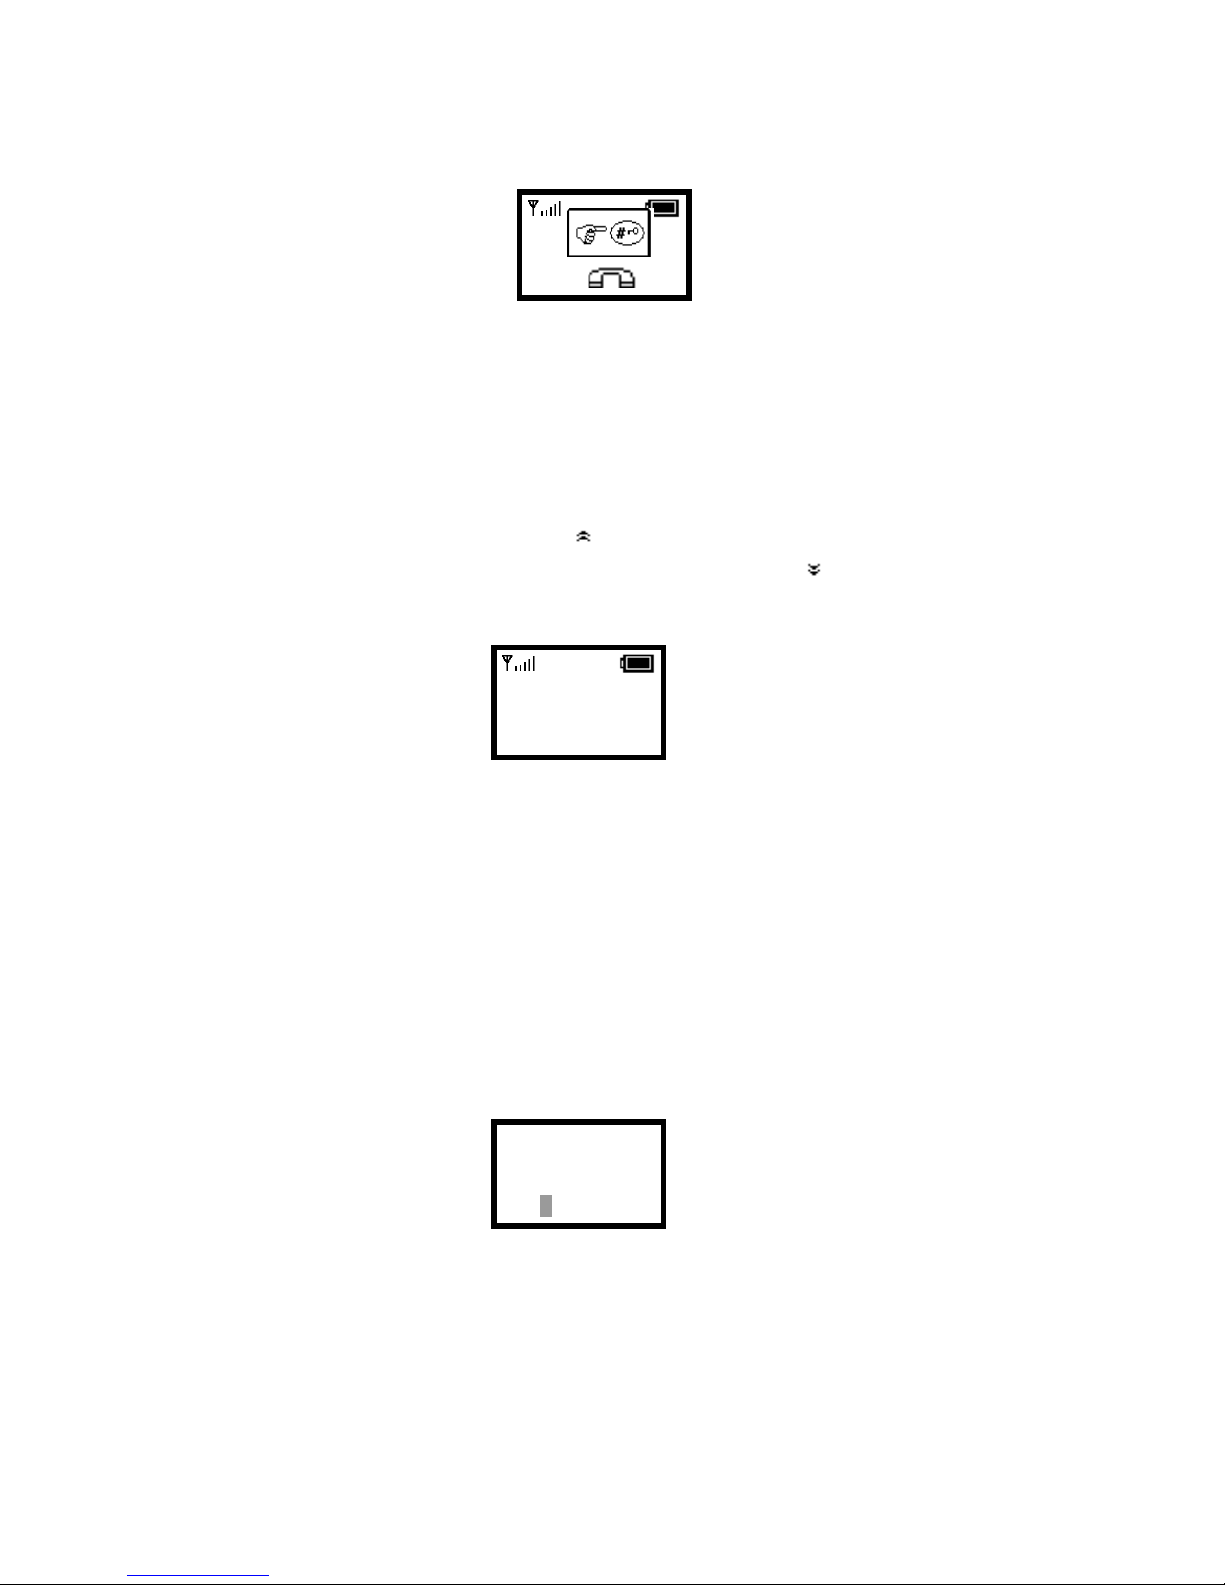
2. To release, press and hold the key for approximately 2 seconds and
the message will appear prompting you to confirm, the procedure like Figure
2.6-2.
Figure 2.6-2 Keypad Unlocked
〈
ENGINEER MENU
〉
Enabled Engineer
Mode For MMI/WEB
10/20
12:00
X
12:00
WLAN660-user
Not Registered
Menu Names
10/20
12:00
X
10/20
12:00
X
10/20
12:00
X
10/20
12:00
X
10/20
WLAN660-user
Not Registered
Menu Names
10/20
12:00
X
Page 9
9
3. When locking, press any key would show, Figure 2.6-3.
Figure 2.6-3 Keypad Locked
2.7. Adjusting the Speaker Volume
During conversation, press the ” “ key to increase the volume.
To decrease the volume, during conversation, press the ”
“
key. See Figure 2.7-1.
Figure 2.7-1 Adjusting the Speaker Volume
2.8. Selecting the Character Mode
Use the up / down arrow keys (
▲ /▼)
to select the character mode: capital or lowercase
characters, numbers or special characters (A, a, 1, @).
Figure 2.8-1 Selecting the Character Mode
12:00
12 ) ) ) ) ) ) ) ) ) )
123456
Phone Number
100|
Ok Aa1@ Back
10/20
12:00
X
Page 10
10
3. Configuring Network Environment
This chapter explains how to modify the network environment.
3.1. Network Configuration
This section introduces modifications to the network information.
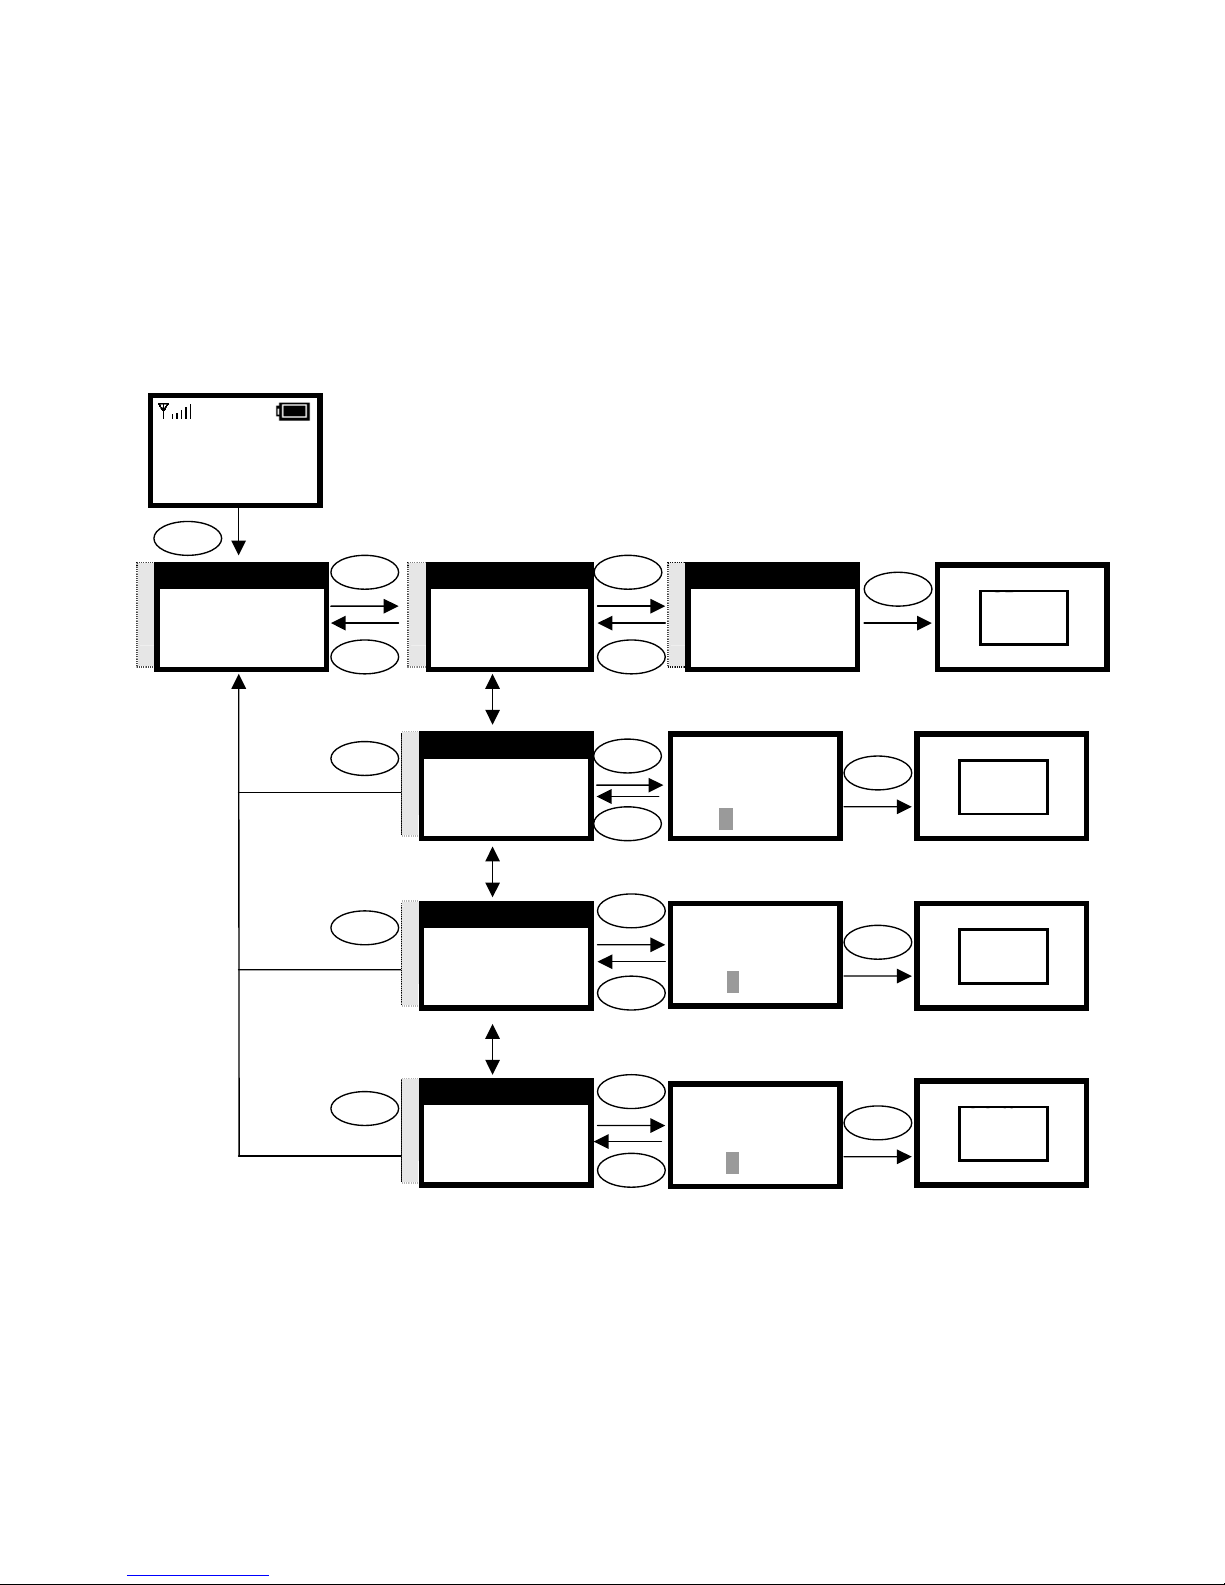
3.1.1. Fixed IP
This section introduces how to select Fixed IP.
12:00
WLAN660-user
Not Registered
Menu Names
Menu
Select
Select
Back
IP Address
192.168.0.6|
Ok Aa1@ Back
Subnet Mask
255.255.0.0|
Ok Aa1@ Back
Select
Gateway
172.16.0.1|
Ok Aa1@ Back
Select
Back
Back
Back
S
T
4. Net Setting
5. SIP Setting
6. Settings
Select Back
Back
S
T
[1]Fixed IP
[2]DHCP
[3]PPPoE
Select Back
S
T
2. IP Address
3. Subnet Mask
4. Gateway
Select Back
Select
S
T
3. Subnet Mask
4. Gateway
1. Network Mode
Select Back
S
T
4. Gateway
1. Network Mode
2. IP Address
Select Back
[1]Fixed IP
[2]DHCP
[3]PPPoE
Select Back
OK
Select
S
T
1. Network Mode
2. IP Address
3. Subnet Mask
Select Back
Back
Back
Back
Ok
IP Address
192.168.0.6|
Ok Aa1@ Back
OK
Ok
Subnet Mask
255.255.0.0|6|
Ok Aa1@ Back
OK
Ok
Gateway
172.16.0.1|
Ok Aa1@ Back
OK
Page 11
11
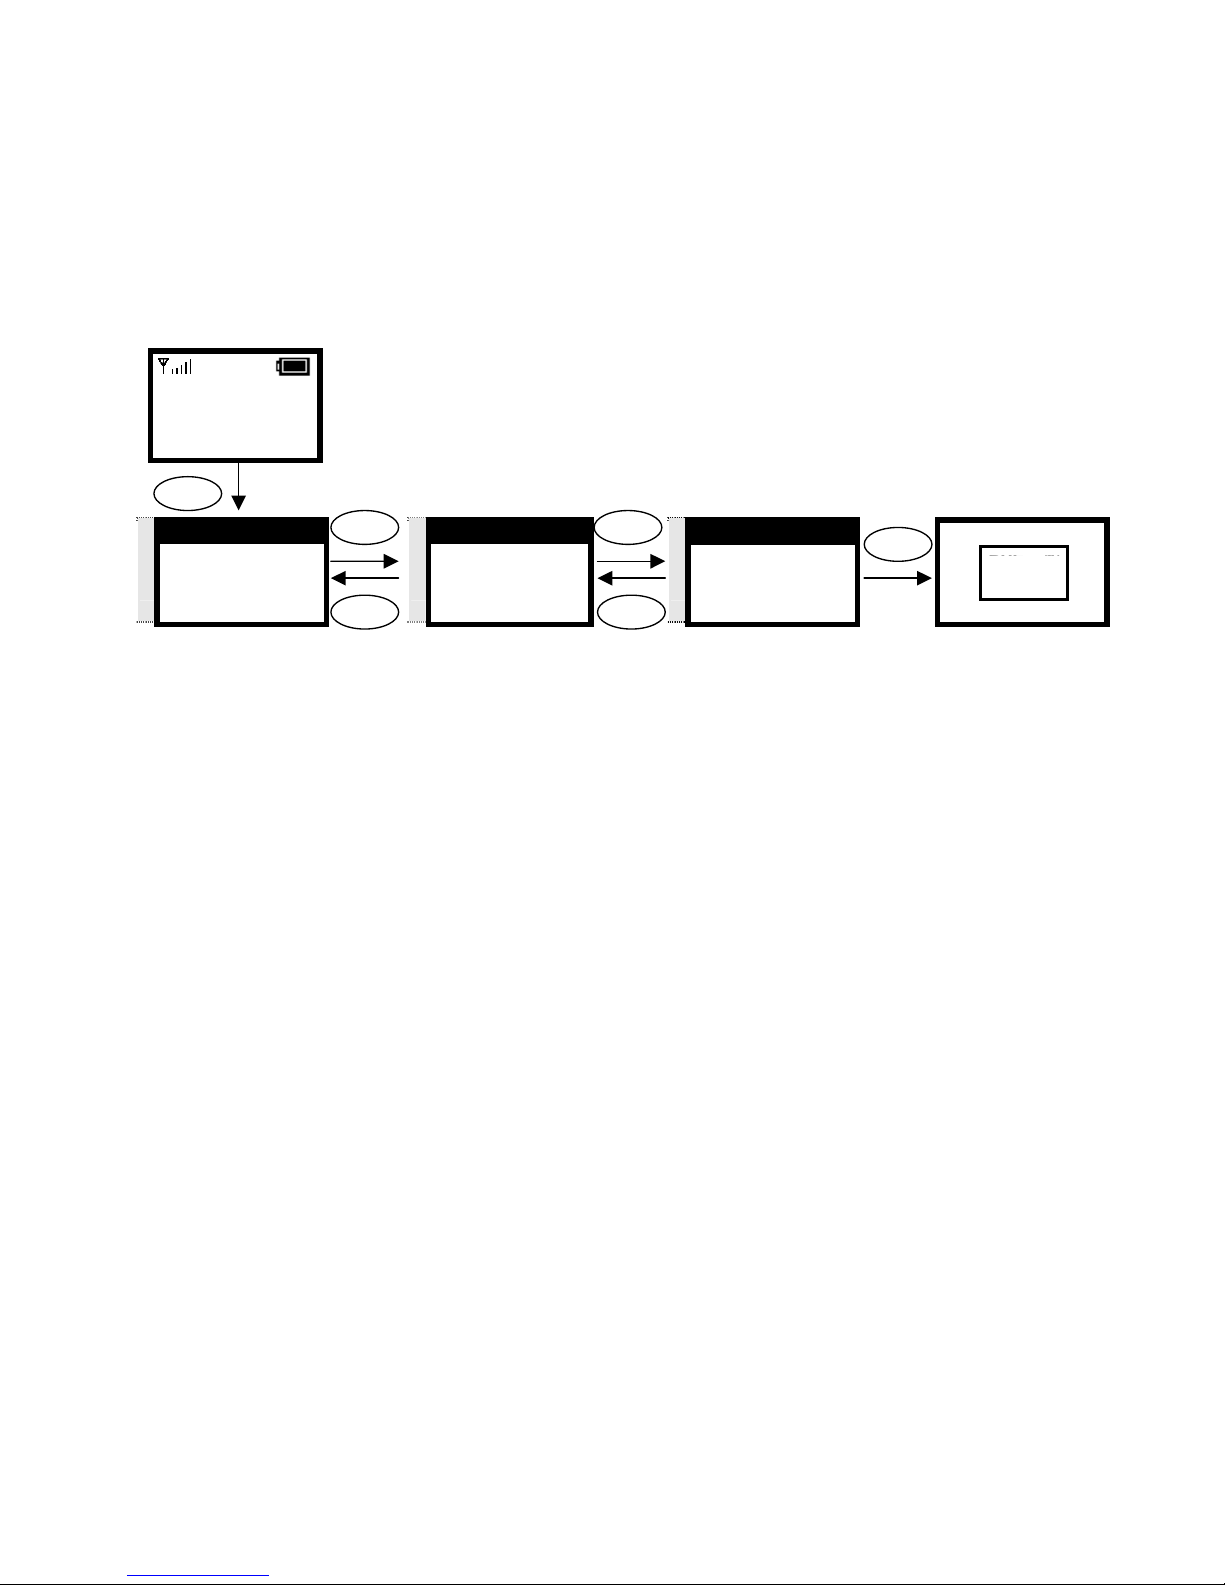
3.1.2. DHCP
This section provides instructions for performing the DHCP settings.
The Dynamic Host Configuration Protocol (DHCP) client provides a
mechanism for allocating IP address dynamically so that addresses can be
reused when hosts no longer need them.
12:00
WLAN660-user
Not Registered
Menu Names
Menu
Select
Select
Back
S
T
4. Net Setting
5. SIP Setting
6. Settings
Select Back
Back
S
T
[2]DHCP
[3]PPPoE
[1]Fixed IP
Select Back
[2]DHCP
[3]PPPoE
[1]Fixed IP
Select Back
OK
Select
S
T
1. Network Mode
2. IP Address
3. Subnet Mask
Select Back
Page 12
12
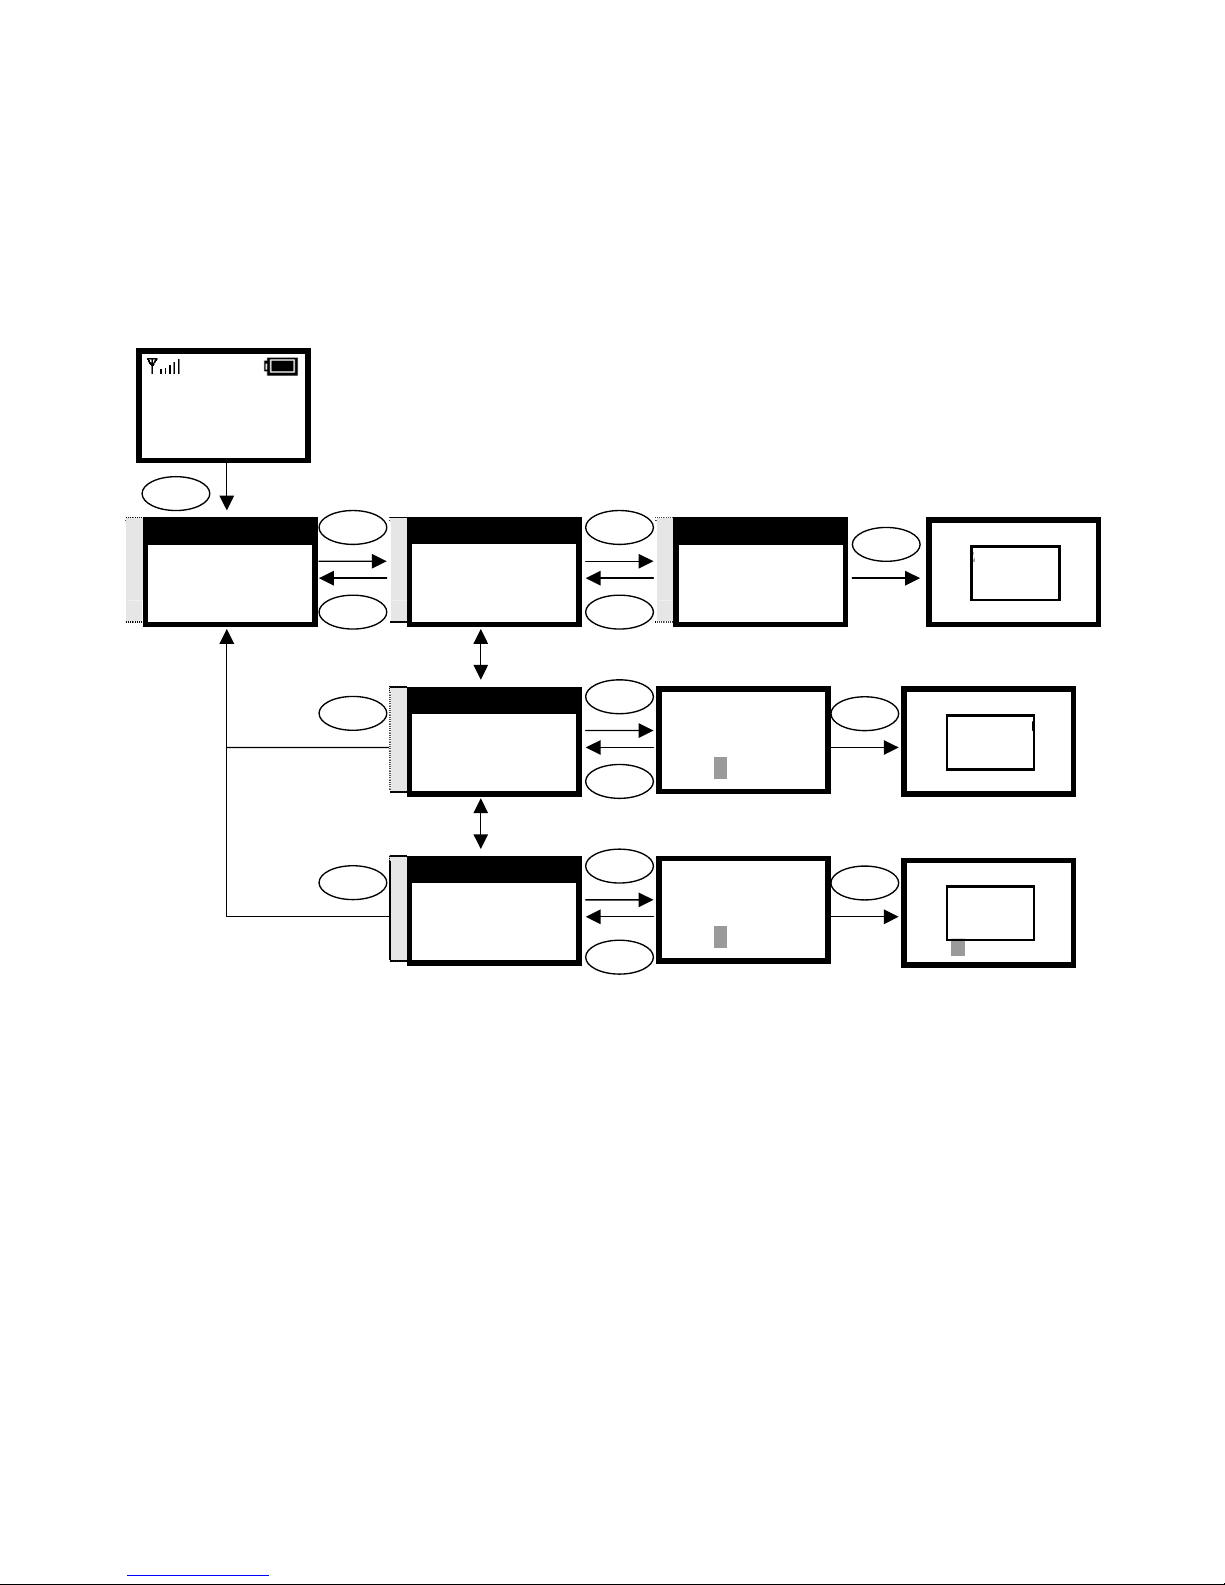
3.1.3. PPPoE
The Point-to-Point Protocol over Ethernet (PPPoE) provides more than just IP
address assignment, which is the primary purpose of DHCP (assigning a unique
and available IP address based upon a unique network adapter address).
PPPoE also allows for the movement of TCP/IP traffic between two known
points. It requires a username and password to log on.
PPPoE Name
pppoe_username|
Ok Aa1@ Back
Select
Ok
PPPoE Pwd
************|
Ok Aa1@ Back
Select
Ok
Back
Back
12:00
WLAN660-user
Not Registered
Menu Names
Menu
Select Select
Select
Back Back
S
T
4. Net Setting
5. SIP Setting
6. Settings
Select Back
S
T
1. Network Mode
2. IP Address
3. Subnet Mask
Select Back
S
T
[3]PPPoE
[1]Fixed IP
[2]DHCP
Select Back
S
T
3. PPPoE Pwd
1. Network Mode
2. PPPoE Name
Select Back
S
T
2. PPPoE Name
3. PPPoE Pwd
1. Network Mode
Select Back
Input the name
Input the password
Back
Back
[3]PPPoE
[1]Fix IP
[2]DHCP
Select Back
OK
PPPoE Name
pppoe_username
Ok Aa1@ Back
OK
PPPoE Pwd
************|
Ok Aa1@ Back
OK
Page 13
13
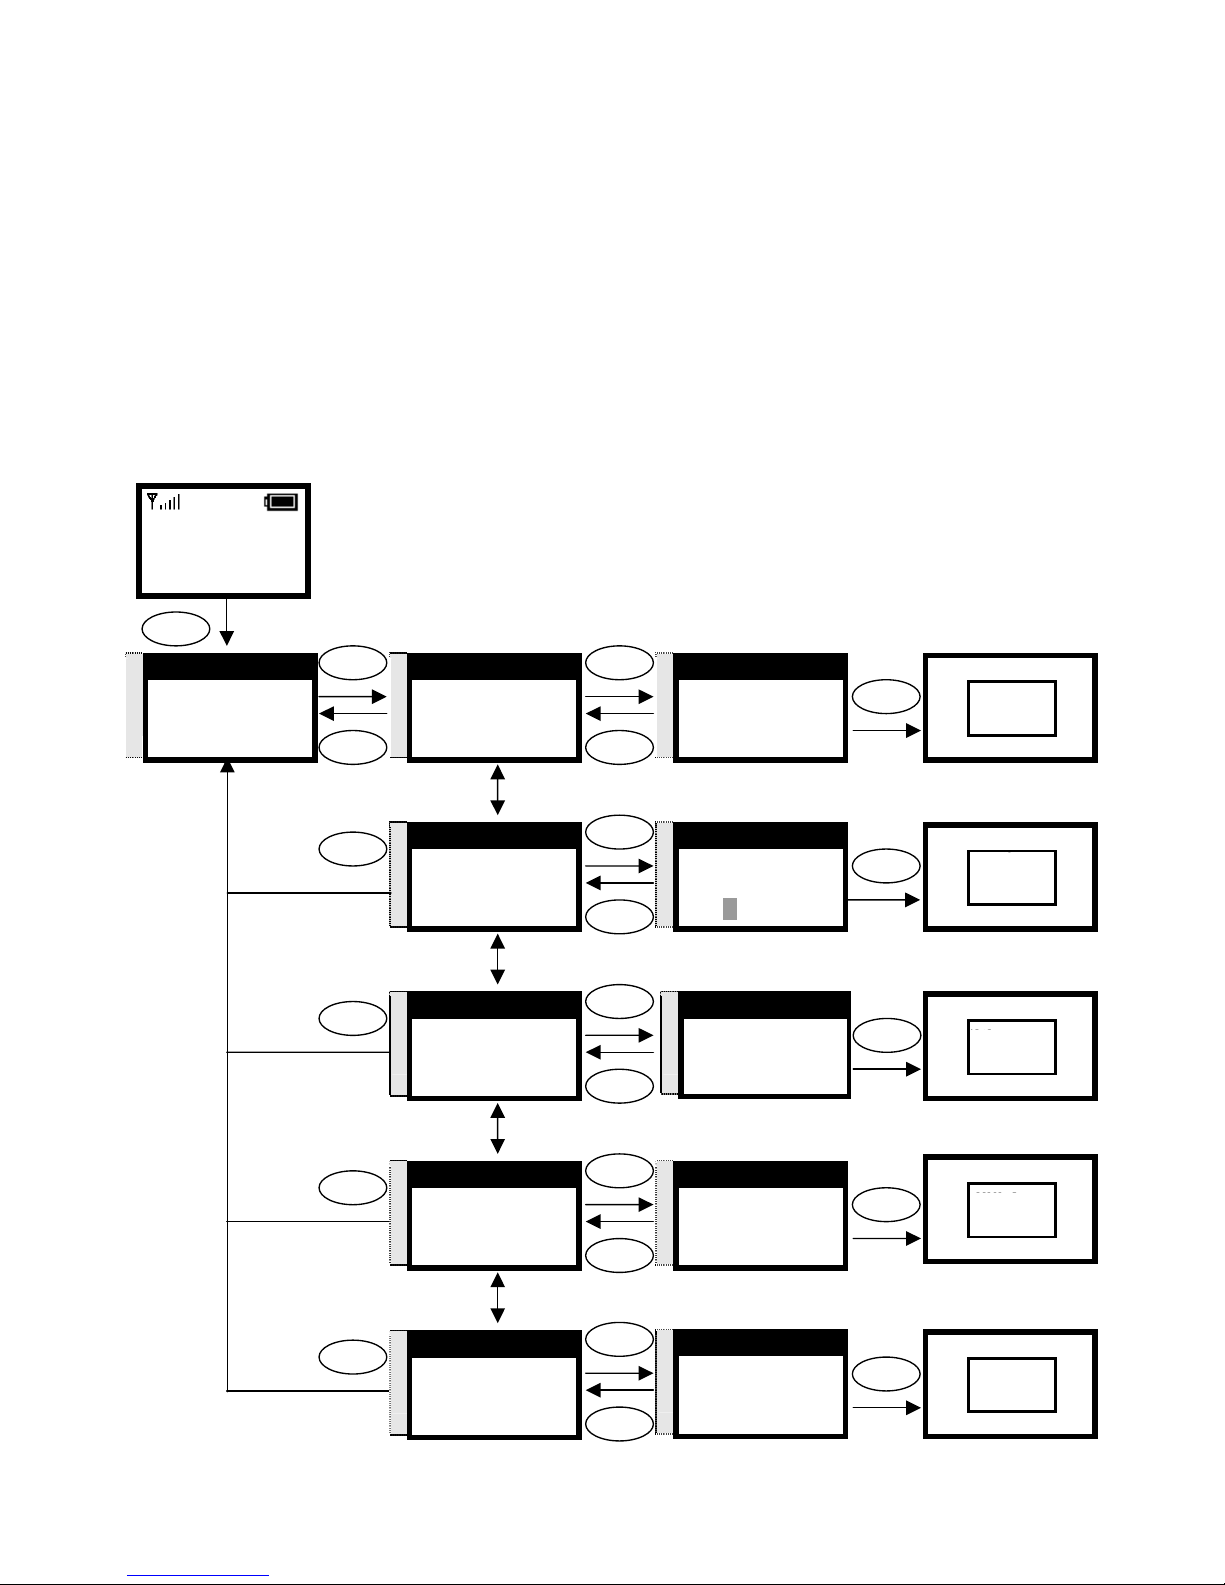
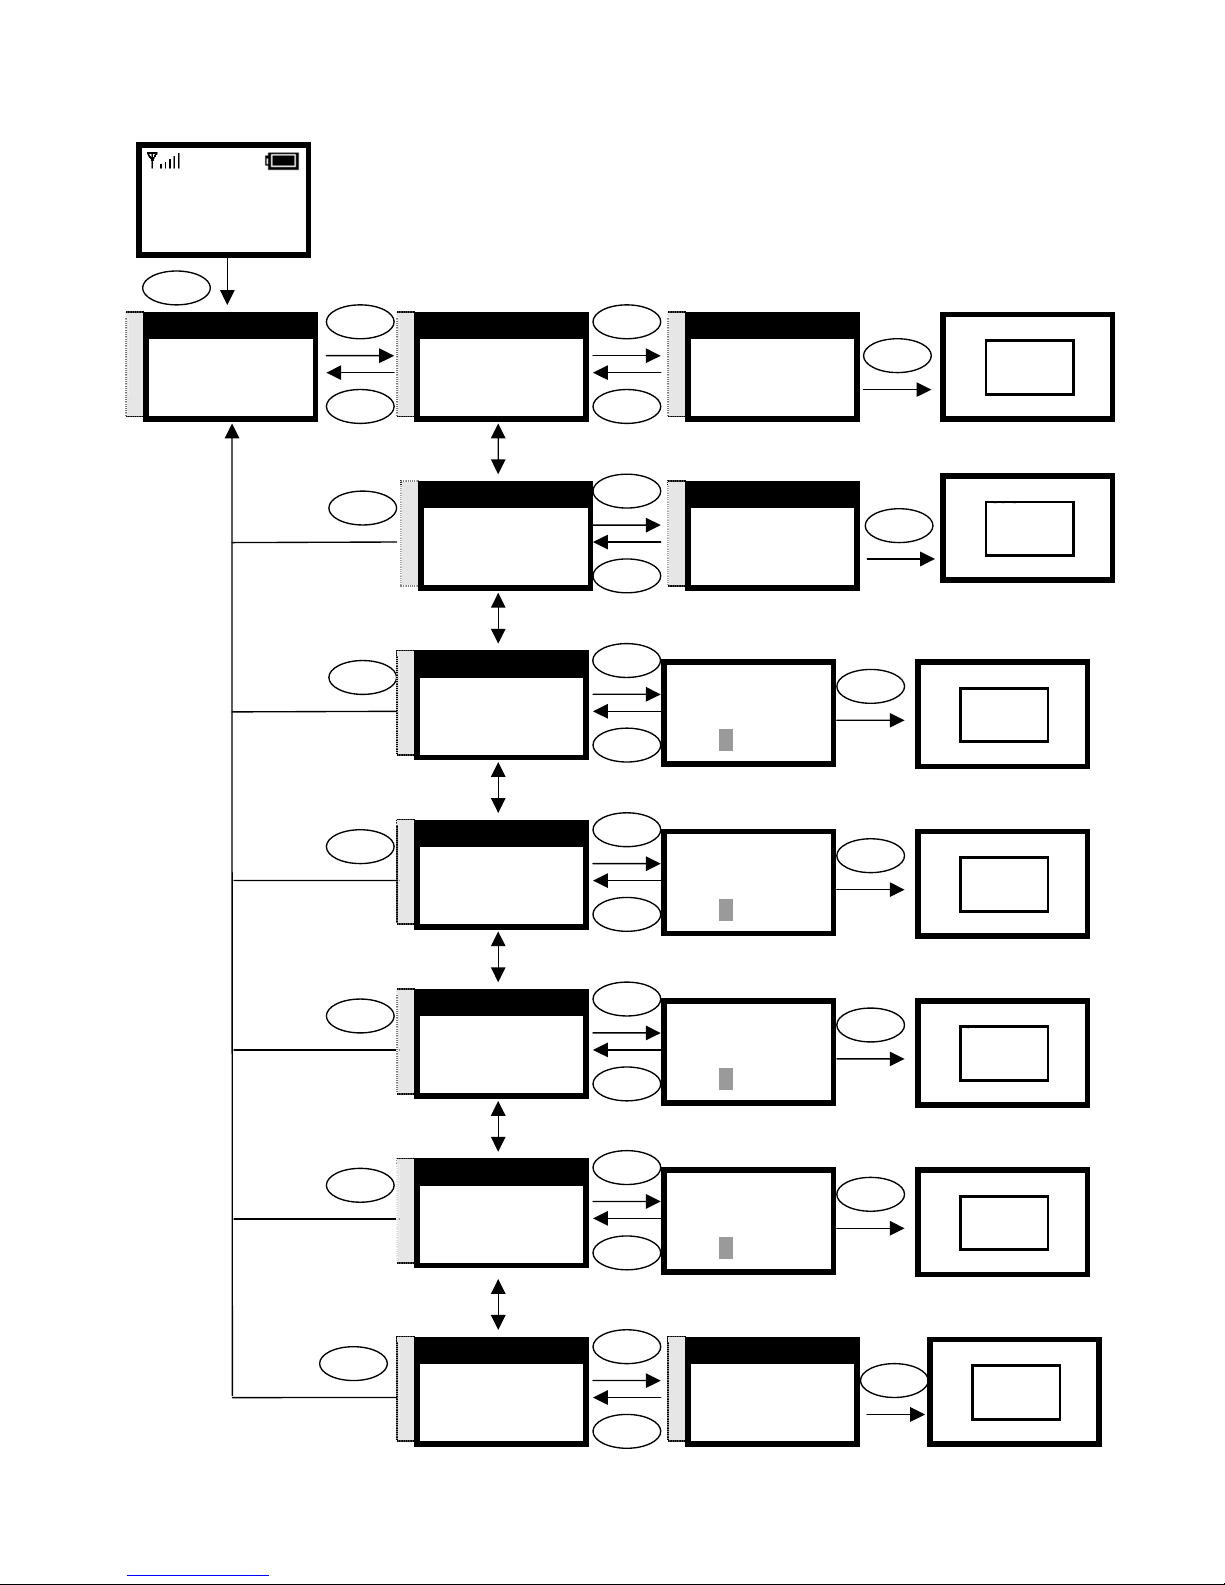
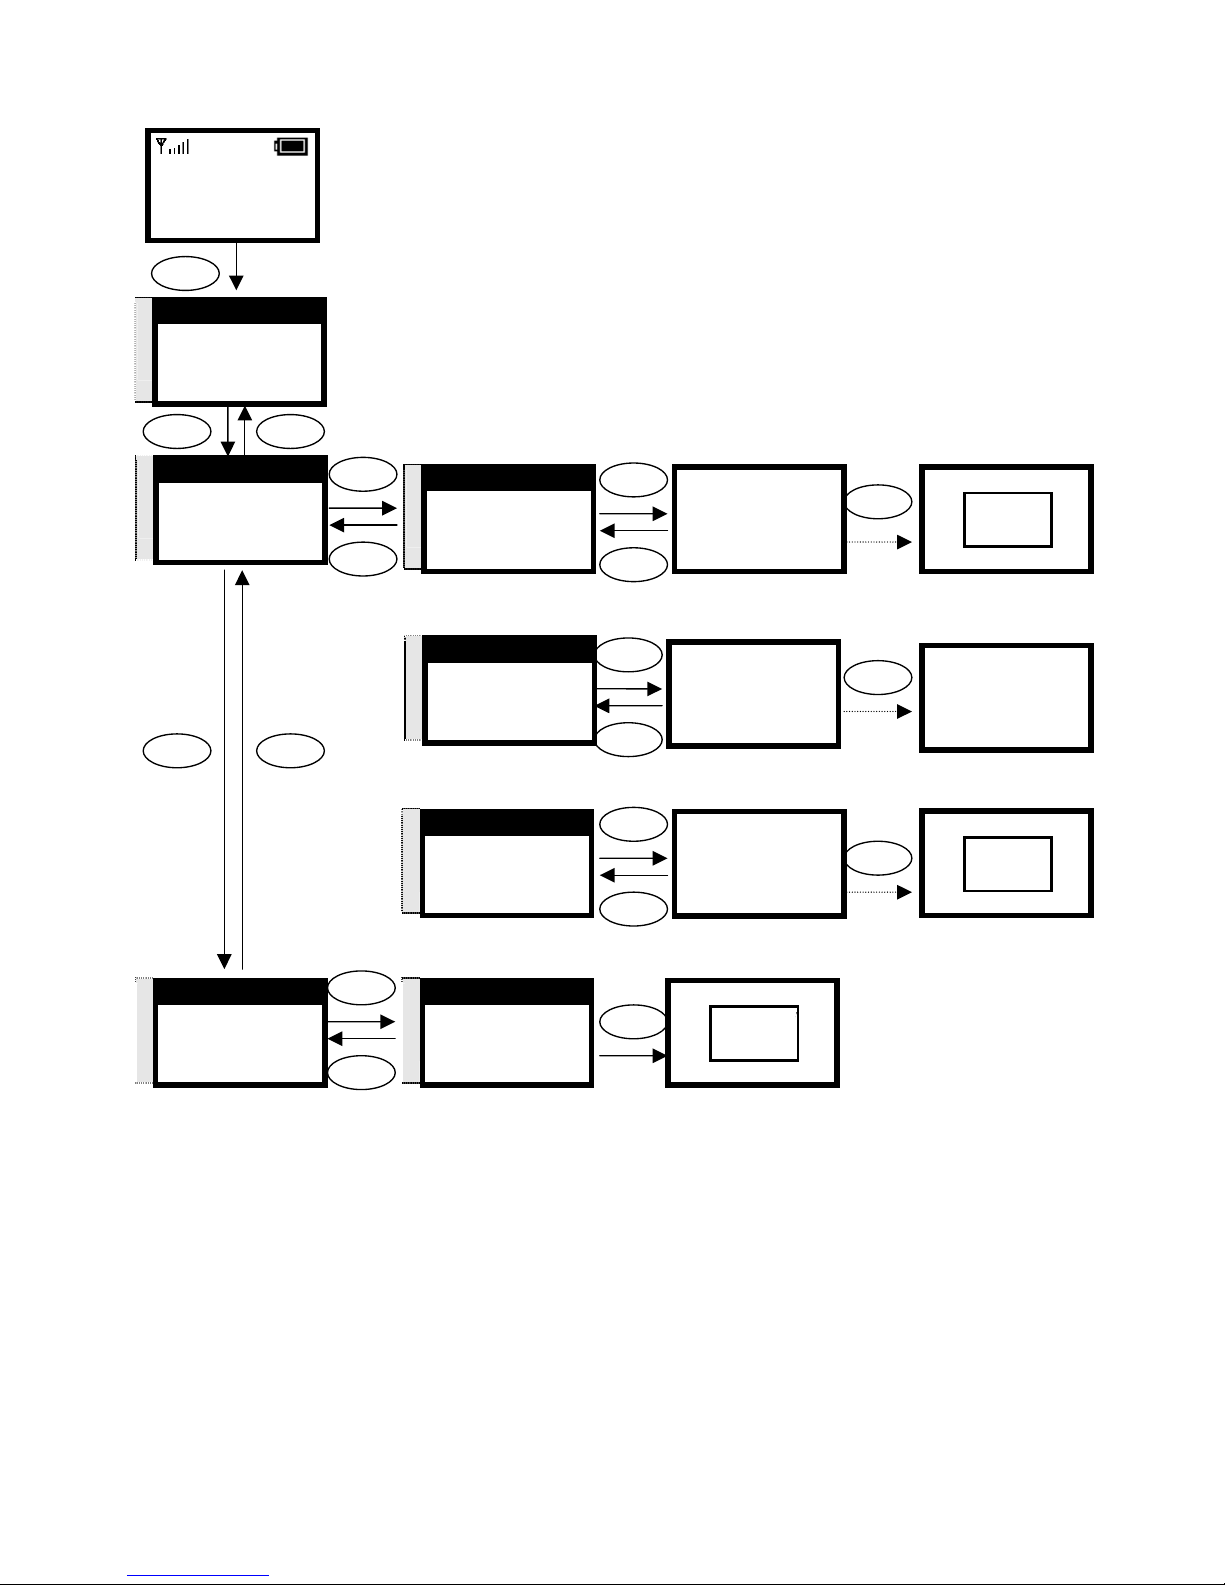
3.2. Wireless Configuration
This section provides instructions for configuring the wireless, 802.11b,
configuration submenu.
3.2.1. Wireless LAN Settings
This section explains the following:
Scanning for the Wireless Service Set Identifier
Making wireless settings
Setting up WEP Keys (Wireless Equivalent Privacy Keys)
3.2.1.1. Wireless LAN
Ok
S
T
2. SSID
3. Network Mode
4. Channel
Select Back
Input the SSID
12:00
WLAN660-user
Not Registered
Menu Names
Menu
Select Select
Select
Back Back
S
T
7. Wireless
8. Restart
1. Information
Select Back
S
T
1. Site Survey
2. SSID
3. Network Mode
Select Back
S
T
AP1
AP2
AP3
Select Back
Back
Select
Select
Select
Back
Select
Back
Back
S
T
[1]Ad Hoc
[2]Infra.
Select Back
S
T
3. Network Mode
4. Channel
5. Rate
Select Back
S
T
4. Channel
5. Rate
6. WEP Select
Select Back
S
T
Channel 1
Channel 2
Channel 3
Select Back
Select
Select
Back
Back
S
T
5. Rate
6. WEP Select
7. Profile
Select Back
S
T
[1]Auto
[2]1M
[3]2M
Select Back
Select
Back
S
T
SSID
bcm-test|
Ok Aa1@ Back
AP1
AP2
AP3
Select Back
OK
Back
SSID
bcm-test|
Ok Aa1@ Back
OK
[1]Ad Hoc
[2]Infra.
Select Back
OK
Channel 1
Channel 2
Channel 3
Select Back
OK
[1]Auto
[2]1M
[3]2M
Select Back
OK
Page 14
14
Back
S
T
6. WEP Select
7. Profile
8. Auth Type
Select Back
12:00
WLAN660-user
Not Registered
Menu Names
Select
Menu
Select
Ok
Select
Ok
Ok
Back
Back
S
T
7. Wep Key 1
8. Wep Key 2
9. Wep Key 3
Select Back
S
T
8. Wep Key 2
9. Wep Key 3
10. Wep Key 4
Select Back
S
T
9. Wep Key 3
10. Wep Key 4
11. Key Select
Select Back
Select
Ok
S
T
10. Wep Key 4
11. Key Select
12. Profile
Select Back
Input the wep key 1
Wep Key 1
*******
Ok Aa1@ Back
Select
Wep Key 2
*******
Ok Aa1@ Back
Wep Key 3
*******
Ok Aa1@ Back
Wep Key 4
*******
Ok Aa1@ Back
Input the wep key 3
Input the wep key 4
Select Select
Select
Back Back
S
T
[1]None
[2]64bit
[3]128bit
Select Back
Select
Select
Select
Back
S
T
[2]64bit
[3]128bit
[1]None
Select Back
S
T
7. Wireless
8. Restart
1. Information
Select Back
Input the wep key 2
[1]None
[2]64bit
[3]128bit
Select Back
OK
[2]64bit
[3]128bit
[1]None
Select Back
OK
Back
Wep Key 1
*******
Ok Aa1@ Back
OK
Wep Key 3
*******
Ok Aa1@ Back
OK
Wep Key 3
*******
Ok Aa1@ Back
OK
Back
Back
Back
Wep Key 4
*******
Ok Aa1@ Back
OK
S
T
6. WEP Select
7. Profile
8. Auth Type
Select Back
Select
Back
S
T
11. Key Select
12. Profile
13. Auth type
Select Back
S
T
Key 1
Key 2
Key 3
Select Back
Key 1
Key 2
Key 3
Select Back
OK
Select
Back
Page 15
15
Select Back
Select
[1]Open System
[2]Shared Key
Select Back
OK
S
T
7. Wireless
8. Restart
1. Information
Select Back
Select
12:00
WLAN660-user
Not Registered
Menu Names
Menu
1: (AP) Bcm
2:
3:
Select Back
Select
Back
S
T
1. Create
2. Activate
3. Remove
Select Back
S
T
12. Profile
13. Auth type
1. Site Survey
Select Back
Select
Back
1: (AP) Bcm
2:
3:
Select Back
OK
S
T
2. Activate
3. Remove
1. Create
Select Back
S
T
3. Remove
1. Create
2. Activate
Select Back
Select
Back
S
T
[1]Open System
[2]Shared Key
Select Back
S
T
13. Auth type
1.Site Survey
2.SSID
Select Back
Select
1: (AP) Bcm
2:
3:
Select Back
OK
1: (AP) Bcm
2:
3:
Select Back
Select
Back
1: (AP) Bcm
2:
3:
Select Back
Select
Back
Are you sure?
Ok Back
Ok
Select Back
Page 16
16
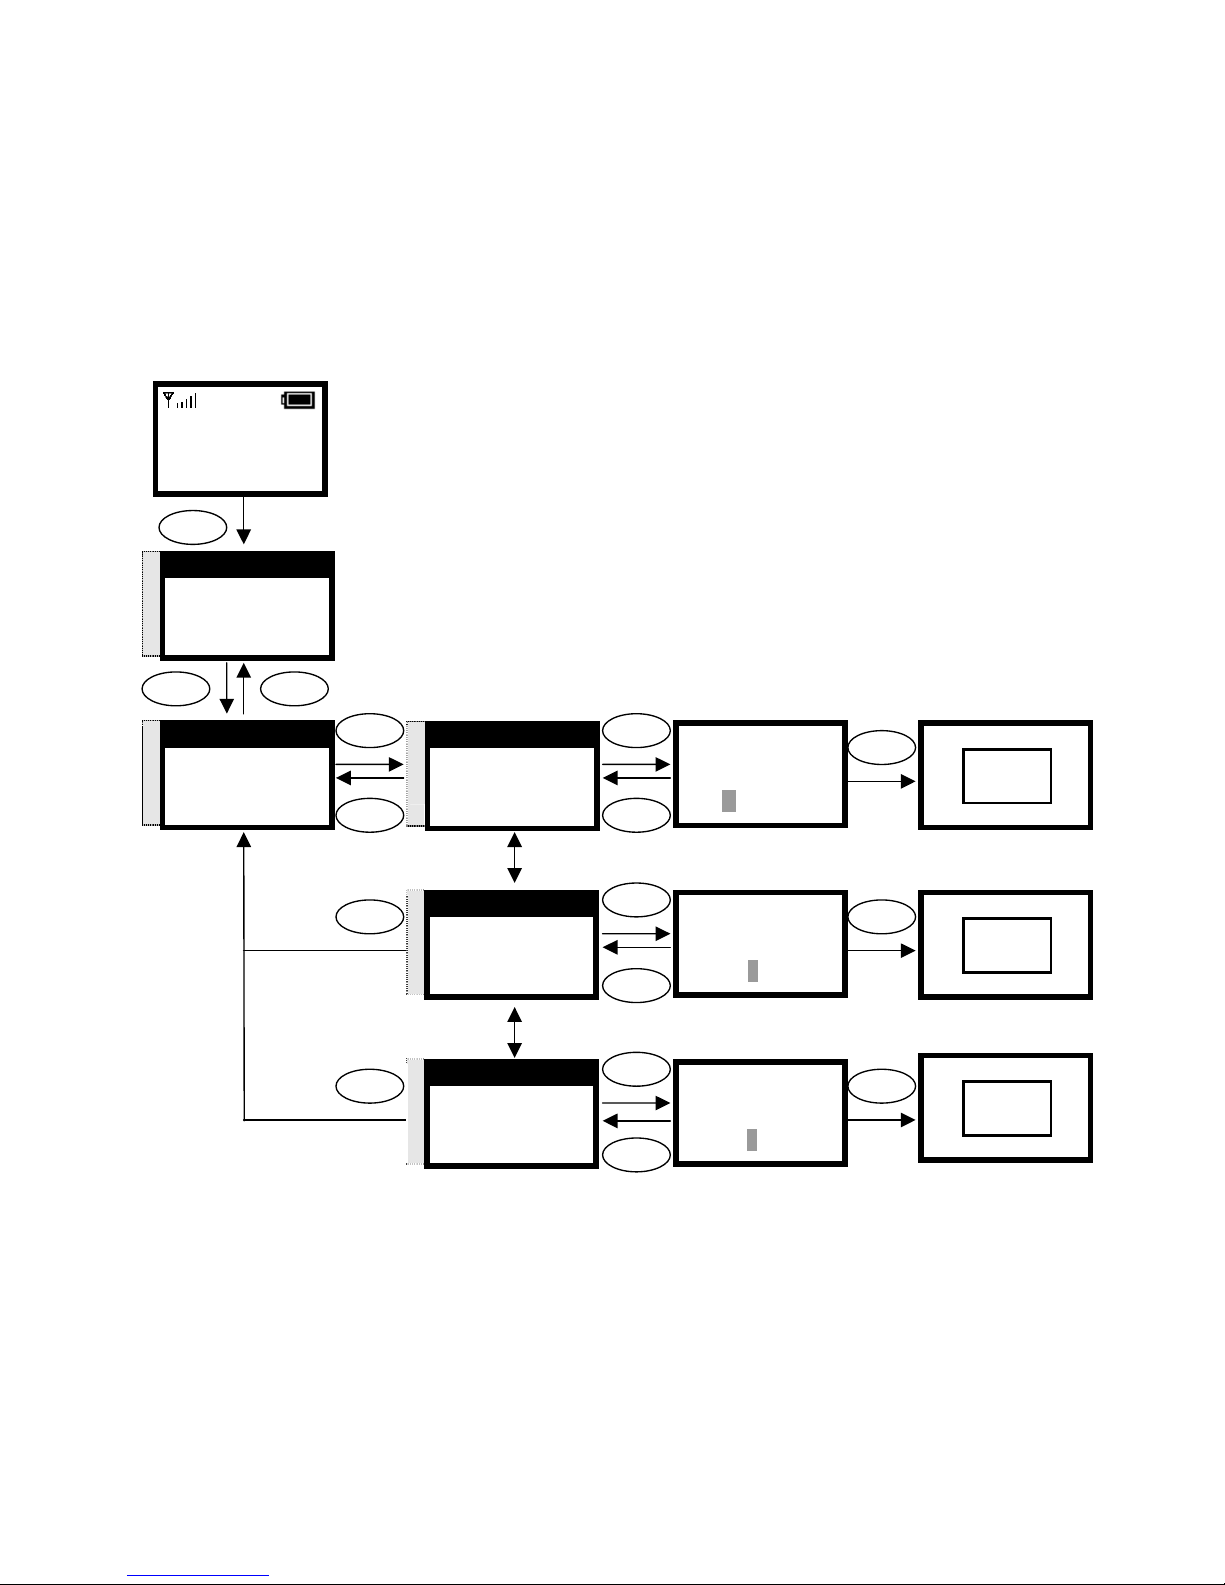
3.3. SIP Configuration
This section provides information on the Session Initiation Protocol (SIP) settings.
Please note that you have to configure both, Registrar Server , SIP Proxy Server and
Outbound Proxy.
3.3.1. Registrar IP Settings
12:00
WLAN660-user
Not Registered
Menu Names
Menu
Select Back
Registrar IP
192.168.0.3|
Ok Aa1@ Back
Select
Ok
Select
Back
Port
5060|
Ok Aa1@ Back
Select
Ok Back
S
T
2. Port
3. Expiry Time
1. Registrar IP
Select Back
Input the Registrar IP
S
T
1. Registrar IP
2. Port
3. Expiry Time
Select Back
Input the Port
Expiry Time
3600|
Ok Aa1@ Back
Select
Ok Back
S
T
3. Expiry Time
1. Registrar IP
2. Port
Select Back
Input the Expiry Time
S
T
5. SIP Setting
6. Settings
7. Wireless
Select Back
Registrar IP
192.168.0.3|
Ok Aa1@ Back
OK
Back
Back
Back
Port
5060|
Ok Aa1@ Back
OK
Expiry Time
3600|
Ok Aa1@ Back
OK
S
T
1. Registrar
2. Outbound Proxy
3. Proxy Server
Select Back
Page 17
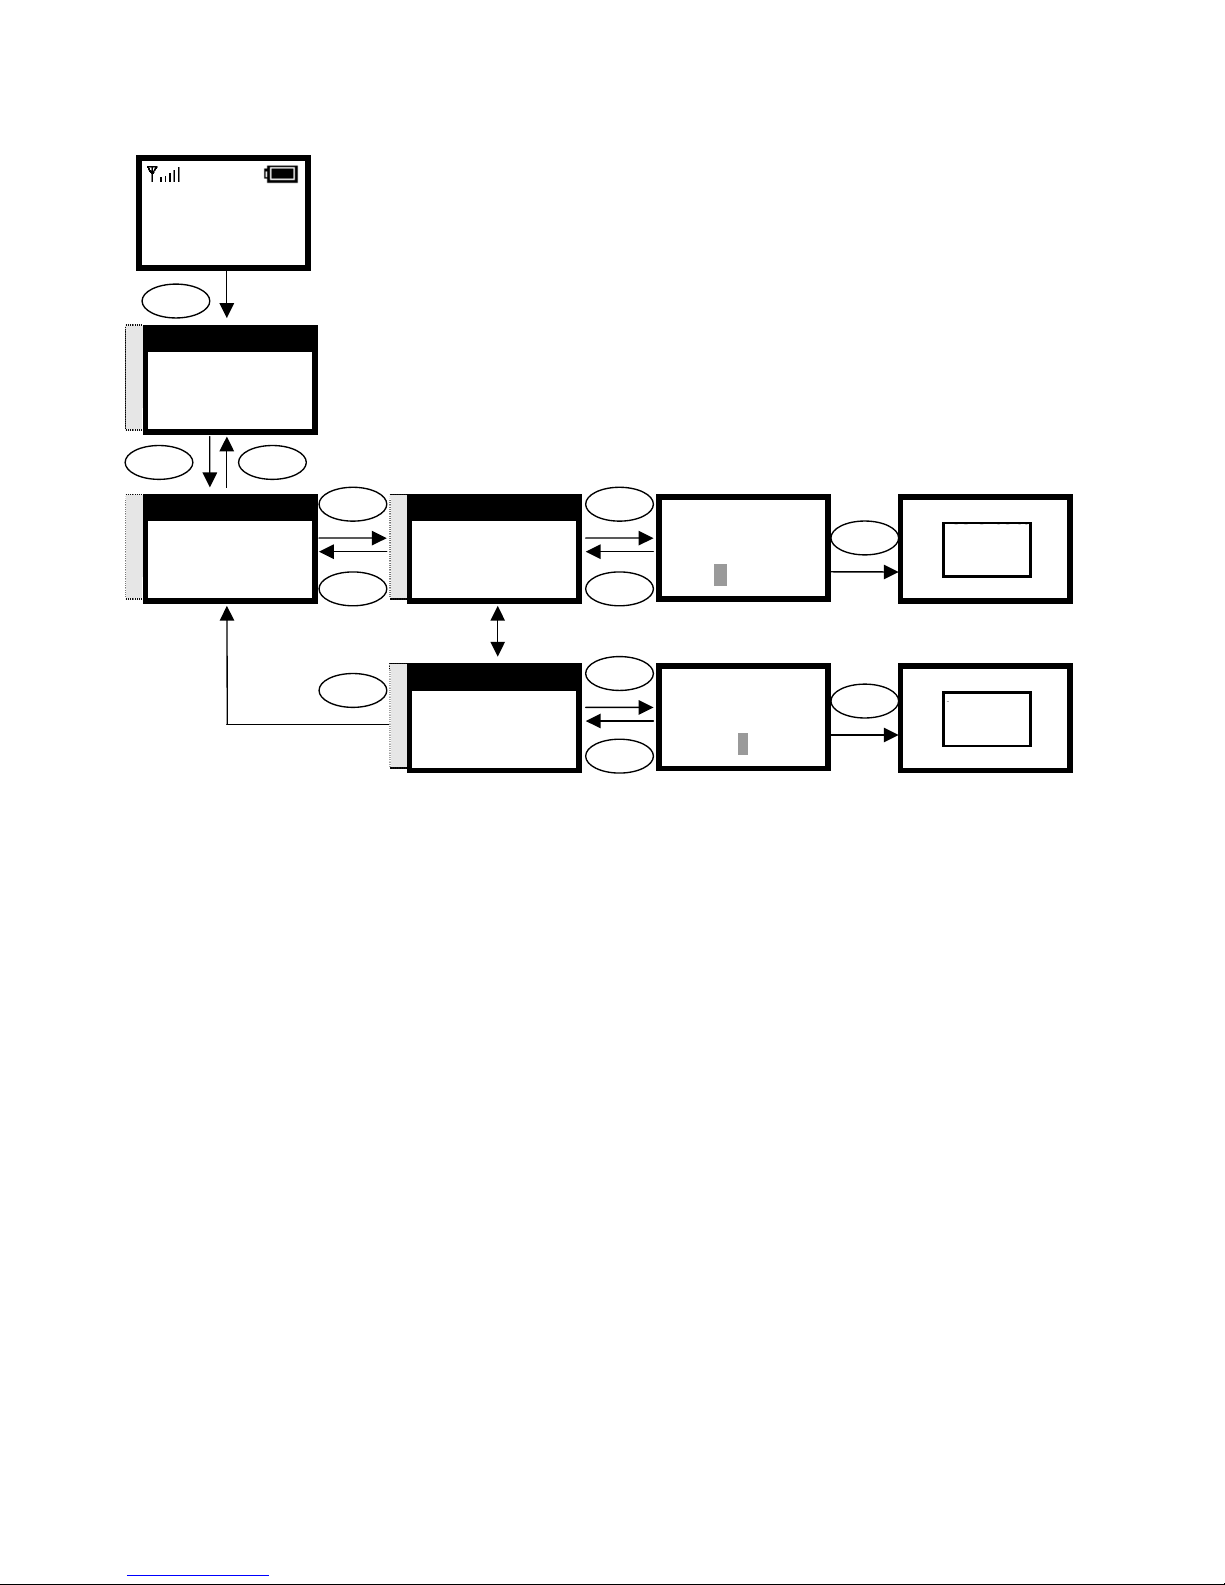
17
3.3.2. Outbound Proxy Settings
Back
Select
12:00
WLAN660-user
Not Registered
Menu Names
Menu
S
T
5. SIP Setting
6. Settings
7. Wireless
Select Back
Proxy IP
192.168.0.191|
Ok Aa1@ Back
Select
Ok
Select
Port
5060|
Ok Aa1@ Back
Select
Ok
Back
S
T
2. Outbound Proxy
3. Proxy Server
4. User Account
Select Back
S
T
1. Proxy IP
2. Port
Select Back
S
T
2. Port
1. Proxy IP
Select Back
Input the Proxy IP
Input the Port
Port
5060|
Ok Aa1@ Back
OK
Proxy IP
192.168.0.191|
Ok Aa1@ Back
OK
Back
Back
Back
Page 18
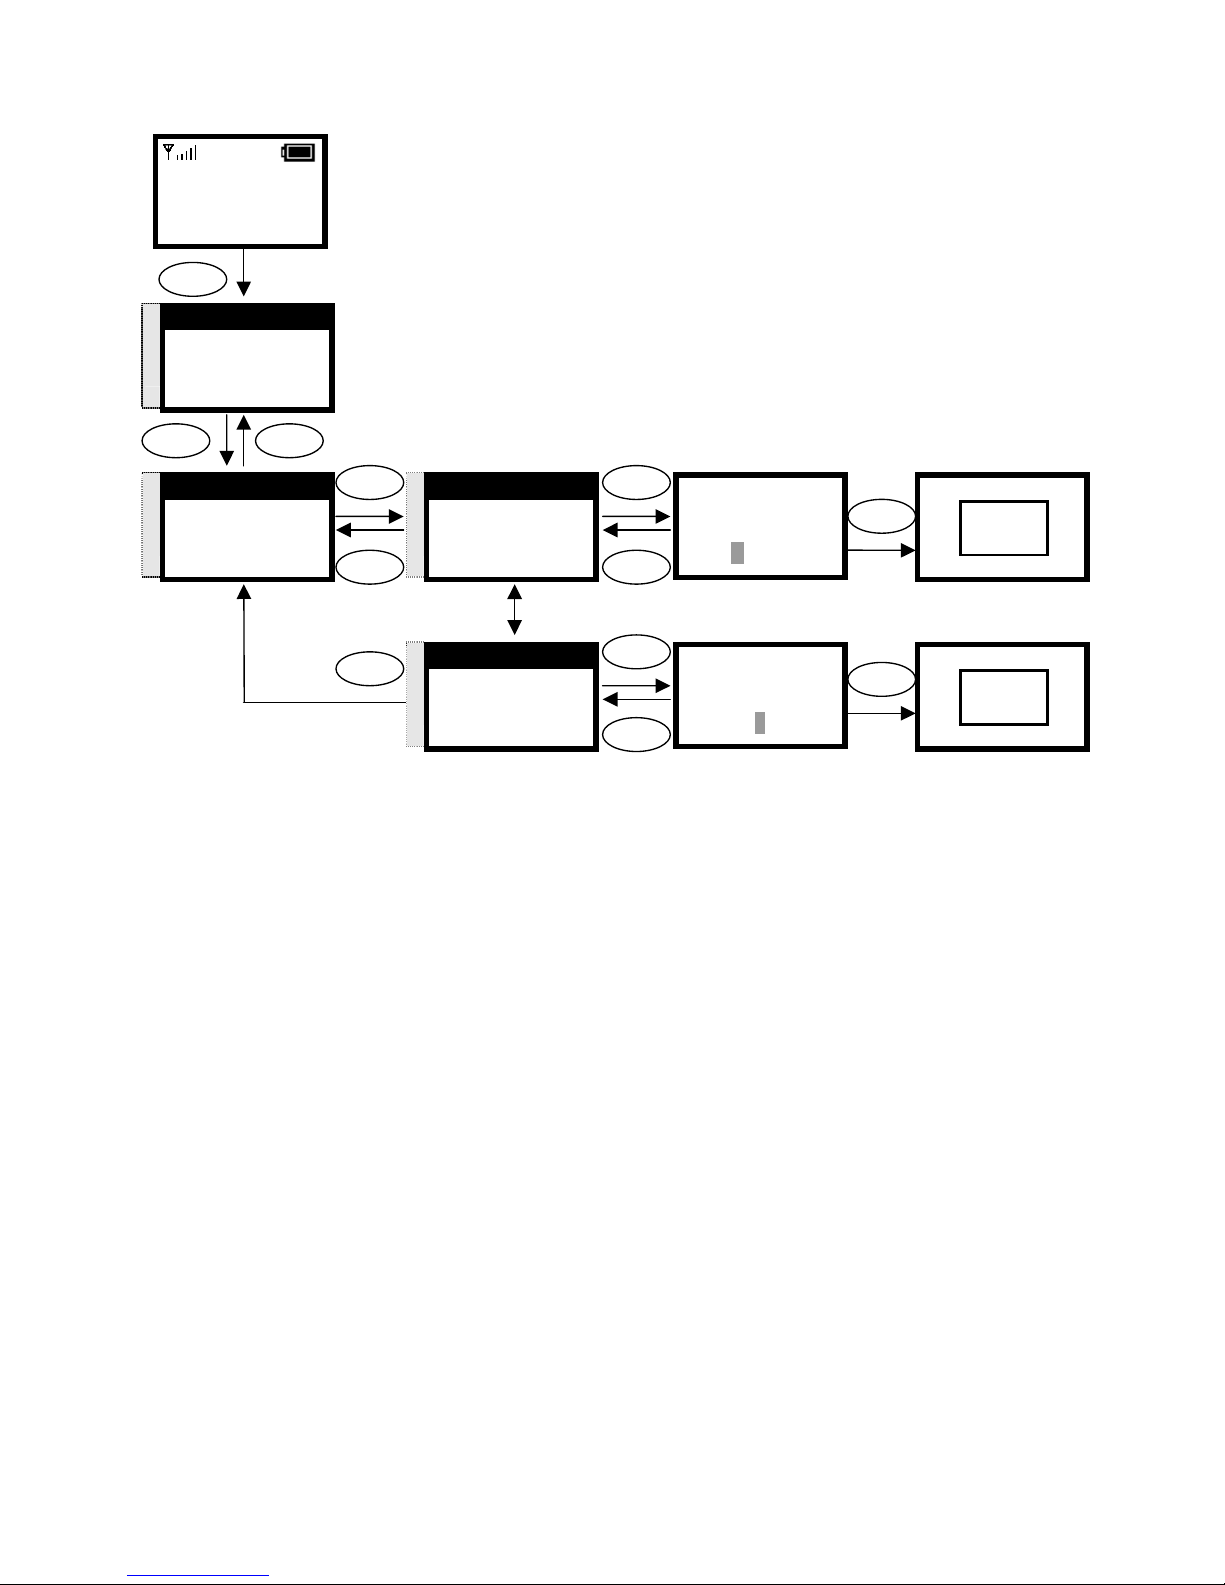
18
3.3.3. SIP Proxy Server Settings
Back
Select
12:00
WLAN660-user
Not Registered
Menu Names
Menu
S
T
5. SIP Setting
6. Settings
7. Wireless
Select Back
Proxy IP
192.168.0.3|
Ok Aa1@ Back
Select
Ok
Select
Port
5060|
Ok Aa1@ Back
Select
Ok
Back
S
T
3. Proxy Server
4. User Account
1. Registrar
Select Back
S
T
1. Proxy IP
2. Port
Select Back
S
T
2. Port
1. Proxy IP
Select Back
Input the Proxy IP
Input the Port
Port
5060|
Ok Aa1@ Back
OK
Proxy IP
192.168.0.3|
Ok Aa1@ Back
OK
Back
Back
Back
Page 19
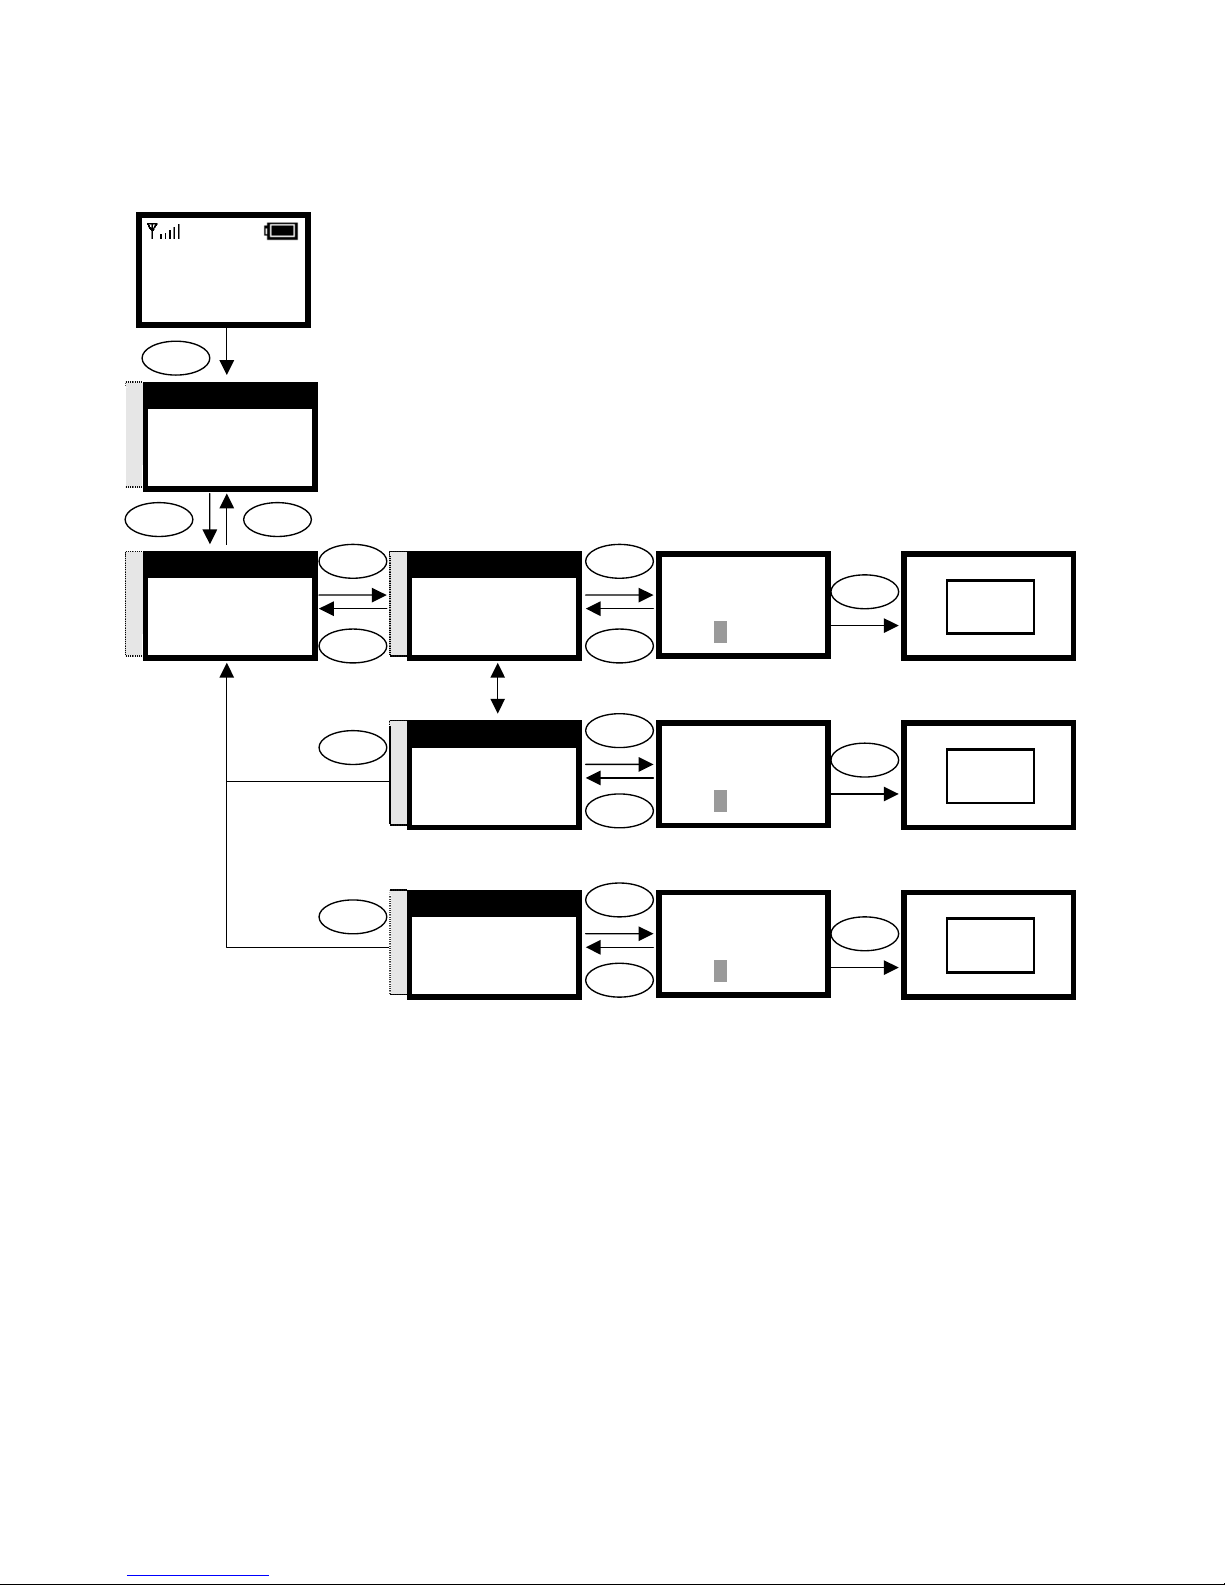
19
3.3.4. Setting up the User Account
This section explains how to set up your phone number, username and
password you will be using to connect to the SIP server.
Select Back
12:00
WLAN660-user
Not Registered
Menu Names
Menu
S
T
5. SIP Setting
6. Settings
7. Wireless
Select Back
Input the number
Input the name
Input the password
Phone Number
100|
Ok Aa1@ Back
Select
Ok
Select
Back
Username
David|
Ok Aa1@ Back
Select
Ok
Back
Back
S
T
4. User Account
1. Registrar
2.
Outbound Proxy
Select Back
S
T
1. Phone Number
2. Username
3. User Pwd
Select Back
S
T
2. Username
3. User Pwd
1. Phone Number
Select Back
User Pwd
******|
Ok Aa1@ Back
Select
Ok
S
T
3. User Pwd
1. Phone Number
2. Username
Select Back
Back
Phone Number
100|
Ok Aa1@ Back
OK
Username
David|
Ok Aa1@ Back
OK
Back
Back
User Pwd
******|
Ok Aa1@ Back
OK
Page 20
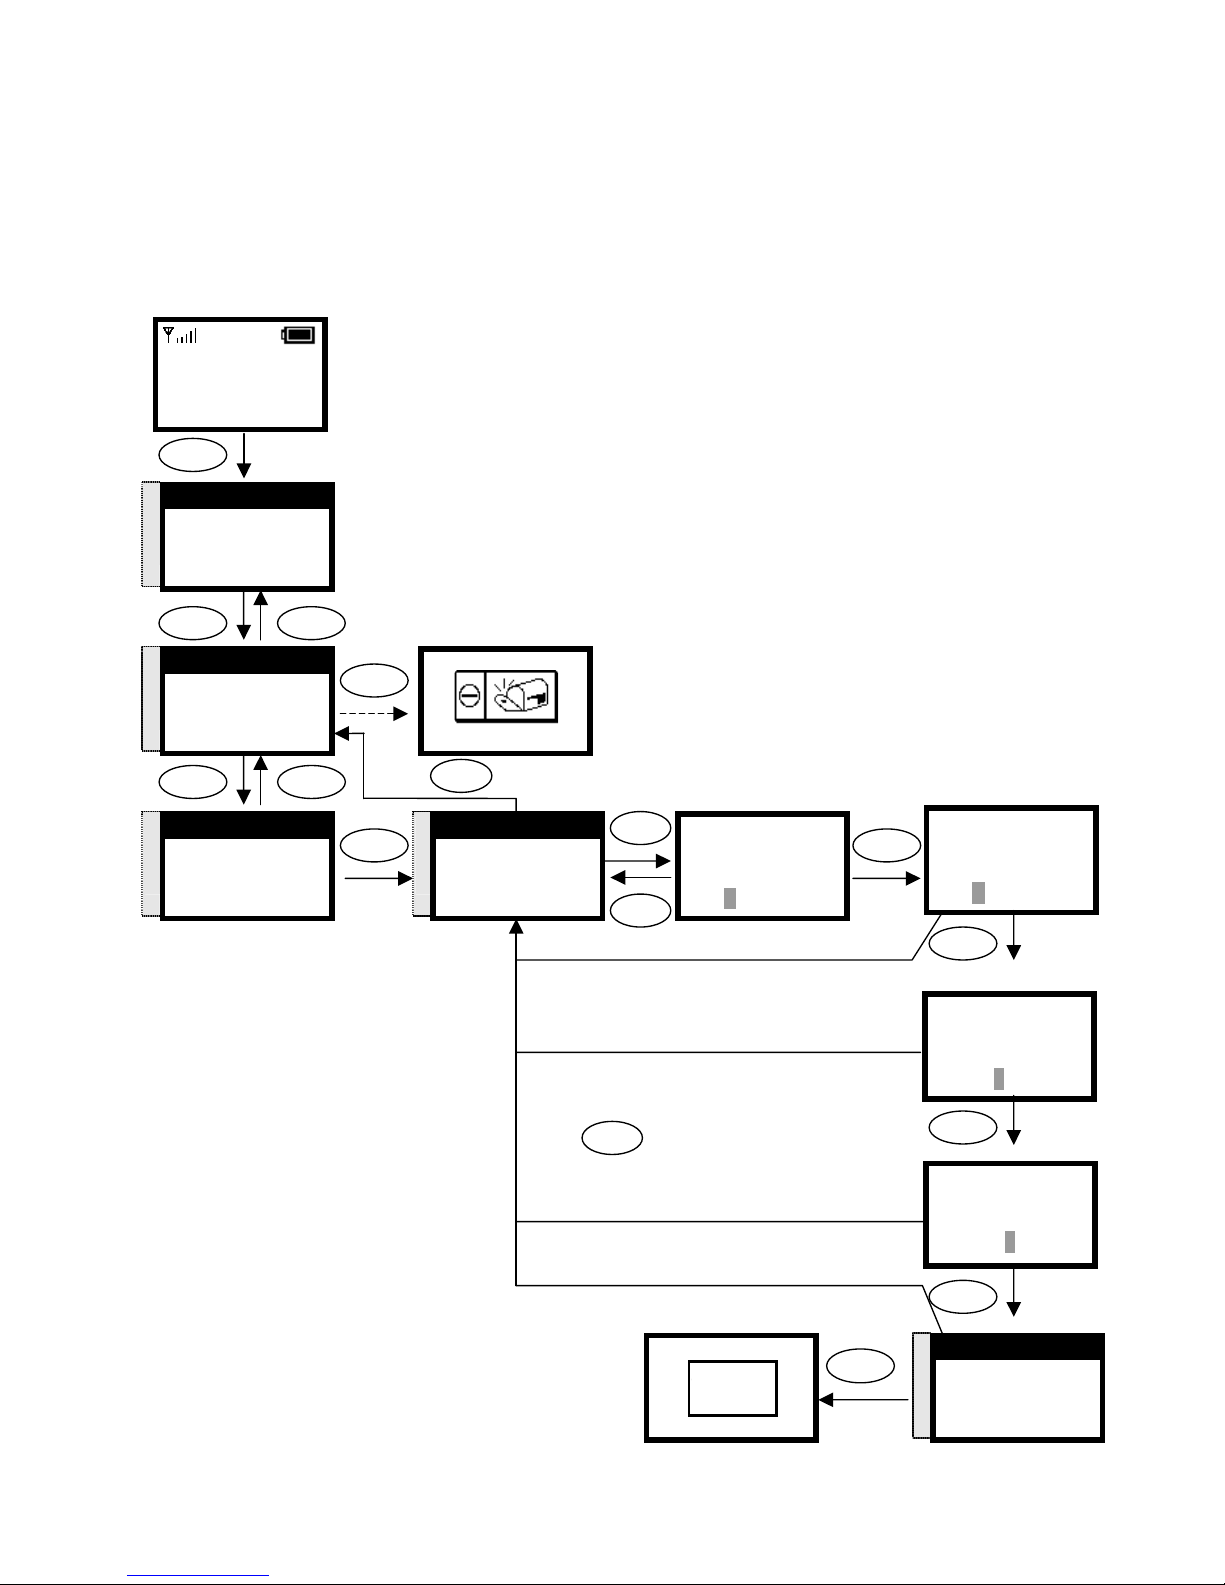
20
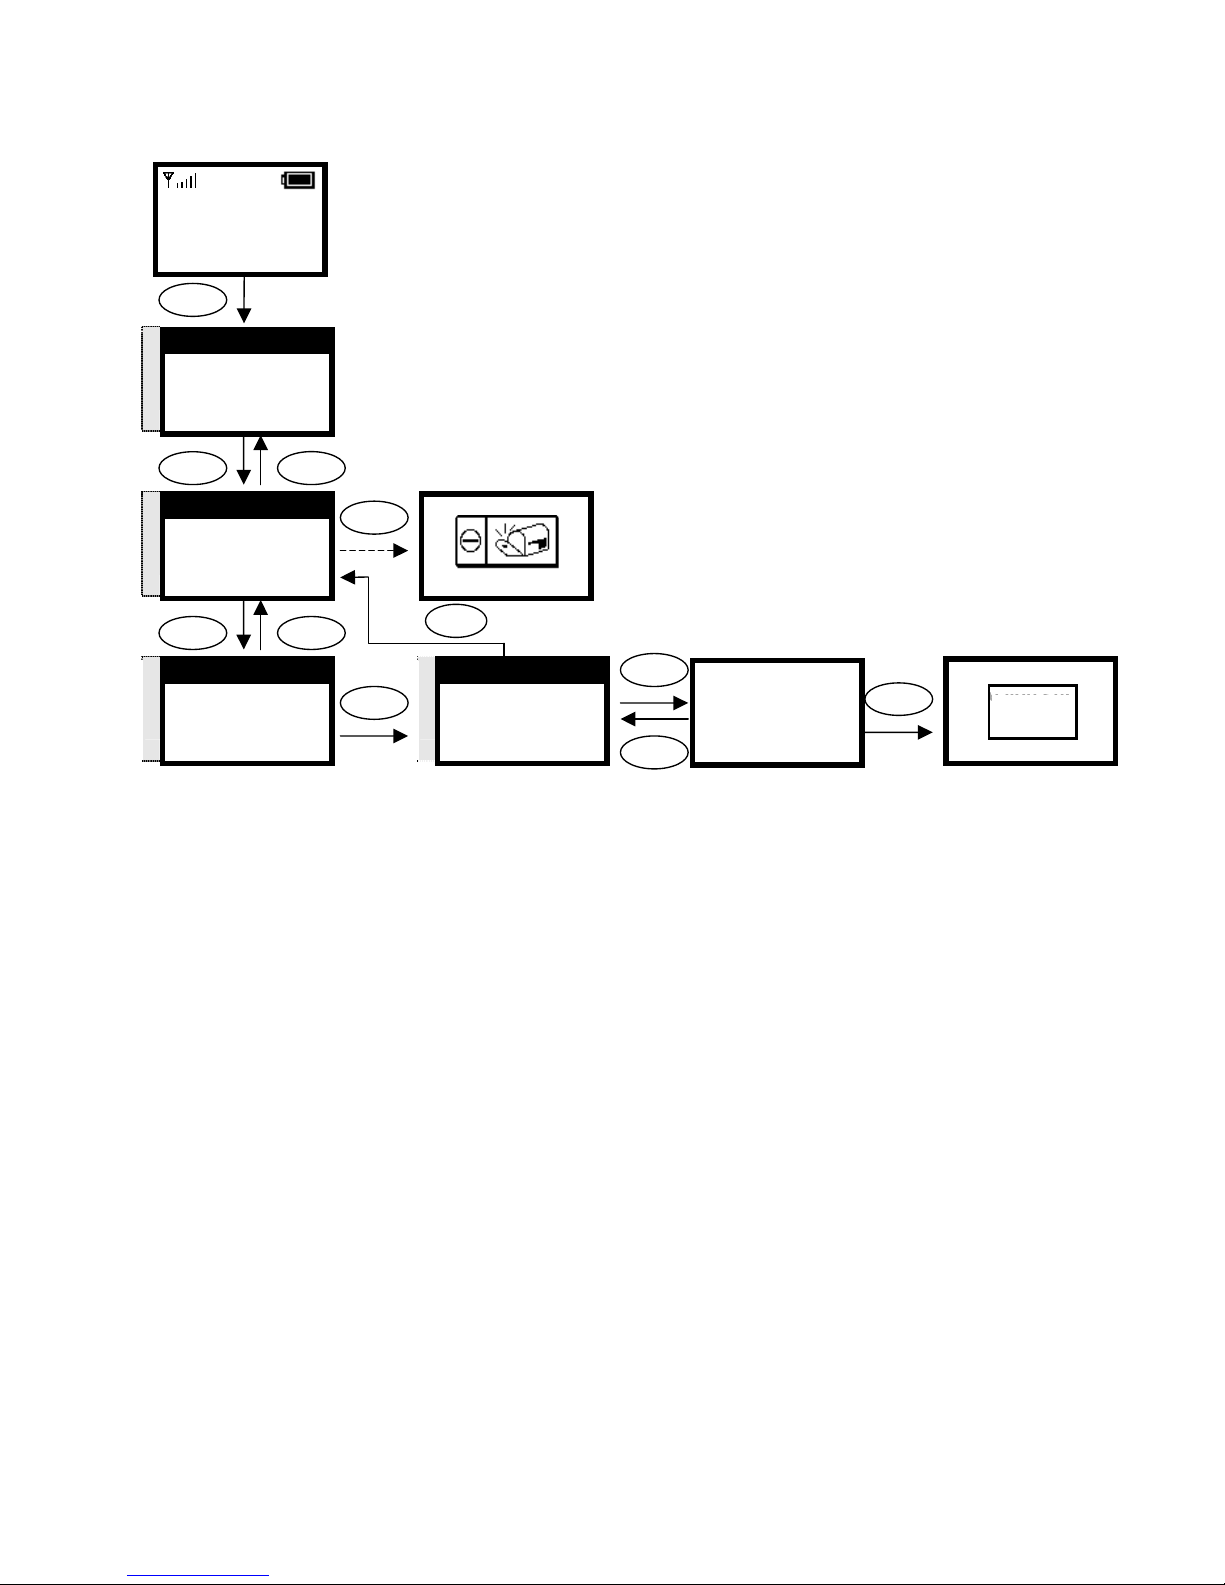
3.4. Using the Phonebook
This section provides information about accessing the phonebook and using its
features.
3.4.1. Searching Phonebook Entries - Edit Entry
Back
Select
S
T
P2P
Proxy
Select Back
Port:
5060
Ok Aa1@ Back
User Info:
123456|
Ok Aa1@ Back
12:00
WLAN660-user
Not Registered
Menu Names
Menu
Select Back
Display Name:
David|
Ok Aa1@ Back
S
T
3. Phonebook
4. Net Setting
5. SIP Setting
Select Back
S
T
1. Search
2. Add Entry
3. Erase
Select Back
Select
Back
S
T
David
Mark
Ken
Select Back
S
T
1. Edit
2. Erase
3. Speed dial
Select Back
Host IP:
172.16.156.123|
Ok Aa1@ Back
Edit the number
Edit the IP
Select
P2P
Proxy
Select Back
OK
Selec
Ok
Ok
Ok
Ok
Select
Edit the name
1. Search
2. Add Entry
3. Erase
Select Back
Press key , go back menu
Back
Press key , go back menu
Back
Page 21
21
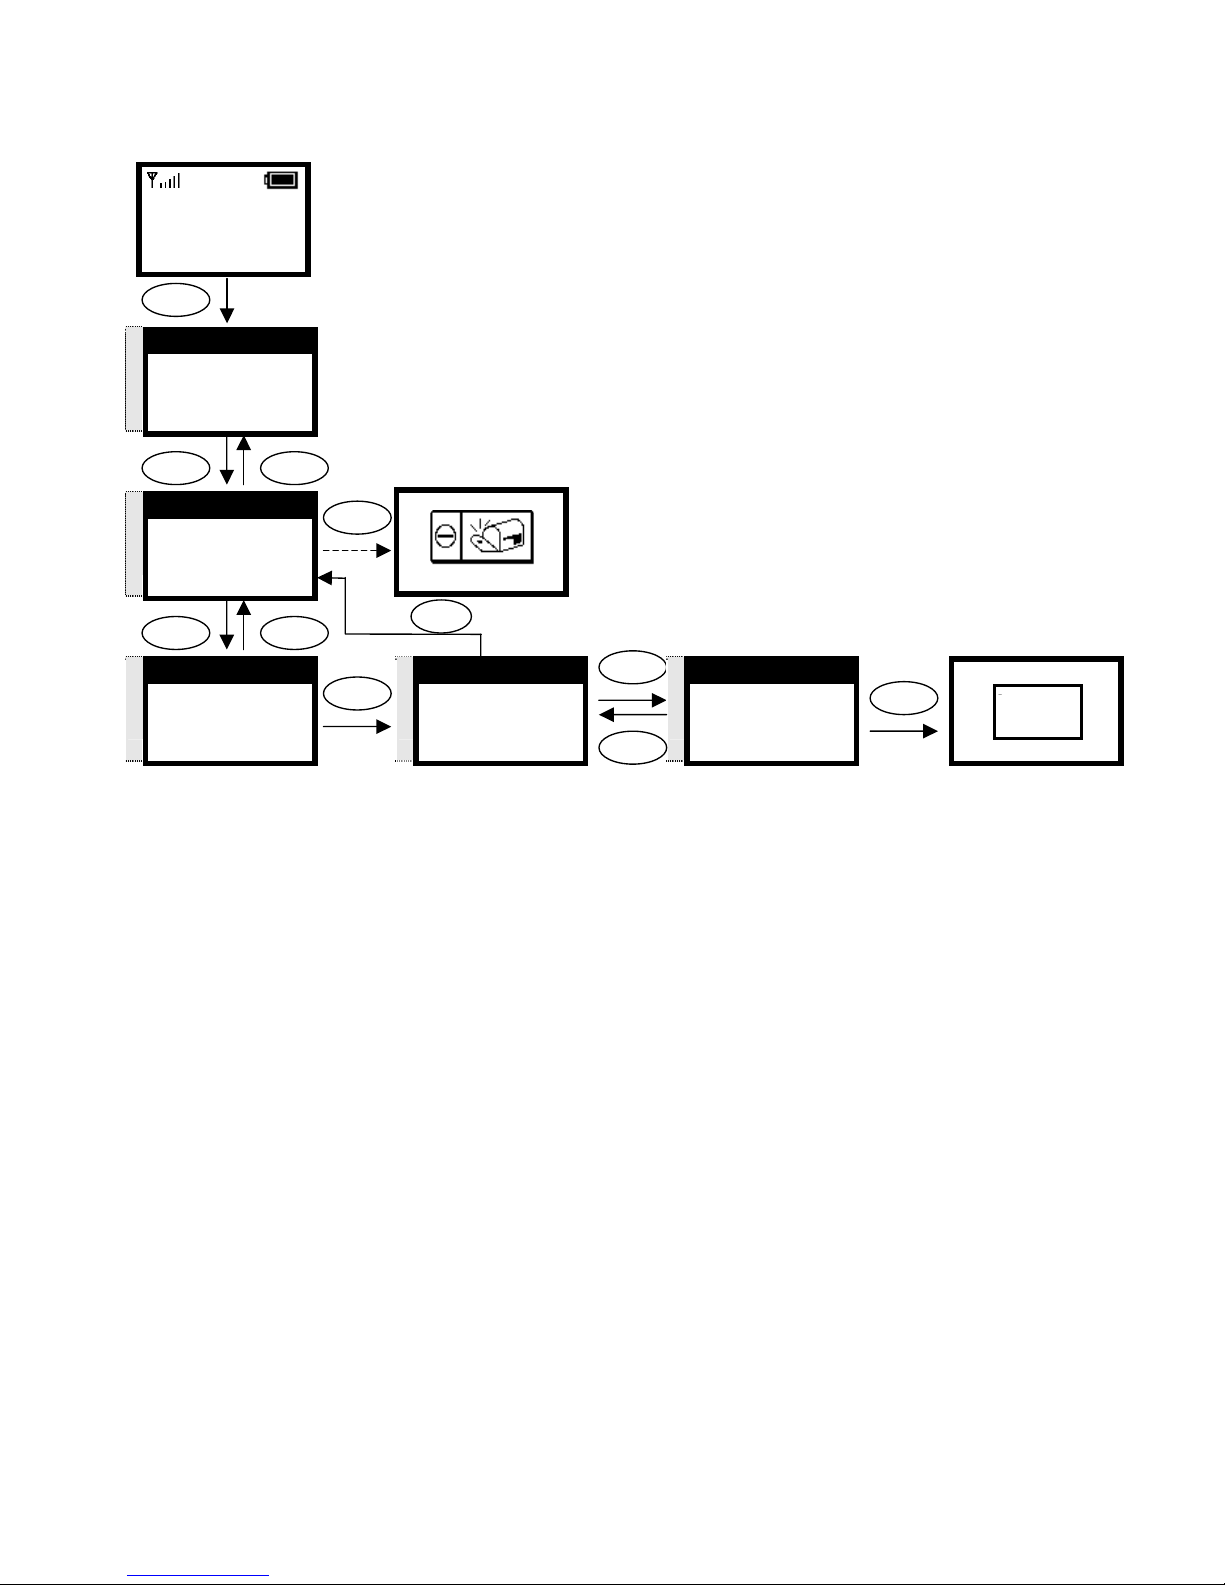
3.4.2. Searching Phonebook Entries - Erase Entry
1. Search
2. Add Entry
3. Erase
Select Back
S
T
1. Search
2. Add Entry
3. Erase
Select Back
Back
12:00
WLAN660-user
Not Registered
Menu Names
Menu
Select
Back
Are you sure?
Ok Back
Select
S
T
3. Phone book
4. Net Setting
5. SIP Setting
Select Back
Select
S
T
David
Mark
Ken
Select Back
S
T
2. Erase
3. Speed dial
1. Edit
Select Back
Select
Ok
Select
Are you sure?
Ok Back
OK
Back
Press key , go back menu
Back
Page 22
22
3.4.3. Searching Phonebook Entries – Speed dial Entry
Back
Select
1. Search
2. Add Entry
3. Erase
Select Back
12:00
WLAN660-user
Not Registered
Menu Names
Menu
Select Back
Select
S
T
3. Phonebook
4. Net Setting
5. SIP Setting
Select Back
S
T
1. Search
2. Add Entry
3. Erase
Select Back
Select
S
T
David
Select Back
S
T
3. Speed dial
1. Edit
2. Erase
Select Back
Select
S
T
Key 1 David
Key 2
Key 3
Select Back
Select
Key 1 David
Key 2
Key 3
Select Back
OK
Back
Press key , go back menu
Back
Page 23
23
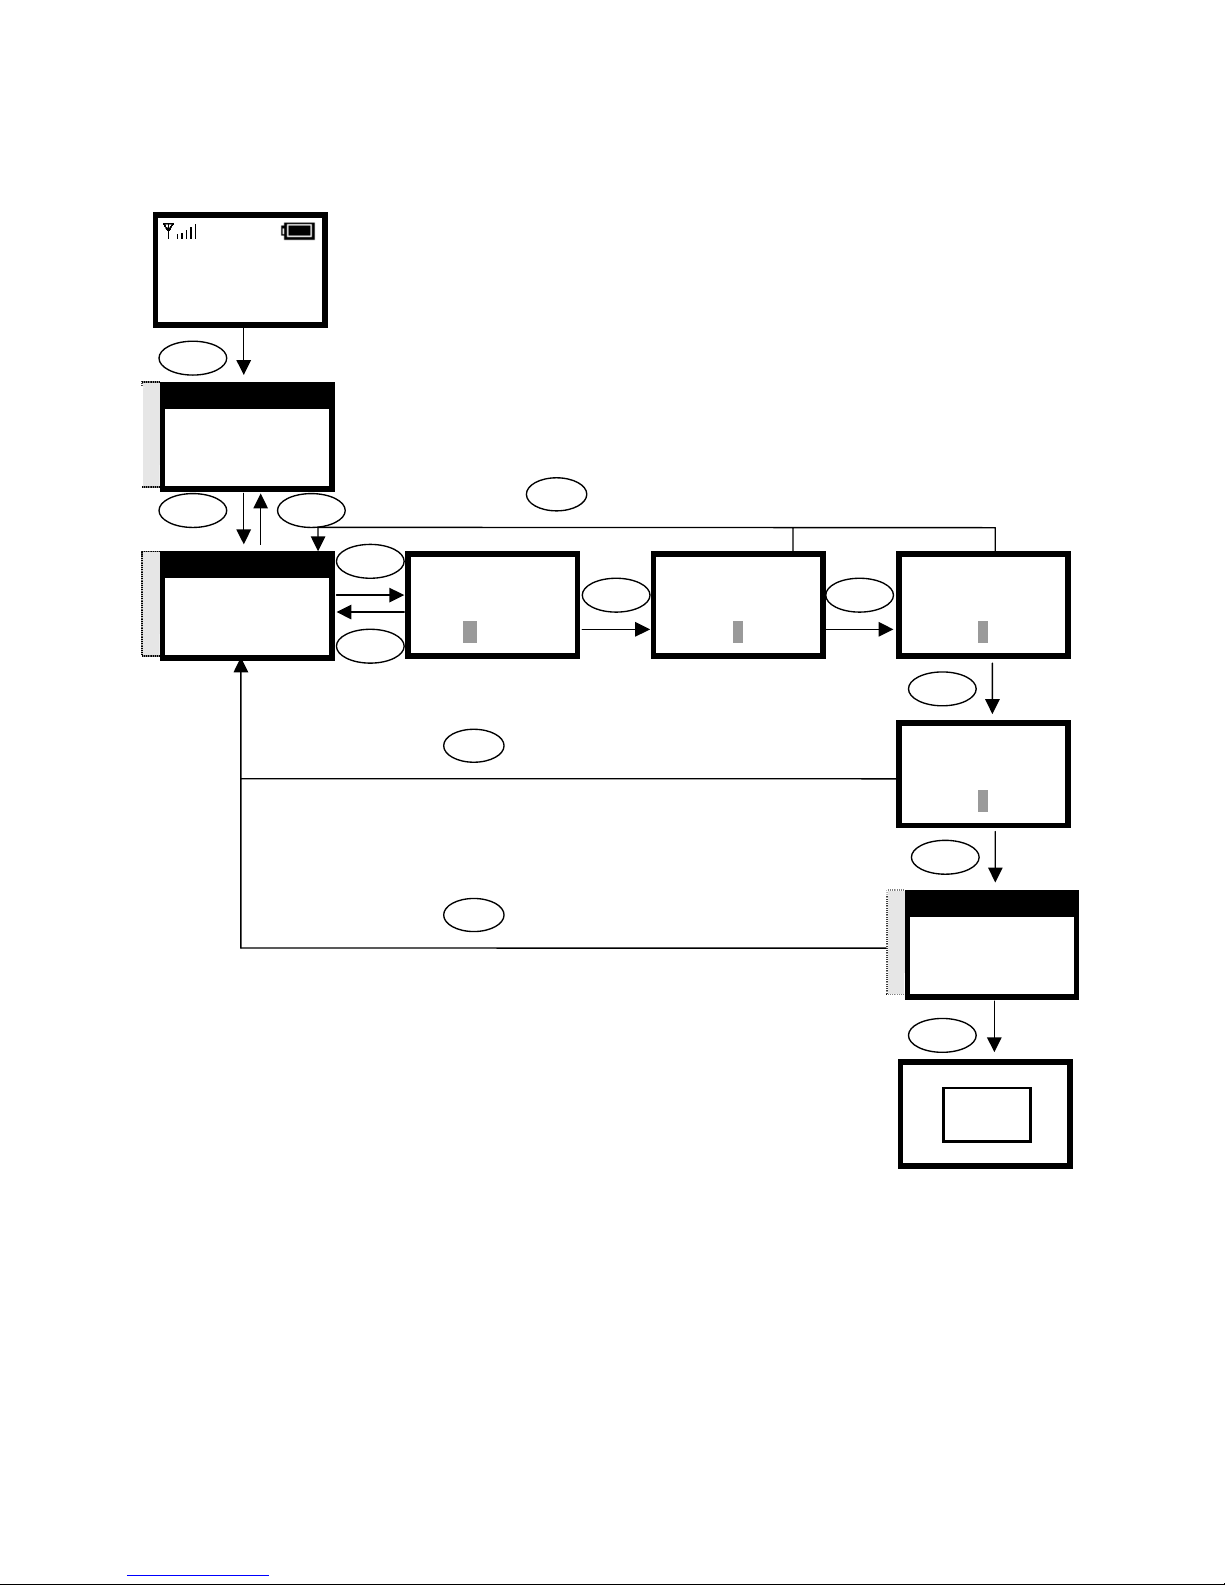
3.4.4. Adding a Phonebook Entry
This section provides information on adding a new entry in your Phonebook.
P2P
Proxy
Select Back
OK
12:00
WLAN660-user
Not Registered
Menu Names
Display Name:
David|
Ok Aa1@ Back
User Info:
123456|
Ok Aa1@ Back
S
T
3. Phonebook
4. Net Setting
5. SIP Setting
Select Back
S
T
2. Add Entry
3. Erase
1. Search
Select Back
Host IP:
123.123.123.123|
Ok Aa1@ Back
Input the name Input the number Input the IP
S
T
P2P
Proxy
Select Back
Port:
5060
Ok Aa1@ Back
Select
Ok Ok
Select
Select Back
Menu
Back
Ok
Ok
Press key , go back menu
Back
Press key , go back menu
Back
Press key , go back menu
Back
Page 24
24
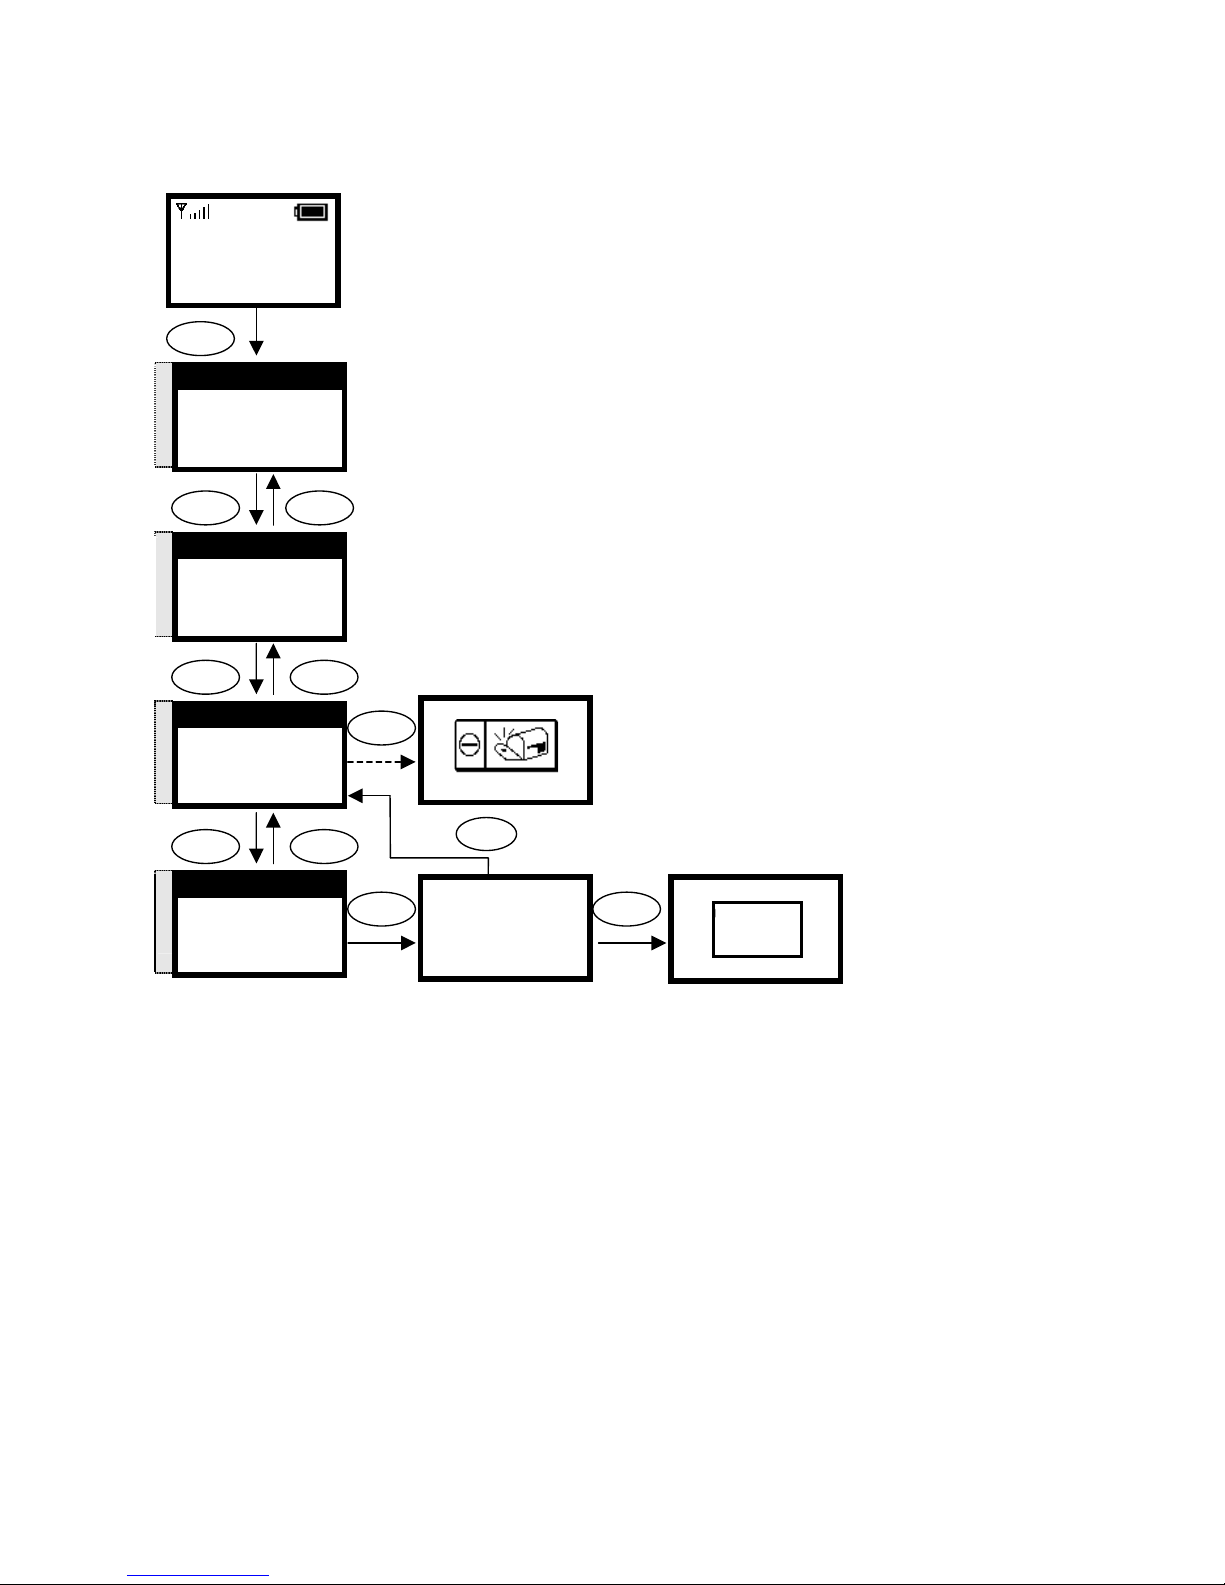
3.4.5. Erasing Phonebook Entries - One By One
This section explains how to erase an existing entry from your Phonebook.
1. One By One
2. Erase All
Select Back
Are you sure?
Ok Back
Select
S
T
1. One By One
2. Erase All
Select Back
Ok
S
T
3. Erase
1. Search
2. Add Entry
Select Back
Select
12:00
WLAN660-user
Not Registered
Menu Names
Select Back
Select
Select Back
Back
Menu
S
T
3. Phonebook
4. Net Setting
5. SIP Setting
Select Back
S
T
David
Select Back
Are you sure?
OK Back
OK
Press key , go back menu
Back
Page 25
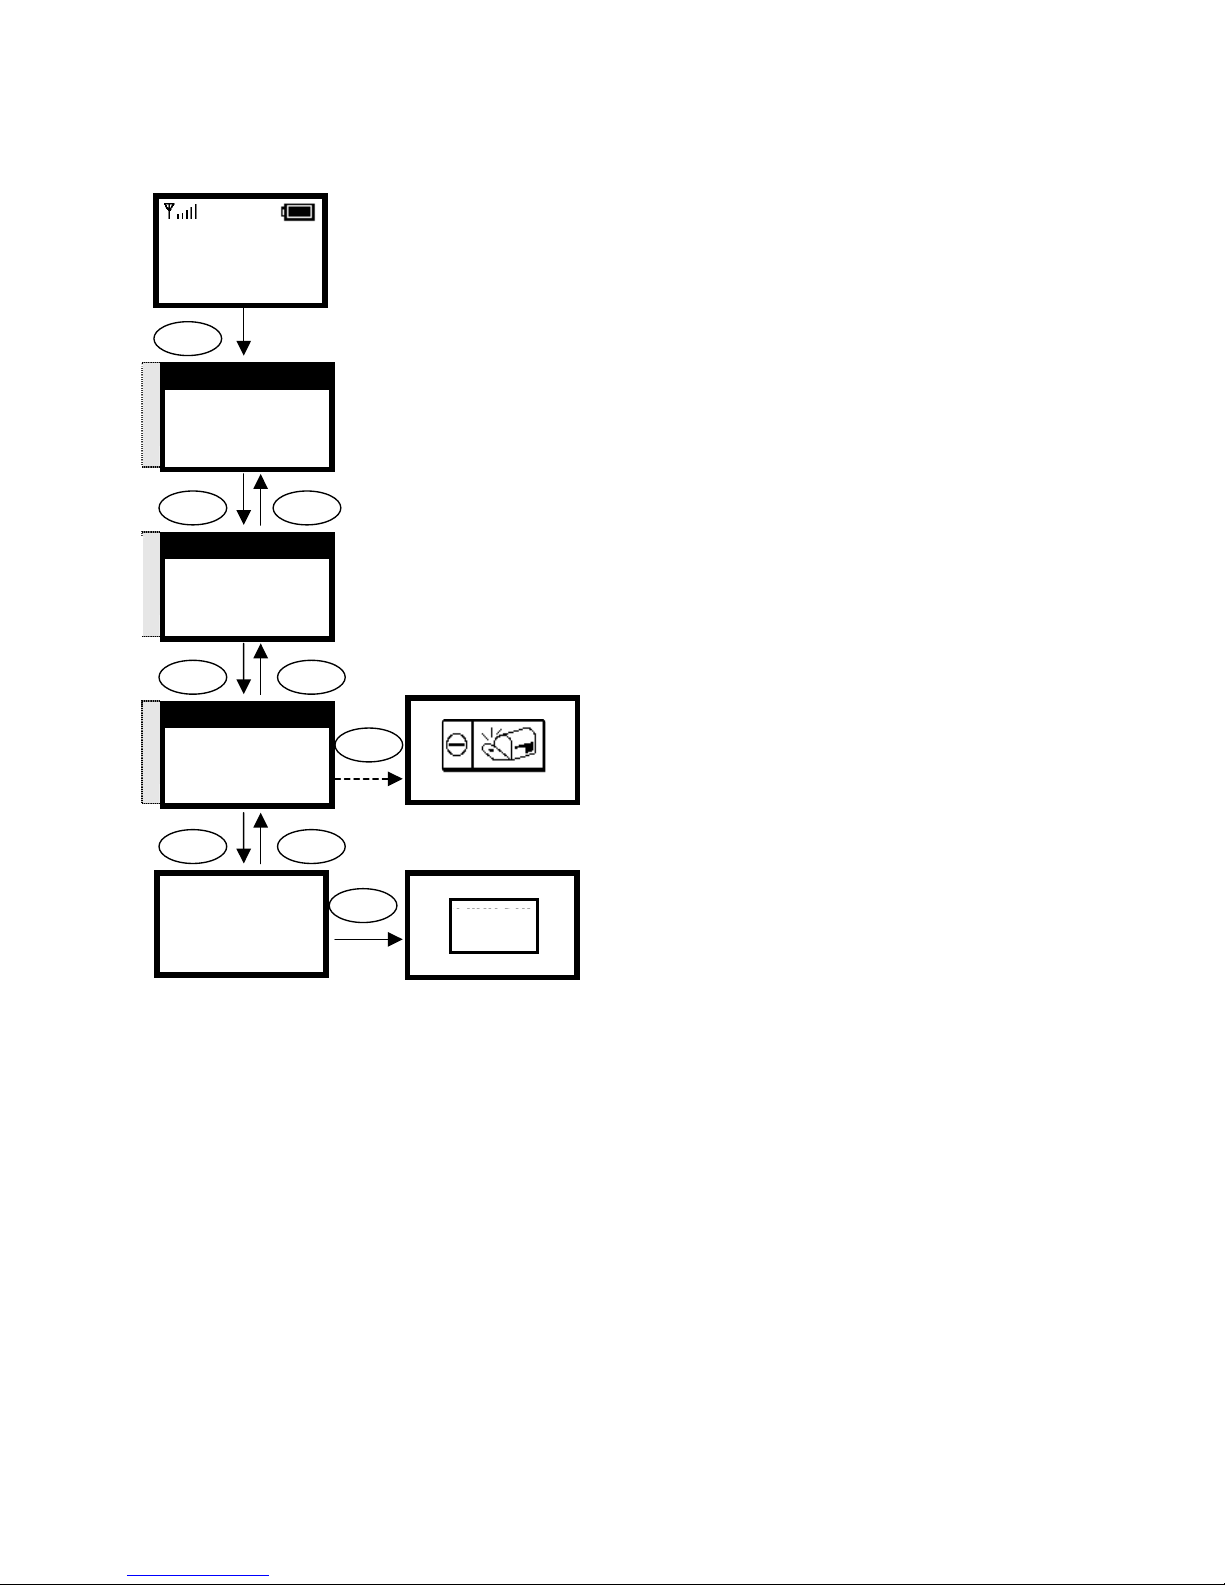
25
3.4.6. Erasing Phonebook Entries - All
This section explains how to erase all entries from your Phonebook.
Are you sure?
Ok Back
Ok
Are you sure?
OK Back
OK
2. Erase All
1. One By One
Select Back
S
T
2. Erase All
1. One By One
Select Back
S
T
3. Erase
1. Search
2. Add Entry
Select Back
Select
12:00
WLAN660-user
Not Registered
Menu Names
Select Back
Select
Select Back
Back
Menu
S
T
3. Phonebook
4. Net Setting
5. SIP Setting
Select Back
Page 26
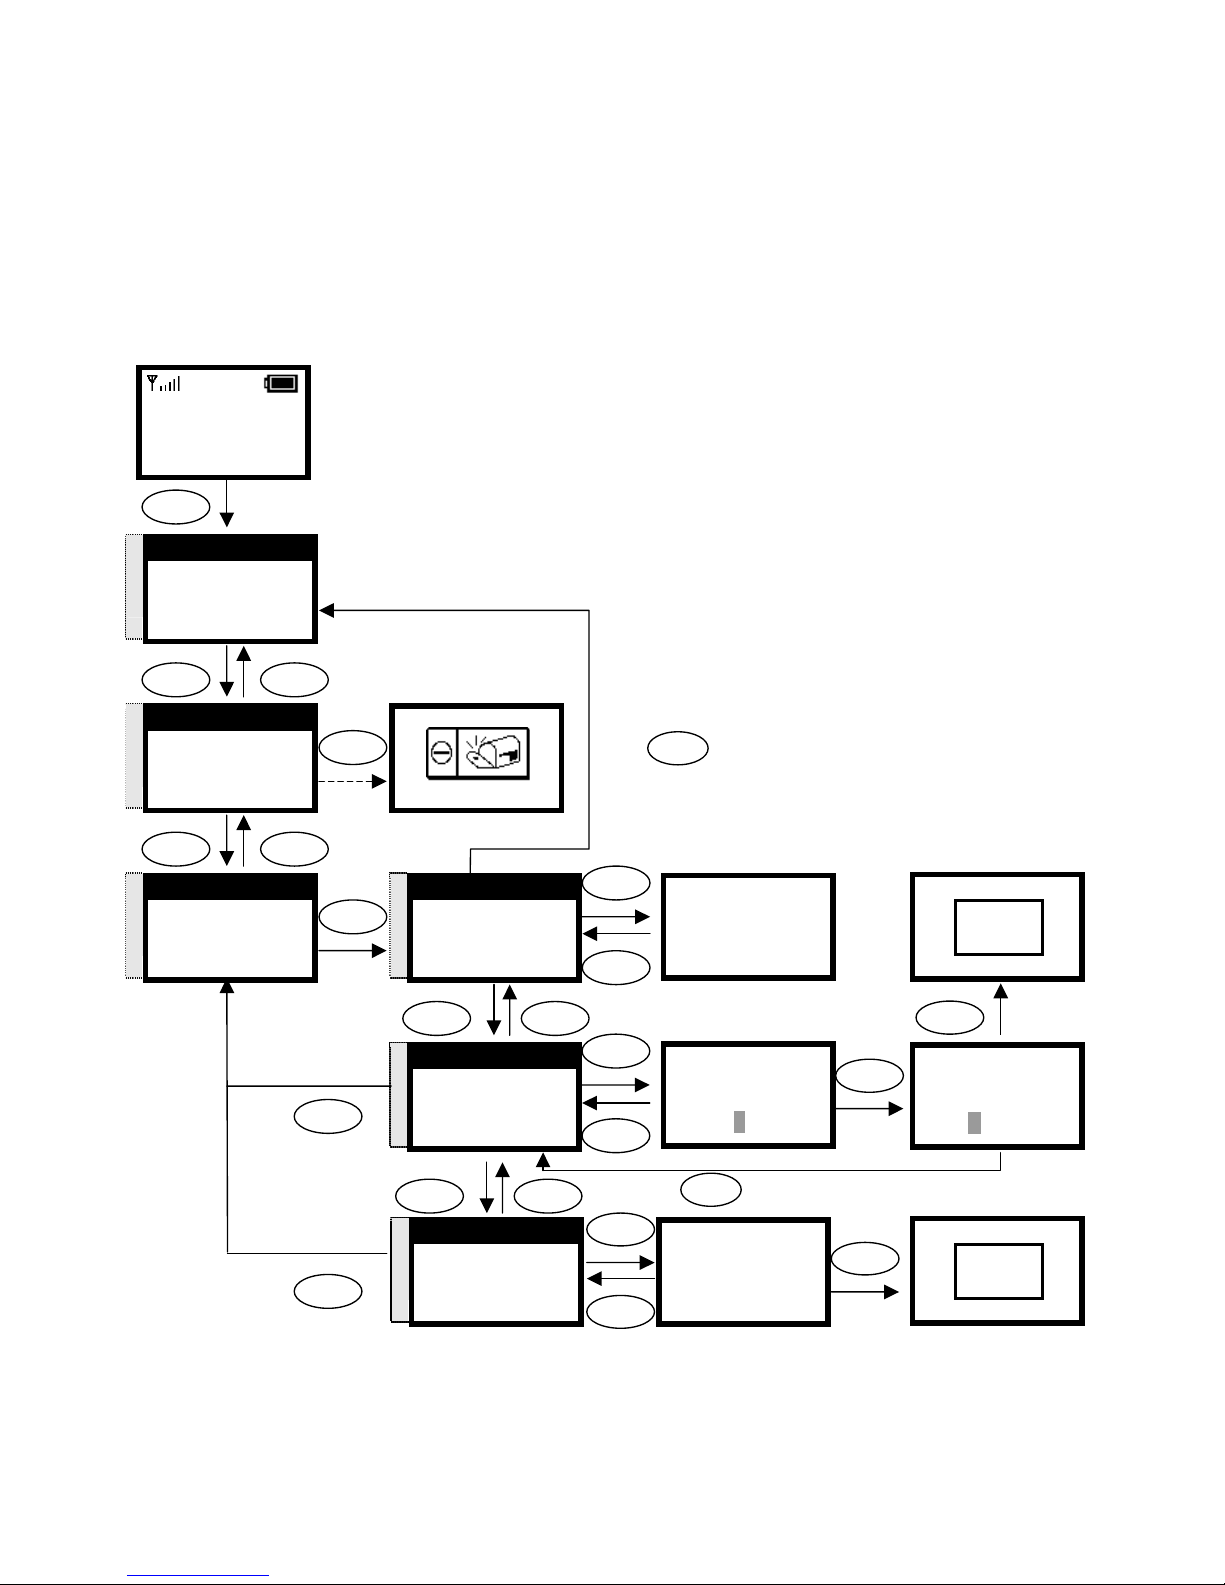
26
3.5. Call History
Call History is a useful feature for checking missed calls, received calls, and dialed
calls.
3.5.1. Missed Call
This option allows you to check for missed calls, then edit, save and dial the
selected phone number.
Select
Are you sure?
Ok Back
Back
12:00
WLAN660-user
Not Registered
Menu Names
Menu
Select Back
Select
Select
S
T
2. Call History
3. Phonebook
4. Net Setting
Select Back
S
T
1. Missed Call
2. Received Call
3. Dialed Call
Select Back
Select Back
S
T
David
Select Back
Select Back
Select
Back
S
T
2. Edit Missed
3. Erase Miss
1. Time of Call
Select Back
Time of Call
20:03 10/20
Ok Back
User Info:
808
Ok Aa1@ Back
Ok
S
T
1. Time of Call
2. Edit Missed
3. Erase Miss
Select Back
Back
Display Name:
David
Ok Aa1@ Back
Display Name:
David
Ok Aa1@ Back
OK
Ok
Back
S
T
3. Erase Miss
1. Time of Call
2. Edit Missed
Select Back
Select Back
Back
Select
Ok
Are you sure?
Ok Back
OK
1. Missed Call
2. Received Call
3. Dialed Call
Select Back
Press key , go back menu
Back
Press key , go back menu
Back
Page 27
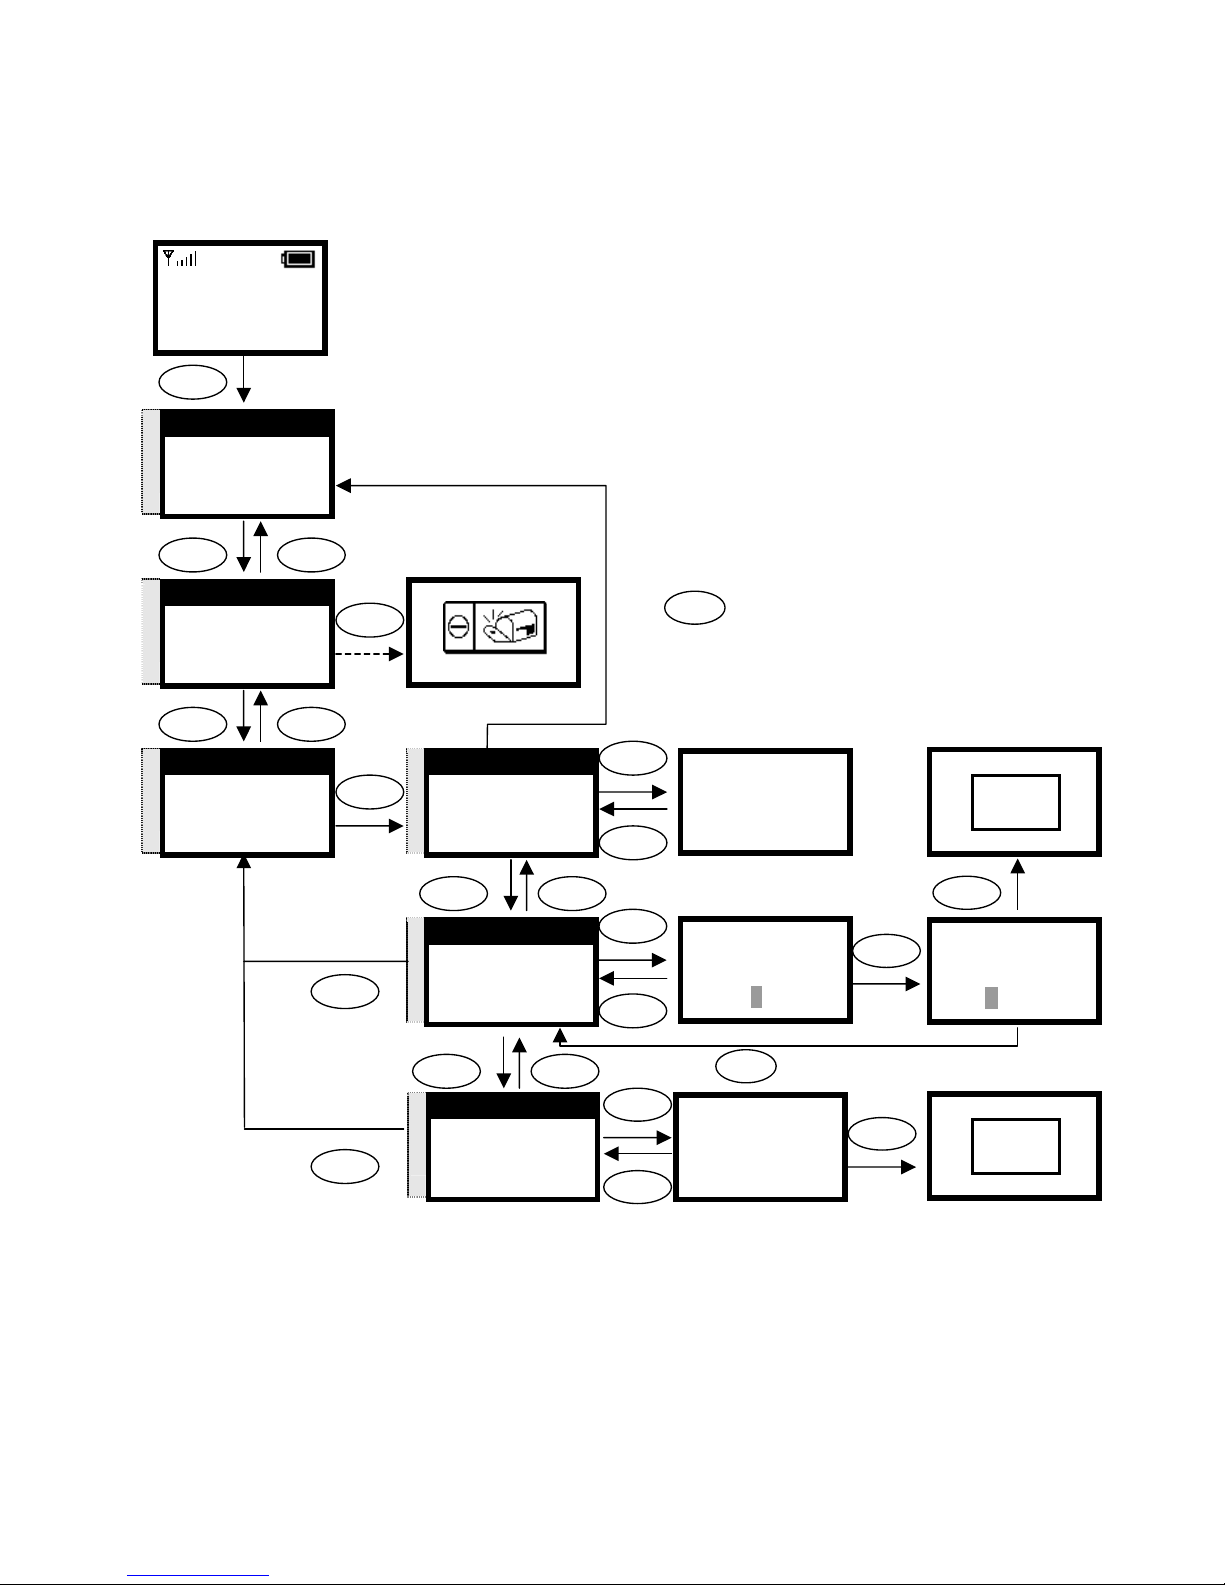
27
3.5.2. Received Call
This option allows you to check for received calls, then edit, save and dial the
selected phone number.
Select
Back
12:00
WLAN660-user
Not Registered
Menu Names
Menu
Select Back
Select
Select
S
T
2. Call History
3. Phonebook
4. Net Setting
Select Back
S
T
2. Received Call
3. Dialed Call
4. Erase Call
Select Back
Select Back
S
T
David
Select Back
Select Back
Select
Back
S
T
2. Edit Receive
3. Erase Receive
1. Time of Call
Select Back
Time of Call
20:03 10/20
Ok Back
User Info:
808
Ok Aa1@ Back
Ok
S
T
1. Time of Call
2. Edit Receive
3. Erase Receive
Select Back
Back
Display Name:
David
Ok Aa1@ Back
Display Name:
David
Ok Aa1@ Back
OK
Ok
Back
S
T
3. Erase Receive
1. Time of Call
2. Edit Receive
Select Back
Select Back
Back
Are you sure?
Ok Back
Select
Ok
Are you sure?
Ok Back
OK
2. Received Call
3. Dialed Call
4. Erase Call
Select Back
Press key , go back menu
Back
Press key , go back menu
Back
Page 28
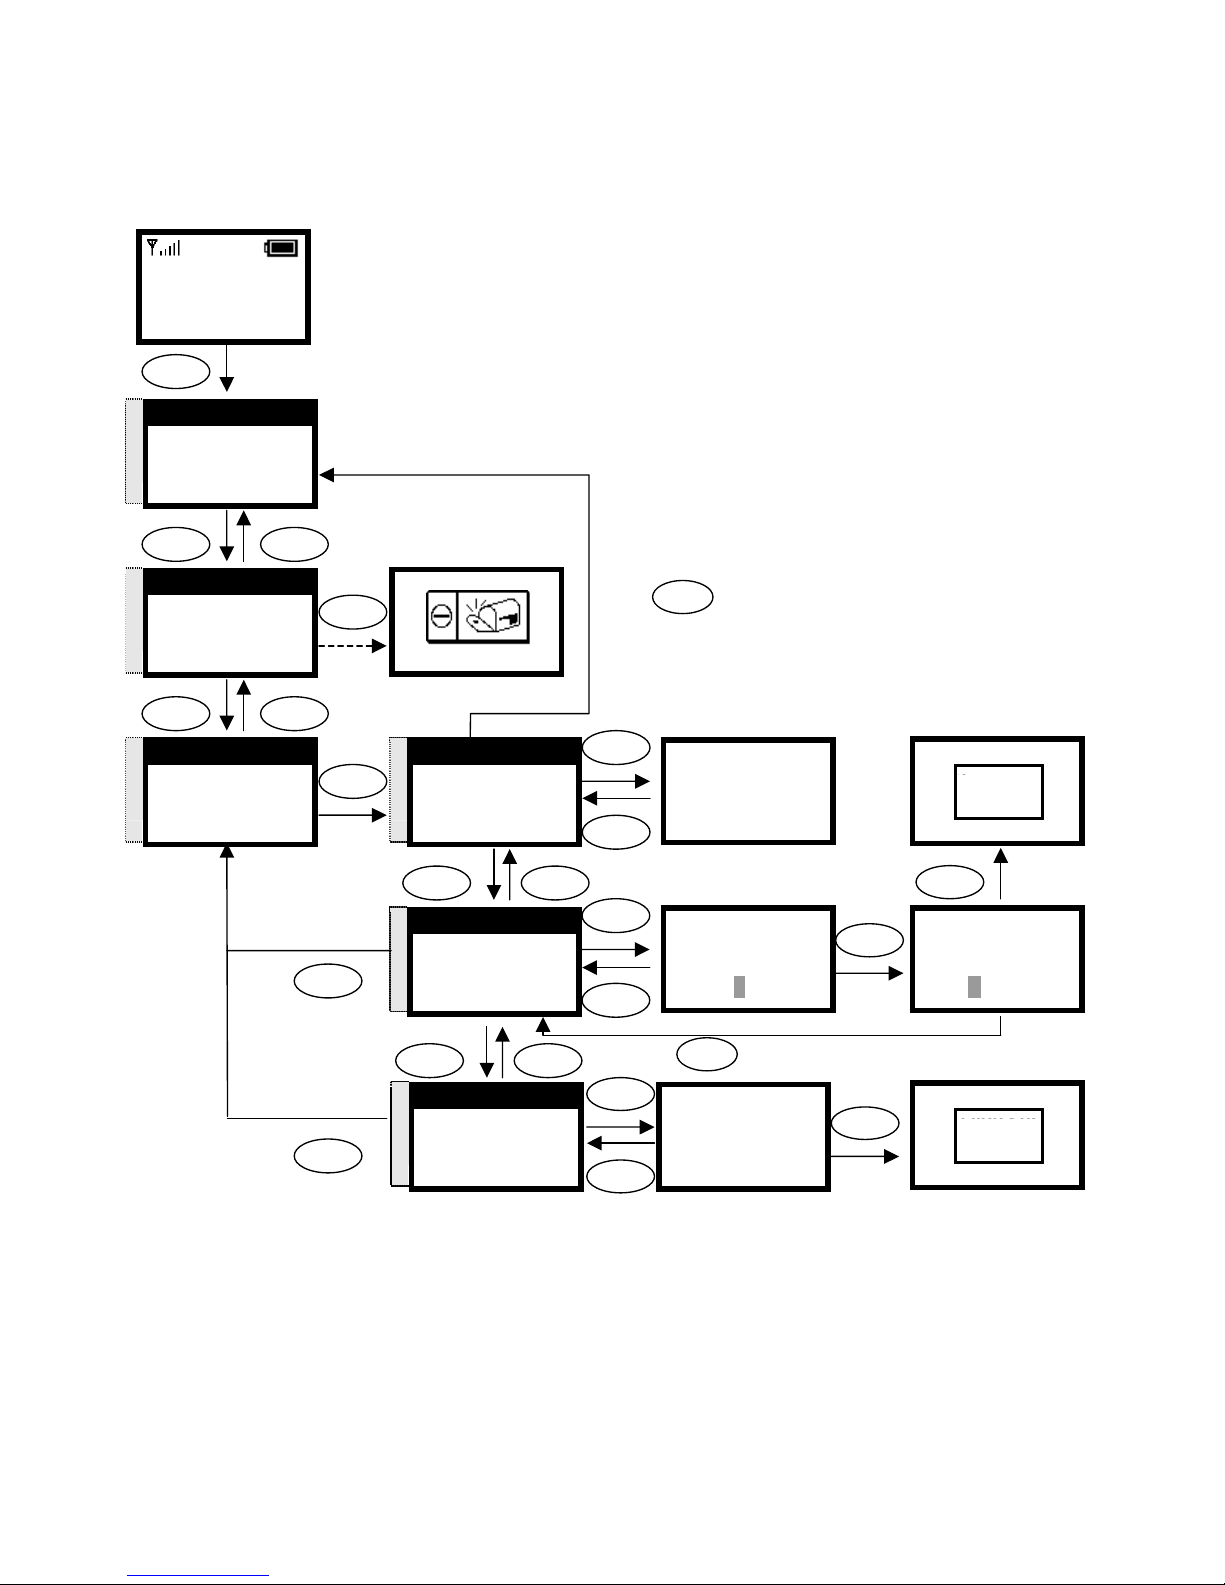
28
3.5.3. Dialed Call
This option allows you to check for dialed calls, then edit, save and dial the
selected phone number.
Select
Display Name:
David
Ok Aa1@ Back
Back
12:00
WLAN660-user
Not Registered
Menu Names
Menu
Select Back
Select
Select
S
T
2. Call History
3. Phonebook
4. Net Setting
Select Back
S
T
3. Dialed Call
4. Erase Call
1. Missed Call
Select Back
Select Back
S
T
David
Select Back
Select Back
Select
Back
S
T
2. Edit Dialed
3. Erase Dial
1. Time of Call
Select Back
Time of Call
20:03 10/20
Ok Back
User Info:
808
Ok Aa1@ Back
Ok
S
T
1. Time of Call
2. Edit Dialed
3. Erase Dial
Select Back
Back
Display Name:
David
Ok Aa1@ Back
OK
Ok
Back
S
T
3. Erase Dial
1. Time of Call
2. Edit Dialed
Select Back
Select Back
Back
Are you sure?
Ok Back
Select
Ok
Are you sure?
Ok Back
OK
3. Dialed Call
4. Erase Call
1. Missed Call
Select Back
Press key , go back menu
Back
Press key , go back menu
Back
Page 29
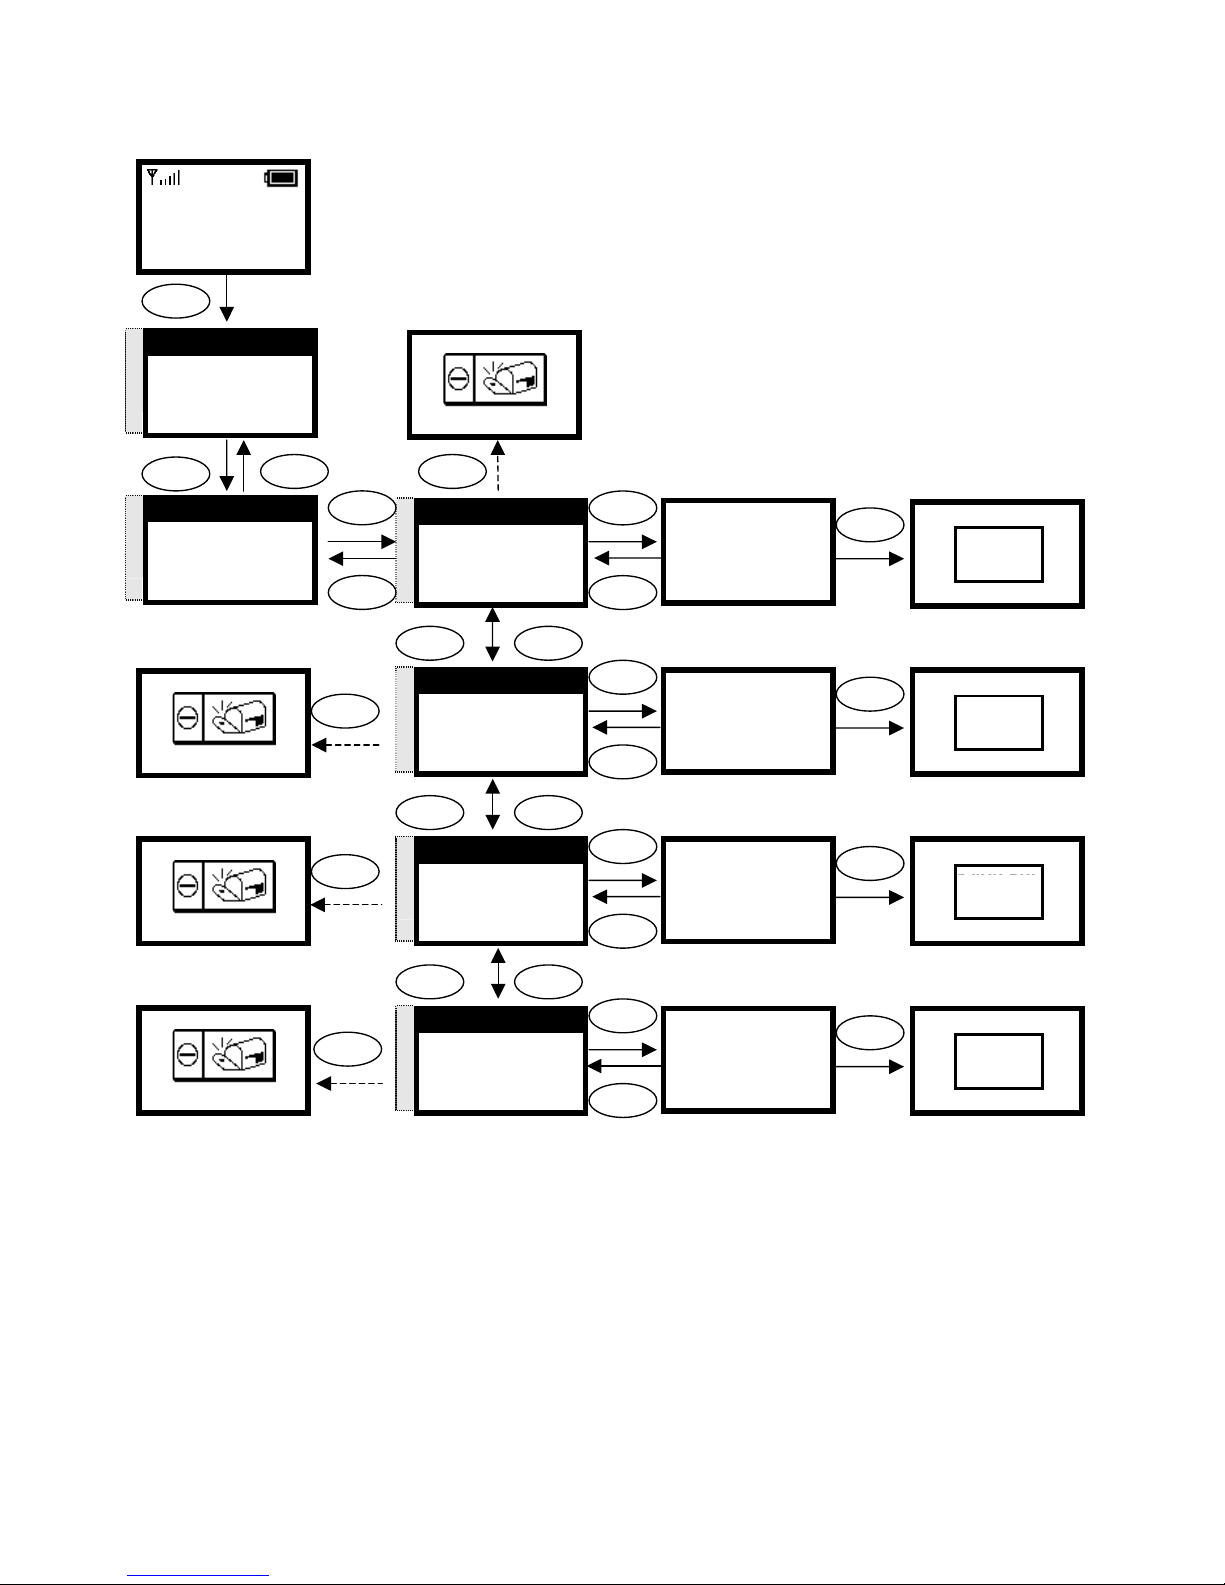
29
3.5.4. Erasing Call
Are you sure?
Ok Back
Select
Back
Are you sure?
Ok Back
OK
Select Back
S
T
4. Erase Dial
1. Erase All
2. Erase Miss
Select Back
Select
Back
Are you sure?
Ok Back
OK
Select
Back
Are you sure?
Ok Back
OK
S
T
2. Erase Miss
3. Erase Receive
4. Erase Dial
Select Back
S
T
3. Erase Receive
4. Erase Dial
1. Erase All
Select Back
Select Back
Are you sure?
Ok Back
OK
Are you sure?
Ok Back
OK
Are you sure?
Ok Back
OK
Select
Select
Select
S
T
1. Erase All
2. Erase Miss
3. Erase Receive
Select Back
Select
12:00
WLAN660-user
Not Registered
Menu Names
Menu
Select
Back
S
T
2. Call History
3. Phonebook
4. Net Setting
Select Back
Back
Select
Back
Are you sure?
Ok Back
OK
Select Back
S
T
4. Erase Call
1. Missed Call
2. Received Call
Select Back
Are you sure?
Ok Back
OK
Select
Are you sure?
Ok Back
Are you sure?
Ok Back
Are you sure?
Ok Back
Page 30
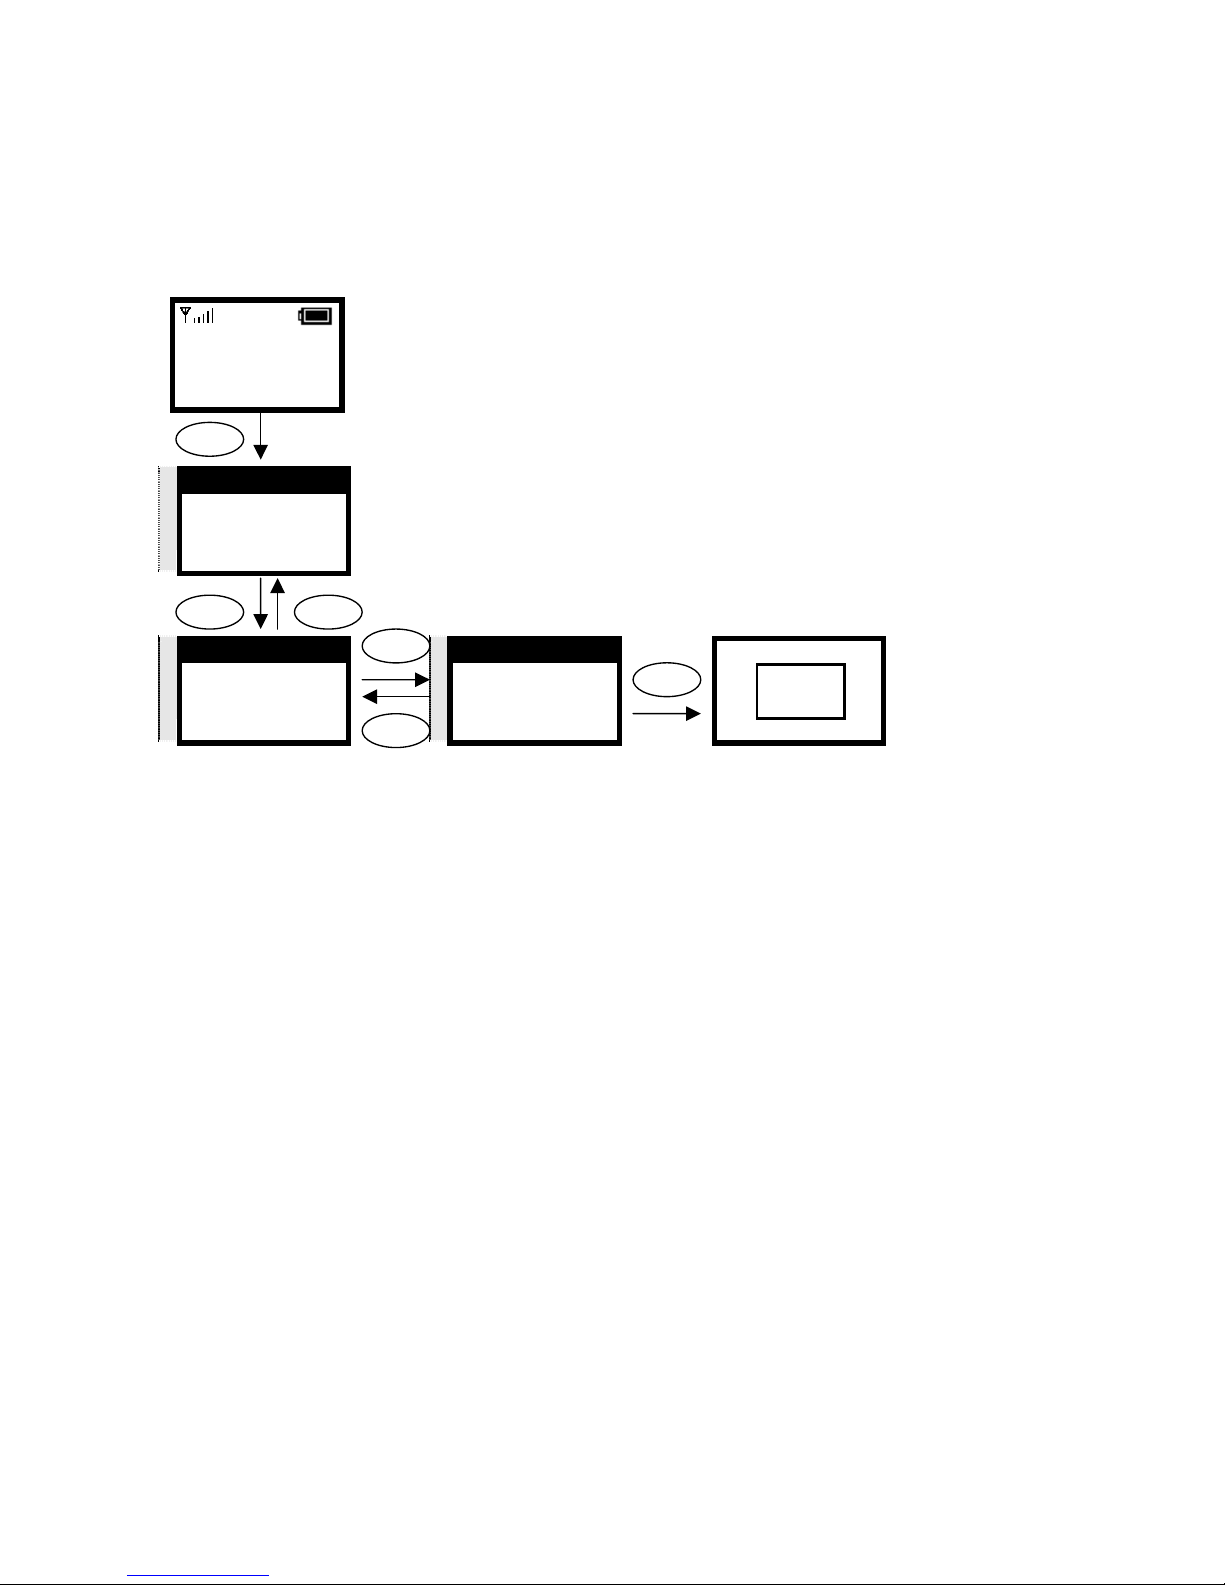
30
3.6. Settings
This section describes how to modify melody, ring volume, time, banner, etc.
3.6.1. Setting the Ring Melody
12:00
WLAN660-user
Not Registered
Menu Names
Menu
Select Back
S
T
6. Settings
7. Wireless
8. Restart
Select Back
S
T
1. Melody
2. Vibrator
3. Ring Volume
Select Back
S
T
Default
Melody 1
Melody 2
Select Back
Select
Back
Select
Default
Melody 1
Melody 2
Select Back
OK
Page 31
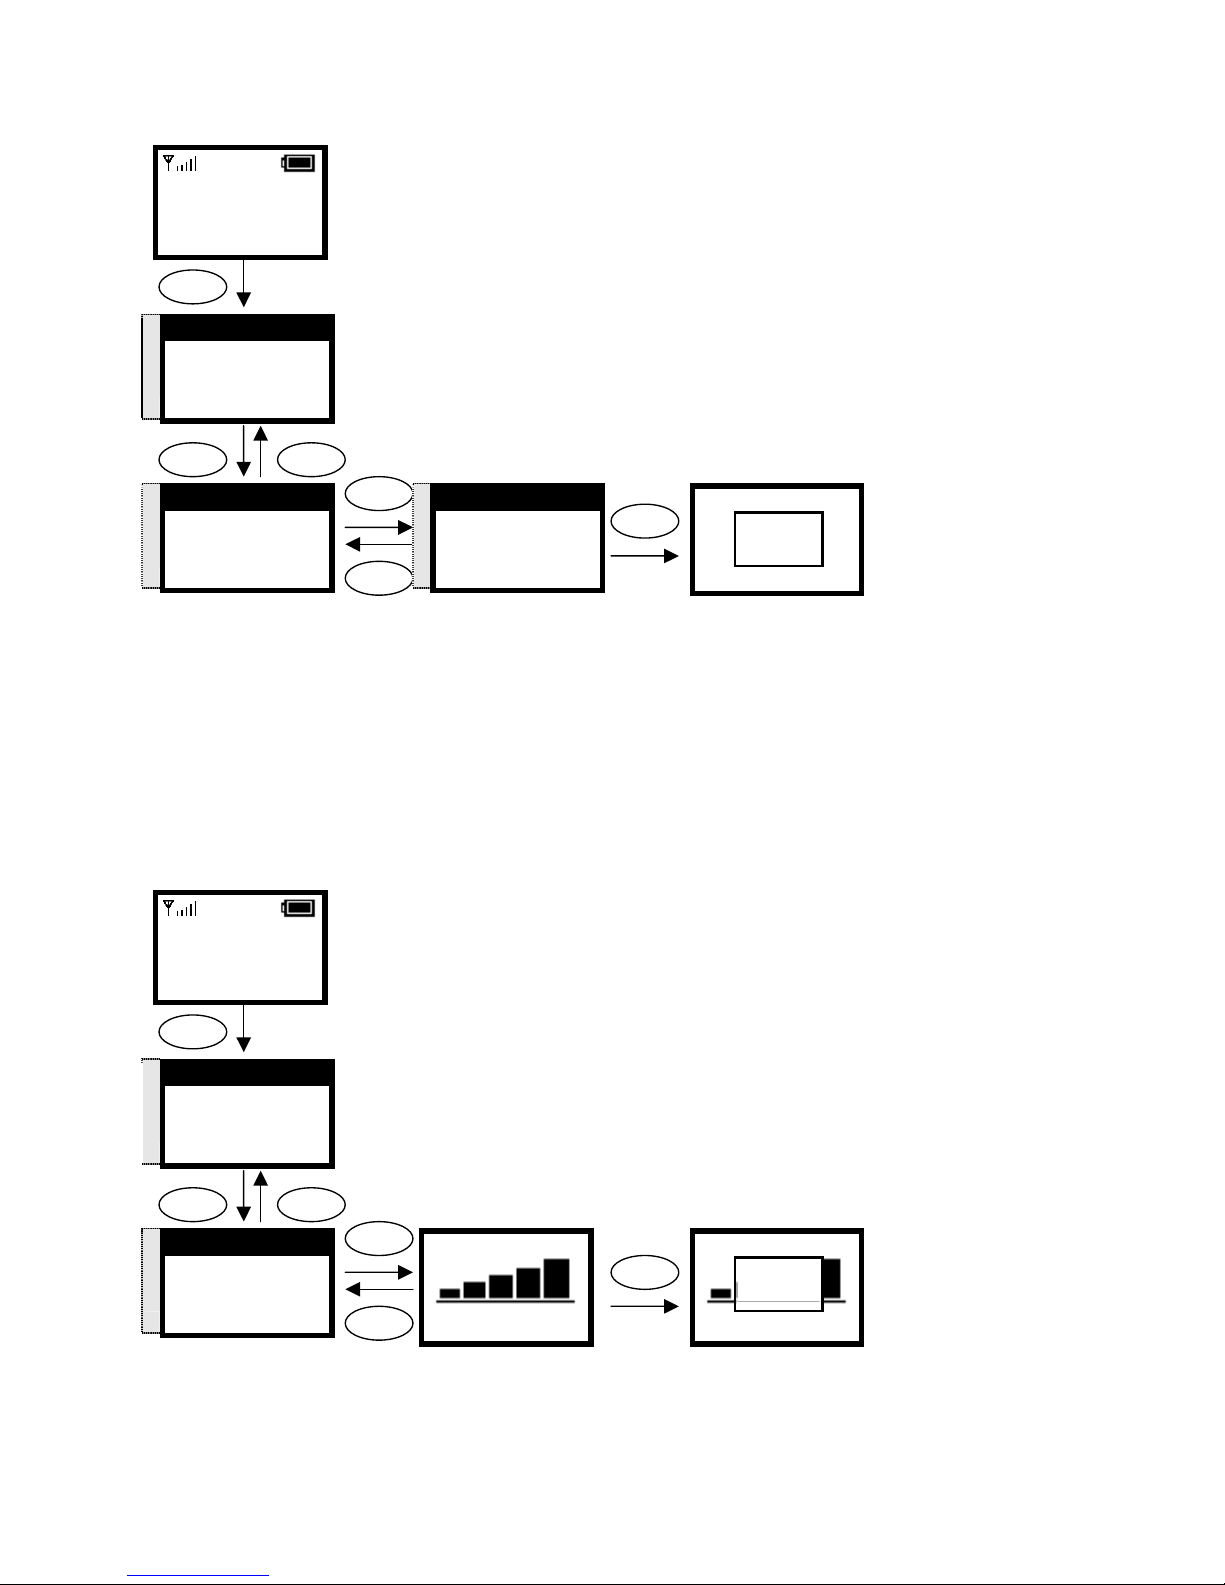
31
3.6.2. Setting the Vibration Mode
3.6.3. Adjusting the Ring Volume
Use the left / right arrow keys (◄ / ►) to decrease / increase the ring volume.
12:00
WLAN660-user
Not Registered
Menu Names
Menu
Select Back
S
T
6. Settings
7. Wireless
8. Restart
Select Back
S
T
2. Vibrator
3. Ring Volume
4. Edit Time
Select Back
Select
Back
Select
Ring Only
Vibrate Only
Vibrate - Ring
Select Back
OK
S
T
Ring Only
Vibrate Only
Vibrate -
> Ring
Select Back
12:00
WLAN660-user
Not Registered
Menu Names
Menu
Select Back
S
T
6. Settings
7. Wireless
8. Restart
Select Back
S
T
3. Ring Volume
4. Edit Time
5. Edit Date
Select Back
Select
Back
Select
Ring Volume
Select Back
OK
Ring Volume
Select Back
Page 32
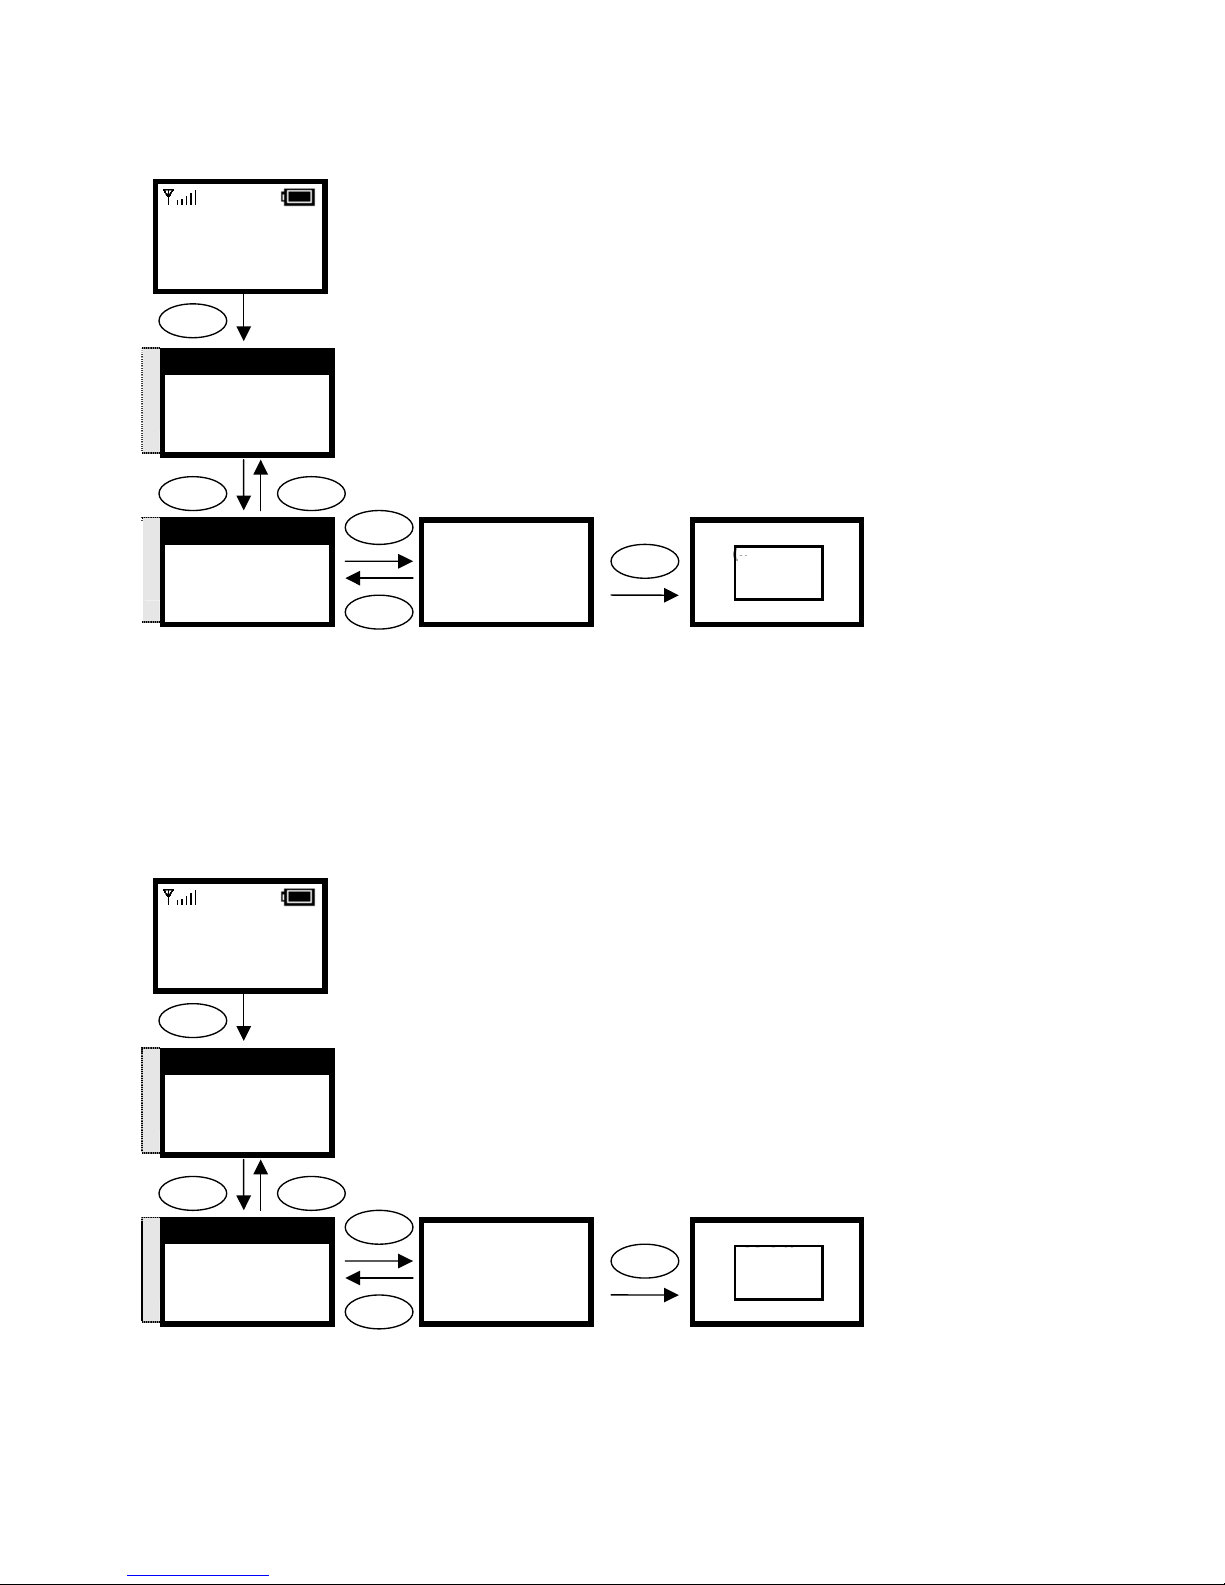
32
3.6.4. Setting the Time
3.6.5. Setting the Date
12:00
WLAN660-user
Not Registered
Menu Names
Menu
Select Back
S
T
6. Settings
7. Wireless
8. Restart
Select Back
S
T
4. Edit Time
5. Edit Date
6. Banner
Select Back
Select
Back
Select
Edit Time
12:00|
Ok Back
OK
Edit Time
12:00|
Ok Back
12:00
WLAN660-user
Not Registered
Menu Names
Menu
Select Back
S
T
6. Settings
7. Wireless
8. Restart
Select Back
S
T
5. Edit Date
6. Banner
7. Key Lock
Select Back
Select
Back
Select
Edit Date
2004.08.04|
Ok Back
OK
Edit Date
2004.08.04|
Ok Back
Page 33
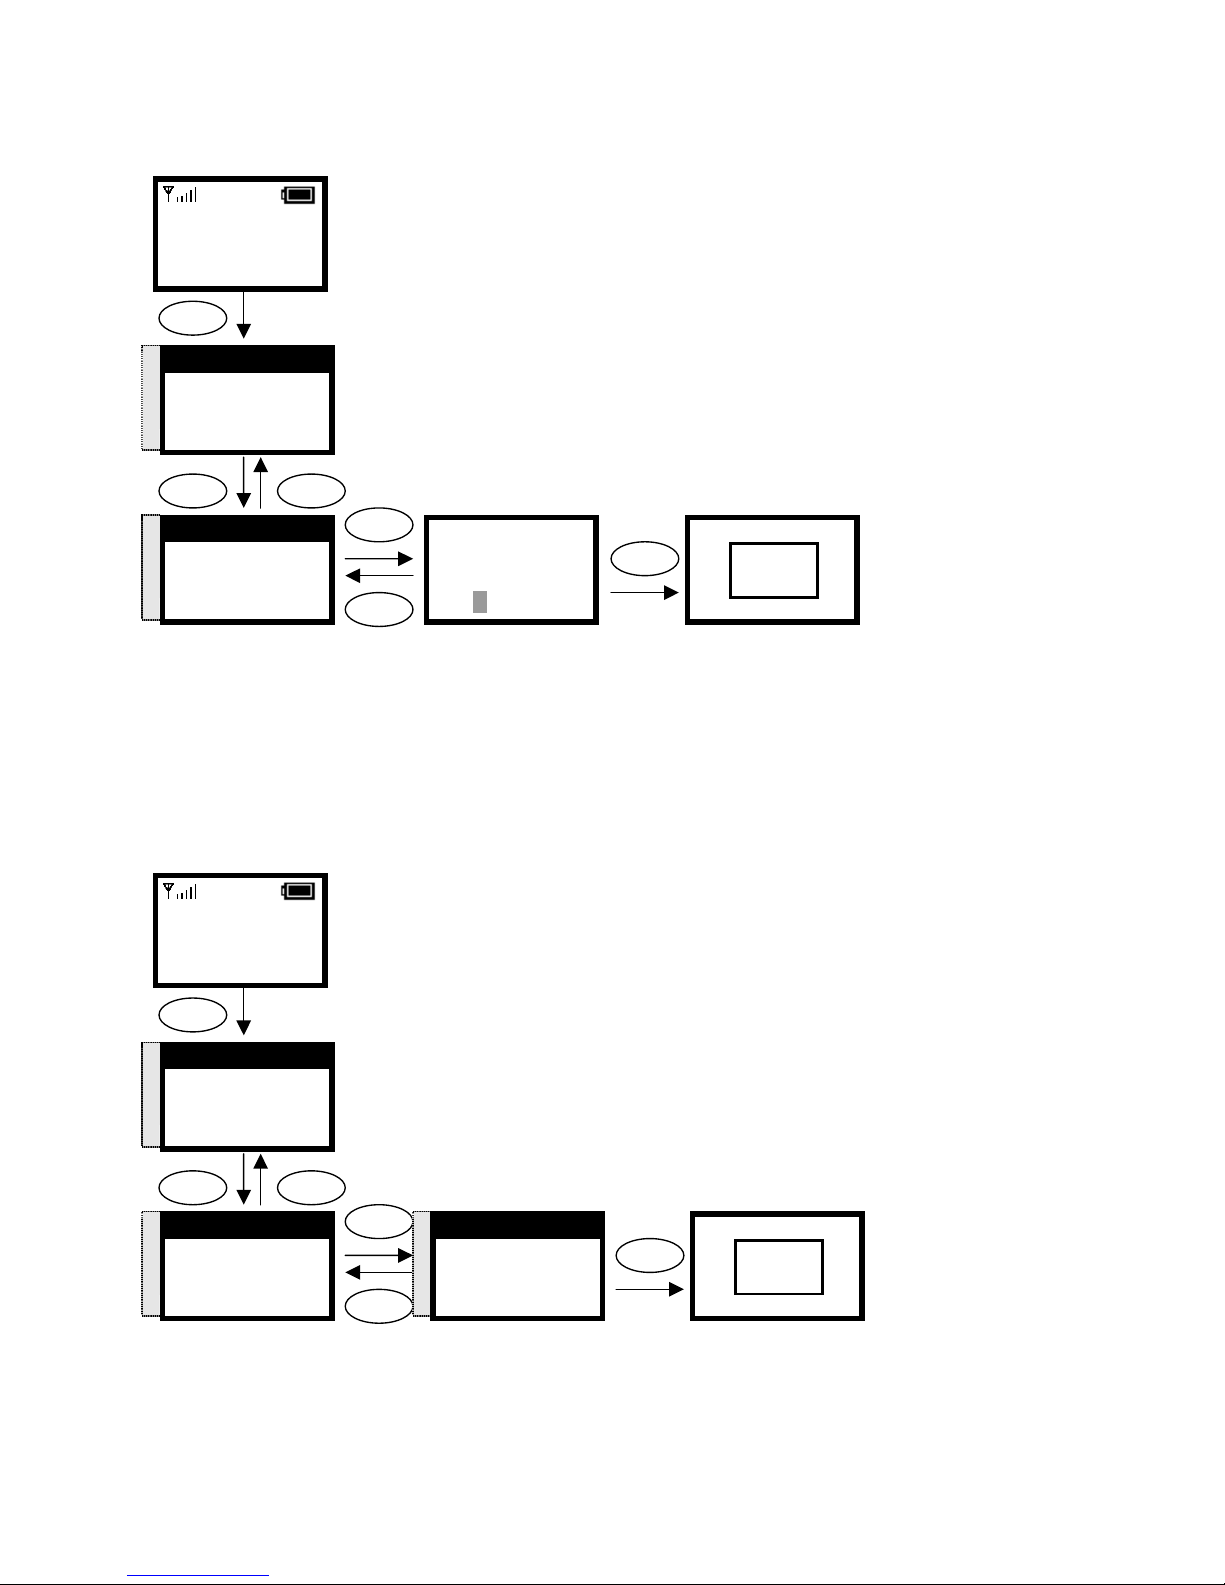
33
3.6.6. Setting the Banner
3.6.7. Setting the Key Lock
12:00
WLAN660-user
Not Registered
Menu Names
Menu
Select Back
S
T
6. Settings
7. Wireless
8. Restart
Select Back
S
T
7. Key Lock
8. Don’t Disturb
9. Load Default
Select Back
Select
Back
Select
S
T
off
on
Select Back
off
on
Select Back
OK
12:00
WLAN660-user
Not Registered
Menu Names
Menu
Select Back
S
T
6. Settings
7. Wireless
8. Restart
Select Back
S
T
6. Banner
7. Key Lock
8. Don’t Disturb
Select Back
Select
Back
Ok
Banner
WLAN660-SIP
Ok Aa1@ Back
OK
Banner
WLAN660-SIP
Ok Aa1@ Back
Page 34
34
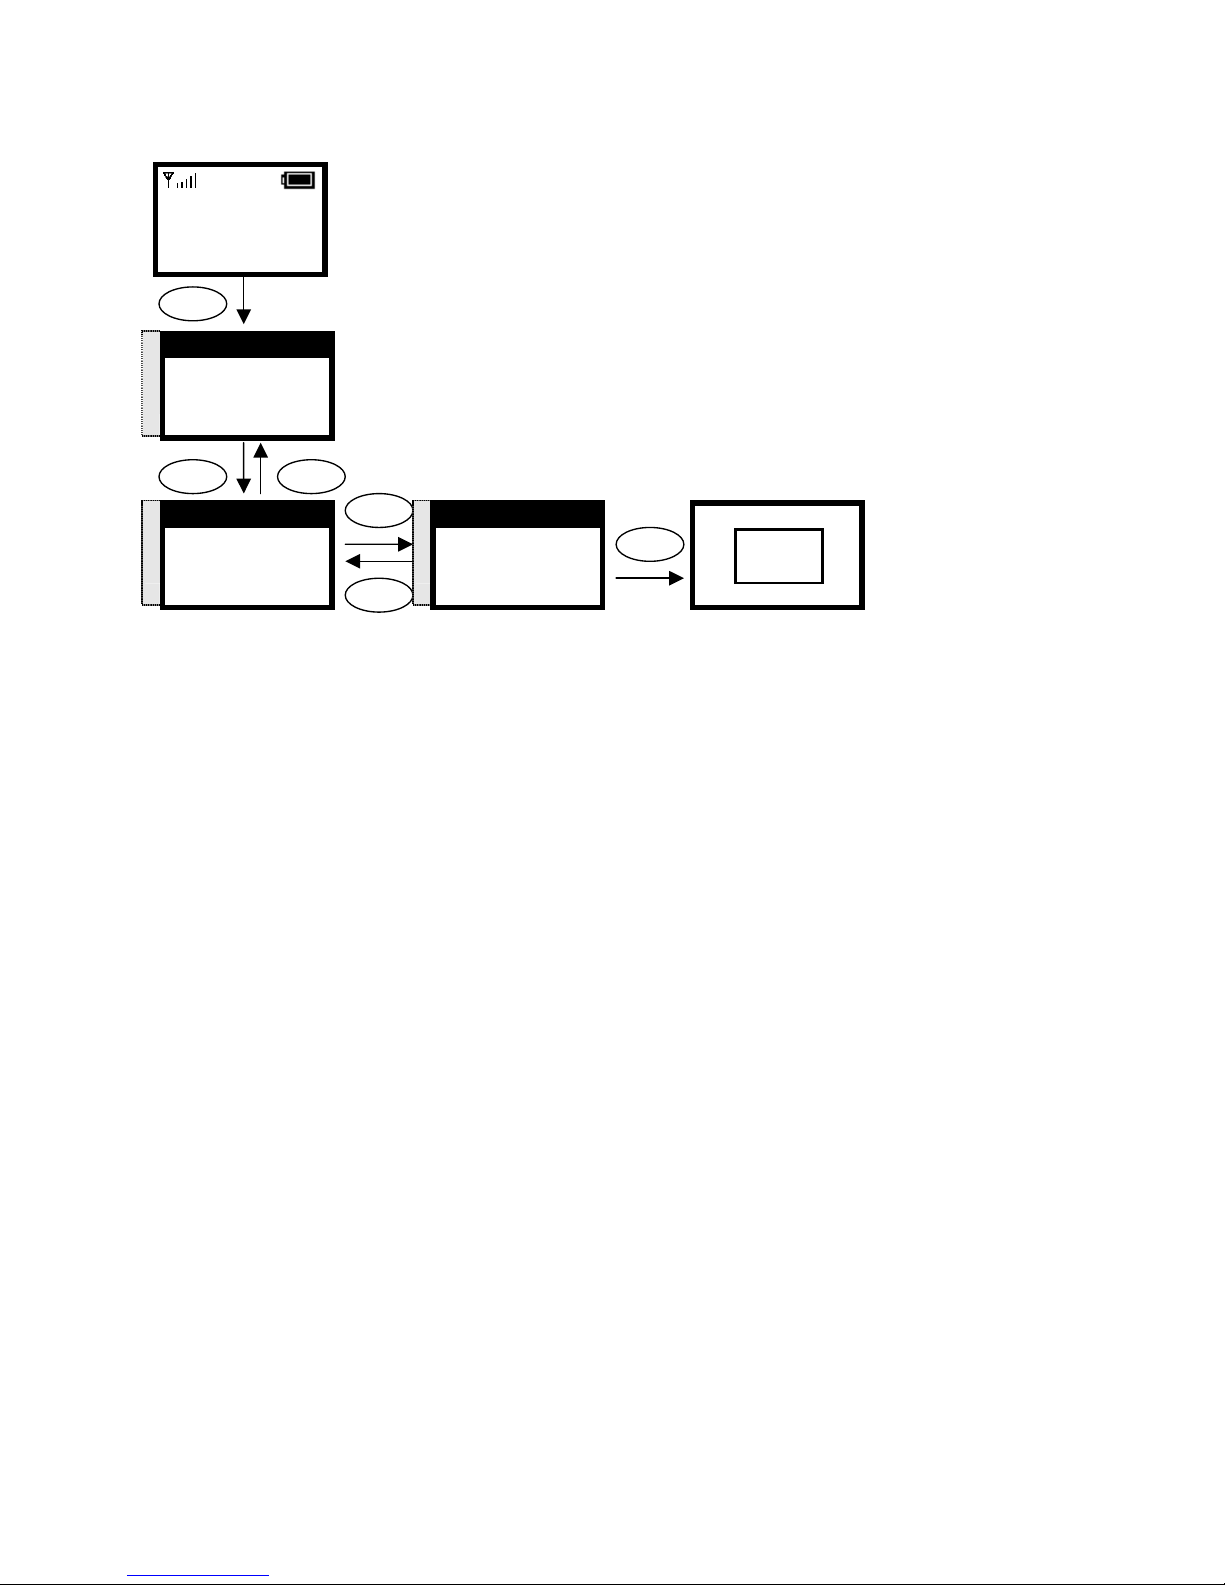
3.6.8. Don’t Disturb
12:00
WLAN660-user
Not Registered
Menu Names
Menu
Select Back
S
T
6. Settings
7. Wireless
8. Restart
Select Back
S
T
8. Don’t Disturb
9. Load Default
1. Melody
Select Back
Select
Back
Select
S
T
off
on
Select Back
off
on
Select Back
OK
Page 35
35
4. Web Configuration
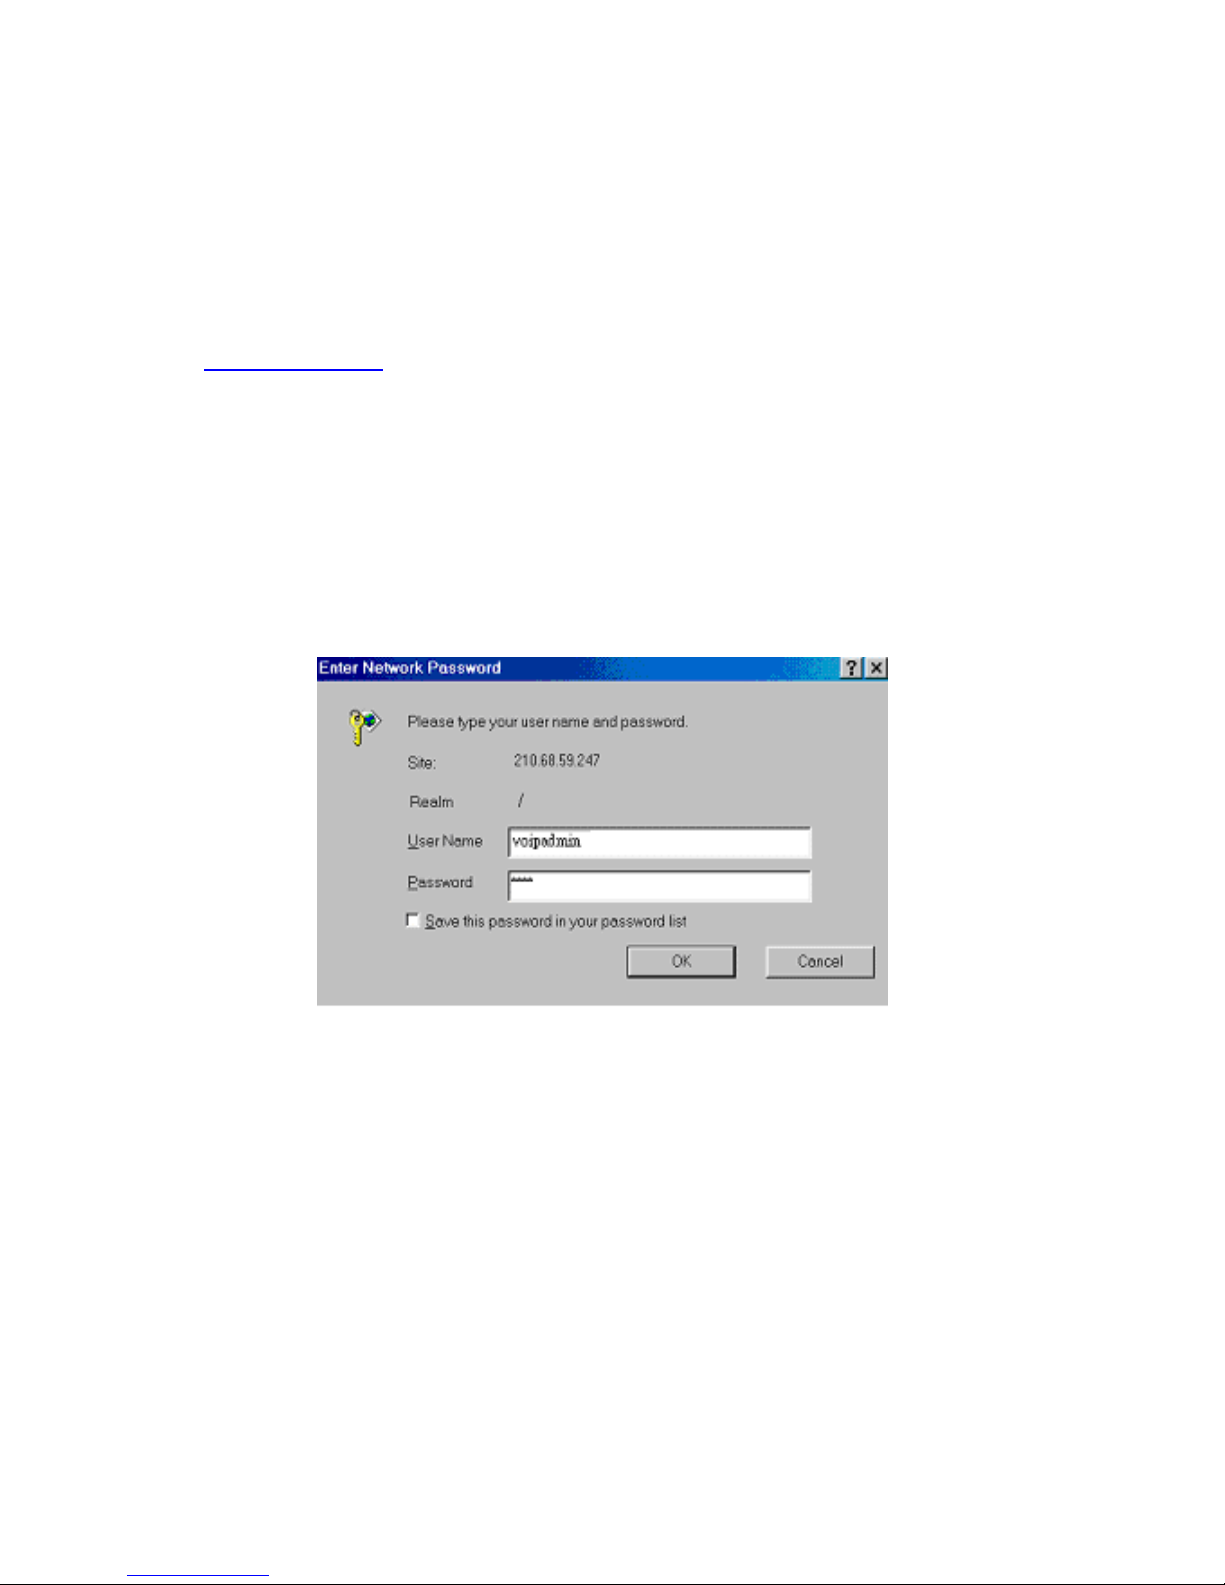
This chapter explains how to use the WLAN660 web interface to configure your wireless
IP phone.
4.1. Login Password
Use your browser to access the WLAN660 web page – in the Address field, type:
http://<ipaddress> , then click the Go button.
WLAN660 offers two default accounts:
1. the user’s account,
User Name: user
Password: 1111
2. and the administrative account
User Name: voipadmin
Password: admin
The main web page is divided into several frames, each related to a VoIP module. It
includes information, network settings, SIP proxy server settings, registrar server settings,
phone book settings, voice codec settings, voice quality settings, system settings, and
update settings.
Page 36

36
5. Basic Phone Tasks
5.1. Dialing a Phone Number
1. In idle state, enter a phone number by using the numerical keys.
2. If you have entered an incorrect number, press the key to delete it.
3. Press the key to connect your call.
5.2. Redialing a Phone Number
1. In idle state, press the key.
The list of placed calls is displayed.
2. Scroll through the list by using the S or T key.
Press the key to make the call.
5.3. Answering a Call
To answer a call, press the key.
To reject a call, press the key.
Page 37
37
6. Display Messages
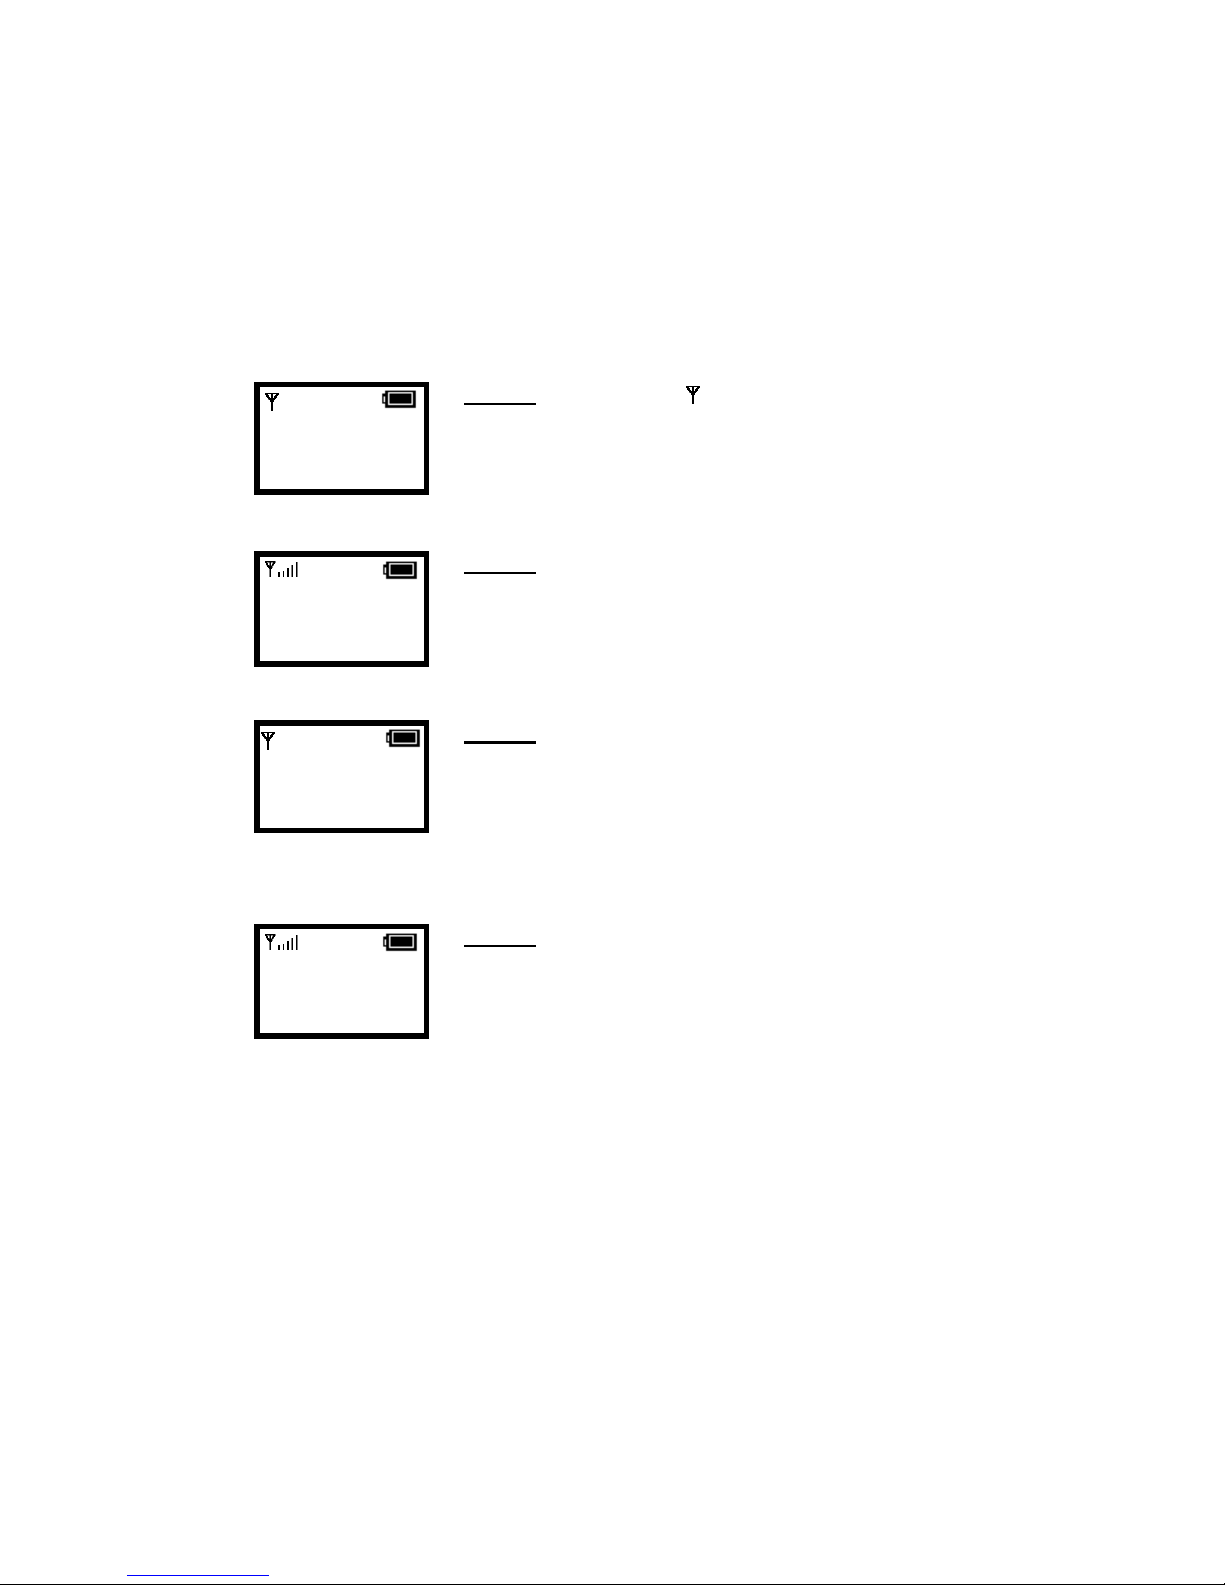
6.1. Error Messages
Error messages are displayed to let you know that an error has occurred. These
error messages may prevent you from connecting to the network or from using the
phone. You may need to contact the system administrator to resolve the problem.
Error 1: No AP found ( blinking)
The ESSID set on the phone does not match any of the Service
Set Identifiers (SSIDs) of the AP in the network.
Error 2: Net Fail! (DHCP)
The phone failed to obtain the IP address from the DHCP
server, or failed to authenticate due to a Wep Key error.
Error 3: Net Fail! (PPPoE)
The phone failed to obtain the IP address from your ISP
service.
Error 4
: Registering to SIP proxy failed
The phone failed to register with the SIP Proxy.
It could be due to the WEP key or SIP proxy setting error.
Please contact your service provider, or check your SIP
Settings.
12:00
WLAN660-user
Not Registered
Menu Names
12:00
WLAN660-user
Net Fail! (DHCP)
Menu Names
12:00
WLAN660-user
Net Fail! (PPPoE)
Menu Names
12:00
WLAN660-user
Not Registered
Menu Names
Page 38
38
6.2. Warning Messages
Warning messages are displayed when the phone detects a condition that may
disrupt your phone service.
Warning 1: No display when the phone is seated in the
charger.
- Situation 1: The phone is seated in the charger but there is
no LCD display and back light, even if it has been powered
on.
- Situation 2: The phone is seated in the charger but there is
no LCD display; the back light is on.
Corrective Action:
Place the phone in the charger and turn off the power. Keep
the phone in the charger for approximately 30 seconds. Then
remove it from the charger briefly, for approximately 2
seconds. Place the phone back in the charger and it will
automatically turn on.
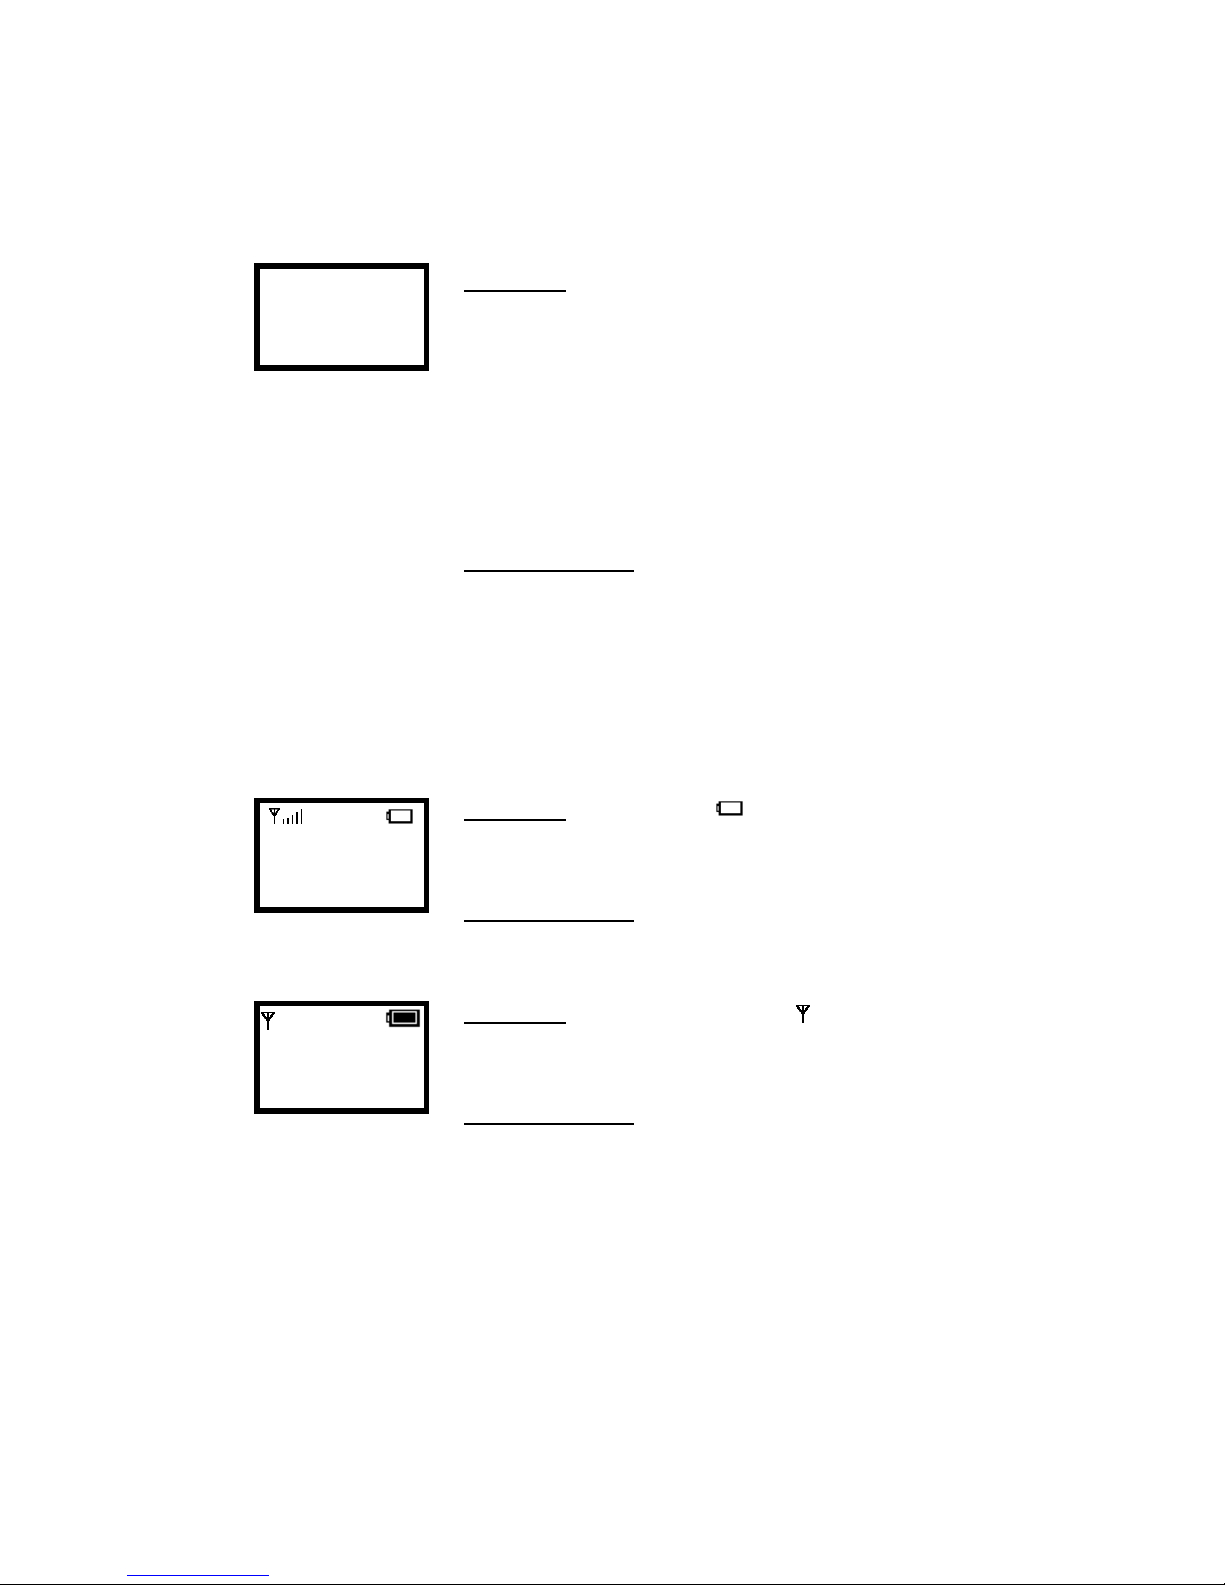
Warning 2: Battery Low ( blinking)
The battery energy level is low.
Corrective Action: Recharge the battery.
Warning 3: Weak signal detected ( blinking)
The signal quality is low.
Corrective Action:
Connect to another AP. Move your phone closer to the AP.
There may be too much radio interference (for example a
microwave or another AP using the same channel) around
your wireless network. Relocate or reduce the radio
interference.
12:00
WLAN660-user
Net Fail! (DHCP)
Menu Names
12:00
WLAN660-user
Not Registered
Menu Names
 Loading...