

Page 1

Mini-iTX
MX965Q
Core™ 2 Duo/
Pentium® 4/ Pentium® D/
w/ 1066/800/533MHz FSB
Intel® 65nm
Pentium® Dual core/
Celeron 440
User’s Manual
Rev 1.00 – Nov, 2008
1
Page 2

FCC Statement
THIS DEVICE SUPPORTS PART 15 FCC RULES. OPERATION IS SUBJECT TO THE FOLLOWING TWO
CONDITIONS:
(1) THIS DEVICE MAY NOT CAUSE HARMFUL INTERFERENCE.
(2) THIS DEVICE MUST ACCEPT ANY INTERFERENCE RECEIVED INCLUDING INTERFERENCE
THAT MAY CAUSE UNDESIRED OPERATION.
THIS EQUIPMENT HAS BEEN TESTED AND FOUND TO SUPPORT WITH THE LIMITS FOR A CLASS
"A" DIGITAL DEVICE, PURSUANT TO PART 15 OF THE FCC RULES.
THESE LIMITS ARE DESIGNED TO PROVIDE REASONABLE PROTECTION AGAINST HARMFUL
INTERFERENCE WHEN THE EQUIPMENT IS OPERATED IN A COMMERCIAL ENVIRONMENT. THIS
EQUIPMENT GENERATES, USES, AND CAN RADIATE RADIO FREQUENCY ENERGY AND, IF NOT
INSTATLLED AND USED IN ACCORDANCE WITH THE INSTRUCTION MANUAL, MAY CAUSE
HARMFUL INTERFERENCE TO RADIO COMMUNICATIONS.
OPERATION OF THIS EQUIPMENT IN A RESIDENTIAL AREA IS LIKELY TO CAUSE HARMFUL
INTERFERENCE IN WHICH CASE THE USER WILL BE REQUIRED TO CORRECT THE
INTERFERENCE AT HIS OWN EXPENSE.
Notice
This guide is designed for experienced users to setup the system within the shortest time.
For detailed information, please always refer to the electronic user's manual.
Copyright Notice
Copyright © 2008 BCM Advanced Research, ALL RIGHTS RESERVED.
No part of this document may be reproduced, copied, translated, or transmitted in any
form or by any means, electronic or mechanical, for any purpose, without the prior written
permission of the original manufacturer.
Trademark Acknowledgement
Brand and product names are trademarks or registered trademarks of their respective
owners.
2
Page 3

Disclaimer
BCM Advanced Research reserves the right to make changes, without notice, to any
product, including circuits and/or software described or contained in this manual in order
to improve design and/or performance. BCM Advanced Research assumes no
responsibility or liability for the use of the described product(s), conveys no license or title
under any patent, copyright, or masks work rights to these products, and makes no
representations or warranties that these products are free from patent, copyright, or mask
work right infringement, unless otherwise specified. Applications that are described in this
manual are for illustration purposes only. BCM Advanced Research makes no
representation or warranty that such application will be suitable for the specified use
without further testing or modification.
Life Support Policy
BCM Advanced Research PRODUCTS ARE NOT FOR USE AS CRITICAL
COMPONENTS IN LIFE SUPPORT DEVICES OR SYSTEMS WITHOUT THE PRIOR
WRITTEN APPROVAL OF BCM Advanced Research.
As used herein:
1. Life support devices or systems are devices or systems which, (a) are intended for
surgical implant into body, or (b) support or sustain life and whose failure to perform,
when properly used in accordance with instructions for use provided in the labeling,
can be reasonably expected to result in significant injury to the user.
2. A critical component is any component of a life support device or system whose
failure to perform can be reasonably expected to cause the failure of the life support
device or system, or to affect its safety or effectiveness.
A Message to the Customer
BCM Customer Services
Each and every BCM product is built to the most exacting specifications to ensure reliable
performance in the harsh and demanding conditions typical of industrial environments.
Whether your new BCM device is destined for the laboratory or the factory floor, you can
be assured that your product will provide the reliability and ease of operation for which the
name BCM has come to be known.
Your satisfaction is our primary concern. Here is a guide to BCM customer services. To
3
Page 4

ensure you get the full benefit of our services, please follow the instructions below
carefully.
Technical Support
We want you to get the maximum performance from your products. So if you run into
technical difficulties, we are here to help. For the most frequently asked questions, you
can easily find answers in your product documentation. These answers are normally a lot
more detailed than the ones we can give over the phone. So please consult the user’s
manual first.
To receive the latest version of the user’s manual; please visit our Web site at:
http://www.bcmcom.com.
If you still cannot find the answer, gather all the information or questions that apply to your
problem, and with the product close at hand, call your dealer. Our dealers are well trained
and ready to give you the support you need to get the most from your BCM products. In
fact, most problems reported are minor and are able to be easily solved over the phone.
In addition, free technical support is available from BCM engineers every business day.
We are always ready to give advice on application requirements or specific information on
the installation and operation of any of our products. Please do not hesitate to call or
e-mail us.
BCM Advanced Research
7 Marconi,
Irvine, California, 92618
USA
Tel : +1-949-470-1888
Fax : +1-949-470-0971
http://www.bcmcom.com
E-mail: [email protected]
4
Page 5

Product Warranty
BCM warrants to you, the original purchaser, that each of its products will be free from
defects in materials and workmanship for two years from the date of purchase.
This warranty does not apply to any products which have been repaired or altered by
persons other than repair personnel authorized by BCM, or which have been subject to
misuse, abuse, accident or improper installation. BCM assumes no liability under the
terms of this warranty as a consequence of such events. Because of BCM high
quality-control standards and rigorous testing, most of our customers never need to use
our repair service. If any of BCM products is defective, it will be repaired or replaced at no
charge during the warranty period. For out-of-warranty repairs, you will be billed according
to the cost of replacement materials, service time, and freight. Please consult your dealer
for more details. If you think you have a defective product, follow these steps:
1. Collect all the information about the problem encountered. (For example, CPU type
and speed, BCM products model name, hardware & BIOS revision number, other
hardware and software used, etc.) Note anything abnormal and list any on-screen
messages you get when the problem occurs.
2. Call your dealer and describe the problem. Please have your manual, product, and
any helpful information available.
3. If your product is diagnosed as defective, obtain an RMA (return material
authorization) number from your dealer. This allows us to process your good return
more quickly.
4. Carefully pack the defective product, a complete Repair and Replacement Order Card
and a photocopy proof of purchase date (such as your sales receipt) in a shippable
container. A product returned without proof of the purchase date is not eligible for
warranty service.
Write the RMA number visibly on the outside of the package and ship it prepaid to your
dealer.
5
Page 6
Manual Objectives
This manual describes in detail the BCM MX965Q mainboard.
We strongly recommend that you study this manual carefully before attempting to
interface with MX965Q or change the standard configurations. Whilst all the necessary
information is available in this manual we would recommend that unless you are
confident, you contact your supplier for guidance.
Please be aware that it is possible to create configurations within the CMOS RAM that
make booting impossible. If this should happen, clear the CMOS settings, (see the
description of the Jumper Settings for details).
If you have any suggestions or find any errors concerning this manual and want to inform
us of these, please contact our Customer Service department with the relevant details.
Safety Precautions
Warning!
Always completely disconnect the power cord from your chassis
whenever you work with the hardware. Do not make connections
while the power is on. Sensitive electronic components can be
damaged by sudden power surges. Only experienced electronics
personnel should open the PC chassis.
Caution!
Always ground yourself to remove any static charge before
touching the mainboard. Modern electronic devices are very
sensitive to static electric charges. As a safety precaution, use a
grounding wrist strap at all times. Place all electronic components
in a static-dissipative surface or static-shielded bag when they are
not in the chassis.
Document Amendment History
Revision Date Comment
1st Nov, 2008 Initial Release
6
Page 7

Contents
Chapter 1: System Setup............................................................................................................................11
1.1 Welcome! ......................................................................................................................................11
1.2 Packing Contents..........................................................................................................................11
1.3 Special Features ...........................................................................................................................12
1.3.1 Product Highlights.........................................................................................................................12
1.4 Before you proceed.......................................................................................................................14
1.5 Mainboard Overview .....................................................................................................................15
1.5.1 Placement direction ......................................................................................................................15
1.5.2 Screw Holes..................................................................................................................................15
1.5.3 Mainboard Layout .........................................................................................................................16
1.6 Central Processing Unit (CPU) .....................................................................................................17
1.6.1 Installing the CPU .........................................................................................................................18
1.6.2 Installing the CPU Heatsink and fan .............................................................................................20
1.6.3 Uninstalling the CPU Heatsink and fan.........................................................................................22
1.7 System Memroy ............................................................................................................................24
1.7.1 Overview .......................................................................................................................................24
1.7.2 Dual-Channel Mode Population Rule ...........................................................................................24
1.7.3 Installing DIMM .............................................................................................................................25
1.7.4 Removing a DIMM ........................................................................................................................26
1.8 Power Supply................................................................................................................................27
1.8.1 ATX Power Connectors: EATXPWR1 (20-pin), ATX12V1 (4-pin) ................................................27
1.9 Back Panel ....................................................................................................................................28
1.10 Connectors/Headers .....................................................................................................................30
1.10.1 Serial ATA Connectors: SATA1, SATA2 ......................................................................................30
1.10.2 Fan Power Connector: CPU_FAN1, CHA_FAN2 .........................................................................30
1.10.3 Front Panel Audio Connector: AAFP1 ..........................................................................................31
1.10.4 Amplifier Connector: JAMP1.........................................................................................................31
1.10.5 Front USB Connector: USB1 ........................................................................................................31
1.10.6 Front Panel Connectors: F_PANEL1 ............................................................................................32
1.10.7 COM1/COM2 +12V/+5V Power Select: JCOMPWR5 ...............................................................32
1.10.8 COM1/COM2 Power Enable/Disable: JCOMPWR6 ..................................................................32
1.10.9 The Headers: JSPI1, JLPC1, JSIDE1 ..........................................................................................32
1.11 Jumpers ........................................................................................................................................33
1.11.1 Clear CMOS Jumpers: CLRTC1...................................................................................................33
7
Page 8

1.12 The Expansion Slots.....................................................................................................................34
1.12.1 Installation of expansion card .......................................................................................................34
1.12.2 Setup an expansion card ..............................................................................................................34
1.12.3 PCI (Peripheral Component Interconnect) Express Slot ..............................................................34
1.12.3.1 PCI-Ex16 Slot: PCIEX1.................................................................................................................35
Chapter 2: Starting Up the System ..........................................................................................................36
2.1 Starting Up Your System...............................................................................................................36
Chapter 3: BIOS Setup................................................................................................................................38
3.1 Introducing BIOS...........................................................................................................................38
3.2 Entering BIOS Setup Menu...........................................................................................................39
3.3 Getting Help ..................................................................................................................................39
3.4 The Main Menu .............................................................................................................................40
3.5 Standard CMOS Features ............................................................................................................42
3.6 Advanced BIOS Features .............................................................................................................44
3.7 Advanced Chipset Features..........................................................................................................46
3.8 Integrated Peripherals...................................................................................................................47
3.9 Security Chip Configuration ..........................................................................................................48
3.10 Power Management Setup ...........................................................................................................49
3.11 PC Health Satus............................................................................................................................50
3.12 Frequency/voltage Control............................................................................................................51
3.13 Load Setup Defaults .....................................................................................................................52
8
Page 9

Mainboard Specifications
Model MX965Q
Processor Intel® 65nm LGA 775 processors.
Supports 65nm Intel® Core™ 2 Duo/ Pentium® Dual Core/ Pentium® 4/ Pentium®
D/ Celeron 440 w/ 1066/800/533MHz FSB
North Bridge Intel® Q965
Memory
Integrated Graphics Intel® GMA 3000 Engine; up to 256MB can be allocated for GFX
South Bridge Intel® ICH8
SATA 2 x SATA II connectors supports 3.0 Gbs transfer speed
PCI-E 1 x PCI-E x 16 slot
USB 6 x USB 2.0 ports (4 x Rear I/O, 2 x header)
Super I/O Controller Winbond® 83627DHG-A
Serial Ports 2 x RS232 port (2 x Rear I/O)
Watch Dog Timer 1 ~ 255 sec timer
HW Monitor Yes
DDR2 800/667/533 SDRAM
* Supports DDR2 533MHz (PC2-4200), DDR2 667MHz (PC2-5300), DDR2 800MHz
(PC2-6400) memory modules up to 4GB max. (2GB max/ DIMM slot)
* Two DDR2 DIMM slots (240-pin/ 1.8V), supports Non-ECC, un-buffered memory
Infineon® TPM TPM
1 x TPM 1.2 Security Device
Realtek® ALC888 Audio
HD Audio Codec with auto jack sensing
BIOS Award ® BIOS with 8Mb SPI ROM
Expansion Slots
PCI-E 1 x PCI-E x 16 Slot supports PCI-E x16 Graphic card
Onboard I/O Headers
SATA 2 x Std. SATA Connectors
USB 1 x USB Headers (supports 2 USB ports)
Front Audio 1 x Header
Audio Amplifier 1 x Header
Front Panel 1 x Headers
Fan Header 2 x Headers
Realtek® RTL8111B PCI-E Gigabit LAN LAN
1 x 10/100/1000 LAN
9
Page 10

Back I/O Panel
PS/2 Keyboard Mouse 1 x DIN 6 Stack up Connector
VGA 1 x DB 15 Connector
Serial 2 x DB 9 Connector
LAN and USB 1 x Stack up RJ45 and USB Connectors (2 USB ports)
USB 1 x Stack up USB Connectors (2 USB ports)
Audio 1 x 3 jacks Audio Connector
Power & Connector
1 x Std. 24 pin ATX Connector
1 x 4 pin ATX 12 Connector
Form Factor
Mini-iTX 6.69” x 6.69” (170mm x 170mm)
10
Page 11

Chapter 1: System Setup
This chapter describes the motherboard features and the new technologies it supports
1.1 Welcome!
The motherboard delivers a host of new features and latest technologies, making it another line of
BCM long life motherboards! Before you start installing the motherboard, and hardware devices on it,
check the items in your package with the list below.
If any of the below items is damaged of missing, please contact your vendor.
1.2 Packing Contents
Motherboard
z 1 x MX965Q
Cable
z 2 x Serial ATA Signal Cable
z 2 x Serial ATA Power Cable
Accessories
z 1 x MX965Q I/O Shield
Software CD
z 1 x CD contains drivers, user’s manual, and QIG (Quick Installation Guide)
Documentation
z 1 x Quick In stallation Guide
11
Page 12

1.3 Special Features
1.3.1 Product Highlights
Intel® Core
This mainboard supports the Intel® Intel® Core™ 2 Duo processors in the LGA775 package. With the new
Intel® Core
the most powerful and energy efficient CPU in the world.
Intel® Q965 Express Chipset
The Intel® Q965 Express Chipset provides all business with more effective costs management, safer
computing environment, and deploys more responsive PCs. It features the integrated graphics engine,
Intel® Graphics Media Accelerator 3000.
DDR2 Memory Support
The mainboard supports DDR2 memory that features data transfer rates of 800/ 667/ 533MHz to meet the
higher bandwidth requirements of the latest 3D graphics, multimedia, and Internet applications. The
dual-channel DDR2 architecture doubles the bandwidth of your system memory to boost system
performance, and eliminating bottlenecks with peak bandwidths of up to 12.8GB/s.
TM
2 Processor Ready
TM
2 micorarchitecture technology and 1066/800 MHz FSB, Intel® CoreTM2 processor is one of
Serial ATA 3.0Gb/s Technology
The mainboard supports the Serial ATA (SATA) technology through 6 Serial ATA II interface from Intel®
ICH8 chipset. The SATA II specification allows for thinner, more flexible cables with lower pin count,
reduced voltage requirement (compared to IDE specification), and provides up to 300MB/s data transfer
rate.
High Definition Audio
The mainboard came with the Realtek ALC888 high-definition audio CODEC that lets you enioy high
quality 7.1+2 channel audio without having to buy advanced sound cards.
PCI-E x16 support
The PCI-E x16 VGA interface specification enhances graphics performance with high bandwidth speeds up
to 2.5 Gb/s.
USB 2.0 Technology
The mainboard implements the Universal Serial Bus (USB) 2.0 specification, dramatically increasing the
connection speed from the 12Mbps bandwidth on USB1.1 to a fast 480Mbps on USB2.0. USB2.0 is
backward compatible with USB1.1.
12
Page 13

Trusted Platform Module (TPM) Support
By combining the onboard TPM 1.2 with TPM security software (provided by the third party), it will enhance
the security level of the system.
• PRECAUTION: When TPM is enabled and utilized through TPM software, there is
possibility that the encrypted data will not be accessible, or recoverable if one of th e
following situations occurred:
1. Lost of TPM password.
2. System or board failure, or being replaced.
3. Hard Drive failure.
13
Page 14

1.4 Before you proceed
Take note of the following precautions before you install motherboard components or change any
motherboard settings.
• Unplug the power cord from the wall socket before touching any component.
• Use a grounded wrist strap or touch a safely grounded object or to a metal object, such as th e
power supply case, before handling components to avoid damaging them due to static
electricity
• Hold components by the edges to avoid touching the ICs on them.
• Whenever you uninstall any component, place it on a grounded antistatic pad or in the bag
that came with the component.
• Before you install or remove any component, ensure that the ATX power supply is switched
off or the power cord is detached from the power supply. Failure to do so may cause s evere
damage to the motherboard, peripherals, and/or components.
14
Page 15
1.5 Mainboard Overview
Before you install the mainboard, study the configuration of your chassis to ensure that the motherboard fits
into it.
Make sure to unplug the power cord before installing or removing the mainboard. Failure
to do so can cause you physical injury and damage mainboard components.
1.5.1 Placement direction
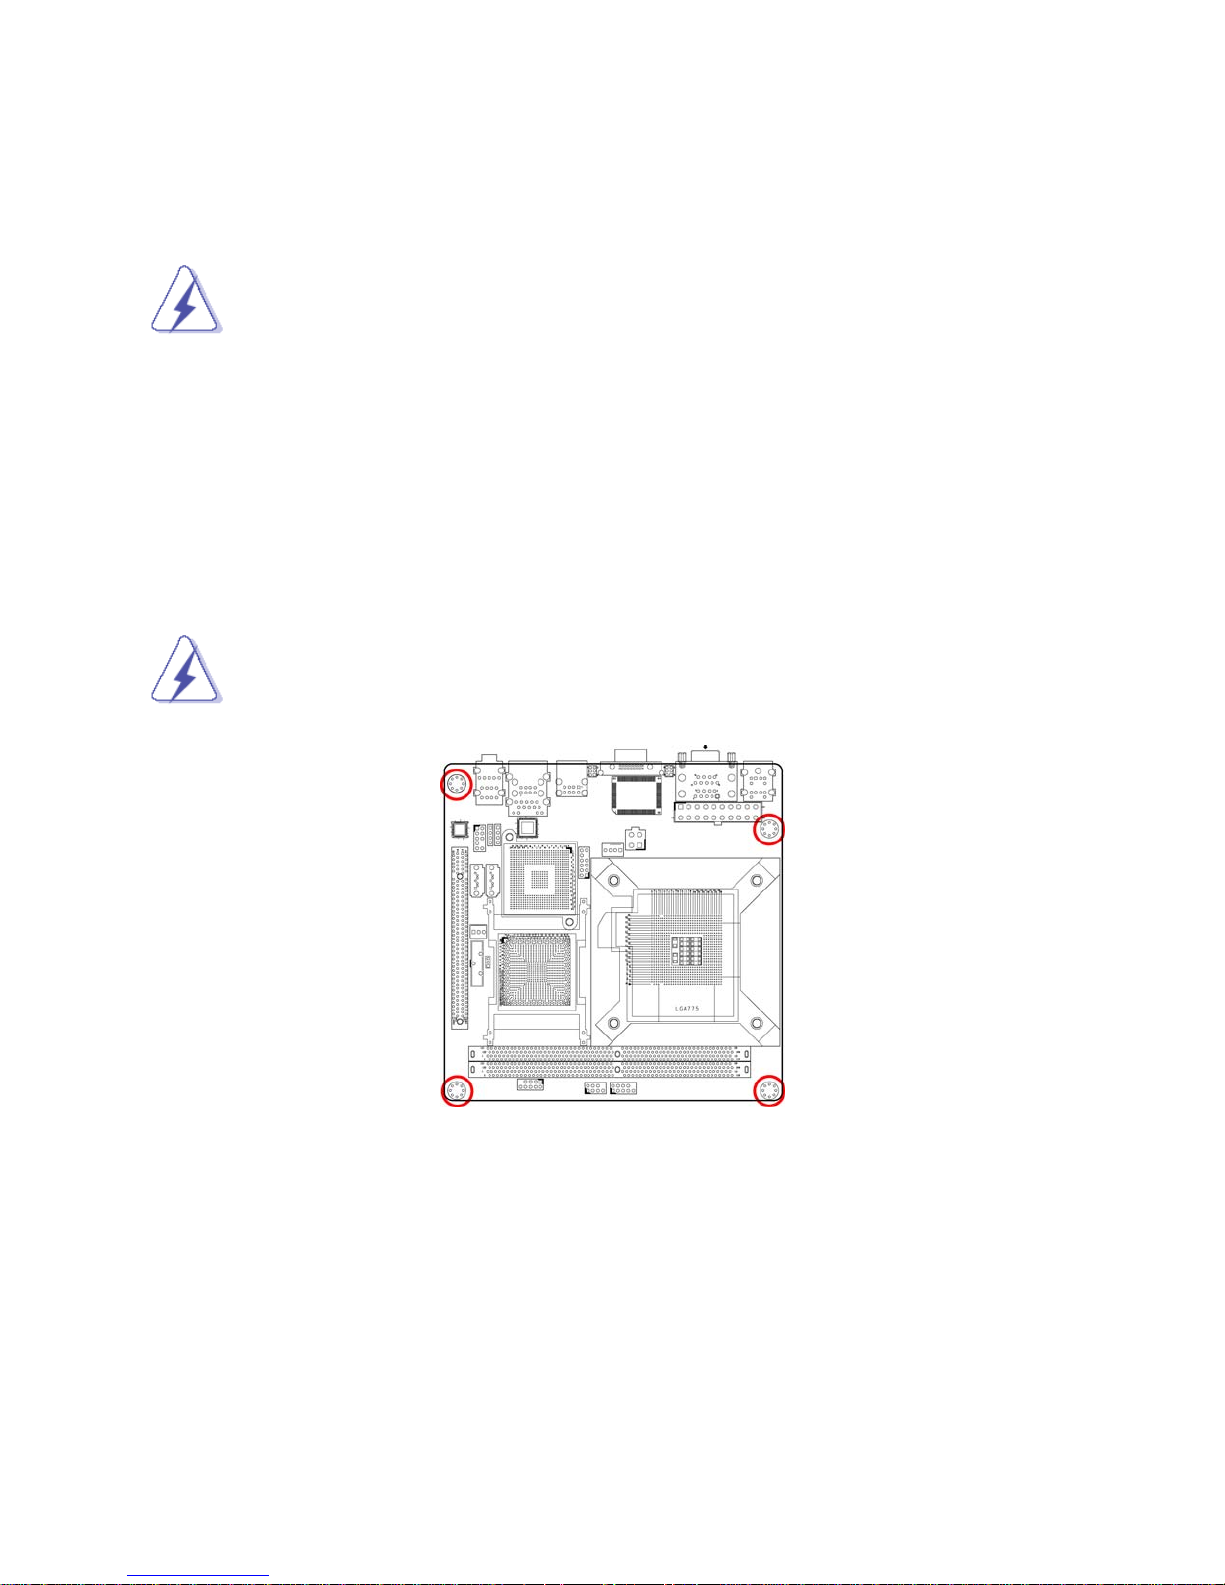
When installing the mainboard, make sure that you place it into the chassis in the correct orientation. The
edge with external port goes to the rear part of the chassis as indicated in the image below.
1.5.2 Screw holes
Place the screws into the holes indicated by circles to secure the mainboard to the chassis.
Do not over-tighten the screws! Doing so may damage the mainboard.
15
Page 16
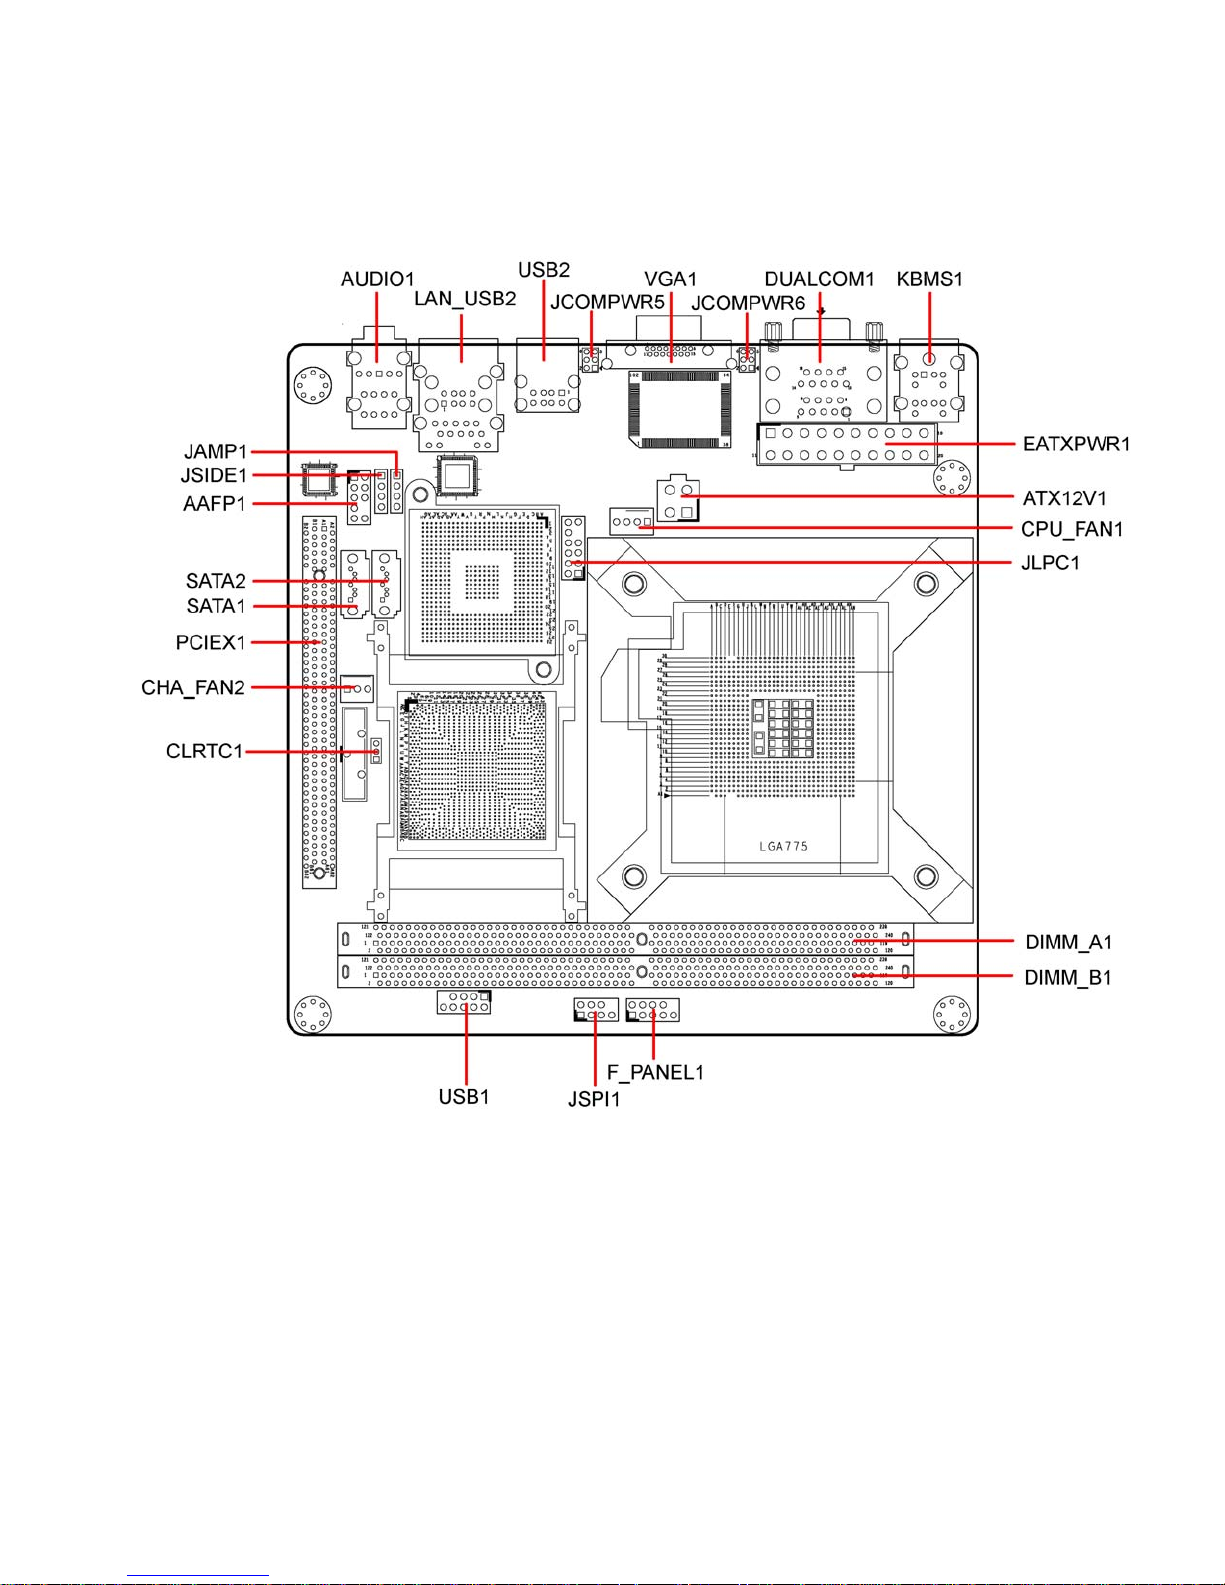
1.5.3 Mainboard Layout
16
Page 17

1.6 Central Processing Unit (CPU)
This mainboard supports Intel® 65nm Core™ 2 Duo (E6x00 Series), Pentium® 4 (6x1 series), Pentium® D
(9xx Series), Celeron D 352, Celeron 440 in LGA775 package (with 1066/800/533MHz FSB only). When
you are installing the CPU, make sure to install the cooler to prevent overheating. If you do not have the
CPU cooler, consult your dealer before turning on the system.
• Your boxed Intel® LGA775 processor package should come with installation instructions for the
CPU, fan and heatsink assembly.
• Upon purchase of the mainboard, make sure that the PnP cap is on the socket and the socket
pins are not bent. Contact your retailer immediately if the PnP cap is missing, or if you see any
damage to the PnP cap/socket pins/motherboard components. BCM will shoulder the cost of
repair only, if the damage is shipment/ transit-related.
• Keep the PnP cap after installing the mainboard. BCM will process Return Merchandise
Authorization (RMA) requests only if the mainboard comes with the cap on the LGA775 socket.
• The product warranty does not cover damage to the socket pins resulting from incorrect CPU
installation/removal, or misplacement/loss/incorrect removal of the PnP cap.
1. Overheating: Overheating will seriously damage the CPU and system. Always make
sure the cooling fan is function properly to protect the CPU from overheating. Make
sure that you apply an even layer of thermal paste between the CPU and the
heatsink to enhance heat dissipation.
2. Replacing th e CPU: While replacing the CPU, always turn off the ATX power suppply
or unplug the power supply’s powr cord from the grounded outlet first to prevent
damage to the system and the system.
17
Page 18
1.6.1 Installing the CPU
To install a CPU
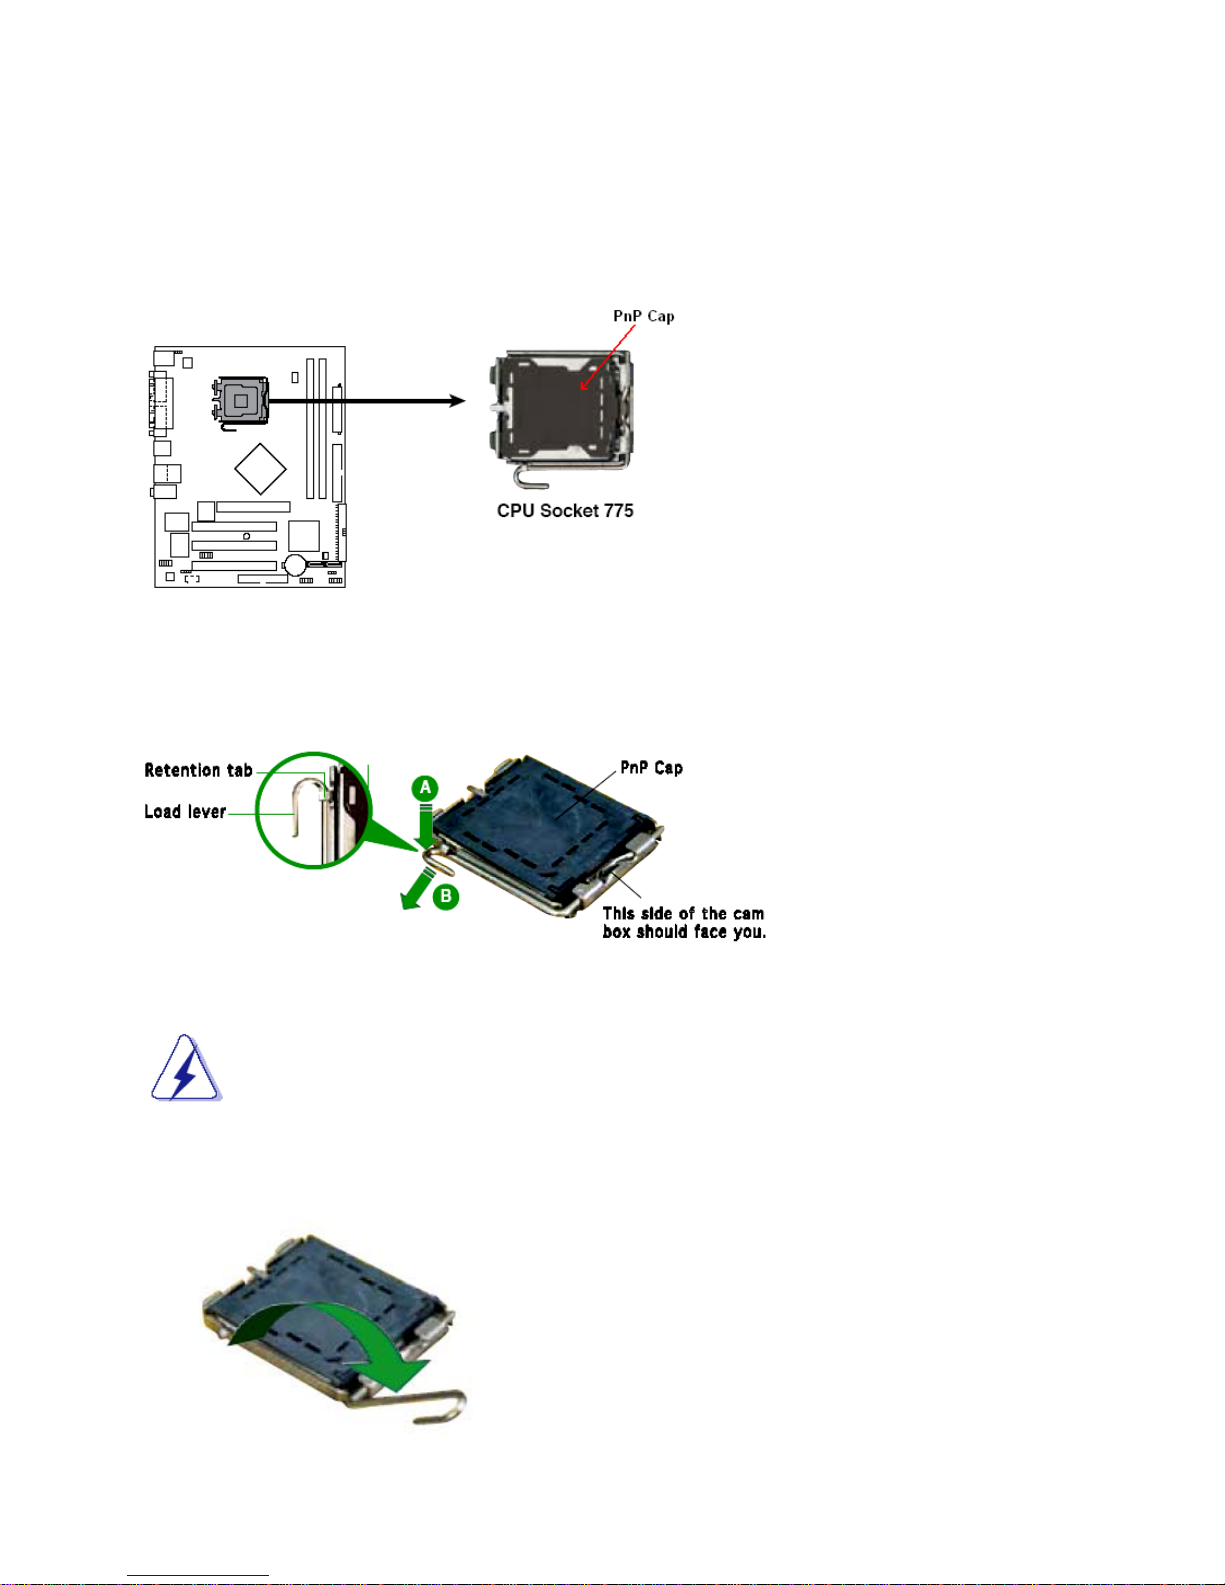
1. Locate the CPU socket on the motherboard
2. Press the load lever with your thumb (A) and move it to the left (B) until it is released from the retention
tab.
To prevent damage to the socket pins, do not remove the PnP cap unless you have
installed the CPU.
3. Lift the load lever in the direction of the arrow to a 135° angle
18
Page 19
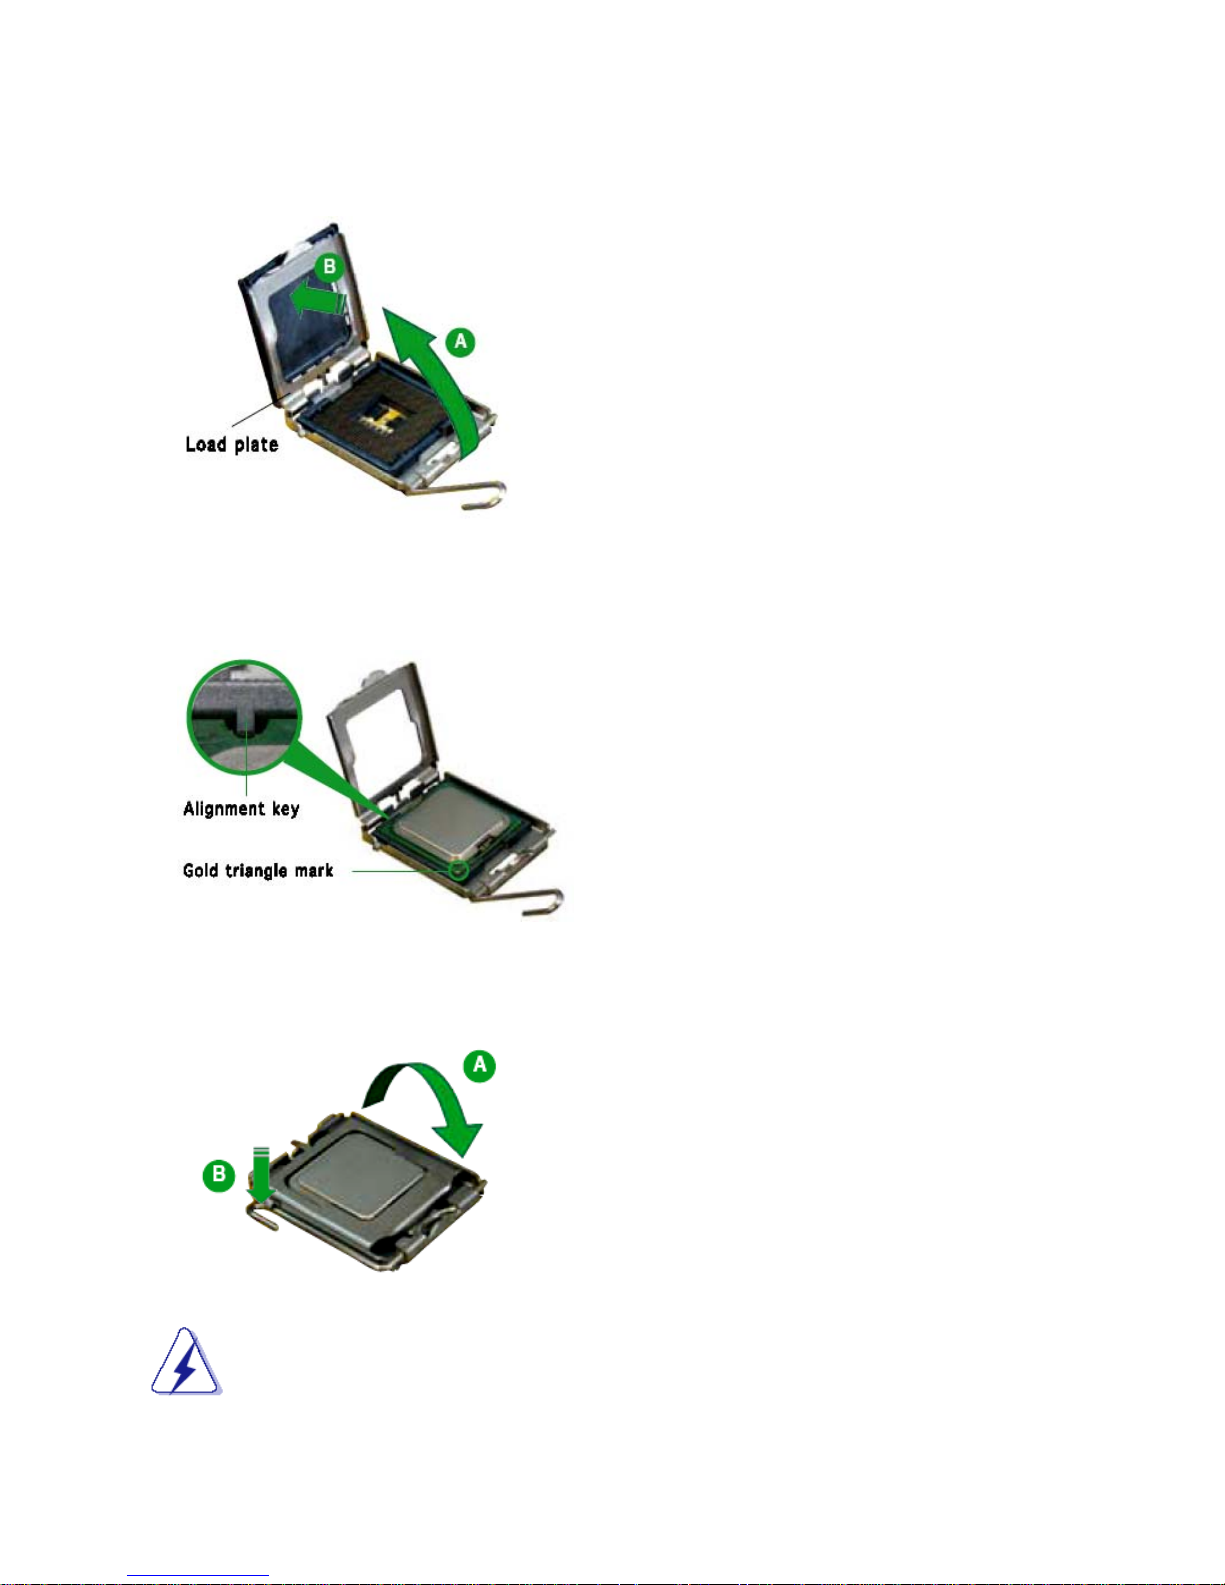
4. Lift the load plate with your thumb and forefinger to a 100° angle (A), then push the PnP cap from the
load plate window to remove (B).
5. Position the CPU over the socket, making sure the gold triangle is on the bottom-left corner of the
socket. The socket alignment key should fit into the CPU notch.
6. Close the load plate (A), then push the load lever (B) until it snaps into the retention tab.
The CPU fits in only one correct orientation, DO NOT force the CPU into the socket to prevent
damage to the socket pins or CPU.
19
Page 20
1.6.2 Installing the CPU heatsink and fan
The Intel LGA775 processor requires a specially designed heatsink and fan assembly to ensure optimum
thermal condition and performance.
• When you purchase a boxed Intel® processor, the package includes the CPU fan and
heatsink assembly. If you buy a CPU separately, make sure that you use only Intel®-certified
multi-directional heatsink and fan.
• Your Intel® LGA775 heatsink and fan assembly comes in a push-pin design and requires
no tool to install.
• If you purchased a separate CPU heatsink and fan assembly, make sure that you have
properly applied Thermal Interface Material to the CPU heatsink or CPU before you install
the heatsink and fan assembly.
• Be sure the CPU heatsink is capable of supporting the CPU thermal design power specified
for the corresponding CPU.
• Make sure the temperature inside the chassis is maintained at 40
Make sure that you have installed the mainboard to the chassis before you install the CPU fan
Note:
and heatsink assembly.
o
C or less.
To install the CPU heatsink and fan:
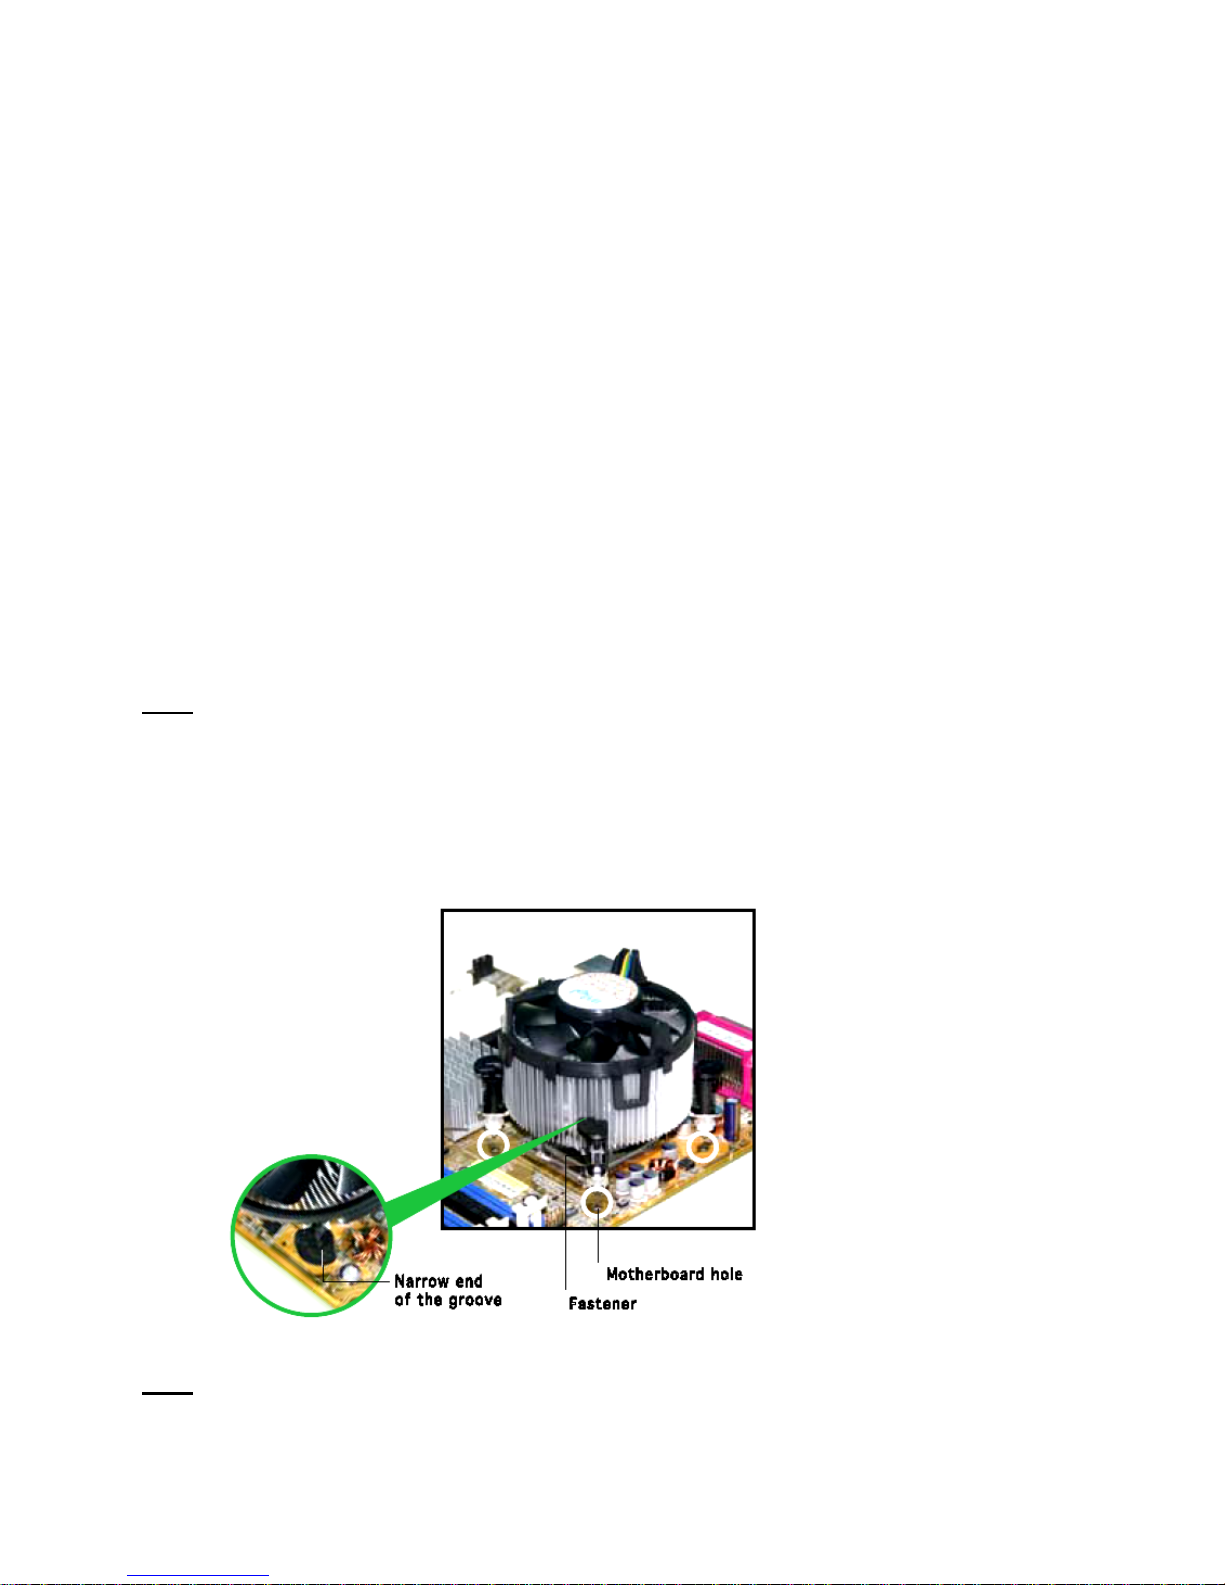
1. Place the heatsink on top of the installed CPU, making sure that the four fasteners match the holes
on the motherboard.
Note:
Orient the heatsink and fan assembly such that the CPU fan cable is closest to the CPU fan
connector.
20
Page 21
Make sure to orient each fastener with the narrow end of the groove pointing outward.
(The photo shows the groove shaded for emphasis.)
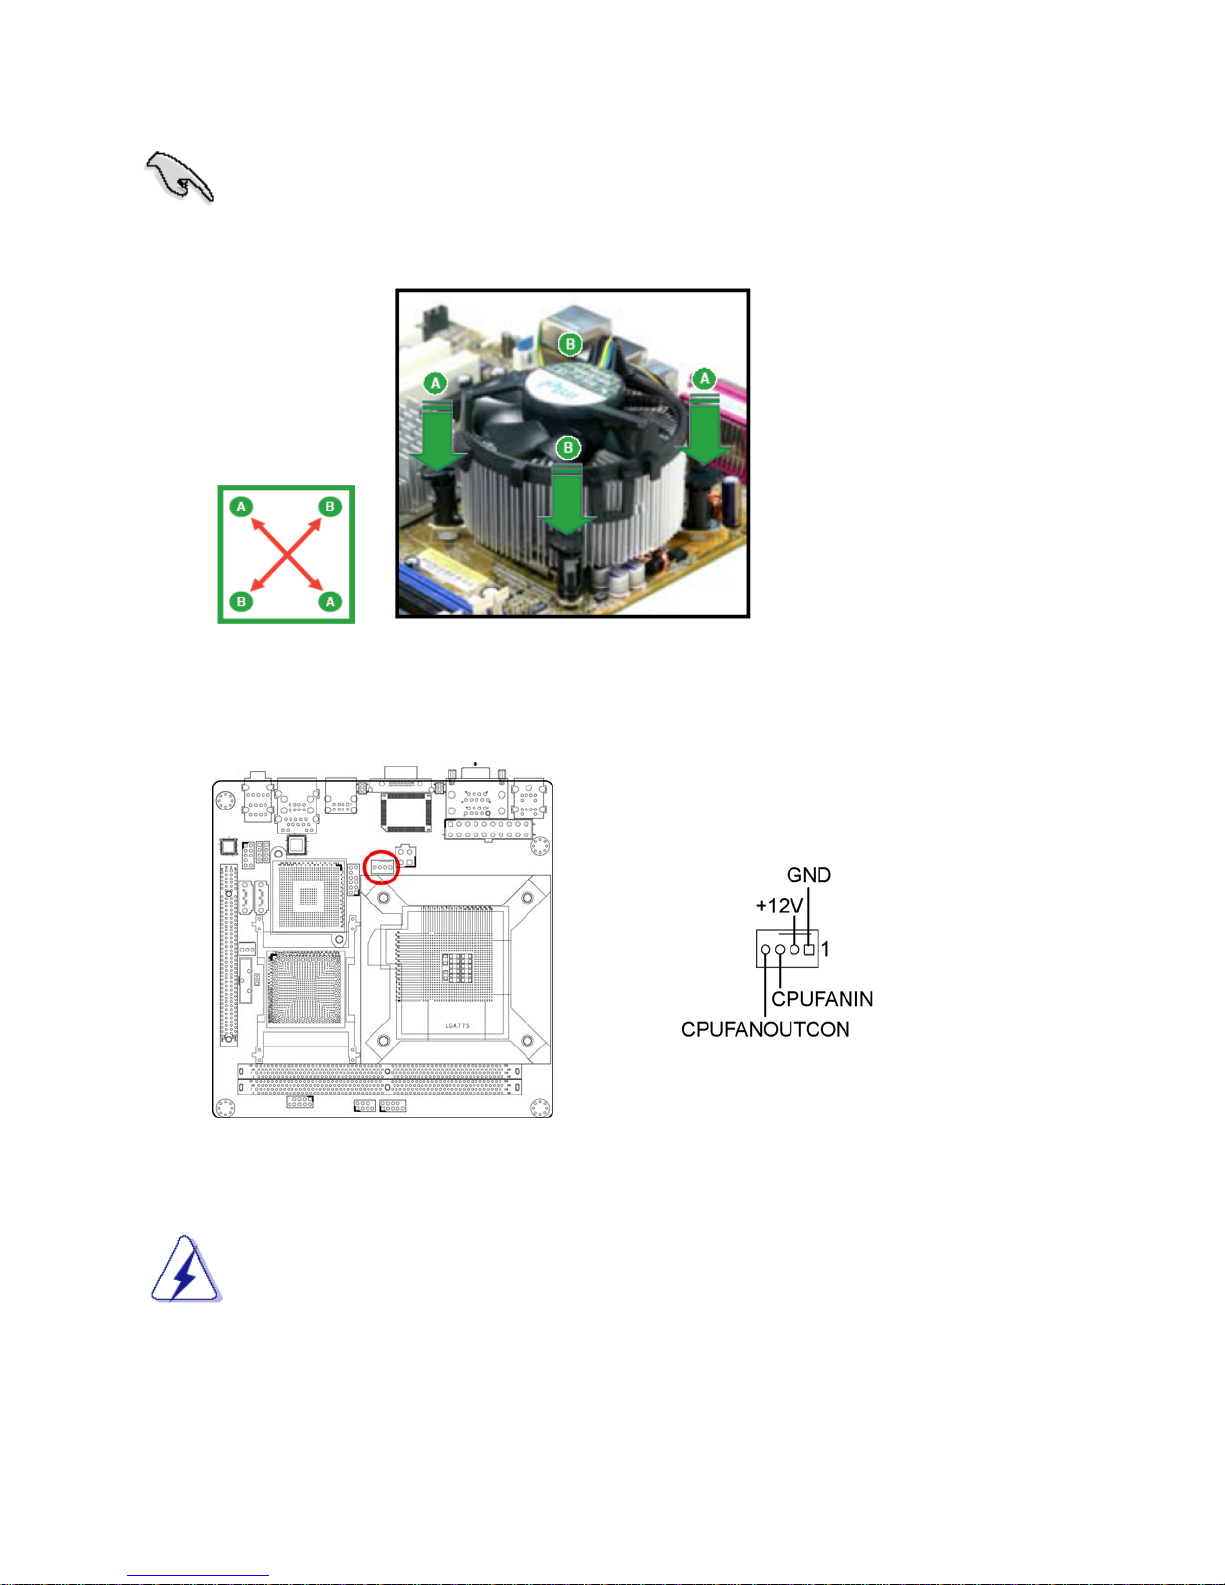
2. Push down two fasteners at a time in a diagonal sequence to secure the heatsink and fan
assembly in place
3. Connect the CPU fan cable to the connector on the motherboard labeled CPUFAN1.
.
Do not forget to connect the CPU fan connector! Hardware monitoring errors can occur if you fail
to plug in this connector.
21
Page 22
1.6.3 Uninstalling the CPU heatsink and fan.
To uninstall the CPU heatsink and fan:
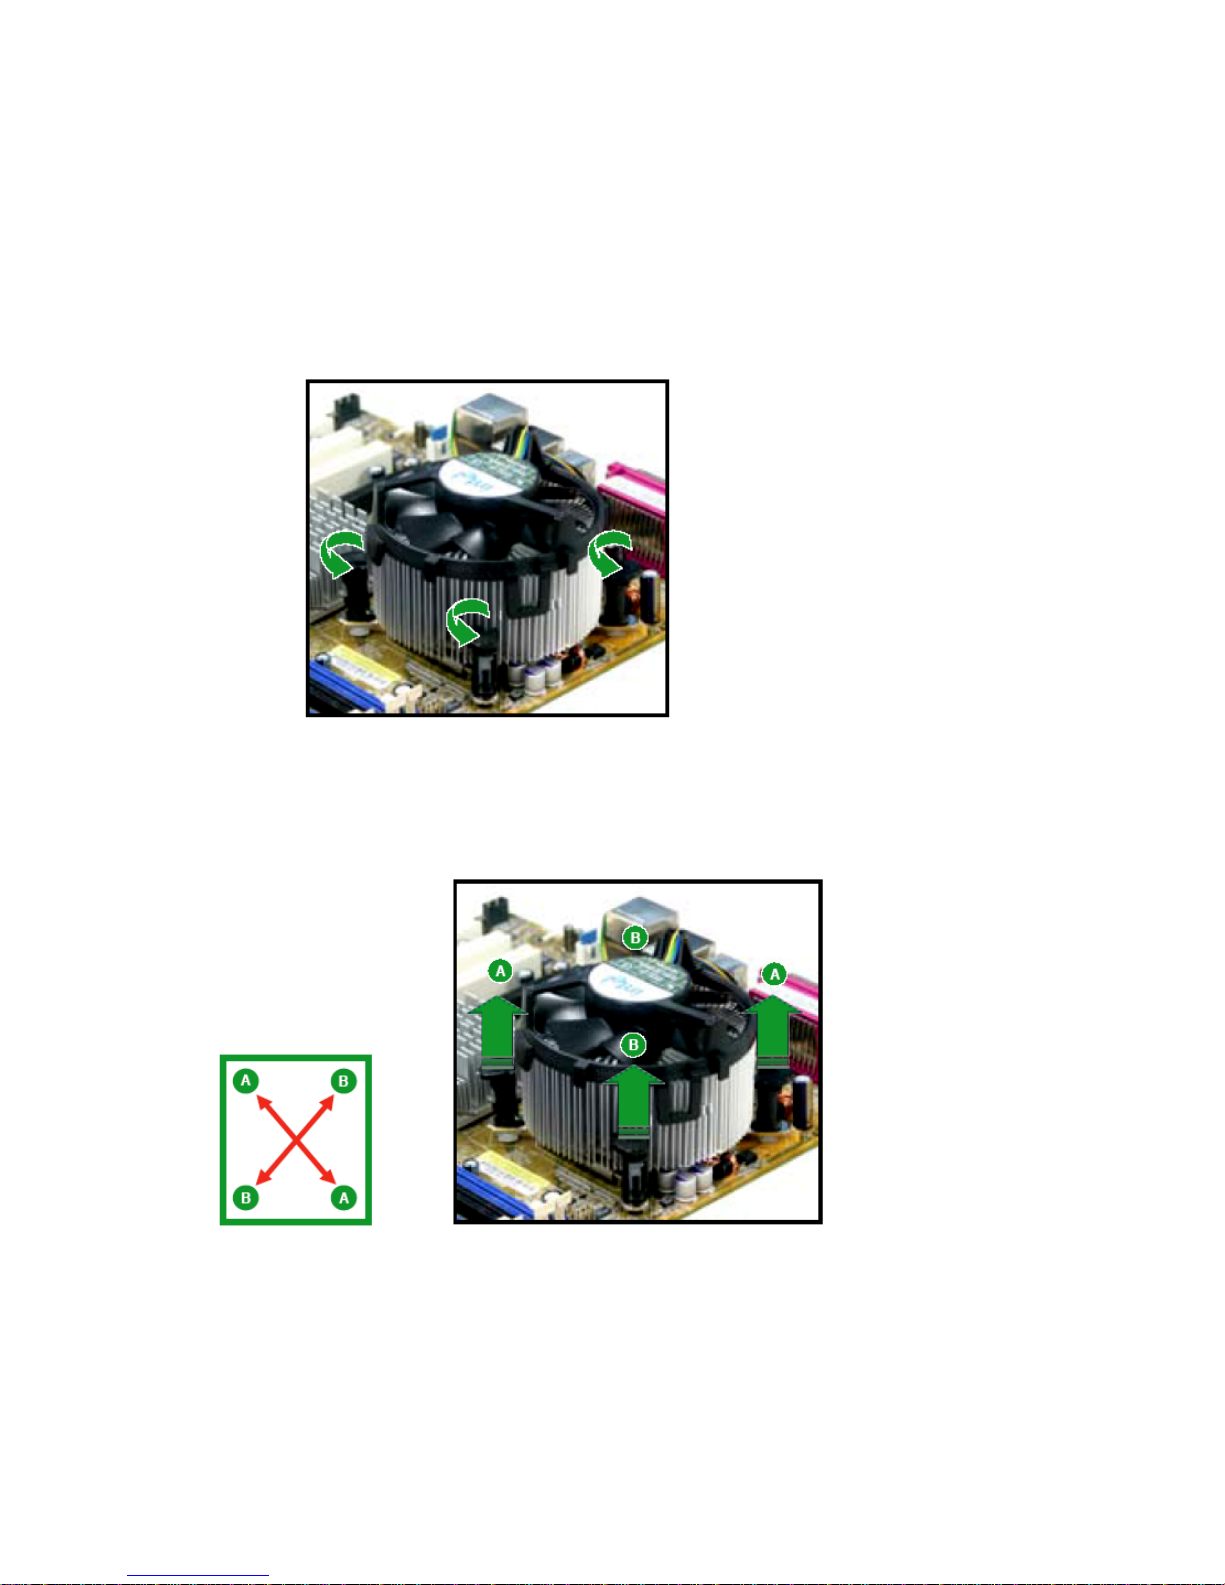
1. Disconnect the CPU fan cable from the connector on the motherboard.
2. Rotate each fastener counterclockwise.
3. Pull up two fasteners at a time in a diagonal sequence to disengage the heatsink and fan
assembly from the mainboard.
22
Page 23
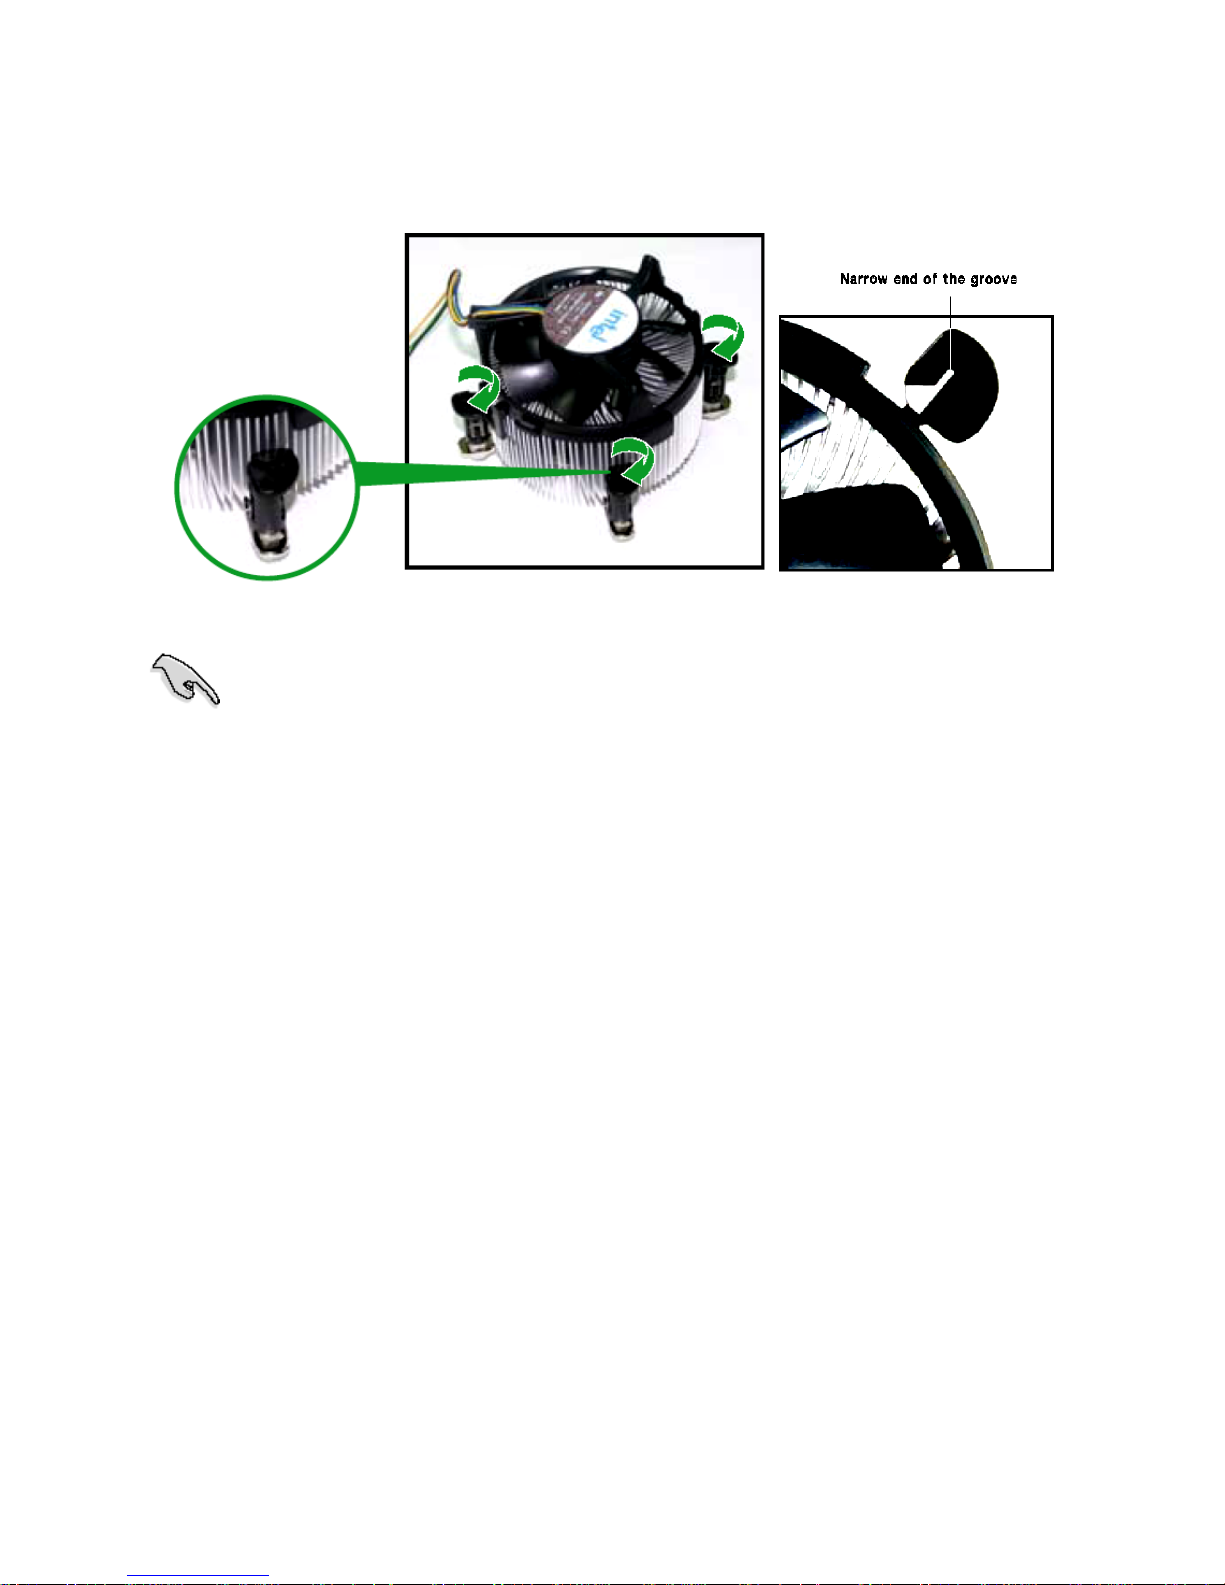
4. Rotate each fastener clockwise to ensure correct orientation when reinstalling.
The narrow end of the groove should point outward after resetting.
(The photo shows the groove shaded for emphasis.)
23
Page 24
1.7 System Memory
1.7.1 Overview
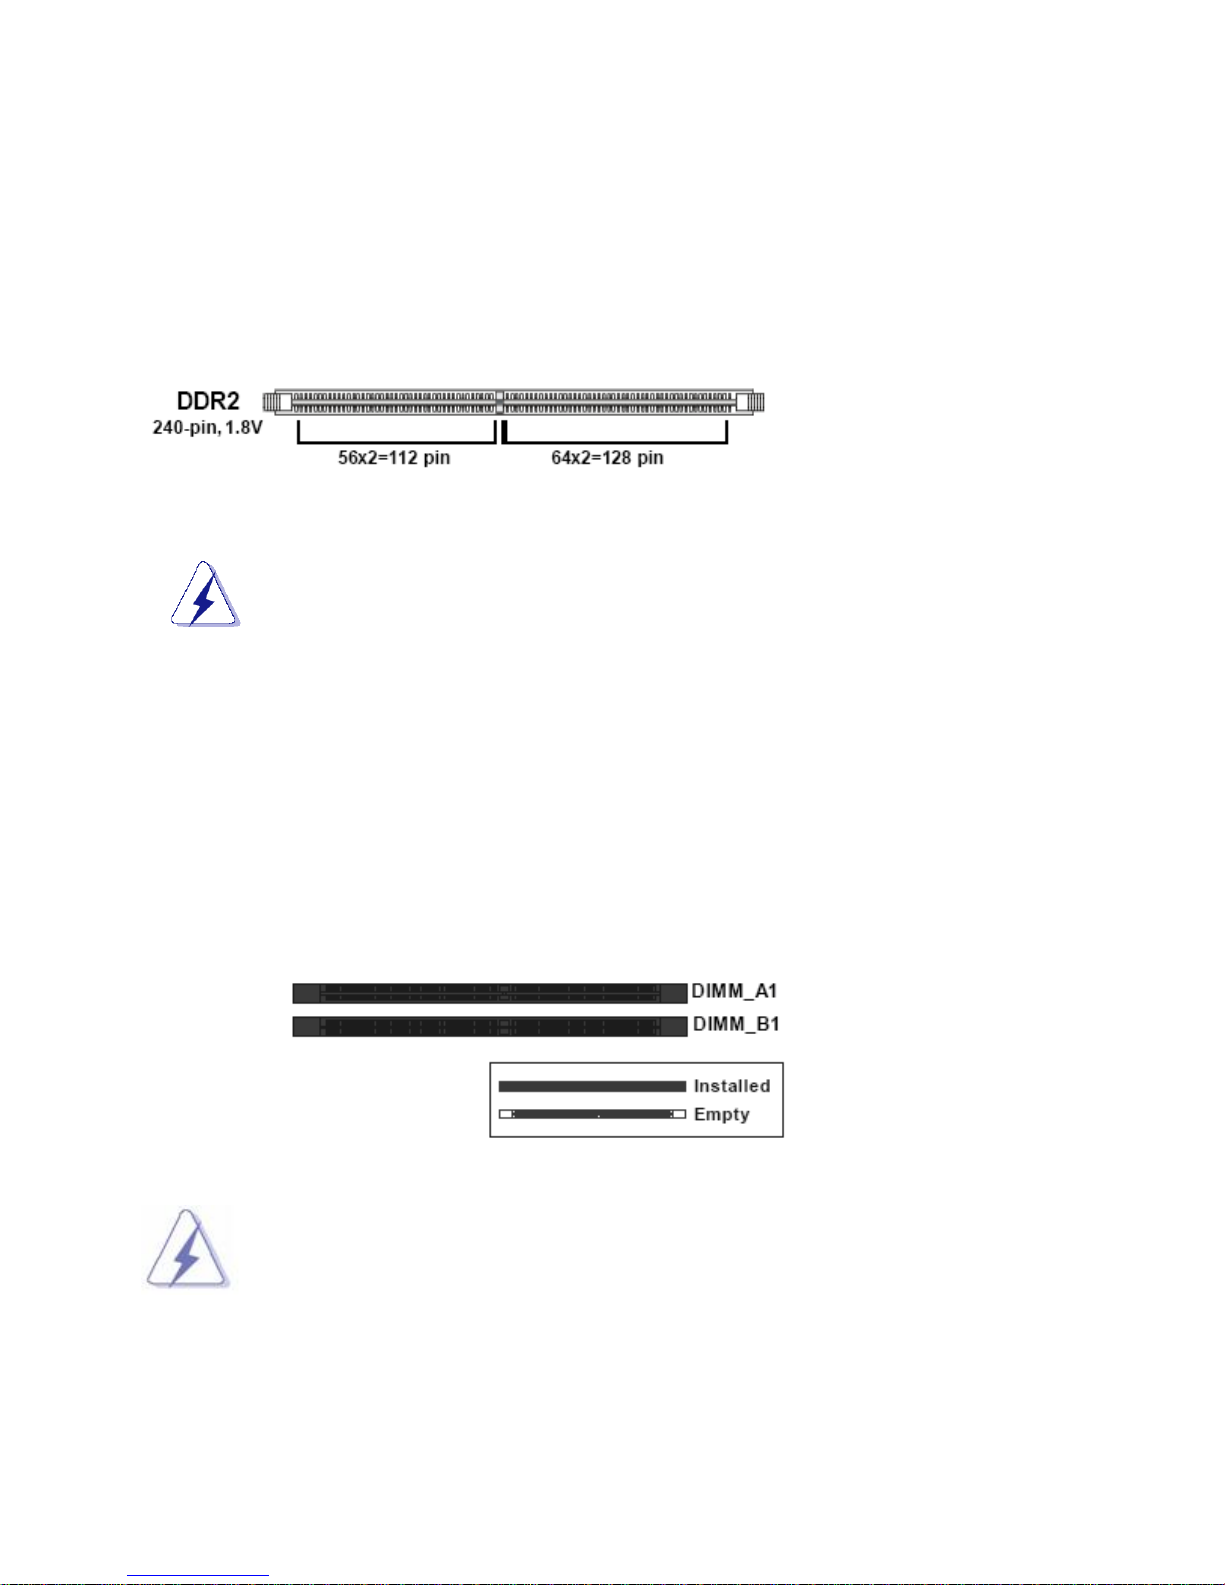
The mainboard comes with two 240-pin DDR2 Dual Inline Memory Modules (DIMM) sockets. You may use 533MHz
(PC2-4200), 667MHz (PC2-5300), or 800MHz (PC2-6400); Non-ECC, Un-buffered 1.8V DDR2 memory modules on
this board (2GB maximum for each slot).
• Some old-version DDR2-800/667 DIMMs may not match Intel®’s On-Die-Termination (ODT)
requirement and will automatically downgrade to run at DDR2-533. If this happens, contact your
memory vendor to check the ODT value.
• Due to chipset limitation, DDR2-800 with CL=4 will be downgraded to run at DDR2-667 by default
setting. If you want to operate with lower latency, adjust the memory timing manually.
• Due to chipset limitation, DDR2-667 with CL=3 will be downgraded to run at DDR2-533 by default
setting. If you want to operate with lower latency, adjust the memory timing manually.
1.7.2 Dual-Channel mode Population Rule
In Dual-Channel mode, the memory modules can transmit and receive data with two data bus lines simultaneously.
Enabling Dual-Channel mode can enhance the system performance. Please refer to the following illustrations for
population rules under Dual-Channel mode.
• In dual-channel configurations, install only identical (the same type and size) DDR2
memory module pairs for each channel. For instance, DIMM_A1 paired with DIMM_B1.
• Always install DIMMs with the same CAS latency. For optimum compatibility, it is
recommended that you obtain memory modules from the same vendor.
24
Page 25
1.7.3 Installing DIMM
Make sure to unplug the power supply before adding or removing DIMMS or other
system components. Failure to do so may cause severe damage to both the mainboard and
the components.
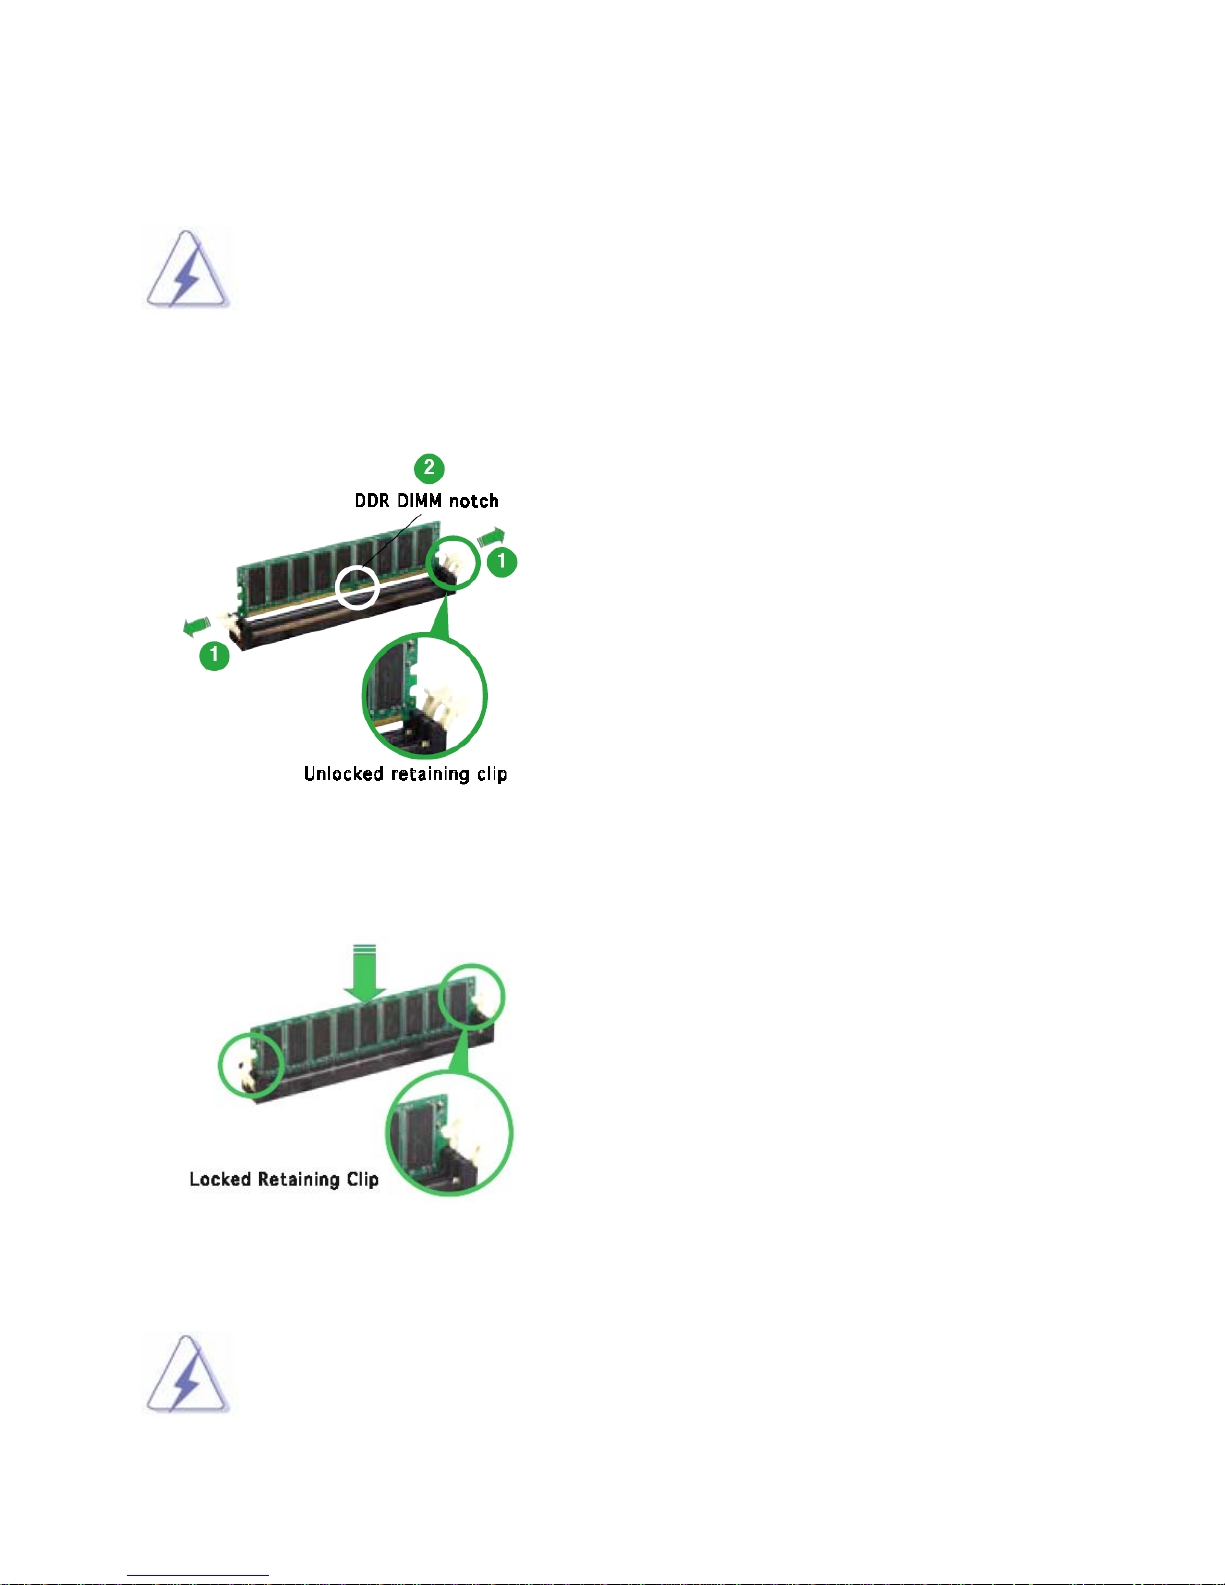
1. Unlock a DIMM socket by pressing the retaining clips outward.
2. Align a DIMM on the socket such that the notch on the DIMM matches the break on the socket.
3. Firmly insert the DIMM into the socket until the retaining clips snap back in place and the DIMM is properly
seated.
1. A DDR2 memory module is keyed with a notch so that it fits in only one direction.
2. DO NOT force the memory module into the socket in order to avoid damaging the
memory module and the slot.
25
Page 26
3. DDR2 memory modules are not interchangeable with DDR and is DDR2 standard
is not backward compatible. You shall always install DDR2 memory modules in
the DDR2 memory slots.
4. To enable the system boot-up successfully, always inset the memory module into
the DMM_A1 slot first.
1.7.4 Removing a DIMM
Follow these steps to remove a DIMM.
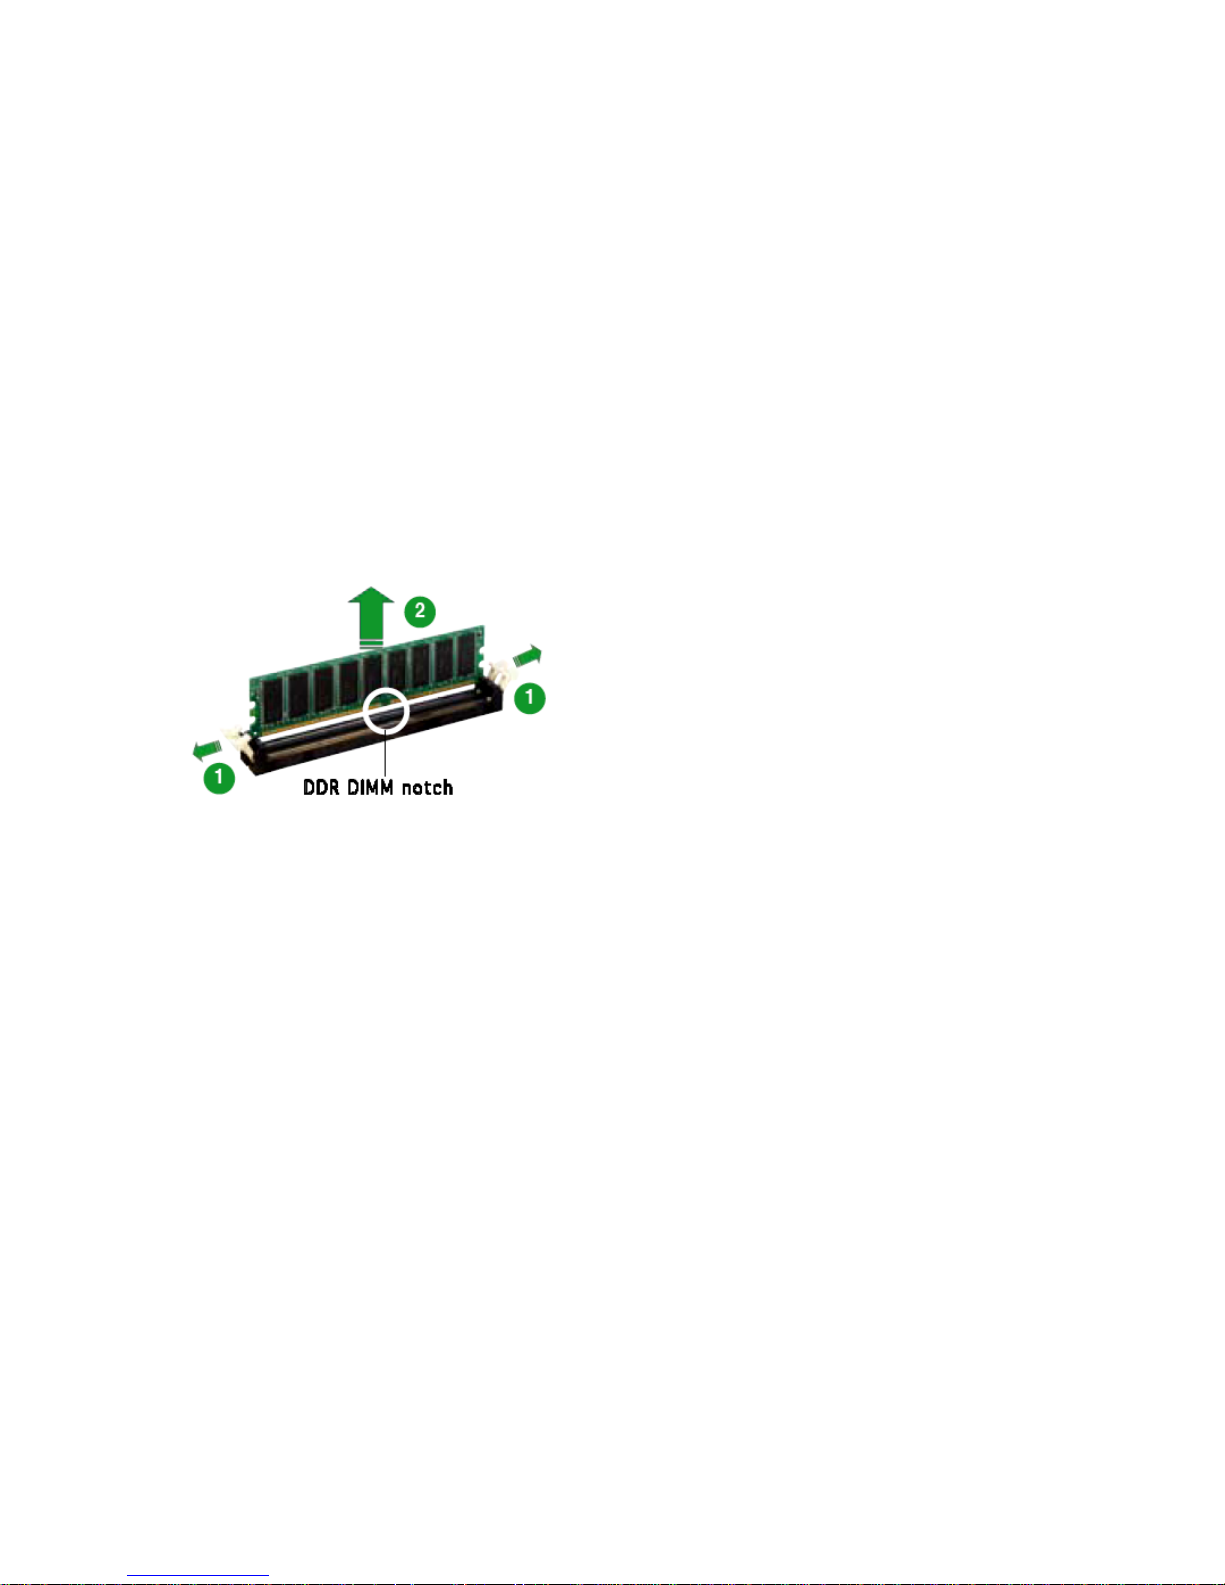
1. Simultaneously press the retaining clips outward to unlock the DIMM.
2. Remove the DIMM from the socket.
26
Page 27
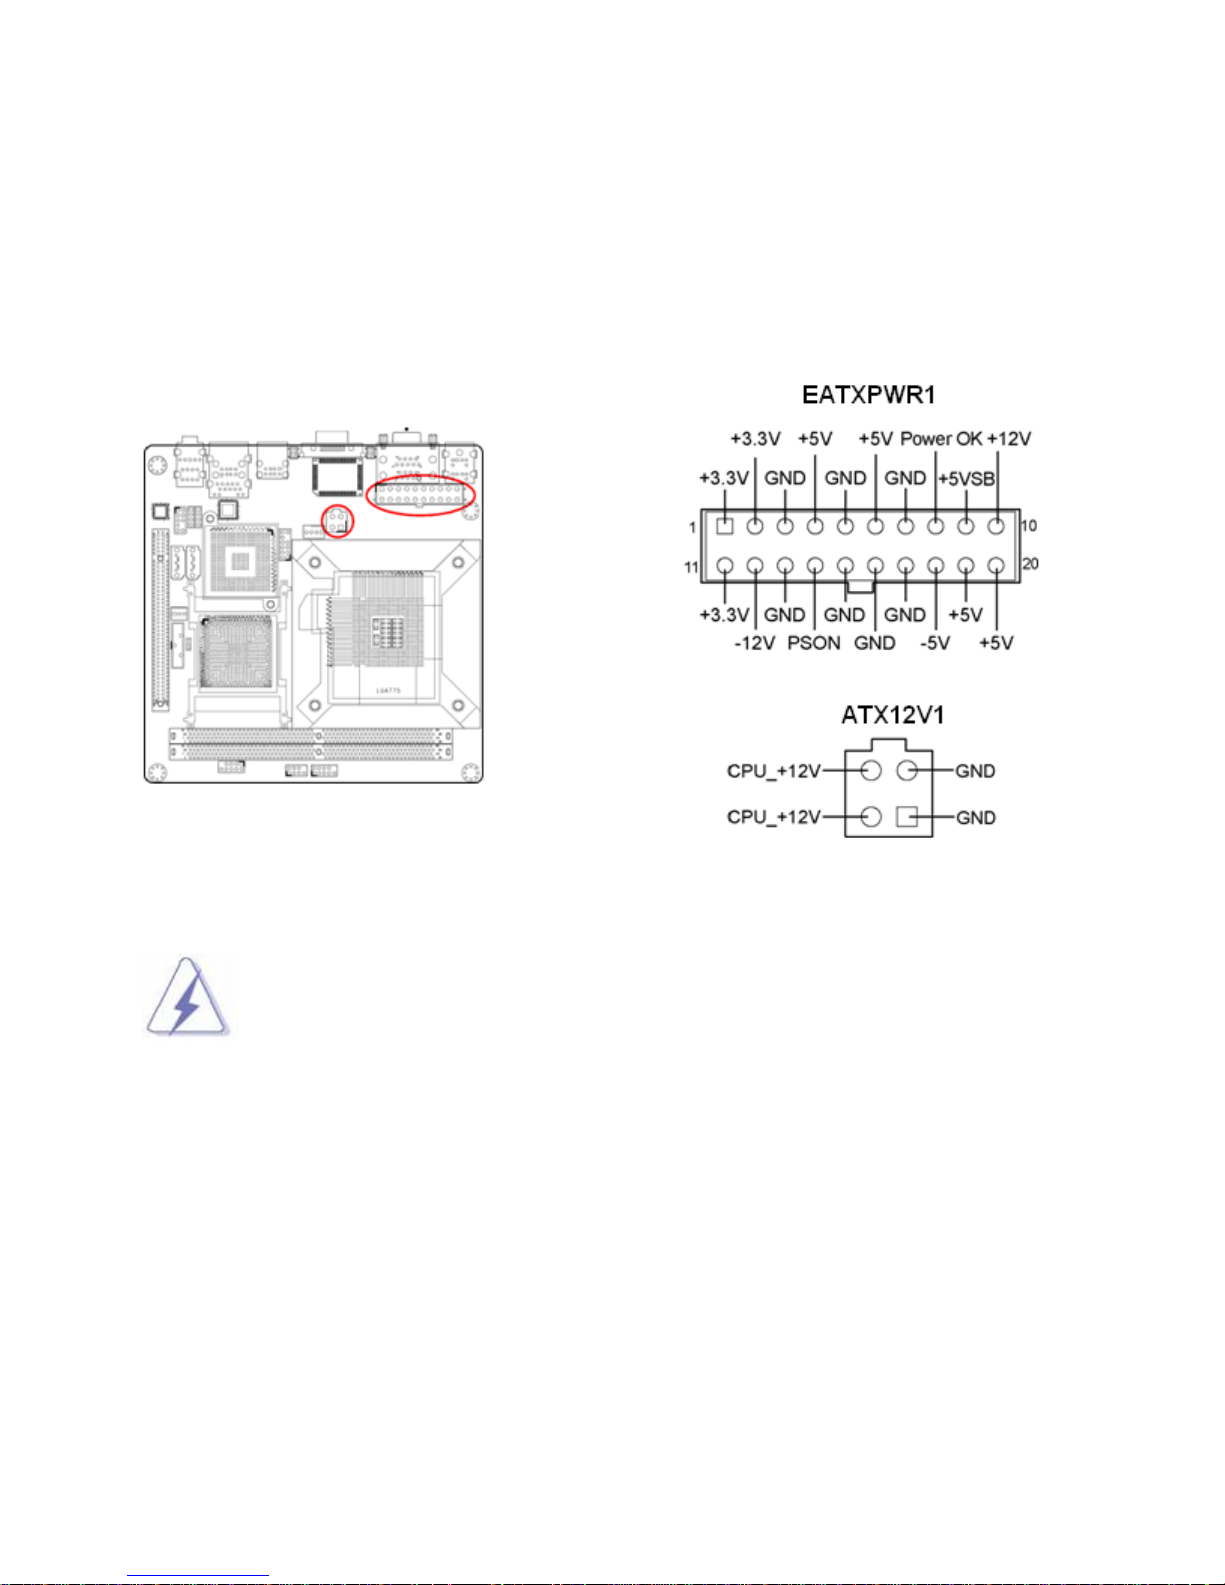
1.8 Power Supply
1.8.1 ATX Power Connectors: EATXPWR1 (20-pin), ATX12V1 (4-pin)
These connectors are for ATX power supply plugs. The power supply plugs are designed to fit these
connectors in only one orientation. Find the proper orientation and push down firmly until the
connectors are completely fit.
1. For a fully configured system, we recommend that you use a power supply unit
(PSU) that complies with ATX 12 V specification 2.0 (or later version) a nd provides a
minimum power of 400W.
2. Do not forget to connect the 4-pin ATX12V1 power plug; otherwise, the system will
not boot.
3. Use of a PSU with a higher power output is recommended when configuring a
system with more power-consuming devices. The system may become unstable or
may not boot if the power is inadequate.
27
Page 28
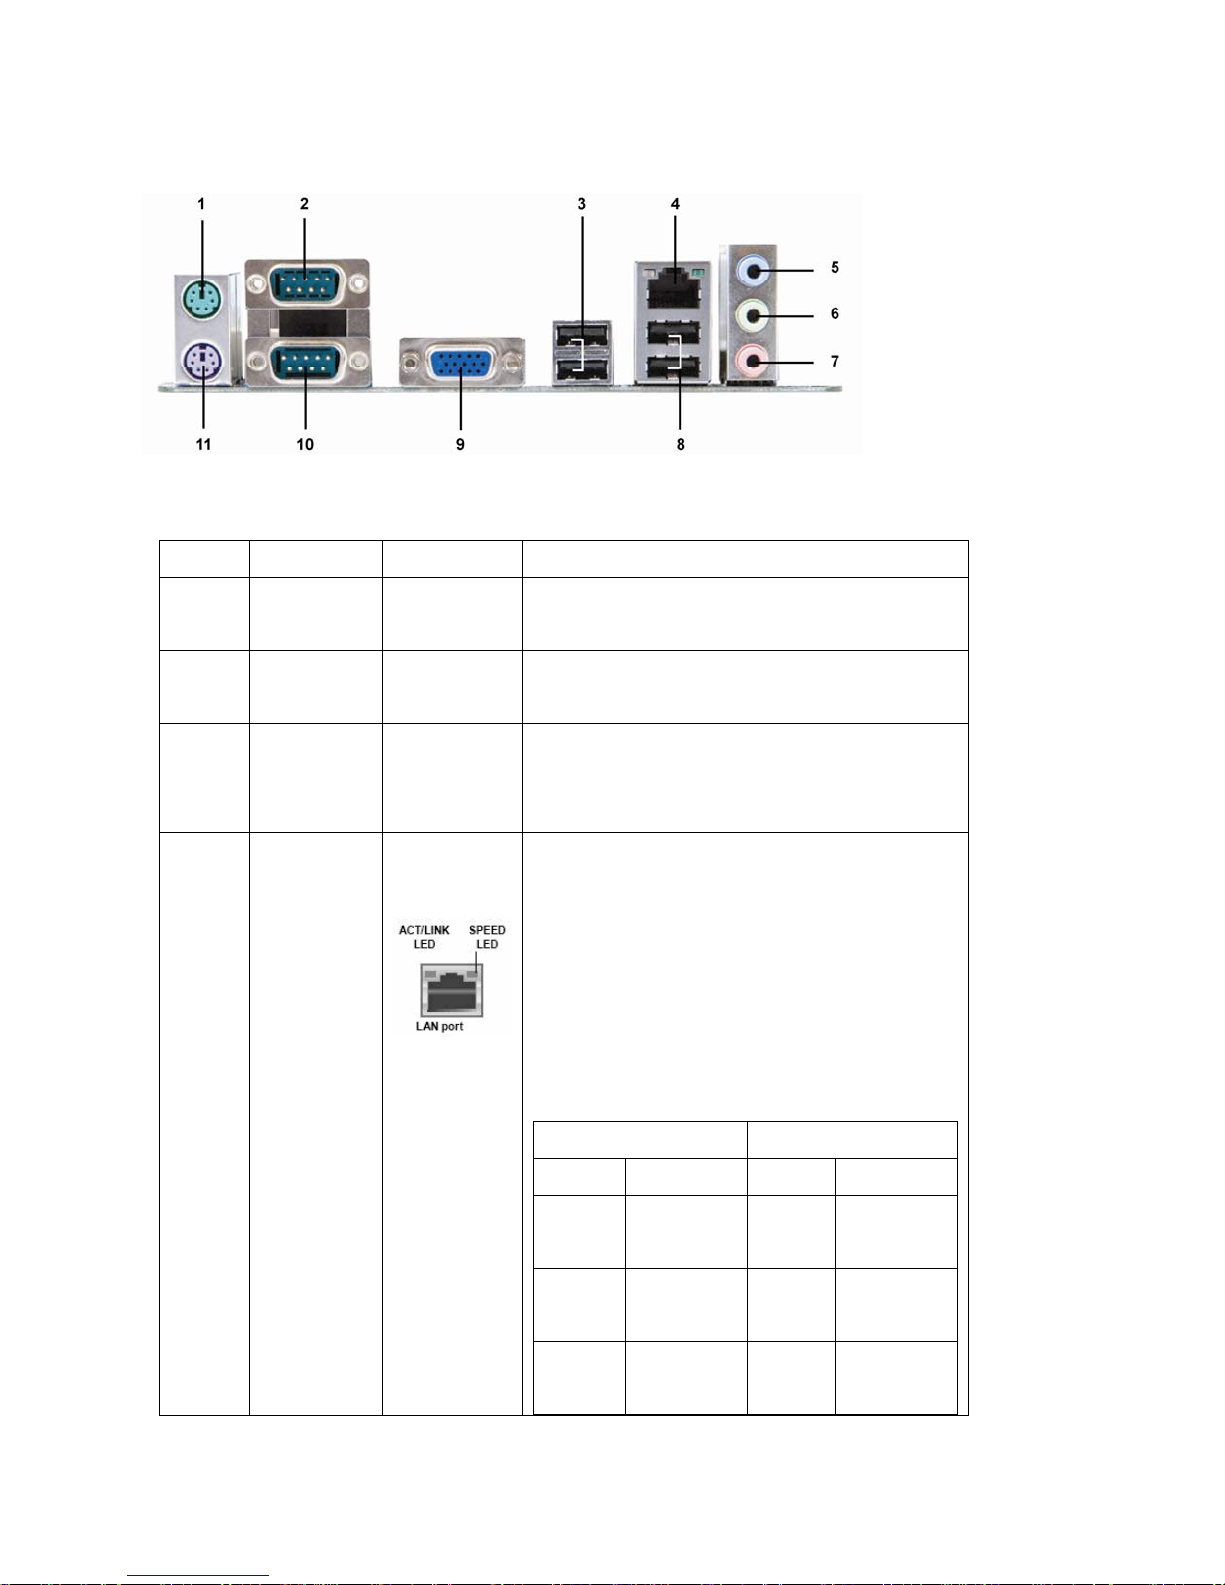
1.9 Back Panel
Name Function Description
1 KBMS1 PS/2 mouse
connector
2 DUALCOM1 COM port
connector
3 USB2 USB 2.0
connector
4 LAN_USB2 LAN (RJ-45)
connector
The standard PS/2 mouse DIN connector is for
a PS/2 mouse.
This 9-pin port is for a COM port device.
These two 4-pin Universal Serial Bus (USB)
ports are available for connecting USB2.0
devices.
This port allows Gigabit connection to a Local
Area Network (LAN) through a network hub.
Refer to the table below for the LAN port LED
indications. The optional 10/100 Mbps LAN
controller allows 10/100
Mbps connection to a Local Area Network (LAN)
through a network hub.
ACT/Link LED Speed LED
Status Description Status Description
OFF No link OFF 10Mbps
connection
Orange Linked Orange 100Mbps
connection
Blinking Data
activity
Green 1Gbps
connection
28
Page 29

5 AUDIO1 Line-in port
This port connects a tape, CD, DVD player, or
(Light blue)
6 AUDIO1 Line-out port
(Lime)
7 AUDIO1 Microphone
port (Pink)
8 LAN_USB2 USB 2.0
connector
9 VGA1 VGA port This 15-pin port is for a VGA monitor or other
10 DUALCOM1 COM port
connector
11 KBMS1 PS/2 KB
connector
other audio sources.
This port connects a headphone or a speaker.
In 4-channel, 6-channel, and 8-channel
configuration, the function of this port becomes
Front Speaker Out.
This port connects a microphone.
These two 4-pin Universal Serial Bus (USB)
ports are available for connecting USB 2.0
devices.
VGA-compatible devices.
This 9-pin port is for a COM port device.
This port is for a PS/2 keyboard.
29
Page 30
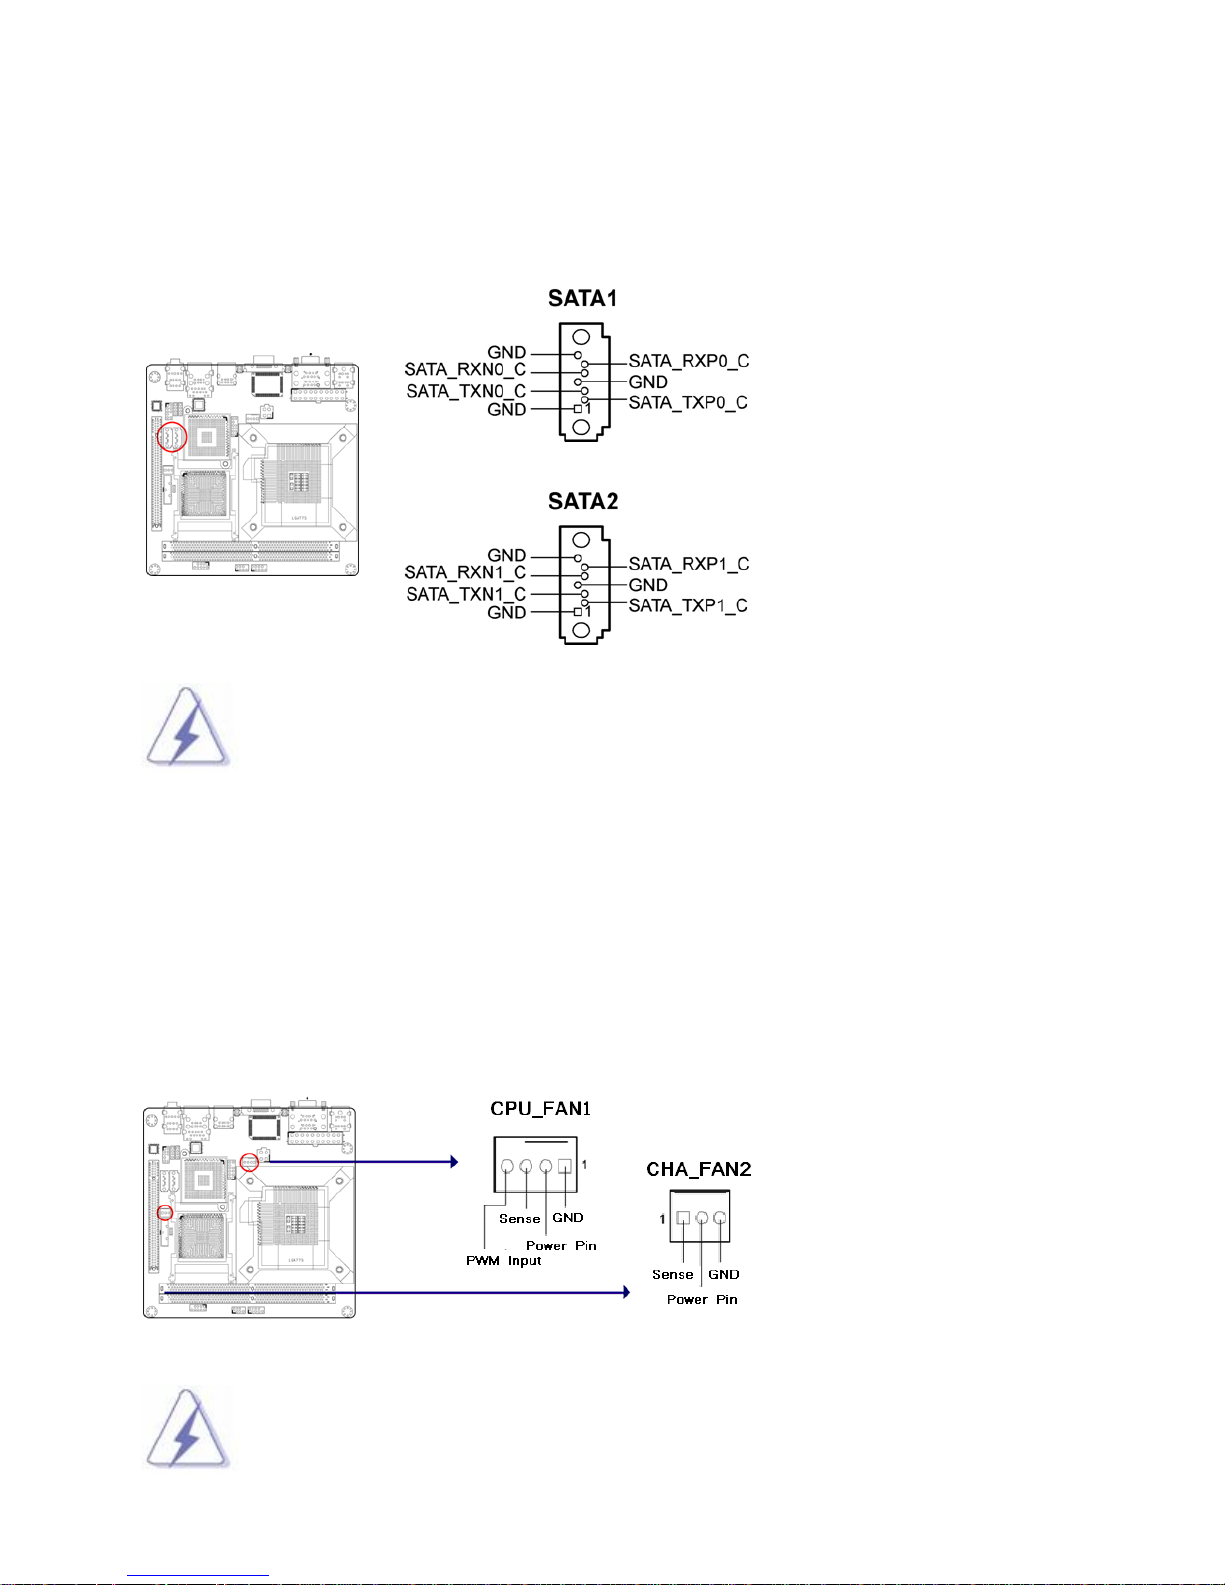
1.10 Connectors/ Headers
1.10.1 Serial ATA Connectors: SATA1, SATA2
Please do not fold the Serial ATA cable into 90-degree angle. Otherwise, data loss may
occur during transmission.
1.10.2 Fan Power Connectors: CPU_FAN1, CHA_FAN2
The fan power connectors support system cooling fan with +12V. When connecting the wire to these fan
connectors, please note that the red wire usually is designated as “Power” and should be connected to
“Power Pin”; the black wire is normally designated as “Ground” and should be connected to “GND”. In order
to take the advantage of System Hardware Monitor, be sure to use the fan which is specifically designed
with speed sensor.
Please refer to the recommended CPU fans at processor’s official website or consult
the vendor for proper CPU cooling fan.
30
Page 31
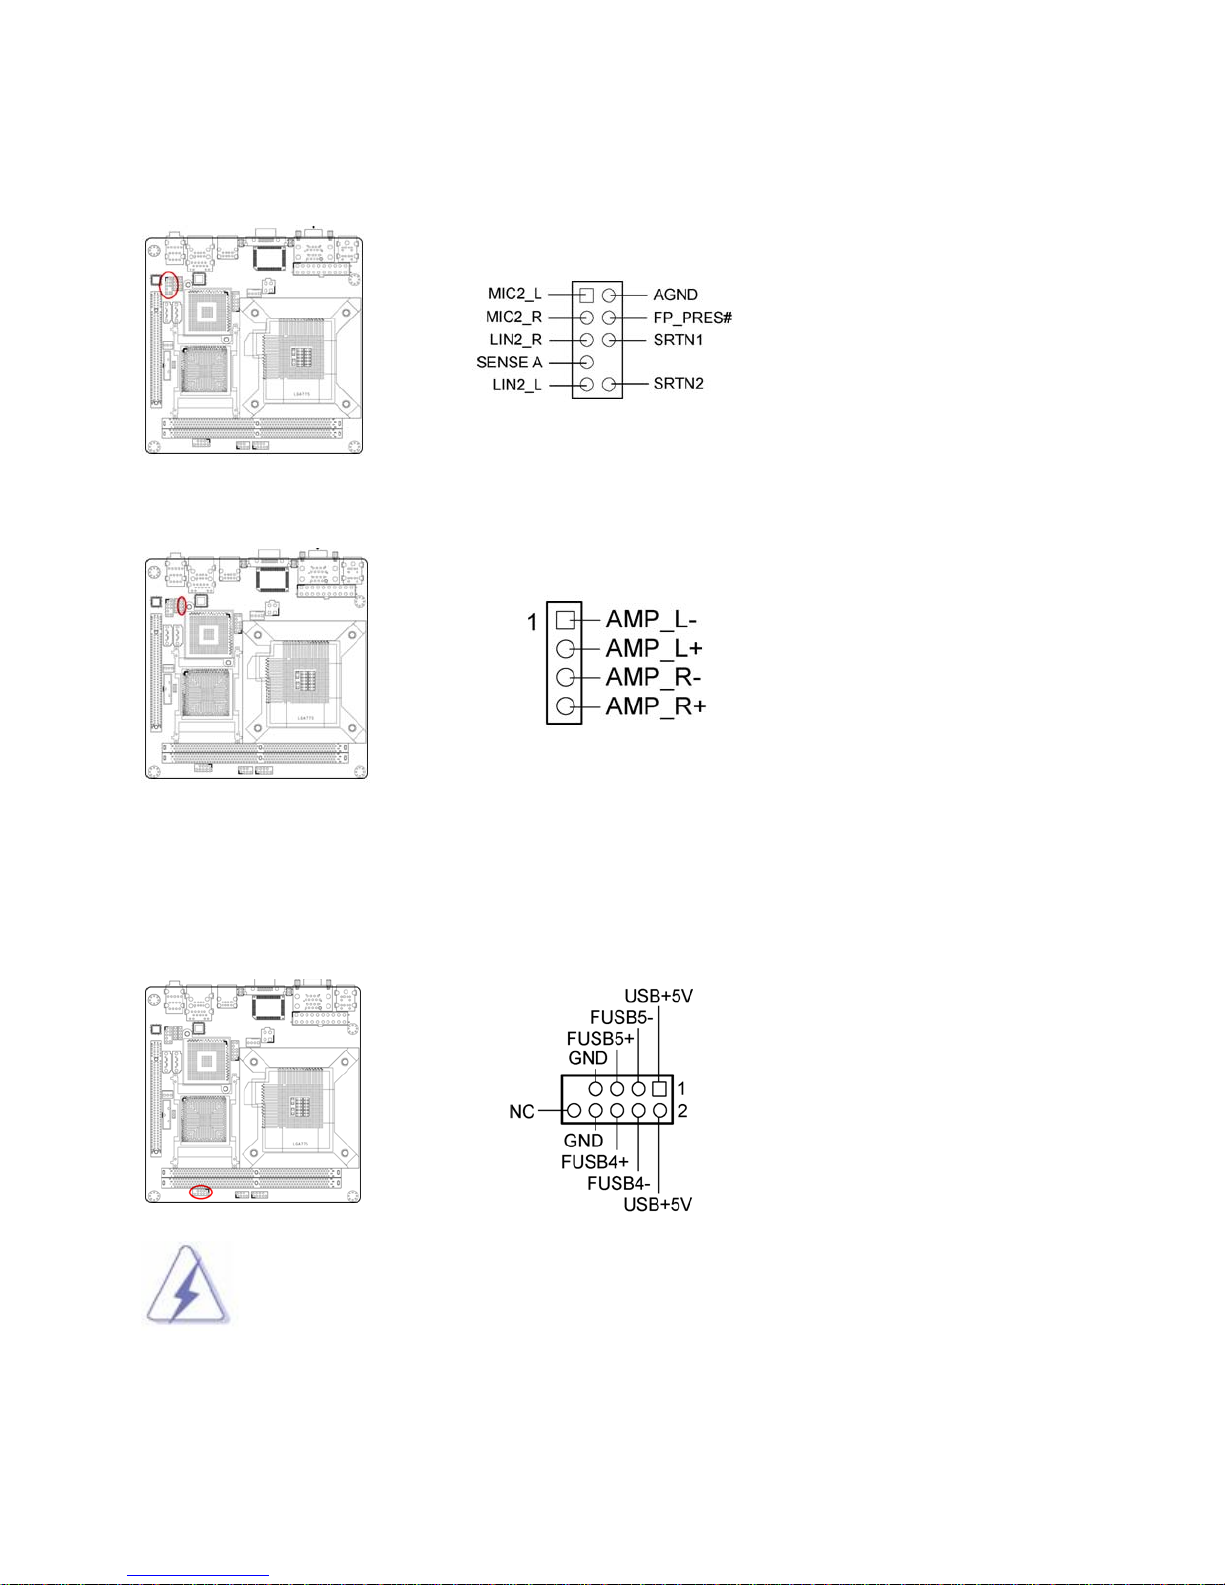
1.10.3 Front Panel Audio Connector: AAFP1
This connector allows you to connect the front panel audio.
1.10.4 Amplifier Connector: JAMP1
1.10.5 Front USB Connector: USB1
This connector is compliant with Intel® I/O Connectivity Design Guide, which is ideal for connecting
high-speed USB peripherals such as USB HDD, USB digital cameras, USB MP3 players, USB printers,
etc.
Be sure the pins of VCC and GND is connected to the connector correctly. Otherwise,
it may cause damage to the USB port and/or the connected USB device.
31
Page 32
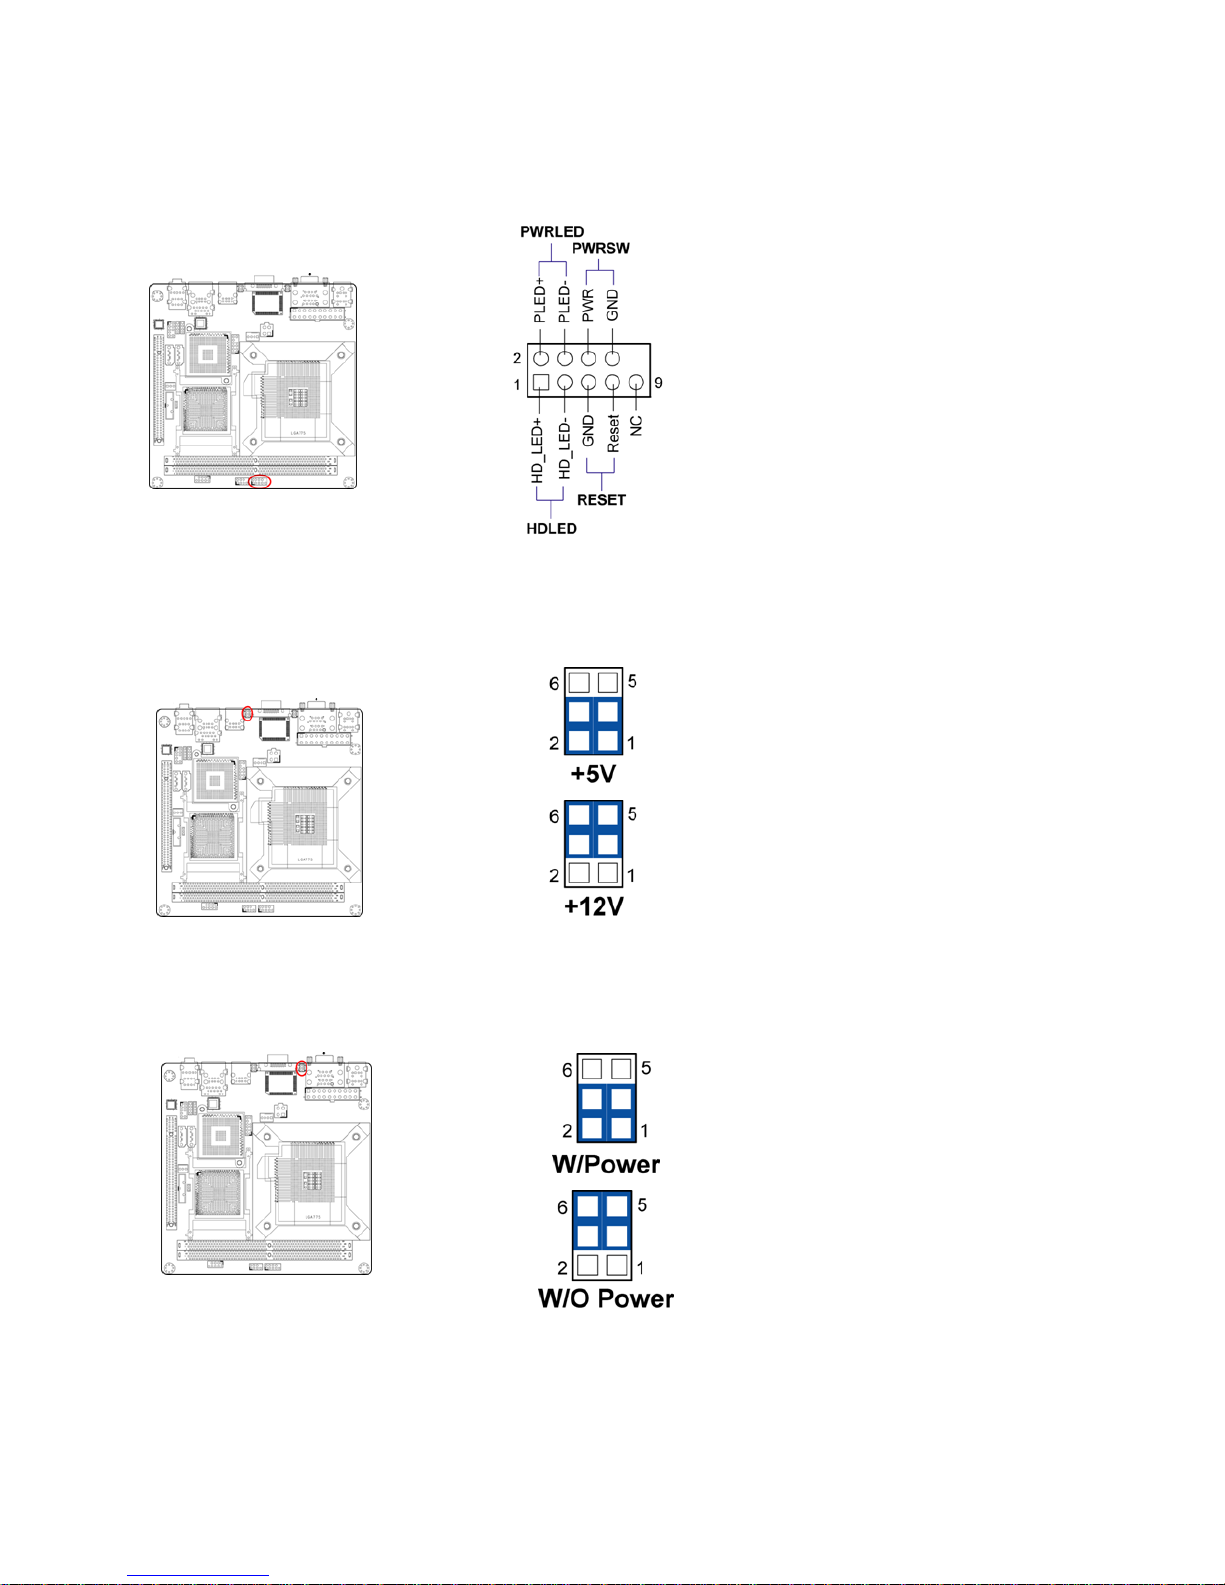
1.10.6 Front Panel Connectors: F_PANEL1
These connectors are for electrical connections to the front panel switches and LEDs.
1.10.7 COM1/COM2 +12V/+5V Power Select: JCOMPWR5
1.10.8 COM1/ COM2 Power Enable/Disable: JCOMPWR6
1.10.9 The Headers: JSPI1, JLPC1, JSIDE1
These headers are reserved for factory use only.
32
Page 33
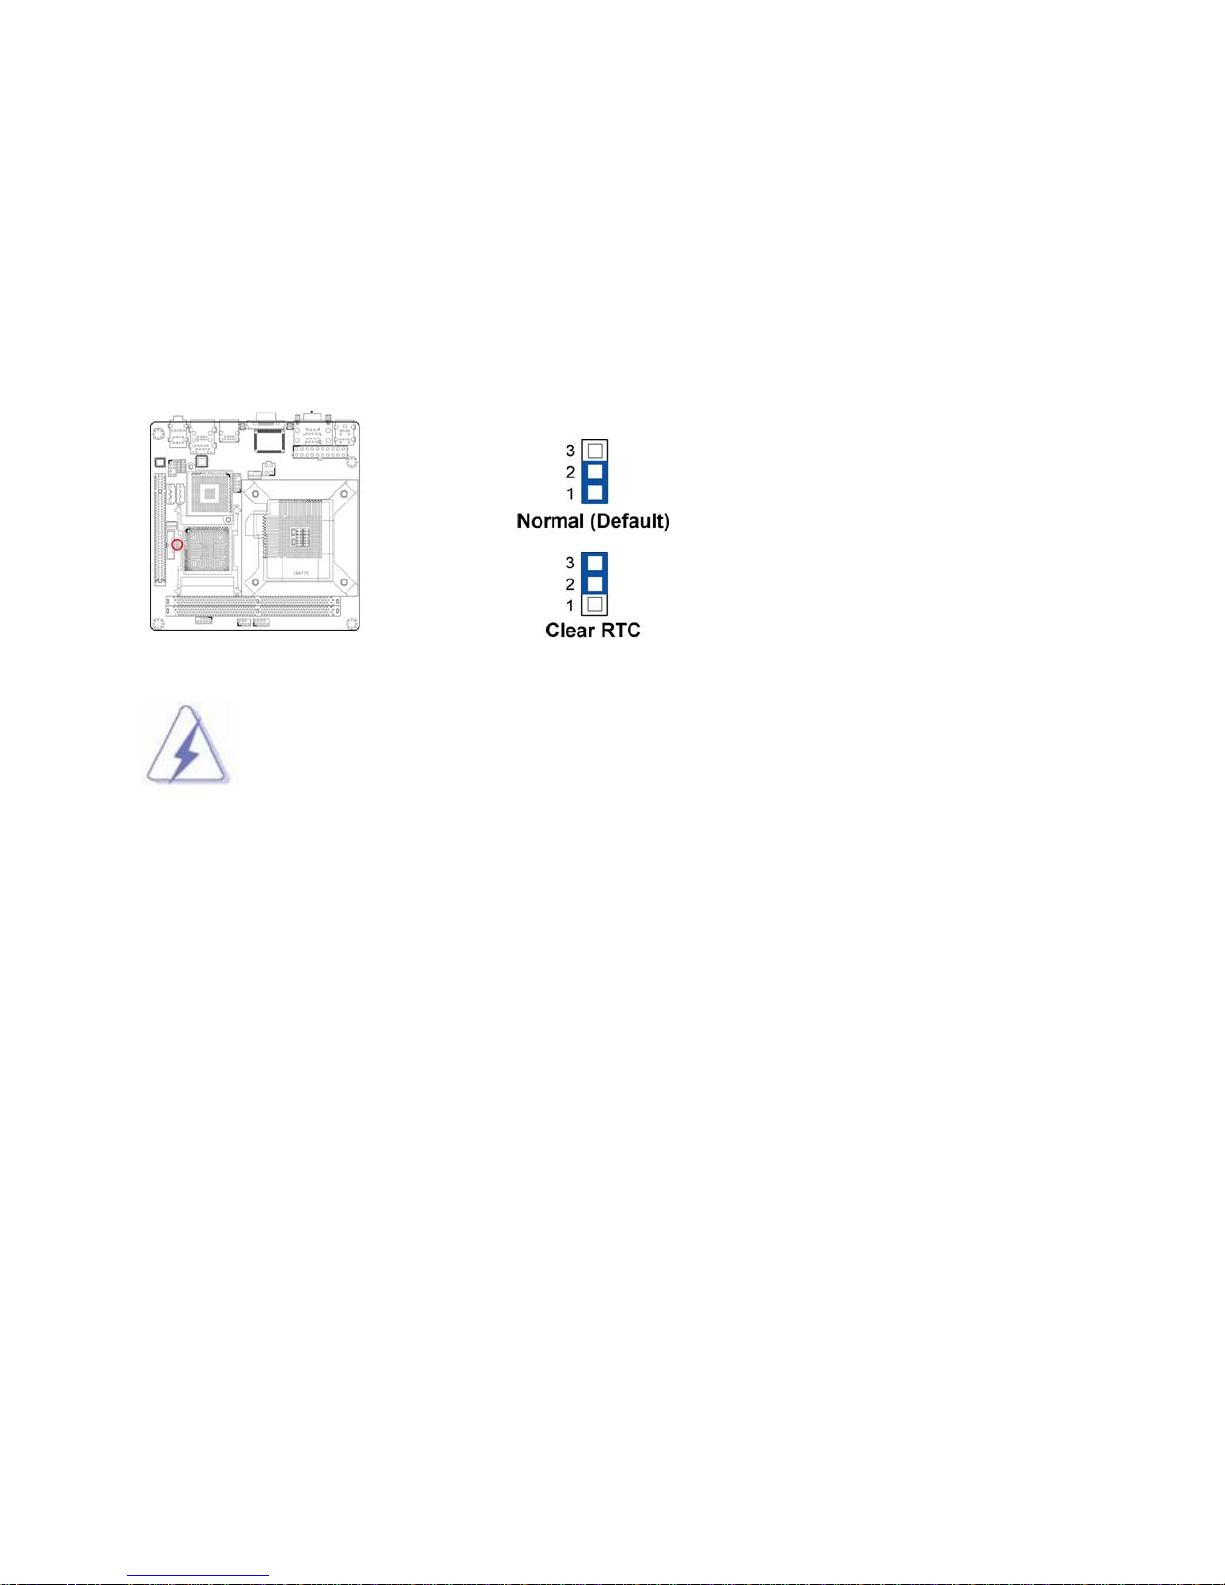
1.11 Jumpers
1.11,1 Clear CMOS Jumper: CLRTC1
There is a CMOS RAM onboard that has a power supply from an external battery to keep the data of
system configuration.
For normal state (default), the jumper is set on pin location 1 and 2.
To clear the CMOS, set the jumper to pin location 2 and 3 for at least 30 seconds while the system is off.
1. You can clear CMOS by shorting pin 2-3 for at least 30 seconds (while the system is
OFF), then place the jumper back to pin 1-2 for normal operation.
2. It is recommended to remove all power connections from the power supply to the
motherboard while clearing the CMOS.
3. Avoid clearing the CMOS while the system is ON; this will damage the motherboard.
33
Page 34

1.12 The Expansion Slots
In the future, you may need to install expansion cards. The following sub-sections describe the expansion
slots and the expansion cards that they support.
Make sure to unplug the power cord before adding or removing expansion cards.
Failure to do so may cause you physical injury and damage mainrboard
components.
1.12.1 Installation of expansion card
To install an expansion Card:
1. Before install the expansion card, read the documentation that came with it and make the necessary
hardware setting for the card.
2. Remove the chassis cover (if the mainboard is installed in a chassis).
3. Remove the expansion slot bracket from the chassis on the slot that you intend to use. Keep the screw
for later use.
4. Align the card connector with the slot and press it firmly until the card is completely seated on the slot.
5. Secure the card to the chassis with the screw that have been removed earlier (in step 3).
6. Place the chassis cover back on.
1.12.2 Setup an expansion card
After installing the expansion card, configure it by adjusting the software settings.
1. Turn on the system and change the BIOS settings if necessary. See Chapter 2 for information on BIOS
setup.
2. Install the software drivers for the expansion card.
1.12.3 PCI (Peripheral Component Interconnect) Express Slot
The PCI Express slot supports the PCI Express interface expansion card.
▪ The PCI Express x16 supports up to 4.0GB/s transfer rate.
▪ The PCI Express x8 supports up to 2.0GB/s transfer rate.
▪ The PCI Express x4 supports up to 1.0GB/s transfer rate.
▪ The PCI Express x1 supports up to 250MB/s transfer rate.
34
Page 35
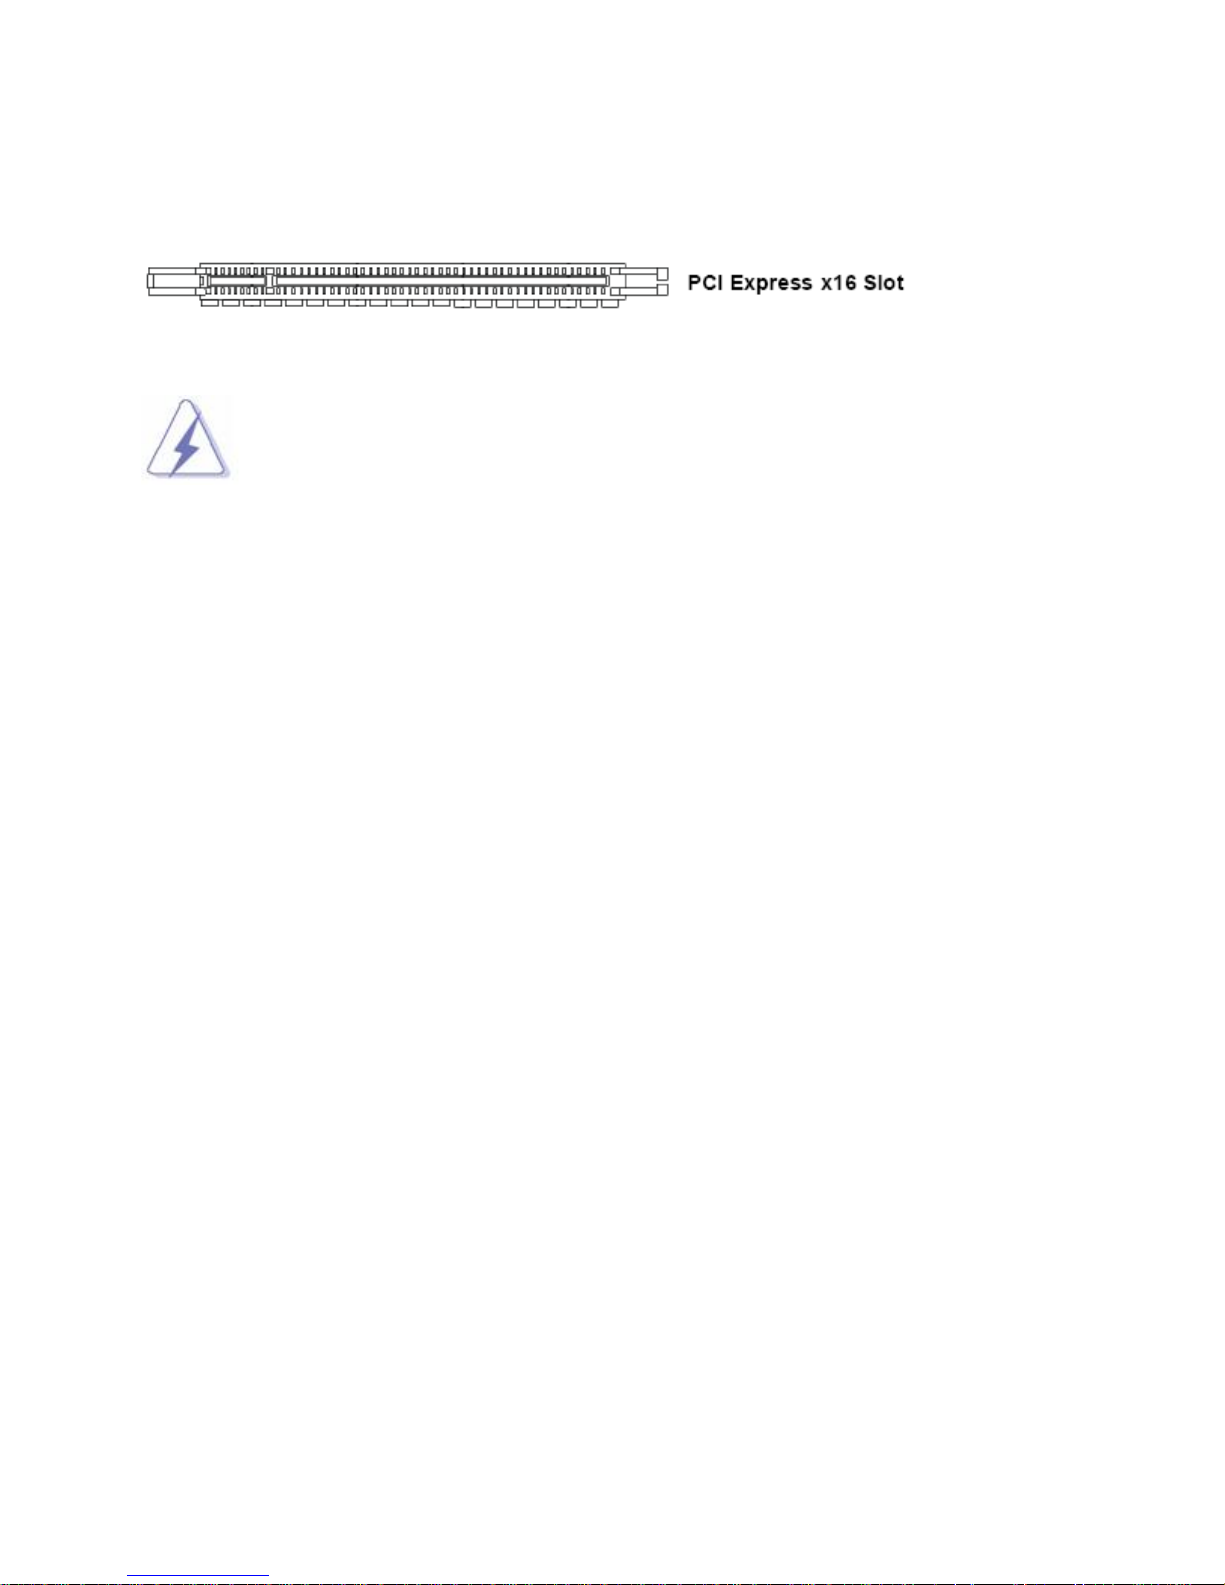
1.12.3.1 PCI-E x 16 Slot: PCIEX1
This slot supports PCI-E x16 graphic cards only.
1. When adding or removing expansion cards, make sure the system power is OFF.
2. After the card is installed on the system, make the adjustments under system BIOS
if necessary, then install the card driver provided by the card vendor under sy stem
OS.
3. When using PCI cards on shared slots, ensure that the card driver support “Share
IRQ” or the PCI cards do not need IRQ assignments. Otherwise, conflicts will arise
between the two PCI groups; marking the system unstable and the card inoperable.
35
Page 36

Chapter 2: Starting Up the System
2.1 Sarting Up Your System
1. After all connections are made, close your computer case cover.
2. Be sure all the switches are off, and check that the power supply input voltage is set to the local
voltage, usually in-put voltage is 220V∼240V or 110V∼120V depending on your country’s voltage used.
3. Connect the power supply cord into the power supply located on the back of your system case
according to your system user’s manual.
4. Turn on your peripheral as following order:
a. Your monitor.
b. Other external peripheral (Printer, Scanner, External Modem etc…)
c. Your system power. For ATX power supplies, you need to turn on the power supply and press
the ATX power switch on the front side of the case.
5. The power LED on the front panel of the system case will light. The LED on the monitor may light up
or switch between orange and green after the system is on. If it complies with green standards or if it
is has a power standby feature. The system will then run power-on test. While the test are running,
the BIOS will alarm beeps or additional message will appear on the screen.
If you do not see any thing within 30 seconds from the time you turn on the power. The system may
have failed on power-on test. Recheck your jumper settings and connections or call your retailer for
assistance.
Beep Meaning
One short beep when displaying logo No error during POST
Long beeps in an endless loop No DRAM install or detected
One long beep followed by three short
beeps
High frequency beeps when system is
working
6. During power-on, press <Del> key to enter BIOS setup. Follow the instructions in BIOS SETUP.
Video card not found or video card memory bad
CPU overheated
System running at a lower frequency
36
Page 37

7. Power off your computer: You must first exit or shut down your operating system before switch off
the power switch. For ATX power supply, you can press ATX power switching after exiting or shutting
down your operating system. If you use Windows Operating Systems, click “Start” button, click
“Shut down” and then click “Shut down the computer” The power supply should turn off after
windows shut down.
37
Page 38

Chapter 3: BIOS Setup
Warnining: When flashing the BIOS, please be sure to make the following adjustments on the system:
1. After the BIOS is flashed; shut down the system.
4. Remove all power connections from power supply to the motherboard.
5. Clear the CMOS (For at least 30 seconds).
6. Reconnect all power connections from po wer supply to the motherboard.
7. When the system is booting first time after the new BIOS is flashed, it is recommended to enter
the BIOS; load the option “Load Setup Default”, and then “Save and Exit Setup”.
NOT DOING SO MAY CAUSE THE BIOS INTENDED TO BE FLASHED UNSTABLE
.
3.1 Introducing BIOS
The BIOS is a program located on a Flash Memory on the motherboard. This program is a bridge
between motherboard and operating system. When you start the computer, the BIOS program gains
control. The BIOS first operates an auto-diagnostic test called POST (power on self test) for all the
necessary hardware, it detects the entire hardware device and configures the parameters of the hardware
synchronization. Only when these tasks are completed done it gives up control of the computer to
operating system (OS). Since the BIOS is the only channel for hardware and software to communicate, it
is the key factor for system stability, and in ensuring that your system performance as its best.
In the BIOS Setup main menu of Figure 3-1, you can see several options. We will explain these options
step by step in the following pages of this chapter, but let us first see a short description of the function keys
you may use here:
• Press <Esc> to quit the BIOS Setup.
• Press ↑↓←→ (up, down, left, right) to choose, in the main menu, the option you want to confirm or to
modify.
• Press <F10> when you have completed the setup of BIOS parameters to save these parameters and
to exit the BIOS Setup menu.
• Press Page Up/Page Down or +/– keys when you want to modify the BIOS parameters for the active
option.
38
Page 39
3.2 Entering BIOS Setup Menu
Power on the computer and by pressing <Del> immediately allows you to enter BIOS Setup Menu.
If you are not able to enter the BIOS menu but you still wish to enter Setup, restart the system to try again
by turning it OFF then ON or pressing the “RESET” button on the system case. You may also restart by
simultaneously pressing <Ctrl>, <Alt> and <Delete> keys.
The items under each BIOS category described in this chapter are under continuous
update for better system performance. Therefore, the description may be slightly
different from the latest BIOS and should be held for reference only.
3.3 Getting Help
Main Menu
The main menu lists the setup functions you can make changes to. You can use the arrow keys to select
the item. The on-line description of the highlighted setup function is displayed at the bottom of the screen.
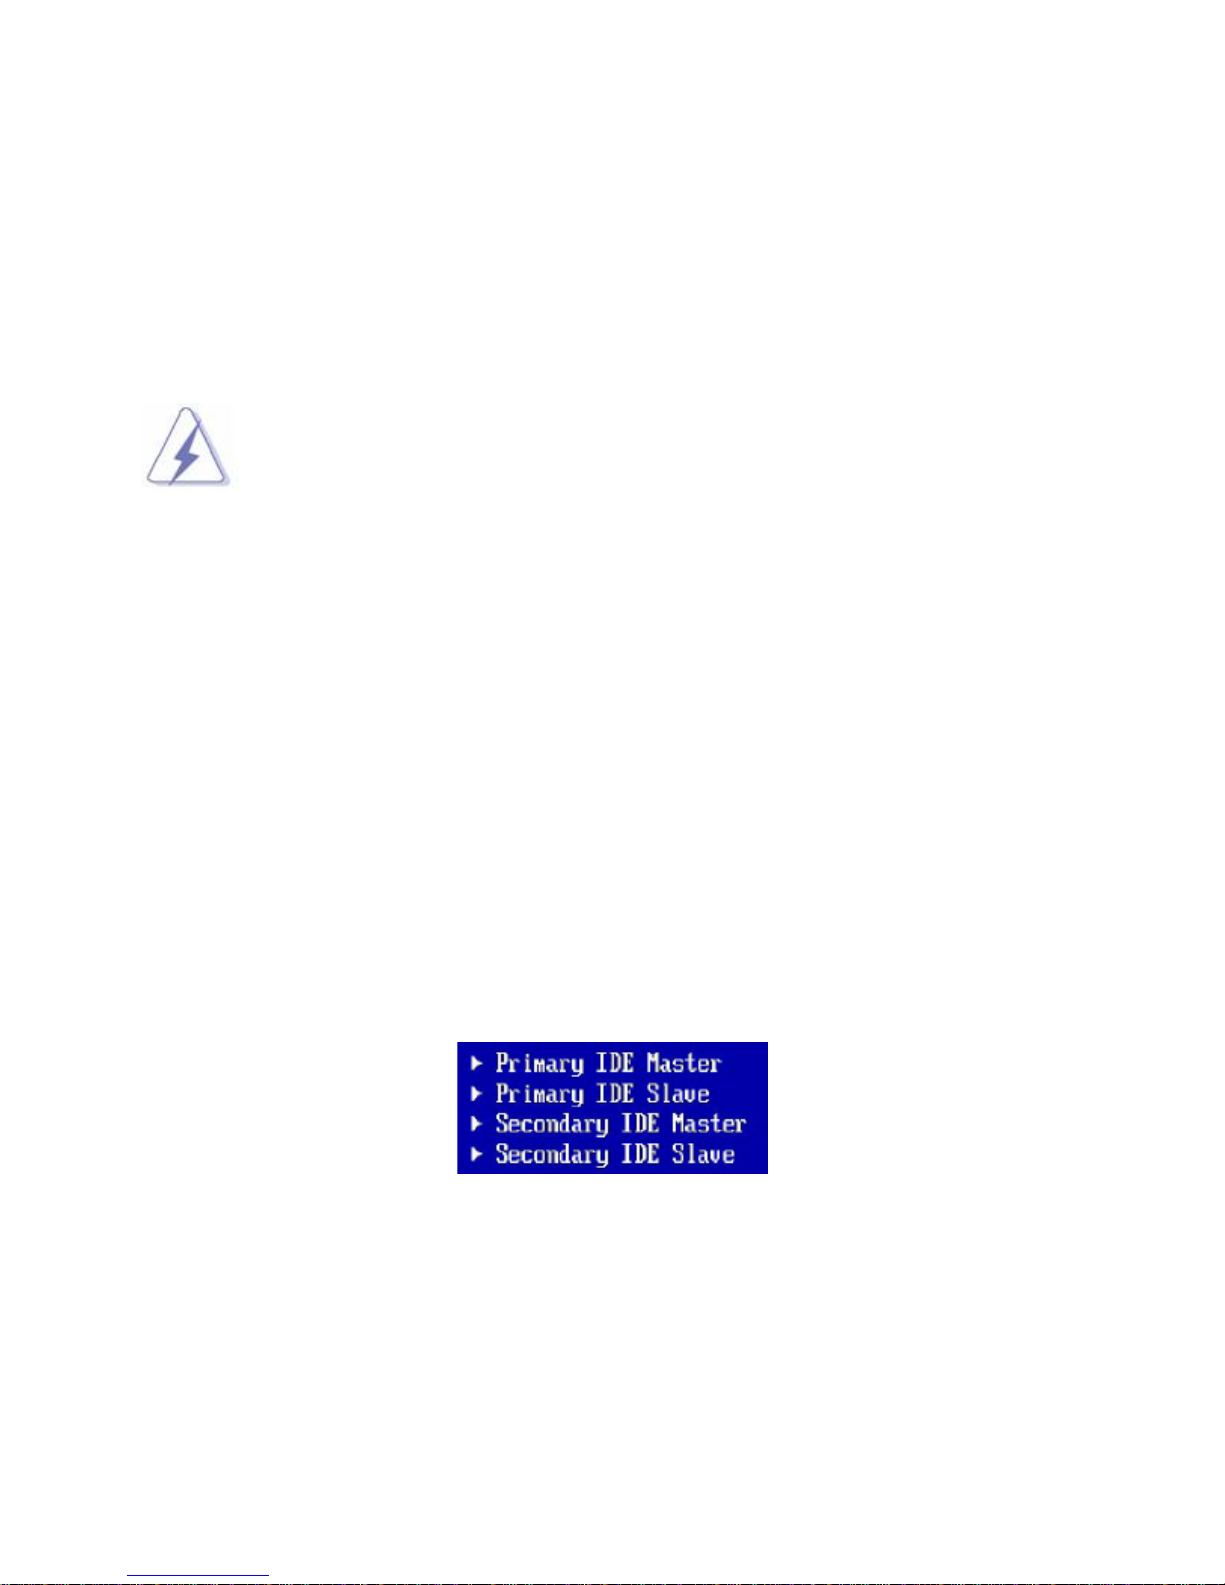
Sub- Menu
If you find a right pointer symbol (as shown in the picture below) appears to the left of certain fields that
means a sub-menu can be launched from this field. A sub-menu contains additional options for a field
parameter. You can use arrow keys to highlight the field and press <Enter> to call up the sub-menu. Then
you can use the control keys to enter values and move from field to field within a sub-menu. If you want to
return to the main menu, just press the <ESC>.
General Help <F1>
The BIOS setup program provides a General Help screen. You can call up this screen from any menu by
simply pressing <F1>. The Help screen lists the appropriate keys to use and the possible selections for the
highlighted item. Press <Esc> to exit the Help screen.
39
Page 40
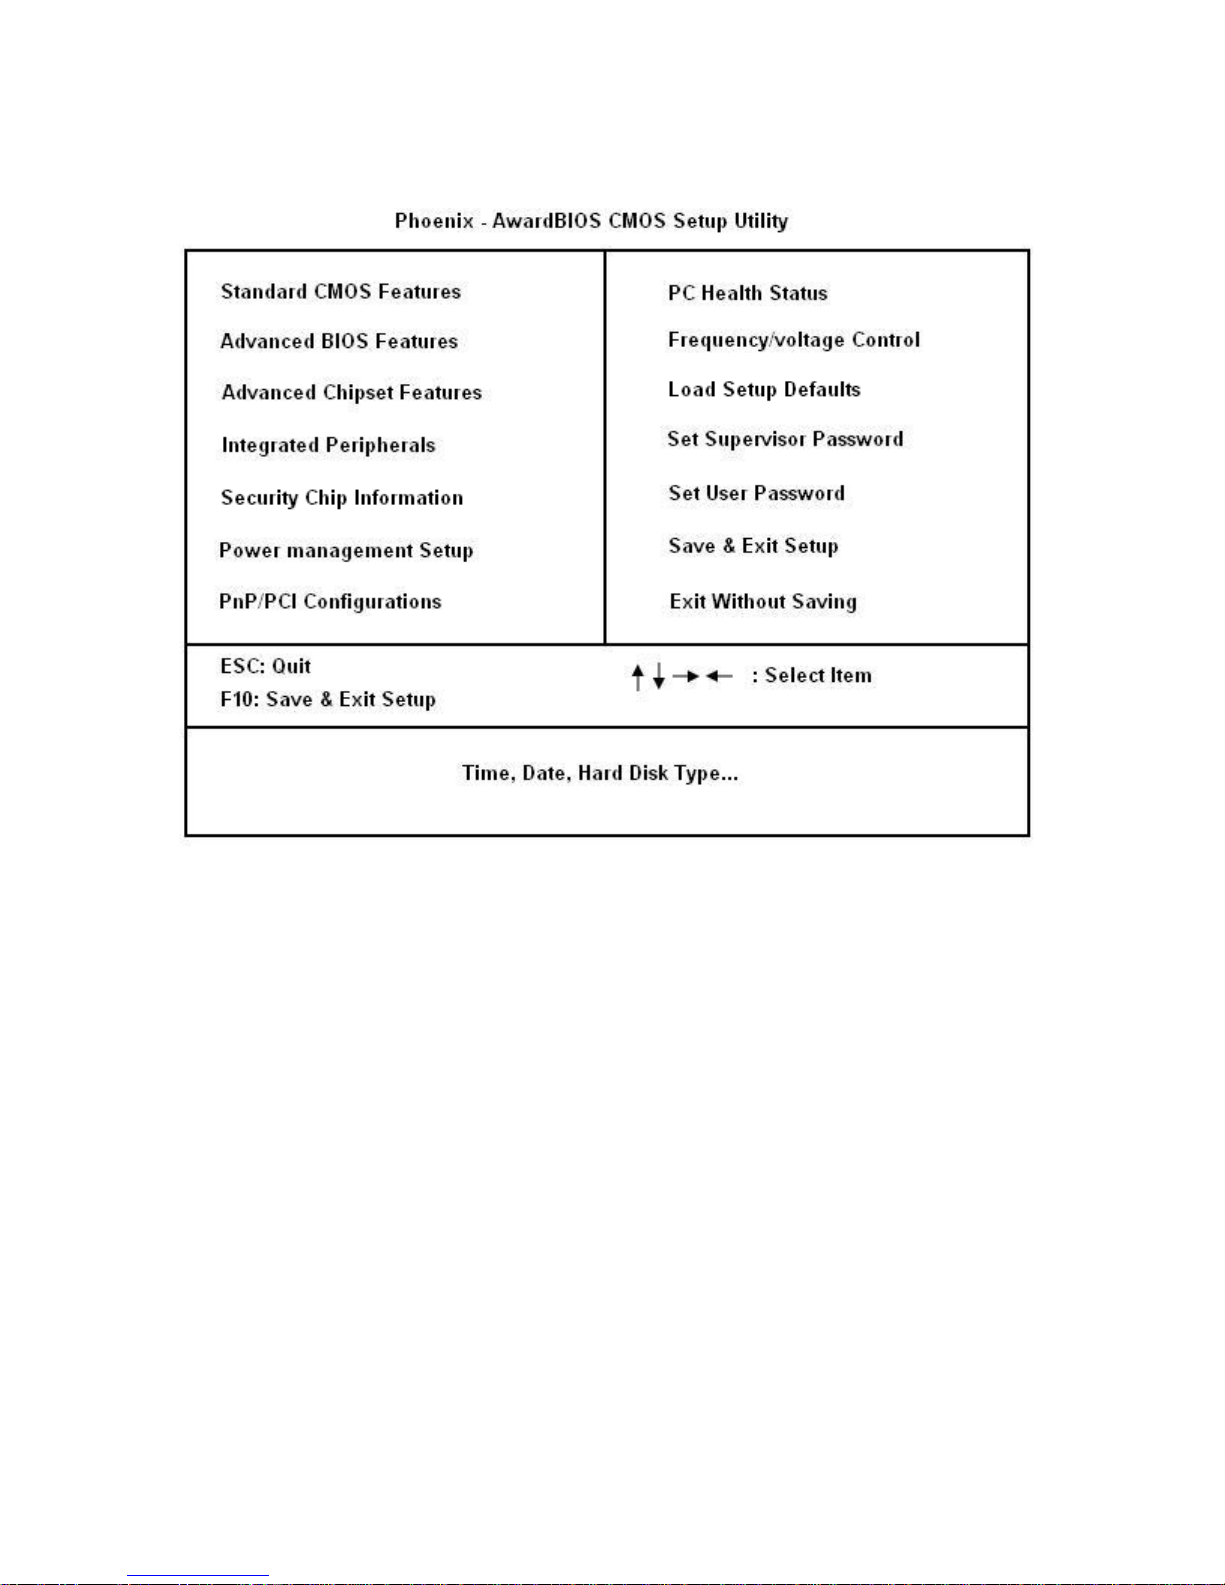
3.4 The Main Menu
• Standard CMOS Features
Use this menu for basic system configurations, such as time, date, etc.
• Advanced BIOS Features
Use this menu to setup the items of AMI® special enhanced features.
• Advanced Chipset Features
Use this menu to change the values in the chipset registers and optimize your system’s performance.
• Integrated Peripherals
Use this menu to specify your settings for integrated peripherals.
• Security Chip Configuration
Use this menu to setup the TPM related functions.
• Power Management Setup
Use this menu to specify your settings for power management.
40
Page 41

• PnP/PCI Configurations
This entry appears if your system supports PnP/PCI.
• PC Health Status
This entry shows your PC health status.
• Frequency/Voltage Control
Use this menu to setup frequency related features.
• Load Setup Defaults
Use this menu to load the default values set by the mainboard manufacturer specifically for optimal
performance of the mainboard.
• Set Supervisor Password
Use this menu to set the Supervisor password for BIOS.
• Set User Password
Use this menu to set the User password for BIOS.
• Save & Exit Setup
Save changes to CMOS and exit setup.
• Exit Without Saving
Abandon all changes and exit setup.
41
Page 42
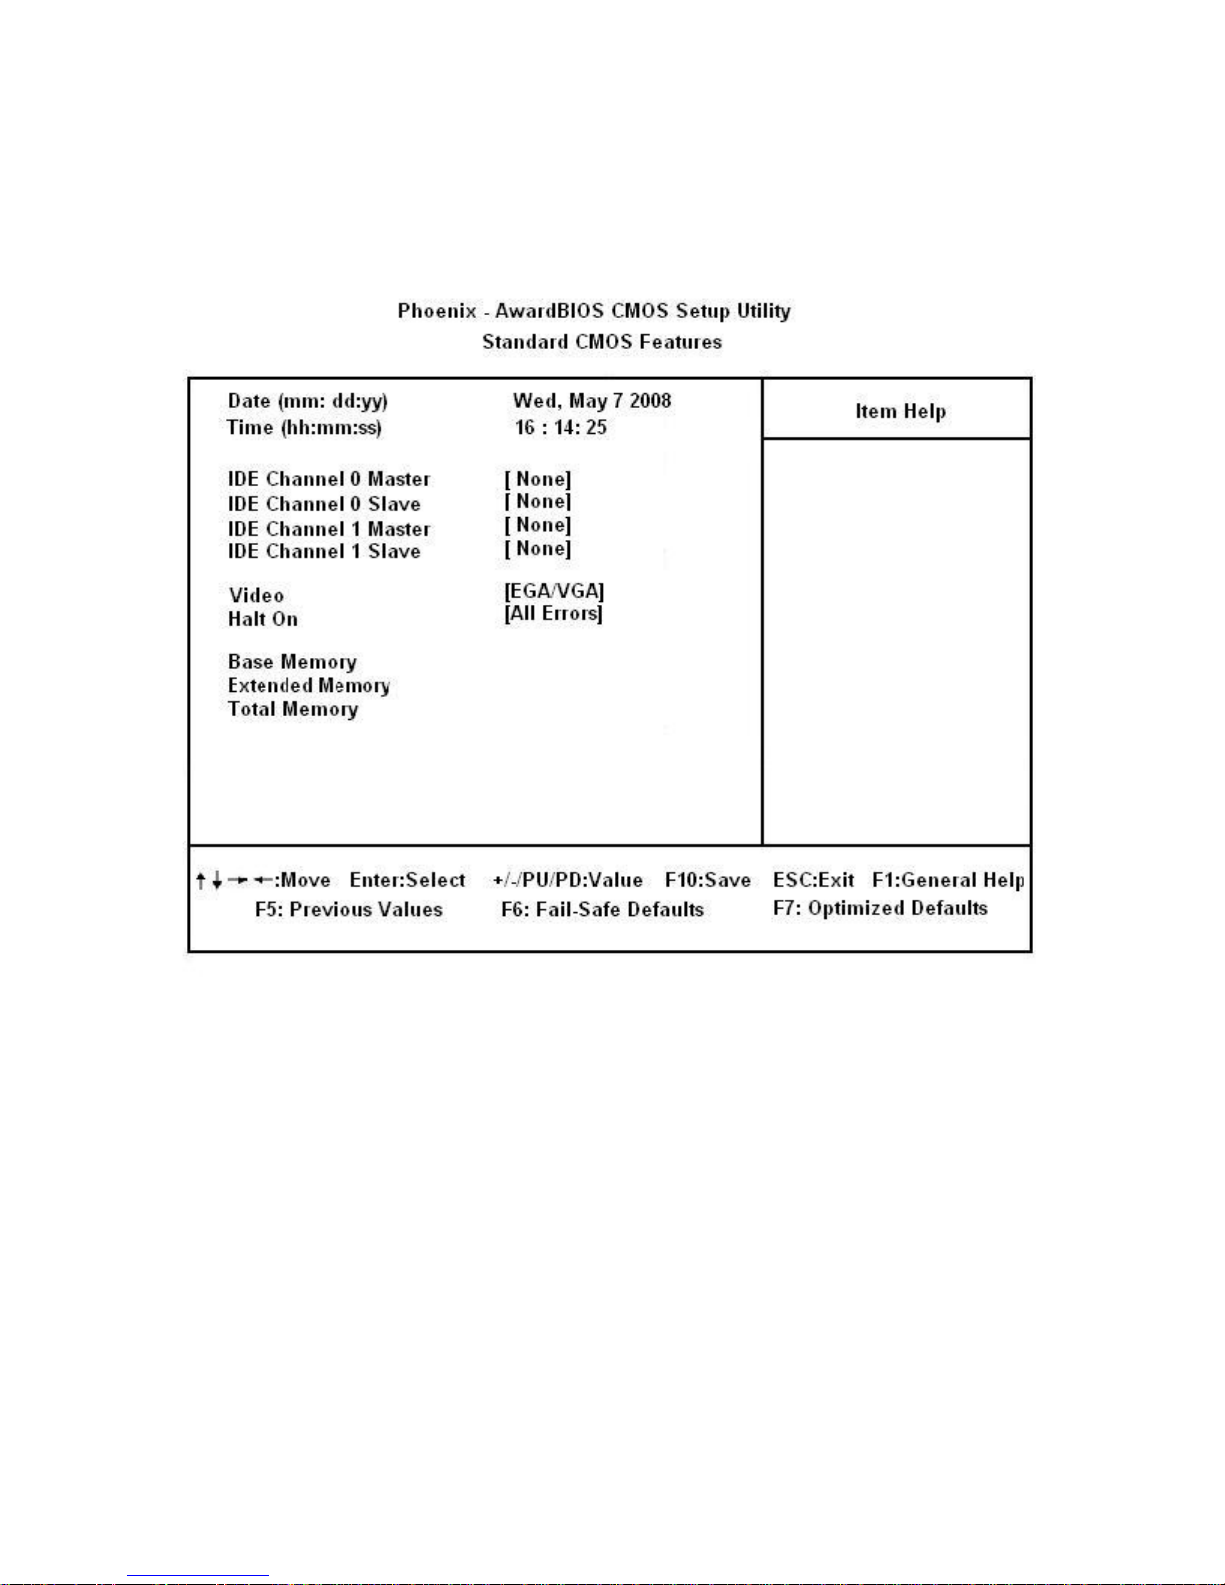
3.5 Standard CMOS Features
The items in standard CMOS Features Menu include some basic setup items. Use the arrow keys to
highlight the item and then use the <PgUp> or <PgDn> keys to select the value you want in each item.
• Date
The date format is <day><month><date><year>.
Day Day of the week, from Sun to Sat, determined by BIOS. Read-only.
Month The month from Jan. through Dec.
Date The date from 1 to 31 can be keyed by numeric function keys.
Year The year depends on the year of the BIOS.
Time The time format is <hour><minute><second>.
• IDE Channel 0 Master/Slave
• IDE Channel 1 Master/Slave
42
Page 43

Press PgUp/<+> or PgDn/<–> to select Manual, None, Auto type. Note that the specifications of your
drive must match with the drive table. The hard disk will not work properly if you enter improper
information for this category. If your hard disk drive type is not matched or listed, you can use Manual to
define your own drive type manually.
If you select Manual, related information is asked to be entered to the following items. Enter the
information directly from the keyboard. This information should be provided in the documentation from
your hard disk vendor or the system manufacturer.
Access Mode The settings are Auto, CHS, Large, and LBA.
Cylinder Number of cylinders
Head Number of heads
Precomp Write precomp
Landing Zone Landing zone
Sector Number of sectors
• Video
Select the type of primary video subsystem in your computer. The BIOS usually detects the correct video
type automatically. The BIOS supports a secondary video subsystem, but you do not select it in Setup.
EGA/VGA Enhanced Graphics Adapter/Video Graphics Array. For EGA, VGA, SEGA, SVGA or
PGA monitor adapters.
CGA 40 Color Graphics Adapter, power up in 40 column mode
CGA 80 Color Graphics Adapter, power up in 80 column mode
MONO Monochrome adapter, includes high resolution monochrome adapters
• Halt On
During the power-on self-test (POST), the computer stops if the BIOS detects a hardware error. You can
tell the BIOS to ignore certain errors during POST and continue the boot-up process.
All Errors If the BIOS detects any error, POST stops and prompts you to continue or enter
BIOS setup.
No Errors POST does not stop for any errors.
All, But Keyboard POST stops for all errors except keyboard errors.
43
Page 44
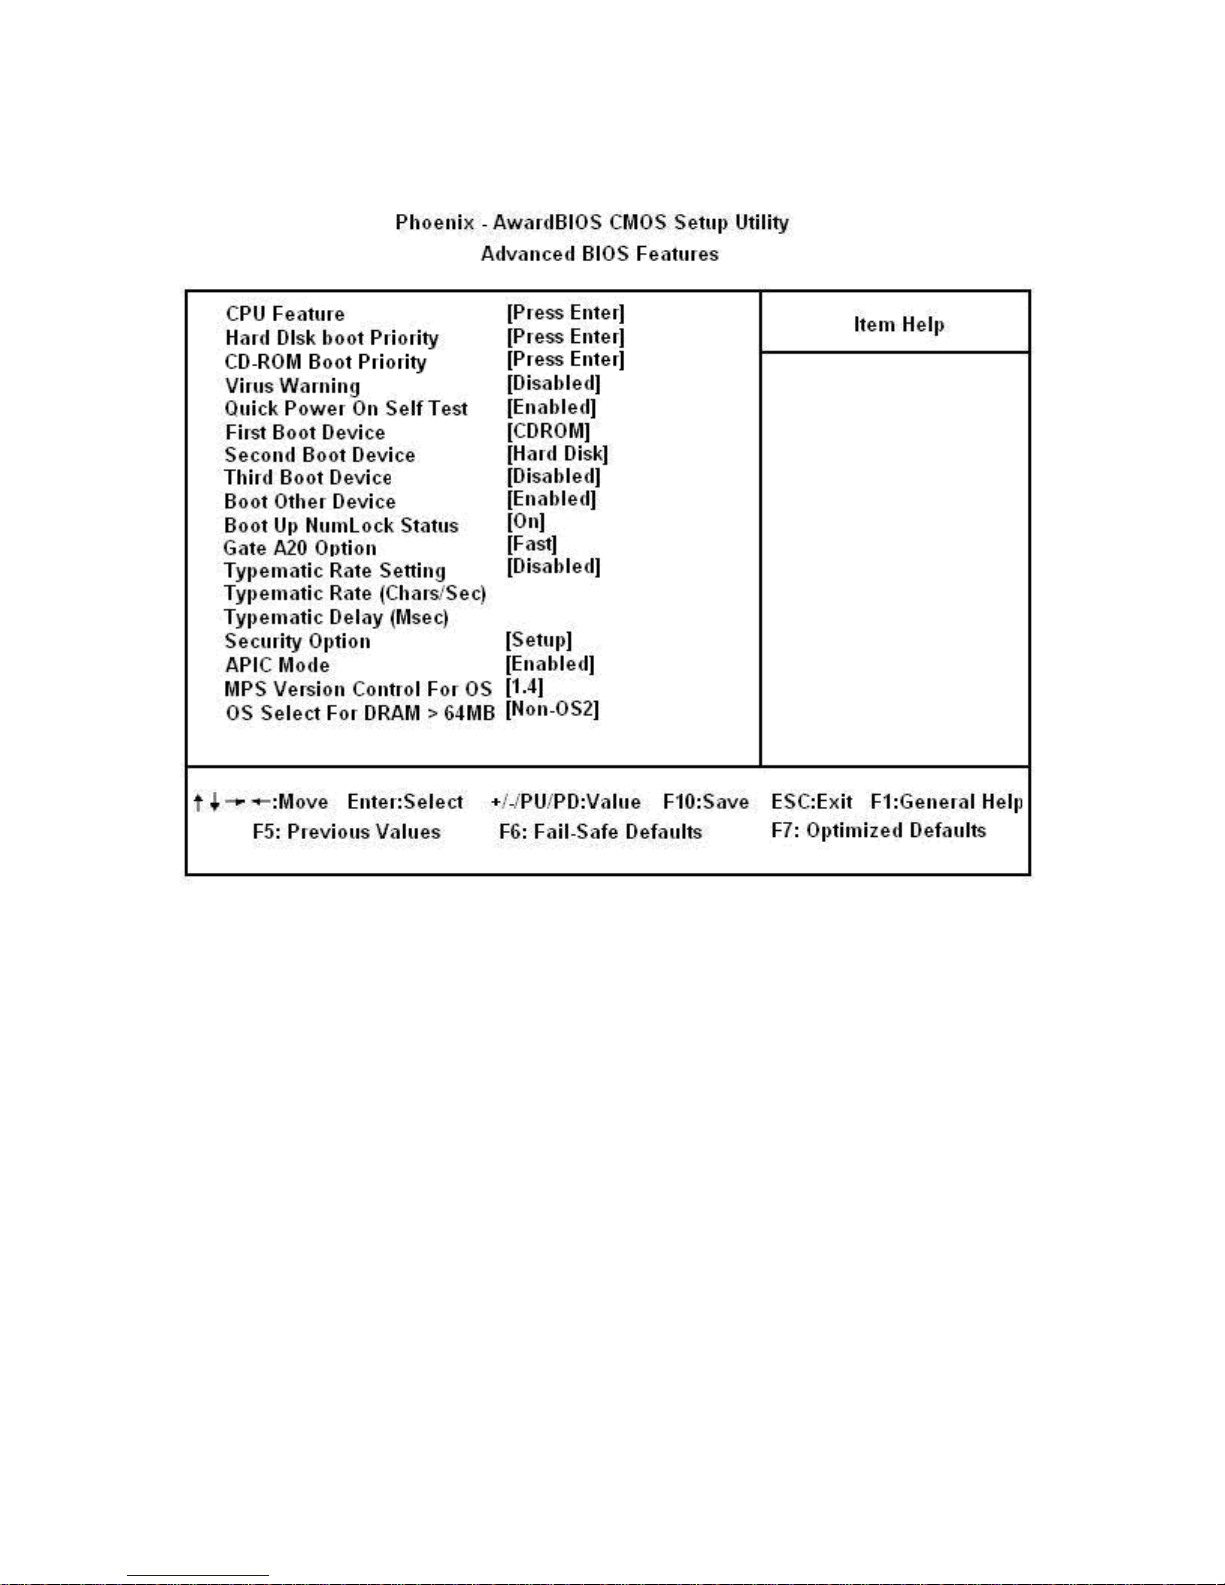
3.6 Advanced BIOS Features
• Virus Warning
Allow you to enabled or disabled boot sector overwrite protection
• Quick Power On Self Test
Select Enabled to reduce the amount of test ran during power-on self-test (POST).
• First/Second/Third Boot Device
Selects order for boot devices
• Boot Other Device
If enabled, the BIOS will check for unlisted boot devices after it has failed to boot from the three listed boot
devices.
• Boot Up NumLock Status
Controls the state of the NumLock key when the system boots.
44
Page 45

• Gate A20 Option
Refers to the way the system addresses memory above 1 MB (extended memory). When set to Fast, the
system chipset controls Gate A20. When set to Normal, a pin in the keyboard controller controls Gate A20.
Setting Gate A20 to Fast improves system speed, particularly with OS/2 and Windows.
• Typematic Rate Setting
When Enabled, you can select a typematic rate and typematic delay.
• Security Option
If you have set a password, select whether the password is required every time the System boots, or only
when you enter Setup.
• APIC Mode
The Advanced Programmable Interrupt Controller (APIC) prioritizes interrupts.
• MPS Version Control For OS
Allows the operating system to work with multiple CPUs. Select “1.1” for compatibility with older OS.
45
Page 46
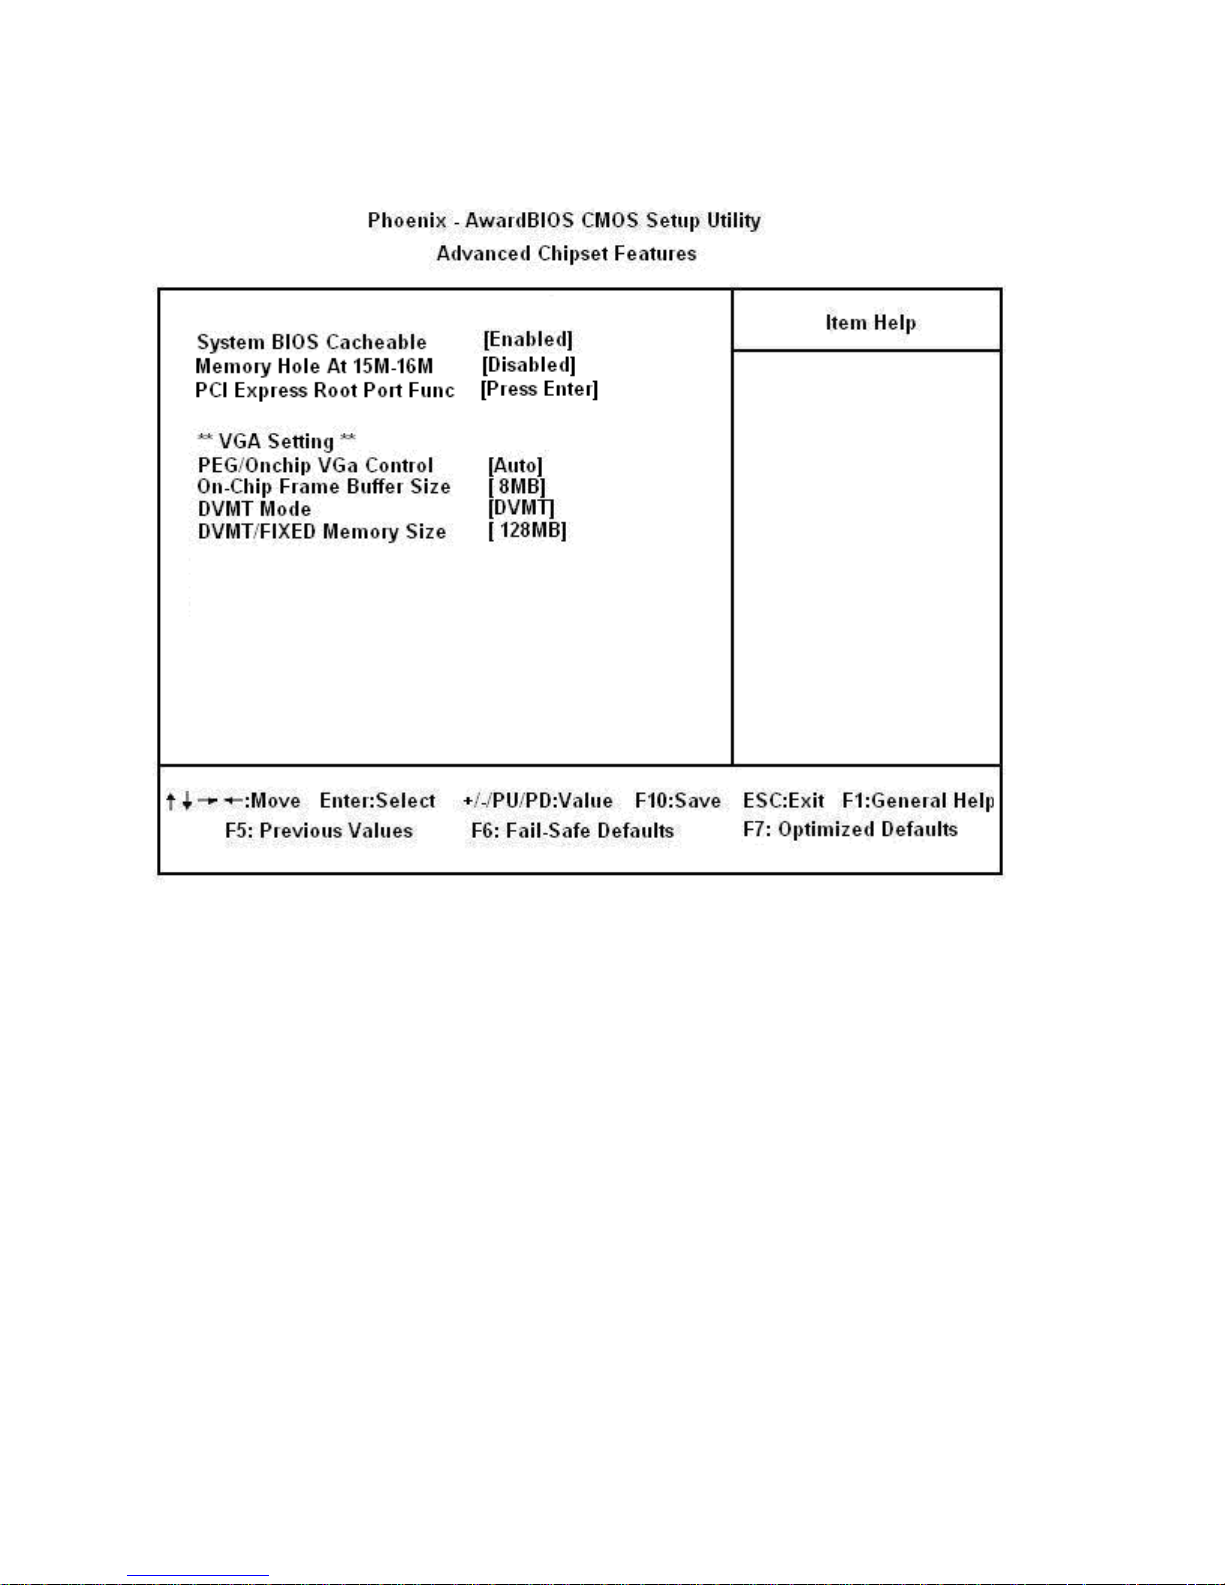
3.7 Advanced Chipset Features
• System BIOS Cacheable
This option allow you to Enable or Disable the system BIOS to be cache to DRAM.
• PEG/Onchip VGA Control
Select between Onchip VGA or PCIe graphics card.
• On-Chip Frame Buffer Size
This item allows you to set the on-chip frame buffer size. Available choice: 1M, 8M.
• DVMT Mode
This item allows you to select the Dynamic Video Memory Technology (DVMT) to a Fixed (constant),
DVMT (dynamic) or Both (minimum is constant, but allows it to dynamically increase).
• DVMT/FIXED Memory Size
This item allows you to select the DVMT/ Fixed Memory Size. Available choice: 64MB or 128MB.
46
Page 47
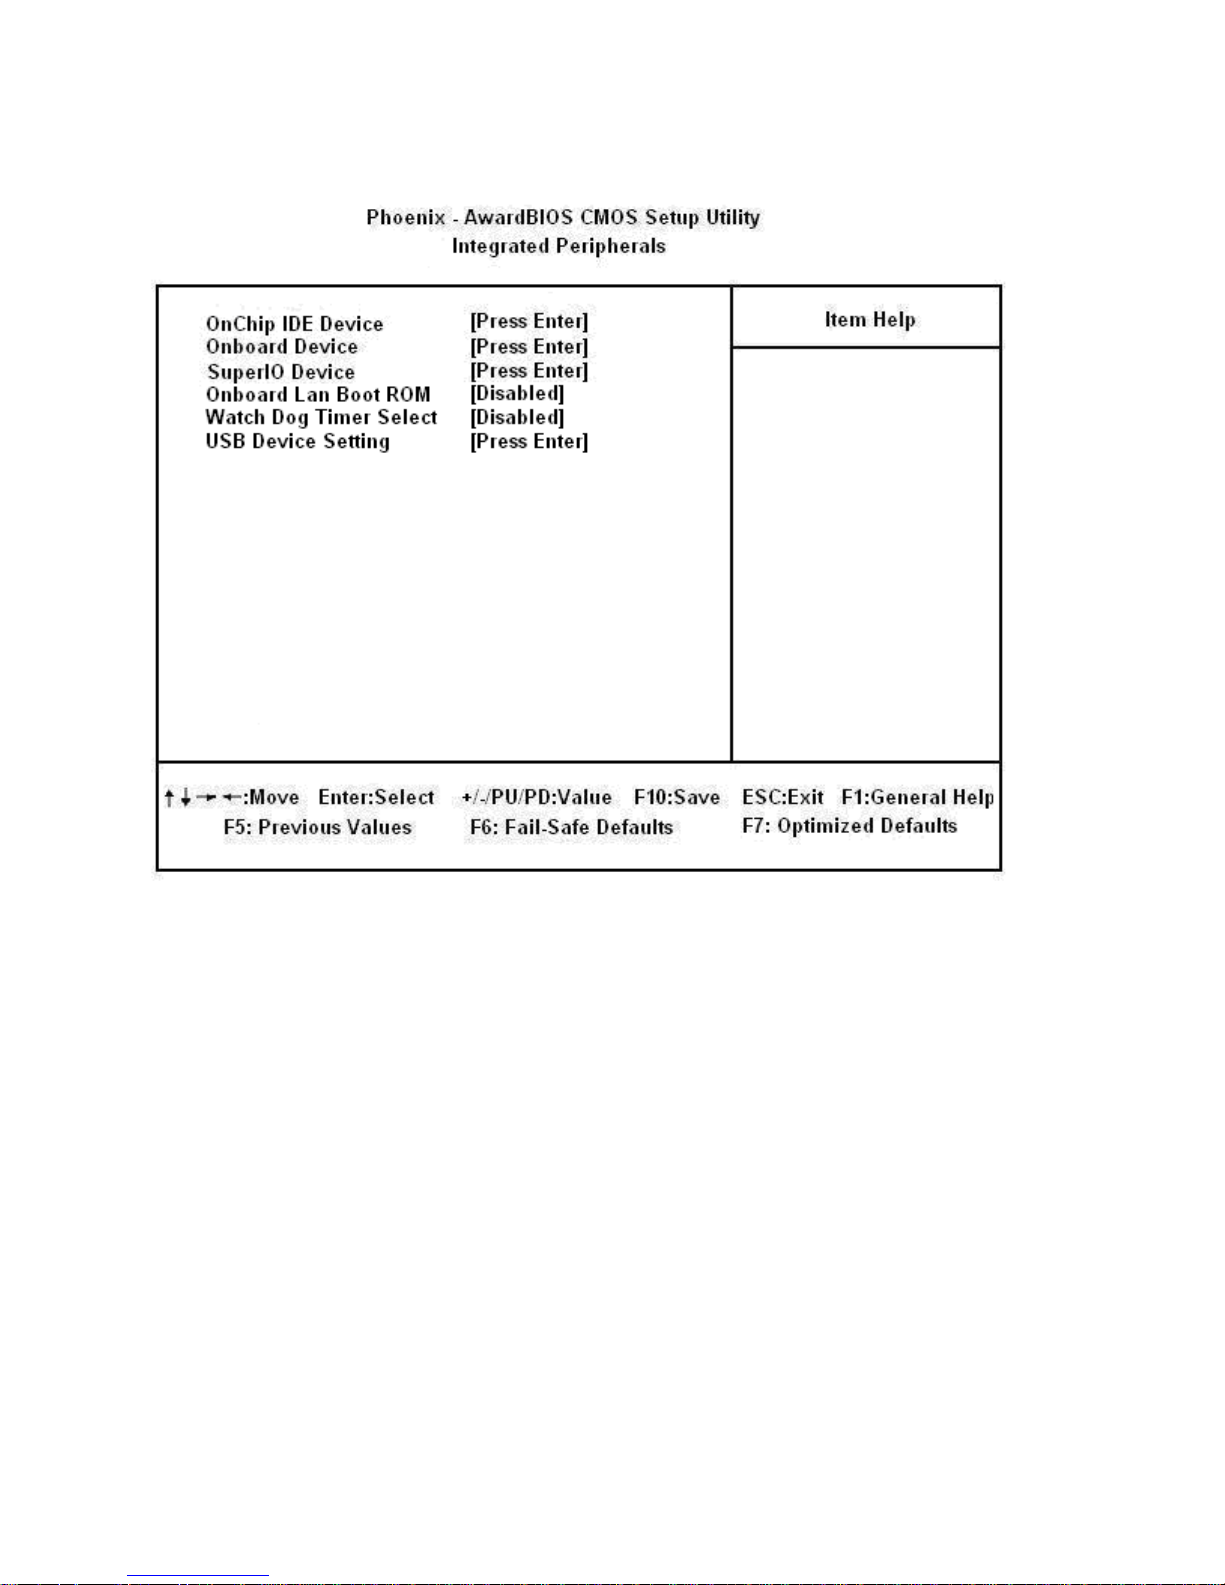
3.8 Integrated Peripherals
• OnChip IDE Device
Setup the mode for the on board storage device.
• Onboard Device
This option provides the access to control the onboard LAN, audio codec, and audio amplifier.
• SuperIO Device
This option provides the control for power-related settings, and serial ports settings.
• Onboard Lan Boot ROM
Enable/Disable the onboard LAN Boot ROM .
• Watch Dog Timer Select
Select the time for watch dog timer.
• USB Device Setting
This option provides USB related settings.
47
Page 48
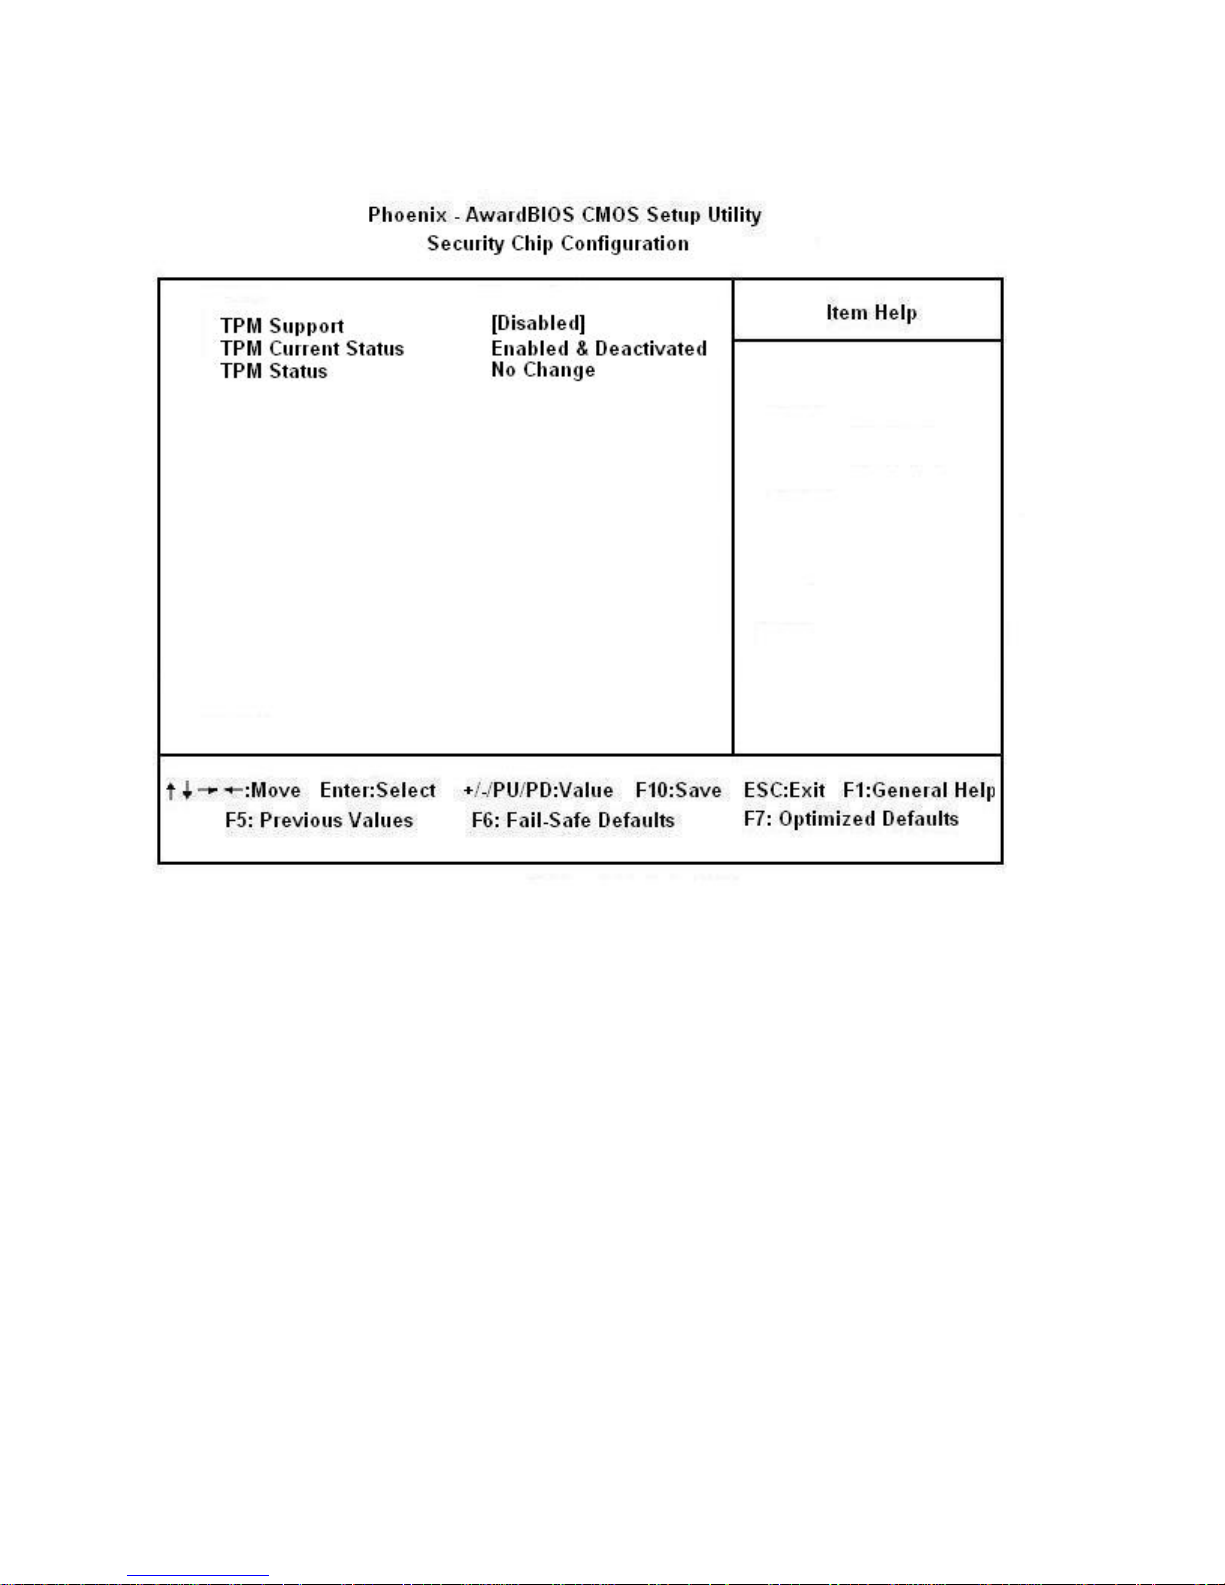
3.9 Security Chip Configuration
• TPM Support
This option provides TPM related settings.
48
Page 49
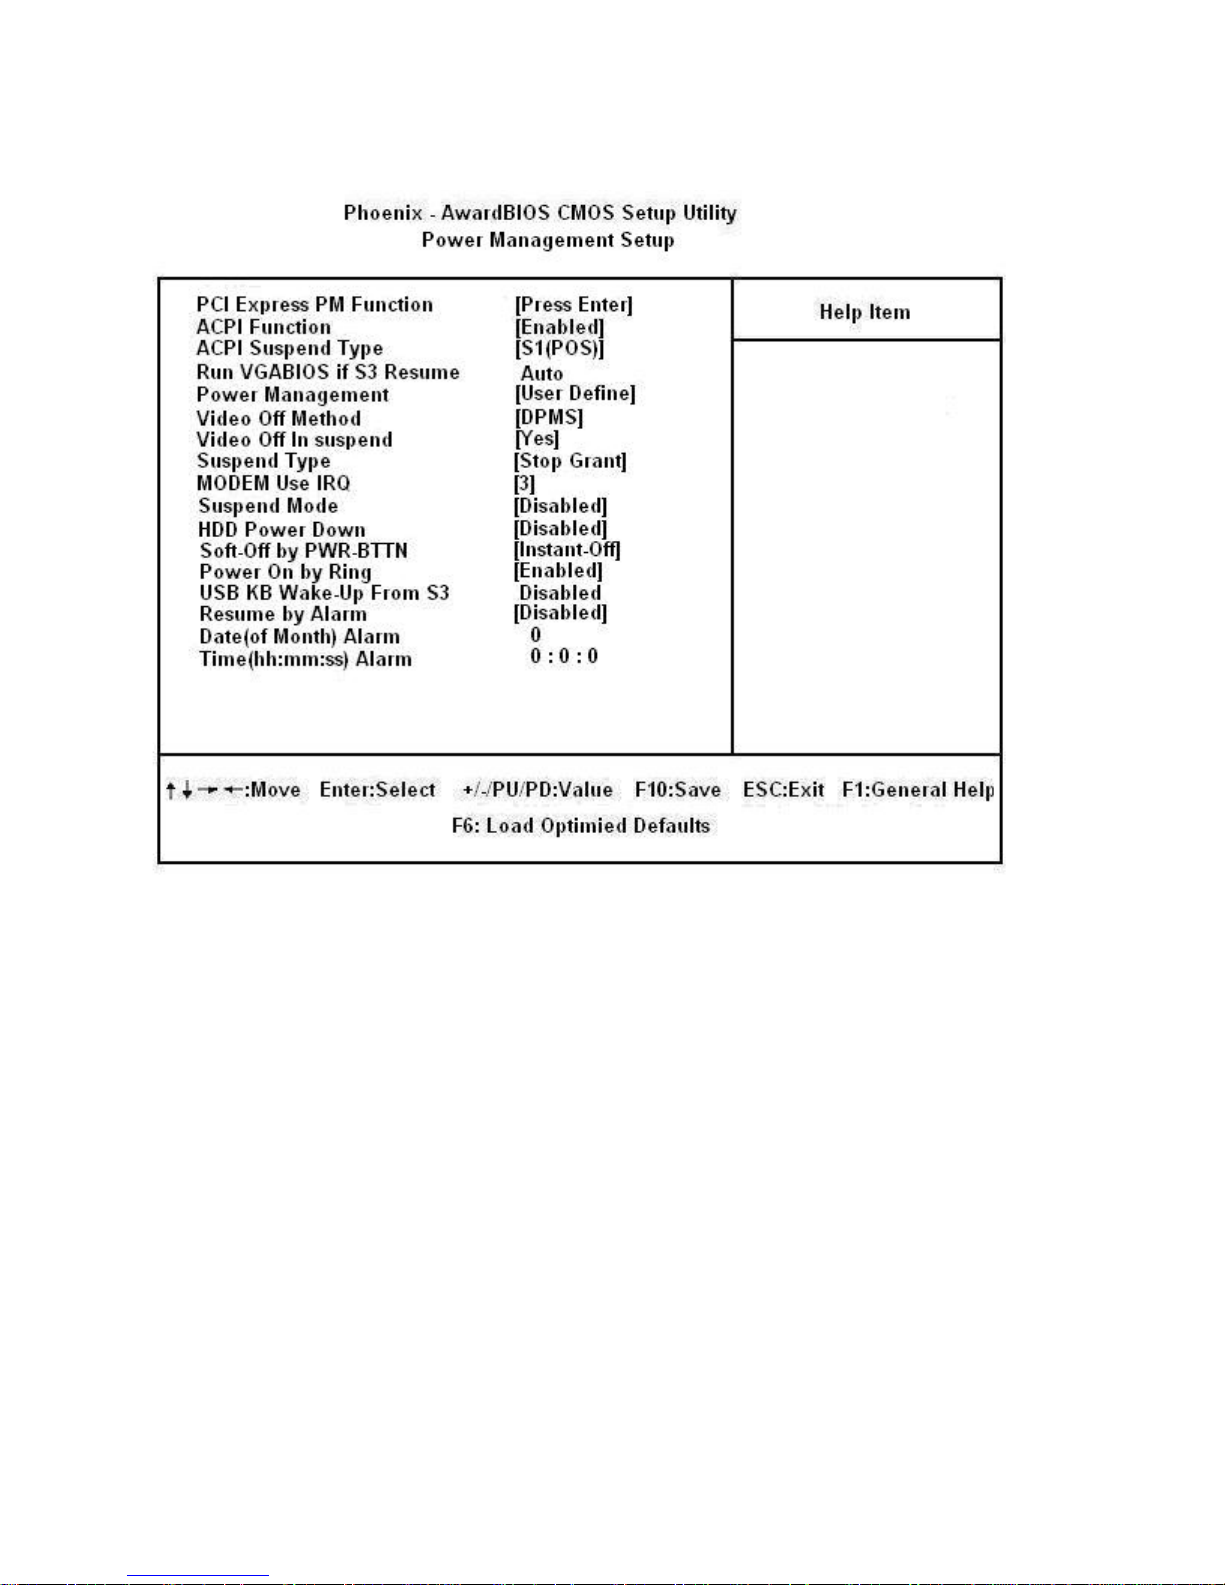
3.10 Power Management Setup
• ACPI Function
This item is to activate the ACPI (Advanced Configuration and Power Management Interface) Function. If
your operating system is ACPI-aware, such as Windows 2000/XP, select [Enabled].
• ACPI Suspend Type
This item specifies the power saving modes for ACPI function. If your operating system supports ACPI,
such as Windows 2000/ XP, you can choose to enter the Standby mode in S1(POS) or S3 (STR) fashion
through the setting of this field. Settings are:
[S1] The S1 sleep mode is a low power state. In this state, no system context is lost (CPU or chipset)
and hardware maintains all system context.
[S3] The S3 sleep mode is a lower power state where the in formation of system configuration and
open applications/files is saved to main memory that remains powered while most other
hardware components turn off to save energy. The information stored in memory will be used to
restore the system when a “wake up” event occurs.
49
Page 50
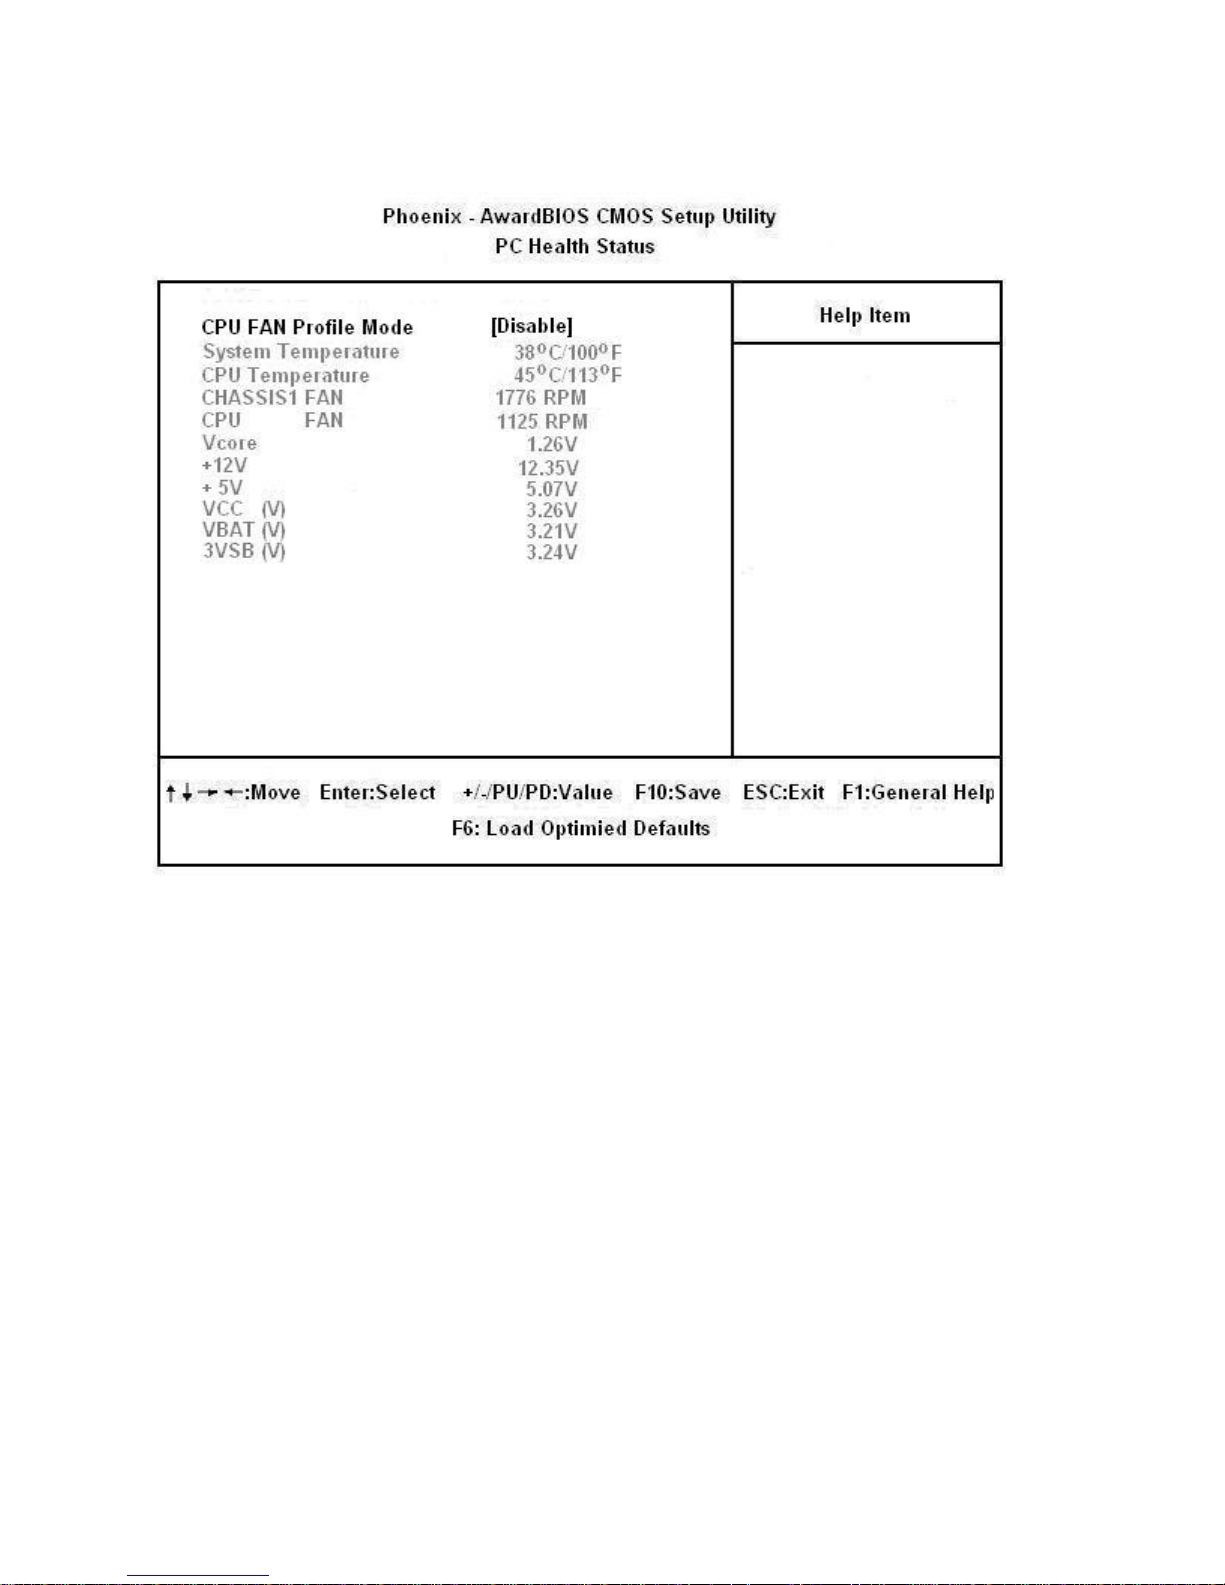
3.11 PC Health Status
• CPU FAN Profile Mode
[Silent Mode]
Under this mode the initial target temperature is 60 degrees, temperature tolerance is 1 degree and
the initial FAN speed is set to run at 40% of its full speed.
[Optimal Mode]
Under this mode the initial target temperature is 50 degrees, temperature tolerance is 1 degree and
the initial FAN speed is set to run at 53% of its full speed.
[Performance Mode]
Under this mode the initial target temperature is 40 degrees, temperature tolerance is 1 degree and
the initial FAN speed is set to run at 66% of its full speed.
50
Page 51
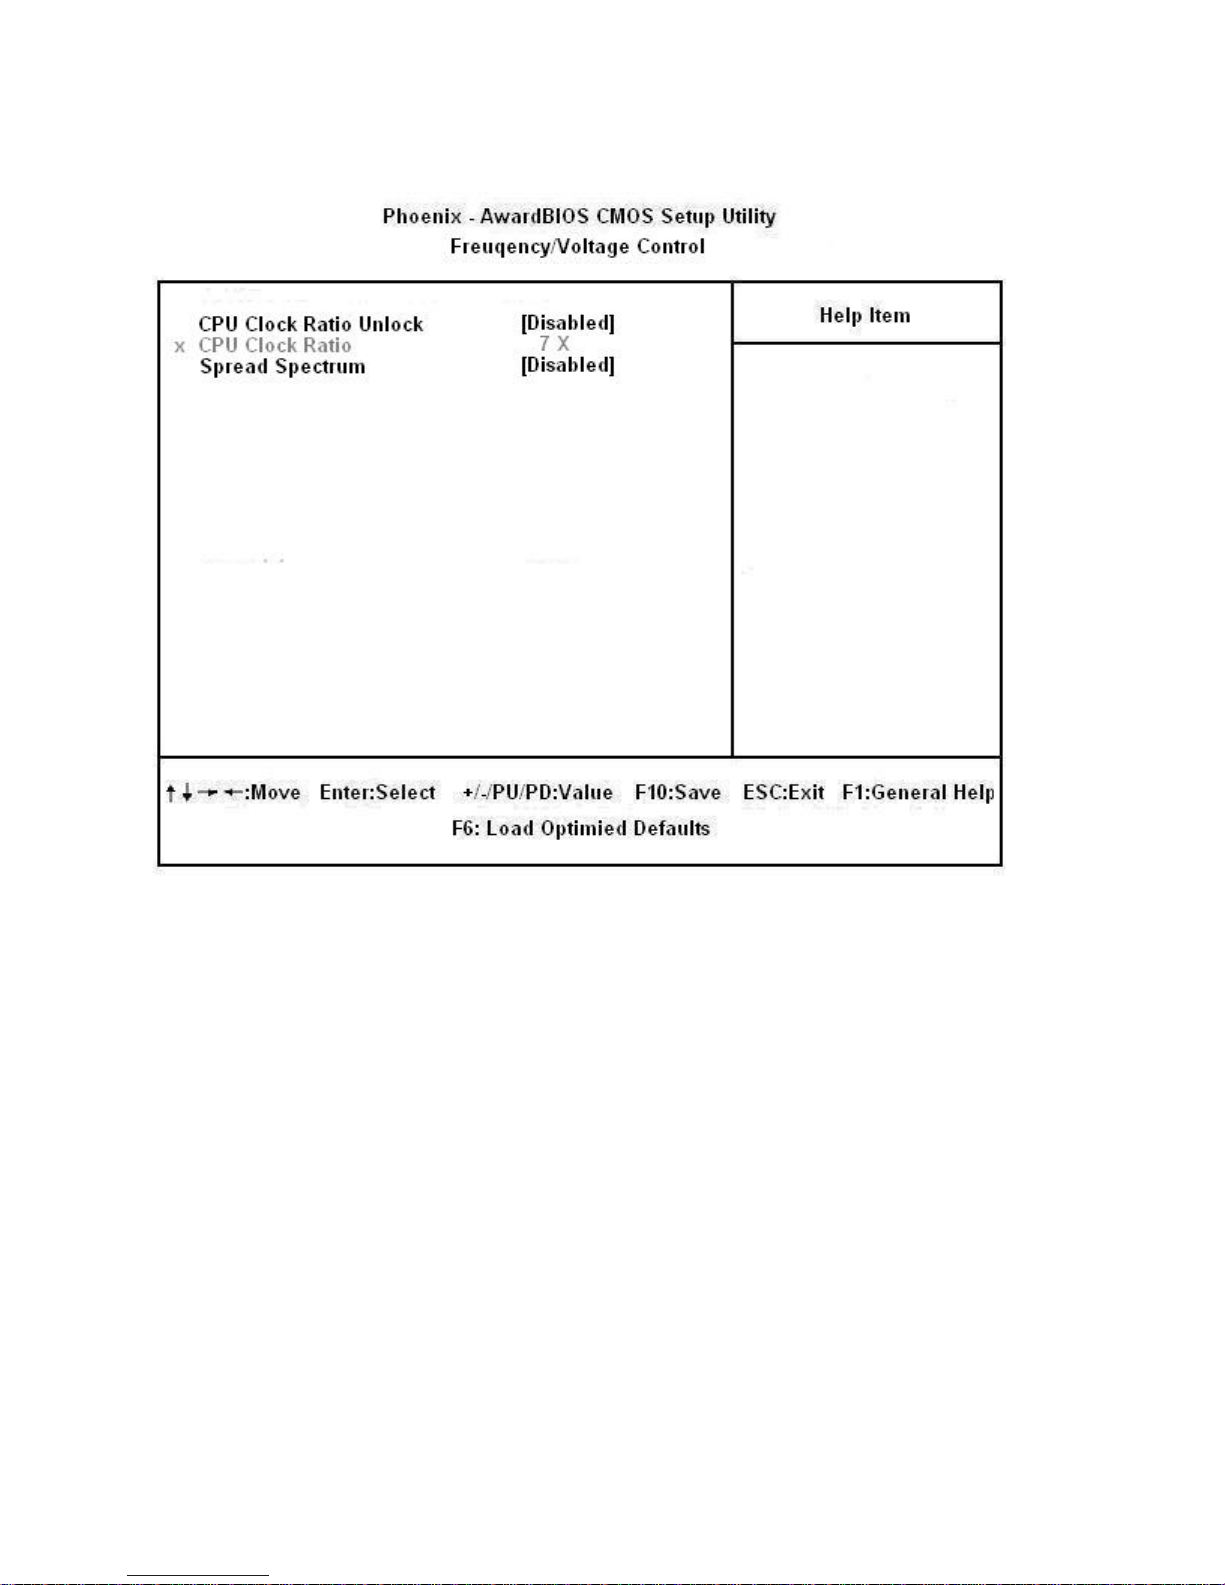
3.12 Frequency/voltage Control
• CPU Clock Ratio Unlock
This feature provides the option to enable/disable the CPU clock ratio lock. Once it is enabled, user may
change the CPU clock ratio under the “CPU Clock Ratio” manually. It is strongly recommended to keep this
option as “disabled”, which will use the default settings provided by the CPU manufacturer.
• Spread Spectrum
This option let user enable/disable the spread spectrum for EMI consideration.
51
Page 52

3.13 Load Setup Defaults
This option allows user to restore all of the BIOS settings to the default Optimized values. The Optimized
Defaults are the default values set by the mainboard manufacturer specifically for optimal performance of
the mainboard.
.
• For most of the system applications, it is recommended to load the option “Loa d Setup
Defaults”. After this option is loaded, don’t forget to load “Save & Exit Setup” in order
for the optimized default settings to take effect.
52
 Loading...