

Page 1

P4 Socket 775 Motherboard
IN915GVE
User’s Manual
http://www.bcmcom.com
Page 2

Declaratio
n
USER’S NOTICE
COPYRIGHT © OF THIS MANUAL BELONGS TO THE MANUFACTURER. NO PART OF
THIS MANUAL, INCLUDING THE PRODUCTS AND SOFTWARE DESCRIBED IN IT MAY
BE REPRODUCED, TRANSMITTED OR TRANSLATED INTO ANY LANGUAGE IN ANY
FORM OR BY ANY MEANS WITHOUT WRITTEN PERMISSION OF THE
MANUFACTURER.
THIS MANUAL CONTAINS INFORMATION NECESSARY TO USE OF IN915GVE
MOTHER-BOARD AND WE HAVE TRY TO INCLUDE IN THIS MANUAL AS MANY
INFORMATION AS POSSIBLE, BUT WE RESERVE RIGHT TO CHANGE, UPDATE
ANYTIME WITHOUT PRIOR NOTICE. MANUFACTURER PROVIDES THIS MANUAL “AS
IS ” WITHOUT WARRANTY OF ANY KIND, AND WILL NOT BE LIABLE FOR ANY
INDIRECT, SPECIAL, INCIDENTIAL OR CONSEQUENTIAL DAMAGES (INCLUDING
DAMANGES FOR LOSS OF PROFIT, LOSS OF BUSINESS, LOSS OF USE OF DATA,
INTERRUPTION OF BUSINESS OF ANY KIND ALIKE).
PRODUCTS AND CORPORATE NAMES APPEARING IN THIS MANUAL MAY OR M AY
NOT BE REGISTERED TRADEMARKS OR COPYRIGHTS OF THEIR RESPECTIVE
COMPANIES, AND THEY ARE USED ONLY FOR IDENTIFICATION OR EXPLANATION
AND TO THE OWNER’S BENEFIT, WITHOUT INTENT TO INFRINGEMENT.
z Intel, Pentium
®
4 are registered trademarks of Intel ® Corporation.
z Microsoft ® and Windows
®
are registered trademarks of Microsoft ® Corporation.
z Phoenix /Award
®
are registered trad e marks of Phoenix Technologies LTD..
WARNING:
Incorrectly battery installation might cause battery to explode. Replace yo ur sy stem’s CMOS RAM
battery with the identical CR-2032 3V Lithium-Ion coin cell (or equivalent) battery type only to
avoid risk of personal injury or physical damage to your equipment. Lithium battery might content
toxic chemical, always dispose used batteries according to the manufacturer’s instructions, or as
required by the local ordinance (where applicable).
References:
This manual is created and written by BCM Technical Dept., but not limited, to the information
from the IN915GVE External Production Specifications, and IN915GVE Specifications. If any
comments, suggestions, or errors for this manual, please write an e-mail to [email protected].
Page 3

Compliance & Certificate
CCoommpplliiaannccee && CCeerrttiiffiiccaattee
ISO 9001 Certificate:
This device was produced in our plant with advanced quality system certified by DNV QA Ltd. in
according to ISO 9001. The Certificate is valid for:
DESIGN & MANUFACTURE OF MOTHERBOARD AND PERSONAL COMPUTERS.
CE Declaration:
CE marking is a visible declaration by the manufacturer or his authorized representatives
that the electrical equipment to which it relates satisfies all the provisions of the 1994
Regulations.
FCC Compliance:
FCC stands for Federal Communications Commission.
This product complies with FCC Rules Part 15 and has been tested, and complied with the EMI
rules by a certified body. In normal operation, there shall be no harmful interference caused by this
device nor shall this device accept any interference received, including interference that may cause
undesired operation of this product.
Page 4

Easy Installatio
n
EEaassyy IInnssttaallllaattiioonn
The following “Easy Installation” steps are for users accustomed to the
assembly of a computer system. For those individuals requiring more
specific information, please refer to the more detailed descriptions
located within the latter chapters of this manual.
Note: You must keep your power cable unplugged until the following
installation steps are completed.
Getting Started
Touch a grounded metal surface to discharge static electricity stored in
your body before unpacking your motherboard. For details please refer
to Precaution.
Install the CPU by correctly alig ning th e CPU with th e socket LGA 775
(refer to CPU Installation Section). Next, install the 1.8 volt unbuffered DDRII SDRAM into the 240 pin DIMM slots.
Plug in any peripheral card(s) that you want to be included in the
system .
Plug in all cables included in the package except for the power cord.
Please recheck all steps to ensure no mistakes have been made and then
p
lug in the power cord and turn on the power to enter the BIOS setup,
Chapter 3.
Page 5

i
USER’S NOTICE
1
MANUAL REVISION INFORMATION
1
COOLING SOLUTIONS
2
CHAPTER 1 INTRODUCTION OF IN915GVE MOTHERBOARD
1-1 FEATURE OF MOTHERBOARD 3
1-2 SPECIFICATION 4
1-3 SYSTEM DIAGRAM 5
1-4 LAYOUT DIAGRAM 6
CHAPTER 2 HARDWARE INSTALLATION
2-1 HARDWARE INSTALLATION STEPS 8
2-2 CHECKING MOTHERBOARD'S JUMPER SETTING 8
2-3 INSTALL 9
2-3-1
GLOSSARY
9
2-3-2
ABOUT INTEL PENTIUM 4 LGA 775 CPU
10
2-4 INSTALL MEMORY 12
2-5 EXPANSION CARD 13
2-5-1
PROCEDURE FOR EXPANSION CARD INSTALLATION
13
2-5-2
ASSIGNING IRQ FOR EXPANSION CARD
13
2-5-3
INTERRUPT REQUEST TABLE FOR THIS MOTHERBOARD
14
2-6
CONNECTORS, HEADERS
15
2-6-1
CONNECTORS
15
2-6-2
HEADERS
18
2-7 STARTING UP YOUR COMPUTER 21
CHAPTER 3 INTRODUCING BIOS
3-1 ENTERING SETUP 23
3-2 GETTING HELP 23
3-3 THE MAIN MENU 23
3-4 STANDARD CMOS FEATURES 25
3-5 ADVANCED BIOS FEATURES 27
3-6 ADVANCED CHIPSET FEATURES 29
3-6-1
DRAM TIMING SETTINGS
29
3-7 INTEGRATED PERIPHERALS 31
3-7-1
PCI EXPRESS FUNCTION
31
3-7-2
CHIPSET IDE DEVICES
32
3-7-3
ONBOARD DEVICES
33
3-7-4
LEGACY DEVICES
34
3-8 POWER MANAGEMENT SETUP 36
3-9 PNP/PCI CONFIGURATION SETUP 38
3-10 PC HEALTH STATUS 40
3-11 POWER BIOS FEATURE 41
3-12 LOAD STANDARD/OPTIMIZED DEFAULTS 41
3-13 SET SUPERVISOR/USER PASSWORD 42
Mechanical Draw
43
TABLE OF CONTENT
Page 6

1
Manual Revision Information
Reversion Revision History Date
1.0 First Release Dec. 2005
Item Checklist
5
1 x IN915GVE Mainboard
5
1 x Cable for IDE/Floppy
5
1 x CD for motherboard utilities
5
1 x IN915GVE Quick Reference Guide
5
1 x IN915GVE User’s Manual Digital Format on CD or DVD
5
1 x IN915GV Standard I/O Shield
5
1 x SATA cable
□
Cable for USB Port ¾ (Optional)
□
S/PDIF Module (Optional)
Page 7

2
Intel Pentium 4® Processor Family
Cooling Solutions
As processor technology pushes to faster speeds and higher performance, thermal management
becomes increasingly crucial when building computer systems. Maintaining the proper thermal
environment is key to reliable, long-term system operation. The overall goal in providing the
proper thermal environment is keeping the processor below its specified maximum case
temperature. Heatsinks induce improved processor heat dissipation through increased surface area
and concentrated airflow from attached fans. In addition, interface materials allow effective
transfers of heat from the processor to the heatsink. For optimum heat transfer, Intel recommends
the use of thermal grease and locking mechanism to attach the heatsink to the processor.
When selecting a thermal solution for your system, please utilize an Intel recommend heatsink for
use with Intel processors. Note, those heatsinks are recommended for maintaining the specified
Maximum T case requirement. In addition, this collection is not intended to be a comprehensive
listing of all heatsinks that support Intel processors.
Please visit Intel website below for CPU installation video :
http://www.intel.com/cd/channel/reseller/asmo-na/eng/100617.htm
Page 8

3
Chapter 1
Introduction of IN915GVE Motherboard
1-2 Feature of motherboard
The IN915GVE motherboard is design for u se Intel latest Pentium® 4 LGA775 Processor, with
Hyper-Threading Technology sup ported, the Intel 915GV
®
Chipset delivers a high performance and
professional desktop, workstation platform solution. Which utilize the Socket LGA775 design.
IN915GVE motherboard use the Intel 915GV
®
Chipset Supports 533/800MHz System Bus in data
transfer rate.
Up to 2GB Dual Channel DDR2 Memories. DDR2 is the next generation memory technology to
replace the current DDR. With initial speeds from 400 and 533MHz, DDR2 memory provides
bandwidth up to 4.3GB/s. Doubled by the dual-channel architecture, the widest memory bus
bandwidth 8.6GB/s is achieved on this motherboard.
The ICH6R offers 4 SATA ports to provide speedier HDD throughout that boost ov erall system
performance, one PIDE connection support UDMA33/ATA 66/ATA 100, allows 2 IDE devices
connection.
With integrated Intel Graphics Media Accelerator 900 2D/3D supports 333MHz graphics core, and
supports hardware motion compensation assist for software MPEG/DVD decode, by using a PCIE x16
connector, for alternative graphics solution, the IN915GVE is the most valuable and flexible solution .
The IN915GVE motherboard include LAN onboard, an Realtek 10/100 PCI LAN Controller
(Optional Realtek Gbe).
Its also has integrated onboard an AC’97 2.1 Audio CODEC, which is fully compatible with Sound
Blaster Pro® that gives you the best sound quality and compatibility.
With USB control as well as capability of expanding to 8 USB2.0 function ports to meet faster data
transfer, built-in hardware monitor function. This enable system monitor and protect your computer.
These motherboards provided design in hardware to protect BIOS from virus crash BIOS data.
IN915GVE is the best value solution with high performance & Longevity for Embedded PC
Applications.
Page 9

4
1-2 Specification
Spec Description
Design
∗
Micro ATX form factor 4 layers PCB size: 9.6”(W) x 9.6”(D ) (245 x
244 mm)
Chipset
∗
Intel
®
915GV Graphics Memory Controller Hub (GMCH) Chipset
∗
Intel
®
82801FB I/O Controller Hub (ICH6) Chipset
CPU Socket
(PLGA 775 Socket)
∗
Support Intel Pentium 4 LGA775 processor
∗
Support CPU Frequency 533/800MHz
∗
Support Intel 775 Pin Celeron D 3xx/ Pentium 4 5xx/ 6xx proc essor
∗
Reserves support for future Intel Pentium 4 processors
Video Display
∗
Integrated Intel High Performance Graphics Media Accelerator 900
2D/3D, Graphics Core at 333MHz.
Memory Socket
∗
240-pin DDRII SDRAM module socket x2
∗
Support Memory Type 128Mbit, 256Mbit, 512Mbit and 1Gbit
Technology
∗
Support Only 8x and 16x SDRAM device with 4 banks
∗
Support 1.8V DDR2 400/DDR2 533
∗
Expandable to 2GB
Expansion Slot
∗
1x PCI Express x16 slot (by 4 lines) for PCI Express VGA
∗
3x 32-bit PCI slot (PCI v2.3 compliant)
Integrate IDE
∗
One IDE interface support PCI Bus Mastering, ATA PIO/DMA and
the ULTRA DMA 33/66/100 functions that deliver the data transfer
rate up to 100 MB/s, support up to 2 IDE device.
SATA
∗
Four Serial ATA host controller with independent DMA operation on
all ports.
∗
Data transfer rates up to 1.5Gb/s
USB
∗
8x USB connectors, USB 2.0 compliant (4 connectors at rear panel
and 4 on board header)
LAN
∗
Realtek RTL8100C
®
10/100 LAN
Audio
∗
AC’97 Digital Audio controller integrated
∗
On board Realtek ALC-655 AC’97 2.3 Audio CODEC
∗
2 or 6 Channel Audio selectable
∗
Audio driver and utility included
BIOS
∗
Phoenix
®
Award 4MB Flash ROM
Multi I/O
∗
PS/2 keyboard and PS/2 mouse connectors
∗
Floppy disk drive connector x1
∗
Parallel port x1, Serial port x2 (one on header)
∗
Audio connector Line-in, Line-out, MIC
Page 10
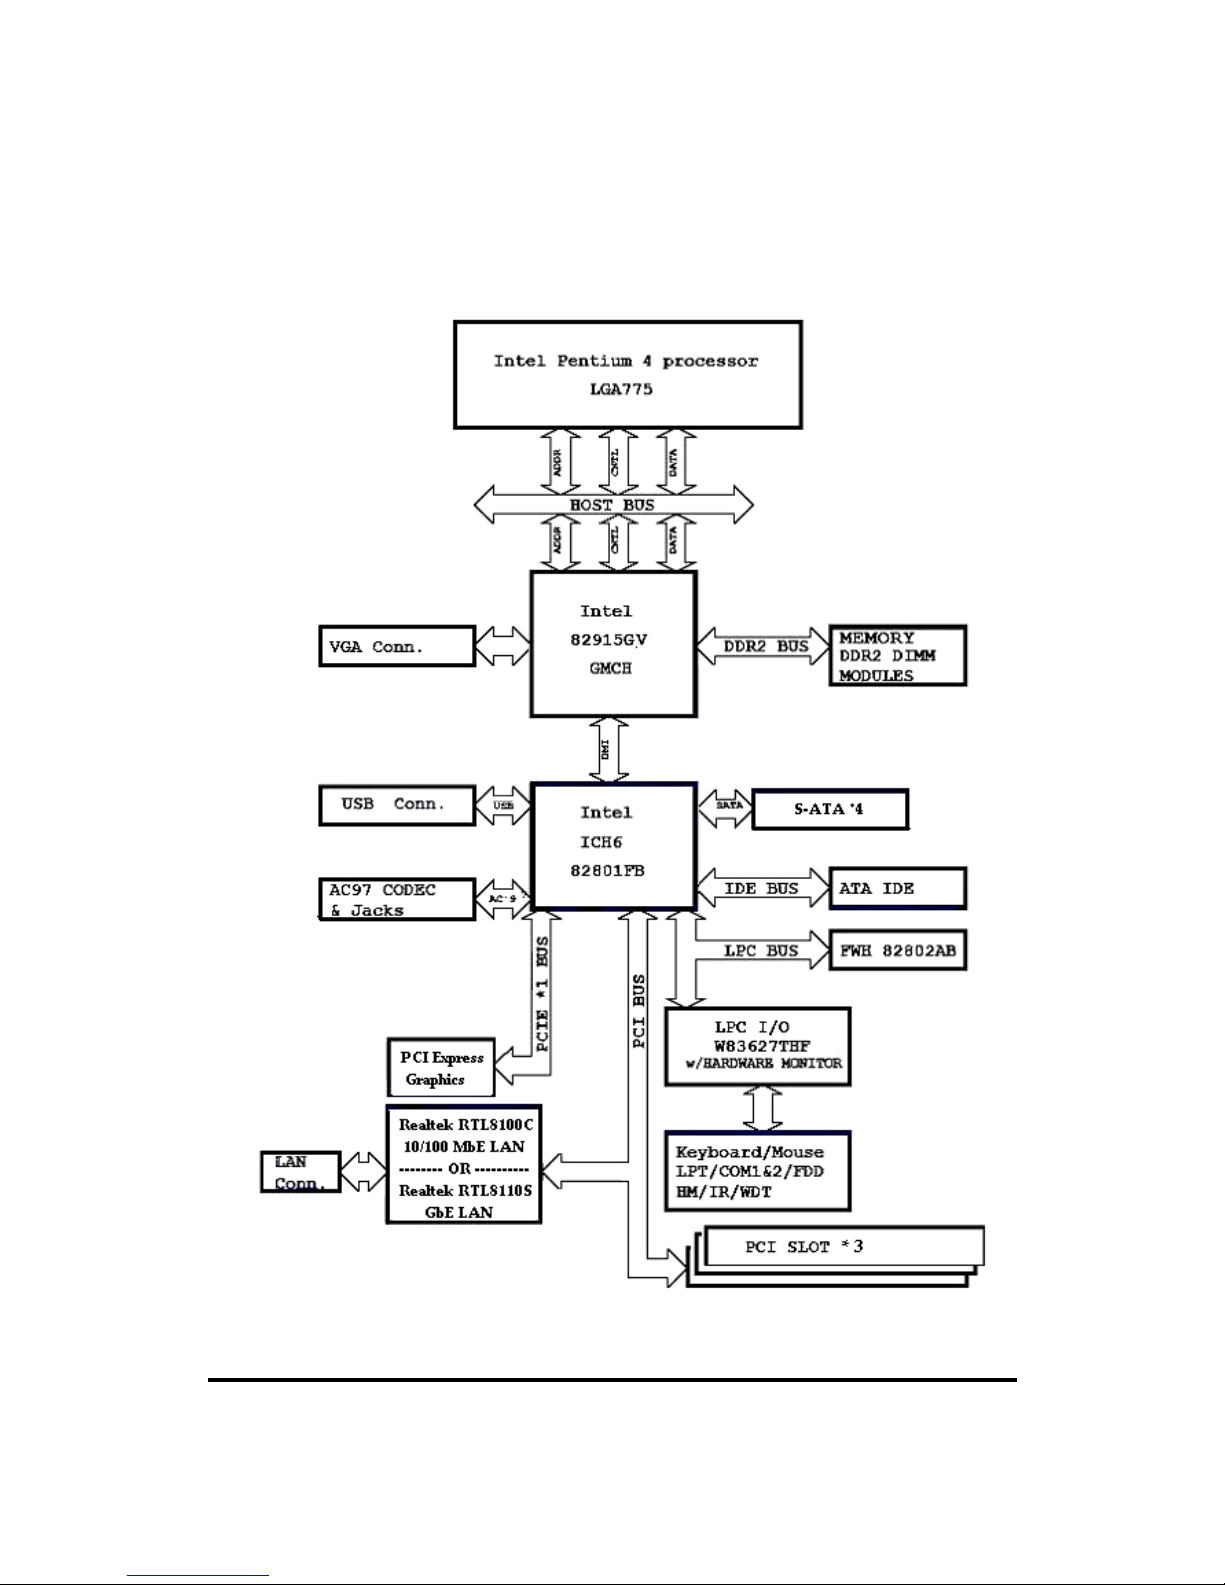
5
1-3 System Diagram
IN915GVE Mainboard Diagram
Page 11
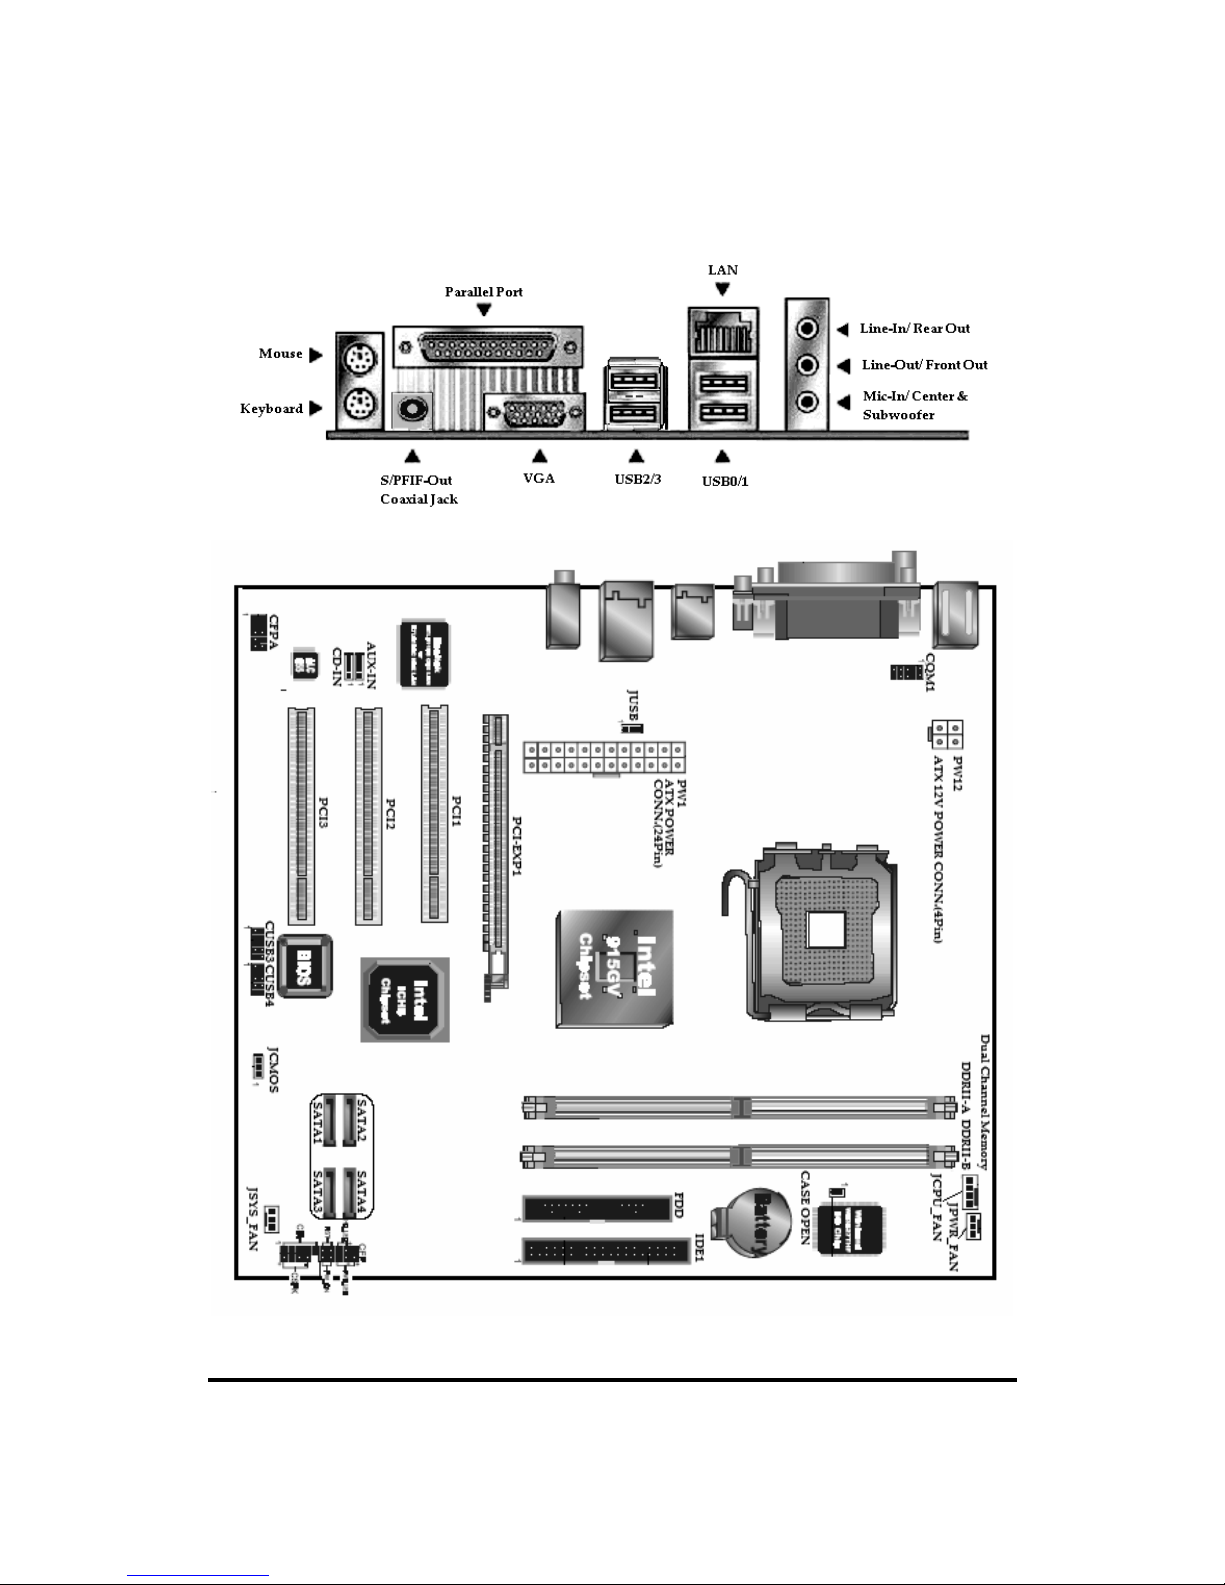
6
1-4 Jumper & Connector
Page 12

7
Jumpers
Jumper Description Note
JCMOS
Clear CMOS
JUSB
USB S3 Wake up Jumper
Connector Description Note
AUX_IN
Extra Audio In 4 x 1 Wafer, Pitch 2.54mm
CFPA
Front Panel Audio Connector 2 x5 Pin Header, Pitch 2.54mm
CD_IN
CD-In 4 x 1 Wafer, Pitch 2.54mm
JCPU_FAN
CPU Fan Power Connector 4 x 1 Wafer, Pitch 2.54mm
JPWR_FAN
Additional Fan Connector 3 x 1 Wafer, Pitch 2.54mm
JSYS_FAN
Chassis Fan Connector 3 x 1 Wafer, Pitch 2.54mm
PW1
24 Pin ATX Power Connector 24 Pin Power Block
PW12
4 Pin ATX 12V Power Connector 4 Pin Power Block
CUSB3
Front USB Header 2 5 x 2 Header, Pitch 2.54mm
CUSB4
Front USB Header 2 5 x 2 Header, Pitch 2.54mm
J10
SPDIF 4 x 1 Wafer, Pitch 2.54mm
CFP
Chassis Front Panel Connector 5 x 2 Header, Pitch 2.54mm
CIR
IRDA Connector 5 x 1 Header, Pitch 2.54mm
CSPK
PC Speaker Connector 4 x 1 Header, Pitch 2.54mm
SATA1-4
SATA Connector
COM1
COM Port Header 5 x2 Header, Pitch 2.54mm
Case-Open
Chassis intrusion 2 Pin header
Socket Description Note
U16
CPU Socket LGA 775 Socket
DDR2 A1
DDRII Socket 240 Pin DIMM Socket
DDR2 B1
DDRII Socket 240 Pin DIMM Socket
Page 13
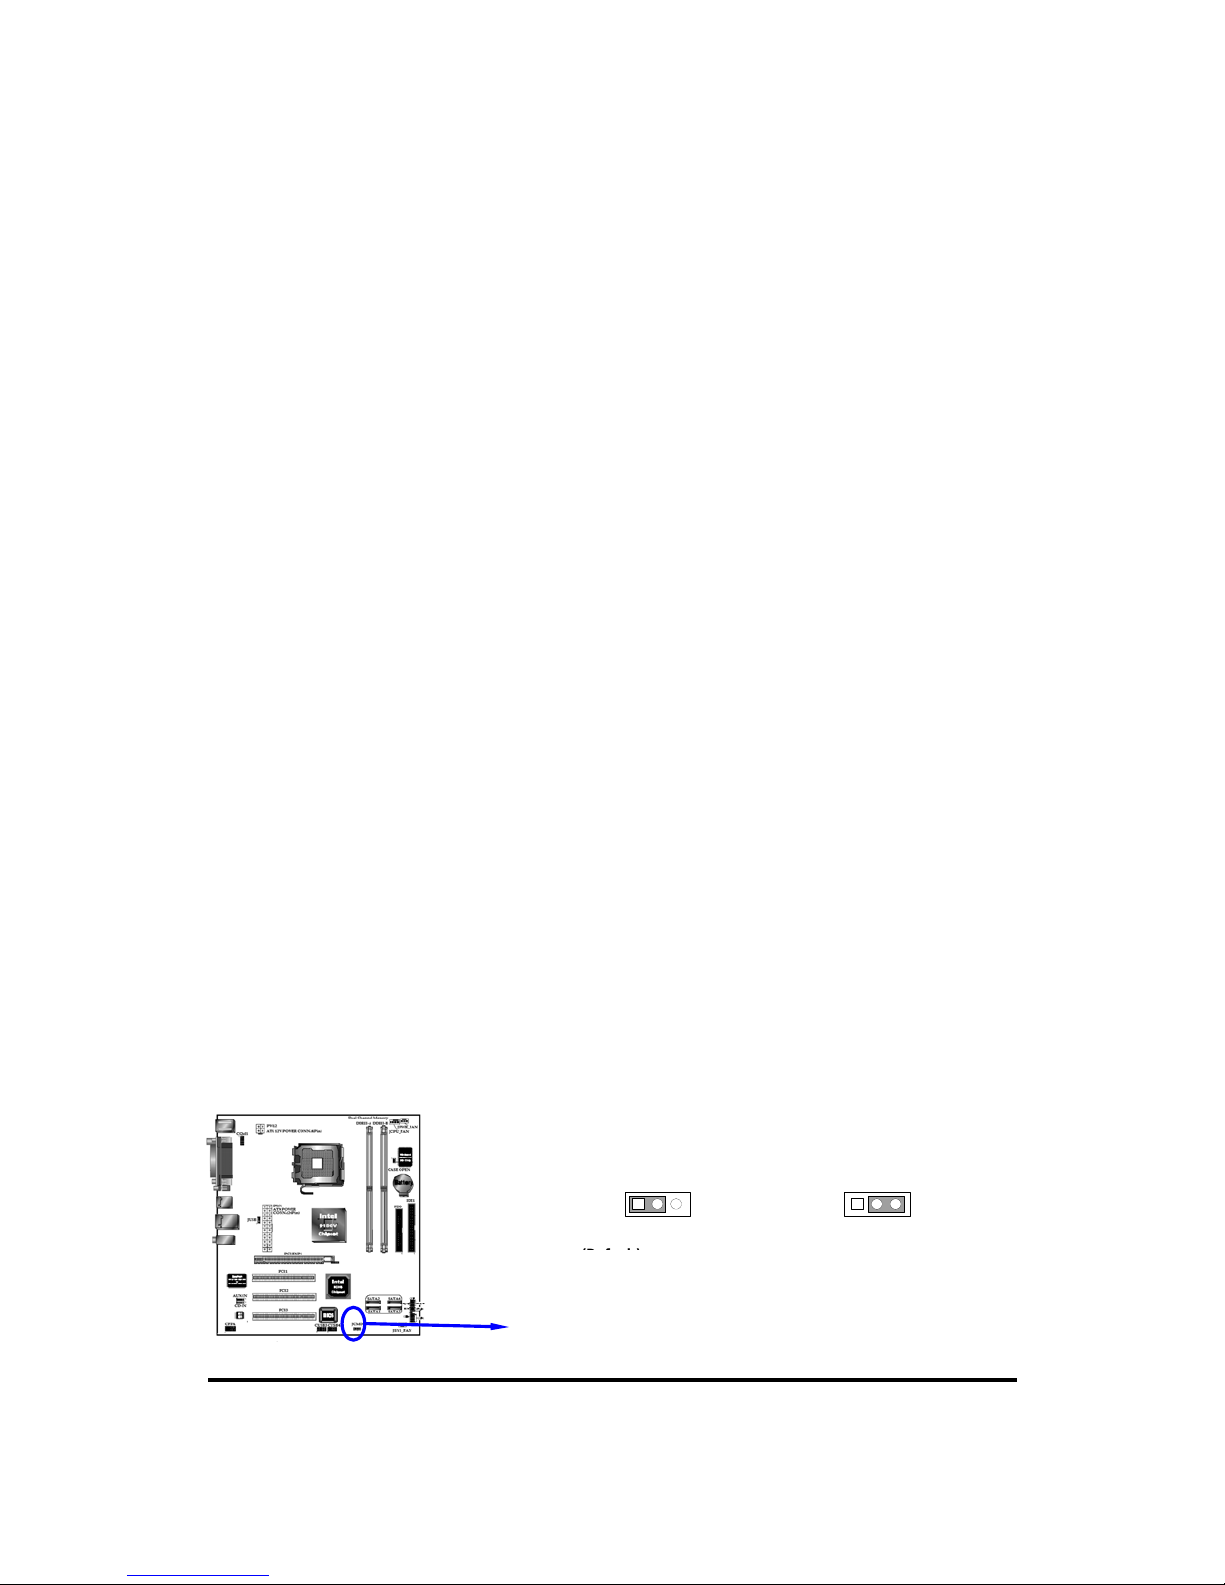
8
Chapter 2
Hardware installation
2-1 Hardware installation Steps
Before using your computer, you had better complete the following steps:
1. Check motherboard jumper setting
2. Install CPU and Fan
3. Install System Memory (DDR2 DIMM)
4. Install Expansion cards
5. Connect HDD and Floppy cables, Front Panel /Back Panel cable
6. Connect ATX Power cable
7. Power-On and Load Standard Default
8. Reboot
9. Install Operating System
10. Install Driver and Utility
2-2 Checking Motherboard’s Jumper Setting
(1) CMOS RAM Clear (3-pin) : JCMOS
A battery must be used to retain the motherboard configuration in CMOS RAM short
1-2 pins of JP4 to store the CMOS data.
To clear the CMOS, follow the procedure below:
1. Turn off the system and unplug the AC power
2. Remove ATX power cable from ATX power connector
3. Locate JCMOS and short pins 2-3 for a few seconds
4. Return JCMOS on its normal setting by shorting pins 1-2
5. Connect ATX power cable back to ATX power connector
Note: When should clear CMOS
1. Troubleshooting
2. Forget password
3. After over clocking system boot fail
CMOS RAM Clear Setting
JP1
1 3
2-3 closed Clear CMOS
JP1
1 3
1-2 closed Normal
Page 14

9
2-3 Installation
2-3-1 Glossary
Chipset (or core logic) – An highly integrated circuits which control the interfaces
between the system processor, RAM, I/O devises, and adapter cards.
Processor slot/socket - the slot or socket used to mount the system processor on the
motherboard.
Slot - (PCI Express, PCI, DIMM) - the slots used to mount ada pt er card s an d syst em RAM.
PCI Express – A latest Serial Point to Point Protocol PCI Interconnect, PCIE devices
does not share bandwidth.
PCI - Peripheral Component Interconnect - a high speed interface for video cards, sound
cards, network interface cards, and modems; runs at 33MHz.
Serial Port - a low speed legacy interface typically used for mouse and external modems.
Parallel Port - a low speed legacy interface typically used for printers.
PS/2 - a low speed legacy interface used for mouse and keyboards.
USB - Universal Serial Bus - a medium speed interface typically used for mouse,
keyboards, scanners, and some digital cameras.
Sound (interface) - the interface between the sound card or integrated sound connectors
and speakers, MIC, game controllers, and MIDI sound devices.
LAN (interface) - Local Area Network - the interface to your local area network.
BIOS (Basic Input/Output System) - the program logic used to boot up a computer and
establish the relationship between the various components.
Driver - software, which defines the characteristics of a device for use by another device
or other software.
Processor - the "Central Processing Unit" (CPU); the principal integrated circuit used for
doing the "computing" in "personal computer"
Front Side Bus Frequency -
the working frequency of the motherboard, which is
generated by the clock generator for CPU, DRAM and PCI BUS.
CPU L2 Cache -
the flash memory inside the CPU, normally Intel P4 CPU has 512K or
above, while Celeron will have 256K.
Page 15
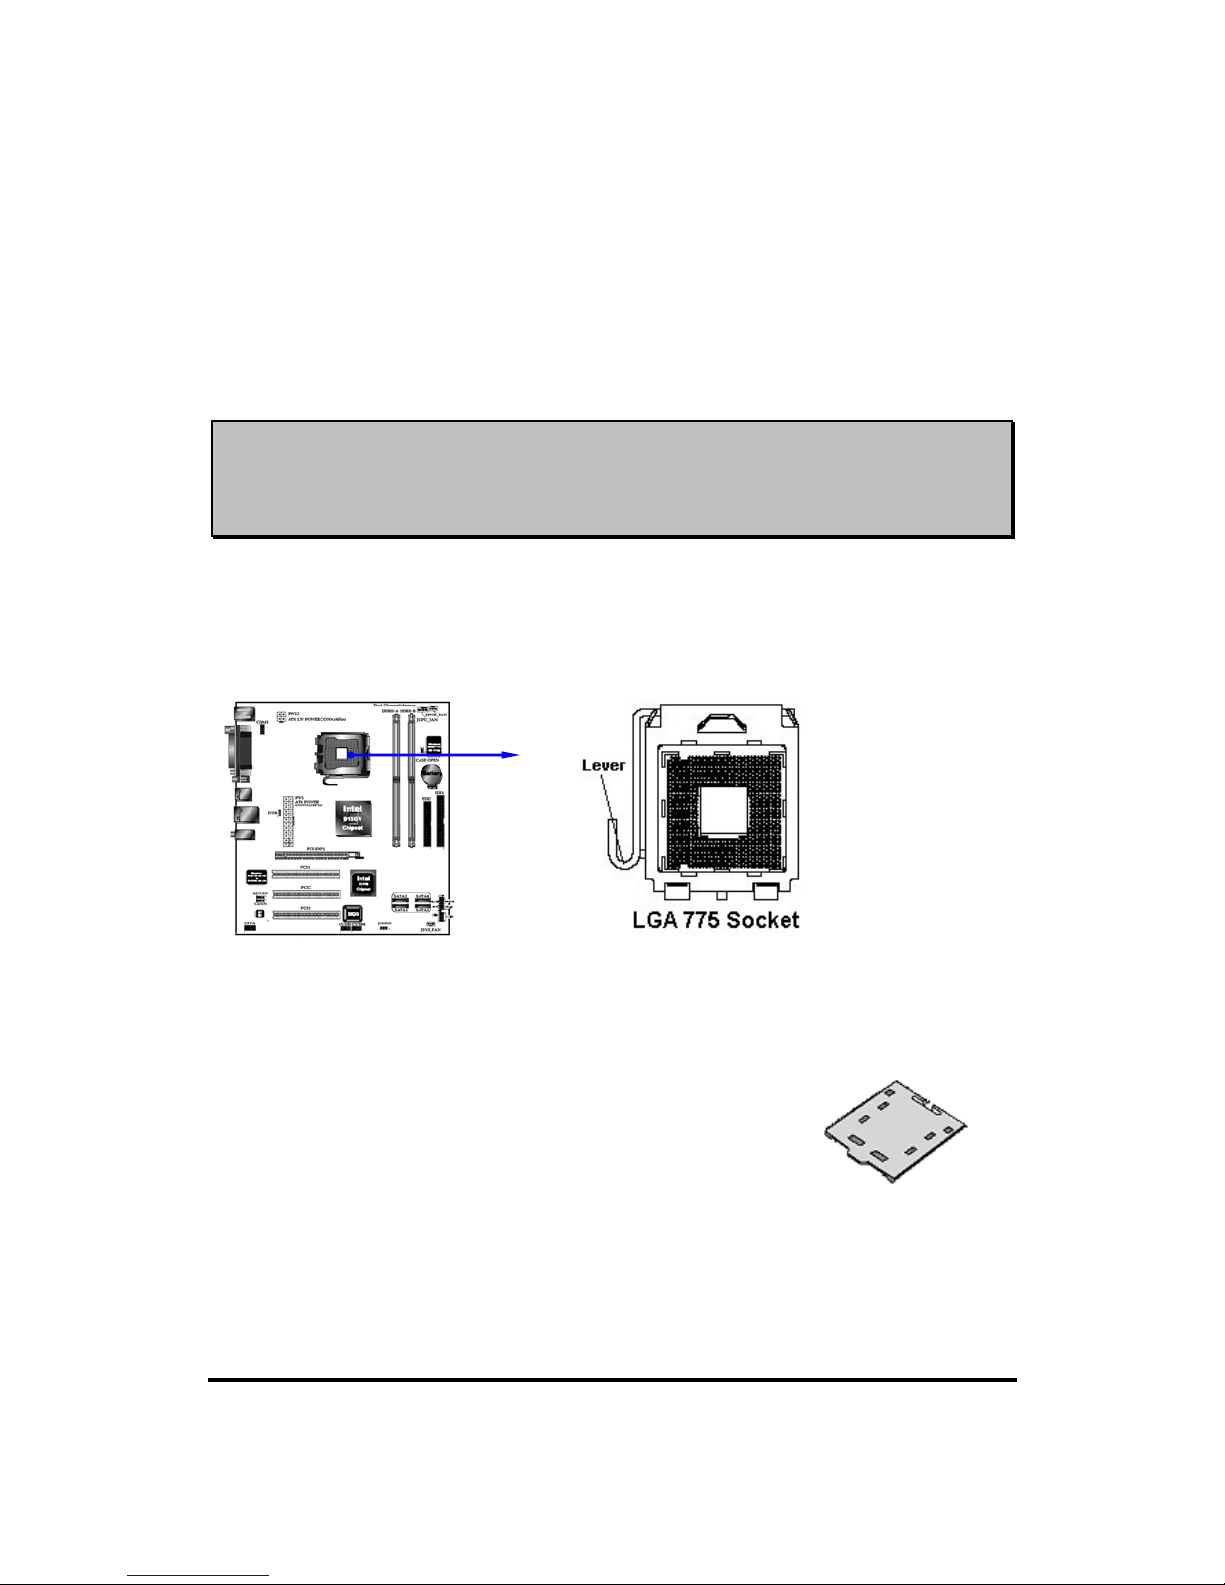
10
2-3-2 About Intel Pentium 4 LGA 775-pin CPU
This motherboard provides a 775-pin surface mount ZIF socket (Zero Insertion Force),
referred to as the LGA 775 socket supports Intel Pentium 4 processor in the 775-land
package utilizes Flip-Chip Pin Land Grid Array (FC-LGA4) package technology.
The CPU should have a cooling FAN attached to prevent overheating. If this is not the
case, then make sure the CPU has a sufficient cooling to dissipate heat generate from the
CPU (Please check with Intel specification).
WARNING!
Be sure that there is sufficient air circulation across the processor’s
heatsink and CPU cooling FAN is working correctly, otherwise it may
cause the processor and motherboard overheat and damage, you may
install an auxiliary cooling FAN, if necessary.
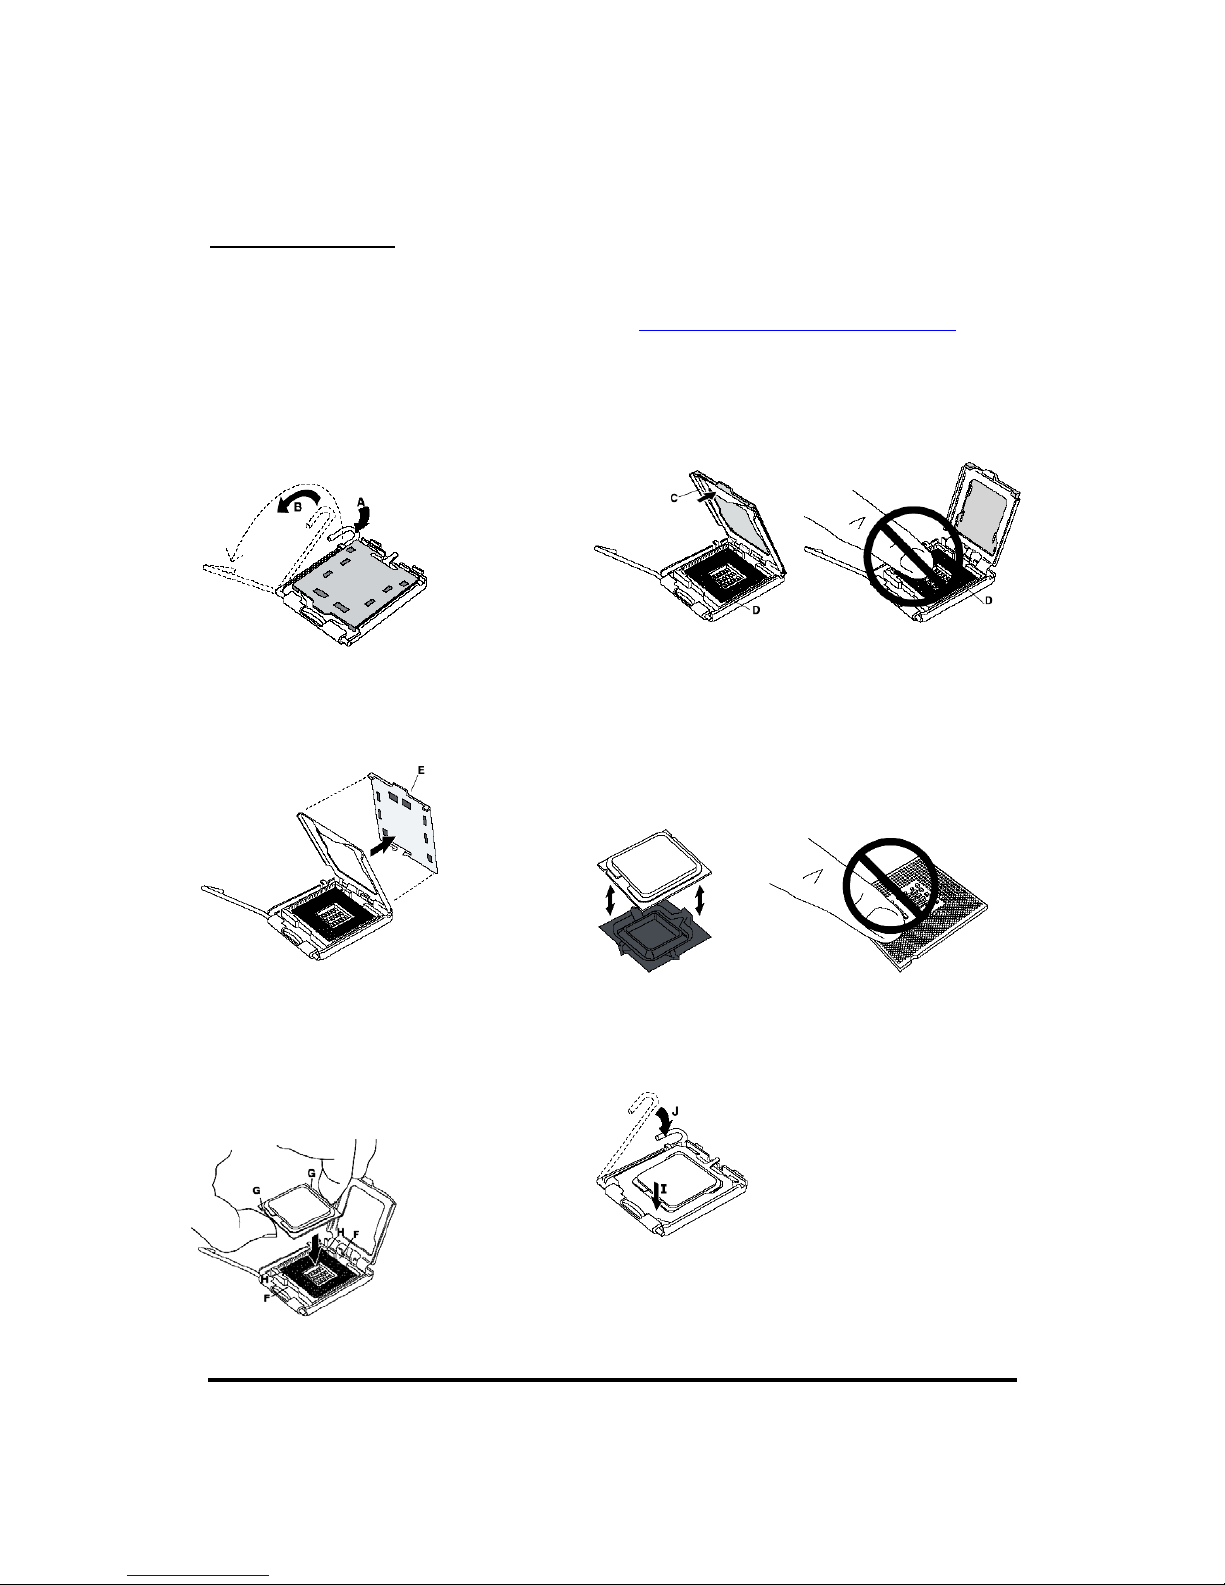
To install a CPU, first turn off your system and remove its cover. Locate the LGA775
socket and open it by first pulling the level sideways away from the socket then upward to
a 90-degree angle. Insert the CPU with the correct orientation as shown below. The
notched corner should point toward the end of the level. Because the CPU has a corner
pin for two of the four corners, the CPU will only fit in the orientation as shown.
When you put the CPU into the ZIF socket. No force require to insert of the CPU, do not
touch the socket leads, touching the socket leads may result in damage to the leads. Do not
slide or twist the processor during installation.
Save The Processor Socket Cover
After removing the processor cover during processor installation,
please save the processor socket cover. In the event that the
desktop board needs to be returned for service or any time the
processor is removed, the cover should be replaced on the
processor socket.
Page 16
11
CPU Installation
This processor is intended to be professionally installed. Before installing t he processor,
please review the additional notes avai lable at http://www.intel.com/go/integration
. Take
proper electrostatics discharge (ESD) precautions such as using appropriate ground strips,
gloves, and ESD mats.
1) Open socket lever by pushing lever down
and away from socket (A). Lift lever (B).
3
) Remove protective cover (E) from load
plate. Do not discard the protective cover.
Always replace the socket cover if the
processor is removed from the socket.
5) Hold processor with thumb and index
fingers oriented as shown. {Ensure fingers
align to socket cutouts (F)}. Align notches
(G) with socket (H). Lower the processor
straight down without tilting or sliding the
processor in the socket.
2) Open load plate (C). DO NOT TOUCH SOCKET
CONTACTS (D)
4) Remove processor from protective cover. (HOLD
PROCESSOR ONLY AT EDGES, BEING CAREFUL
NOT TO TOUCH BOTTOM OF PROCESSOR) Do
not discard the protective cover. Always replace the
socket cover if the processor is removed from the
socket.
6) Close load plate. Pressing down on load plate (I)
close and engage socket lever (J).
Page 17
12
2-4 Install Memory
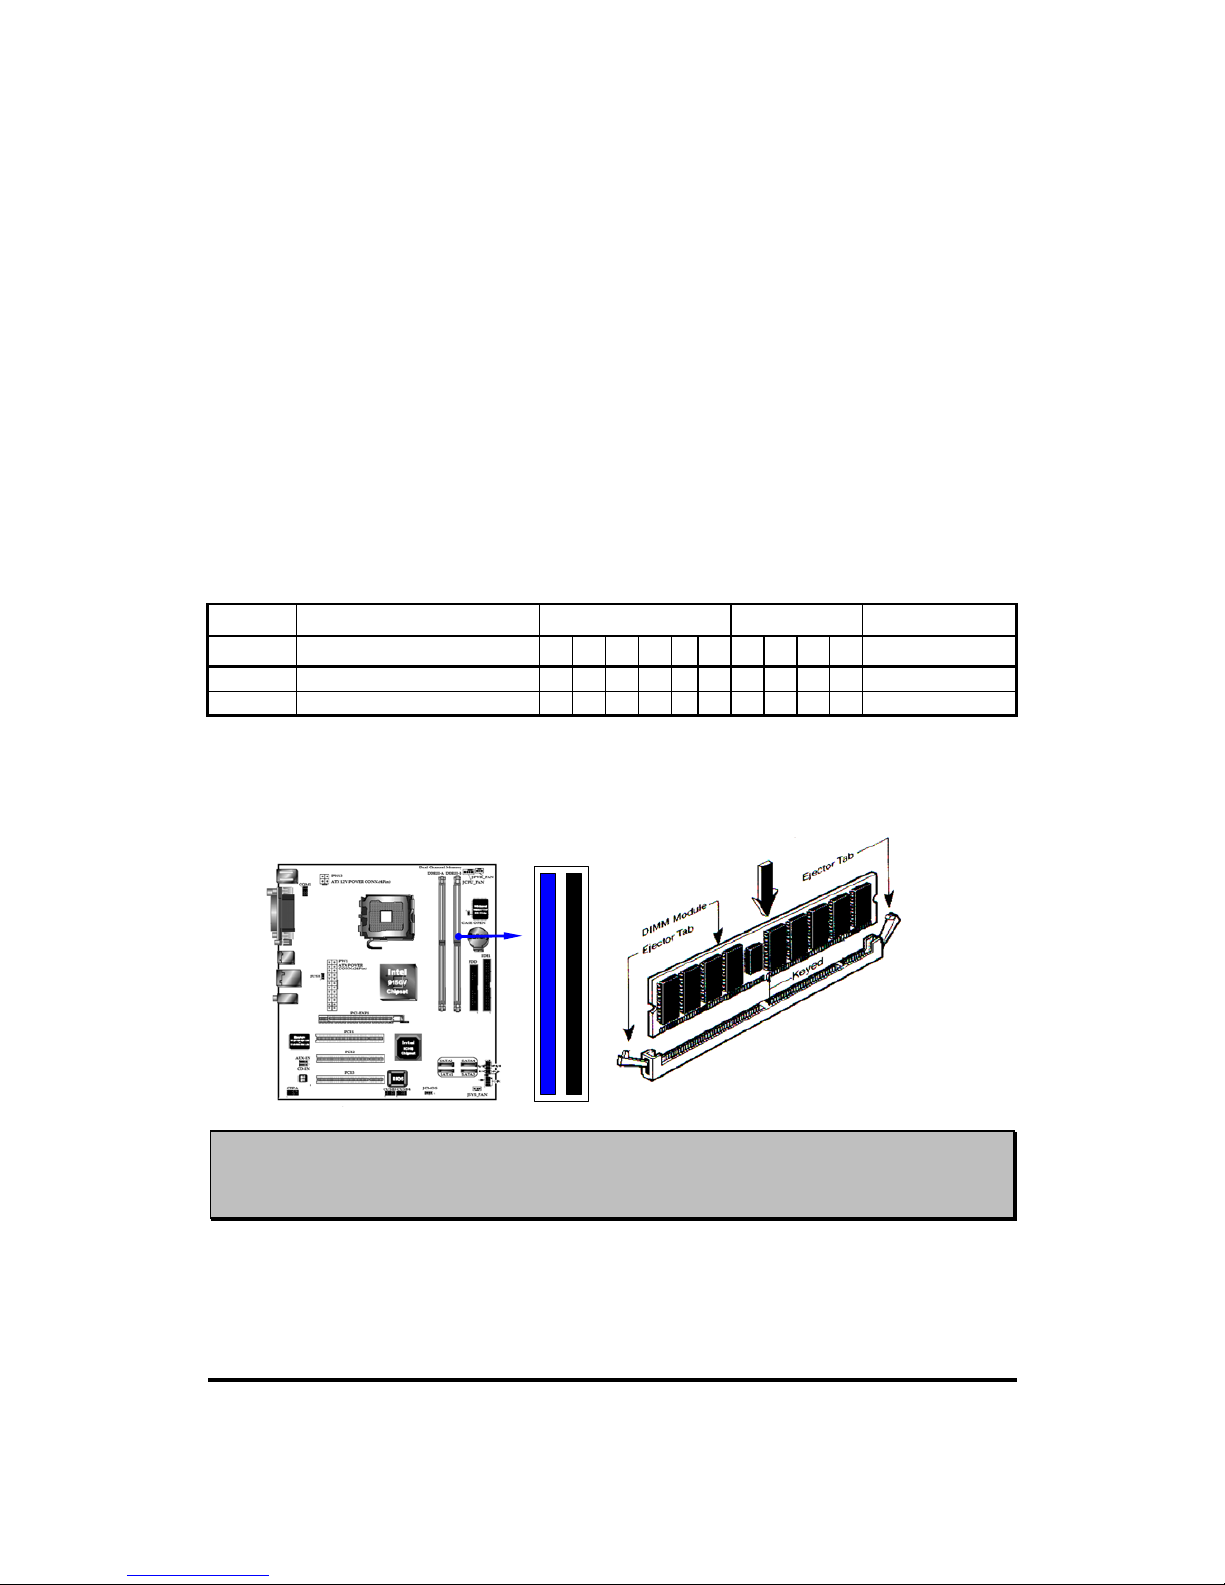
The IN915GVE support Dual Channel Technology, operating with Dual Channel
Technology, the bandwidth of Memory Bus will double up to 6.4GB/s.
IN915GVE includes 2x DDR2 DIMM (Double Data Rate) memory socket allow up to a
maximum memory size of 2.0GB.
Support 256Mb, 512Mb and 1Gb technologies implemented as x8, x16 devices.
• Non-ECC un-buffered only.
Use of two DDR2 memory modules in to same color DIMMs slots is strongly
recommended, for optimal performance for Dual Channel Technology to work. Always
install DIMMs with same CAS latency to avoid memory timing compatibility problem. It
is also recommended to use memory modules from the same vendor.
Valid Memory Configurations
Bank DDR2 Single Channel Dual Channel Total Memory
DDRII A1 DS/SS DDRII X X X X
256MB∼1.0GB
DDRII B1 DS/SS DDRII X X X X X
256MB∼1.0GB
Total System Memory(Max. 4.0GB)
256MB∼2.0GB
* DS Double Side, SS Single Side
Generally, installing DDRII SDRAM modules to your motherboard is very easy, refer to
figure 2-4 to see what a 240-Pin DDRII 533/DDRII 400 SDRAM module looks like.
DDRII B1
DDRII A1
NOTE!
When you install DIMM module fully into the DIMM socket the eject tab
should be locked into the DIMM module very firmly and fit into its inden tion
on both sides.
Page 18

13
2-5 Expansion Cards
WARNING!
Turn off your power when adding or removing expansion cards or other system
components. Failure to do so may cause severe damage to both your
motherboard and expansion cards.
2-5-1 Procedure For Expansion Card Installation
1. Read the documentation for your expansion card and make any necessary hardware or
software setting for your expansion card such as jumpers.
2. Remove your computer’s cover and the bracket plate on the slot you intend to use.
3. Align the card’s connectors and press firmly.
4. Secure the card on the slot with the screen you remove above.
5. Replace the computer system’s cover.
6. Set up the BIOS if necessary.
7. Install the necessary software d r iver for your expansion card.
2-5-2 Assigning IRQs For Expansion Card
Some expansion cards need an IRQ to operate. Generally, an IRQ must exclusively assign
to one use. In a standard design, there are 16 IRQs available but most of them are already
in use.
Standard Interrupt Assignments
IRQ Priority Standard function
0 N/A System Timer
1 N/A Keyboard Controller
2 N/A Programmable Interrupt
3 * 8 Built-in Infrared Device
4 * 9 Communications Port (COM1)
5 * 6 LPT2 or COM5
6 * 11 Floppy Disk Controller
7 * 7 Printer Port (LPT1)
8 N/A System CMOS/Real Time Clock
9 * 10 ACPI Compliant Mode when enabled
10 * 3 IRQ Holder for PCI Steering
11 * 2 IRQ Holder for PCI Steering
12 * 4 PS/2 Compatible Mouse Port
13 N/A Numeric Data Processor
14 * 5 Primary IDE Channel
15 * 1 Secondary IDE Channel
* These IRQs are usually available for ISA or PCI devices.
Page 19
14
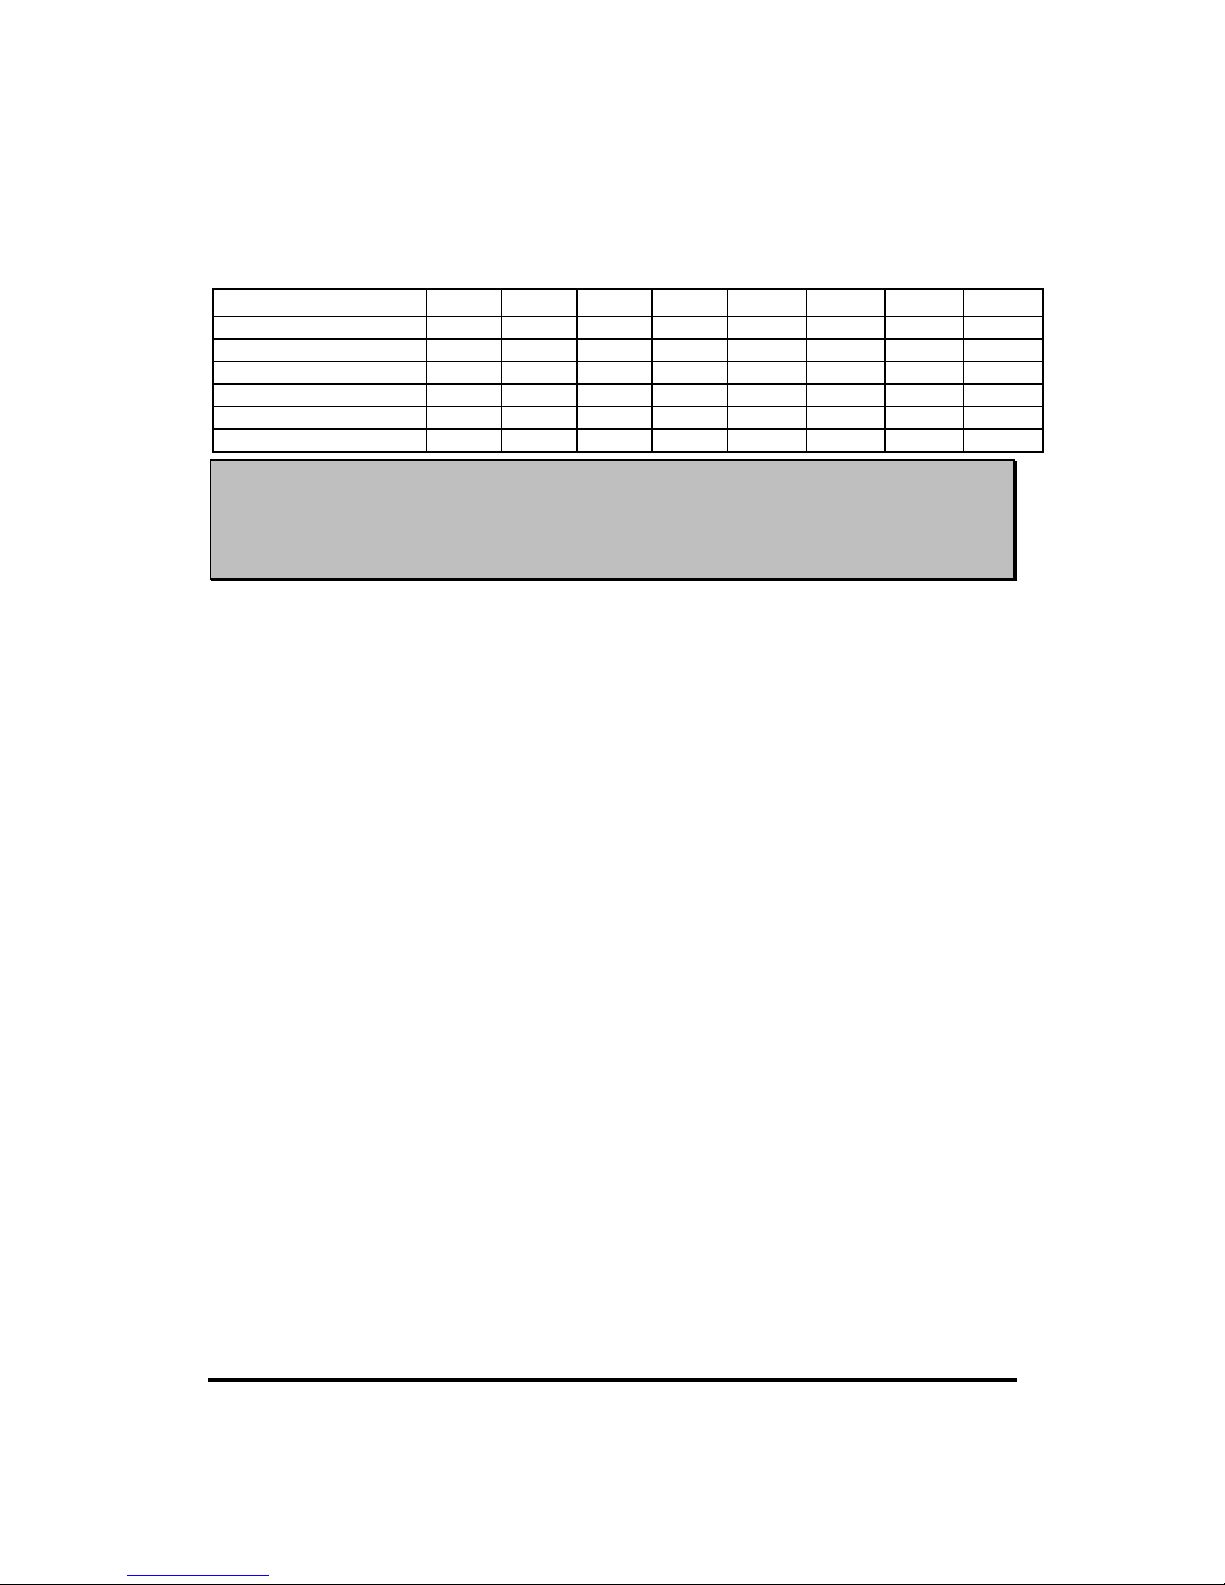
2-5-3 Interrupt Request Table For This Motherboard
Interrupt request are shared as shown the table below:
INT A INT B INT C INT D INT E INT F INT G INT H
PCI Slot 1
PCI Slot 2
PCI Slot 3
Realtek RTL8100C LAN
IMPORTANT!
If using PCI cards on shared slots, make sure that the drivers support
“Shared IRQ” or that the cards don’t need IRQ assignments. Conflicts
will arise between the two PCI groups that will make the system
unstable or cards inoperable.
Page 20
15
2-6 Connectors, Headers
2-6-1 Connectors
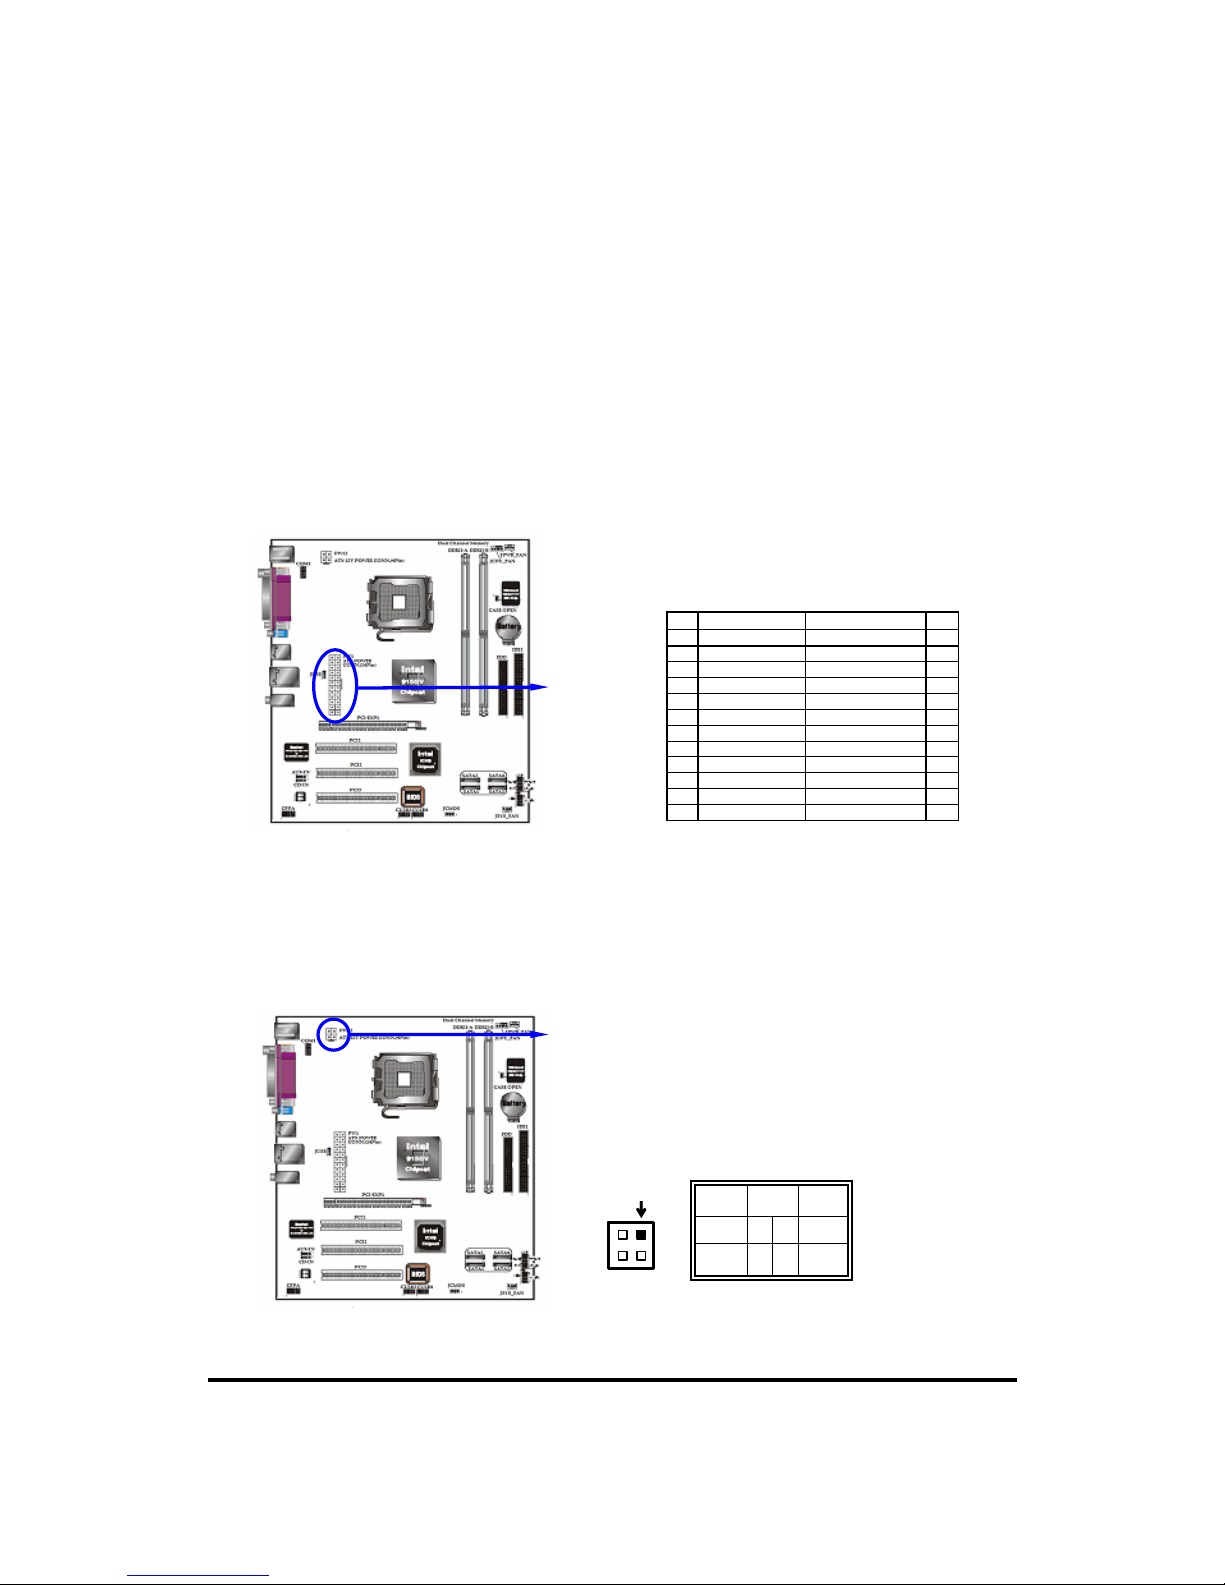
(1) Power Connector (24-pin block) : PW1
ATX Power Supply connector. This is a new defined 20-pins connector that usually
comes with ATX case. The ATX Power Supply allows to use soft power on
momentary switch that connect from the front panel switch to 2-pins Power On
jumper pole on the motherboard. When the power switch on the back of the ATX
power supply turned on, the full po wer will not come into the system board until the
front panel switch is momentarily pressed. Press this switch again will turn off the
power to the system board.
PIN ROW2 ROW1 PIN
1
+3.3V +3.3V
13
2
-12V +3.3V
14
3
GND GND
15
4
Soft Power On 5V
16
5
GND GND
17
6
GND 5V
18
7
GND GND
19
8
-5V Power OK
20
9
+5V +5V (for Soft Logic)
21
10
+5V +12V
22
11
+ 5V +12V
23
12 GND +3.3V 24
Pin 1
(2) ATX 12V Power Connector (4-pin block) : PW12
This is a new defined 4-pins connector that usually comes with ATX Power Supply.
The ATX Power Supply which fully support Pentium 4 processor must including
this connector for support extra 12V voltage to maintain system power consumption.
Without this connector might cause system unstable because the power supply can
not provide sufficient current for system.
Signal Pin Signal
12V 2 1 GND
12V 4 3 GND
Pin 1
Page 21
16
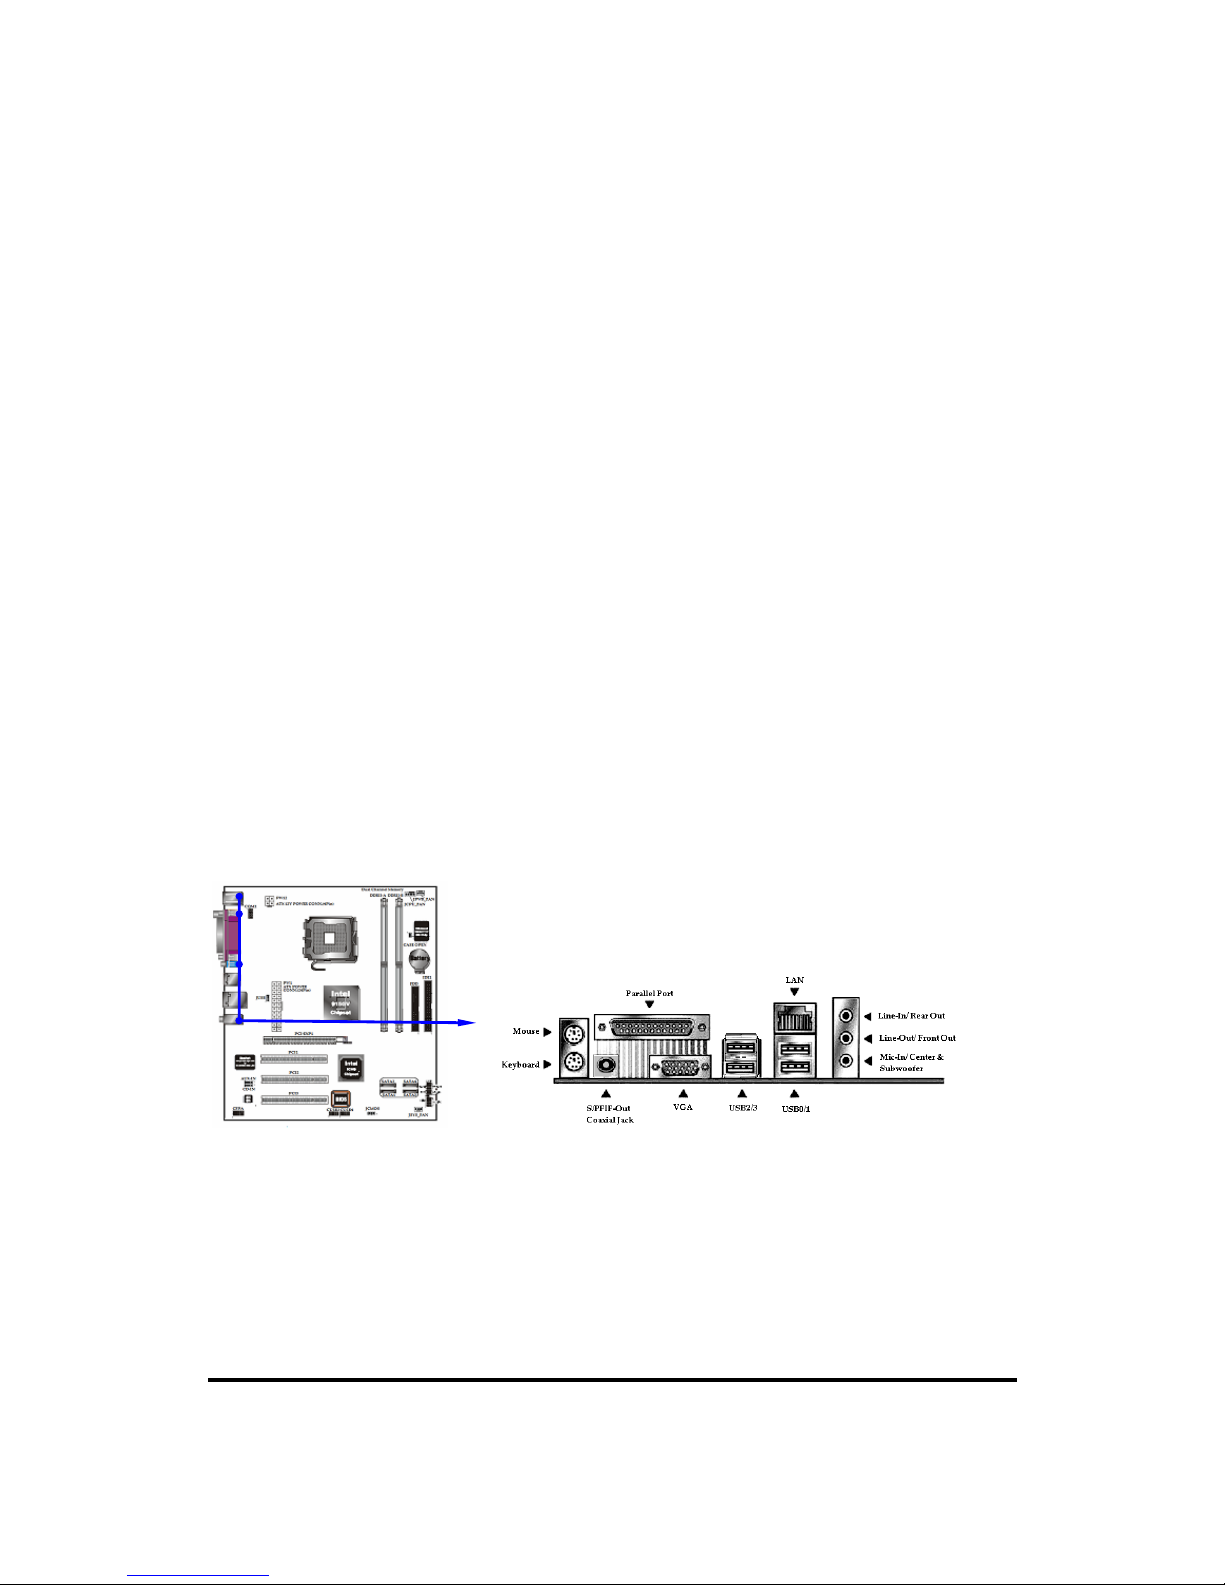
(3) PS/2 Mouse & PS/2 Keyboard Connector: PS2 KB/MOUSE
The connectors for PS/2 keyboard and PS/2 Mouse.
(4) USB Port connector: USB (USB1)
The connectors are 4-pin connector that connect USB devices to the system board.
(5) LAN Port connector: LAN
This connector is standard RJ45 connector for Network connector.
(6) Parallel Port Connector (25-pin female): LPT
Parallel Port connector is a 25-pin D-Subminiature Receptacle connector. The Onboard Parallel Port can be disabled through the BIOS SETUP. Please refer to
Chapter 3 “INTEGRATED PERIPHERALS SETUP” section for more detail
information.
(7) Audio and Game Connector : GAME
This Connector are 3 phone Jack for LINE-OUT, LINE-IN, MIC and a 15-pin
D-Subminiature Receptacle Conn ector for joystick/MIDI Device.
Line-out :
Audio output to speaker
Line-in :
Audio input to sound chip
MIC :
Microphone Connector
Game/MIDI :
For joystick or MIDI Device
(8) VGA Connector (15-pin D-Sub) Connector: VGA
VGA is the 15-pin D-Subminiature female connector for display monitor.
(9) Serial Port COM1: COM1
OM1 is the 9-pin D-Subminiature mail connector. The On-board serial port can be
disabled through BIOS SETUP. Please refer to Chapter 3 “INTEGRATED
PERIPHE RAL S SETUP” section for more detail information.
Page 22
17
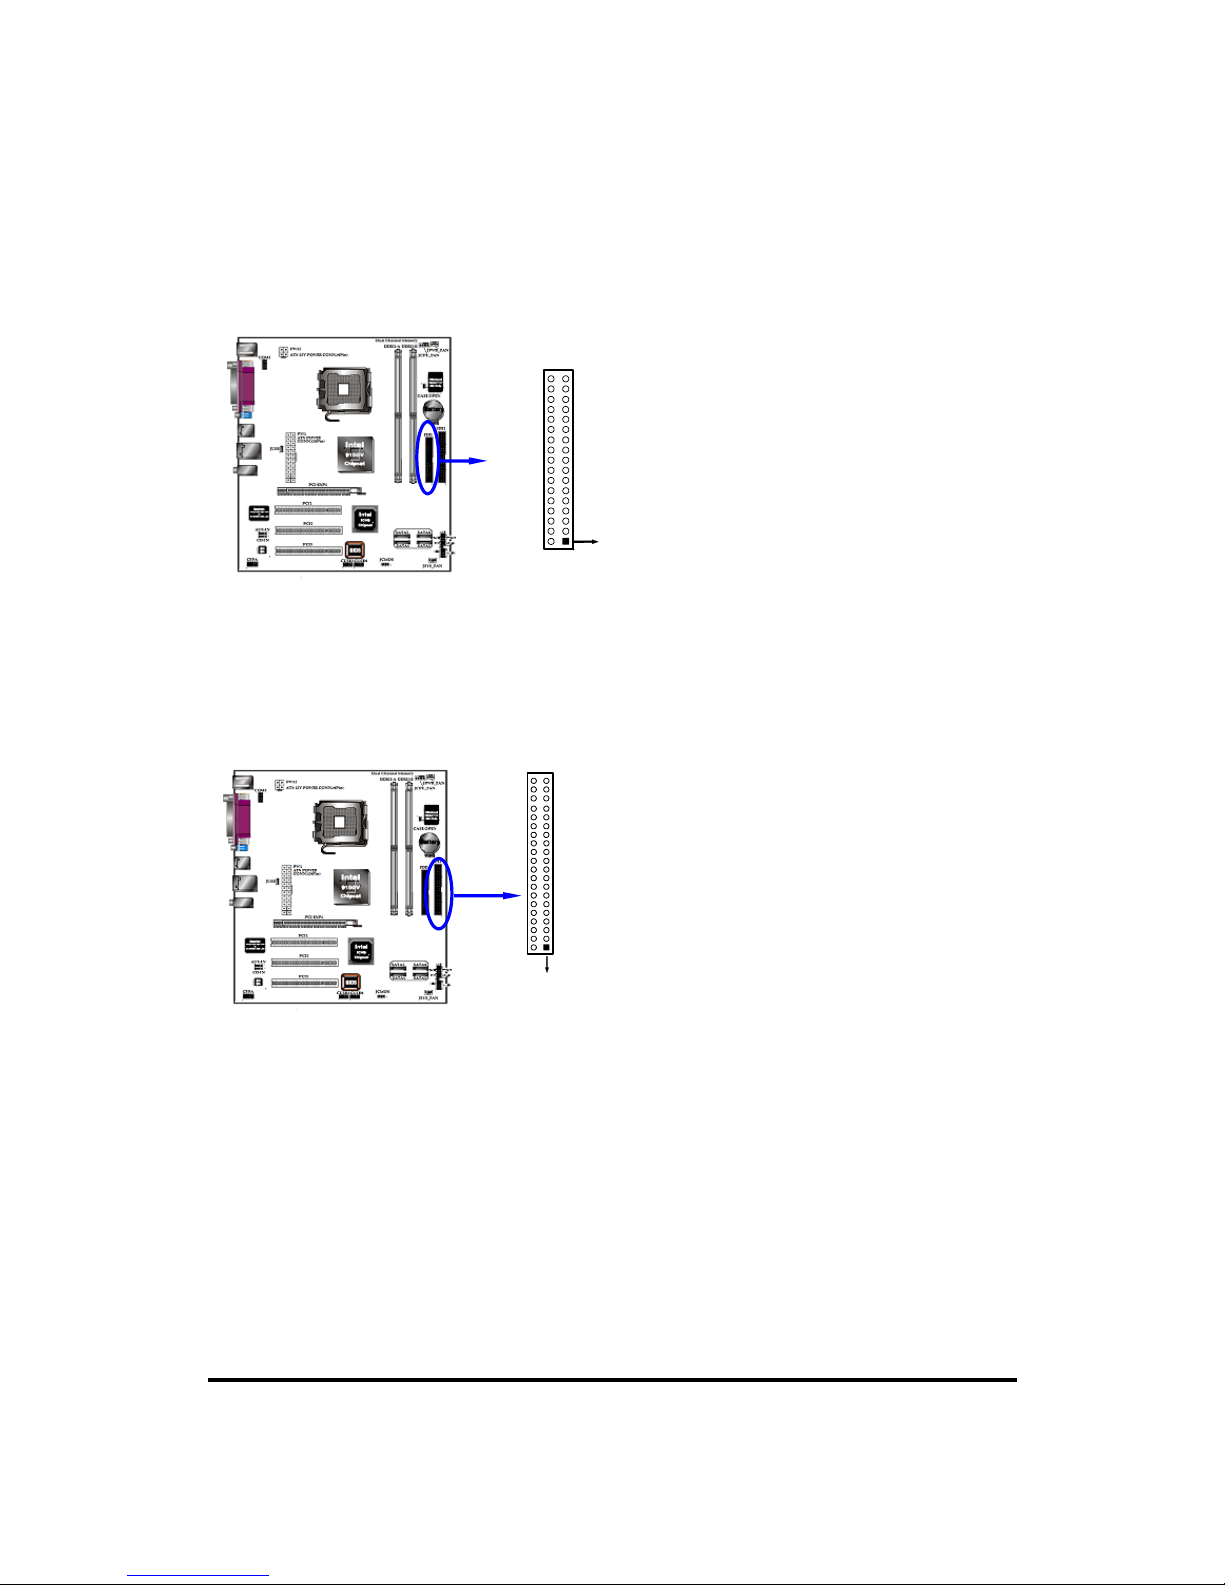
(10) Floppy drive Connector (34-pin block): FDD
This connector supports the provided floppy driv e ribbon cable. Aft er co nne cti ng th e
single plug end to motherboard, connect the two plugs at other end to the floppy
drives.
Floppy Drive Connector
Pin 1
FDD
(11) Primary IDE Connector (40-pin block): IDE1
This connector supports the provided IDE hard disk ribbon cable. After connecting
the single plug end to motherboard, connect the two plugs at other end to your hard
disk(s). If you install two hard disks, you must configure the second drive to Slave
mode by setting i ts jumpers accordingly . Please refer to the do cumentation of your
hard disk for the jumper settings.
Parallel IDE Connector
Pin 1
IDE1
Page 23
18
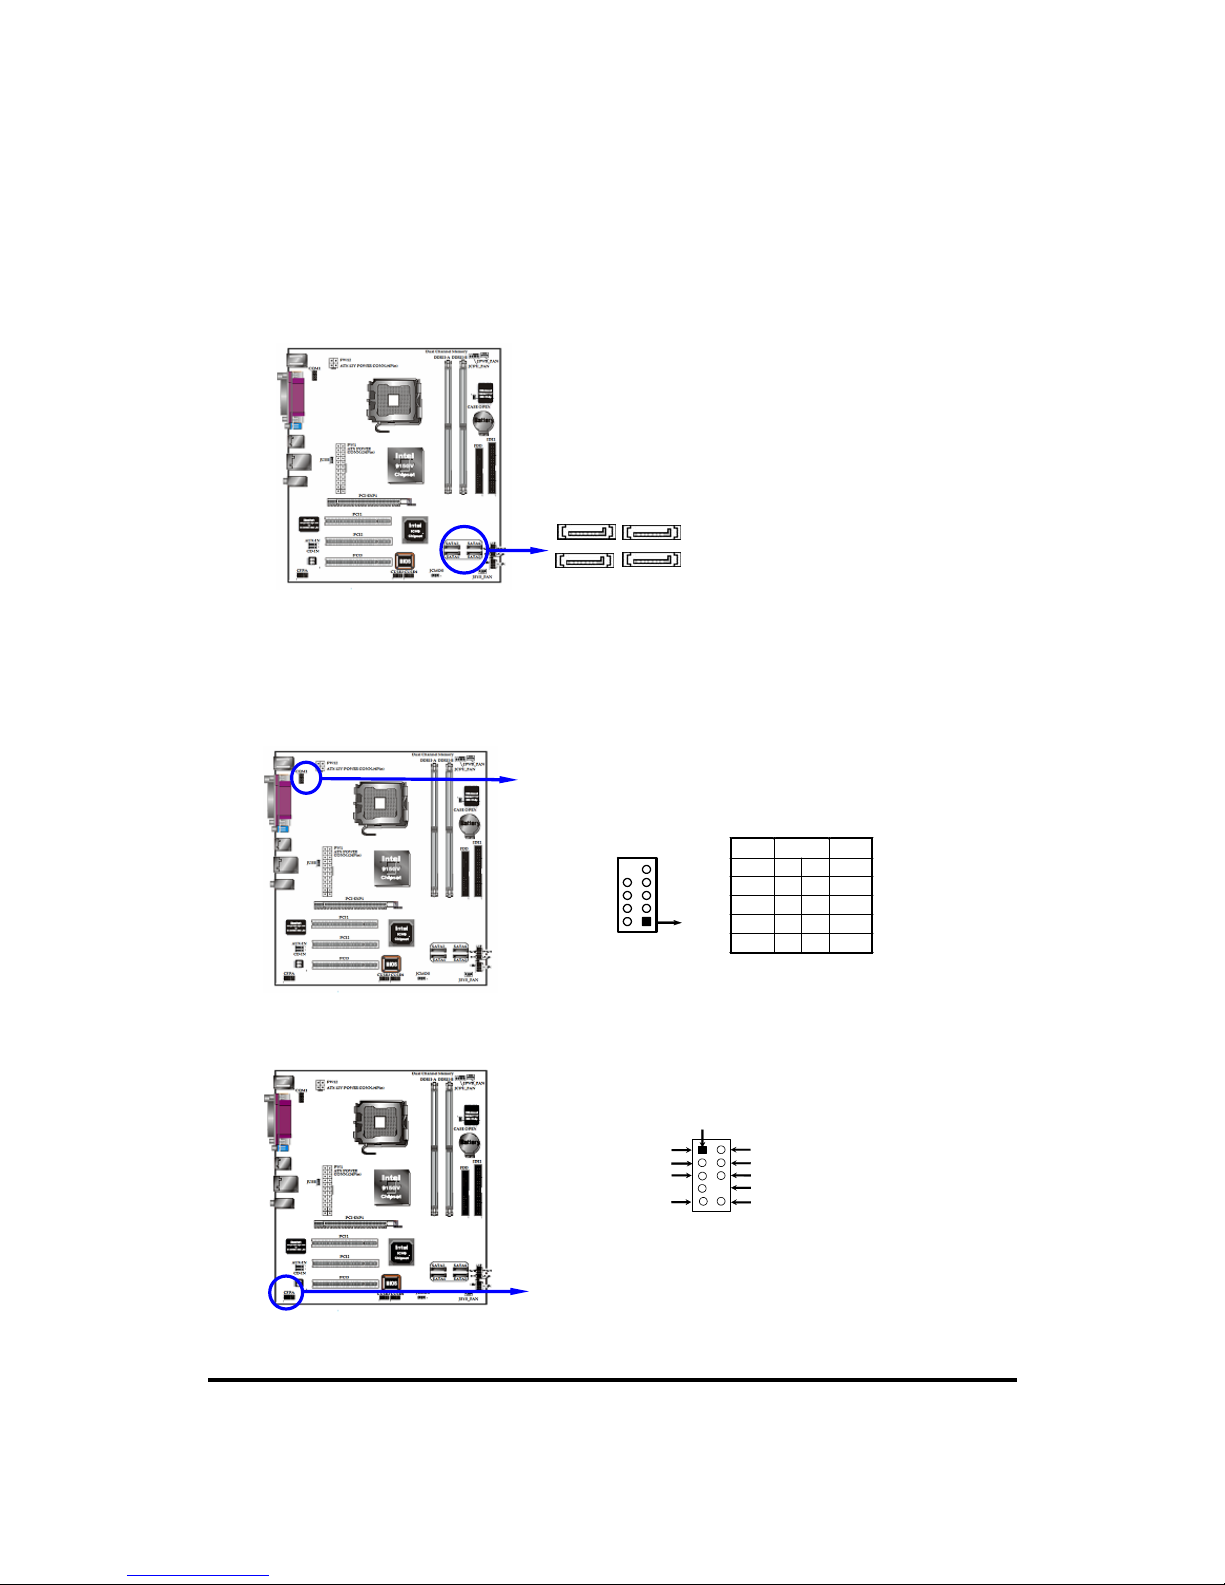
(12) Serial ATA SATA1, SATA2, SATA3, SATA4
This connector supports Serial ATA device. After connecting the single plug end to
motherboard, connect the plug at other end to the SATA device.
2-6-2 Headers
(1) Serial Port2 COM2 Header (9-pin) : J28
2) Line-Out, MIC Header (9-pin): AUDIO
This header connect to Front Panel Line-out, MIC connector with cable.
Line-Out, MIC Headers CFPA
A
UDIO
Pin 1
Mic_In
K
ey
Front Ln Out L
Front Ln Out
R
NC
Mic Ref
R
ea
r Ln
Out
FL
Rear Ln Out FR
+
5V
2
9 10
COM1
Pin 1
Signal Pin Signal
NC 10 5 GND
RI 9 4 TxD
CTS 8 3 SOUT
RTS 7 2 RxD
DSR 6 1 DCD
Serial Port COM1 Header
SATA1, SATA2, SATA3, SATA4
SATA2 SATA4
SATA1 SATA3
Page 24
19
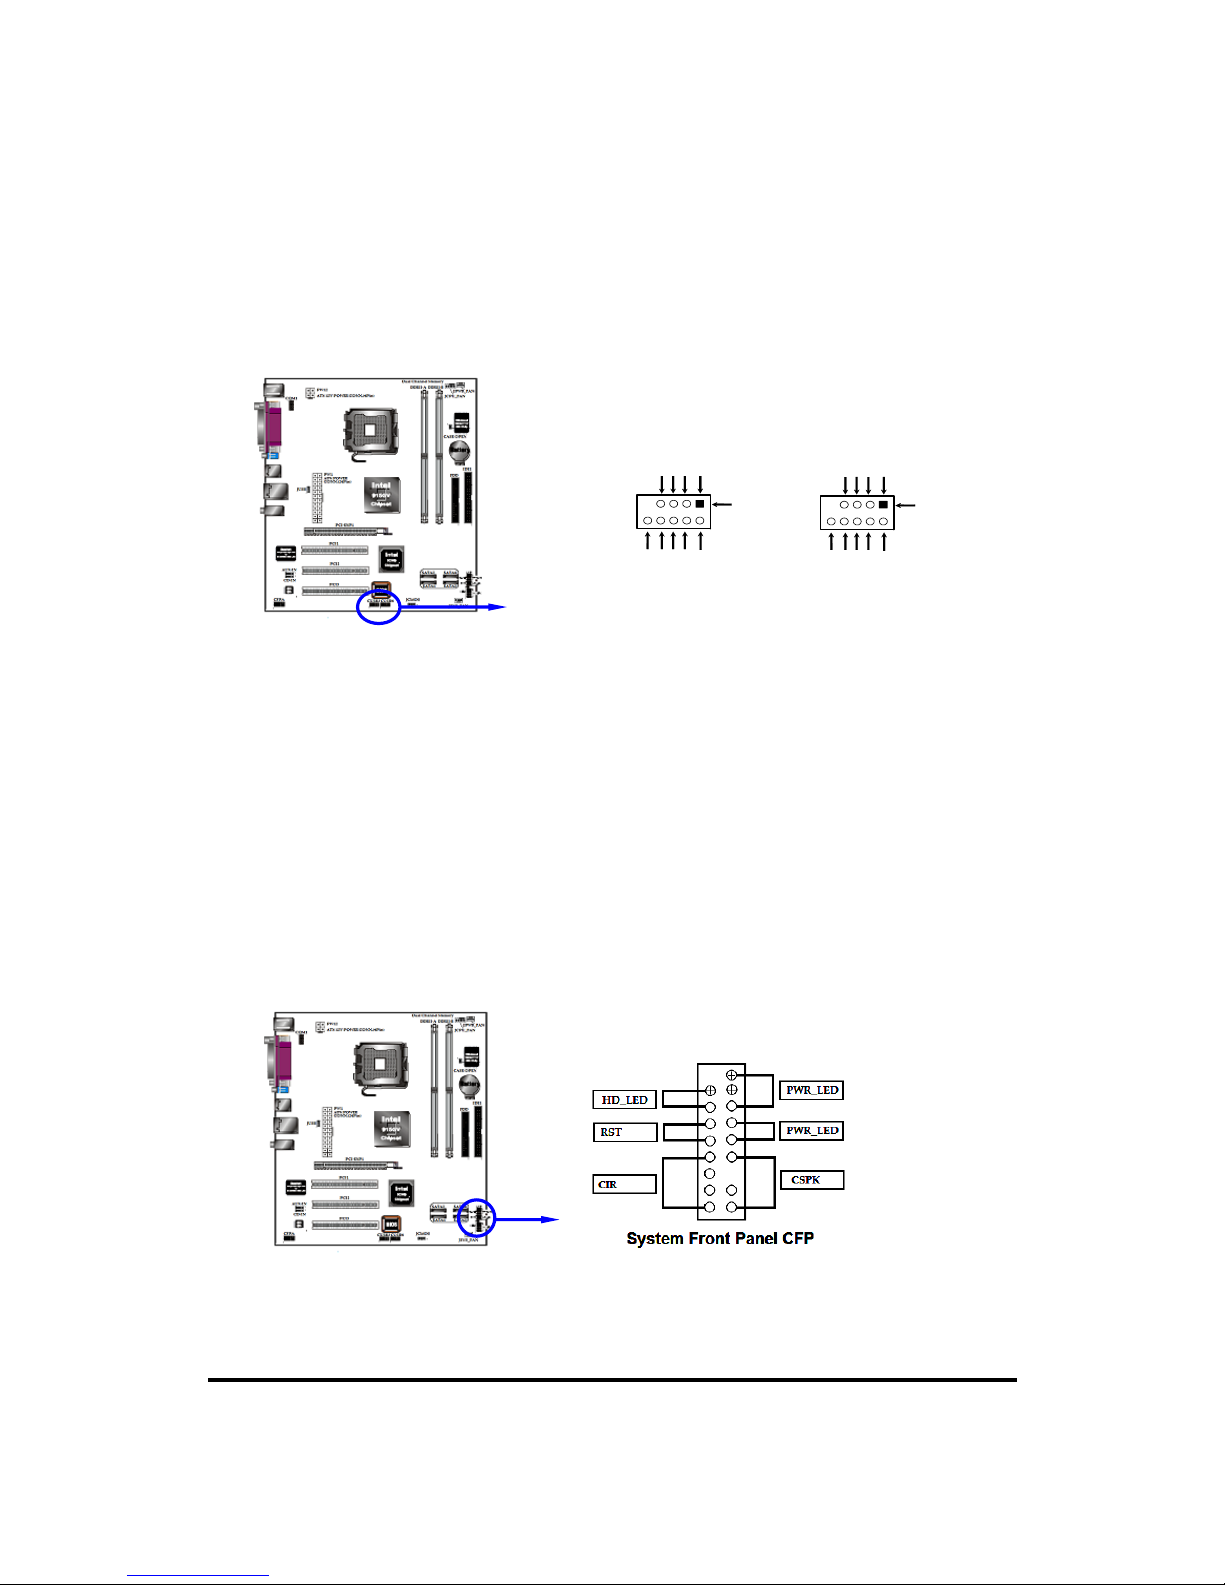
(3) Front USB Headers (9-pin) : CUSB3, CUSB4
These headers are used for connecting the ad ditional USB port plug. By attaching
an option USB cable, your can be provided with two additional USB plugs affixed
to the back panel.
USB Port Headers
Pin 1
USB6/7
VCC
-
DATA
GND
+DATA
VCC
NC
-
DATA
GND
+DATA
Pin 1
USB4/5
VCC
-
DATA
GND
+DATA
VCC
NC
-
DATA
GND
+DATA
(4) IDE Activity LED: IDE LED
This connector connects to the hard disk activity indicator light on the case.
(5) Reset switch lead: RESET
This 2-pin connector connects to the case-mounted reset switch for rebooting your
computer without having to turn off your power switch. This is a preferred method
of rebooting in order to prolong the lift of the system’s power supply. See the figure
below.
(6) Power LED
The Power LED is light on while the system power is on. Connect the Power LED
from the system case to this pin.
(8) Power switch: PWR BTN
This 2-pin connector connects to the case-mounted power switch to power ON/OFF
the system.
Page 25
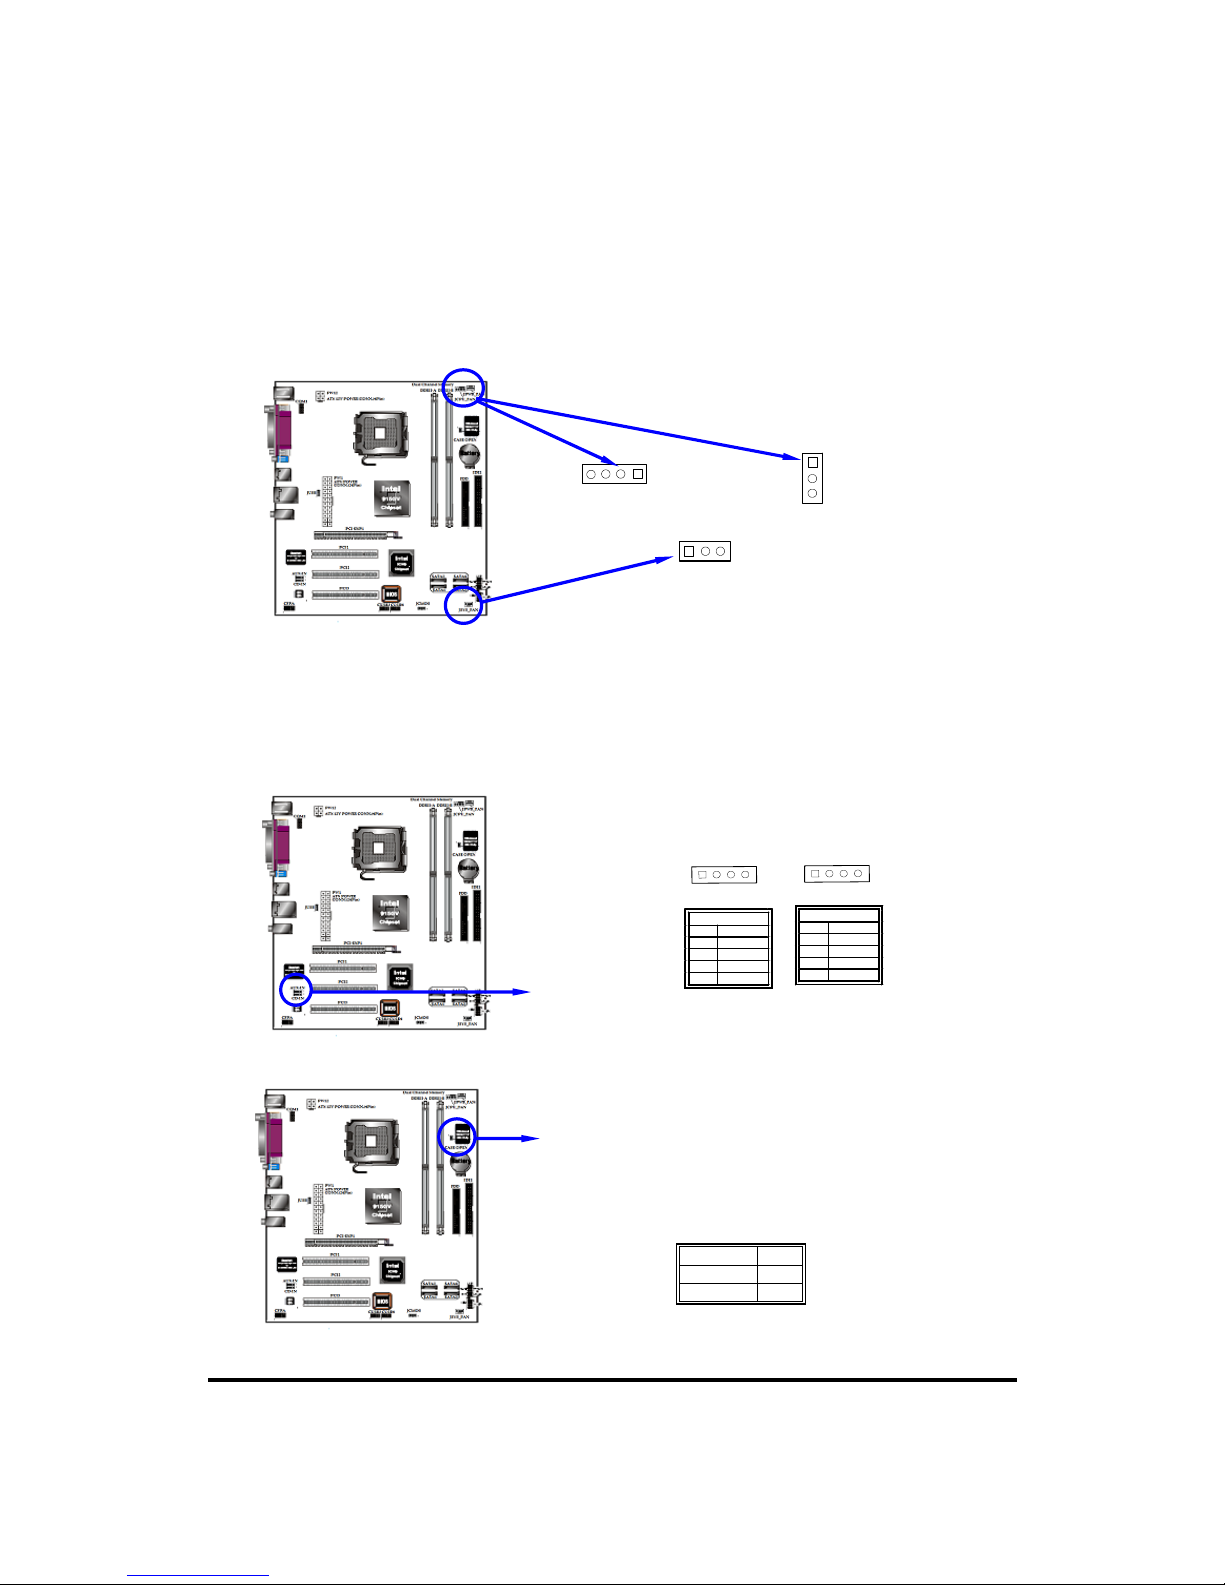
20
FAN Speed Headers
JCPU FAN
1
4
JPWR FAN
1
3
JSYS FAN
1 3
(9) FAN Speed Headers (3-pin) : Chassis FAN, SYSFAN, CPUFAN
These connectors support cooling fans, depending on the fan manufacturer, the wire
and plug may be different. The red wire should be positive, while the black should
be ground. Connect the fan’s plug to the board taking into consideration the polarity
of connector.
(10) CD Audio-In Headers (4-pin) : CDIN
CDIN are the connectors for CD-Audio Input signal. Please connect it to CD-ROM
CD-Audio output connector.
(11) Chassis Intrusion (J27)
Signal Pin
Chassis# 1
GND 2
J11
Pin Signal
1 CD-L
2 CD-GND
3 CD-GND
4 CD-R
J4
Pin Signal
1 AUX-L
2 AGND
3 AGND
4 AUX-R
CD-IN & AUX-IN Header
1 4
CD-IN
1 4
AUX-IN
Page 26

21
2-7 Starting Up Your Computer
1. After all connection are made, close your computer case cover.
2. Be sure all the switch are off, and check that the power supply input voltage is set to
the local voltage, usually in-put voltage is 220V∼240V or 110V∼120V depending on
your country’s voltage used.
3. Connect the power supply cord into the power supply located on the back of your
system case according to your system user’s manual.
4. Turn on your peripheral as following order:
a. Your monitor.
b. Other external peripheral (Printer, Scanner, External Modem etc…)
c. Your system power. For ATX power supplies, you need to turn on the power
supply and press the ATX power switch on the front side of the case.
5. The power LED on the front panel of the system case will light. The LED on the
monitor may light up or switch between orange and green after the system is on. If it
complies with green standards or if it is has a power standby feature. The system will
then run power-on test. While the test are running, the BIOS will alarm beeps or
additional message will appear on the screen.
If you do not see any thing within 30 seconds from the time you turn on the power.
The system may have failed on power-on test. Recheck your jumper settings and
connections or call your retailer for assistance.
Beep Meaning
One short beep when displaying logo No error during POST
Long beeps in an endless loop No DRAM install or detected
One long beep followed by three short beeps Video card not found or video card memory bad
High frequency beeps when system is working CPU overheated
System running at a lower frequency
6. During power-on, press <F2> key to enter BIOS setup. Follow the instructions in
BIOS SETUP.
7. Power off your computer: You must first exit or shut down your operating sy stem
before switch off the power switch. For ATX power supply, you can press ATX
power switching after exiting or shutting down your operating system. If you use
Windows 9X, 2K, XP, click “Start” button, click “Shut down” and then click “Shut
down the computer?” The power supply should turn off after windows shut down.
Page 27

22
Chapter 3
Introducing BIOS
The BIOS is a program located on a Flash Memory on the motherboard. This program is a bridge
between motherboard and the operating system. When starting up the computer, the BIOS program
gain control. The BIOS first operates a self-diagnostic test called POST (Power On Self Test) for
all the necessary hardware, it detects the entire hardware device and configures the parameters of
the hardware synchronization. Only when these tasks are completed done it gives up co ntrol of the
computer to operating system (OS). Since the BIOS is the only channel for hardware and software
to communicate, it is the key factor for system stability, and in ensuring that your system
performance as its best.
BIOS SETUP Program
Phoenix /Award provides a highly efficient and maintainable system BIOS for MX855-LC. The
concise user interface and clear explanations help customer easily modify the BIOS parameters via
the BIOS SETUP program.
The BIOS Flash ROM on the motherboard stores the SETUP program. When you start up the
computer, the system provides you the opportunity to run this program. This appears during the
Power-On Self Test (POST). Press <Del> to call up the SETUP Program. If you are late in
pressing the mentioned key and operating system is started, you will need to shutdown the
operating system, restart the system and repeat the process again.
The SETUP program is a menu-driven program. You can scroll through the various menus and
make your selections among the predetermined choices in just a few keystrokes.
To access the BIOS SETUP program, press the <Del> key after the computer has run through its
POST. Your computer manufacturer may use a key other than <Del> key to invoke the SETUP
program. BIOS POST screen displays the SETUP key assignment for these BIOS on the bottom of
the POST screen.
NOTE: Because the BIOS software is constantly being updated, the following BIOS screens and
Page 28

23
descriptions are for reference purposes only and may not reflect your BIOS screens exactly.
In the BIOS Setup main menu of Figure 3-1, you can see several options. We will explain these options
step by step in the following pages of this chapter , but let us first see a short description of the
function keys you may use here:
•
Press <Esc> to quit the BIOS Setup.
•
Press
↑↓←→
(up, dow n, left, right) to cho ose, in the main menu, the option you want to
confirm or to modify.
•
Press <F10> when you have completed the setup of BIOS parameters to save these parameters
and to exit the BIOS Setup menu.
•
Press Page Up/Page Down or +/– keys when you want to modify the BIOS parameters for the
active option.
3-1 Entering Setup
Power on the computer and by pressing <Del> immediately allows you to enter Setup.
If the message disappears before your respond and you still wish to enter Setup, restart the system to try
again by turning it OFF then ON or pressing the “RESET” button on the system case. You may
also restart by simultaneously pressing <Ctrl>, <Alt> and <Delete> keys. If you do not press the
keys at the correct time and the system does not boot, an error message will be displayed and you
will again be asked to
Press <F1> to continue, <Ctrl-Alt-Esc> or <Del> to enter Setup
3-2 Getting Help
Main Menu
The on-line description of the highlighted setup function is displayed at the bottom of the
screen.
Status Page Setup Menu/Option Page Setup Menu
Press F1 to pop up a small help window that describes the appropriate keys to use
and the possible selections for the highlighted item. To exit the Help Window,
press <Esc>.
3-3 The Main Menu
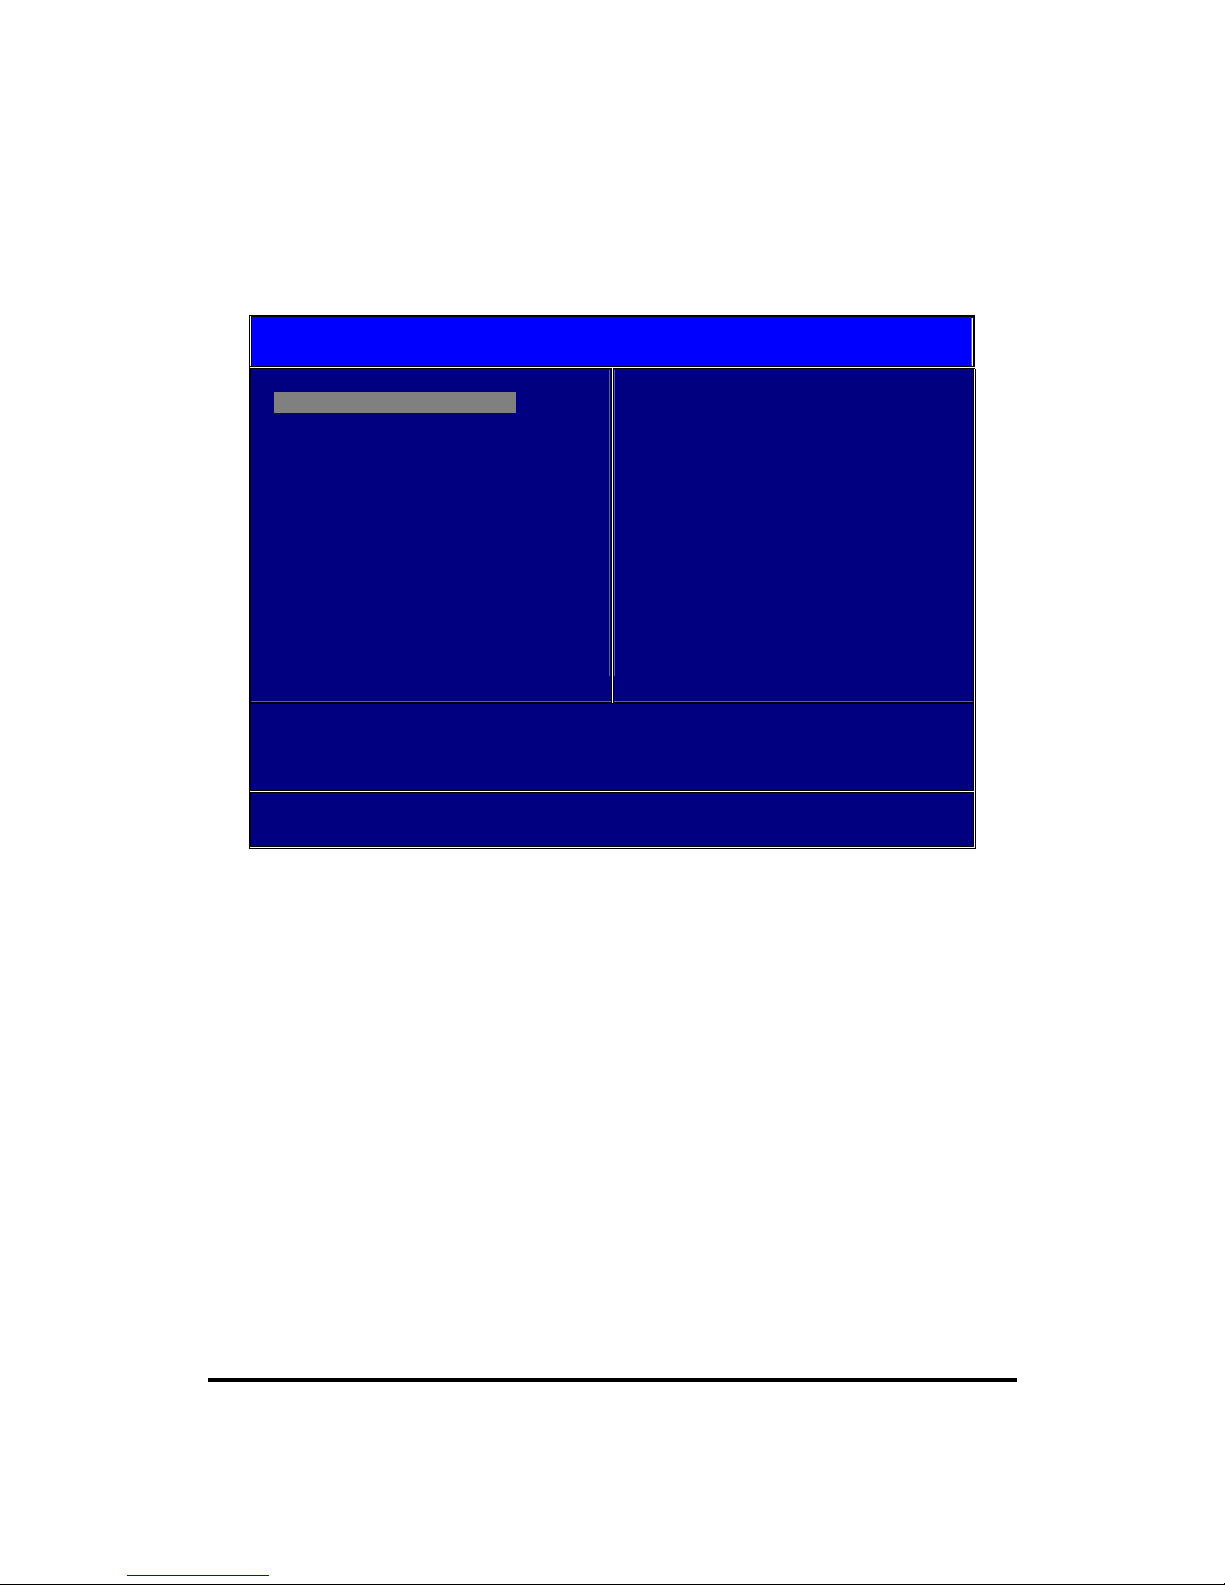
Once you enter Award® BIOS CMOS Setup Utility, the Main Menu (Figure 3-1) will appear
on the screen. The Main Menu allows you to select from fourteen setup functions and two
Page 29
24
exit choices. Use arrow keys to select among the items and press <Enter> to accept or
enter the sub-menu.
Phoenix – AwardBIOS CMOS Setup Utility
Standard CMOS Features
Advanced BIOS Features
Advanced Chipset Features
Integrated Peripherals
Power Management Setup
PnP/PCI/PCI-E Configurations
PC Health Status
Power BIOS Features
Load Fail-Safe Defaults
Load Optimized Defaults
Set Supervisor Password
Set User Password
Save & Exit Setup
Exit Without Saving
Esc : Quit
↑↓→ ←
: Select Item
F10 : Save & Exit Setup
Time, Date, Hard Disk Type...
Figure 3-1
Page 30

25
3-4 Standard CMOS Features
The items in Standard CMOS Setup Menu are divided into several categories. Each category
includes no, one or more than one setup items. Use the arrow keys to highlight the item
and then use the <PgUp> or <PgDn> keys to select the value you want in each item.
Phoenix – AwardBIOS CMOS Setup Utility
Standard CMOS Features
Item Help
Date (mm:dd:yy) Tue, Dec, 16 2005
Time (hh:mm:ss) 11 : 26 : 48
► IDE Primary Master None
► IDE Primary Slave None
► IDE Secondary Master None
► IDE Secondary Slave None
► SATA Channel 1 None
► SATA Channel 2 None
► SATA Channel 3 None
► SATA Channel 4 None
Drive A 1.44M, 3.25 in.
Halt On All,But Keyboard
Base Memory 640K
Extended Memory 56320K
Total Memory 57344K
Menu Level >
Change the day, month,
year and century
↑↓→←
Move Enter:Select +/-/PU/PD:Value F10:Save ESC:Exit F1:General Help
F5:Previous Values F6: Fail-Safe Defaults F7: Optimized Defaults
Date
The date format is <day><month><date><year>.
Day Day of the week, from Sun to Sat, determined by BIOS. Read-only.
Month
The month from Jan. through Dec.
Page 31

26
Date
The date from 1 to 31 can be keyed by numeric function keys.
Year
The year depends on the year of the BIOS.
Time
The time format is <hour><minute><second>.
Primary Master/Primary Slave
Secondary Master/Secondary Slave
Press PgUp/<+> or PgDn/<–> to select Manual, None, Auto type. Note that the
specifications of your drive must match with the drive table. The hard disk will not
work properly if you enter improper information for this category. If your hard disk
drive type is not matched or listed, you can use Manual to define your own drive ty pe
manually.
If you select Manual, related information is asked to be entered to the following items.
Enter the information directly from the keyboard. This information should be
provided in the documentation from your hard disk vendor or the system manufacturer.
If the controller of HDD interface is SCSI, the selection shall be “None”.
If the controller of HDD interface is CD-ROM, the selection shall be “None”
Access Mode
The settings are Auto Normal, Large, and LBA.
Cylinder
number of cylinders
Head
number of heads
Precomp
write precomp
Landing Zone
landing zone
Sector
number of sectors
Page 32

27
3-5 Advanced BIOS Features
Phoenix – AwardBIOS CMOS Setup Utility
Advanced BIOS Features
Item Help
► CPU Feature [Press Enter]
► Hard Disk Boot Priority [Press Enter]
CPU L1 & L2 Cache [Enabled]
First Boot Device [Floppy]
Second Boot Device [HDD-0]
Third Boot Device [CDROM]
Boot other Device [Enabled]
Boot Up Floppy Seek [Enabled]
Boot Up NumLock Status [On]
Security Option [Setup]
APIC Mode [Enabled]
HDD S.M.A.R.T Capability [Disabled]
Menu Level >
↑↓→←
Move Enter:Select +/-/PU/PD:Value F10:Save ESC:Exit F1:General Help
F5:Previous Values F6: Fail-Safe Defaults F7: Optimized Defaults
CPU Feature
Hard Disk Boot Priority
Allow you to select Hard Disk boot Priority.
Thermal Management
Select type of thermal management for On die throttling, or Ratio & VID transistion.
Limit CPUID MaxVal
Set limit CPUID MaxVal to 3, should be set to disabled for WinXP
Execute Disable Bit
When this feature is set to disabled, Forcing the XD feature flag to always return 0.
Page 33

28
3-5-1 CPU Feature
Phoenix – AwardBIOS CMOS Setup Utility
Advanced Chipset Features
Item Help
TM1 Function [Enabled]
Delay Prior to Thermal [16 Min]
Thermal Management [Thermal Monitor 1]
X TM2 Bus Ratio 14 X
X TM2 Bus VID 1.3875V
Intel Enhanced Debug [Disabled]
Limit CPUID MaxVal [Disabled]
Execute Disable Bit [Enabled]
Menu Level >
↑↓→←
Move Enter:Select +/-/PU/PD:Value F10:Save ESC:Exit F1:General Help
F5:Previous Values F6: Fail-Safe Defaults F7: Optimized Defaults
3-5-2 Hard Disk Boot Priority
Phoenix – AwardBIOS CMOS Setup Utility
Hard Disk Boot Priority
Item Help
1. Bootable Add-In Cards
Menu Level >
↑↓→←
Move Enter:Select +/-/PU/PD:Value F10:Save ESC:Exit F1:General Help
F5:Previous Values F6: Fail-Safe Defaults F7: Optimized Defaults
Hard Disk Boot Priority
Use arrow key to select which boot device has higher priority.
Page 34

29
3-6 Advanced Chipset Features
Phoenix – AwardBIOS CMOS Setup Utility
Advanced Chipset Features
Item Help
DRAM Timing Selectable [By SPD]
X CAS Latency Time 4
X DRAM RAS# to CAS# Delay 4
X DRAM RAS# Precharge 4
X Precharge delay (tRAS) 11
System BIOS Cacheable [Enabled]
Video BIOS Cacheable [Disabled]
** VGA Setting **
On-Chip Frame Buffer Size [32MB]
DVMT Mode [DVMT]
DVMT Fixed Memory Size [128MB]
Menu Level >
↑↓→←
Move Enter:Select +/-/PU/PD:Value F10:Save ESC:Exit F1:General Help
F5:Previous Values F6: Fail-Safe Defaults F7: Optimized Defaults
DRAM Timing Selectable:
Select the DRAM timing for SPD or Manual
CAS Latency Time:
This Option allow to select the DRAM CAS latency depend on the module specs.
Available choice: 2 or 2.5.
DRAM RAS# To CAS# Delay:
This field allow you to insert a timing delay between the CAS and RAS strobe.
Avalable choice: 2 or 3.
DRAM RAS# Precharge:
Page 35

30
Available choice : 2 or 3.
System BIOS Cacheable
:
This option allow you to Enable or Disable the system BIOS to be cache to DRAM.
Available choice: Enabled or Disabled.
Video BIOS Cacheable:
This Option Allow you to Enable or Disable the video BIOS to be cache to DRAM.
Available choice: Enabled or Disabled.
On-Chip Frame Buffer Size:
This item allows you to set the on-chip frame buffer size.
Available choice: 1M, 8M.
DVMT Mode:
This item allows you to select the Intel Dynamic Video Memory to a fixed, Dynamic
or Both.
DVMT/FIXED Memory Size:
This item allows you to select the DVMT/ Fixed Memory Size.
Available choice: 64 or 128.
Page 36
31
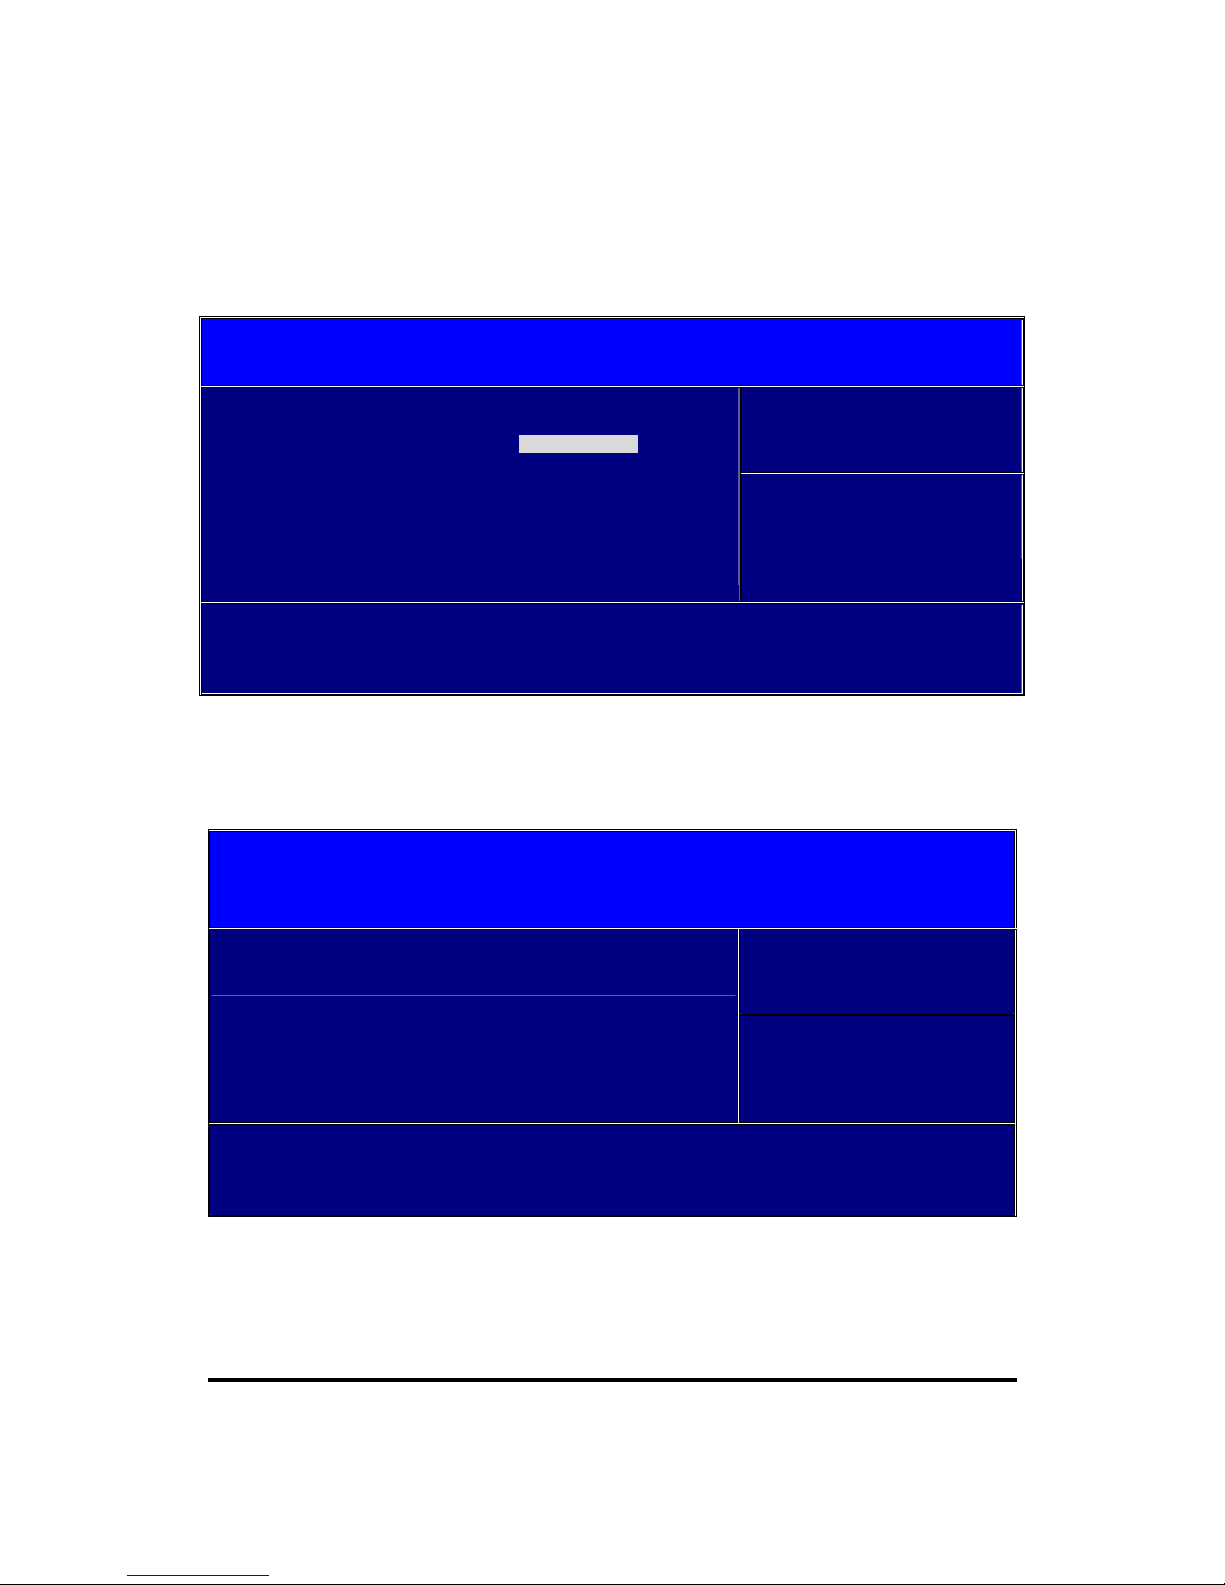
3-7 Integrated Peripherals
Phoenix – AwardBIOS CMOS Setup Utility
Integrated Peripherals
Item Help
► PCI Express Function [Press Enter]
► Chipset IDE Devices [Press Enter]
► Onboard Devices [Press Enter]
► Legacy Devices [Press Enter]
RealTek LAN Boot ROM [Disable]
Menu Level >
↑↓→←
Move Enter:Select +/-/PU/PD:Value F10:Save ESC:Exit F1:General Help
F5:Previous Values F6: Fail-Safe Defaults F7: Optimized Defaults
3-7-1 PCI Express Function
Phoenix – AwardBIOS CMOS Setup Utility
PCI Express Function
Item Help
PCI-E X1 FUNC 1 (PCI-Exp1) [Disabled]
PCI-E Compliancy Mode [v1.0a]
Menu Level >>
↑↓→←
Move Enter:Select +/-/PU/PD:Value F10:Save ESC:Exit F1:General Help
F5:Previous Values F6: Fail-Safe Defaults F7: Optimized Defaults
Page 37

32
3-7-2 Chipset IDE Devices
Phoenix – AwardBIOS CMOS Setup Utility
Chipset IDE Devices
Item Help
Delay For HDD (Secs) [0]
IDE HDD Block Mode [Enabled]
IDE DMA Transfer Access [Enabled]
Chipset Primary PCI IDE [Enabled]
IDE Primary Master PIO [Auto]
IDE Primary Slave PIO [Auto]
IDE Primary Master UDMA [Auto]
IDE Primary Slave UDMA [Auto]
Chipset Secondary PCI IDE [Enabled]
IDE Secondary Master PIO [Auto]
IDE Secondary Slave PIO [Auto]
IDE Secondary Master UDMA [Auto]
IDE Secondary Slave UDMA [Auto]
*** Chipset Serial ATA Setting ***
Chipset Serial SATA [Auto]
X PATA IDE Mode Primary
SATA Port S2, S4 is Secondary
Menu Level >>
↑↓→←
Move Enter:Select +/-/PU/PD:Value F10:Save ESC:Exit F1:General Help
F5:Previous Values F6: Fail-Safe Defaults F7: Optimized Defaults
Page 38

33
3-7-3 Legacy Devices
Phoenix – AwardBIOS CMOS Setup Utility
Onboard Devices
Item Help
USB Controller [Enable]
USB 2.0 Controller [Enable]
USB Keyboard Support [Disabled]
USB Mouse Support [Disabled]
AC97 Audio [Auto]
RealTek LAN Device [Enabled]
Menu Level >>
↑↓→←
Move Enter:Select +/-/PU/PD:Value F10:Save ESC:Exit F1:General Help
F5:Previous Values F6: Fail-Safe Defaults F7: Optimized Defaults
USB Controller :
This Option Allow you to Enabled or Disabled the onboard USB controller.
Available choice: Enabled or Disabled.
USB 2.0 Controller:
This Option Allow you to Enabled or Disabled onboard USB 2.0 or 1.1 only.
Available choice: Enabled or Disabled.
USB Keyboard Support:
This Option Allow you to Enabled or Disabled the USB keyboard legacy supports.
Available choice: Enabled or Disabled.
USB Mouse Support:
This Option Allow you to Enabled or Disabled USB mouse legacy supports.
Available choice: Enabled or Disabled.
AC97 Audio:
This Option Allow you to Disable the onboard AC97 Audio.
Available choice: Auto or Disabled.
Page 39

34
3-7-4 Legacy Devices
Phoenix – AwardBIOS CMOS Setup Utility
Legacy Devices
Item Help
Onboard FDC Controller [Enabled]
Onboard Serial Port 1 [3F8/IRQ4]
Infrared Prot Select [2F8/IRQ3]
Onboard Parallel Port [378/IRQ7]
Parallel Port Mode [SPP]
EPP Mode Select [EPP1,7]
ECP Mode Use DMA [3]
Menu Level >>
↑↓→←
Move Enter:Select +/-/PU/PD:Value F10:Save ESC:Exit F1:General Help
F5:Previous Values F6: Fail-Safe Defaults F7: Optimized Defaults
Onboard FDD Controller:
Select Enabled if your system has a floppy disk controller (FDD) installed on the system board and
you wish to use it. If you install add-on FDC or the system has no floppy drive, select Disabled in
this field. The settings are: Enabled and Disabled.
Onboard Serial Port /Infrared Port:
Select an address and corresponding interrupt for the first and the second serial ports.
Available settings are: 3F8/IRQ4, 2E8/IRQ3, 3E8/IRQ4, 2F8/IRQ3, Disabled, Auto.
Infrared Port :
This item allows you to select InfraRed(IR) port I/O address and IRQ uses.
Available settings are: 3F8/IRQ4, 2E8/IRQ3, 3E8/IRQ4, 2F8/IRQ3, Disabled, Auto.
Onboard Parallel Port:
There is a built-in parallel port on the on-board Super I /O chipset that Pro vides Standard , ECP, and
EPP features. It has the following option:
Disabled
(3BCH/IRQ7)/
Line Printer port 0
Page 40

35
(278H/IRQ5)/
Line Printer port 2
(378H/IRQ7)
Line Pr inter port 1
Parallel Port Mode
SPP : Standard Parallel Port
EPP : Enhanced Parallel Port
ECP : Extended Capability Port
SPP/EPP/ECP/ECP+EPP
To operate the onboard parallel port as Standard Parallel Port only, choose “SPP.” To operate
the onboard parallel port in the EPP modes simultaneously, choose “EPP.” By choosing
“ECP”, the onboard parallel port will operate in ECP mode only. Choosing “ECP+EPP” will
allow the onboard parallel port to support both the ECP and EPP modes simultaneously. The
ECP mode has to use the DMA channel, so choose the onboard parallel port with the ECP
feature. After selecting it, the following message will appear: “ECP Mode Use DMA” at this
time, the user can choose between DMA channels 3 to 1. The onboard parallel port is EPP
Spec. compliant, so after the user chooses the onboard parallel port with the EPP function, the
following message will be displayed on the screen: “EPP Mode Select.” At this time either
EPP 1.7 spec. or EPP 1.9 spec. can be chosen.
Page 41

36
3-8 Power Management Setup
CMOS Setup Utility – Copyright(C) 1984-2002 Award Software
Power Management Setup
Item Help
ACPI Suspend Type [Enable]
X Run VGABIOS if S3 Resume Auto
X S3 KB Wake-up Function AnyKey
POWER ON Function [Hot Key]
X KB Power ON Password Enter
Hot Key Power ON [Ctrl-F1]
PWRON After PWR-Fail [Off]
Video Off Method [DPMS]
Suspend Mode [Disabled]
HDD Power Down [Disabled]
Soft-Off by PWR-BTTN [Instant-Off]
Wake-Up by PCI card [Disable]
Power On by Ring [Disabled]
Resume by Alarm [Disable]
x Date<of Month> Alarm 0
x
Time<hh:mm:ss> Alarm 0:0:0
Menu Level >
↑↓→←
Move Enter:Select +/-/PU/PD:Value F10:Save ESC:Exit F1:General Help
F5:Previous Values F6: Fail-Safe Defaults F7: Optimized Defaults
ACPI Suspend Type:
This option allows you to select ACPI suspend mode.
Available choice: S1, S3 or S1 & S3.
Page 42

37
POWER ON Function:
This items allows you to select how to power on the system.
Available choice: Password, Hot Key, Mouse Left, Mouse Right, Any Key, Button Only,
Keyboard 98.
PWRON After PWR-Fail:
This item allows you to select system power status after power lost.
Available choice: Off, On, Former Sts.
Wake-Up by PCI card
When Disabled is selected, the system will ignore any incoming call from the PCI card/modem.
When Enabled is selected, the system will boot up if there’s an incoming call from the PCI card
/modem.
Resume by Alarm
This function is for setting date and time for your computer to boot up. During Disabled, you
cannot use this function. During Enabled, choose the Date and Time Alarm:
Date(of month) Alarm
You can choose which month the system will boot up. Set to 0, to boot every day.
Time(hh:mm:ss) Alarm
You can choose what hour, minute and second the system will boot up.
Note: If you have change the setting, you must let the system boot up until it goes to
the operating system, before this function will work
PM Timer Reload Events
Page 43

38
3-9 PnP/PCI/PCI-E Configuration
Phoenix – AwardBIOS CMOS Setup Utility
PnP/PCI/PCI-E Configuration
Item Help
Init Display First [PCI Slot]
Resources Controlled By [Auto]
x IRQ Resources Press Enter
PCI/VGA Palette Snoop [Disabled]
** PCI Express related item **
Maximum Payload Size [4096]
Menu Level >
↑↓→←
Move Enter:Select +/-/PU/PD:Value F10:Save ESC:Exit F1:General Help
F5:Previous Values F6:Fai-Safe Defaults F7:Optimized Defaults
Init Display First:
This item allows you to select which display will be initialize first, if you would like to use
a PCI display card as primary display, you will have to select PCI slot, but if the primary
display is onboard graphics controller then select onboard
Available choice: PCI Slot, Onboard or PCIEx.
Resource Controlled By:
The Award Plug and Play BIOS has the capacity to automatically configure all of the boot
and Plug and Play compatible devices. However, this capability means absolutely nothing
unless you are using a Plug and Play operating system such as Windows
®
95/98. If you
set this field to “manual” choose specific resources by going into each of the sub menu
that follows this field (a sub menu is preceded by a “>”).
The settings are: Auto(ESCD), Manual.
IRQ Resources:
When resources are controlled manually, assign each system interrupt a type, depending
on the type of device us ing the interrupt.
Please refer to section 3-9-1
Page 44
39
PCI/VGA Palette Snoop:
Leave this field at Disabled. The settings are Enabled, Disabled.
Maximum Payload Size:
This item allows you to select the PCIE data packet payload size.
Available choice: 128, 256, 512, 1024, 2048 or 4096.
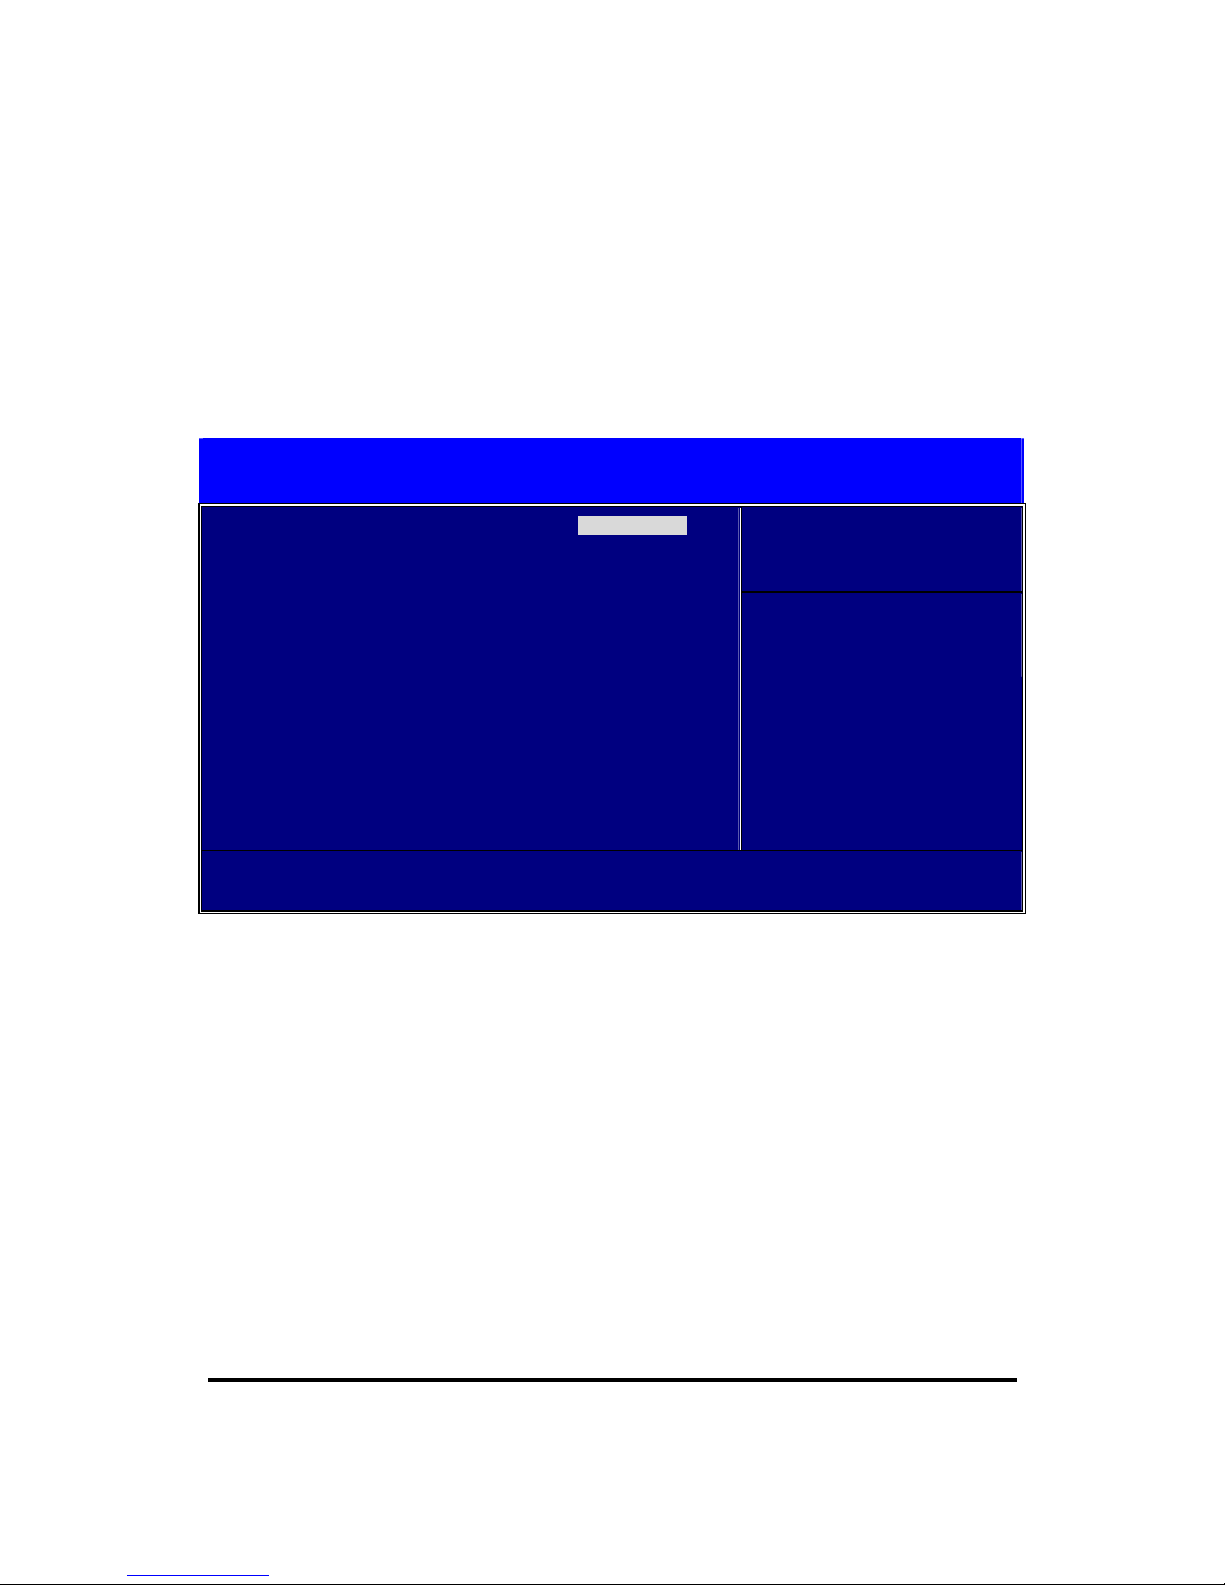
3-9-1 IRQ Resources
Phoenix- AwardBIOS CMOS Utility
IRQ Resources
Item Help
IRQ-3 assigned to [PCI Device]
IRQ-4 assigned to [PCI Device]
IRQ-5 assigned to [PCI Device]
IRQ-7 assigned to [PCI Device]
IRQ-9 assigned to [PCI Device]
IRQ-10 assigned to [PCI Device]
IRQ-11 assigned to [PCI Device]
IRQ-12 assigned to [PCI Device]
IRQ-14 assigned to [PCI Device]
IRQ-15 assigned to [PCI Device]
Menu Level >>
↑↓→←
Move Enter:Select +/-/PU/PD:Value F10:Save ESC:Exit F1:General Help
F5:Previous Values F6:Optimized Defaults F7:Standard Defaults
Page 45
40
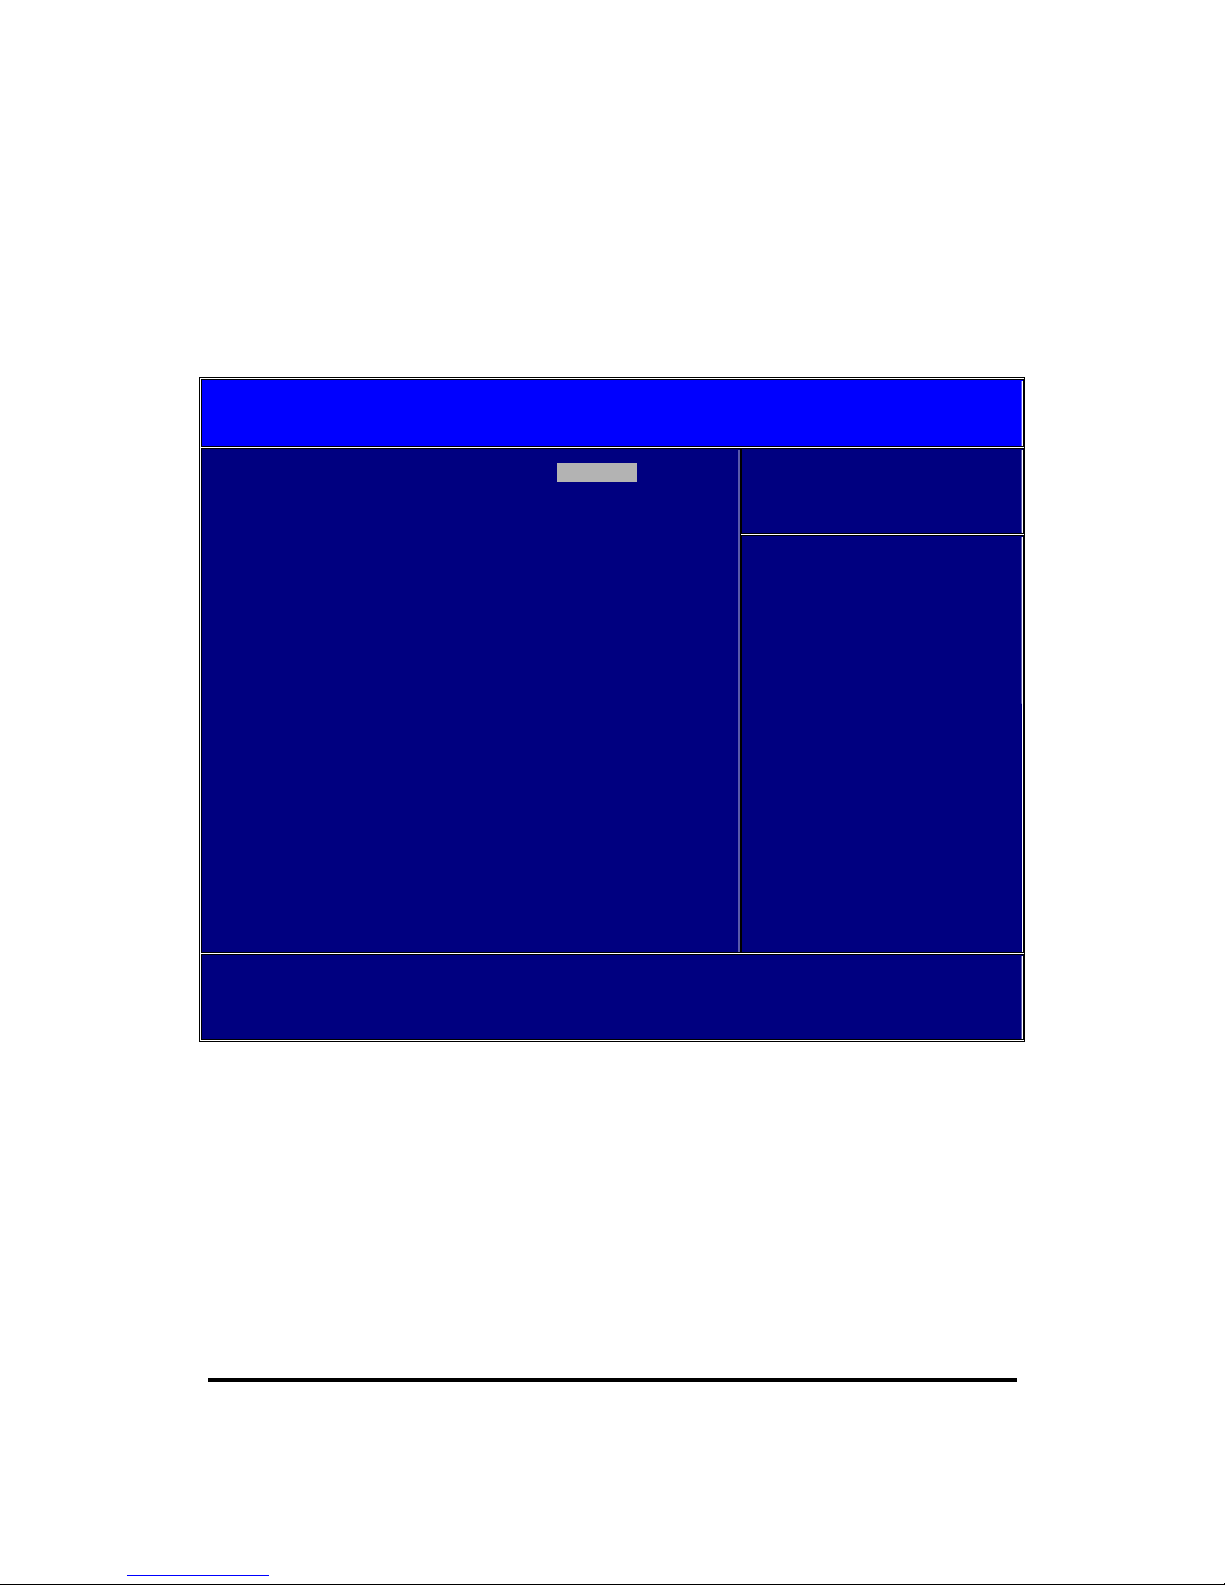
3-10 PC Health Status
This section shows the Status of you CPU, Fan, Warning for overall system status. This is
only available if there is Hardware Monitor onboard.
Phoenix – AwardBIOS CMOS Setup Utility
PC Health Status
Item Help
ACPI Shutdown Temperature [Disabled]
Current System Temperature 35°C/ 95°F
Current CPU Temperature 35°C/ 95°F
Current FAN CHASSIS Speed 0 RPM
Current CPU Fan Speed 5649 RPM
Current PWR Fan Speed 3920 RPM
Vcore 1.36 V
VChip 1.50 V
+12V 11.54 V
VDIMM 1.84 V
VCC (V) 5.07 V
VBAT(V) 3.28 V
5VSB(V) 4.98 V
CPU Fan Auto Control [Disable]
Menu Level >
↑↓→←
Move Enter:Select +/-/PU/PD:Value F10:Save ESC:Exit F1:General Help
F5:Previous Values F6: Fail-Safe Defaults F7: Optimized Defaults
Page 46
41
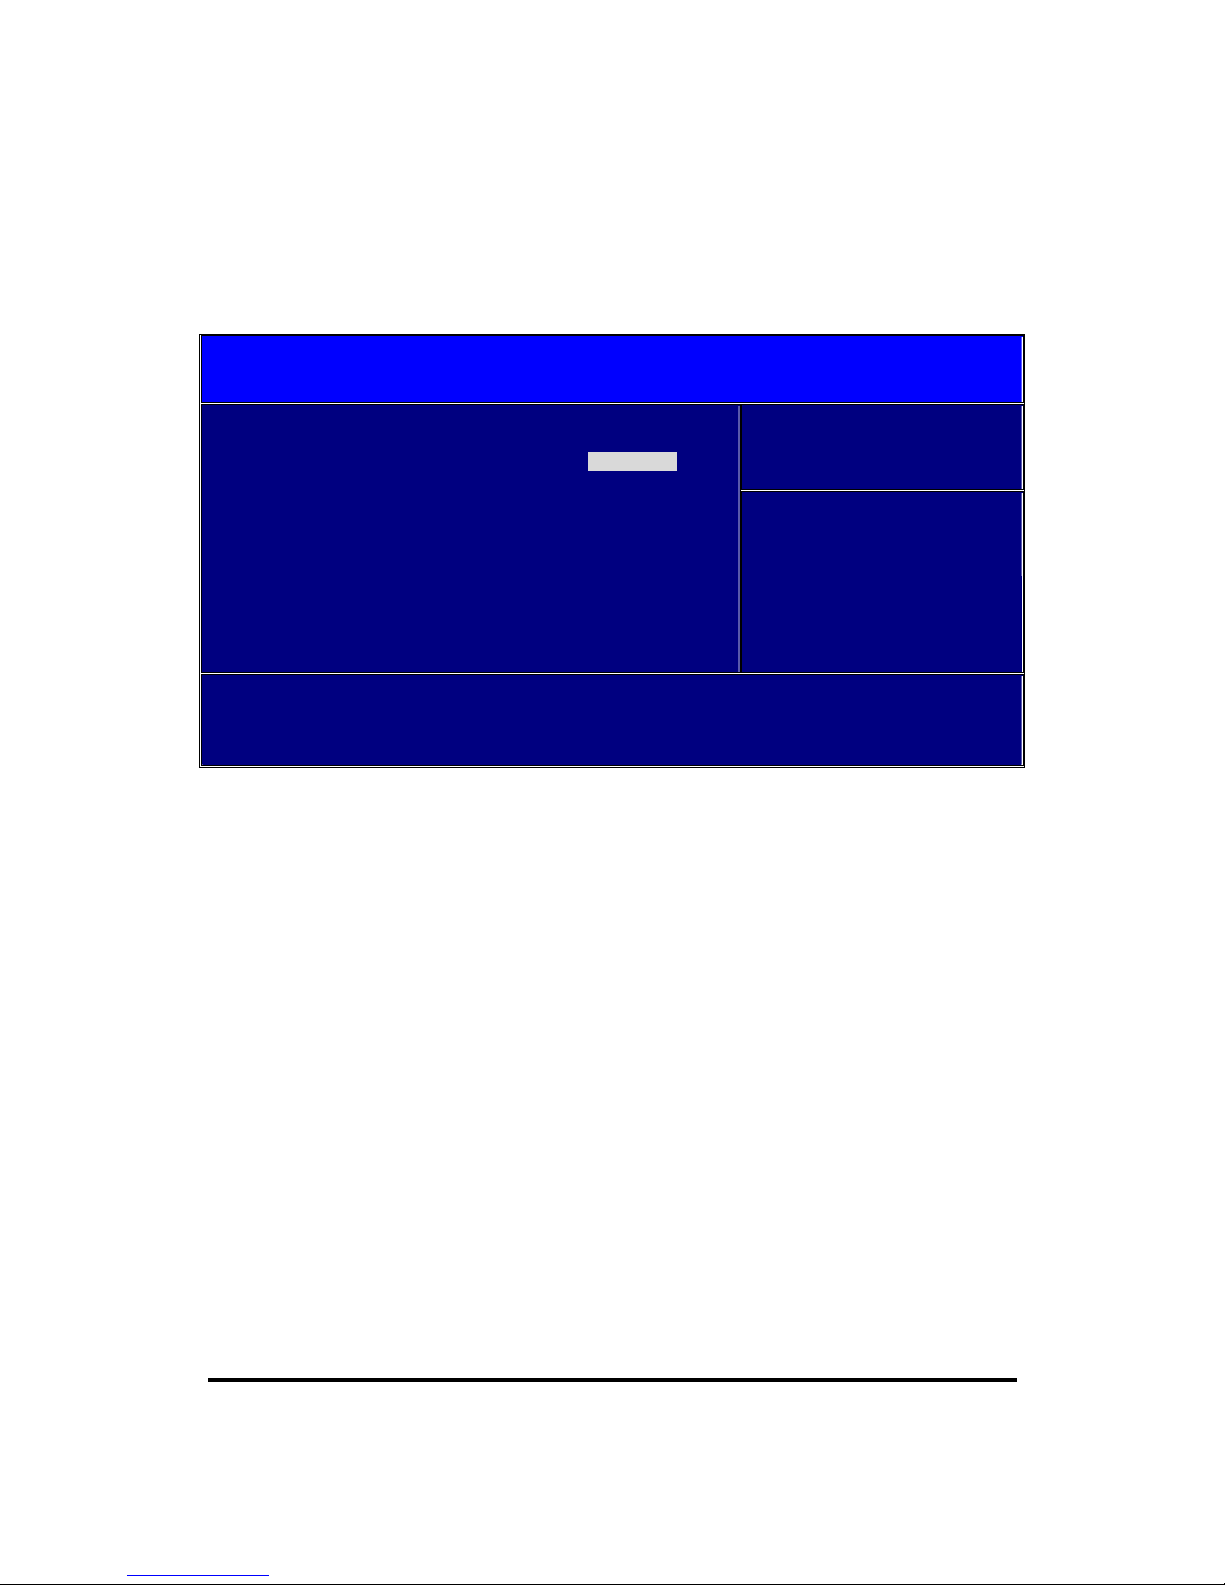
3-11 POWER BIOS Features
This section is for setting CPU Frequency/Voltage Control.
Phoenix – AwardBIOS CMOS Setup Uitility
Frequency/ Voltage Control
Item Help
Auto Detect PCI CLK [Enabled]
Spread Spectrum Modulated [Disabled]
Watch Dog Function [Enabled]
CPU CLOCK/SPEED [133MHz/2.93GHz]
PCI Freq Select [32MHz]
System Memory Frequency [Auto=> DDR533]
CPU Clock Ratio 22 X
Menu Level >
↑↓→←
Move Enter:Select +/-/PU/PD:Value F10:Save ESC:Exit F1:General Help
F5:Previous Values F6: Fail-Safe Defaults F7: Optimized Defaults
3-12 Load Manufacture Settings
Load Fail-Safe Defaults:
When you press <Enter> on this item, you get a confirmation dialog box with a message
similar to:
Restore Fail-Safe Settings (Y/N)? N
Pressing <Y> loads the default values that are factory settings for optimal performance
system operations.
Load Optimized Defaults:
When you press <Enter> on this item, you get confirmation dialog box with a message
similar to:
Load Optimized Defaults (Y/N)? N
Pressing <Y> loads the BIOS default values for the most stable, minimal-performance
system operations.
Page 47

42
3-13 Set Supervisor/ User Password
You can set either supervisor or user password, or both of them. The differences are:
User password: Can only enter but do not have the right to change the options of
the setup menus. When you select this function, the following
message will appear at the center of the screen to assist you in
creating a password.
ENTER PASSWORD:
Type the password, up to eight characters in length, and press <Enter>. The password
typed now will clear any previously entered password from CMOS memory. You will be
asked to confirm the password. Type the password again and press <Enter>. You may
also press <Esc> to abort the selection and not enter a password.
To disable a password, just press <Enter> when you are prompted to enter the password.
A message will confirm that the password will be disabled. Once the password is disabled,
the system will boot and you can enter Setup freely.
PASSWORD DISABLED.
When a password has been enabled, you will be prompted to enter it every time you try to
enter Setup. This prevents an unauthorized person from changing any part of your system
configuration.
Additionally, when a password is enabled, you can also require the BIOS to request a
password every time your system is rebooted. This would prevent unauthorized use of
your computer.
You determine when the password is required within the BIOS Features Setup Menu and
its Security option. If the Security option is set to “System”, the password will be required
both at boot and at entry to Setup. If set to “Setup”, prompting only occurs when trying to
enter Setup.
3-14 Exit
Leave Setup program, System will restart after saving setting to CMOS when “Save
Change and Exit” is selected. If “Discard change and Exit” is selected, system will restart
without saving any changes.
Page 48

43
Mechanical Draw
 Loading...