

Page 1
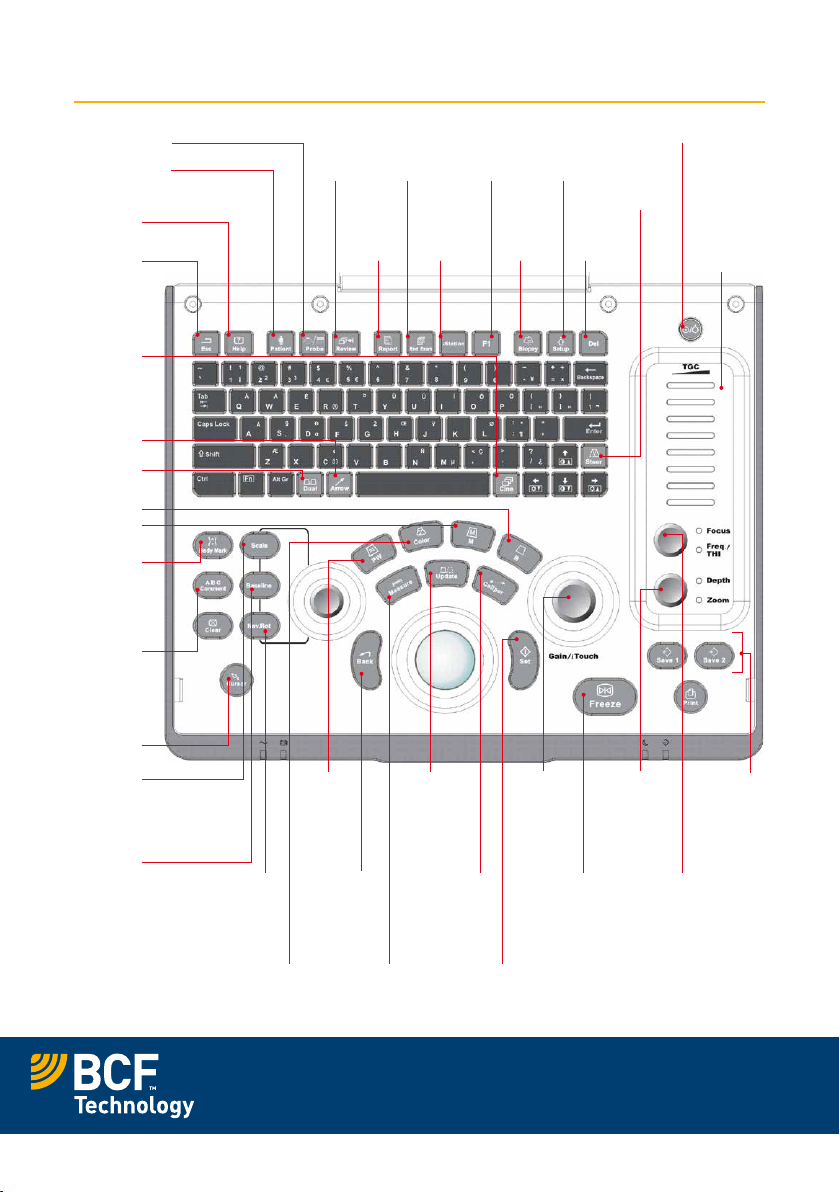
Mindray Z5 Quick Guide
3. Press to switch Probe
and Exam Type
2. Patient – Press
to open/exit animal
information screen
Help
Exit current
status to
the previous
status
Press to enter
or exit the
Cine Review
status
Press to
show/hide
on-screen
arrow
Two split
screen images
B mode
11. M mode
Press to
enter or exit
the Body
Mark status
Press to
enter or
exit the
character
comment
status
Press to
review
the stored
images
Press to
open or
close the
diagnosis
report
15. Press
to end an
exam
14. iStation –
Access stored
images and
clips for all
patients
F1 – Assign a
function to this
key through set
up menu
Press to
display or
hide the
biopsy
guide line
Press to
open/close
the set-up
menu
Press to
delete
comments
Press to
activate
the steer
function
for linear
probe
1. On/Off button
Time Gain
Compensation
increases/
decreases
brightness of
returning signal at
varying depths
8. Cursor
button
Press to
adjust image
parameter of
Scale in PW
Doppler mode
Press to
adjust image
parameter of
Baseline in
PW Doppler
mode
Multifunction
knob
9. Press to
enter Colour
mode
10. Press
to enter
PW mode
Press to return
to the previous
operation or
delete previous
item
Press for
measurement
packages
Press to move
between
active images
when in split
screen mode
12. Calipers
for measuring
distance and
area
6. Gain –
Increases/
decreases
overall
brightness
Freeze image. Use
trackball to scroll
back through paused
images to select
required image
Press to
confirm an
operation
5. Depth of
view. Rotate
to alter
scanning
depth. Press
to zoom.
13. Save 1
stores still
image,
Save 2 stores
a cine-loop
4. Freq/THI – Press to
activate then rotate to
change frequency.
7. Focus – Rotate to
move focal point up/
down the depth scale.
Your animal imaging partner
www.bcftechnology.com
Page 2

Mindray Z5 Quick Guide
1. Attach relevant probe before turning on the
scanner. Do not remove the probe whilst
the scanner is turned on.
2. Patient – Enter patient details.
3. Probe – Ensure you are in the correct
application setting (preset) for the type of
exam being performed.
4. Frequency – Ensure that your frequency is
at the correct setting. A higher frequency
setting provides higher resolution to the
image, however, penetration is reduced.
A lower frequency setting improves
penetration ability, however, resolution is
diminished.
5. Depth – Adjust so that the region of interest
occupies approximately ¾ of the screen.
A depth scale (in centimetre increments) is
displayed next to the image.
6. Gain – Increase or decrease the overall
brightness of the image.
7. Focus – Move the focal point(s) up and
down the depth scale until it/they are
pointing at the region of interest. When
imaging an organ that is markedly wider
than can be covered by the focal zone(s) it is
better to set the focal point at the deepest
part of the structure, not in the middle or at
the shallowest part.
8. Menu – Use the cursor to select further
image optimisation parameters from the
menu bar on the top left of the screen.
Highlight individual parameters and use
the set and back buttons (located to the
left/right of the trackball) to alter each
parameter.
9. Colour exam – Select a high-quality image
during B mode scanning and adjust to
place the area of interest in the centre of
the image. Press colour to enter B + colour
mode. Adjust image parameters during
scanning to obtain optimised images.
10. PW exam – Select a high-quality image
during B mode or B + colour mode
scanning, and adjust to place of interest
in the centre of the image. Press PW to
adjust the sample line, press PW again
and preform examination. Adjust image
parameters during scanning to obtain
optimised image.
11. M mode – Select a high quality image
during B mode scanning and adjust to
place the area of interest in the centre of
the B mode image. Press M and roll the
trackball to adjust the sample line. Press
the M mode again to enter M mode then
you can observe the tissue motion along
with anatomical images of the B mode.
12. Measurements and calculations – Freeze
the image and scroll back through the
paused images (using the track ball) to
select an appropriate image. Then press
the caliper or measure button.
13. Save 1 or 2 – Save relevant images and
cine-loops.
14. iStation – Access stored information for
each exam performed, review images/cineloops, transfer images to USB memory
stick.
15. End exam – Finishes the exam of the
current patient. You are then ready to
repeat for scanning the next patient.
Note: All BCF Technology products are to be
used for animal applications only.
Your animal imaging partner
UK +44 (0)1506 460 023 | IRE +353 (0)42 932 0070
© BCF Technology 2014
 Loading...