

Page 1
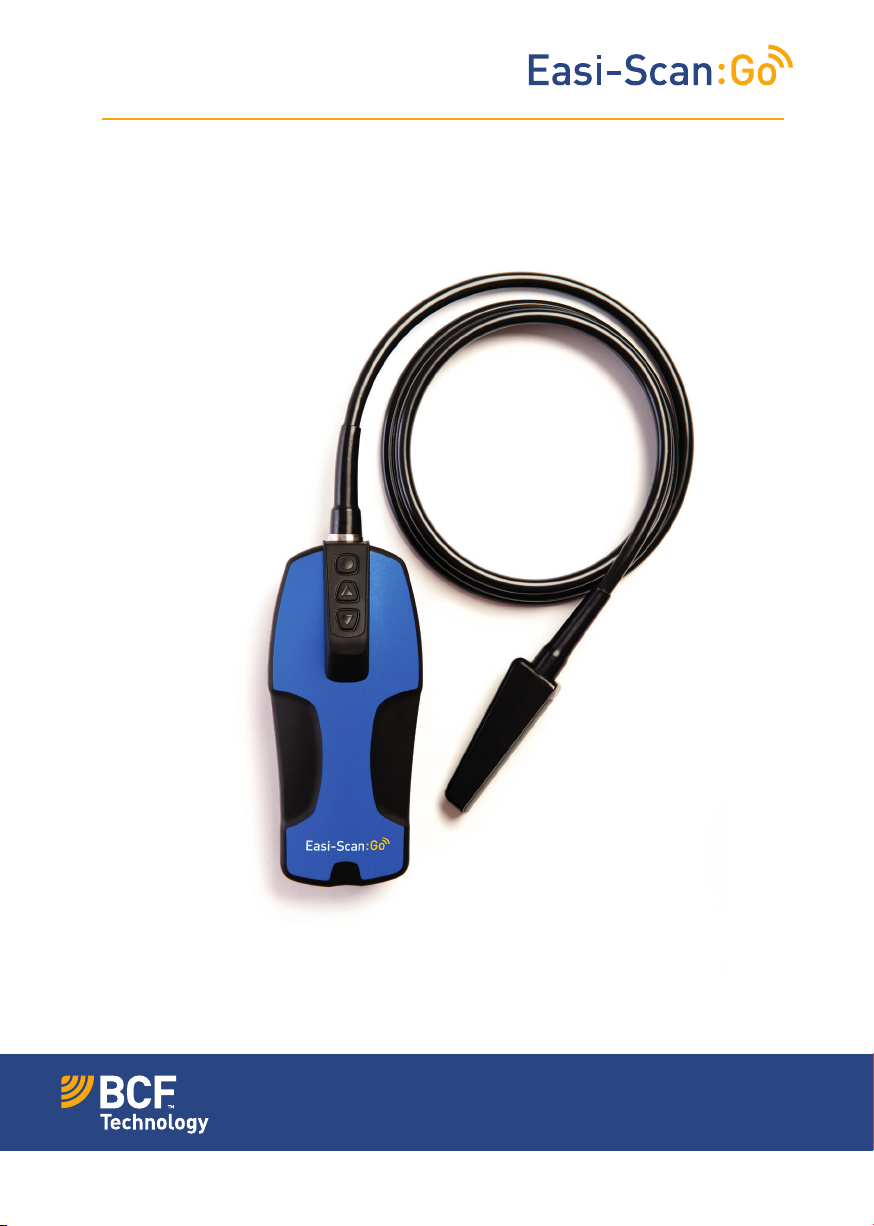
Instruction manual
TM
Your animal imaging partner
Page 2
TMTM
Contents
1 Scanner menu 3
2 LED sequence 4
3 Activation 5
4 BCF Go Scan App 6
5 Usage les 13
6 Factory reset 13
7 Charging 14
8 Care & maintenance 15
9 Specications 16
10 Service centres 18
Certication
Hereby, BCF Technology Ltd., declares that the radio equipment type Easi-Scan:Go is in
compliance with Directive 2014/53/EU. The full text of the EU declaration of conformity is
available at the following internet address: https://www.bcftechnology.com/esg-doc/
This device complies with part 15 of the FCC Rules. Operation is subject to the following two
conditions: (1) This device may not cause harmful interference, and (2) this device must accept
any interference received, including interference that may cause undesired operation of the
device.
If the user makes any modifications not expressly approved by the party responsible for
compliance it could void the user’s authority to operate the equipment.
This device complies with Industry Canada’s licence-exempt RSSs. Operation is subject to the
following two conditions: (1) This device may not cause interference; and (2) This device must
accept any interference, including interference that may cause undesired operation of the device.
Cet équipement est conforme et se soustrait de Licence au Cahier des Charges sur les Normes
Radioélectriques (RSS) d’Industrie Canada.
L’opération est soumise aux deux conditions suivantes:
(1) Cet appareil ne cause pas d’interférence; et
(2) Cet appareil accepte toute interférence, y compris les interférence pouvant provoquer un
fonctionnement indésirable de l’appareil.
Contains IC 451I-WL18DBMOD
Note: All BCF Technology products are for animal applications only. The product shall not
be used outside its scope as declared by the manufacturer.
1 Scanner menu
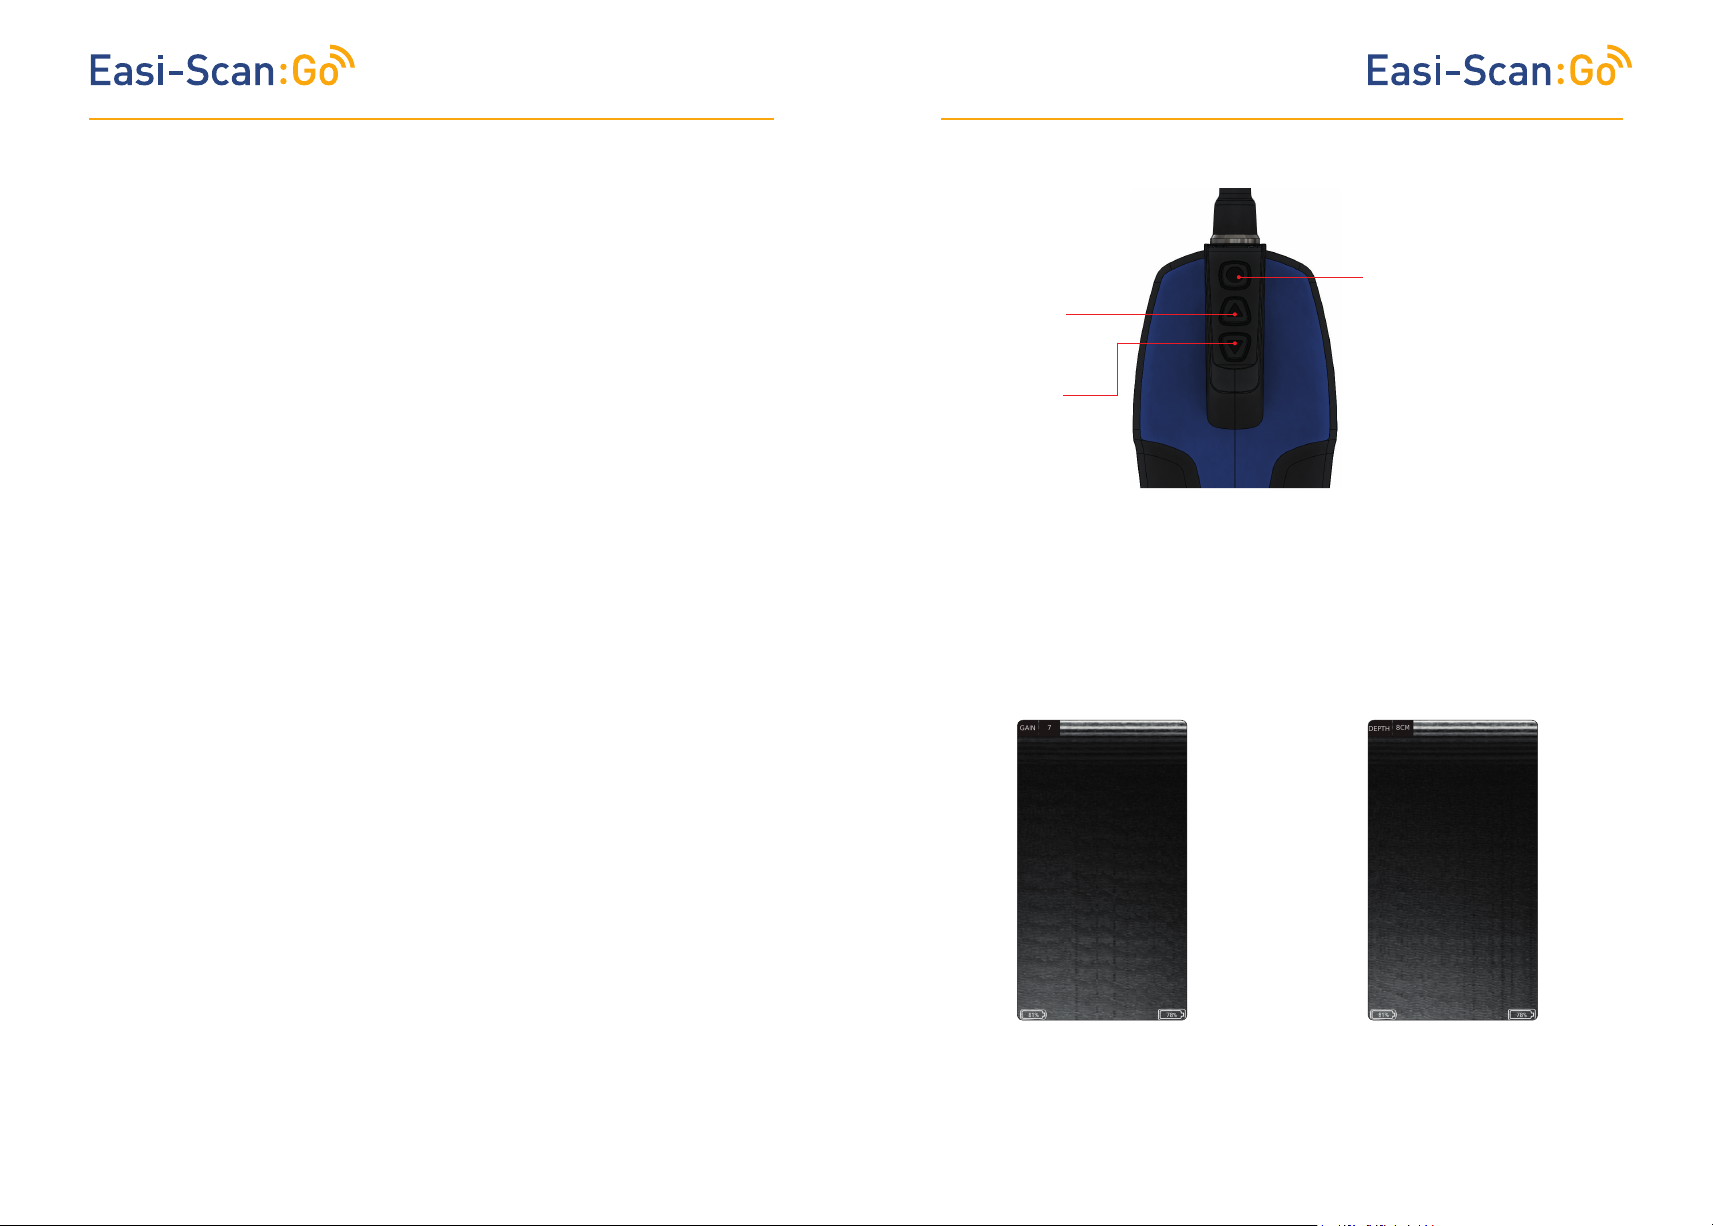
Up button
• Adjust gain.
• Save videos.
Down button
• Adjust depth.
• Save images.
1.1 Adjusting gain and depth using the scanner buttons
Power button
• To switch on/off the
scanner press and hold
until it beeps.
• Short press to freeze the
image.
• If on a congested Wi-Fi
channel, double press
to change channel when
no viewing devices are
connected.
In live scanning pressing “Up” button will
bring up the gain menu.
Pressing “Down” button will bring
up depth menu.
Once the gain or depth is visible, pressing the “Power Button” will select that setting. Use the Up
and Down buttons to adjust the selected settings.
2 3
Page 3
TMTM
1.2 Saving images and videos using the scanner buttons
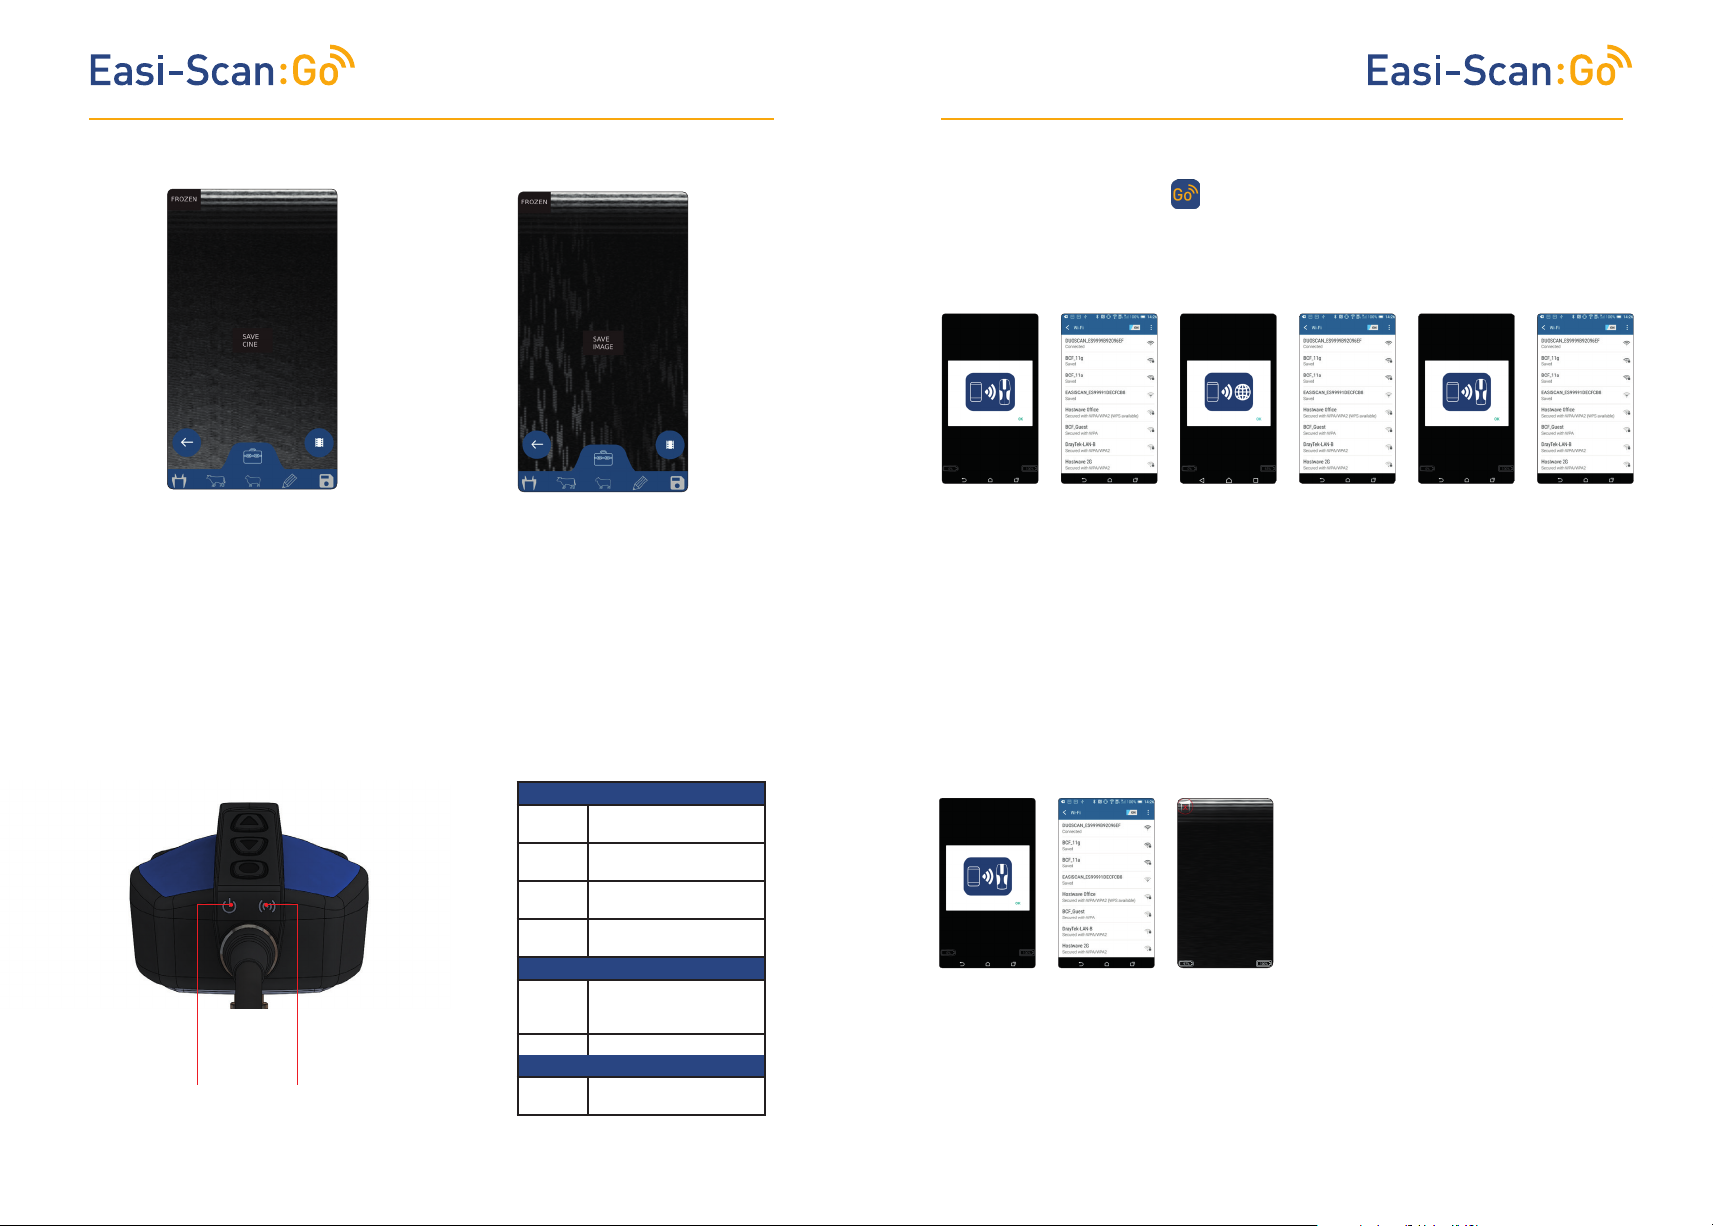
Freeze the image using “Power button”
Press “Up” will bring up “Save Cine”.
Freeze the image using “Power button”
Press “Down” will bring up “Save Image”.
Once the desired option is visible, pressing the Power Button will select that option.
Note: The scanner will store the last 300 frames (10-12.5 seconds depending on the selected
scan depth) in its internal memory.
To store on the scanner, the scanner must be Frozen.
During
save, particularly cine save, the app will pause while frames are downloading and saving the data
while scanning. It is recommended that you save images and videos directly from the app where
possible.
2 LED sequence
3 Activation
3.1 First time use
Download the BCF Go Scan app from Google Play or the App store.
You are likely to be prompted for a scanner software update on first time use. Please see
Scanner Update section.
To activate the scanner, ensure that the scanner is charged and that you have a local Wi-Fi
internet connection. This is only necessary the first time you connect the scanner.
1. Press “Power
button” to switch
on the scanner.
Open app on the
smart device. The
app will request
to connect to the
scanner. Click
OK.
2. Select
EASISCAN
from the Wi-Fi
page and
return to the
app.
The app will
get the serial
number from
the scanner.
After a few seconds, the ultrasound image will appear. Touchanywhere on the screen to bring up
the live scanning menu.
Note - if the Wi-Fi LED is flashing on the scanner it is not connected to any smart device.
3 App requests
to connect to
the internet.
Click OK.
4. Select your
local Wi-Fi
network to
connect to the
internet.
5. App retrieves
the license
from BCF’s
license server
and the app
will request to
connect back to
the scanner.
6. Select your
EASISCAN from
the Wi-Fi page
and return to
the app.
Power LED
3.2 Normal start up process
Blue
flashing
Blue Scanner on and battery
Yellow Scanner on and battery
Yellow
flashing
Wi-Fi LED
Blue
flashing
Blue Smart device connected
Both LEDs
Flashing
Power
LED
4 5
Wi-Fi
LED
Both LEDs
yellow
Flashing
yellow
Scanner turning on
between 66–100% charge
between 33–66% charge
Scanner on and battery
between 0–33% charge
Scanner ready for smart
device to connect, nothing
connected
Software updating
Software updating
1. Switch on the
scanner and wait
until the Wi-Fi
LED illuminates.
Launch BCF
Go Scan App.
App requests
to connect to
scanner.
2. Select your
EASISCAN
from the Wi-Fi
page. Return to
the App.
3.It can take up
to 10 seconds
to connect and
start receiving
ultrasound. You
are now ready
to scan.
3.3 Scanner Updates
The app automatically checks the BCF licence
server for scanner software updates when
connected to Wi-Fi.
After connecting to an EASISCAN, you may
be prompted to update the scanner software.
The scanner will only update if the battery is
above 50% charge.
Press OK or Cancel. Pressing OK will cause
the scanner LEDs to flash yellow - the
scanner will take roughly two minutes to
update. Press cancel if you wish to update
later.
Once the update is finished the scanner will
switch off. The scanner software version
number can be checked in the User Settings
section.
Page 4
TMTM
4 BCF Go Scan App
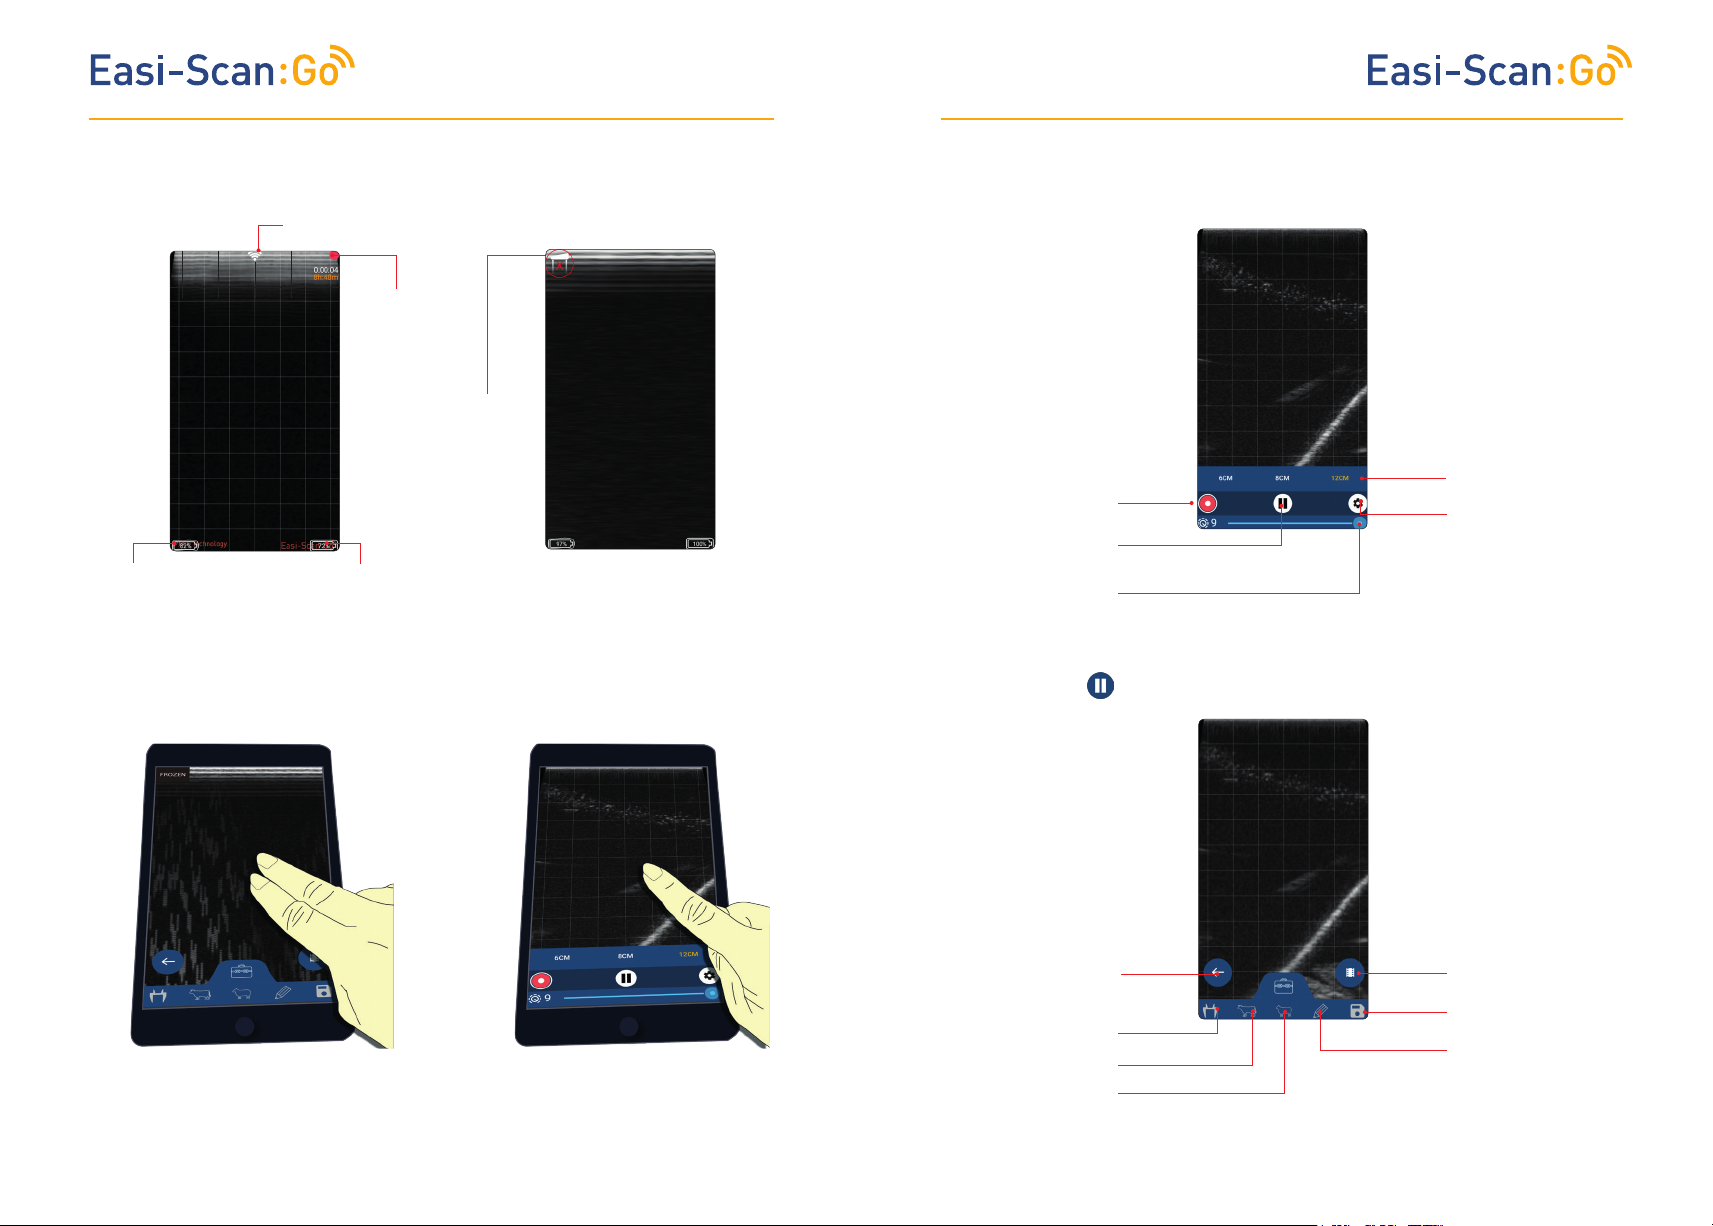
4.1 Live scanning
Wi-Fi channel quality*
(only on Android devices)
Recording
indicator
and elapsed
time during
recording.
No probe contact,
scanner enters
low-power
mode and the
screen will dim.
The scanner battery
level
*Change the channel in Wi-Fi settings. No indicator: clear channel on the 5GHz band. This is
recommended state. White indicator: clear channel, but is on 2.4GHz band, it is more prone to
interference. Orange/red indicator: channel has other networks or scanners on it. This is likely to
cause interference issues.
The smart device
battery level
4.2 Main menu
Start recording
Freeze ultrasound
Adjust gain
4.2.1 Freeze menu
Adjust
scanning depth
Open Settings
Unfreeze and return
to live scanning.
Callipers to measure
size of the embryo
Cattle
Touching the screen with two fingers
simultaneously will freeze the image.
6 7
Touching the screen with one finger
will open the main menu.
Sheep
Go to cine mode
Save image on
smart device
Draw annotations on
the image
Page 5
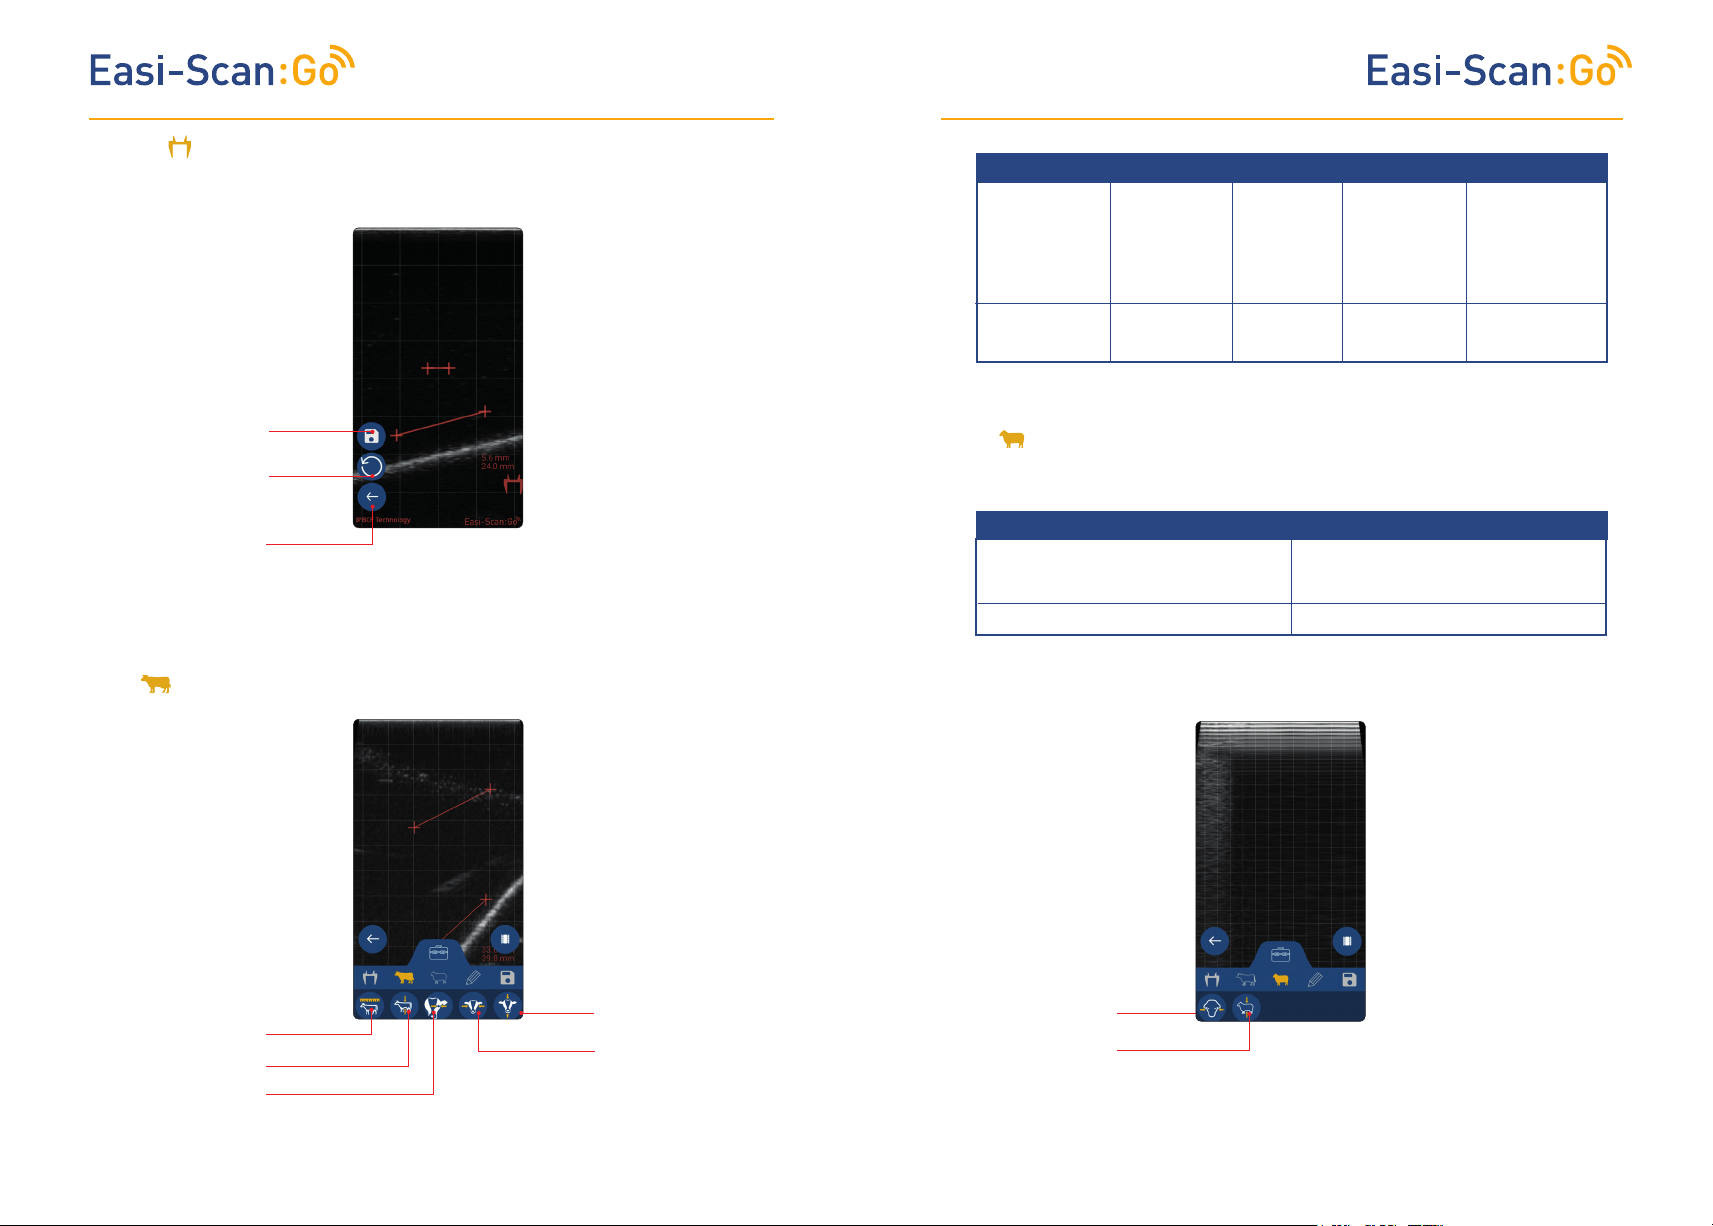
Callipers
TMTM
Gestational measurements available:
Save images to the
camera folder on a
smart device
Reset the callipers to
the initial position
Return to freeze
menu
Note: Use your finger to move the cursors.
Cattle
CrownRump length
(distance from
the top of the
skull to the end
of the body)
14mm – 180mm,
33 – 76 days
Trunk diameter
(width of the
ribcage at the
widest part)
14mm – 123mm,
53 – 133 days
Sheep
Gestational measurements available:
Head diameter
(width of the skull at the widest point)
Eye diameter
(diameter of
the eye socket)
3mm – 28mm,
62 – 241 days
Trunk diameter
(width of the ribcage at the widest part)
14mm – 101mm, 49 – 126 days19mm – 66mm, 48 - 121 days
Head diameter,
(width of the
skull at the
widest point)
14mm – 86mm,
55 - 135 days
Head length
(distance from
the top of the
skull to the end
of the nose)
21mm – 146mm,
56 – 134 days
Crown rump length
Trunk diameter
Eye diameter
8 9
Head length
Head diameter
Head diameter
Trunk diameter
Page 6
TMTM
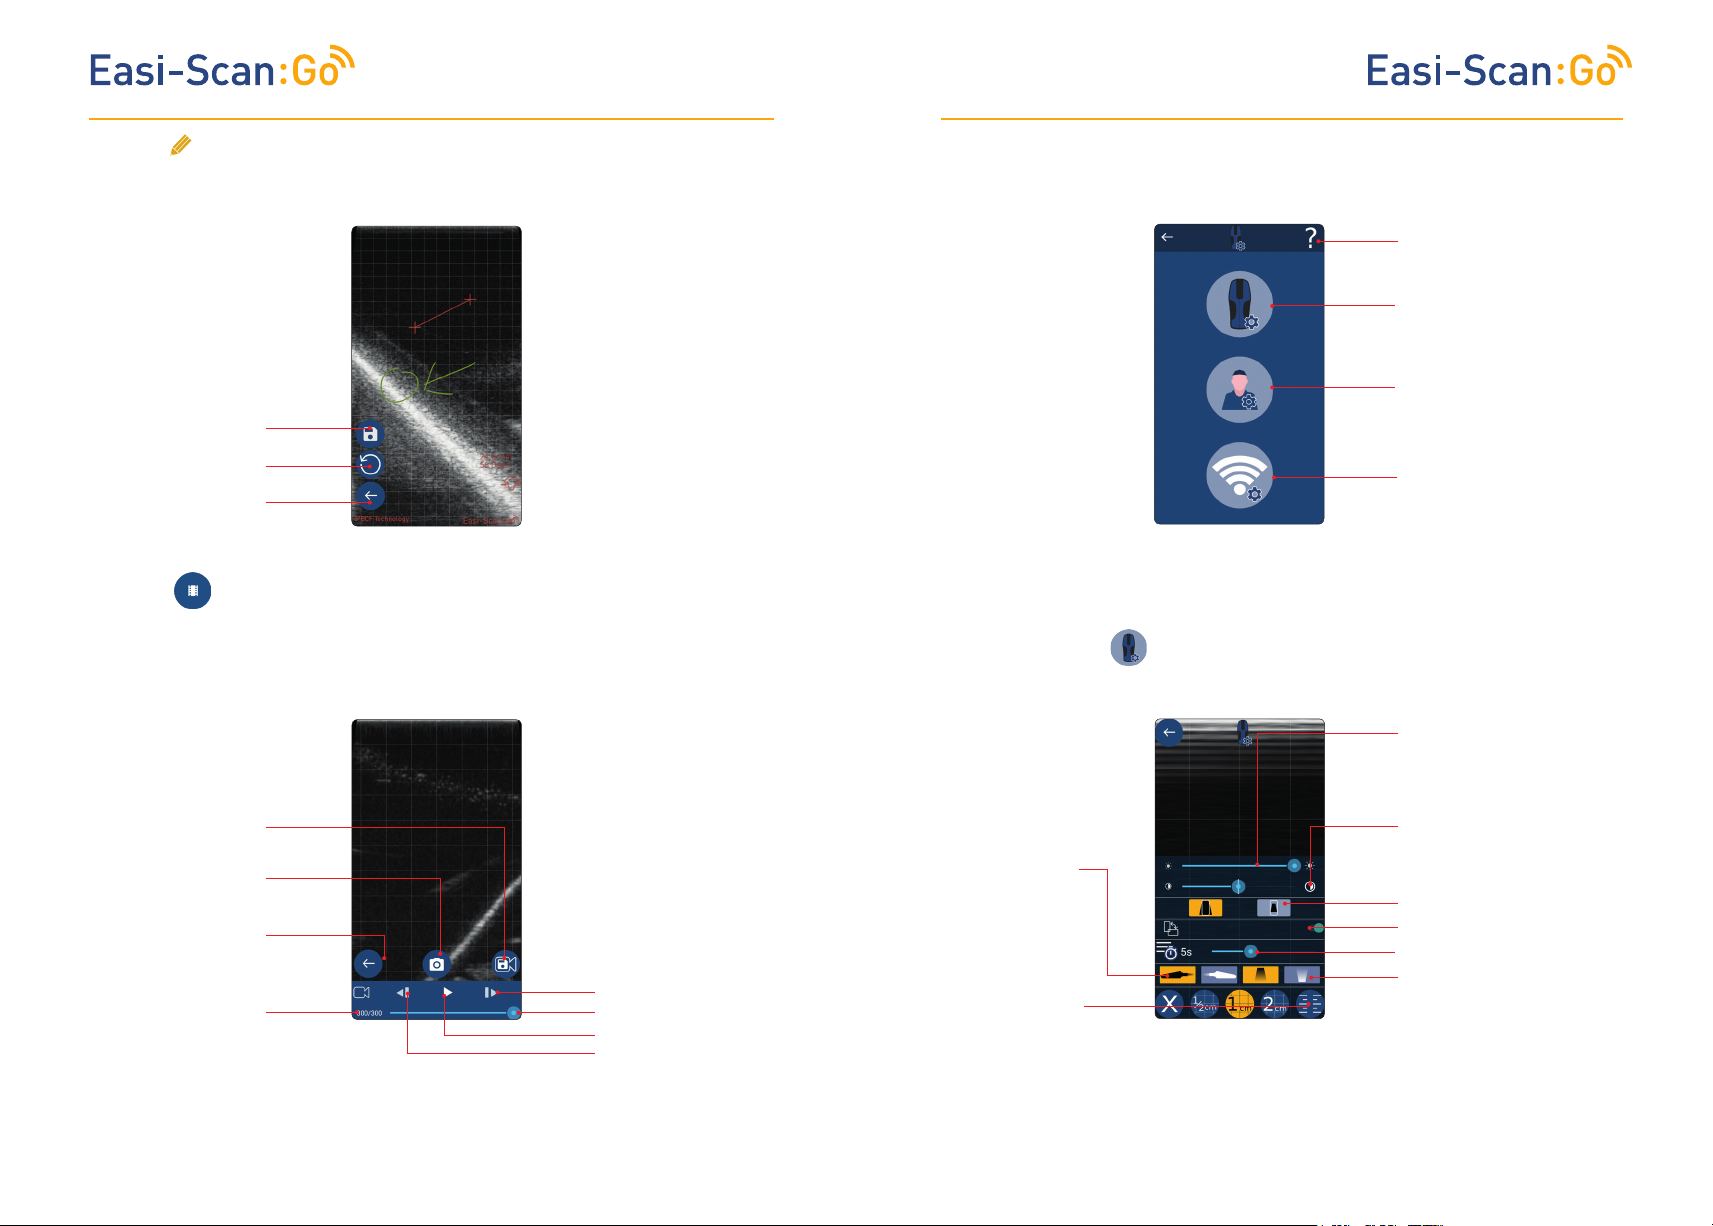
Freedraw
Touch and drag to draw on screen, can be used to make simple annotations or to highlight areas
of interest. Any measurements placed on screen remain visible.
Save button, save the
current image to the
camera folder.
Reset button, deletes all
drawn lines.
Back button, return to
freeze menu.
Cine mode
The app automatically stores the last 300 ultrasound frames (approximately 10 seconds), in cine
mode. These frames can be viewed individually or as a video, individual frames can be saved as
still images or the entire loop as a video.
Save cine
4.3 Settings
Access the terms and
conditions, privacy policy,
Quick Guide, FAQ
Scanner
settings
User
settings
Wi-Fi settings
(only on Android
devices)
Note: FAQ and terms and conditions require an internet connection.
4.3.1 Scanner settings
Adjust screen
brightness. Restores
to original settings
when the app is
closed
Adjust ultrasound
contrast
Save image
Back
Frame
counter
Frame forward
Frame slider
Play
Frame back
Select probe
orientation. The
probe orientation
will change on all
connected devices
Grid setting. The grid
overlay will change
on all connected
devices
Fit ultrasound by
height or width
Lock screen rotation
Adjust menu timeout
Invert the ultrasound
image
Note: Touching outside the menu area will return to live scanning.
10 11
Page 7
TMTM
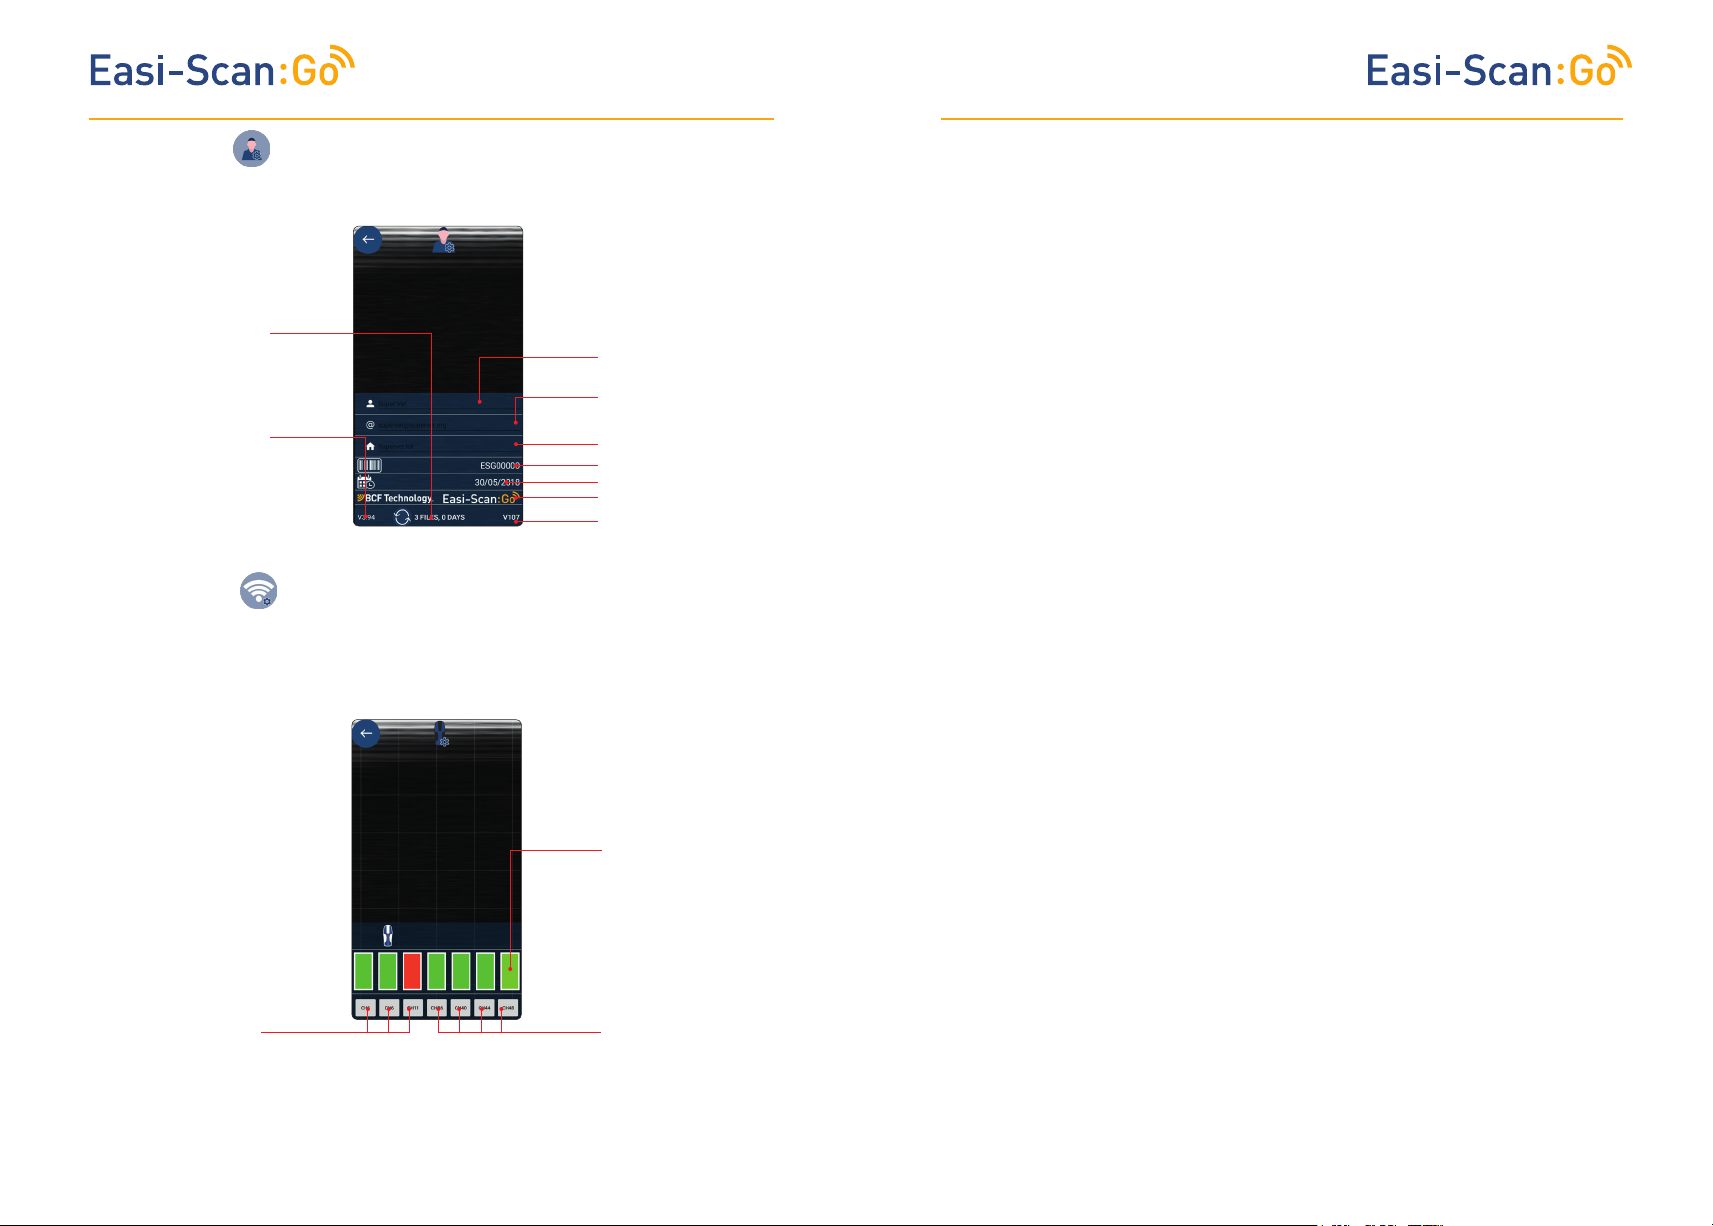
4.3.2 User settings
Number of usage les
on this device, when it
was last synchronised
with the server
Software version of app
User name
User email
Practice or company
name
Scanner serial number
Licence expiry date
Type of scanner
Software version of
scanner
4.3.3 Wi-Fi settings
Wi-Fi settings are only available on Android devices. Channels can be changed.
5 Usage les
The app will generate usage files.
Events logged:
• Images saved – time and date, scanner serial number and location (if permitted)
• Connecting to scanner
• Freeze and unfreeze
• Texts from Visits ToDo App
• Entering and exiting standby mode
Files can be uploaded to BCF’s license server, www.licencing.bcftechnology.com.
• Automatically - if launching app when connected to Wi-Fi
• Manually – by clicking sync button
• Prompts – If there are more than 20 usage files to upload
• Our privacy policy can be viewed on our website
6 Factory reset
A scanner can be reset to factory firmware settings in the unlikely event the scanner fails.
Hold down Power and Down until both LEDs glow yellow and release.
Press and hold power and down buttons until both LEDs glow yellow and release.
This will take a few minutes and the scanner will then switch off – removing the license from the
scanner.
Tap and select the
channel.
Yellow, orange, red are
congested channels
Green are clear
channels
2.4 GHz channels
Prone to interference
12 13
5GHz channels. Best
connection
Page 8
TMTM
7 Charging
The battery can be charged in the charging dock, powered by a standard outlet. It can also be
connected in the carry case for in-car charging.
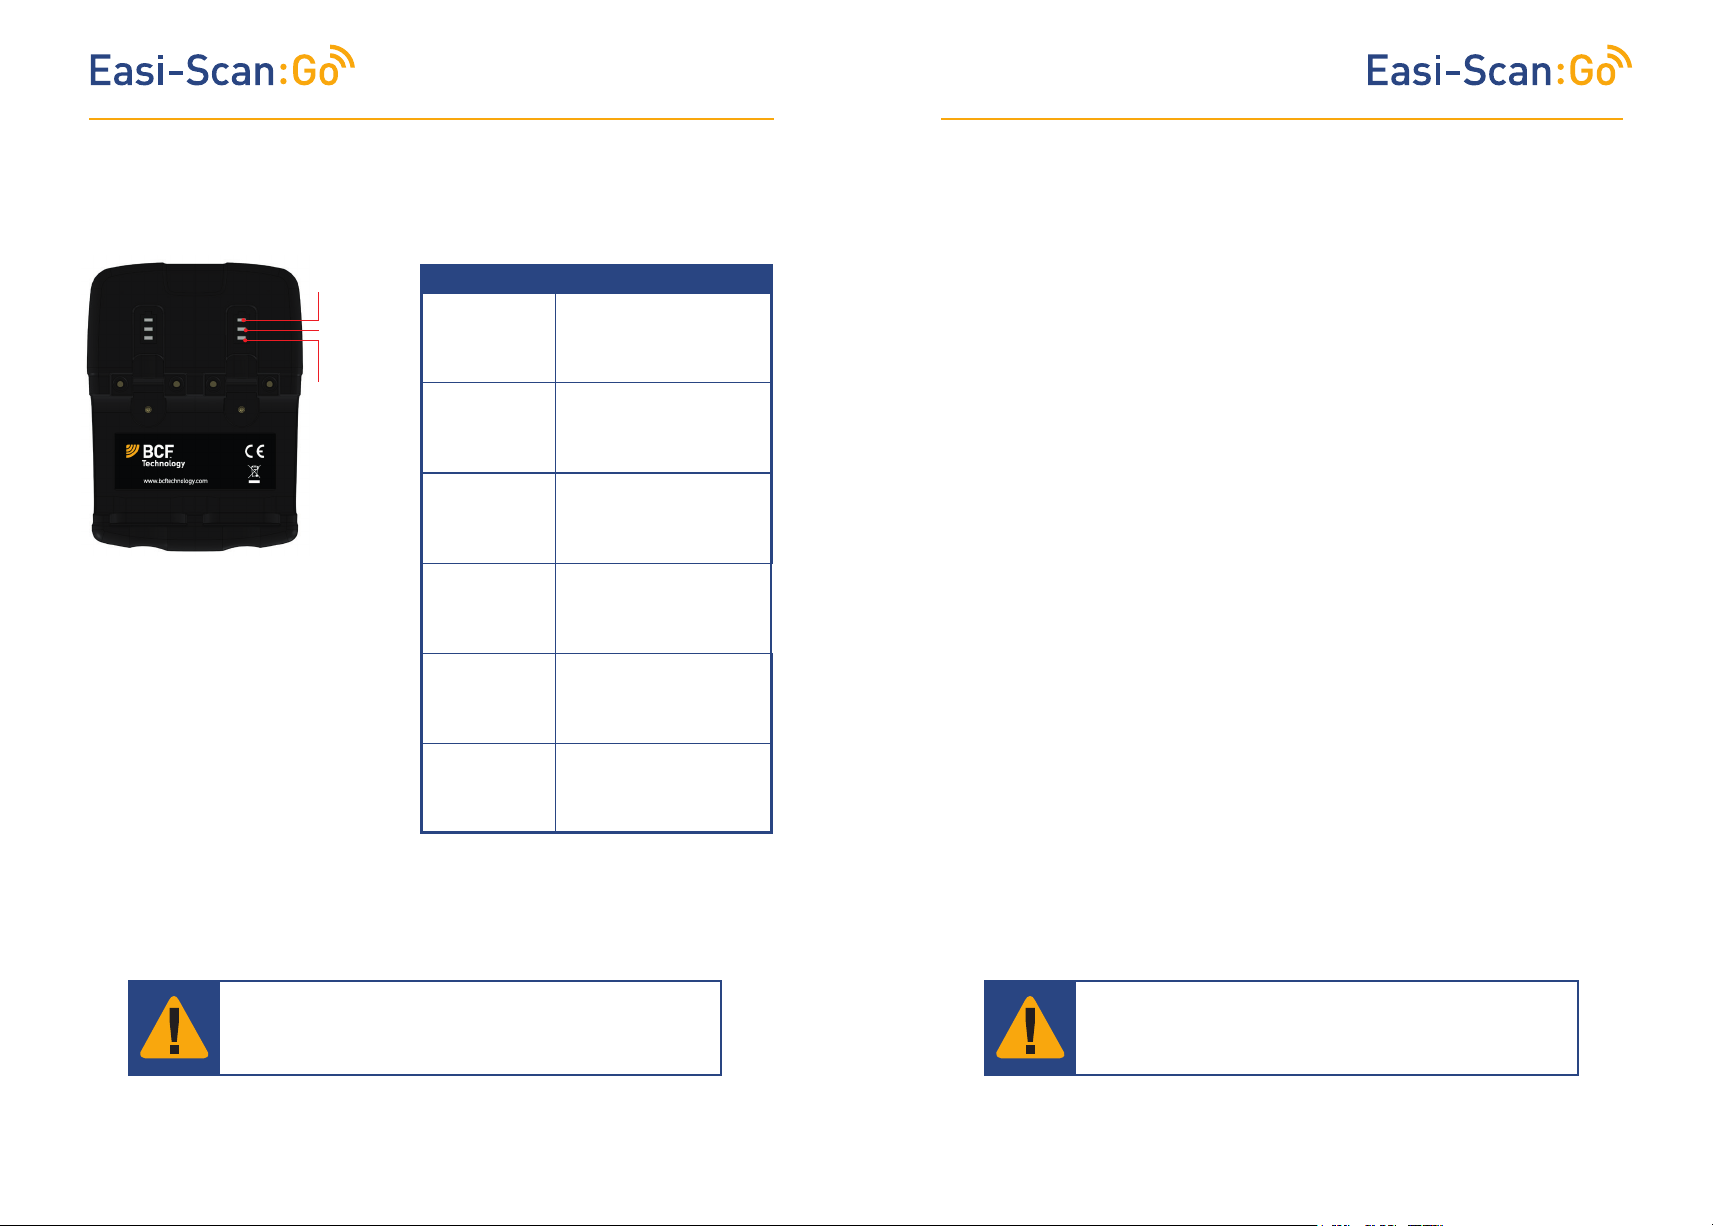
3rd LED
2nd LED
1st LED
A fully discharged battery should be fully
charged within 5.5 hours. While in a good
condition, the battery run time will be 5
hours (assuming 50% idle time between
scans).
Scanner will enter low power mode when
idle.
The Li-ion cells used in the battery pack
do not suffer from the ‘Memory effect’. For
optimal battery longevity, avoid letting the
battery run completely down and recharge at
approximately 20 Celsius/68 Fahrenheit.
Electrical connection to the power pack is through the gold pads on battery and scanner. Power
pack output is protected but care should be taken to prevent short circuiting the gold connector
pins and pads.
LED sequence
One blue flashing
First LED solid
blue
Second LED
flashing blue
First and second
LEDs solid
blue, third LED
flashing blue
All LEDs solid
blue – fully
charged.
All LEDs flashing
yellow
All LEDs flashing
blue
Charging, charge level below
33%
Charging, charge level below
66%
Charging, charge level below
100%
Fully charged
Temperature is too high
(more than 45 Celsius, 113
Fahrenheit) for safe charging
Temperature is too low (less
than 0 Celsius, 32 Fahrenheit)
for safe charging.
8 Care & maintenance
8.1 Easi-Scan:Go & battery
Please note the following important points:
• The unit is not sealed against jets of water. Water will penetrate your scanner if it is hosed
down or rinsed under a fast flowing tap.
• The unit is NOT corrosion proof and thus it should not be left wet.Take care to detach the
external battery and ensure interconnect areas are dry also.
• The battery charger and charging carry case are not waterproof – avoid getting them wet.
Probe
While every attempt has been made to make the probe as rugged as possible the crystal array
remains vulnerable and should be protected from knocks. The probe has a protective sheath
covering the length of cable subject to wear and flexing. Any damage to this sheath or the rest
of the cable should be repaired before further use to prevent moisture ingress that will rapidly
damage the probe. The probe should be checked regularly for such damage.
Cleaning
The scanner, battery and probe can be wiped down with an antibacterial wet wipe, reducing the
need for drying. This prevents problems relating to corrosion following wash-down.
The scanner and power pack can also be cleaned using a cloth, soap and warm water.
Sponging down or even brief, shallow submersion is less aggressive than rinsing or hosing down.
Warning: The scanner and power pack must not be stored damp – severe corrosion will result.
Thoroughly dry the scanner before storage and charging. Take care to detach the external power
pack and ensure interconnect areas are dry also.
Gels
Use only gels recommended by BCF Technology Ltd. Do not store the probe in gel.
Storage
Clean and dry the probe head prior to storage in dry location. Do not store the transducer in gels
or cleaning/disinfecting solutions. This will lead to premature deterioration of the probe.
Do not expose the transducer to materials containing the following agents:
• Acetone
• Methanol
• Mineral oil
• Iodine
• Freon
• Industrial cleaners
• Materials containing perfumes (lotions, gels, etc.)
Warning:
To reduce the risk of burns, fire, electric shock, or injury to persons
an appliance should never be left unattended when plugged into
mains or 12V cigarette lighter.
14 15
Warning:
Never sterilize the transducer with autoclave, ultraviolet, gamma
radiation, gas, steam or heat sterilization techniques. Severe
damage will result.
Page 9
TMTM
9 Specications
Size 19x8.3x6.2cm / 7.5 x 3.25 x 2.4 in
Weight 800g/1.76lbs
Mechanical Rugged Glass filled Polypropylene casing with TPE over mould.
Scanner operating frequency bands: B1=2412MHz-2462MHz and B2=5150MHz-5250MHz
Maximum radio-frequency power transmitted in the frequency bands: 16.1dBm for B1 and 18dBm
for B2.
User Output
Scanner wireless link to compatible viewing device using BCF Sound-Link over standard WI-FI
connection.
Image and video storage
Storage of images and cine loops limited only by available space on smart device linked with
scanner.
Probe
Broadband straight linear rectal
Active array length 64 mm
Frequency range 4.5 to 8.5 MHz
3 user selectable depths of scan: 6cm, 8cm, 12cm
128 element crystal array.
Power and charging
Removable li-ion battery gives 5h runtime *
Battery charge time 5.5h. Only use BCF approved/supplied battery, 12V vehicle power supply,
battery charger and DC power adapter.
ESG-CHARGER: Input: 12V, 2A / Output: 4.2V, 2A.
BCF Vehicle Power Outlet/Cigarette Plug Cable (Model: ACC-DC LEAD):12VDC, 2A Fused.
Only to be used when charging from a vehicle supply.
Only replace fuse with 2A medium acting fuse rated to 125V, 10kA breaking capacity (F2A M125V).
DC power Adapter (XP Power, Model: VEP24US12): Input: 100-240VAC, 0.6A/Output: 12VDC, 2.0A
Battery (Model: ESG-BATT): 3.6Vdc, 6700mAhr.
Scanner will enter low power mode when idle.
Temperature range
Scanner: -10 Deg C to 45 Deg C *.
Battery Charge: 0 Deg C to 35 Deg C *
Battery Charger has under and over temperature protection and LED status indication.
Warning: if the equipment is used in a manner not specified by the manufacturer, the protection
provided by the equipment may be impaired.
* Best charged at 25 Deg C, frequent charging at 35 Deg C / 95 F may shorten battery lifetime.
Warranty
BCF Technology warrants Easi-Scan:Go against defects in materials for one year from the date
of purchase. BCF Technology does not warrant against normal wear and tear, nor damage
caused by accident or abuse. Lifetime warranty is available on request.
Smart devices compatibility
Android:
Minimum version: Kit Kat (Android V4.4)
Minimum RAM: 2Gb
Minimum Processor: Quad-Core 1.8GHz
Recommended WiFi: 802.11 a/ac (5GHz band)
Apple:
Minimum version: iOS 8
Minimum iPhone version: iPhone 5s
Minimum iPad version: iPad4
16
Page 10
TMTM
For further information and video manuals about the Easi-Scan:Go please visit the “Customer
support“ section of the BCF website www.bcftechnology.com/service-support.
10 Service centres
Your equipment should be returned periodically to a BCF service centre. Our qualified service
engineers will use special test equipment to thoroughly check the instrument and advise of any
work that appears to be necessary.
If your Easi-Scan requires servicing please contact an official authorised service center or the
distributor in your country.
In the UK:
BCF Technology Ltd
Imaging House, Phoenix Crescent
Strathclyde Business Park Bellshill,
ML4 3NJ
Scotland, UK
T +44 (0)1506 460 023
[email protected]
www.bcftechnology.com
In Ireland:
BCF Technology Ltd
Unit 2, Quayside Business Park
Mill Street, Dundalk
Co Louth, Ireland
T +353 (0)42 932 0070
[email protected]
www.bcftechnology.com
In North America:
BCF Technology USA Ltd, LLC
2625 Highway 14 West, Suite K
Rochester, Minnesota 55901
T 507-529-8200
T 800-210-9665
F 507-529-8205
[email protected]
www.bcftechnology.com
In Australasia:
BCF Ultrasound Australasia Pty Ltd
10/56 Norcal Road
Nunawading 3131
Melbourne, Victoria
Australia
T +61 (0)3 9894 8980
[email protected]
www.bcfultrasound.com
Easi-Scan:Go does not contain user serviceable parts. Servicing has to be done by BCF´s
authorised service centers.
18 19
Page 11
TM
20
© BCF Technology Ltd , V26 May 2018/ Easi-Scan:Go
 Loading...