

Page 1
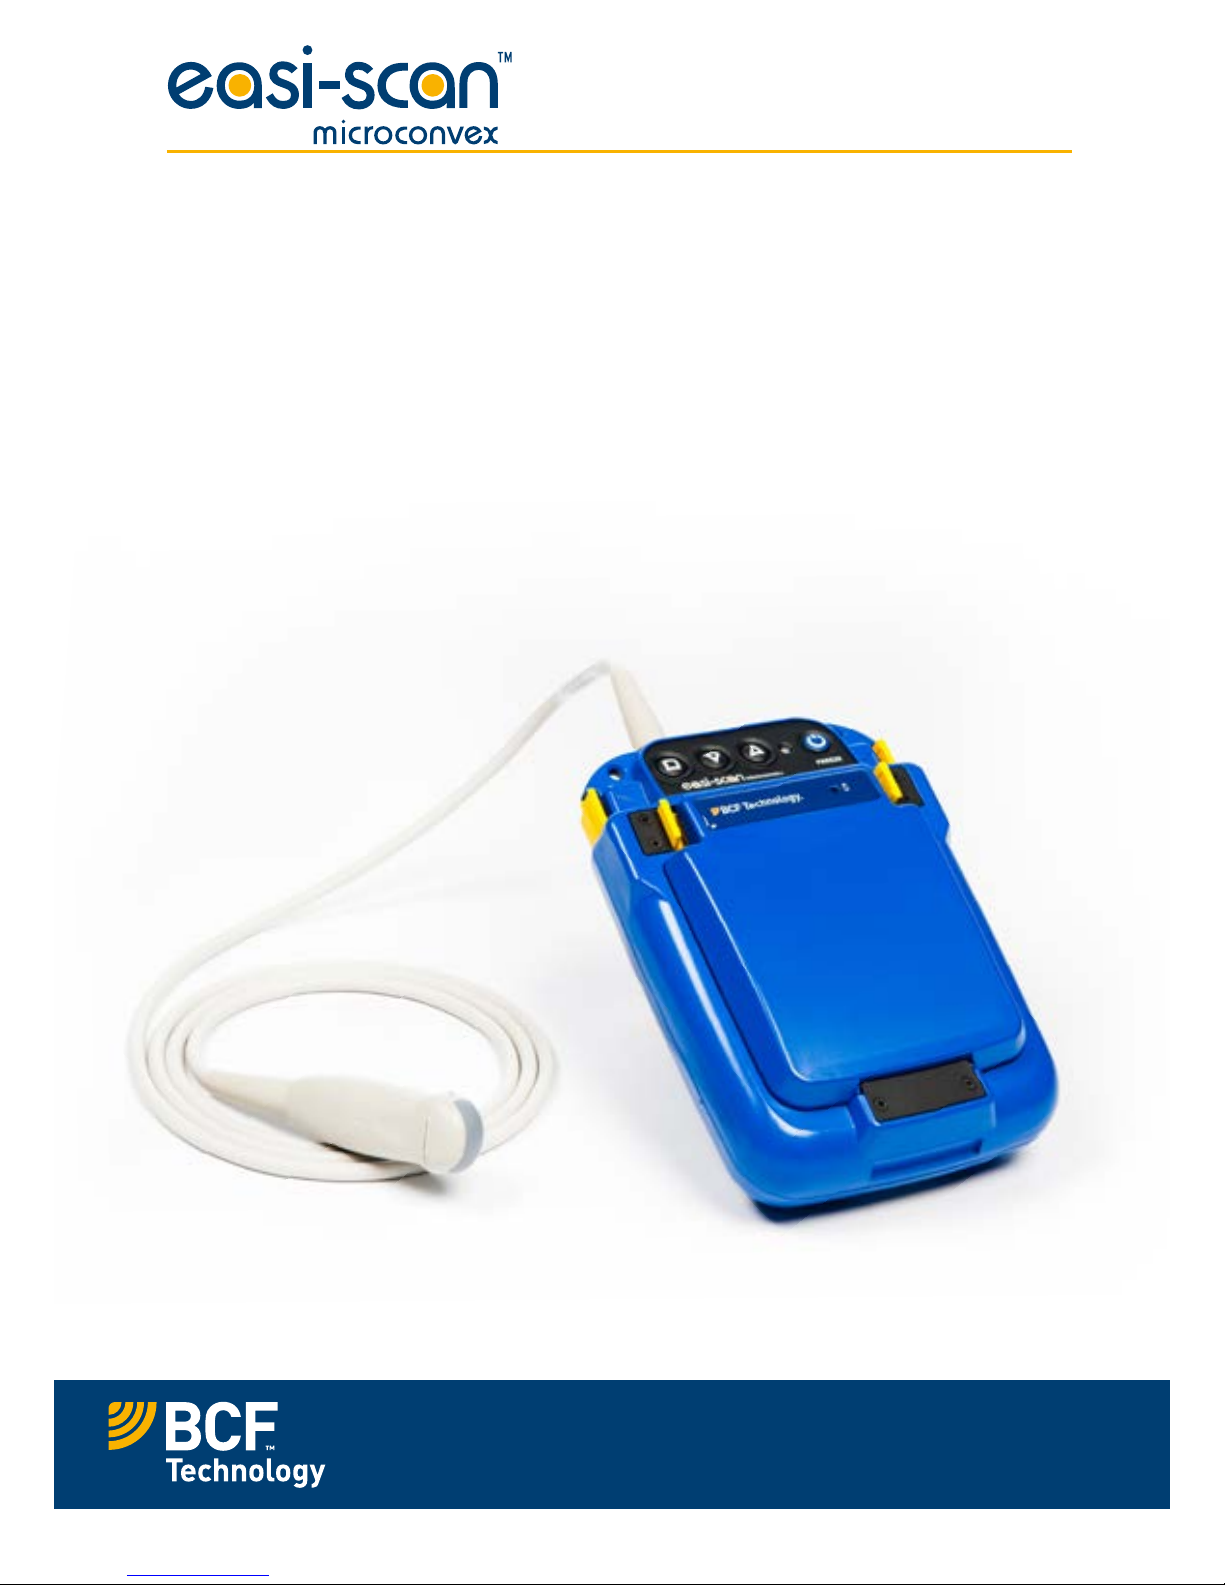
Your animal imaging partner
Instruction manual
Page 2

2
Contents
Introduction 3
System features 4
Operator safety 4
1 Operating instructions 5
1.1 Preliminary switch on 5
1.2 Power 5
1.3 Scanning 6
1.4 Scanner setup 10
1.5 Smart Display 11
2 Care & maintenance 13
2.1 Easi-Scan & power packs 13
2.2 Battery charging 13
2.3 Easi-Scan Micro-Convex probe 15
Technical specification 16
Accessories 18
Service centres 19
Page 3

3
Introduction
Since 1983 BCF Technology Ltd has been developing, manufacturing and distributing worldwide
animal husbandry equipment becoming market leader in the development and production for
realtime ultrasound pregnancy scanners for most animal species.
Using the latest state of the art technology we have combined cutting edge digital imaging with low
power consumption and miniaturisation to produce Easi-Scan Micro-Convex: a small, light, robust,
portable and truly versatile ultrasound scanner.
The Easi-Scan Micro-Convex is designed and manufactured in Scotland at:
BCF Technology Ltd
Imaging House, Phoenix Crescent
Strathclyde Business Park
Bellshill, ML4 3NJ
Scotland, UK
T +44 (0)1506 460 023
www.bcftechnology.com
As specialists in providing ultrasound imaging equipment for veterinary and animal husbandry
applications, we realise the importance of equipment reliability and speed of response should service
assistance be required. Our engineers and their appointed agents are available to provide rapid service
assistance to ensure optimum performance of BCF systems.
The Easi-Scan Micro-Convex meets all essential and safety requirements of all current relevant
European Directives. The CE mark on the front label is a symbol of this conformance. If you require
any further information regarding these directives please contact us directly. This product is classed
as electronic equipment. At the end of its useful life it should not be disposed of with general waste,it
should be taken to a recycling point for electrical\electronic equipment. The crossed-out wheelie
bin symbol is placed on the front label as a reminder and in conformance with the European WEEE
Directive.
Note: All BCF Technology products are to be used for animal applications only.
Page 4

4
System features
Easi-Scan Micro-Convex is optimised for mobile real time ultrasound scanning, giving crisp imaging
in target applications with minimum need for operator adjustments.
• The fixed high resolution broadband probe supports a wide application range from OPU
applications to external abdominal scanning
• Scanner settings are optimised for imaging depth
• The image may be viewed on a choice of displays
• Images may be stored, for later review. Stored images may be uploaded to computer via USB
or printed with optional accessories
• Lightweight unit for less strain
• Four hours continuous use from external rechargeable battery and even longer using the auto
Standby function
• The unit is water resistant to IP65 (see comments later in manual)
• Easily cleaned; all component parts can be wiped down to clean
Operator safety
Easi-Scan Micro-Convex is designed to run from its external battery latched to the scanner.
The batteries must be charged using only the BCF battery charger or integrated carry case powered
from the car power outlet (12 V DC) or the BCF mains power supply. The carry case must not be closed
during charging. If the unit must be charged using the mains adapter, use only in dry conditions.
Although the Easi-Scan Micro-Convex runs from a low voltage source, high voltages are generated
inside the unit. For this reason no attempt should be made to disassemble the scanner.
Page 5
5
1 Operating instructions
1.1 Preliminary switch on
Ensure that the external battery is securely latched to the top of the scanner.
If a remote display is used, switch on the scanner ensuring the correct receive channel is selected. If
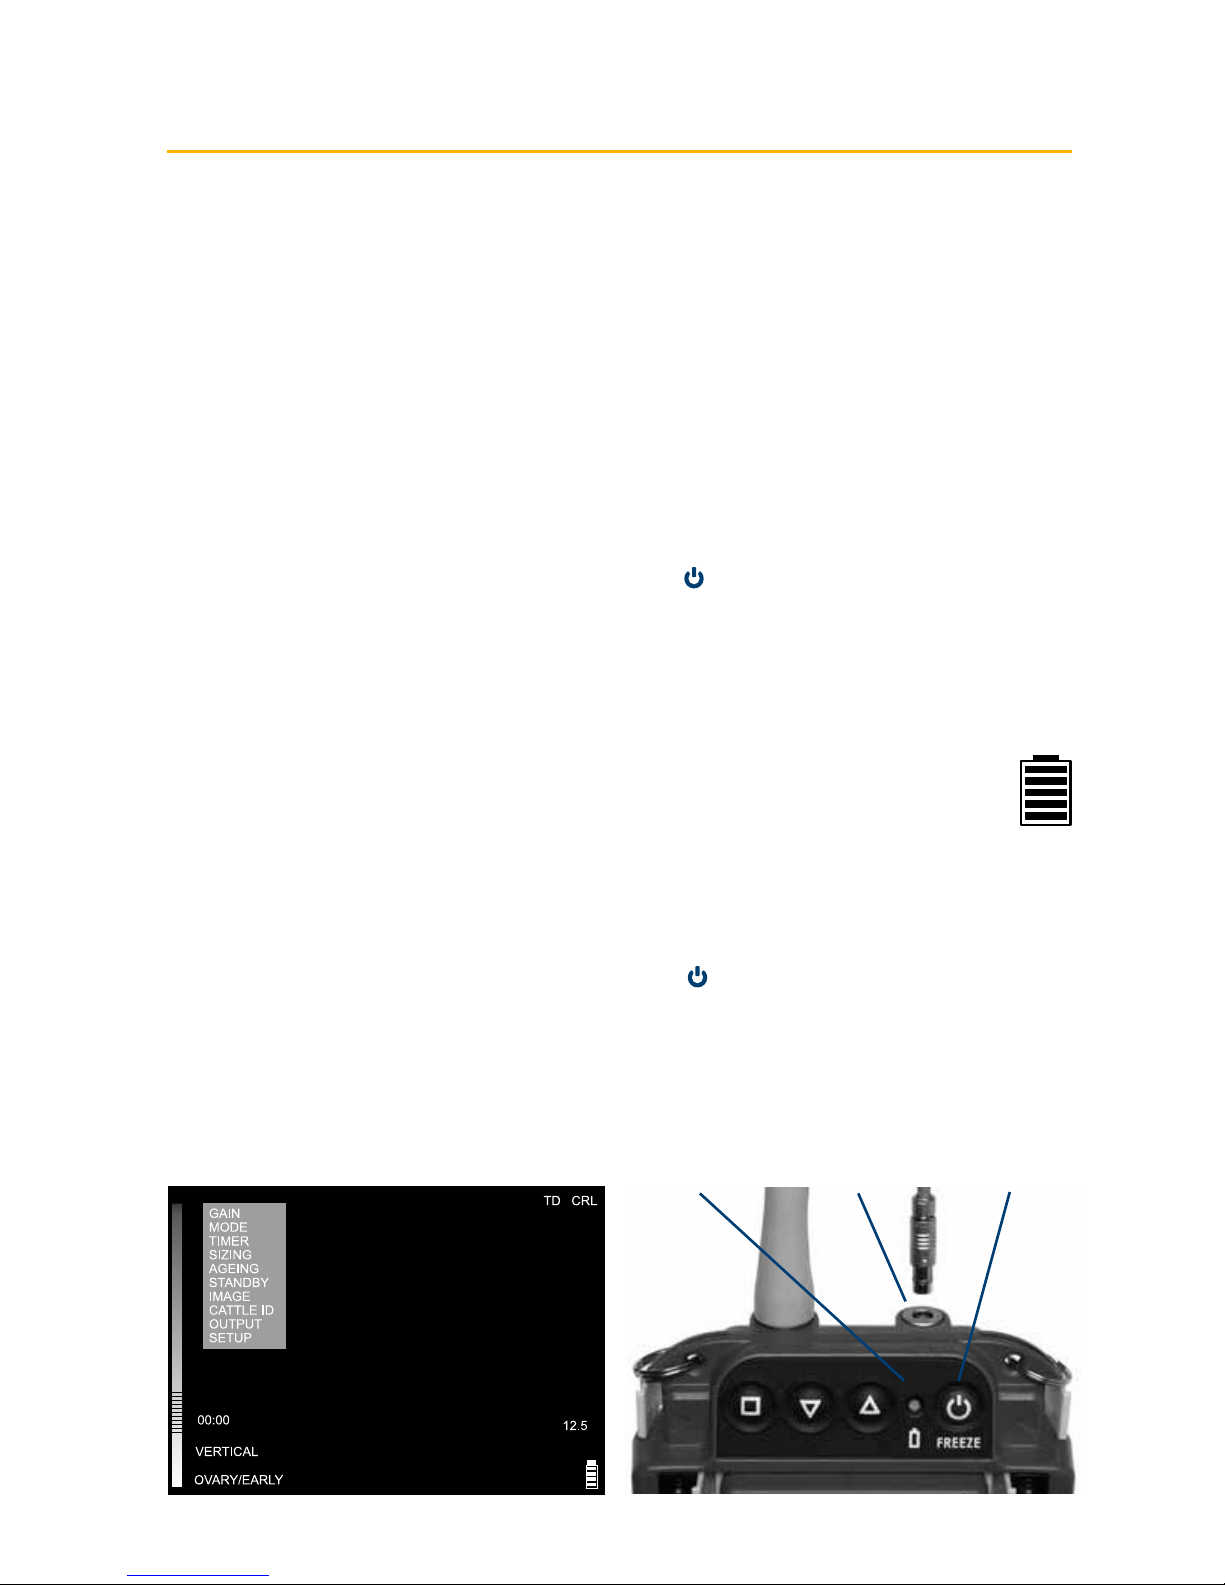
a cable connection is required, attach the plug to the user connector port on top of the scanner (Fig1).
Check the plug and socket are free from debris. Align the dots on the plug and socket and push to click
in place.
1.2 Power
Topower the scanner on, press and hold the Power button
(Fig 2) until the scanner beeps.
Thecontrol panel LED (Fig 3) will illuminate green.
The external battery charge level is indicated on the Battery LED while the scanner is switched on.
On power-up, the scanner will perform a system initialisation, displaying the Main Menu, current
operating mode and battery level indicator. In addition, a grey bar will be visible down the left side of
the display (Fig 3).
The on-screen battery indicator gives a more accurate indication of the battery charge
remaining in the external battery (Fig 4). If viewing on a display headset, the headset may
need to be switched on separately. The scanner will beep a second time, indicating system
initialisation is complete and the system is ready to function.
Note: The scanner will power on with the same settings it had when last switched off.
To switch the scanner off, press and hold the Power button until the scanner beeps twice.
Fig 4
Fig 3 Fig 1 Fig 2
Page 6
6
1.3 Scanning
Easi-Scan Micro-Convex has several selectable preset scanning depth modes. System gain may be
varied to suit current study. A short press on the Power button will freeze and unfreeze the image.
1.3.1 Standard operation
The scanner loads the preferred settings at power on and is ready for use.
To change a setting, press the Select button
to switch the Main Menu on. In the absence of any
button presses, the menu disappears after a short (user selectable) period. Use the Up
and
Down
buttons to navigate the menu and the Select button to switch the relevant Sub-Menu on or
off. In normal operation (Sizing not selected, see 1.3.6) with no menu displayed, the Up
and Down
buttons control the gain setting. To clear the menu or navigate to the previous menu press and hold
the Select button
.
1.3.2 Mode selection
The scanner loads the preferred start-up mode when switched on. Press the Select button
to bring
up the menu, use the arrow buttons to highlight ‘Mode’ and press the Select button
to display the
ModeMenu.
Use the Up and Down buttons to select preferred mode:
1. Near
2. Mid
3. Far
The preferred start-up mode will be stored automatically when the unit is powered off.
1.3.3 Mode description
The Easi-Scan Micro-Convex is designed for OPU applcations and abdominal scanning and offers 3
ranges of examination. Near mode is limited to 6 cm and is optimised for detailed scanning with a
high resolution. Mid mode is set to 8cm with settings balanced between resolution and penetration for
general imaging. All modes provide a wide view from a small contact patch.
1.3.4 Gain control
The gain may be adjusted via the menu, press the Select button
to bring up the menu, use the arrow
Up
and Down buttons to highlight ‘Gain’ and press the Select button to display the Gain Menu,
then use the Up
and Down buttons to adjust the gain.
Pressing the Up
and Down buttons will adjust the gain (while the menu is not on screen.
Thecurrent gain setting (1-to-10) will be briefly displayed at the top of the screen.
Page 7

7
1.3.5 On-farm timer control
The Easi-Scan Micro-Convex provides a timer which can be used to monitor On-farm time. Its
operation is as follows: Select ‘Timer’ from the main menu. The Timer Sub-Menu will appear with the
following options:
Exit Select this option to exit the menu without making any changes
Start/Stop Select this option to start and stop the timer; a running timer is displayed
in a light grey colour, a stopped timer in a dark grey
Reset Select this option to reset the timer
Display Select this option to switch the timer display on and off
Note: The timer will continue to run even if not displayed.
The timer value is stored on power down and on power on will resume with the same value and settings.
1.3.6 Auto standby mode
The Easi-Scan Micro-Convex has a low power standby mode, which can be enabled by selecting a
duration from the Standby Sub-Menu.
If the scanner does not detect an ultrasound image for the period selected in the Standby Sub-Menu,
then it switches to low power mode. In this mode, the power consumption is halved by using a
non-imaging scan, but ultrasound echoes are continually monitored. On detecting ultrasound echoes
or in response to any button press, the scanner immediately reverts to normal imaging.
1.3.8 Image storage and review
The Easi-Scan Micro-Convex allows the operator to store up to 100 images on the scanner.
To store a frozen image, select ‘Image’ from the Main Menu and Select ‘Store’ from the Image
Sub-Menu, the scanner will then store the image. If a Cattle ID has been entered, the ID will be
overlaid across the top left of the image, and the first five characters of the Cattle ID will form the
image filename. If a Practice ID has been entered, this will also be overlaid on the stored image.
Oncethe image storage memory is full (100 images) newly stored images will overwrite the earliest
stored images.
To review the stored images on the scanner, Select ‘Review’ from the Image Sub-Menu and use the
Up
and Down
buttons
to page through the stored images. The scanner defaults to reviewing the
most recently stored image every time it is switched off or if a new image is stored. Otherwise it will
return to the last reviewed image during any scan session. Stored images may be uploaded to a PC
using the USB cable accessory – See WARNING and instructions in USB image retrieval below. All
images stored on the scanner may be removed by selecting the ‘Delete all’ menu option available in
Review mode. Select ‘Exit’ from the Image Sub-Menu to leave image review mode.
Page 8

8
USB image retrieval
Warning: Select USB from the Output Sub-Menu on your scanner BEFORE connecting the
USB cable. Once images have been copied, disconnect the USB cable before switching your
scanner off.
Note: The scanner identifies itself as a removable flash drive and will function with Windows,
Apple and Linux computers.
To retrieve stored images from the scanner, select USB from the Output Sub-Menu. Connect the USB
adapter cable (accessory) to the front panel and connect the USB plug to a computer. The scanner
will identify itself as a USB Flash drive with the name Easi-Scan, if necessary, perform any mounting
operations required by your operating system.
Once the drive has mounted, all of the stored images will be visible as bmp (bitmap) images which can
be copied to the computer and opened in most image viewers.
The scanner is read only and images cannot be deleted via the connected computer. To clear the
images stored on the scanner disconnect the USB lead, and Select ‘Delete all’ from the scanner menu,
available when ‘Review’ is selected from the Image Sub-Menu. See Image storage and Review section.
1.3.9 Image ID entry
The Easi-Scan Micro-Convex allows the operator to enter an identification number (ID), which will be
associated with the image once it is stored.
If a ID has been entered, on storing an image the ID will be overlaid across the top left of the image, and
the first five characters of the ID will form the image filename. The ID will only be displayed when the
image is frozen. Selecting ‘ID’ from the Main Menu, brings up the ID Entry Menu. The operator can use
the
Up and Down
buttons to select the digit to be changed, pressing Select highlights the digit
and its value can be changed by using the
Up and Down b
uttons, pressing Select again returns
to the digit selection mode. To exit this sub-menu, it is necessary to either wait for the menu to blank or
press and hold the Select button
until the scanner beeps twice andthe menuexits.
1.3.10 Output selection
On Easi-Scan Micro-Convex , current BCF Display and accessory products are automatically detected
when connected: all BUGs variants will be detected upon connection, switching the output to Goggles
Mode; connecting the wrist display will cause the Easi-Scan Micro-Convex to switch to Wrist Display
Mode; and connecting the USB cable between the Easi-Scan Curve and a computer will switch the
scanner into USB mode. If using older accessories or cables it may be necessary to manually set the
output.
The operator can select from 3 different uses on the front panel user connector:
Page 9
9
Caution: If you rely on a viewing device plugged into the scanner display connector, altering this
setting will interrupt viewing, making it difficult to revert to correct setting. It is recommended
you do not alter this setting unless you have a Wireless monitor which will continue to display
regardless of changes to the Output selection setting.
The Output Sub-Menu can be accessed by Selecting ‘Output’ from the Main Menu.
Use the Select button
to choose from the following output options;
Wrist display Selecting this option feeds a digital video signal out of the front panel, this option
is used with the BCF wrist display accessory
Goggles Selecting this option feeds a standard greyscale NTSC video signal out of the
front panel, this option is used for BCF BUGs or other goggles, or if using a video
lead accessory (e.g. for video printer)
USB Selecting this option allows the user to connect the scanner to a computer via
the USB adapter accessory. This mode is used to copy stored images from the
scanner. See WARNING and instructions in Appendix B)
Note: If there is no image on your connected viewing device, and you do not have a Wireless
monitor to facilitate menu navigation to select the correct video output signal, the scanner
output can be switched by pressing and holding the button combinations (below) while
switching the scanner on.
For goggles Press and hold and simultaneously while switching on
For wrist display Press and hold
and simultaneously while switching on
1.3.10 Selection of languages for the menu
The menu on Easi-Scan is available in English, German, French, Italian, Spanish, Polish, Portuguese
and Russian.
To choose the language:
Press the button
to switch the Main Menu on. Use the Up and Down buttons to select ‘Setup’.
Then use Up
and Down buttons to select Language. Then choose your language from the menu.
If you have chosen the wrong language accidently, disconnecting the battery will switch the scanner
back to the previous language. The language setting will only be saved if you switch off your scanner
using the Power button
.
1.4 Scanner setup
Preferences such as image orientation and graticule grid display may be altered and stored as default
at start-up. The Setup Sub-Menu can be accessed by Selecting ‘Setup’ from the Main Menu.
Page 10

10
1.4.1 BUGs control
The first 2 options in the Setup Sub-Menu allow the user to adjust the brightness and contrast of
BCFBUGs headmounted display.
To adjust the settings, select either ‘Contrast’ or ‘Brightness’, the word ‘Adjust’ will appear alongside
the selected option. Use the Up and Down buttons to adjust the settings, press the
Select button
to exit adjustment mode.
1.4.2 Low battery warning
When the external battery is nearing the end of its useful capacity, the on-screen indicator will start to blink.
In addition, by switching the ‘Low Batt Buzzer’ option to on, the scanner will give an audible indication.
1.4.3 Grid & graticule display
The Easi-Scan Micro-Convex allows the operator to display grid and/or graticule lines on the image.
The following options are available:
Off No grid or scale markings displayed
Grid 1⁄2 cm A 1⁄2 cm grid is displayed
Grid 1 cm A 1 cm grid is displayed
Scale Scale markings (1/5 cm on Detail mode, 1/2 cm on other modes)
are displayed down each side of the image
Grid & scale A 1 cm grid, and scale markings are displayed
1.4.4 Video link channel (remote monitor option)
The Easi-Scan Micro-Convex can transmit to an optional wireless monitor. To reduce interference and
allow the use of multiple Easi-Scans, the scanner can be set to transmit on one of four channels.
Press the Select button
to bring up the RF Channel Sub-Menu and use the Up and Down
buttons to select the required channel.
1.4.5 Bluetooth enable
The Easi-Scan Micro-Convex can be controlled via Bluetooth (See Appendix A).
This sub-menu allows the Bluetooth module to be switched On or Off.
The Bluetooth control functions are also available through an Android app called “Easi-Scan
Bluetooth” available from the Android app store.
Page 11

11
Bluetooth control
The Easi-Scan Micro-Convex allows control of certain scanner functions via Bluetooth, all functions
are controlled in the same manner. A Bluetooth device (phone, PDA, PC etc) sends an address entry
(vcard) where the Name takes one of the following forms:
M Sending this name will switch to the next mode
M D Sending this name will switch to Detail mode
M F Sending this name will switch to Foetal Sexing mode
M O Sending this name will switch to Ovary/Early mode
M L Sending this name will switch to Late mode
C (followed by Cattle Identification) – Sending this name followed by a space and
the Cattle ID number will change the cattle ID on the scanner
P (Practice Name) – Sending this name followed by a space and the Practice name
will change the practice name on the scanner
F Sending this name will Freeze/Unfreeze the scanner
Initial ‘pairing’ between your Bluetooth device and your Easi-Scan Micro-Convex will require you to
enter a ‘Passkey’. Refer to the manual for your Bluetooth device for details on pairing with another
device.
The passkey for Easi-Scan Micro-Convex is ’0000’ (four zeros).
1.4.6 Practice data entry
The Easi-Scan Micro-Convex allows the operator to enter a practice name which will be overlaid on
any image that is stored. Selecting ‘Practice Data’ from the Setup Sub-Menu brings up the Practice
Data Entry Menu. The operator can use the Up
and Down buttons to select the digit to be
changed, pressing ‘Select’ highlights the digsit and its value can be changed by using the Up
and
Down
buttons, pressing ‘Select’ again returns to the digit selection mode. To exit this sub-menu,
it is necessary to either wait for the menu to blank or press and hold the Select button
until the
scanner beeps twice and the menu exits.
1.4.7 Factory reset
Selecting ‘Reset’ from this sub-menu will reset all settings to factory defaults, stored images are
not affected.
1.4.8 Menu timer
Selecting ‘Short’ from this sub-menu will set the time the menu is displayed to about one second.
Selecting ‘Long’ from this sub-menu will set the time the menu is displayed to about four seconds.
1.5 Smart Display
The Easi-Scan Micro-Convex may be used with the Smart Display accessory .
Page 12

12
To use the Smart Display, make sure the Easi-Scan Micro-Convex is switched off, feed the probe
cable through the lower handle of the Smart Display, engage the rear of the Easi-Scan Micro-Convex
with the lip on the Smart Display and press the Easi-Scan Micro-Convex into place, ensuring that the
yellow clips on the Easi-Scan Micro-Convex are fully engaged with the Smart Display and switch on by
pressing the power button on the front of the Smart Display.
When Easi-Scan Micro-Convex is used with Smart Display it can be used for OPU procedures with OPU
handle and needle guide.
Page 13

13
2 Care & maintenance
2.1 Easi-Scan Micro-Convex & power packs
The Easi-Scan Micro-Convex is designed for reliability in the veterinary and animal husbandry
marketplace. Our engineers and their appointed agents are available to provide rapid service
assistance to ensure optimum performance of BCF systems. However there is no substitute for careful
usage.
We state that the Easi-Scan Micro-Convex is splashproof, indeed it is sealed to IP65, but you should
note the following important points:
1. The unit is not sealed against jets of water. Water will penetrate your scanner if it is hosed down
or rinsed under a fast flowing tap
2. The unit is NOT corrosion proof and thus it should not be left wet
3. Some types of goggles are not waterproof and care should be taken to avoid submersion
4. The standalone charger, battery charger and charging carry case are not waterproof – avoid
getting them wet
Cleaning
• Antibacterial wet wipes are particularly effective for scanner, battery and probe wipedown, and
reduce the need for drying. This prevents problems related to corrosion following washdown
• The plastic scanner, power pack and carry pack can also be cleaned using a cloth, soap and
warm water
• Sponging down or even brief, shallow submersion is less aggressive than rinsing or hosing
down
• Thoroughly dry the scanner before storage or charging. Take care to detach the external power
pack and ensure interconnect areas are dry also
• Neoprene Scanner waist pouch may be machine washed
• Warning: The scanner and power pack must not be stored damp – severe corrosion will result.
See separate section for probe care
• Your equipment should be returned periodically to a BCF qualified service engineer. Theservice
agent will use special test equipment to thoroughly check the instrument and advise of any
work that appears to be necessary. Any other service problems should be referred to our
qualified service engineers
2.2 Battery charging
The external battery can be charged in the carry case either while connected to the scanner with the
scanner docked or in the battery charging dock. The battery can also be charged in the standalone
charger.
The battery LED will flash slowly while charging with the colour indicating the current state of charge
(Red = less than 25%, Amber = 25% – 75%, Green = more than 75%. Once fully charged the LED will
either show continuous green or a rapid flashing green.
All batteries will be charged within five hours, but will not be damaged by continued charging.
Page 14

14
The NiMH batteries in the battery pack are paired with charge management circuits to give several
hundred recharge cycles. While the battery is in a good condition and is fully charged, the scanner will
run for the duration below. This time will vary depending on the display option used.
• Easi-Scan Micro-Convex with power pack latched 4 hours
Scanner run time may approach double this duration using the Auto Standby feature.
Electrical connection to the power pack is through the gold pads on battery and scanner. Power pack
output is protected with a resetting fuse but care should be taken to prevent short circuiting the gold
connector pins and pads. Battery metering relies on internal calculation. Repeated cycling without
complete discharge or charge completion will result in increasingly inaccurate battery level indication.
For peak performance, and for most accurate battery meter indication, batteries should occasionally
be run flat followed by a complete charge cycle.
Occasionally (every ten cycles, or once a fortnight) discharge until the scanner automatically switches
off, followed by a complete charge in one go (preferably from the mains supply).
Notes: The biggest difference you can make towards battery longevity is the occasional full
discharge-recharge cycle. When charging in short bursts e.g. top-up charging between
jobs, or in-car with Cigar power cycling on engine start etc the charger uses a less
accurate method to terminate charging. Occasional full charge-discharge cycle not only
helps maintain maximum capacity, but ensures updated calibration of the integrated
charge control circuit for optimum charge control which in turn ensures maximum battery
lifetime. Corrections are also made to battery level metering for continued accuracy of
on-screen battery level display.
‘Memory effect’ - if NiMH batteries are not used regularly (weekly) or fully (repeatedly
using only a fraction of full capacity) there will be a temporary reduction in available
capacity, with resulting reduced run times. After the battery has been “exercised” the
full capacity returns. A return to almost full capacity is achieved with a complete charge
/ discharge cycle. Further marginal improvement in capacity may be seen progressively
over two to three complete charge/discharge cycles.
Do not store the scanner for extended periods without occasional exercise. Store the scanner
fully charged – particularly in hot climates.
Notes: This is only relevant if your scanner will remain unused for 6 months or more. Some
permanent reduction in capacity can be incurred through prolonged storage without
occasional recharging. Battery charge will not be maintained very long in storage –
particularly at higher ambient temperatures. Batteries can lose as much as 30% of
their charge in 1 month’s storage.
Warning:
To reduce the risk of burns, fire, electric shock, or injury to persons an
appliance should never be left unattended when plugged into mains or
12V cigarette lighter.
Page 15

15
2.3 Easi-Scan Micro-Convex probe
While every attempt has been made to make the probe as rugged as possible the crystal array remains
vulnerable and should be protected from knocks. Even a small knock against a hard object can cause
damage to the probe elements situated behind the thin rubber coating on the probe face. The probe
has a protective sheath covering the length of cable subject to greatest wear and flexing. Any damage
to this sheath or the rest of the cable should be repaired before further use to prevent moisture
ingress that will rapidly damage the probe. The probe should be checked regularly for such damage.
Gels
Use only gels recommended by BCF TechnologyLtd. Do not store the probe in gel.
Cleaning
The probe may be cleaned by removing all organic/protein residue and disinfecting using an IPA or
10% bleach wipe. Do not soak transducer in IPA or bleach.
Storage
Clean and dry the probe head prior to storage in dry location. Do not store the transducer in gels
or cleaning/disinfecting solutions. This will lead to premature deterioration of transducer materials.
Warning: Never sterilize the transducer with autoclave, ultraviolet, gamma radiation, gas, steam or
heat sterilization techniques. Severe damage will result.
Do not expose the transducer to materials containing the following agents:
• Acetone
• Methanol
• Mineral oil
• Iodine
• Freon
• Industrial cleaners
• Materials containing perfumes (lotions, gels, etc.)
Transducers must not be soaked in alcohol, bleach, or hydrogen peroxide.
Page 16

16
Technical specification
Digital ultrasound scanner with fixed probe
Size 22 x 15 x 7 cm / 6 x 8.5 x 2.5 in
Weight 2 kg / 4 lb (with battery)
Mechanical Splashproof, rugged plastic casing. Sealed to IP65
User operation
Sealed 4 button key pad with LED
User functions
• Selection of operating modes optimised to application, automatically setting suitable range,
frequency & post processing e.g. dynamic range, edge enhancement
• Preset modes: Near (6 cm), Mid (8 cm), Far (12 cm)
• Overall gain adjustable
• Image freeze
• Foetal ageing reference
• Image store and review with filename entry by keypanel or over Bluetooth
User output
Waterproof User connector provides power and selectable signal output
• Composite NTSC video format for display headset Video review or Video printer accessories
using adapter lead (accessory)
• Digital Video out (proprietary format) for wrist display (accessory)
• USB PC connection using adapter lead (accessory)
Page 17

17
Power output
5 V @ 250 mA max.
Storage
100 images with user entered image file identity Stored on non-volatile internal flash memory
image format 640 x 480 bitmap, 8 bpp
Probe
• Fixed broadband micro-convex probe
• 15 mm radius
• Frequency range 5 MHz to 8 MHz
• 80 element crystal array
• 10 digital channels
• 90º curved
Power
• External battery gives four hours continuous use
• Charge time 5 hours
• Runtime extended with auto standby enabled
• Indicator on screen. Low battery audible buzzer.
Temperature range
• -10 ºC to 40 ºC / 14 ºF to 104 ºF
Please note that frequent usage above 35 ºC / 95ºF will shorten battery lifetime. Video link stability
maybe affected below -10 ºC / 14 ºF until scanner has warmed up.
Page 18
18
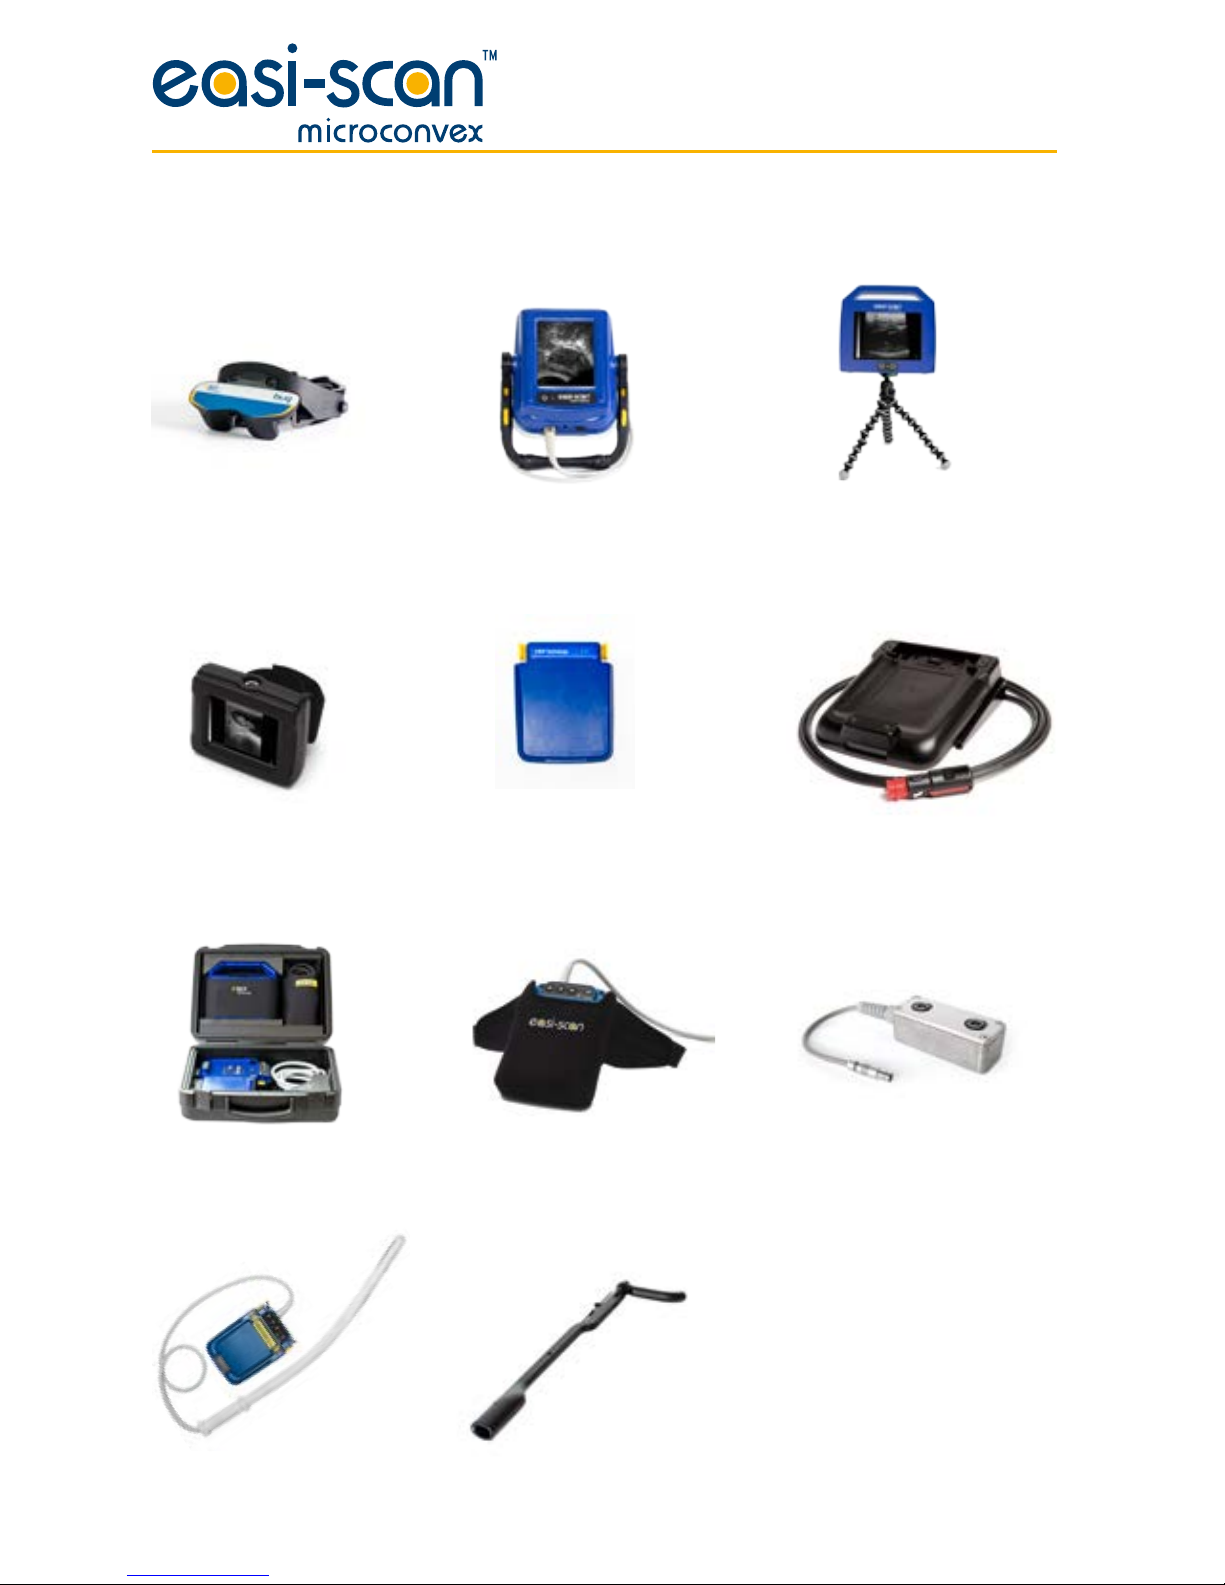
Accessories
Battery pack Battery charger
Charging carrycase
OPU handle
Carry bag Video splitter
Introducer
Wrist monitor
BUG
(BCF Universal Goggles)
Smart Display Remote Display
Page 19

19
Service centres
If your Easi-Scan requires servicing please contact official authorised service centres below or
distributor in your country. Distributors contact details can be found at www.bcftechnology.com
In the UK:
BCF Technology Ltd
Imaging House, Phoenix Crescent
Strathclyde Business Park
Bellshill, ML4 3NJ
Scotland, UK
T +44 (0)1506 460 023
[email protected]
www.bcftechnology.com
In Ireland:
BCF Technology Ltd
Unit 2, Quayside Business Park
Mill Street, Dundalk
Co Louth, Ireland
T +353 (0)42 932 0070
[email protected]
www.bcftechnology.com
In North America:
BCF Technology USA Ltd, LLC
2900 43rd Street NW, Suite 600
Rochester, Minnesota 55901
USA
T 507-529-8200
T 800-210-9665
F 507-529-8205
[email protected]
www.bcftechnology.com
In Australasia:
BCF Ultrasound Australasia Pty Ltd
10/56 Norcal Road
Nunawading 3131
Melbourne, Victoria
Australia
T +61 (0)3 9894 8980
[email protected]
www.bcfultrasound.com
Page 20

© BCF Technology Ltd, Dec 2014
For further information on care and maintenance of the Easi-Scan Curve please visit the
“Customer support“ section of the BCFwebsite www.bcftechnology.com
 Loading...