

Page 1
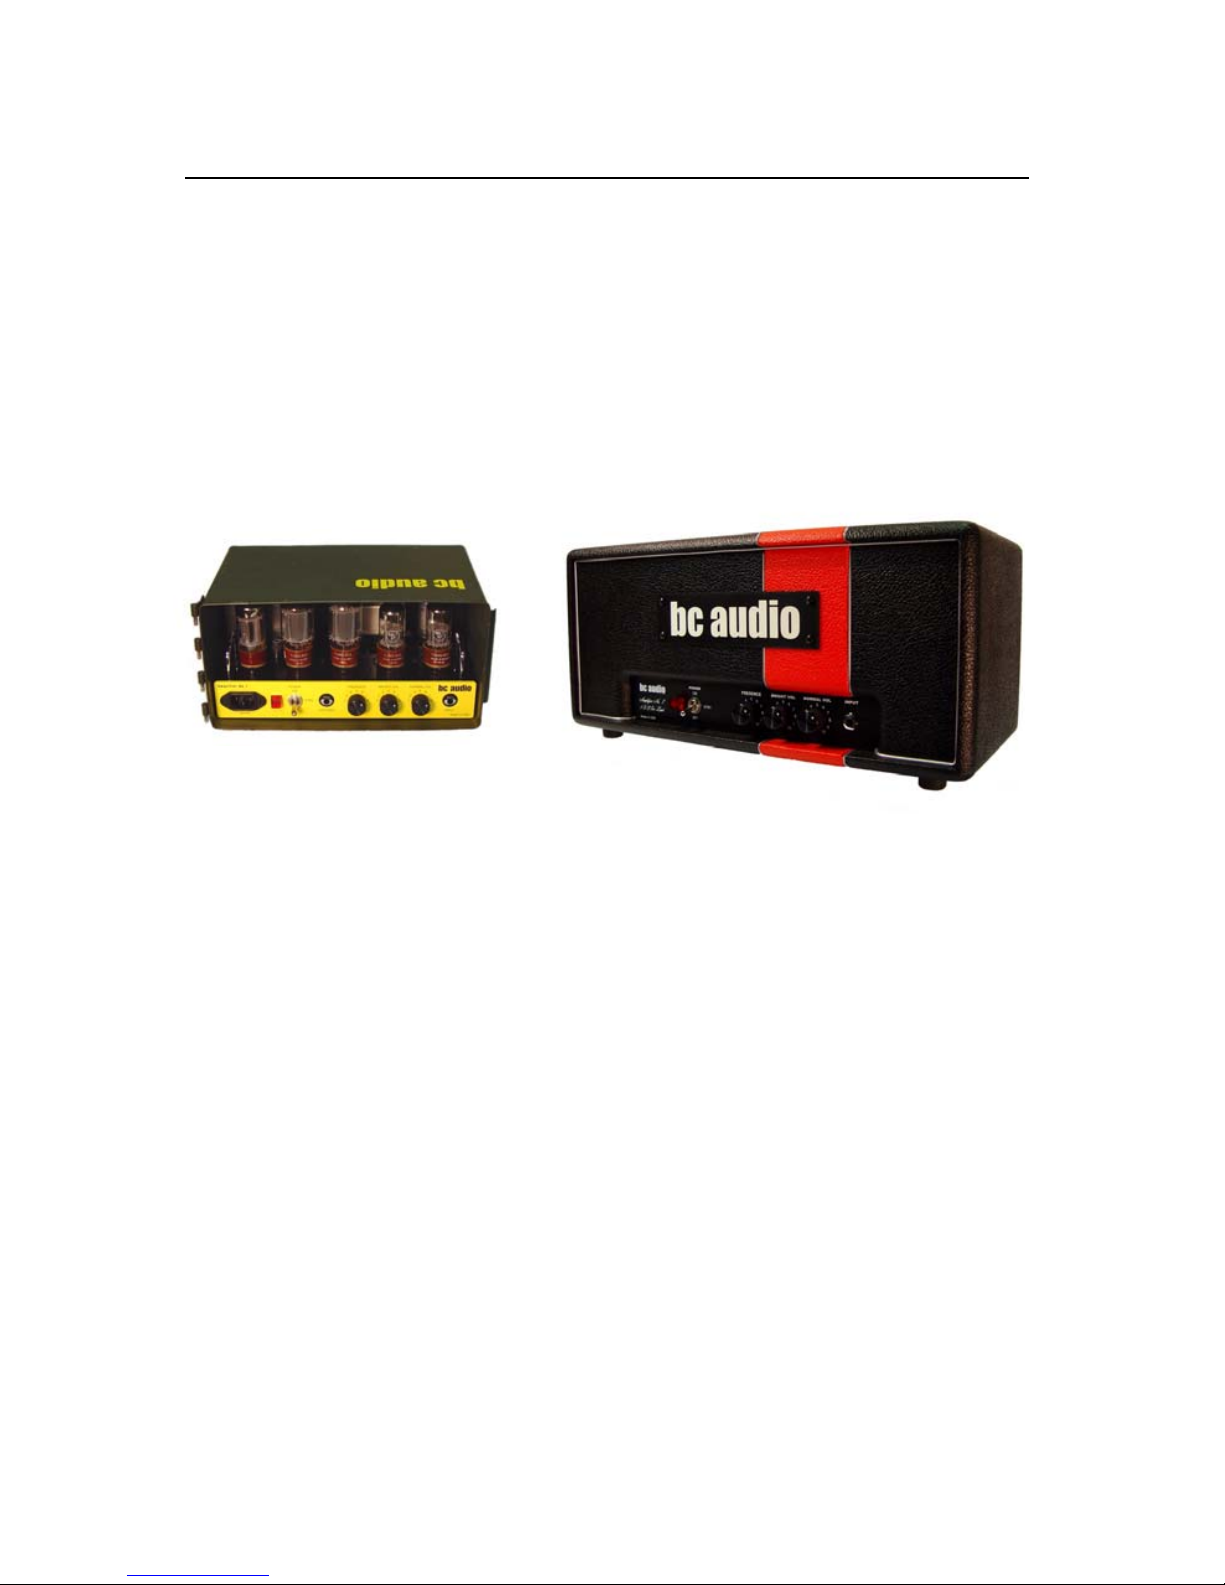
bc audio hand-made all-tube non-clone guitar amps
Amplifier No. 7
OWNER’S MANUAL
Models A7, A7HB, A7-240 and A7HB-240
Congratulations on your purchase of BC Audio’s flagship model,
Amplifier No. 7, developed by award winning amp builder and guitarist
Bruce Clement. That’s me.
I designed Amplifier No. 7 to be the ideal rock amp for club and concert
work. It is a dual-channel non-Master Volume amp, meant to be played
loud and driven hard. Construction is heavy-duty, meant for real-world
use and abuse. It will drive any 8 or 16 ohm cab and works well with
pedals. Amplifier No. 7 is made with the highest quality components,
USA iron, and true point-to-point wiring.
I sincerely hope you enjoy playing your new Amplifier No. 7 as much as I
enjoyed building it.
Page 2
bc audio AmplifierNo.7Owner’sManual
IMPORTANT SAFETY INSTRUCTIONS
READ, FOLLOW, HEED, AND KEEP ALL INSTRUCTIONS AND WARNINGS.
• DO NOT REMOVE SCREWS ON BOTTOM/REAR. LETHAL VOLTAGES LURK
INSIDE. BOO! CONTACT THE MANUFACTURER FOR SERVICE INFORMATION.
SERVICE MUST BE PERFORMED BY QUALIFIED PERSONNEL.
• THIS AMPLIFIER IS CAPABLE OF PRODUCING HIGH SOUND PRESSURE
LEVELS. CONTINUED EXPOSURE TO HIGH S OUND PRESSURE LEVELS CAN
CAUSE PERMANENT HEARING IMPAIRMENT OR LOSS. WHAT? SPEAK UP!
USER CAUTION IS ADVISED AND EAR PROTECTION IS RECOMMENDED IF
UNIT IS OPERATED AT HIGH VOLUME. WHICH OF COURSE IT SHOULD BE.
• WHEN POWERED ON, THE TUBES MAY BECOME VERY HOT, HOT ENOUGH
TO BURN SKIN ON CONTACT. SO DON’T TOUCH ‘EM. AND KEEP OUT OF
REACH OF CHILDREN AND PETS.
• DO NOT OPERATE WITHOUT SPEAKER OR OTHER SUITABLE LOAD
CONNECTED TO THE SPEAKER JACK, AS DAMAGE MAY RESULT.
• DO NOT OPERATE NEAR ANY HEAT SOURCE.
• DO NOT OPERATE WITH LID IN CLOSED POSITION (MODELS A7 AND A7-240)
OR WITH VENTILATION OPENING(S) COVERED, AS THIS MAY OVE RHEAT THE
AMP. DUH.
• DO NOT USE NEAR SPLASHING, FALLING, SPRAYING, OR STANDING
LIQUIDS. AND DON’T EVER LET SOME FOOL SET HIS DRINK ON YOUR RIG.
• CLEAN ONLY WITH A LINT-FREE DRY CLOTH. DO NOT USE CLEANING
AGENTS.
• CONNECT POWER CORD ONLY TO A POLARIZED, SAFETY GROUNDED
OUTLET WIRED TO CURRENT ELECTRICAL CODES AND COMPATIBLE WITH
VOLTAGE, POWER, AND FREQUENCY REQUIREMENTS STATED ON THE
APPLIANCE.
• PROTECT THE POWER CORD FROM DAMAGE DUE TO BEING WALKED ON,
PINCHED OR STRAINED.
• UNPLUG THE APPARATUS DURING LIGHTNING STORMS OR WHEN NOT IS
USE.
• REPLACE FUSE WITH CORRECT TYPE AND RATING AS INDICATED IN THIS
MANUAL AND ON THE APPLIANCE.
• ONLY USE ATTACHMENTS, ACCESSORIES, STANDS, OR BRACKETS
SPECIFIED BY THE MANUFACTURER FOR SAFE OPERATION AND TO AVOID
INJURY.
2
OVERVIEW
MAJOR FEATURES
Built by me in the USA
100% All-Tube Signal Path
True Point-to-Point Wiring
Custom Heavy 16ga Powder Coated
Steel Chassis
American-made Paper Bobbin/Paper
Layer Wound Transformers
Stainless Steel Hardware
Tube Rectifier
Class A Cathode Biased Output
Section
Choice of Power Tubes
Octal Preamp
Combination Power/Standby Switch
Bright and Normal Channels
Presence Control
Will Drive Any 8 or 16 Ohm Guitar
Speaker Cabinet
TUBE COMPLEMENT
For 15 Watts*
(1) 5Y3 Rectifier**
(2) 6V6 Power Tubes
(2) 6SL7 Octal Preamp Tubes
For 25 Watts*
(1) 5AR4/GZ34 Rectifier
(2) 5881 Power Tubes
(2) 6SL7 Octal Preamp Tubes
*maximum power into 16 ohms
** If ordered in 15w configuration, your
Amplifier No. 7 is supplied with an
NOS (New Old Stock) 5Y3. If possible,
replace only with an NOS 5Y3. New
production examples do not produce
the ideal B+ voltage for 6V6s.
ESSENTIAL INFORMATION
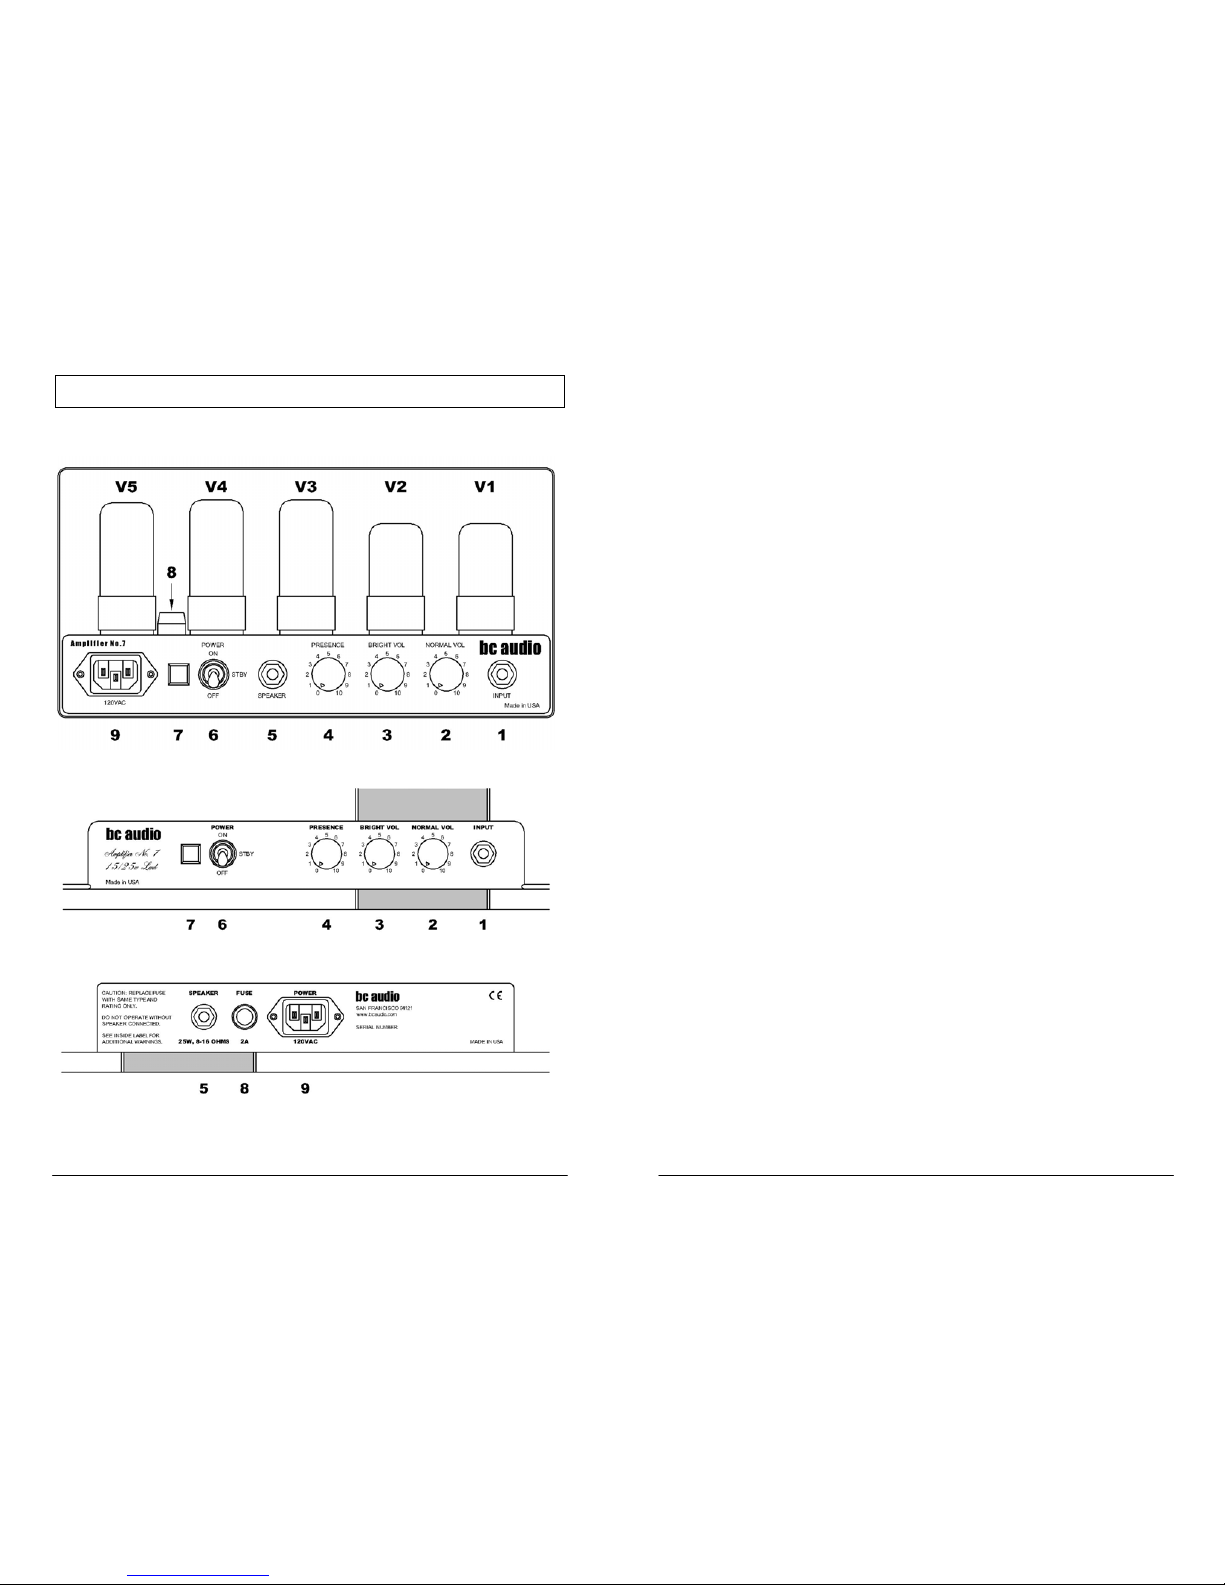
Tube placement, left to right (facing the front, see diagram, p. 4):
V5 V4 V3 V2 V1
15w Configuration: 5Y3 6V6 6V6 6SL7 6SL7
25w Configuration: GZ34 5881 5881 6SL7 6SL7
Always use the appropriate rectifier tube with your chosen power tubes, as
indicated above. Do not use a GZ34 with 6V6s, as it will shorten their life.
Never use a solid state rectifier replacement module in place of a tube rectifier,
unless it is designed to emulate the rectifier you are replacing, in which case,
why not just use the real thing?
Power (Models A7 and A7HB): 120VAC, 60Hz, 1A
Power (Models A7-240 and A7HB-240): 240VAC, 60Hz, 0.5A
Fuse (Models A7 and A7HB): 2A Slow Blow, Type 3AG, 1/4” x 1-1/4”
Fuse (Models A7-240 and A7HB-240): 1A Slow Blow, Type 3AG, 1/4” x 1-1/4”
3
Page 3
bc audio AmplifierNo.7Owner’sManual
CONNECTIONS AND CONTROLS
Model A7 (A7-240 Similar)
Models A7HB and A7HB-240 – Front Panel
Model A7HB – Rear Panel (A7HB-240 Similar)
4
1. Input Jack
The INPUT jack feeds the Normal and Bright channels simultaneously. Plug a
guitar cable into the INPUT jack, and the other end into your guitar, pedal board
or accordion.
2 & 3. Volume Controls
NORMAL VOL (2) sets the volume level of the Normal Channel, while BRIGHT
VOL (3) sets the volume level of the Bright Channel. No kidding! By mixing
Bright and Normal Channels, you can dial in an infinite variety of mellow to
cutting tones. Both channels are active at all times.
4. Presence Control
PRESENCE adjusts the amp’s overall brilliance and bite. Unlike a “Tone” or
“Treble” control, Presence works in the amp’s power section to subtly change the
sound and feel of the amp. Lower settings produce a darker, “browner” sound
(yeah, I know), while higher settings produce a brighter, sharper tone.
5. Speaker Output Jack
Plug a speaker cable into the SPEAKER jack, and plug the other end into any 8or 16-ohm guitar speaker cabinet. Be sure to use a speaker cable, not a guitar
cable, or damage to the cable, the amp and your reputation may occur. It is
perfectly safe to use a quality attenuator for those quiet restaurant gigs and
weddings. Say, what are you doing playing those kinds of shows?
6. Power/Standby Switch
Amplifier No.7 is equipped with a combination Power/Standby switch. To turn on
the amp, move the POWER switch to the center STBY (Standby) position to
allow the tubes to warm up. After a half-minute or so, flip the switch up to the ON
position. To turn the amp off, simply flip the switch all the way down to OFF.
There’s no need to put it in Standby when shutting down.
7. Power Indicator
The Power Indicator lamp will illuminate when power is connected and the
POWER switch (6) is set to either STBY (Standby) or ON. If it doesn’t light, the
power is not connected, or the fuse (8) has blown.
8. Fuse Holder (Top of Chassis on Models A7 and A7-240)
Disconnect power before changing the fuse. Push in and turn counter-clockwise
to remove the fuse. Replace with same type and rating only (see p. 3). On
Models A7 and A7-240, you will need to remove one of the tubes adjacent to the
fuse holder (V4 or V5) to access it.
9. IEC Power Inlet
With the POWER switch (6) in the OFF (down) position, plug the included power
cord into the IEC power inlet, and the other end into a suitable power source.
Any medium or heavy duty cord designed to fit the standard IEC power inlet will
work fine, but Amplifier No.7 ships with a Hospital Grade cord. Sick! Get it?
Hospital...Sick...
5
Page 4

bc audio AmplifierNo.7Owner’sManual
SETUP
Opening and Removing the Lid (Models A7 and A7-240 Only)
To open the lid, lift up on the side latch, then pull the lid open.
If you place the amp on top of a speaker cabinet, I suggest that you detach the
lid and place it out of the way to avoid vibration noise from the handle. To detach
the lid, open it at about 90 degrees, then slide it sideways at the hinge. To put
the lid back on, align the holes with the pins and slide it on. This can be a little
tricky in a dark bar at 2am, so take your time.
Sometimes the small handle attached to the end of the can will vibrate. You can
eliminate vibration by looping your guitar cable through the handle.
Stage Placement (Models A7 and A7-240 Only)
I like to place Amplifier No. 7 on top of a speaker cabinet, but you may place it on
the floor next to your cab or rack, or even up front with your pedal board.
Place it on its side, controls facing forward and tubes vertical; or on its bottom,
controls up and tubes horizontal. The metal enclosure will remain a bit cooler
with the amp placed on its bottom. Heat rises, you know. The case may get
quite hot; this is normal.
Contact BC Audio for a rack mount kit.
PLAYING IT
Control Settings
There are only three knobs, so you won’t have a hard time dialing in your sound.
And like the great amps of yesteryear, you can’t really get a bad tone out of
Amplifier No. 7. Plug it in, set the controls just about anywhere, and off you go.
Experiment with the mix of BRIGHT VOL and NORMAL VOL settings; you will
find quite a range of possibilities. PRESENCE is rather subtle, but you’ll hear it
and feel it, so try it, you’ll like it!
Tone Tip: Use your guitar’s volume controls! Set the amp for the most gain you
will need, then back off the guitar’s volume to clean it up. Some of the smoothest
clean tones you will ever hear can be had by backing off on an overdriven tube
amp.
6
Getting Distortion
As a non-Master Volume amp, Amplifier No. 7 is meant to be cranked up in order
to bring out its overdrive tones. To really hear Amplifier No. 7 and what it can do
for you, I suggest you start out by plugging your guitar directly into the amp
without any pedals, rack gear or multi-fx units.
Depending on the strength of your pickups, you will find that break-up begins
when the volume controls are on about 5. The Bright Channel naturally has
more gain and will yield overdrive tones at lower settings than the Normal
Channel. Increasing BRIGHT VOL and/or NORMAL VOL settings will bring on
more rich, thick and chocolaty distortion. Adjust PRESENCE for the desired
amount of bite.
Tone Tip: You don’t need as much gain as you think! Some of the biggest and
baddest guitar tones don’t have tons of gain. It’s the character of the crunch
coming from the power tubes that makes it sound rich and full of harmonics.
Using Overdrive/Distortion/Boost/Dirt/Fuzz Pedals
If you need a bit more gain for solos or very high-gain tones, feel free to use a
pedal. Amplifier No. 7 works well with these kinds of pedals.
Tone Tip: I’ve met a lot of players who put a Fuzz Face in front of a Marshall
Superlead - which at any sane volume is running clean - and they complain that
they don’t sound anything like Jimi Hendrix. And they’re right, they don’t! Let me
share with you a simple technique that many great players - including Jimi - have
used since the dawn of rock: Set the amp loud enough to be already somewhat
distorted without the pedal engaged. When you do kick in the pedal, it will still be
the “voice” of the amp that you hear. The pedal gives you lots of gain, but it is
the amp that produces that sound, not the pedal.
7
Page 5

LIMITED WARRANTY
BC Audio warrants this product against defects in materials and workmanship for ONE (1 )
YEAR from date of original retail purchase (30 days for tubes). BC Audio reserves the
right, before having any obligation under this limited warranty, to inspect the damaged
product, and all costs of shipping the product to BC Audio for inspection shall be borne
solely by the purchaser. In order to recover under this limited warranty, Purchaser must
make claim to BC Audio within 30 days of occurrence, and must present acceptable proof
of original ownership (such as original receipt) for the product. BC Audio, at its option, shall
repair or replace the defective unit covered by this warranty.
This limited warranty does not cover any damage to this product that results from improper
installation, accident, abuse, misuse, neglect, natural disaster, insufficient or excessive
electrical supply, abnormal mechanical or environmental conditions, or any unauthorized
disassembly, repair, or modification. This limited warranty also does not apply to any
product on which the original identification information has been altered, obliterated or
removed, has not been handled or packaged correctly, has been sold as second-hand or
has been resold contrary to the US export regulations.
This limited warranty covers only repair or replacement of defective BC Audio products, as
provided above. In the event of a claim, BC Audio's sole obligation shall be replacement of
the product.
DISCLAIMER OF WARRANTY
EXCEPT FOR THE LIMITED WARRANTY PROVIDED HEREIN, TO THE EXTENT
PERMITTED BY LAW, BC AUDIO DISCLAIMS ALL WARRANTIES, EXPRESS OR
IMPLIED, INCLUDING ALL WARRANTIES OF MERCHANTABILITY AND/OR FITNESS
FOR A PARTICULAR PURPOSE. TO THE EXTENT THAT ANY IMPLIED WARRANTIES
MAY NONETHELESS EXIST BY OPERATION OF LAW, ANY SUCH WARRANTIES ARE
LIMITED TO THE DURATION OF THIS WARRANTY. SOME STATES/PROVINCES DO
NOT ALLOW LIMITATIONS ON HOW LONG AN IMPLIED WARRANTY LASTS, SO THE
ABOVE LIMITATIONS MAY NOT APPLY TO YOU.
LIMITATION OF LIABILITY
REPAIR OR REPLACEMENT OF THIS PRODUCT, AS PROVIDED HEREIN, IS YOUR
EXCLUSIVE REMEDY. BC AUDIO SHALL NOT BE LIABLE FOR ANY SPECIAL,
INCIDENTAL OR CONSEQUENTIAL DAMAGES, INCLUDING, BUT NOT LIMITED TO,
PROPERTY DAMAGE, LOST REVENUES, LOST PROFITS, RENTAL OF
REPLACEMENT EQUIPMENT, DOWNTIME, DAMAGE TO PROPERTY, AND THIRDPARTY CLAIMS, ARISING OUT OF ANY THEORY OF RECOVERY, INCLUDING
WARRANTY, CONTRACT, STATUTORY OR TORT. NOTWITHSTANDING THE TERM
OF ANY LIMITED WARRANTY OR ANY WARRANTY IMPLIED BY LAW, OR IN THE
EVENT THAT ANY LIMITED WARRANTY FAILS OF ITS ESSENTIAL PURPOSE, IN NO
EVENT WILL BC AUDIO'S ENTIRE LIABILITY EXCEED THE PURCHASE PRICE OF
THIS PRODUCT. SOME STATES/PROVINCES DO NOT ALLOW THE EXCLUSION OR
LIMITATION OF INCIDENTAL OR CONSEQUENTIAL DAMAGES, SO THE ABOVE
LIMITATION OR EXCLUSION MAY NOT APPLY TO YOU. THIS WARRANTY GIVES
YOU SPECIFIC LEGAL RIGHTS AND YOU MAY ALSO HAVE OTHER RIGHTS THAT
VARY FROM STATE TO STATE AND PROVINCE TO PROVINCE.
©2010 Bruce Clement, BC Audio, San Francisco
Other copyrights and trademarks are the property of their respective owners.
www.bcaudio.com
 Loading...