

Page 1
1
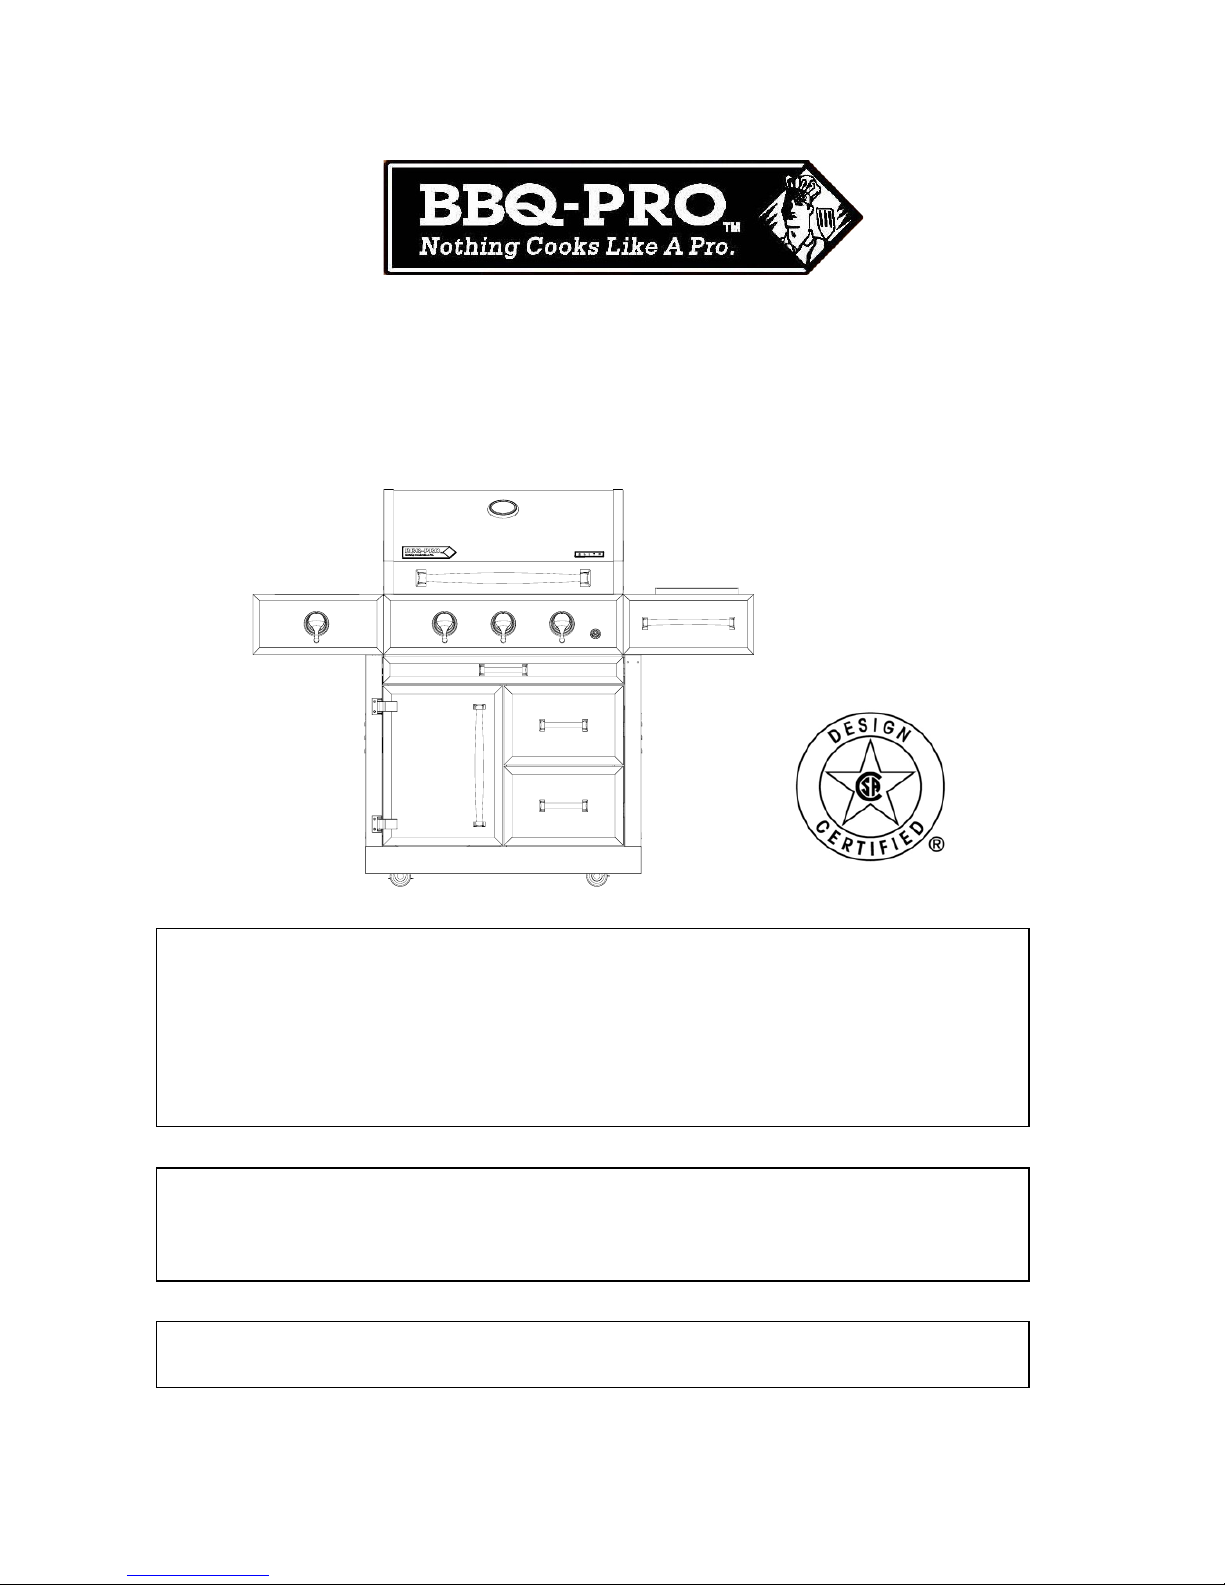
Grill Guide
For Model BQ05041-28 (BQ51009)
LP Gas Barbecue Grill
FOR YOUR SAFETY:
1. Read this Grill Guide before attempting to assemble or operate your grill.
2. Follow all safety instructions.
3. Check for leaks according to directions in this Grill Guide before operating your grill,
even if purchasing an assembled grill.
4. Keep this Grill Guide for future reference.
5. Contact 1-800-933-0527 should you need assembly assistance or have any questions.
TO THE INSTALLER OR PERSON ASSEMBLYING THIS GRILL:
Leave this Grill Guide with the consumer.
TO THE CONSUMER:
Retain this G
r
ill Guide for future reference.
THIS GRILL IS FOR OUTDOOR USE ONLY.
If stored indoors, then detach and leave propane cylinder outside.
Page 2
2
Safety Precautions
Always read and follow all DANGER, WARNING, AND FOR YOUR SAFETY notices in this Grill
Guide. Failure to do may result in serious bodily injury or death, or in a fire or an explosion causing
damage to property.
1. Grill installation must conform with local codes or, in the absence of local codes, with either the
National Fuel Gas Code, ANSI Z223.1/NFPA 54, Natural Gas and Propane Installation Code, CSA
B149.1, or Propane Storage and Handling Code, B149.2.
2. This gas grill, when installed, must be electrically grounded in accordance with local codes or , in
the absence of local codes, with the National Electrical Code, ANSI/NFPA 70, or the Canadian
Electrical Code, CSA C22.1. This applies if an external electrical source is utilized.
3. This gas grill shall be used only outdoors, and not be used in a building, garage, or any other
enclosed area.
4. This gas grill is not intended to be installed in or on recreational vehicles and/or boats.
5. Never use any other type of fuel for this grill other than LP gas.
6. Only use the pressure regulator with a type 1 connector that is supplied with this gas grill.
7. Inspect the gas hose before each use. If it is evident there is excessive abrasion or wear, or the hose
is cut, it must be replaced prior to the gas grill being put into operation. The replacement hose
assembly shall be that specified by the manufacturer.
8. Always perform a Leak Test before operating your grill.
FOR YOUR SAFETY
1. Do not store or use gasoline or other flammable vapors and liquids in the vicinity of this or
any other appliance.
2. An LP cylinder not connected for use shall not be stored in the vicinity of this or any other
appliance.
FOR YOUR SAFETY
If you smell gas:
1. Shut off gas to the appliance.
2. Extinguish any open flame.
3. Open lid.
4. If odor continues, immediately call your gas supplier or your fire department.
WARNING
Combustion by-products produced when using this product contain chemicals known to the State
of California to cause cancer, birth defects, and other reproductive harm.
Page 3

3
Table of Contents
Safety Precautions……….……………………………..……………...…………...…… 2
Table of Contents…………………….…………………………………..……….……...3
Warranty……………………………….………………………………………….…….. 4
Customer Support Center……………….………………………………………….…….4
Assembly Instructions...…………………………………………………………..…..5-16
General Information and Operation………………..………………………………..17-26
Trouble Shooting Guide……………………………………………….................……..27
Frequently Asked Questions……………………………….................………………...28
Write down here and keep for future
reference
Date of Purchase: _________________
Serial Number: ___________________
The serial number may be found on the placard located
on the back of the grill
BQ05041-28 (BQ51009)
Kmart Corporation
Hoffman Estates, IL 60179
1-866-562-7848
SHOP: WWW.KMART.COM
Page 4

4
The manufacturer warrants to the original
consumer-purchaser that this product shall be
free from defects in workmanship and materials
under normal and reasonable use when
assembled and operated according to this Grill
Guide from date of purchase as follows:
One year except as noted below:
Stainless Steel Burners – 3 years
Cast Aluminum and Stainless Steel Cabinet
Parts and Control Panel – 5 years
The manufacturer will, at its option, refinish or
replace any product or part found to be defective
during the limited warranty period. There may be
a shipping charge. The manufacturer may
require you to return the part(s) claimed to be
defective for its inspection, freight or postage
prepaid. Contact our Customer Support Center as
shown below before returning any part(s).
Additional information can be obtained by
writing:
Barbecue Grills
Warranty Dept.
1375 Mitchell Blvd
Schaumburg, IL 60193
The manufacturer will require reasonable proof
of purchase. We strongly recommend you
keep your sales receipt and register your grill.
You can attach your receipt to this guide.
This limited warranty does not cover the cost of
any inconvenience or property damage due to
failure of the product and does not cover damage
due to misuse, abuse, alteration, improper or
failure to perform normal and routine
maintenance, discoloration, scratches, rust,
accident, damage arising out of transportation of
the product, or normal wear and tear. This
limited warranty will not apply to any grill used
for commercial use.
This limited warranty is the sole warranty given
by the manufacturer and is in lieu of all other
warranties; express or implied, including implied
warranty of merchantability or fitness for a
particular purpose. Neither manufacturer dealers
nor the retail establishment selling this product
have any authority to make any warranties or to
promise remedies in addition to or inconsistent
with those stated above.
This limited warranty applies only to products
sold at retail, and is not transferable.
The manufacturer's maximum liability, in any
event, shall not exceed the purchase price of the
product paid by the original consumer-purchaser.
Some states do not allow the exclusion or
limitation of incidental or consequential damages.
Therefore, the above limitations or exclusions
may not apply to you. This warranty gives you
specific legal rights and may also have other
rights, which vary from state to state.
Limited Warranty
Customer Support Center
Thanks for purchasing a BBQ Pro Gas Grill. We’re here to help you maximize your enjoyment an
d
appreciation of your new grill. Please don’t hesitate to contact us should you have any questions regarding
assembly, performance, warranty, or accessories. Please have your model number ready before you contact us.
We’re here to serve You!
• If you need assistance or to order parts: Call □ 1-800-933-0527 or send a FAX to □ 1-847-252-1001.
• Business hours: Monday through Friday; 8:30AM-5:00PM Central Time.
• Visit us on the web at: www.omahagrills.com
Page 5
5
Assembly Instructions
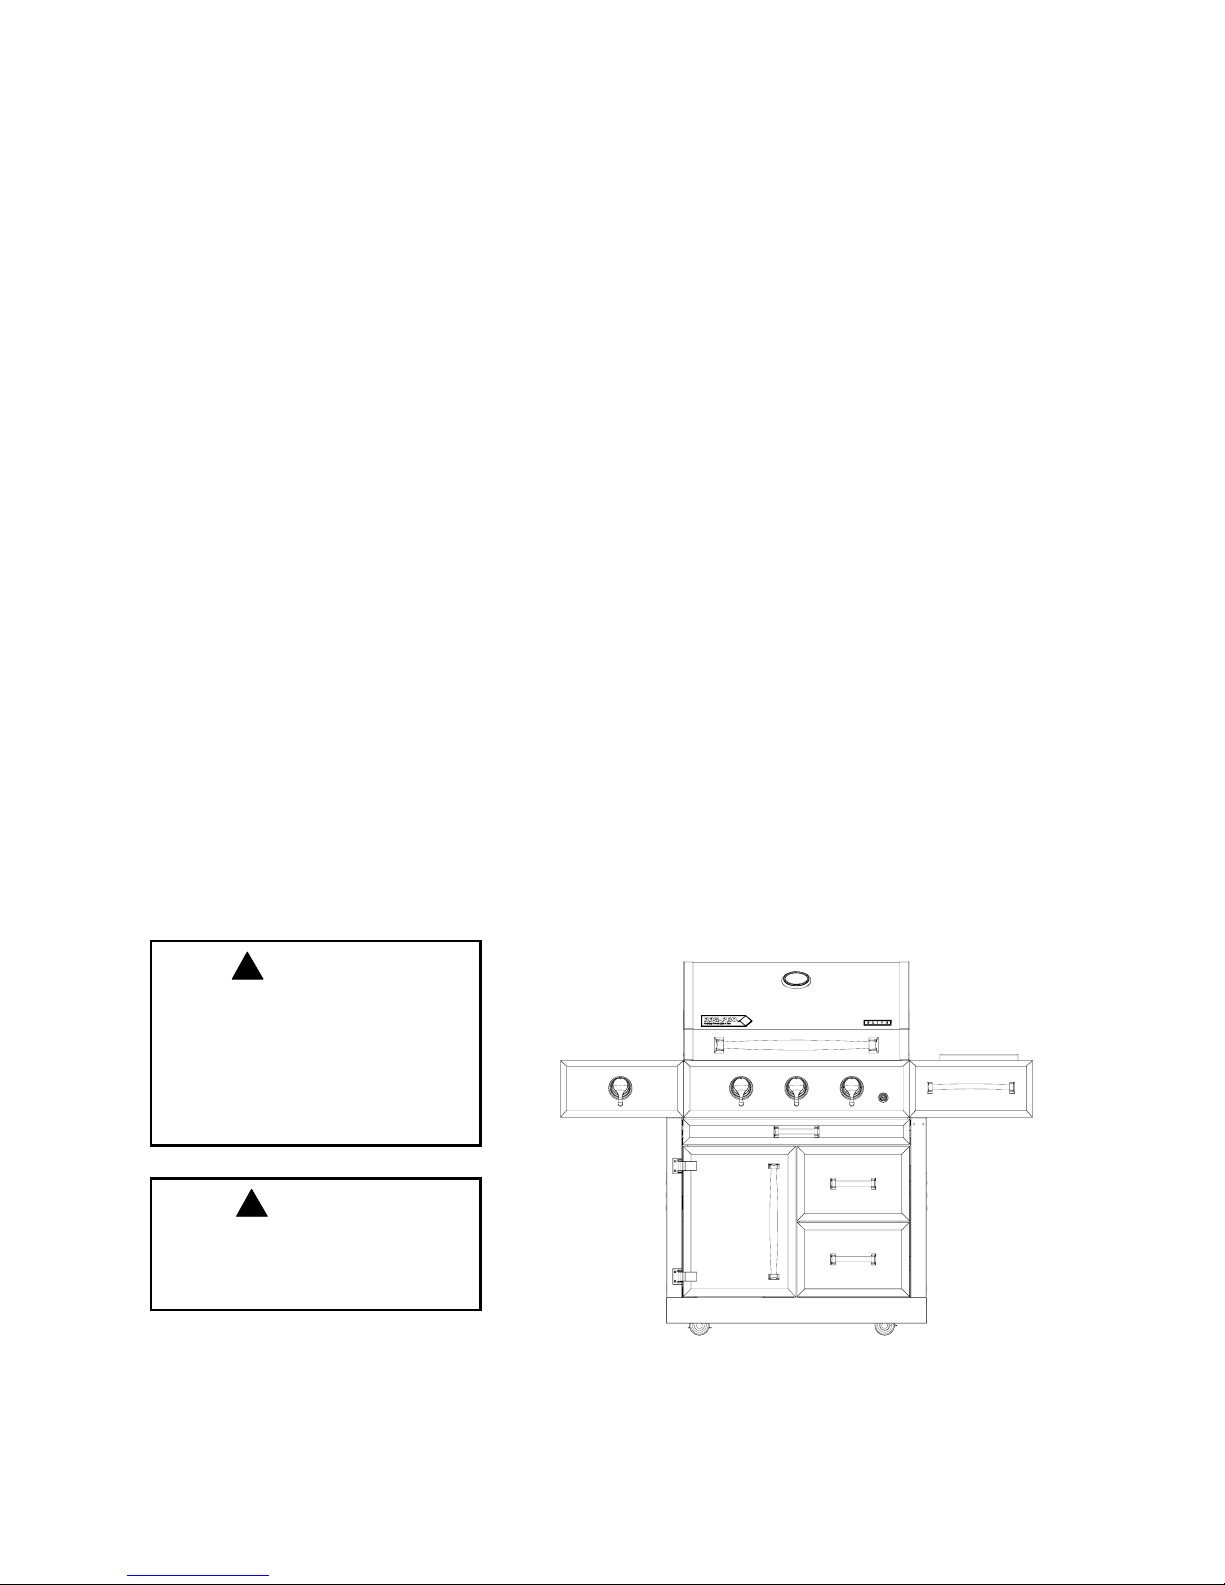
This page will give you an overview of information to assemble your grill. The following pages will show in
step-by-step detail how to do so. We offer the following suggestions to make your grill assembly as easy as
possible.
1.) Read through the entire Assembly Instructions before you begin.
2.) Choose an area large enough to comfortably lay out all the parts and hardware with enough
room to easily
maneuver.
3.) Have an area with a non-abrasive surface where you can lay parts without scratching them.
4.) Use 2 people to remove the Cabinet and Firebox Assembly from the carton.
5.) Lay all parts and hardware out and ensure you have everything listed on the Parts and Hardware page before
you begin assembly. See the Customer Support Page for contact information should any parts be damaged or
missing.
6.) A Phillips Head Screwdriver has been provided for assembly.
7.) Do not use a Power Screwdriver for assembly as you could strip the threads on the Nuts and Bolts.
8.) The propane tank for this grill is sold separately. See the LP Gas and Cylinder Information later in this
guide.
BQ05041-28 (BQ51009)
WARNING
Failure to follow all Danger,
Warnings, and For Your Safety
notices in this Grill Guide may
result in serious bodily injury o
r
death, or in a fire or an explosion
causin
g
damage to property.
CAUTION
Perform the Leak Test explained
later in this Grill Guide before
operating your grill.
Page 6

6
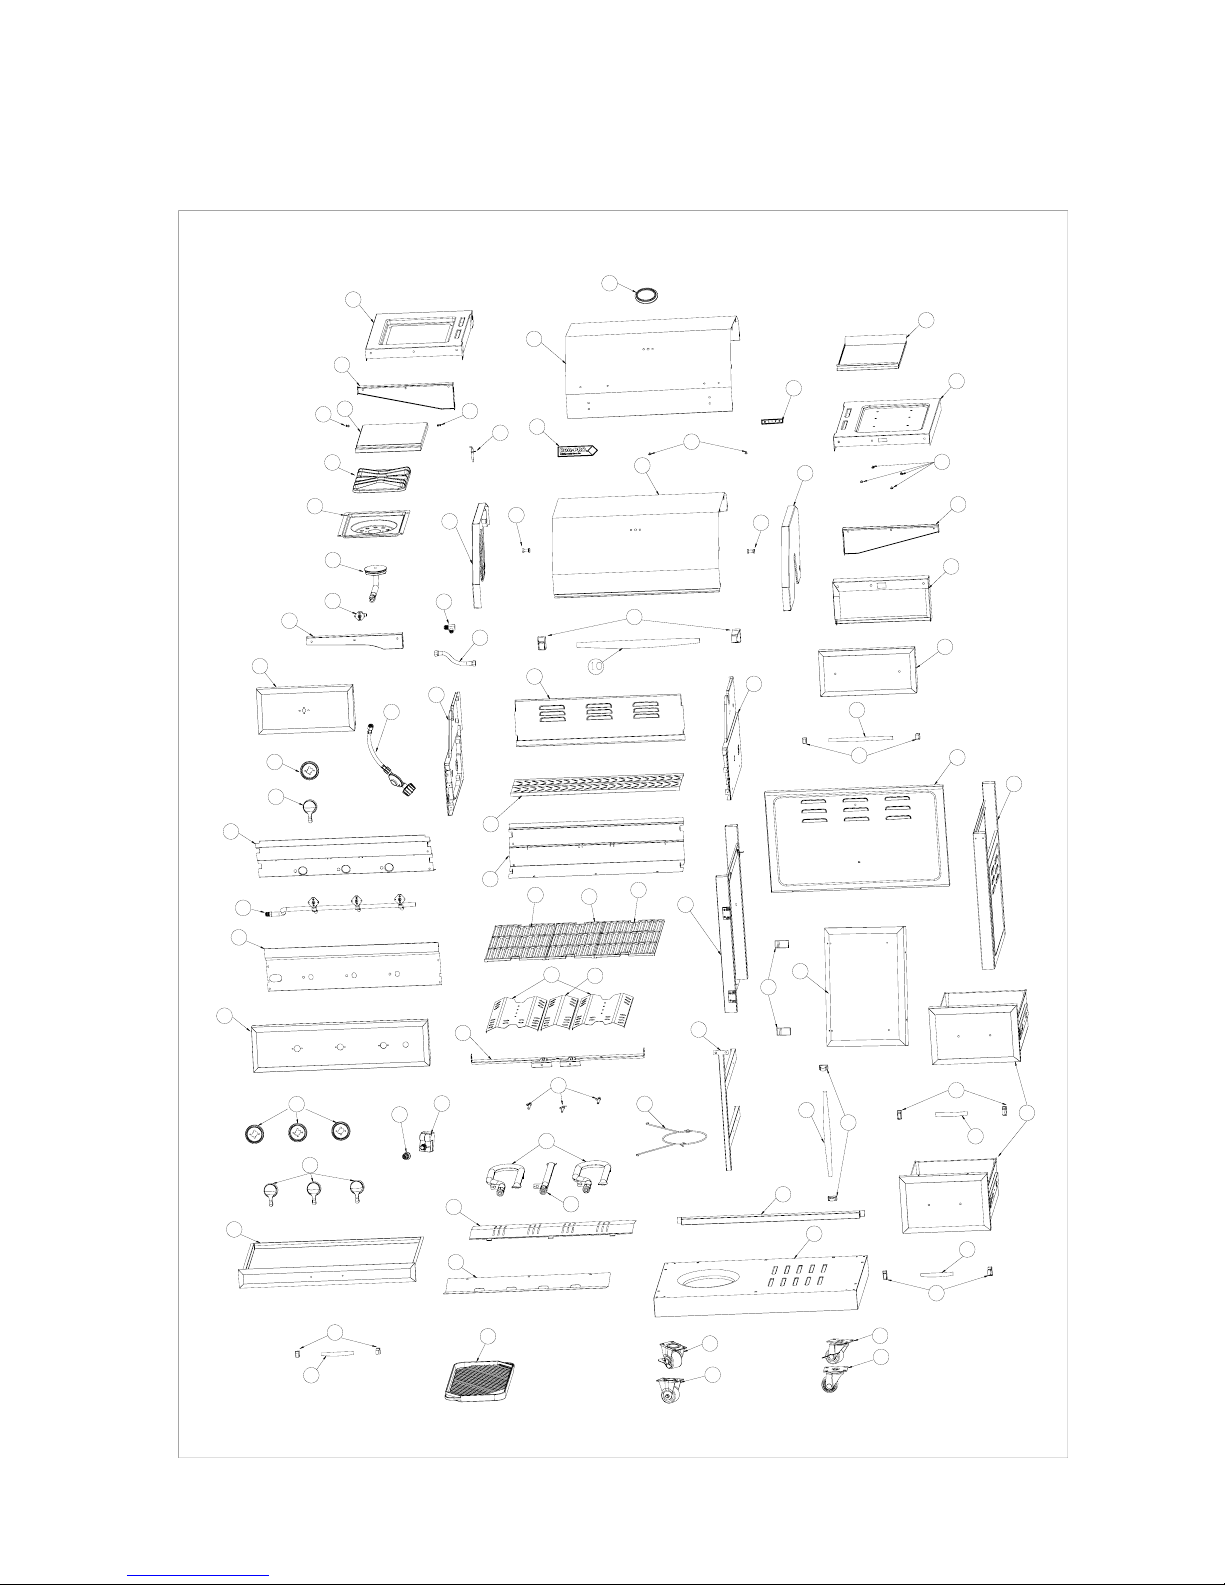
BQ05041-28 (BQ51009) Detail Parts List
1 Thermometer & Thermometer Seat
39 Side Burner Shelf Frame
2 Hood – Outer
40 Side Burner Back Bracket
3 Silicon Stopper
41 Side Burner Electrode
4 Logo Plate
42 Side Burner Cover
5 Hood – Inner
43 Side Burner Pan Support
6 Hood Bolt
44 Side Burner Inside Frame
7 Hood Side Panel – Left
45 Side Burner Valve
8 Hood Side Panel – Right
46 Side Burner
9 Handle Support
47 Side Burner Air Shutter
10 Handle
48 Side Burner Front Bracket
11 Firebox-Left Side
49 Side Burner Front Panel
12 Firebox – Right Side
50 Serving Tray
13 Firebox – Upper Back
51 Side Shelf Frame
14 Gas Hose
52 Side Shelf Back Bracket
15 Regulator and Hose
53 Side Shelf Front Panel Frame
16 Warming Rack
54 Side Shelf Front Panel
17 Firebox – Lower Back
55 Side Shelf Front Panel Handle
18 Cooking Grate – Small
56 Cabinet Back Panel
19 Cooking Grate – Large 57 Cabinet Right Side Panel
20 Griddle 58 Cabinet Left Side Panel
21 Heat Diffuser – Large
59 Cabinet Door – Left
22 Heat Diffuser – Small
60 Cabinet Door Hinge
23 Burner Support Rail
61 Cabinet Center Drawer Support
24 Electrode – Main Burners
62 Cabinet Door Handle
25 “U” Burner
63 Handle Support
26 “I” Burner
64 Drawer
27 Heat Shield – Firebox
65 Cabinet Drawer Handle
28 Heat Shield – Grease Tray
66 Cylinder Support Ring
29 Heat Shield - Control Panel Inner
67 Cabinet Crossbar
30 Gas Manifold Assembly
68 Cabinet Bottom Panel
31 Heat Shield - Control Panel Outer
69 Locking Caster
32 Control Panel
70 Non-Locking Caster
33 Control Knob Seat
71 Swivel Locking Caster
34 Electric Igniter
72 Swivel Non-Locking Caster
35 Control Knob
73 Electric Igniter Cap
36 Grease Tray
74 Side Burner Cover Bolts
37. Handle Support 75 Name Plate
38. Grease Tray Handle 76 Silicon Pad
Page 7
7
BQ05041-28 (BQ51009) Detail Parts List
2
36
37
38
39
40
42
43
44
46
26
27
28
29
30
32
33
34
35
41
45
14
15
1
4
6
6
5
7
8
9
13
11
12
16
17
18
20
21
31
23
24
25
70
71
68
67
65
63
63
62
61
60
58
63
65
57
56
55
37
54
53
52
51
50
22
59
66
64
3
19
33
35
47
48
49
69
72
73
74
74
19
75
76
Page 8
8
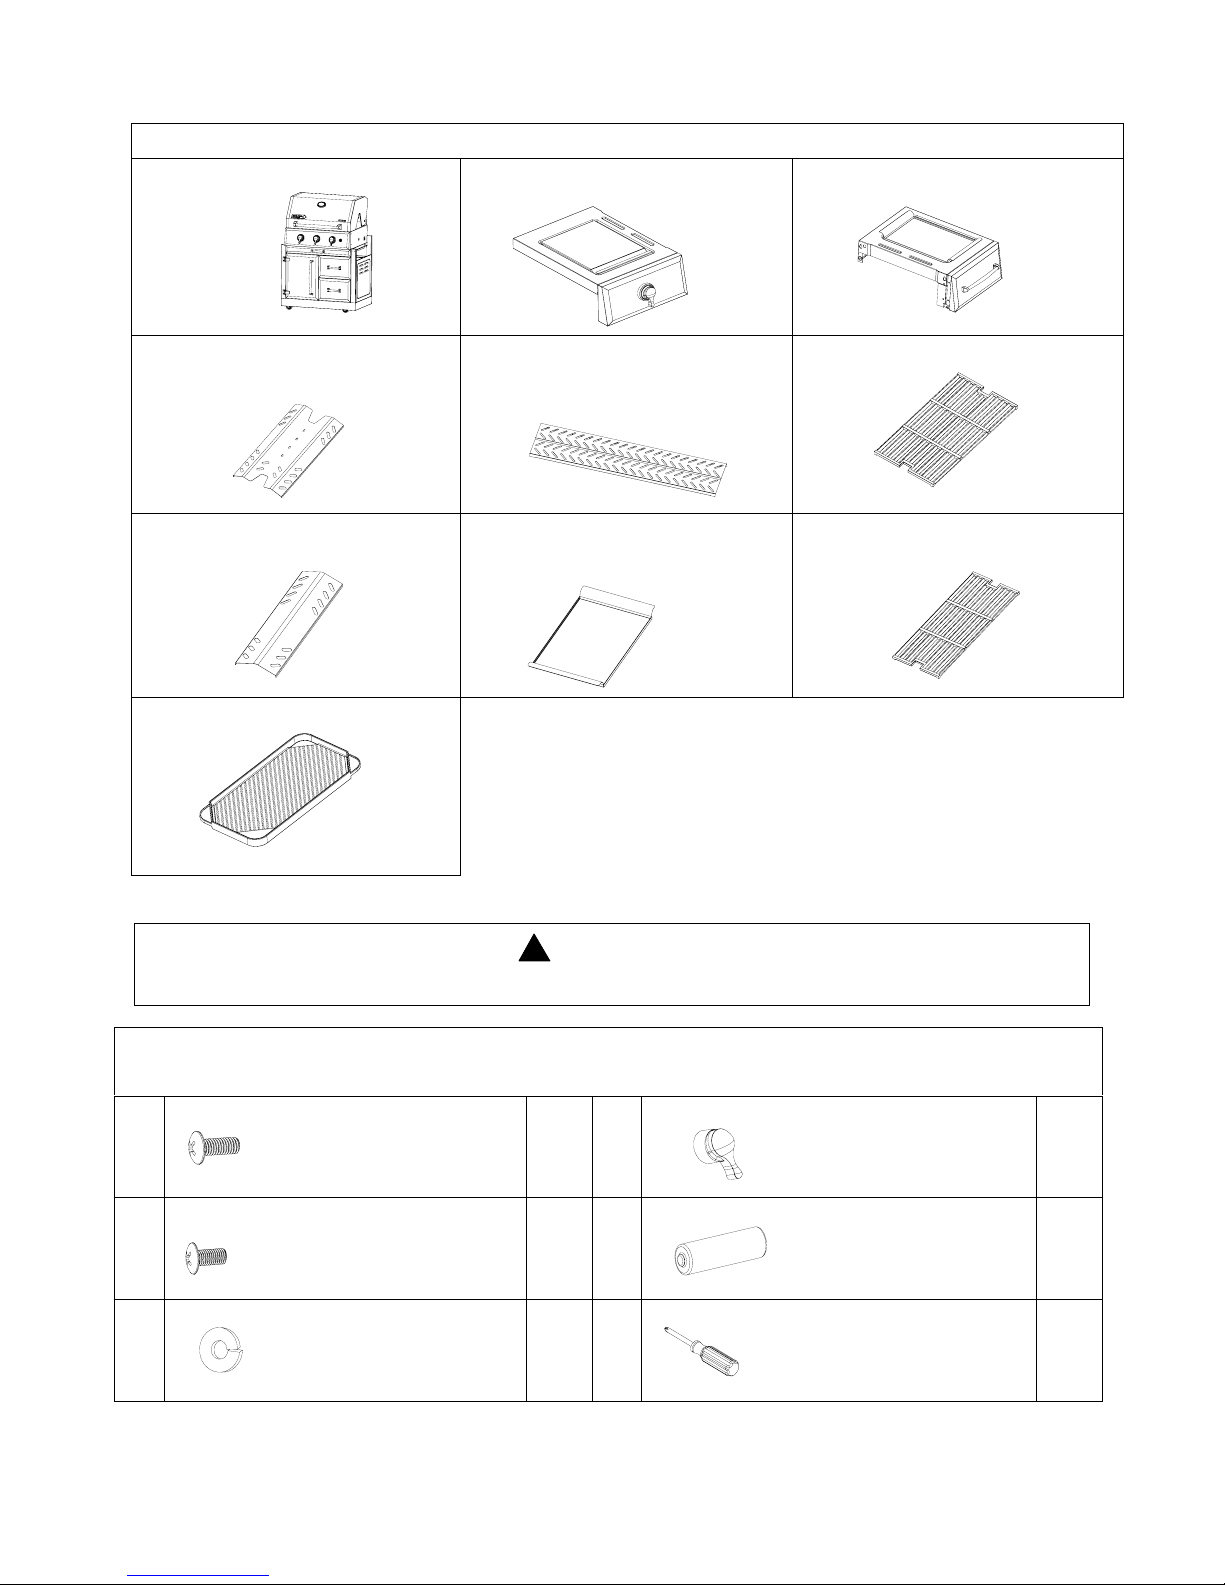
Assembly Parts List
Cabinet and Firebox Assembly..1PC
Side Burner Assembly…1PC Side Shelf Assembly…1PC
Heat Diffuser (large)…2PCS
Warming Rack…1PC Cooking Grate (large)…2PCS
Heat Diffuser (small)…1PC
Serving Tray...1PC
Cooking Grate (small)…1PC
Griddle…1PC
Hardware List
A
Phillips Head Bolt M6*3/8”L
14PCS D Control Knob 1PC
B
Phillips Head Bolt M4*5/16”L
2PCS E
Battery Size AA 1PC
C
Lock Washer M6
14PCS F
Phillips Head Screwdriver 1PC
WARNING
DO NOT DISPOSE OF BATTERIES IN FIRE. BATTERIES MAY EXPLODE OR LEAK.
Page 9

9
STEP 1
Attach the Side Burner Front Panel to the Side Burner Front Bracket using 3 Phillips Head Bolts (A) and 3
Lock Washers (C).
STEP 2
Loosely screw 2 Phillips Head Bolts (A) and 2 Lock Washers (C) into the upper left and right corner
holes in the left side of the Firebox as shown in the insert. Leave them loose so that you can fit the
Side Burner Assembly between the Firebox side and the head of the bolt. Remove the Phillips Head
Bolt from the lower side corner of the Control Panel (Fig 1) and hold for Step 4. Now fit the Side
Burner Front and Back Brackets down over the heads of the 2 Phillips Head Bolts (A) as shown.
Fig 1
Page 10
10
STEP 3
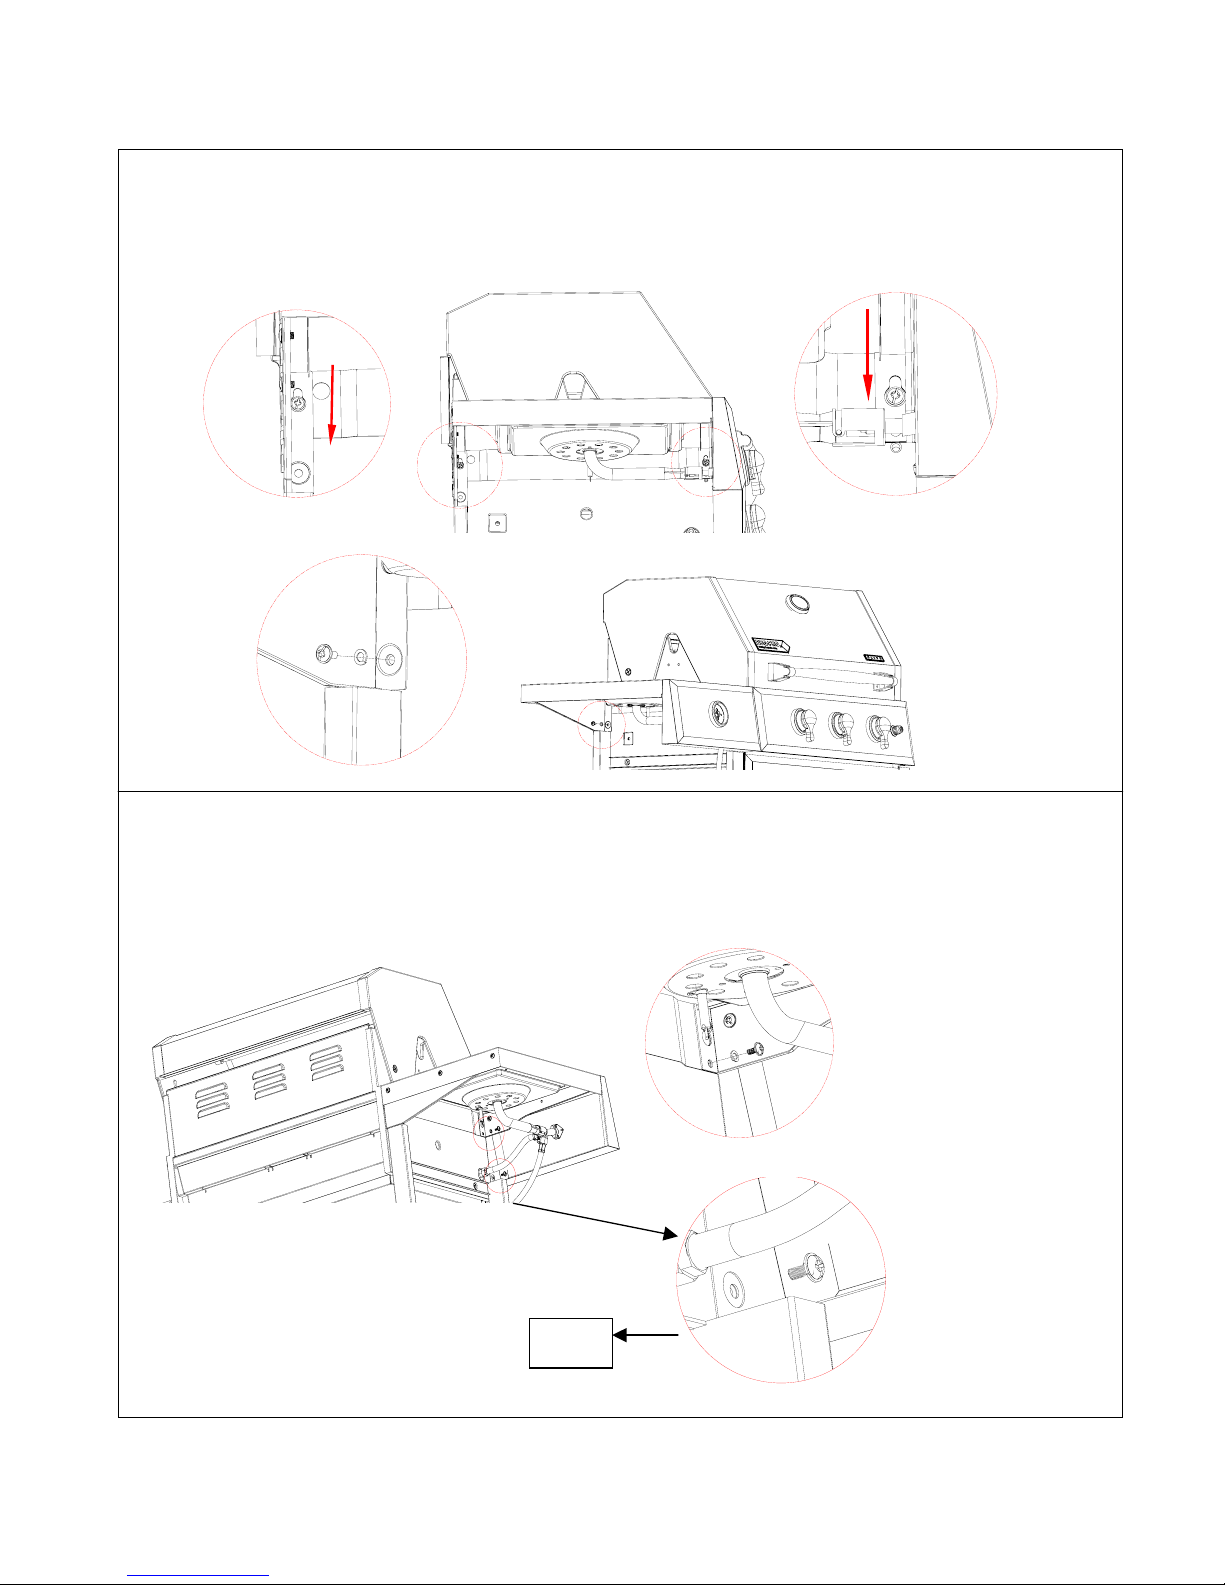
Secure the back of the Side Burner Assembly to the Firebox using 1 Phillips Head Bolt (A) and 1 Lock Washer
(C) in the lower hole of the Side Burner Back Bracket and tightening the Phillips Head Bolt (A) in the upper
hole.
STEP 4
Secure the front of the Side Burner Assembly to the Firebox using 1 Phillips Head Bolt (A) and 1 Lock
Washer (C) in the lower hole of the Side Burner Front Bracket and tightening the Phillips Head Bolt (A) in the
upper hole as shown. Then insert the Phillips Head Bolt that was removed from the lower side corner of the
Control Panel in Step 2 back into its hole and tighten.
Fig 1
Page 11
11
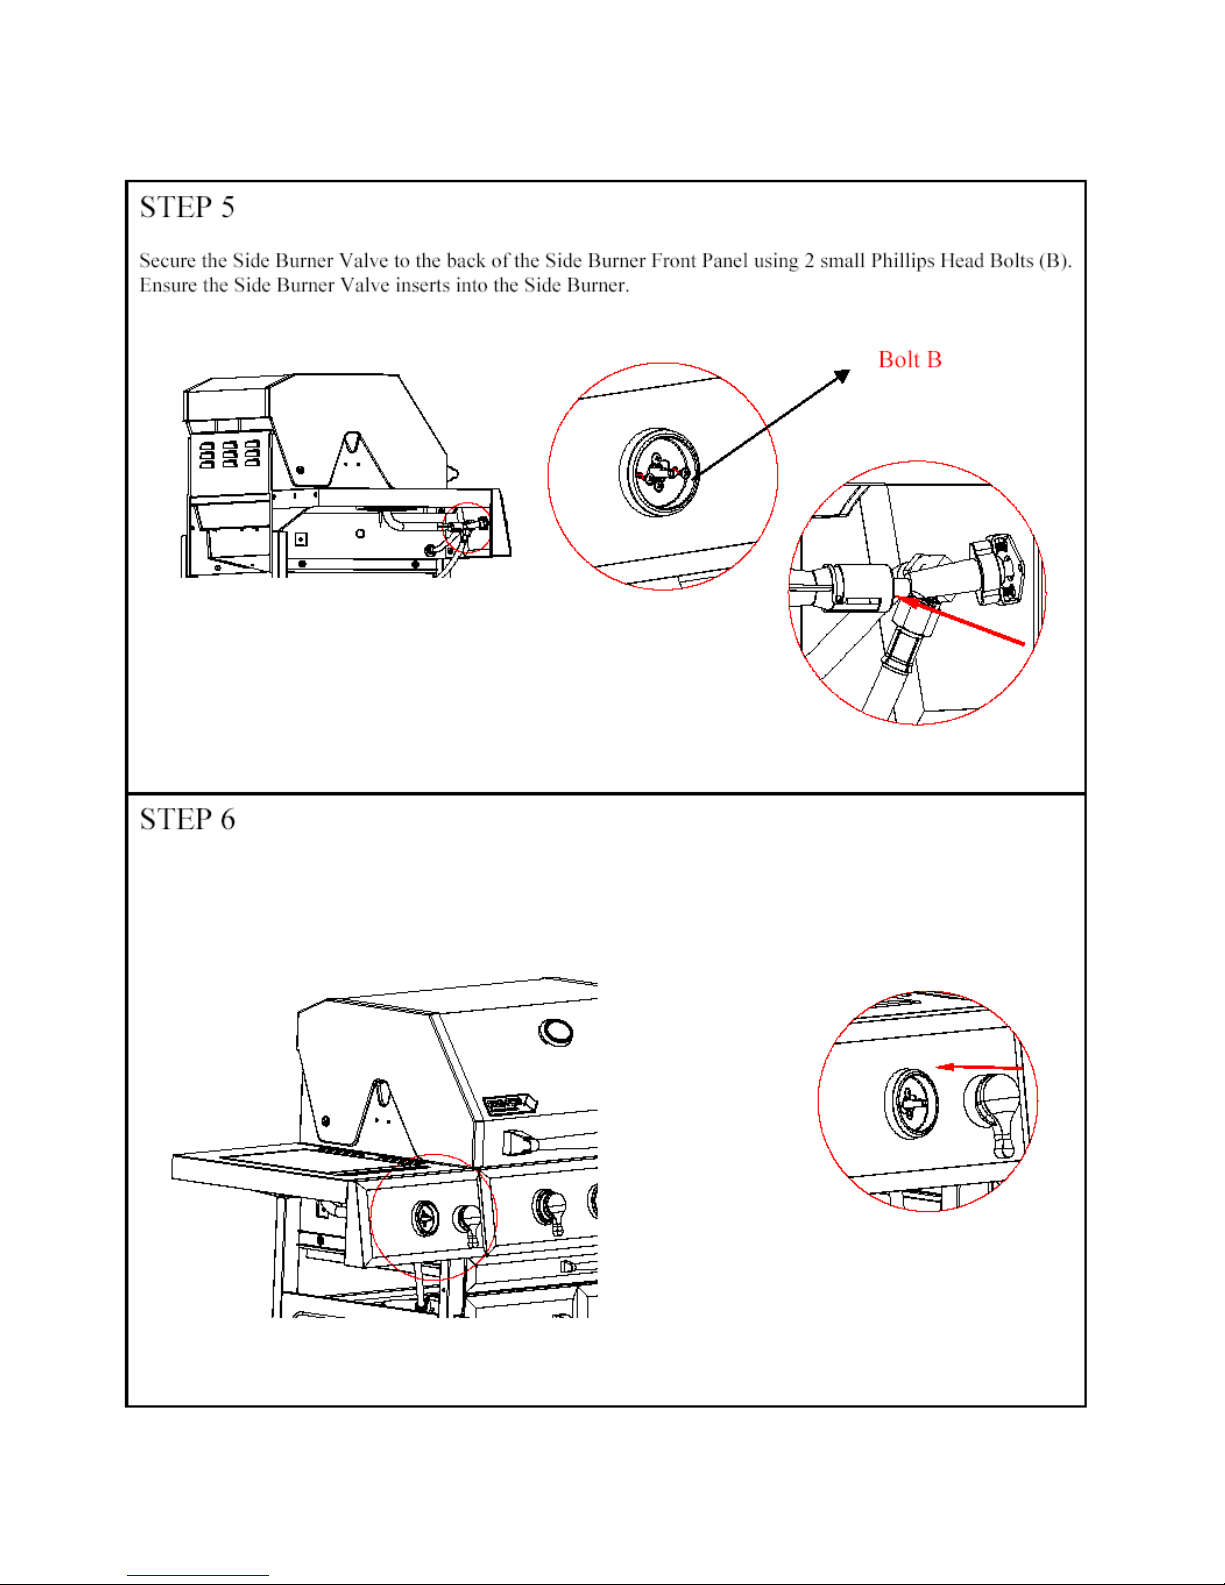
Place the Control Knob (D) onto the Side Burner valve Stem.
Page 12
12
Page 13
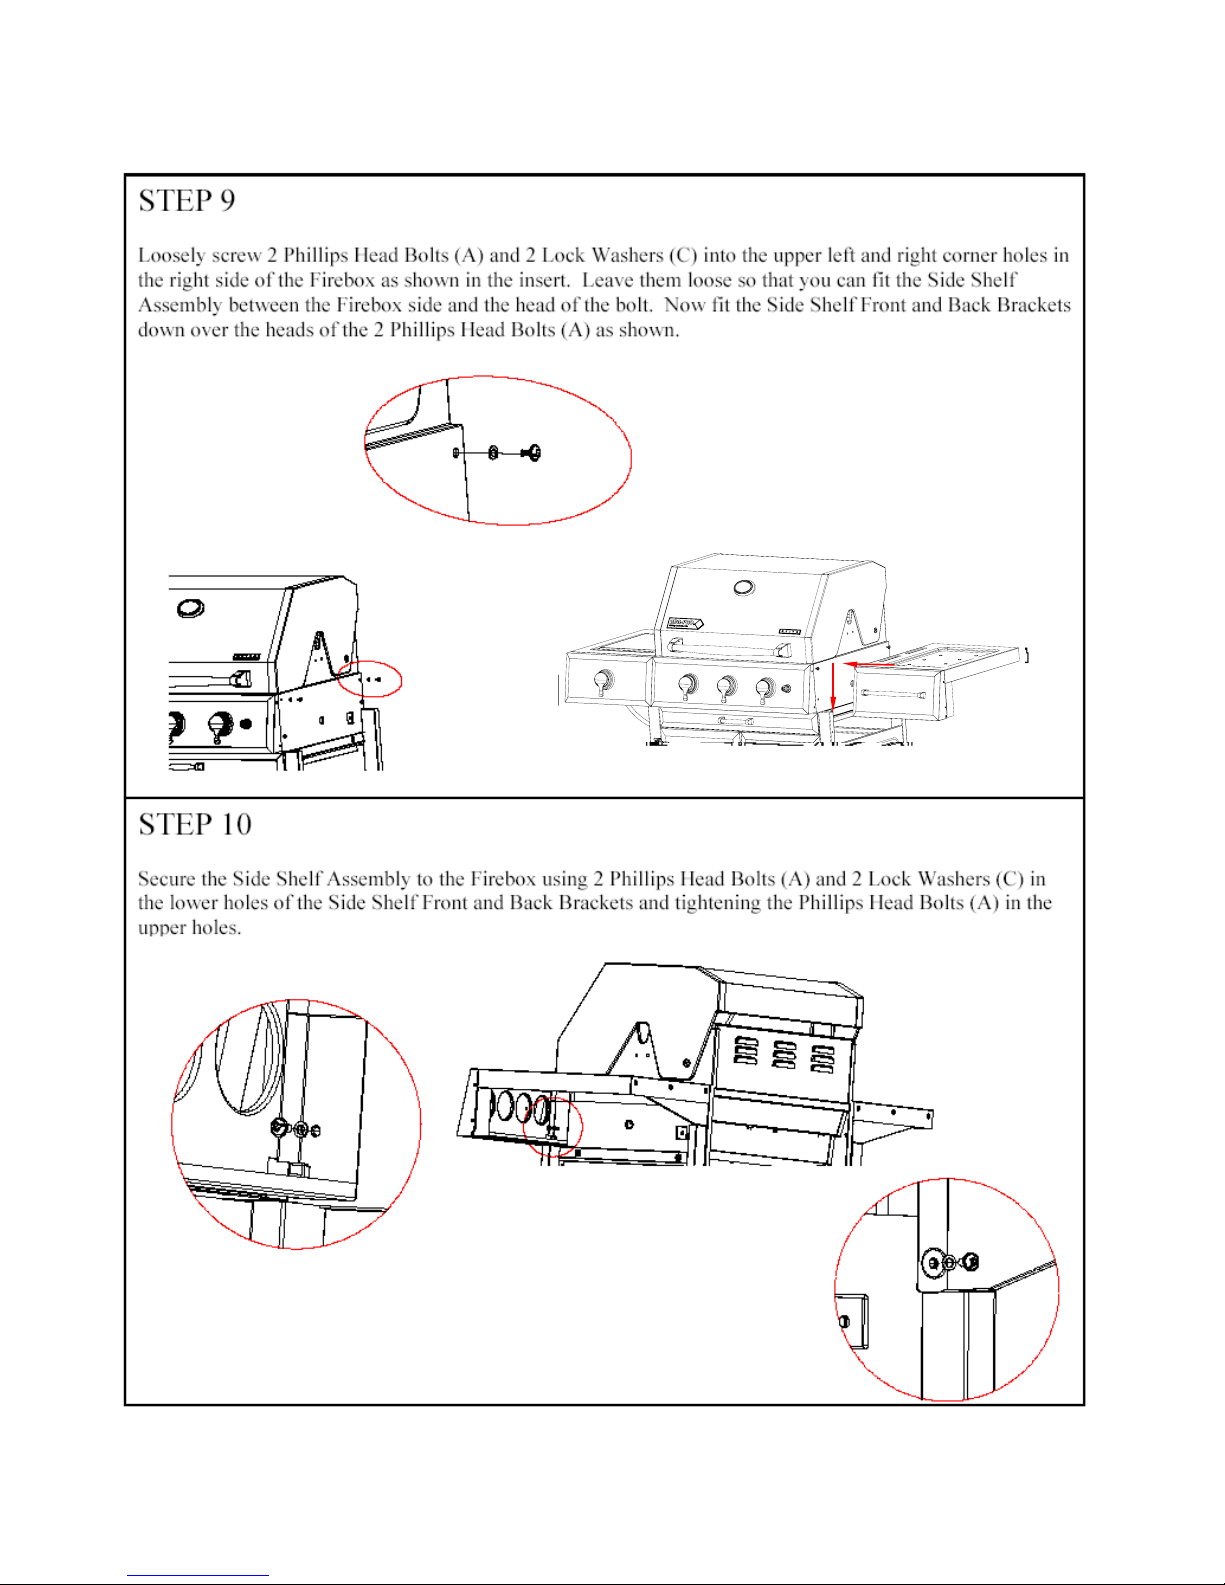
13
Page 14
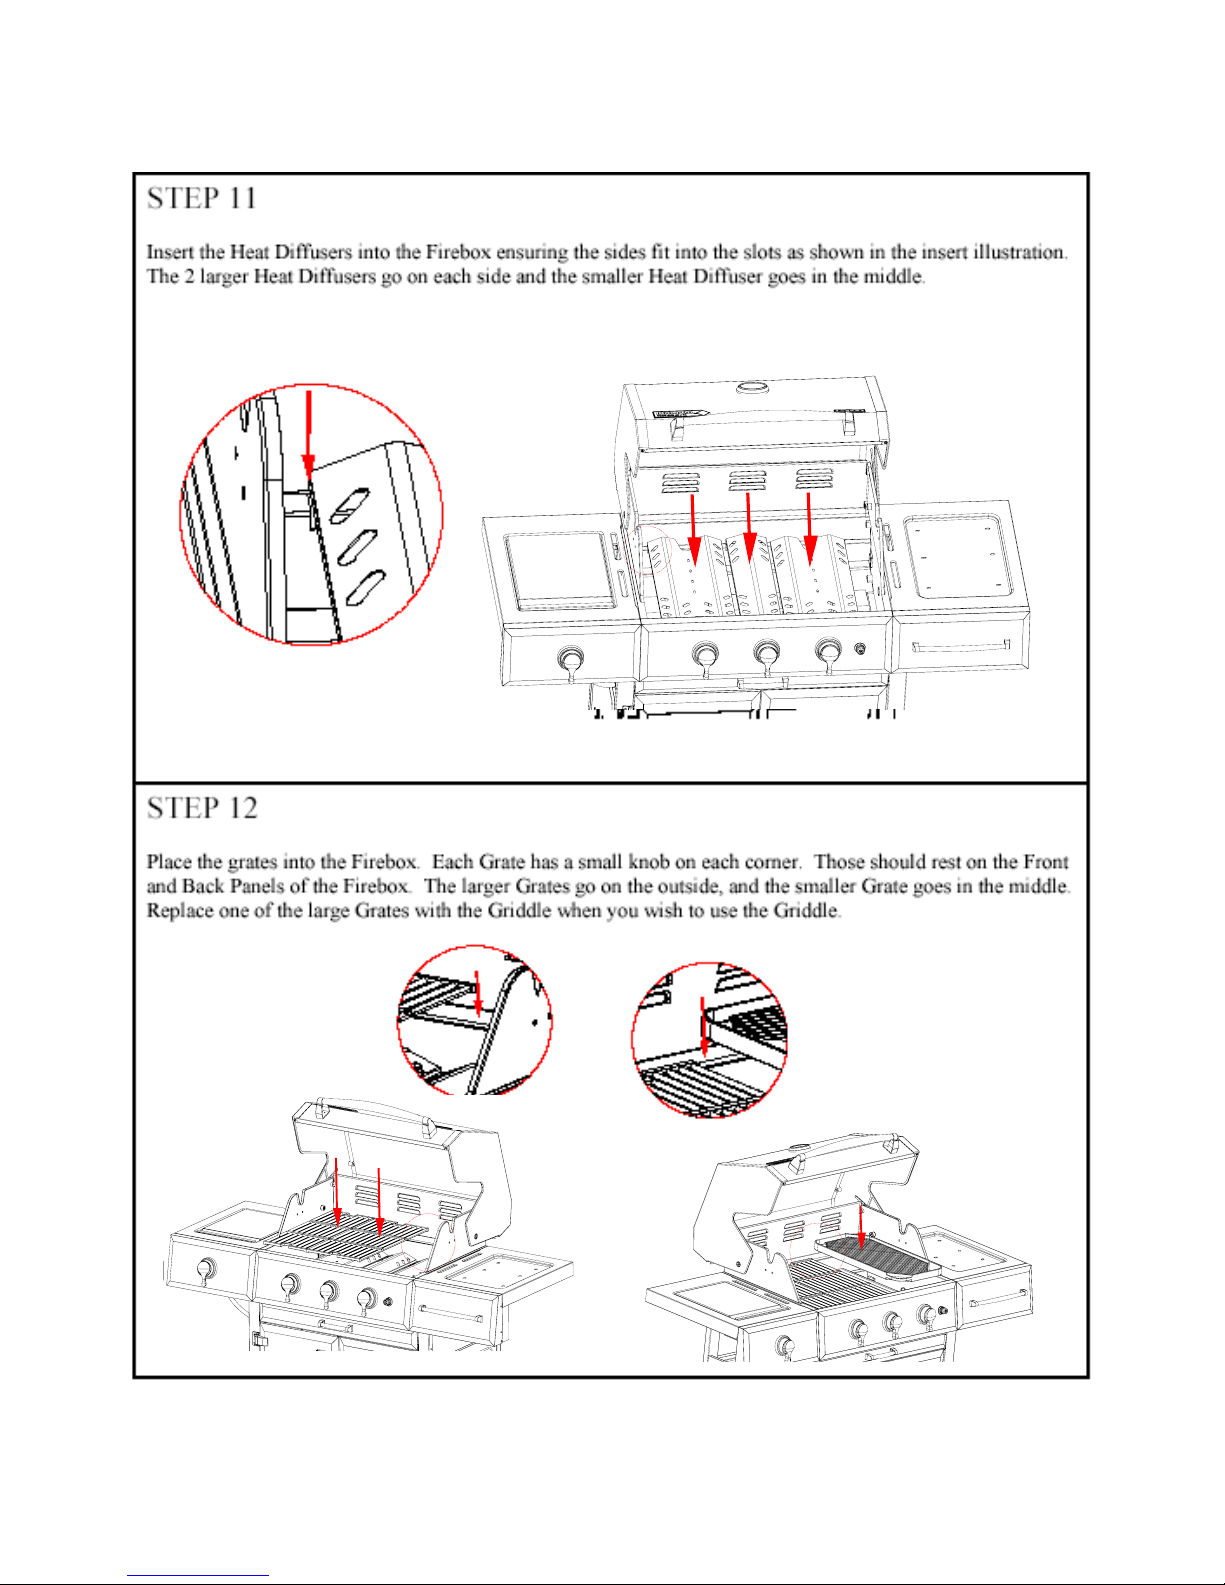
14
Page 15
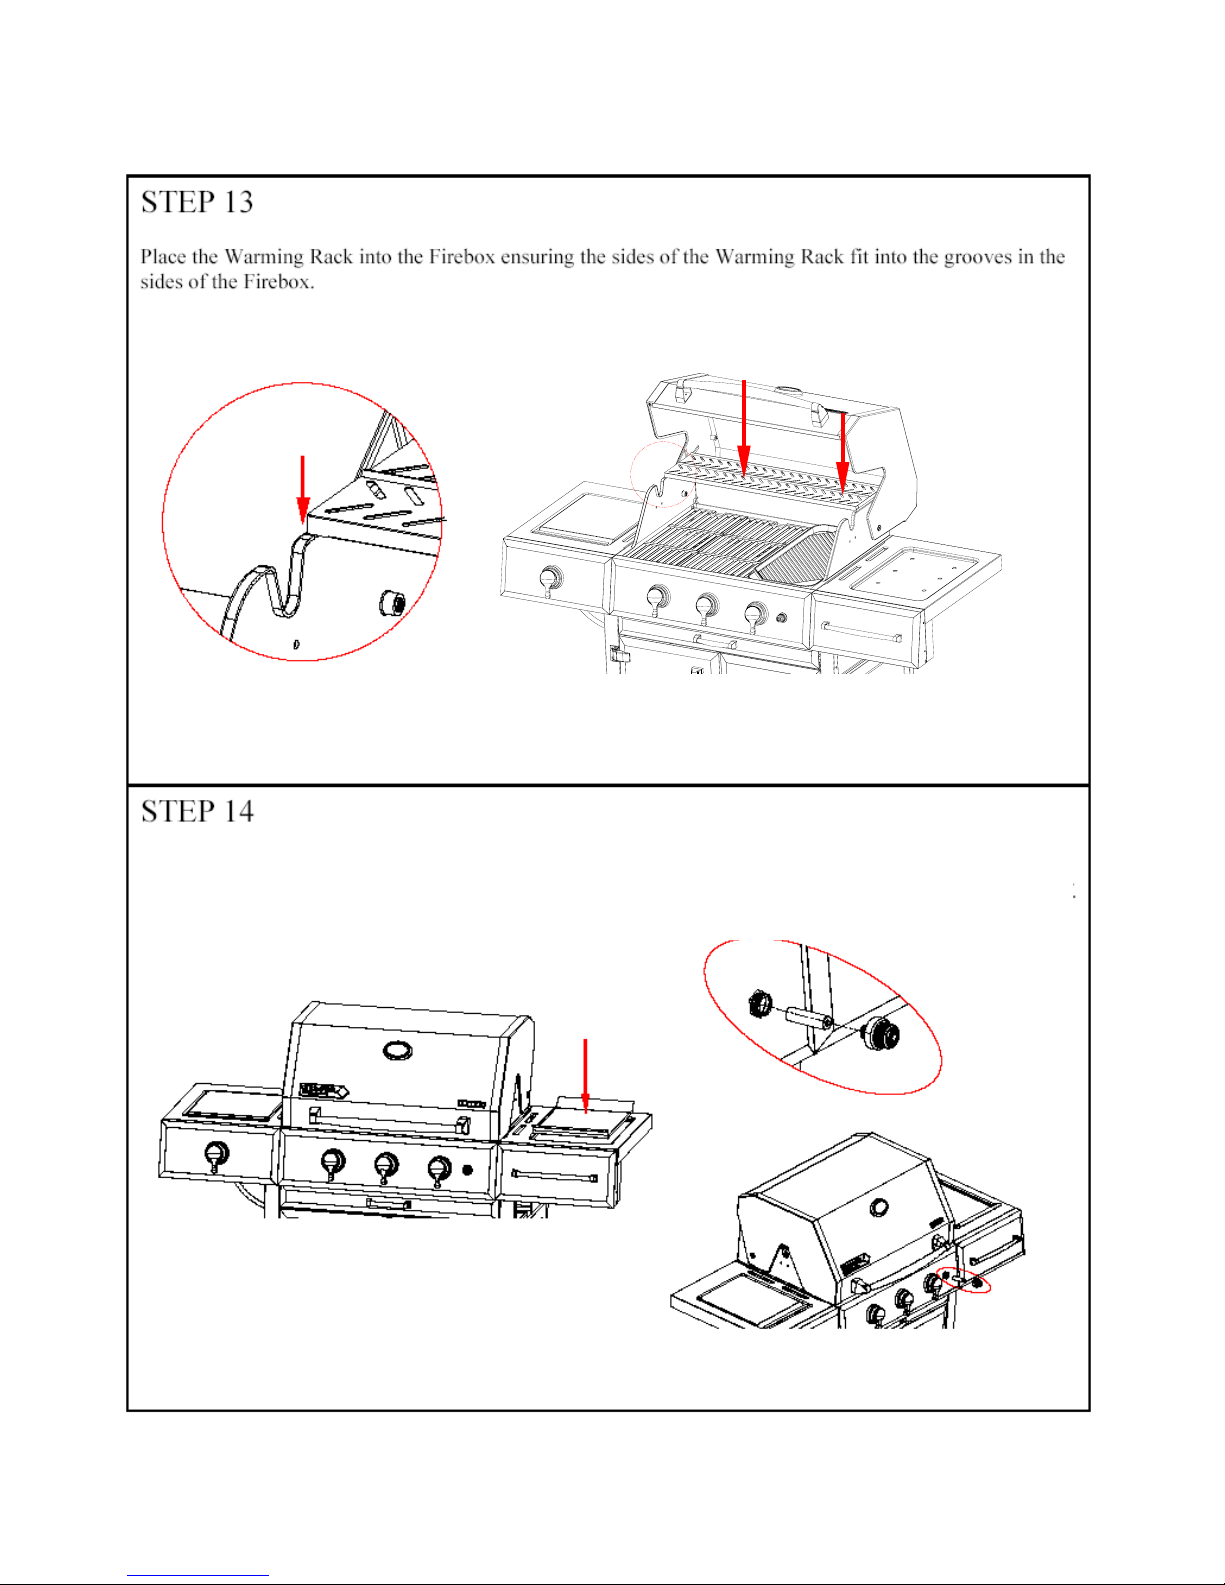
15
Unscrew the Electronic Igniter Cap. Place the “AA” Battery (F) into the Igniter with the Positive (+)
end facing up. Screw the Electronic Igniter Cap back into place. Place the Serving Tray on top of the
Side Shelf.
Page 16
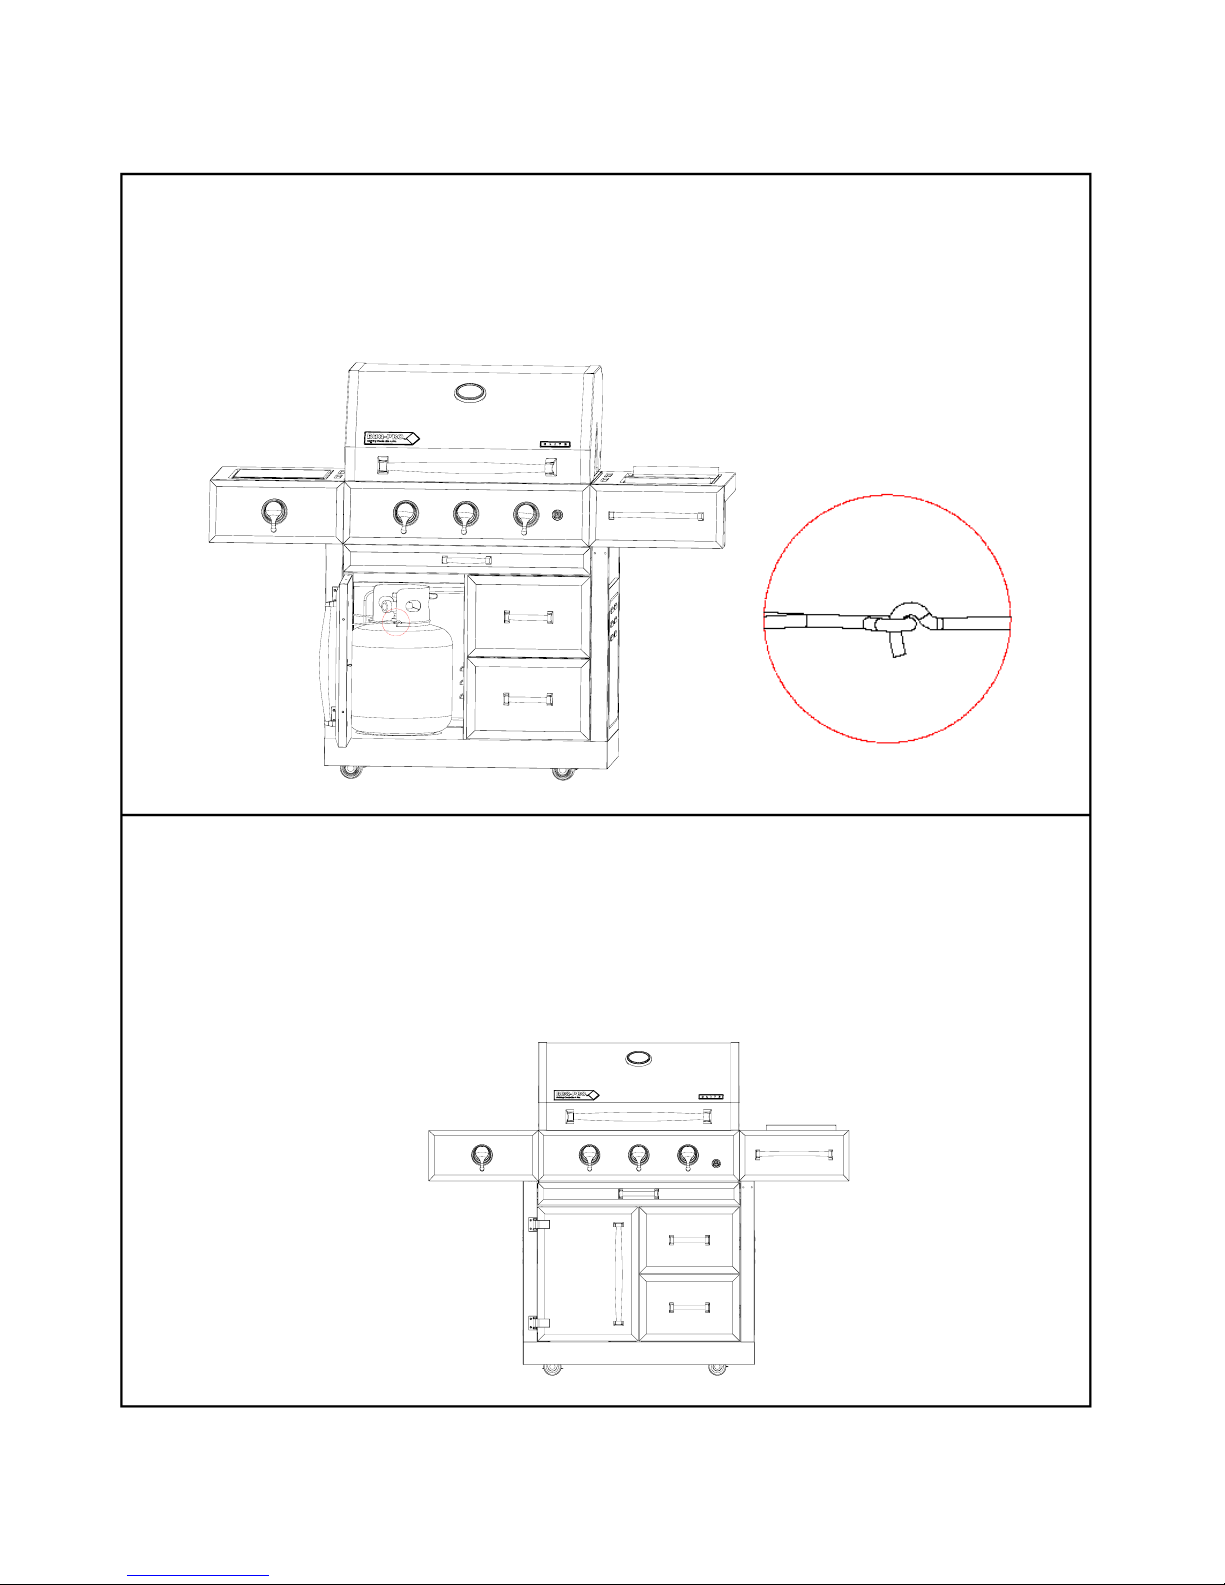
16
Step 15
Pull the cylinder support ring up to the top of the cabinet. Place the LP cylinder down into the tank support
hole in the bottom panel. Ensure the valve faces toward the left panel of the cabinet. Unhook the top ring
from the cylinder support ring and wrap around the neck of the LP cylinder. Reattach the top ring to the
c
y
linder support ring to secure.
Step 16
Remove any labels or additional packing material from the grill. Be sure to clean all foam packing material
out of all areas.
Congratulations! Your grill is now assembled. Please proceed to and real the General Information and
Operation portion of this Grill Guide before attempting to hook up the LP gas cylinder or operating your
g
rill.
Page 17
17
General Information and Instructions
Your new BBQ Pro Grill has been designed and manufactured to high quality standards. It will provide you
with many years of enjoyment with a minimal amount of maintenance. Please keep in mind the following FOR
YOUR SAFETY.
OPERATION
1. Your gas grill requires reasonable care during operation. It will be hot during cooking and cleaning.
You should never leave the grill unattended or move the grill when in use.
2. Children should never use your gas grill. Keep younger children and pets away when in use.
3. Only use your gas grill outside in a well-ventilated area. Never use indoors in any building, garage,
shed, or under any type of flammable canopy or overhang.
4. Ensure your grill is on level ground and the locking casters are locked before use.
5. Turn all gas valves off should the burners go out when cooking. Open the lid and wait 5 minutes before
relighting.
6. Do not lean over the grill or touch the edges of the firebox or lid when in use.
7. Turn the burners off, close the lid, and shut off the LP cylinder should a grease fire occur.
8. Do not obstruct the flow of combustion and ventilation air to this grill.
9. Keep the ventilation openings of the cylinder enclosure free and clear from debris.
10. Keep the outdoor cooking gas appliance area clear and free from combustible materials, gasoline, and
other flammable vapors and liquids.
11. Do not put a barbecue cover or other flammable material in the storage area of this grill.
12. Do not use charcoal briquettes, lava rock, or any type of ceramic product in this grill.
LP Gas and Cylinder Information
Your new gas grill operates on LP (Liquid Petroleum) Gas. It is odorless, colorless, and non-toxic when
produced. You can smell LP gas as it has been given an odor similar to rotten cabbage for your safety.
Your grill uses the newest and safest LP Gas Cylinder.
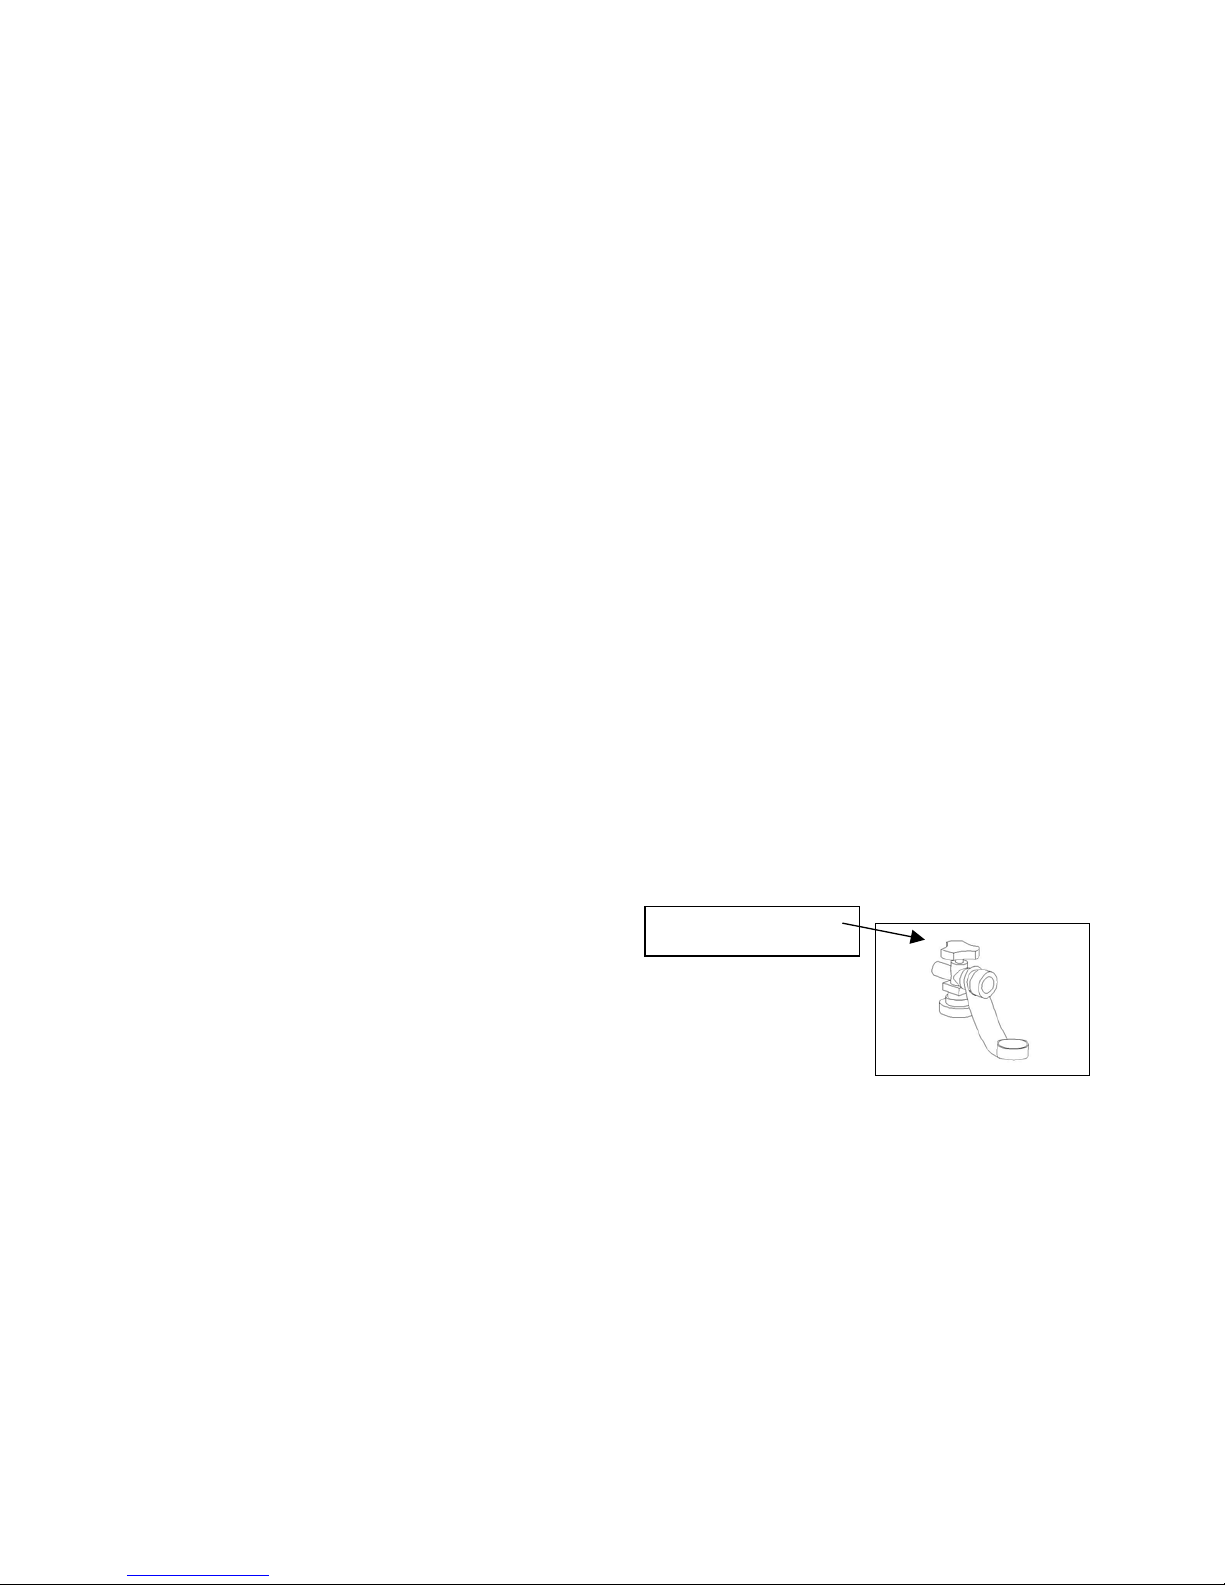
1. A listed O.P.D. (Overfill Protection Device) – prevents accidental gas leaks
caused by overfilling of the tank. Each tank contains a float that
closes the input valve when the tank is 80% full. This allows room
for the LP gas to expand in hot temperatures. A triangular hand wheel
distinguishes this type of tank.
2. O.C.C.1 Type 1 Quick Connect Valve – provides fast tank hook-ups and requires only to be tightened by
hand. This is distinguished by large external threads on the outlet part of the valve.
In addition, the LP tank you use with your grill must meet the following requirements
1. Required Measurements: 12-1/2” (317mm) in diameter and 18-1/2” (472mm) in height.
2. 20-pound (9.1kg) propane cylinder.
3. Constructed and marked with U.S. Department of Transportation (D.O.T.) for the US or CAN/CSA-
B339, Cylinders, Spheres and Tubes for Transportation of Dangerous Goods; and Commission, for
Canada.
4.
A safety release valve.
5.
A means for vapor withdrawal.
6.
A collar to protect the tank valve.
7. A bottom ring for mounting.
Triangular Hand Wheel
Page 18
18
LP CYLINDER FILLING AND EXCHANGE
Some areas only allow you to exchange your empty cylinder for a replacement that is already full. Other areas
allow you to refill your cylinder. If you are in an area where you can refill your cylinder:
1. Use only a licensed dealer.
2. The dealer must first purge a new cylinder before filling.
3. Never fill a cylinder more than 80% full by volume. Volume will vary by temperature. An empty
cylinder weighs approximately 18 pounds (8.2kgs).
4. Be sure the LP dealer checks the cylinder for leaks after filling.
5. Do not release LP gas into the atmosphere, as it can unexpectedly ignite when mixed with air.
6. Contact a LP dealer to remove LP gas from a cylinder.
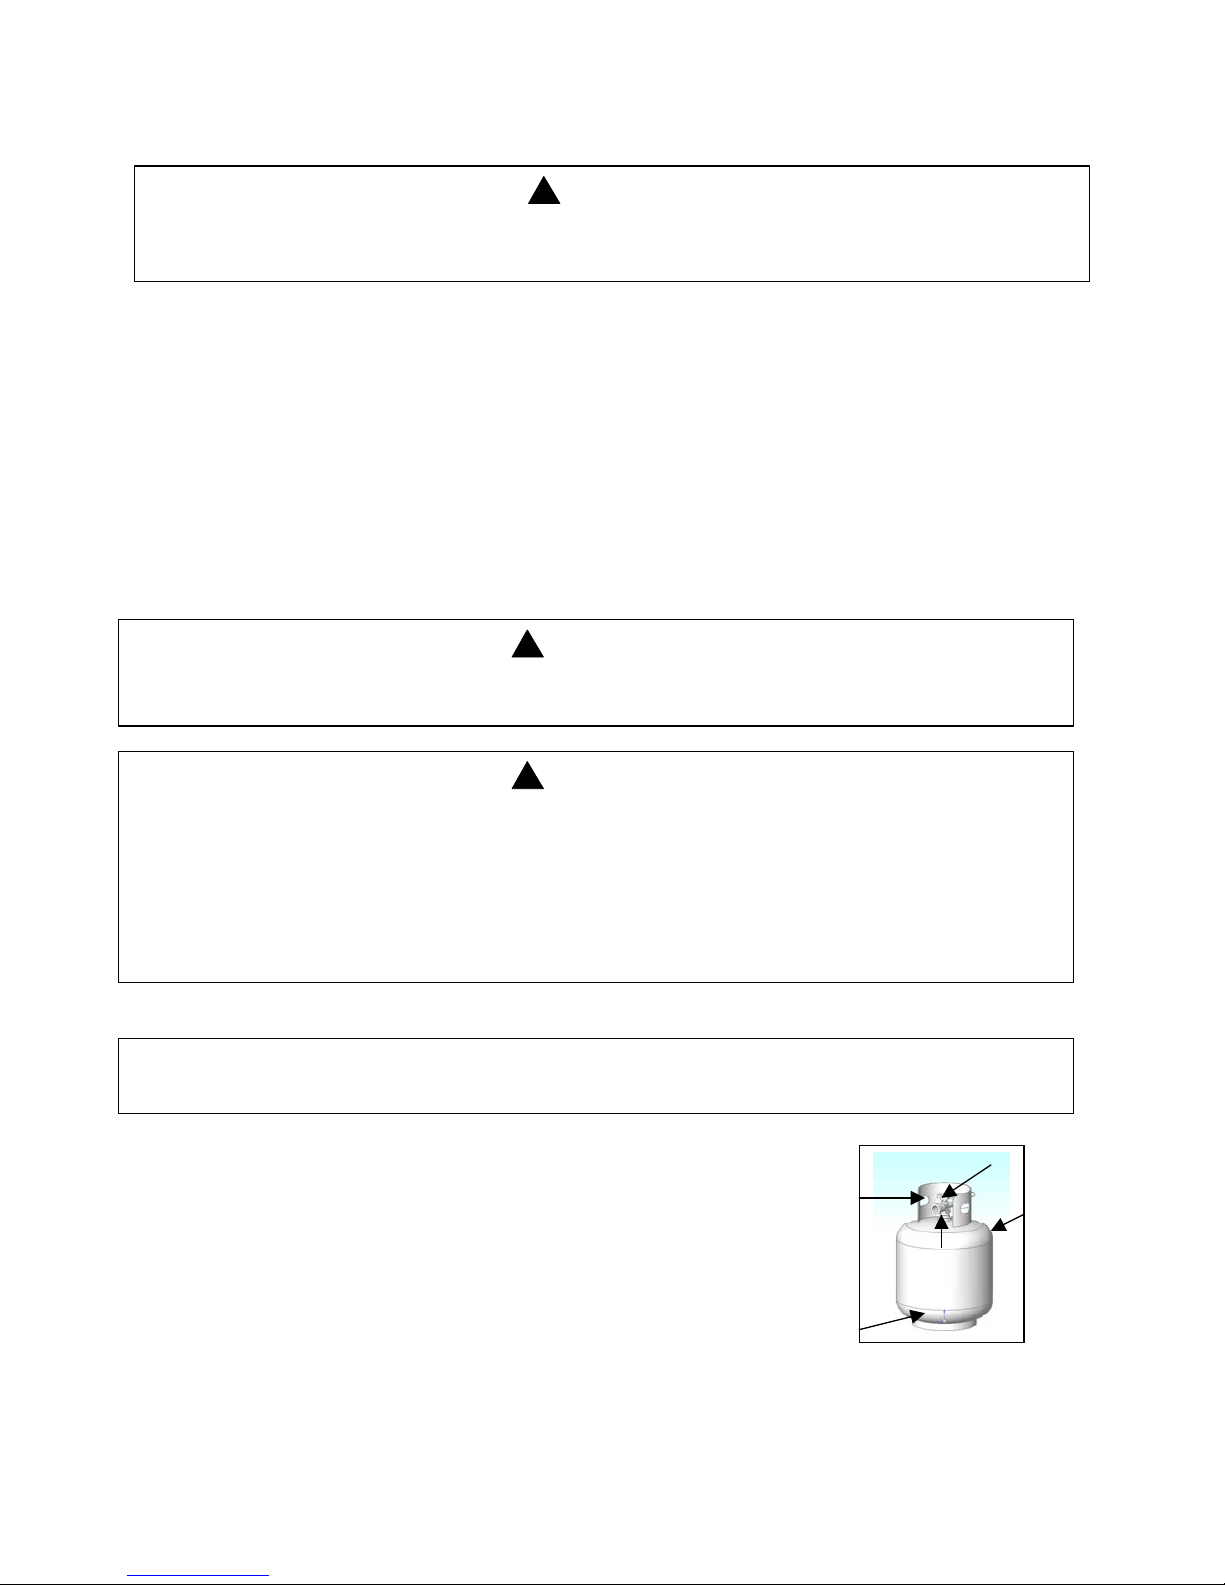
Only exchange your cylinder for one with an O.P.D. feature as shown above.
LP CYLINDER LEAK TEST
A leak test should be done each time a cylinder is refilled or exchanged. Do
not smoke or use any type of flammable material in the area during this leak test.
Do not use an open flame to check for leaks.
1. Test outside in a well ventilated area.
2. Use a paintbrush and a solution of 50% liquid soap and 50% water. Do
not use cleaning agents and they can damage the fuel supply parts.
3. Brush liquid onto areas highlighted with arrows.
4. Bubbles indicate a leak.
WARNING
1. Do not attempt to use a cylinder with any other type of connection device.
2. Do not attempt to use a cylinder with a larger capacity
WARNING
A frosty cylinder valve indicates possible gas overfill. Close the LP valve and call your dealer
immediately.
WARNING
1. Never store any extra cylinders under or near your grill.
2. Keep cylinders out of direct sunlight and high heat.
3. Never fill your cylinder over 80% full by volume. This may cause release of gas from the safety
release valve.
4. Immediately call your LP dealer or fire department should you hear, smell, or see escaping gas
from the cylinder.
5. Do not insert any type of foreign objects into the valve outlet.
The gas supply must be turned off at the LP-gas supply cylinder when this outdoor cooking gas
appliance is not in use.
Page 19
19
TRANSPORTATION AND STORAGE
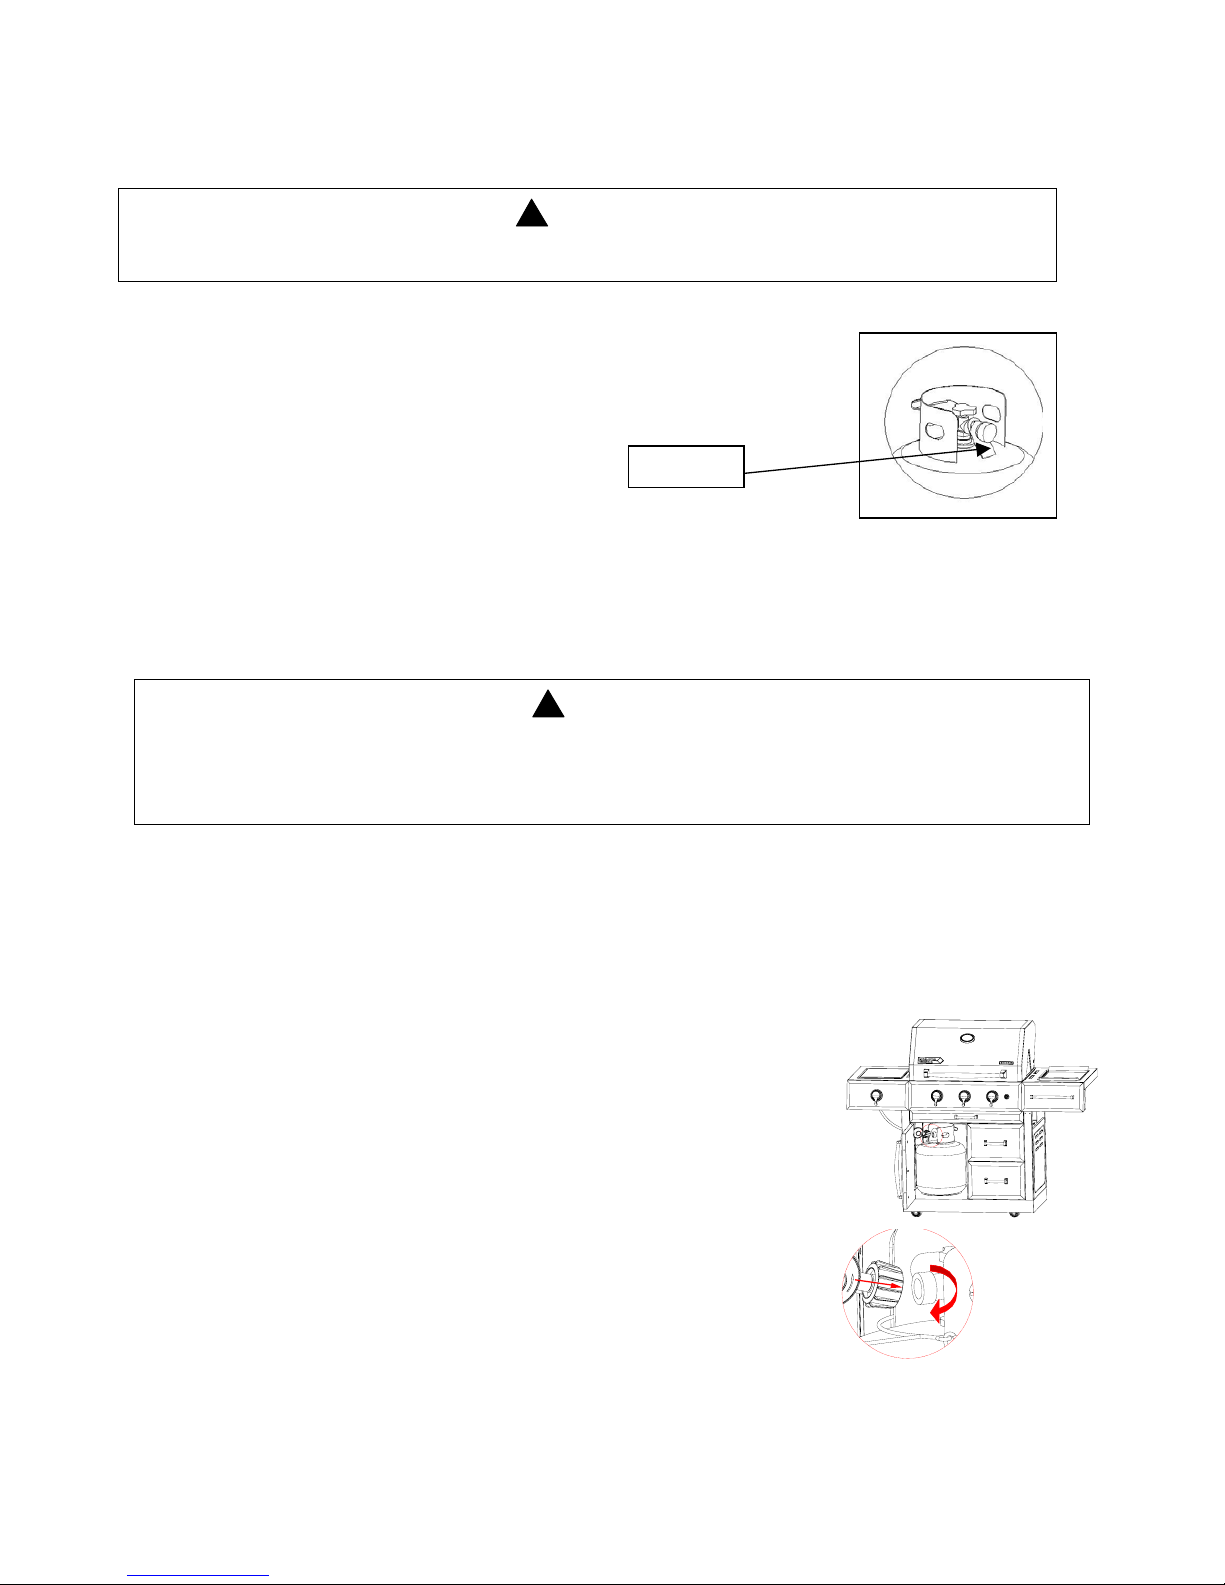
1. Place dust cap on cylinder valve outlet whenever the cylinder is not in use.
Only install the type of dust cap on the cylinder valve outlet that
is provided with the cylinder of Propane Valve. Other types of caps
or plugs may result in leakage.
2. Always transport in an upright position.
3. Do not smoke when transporting your cylinder.
4. Keep cylinders out of direct sunlight and away from sources of heat.
Regulator and LP Cylinder Connections
Your regulator is equipped with a Q.C.C. Type 1 quick connect system. It will not allow gas to flow until a
positive seal has been made. It has a thermal element that will shut off the gas flow if the temperature reaches
240 degrees F (115 degrees C). It also has a flow-limiting device that will restrict the flow of gas to 10 cubic
feet per hour (0.28 cubic meters per hour).
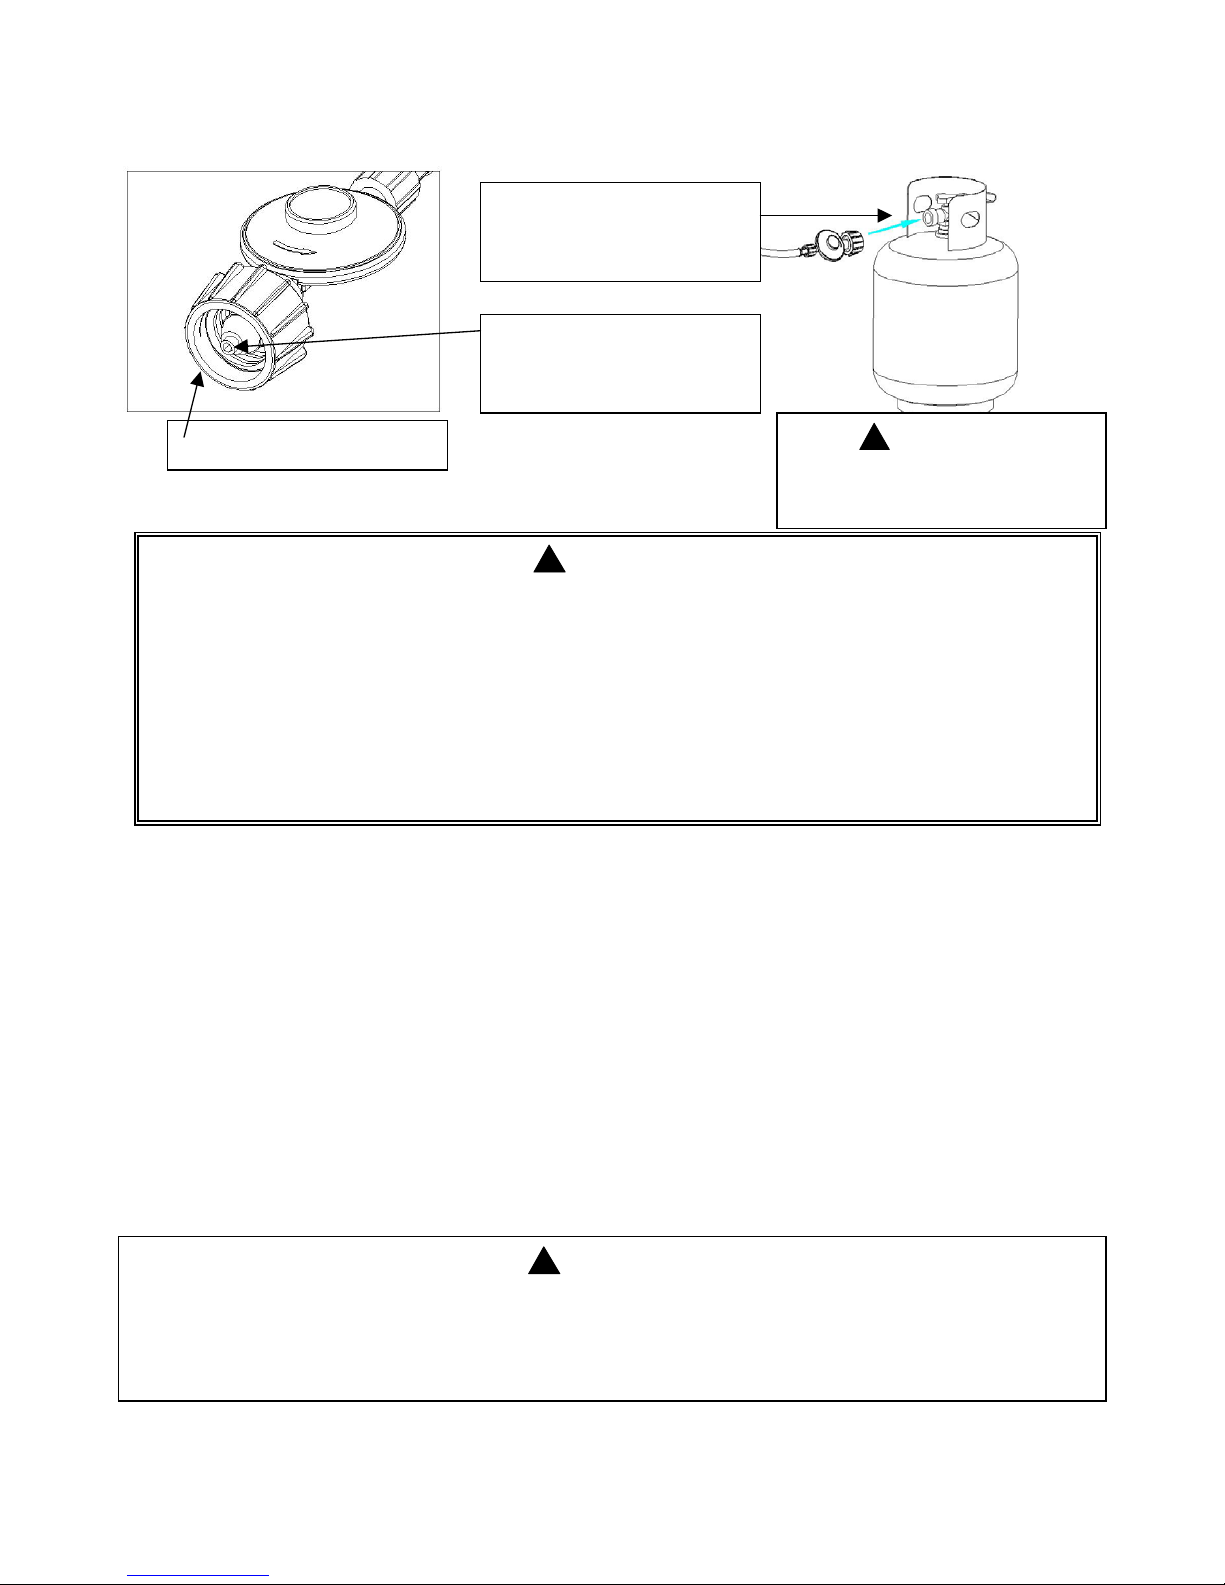
TO CONNECT THE CYLINDER TO THE REGULATOR AND HOSE
1. Be sure the LP cylinder is “OFF” by turning the hand wheel clockwise
until it stops.
2. Place the cylinder into the base cabinet shelf of the grill with the valve
facing outward and secure with the cylinder support ring.
3. Be sure all burner controls are turned to the “Off” position.
4. Remove the safety cap from the from the cylinder valve.
5. Center the nipple of the regulator into the cylinder valve
6. Turn the black nut clockwise until it stops. Hand Tighten Only.
Do Not Use A Wrench.
CAUTION
The gas pressure regulator provided with this outdoor cooking appliance must be used. This regulator is
set for an outlet pressure of 11 inches water column. Replacement pressure regulators and hose
assemblies must be those specified in the parts list.
DANGER
Bubbles indicate a leak. In that case, call your LP dealer or fire department immediately.
Dust Cap
Page 20
20
LEAK TESTING THE REGULATOR, VALVES, HOSES, AND CONNECTIONS
1. Ensure the LP cylinder valve and all burners are “Off”.
2. Ensure the LP cylinder is connected to the regulator.
3. Mix up a solution of 50% water and 50% liquid dish soap. Do not use any household cleaner
solution.
4. Open the LP tank valve by turning the hand wheel counterclockwise one turn. If you hear a rushing
sound, turn the gas off immediately. In that case, there could be a leak at the connection. Reconnect
the cylinder to the regulator.
5. Spray or brush on the solution covering the following areas: cylinder welds, regulator and cylinder
connection, gas hose connections to the regulator, all gas hoses, all gas hose connections to the
burners including the main and side burners.
6. Growing bubbles on any of the parts and connections listed above indicate a gas leak. Immediately
shut off the LP tank valve by turning the valve clockwise. Retighten the connections or order
replacement parts as needed. Continue to test as necessary until no leaks are detected.
7. Close the LP tank valve by turning the hand wheel clockwise.
WARNING
1. Do not connect this grill to any unregulated sources of propane.
2. Protect the regulator fitting from damage when disconnected. A damaged regulator fitting may
result in a gas leak when connected to a LP cylinder.
3. Inspect the gas hose before each use. Replace the hose assembly before use if you notice any
fraying, cracking, or excessive wear.
4. Always perform the Leak Test listed below before using your grill for the first time, if the cylinder
has been changed, any gas components have been changed, the regulator flow-limiting device has
been activated, or after a long period of non-use.
5. Do not attempt to connect this grill to the LP system of a motor home or trailer.
Center this nipple of the
regulator into the cylinder
valve.
The regulator must enter the
cylinder valve in a straight
line.
WARNING
1.
DO NOT USE THE GRILL
if you cannot stop a leak. Be sure the LP cylinder valve is closed. If
the LP cylinder is still leaking, contact your LP dealer or local fire department.
2. Do not use any match or open flame, or smoke, during leak testing.
3. Do not light a burner during leak testing.
Q.C.C.1 Type 1 Connector
WARNING
Always keep the gas cylinder in
the upright position all the time
Page 21
21
Grill Placement
Grill Operations
LIGHTING
Always visually inspect your grill before lighting. Replace any hoses that are frayed or cracked before lighting
your grill. Look for anything that may be blocking spaces for ventilation and remove. After lighting, always
check the flame to ensure you have a good flame all along each burner. If not able to light, or the flame is not
even along the entire burner(s), then see the Trouble Shooting section.
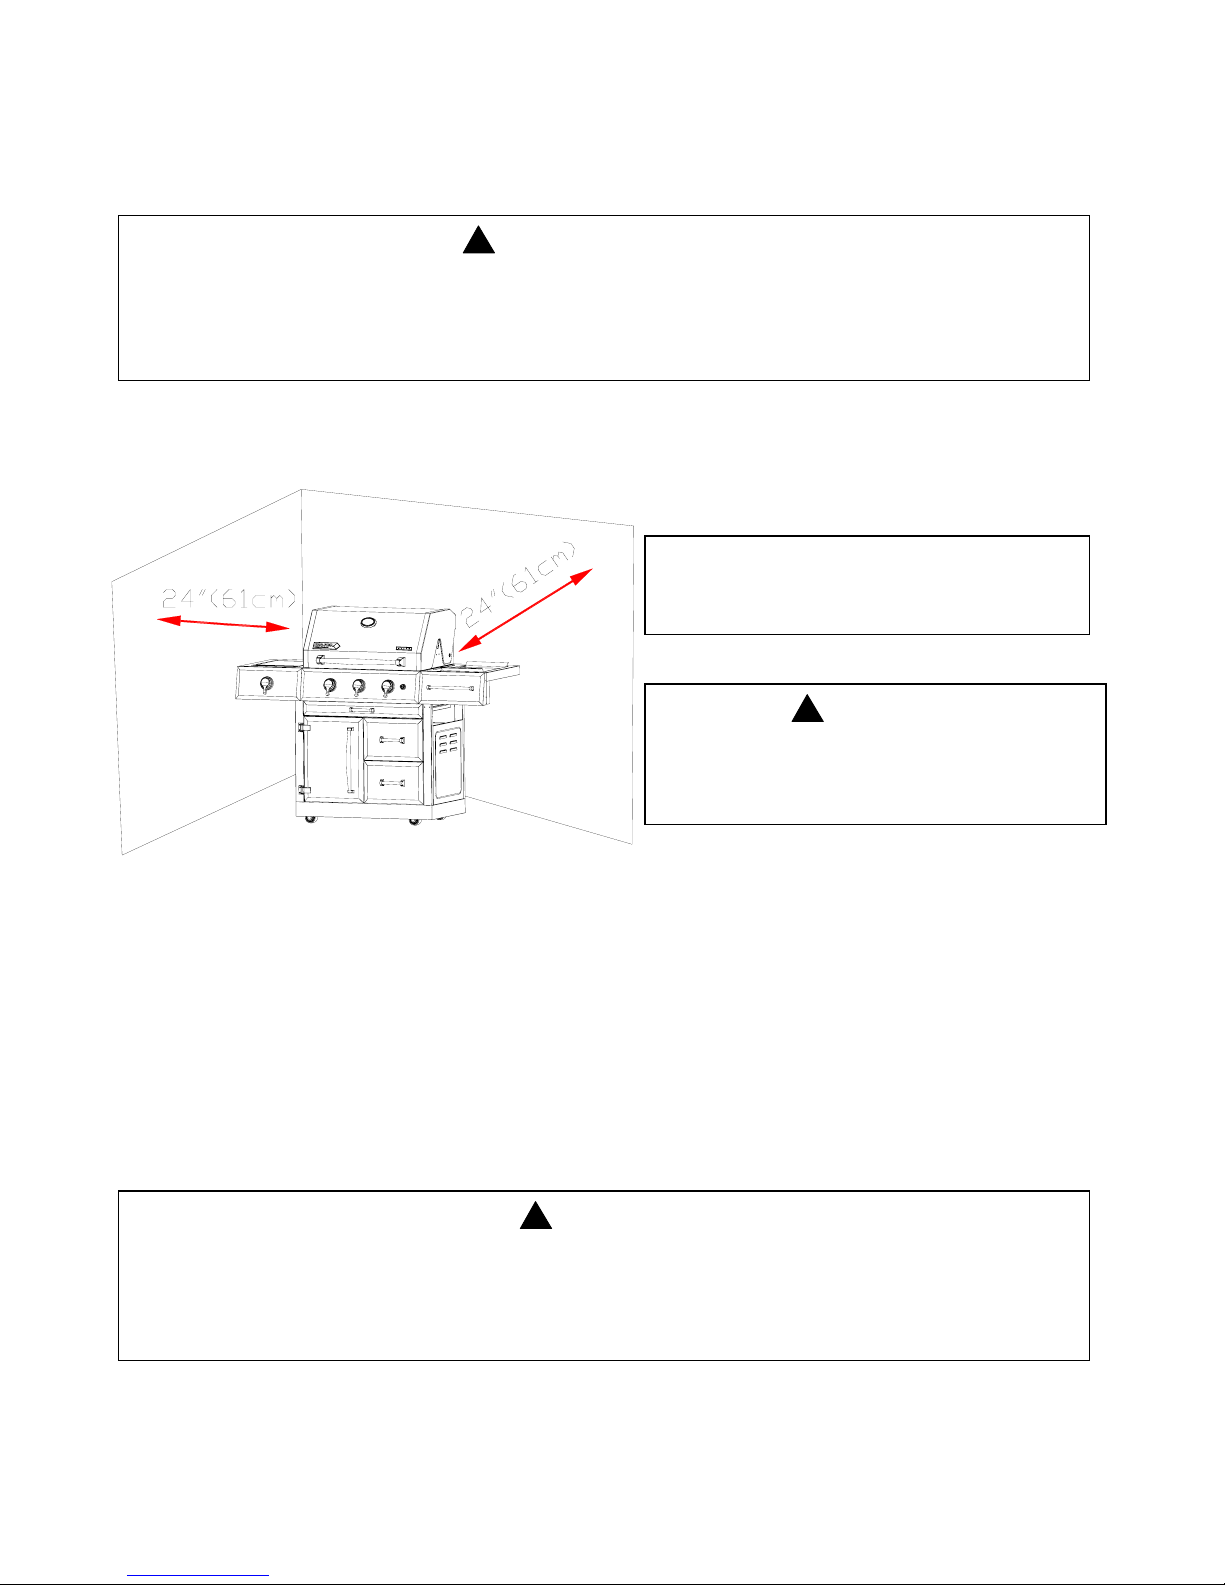
FOR YOUR SAFETY
1. Minimum clearance required from sides and back of unit to adjacent combustible construction is 24
inches (61 cm).
2. Do not locate or use this outdoor cooking gas appliance under unprotected overhead combustible
surfaces.
APARTMENT RESIDENTS
Check with your apartment manager regarding
your regulations for barbecues.
WARNING
Keep any electrical supply cord and the fuel
supply hose away from any heated surfaces and
water.
WARNING
1. Read instructions before lighting.
2. Open lid during lighting.
3. If ignition does not occur in 5 seconds, turn the burner control(s) off, wait 5 minutes and repeat the
lighting procedure
Page 22
22
LIGHTING THE MAIN BURNERS USING ELECTRONIC IGNITION
1. Open the lid.
2. Ensure all burner control knobs are in the “Off” position.
3. Turn on the LP gas by slowly turning the hand wheel on the cylinder valve.
4. Turn one main burner control knob to “HI/LIGHT”.
5. Depress the electronic ignition button and hold down. You should hear a clicking sound, which shows the
electronic ignition is working.
6. If the burner does not light within 5 seconds, turn the burner control knob to “Off”. Wait 5 minutes for the
gas to clear, and repeat the above procedure. Use the Manual directions if it still will not light.
7. When lit, turn the control knob to the desired setting.
8. Your grill is equipped with continuous ignition. Simply turn any other of the main burner control knobs
next to the lit burner to “HI/LIGHT” to light, and then to the desired heat setting. They will ignite
automatically once the initial burner is lit. Do not press the electronic ignition button again.
MANUALLY LIGHTING THE MAIN BURNERS WITH THE MATCH HOLDER
1. Open the lid.
2. Ensure all burners are in the “Off” position.
3. Slowly turn on the gas at the LP cylinder valve if it is not already on.
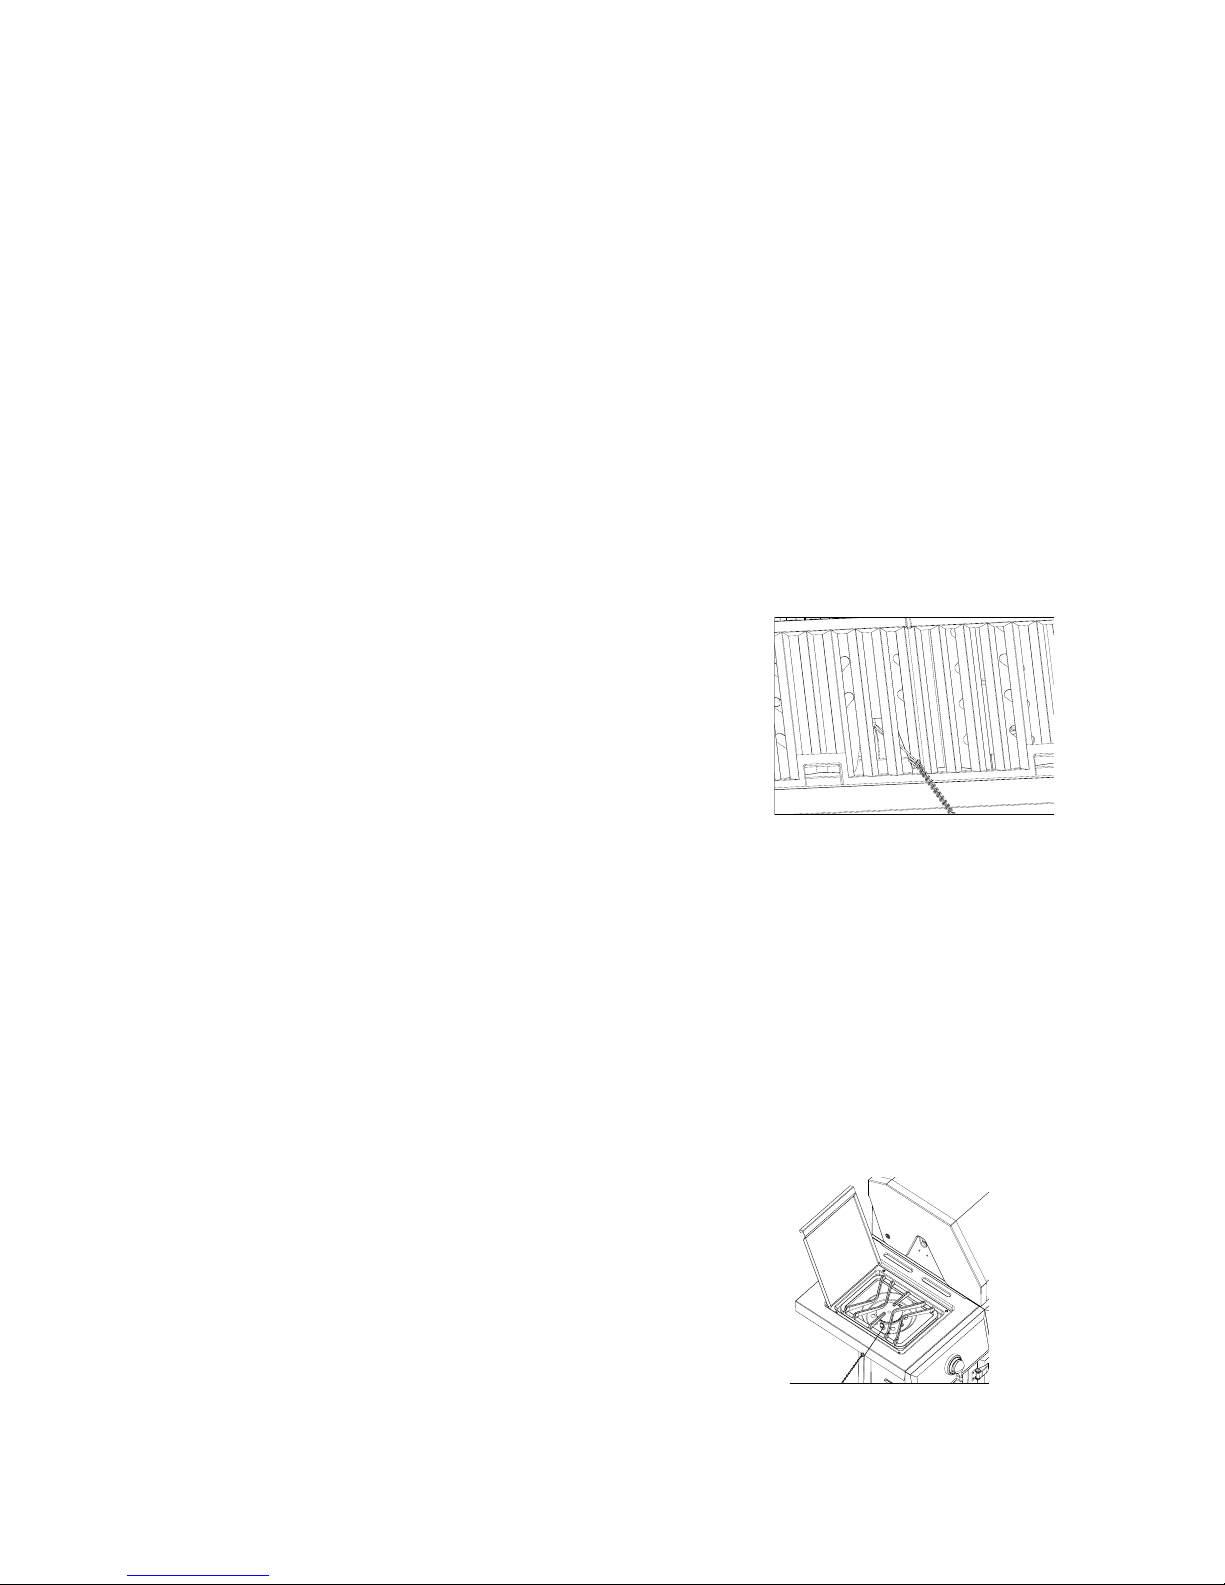
4. Place a match in the Match Holder. This is located on the left
side of the grill cabinet underneath the side burner shelf.
5. Strike the match, and insert into the lighting hole close to the burner.
6. Turn the left burner control knob to “HI/LIGHT”.
7. If the burner does not light within 5 seconds, turn the burner control
knob to “Off”. Wait 5 minutes for gas to clear, and try again.
8. When lit, turn the control knob to the desired heat setting.
LIGHTING THE SIDE BURNER WITH ELECTRONIC IGNITION
1. Open the side burner cover
2. Ensure the side burner control knob is in the “Off” position, as well as any main burners not in use.
3. Slowly turn on the gas at the LP cylinder valve if it is not already on.
4. Turn the side burner control knob to “HI/LIGHT”.
5. Depress the electronic ignition button and hold. You should hear a clicking sound, which shows the
electronic ignition is working.
6. If the burner does not light within 5 seconds, turn the burner control knob to “Off”. Wait 5 minutes for the
gas to clear, and repeat the above procedure. Use the Manual directions if it still will not light.
7. When lit, turn the side burner control knob to its desired heat setting.
LIGHTING THE SIDE BURNER WITH THE MATCH HOLDER
1. Open the side burner cover.
2. Ensure the side burner control knob is in the “Off” position, as well
as any main burner not in use.
3. Slowly turn on the gas at the LP cylinder valve if it is not already on.
4. Strike the match, and place near the top of the burner.
5. Turn the side burner control knob to “HI/LIGHT”.
6. If the burner does not light within 5 seconds, turn the burner
control knob to “Off”. Wait 5 minutes for the gas to clear,
and try again.
7. When lit, turn the side burner control knob to its desired heat setting.
Page 23
23
TURNING OFF YOUR GRILL
1. Turn all burner control knobs to the “Off” position.
2. Turn off the gas supply at the LP tank by turning the valve clockwise.
Cleaning Your Grill
STAINLESS STEEL SURFACES AND OTHER EXTERIOR SURFACES– wash with a mild dish soap
and warm water. A cloth, soft brush, or plastic cleaning pad can be used. Rinse thoroughly and wipe dry. The
stainless steel used in the construction of your grill is 304 commercial grade. There are many specific stainless
steel cleaners available. Follow the manufacturer’s directions. Always polish in the direction of the lines. Do
not allow dirt and grease to accumulate. Do not use steel wool as it will scratch the surface.
COOKING GRATES, WARMING RACK, AND HEAT DIFFUSERS – use a stiff brass brush. Wash with
warm water and mild dish soap as needed, rinse, and dry.
GREASE PAN AND TRAY – check after each use. Remove and empty the Tray when half full. Remove and
clean the Pan as grease builds up. Both can be washed with warm water and mild dish soap.
ELECTRONIC IGNITER – visually inspect for cracks. Replace if a crack is found. Do not use water to
clean the igniter.
BURNERS – we recommend you clean your burners at least twice a year, or before use if the grill has not been
used in over one month.
WARNING
1. Do not clean any part of your barbecue grill in a self-cleaning oven.
2. Do not use oven cleaners, abrasive kitchen cleaners, cleaners that contain citrus products, or
mineral spirits.
3. Do not use any type of steel bristled brush.
4. Clean your grill regularly to prohibit grease build-ups and avoid a grease fire or excessive flareups.
WARNING
Small insects, such as spiders, are able to access the burner tubes. Sometimes they will build nests or spin
webs. In either case, this can block or reduce the amount of gas flowing through the burner. You will
usually see a smaller flame, or a flame that is mostly yellow rather than blue, coming from the burner when
this happens. Other signs include the gill not heating evenly, not reaching temperature, or burners not
igniting. In cases with severe blockage, this can cause the flame to burn backwards, and outside of the
burner tubes, which can cause damage to your grill and/or personal injury. IMMEDIATELY SHUT OFF
THE FLOW OF LP GAS AT THE CYLINDER BY TURNING THE HAND WHEEL
CLOCKWISE SHOULD THIS HAPPEN. Wait for the grill to cool, and then clean all burners.
Page 24
24
CLEANING THE BURNERS
1. Ensure the LP gas is turned off at the LP cylinder.
2. Remove the cooking grates, heat diffusers, and grease tray.
3. Remove the Phillips Head screws located at the back end of each burner. Remove the nut and bolt
which secures the burner to the electronic igniter.
4. Lift each burner up and out.
5. Clean the inside of the burner using a stiff wire. A straightened coat hanger is one suggested tool. An
alternative way to clean the inside of the burner is using compressed air. Always wear eye protection if
using this method. Never enlarge the burner ports during cleaning.
6. Brush the outer surface of the burner.
7. Ensure all ports (holes) are free of all debris
8. Inspect the burner. Replace if any cracks or enlarged holes.
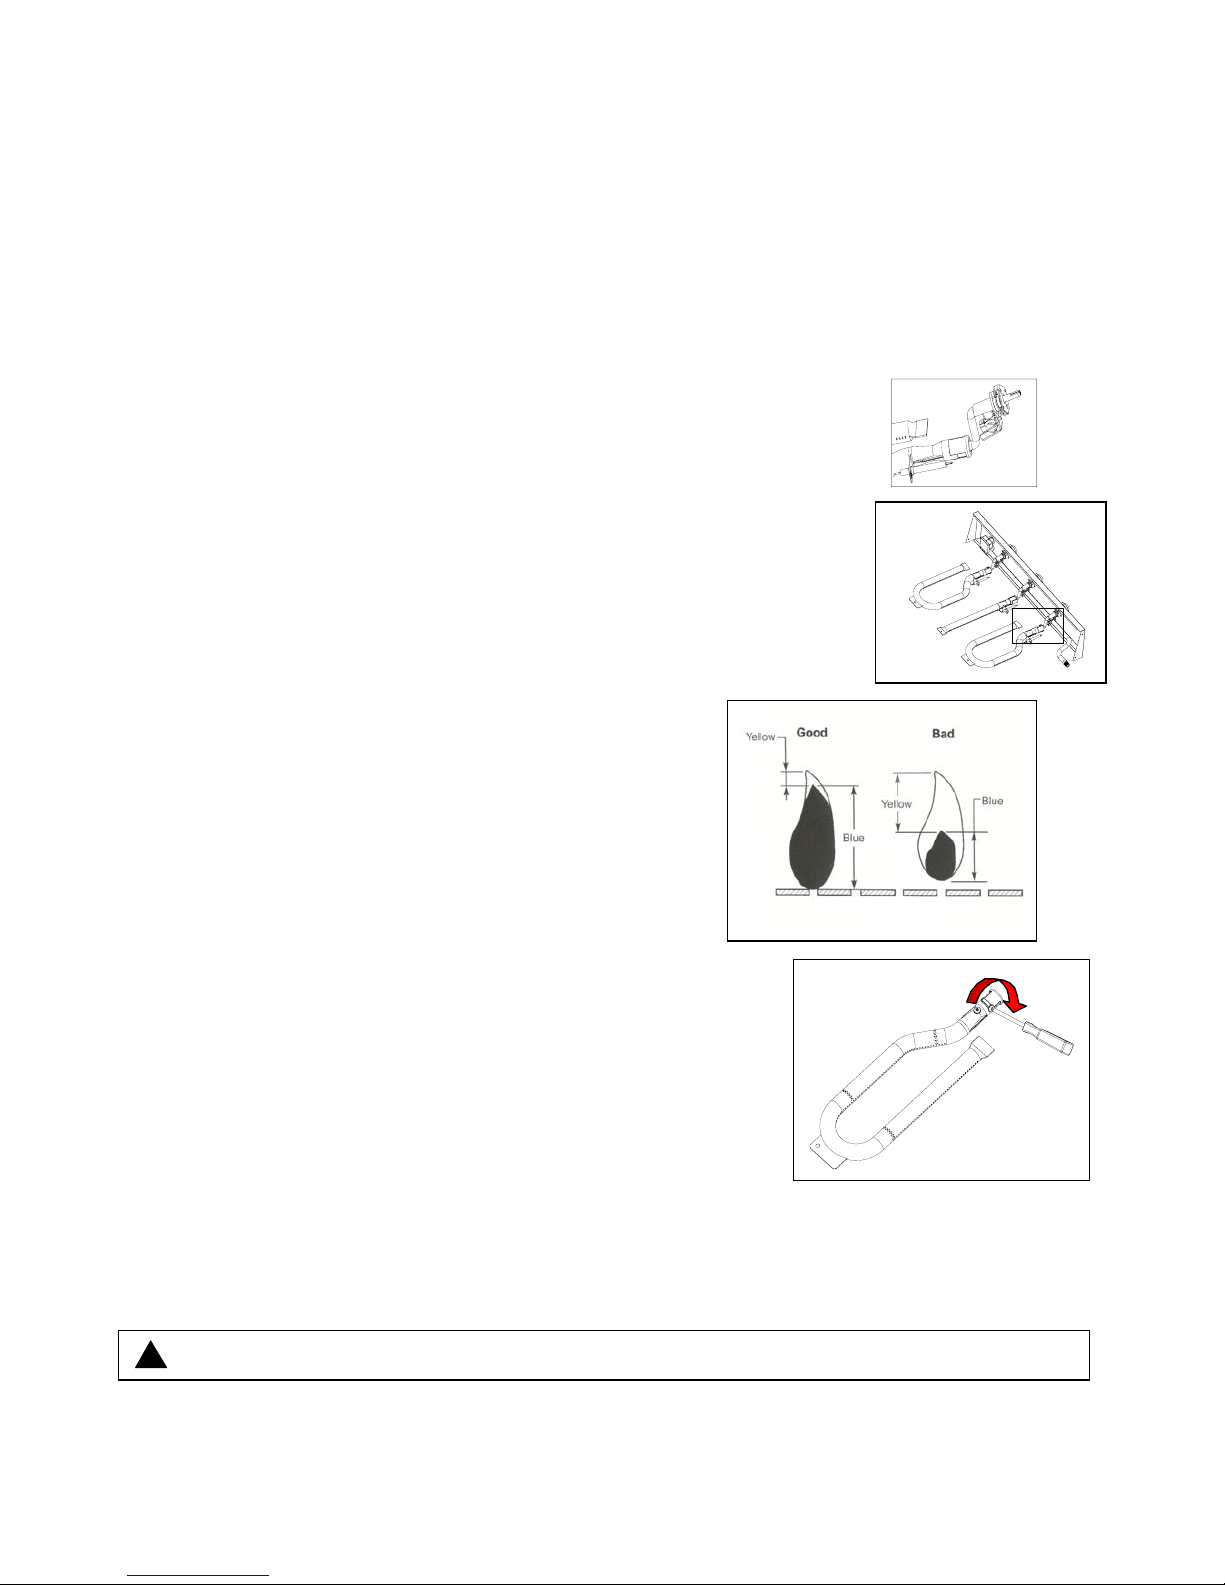
9. Reinstall the burners making sure the burners seat over the
valves as shown in the figure to the right.
10. Secure the back of the burners to the firebox with the Phillips
Head screws and reattach to the electronic igniters.
11. Replace the grease tray, heat diffusers, and cooking grates.
12. Perform a Leak Test described earlier in this guide.
BURNER FLAMES
Always inspect the burner flame after lighting. A good flame
should be primarily blue with a yellow tip and have a minimal
amount of noise. Some yellow tips are OK if under one inch.
New burners sometimes have oil residue, which will cause
yellow flame when burning off. Variations in gas supply,
altitude, weather, and other factors can all impact burner
performance. Older grills can also show more yellow flame as
food deposits, oils, and fats can build up
BURNER ADJUSTMENTS
Each burner is adjusted and tested at the factory before packaging.
However, variations in gas supply, altitude, and other factors can
impact burner performance, thereby making burner adjustments
sometimes necessary. Burner flames should be mainly blue with
little noise. Too much yellow indicates too little air. You can try
moving the grill to an area with more air circulation or opening the
shutter on the burner. Too much noise indicates too much air. Move
the grill to an area of decreased air circulation, or closing the shutter
on the burner to get to your desired result.
ELECTRONIC IGNITION MAINTENANCE
Your grill is equipped with electronic ignition. It’s powered by one “AA” size battery. Replace the battery
when necessary. Unscrew the igniter top. Place the new battery into the igniter with the positive (+) end of the
battery facing up. Screw the igniter top back into place.
WARNING: Do not dispose of batteries in fire! Batteries may explode or leak.
Page 25

25
GRILL STORAGE
1. Clean your grill before storage.
2. Disconnect the LP cylinder from the regulator.
DO NOT BRING THE LP CYLINDER INDOORS
UNDER ANY CIRCUMSTANCES.
3. Cover the grill.
4. Perform a Leak Test before use after storage.
Grilling With Your New Grill
Welcome to the world of grilling. Whether you’re already an established griller, or just starting out, your new
grill should bring you much enjoyment and satisfaction, to say nothing of some phenomenal meals. We
encourage you to experiment to find your own favorite recipes.
Your temperature control knobs are labeled “High”, “Low”, and “Off”. Simply push in on the temperature
control knobs and turn to the desired heat setting. A thermometer is placed in the hood so that you can see the
cooking temperature inside the grill.
The heat diffusers are designed to help evenly distribute heat throughout the grill. They are also designed to
catch and smoke the right amount of drippings, adding more flavors to your meal.
DIRECT VS. INDIRECT COOKING
Food cooked on the grill is either done using direct or indirect cooking. Direct cooking is when the food is
cooked directly over the heat. Food is placed in-between the burners for indirect cooking.
DIRECT – used for preheating and searing
Use Direct cooking to sear meats. This helps to keep food moist by locking in juices. Some food, such as steak,
is first seared using Direct cooking, and then finished cooking using the Indirect method. This is generally used
for quicker cooking foods. Preheat the grill to 500°F (260°C). You can shut off one or more burners if you do
not need to use the entire grilling surface once you reach over 500°F(260°C). You can also use a medium high
heat of 400°F or more by turning the burners down slightly. Place the food directly over the heat source.
Remain vigilant when grilling using this method, as it’s easy to overcook.
INDIRECT – how most food is cooked on a gas grill
Indirect cooking is used for foods that take longer to cook, including large cuts of meat such as roasts. It’s also
used for cooking more delicate food that can dry out quickly such as fish and poultry, for fattier foods to reduce
flare-ups, and when grilling using a roasting pan or aluminum foil. Preheat the grill to 500°F(260°C). Then
turn some burners off, and others to medium to low depending on the temperature you want to maintain.
Generally, turn the center burner off for a 3-burner model and the 2 inside burners off on a 4-burner model.
Grills with more than 4 burners will vary depending on what you are cooking. Generally, you want to keep the
temperature around 350°F. Do not place the food directly over any burners when using this grilling method.
SIDE BURNER
Use the side burner to boil soups, corn on the cob, lobster, steam, stir-fries, or warm.
Page 26

26
KNOWING WHEN THE FOOD IS DONE
We strongly recommend using a meat thermometer. Food cooked on a grill can brown very fast on the outside,
well before it’s cooked on the inside. Many factors can influence cooking times, including wind, outdoor
temperatures, and altitude. Therefore, it’s best to use a meat thermometer to ensure your food has cooked long
enough. Check with your specific recipe, but for general guidelines:
1. Hamburgers, sausages, and all ground meat should reach 160°F (71°C).
2. Beef should reach 145°F (63°C) for medium rare
3. Veal should reach 160°F (71°C) for medium and lamb should reach 145°F (63°C) for medium rare.
4. Pork should reach 160°F (71°C).
5. Poultry should reach 180°F(82°C), or 170°F(77°C) for boneless pieces.
GRILLING TIPS AND TRICKS
1. Always “Preheat” your grill before cooking. Light all main burners, turn to “High”, and close the lid
until the thermometer reads over 500°F (260°C), which should be 5 to 10 minutes. Then adjust the
burner control knobs to the proper temperature. Note that no preheating is necessary for the side burner.
2. The thermometer measures the temperature at the top of the lid. The temperature down by the cooking
grates is generally somewhat warmer.
3. Always cook with the lid down. This provides more even circulation of heat, and the food cooks faster.
Remember that heat is lost each time the hood is raised.
4. Mother Nature can impact your grilling times. Allow more cooking time for cold, wind, and higher
altitudes. We recommend you place the grill in an area protected from much wind.
5. Trim away any excess fat from meat to reduce flare-ups.
6. Keep similar size portions together so that they cook more evenly.
7. Generally speaking, the more food on the grill, the longer the cooking time.
8. Be aware when using the Direct cooking method, as food can easily become overcooked, burned, or dry
out. Food may require more turning, or sometimes, may need to be moved off the flame.
9. Larger pieces of meat generally require more cooking time per pound than smaller pieces of meat.
10. If a major flare-up, or too many flare-ups occur, turn off the gas, move the food away from the flare-up,
and close the hood. Restart the grill once the flare-up has died down.
11. Turn foods infrequently. Generally, only turn a steak once during cooking.
12. Use tongs rather than a fork when turning the food on the grill. Less juice will be lost that way.
13. Know your sauce and when to apply. Oil and vinegar based sauces can be brushed on any time. Sugar
based sauces like barbecue sauce should be applied during the last few minutes of cooking.
14. A timer can help you keep from over-cooking the food.
15. Use insulated protective mitts or potholders when working around a grill in operation.
16. Use a small amount of cooking oil on the cooking grates before heating to reduce foods sticking on the
grates.
FOOD SAFETY
1. Always use safe food handling and preparation when using this grill.
2. Wash all poultry, seafood, and vegetables before cooking.
3. Use separate platters, plates, and utensils for uncooked and cooked foods.
4. Leave all meat, poultry, and seafood in the refrigerator until ready to cook.
5. Use a meat thermometer to ensure foods are adequately cooked.
Page 27

27
Trouble Shooting Guide
BURNER WILL NOT LIGHT
1.) Gas supply is turned off. Turn on gas at LP cylinder.
2.) Out of propane. Check to be sure you still have propane in your tank.
3.) Regulator is not properly seated into the tank valve. Remove and reattach. Hand tighten only.
4.) Crimped fuel supply hose. Inspect and straighten.
5.) Regulator failure or damaged hose. Order replacement part and replace.
6.) Make sure you can hear the electronic igniter clicking. If not, replace the battery with an “AA” size.
Inspect the electrode to be sure it’s not coated in grease or dirt. If so, clean with rubbing alcohol. Check
the distance from the electrode tip to the burner. The tip of the electrode should be 1/8” to ¼” from the
main burner and 1/8” to 3/16” from the side burner. Adjust if necessary. Inspect the electrodes to be
sure they are not cracked or broken. If so, order replacement parts and replace.
7.) Blockage in the gas system. Inspect the burners to be sure insects, spider webs, etc do not block them.
Clean if necessary. Inspect under the control panel to be sure the burners are aligned properly with the
valves.
IRREGULAR FLAME OR YELLOW FLAME
1.) New burner may have residual oil, which will burn off.
2.) Tubes in burners are blocked. Remove and clean.
3.) Burners have a high grease or dirt build-up. Remove and clean.
4.) Burners are not aligned properly with the valves. Inspect under the control panel.
SUDDEN DROP IN GAS PRESSURE OR FLAMES BLOW OUT
1.) Out of gas. Check to be sure you still have propane in your tank.
2.) Your excessive fuel flow valve has tripped, thereby reducing the flow of gas. Turn off all burners, wait
30 seconds, and relight grill. If problem persists, turn off all burners. Disconnect regulator from tank.
Wait 10 minutes. Reconnect regulator and leak test. Slowly turn on LP tank and relight grill. Relight
the burner furthest from the LP cylinder first. Other ways the flow limiting device can be activated
include
a. A ruptured gas hose. Inspect, perform a leak test, and replace as necessary.
b. Opening the control knobs before turning on the LP gas at the cylinder. Turn on the gas at the
LP cylinder first before turning on a control knob to light.
c. Improper purging of cylinder before it was filled. See your LP gas dealer.
3.) Wind could be blowing out your burners. Turn front of grill to face wind or move out of the wind.
EXCESSIVE FLARE-UPS
1.) Heat diffusers, inside of grill, grates, and burners need to be cleaned.
2.) Grease tray needs to be cleaned and emptied.
3.) Using too high of heat to cook. Reduce control knob setting.
4.) Direct cooking method will produce more flare-ups than indirect. Try using indirect if using direct.
FIRE BEHIND CONTROL PANEL
Immediately shut off cylinder valve and allow grill to cool.
1.) Check burners for obstructions and clean.
2.) Inspect under the control panel to be sure the burners are aligned properly with the valves.
3.) Gas is leaking from a faulty connection or damaged hose. Perform a leak test and inspect for leaks.
Tighten or replace parts as necessary.
Page 28

28
Frequently Asked Questions
Can I convert my gas grill from one fuel source to another?
No. Your gas grill is manufactured to specific standards developed by CSA and ANSI for your safety
and grilling performance for either LP or Natural Gas. We do not offer conversion kits nor do we
recommend you change the fuel type.
What is the difference between 304 commercial series stainless steel and others?
304 series stainless steel is also called 18/8, which means that it contains 18% chromium and 8% nickel.
The chromium gives the stainless steel its color and its corrosion resistant properties on the surface. The
nickel, which is what differentiates 304 series stainless steel, hardens the surface for additional
protection. Some manufacturers use a 430 series stainless steel, which is 18/0. It contains less that 1%
nickel. Therefore, it provides less corrosion protection and rust resistance. Our grills use only 304
series stainless steel. 304 series stainless steel is not magnetic, where 430 series stainless steel is.
How are your grills tested?
Our grills are tested and certified by CSA, a leading worldwide independent testing center, to meet or
exceed various CSA and ANSI standards along with various performance standards. The burners and
gas line in each grill are also individually tested when each grill comes off the assembly line just prior to
packaging. Each burner is ignited for this test.
What is the humming noise I sometimes here coming from my regulator?
The humming sound you can hear is just gas flowing through the regulator. There is no need to be
concerned with a low volume of noise.
My grill has a low flame on some burners, or some burners will not light at all. What can cause this?
This can be caused by the regulator’s flow limiting device, which is generated by a sudden change in
pressure. Opening the tank valve too quickly can cause this. In this case, close the LP tank valve and
disconnect from the regulator. Let it stand for 10 minutes. Reconnect the regulator to the LP tank.
Open the grill lid. Slowly open the LP tank valve. Follow the burner lighting procedures and light the
burner furthest from the LP tank. Continue to light the other burners as you move towards the LP tank.
Can I use ceramic plates, briquettes of any kind, or lava rocks?
No. Your grill is designed for use only with the heat diffusers. Grease drips down on to the diffusers
and is burned, creating steam and additional flavor.
Page 29
29
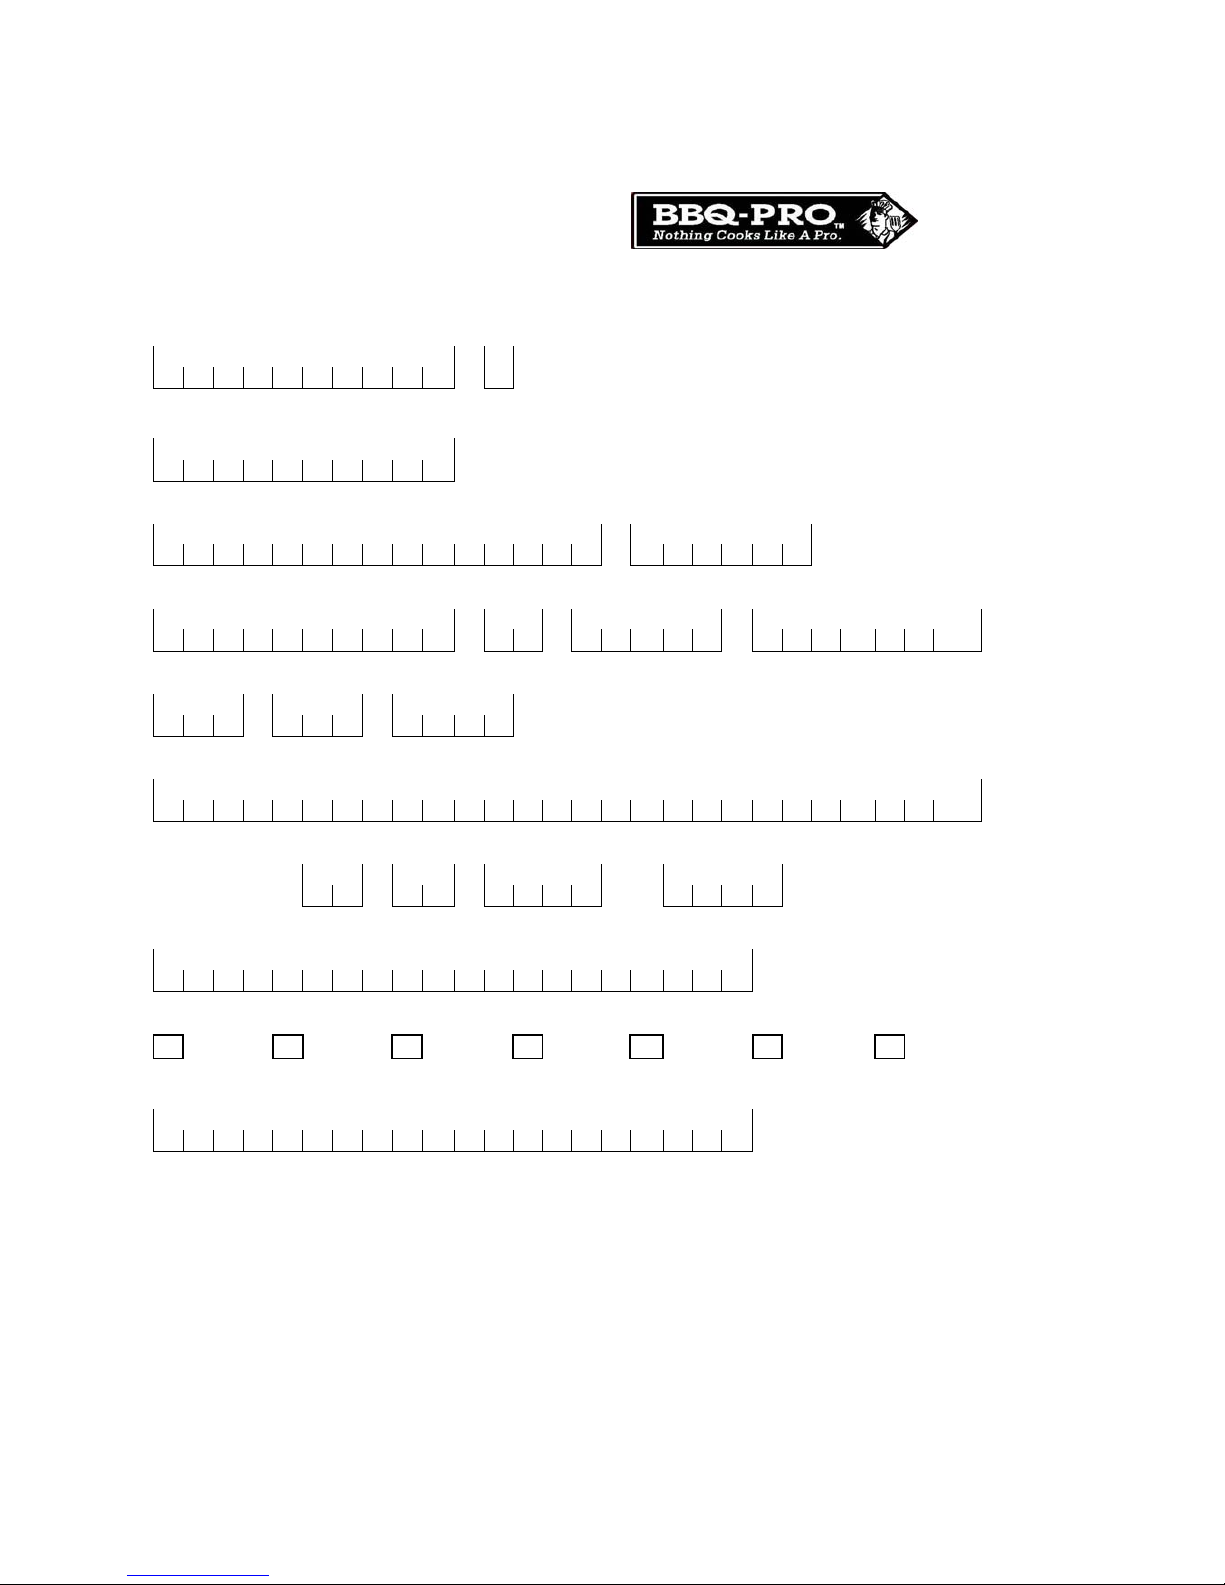
Product Registration Card
Thank you for purchasing a BBQ Pro
TM
. Please
complete and return the Registration Card or visit
us online to register your grill.
1. First Name:
Middle Initial:
Last Name:
2. Address: (number and street)
Apt:
City:
State:
Zip Code:
Country:
3. Phone Number Daytime:
4. Email Address:
5. Date of Purchase: Month:
Day:
Year:
6. Purchase Price
$
.
00
7. Name of Store:
8. What Model Did You Purchase?
BQ51011
BQ52006
BQ52007
BQ51009
BQ04023-1
BQ04023-2
BQ04028
9. Serial Number:
Register online at www.omahagrills.com
____________________________________________________________________________________________________
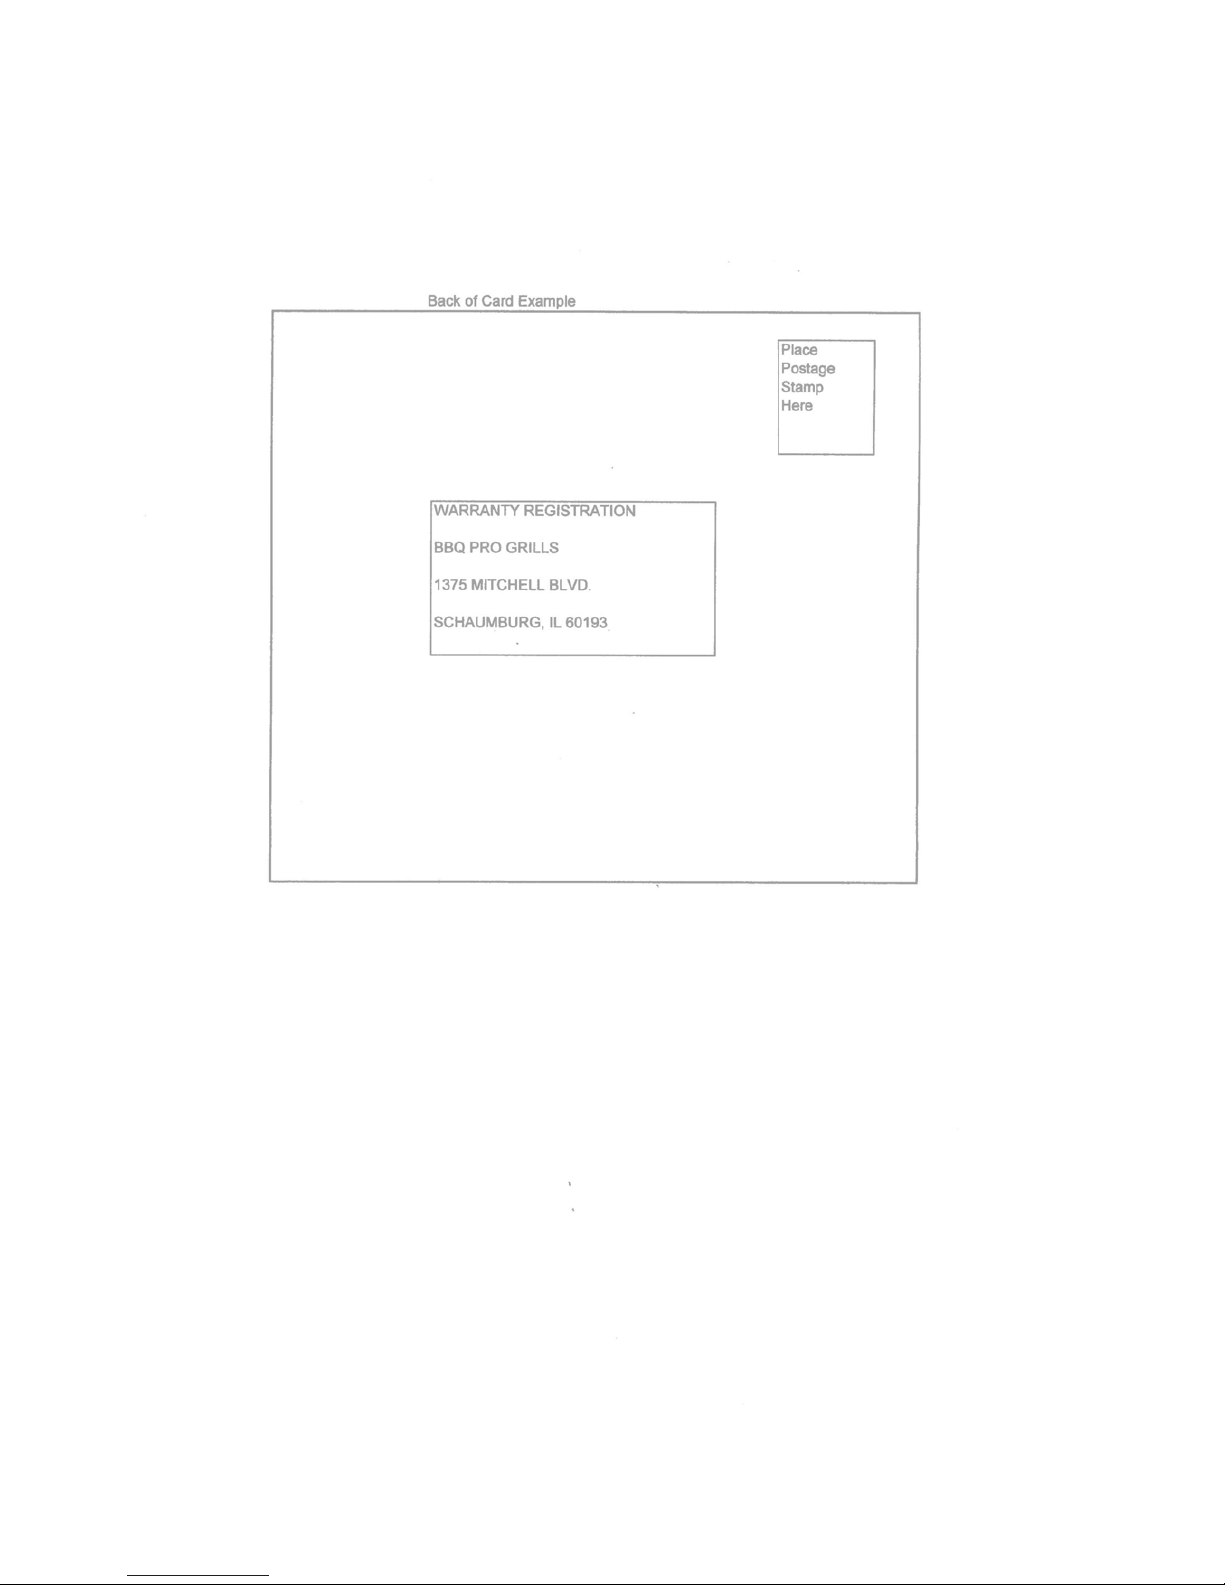
How to Register Your Product:
1. Visit us on the web at http://www.omahagrills.com
2.) Complete the above card and mail to:
Warranty Registration
BBQ Pro Grill
1375 Mitchell Blvd.
Schaumburg, IL 60193
You can locate the serial number of your grill by looking at the label attached to the back of the
cabinet.
Page 30
30
 Loading...