

Page 1
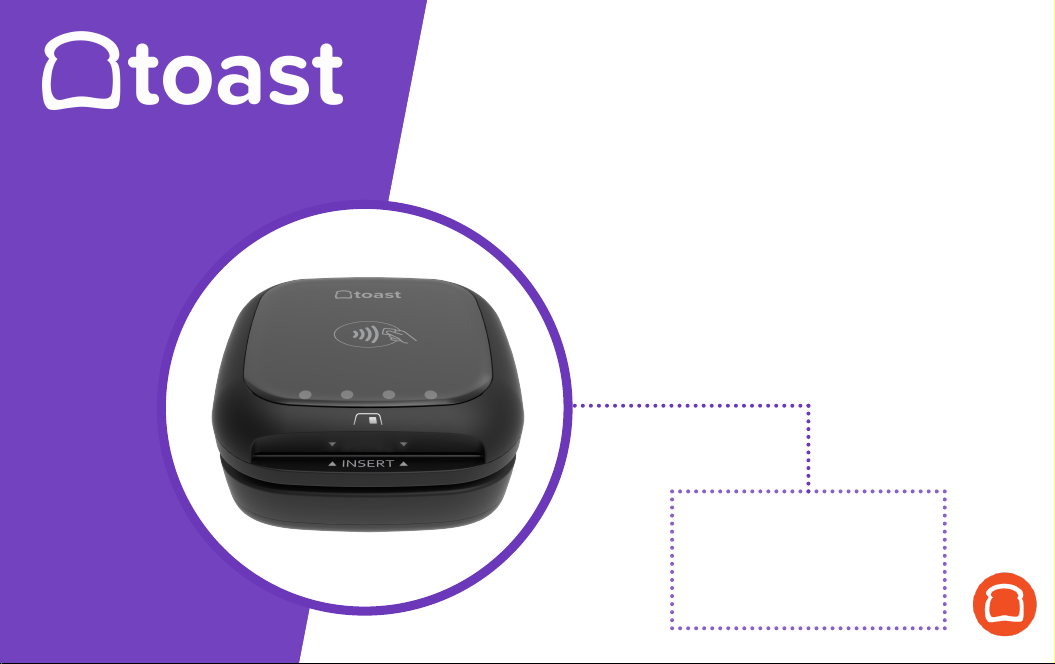
Contactless Pay
INSTALLATION &
CONFIGURATION
INSTRUCTIONS
Page 2
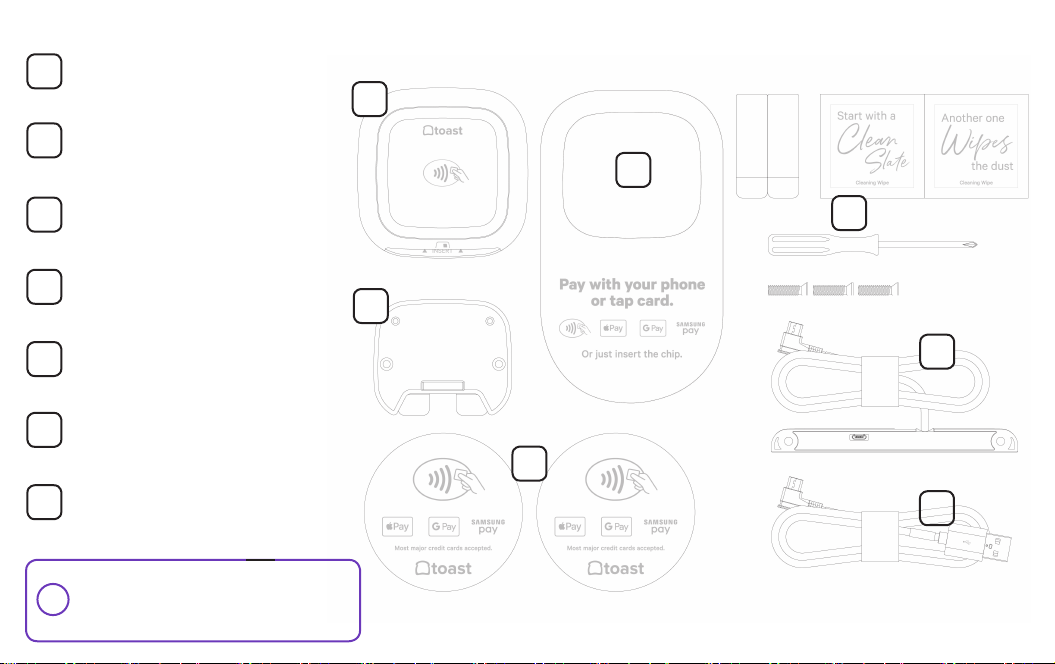
Contactless Puck
1
Contactless Reader Plate
2
with adhesive
Stickers for your door or
windows to advertise the types
3
of payments you can accept
Counter placement pad for your
4
Contactless Puck
WHAT’S IN THE BOX?
1
4
5
2
Tool kit containing a screwdriver,
5
alcohol wipes, and extra adhesives
Micro-USB to Micro-USB cable
6
USB-A to Micro-USB cable
7
Note: You will only use one of the
cables provided to install your
!
contactless reader.
6
3
7
Page 3
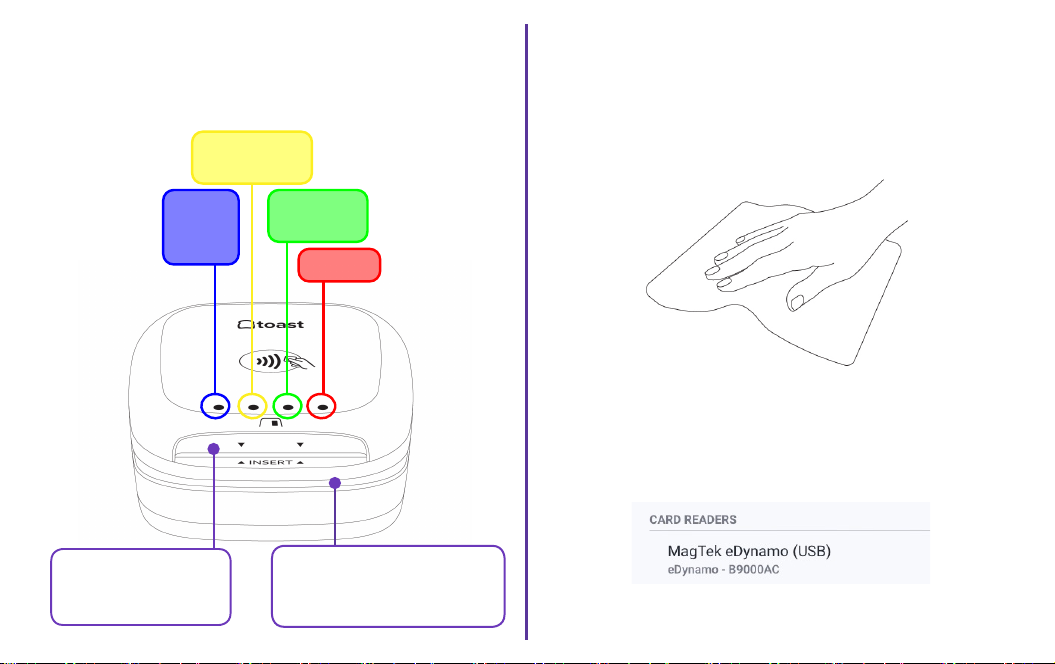
YOUR NEW CONTACTLESS PUCK
Here’s a breakdown of your new hardware.
Below explains each light and both ways to insert or slide cards.
Processing
Reader
ready!
Success!
Error
ASSESS YOUR COUNTER SPACE
AND TERMINAL
1
Wipe down the countertop with the alcohol wipe provided in
your tool kit. This will make it even easier for your contactless
puck to adhere properly.
Next, if you have an existing card reader, physically remove
it before installation. You’ll also need to digitally remove the
reader in Toast following these steps:
1. Navigate to the main menu on your terminal, then select
Device Setup.
Insert chip cards with
chip facing up.
Swipe with stripe facing up
(only for cards without chip
or if chip fails).
2. Select the card reader, then select the red Remove Card
Reader option.
Page 4
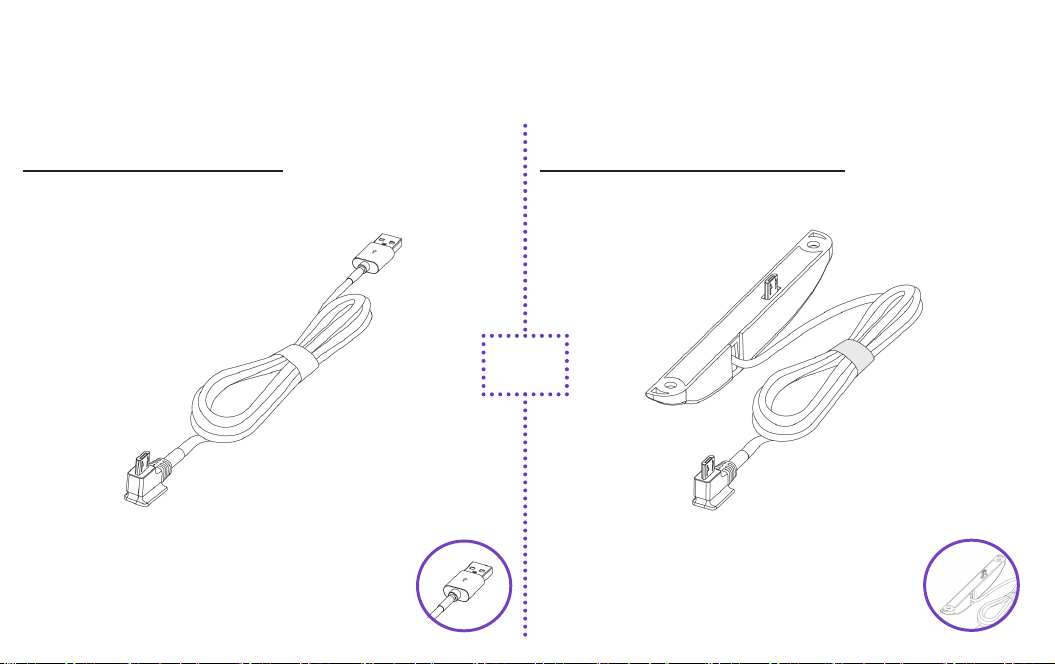
PICK YOUR CABLE FOR INSTALLATION
2
USB-A to Micro-USB cable
We recommend using this cable if you have an available port
open on your Toast Hub, USB-Hub, or Toast Printer.
This cable plugs into the USB port on your
device.
See installation instructions for the USB-A to
Micro-USB cable on the next page.
Begin by determining the cable you’ll use to plug in your contactless reader.
You’ll only use one of these cables.
Micro-USB to Micro-USB cable
If you don’t have an available port, or if you only have a
terminal, use this cable instead.
OR
This cable with the plate attached plugs into the
side of your terminal and is adhered with screws.
Jump ahead to the Micro-USB to Micro-USB
installation instructions.
Page 5
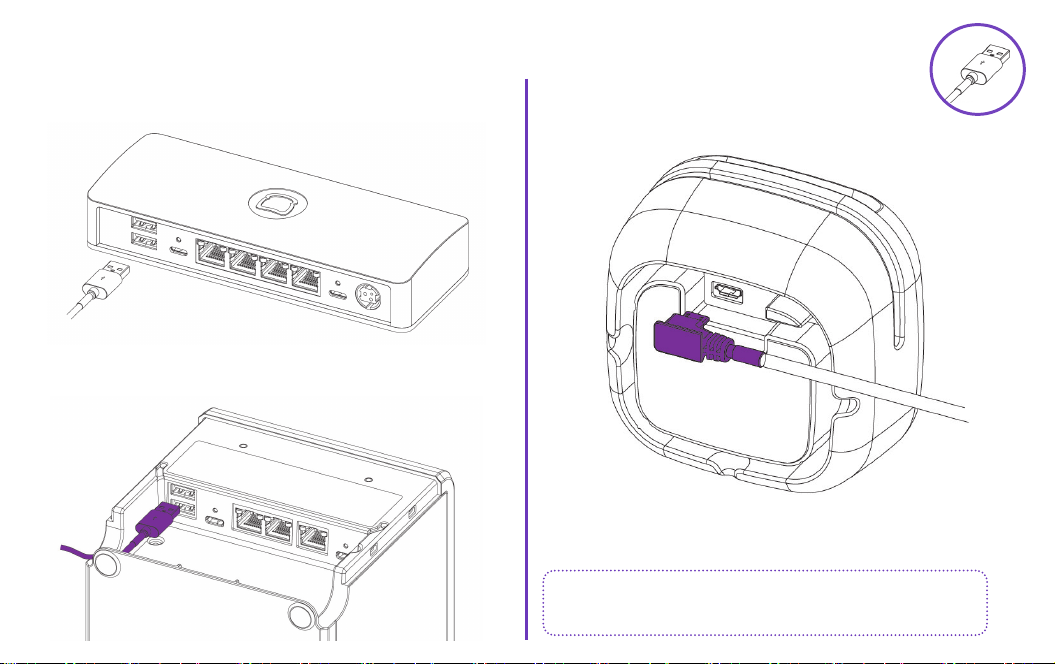
USB–A TO MICRO-USB INSTALL STEPS
1. Take the USB-A end of the cable and plug it into your
Toast Hub or USB-Hub.
Or plug the USB end of the cable into your Toast Printer.
2. Plug in the remaining Micro-USB side into
the bottom of the puck.
The end of this cable will be marked “to reader.”
Nice work! Next, turn to the EMV Configuration
section to enable all types of payments.
Page 6

MICRO-USB TO MICRO-USB INSTALL STEPS
1. Remove the plate covering the port on the
side of your terminal.
2. Plug in the end of the Micro-USB cable
paired with the cover and screws. Then
screw in the plate to the terminal.
3. If your terminal stand has a neck to hide the cable,
feed it through for a cleaner look.
4. Plug in the remaining end into the bottom of the puck.
The end of this cable will be marked “to reader.”
Nice work! Turn to the next page to enable EMV
so your reader can accept all types of payment.
Page 7

EMV CONFIGURATION
3
1. Once the puck has been properly plugged into your
Toast hardware, restart your terminal.
2. From the main menu in Toast, select Device Setup.
3. In the list of settings, there will be an option
EMV Enabled. Make sure that this is turned on.
Your contactless reader will auto detect once plugged into your Toast system.
You’ll need to enable EMV for the ability to take chip card and contactless payments.
4. You’ll see an option for Card Readers below the EMV
settings. Your new contactless puck is listed as:
BBPOS Chipper 2X(USB)
Confirm this is listed. You may also be prompted to
update the reader’s software. If so, opt into the update.
If you have a second screen attached to your terminal - also
known as a guest-facing display - you may have an additional
swipe-only card reader. If you have this, make sure the
BBPOS Chipper 2X(USB) reader is set to Guest Pay.
Note: Switching out readers automatically turns
the EMV setting o. Even if you’ve already
!
enabled it, EMV will need to be turned on again.
Page 8

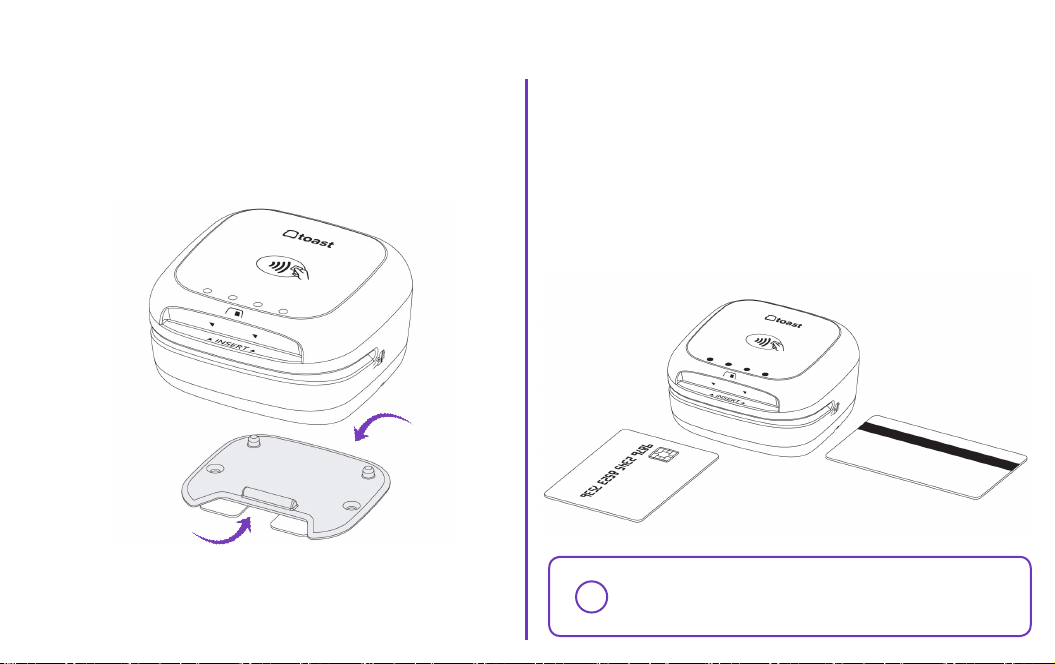
FINISHING TOUCHES
4
1. Wrap your cable around the inside of your puck in a
clockwise motion to reduce wire clutter.
2. To anchor your contactless puck, take the plate with
adhesive and apply it to your counter surface.
Keep in mind, the adhesive is strong, so plan your
!
anchoring spot wisely.
Page 9
FINISHING TOUCHES
3. Firmly press the plate down with the adhesive
and hold for six seconds. The “insert” side should
face toward your guests.
Back
This side up
“Insert” side
The reader can sit on the plate, but can be removed to
fit any scenario.
Cards can be:
• Tapped on the top of the puck.
• Dipped into the front slot with the card chip facing up.
• Swiped across in any direction with the card stripe
facing upwards.
Note: If you were using a card reader with dip
options prior, you’ll need to reconfigure your
!
manager swipe cards.
Page 10

Let your customers
Questions?
know they can pay
with contactless.
Find a visible clean spot on
1.
2.
3.
4.
the counter to display the
card reader and mat.
Flip mat over to preferred
color treatment.
Place on the surface in your
preferred location.
Place Toast puck device in
the space provided.
See the Contactless Reader
Troubleshooting Guide.
Or contact Toast Support online or via
phone at 617-682-0225.
Scan the QR code with the camera
app on your phone to access these
documents for more info!
Set up for success
with Training & Best
Practices.
Page 11

FCC Caution Statement
FCC Supplier’s Declaration of Conformity:
BBPOS / TD200 (CHB24, CHB25)
This device complies with Part 15 of the FCC Rules. Operation is subject
to the following two conditions: (1) This device may not cause harmful
interference, and (2) This device must accept any interference received,
including interference that may cause undesired operation.
BBPOS Corp.
2033 Gateway Place, 5th FLR, San Jose, CA 95110
www.bbpos.com
Caution: Any changes or modifications not expressly approved by the party
responsible for compliance could void the user's authority to operate the
equipment.
This equipment has been tested and found to comply with the limits for a
Class B digital device, pursuant to part 15 of the FCC rules. These limits are
designed to provide reasonable protection against harmful interference in a
residential installation. This equipment generates, uses and can radiate radio
frequency energy and, if not installed and used in accordance with the
instructions, may cause harmful interference to radio communications.
However, there is no guarantee that interference will not occur in a particular
installation. If this equipment does cause harmful interference to radio or
television reception, which can be determined by turning the equipment off
and on, the user is encouraged to try to correct the interference by one or
more of the following measures:
- Reorient or relocate the receiving antenna.
- Increase the separation between the equipment and receiver.
- Connect the equipment into an outlet on a circuit different from that to which
the receiver is connected.
- Consult the dealer or an experienced radio/TV technician for help.
This transmitter must not be co-located or operating in conjunction with any
other antenna or transmitter.
This equipment complies with FCC RF radiation exposure limits set forth for
an uncontrolled environment. This equipment should be installed and
operated with a minimum distance of 20cm between the radiator and any part
of your body.
Page 12

 Loading...