

Page 1

Exposure to Radio Frequency(RF) Signals
The wireless phone is a radio transmitter and receiver. It is
designed and manufactured not to exceed the emission
limits for exposure to radio frequency(RF) energy set by
the federal communications commission of the U.S.
Government. These limits are part of comprehensive
guidelines and establish permitted levels of RF energy for
the general population. The guidelines are base on the
safety standards previously set by both U.S. and
international standards bodies:
1) American National Standards Institute(ANSI)
IEEE.C95.1-1992
2) National Council on Radiation Protection and
Measurement(NCRP).report 86.1986
3) International Commission on Non-lonizing Radiation
Protection(ICNIRP)1996.
4) Ministry of Health(Canada).Safety Code 6.The
standards include a substantial safety margin designed
to assure the safety of all persons. regardless of age
and health.
SAR Information
SAR:
THIS MODEL DEVICE MEETS THE
GOVERN-MENTS REQUIREMENTS FOR EXPOSURE
TO RADIO WAVES.
For body worm operation, this phone has been tested and
meets the FCC RF exposure guidelines when used with an
accessory that contains no metal,and that positions the
antenna of the GSM phone a minimum of 1.0cm from the
body.The SAR values of this GSW phone are
0.178w/kg(body).Use of other accessories may bot ensure
compliance with the FCC RF exposure guidelines
The FCC has granted an Equipment Authorization for this
model device with all reported SAR levels evaluated as in
compliance with the FCC RF exposure guidelines.SAR
information on this model device is on files with the FCC
and can be found under the Display Grant section of
http://www.fcc.gov/oet/fccid.after
searching on FCC
ID:SV5BBK302GM. In the U.S. and Canada,the SAR
limit for mobile GSW phones used by the pulic is 1.6
Watts/kg(W/kg) averaged over one gram of tissue.The
standard incorporates a substantial margin of safety to give
additional protection for the public and to account for any
variations in usage
Page 2

MODEL: BKGP-302
USER’S MNAUAL
GSM Fixed Wireless Phone
Please read before use and save
Contents
Safety Instructions-----------------------------------------1-2
Features---------------------------------------------------------3
Location of Controls----------------------------------------4-5
Installation----------------------------------------------------6-7
Icon Map--------------------------------------------------------8
Making Calls-----------------------------------------------9-10
Answering Calls------------------------------------------10-11
Preset Dialing----------------------------------------------11
EXTRA Button------------------------------------------------11
Night Illumination-------------------------------------------12
Call Log---------------------------------------------------12--13
Messages-------------------------------------------------13-18
Organiser--------------------------------------------------18-20
Setting-----------------------------------------------------21-22
Network--------------------------------------------------22-25
Troubleshooting-----------------------------------------26-27
Page 3

Safety Instructions
Please read the user guide carefully before using
your phone.
Road safety comes first
Do not use a wireless phone while driving. Park
the vehicle first.
Be aware of interference
All wireless phones may get interference that
could affect performance.
Power off in hospitals
Follow any regulations or rules. Power off your
phone near medical equipment.
Power off in aircraft
Wireless devices can cause the interference.
Power off when refueling
Do not use your phone at a refueling point. Do not
use it near fuel or chemicals.
Power off near blasting
Do not use your phone where blasting is progress.
Observe restrictions, and follow any regulations
or rules.
Use only qualified service personnel
Only qualified personnel may install or repair
phone equipment.
1
Use approved adapter and battery
Use only approved adapter and battery. Do not
connect incompatible products.
Keep your phone dry
Do not use your phone near water or when your
hands are wet. Keep it dry.
Page 4
2
Features
Mobile phone facility
GSM Wireless Interface for voice and SMS
Caller ID (Name or number) compatible
SMS and call log function
20pcs missed Calls
100pcs outgoing Calls
20pcs received Calls
Duration record for last call, all calls and
outgoing calls
Handset-free and Redial function
Phonebook function
Personal ringer
Pre-dialing and rapid dialing
Call Rejection
Support Call Divert, Call Waiting and other
network service
Alarm clock with different ringers and adjustable
volume
Full icon dynamic display
Ringer tone and volume selectable
Key tone volume adjustable
LCD brightness and visual angle adjustable
Night illumination of LCD and keyboard
Two- way power solution
Desk and wall convertible (for optional)
3
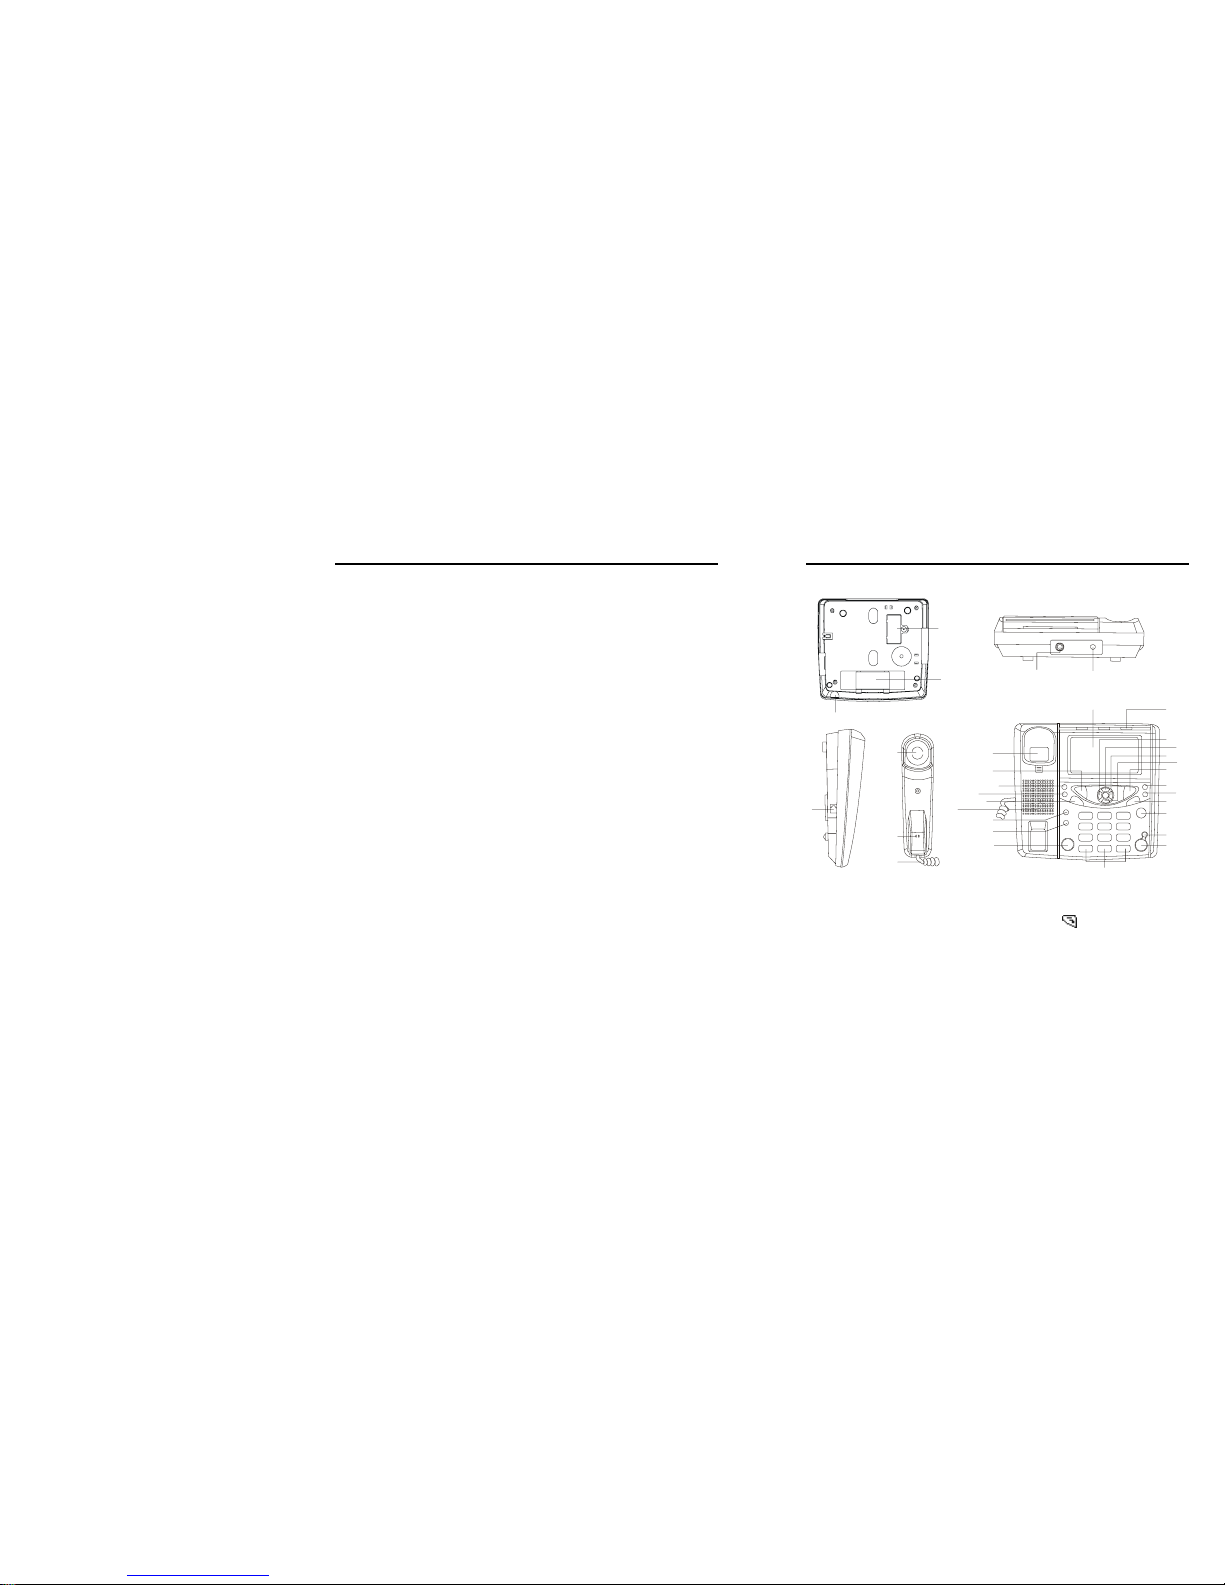
Location of Controls
1
2
3
4
5
6
7
8
9
10
11
12
13
14
15
16
17
18
19
20
21
22
23
24
25
26
27
28
29
30
31
32
1. SIM Card Cage 10. Hook Switch
2. Battery Case 11.
Button
3. Speaker MIC 12. CLOCK Button
4. AC Power Jack 13. RING Button
5. Reset Button 14. EXTRA Button
6. Coiled Cord Jack 15. Built-in Speaker
7. Earpiece 16. CALL LOG Button
8. MIC 17. SHIFT Button
9. Coiled Cord 18. BOOK Button
Page 5
4
19. Dial Buttons
20. HF Button
21. RD Button
22. DEL Button
23. MENU Button
24. CALENDAR Button
25. ALARM Button
26.
Button
27. ▼ Button
28. X Button
29. ▲ Button
30. W Button
31. POWER/SIGNAL Indicator
32. Liquid Crystal Display (LCD)
Note:
Button and Button have various functions in
different interface:
i) Accept
ii) Confirm
iii) Dial
iv) Select
v) Option
Button
vi) Clear
i) Back
ii) Cancel
Button
iii) Save
5
Installation
This telephone should be placed in a cool, dry,
ventilating and erosive gas freed place. Avoid placing
it in the beam-violent or dank area.
1. Insert SIM card properly after the phone housing
is open.
2. Install rechargeable battery into the phone battery
case (rechargeable battery only).
Note:
Rechargeable battery should be in charge for 4
hours as minimum period if initial use or long-term
operation.
3. Connect one end of the coiled cord to the handset
jack, and the other end to the jack of the base.
4. Connect adapter output end to AC power jack of
the base and input end to the power socket.
5. Keep pressing the
button to get WELCOME
interface for power-on.
6. After successful login and LCD standby interface
displays, pick up the handset or press HF button
to make a call.
7. Keep pressing the
button to get GOODBYE
interface for power-off.
Page 6

6
NOTE:
1. Keep pressing the
button to get power-on/off.
2. Before install battery and adapter, please insert
SIM card properly.
3. If security function has been activated, phone will
ask for PIN code, please input your SIM PIN code
accordingly and press
button to confirm.
4. Only use Provider PROVIDED adapter, other
adapter is forbidden.
5. Only use the designated rechargeable battery.
Dispose of exhausted battery properly. Never
discard a battery in or near fire or flame.
6. If abnormal phenomenon appears, press Reset
button once. If still unworkable, please take away
all power sources (adapter and battery), then
install them back after 30 seconds.
7. Three ways of power sources are available (both
adapter and battery, adapter only or battery only.)
7
Icon Map
------ Network Signal Strength
-------- Battery Capacity
-------- New Message
--------- Alarm in Use
-------- Call Divert Activated
---------- Speakerphone in Use
--------- Telephone in off-hook State
Page 7

8
Making Calls
1. Pick up the handset or press HF button
2. Dial the number against the dial tone.
Or
Enter your number directly, then press HF or
button or pick up the handset to dial out.
3. If misdial, press DEL button once to delete the
digit from the end one by one, or keep pressing to
delete all.
4. If the line is busy, hang up, then reseize the line,
press RD button to redial against dialing tone.
NOTE:
1. National call: enter your numbers directly.
2. International call: please follow your local
international call operation. If “+” symbol should
be on the top, hold “0” button to get it.
Making Calls from Phonebook:
In standby mode
1. By shortcut, press BOOK button.
2. By menu, press MENU button or
button →
“Organiser” → “Phone Book”.
3. Find the objective number.
4. Pick up the handset or press HF button to dial
out.
9
Speedy dialing from Call Log:
1. In standby mode, press MENU button or
button → “Call log” →
button to get the
following display:
“Missed”, “Received”, “Dialed” and “Call timing”.
2. Select by “▲”, “W”, “▼” or “X” button →
button to confirm,pick up the handset or press HF
button to dial out.
Redialing:
1. In standby mode, press RD button, the last
outgoing number will appear.
Pick up the handset or press HF button or
button to dial out.
2. If off-hook, press RD button to dial out the last
outgoing number.
Answering Calls
1. When a call is coming, phone will ring with caller
ID (Caller’s name or number) if service is
subscribed.
2. Pick up the handset or press HF or
button to
answer.
3. Press
button to reject.
Page 8

10
NOTE;
1. To swap from SPEAKERPHONE to handset
during a call: Pick up the handset.
2. To swap from handset to SPEAKERPHONE
during a call: Press HF button and then replace
the handset.
Preset Dialing
It will avail user to on-hook program an objective
number (50 digits as maximum). Then the unit will
dial out the phone number automatically.
In standby mode:
1.Enter the phone number.
2.If misdial, move the cursor by “▲”, “W”, “▼” or “X”
button to locate, then press DEL button to erase for
correct edition.
3. Pick up the handset or press HF button or
button to dial out.
4. To store the number, press
button.
EXTRA Button
Press EXTRA button to activate any extra functions
which will be supported by the software version and
local network service, such as IP prefix or area code
access.
11
Night Illumination
It will be convenient for user to operate phone at night
or in darkness (keyboard and LCD), which must be
with power (electricity and battery power).
Call Log
In standby mode, press MENU button or button
→ “▲”, “W”, “▼” or “X”
button → “Call log” →
button to confirm.
By shortcut, press CALL LOG button to get the
following menus:
1. Missed
2. Received
3. Dialed
4. Call timing
Missed
To check the unanswered calls, press button
twice to get the following submenus:
1. Delete Delete the item
2. Text reply Reply by short message
3. Dial back Call back
4. Add to Pbook Save the number into
phonebook
5. Delete all Clear all the record
6. Quit Back to upper menu
Page 9

12
Do the same operation to check Received, Dialed
calls or Call timing undermentioned.
Received
To check the answered calls.
Dialed
To check the outgoing calls.
Call timing
To check the duration of last call, all answered calls,
all outgoing calls and total calls.
Press
button to clear.
Messages
In standby mode, press MENU button or
button
→ “▲”, “W”, “▼” or “X”
button → “Messages” →
button to get the following menus:
1. Inbox
2. Outbox
3. Write message
4. Voice box
5. Templates
6. Message Setup
7. Memory status
8. Del all
13
Inbox
To check the incoming short messages.
1. Enter by
button.
2. Select by “▲” or “▼” button, then
button to
access.
3. Whole browse by “▲”, “W”, “▼” or “X”
button.
4. Press
button to get the following submenus:
1. SMS reply Reply as SMS
2. SMS divert Divert SMS to other
phone numbers
3. Call back Make a call to the sender
4. Add to pbook Save the number into
phonebook
5. Delete Delete the item
Outbox
To check the outgoing short messages with the
following submenus:
1. Send Send the item directly
2. Edit and send Edit and send the item.
3. Add to pbook Save the number into
phonebook
4. Delete Delete the item
Page 10

14
Write Message
To write short message.
1. Enter by
button.
2. Press
button to get the following submenus:
1. Edit and send Edit the recipient’s phone
number
2. Get template Insert template
3. Get Pbook Insert phone number
from phonebook
How to write short messages:
Enter Letters
1. Find the keypad with the letter you want to
enter.
2. Press the keypad repeatedly until the letter
appears on the screen.
For example, press “5” button three times to
enter the letter “L”.
ABC
DEF
JKL MNO
TUV
+
GHI
15
Enter Number
To enter numbers, simply press the numbers you
want.
Enter punctuation and other characters
The following characters may be available:
Keypad Button Characters
1
, . / ? ! - = & ‘ “ 1 æ ;
2
A B C 2 Ä Å Æ Ç a b c ä ã å
3
D E F 3 É d e f è é
4
G H I 4 g h i ì
5 J K L 5 j k l
6
M N O 6 Ñ Ö m n o ö ò
7
P Q R S 7 β Ø p q r s ø
8
T U V 8 Ü t u v ü ù
9 W X Y Z 9 w x y z
*
Space . , ? ! : ; - i + х ( ) ‘ “ _ # & $
¥ % / < > § ¿ Φ Γ Λ Ω Π Ψ
Σ Θ Ξ Δ ¤ @
0
Space х 0 $ ¥ i % ( ) + _
# Change input types
1. Change input types (ABC, abc, 123) by SHIFT or
“#” button.
2. Insert additional characters after your cursor
correct location by “▲” or “▼” button and
button’s confirmation.
Page 11

16
3. Delete the last existing character by DEL button.
4. Exit to the edit interface if press DEL button after
all existing content was clear
Voice Box
User should subscribe for voice box service from the
local Network Operator.
Enter by
button to get the following submenus:
1. connecting
2. voice central number
Templates
To select templates for message.
1. Enter by
button.
2. Select by “▲”, “W”, “▼” or “X” button.
3. Press
button to get the following submenus:
1. Edit Edit or modify template
2. Write Write short message with
the template
3. Delete Delete the template
Message Setup
To set the SMS parameters, press “▲”or “▼” button
to locate, →
button to access.
17
1. SMS Service center Set or check the SMS
service center number
2. Validity period Define SMS validity period
among “1 hour”, “6 hours”,
“12 hours”, “24 hours”, “72
hours”, “1 Week” and “Max
hours”
3. SMS receipt Set receipt report between
“Enabled” or “Disabled”
entry.
NOTE:
i) Center number should be exactly right to get
SMS service. Any problem, please consult
your local Network Operator.
ii) Refer to “DEL” button for edit operation.
iii) Hold “0” button to get “+” symbol if it should be
on the top.
Memory Status
It will avail user to check SIM card capacity.
Delete All
1. Inbox (SIM) Delete SMS from SIM
inbox
2. Outbox (SIM) Delete SMS from SIM
outbox
3. All message Delete all messages
Page 12

18
NOTE:
SMS memory capacity is only from SIM card.
Organiser
In standby mode, press MENU button or
button
→ “▲”, “W”, “▼” or “X” button → “Organiser” →
button to get the following menus:
1. Phone Book
2. Alarm clock
3. Calendar
Phone Book
From standby mode, press BOOK button to shortcut
access:
1. Browse
2. Search
3. Add entry
4. Copy
5. Delete
6. Memory status
1. Browse
To browse the phonebook numbers
2. Search
To search by name or phone number. If OK, press
button twice to get the following submenus:
19
1. Dial Make a call
2. Send message Send message to the
number
3. Edit Edit SMS
4. Copy Copy phonebook record
between SIM card and
phone.
5. Delete Delete entry.
3. Add Entry
To create new phonebook record into phone or SIM
card.
4. Copy
User can copy phonebook records between SIM card
and phone set.
5. Delete
1. From phone
2. From SIM card
3. All
Choose 1 or 2 to delete phonebook record from
phone or SIM card with submenu “One by one”
and “All”.
Choose 3 to delete all name cards in phone and
SIM card.
Page 13

20
6. Memory Status
User can check the memory capacity of phone or SIM
card.
Alarm Clock
No matter how phone works or not, user can set the
objective alarm clock, then clock icon will appear on
LCD if activated.
From standby mode, press ALARM button to shortcut
access:
1. Alarm_a
2. Alarm_b
3. Alarm_c
Three alarm clocks are available.
Calendar
To check the calendar, press “▲”, “W”, “▼” or “X”
button to locate, then operate digit keypad to modify,
the range is from 1901 to 2050.
21
Setting
In standby mode, press MENU button or
button
→ “▲”, “W”, “▼” or “X”
button → “Setting” →
button to get the following menus:
1. Date & Time
2. Ringing tone
3. Key volume
4. Display setting
Date & Time
User can set date and time by button’s
confirmation.
From standby mode, press CLOCK button to shortcut
access.
Ringing tone
1. Ringing tone
2. Ringing volume
Press “▲”, “W”, “▼” or “X”
button to select
different ringing tones with
button’s
confirmation.
From standby mode, press RING button to
shortcut access.
Press “▲”, “W”, “ ▼” or “X”
button to adjust
ringing volume with
button’s confirmation.
Page 14

22
Key volume
Press “▲”, “W”, “▼” or “X” button to adjust the
keypad tone volume, and
button to confirm.
Display setting
Press “▲”, “W”, “▼” or “X” button to adjust LCD
brightness, and
button to confirm.
Network
All network setting and functions should be supported
by your local Network Operator.
In standby mode, press MENU button or
button
→ “▲”, “W”, “▼” or “X”
button → “Network” →
button to get the following menus:
1. Call divert
2. Call waiting
3. Call barring
4. STK
23
Call divert
1. All divert “Enable” or “disable”
“divert All Incoming Calls”
2. Busy divert Divert incoming calls
when your line is busy
3. No answer Divert incoming calls
when there is no answer
4. No service Divert incoming calls
when is unavailable
5. Cancel all Cancel all divert settings
1. All divert
If enabled, please continue your settings:
a) Divert to voice Box
b) Divert to other number
Press
button to confirm divert way from the
above menu.
Enter “Inquire” menu to check phone current
divert status.
NOTE:
1) The above divert submenu operations are the
same to other divert process.
2) Press
button to confirm your settings.
Page 15

24
Call Waiting
It will avail user to enable or disable call waiting
function. If activated, phone will prompt a tone to alert
user during a call.
In unactivated, the caller will hear a busy tone.
If all divert functions has been activated to another
phone number, the third party’s call will be diverted
automatically.
Call barring
1. All outgoing “Enable” or “disable” “bar
All outgoing calls” except
emergency calls.
2. Outgoing international Bar outgoing
international calls
3. Outgoing international
except home country
Bar outgoing
international calls except
home country if roaming
abroad. Only abroad
local call and
international call to home
country are available
4. All incoming Bar all incoming call
5. Incoming when
roaming
Bar incoming calls when
roaming.
6. Cancel all Cancel all call barring
settings with password
7. Change password Change your password
25
1. All outgoing
Password should be required to input for enabled
or disabled service., please confirm your setting
by
button.
Enter “Inquire” menu to check phone current
barring status.
Note:
1) Barring settings must be supported by your local
network operator, password will be required for
settings.
2) The above barring operation is the same to other
barring process.
3) Press
button to confirm your settings.
STK
Phone can support the STK add-value service from
your SIM card and local Network Operator.
Page 16

25
Troubleshooting
(Trouble1) Much noise
1. Check signal strength of your local base station,
phone should work with good signal.
2. Check if the coiled cord line connects well.
(Trouble2) The telephone can not ring when you
receive a call.
1. Hook switch is not in proper position.
2. Ringer part or speakerphone problem.
(Trouble3) Handset can not work.
1. Hook switch is not in proper position.
2. The coiled cord is broken or with bad connection.
(Trouble4) Caller ID or short message is
unavailable.
1. Make sure that the Caller ID has been subscribed
successfully.
2. Make sure that applied SMS service has been
subscribed successfully.
(Trouble5) No voice
Check whether the coiled cord is in firm and good
connection between handset and base jack.
26
(Trouble6) Disable to dial
1. To check if there is short circuit caused by
water-damaged keypad. Please make it dry for
resumption use.
2. If there is circuit problem, please take your phone
set back for maintenance as appointed.
(Trouble7) The POWER/SIGNAL indicator does
not light.
1. The electricity power is very low.
2. Adapter connection between power socket and
power jack of phone set is loose or bad.
3. The power adapter is in bad use.
(Trouble8) Abnormal display or dead phone.
Take away all power sources (adaptor and battery),
then install them back after 30 seconds. If still
unworkable, please take back to maintaining site.
Caution:
Any changes or modifications not expressly
approved by the party responsible for compliance
could void the user's authority to operate the
equipment.
Note:
Page 17

Note: This equipment has been tested and found to
comply with the FCC Rules. These limits are
designed to provide reasonable protection against
harmful interference in a residential installation.
This equipment generates, uses and can radiate
radio frequency energy and, if not installed and
used in accordance with the instructions, may
cause harmful interference to radio
communications. However, there is no guarantee
that interference will not occur in a particular
installation. If this equipment does cause harmful
interference to radio or television reception, which
can be determined by turning the equipment off
and on, the user is encouraged to try to correct the
interference by one or more of the following
measures:
--Reorient or relocate the receiving antenna.
--Increase the separation between the equipment
and receiver.
--Connect the equipment into an outlet on a circuit
different from that to which the receiver is
connected.
--Consult the dealer or an experienced radio/TV
technician for help.
27
 Loading...