

Page 1

BB FlashBack v
User Manual and How-To Guide
Page 2

Page 3

I. Quick Start Guide ......................................................................................................... 1
Recording a movie .................................................................................................... 2
How to make your first recording ....................................................................... 2
Editing your movie ................................................................................................... 6
The toolbar ...................................................................................................... 6
Editing frames .................................................................................................. 9
How to delete frames: ............................................................................... 9
How to insert frames: ................................................................................ 9
How to crop a movie: ................................................................................ 9
Annotating your movie .................................................................................... 10
How to add text to a movie ...................................................................... 10
How to add an image to a movie ............................................................... 15
Using zoom/pan, cropping and autoscroll ........................................................... 17
How to zoom or pan: ............................................................................... 17
How to crop a movie and use the autoscroll ............................................... 18
Publishing your movie ............................................................................................. 20
Exporting your movie ...................................................................................... 20
Uploading to YouTube for easy sharing ............................................................. 22
II. How-To Guides ........................................................................................................... 27
Working with Frames .............................................................................................. 28
How to delete frames: ...................................................................................... 28
How to insert frames: ...................................................................................... 28
Tracks and Clips ..................................................................................................... 29
How to select a clip: ........................................................................................ 29
How to select multiple clips: ............................................................................. 29
How to select a section of a clip: ....................................................................... 29
How to move a clip: ........................................................................................ 29
How to select or de-select a track: ..................................................................... 29
How to select multiple tracks: ........................................................................... 30
Changing Volume and Muting .................................................................................. 31
How to mute a track: ...................................................................................... 31
How to change the volume of a track: ............................................................... 31
How to mute a section of sound: ....................................................................... 31
How to change the volume of a clip: .................................................................. 31
Deleting Sound ........................................................................................................ 33
How to delete a whole clip: .............................................................................. 33
How to delete a section of a clip: ...................................................................... 33
How to delete sound and frames at the same time: .............................................. 33
How to delete a track: ..................................................................................... 34
Inserting Silence ...................................................................................................... 35
How to add silence to a clip: ............................................................................ 35
How to insert silence and frames together: ......................................................... 36
Editing Sound and Video Together ........................................................................... 39
How to edit sound without affecting video: ......................................................... 39
How to edit sound and affect the video: ............................................................. 39
Removing Background Noise .................................................................................... 41
How to remove noise from a clip: ..................................................................... 41
Fading a Clip In and Out ........................................................................................ 42
How to fade a clip in and out: .......................................................................... 42
Adding Sound ......................................................................................................... 43
How to add an existing sound file: .................................................................... 43
How to record a sound clip: ............................................................................. 43
Adding Text and Images, Highlights, Arrows and Buttons ........................................... 44
How to add text to a movie: ............................................................................. 44
iii
Page 4

How to add an image to a movie: ...................................................................... 46
How to add a highlight to your movie: .............................................................. 47
How to insert an arrow: .................................................................................. 48
How to add a button: ...................................................................................... 50
Tips for better performance recording ...................................................................... 53
How to change the recorder settings: ................................................................. 53
Saving your recordings as Flash ............................................................................... 55
How to export as Flash: ................................................................................... 55
Creating Pan and Zoom Effects ................................................................................ 57
How to zoom in: ............................................................................................. 57
How to pan, while zoomed in: .......................................................................... 59
How to zoom out from a previous zoom in: ........................................................ 60
Using Autoscroll ...................................................................................................... 62
How to add a cropping rectangle: ..................................................................... 62
How to remove a cropping rectangle: ................................................................ 62
How to add an autoscroll: ................................................................................ 62
How to remove an autoscroll: ........................................................................... 62
Recording from the Webcam .................................................................................... 63
How to record the webcam whilst you record the screen: ..................................... 63
How to record the webcam only: ...................................................................... 64
How to insert a WebCam recording: ................................................................. 66
How to edit the WebCam recording: ................................................................. 67
How to move or resize the WebCam recording: .................................................. 67
Adding Watermarks ................................................................................................ 68
How to add a watermark: ................................................................................ 68
Inserting A Video File ............................................................................................. 69
How to insert video: ........................................................................................ 69
Scheduled Recording ............................................................................................... 70
How to schedule a recording: ........................................................................... 70
Cursor Highlighting ................................................................................................. 72
How to highlight the cursor: ............................................................................. 72
III. User Guide ................................................................................................................ 73
Professional Edition v4 ............................................................................................ 74
Contacting Blueberry ............................................................................................... 75
System Requirements ............................................................................................... 76
Software Requirements .................................................................................... 76
Hardware Requirements .................................................................................. 76
Buying BB Flashback ...................................................................................... 77
Buying a licence ...................................................................................... 77
Problems with licence keys ....................................................................... 77
Resellers ................................................................................................. 78
Getting Started ....................................................................................................... 79
BB FlashBack Basics ....................................................................................... 79
The Recorder .......................................................................................... 79
The Player .............................................................................................. 79
To get started ......................................................................................... 80
Recording movies ............................................................................................ 81
To view the movie ................................................................................... 81
Playing back movies ........................................................................................ 81
From The Welcome Window .................................................................... 81
Playing a movie from Recorder ................................................................ 82
Sharing movies ........................................................................................ 82
Sharing Movies ....................................................................................... 83
Using BB FlashBack ................................................................................................ 85
iv
Page 5

Recorder Windows .......................................................................................... 85
The Recorder Main Window .................................................................... 85
The Recorder main menu ......................................................................... 86
The movie file sub-menu .......................................................................... 88
The Recorder Options window ................................................................. 90
Adding a Marker while recording ............................................................. 91
Using Recorder when it is minimized ......................................................... 91
Recorder features ............................................................................................ 93
About Recorder features .......................................................................... 93
Recording windows and regions ................................................................ 94
Recording multi monitor systems .............................................................. 95
Windows display options .......................................................................... 95
Capturing keystrokes ............................................................................... 97
Limiting the movie file size ....................................................................... 98
Defining and using hotkeys ....................................................................... 99
Customising delays .................................................................................. 99
Recording Webcam Video ........................................................................ 99
Record modes and performance .............................................................. 101
Troubleshooting video recording ............................................................. 102
Recording sound .................................................................................... 104
Troubleshooting sound recording ............................................................ 105
Scheduled recording ............................................................................... 108
Record-time Notes ................................................................................. 108
The Player .................................................................................................... 110
The Player window ................................................................................ 110
The Timeline and Frame bar .................................................................. 112
Webcam / Picture-in-Picture Video .......................................................... 113
The Player Toolbars .............................................................................. 115
The Player Main Menu .......................................................................... 117
Viewing key presses ............................................................................... 127
Other Player Features ............................................................................ 130
Converting AVI files to FlashBack movies ................................................ 130
Command-line options ........................................................................... 131
Editing Movies .............................................................................................. 132
About editing movies ............................................................................. 132
Working with frames ............................................................................. 132
Annotating movies ................................................................................. 137
Zoom-Pan Effects .................................................................................. 147
Cropping and Autoscrolling .................................................................... 150
The Mouse Cursor ................................................................................. 151
Removing inactive sections ..................................................................... 154
Using Markers in movies ........................................................................ 154
Inserting video files ................................................................................ 155
Pauses .................................................................................................. 155
Start and End Titles .............................................................................. 156
Displaying invisible keystrokes ................................................................ 157
Transitions ............................................................................................ 157
Exporting Movies .......................................................................................... 159
File Formats .......................................................................................... 159
Comparison of Export formats ................................................................ 161
Exporting to Flash Format ..................................................................... 162
Exporting to Quicktime (H264) ............................................................... 173
Exporting to Windows Media Video (WMV) ............................................ 175
Exporting to AVI format ........................................................................ 177
v
Page 6

About AVI codecs .................................................................................. 177
Exporting to MPEG4 ............................................................................. 179
Exporting to Standalone EXE ................................................................. 180
Exporting to MS PowerPoint .................................................................. 181
Exporting to GIF ................................................................................... 181
Sound export options ............................................................................. 181
Batch Exports ....................................................................................... 182
Uploading Movies .......................................................................................... 183
How to Upload a Movie ......................................................................... 183
Uploading to FTP and FileCopy .............................................................. 184
Creating upload profiles ......................................................................... 185
Working with Sound ...................................................................................... 186
Adding and Recording Sound into a Movie ............................................... 186
The Sound Options Window ................................................................... 187
Sound Synchronisation Problems ............................................................. 188
Changing the Volume of a Track or Clip ................................................. 188
Removing Noise ..................................................................................... 189
Fading Sounds In or Out ........................................................................ 189
Volume Level Processing ........................................................................ 189
Editing Sound ....................................................................................... 190
Merging and Splitting Clips and Tracks ................................................... 192
Sound Editing Operations ....................................................................... 193
More About Selecting Sound and Frames ................................................. 194
Using BB FlashBack from the Command Line .................................................. 196
Support ................................................................................................................ 198
Contacting Support ........................................................................................ 198
Troubleshooting FAQ ..................................................................................... 198
When I installed and when I run Recorder, I see a warning about ASUS
software ................................................................................................ 198
My system runs extremely slowly when recording ..................................... 198
When recording I see an error message referring to the BB Capture Driver
............................................................................................................. 198
I'm trying to record a DVD or video clip, but it fails or the results are poor
............................................................................................................. 198
What affects the file size of my final movie file? ........................................ 198
When I replay my movie graphics or text are not displayed correctly or
missing altogether .................................................................................. 199
I cannot hear any sound when replaying my movie .................................... 199
My licence key is not accepted by the program ......................................... 199
My FBR movie file will not open in the Player .......................................... 199
I've exported my movie to an AVI file. This plays fine on my PC but not in
other computers .................................................................................... 200
When I export to any format, I get a 'created by' image in the top right
corner. Will this appear when I buy a licence? .......................................... 200
I've exported my movie to Flash but the SWF file appears distorted or low
quality .................................................................................................. 200
I record with sound, but when I play back the movie, the sound and video
become more and more out of sync ......................................................... 200
Reporting Problems ....................................................................................... 201
How to report a problem to Blueberry ..................................................... 201
Checking for Updates to BB FlashBack ............................................................ 201
How to check for updates to BB FlashBack .............................................. 201
Automatic check for updates ................................................................... 202
vi
Page 7

Part I. Quick Start Guide
Page 8
Recording a movie
First you need to make a recording which you can edit and publish.
How to make your first recording
Here, you will use BB FlashBack Recorder to record a movie which you can then edit in BB FlashBack
Player
1. Open the BB FlashBack Pro 3 Recorder from the windows start menu.
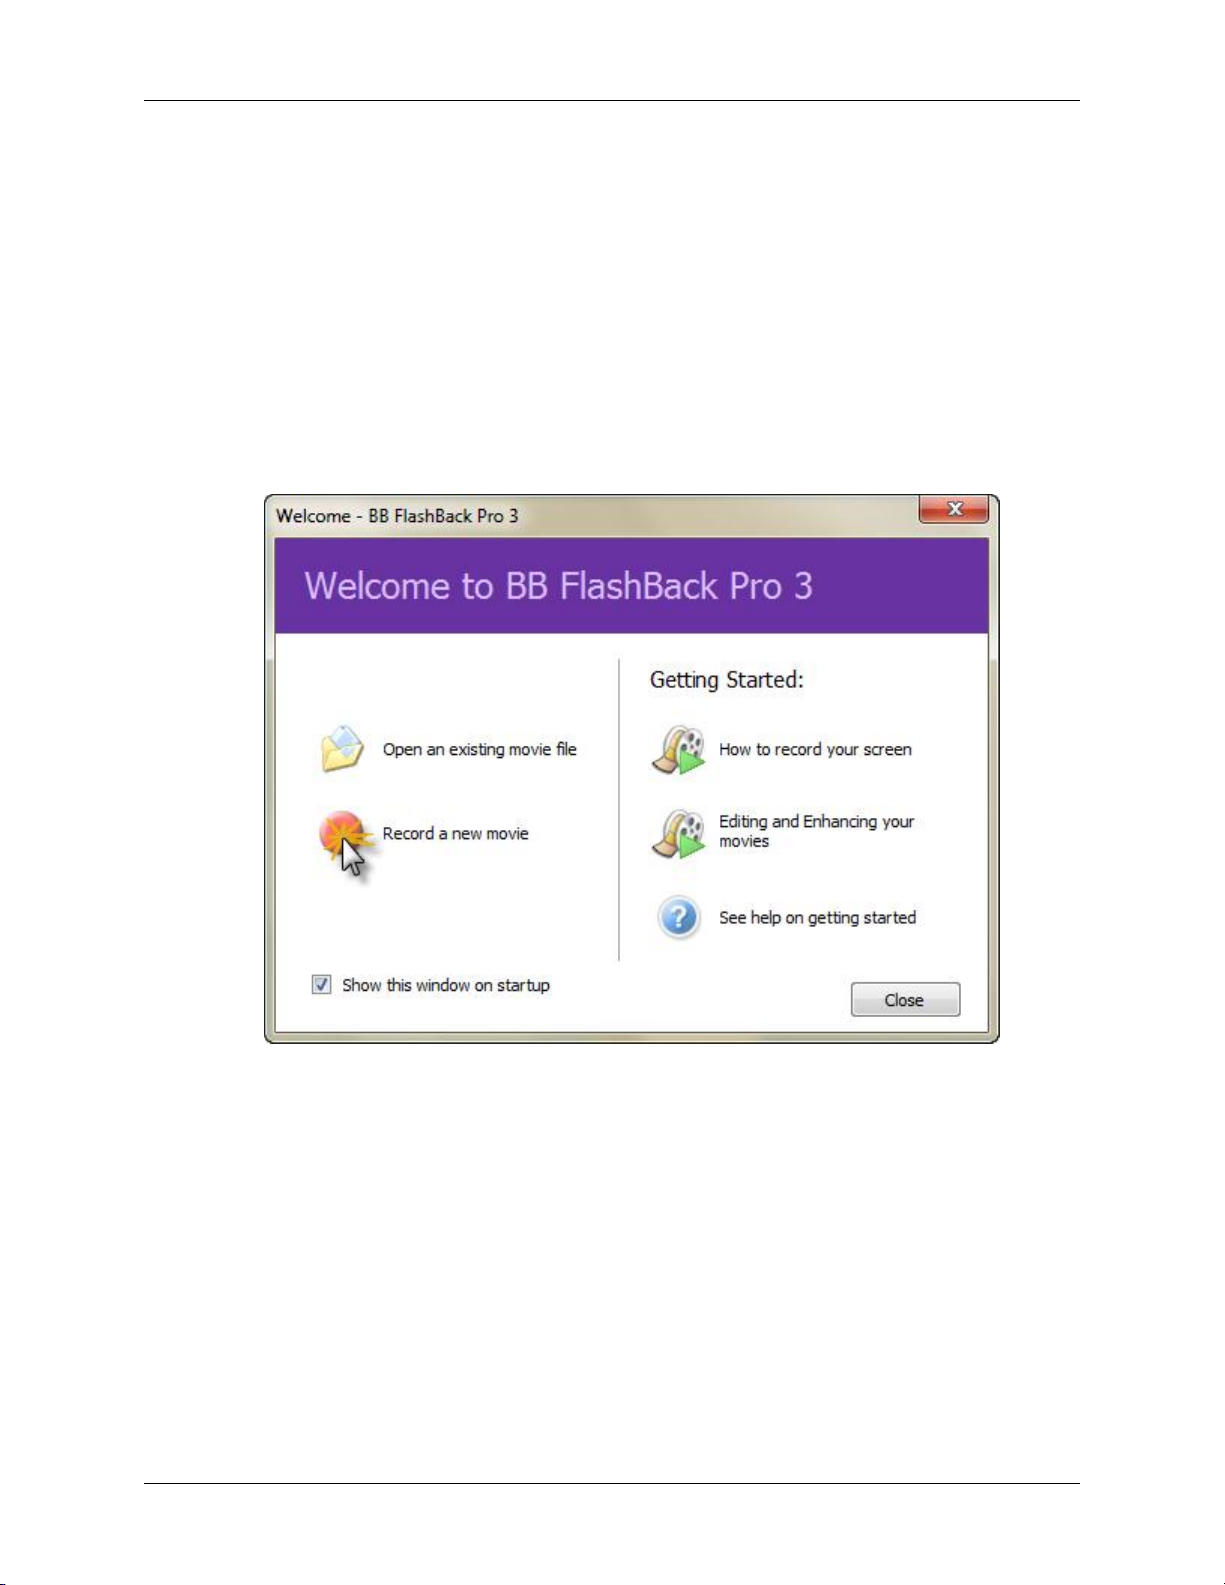
2. On the welcome screen, click Record a new movie;
2
Page 9
Recording a movie
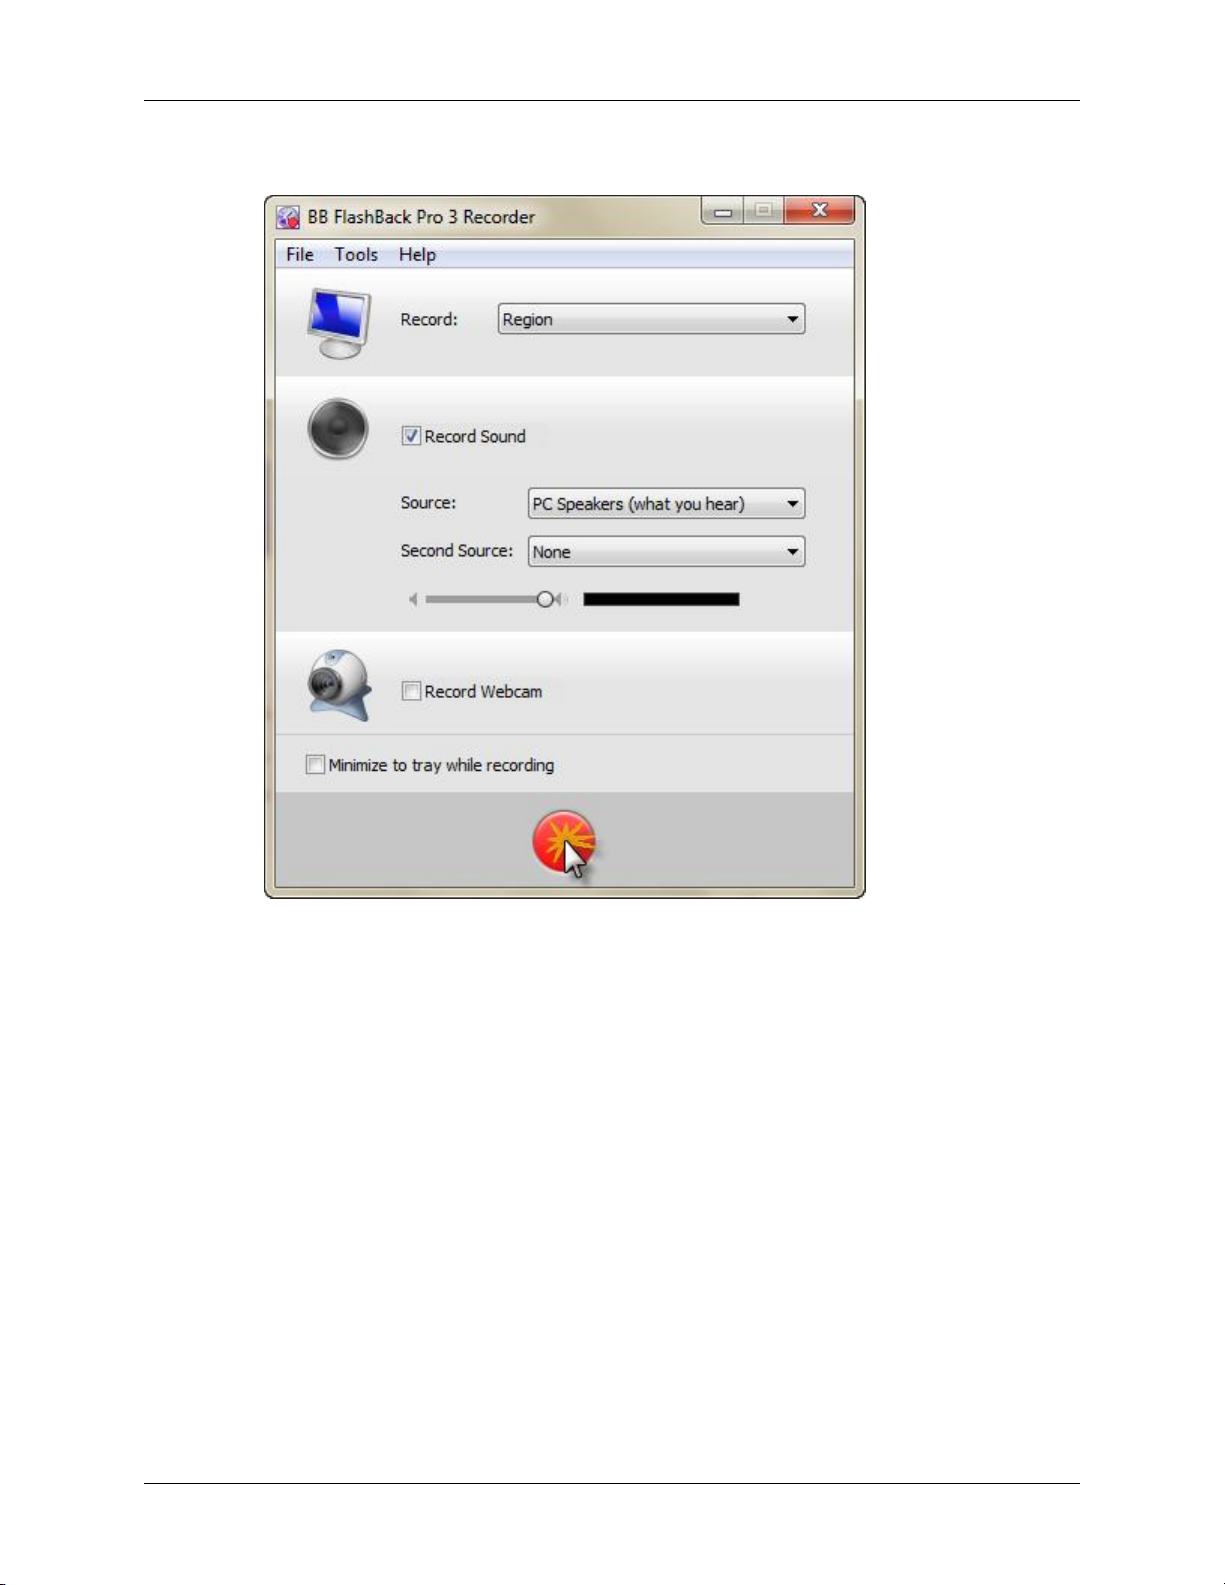
3. Set the recording options and click the record button;
3
Page 10
Recording a movie
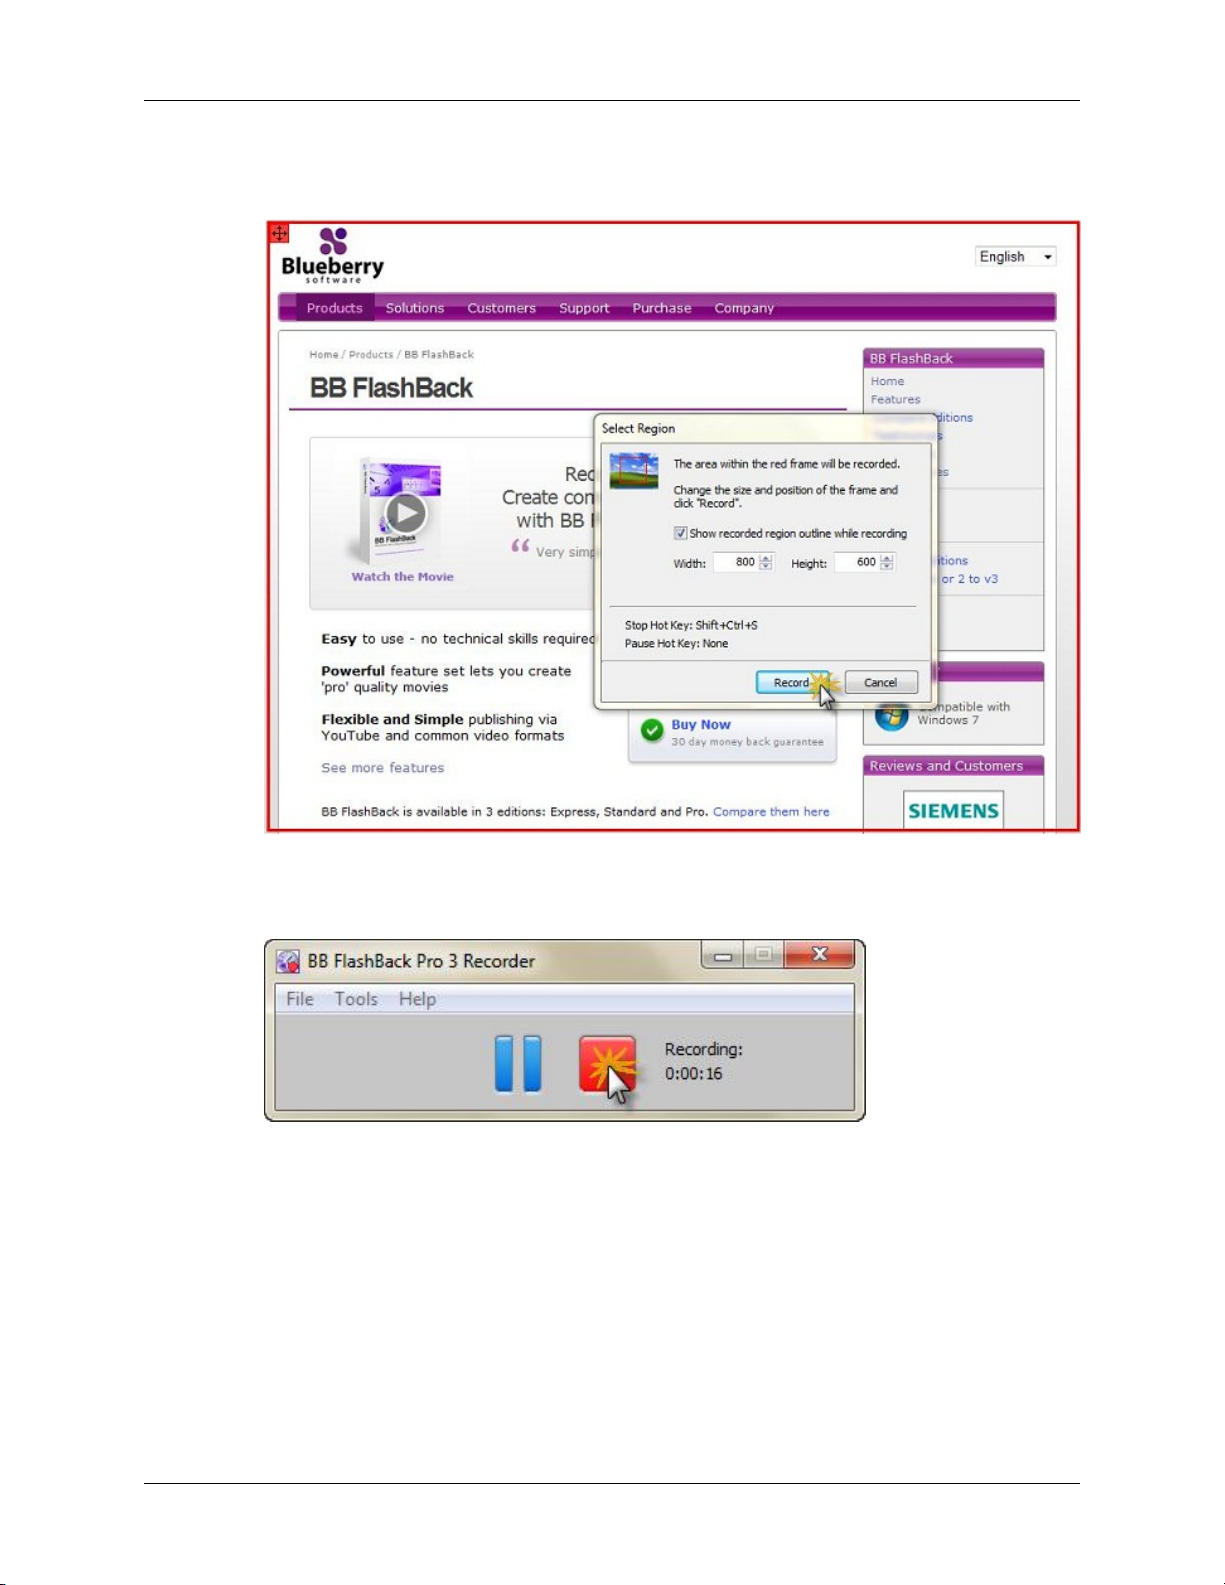
4. In the options, the Record: Region was selected, so set the size and position of the region and click
Record;
5. Click the stop button to end recording;
4
Page 11
Recording a movie
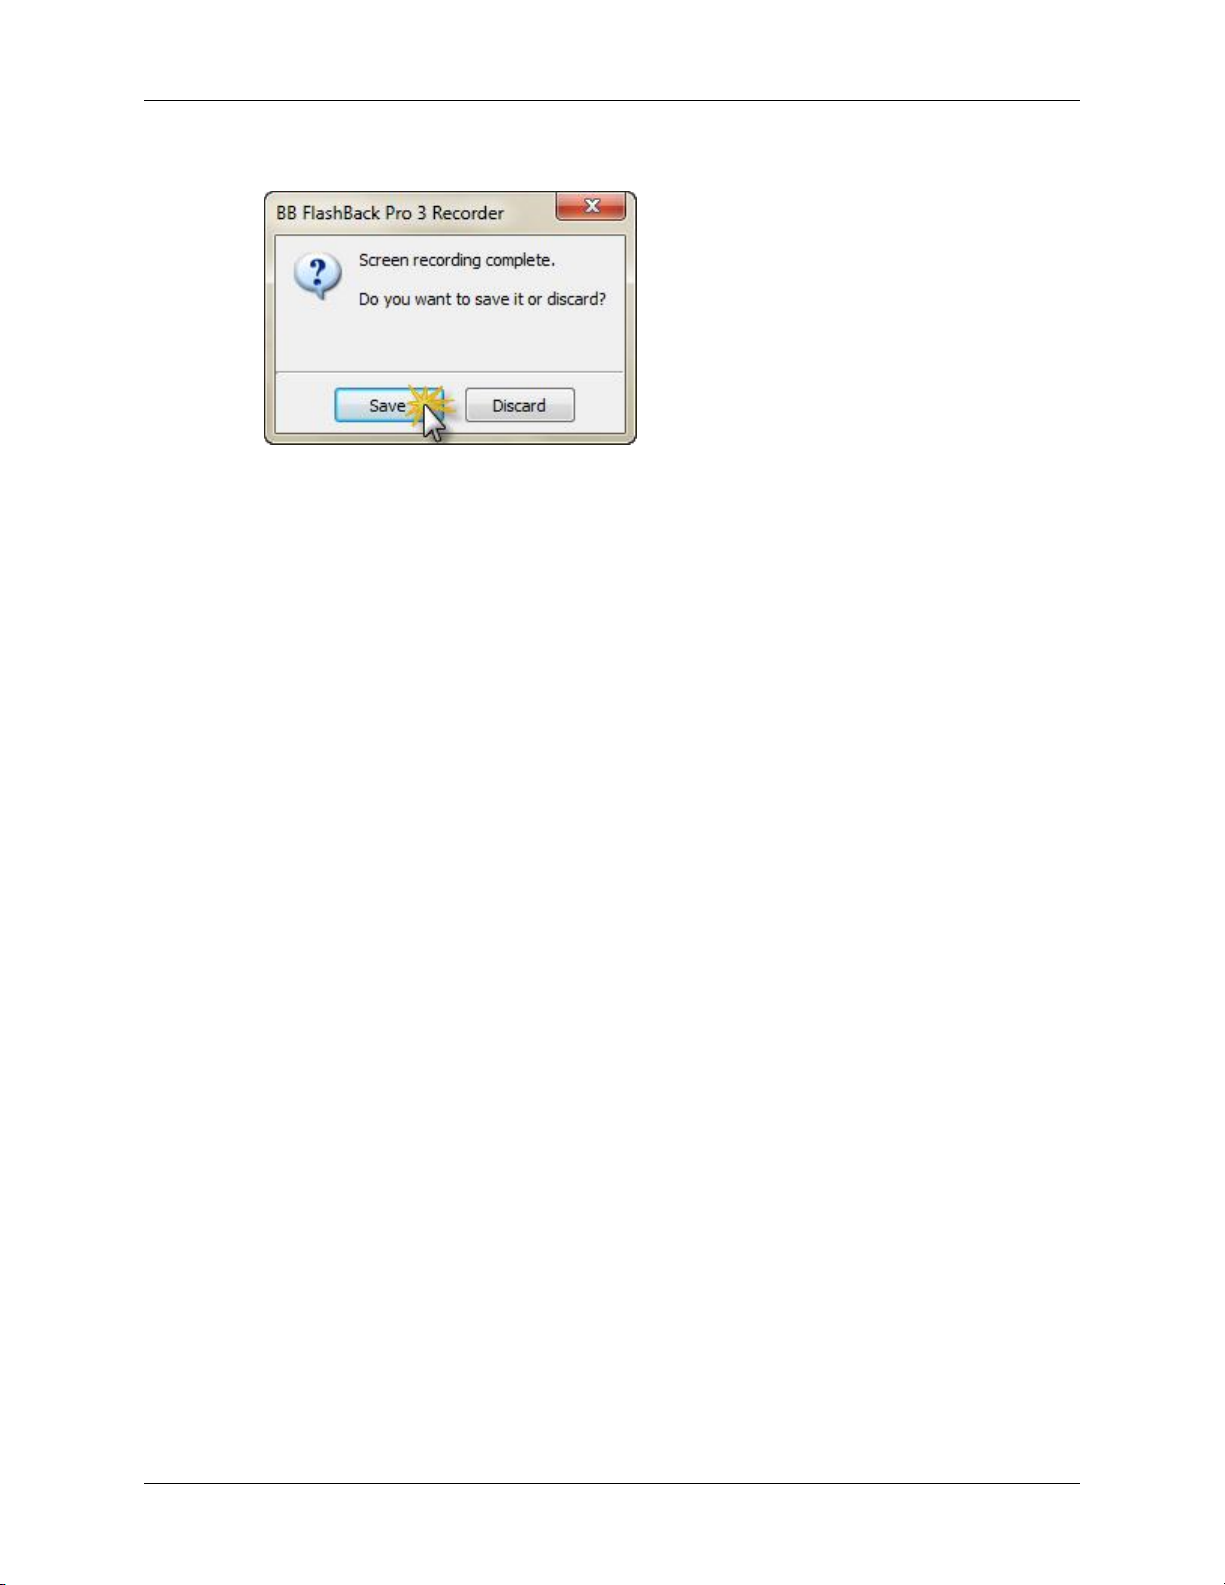
6. Click Save and follow the steps to save the recording;
5
Page 12
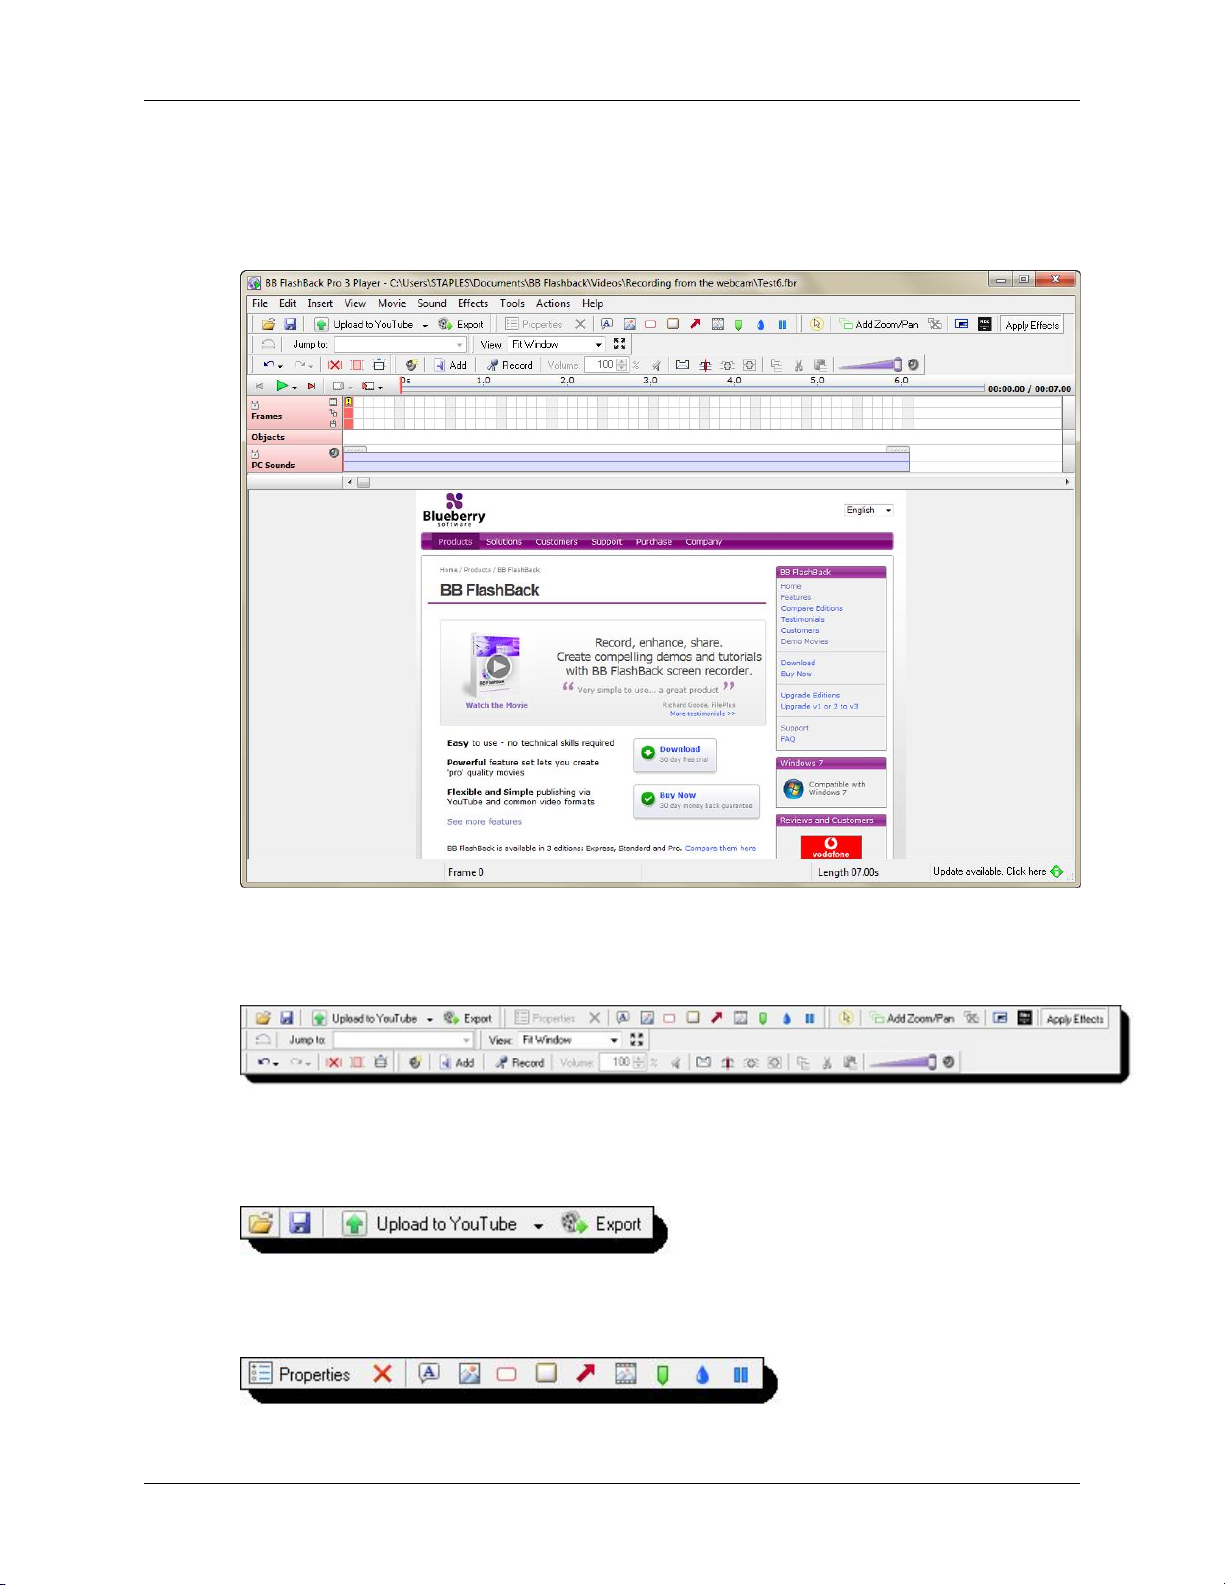
Editing your movie
First, open BB FlashBack Pro 3 Player and then open the movie you have recorded;
The toolbar
Use the toolbar to edit the movie. An overview of the whole toolbar is shown below.
The toolbar buttons are grouped into sections according to their function. The top left of the toolbar gives
quick access to saving and publishing options.
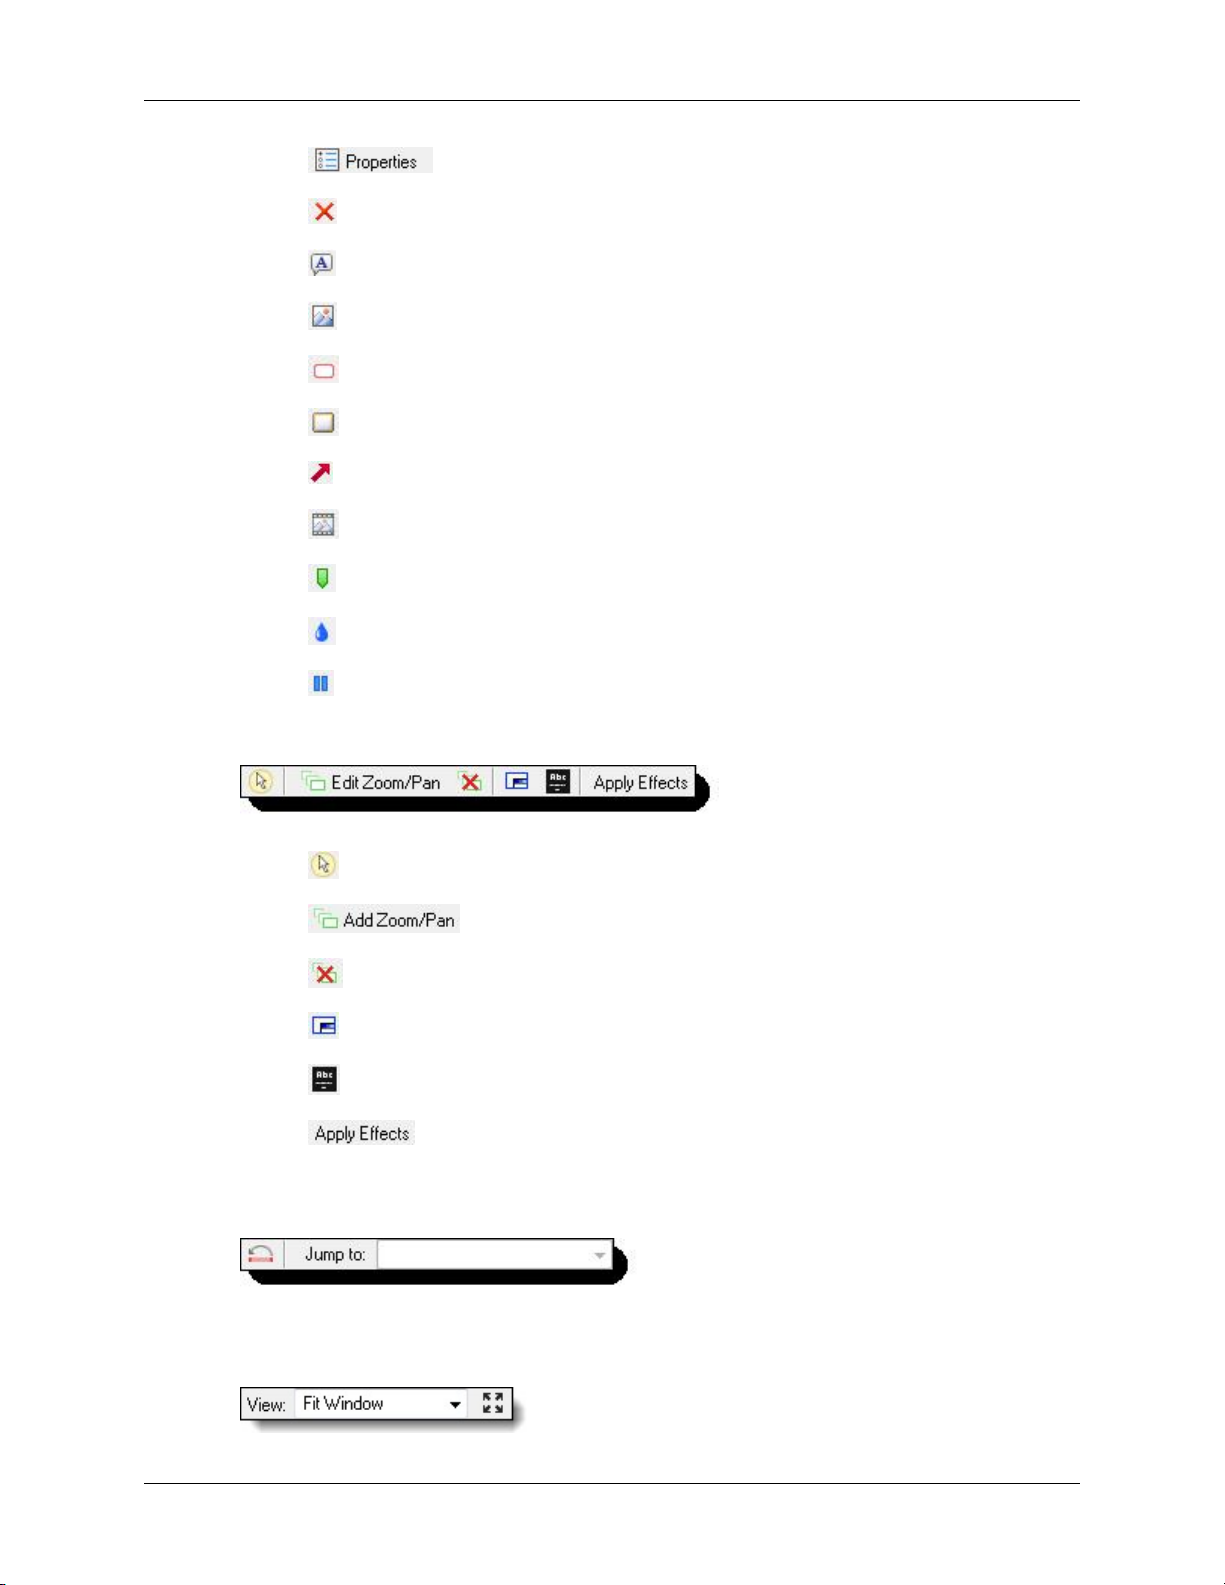
The middle of the top row of buttons provides shortcuts to objects that you can insert into a movie.
6
Page 13
Editing your movie
•
Click to edit the properties of any object which has been inserted into the movie
•
Click to delete any object from the movie
•
Click to insert a textbox
•
Click to insert an image
•
Click to highlight a section of your screen
•
Click to add a button
•
Click to insert an arrow
•
Click to insert another movie
•
Click to set a marker
•
Click to insert a watermark
•
Click to pause a section of the movie
The top right of the toolbar gives quick access to effects
•
Click to add a highlight to the mouse cursor
•
Click to insert or edit a zoom or pan
•
Click to delete an existing zoom or pan
•
Click to set a cropping rectangle
•
Click to add start and end titles to the movie
•
Click to switch the effects on whilst you edit the movie
The middle left part of the toolbar gives you the option to play a short section of the movie, or jump to
a different part
The middle right part of the toolbar allows you to change the viewing options
7
Page 14
Editing your movie
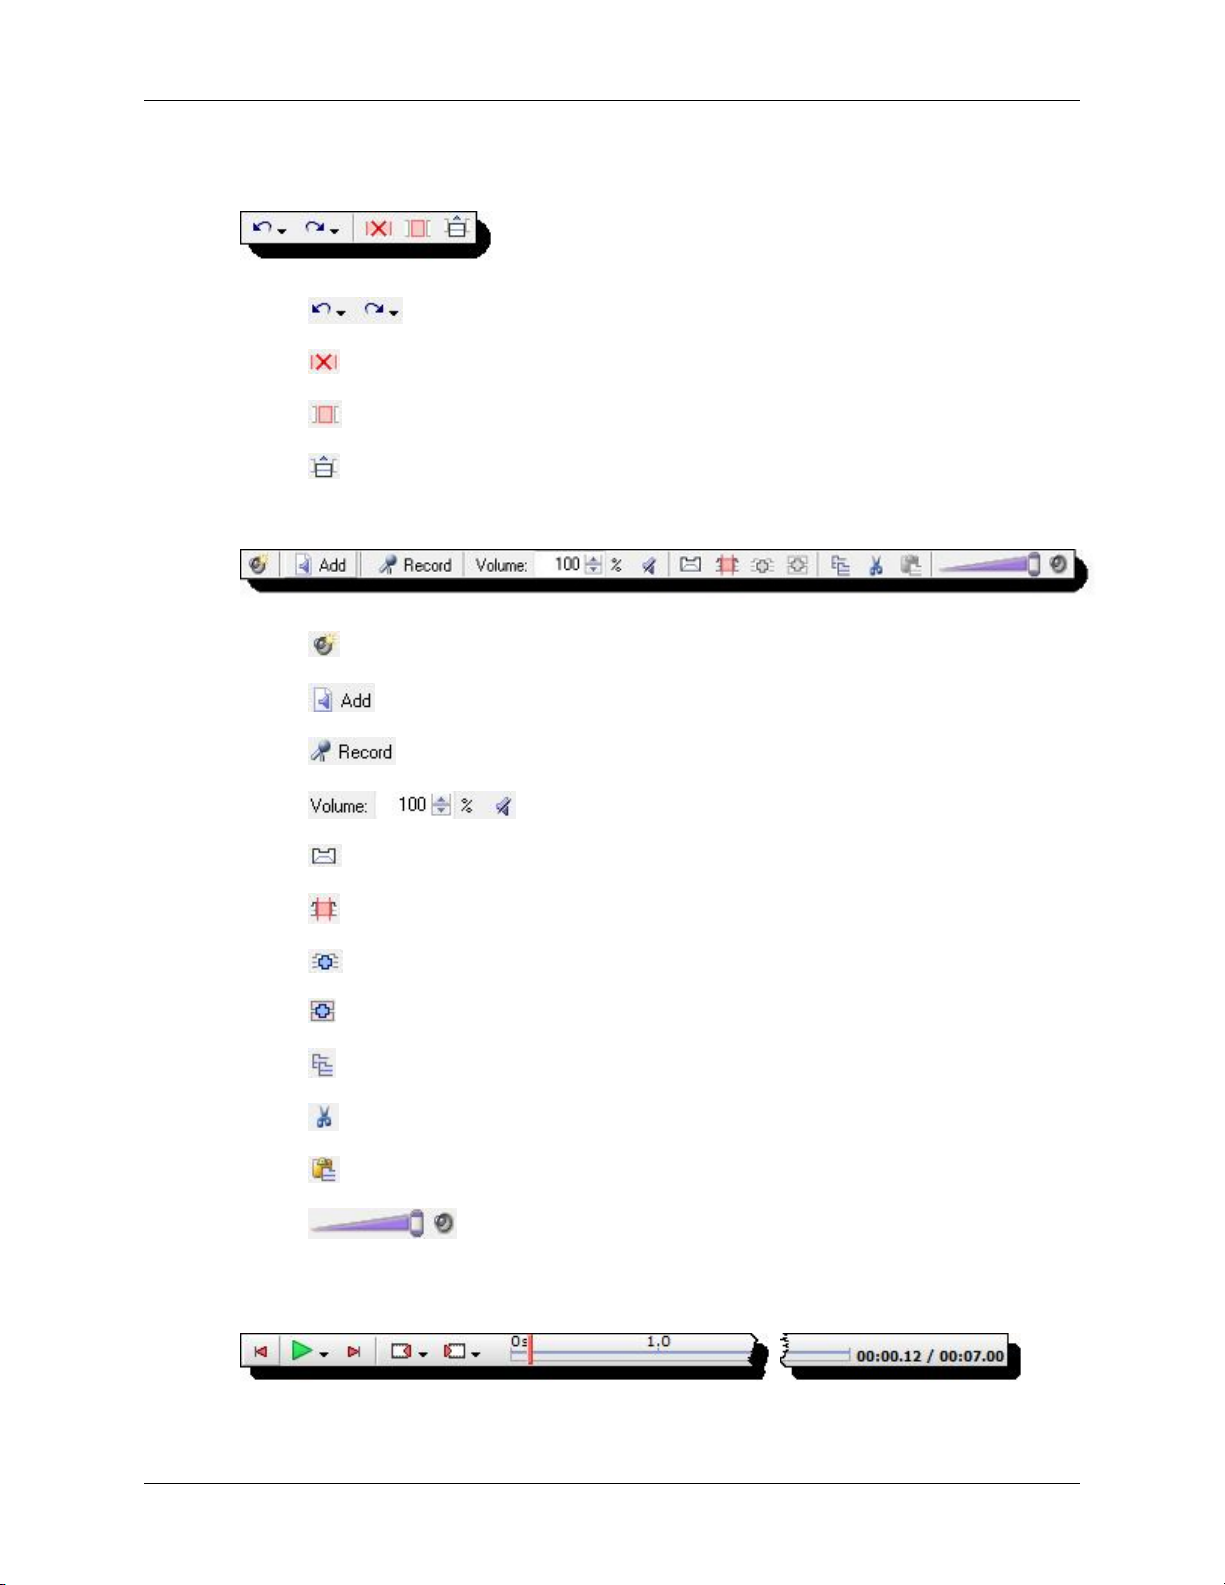
The bottom left of the toolbar gives quick access to basic editing options
•
Click to undo or redo previous steps.
•
Click to delete
•
Click to crop the movie to a selected area
•
Click to insert
The bottom right of the toolbar is for sound editing operations
•
Click to add a new sound track.
•
Click to add a new sound.
•
Click to record a new sound.
•
Click to adjust the volume levels or mute a track or clip.
•
Click to apply a fade in or fade out to a clip.
•
Click to split a sound clip.
•
Click to merge sound clips.
•
Click to merge sound tracks.
•
Click to copy sound.
•
Click to cut sound.
•
Click to paste a copied or cut sound.
•
Click adjust or mute the master volume.
The playback bar gives easy access to playing the movie at various speeds, skipping forward and back or
going directly to a different part of the movie.
8
Page 15
Editing your movie
Editing frames
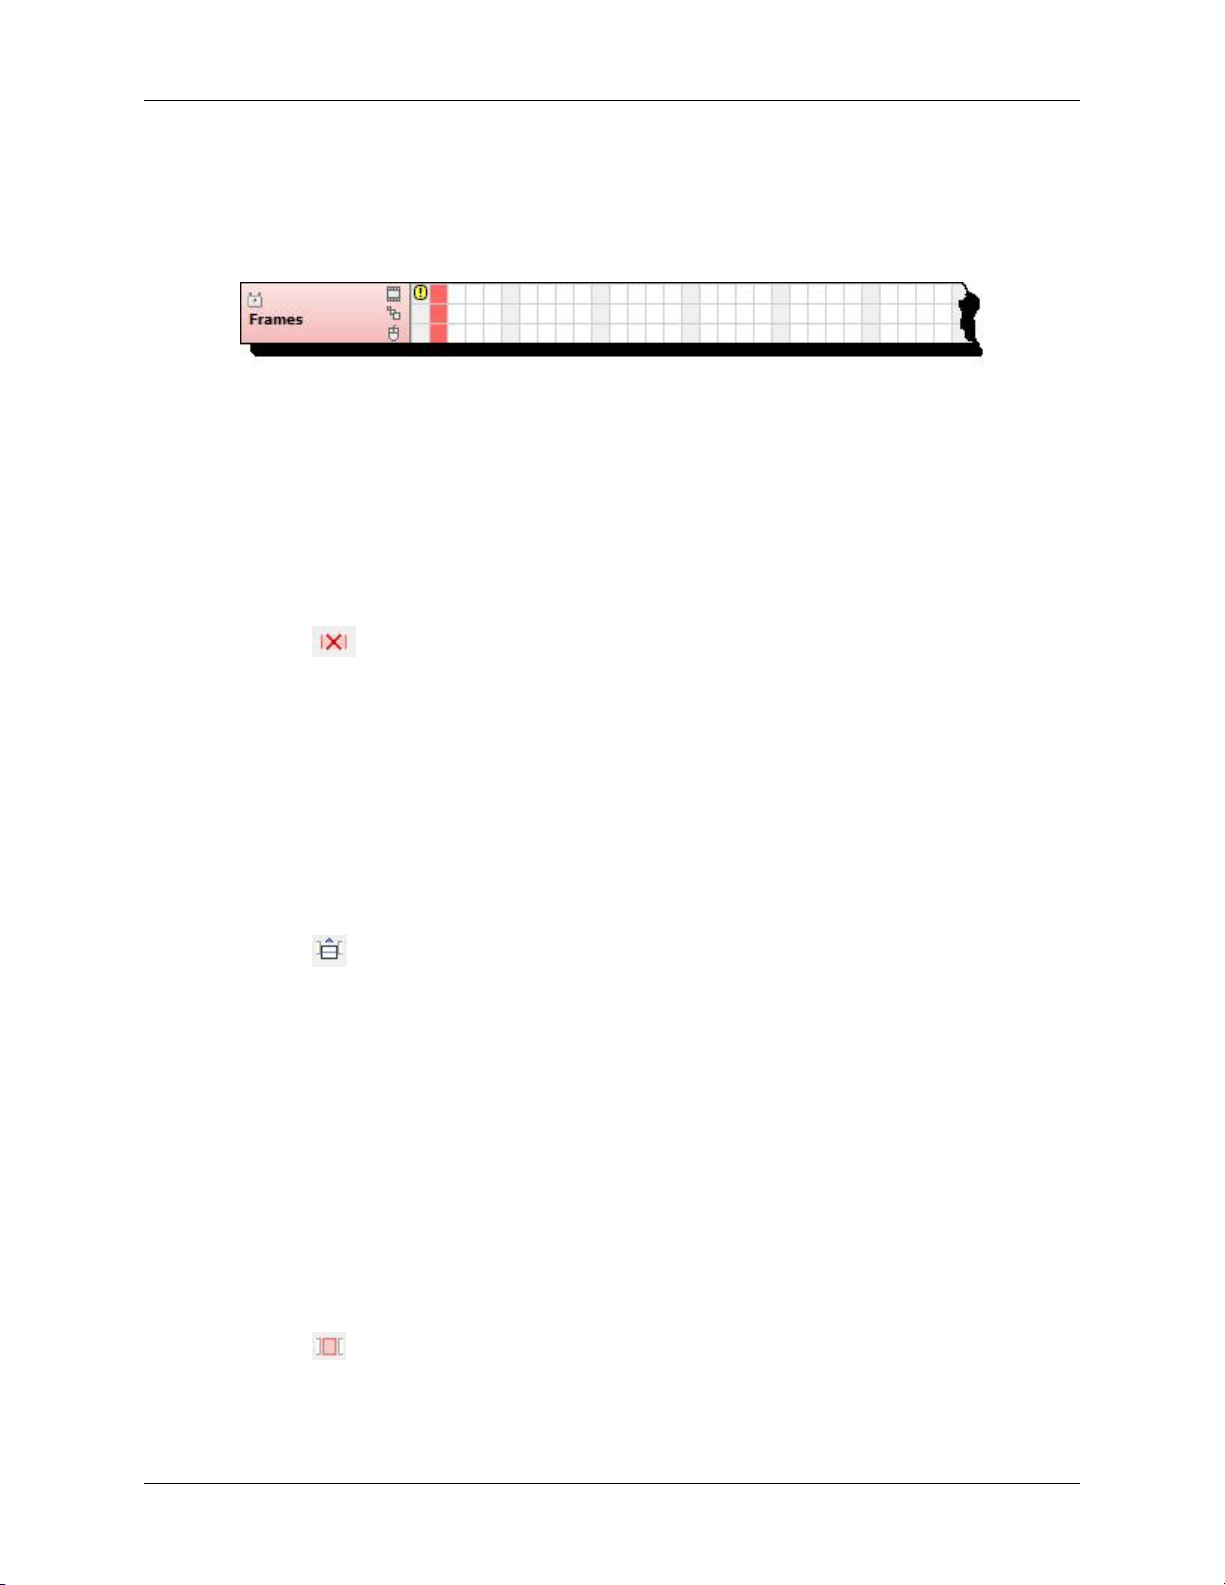
The framebar gives easy access to edit any individual frame or groups of frames in the movie
You can insert and delete frames, and you can crop a movie down to specific frames
How to delete frames:
1. Select the first or last frame to be deleted
2. Drag the mouse across the frame bar to select additional frames
3. Press the delete key on the keyboard.
Or
Click on the toolbar.
Or
Click Edit -> Delete Frame(s)… in the menu.
4. Click OK
How to insert frames:
1. Select the point where you wish to insert the frames
2.
Click on the toolbar.
Or
Click Edit -> Insert Frame(s)… in the menu.
3. Enter the number of frames you wish to insert
4. Click OK.
How to crop a movie:
1. Select the frame where you want to movie to begin.
2. Click and drag across the framebar until you reach the frame where you want the movie to end
3.
Click on the toolbar.
Or
Click Edit -> Crop Frame(s)… in the menu.
9
Page 16
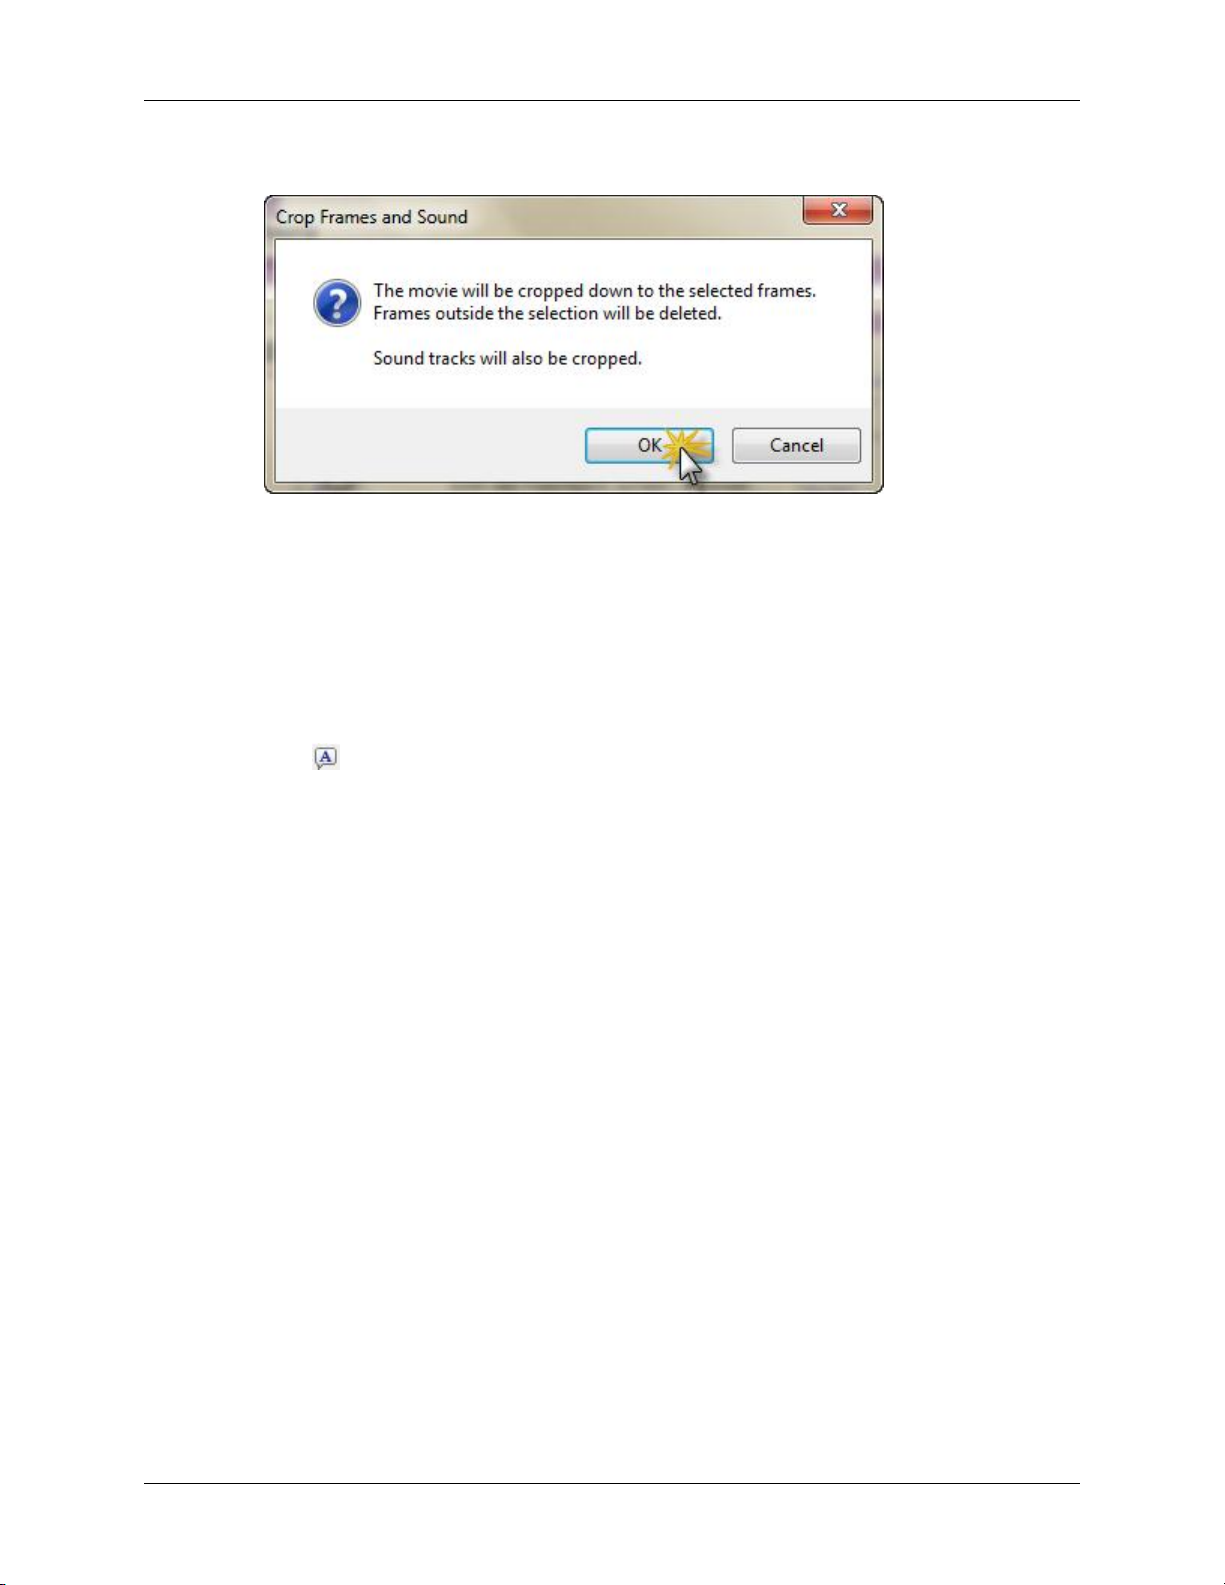
Editing your movie
4. Click OK to confirm the edit;
Annotating your movie
You can add text, images and other objects to a movie.
How to add text to a movie
1. Select the frame where you want to insert the textbox.
2.
Click on the toolbar.
Or
Click Insert -> Text in the menu.
10
Page 17
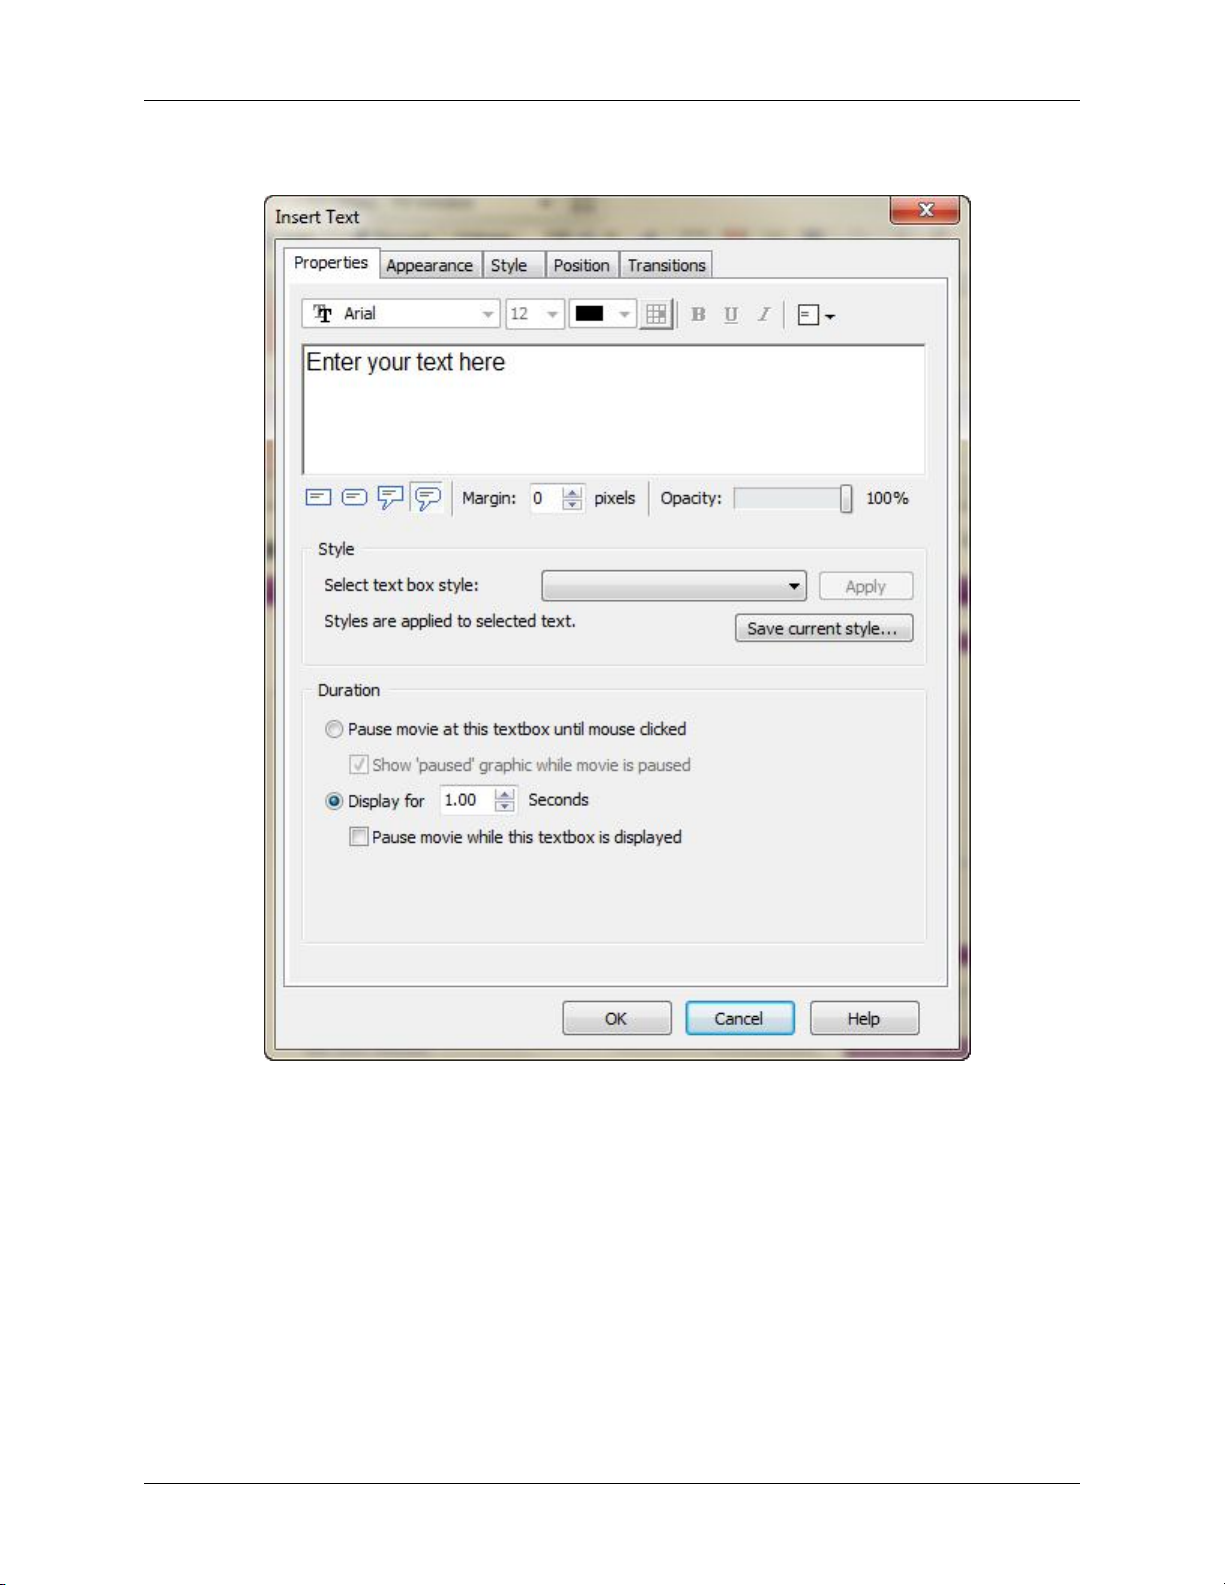
3. Set the properties of the textbox;
Editing your movie
11
Page 18
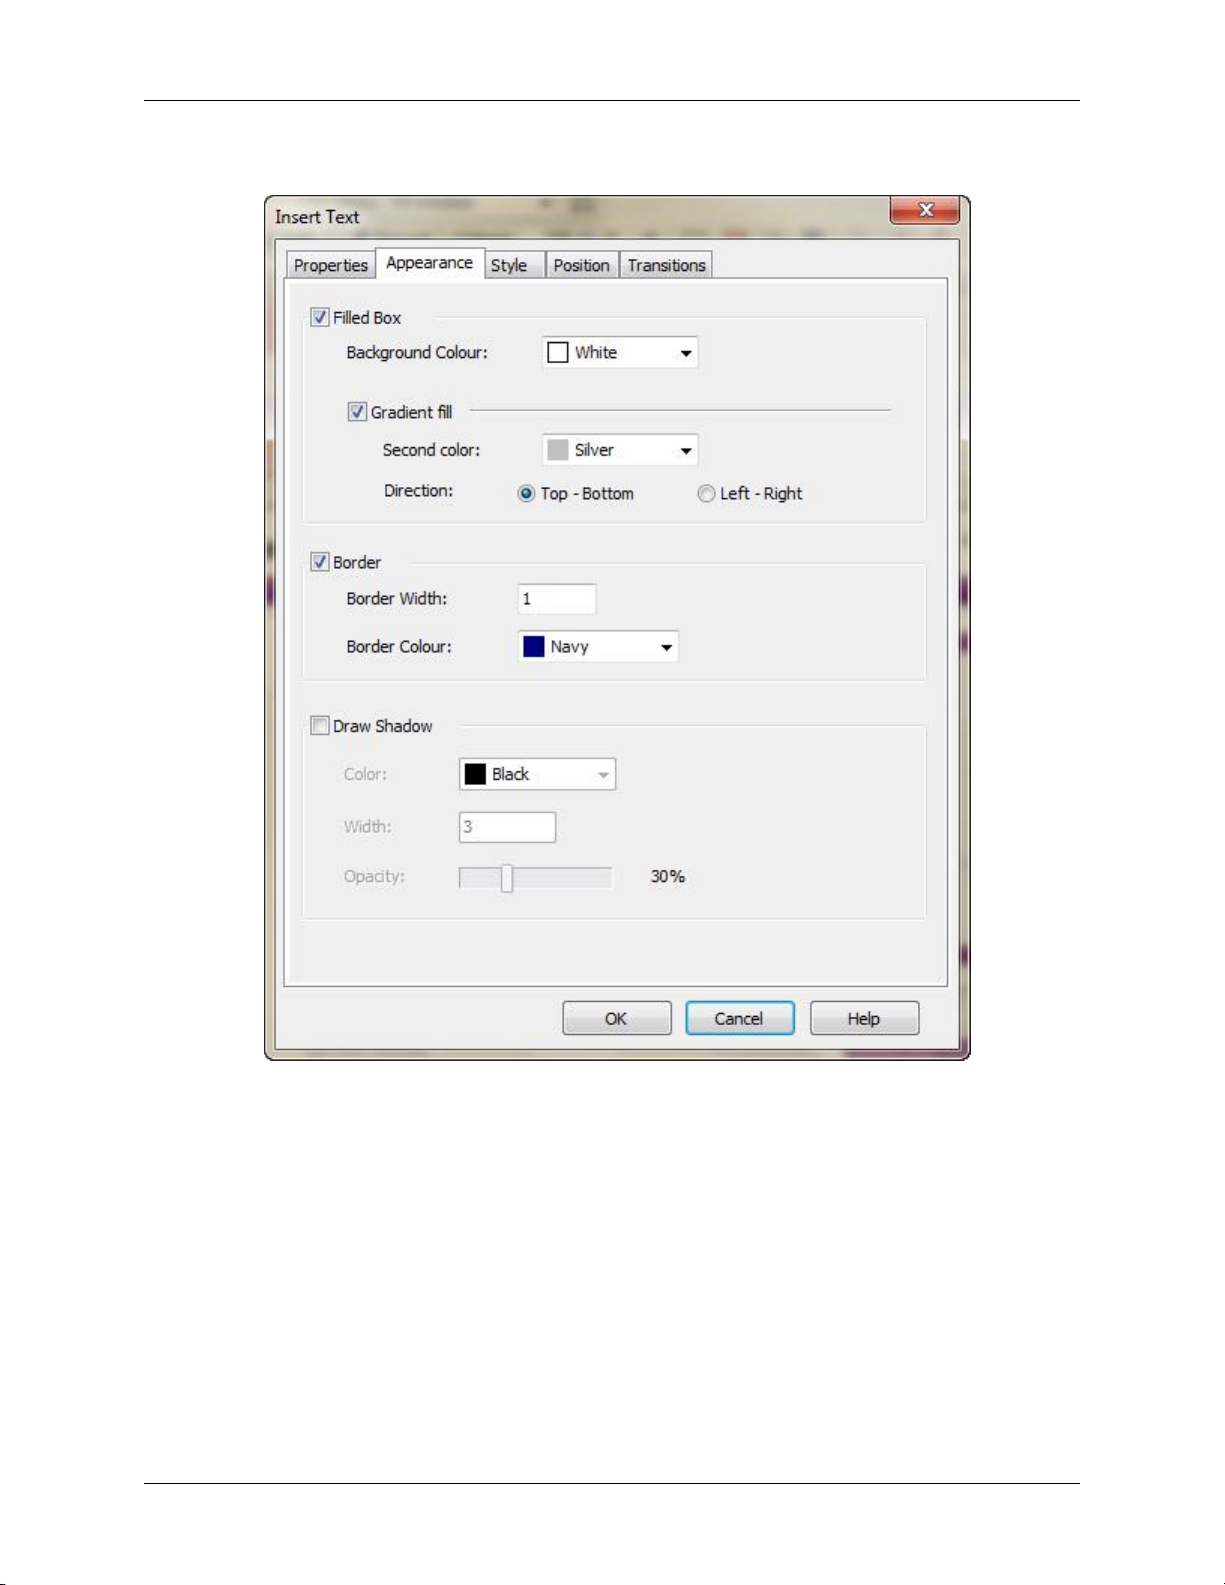
4. Set the appearance of the textbox;
Editing your movie
12
Page 19
Editing your movie
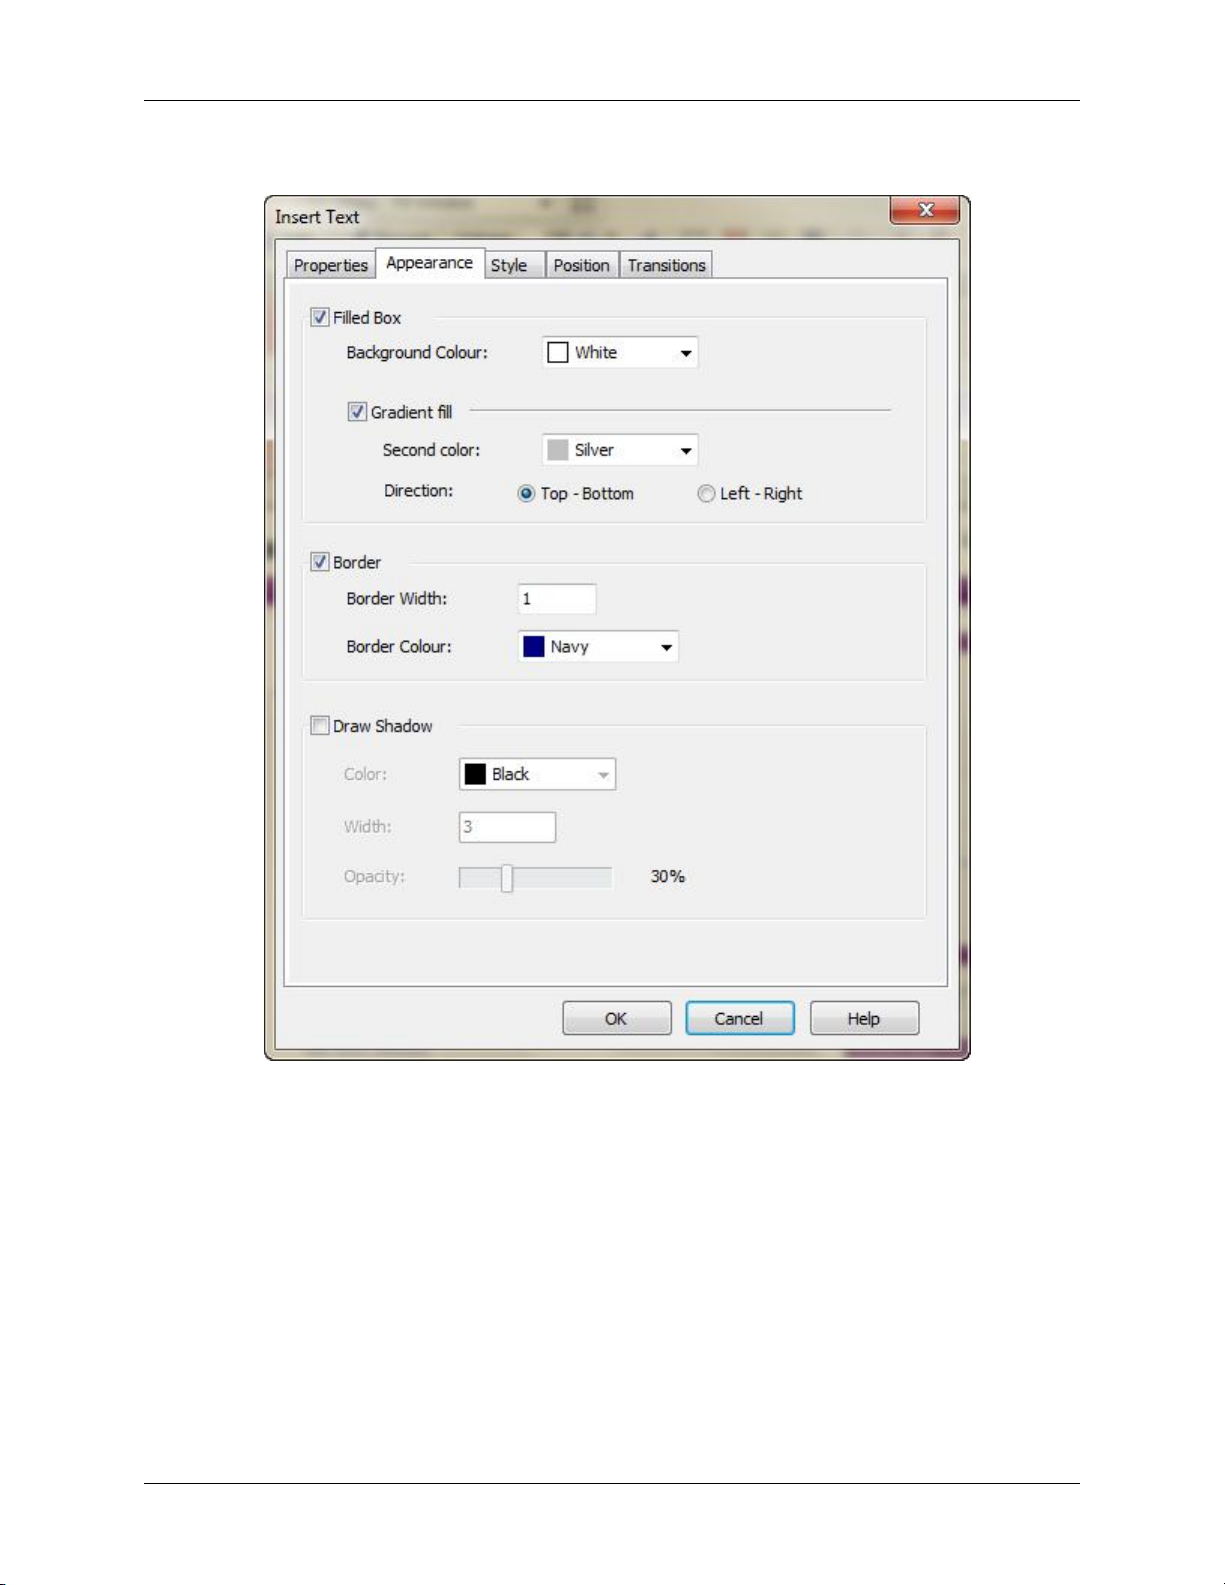
5. You can create and edit styles to use with textboxes throughout a movie;
13
Page 20
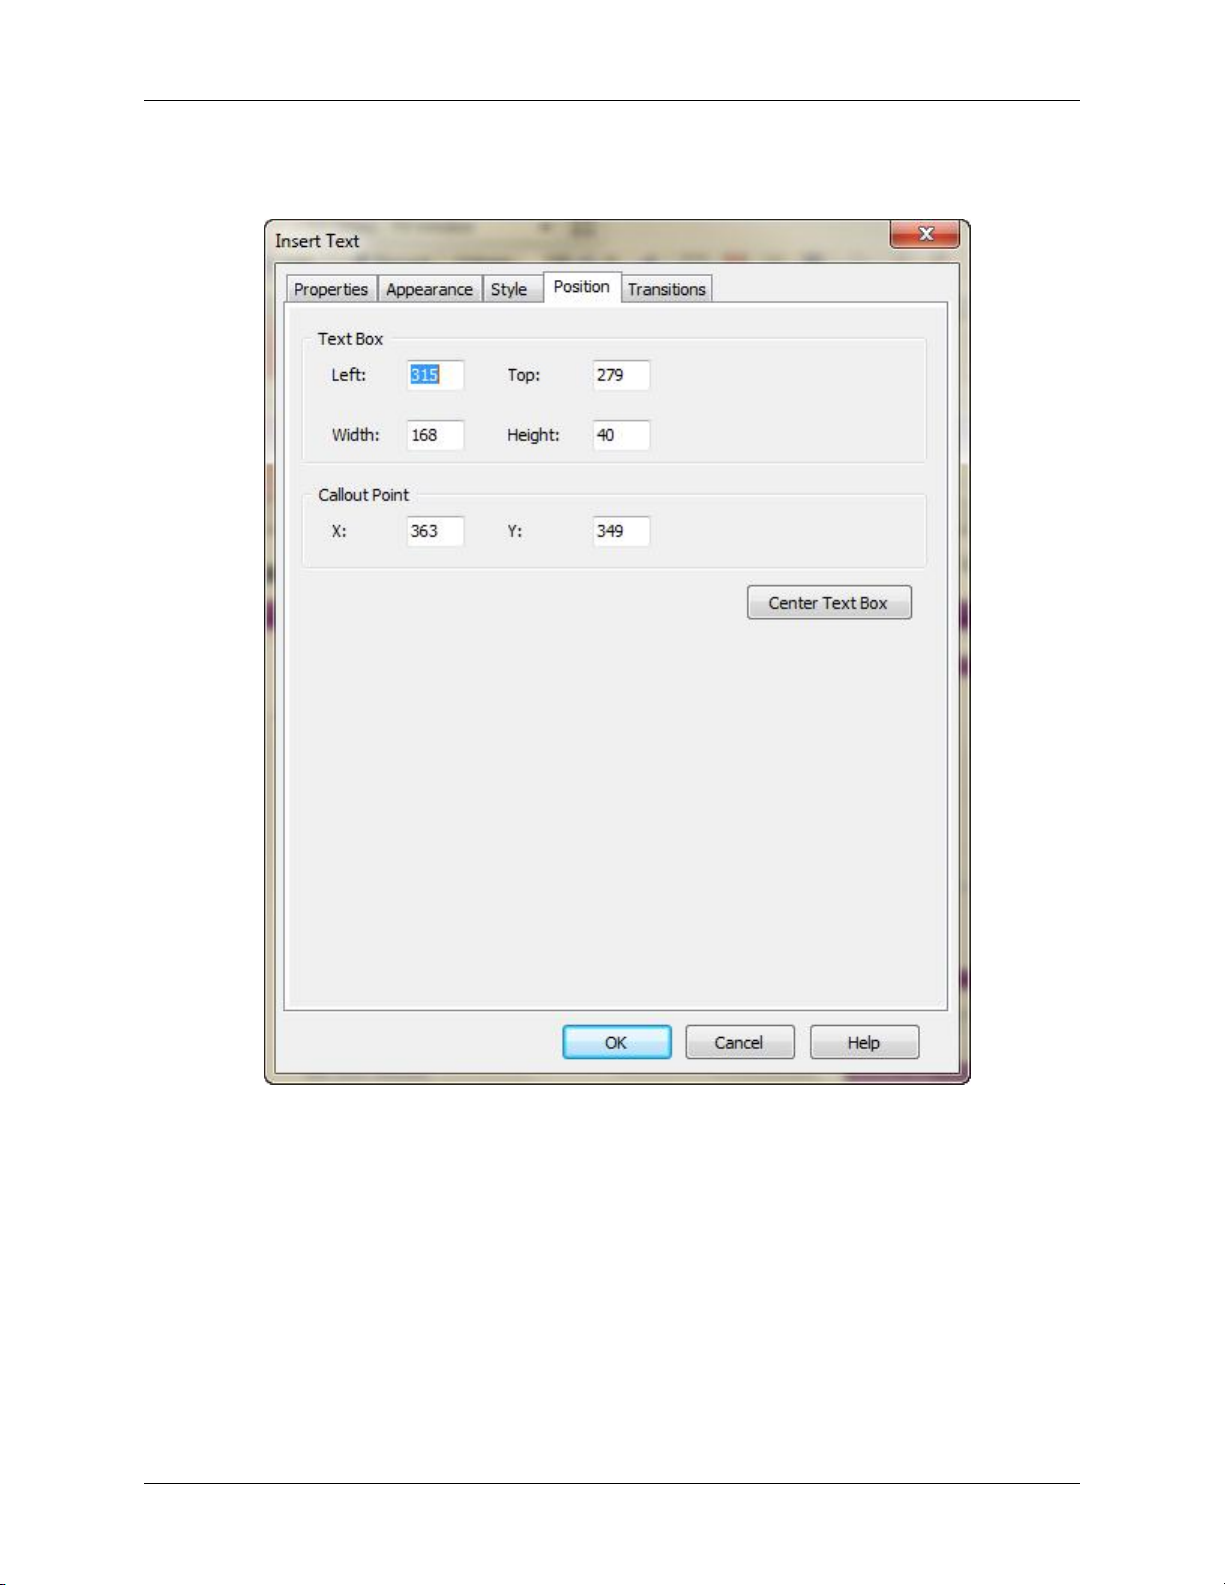
Editing your movie
6. When you are creating a textbox, you can set the size and position. Alternatively, once the textbox has
been created, you can click and drag in the view screen to manually resize and move it;
14
Page 21
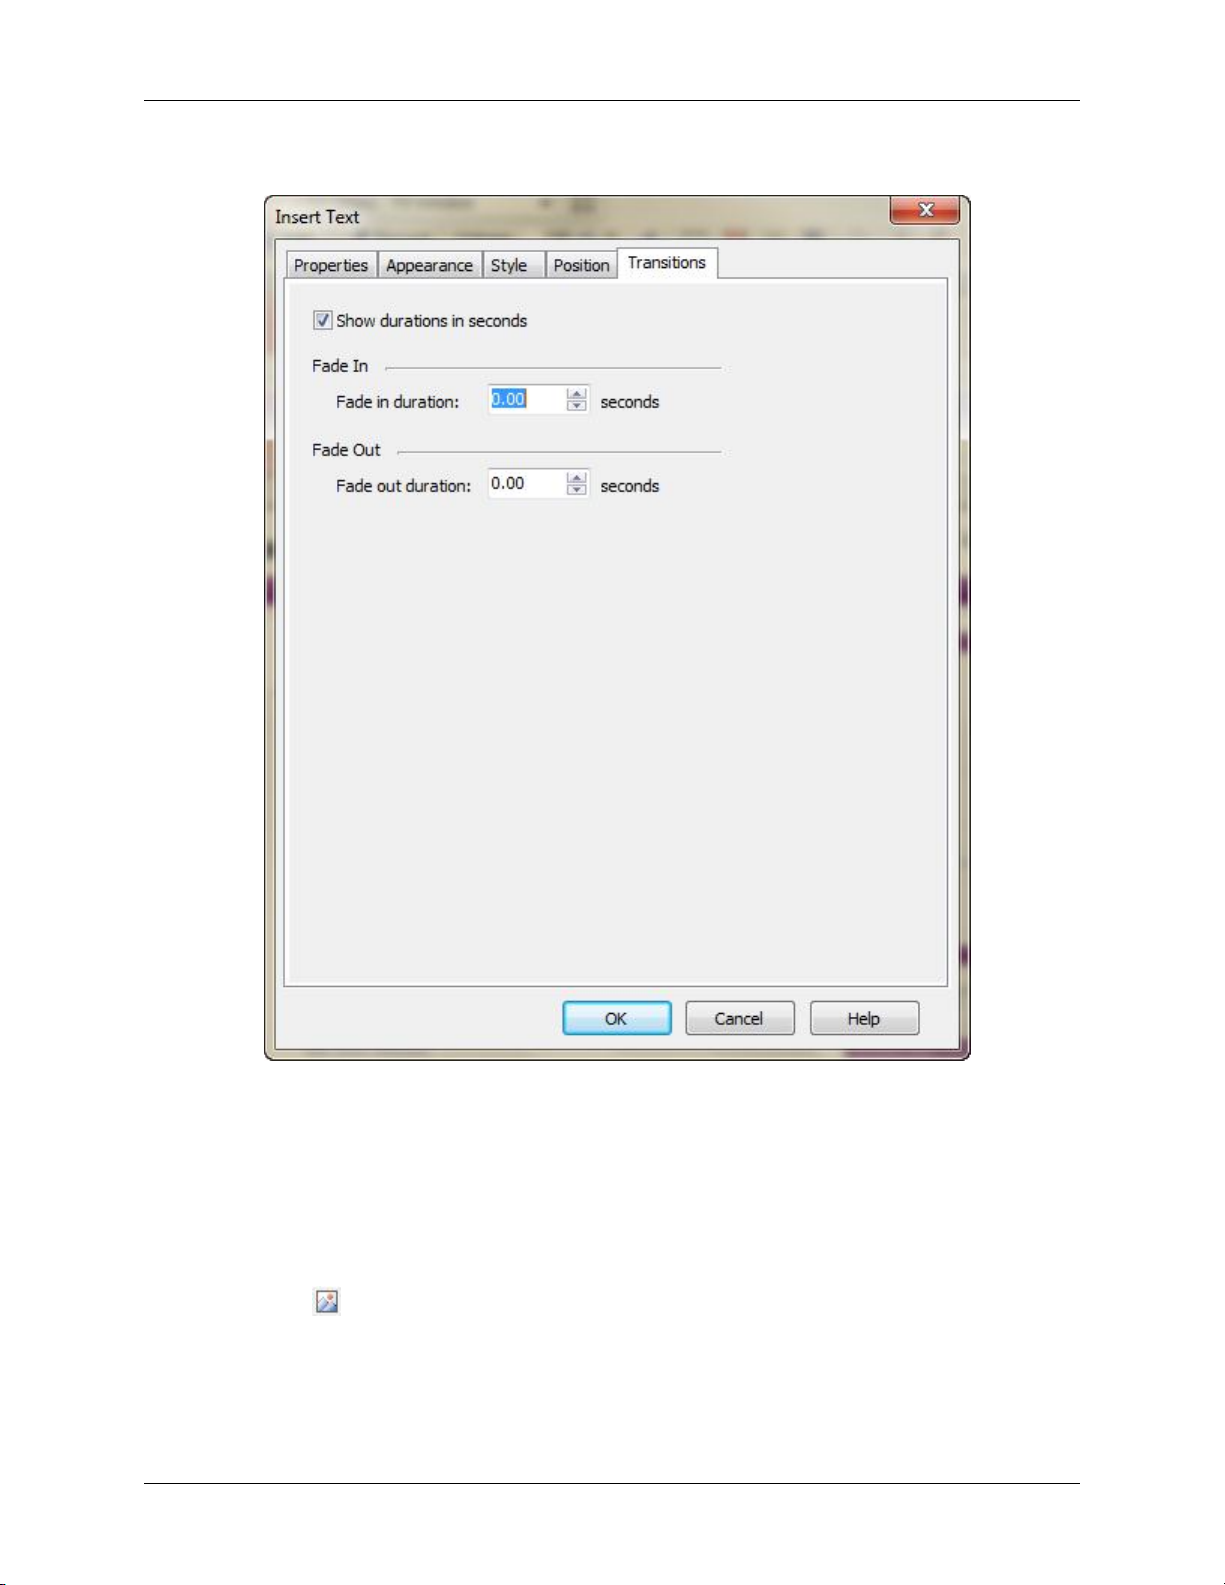
Editing your movie
7. You can create a transition to fade the textbox in and out;
8. Click OK to insert the textbox.
How to add an image to a movie
1. Select the frame where you want to insert the image.
2.
Click on the toolbar.
Or
Click Insert -> Image in the menu.
15
Page 22
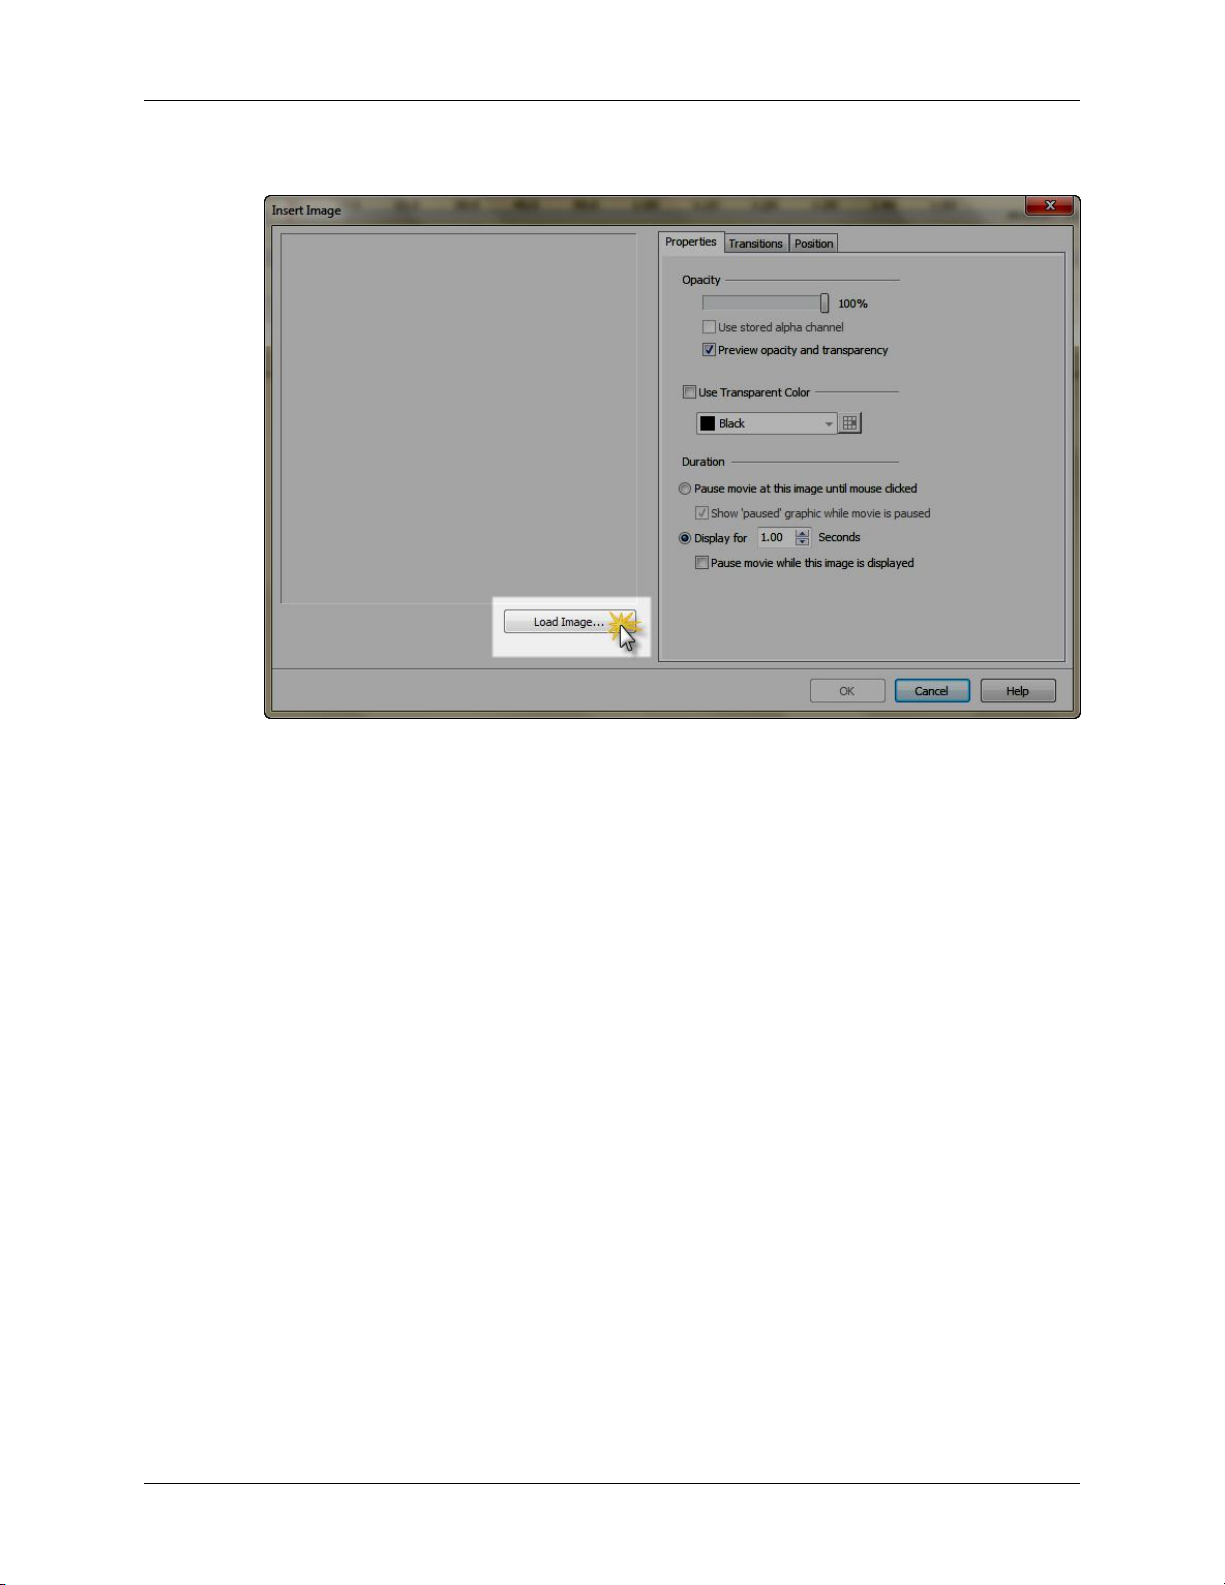
3. Click Load Image;
Editing your movie
4. Browse to the image, select it and click Open.
16
Page 23
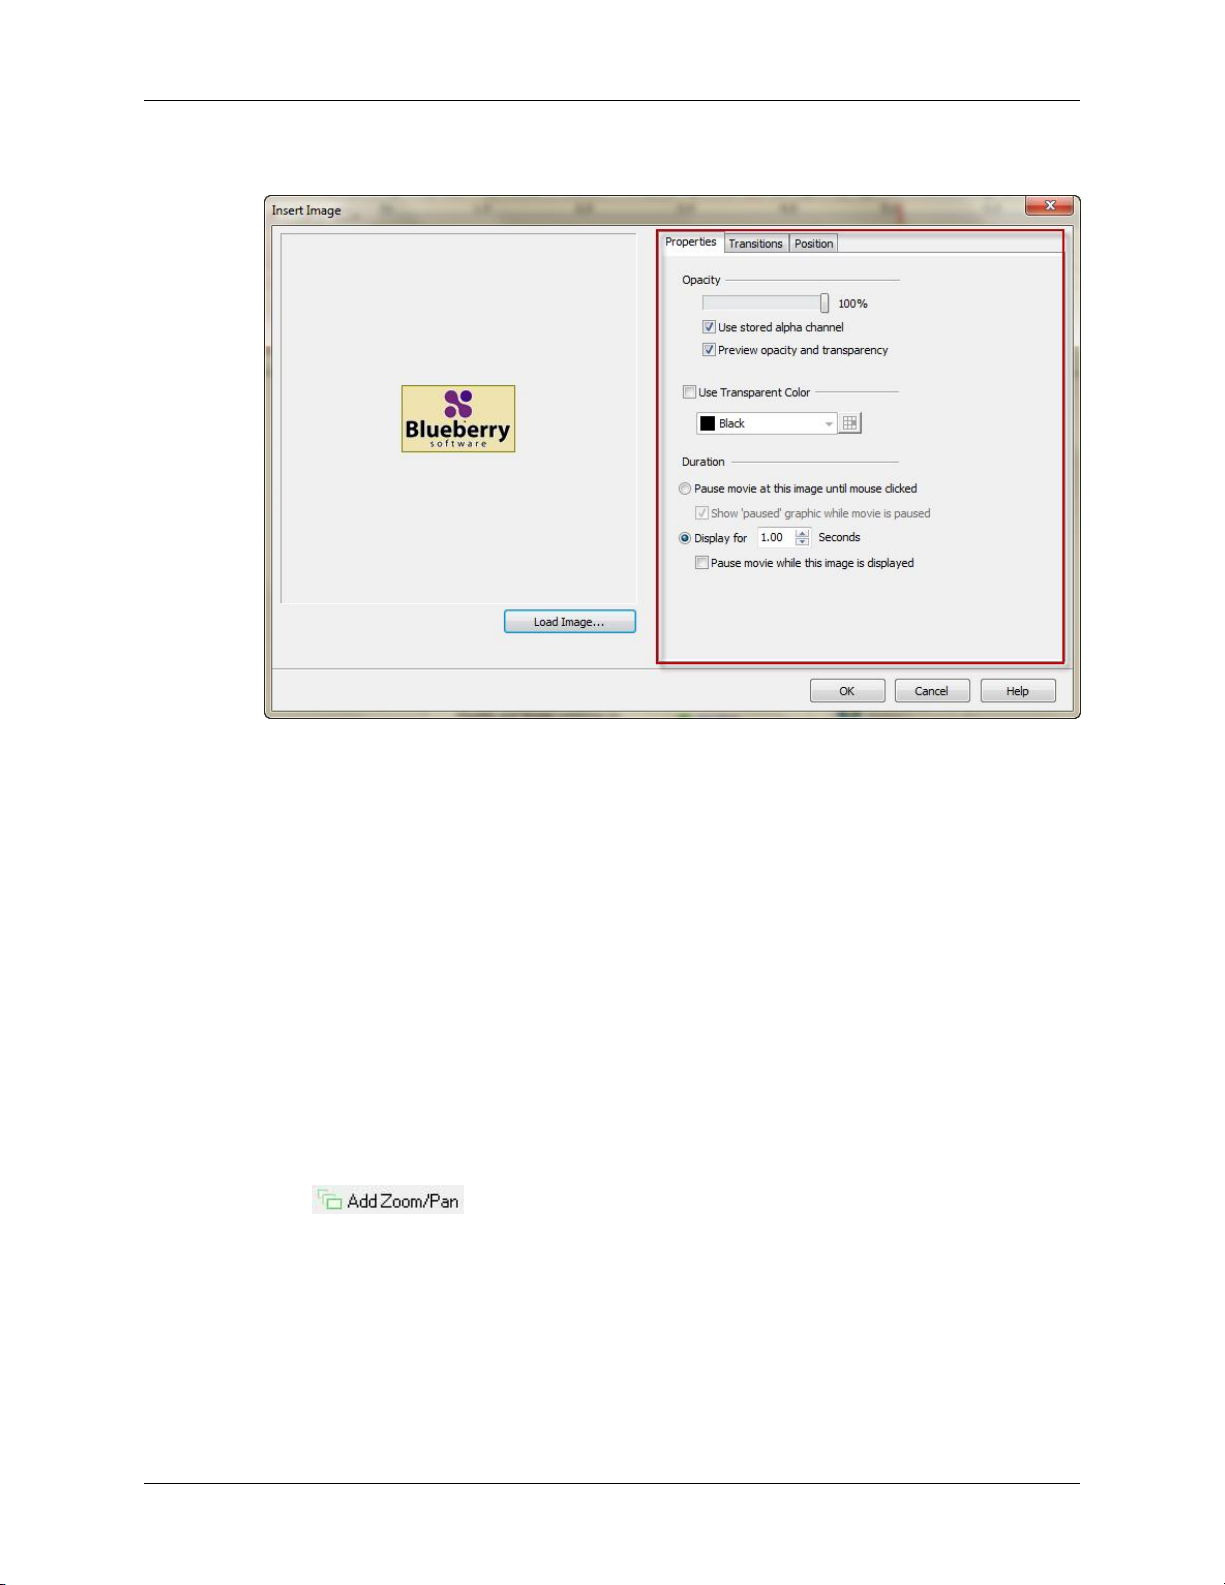
5. Set the properties of your image.
Editing your movie
• Set the size and position of where it will appear in the movie from the Position tab.
• Add a fade in or fade out, using the Transitions tab;
6. Click OK to insert the image.
You can also insert highlights, buttons, arrows and other objects into the movie in a similar way.
Using zoom/pan, cropping and autoscroll
You can create zoom and pan effects in a movie. You can also crop a large movie to a smaller section and
use the autoscroll effect to follow the mouse, missing none of the action.
How to zoom or pan:
1. Select the frame where you want to add the zoom or pan.
2.
Click on the toolbar.
Or
Click Effects -> Add ZoomPan in the menu.
17
Page 24
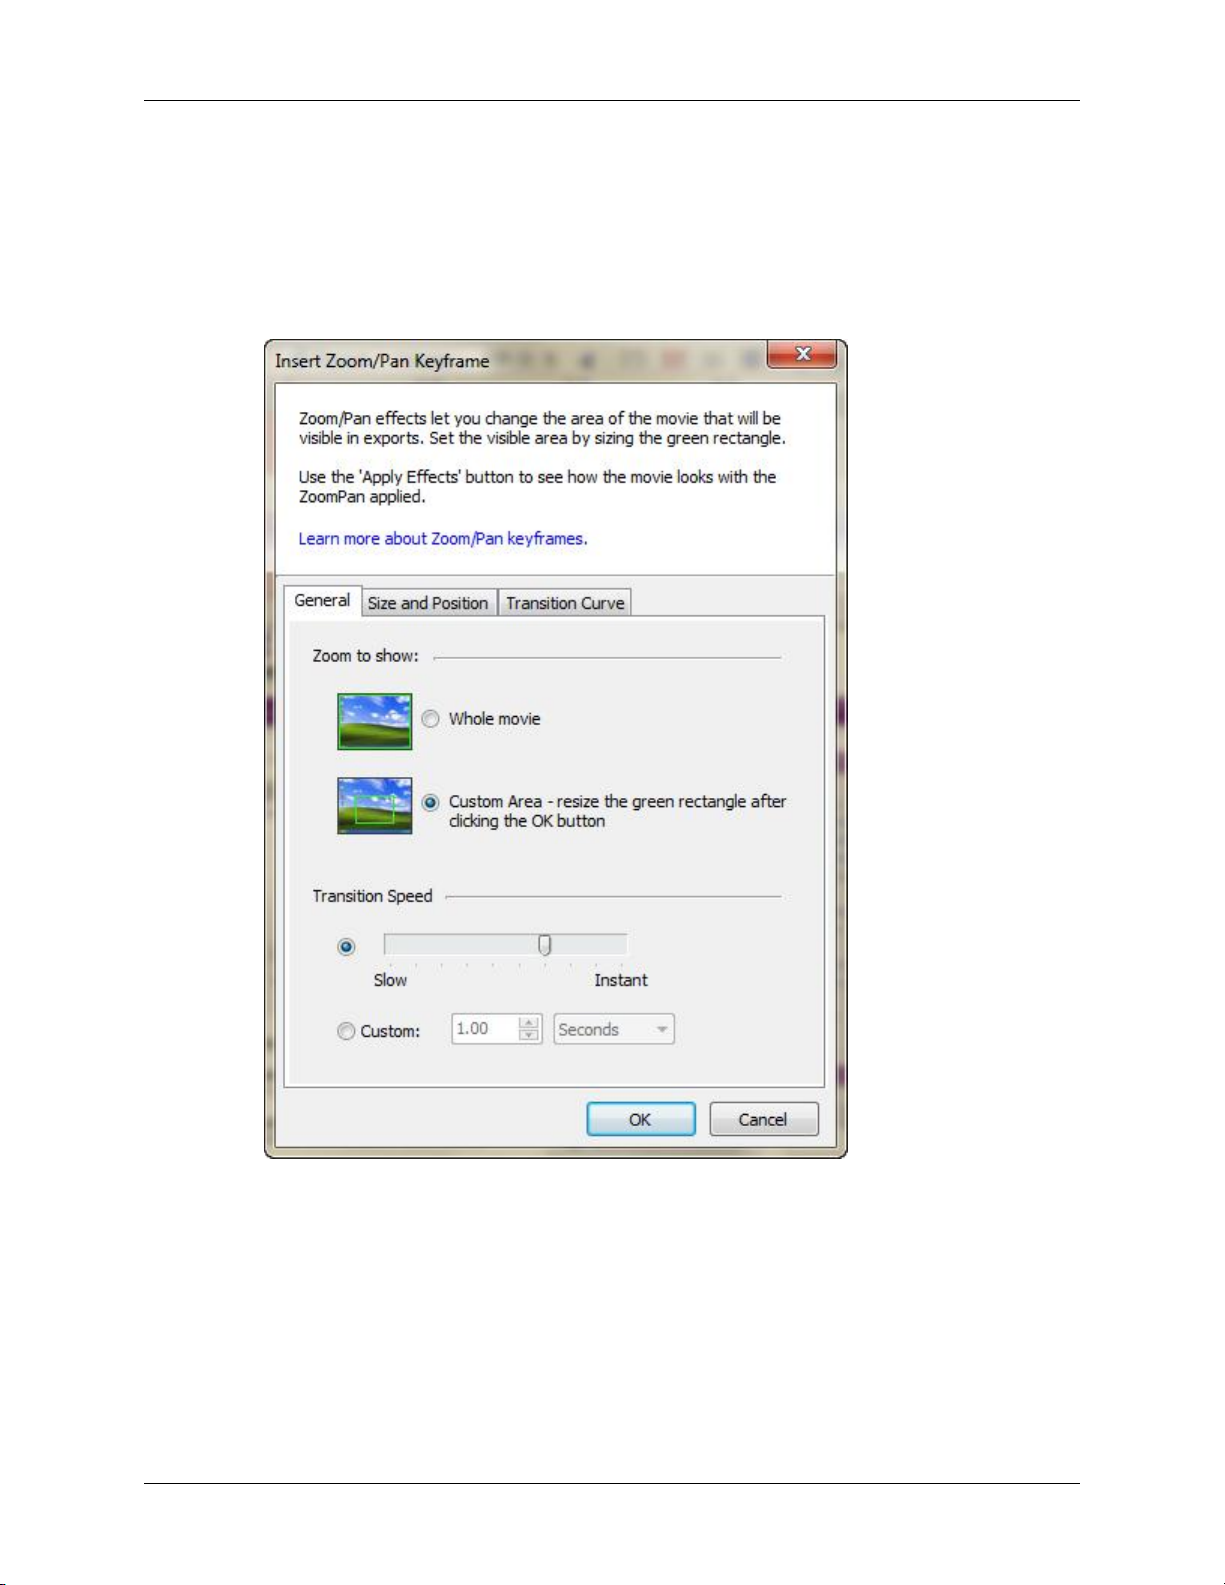
Editing your movie
3. Set the properties of the zoom;
• Select Custom Area to zoom to a particular region of the movie.
• Select Whole Movie to zoom back to show the entire movie if you previously added a zoom-in.
• The transition speed sets how quickly the zoom or pan will appear on screen.
4. Click OK to insert the zoom effect.
Click and drag to re-size the zoom/pan.
Please note, the zoom will remain in the movie until the end, or another zoom effect is created.
How to crop a movie and use the autoscroll
18
Page 25

Editing your movie
1. First, add a cropping rectangle to the movie:
Click on the toolbar.
Or
Click Effects -> Set Cropping Rectangle in the menu.
2. Then add the autoscroll effect:
Click Effects.
3. Go to the Autoscroll Cropping Rectangle submenu.
4. Click Mouse In Centre.
Or
Click Mouse Near Centre.
The cropping rectangle can be resized in the view screen. When you export the movie, only the area within
the cropping rectangle will be exported.
The cropping rectangle will follow the mouse cursor as it moves across the screen when the autoscroll is set.
If zoom and pan effects are being used, a zoom in or pan will only show sections within the cropping
rectangle.
19
Page 26
Publishing your movie
When you have finished editing the movie, it can be exported in a variety of formats and can be uploaded
to YouTube.
Exporting your movie
Here I will demonstrate how to export the movie to Flash
1.
Click on the toolbar.
Or
Click File -> Export in the menu.
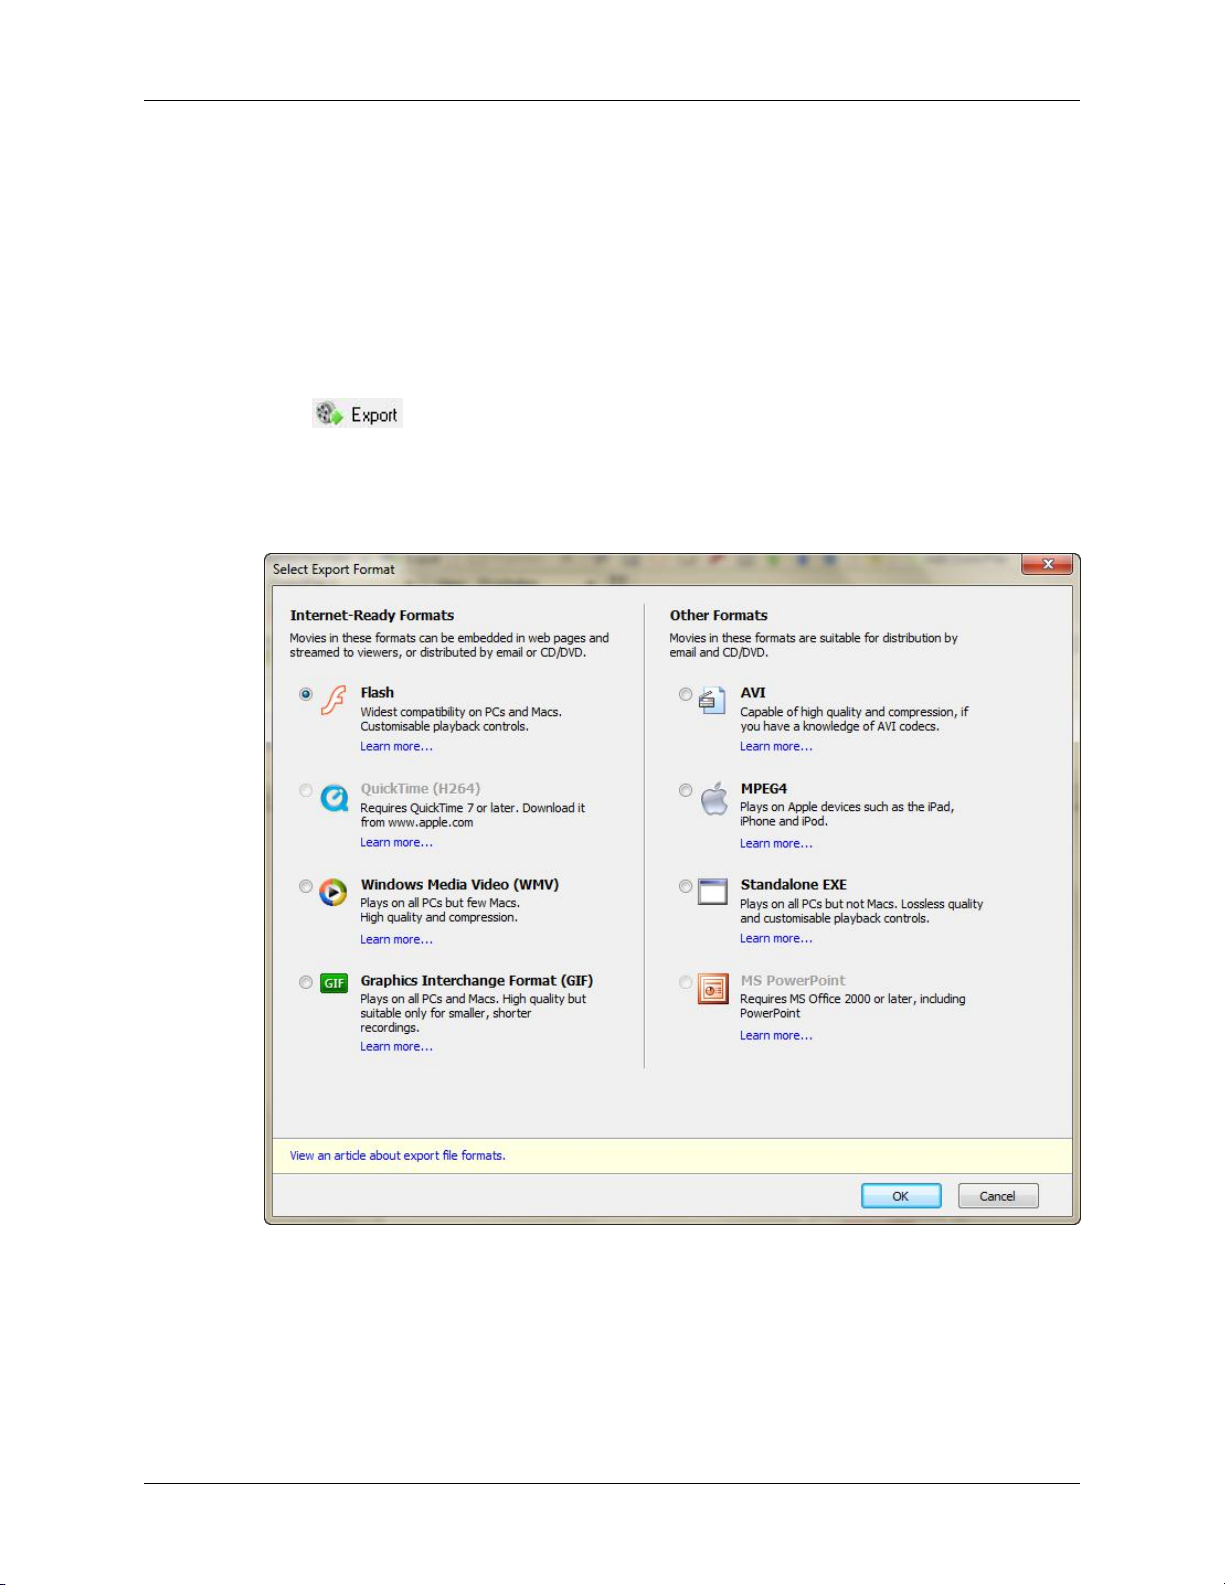
2. Select the Flash export format;
3. Click OK.
20
Page 27
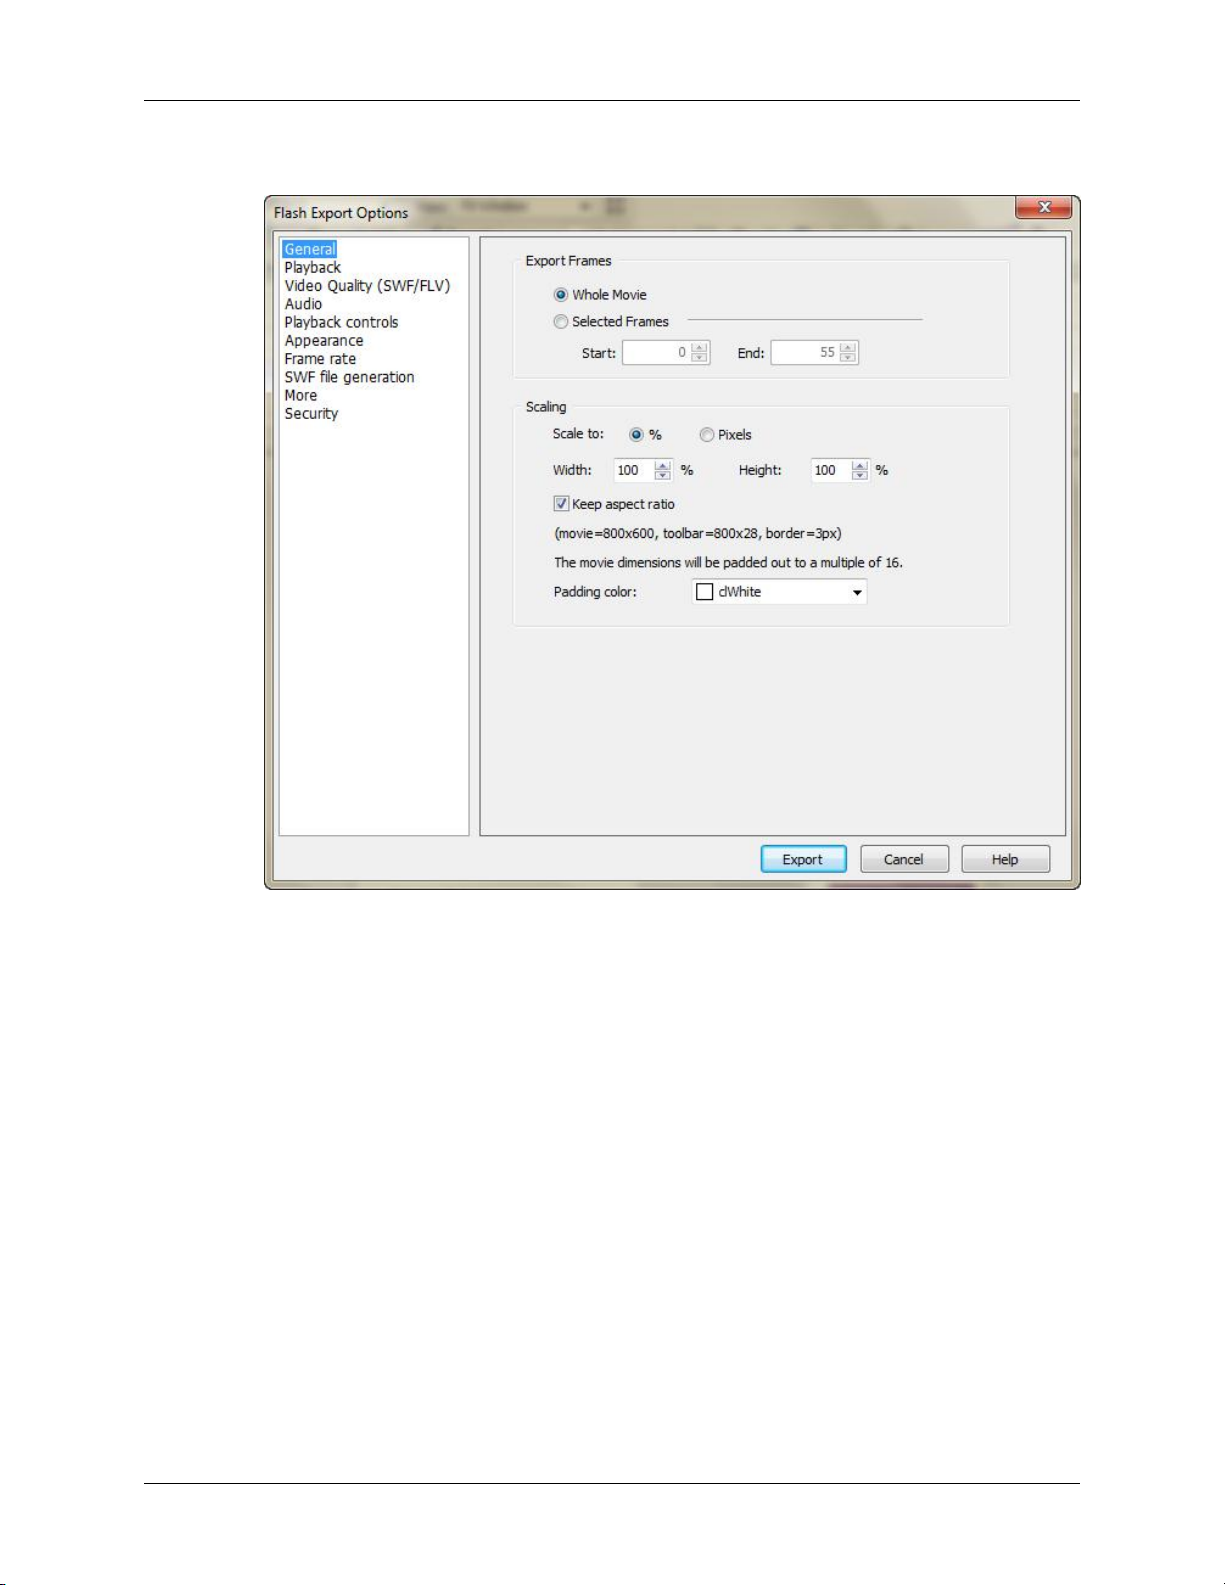
4. Set the Flash Export Options
Publishing your movie
5. Click Export.
6. Choose where to save the exported files and click Save.
Three files are exported and you can choose view the export once completed
To view the movie in a web browser, ensure that you open the .html file that has been exported.
Please note, each export format comes with different options to include in the export.
21
Page 28
Publishing your movie
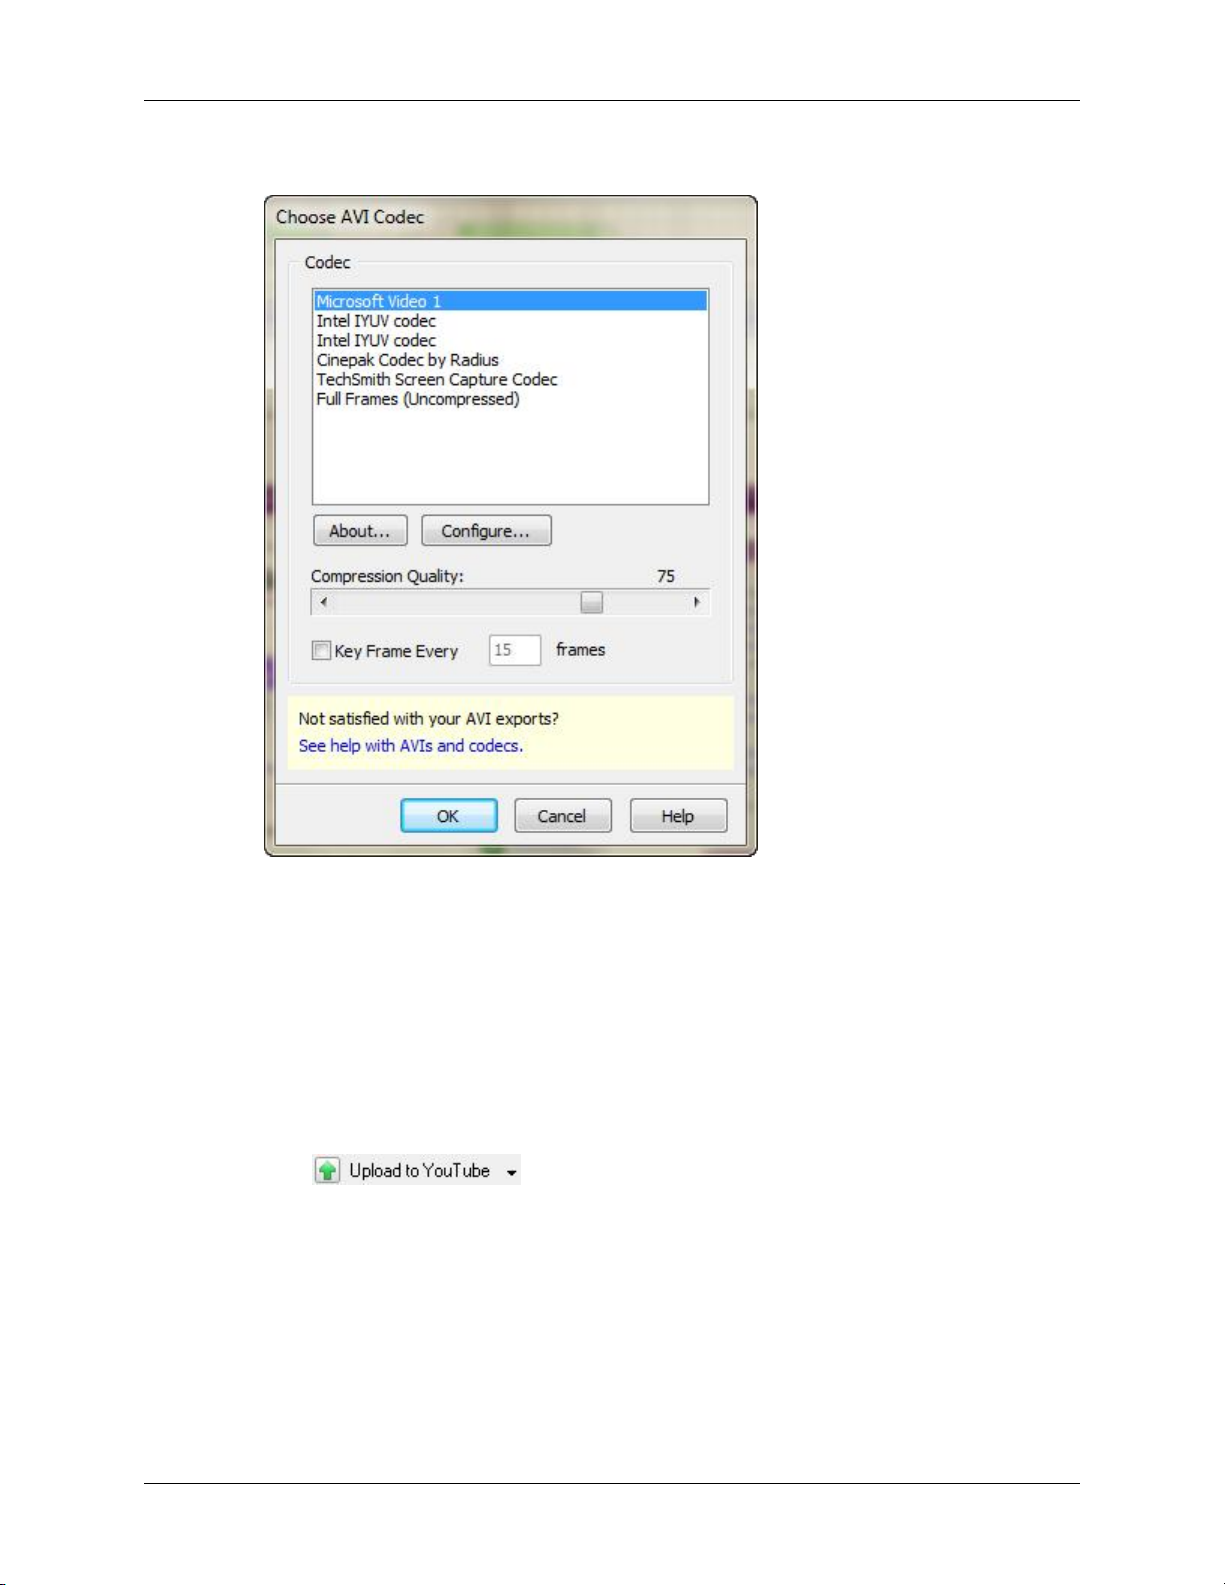
1. When exporting to AVI, you need to select the Codec;
2. After selecting the Codec, you can set the AVI export options;
For example, you may choose to export the movie to AVI (which can be opened and edited again in
FlashBack);
Uploading to YouTube for easy sharing
You can upload a movie to YouTube, directly from BB Flashback Pro 3 Player
1.
Click on the toolbar.
Ot
Click File -> Upload -> YouTube in the menu.
22
Page 29
Publishing your movie
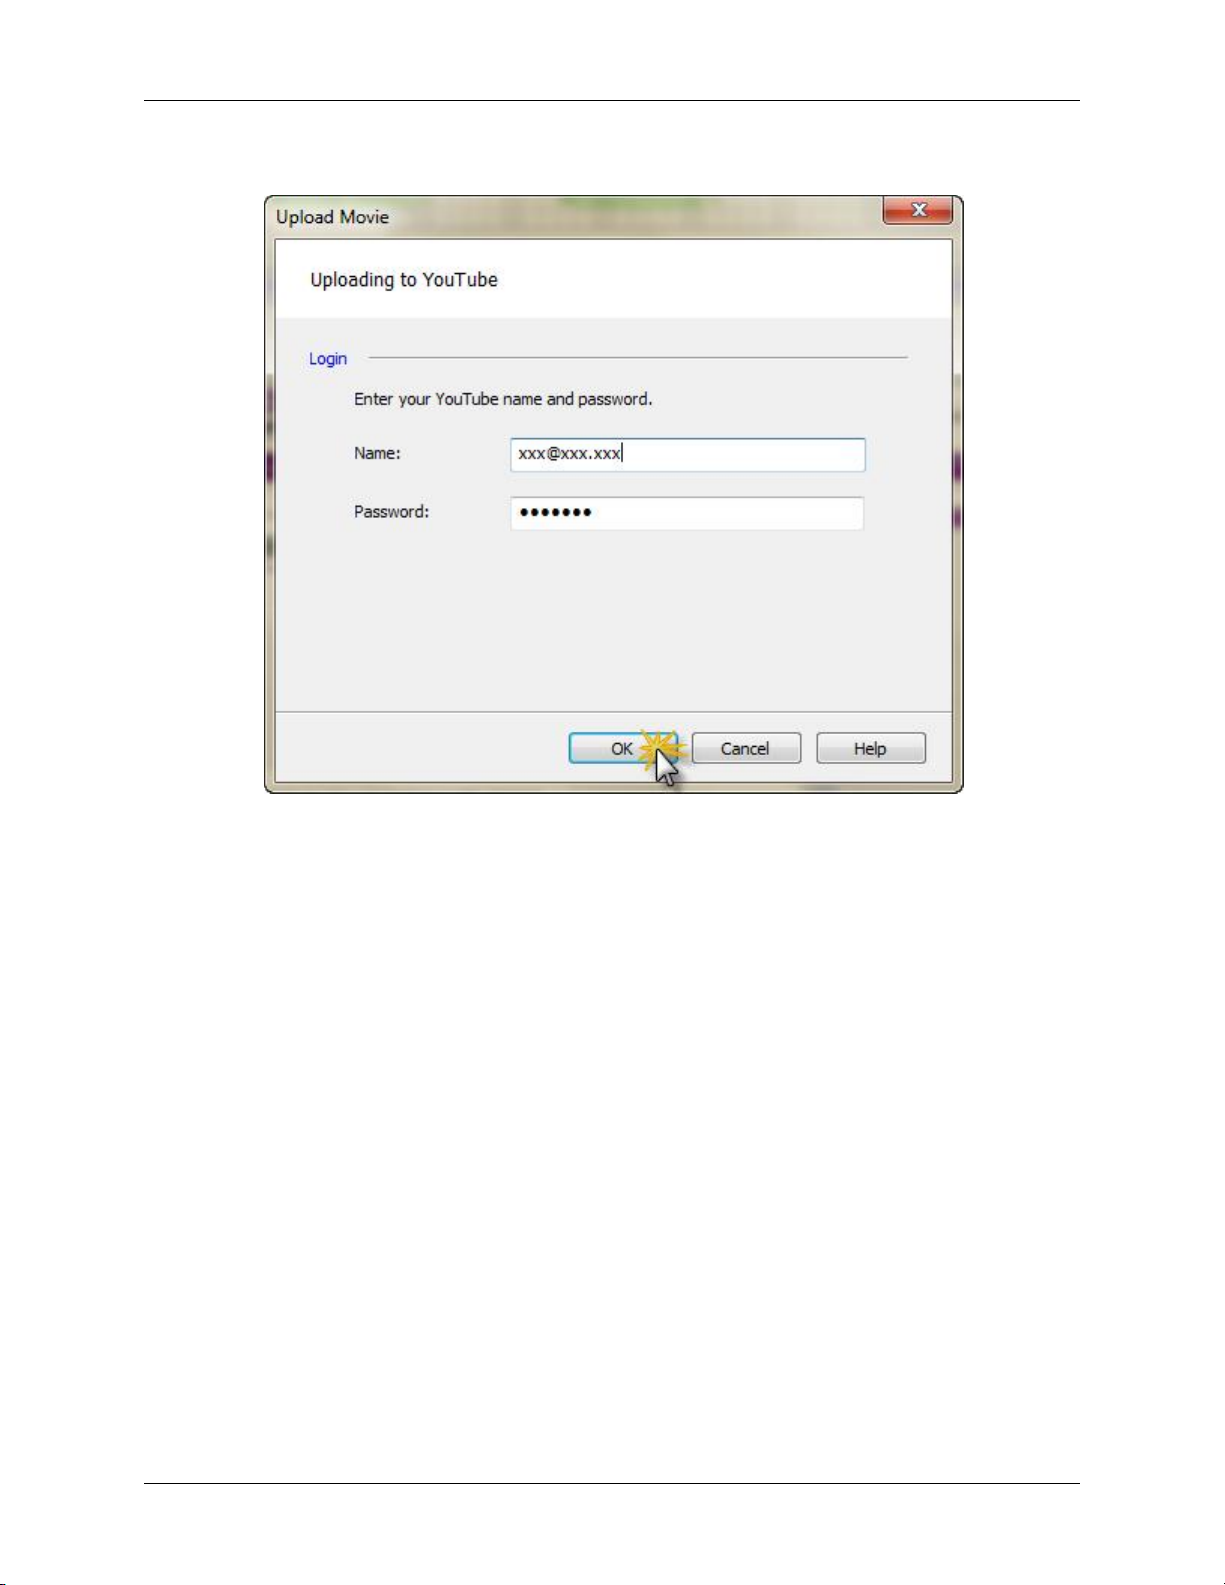
2. Type in your username and password and click OK;
23
Page 30
Publishing your movie
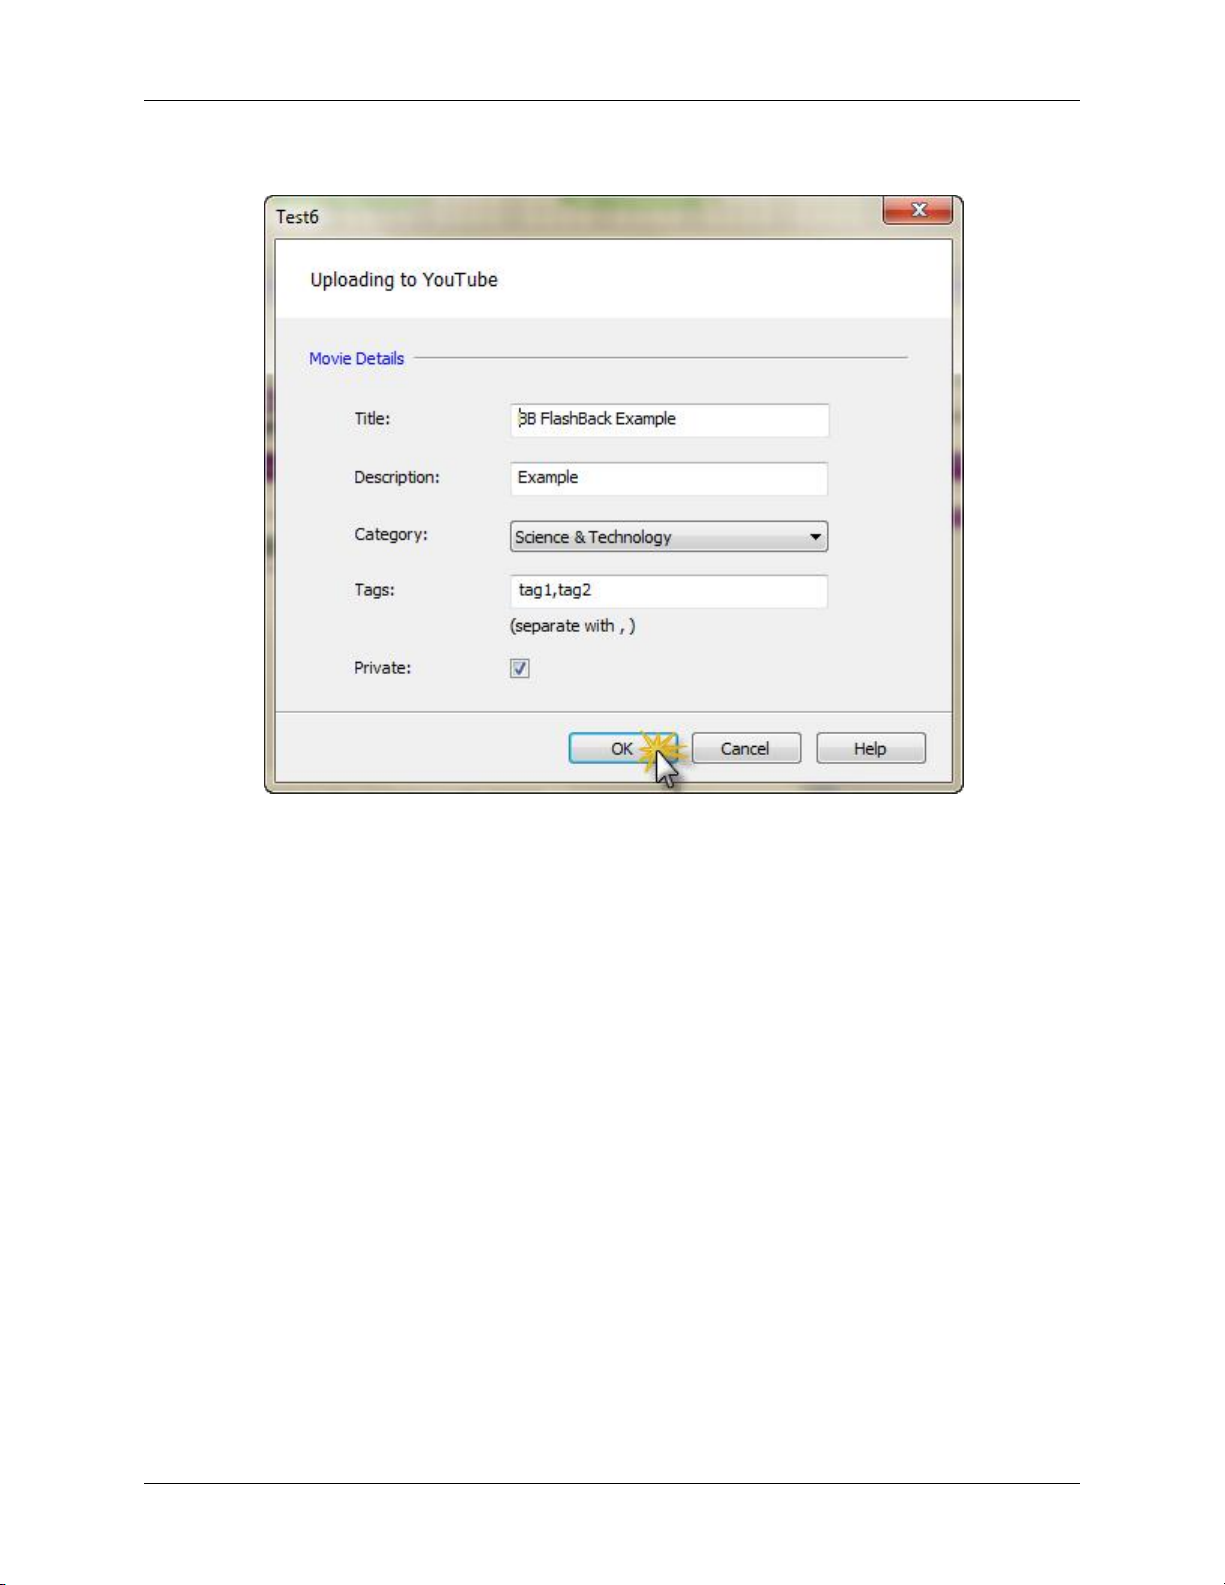
3. Complete the movie details and click OK;
24
Page 31
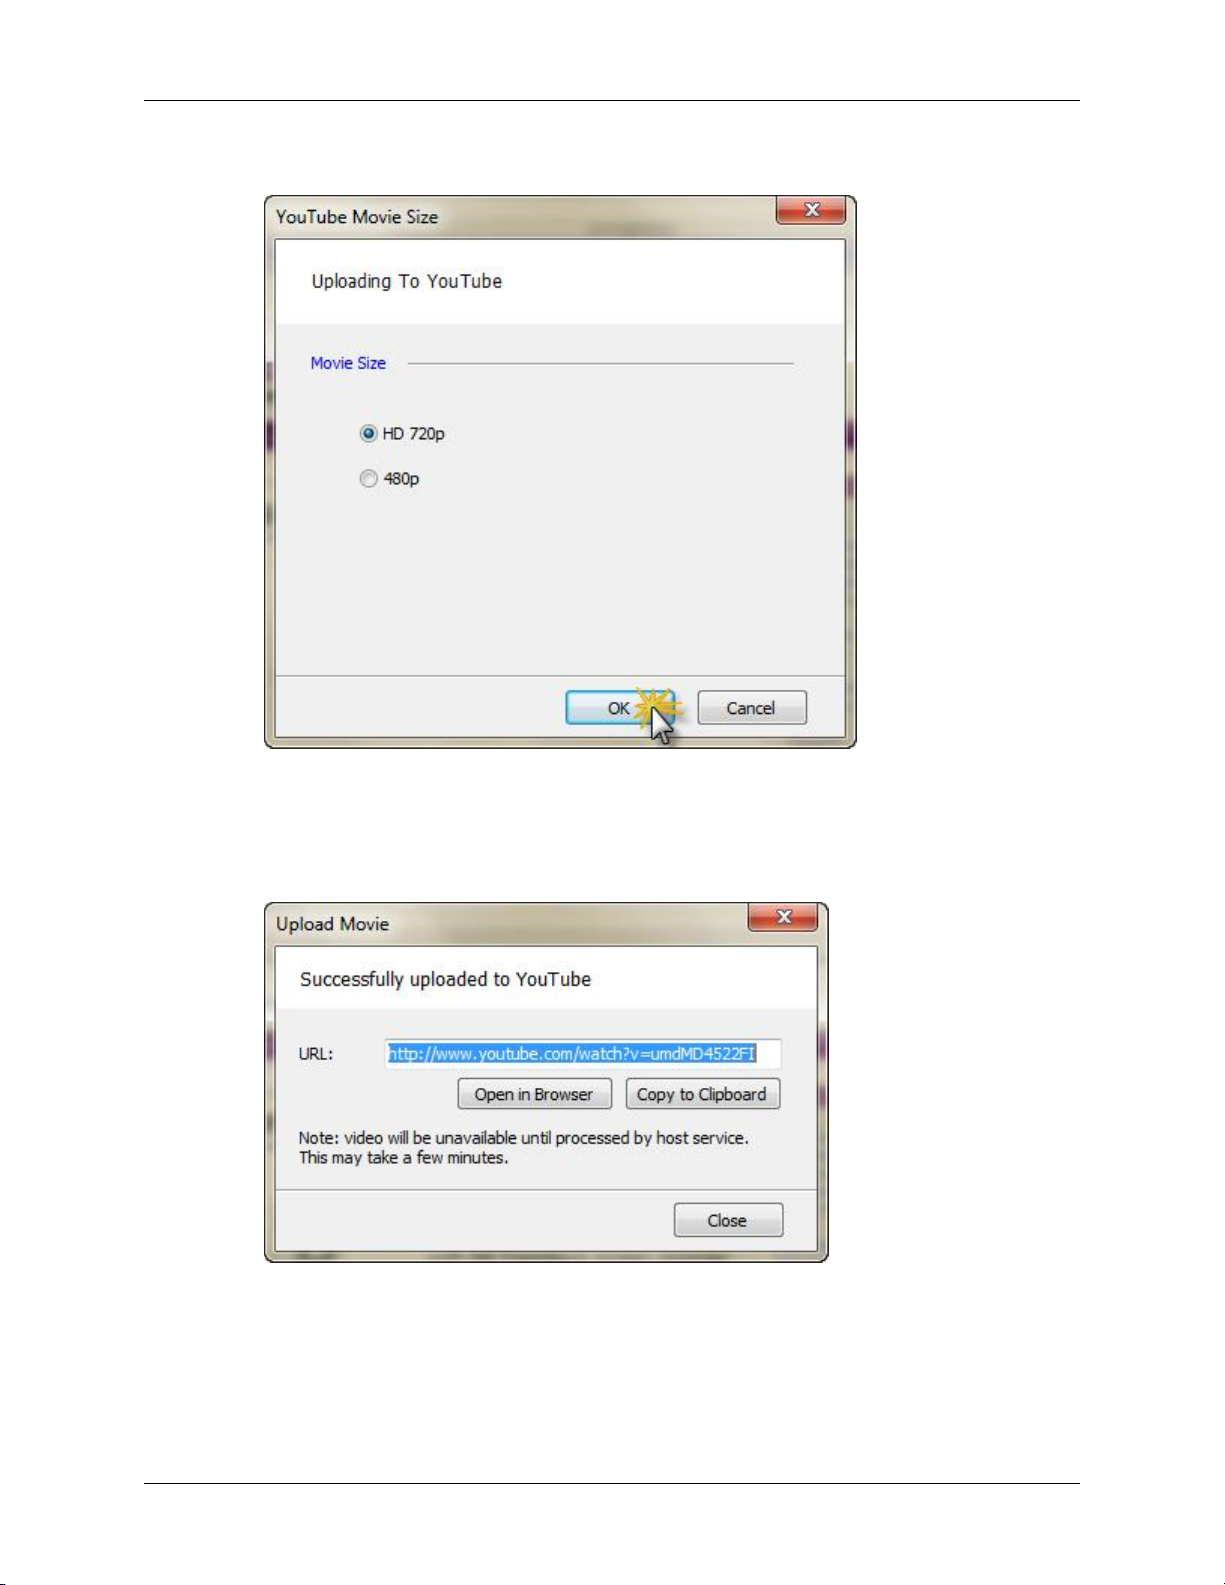
4. Set the movie size and click OK;
Publishing your movie
Note: FlashBack will show sizes equal to and lower than the size of the movie i.e. it won't show the
1080p option if the movie you're uploading is only 400 pixels high.
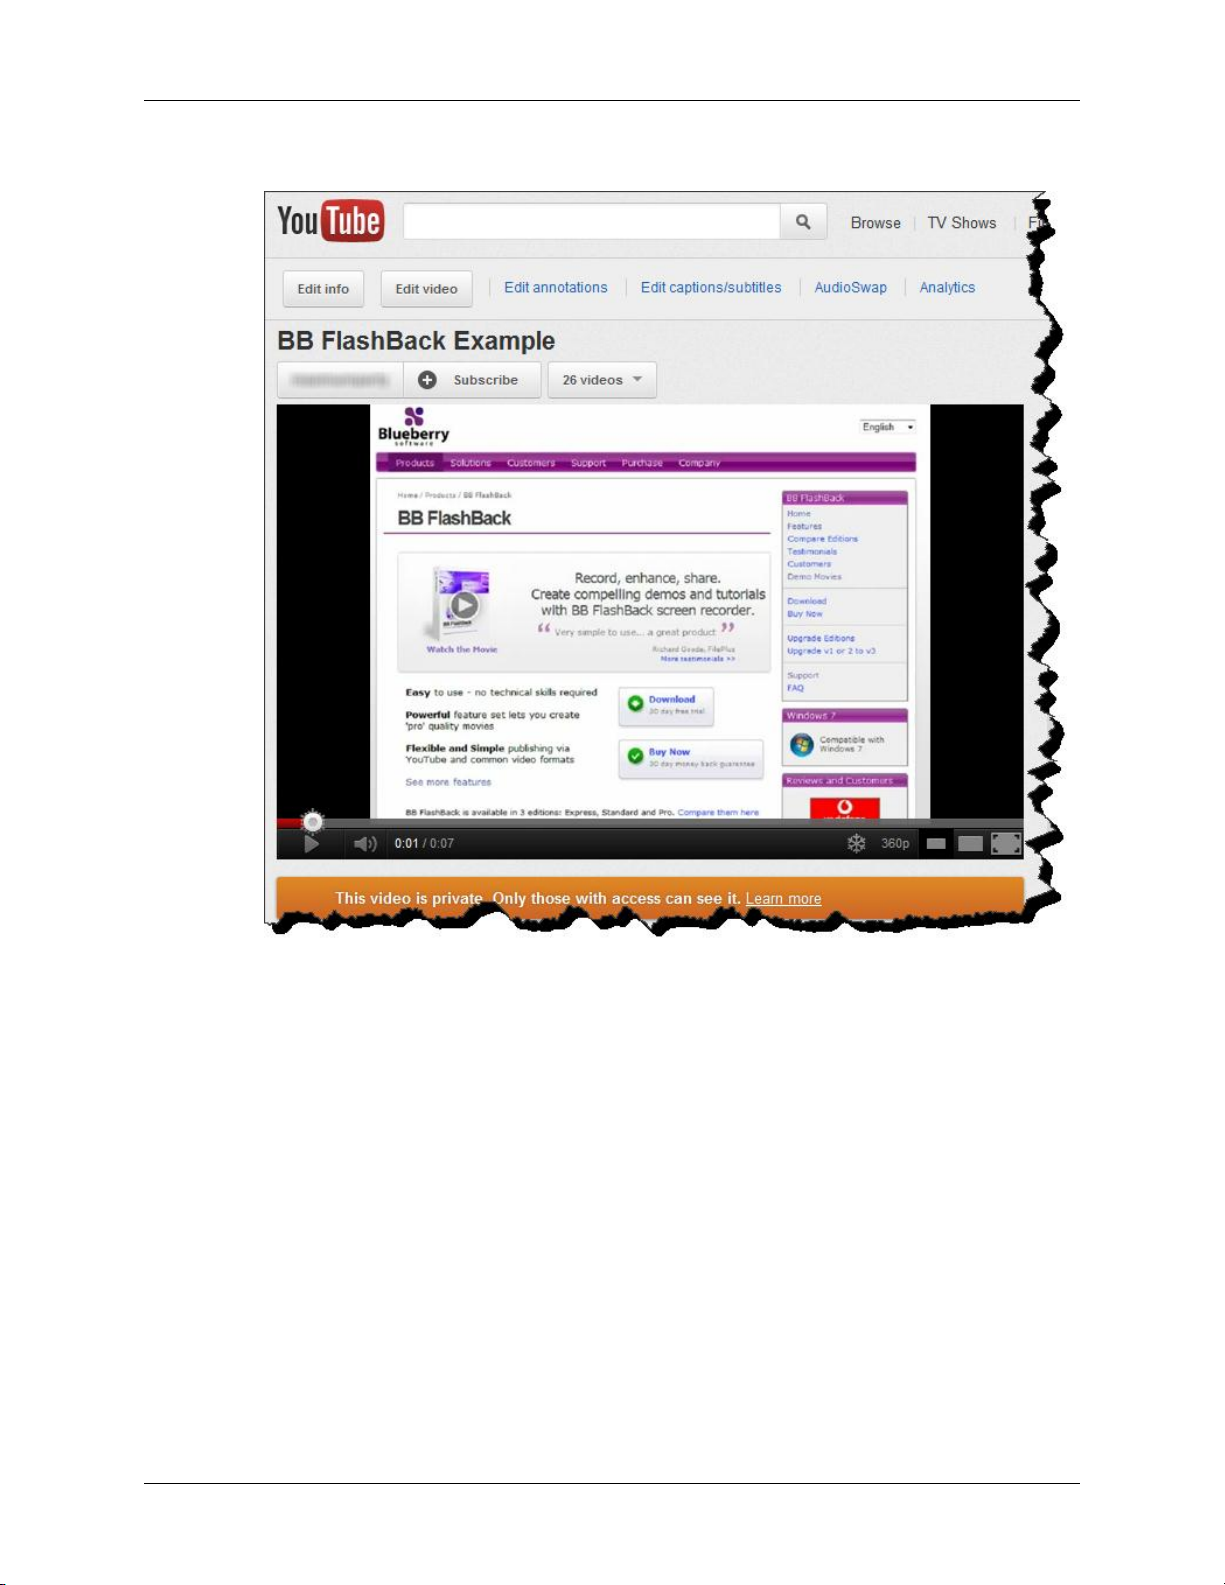
5. You will receive a message to confirm if the upload was successful;
25
Page 32
Publishing your movie
6. Click Open in Browser to view the movie in YouTube;
26
Page 33

Part II. How-To Guides
Page 34

Working with Frames
You can add and delete frames from a section of your movie. This allows you to add new sections to your
movie or remove any sections you no longer need.
See Video
How to delete frames:
1. Select the first or last frame to be deleted.
2. Drag the mouse across the frame bar to select additional frames.
3. Press the delete key on the keyboard.
Or
Click on the toolbar.
Or
Click Edit -> Delete Frame(s)… in the menu.
4. Click OK.
How to insert frames:
1. Select the point where you wish to insert the frames.
2.
Click on the toolbar.
Or
Click Edit -> Insert Frame(s)… in the menu.
3. Enter the number of frames you wish to insert.
4. Click OK.
28
Page 35
Tracks and Clips
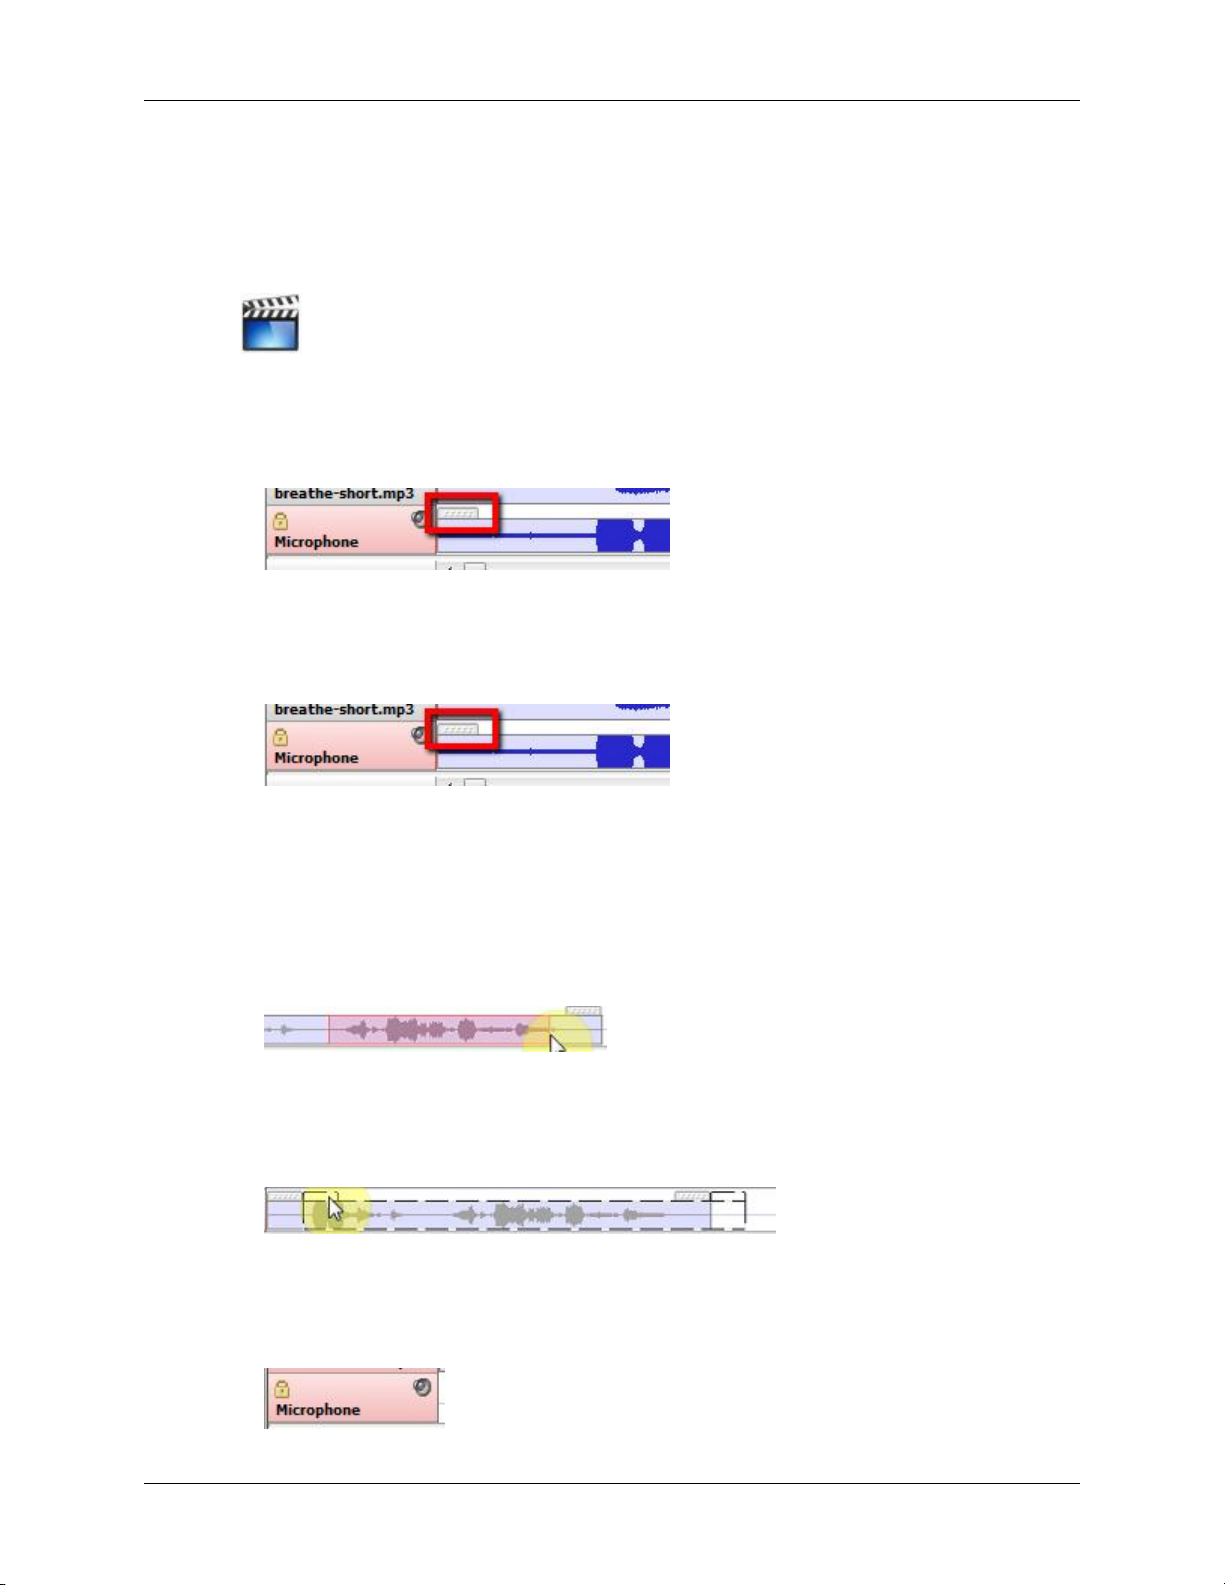
A clip is a piece of sound which can be edited and moved independently of any other clip. A track is series
of one or more clips and can be edited to change every clip it contains.
See Video
How to select a clip:
1. Click the handle of the clip;
How to select multiple clips:
1. Click the handle of the clip;
2. Hold the shift key on the keyboard
3. Click the handle above each additional track.
How to select a section of a clip:
1. Click and drag to highlight the section;
How to move a clip:
1. Click and drag the handle to the left or right;
How to select or de-select a track:
1. Click on the track header;
29
Page 36
Tracks and Clips
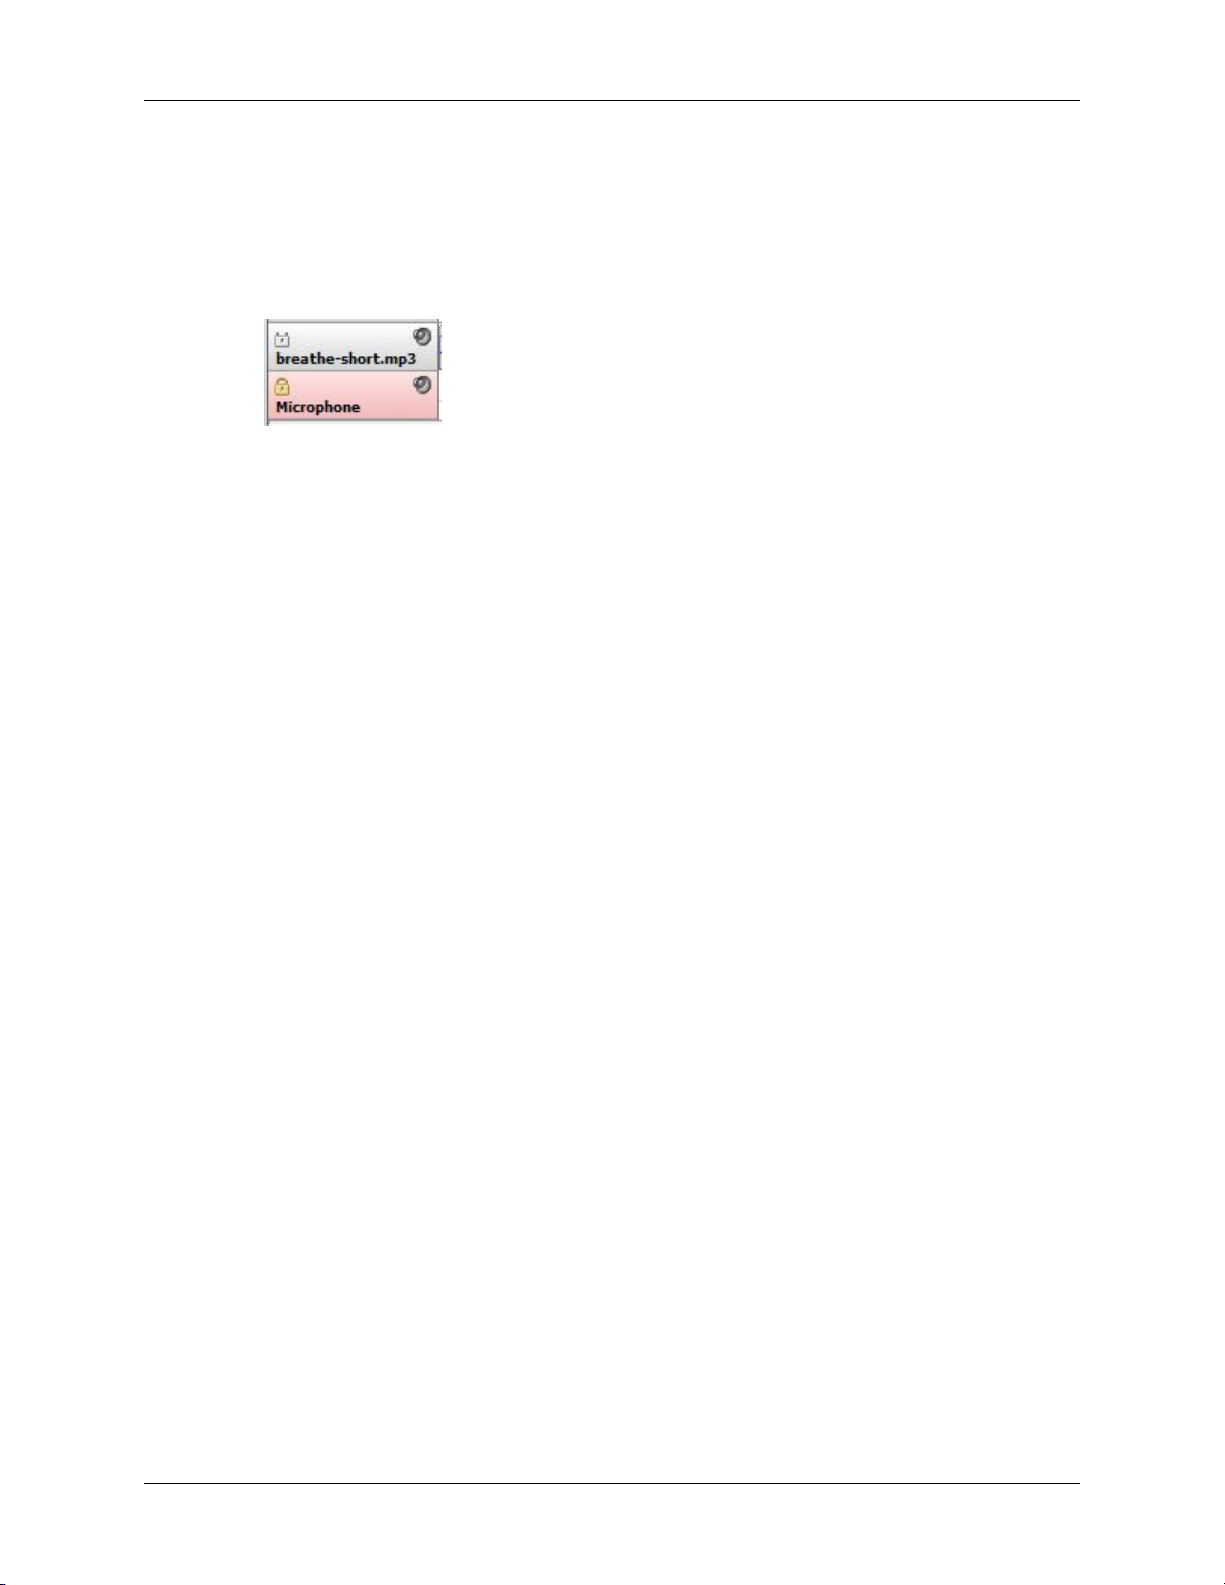
A pink highlight indicates it is selected.
How to select multiple tracks:
1. Click on each individual track header;
A pink highlight indicates which tracks are selected.
30
Page 37
Changing Volume and Muting
You can change the volume of a track, or mute it. You can also change the volume of a clip and mute it.
See Video
How to mute a track:
1. Select the track you want to change.
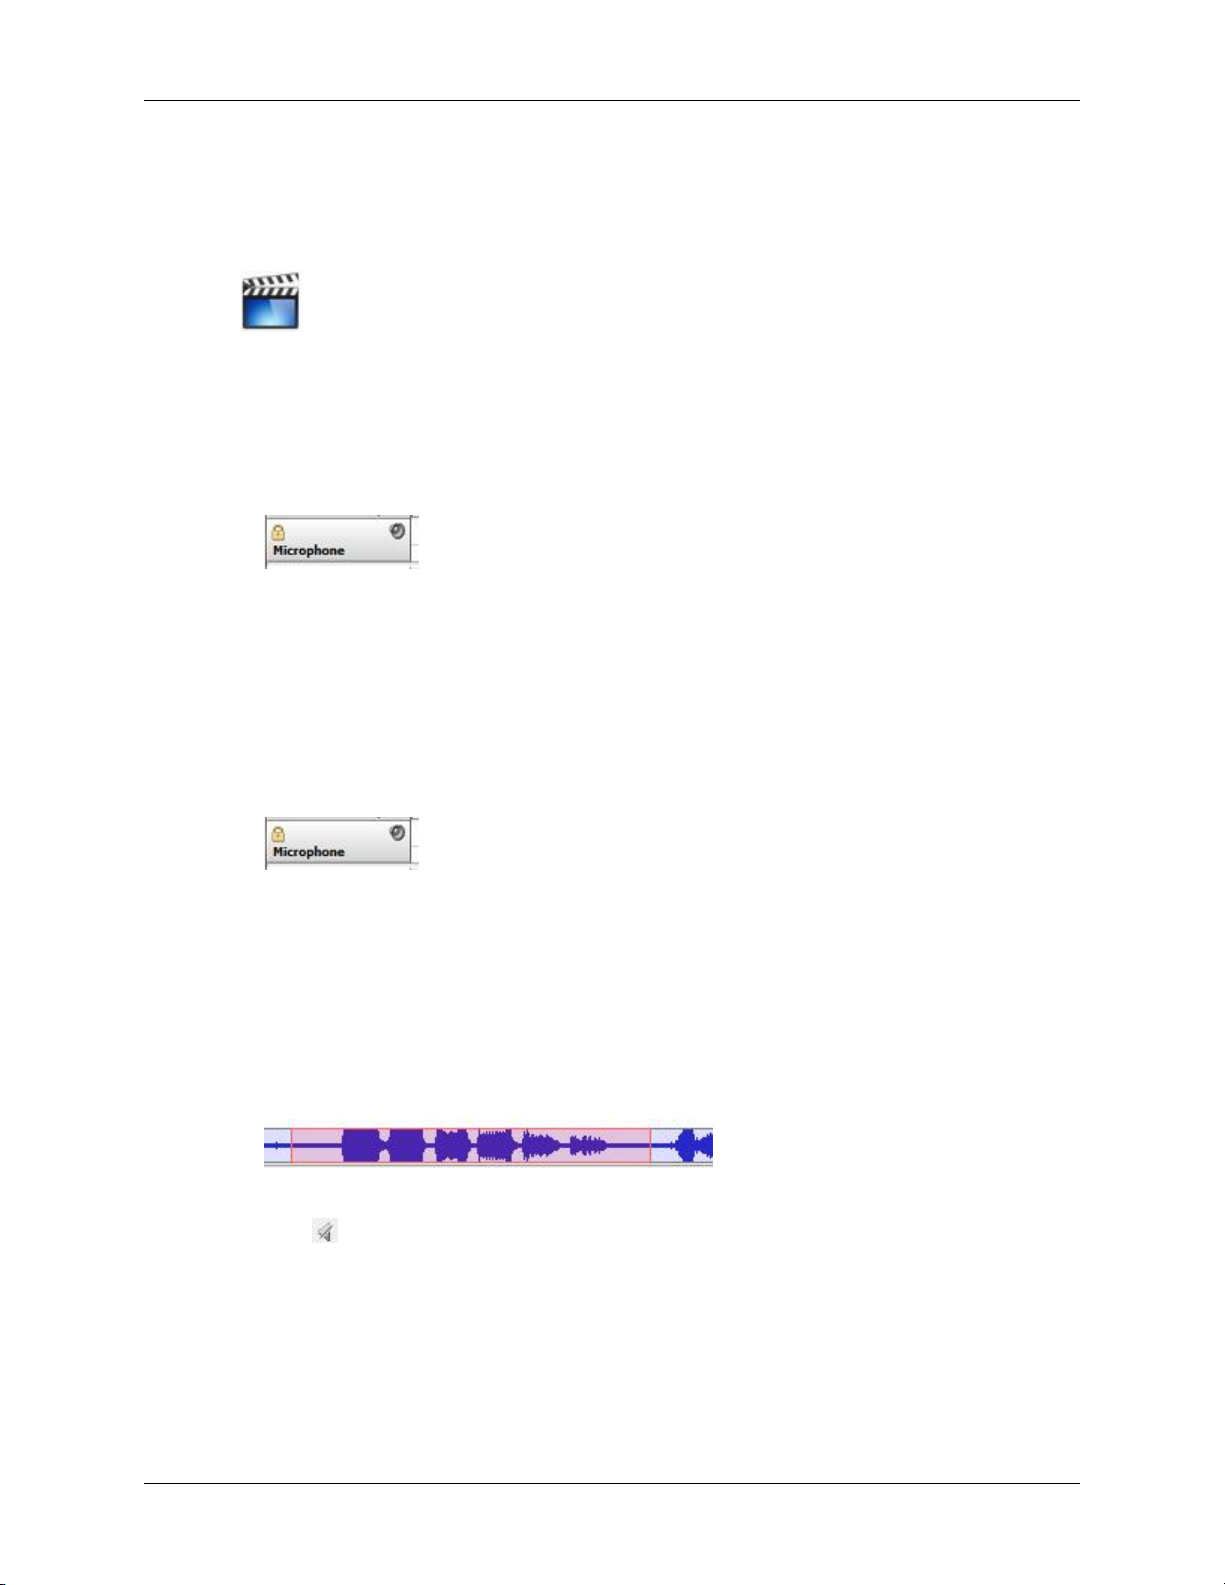
2. Right-click on the track header;
3. Click Mute Track.
How to change the volume of a track:
1. Select the track you want to change.
2. Right-click on the track header ;
3. Click Volume Up or Volume Down
How to mute a section of sound:
1. Select the track you want to change.
2. Click and drag to highlight the section you want to mute;
3.
Click on the toolbar.
Or
Click Sound -> Mute Sound Selection in the menu
How to change the volume of a clip:
1. Select the track you want to change.
31
Page 38
Changing Volume and Muting
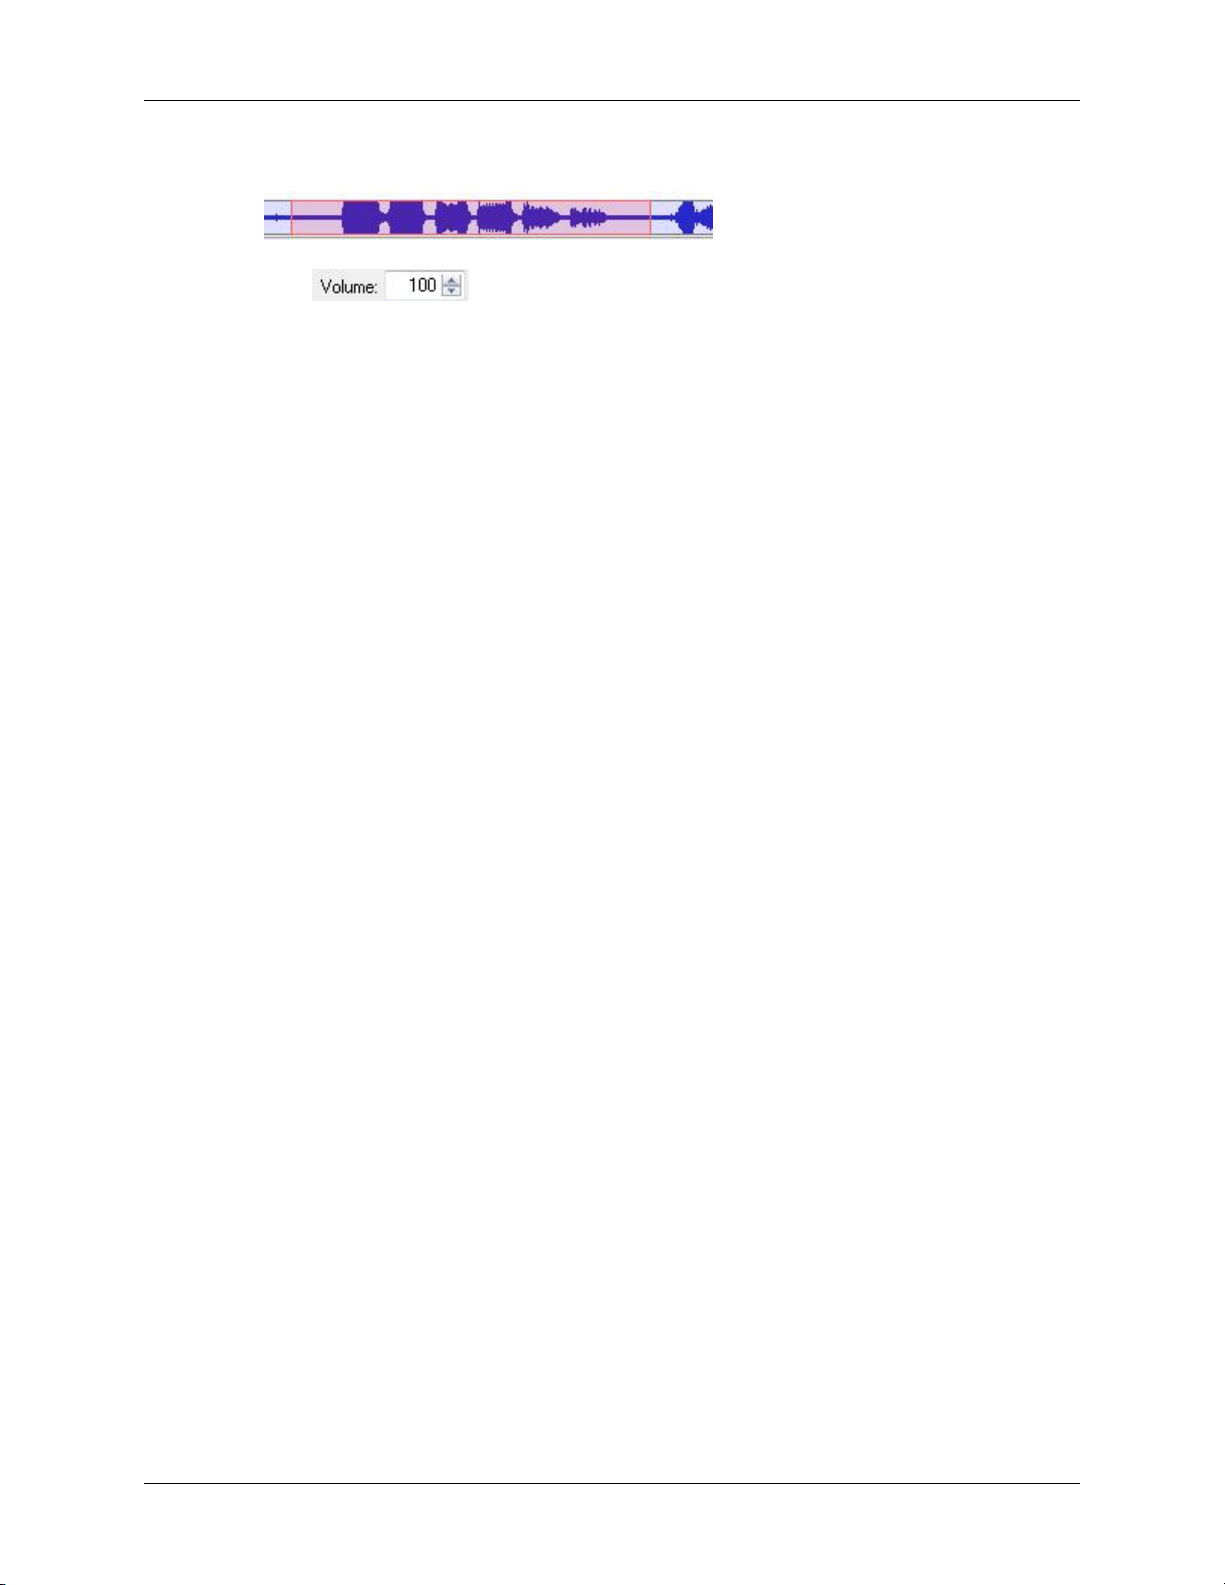
2. Click and drag to highlight the section you want to mute;
3.
Click on the toolbar.
Or
Click Sound -> Increase Sound Volume or Decrease Sound Volume in the menu.
32
Page 39
Deleting Sound
You can delete an entire track or clip or part of a clip from a movie.
See Video
How to delete a whole clip:
1. Select the track you want to change.
2. Click on the handle of the clip.
3. Right-click on the clip.
4. Click Delete Clip.
5. Click Yes.
How to delete a section of a clip:
1. Select the track you want to change.
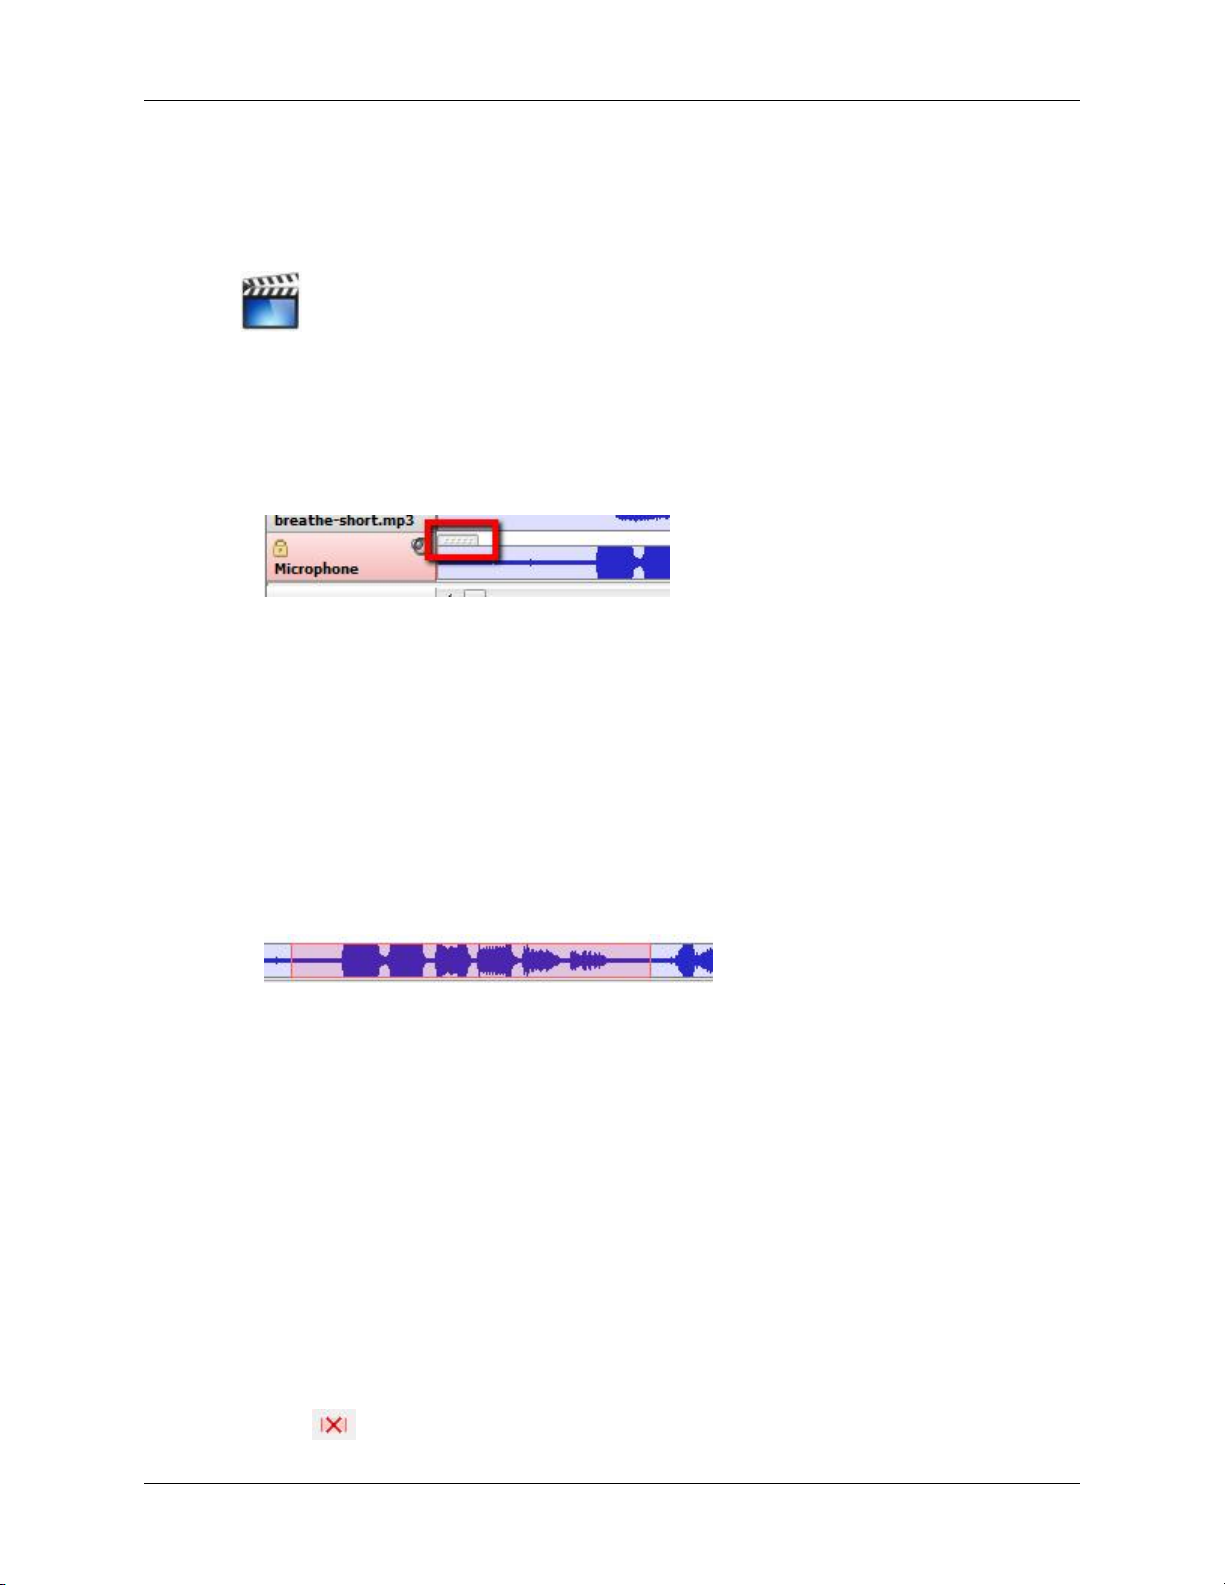
2. Click and drag to highlight the section you want to delete;
3. Right-click on the selection.
4. Click Delete Selection.
5. Choose to shift the remaining sound to the left or leave it where it is and click OK
How to delete sound and frames at the same time:
1. Select the track you want to change.
2. Click and drag to highlight the section you want to delete;
3. Press the delete key on the keyboard.
Or
Click on the toolbar.
33
Page 40
Deleting Sound
Or
Click Edit -> Delete Frame(s)… in the menu.
4. Select which tracks you want to edit and click OK.
5. Choose to shift the remaining sound to the left or leave it where it is and click OK.
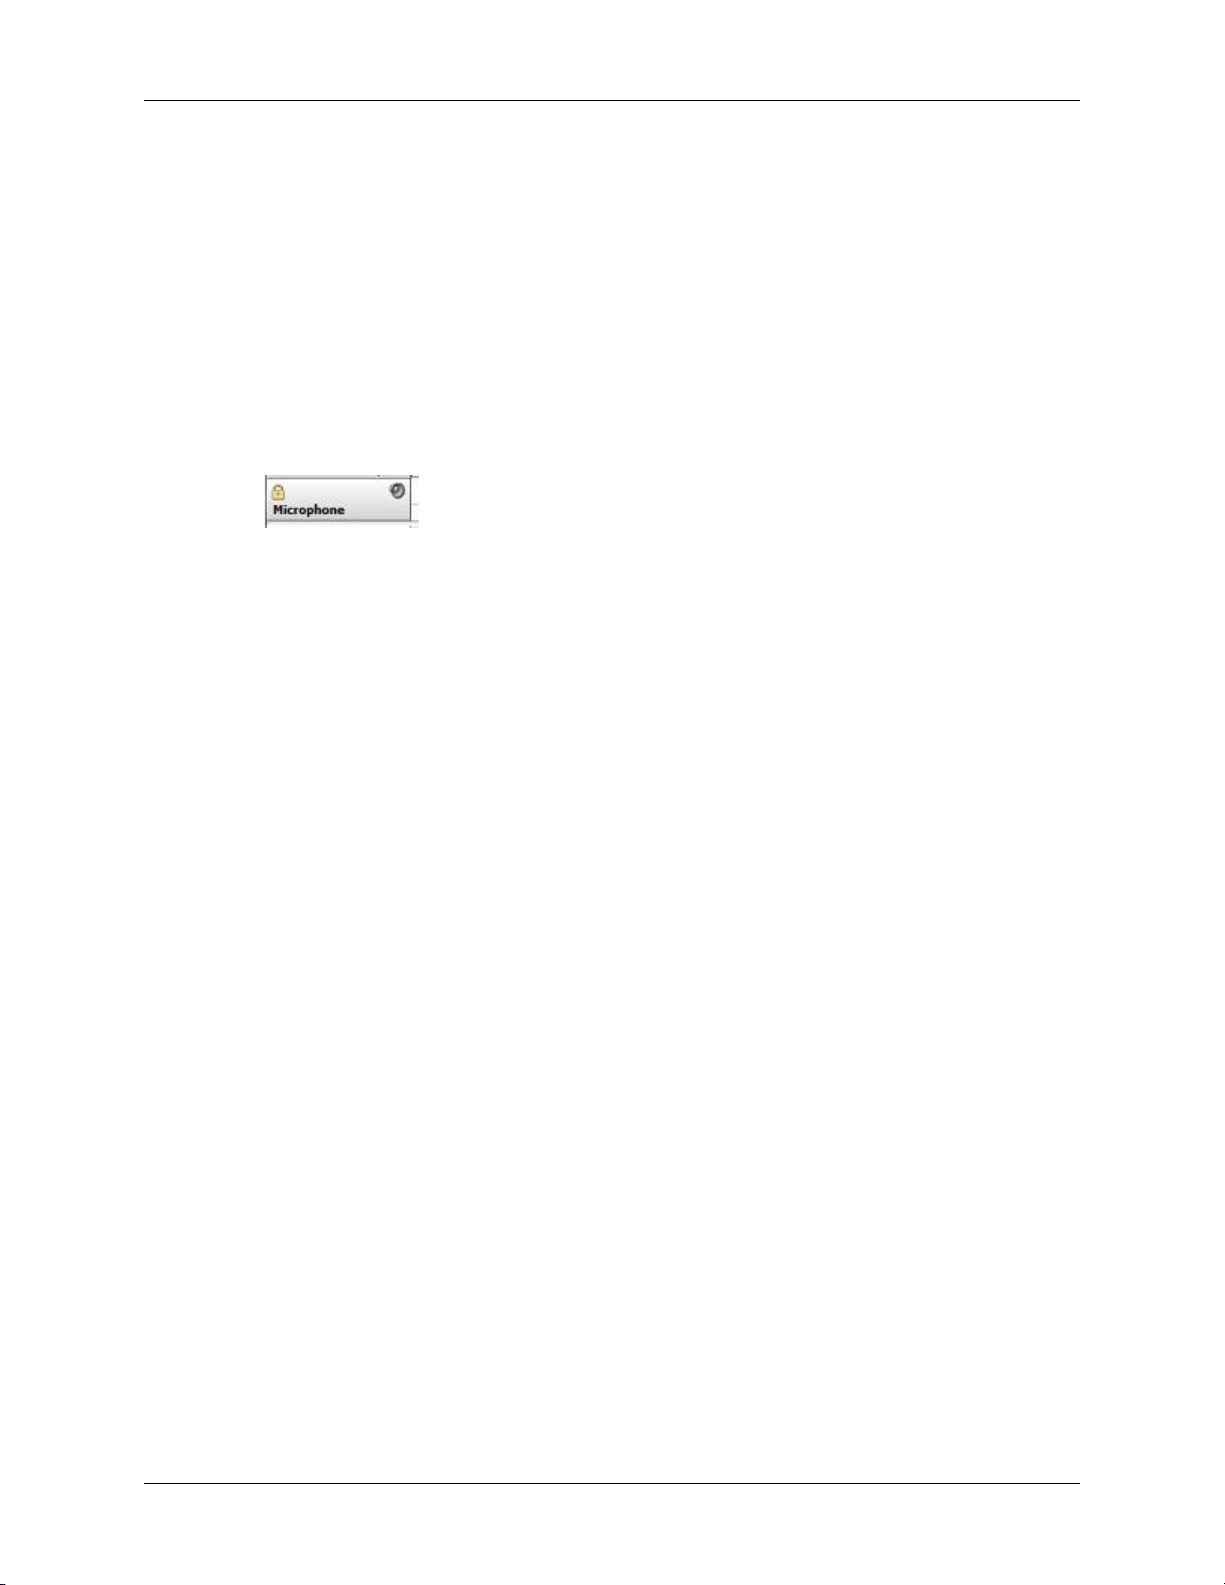
How to delete a track:
1. Select the track you want to delete.
2. Right-click on the track header.
3. Click Delete.
4. Click Yes.
34
Page 41
Inserting Silence
You can insert silence into a clip with or without inserting additional frames.
See Video
How to add silence to a clip:
1. Select the track you want to change.
2. Click on the point where you want to insert silence.
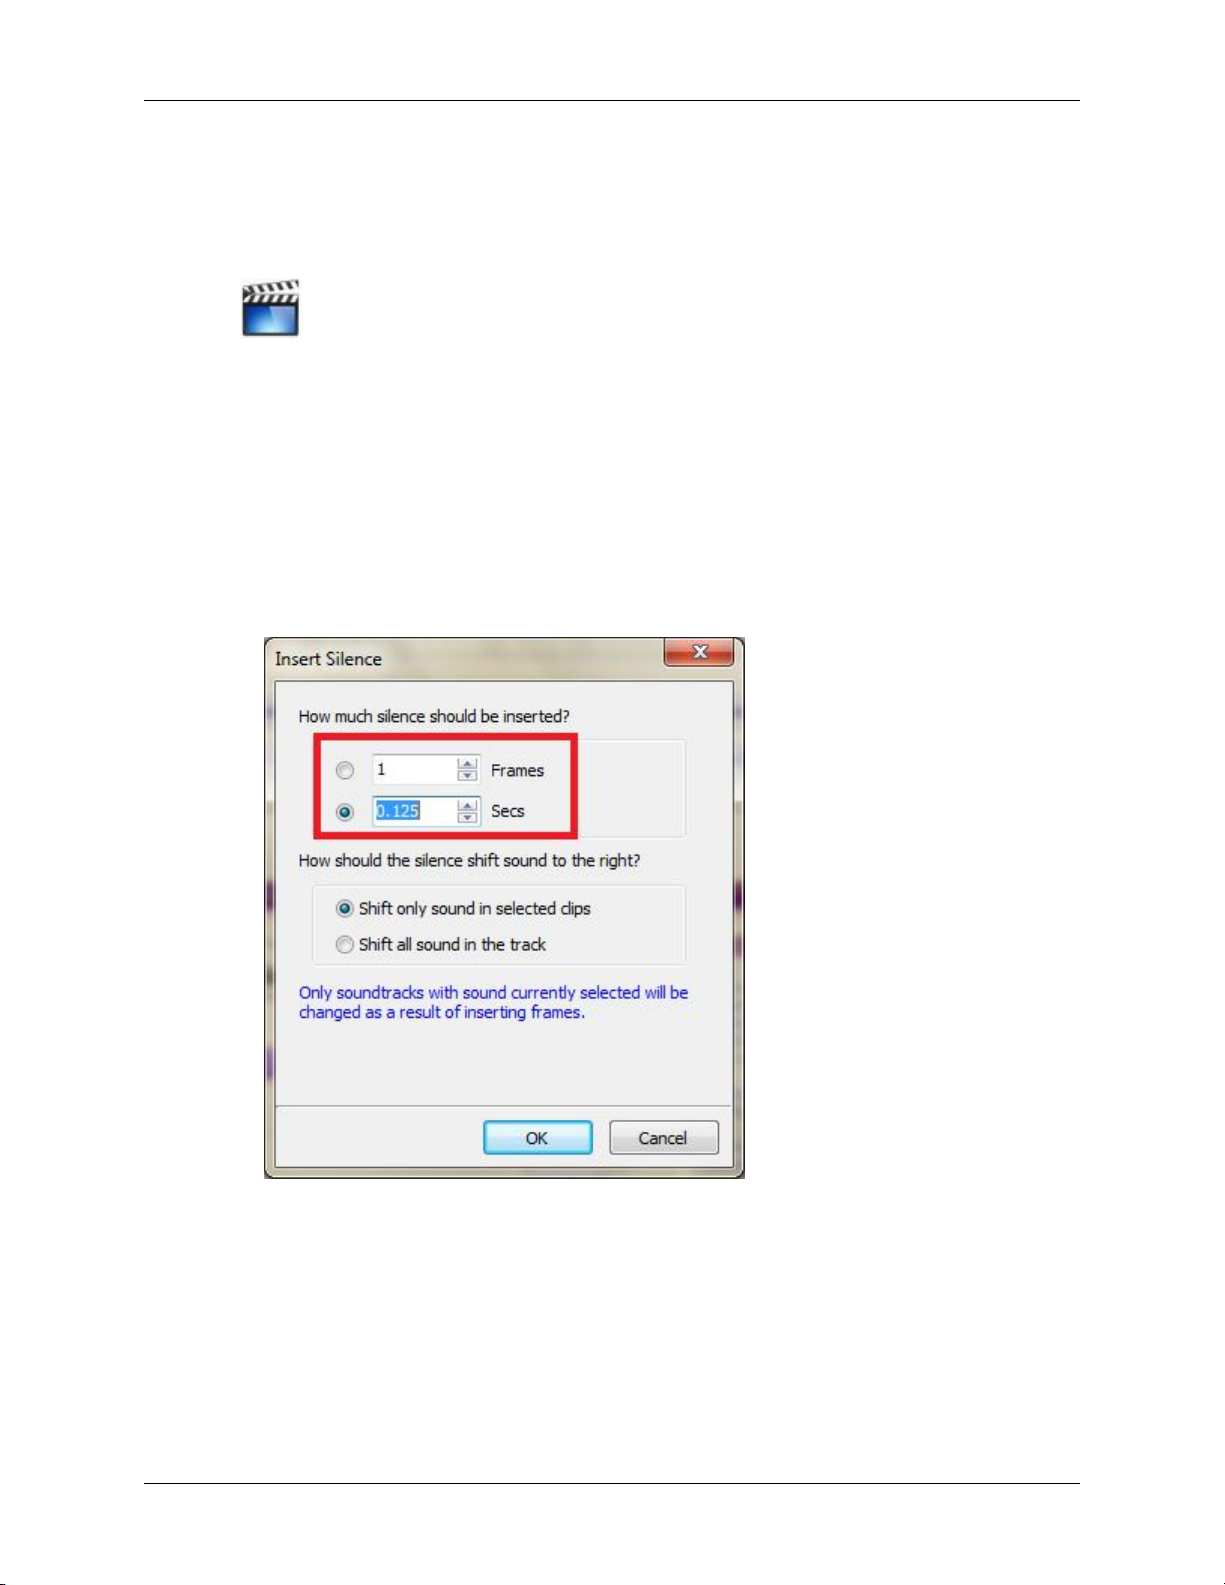
3. Right-click and select Insert Silence.
4. Choose how much silence you want to insert;
35
Page 42
Inserting Silence
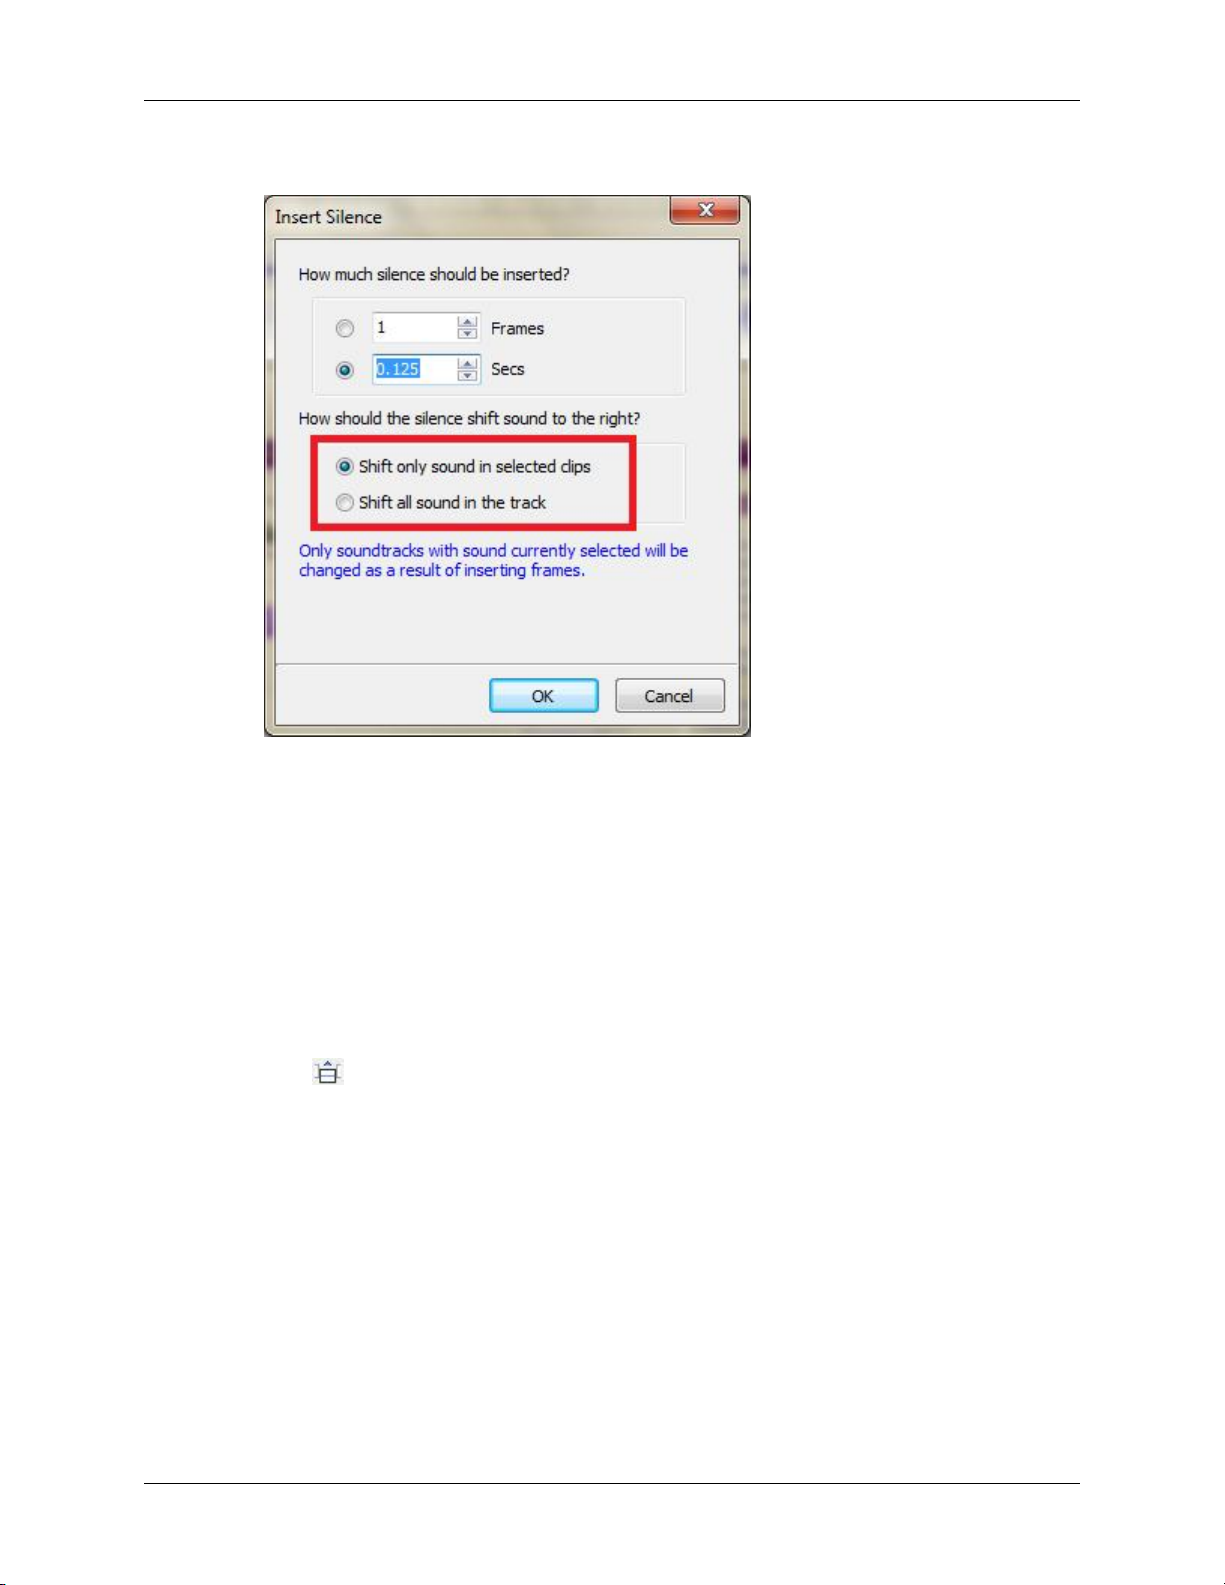
5. Choose how to shift the sound to the right;
6. Click OK.
How to insert silence and frames together:
1. Select the track you want to change.
2. Select the framebar header.
3. Click on the point where you want to insert silence.
4.
Click on the toolbar.
Or
Click Edit -> Insert Frame(s)... in the menu.
36
Page 43
Inserting Silence
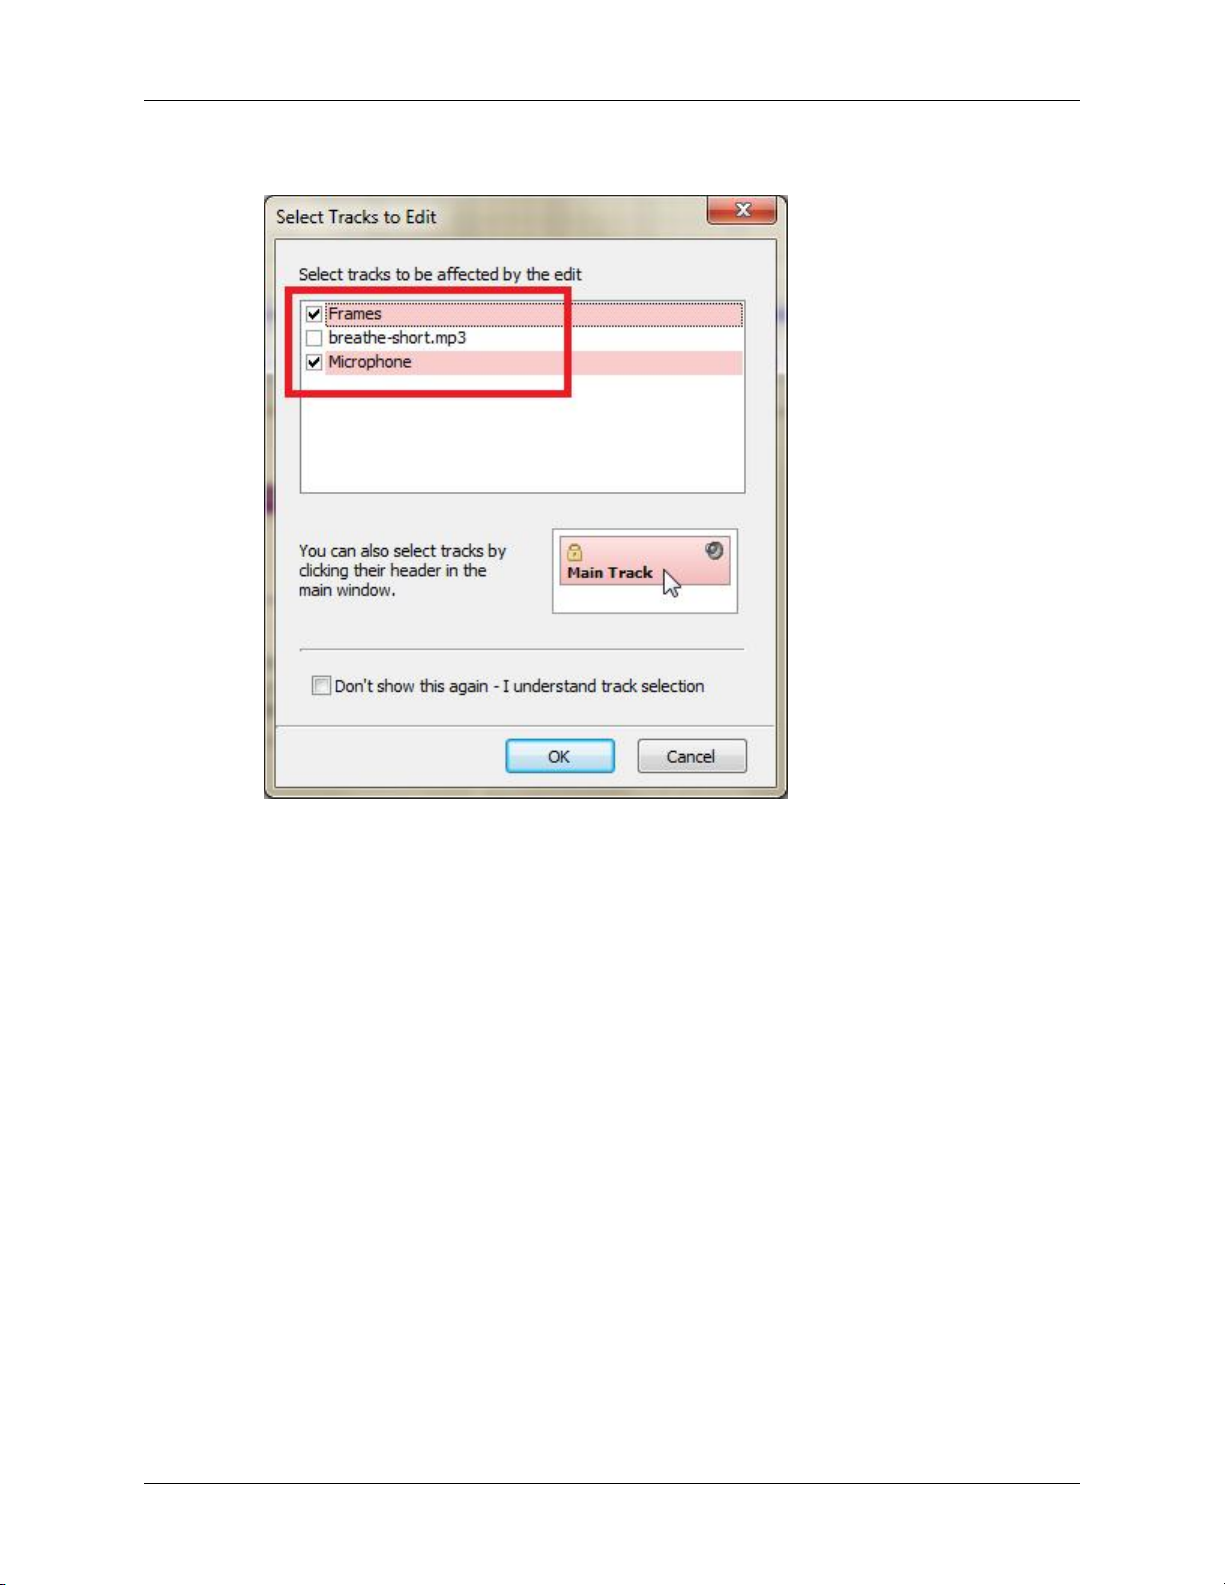
5. Tick any additional tracks you want to edit;
6. Click OK.
37
Page 44
Inserting Silence
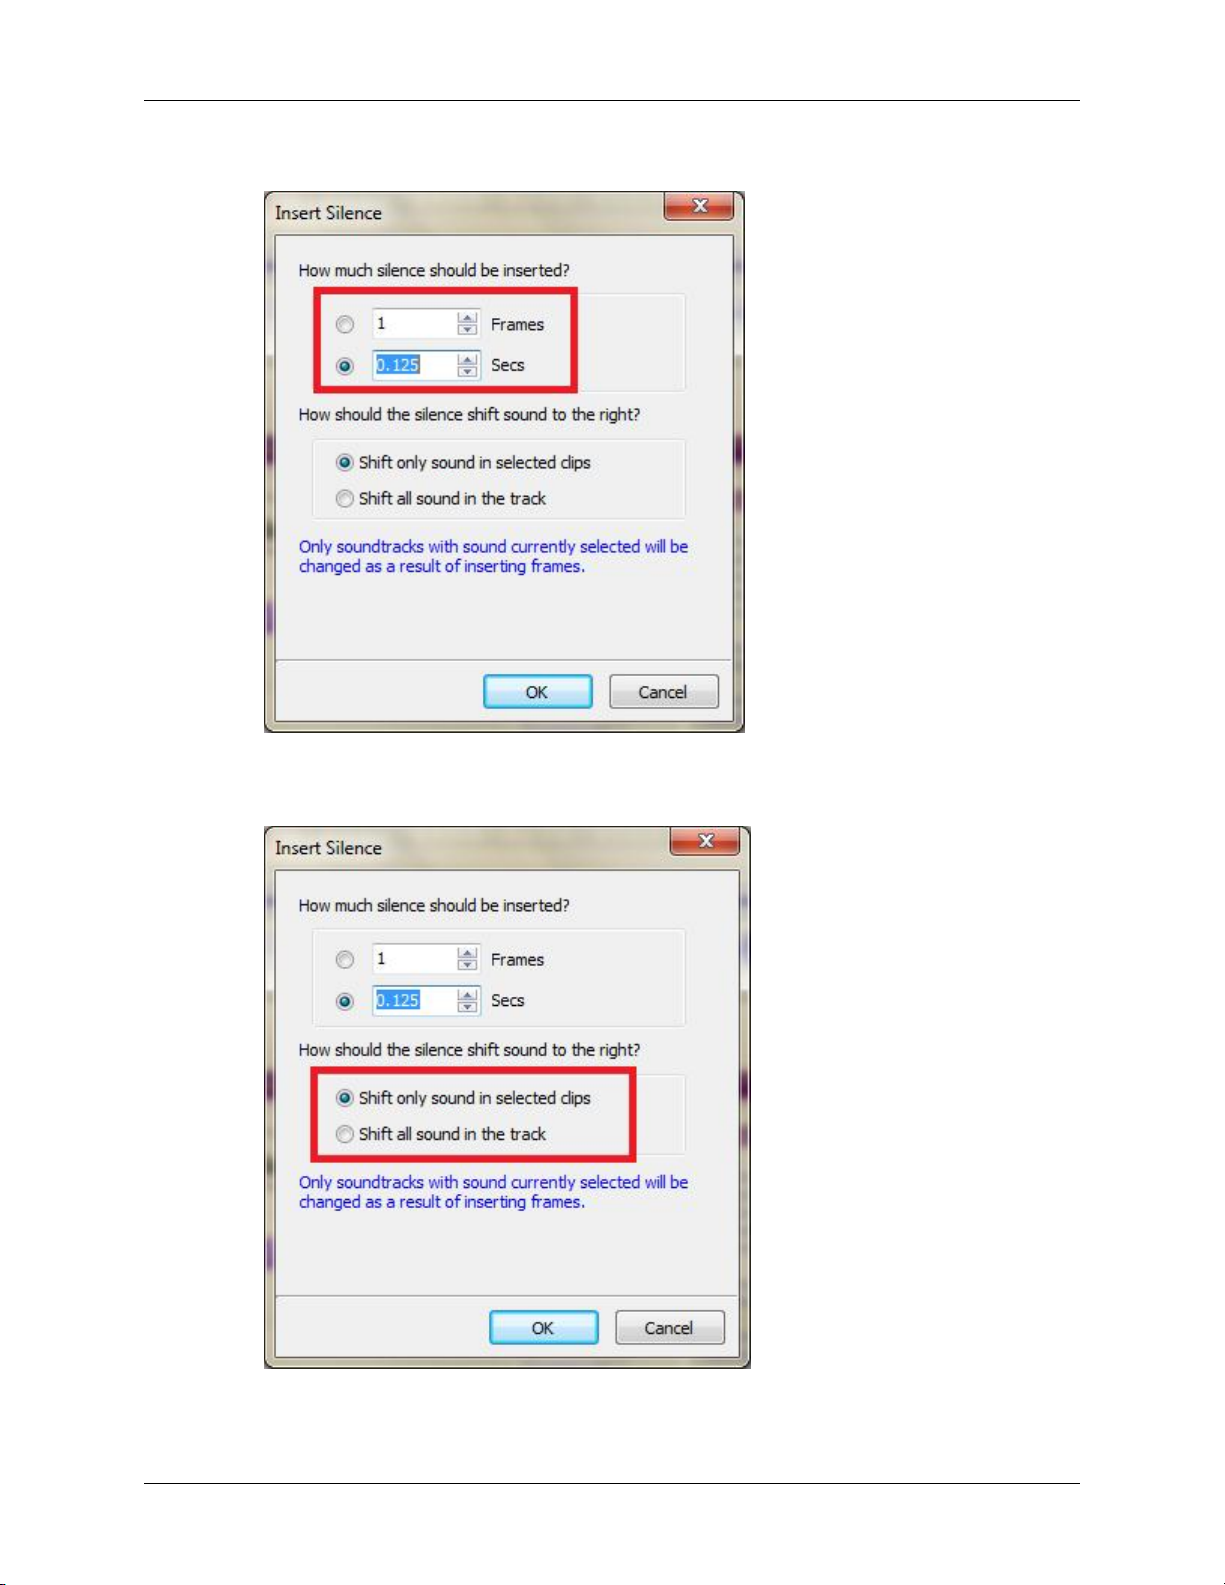
7. Choose how much silence you want to insert;
8. Choose how to shift the sound to the right;
9. Click OK.
38
Page 45
Editing Sound and Video Together
A sound clip can be edited without the edit affecting the video frames. A sound clip can also be edited
with the same edit applying to the video frames.
See Video
How to edit sound without affecting video:
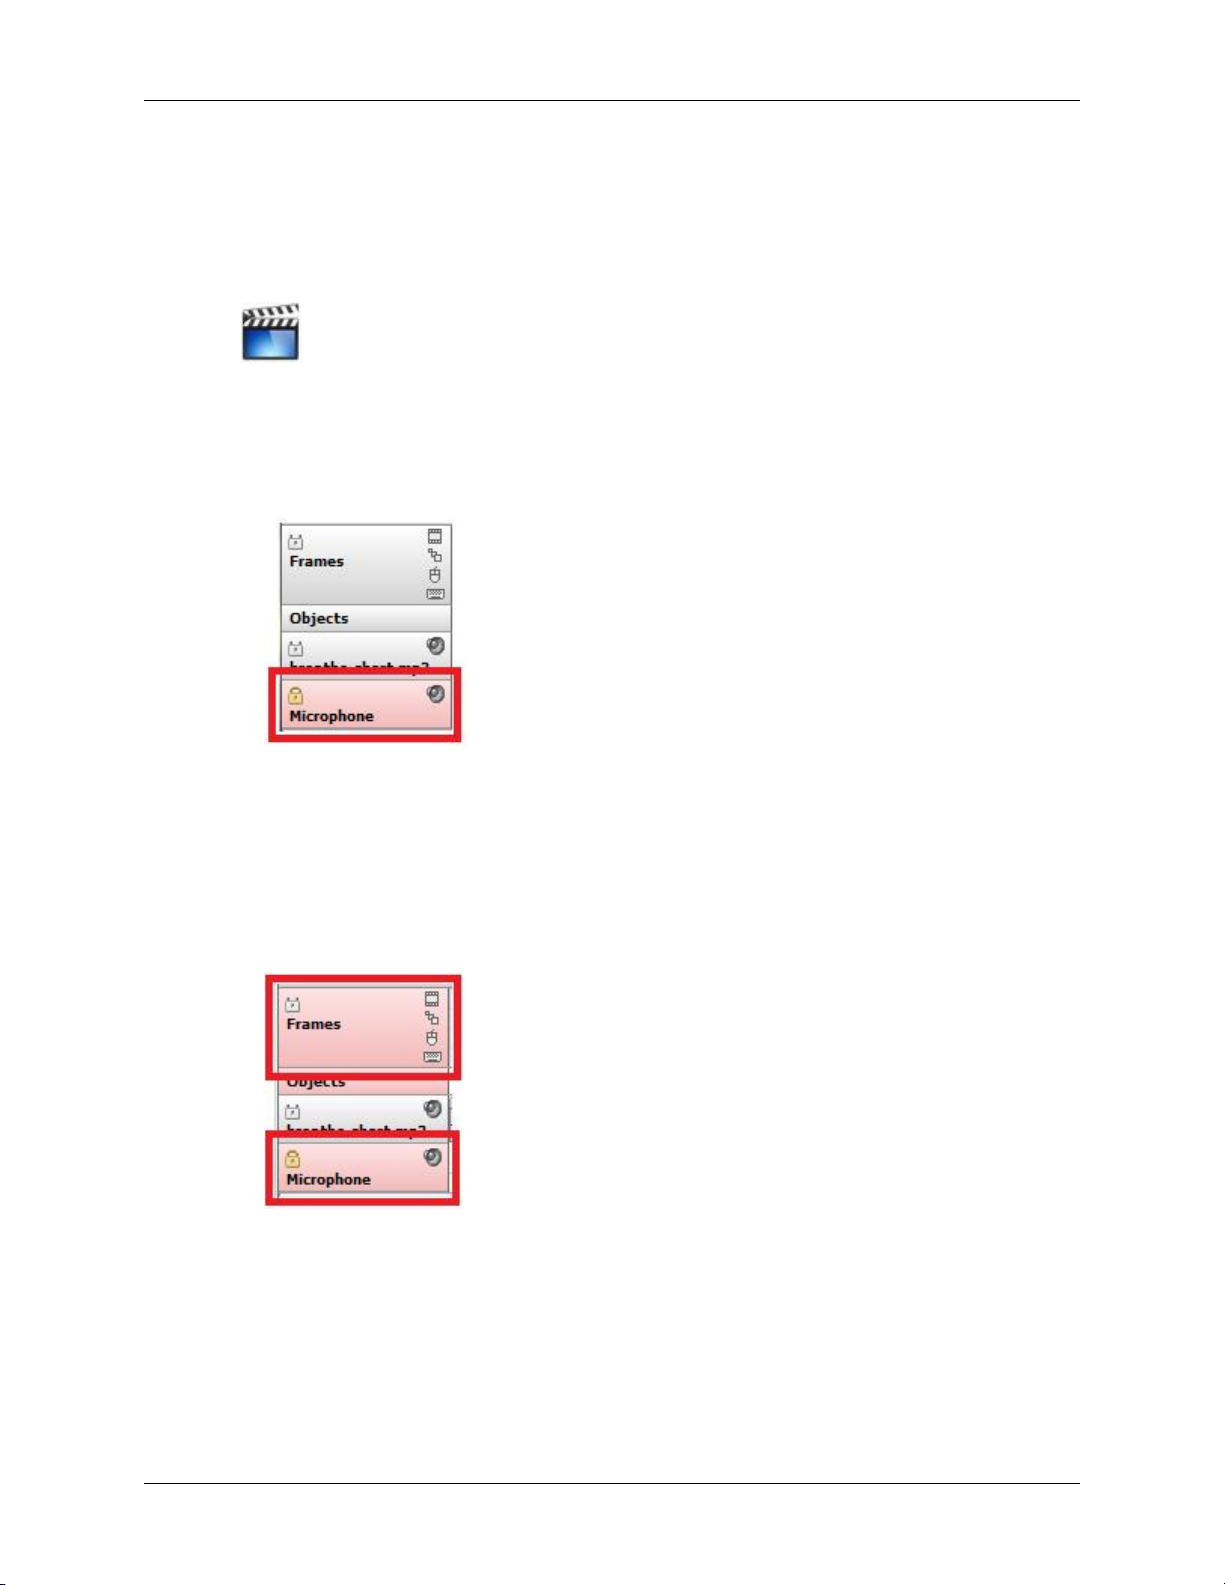
1. Ensure the sound track(s) you want to edit are selected and the Frame header is not;
2. Proceed with the edit.
How to edit sound and affect the video:
1. Ensure that the Frame header is selected along with the sound track(s) you want to edit;
2. Proceed with the edit.
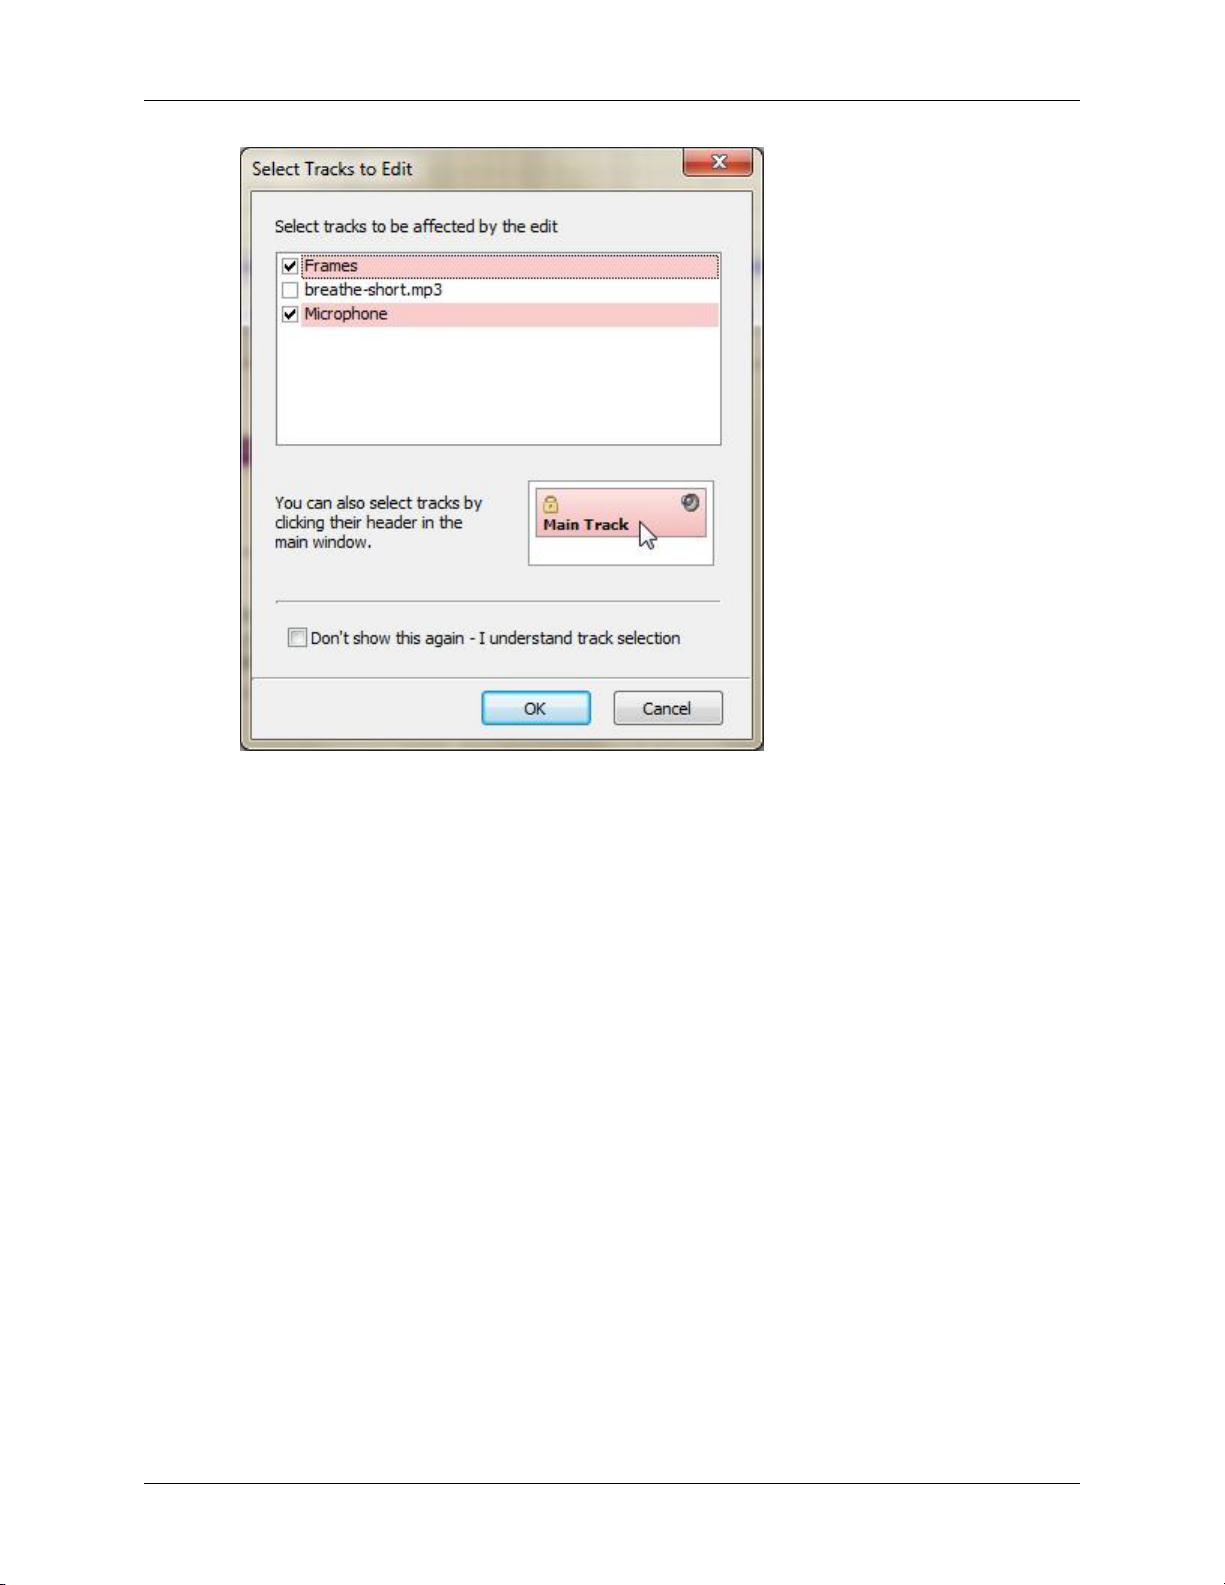
When using toolbar or menu functions to perform an edit, you can choose to include or exclude any track(s)
from the edit in the following pop up box;
39
Page 46
Editing Sound and Video Together
40
Page 47
Removing Background Noise
You can remove background noise from a sound clip or an entire track
See Video
How to remove noise from a clip:
1. Select the track you want to change.
2. Click on the handle of the clip.
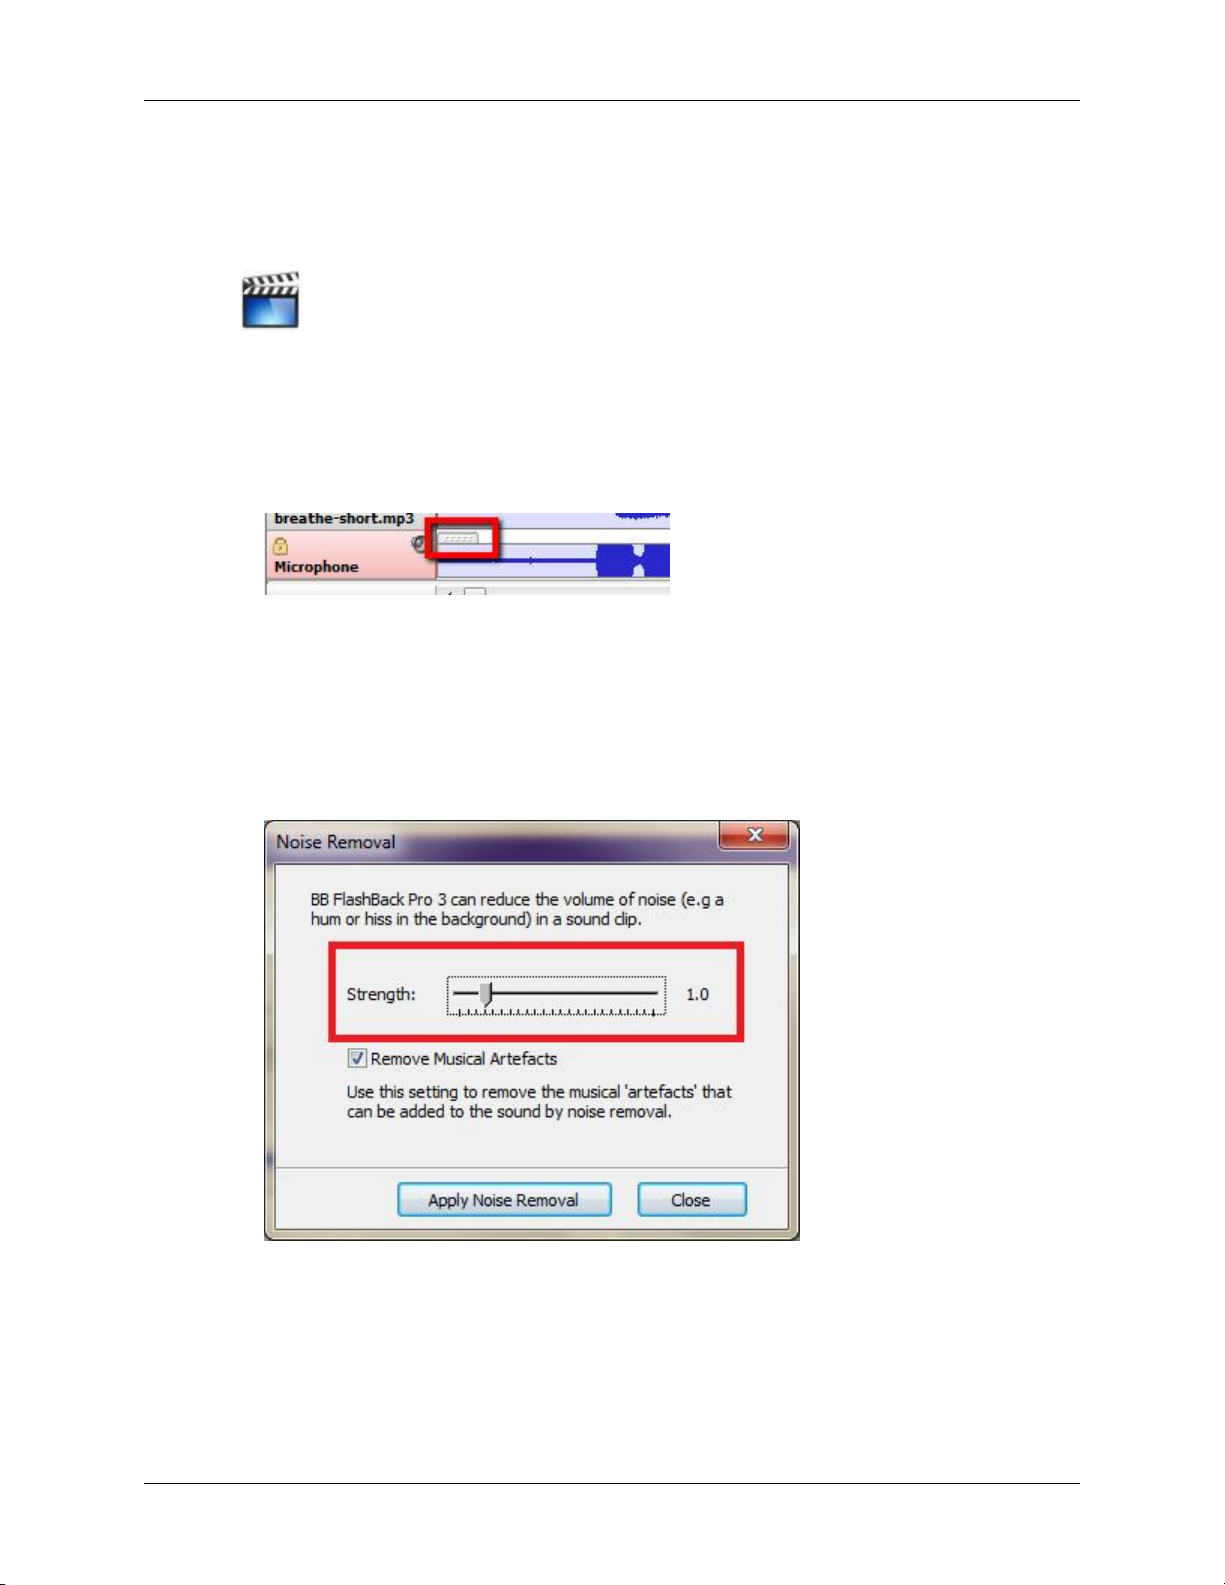
3. Right-click on the clip and select Remove Noise.
Or
Click Sound -> Remove Noise in the menu.
4. Set the strength of the noise removal;
5. Click Apply Noise Removal.
41
Page 48
Fading a Clip In and Out
You can fade a sound clip in and also fade it out.
See Video
How to fade a clip in and out:
1. Select the track you want to change.
2. Select the clip you want to edit.
3. Right-click on the clip and select Fade Clip In/Out.
Or
Click Sound -> Fade Clip In/Out in the menu.
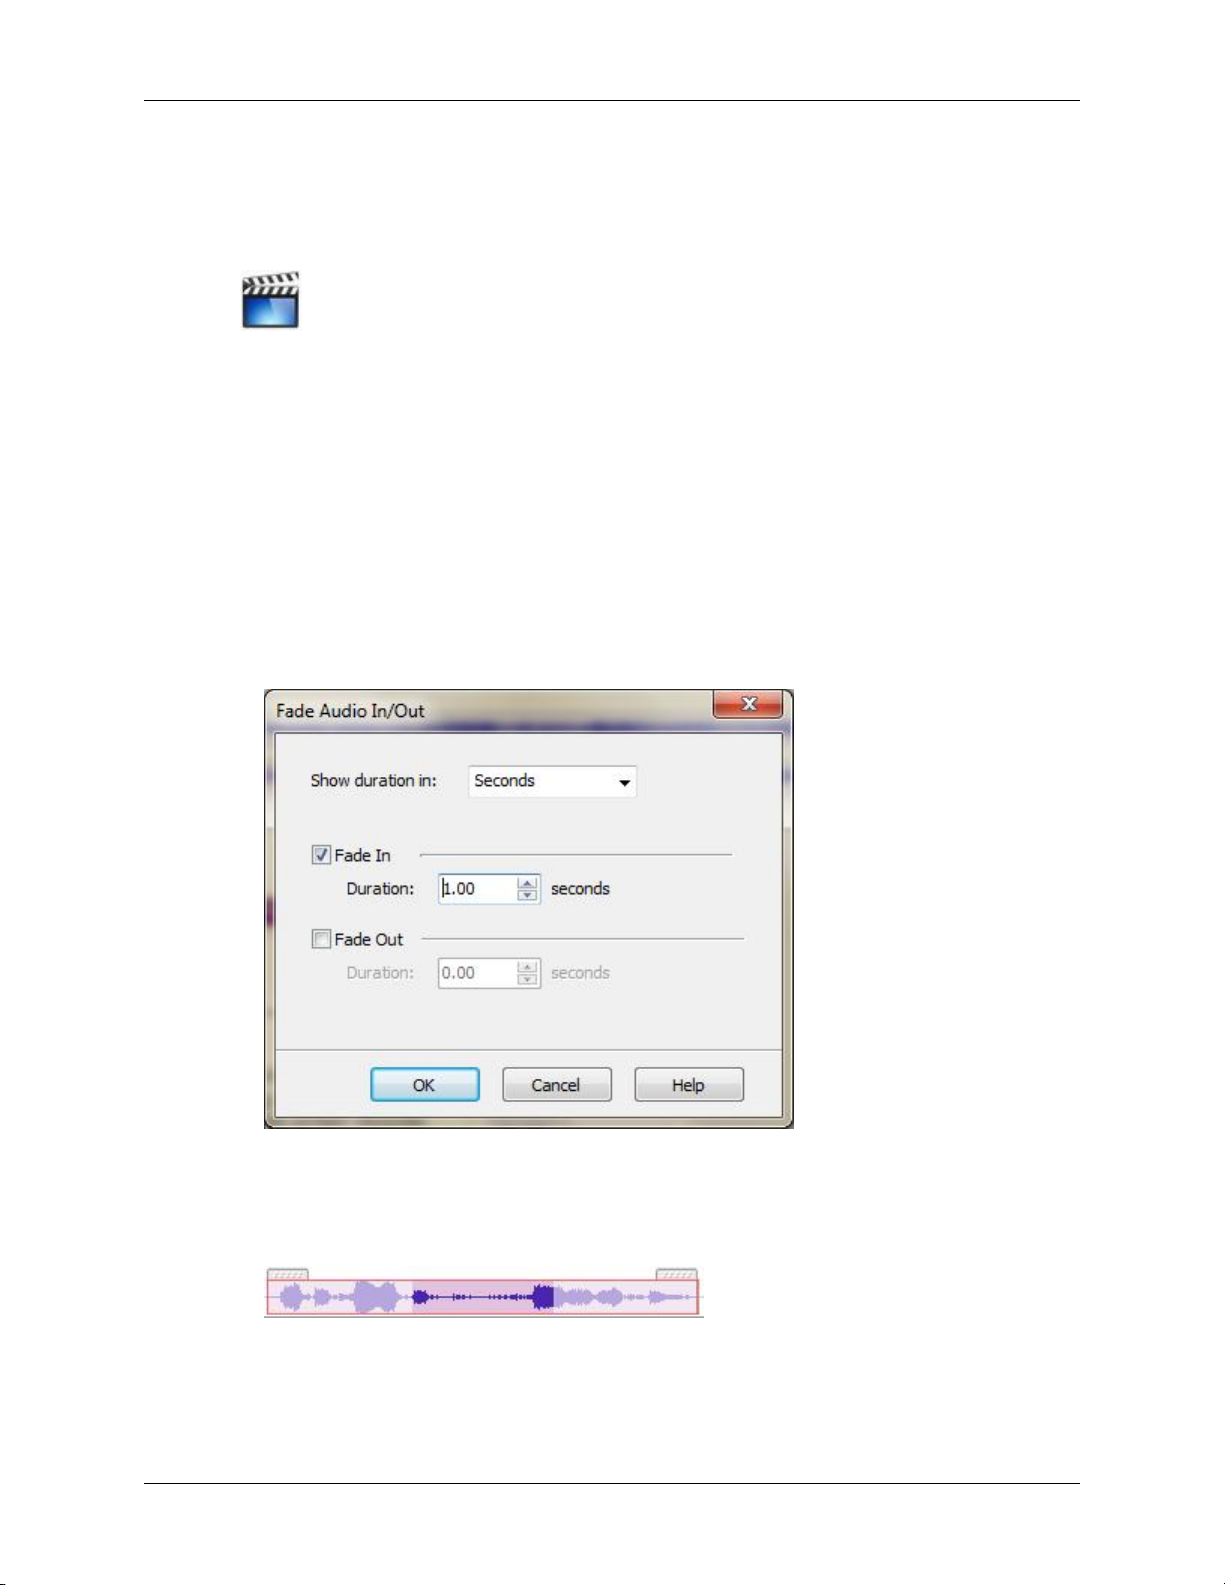
4. Set the duration of the fade in and/or fade out.
5. Click OK.
The fade in and out is displayed as a greyed out section on the sound clip;
42
Page 49

Adding Sound
There are two ways to add sound to a video. You can add an existing sound file to your movie, or record
sound from a microphone.
See Video
How to add an existing sound file:
1. Select the frame where you want to insert the sound file.
2.
Click on the toolbar.
Or
Click Insert -> Sound in the menu.
3. Browse to the file, select it and click the Open button.
4. Click OK.
The sound file has now been added as a new track.
How to record a sound clip:
1. Select the frame where you want the recording to start.
2.
Click on the toolbar.
Or
Click Sound -> Record Sound in the menu.
3. Select which microphone to record with.
4. Click record.
5. Press the space bar or click on the toolbar to stop recording.
The recording has now been added as a new track.
43
Page 50
Adding Text and Images, Highlights,
Arrows and Buttons
See Video (Text)
See Video (Images, Arrows and Buttons)
How to add text to a movie:
1. Select the frame where you want to insert the textbox.
2.
Click on the toolbar.
Or
Click Insert -> Text in the menu.
44
Page 51
Adding Text and Images,
Highlights, Arrows and Buttons
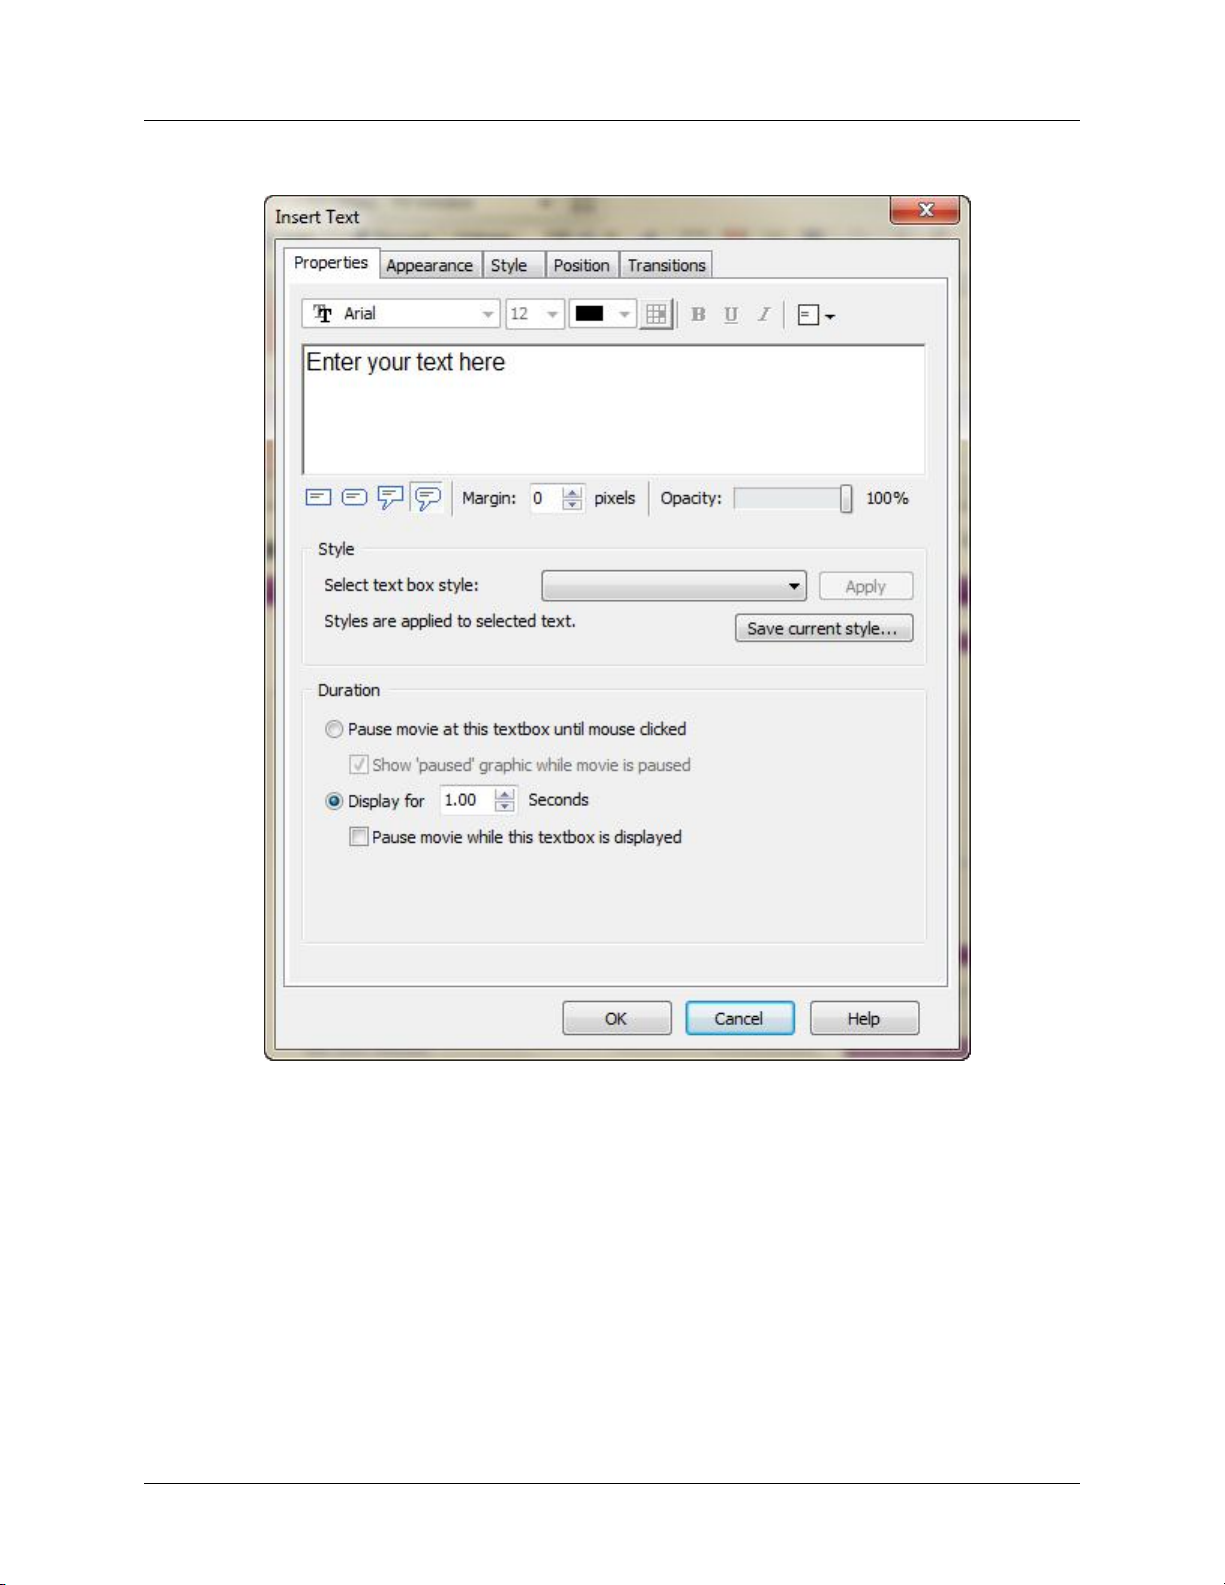
3. Set the properties of your textbox;
45
Page 52
Adding Text and Images,
Highlights, Arrows and Buttons
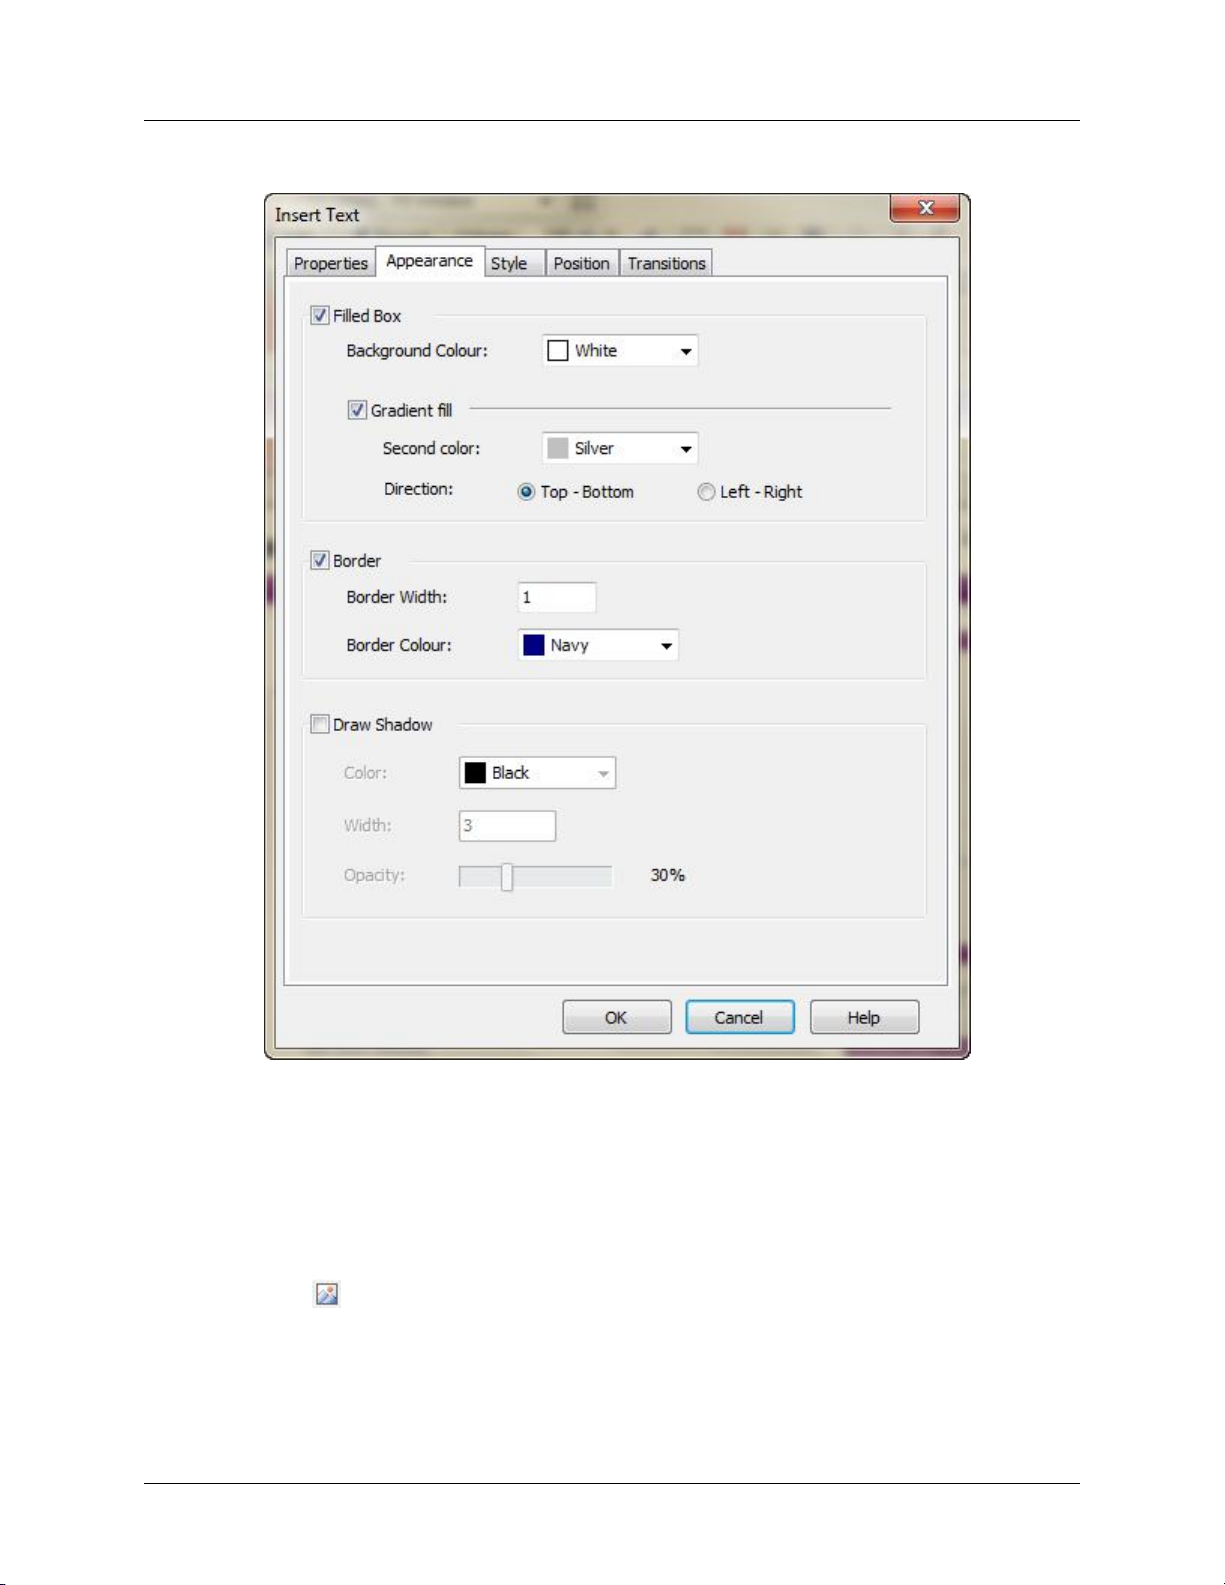
4. Set the appearance of the textbox;
5. Click OK.
How to add an image to a movie:
1. Select the frame where you want to insert the image.
2.
Click on the toolbar.
Or
Click Insert -> Image in the menu.
3. Click Load Image.
46
Page 53
Adding Text and Images,
Highlights, Arrows and Buttons
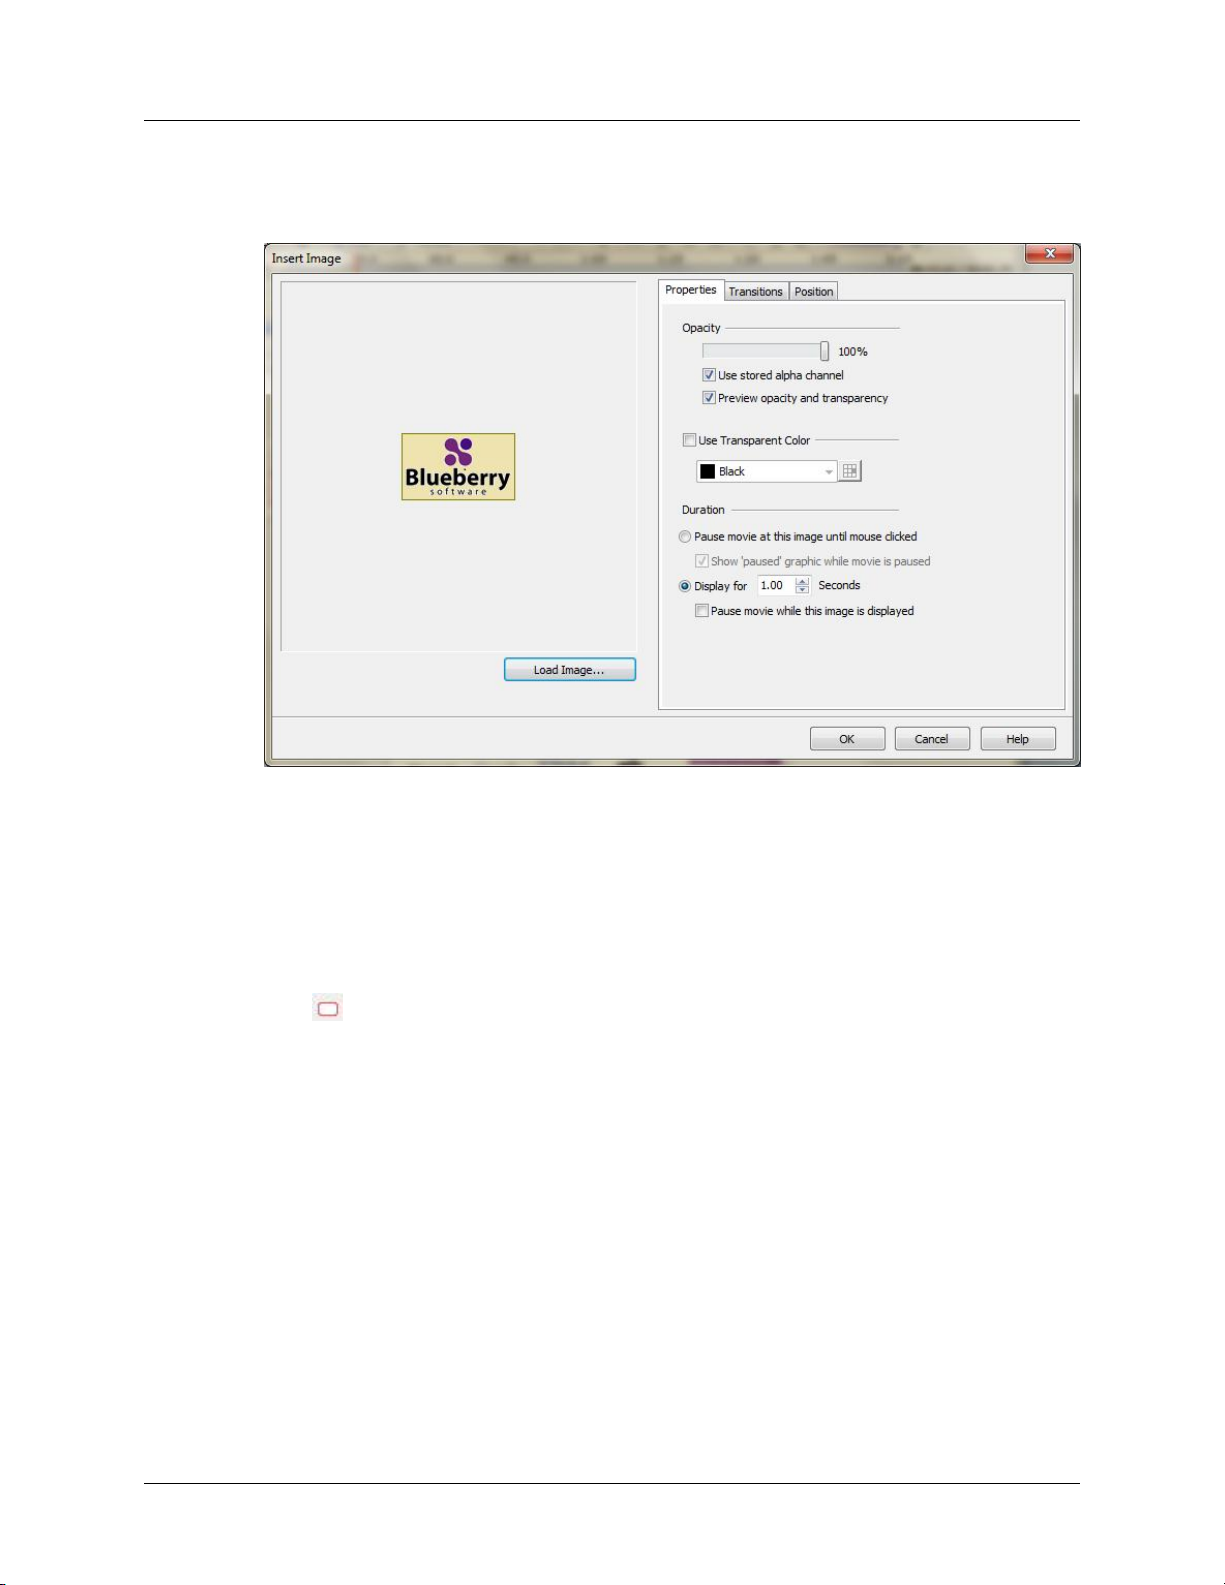
4. Browse to the image, select it and click Open.
5. Set the properties of your image;
6. Click OK.
How to add a highlight to your movie:
1. Select the frame where you want to insert the highlight.
2.
Click on the toolbar.
Or
Click Insert -> Highlight in the menu.
47
Page 54
Adding Text and Images,
Highlights, Arrows and Buttons
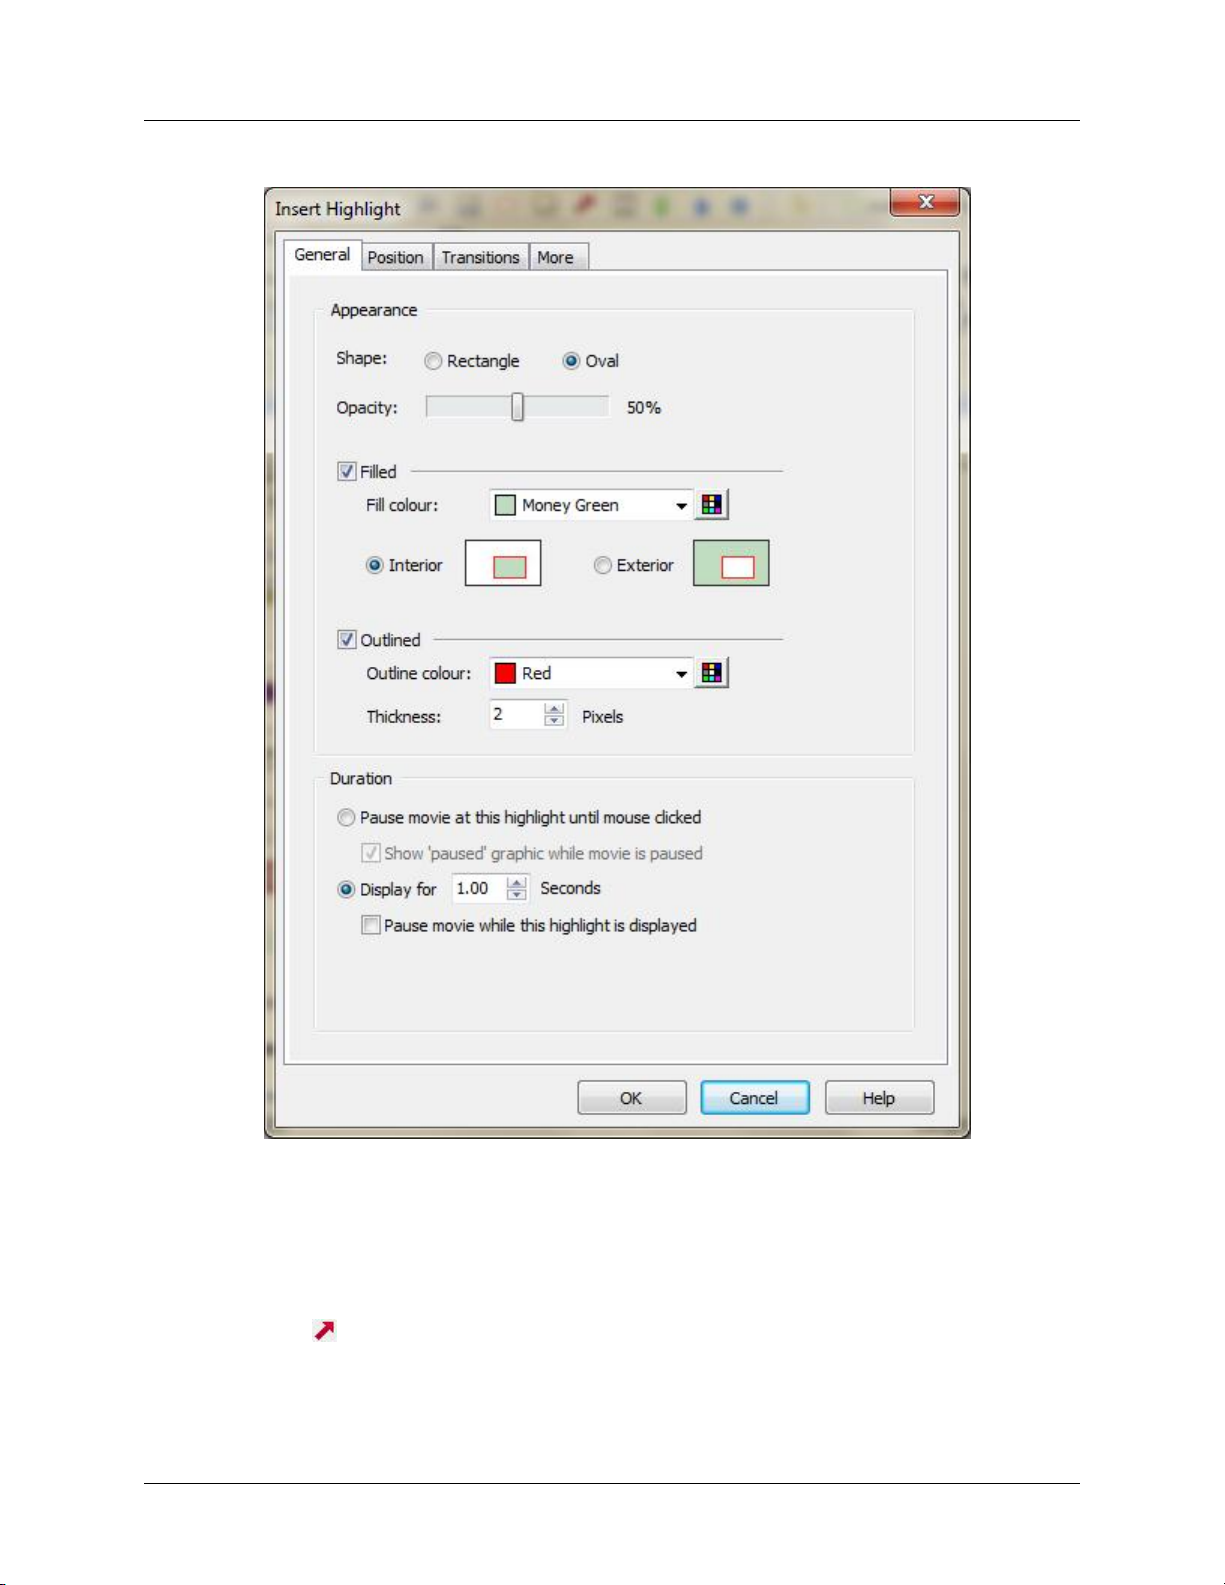
3. Set the properties of the highlight;
4. Click OK.
How to insert an arrow:
1. Select the frame where you want to insert the arrow.
2.
Click on the toolbar.
Or
Click Insert -> Arrow in the menu.
48
Page 55
Highlights, Arrows and Buttons
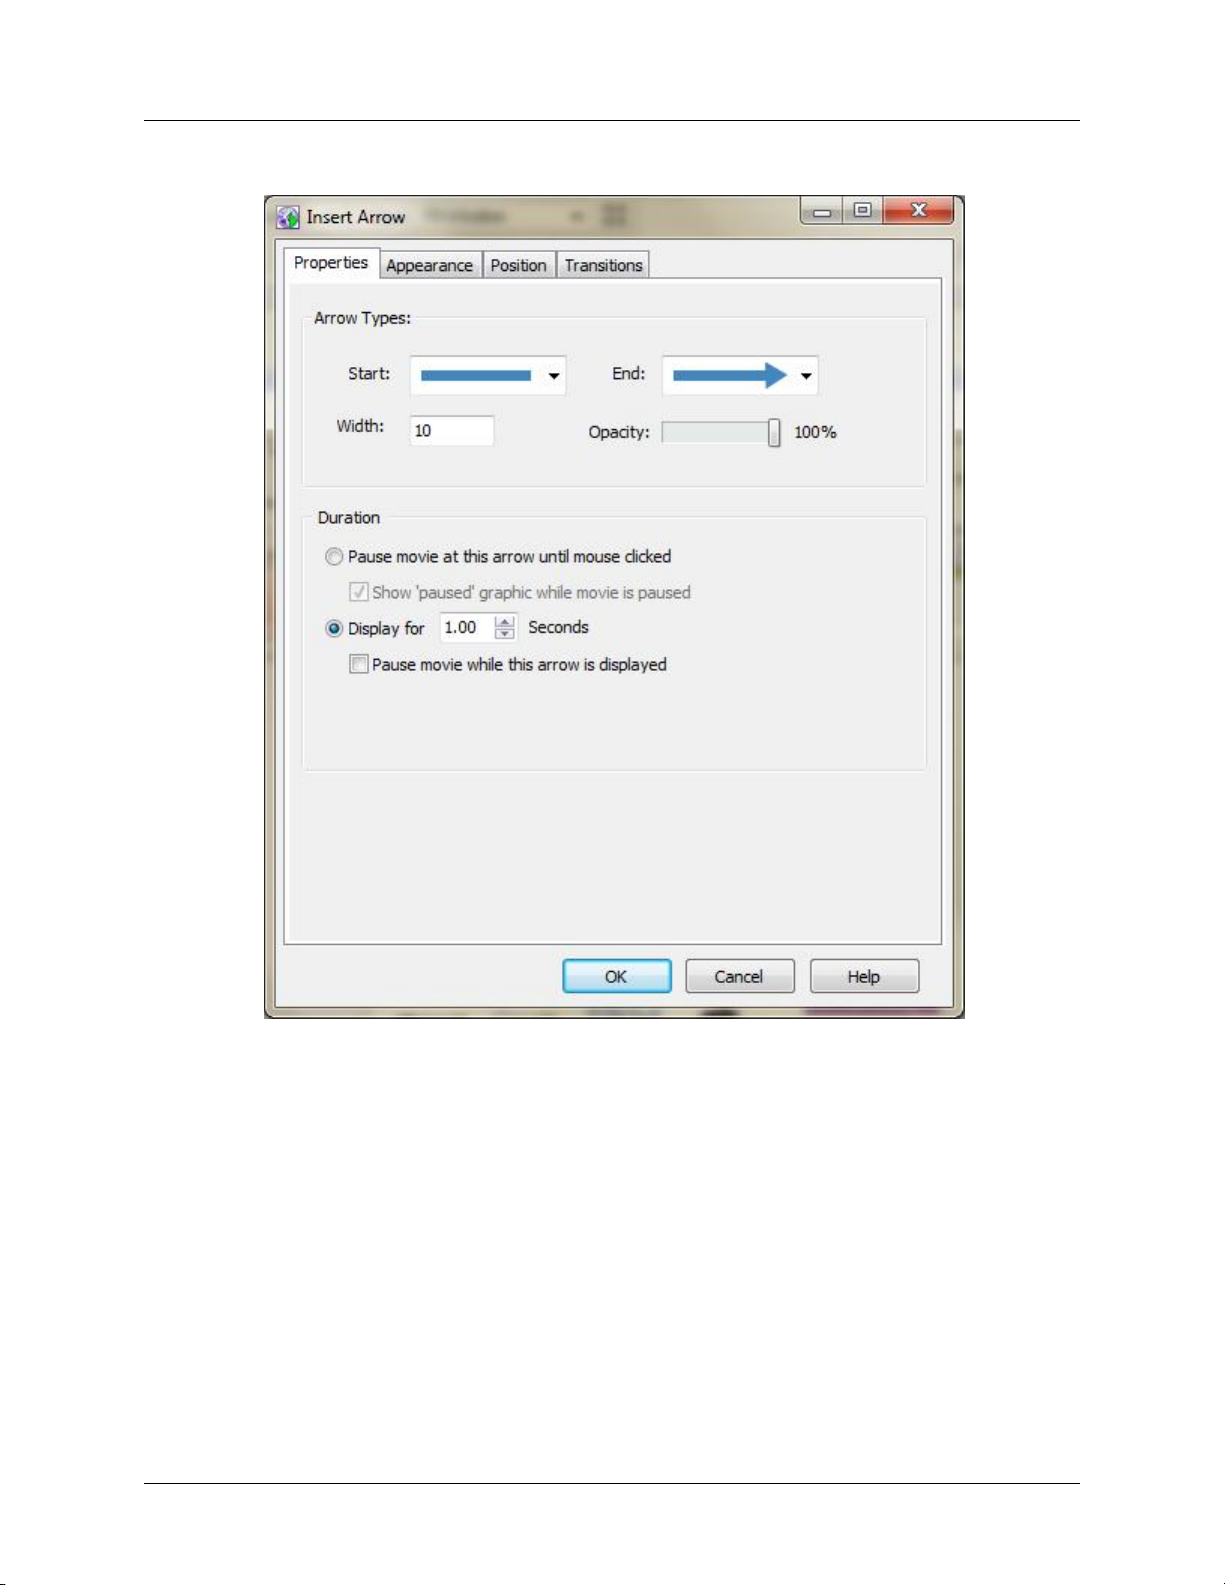
3. Set the properties of the arrow;
Adding Text and Images,
49
Page 56
Adding Text and Images,
Highlights, Arrows and Buttons
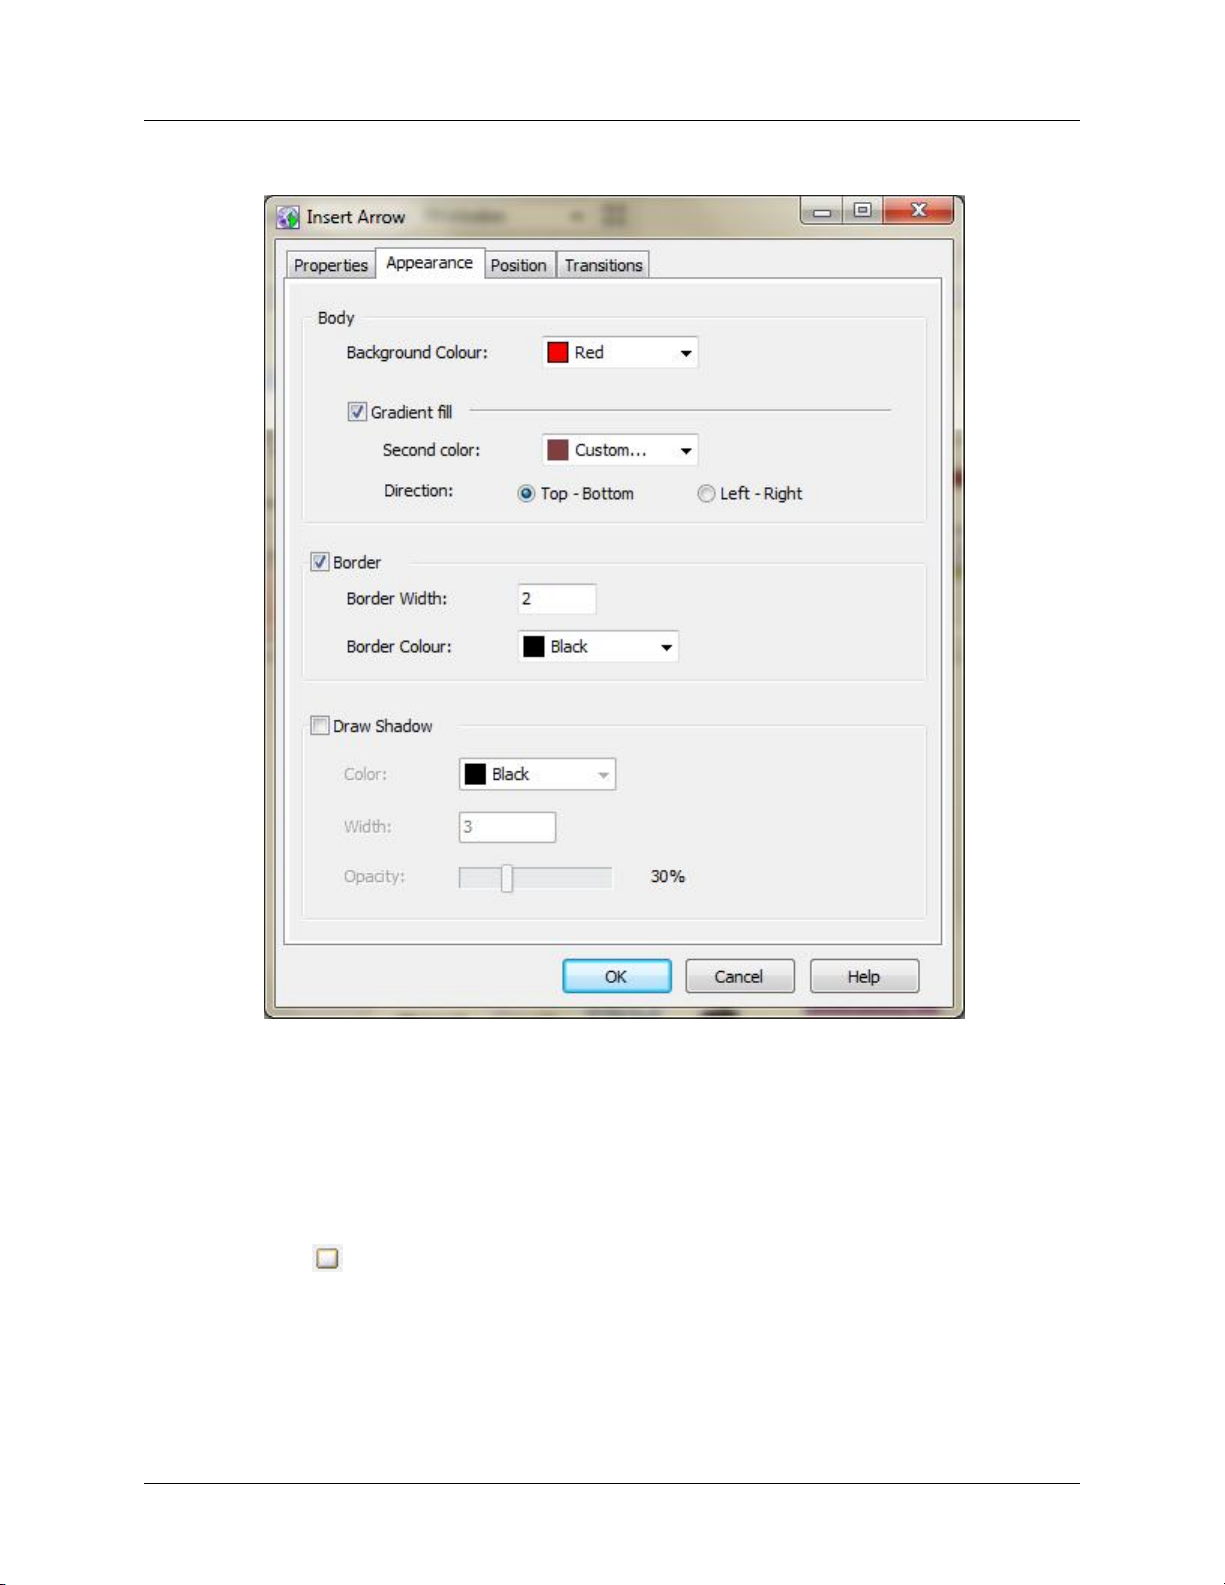
4. Set the appearance of the arrow;
5. Click OK.
How to add a button:
1. Select the frame where you want to insert the button.
2.
Click on the toolbar.
Or
Click Insert -> Button in the menu.
50
Page 57
Adding Text and Images,
Highlights, Arrows and Buttons
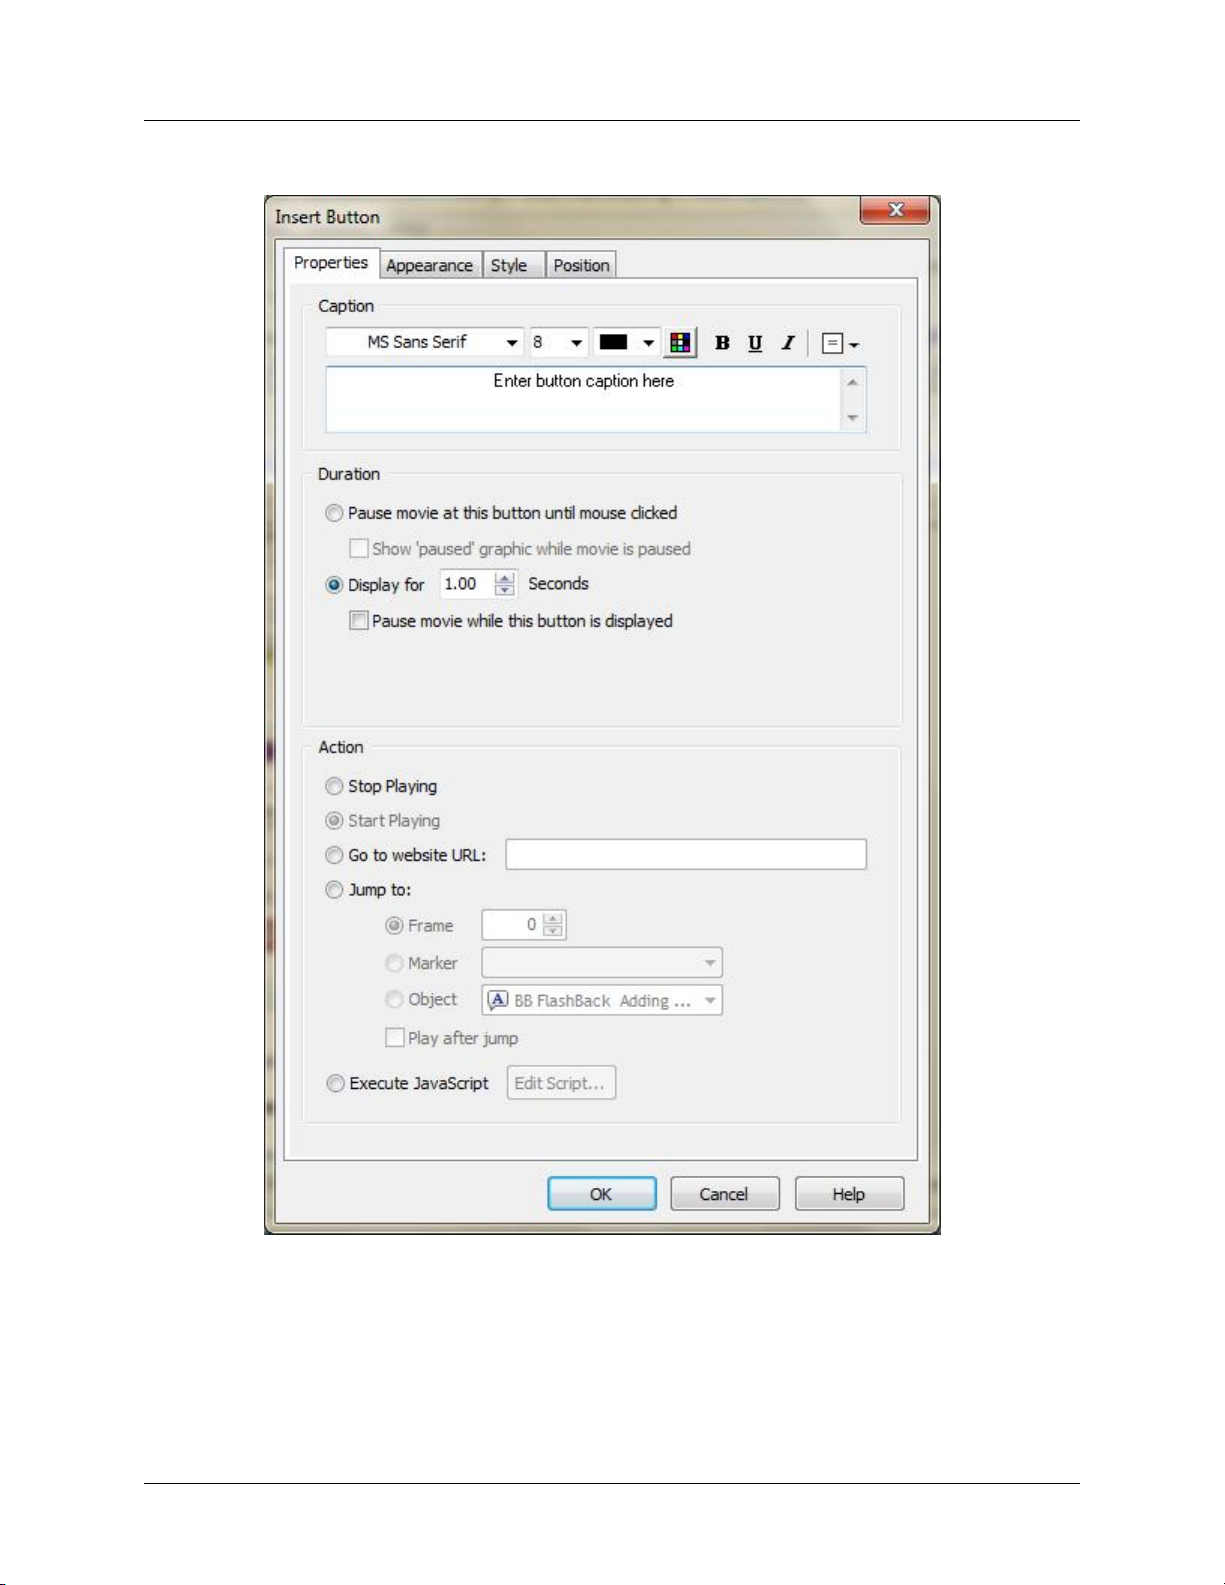
3. Set the properties of the button;
51
Page 58
Adding Text and Images,
Highlights, Arrows and Buttons
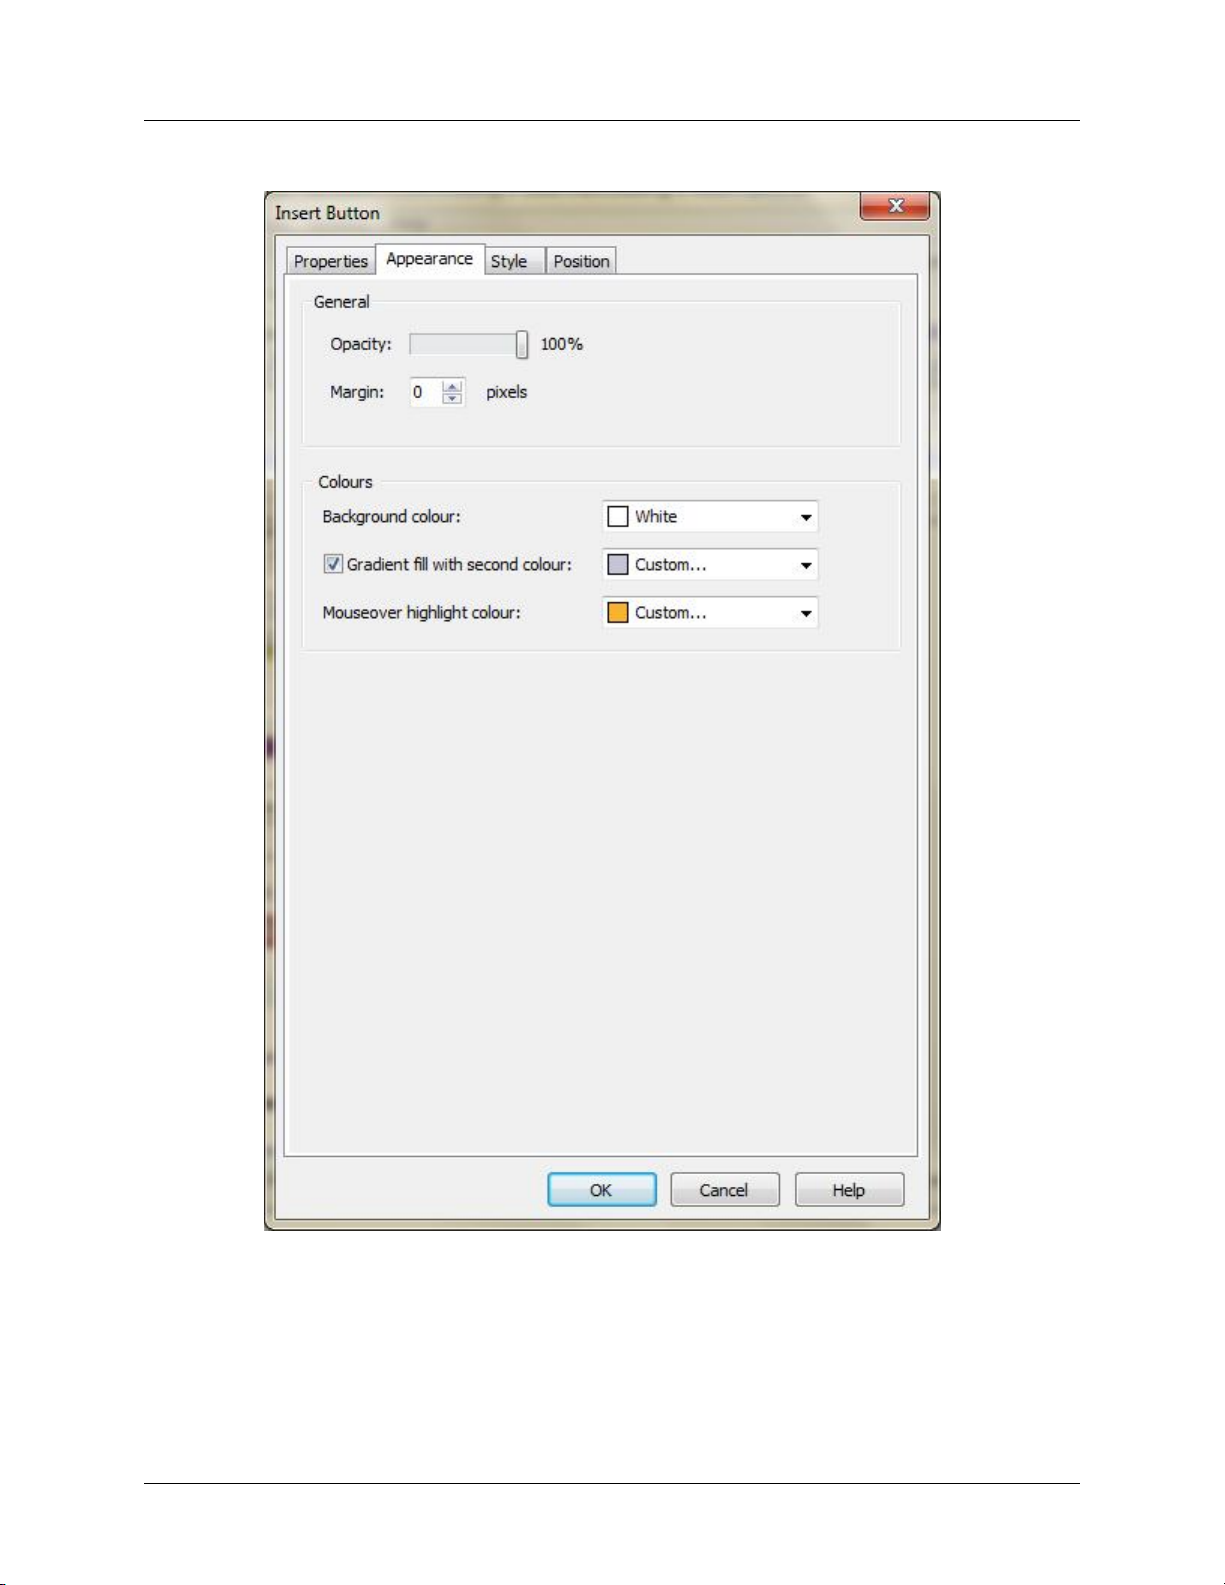
4. Set the appearance of the button;
5. Click OK,
52
Page 59
Tips for better performance recording
You can improve your screen recordings by changing the recorder settings. You can increase the frame
rate of the recording and change the recording type.
See Video
How to change the recorder settings:
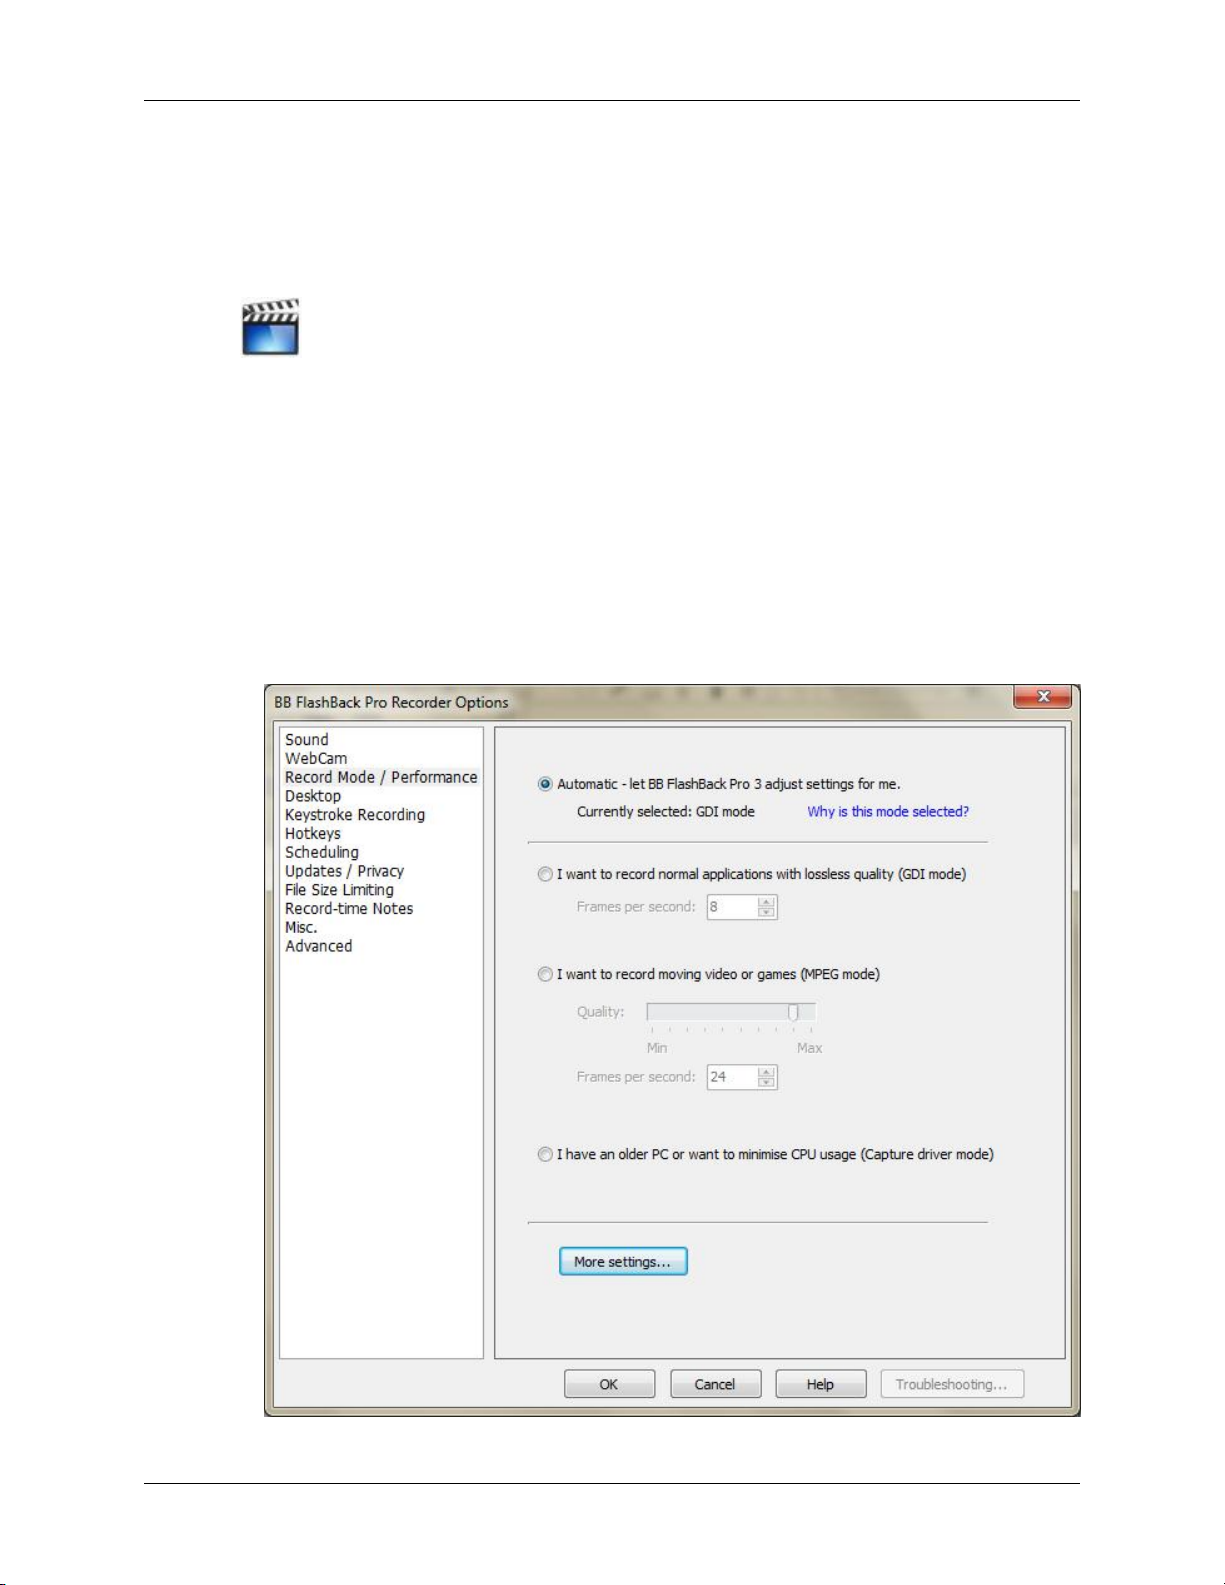
1. From the BB FlashBack recorder, click Tools -> Options in the menu and click Record Mode /
Performance.
Or
From the BB FlashBack player, click Tools -> Recording Options in the menu and click Record
Mode / Performance.
2. Change the recorder settings;
53
Page 60

Tips for better
performance recording
3. Click OK.
For further guidance, please see the article at: http://www.bbsoftware.co.uk/BBFlashBack/Support/
UserGuides/recordingvideo.aspx
54
Page 61
Saving your recordings as Flash
You can export your movie as a Flash file or other types of video formats
See Video
How to export as Flash:
1.
Click on the toolbar.
Or
Click File -> Export in the menu.
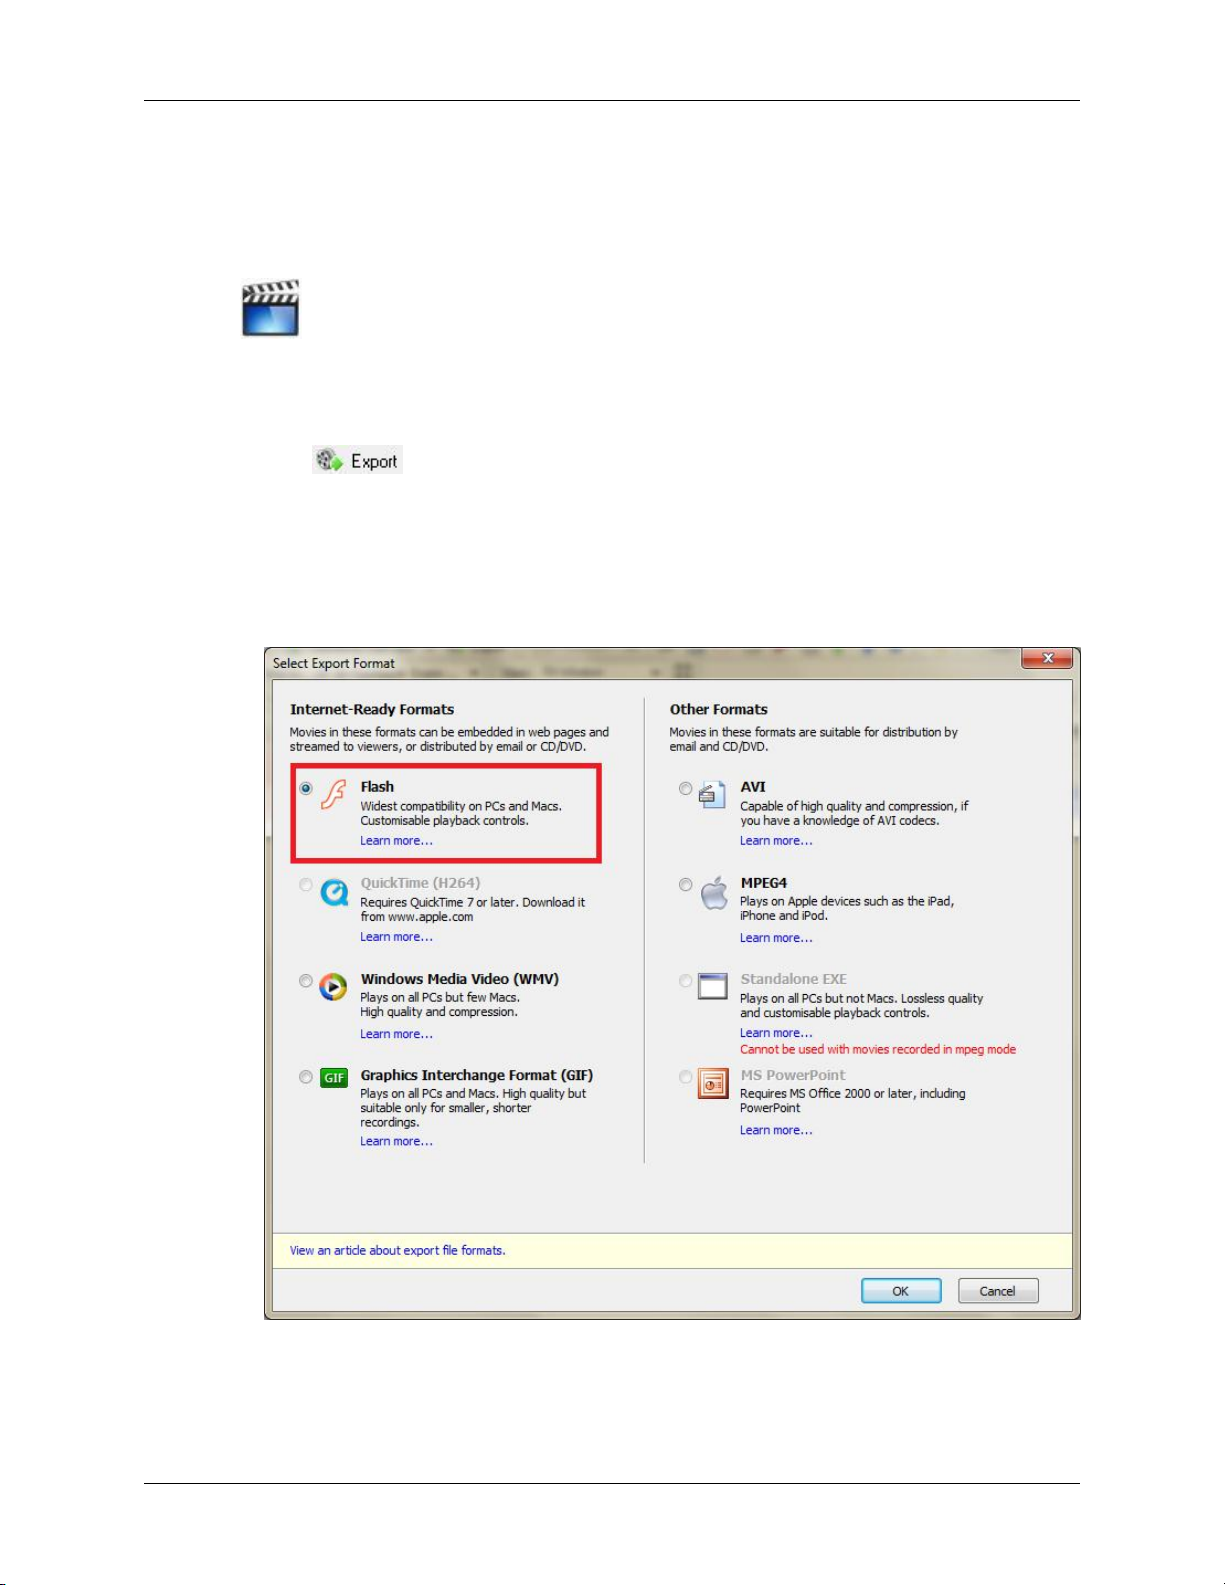
2. Select the Flash option;
3. Click OK.
55
Page 62
Saving your recordings as Flash
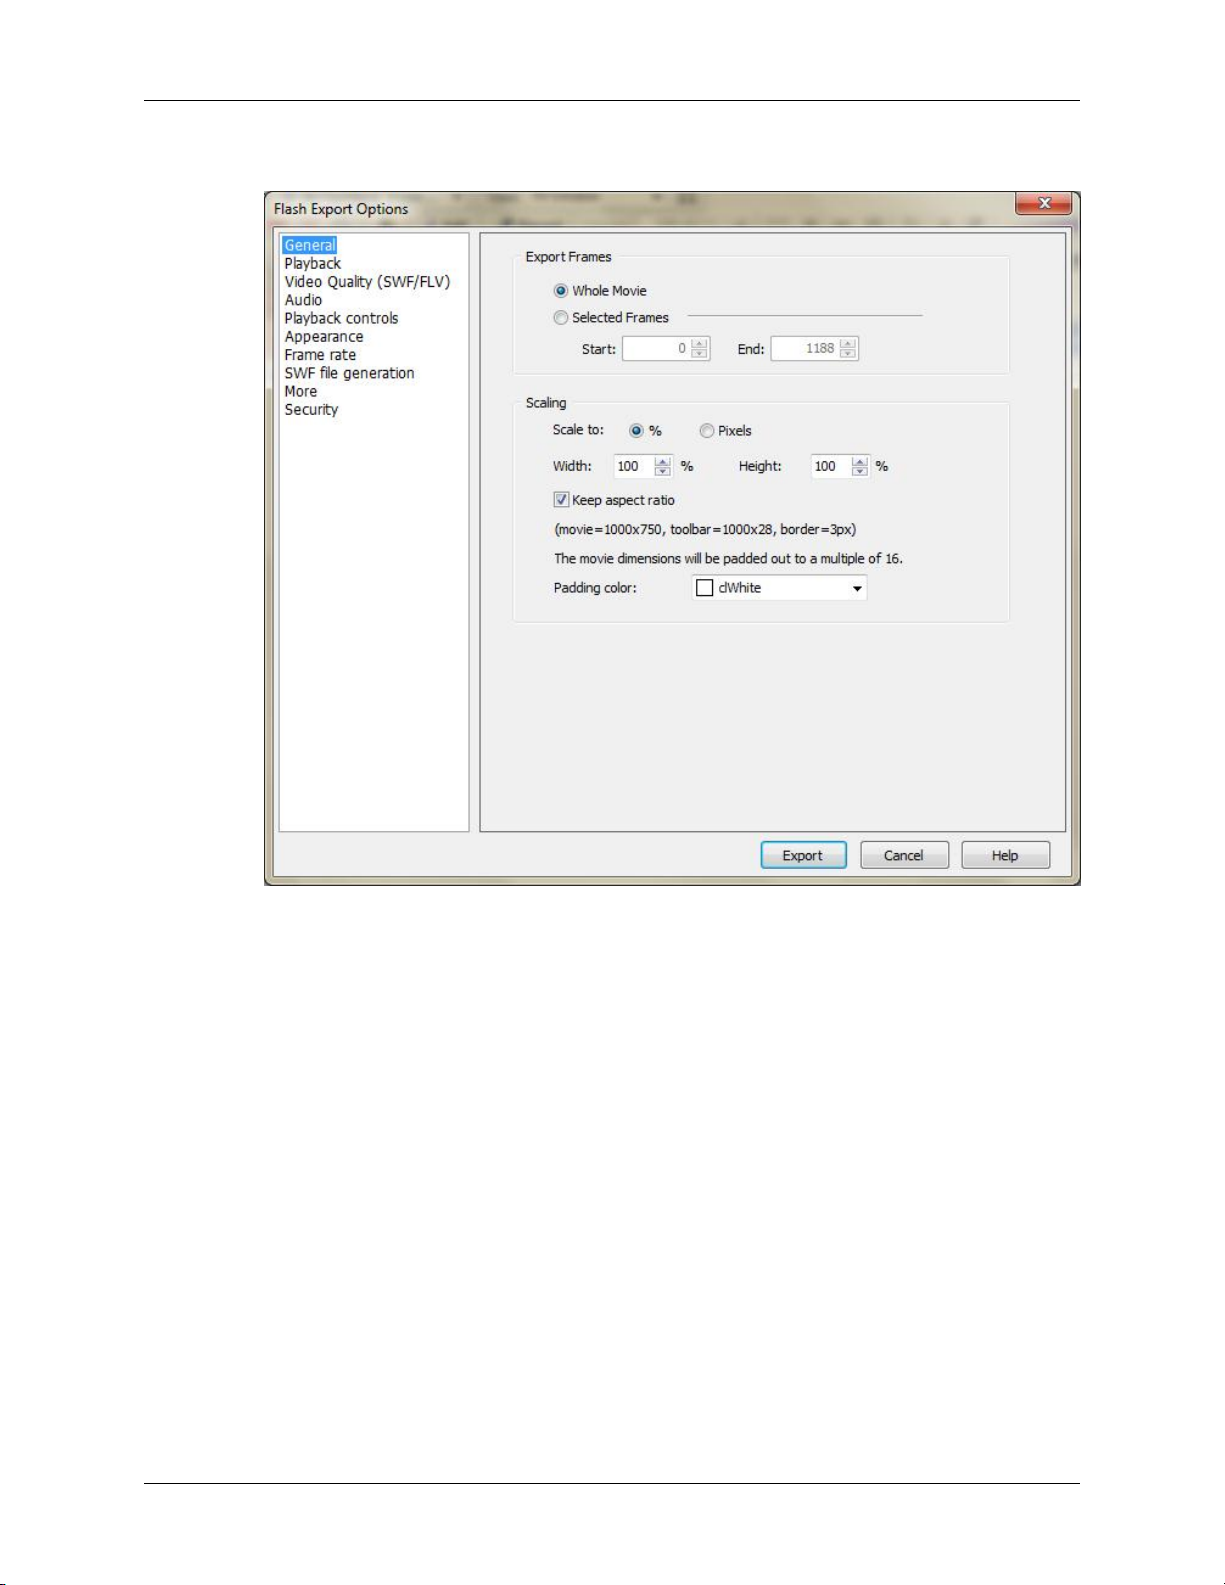
4. Select or change the Flash Export Options.
5. Click Export.
6. Choose where to save the exported files and click Save.
Three files are exported and you can choose view the export once completed. To view the movie in a web
browser, ensure that you open the .html file that has been exported.
56
Page 63
Creating Pan and Zoom Effects
You can zoom into a movie. Whilst the movie is zoomed in, you can add a pan effect or zoom out.
See Video
How to zoom in:
1. Select the frame where you want to add the zoom in.
2.
Click on the toolbar.
Or
Click Effects -> Add ZoomPan in the menu.
57
Page 64
Creating Pan and Zoom Effects
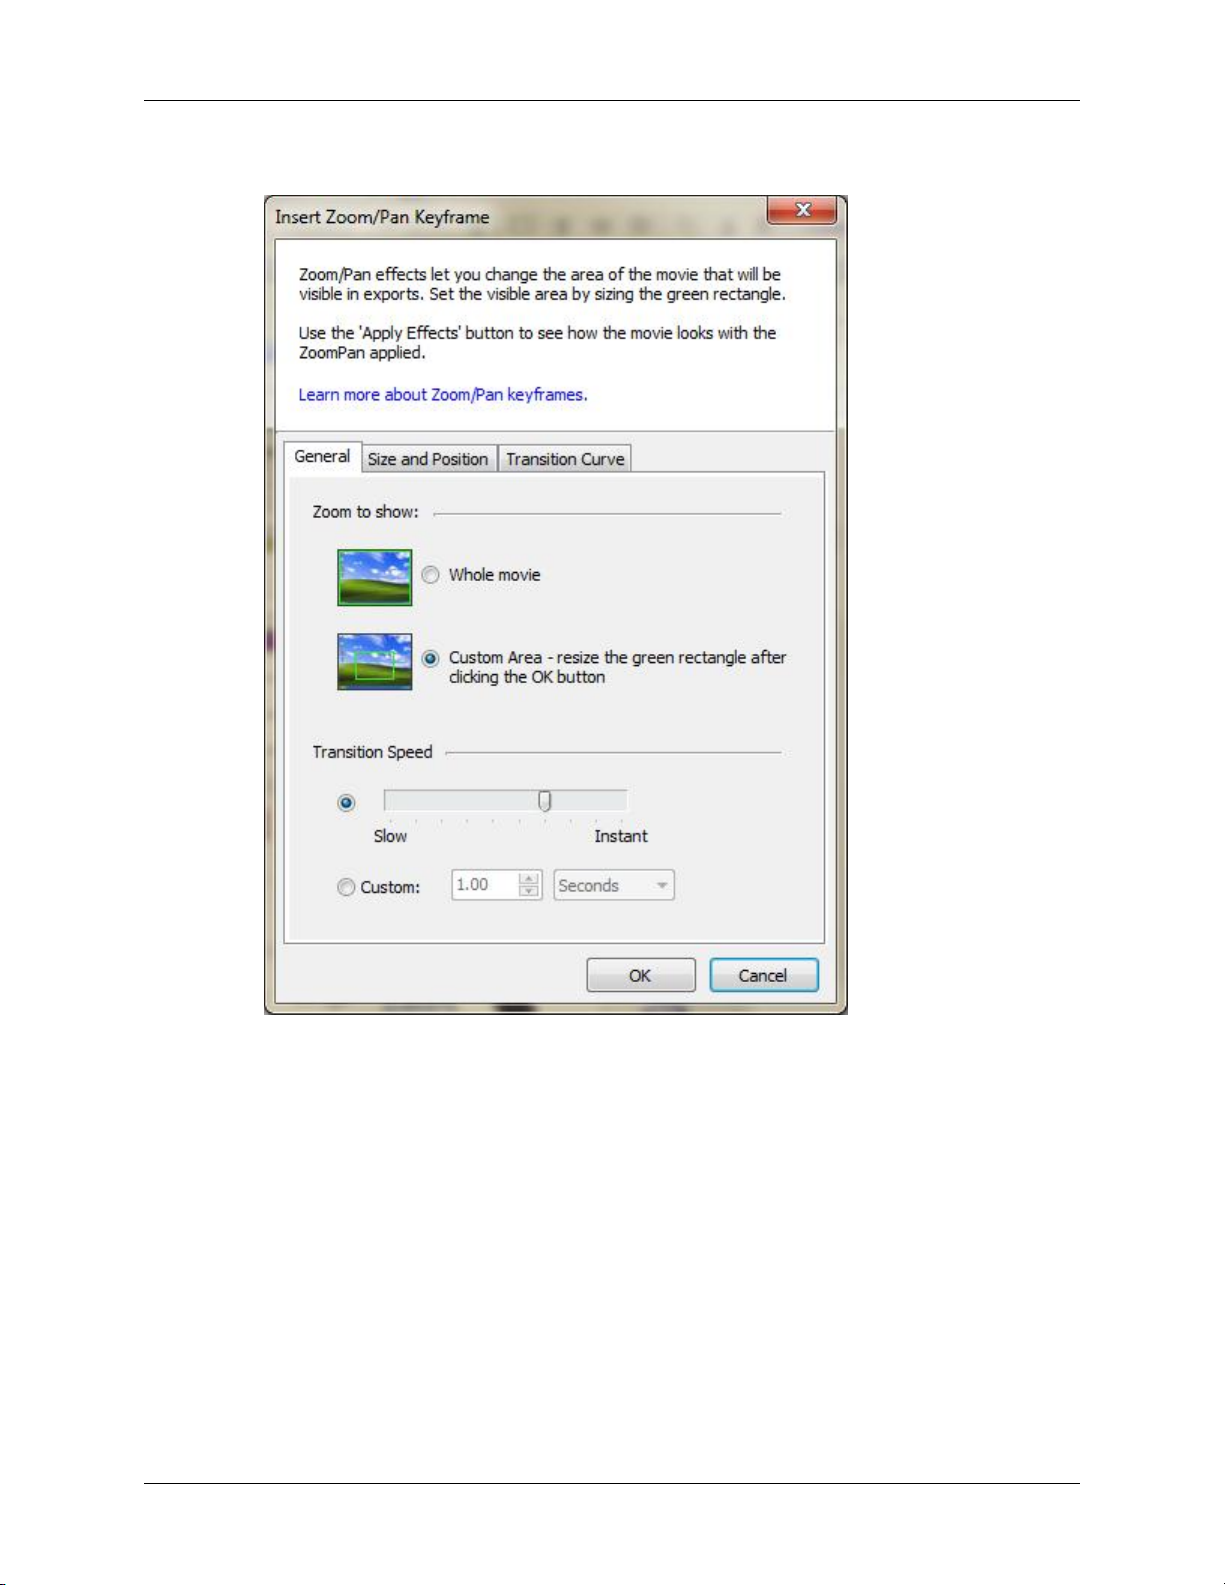
3. Set the properties of the zoom;
58
Page 65
Creating Pan and Zoom Effects
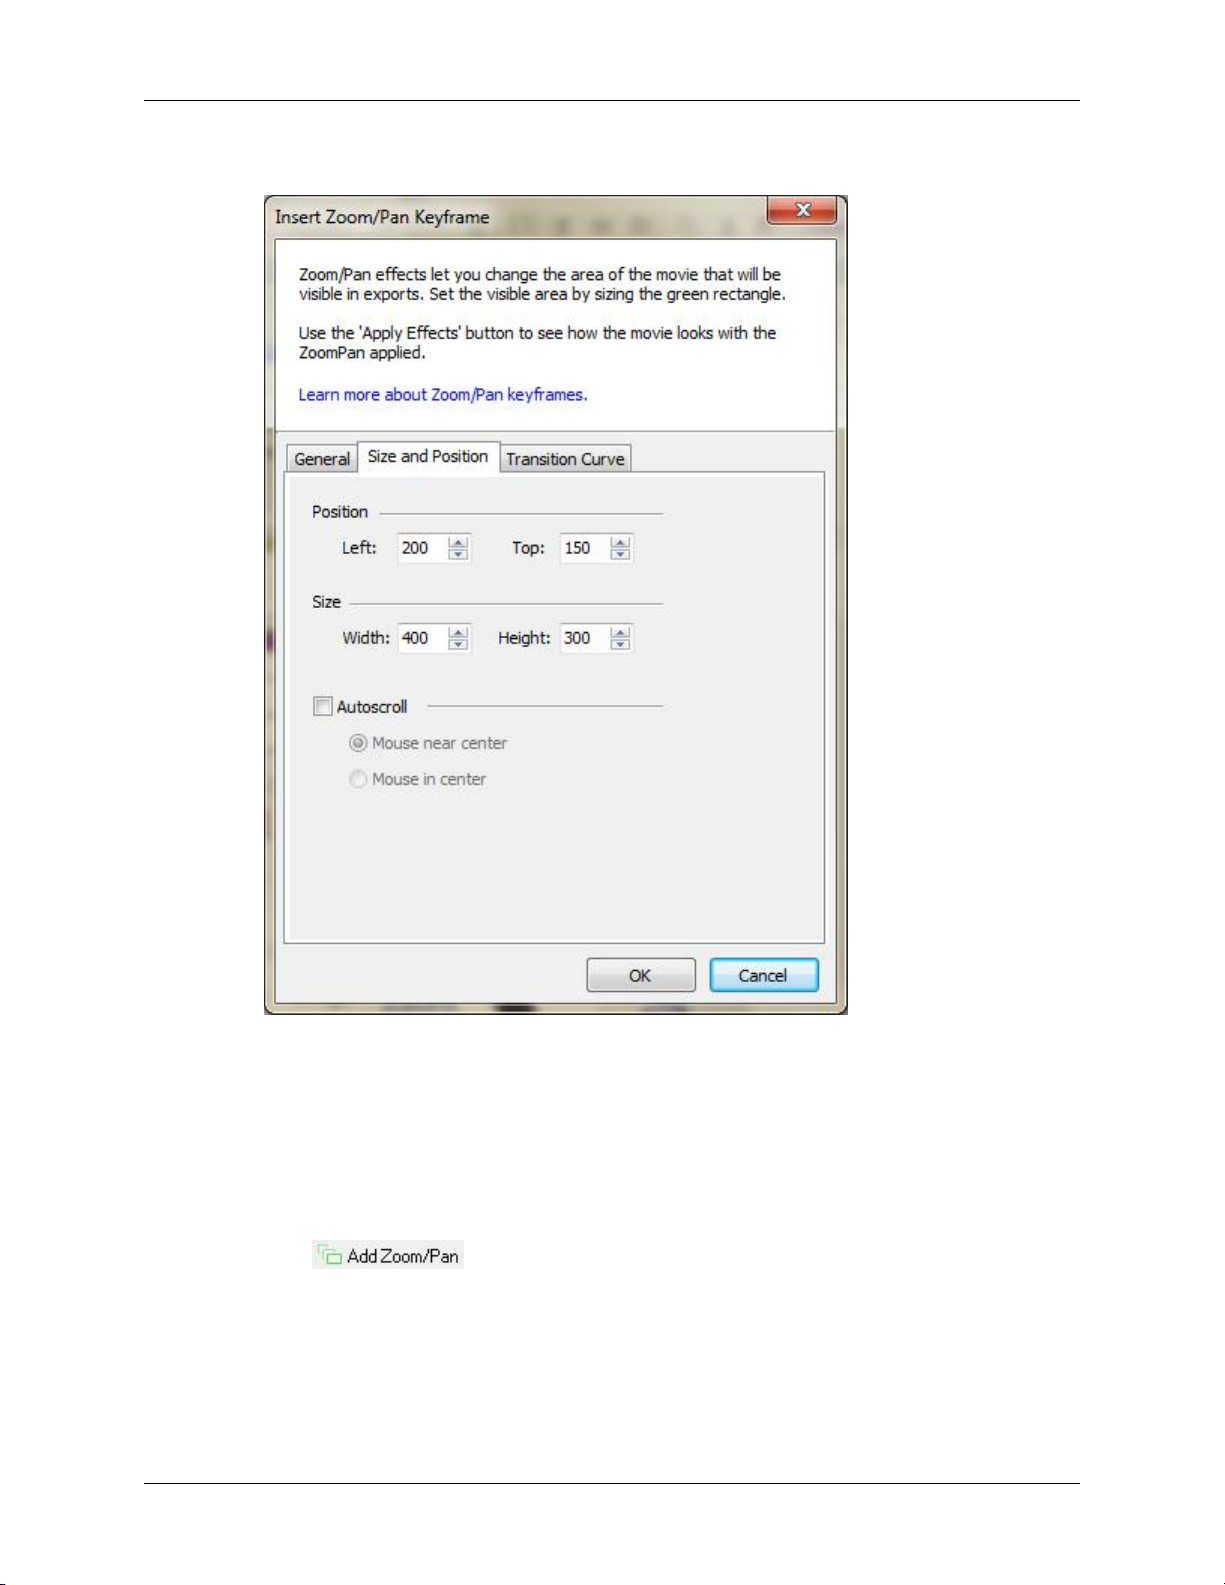
4. Set the size and position of the zoom;
5. Click OK
How to pan, while zoomed in:
1. Select the frame where you want to add the pan.
2.
Click on the toolbar.
Or
Click Effects -> Add ZoomPan in the menu.
59
Page 66
Creating Pan and Zoom Effects
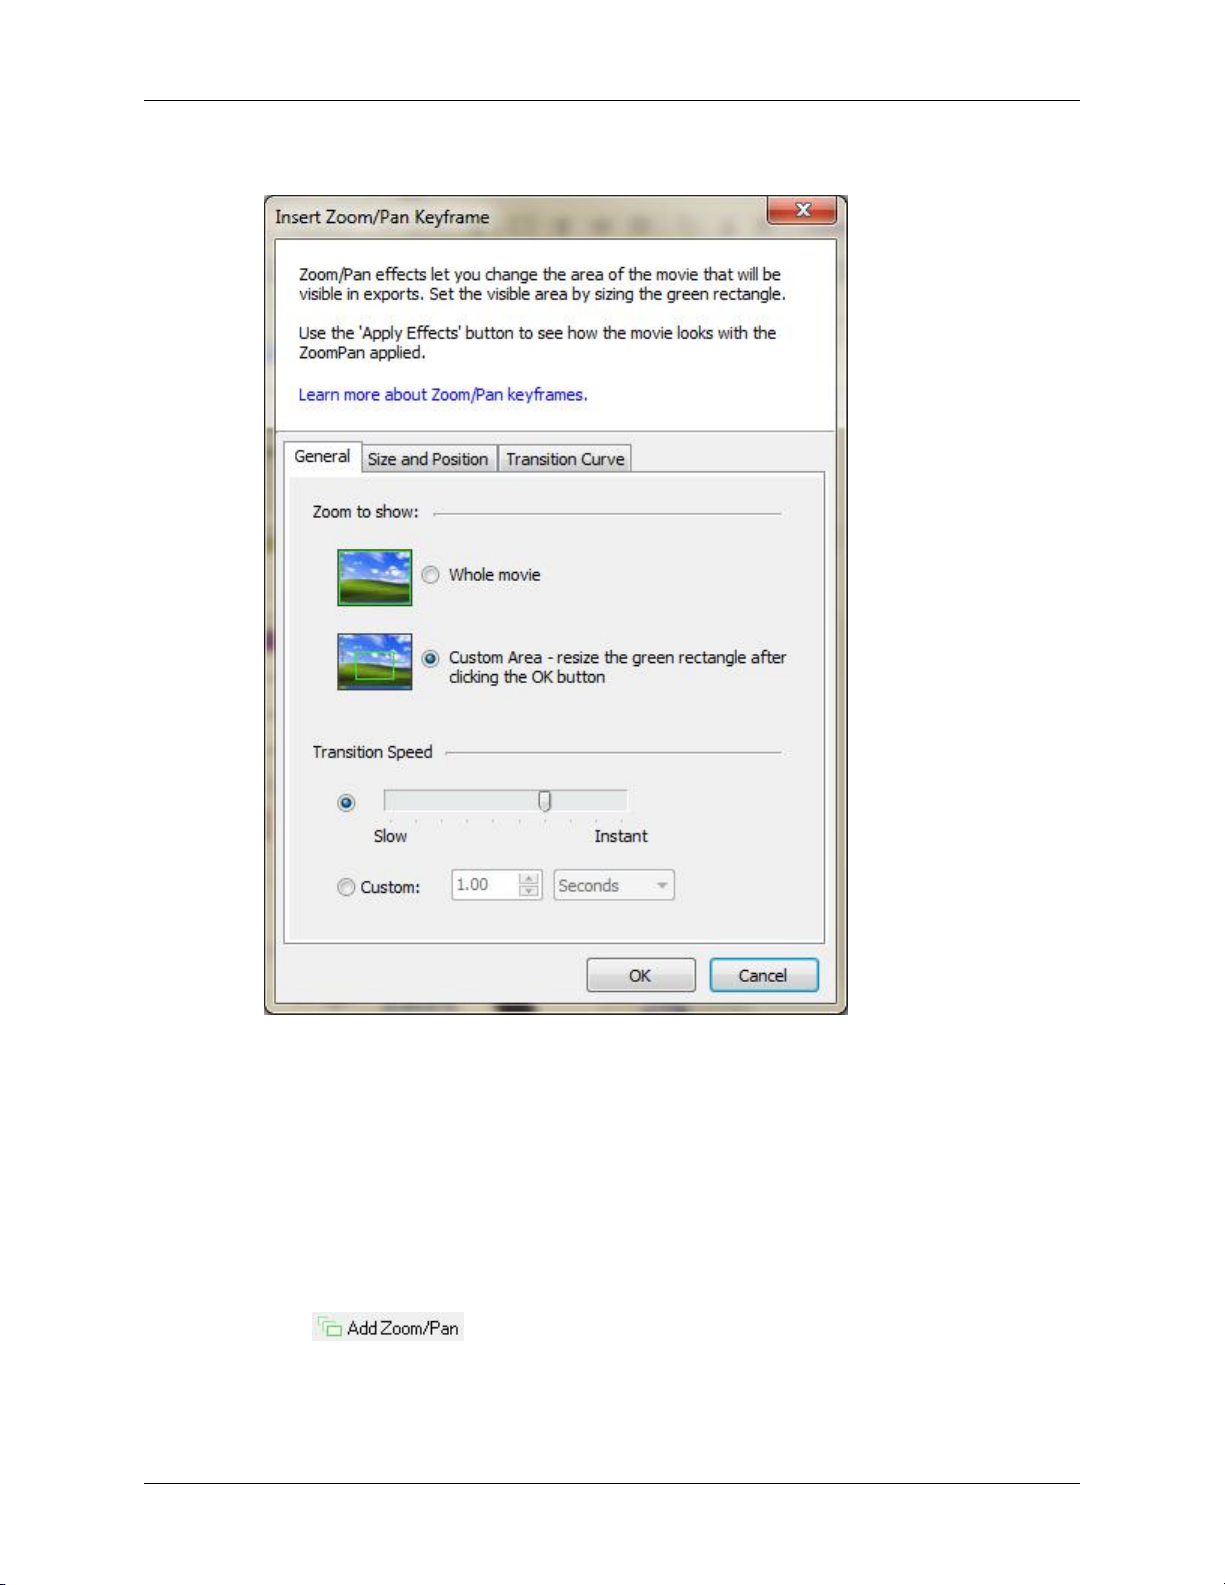
3. Set the properties of the pan;
4. Click OK.
Click and drag the zoom/pan to set the pan destination.
How to zoom out from a previous zoom in:
1. Select the frame where you want to add the zoom out.
2.
Click on the toolbar.
Or
Click Effects -> Add ZoomPan in the menu.
60
Page 67
Creating Pan and Zoom Effects
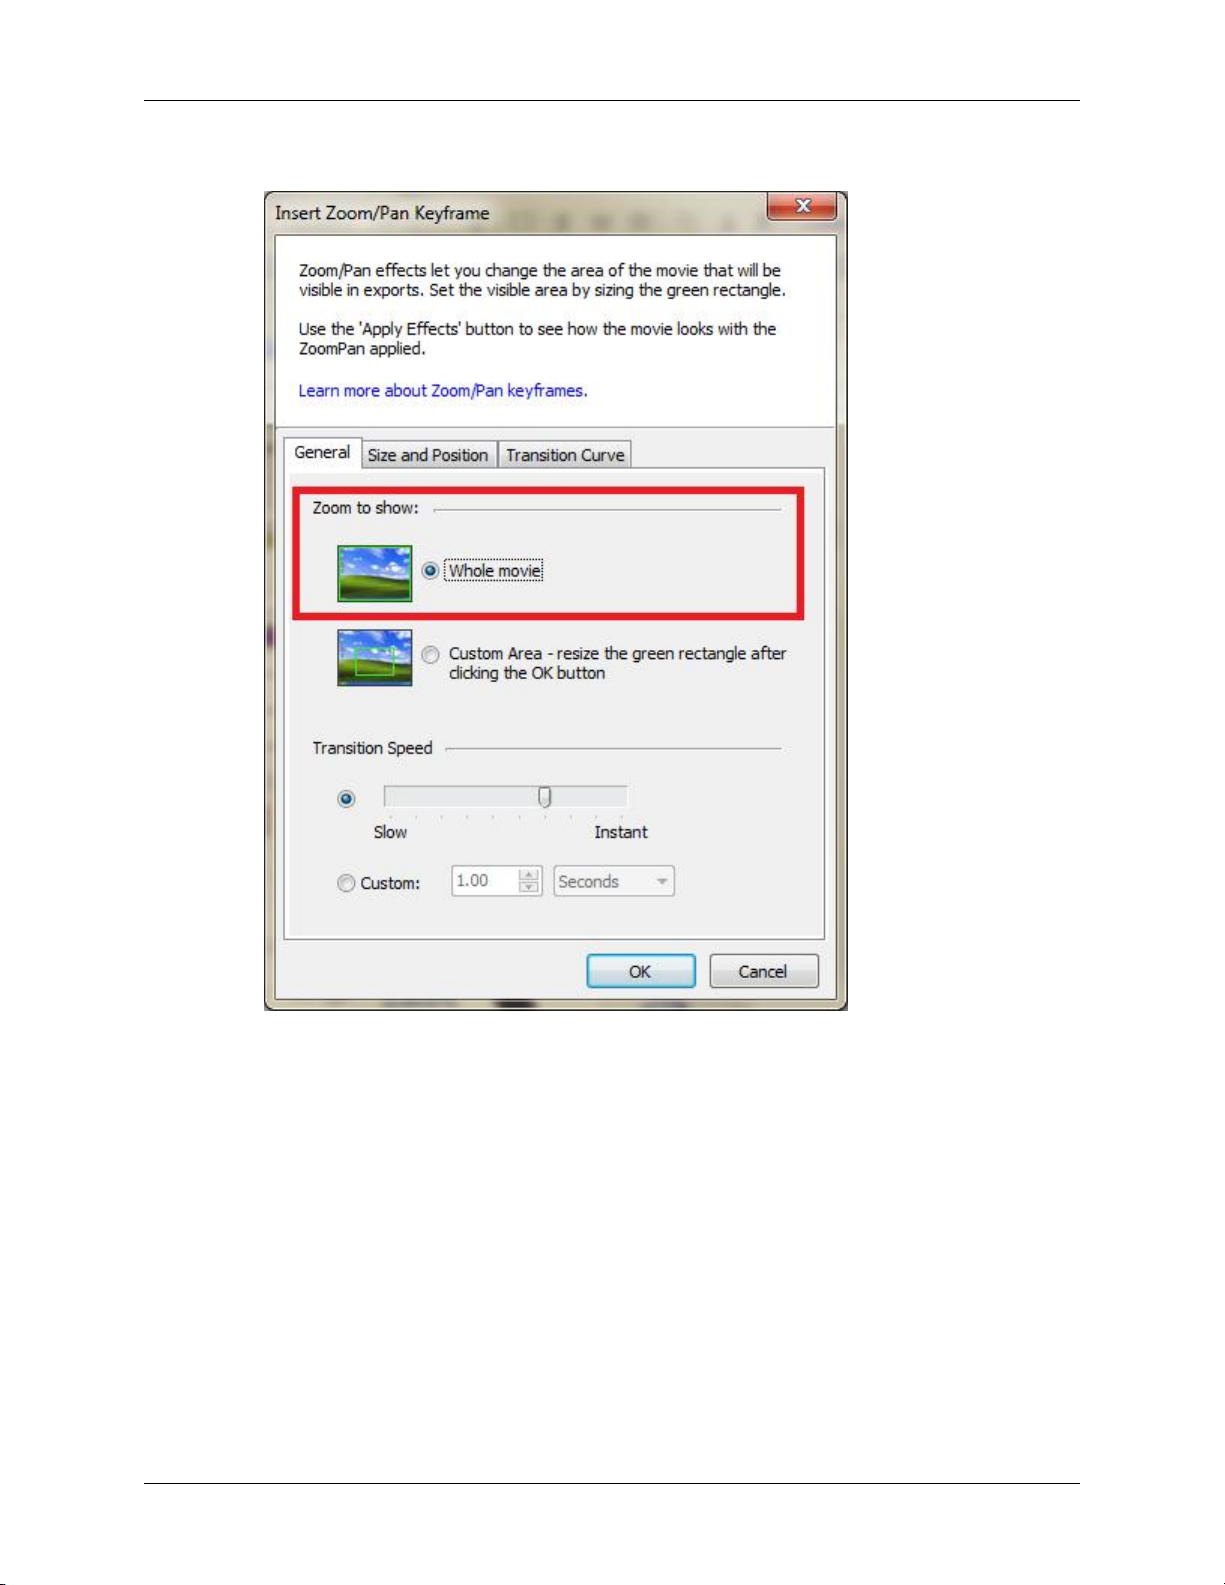
3. Set the zoom to show the whole movie;
4. Click OK.
61
Page 68

Using Autoscroll
You can crop the movie to a smaller size and add an autoscroll effect to still show all of the action.
See Video
How to add a cropping rectangle:
1.
Click on the toolbar.
Or
Click Effects -> Set Cropping Rectangle in the menu.
How to remove a cropping rectangle:
1.
Click on the toolbar.
Or
Click Effects -> Set Cropping Rectangle in the menu.
How to add an autoscroll:
1. Click Effects.
2. Go to the Autoscroll Cropping Rectangle submenu.
3. Click Mouse In Centre.
Or
Click Mouse Near Centre.
How to remove an autoscroll:
1. Click Effects.
2. Go to the Autoscroll Cropping Rectangle submenu.
3. Click None.
62
Page 69

Recording from the Webcam
You can record a webcam whilst you record the screen or record only the webcam.
See Video
How to record the webcam whilst you record the screen:
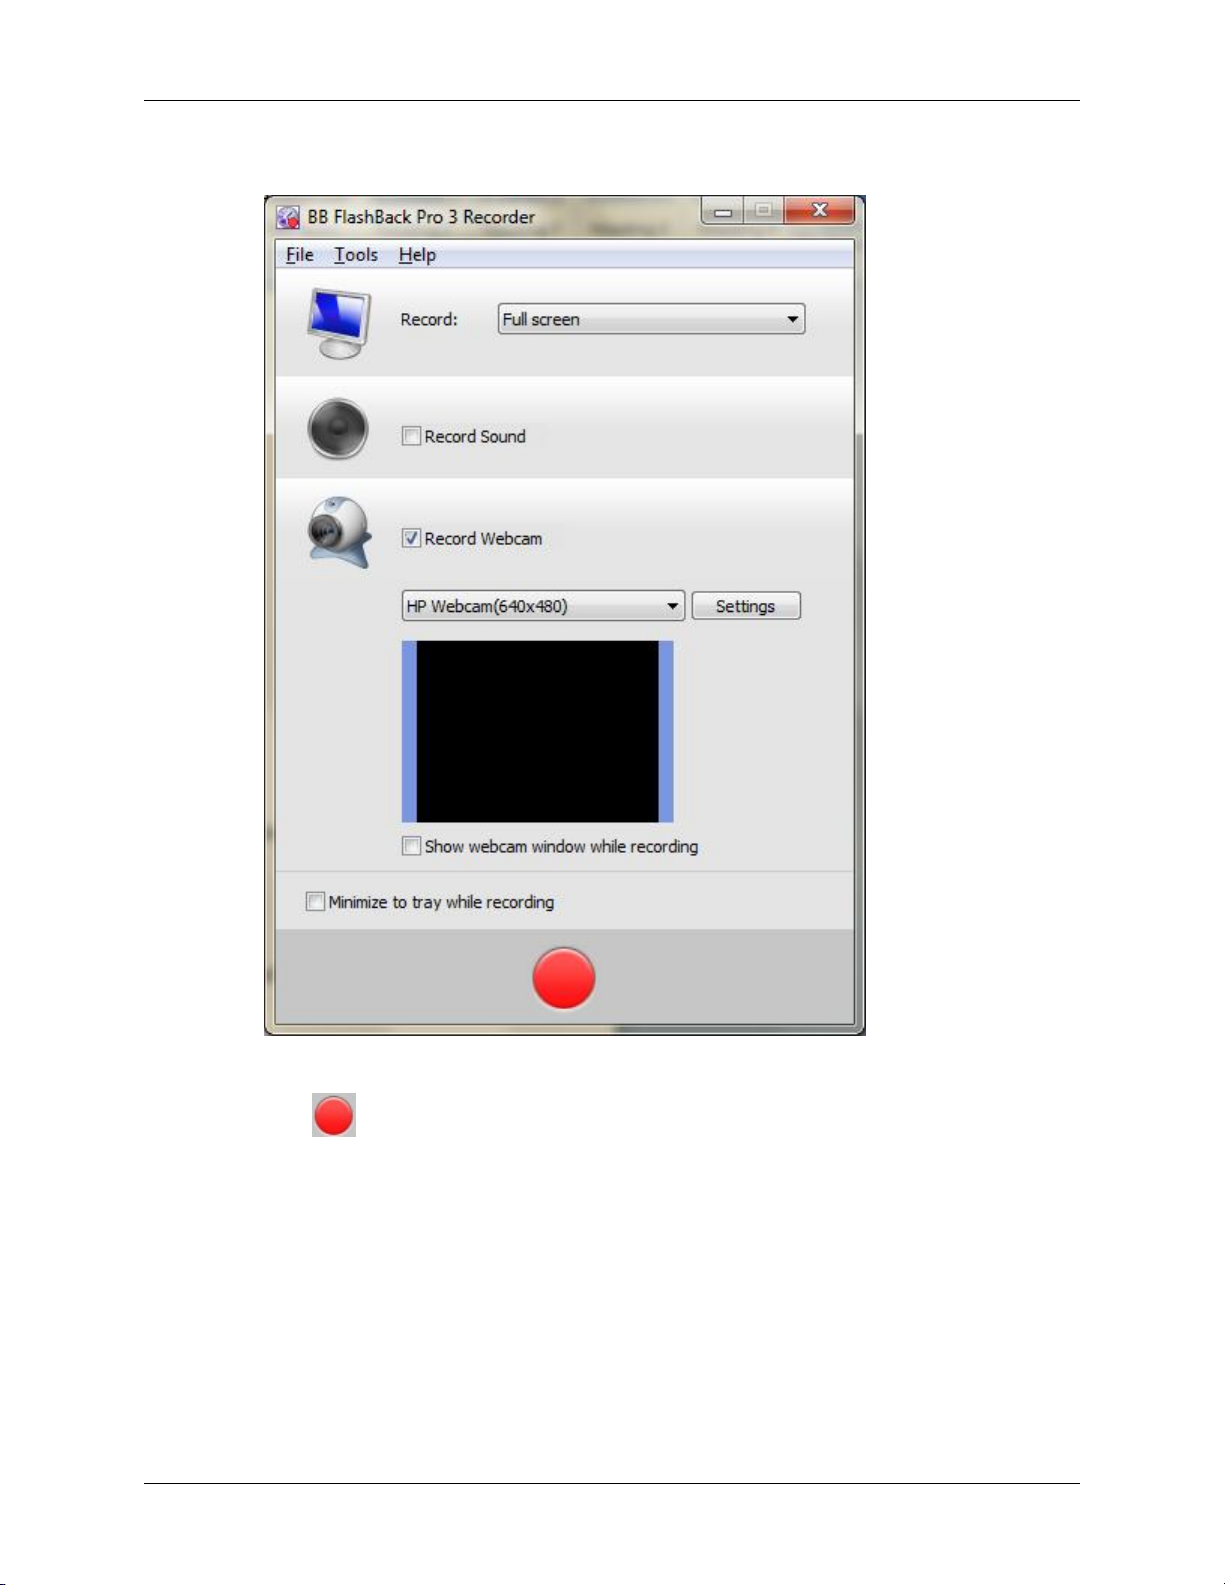
1. From the BB FlashBack recorder, tick Record Webcam.
Or
From the BB FlashBack recorder, click Tools -> Options in the menu, then click Webcam, tick
Capture Video From Webcam and click OK.
Or
From the BB FlashBack player, click Tools -> Recording Options in the menu, then click Webcam,
tick Capture Video From Webcam and click OK.
63
Page 70
Recording from the Webcam
2. Select the webcam to record with;
3.
Click .
Please note, if you tick Show Webcam Window While Recording it will display the webcam video
on screen while recording. The webcam video will be part of the recording and cannot be moved and
resized in BB FlashBack player.
How to record the webcam only:
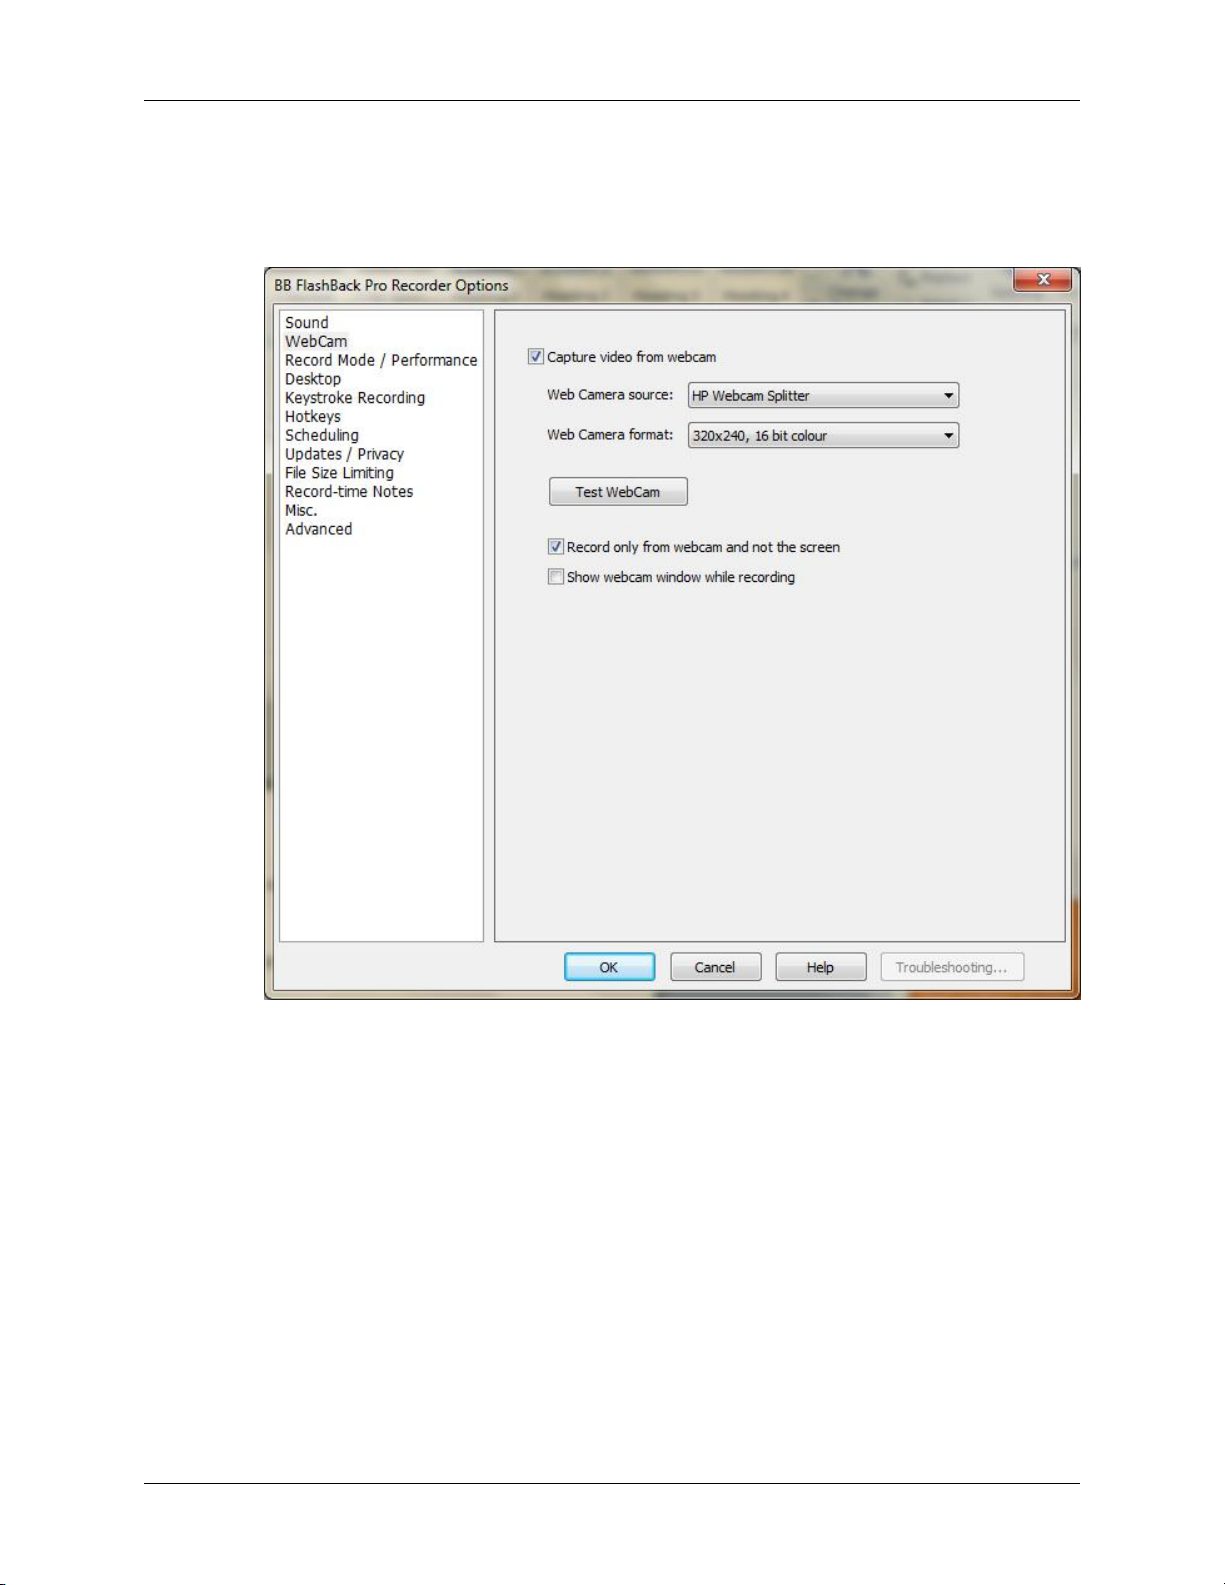
1. From the BB FlashBack recorder, click Tools -> Options in the menu, then click Webcam and tick
Capture Video From Webcam.
Or
64
Page 71
Recording from the Webcam
From the BB FlashBack player, click Tools -> Recording Options in the menu, then click Webcam
and tick Capture Video From Webcam.
2. Tick Record Only From Webcam And Not The Screen;
3. Click OK.
65
Page 72
Recording from the Webcam
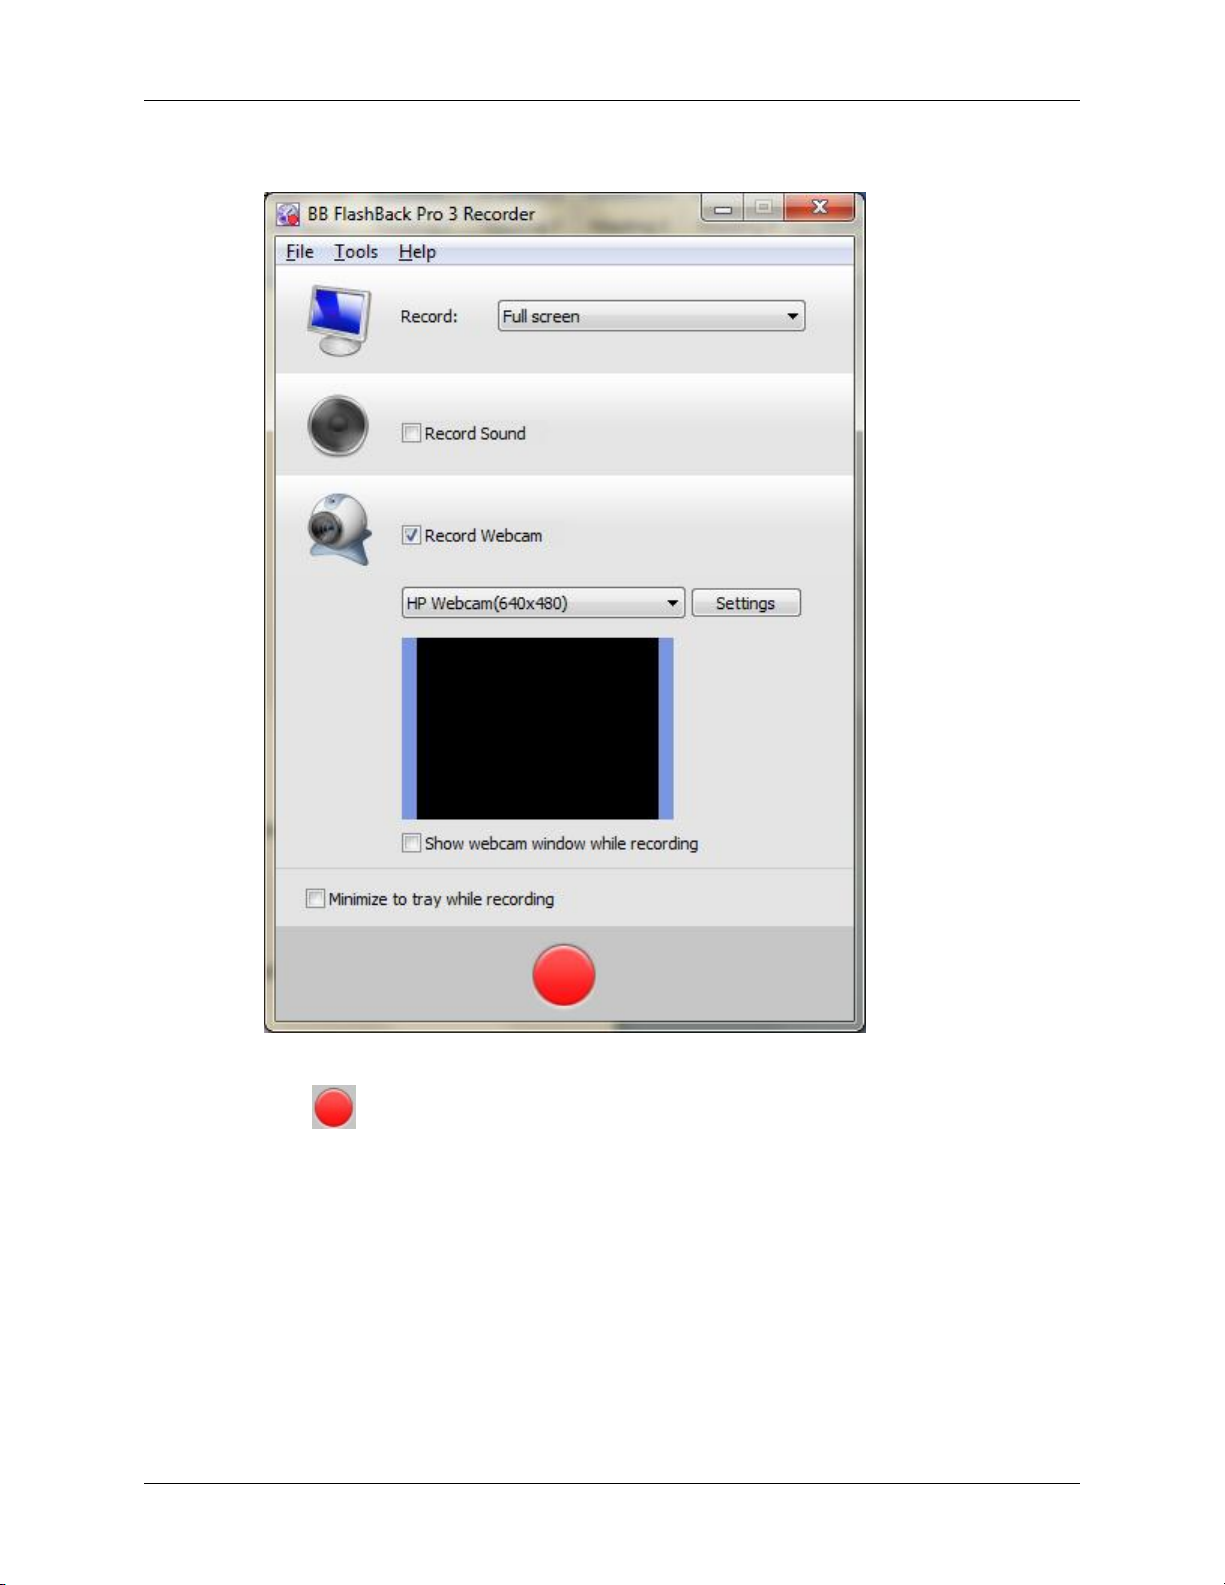
4. Select the webcam to record with;
5.
Click .
Note: The 'Record webcam only' function will create an FLV file instead of an FBR file.
How to insert a WebCam recording:
1. Select the frame where you want to insert the WebCam recording.
2. Click Insert -> WebCam / Picture-In-Picture Video in the menu.
3. Click From FLV Video File.
Or
66
Page 73
Recording from the Webcam
Click From AVI, WMV Video File.
4. Browse to the recording, select it and click Open.
How to edit the WebCam recording:
1.
Select only the WebCam track header and click on the toolbar.
Or
Double-click the WebCam image in the movie.
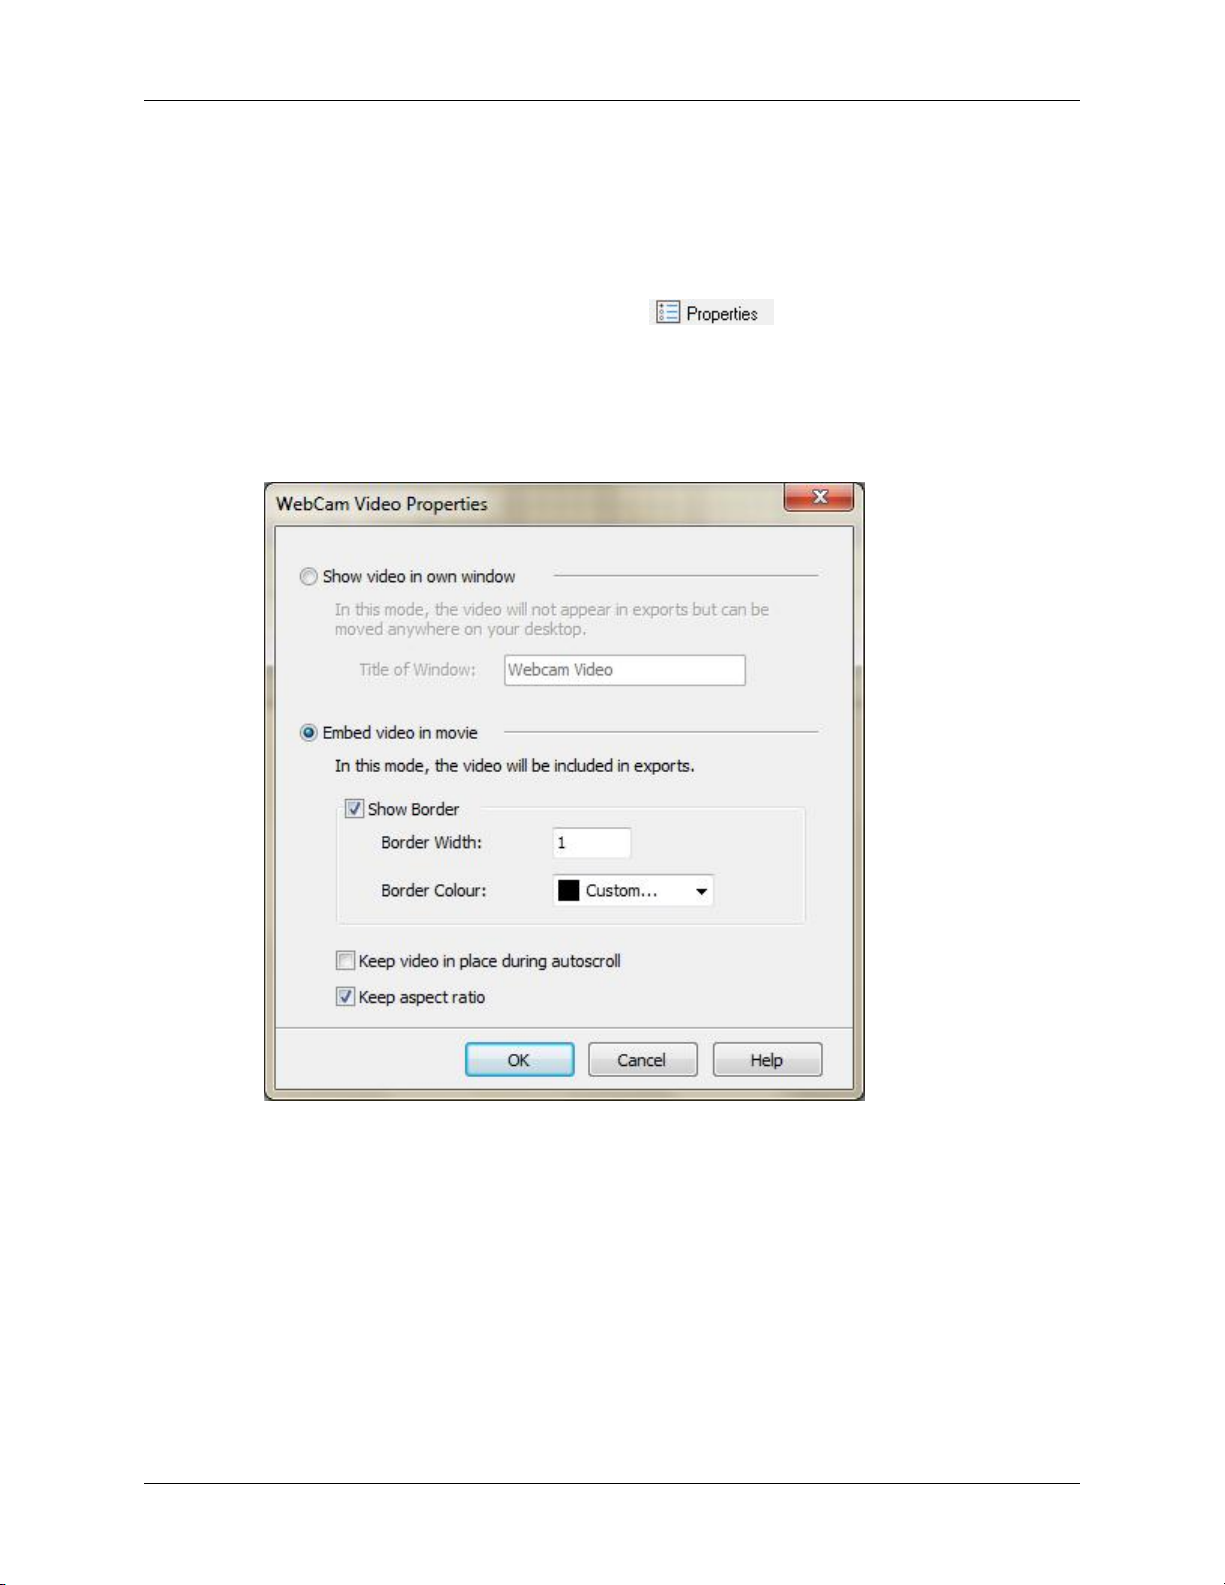
2. Set the WebCam video properties;
3. Click OK.
How to move or resize the WebCam recording:
1. Click and drag to move and resize the WebCam recording.
67
Page 74
Adding Watermarks
You can add a watermark to on a movie.
See Video
How to add a watermark:
1.
Click on the toolbar.
Or
Click Insert -> Watermark in the menu.
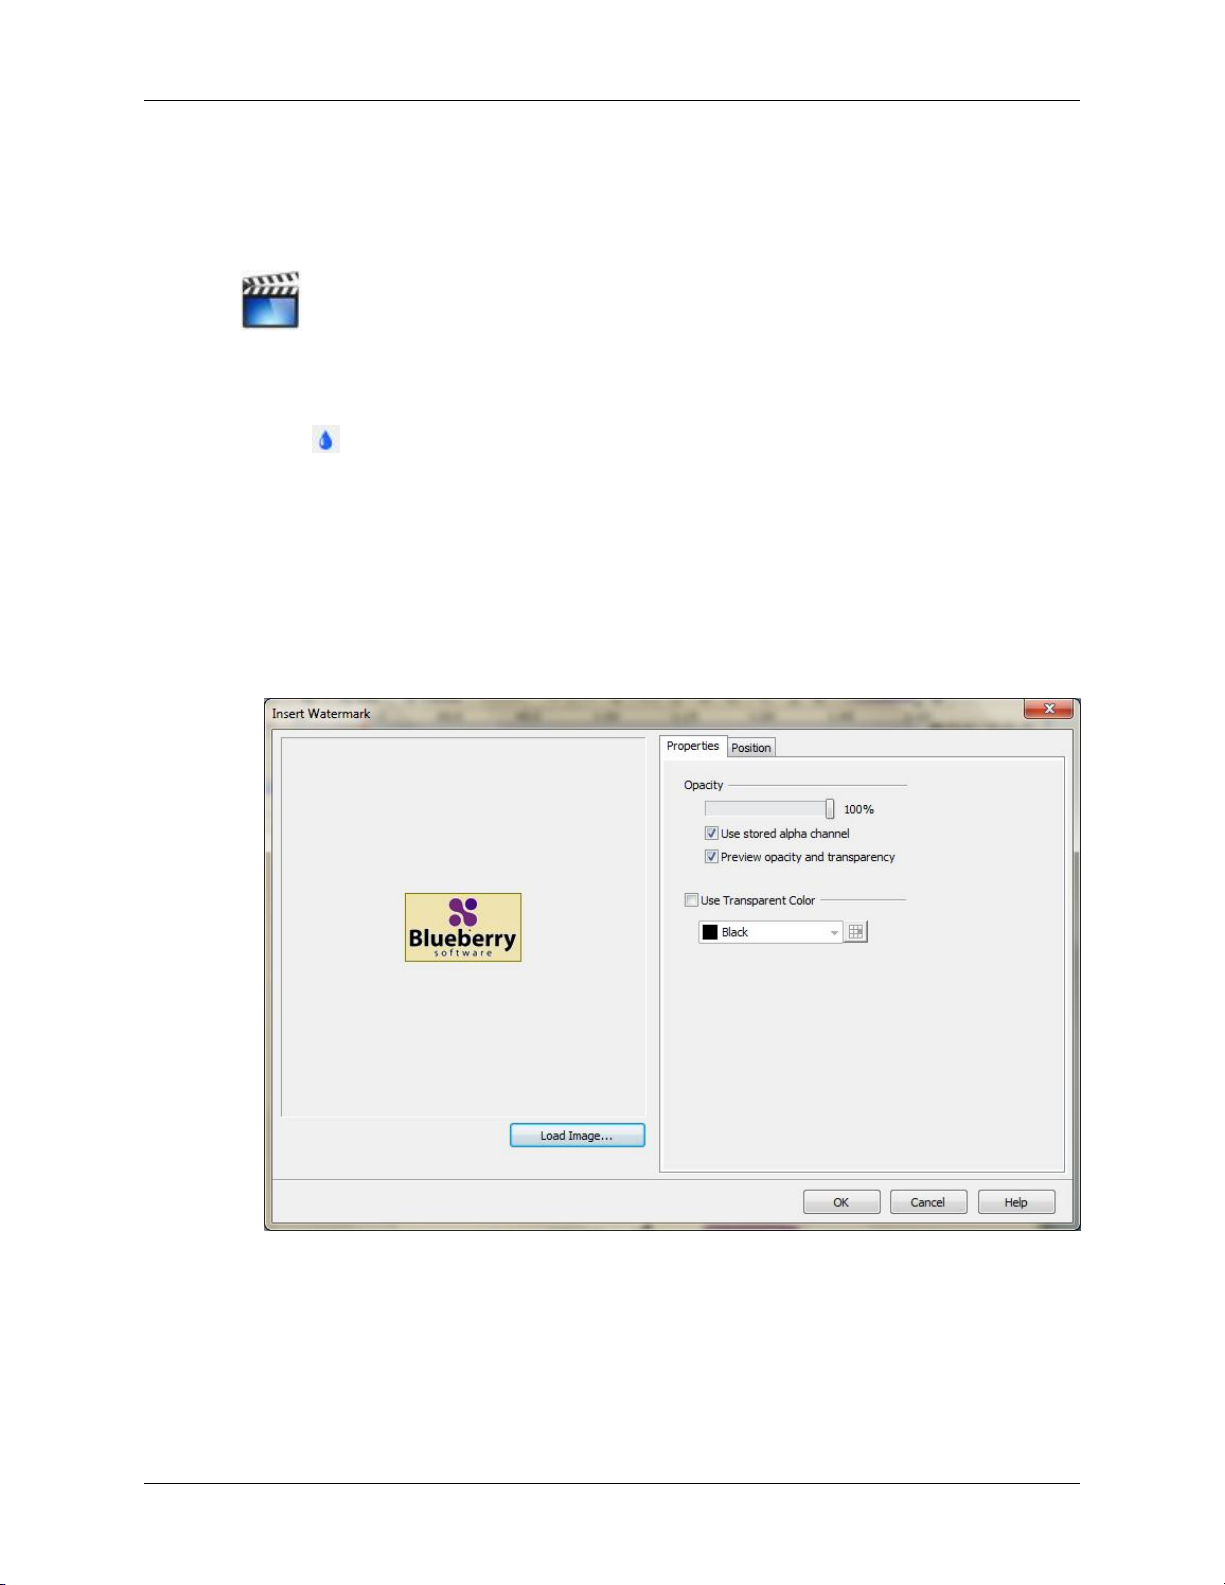
2. Click Load Image.
3. Browse to the image, select it and click Open.
4. Set the properties of the watermark;
5. Click OK.
68
Page 75
Inserting A Video File
You can insert video files into your movie.
See Video
How to insert video:
1. Select the frame where you want to insert the video.
2.
Click in the toolbar.
Or
Click Insert -> Video File in the menu.
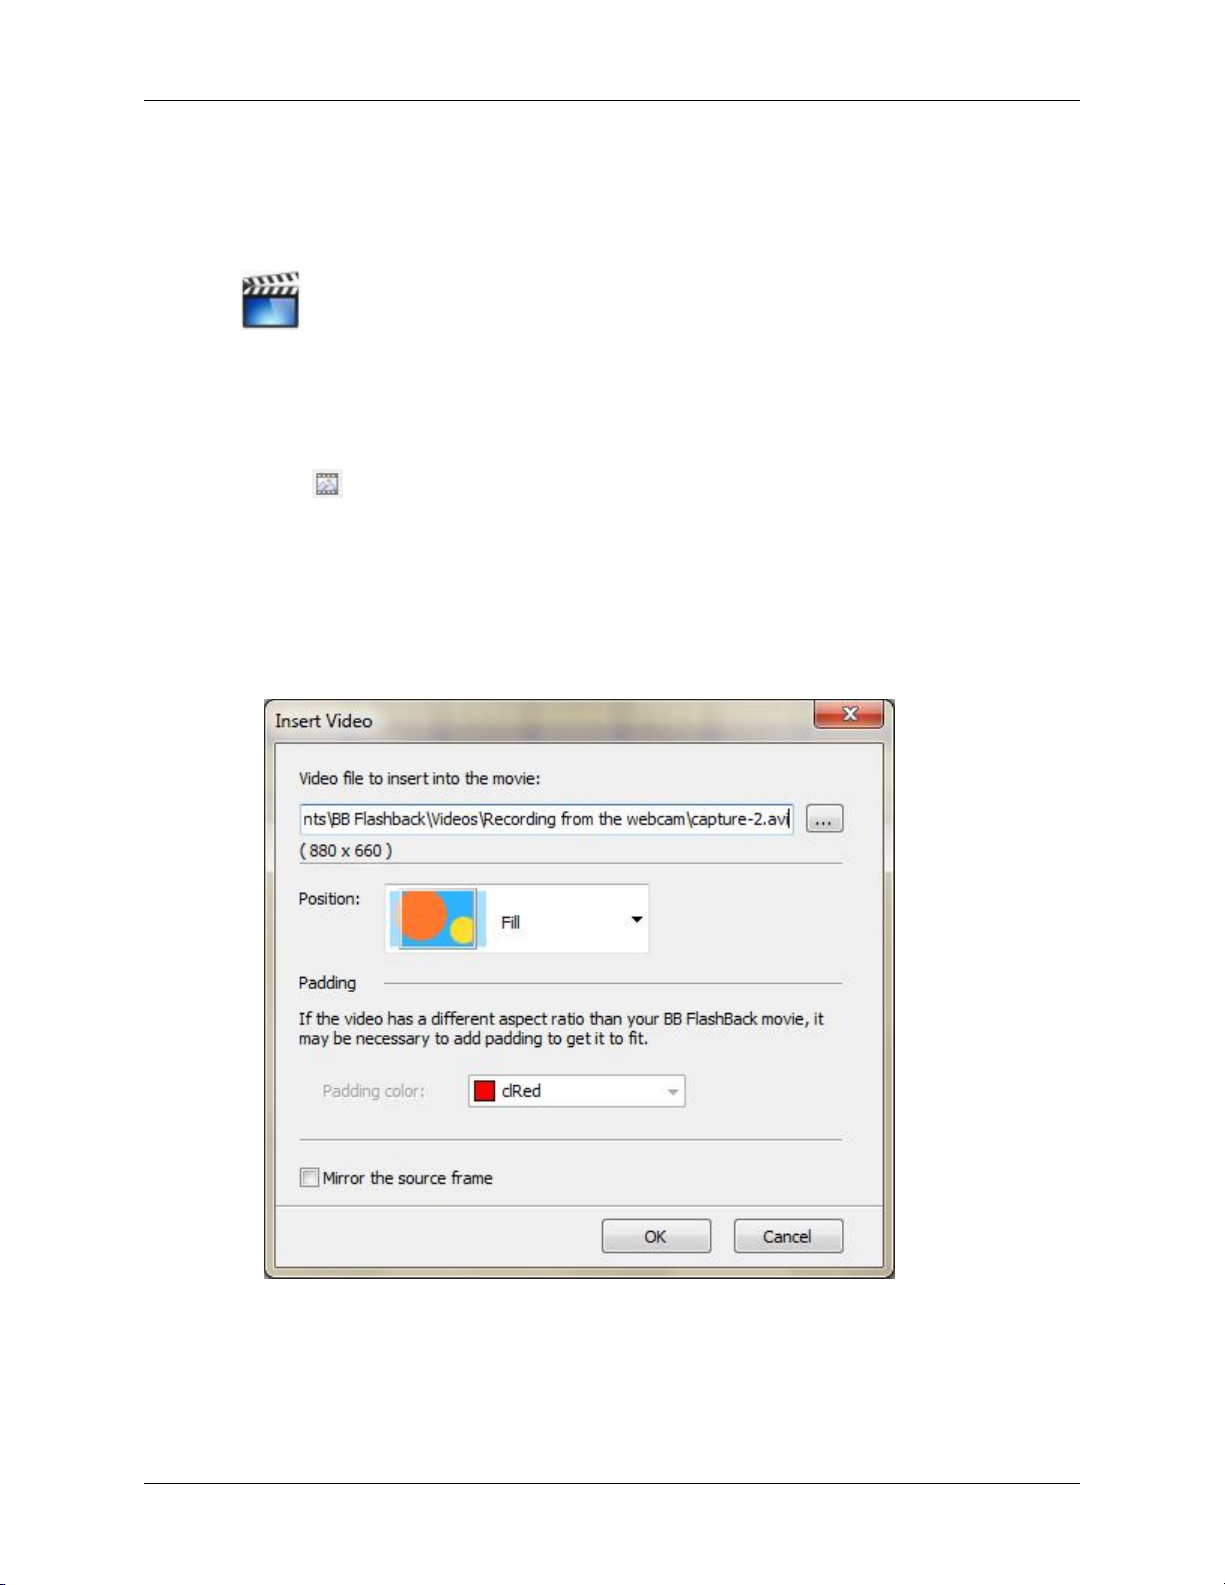
3. Browse to the video file, select it and click Open.
4. Set the position and padding for the video:
5. Click OK.
69
Page 76
Scheduled Recording
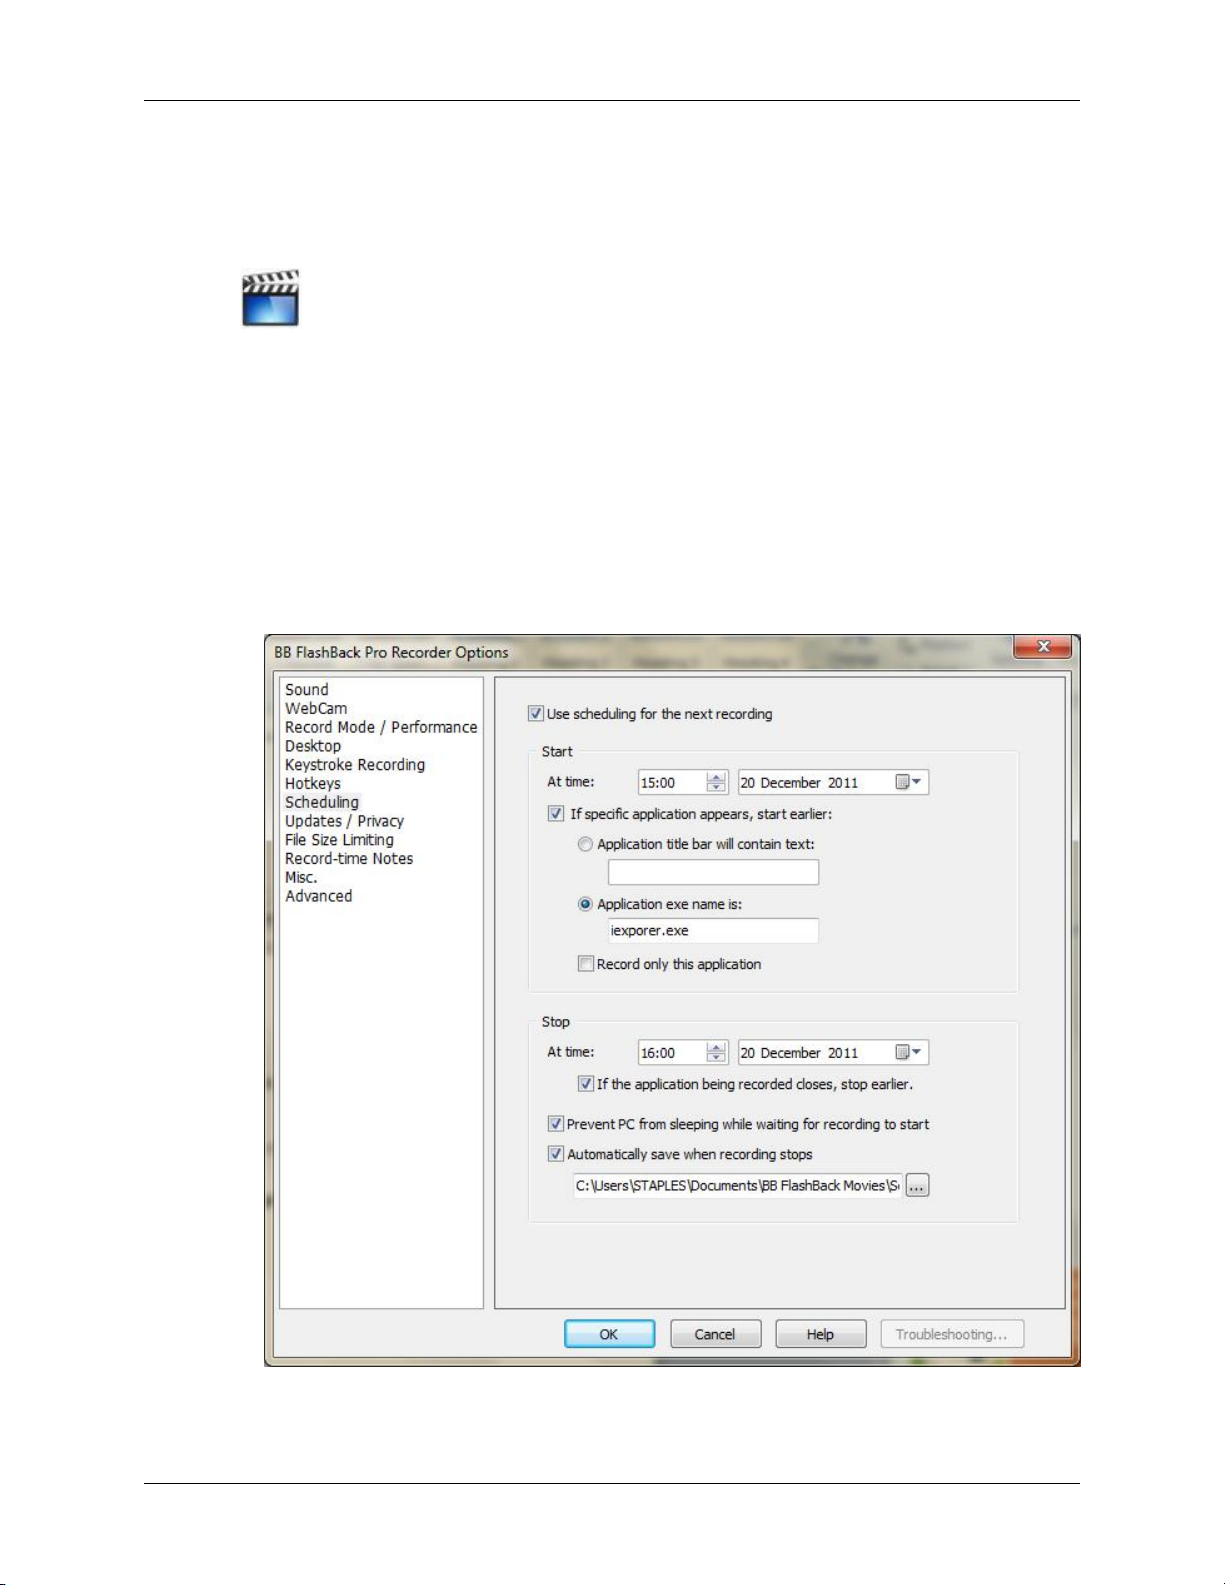
You can schedule a recording for a specific time, or for when a specific application is opened.
See Video
How to schedule a recording:
1. From the BB FlashBack recorder, click Tools -> Options in the menu, then click Scheduling.
Or
From the BB FlashBack player, click Tools -> Recording Options in the menu, then click Scheduling.
2. Tick Use Scheduling For The Next Recording.
3. Set the scheduling properties;
4. Click OK.
70
Page 77

5.
Click .
6. Click OK.
Scheduled Recording
71
Page 78

Cursor Highlighting
You can highlight the cursor and any mouse clicks in the movie.
See Video
How to highlight the cursor:
1.
Click on the toolbar.
Or
Click Effects -> Highlight Cursor in the menu.
2. Set the highlight properties;
3. Click OK.
72
Page 79

Part III. User Guide
Page 80

Professional Edition v4
Introducing BB FlashBack
BB FlashBack is a screen recorder - it makes movies of what you see on your PC screen.
Easy Recording
With only a few clicks of the mouse, BB FlashBack can record everything that happens on your Windows
desktop. It can also record PC sounds or a commentary if you have a microphone.
If you have a webcam connected to your PC, BB FlashBack can record from it to produce 'picture in
picture' movies.
For more details see BB FlashBack basics.
Powerful Editing Features
BB FlashBack comes with a powerful editor application that you can use to add annotations and sound
to your movie
For more details see About Editing Movies.
Easy Upload to Video Sharing Websites
BB FlashBack makes it easy to share your movies by giving you easy upload to some of the most popular
video hosting sites: YouTube, Blip.tv, Viddler and Revver.
For more details see Uploading Movies.
Publish to Popular Formats
Movies can be exported to Flash, QuickTime (H264), Windows Media Video (WMV), GIF, AVI, MS
PowerPoint or standalone EXE format. They can be viewed by virtually anyone with a PC or Internet
Browser.
For more details see About Exporting Movies.
74
Page 81

Contacting Blueberry
Blueberry has years of experience in offering both custom software development and IT consultancy to
clients that require a rare combination of technical expertise and an understanding of how this can address
their business needs.
For more information about Blueberry and its products, go to our website: www.bbsoftware.co.uk [http://
www.bbsoftware.co.uk]
For pre-sales and product support in your region:
1. Go to the Support menu - in the Help menu in Player, and main menu in Recorder.
2. Select the "Support for BB FlashBack" item and use the contact details shown.
75
Page 82

System Requirements
Software Requirements
BB FlashBack runs on Windows 2000, XP, 2003, Vista, 7 and 2008. 32 and 64 bit versions supported.
However Windows 2008 Server R2 does not support playback of recordings.
The capture driver (not required for recording, but may give better performance on older PCs) is certified
for 32 and 64 bit versions of XP and Vista. It has been tested but not certified on Windows 2000 and 2003.
DirectX 7.0 is required to play back movies. If you see a warning message regarding your version of
DirectX when you try to view a movie, you should browse to http://www.microsoft.com/directx and
download the latest version of the DirectX runtime for your Operating System.
Windows 2000 users need to apply a hotfix to Windows before BB FlashBack will run. Go to http://
support.microsoft.com/kb/816542 and click 'View and Request Hotfix Downloads' near the top of the page
to request the hotfix from Microsoft.
Export to Windows Media Video (WMV)
Windows Media Player 9 or newer needs to be installed in order to export to WMV format.
Export to QuickTime
QuickTime 7 or newer needs to be installed in order to export to QuickTime format.
Export to MS PowerPoint
MS Office 2000 or newer (including PowerPoint) must be installed in order to export to PowerPoint format.
Hardware Requirements
Processor speed: 500Mhz minimum, 1Ghz recommended
Memory: 256MB RAM minimum, 512MB RAM recommended
Display: Super VGA (800x600) or higher resolution
Graphics card: 8MB video memory required, 64MB and above recommended
76
Page 83

System Requirements
Buying BB Flashback
To continue to use all the features of BB FlashBack beyond the 30 day evaluation period, you must
purchase a licence key. You can do this either online or by phone.
Buying a licence
1. Start BB FlashBack
If you haven't already entered a licence key, you will see a window that gives you the option to "Buy
BB FlashBack". Select that option. Or, use the menu item "Buy BB FlashBack Pro" in the Help menu
in Player or the main menu in Recorder.
2. Buy a licence
When the online store page opens in your web browser, follow the instructions to buy a licence key. It
will be emailed to the address you register with, so make sure this is your real email address.
3. Type the key into BB FlashBack
When you receive the key, you need to enter it into BB FlashBack. There are two ways to do this.
• If you've not already entered a licence key, you will see a window that gives you the option to "Enter
Your Licence Key". Select this option and enter the key and owner name into the window that appears
next. The owner name is case sensitive.
• Select the "Enter / View Your Licence Key" item from the Help menu in the Player or the main menu
in the Recorder. Enter the key and owner name into the window that appears next. The owner name
is case sensitive.Once you've entered the licence, it takes effect immediately.
Note: This process can be performed from either Player or Recorder. Entering the key once from either
application licences BB FlashBack as a whole – the process does not need to be performed twice.
Problems with licence keys
I purchased online, but I didn't receive the email containing licence keys
When you register with Blueberry, it is essential that you provide a valid email address. We need this
address to send you your registration licence keys to activate the product.
If you purchased BB FlashBack directly from Blueberry (not from a reseller), your licence keys are always
available for viewing on our website. Login at http://www.bbsoftware.co.uk, then click the 'Your Account'
button in the Welcome box on the right-hand side of the page. You will see a page showing details of your
account. Now click “View licence keys you’ve already purchased” at the top of the page.
Also please note that despite our best efforts to prevent it, our mails may be caught by anti-spam software
you are running. If you are expecting licence key information from Blueberry and it hasn't arrived, be sure
to check your junk mail folder.
I'm having problems entering the key into BB FlashBack
To enter the licence key in BB FlashBack, start either the Player or Recorder program and select the 'Enter /
View Licence Key' item from the Help menu in Player or the main menu in Recorder. In the next window,
enter the Licence Key and Owner Name exactly as they appear in the email from Blueberry, or on our
77
Page 84

System Requirements
web site, and click OK. We advise that you cut and paste the Licence Key and Owner Name values into
the relevant fields, to eliminate typing errors.
Other help with key related problems
If you are still having difficulty receiving or entering your licence key, please email
[email protected] [http://[email protected]] or contact your reseller with details of the
problem.
Resellers
We have registered resellers in countries across the globe. If you prefer to use a reseller rather than
buying from Blueberry direct, go to our online resellers list [http://www.bbsoftware.co.uk/purchase/
resellers.aspx].
78
Page 85

Getting Started
BB FlashBack Basics
There are two separate applications in BB FlashBack: the Recorder and the Player.
The Recorder
Records your desktop
It records what happens on your Windows desktop and saves this as a FlashBack movie file.
To learn more, see Recording movies.
Records Sound
It also records sound - either the PC sounds, or a commentary if you have a microphone connected. If
you're running Windows Vista, you can record a commentary and PC sounds at the same time.
To learn more, see Recording sound [93].
Records Webcam video
If you have a webcam connected, BB FlashBack can record from that as well, to show it picture- in-picture
in the final movie.
To learn more, see Recording Webcam video.
The Player
Plays back movies
It lets you play back, edit and add things to FlashBack movies, and save them as movie files that can be
played by all PC users.
To learn more, see Playing back movies.
Edits movies
You can edit out mistakes or add pauses with the frame editing functions.
To learn more, see About editing movies.
Annotates movies with text and images
You can add textboxes, images, highlights or buttons to movies.
To learn more, see Adding text boxes [137], Adding images [139], Adding highlights [141] and
Adding buttons [142].
Adds effects
79
Page 86

Getting Started
You can add 'zoom and pan' type effects to have the movie focus in on an area of the screen.
Exports to other file formats
When you're done and want to show other PC users your movies, you can export to a number of file
formats. See About exporting movies.
To get started
You can record a movie using BB FlashBack Recorder.
See Recording movies.
Once you have recorded a movie you can view and edit it using BB FlashBack Player.
See Playing back movies.
When you want to share the movie with other PC users, BB FlashBack Player gives you the option of
exporting it into a number of file formats. See Sharing movies.
80
Page 87
Getting Started
Recording movies
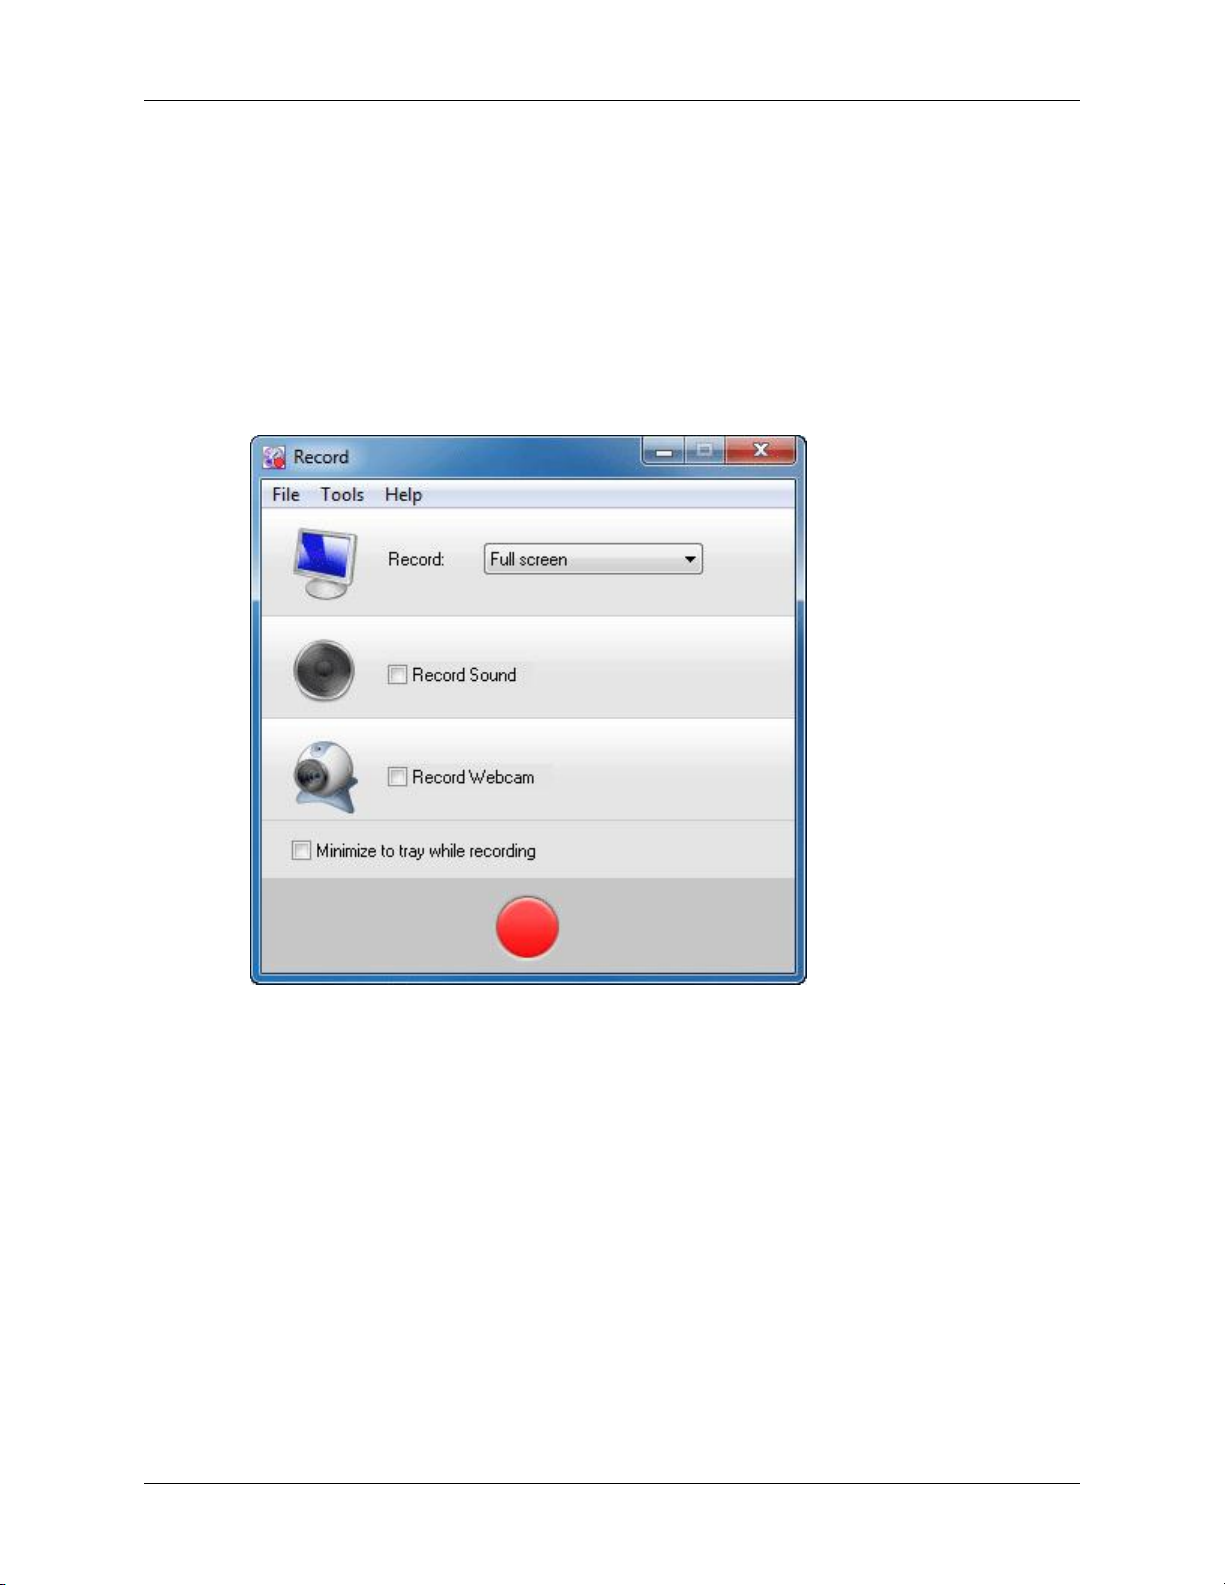
With only a few clicks of the mouse BB FlashBack can start to record everything that happens on your
Windows desktop.
Select whether you want to record the full screen or just a region or window. Choose a sound source and
webcam and click the button, and BB FlashBack records your desktop.
When you're finished, click the button and the recording is saved to a file you can open in BB FlashBack
Player to edit, annotate and save in a standard video format.
To view the movie
For help on viewing your movie, see Playing back movies.
For help on some of the more advanced features of BB FlashBack Recorder, see About recorder features.
Playing back movies
Open BB FlashBack Player from the shortcuts on your desktop or Windows Start menu and play back
movies by using the Open item on the File menu or the button on the toolbar.
From The Welcome Window
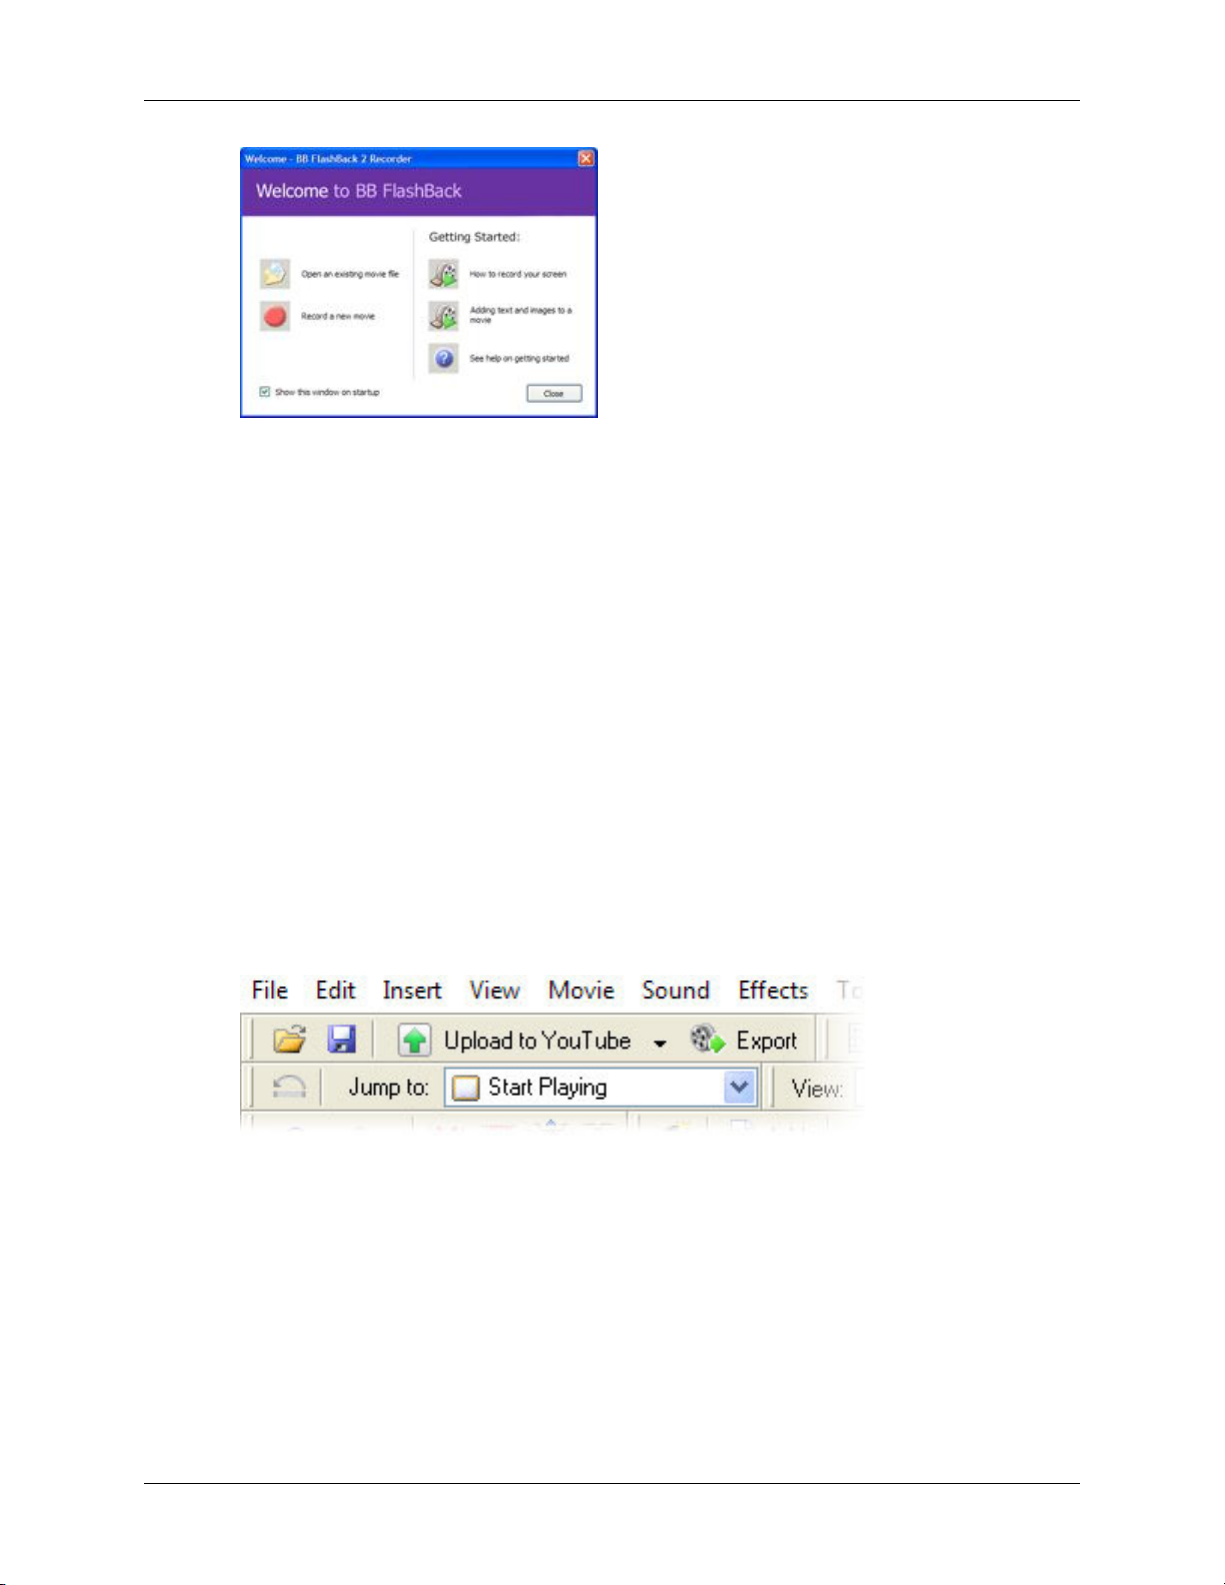
Starting either Recorder or Player shows the Welcome window:
81
Page 88
Getting Started
Click 'Open an existing movie file' to select a recording and play it.
Playing a movie from Recorder
On the File menu of the Recorder main window, use the Open or Open Recent items to open a recording.
When Recorder is minimized to a tray icon or floating controls, show the main menu (by clicking the icon
or clicking the button on the floating controls). Use the Play item or the recently recorded movies list at
the top of the menu.
Sharing movies
If you want to share your movies with other PC or Mac users, you'll need to either upload them to a video
hosting site or export them and send the exported file to the user.
Uploading to a Video Hosting Site
BB FlashBack can upload your movie to these video hosting sites: http://www.youtube.com, blip.tv [http://
blip.tv] and http://www.revver.com. Use the Upload button on the Player toolbar.
You need an account at the video hosting site before you use this function. The first time you use this
feature you'll need to give BB FlashBack your login details (it'll remember them for next time).
When the upload finishes you'll get a web address you can easily send to someone. When they open it in
a browser they'll see a web page displaying the movie.
See Uploading Movies for more help.
82
Page 89

Getting Started
Sharing Movies
If you want non-FlashBack users to see a movie you've created, you'll need to export it. Here are the file
formats BB FlashBack can export to:
Flash
Flash is the easiest format to embed in a webpage. It includes full playback controls. A very high (>95%)
of PC and Mac users should be able to view movies in this format. Flash and EXE formats are the only
formats that support interactive elements like 'click to continue' textboxes and buttons. To learn more, see
Exporting to Flash.
QuickTime (H264)
QuickTime uses advanced compression to achieve a good balance of quality and file size. QuickTime
movies can be embedded in webpages and streamed to viewers. They will play back in all Mac's but
only PCs that have QuickTime or iTunes installed. You need QuickTime 7 or later installed to export to
QuickTime format. To learn more, see Exporting to Quicktime.
Windows Media Video (WMV)
As with QuickTime, you can achieve good quality and file size with this format, and WMV movies can
be embedded in Web pages. WMV files should play back on virtually all PCs, but generally not on Macs.
You need Windows Media Player 9 or newer to export to WMV format. To learn more, see Exporting
to Windows Media Video.
Standalone EXE
BB FlashBack can export your movie as an executable file (EXE file) that plays the movie when opened.
It has configurable playback controls, 'lossless' quality images and can achieve very small file size.
The EXE file will only play back on Windows PCs. EXE and Flash formats are the only formats that
support interactive elements like 'click to continue' textboxes and buttons. To learn more, see Exporting
to Standalone EXE.
AVI
Exporting to AVI can be complicated for less technical users because a codec is needed to encode the
movie. The image quality and file size is very dependent on the codec used. If a PC doesn't have the codec
you used to encode it, it may not be able to play back the AVI file, and the codecs you can guarantee are
installed on all Windows PCs may not give good results. To learn more, see Exporting to AVI.
MS PowerPoint (PPT)
BB FlashBack can save you movie as a PowerPoint file with the movie embedded in the first slide.
You need MS Office 2000 or newer, including PowerPoint, to export to this format. To learn more, see
Exporting to Powerpoint.
I want to send it to other BB FlashBack, BB FlashBack Express or BBTestAssistant users
Just send them the FlashBack Movie file (FBR file) created by BB FlashBack - they will be able to play
it, and the FlashBack file is often smaller than other formats.
83
Page 90

Getting Started
I want to display the movie on a webpage
The easiest way of displaying a movie on a webpage is by uploading to a video hosting site and using the
"embed" code they provide for the movie. See Uploading movies for more details.
If you want higher quality and/or interactive elements in the movie, you need to export to Flash and copy
that Flash export onto your web server. See Displaying a Flash export on a webpage [168] for more help.
WMV and QuickTime formats can also be embedded in web pages. See Displaying a Quicktime movie
on a webpage [173].
I want to include the movie on a CD
Try exporting to Flash, QuickTime, WMV and EXE formats. The format that gives best image quality at
lowest file size may depend on the content of your movie.
EXE format often gives smallest file sizes if 'normal' Windows applications are recorded. If your movie
contains moving video or lots of photographic images, Flash QuickTime or WMV formats may produce
smaller exports.
84
Page 91
Using BB FlashBack
Recorder Windows
The Recorder Main Window
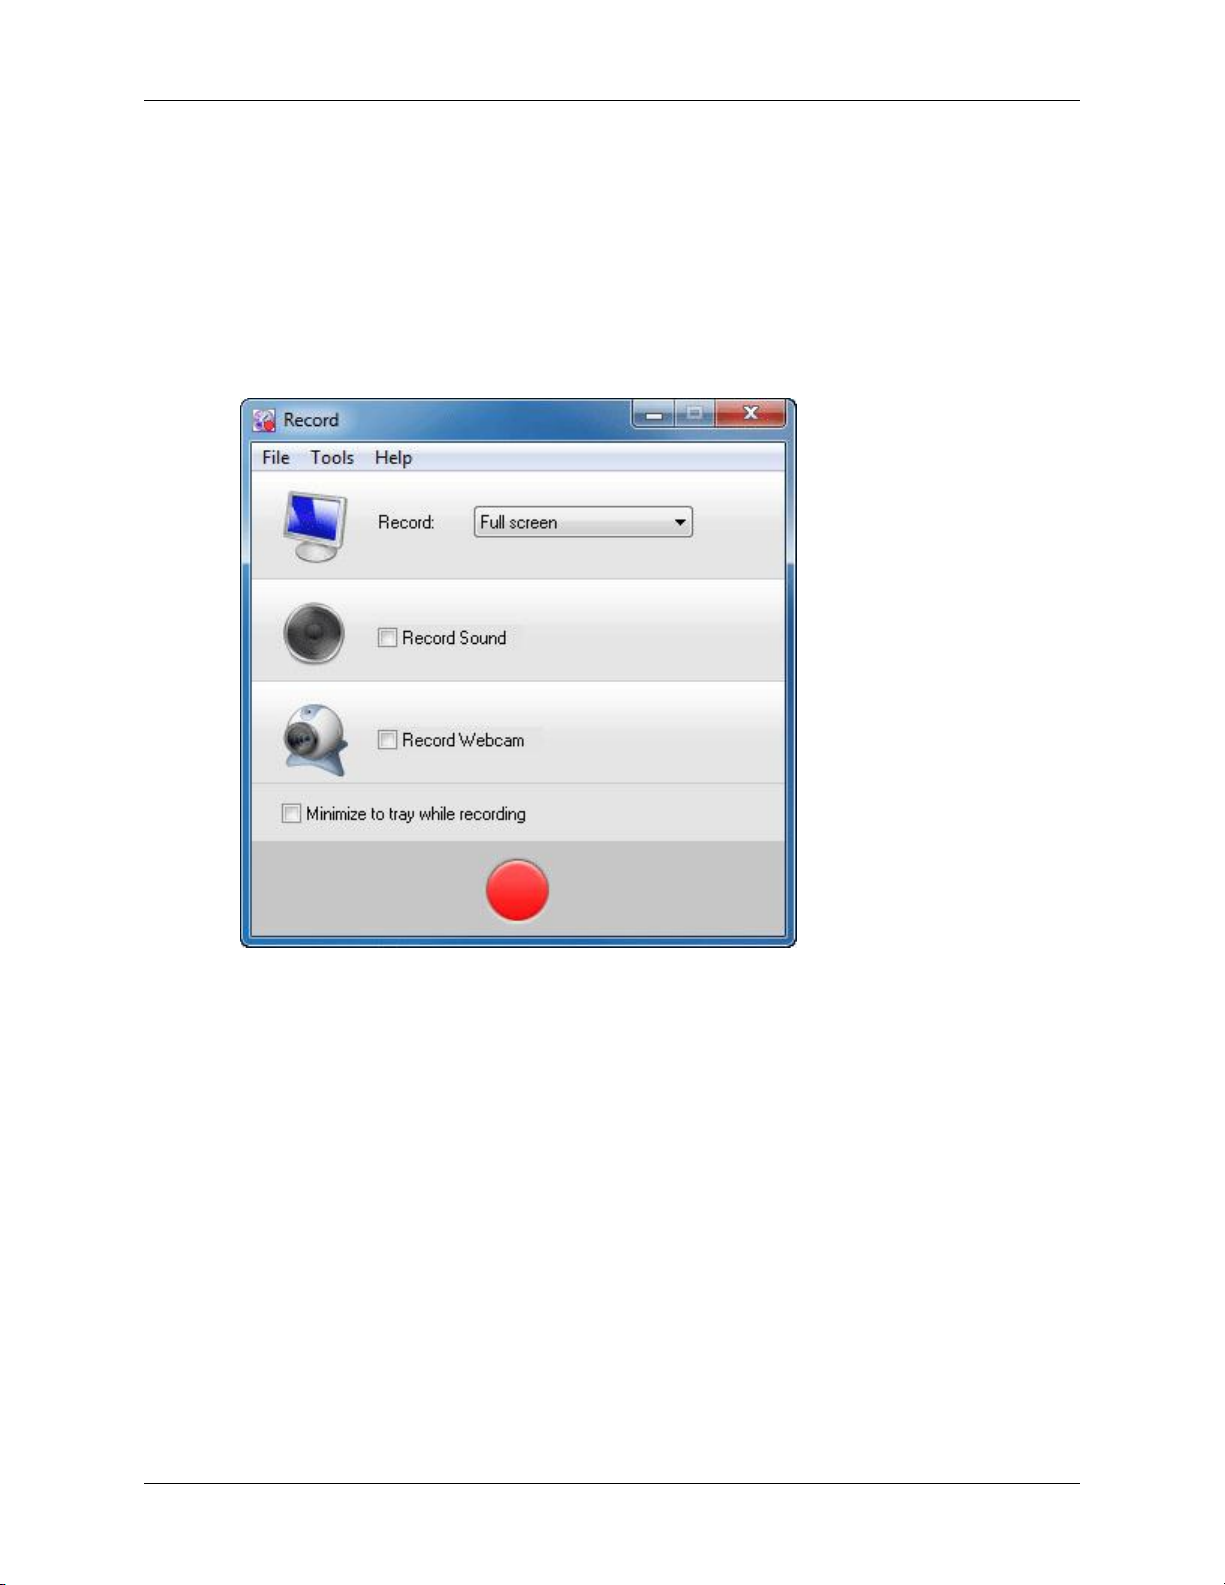
The Recorder main window allows you to easily change the main recording options and start recording
The Record setting allows you to select what to record.
• Full screen (or screens if you have more than one monitor)
• A Window
• A Region
Turn on the 'Record Sound' setting to record sound. You'll need to select a source, usually either PC
Speakers or the Microphone, and you can set the recording levels. See Recording sound for more help.
Turn on the 'Record Webcam' setting to record from attached webcams. See Recording webcam video.
Turn on the 'Minimize to tray/floating controls while recording' setting to minimise Recorder while it is
recording. Select between minimizing to the icon tray or to floating controls by using the settings in the
Tools menu.
85
Page 92

Using BB FlashBack
The Recorder main menu
Show the Recorder main menu by minimizing Recorder to the icon tray and clicking the icon, or
minimizing it to floating controls and clicking the button.
From this menu you can show the recording options window, record a new movie, create a report or play
your recently recorded movies.
When you are recording a movie, this menu can be used to pause or stop recording. The menu items from
top to bottom:
Recently recorded movie list
This list is always at the top of the menu. It shows the names of the previous ten movie files that you have
created. Each file has a pop out menu that contains a number of options to enable you to play, edit or rerecord it. For more help, see Movie file sub-menu.
Play
Displays a file selection dialog, then starts up BB FlashBack Player to show the selected movie.
Record
Starts a recording immediately, using the current settings.
Options
Shows the Recorder options window.
Pause (only enabled while recording)
Pauses recording.
Add Marker (only enabled while recording)
Allows the user to add a marker while recording. Recording is paused and a window is displayed where
you can enter a marker name.
Restart Recording
Starts recording again. Everything recorded up to that point is discarded.
Stop (only enabled while recording)
Stops recording.
Help
Shows the help file within the application.
86
Page 93

Using BB FlashBack
Support
Use the Report Problem to Blueberry item on this sub-menu to report to Blueberry any problems you have
while using BB FlashBack. See Reporting problems for more help.
Buying BB FlashBack
Not displayed once purchased. Contains 2 items:
Buying a licence
Displays help on how to buy a licence.
Buy BB FlashBack online
Select this item to go to our online store. See Buying a licence for more help.
Enter/Review Licence key
Shows a window where you can enter the licence key and owner name you purchased from Blueberry to
fully licence BB FlashBack.
Minimize to tray
Displays the Recorder as an icon in the system tray when minimised.
Minimize to floating controls
Displays Recorder as a floating toolbar when minimized.
Check for updates
Select this item to check on the internet for newer versions of BB FlashBack.
About
Displays the About box. This shows the program version number, licence key and enables registration and
purchasing.
Exit
Closes the Recorder application.
87
Page 94

Using BB FlashBack
The movie file sub-menu
Each item in the recently recorded movie list has a sub-menu. The menu items from top to bottom are
as follows.
Open
Opens the movie in BB FlashBack Player and automatically plays the selected movie file.
Attach to new bug report
This option is only visible if you have installed BB BugReporter. Selecting this option starts up the Bug
Reporter application, creates a new bug report and attaches the selected movie file.
Play Flash
Select this option to play the Flash movie that was previously exported from this movie file. If there has
been no Flash export from the selected movie, this option will not be displayed.
Export To Flash
Select this option to export to a Flash movie file. For more help see Exporting to Flash.
Export to AVI
Select this option to export to an AVI movie. For more help see Exporting to AVI.
Export to WMV
Select this option to export to a WMV movie. For more help see Exporting to WMV.
Export to Standalone EXE
Select this option to export to standalone EXE format. For more help see Exporting to Standalone EXE.
Export to PowerPoint
Selecting this option to export to a PowerPoint file. For more help see Exporting to Powerpoint.
Send by email
Opens a new message in your default email client and attaches the movie in the selected format. There are
3 formats to choose from: native FlashBack FBR file, Macromedia Flash and AVI.
Re-record
Starts to record a new movie with the same name as the selected movie file. The selected movie file is
overwritten and replaced with the new recording.
88
Page 95

Using BB FlashBack
Remove from menu
Choose this option to remove the selected movie file from the recently recorded movies list.
Save As
Choose this option to save the movie to another file name.
Delete
Choose this option to delete the selected movie file and remove it from the recently recorded movies list.
Explore
Choose this option to open the folder containing the selected movie file in Windows Explorer.
Copy file path to clipboard
Copies the full path and name of the movie file as text into the clipboard.
89
Page 96

Using BB FlashBack
The Recorder Options window
Use this window to adjust recording settings, such as display options, sound, webcam and other more
advanced options.
These settings will be used the next time you select Quick Record or Record.
The Record Wizard will take these settings as its defaults.
More settings are available on the Recorder Options window than in the Record Wizard. To show the
Recorder Options window:
From the Recorder main menu select Options...
or
On the Recorder main window select Options from the Tools menu.
The recorder options window contains the following tabs.
Display
Use this to set the Windows display settings during recording and how BB FlashBack windows appear
during recording and in the final movie. For more help, see Windows display ptions.
Sound
Use this tab to select when sound will be recorded, and the format and compression that will be used.
Webcam
Select whether to record video from an attached webcam, and the device and format used. For more help,
see Recording webcam video.
Keystrokes
Options relating to capturing of keystrokes are set on this tab. For more help see: Capturing keystrokes.
Hotkey
Select this to define a hotkey that can be used to make the recording controls pop-up window appear during
recording. For more help, see Defining and using hotkeys.
File Size
Use this tab to select options to limit the size of the movie file produced. For more help, see Limiting
the movie file size.
90
Page 97
Using BB FlashBack
Record mode
Use this tab to change your recording mode or the number of frames captured per second. For more help,
see Recording modes and Performance.
Misc
This tab contains settings relating to start-up options and the various delays that BB FlashBack inserts
between certain operations at the start of recording. For more help, see Customising delays.
Advanced
This tab contains advanced settings relating mainly to performance.
Scheduling
Use these settings to have BB FlashBack record at a set time or when a certain application runs and closes.
For more help, see Scheduled recording.
Adding a Marker while recording
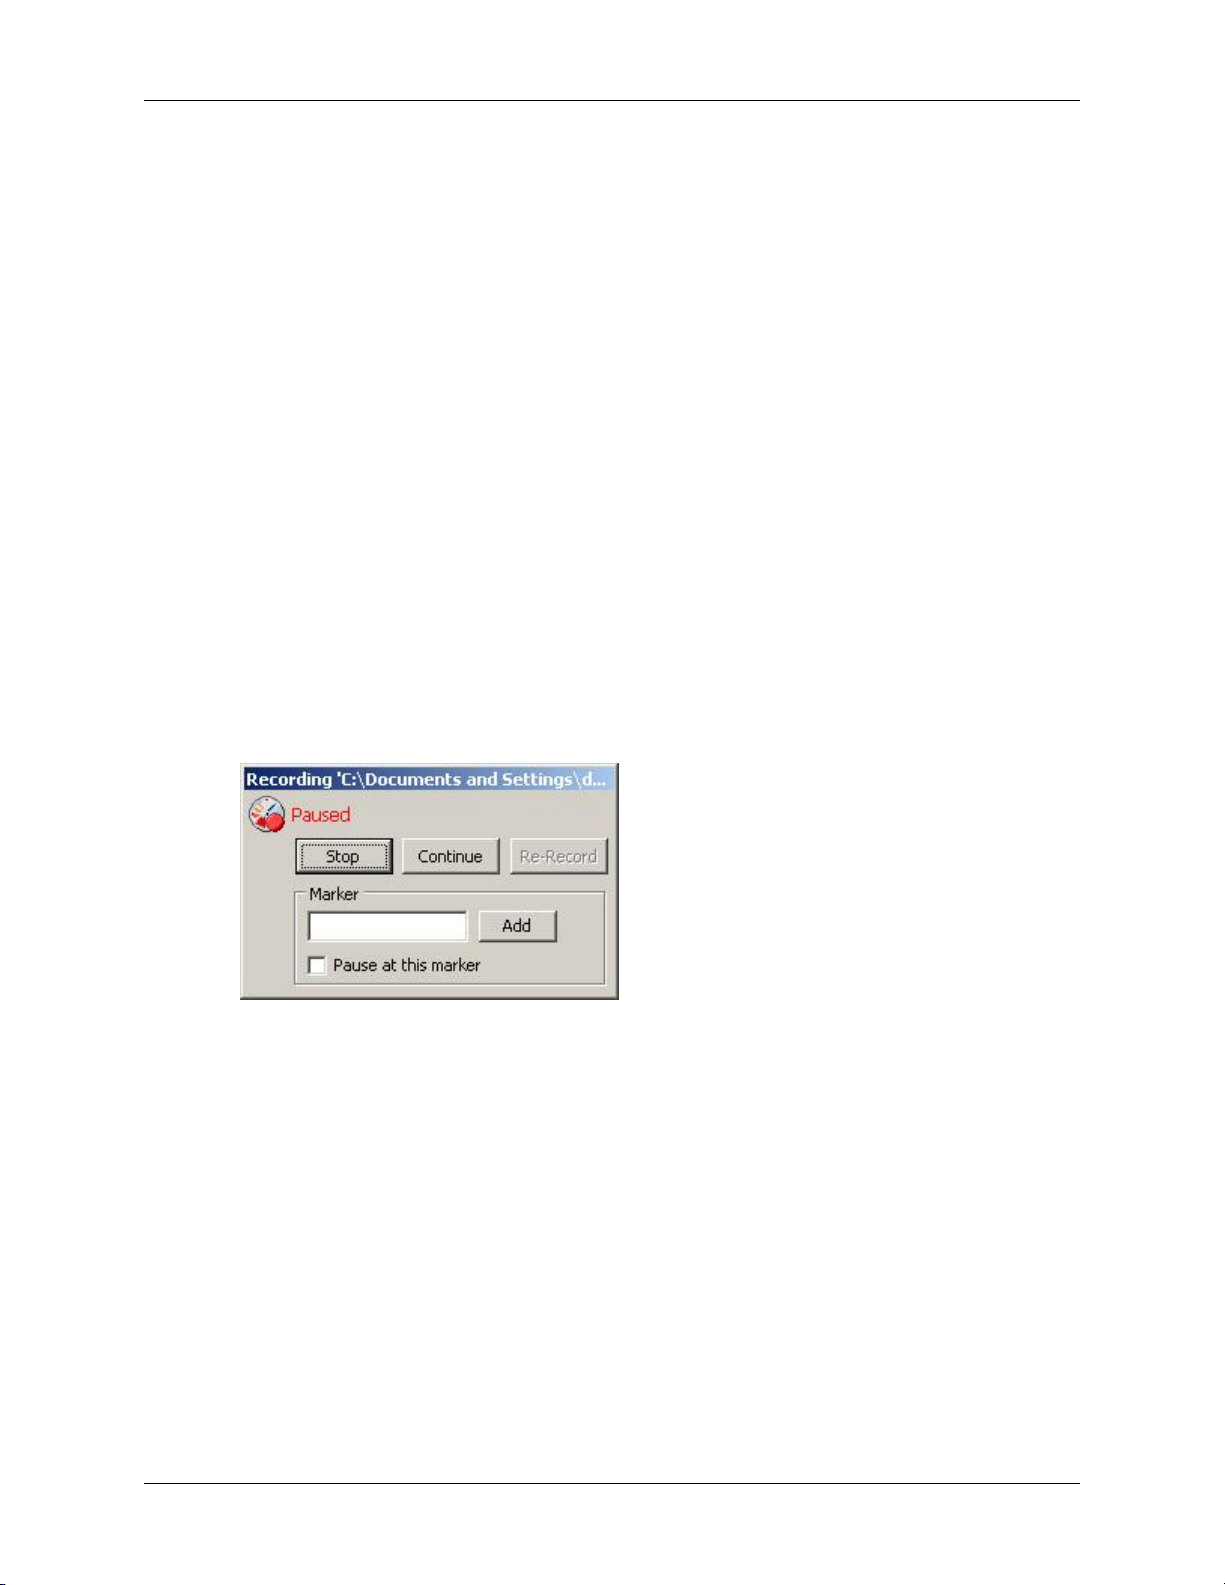
While recording is in progress, you can add a marker by using a popup window.
To make the pop-up window appear during recording
1. Pause recording by selecting Pause from the Recorder main menu or using a hotkey (if defined - see
Defining and using hotkeys).
2. Select 'Add Marker' from the Recorder main menu.
3. Enter a name into the Marker field.
4. Click Add to add the marker at that point in the recording.
5. Continue recording by clicking the Continue button.
Using Recorder when it is minimized
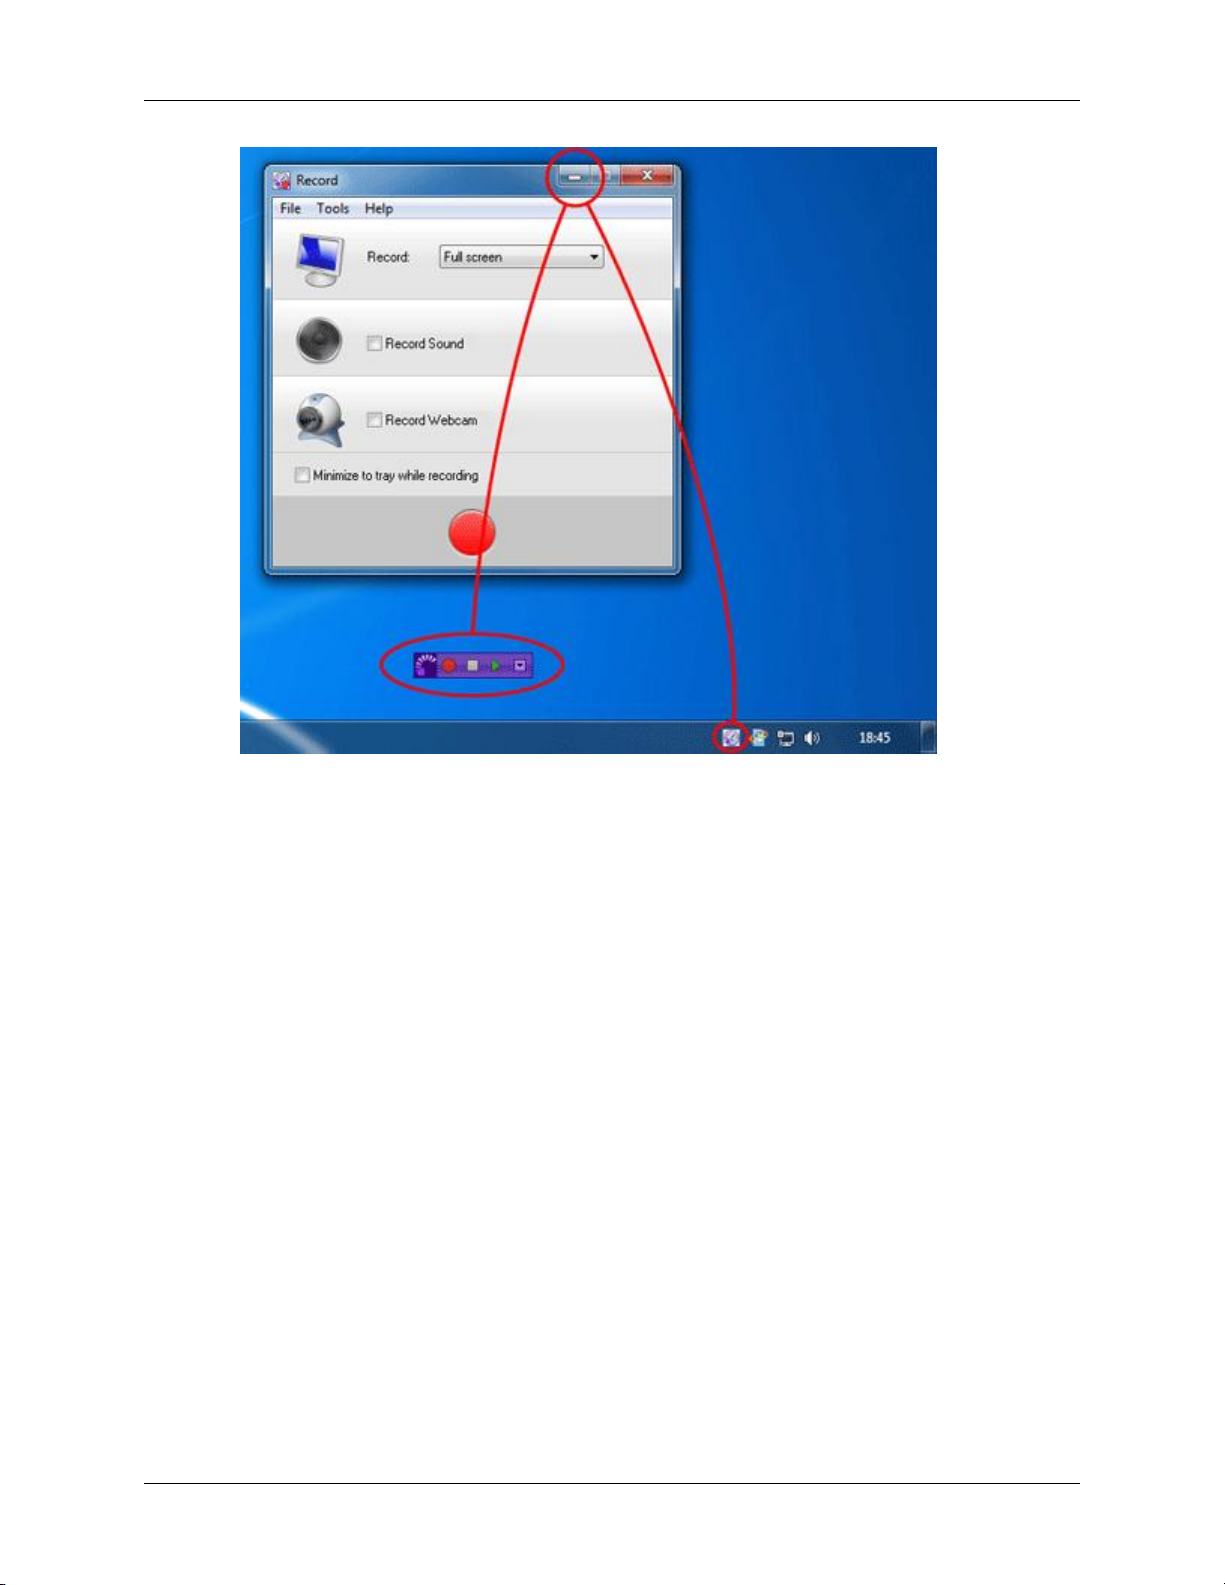
BB FlashBack Recorder can be minimized to the icon tray or to floating controls.
91
Page 98
Using BB FlashBack
In the icon tray
Recorder appears as an icon in the system tray. Access its functions by clicking it and selecting from its
popup menu.
Floating above the desktop
Recorder appears as a set of controls floating above the desktop. You can start to record, or play a movie, by
clicking its Record and Play buttons. You can access the same menu as seen in Tray icon mode by clicking
the 'down arrow' button. The toolbar can be positioned anywhere on the Windows desktop. Position it by
clicking on the FlashBack logo on it left end and dragging.
Change how Recorder minimizes by selecting an option from the Tools menu.
92
Page 99

Using BB FlashBack
Recorder features
About Recorder features
Recording sound
BB FlashBack can record a spoken commentary, via a microphone connected to your PC. See Adding and
Recording Sound into a Movie.
Recording Webcam Video
If you have a webcam attached to your PC, BB FlashBack will record video from that at the same time as
you record the desktop, and play it back 'picture in picture' style.
See Recording Webcam Video.
Recording windows, regions or full screen
BB FlashBack can do all three. See Recording windows and regions.
Recording multi-monitor systems
BB FlashBack can record from multiple monitors simultaneously into one movie. See Recording multi
monitor systems.
Setting Windows display options while recording
To reduce the width and height of your movies, BB FlashBack can set a lower screen resolution during
recording.
Windows graphic effects such as animating or fade-in menus can result in larger file sizes and slower
playback on lower powered PC. These effects can be switched off during recording.
See Windows display options.
Continuous recording
BB FlashBack can record continuously and limit the size of the movie file produced. See Limiting the
movie file size.
Recording modes
BB FlashBack has three different methods of recording screen changes. The best one to use will depend
on your version of Windows and your PC hardware.
See Recording modes and Performance.
Setting hotkeys
BB FlashBack can respond to a hotkey during recording to display a pop-up controls window. See Defining
and using hotkeys.
93
Page 100

Using BB FlashBack
Recording windows and regions
BB FlashBack can record either the entire Windows desktop or only a single window or rectangular region.
You choose whether to record the entire desktop or a region on the Recorder main window.
How to record a single window
1. Select Window in the Record setting on the Recorder main window.
2. When prompted, click the window you want to record - a red frame will appear around it.
3. Click Record.
The recording will be restricted to the area of the selected window.
Note: if you move the selected window the recorded area will not move with it, unless you turn on the
'Track window position while recording' setting on the Advanced tab of the Options window. If you resize
the selected window during recording, the size of the movie does not change from its initial dimensions.
How to record a region
1. Select Region in the Record setting on the Recorder main window.
2. When prompted, size and position the red frame, then click Record.
The recording will be restricted to the area inside the purple frame.
Note: the size and position of the recorder frame window cannot be changed during recording.
94
 Loading...