

Page 1
RRSS--223322//442222//448855
MMuullttii--IInntteerrffaaccee IInndduussttrriiaall
EEtthheerrnneett SSeerriiaall SSeerrvve
MMooddeellss:: EESSRR990011,, EESSRR990022,, EESSRR990044
errss
B&B Electronics Mfg Co Inc – 707 Dayton Rd - Ottawa IL 61350 - Ph 815-433-5100 - Fax 815-433-5104 – www.bb-elec.com
B&B Electronics Ltd – Westlink Commercial Park – Oranmore, Galway, Ireland – Ph +353 91-792444 – Fax +353 91-792445 – www.bb-europe.com
Manual Documentation Number: ESR90x-0508m
Page 2

Page 3

International Headquarters
B&B Electronics Mfg. Co. Inc.
707 Dayton Road
Ottawa, IL 61350 USA
Phone (815) 433-5100 -- General Fax (815) 433-5105
Website: www.bb-elec.com
Sales e-mail: orders@bb-elec.com
Technical Support e-mail: support@bb.elec.com
European Headquarters
B&B Electronics Ltd.
Westlink Commercial Park
Oranmore, Co. Galway, Ireland
Phone +353 91-792444 -- Fax +353 91-792445
Website: www.bb-europe.com
Sales e-mail: sales@bb-europe.com
Technical Support e-mail: support@bb-europe.com
© B&B Electronics – January 2008
-- Fax (815) 433-5109
-- Fax (815) 433-5104
B&B Electronics Mfg Co Inc – 707 Dayton Rd - Ottawa IL 61350 - Ph 815-433-5100 - Fax 815-433-5104 – www.bb-elec.com
B&B Electronics Ltd – Westlink Commercial Park – Oranmore, Galway, Ireland – Ph +353 91-792444 – Fax +353 91-792445 – www.bb-europe.com
Manual Documentation Number: ESR90x-0508m
Page 4

Page 5

©
2008 B&B Electronics. No part of this publication may be reproduced or transmitted in any form or by any means, electronic or
mechanical, including photography, recording, or any information storage and retrieval system without written consent. Information
in this manual is subject to change without notice, and does not represent a commitment on the part of B&B Electronics.
B&B Electronics shall not be liable for incidental or consequential damages resulting from the furnishing, performance, or use of
this manual.
All brand names used in this manual are the registered trademarks of their respective owners. The use of trademarks or other
designations in this publication is for reference purposes only and does not constitute an endorsement by the trademark holder.
B&B Electronics Mfg Co Inc – 707 Dayton Rd - Ottawa IL 61350 - Ph 815-433-5100 - Fax 815-433-5104 – www.bb-elec.com
B&B Electronics Ltd – Westlink Commercial Park – Oranmore, Galway, Ireland – Ph +353 91-792444 – Fax +353 91-792445 – www.bb-europe.com
Manual Documentation Number: ESR90x-0508m
Page 6

Page 7

TTaabbllee ooff CCoonntteennttss
CHAPTER 1: INTRODUCTION .............................................................................. 1
FEATURES .................................................................................................................. 1
COMMUNICATION MODES ......................................................................................... 3
Direct IP Mode ..................................................................................................... 3
Virtual COM Mode ............................................................................................... 3
Paired Mode ......................................................................................................... 3
Heart Beat ............................................................................................................. 4
SERIAL SERVER QUICK START GUIDE ....................................................................... 5
Hardware Setup .................................................................................................... 5
Software Installation ............................................................................................. 5
Serial Server Configuration .................................................................................. 6
Install Virtual COM Ports on PC.......................................................................... 7
Check Communications ........................................................................................ 7
CHAPTER 2: MAKING THE HARDWARE CONNECTIONS ........................... 9
PACKAGE CHECKLIST ................................................................................................ 9
ESR90X INDICATORS, SWITCHES AND CONNECTORS .............................................. 10
Indicators ............................................................................................................ 10
Switches .............................................................................................................. 10
Connectors .......................................................................................................... 10
SERIAL SERVER/PORT OPERATIONAL MODES ......................................................... 11
Default Mode ...................................................................................................... 12
Console Mode ..................................................................................................... 12
Upgrade Mode .................................................................................................... 12
RS-232 Mode ....................................................................................................... 12
RS-422 Mode ....................................................................................................... 13
RS-485H Mode .................................................................................................... 13
RS-485F Mode .................................................................................................... 13
RS-485 Receiver Biasing ..................................................................................... 13
CHAPTER 3: INSTALLING THE VLINX SOFTWARE .................................... 19
SOFTWARE INSTALLATION ....................................................................................... 19
Automatic Installation ......................................................................................... 19
Manual Installation ............................................................................................. 19
Updating an Existing Installation ....................................................................... 21
Opening the ESP Manager ................................................................................. 22
Manual Documentation Number: ESR90x-0508m Table of Contents i
B&B Electronics Mfg Co Inc – 707 Dayton Rd - Ottawa IL 61350 - Ph 815-433-5100 - Fax 815-433-5104 – www.bb-elec.com
B&B Electronics Ltd – Westlink Commercial Park – Oranmore, Galway, Ireland – Ph +353 91-792444 – Fax +353 91-792445 – www.bb-europe.com
Page 8

CHAPTER 4: USING ESP MANAGER ................................................................. 23
HARDWARE SETUP .................................................................................................. 23
SOFTWARE SETUP .................................................................................................... 24
SOFTWARE OVERVIEW ............................................................................................ 25
Menus .................................................................................................................. 25
Server Icons Pane ............................................................................................... 27
Serial Server / Virtual COM Lists ....................................................................... 27
Status Bar ............................................................................................................ 28
SEARCH FOR SERVERS ............................................................................................. 28
CONFIGURE SERVER PROPERTIES ............................................................................ 29
CHAPTER 5: CONFIGURING THE SERIAL SERVER PROPERTIES .......... 31
DESCRIPTION OF THE SERVER PROPERTIES .............................................................. 32
Server Name ........................................................................................................ 32
Serial Number ..................................................................................................... 32
Password ............................................................................................................. 32
DHCP ................................................................................................................. 32
IP Address ........................................................................................................... 33
Netmask ............................................................................................................... 34
Gateway .............................................................................................................. 34
MAC Address ...................................................................................................... 34
Version & Date ................................................................................................... 34
Link Status ........................................................................................................... 34
Server Serial Port ............................................................................................... 34
Baud Rate ............................................................................................................ 34
Data/Parity/Stop ................................................................................................. 34
Flow Control ....................................................................................................... 35
TCP/UDP Protocol ............................................................................................. 35
Serial Timeout ..................................................................................................... 36
TCP Alive Timeout .............................................................................................. 36
Connection Mode ................................................................................................ 36
Delimiter HEX 1 and Delimiter HEX 2 ............................................................... 36
Force Transmit.................................................................................................... 37
Port Status ........................................................................................................... 37
TCP/UDP Port .................................................................................................... 37
Serial Port Mode ................................................................................................. 37
Connection At ..................................................................................................... 38
Max Connection .................................................................................................. 38
Remote IP Address .............................................................................................. 38
Update/Save ........................................................................................................ 39
CHAPTER 6: INSTALLING VIRTUAL COM PORTS ...................................... 41
VIRTUAL COM PORT INSTALLATION ...................................................................... 41
ii Table of Contents Manual Documentation Number: ESR90x-0508m
B&B Electronics Mfg Co Inc – 707 Dayton Rd - Ottawa IL 61350 - Ph 815-433-5100 - Fax 815-433-5104 – www.bb-elec.com
B&B Electronics Ltd – Westlink Commercial Park – Oranmore, Galway, Ireland – Ph +353 91-792444 – Fax +353 91-792445 – www.bb-europe.com
Page 9

MATCHING THE SERIAL SERVER AND VIRTUAL COM PORT SETTINGS ................... 44
CHAPTER 7: REMOVING VIRTUAL COM PORTS ......................................... 47
REMOVING THE VIRTUAL COM PORT WITH ESP MANAGER ................................... 47
REMOVING THE VIRTUAL COM PORT USING DEVICE MANAGER ............................ 48
CHAPTER 8: UPGRADING THE SERIAL SERVER FIRMWARE ................. 51
DOWNLOADING THE FIRMWARE .............................................................................. 51
UPGRADING VIA ESP MANAGER ............................................................................. 51
Preparing the Software ....................................................................................... 51
Upgrading the Firmware .................................................................................... 52
CHAPTER 9: USING CONSOLE MODE ............................................................. 53
CONSOLE MODE SETUP ........................................................................................... 53
Navigating the Configuration Menus .................................................................. 54
Using a Password ............................................................................................... 55
CHAPTER 10: USING THE WEB SERVER ........................................................ 57
SETTING SERVER PROPERTIES ................................................................................. 57
CHAPTER 11: USING TELNET ............................................................................ 61
CONFIGURATION USING TELNET ............................................................................. 61
Navigating the Configuration Menu ................................................................... 63
CHAPTER 12: ESR90X TECHNICAL DATA ...................................................... 65
APPENDIX A: RS-232 CONNECTIONS ............................................................... 70
SERIAL SERVER DB-9 PIN-OUTS IN RS-232 MODE .................................................. 70
ESR901 TERMINAL BLOCK PIN-OUT IN RS-232 MODE ........................................... 71
APPENDIX B: RS-422/485 CONNECTIONS ........................................................ 72
ESR90X DB-9 PIN-OUT IN RS-422 MODE ............................................................... 72
ESR901 TERMINAL BLOCK PIN-OUT IN RS-422 MODE ........................................... 73
APPENDIX C: RS-485 CONNECTIONS ............................................................... 74
ESR90X DB-9 PIN-OUT IN RS-485H (TWO-WIRE, HALF DUPLEX) MODE ................. 74
ESR90X DB-9 PIN-OUT IN RS-485F (FOUR-WIRE, FULL DUPLEX) MODE ................ 75
ESR901 TERMINAL BLOCK PIN-OUT IN RS-485F (FOUR-WIRE, FULL DUPLEX) MODE
................................................................................................................................ 76
APPENDIX D: NETWORK CONNECTIONS ...................................................... 77
STANDARD ETHERNET CABLE RJ-45 PIN-OUT ......................................................... 77
CROSSOVER ETHERNET CABLE RJ-45 PIN-OUT ....................................................... 78
Manual Documentation Number: ESR90x-0508m Table of Contents iii
B&B Electronics Mfg Co Inc – 707 Dayton Rd - Ottawa IL 61350 - Ph 815-433-5100 - Fax 815-433-5104 – www.bb-elec.com
B&B Electronics Ltd – Westlink Commercial Park – Oranmore, Galway, Ireland – Ph +353 91-792444 – Fax +353 91-792445 – www.bb-europe.com
Page 10

iv Table of Contents Manual Documentation Number: ESR90x-0508m
B&B Electronics Mfg Co Inc – 707 Dayton Rd - Ottawa IL 61350 - Ph 815-433-5100 - Fax 815-433-5104 – www.bb-elec.com
B&B Electronics Ltd – Westlink Commercial Park – Oranmore, Galway, Ireland – Ph +353 91-792444 – Fax +353 91-792445 – www.bb-europe.com
Page 11
Introduction
CChhaapptteerr 11:: IINNTTRROODDUUCCTTIIOONN
VLINX ESR90x Industrial Ethernet Serial Servers allow connection of RS-
232, RS-422 or RS-485 devices to an Ethernet network. The serial ports can
be accessed over a LAN/WAN using
Paired Mode connections. The 10/100 Mbps Ethernet connection auto-
selects 10BaseT or 100BaseTX and indicates the type of connection with a
bi-color link light. ESR90x serial servers are built for use in industrial
environments, featuring an IP30, approved slim line DIN rail mountable
case. They operate from a range of AC or DC power supply voltages, support
redundant DC power and feature terminal block power connectors.
Direct IP Mode, Virtual COM Port, or
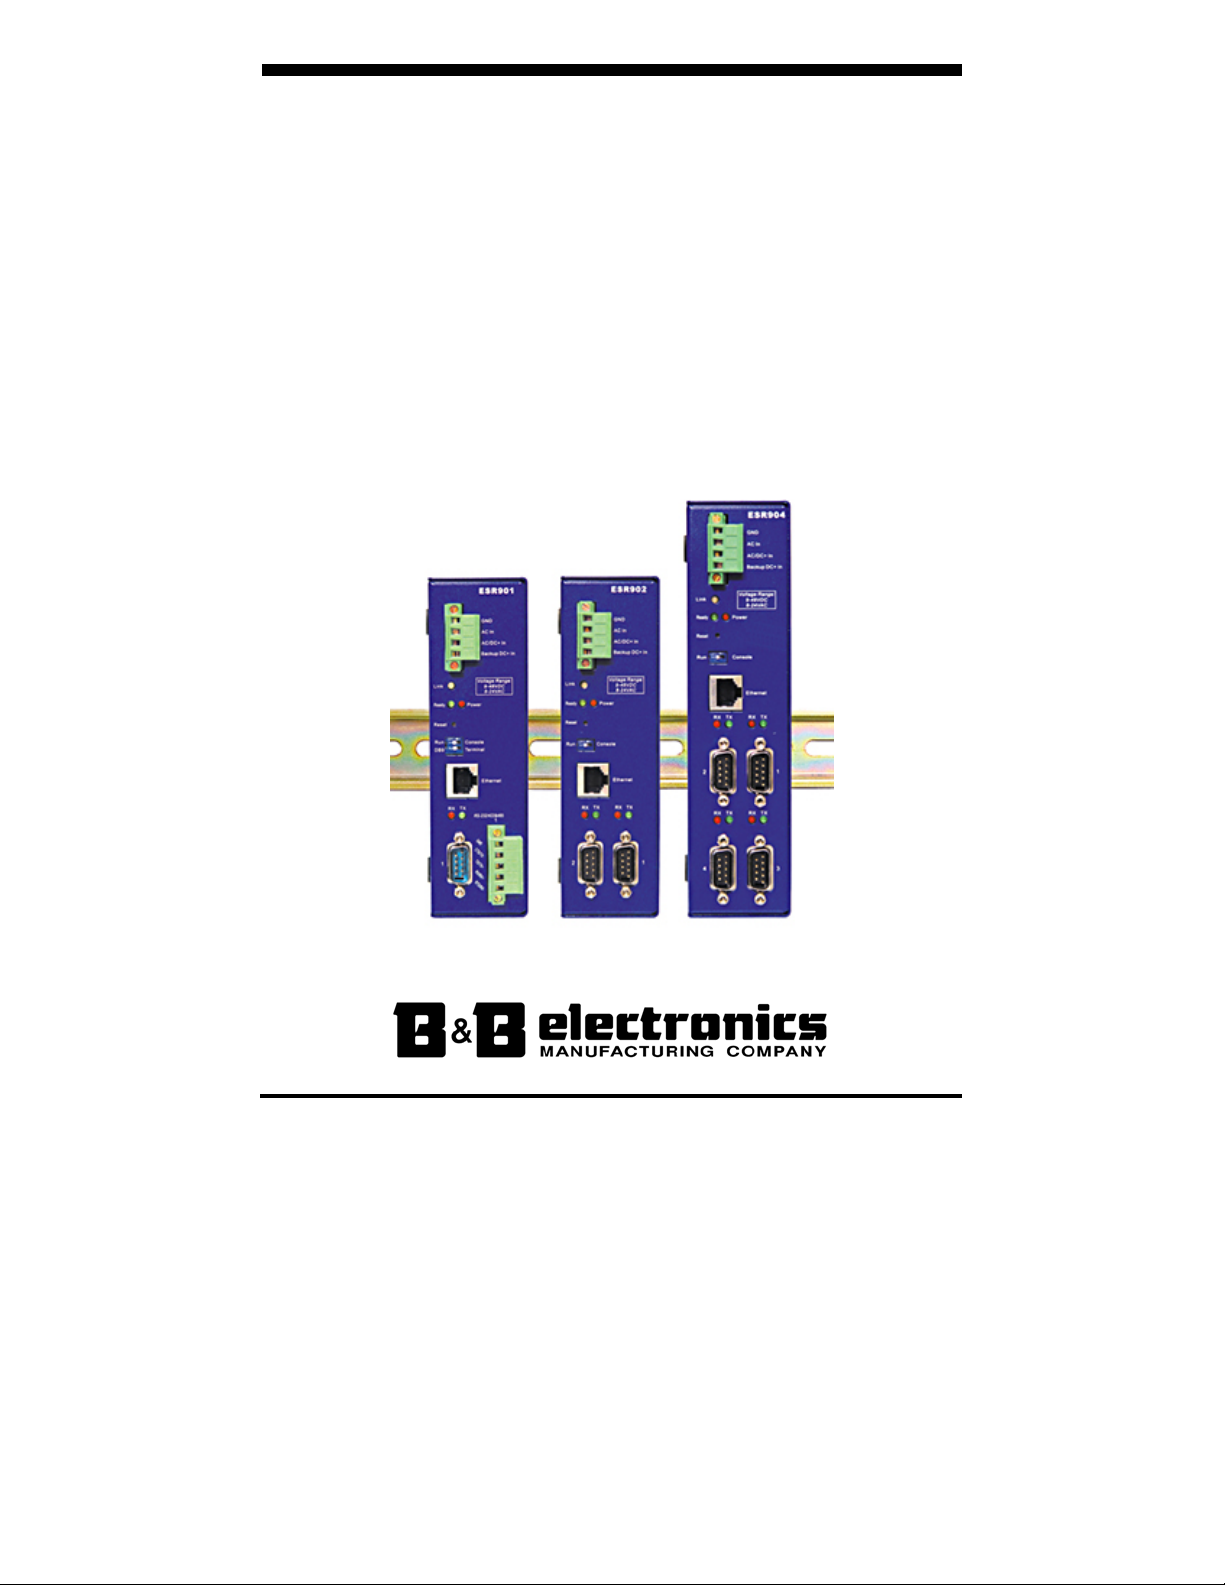
Figure 1. VLINX ESR90x Ethernet Serial Servers
Features
• Multi-interface serial ports
o The ESR901 features one multi-interface serial port and the
choice of standard DB-9M or removable terminal block
connections (switch selectable)
o The ESR902 features two multi-interface serial ports
o The ESR904 features four multi-interface serial ports
Manual Documentation Number ESR90x-0508m Chapter 1 1
B&B Electronics Mfg Co Inc – 707 Dayton Rd - Ottawa IL 61350 - Ph 815-433-5100 - Fax 815-433-5104 – www.bb-elec.com
B&B Electronics Ltd – Westlink Commercial Park – Oranmore, Galway, Ireland – Ph +353 91-792444 – Fax +353 91-792445 – www.bb-europe.com
Page 12

Introduction
o All ports are software selectable as RS-232, RS-422, RS-485
full duplex or RS-485 half duplex interfaces
o For all models Port 1 is software, or DIP switch selectable for
Console Mode operation (configuration via direct serial
connection)
• Slim line DIN rail mountable case
• Accepts AC or DC power over a wide volt range
• Redundant DC power supply input
• 10/100 Mbps Ethernet with Auto Selection
• LAN and WAN Communications
• TCP or UDP Client or Server operation - configurable
• Software Support - Windows 98/ME/2000/2003/XP/ NT 4.0 and Vista
• Firmware Upload for future revisions/upgrades
• Configuration of Ethernet and serial port settings can be accomplished
using any of four methods:
o VLINX ESP Manager Software for Windows allows
configuration via a network connection or directly from the
Ethernet port of a computer (using an Ethernet crossover cable).
Web Server allows configuration via the network using a web
o
browser.
o
Telnet allows configuration via the network by accessing the
setup configuration menu.
o
Console Mode allows configuration through an RS-232 serial
port in using a VT100 Terminal Emulation program and an RS232 crossover cable.
• Virtual COM Driver Software for Windows - installs virtual COM
ports, viewable in the Windows Device Manager under
LPT)
. Virtual COM port provides access to any of the ports on the Serial
Server, like any other serial port (legacy, PCI, USB or PCMCIA) on the
Ports (COM &
computer. Any program running on the computer and using Windowsbased COM ports can access the serial devices attached to the
Server. The LAN becomes transparent to the serial device and the
Serial
software running on the PC.
• Heart Beat Connection - selectable protocol ensures reliable
communications in Virtual COM Port or Paired Connection modes. This
feature restores the connections if communications are temporarily lost
at either end due to loss of power or the Ethernet connection.
2 Chapter 1 Manual Documentation Number: ESR90x-0508m
B&B Electronics Mfg Co Inc – 707 Dayton Rd - Ottawa IL 61350 - Ph 815-433-5100 - Fax 815-433-5104 – www.bb-elec.com
B&B Electronics Ltd – Westlink Commercial Park – Oranmore, Galway, Ireland – Ph +353 91-792444 – Fax +353 91-792445 – www.bb-europe.com
Page 13

Introduction
Communication Modes
The ESR90x Serial servers enable communication with serial devices over a
LAN or WAN. Serial devices no longer are limited to a physical connection
to the PC COM port. They can be installed anywhere on the LAN using
TCP/IP or UDP/IP communications. This allows traditional Windows PC
software access to serial devices anywhere on the LAN/WAN network.
Direct IP Mode
Direct IP connections allow applications using TCP/IP or UDP/IP socket
programs to communicate with the asynchronous serial ports on the serial
server. In this type of application the serial server is configured as a TCP or
UDP server. The socket program running on the PC establishes a
communication connection with the
to and from the serial port on the server. When using UDP protocol the
server can be configured to broadcast data to and receive data from multiple
IP addresses.
Virtual COM Mode
Install Virtual COM Mode allows the user to add a driver, to provide a virtual
COM port on the computer. The new COM port shows up in the Device
Manager. Windows programs using standard Windows API calls are able to
interface to virtual COM ports. When a program on the PC opens the new
COM port, it communicates with the remote serial device connected to one
of the ports on the
Serial Server.
Serial Server. The data is sent directly
After connection, the LAN is transparent to the program and serial device.
Applications are able to work just as if the serial device is connected directly
to a physical COM port on the computer. The virtual COM port software
converts the application’s data into IP packets, sends it across the network to
the
Serial Server, which converts the IP packet back to serial data and sends
the data out a serial port located on the Serial Server.
To use this mode, the
Serial Server must be set to either TCP/server or
UDP/server with a designated communication port number. The virtual COM
driver is the TCP or UDP client.
Paired Mode
Paired Mode is also called serial tunneling. In this mode any two serial
devices that can communicate with a serial link will be able to communicate
using two
Manual Documentation Number ESR90x-0508m Chapter 1 3
B&B Electronics Mfg Co Inc – 707 Dayton Rd - Ottawa IL 61350 - Ph 815-433-5100 - Fax 815-433-5104 – www.bb-elec.com
B&B Electronics Ltd – Westlink Commercial Park – Oranmore, Galway, Ireland – Ph +353 91-792444 – Fax +353 91-792445 – www.bb-europe.com
Serial Servers and the LAN.
Page 14

Introduction
Two Serial Servers are connected to a network, one configured as a TCP or
UDP client and the other as a TCP/UDP server. When setting up the server
the remote IP address section must contain the address of the client. This will
allow the client’s IP address to pass the IP address-filtering feature of the
server. Conversely, the Remote IP address of the client must contain the
server’s IP address. Both communication port numbers must be the same.
Heart Beat
The Heart Beat protocol connection provides a reliable communications
connection in
This feature restores the connection if communications are temporarily lost at
either end due to loss of power or Ethernet connection.
Without this feature a device that loses a connection and stops
communicating would not be able to reconnect without human intervention.
A TCP data connection can be lost when there is a power failure or
temporary loss of an Ethernet connection on either the client or server. If a
loss occurs the Heart Beat feature will try to reconnect the TCP data
connection every five seconds until communications is established again. The
Heart Beat feature is available for use in
Connection Mode. This is not available when using a UDP application.
Virtual COM Port Mode or with Paired Connection Mode.
Virtual COM Port Mode and Paired
4 Chapter 1 Manual Documentation Number: ESR90x-0508m
B&B Electronics Mfg Co Inc – 707 Dayton Rd - Ottawa IL 61350 - Ph 815-433-5100 - Fax 815-433-5104 – www.bb-elec.com
B&B Electronics Ltd – Westlink Commercial Park – Oranmore, Galway, Ireland – Ph +353 91-792444 – Fax +353 91-792445 – www.bb-europe.com
Page 15

Introduction
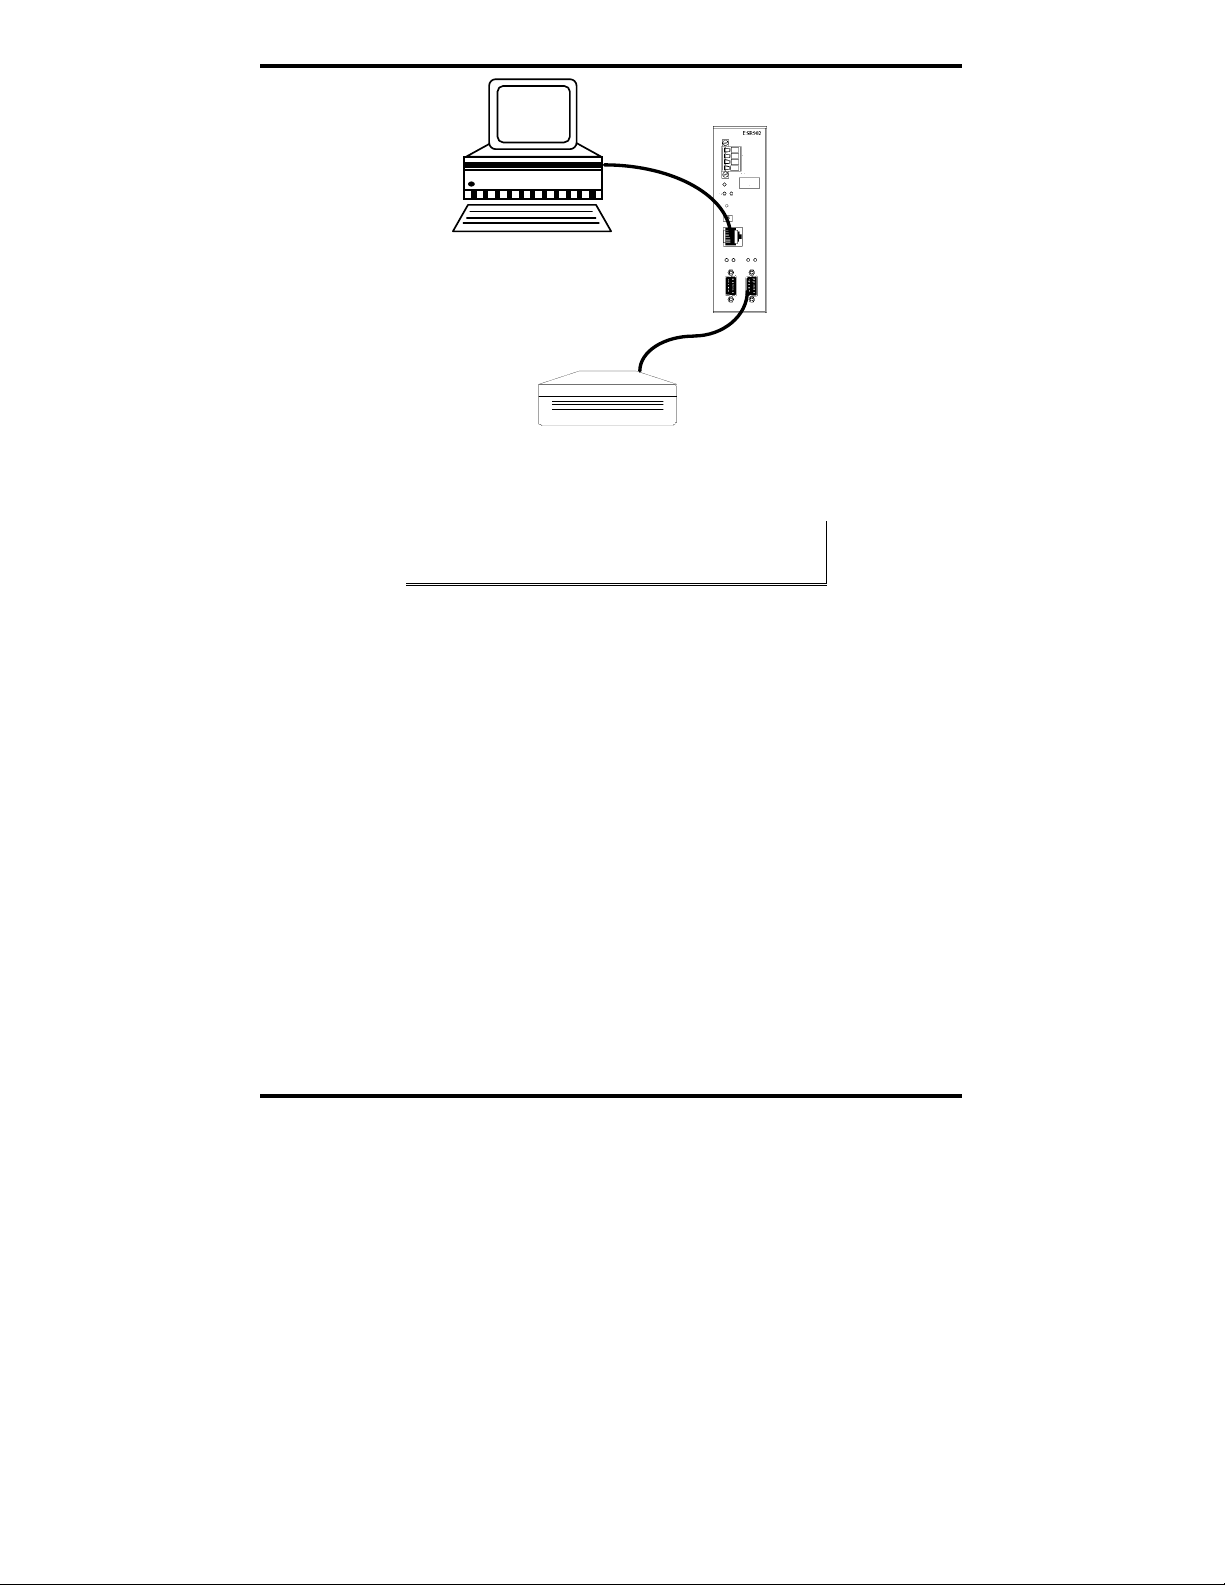
Serial Server Quick Start Guide
For descriptive purposes this Quick Start Guide considers a typical
configuration consisting of a PC connected via an Ethernet LAN to an
ESR902 Serial Server connected to the RS-232 port of a serial device.
Hardware Setup
Ethe rnet
cable
LAN
Etherne t
cable
ESR902
PC
RS-232
cable
Ser ial Devic e
Figure 2. Typical Hardware Setup
Step 1: Connect the Serial Server to the network using a standard network
cable.
Step 2: Connect the
NNoottee::
If the serial device is configured as a DCE use a straight-through serial cable. If
the serial device is configured as a DTE use a crossover (null modem) cable.
Serial Server to the RS-232 port on the serial device.
Step 3: Set the Run/Console DIP switch to the Run position.
Step 4: Apply power to the
Serial Server.
Software Installation
Using the CD included with the Serial Server, install the VLINX Manager
software on the configuring computer.
Manual Documentation Number ESR90x-0508m Chapter 1 5
B&B Electronics Mfg Co Inc – 707 Dayton Rd - Ottawa IL 61350 - Ph 815-433-5100 - Fax 815-433-5104 – www.bb-elec.com
B&B Electronics Ltd – Westlink Commercial Park – Oranmore, Galway, Ireland – Ph +353 91-792444 – Fax +353 91-792445 – www.bb-europe.com
Page 16

Introduction
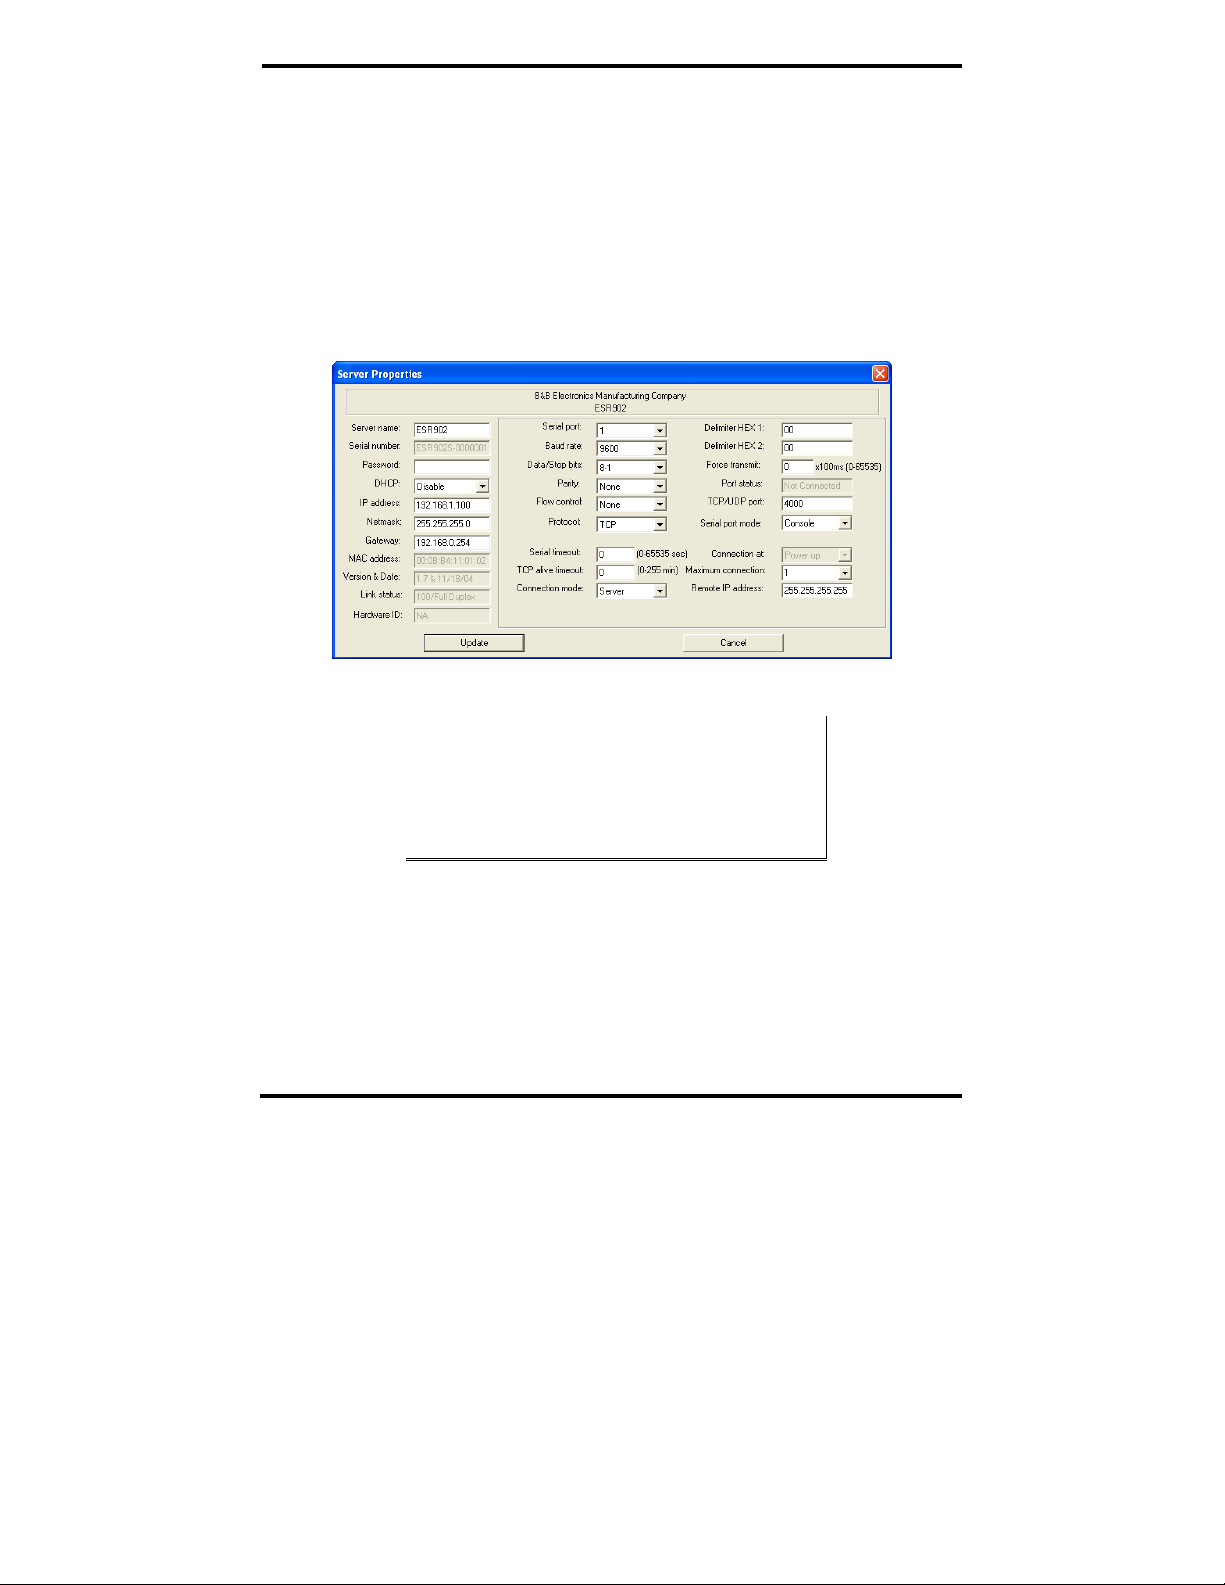
Serial Server Configuration
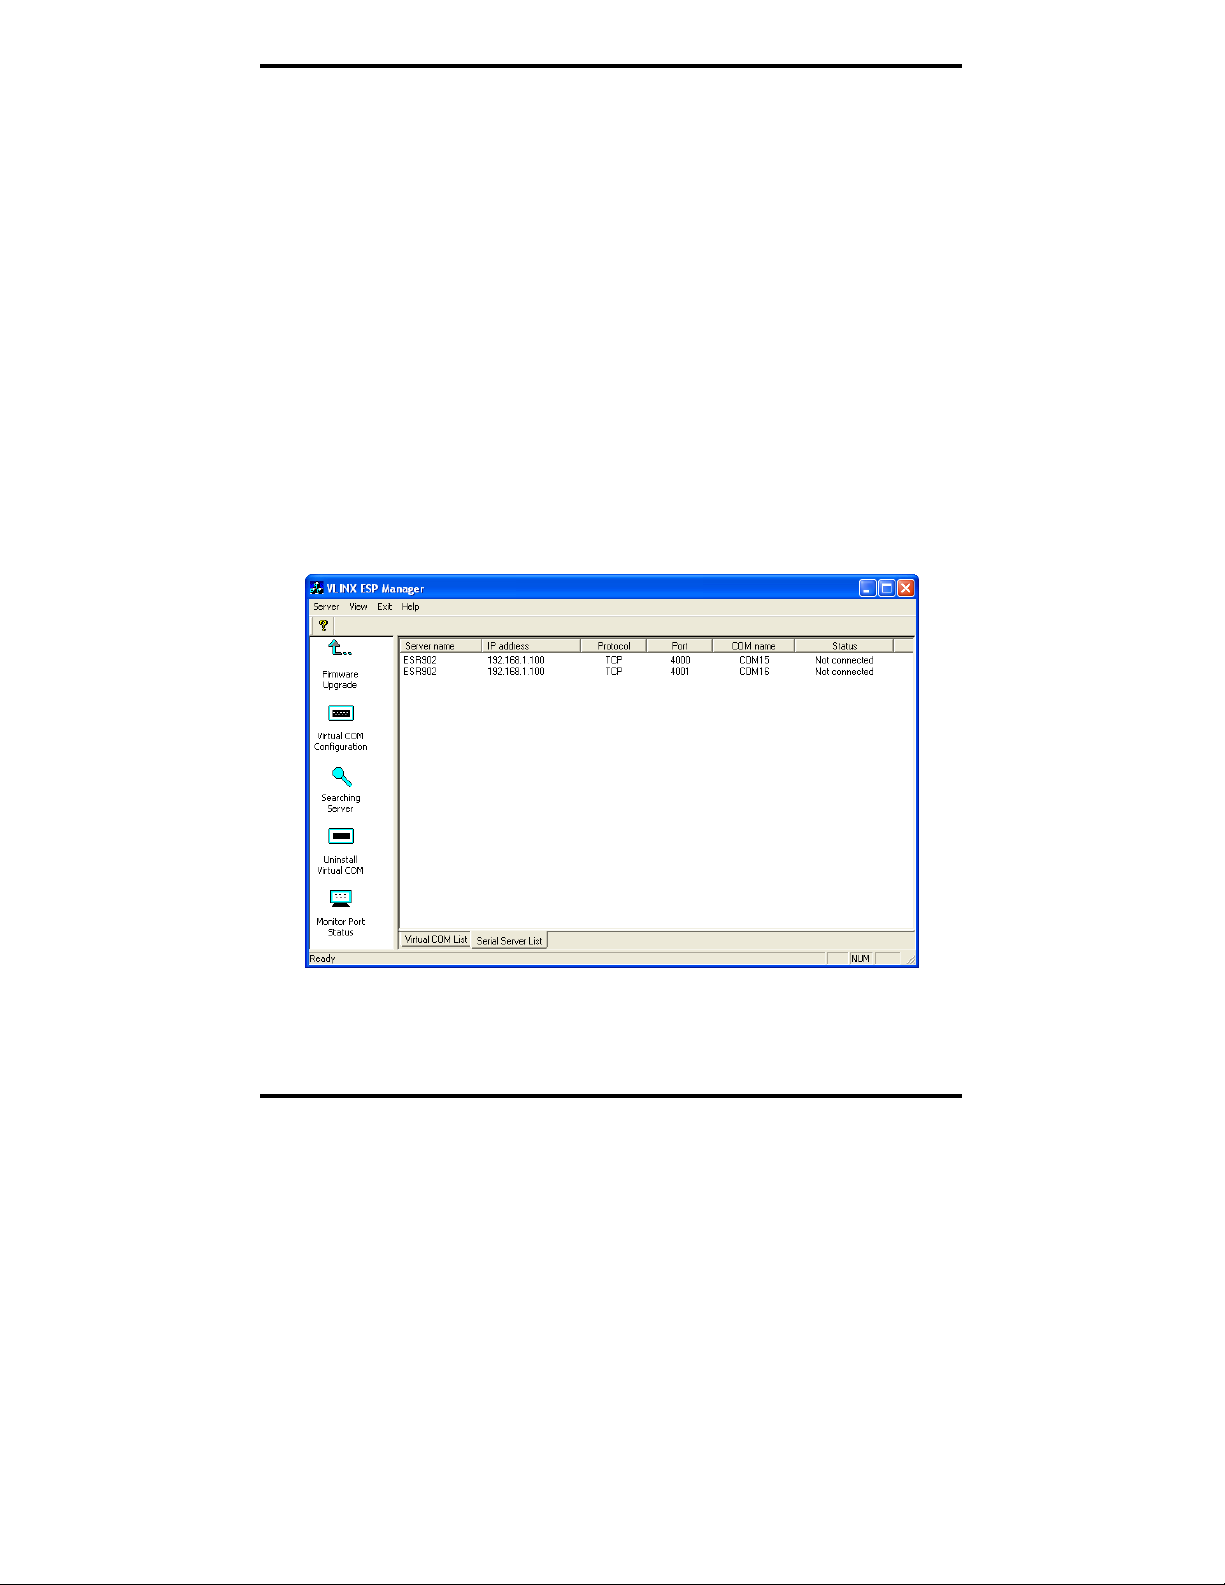
Step 1: Open the ESP Manager software. It will automatically search for
any reachable (ESP or ESR) Serial Servers. A list of all Serial
Servers connected to the LAN will appear in the
window.
Step 2: Double click the desired Serial Server port on the list to bring up the
Server Properties configuration screen.
Figure 3. The Server Properties Window
Serial Server List
Step 3: Change the Server Properties as required.
• Enable
DHCP to allow the Serial Server to generate its own IP
address
OR
• Obtain appropriate static
IP, Netmask and Gateway addresses
from your Network Administrator (recommended)
• Set the
Serial Port Mode property to RS-232 to match the serial
device connected to the Serial Server.
• Set
Baud Rate, Data/Parity/Stop, and Flow Control to match
the configuration of the serial device connected to the Serial
Server
port
Step 4: When the parameters have been set, click
prompts in the dialogue boxes,
Search all reachable servers again.
6 Chapter 1 Manual Documentation Number: ESR90x-0508m
B&B Electronics Mfg Co Inc – 707 Dayton Rd - Ottawa IL 61350 - Ph 815-433-5100 - Fax 815-433-5104 – www.bb-elec.com
B&B Electronics Ltd – Westlink Commercial Park – Oranmore, Galway, Ireland – Ph +353 91-792444 – Fax +353 91-792445 – www.bb-europe.com
Restart the Serial Server and
Update. Following the
Page 17
Introduction
Step 5: Re-enter Server Properties to verify the changes have taken effect,
or to view/change the configuration of other ports. Each port must
be configured separately.
Install Virtual COM Ports on PC
Step 1: From the Windows Start menu, run the Install Virtual COM Ports
utility included with the VLINX software,
Step 2: Search for all servers on the network
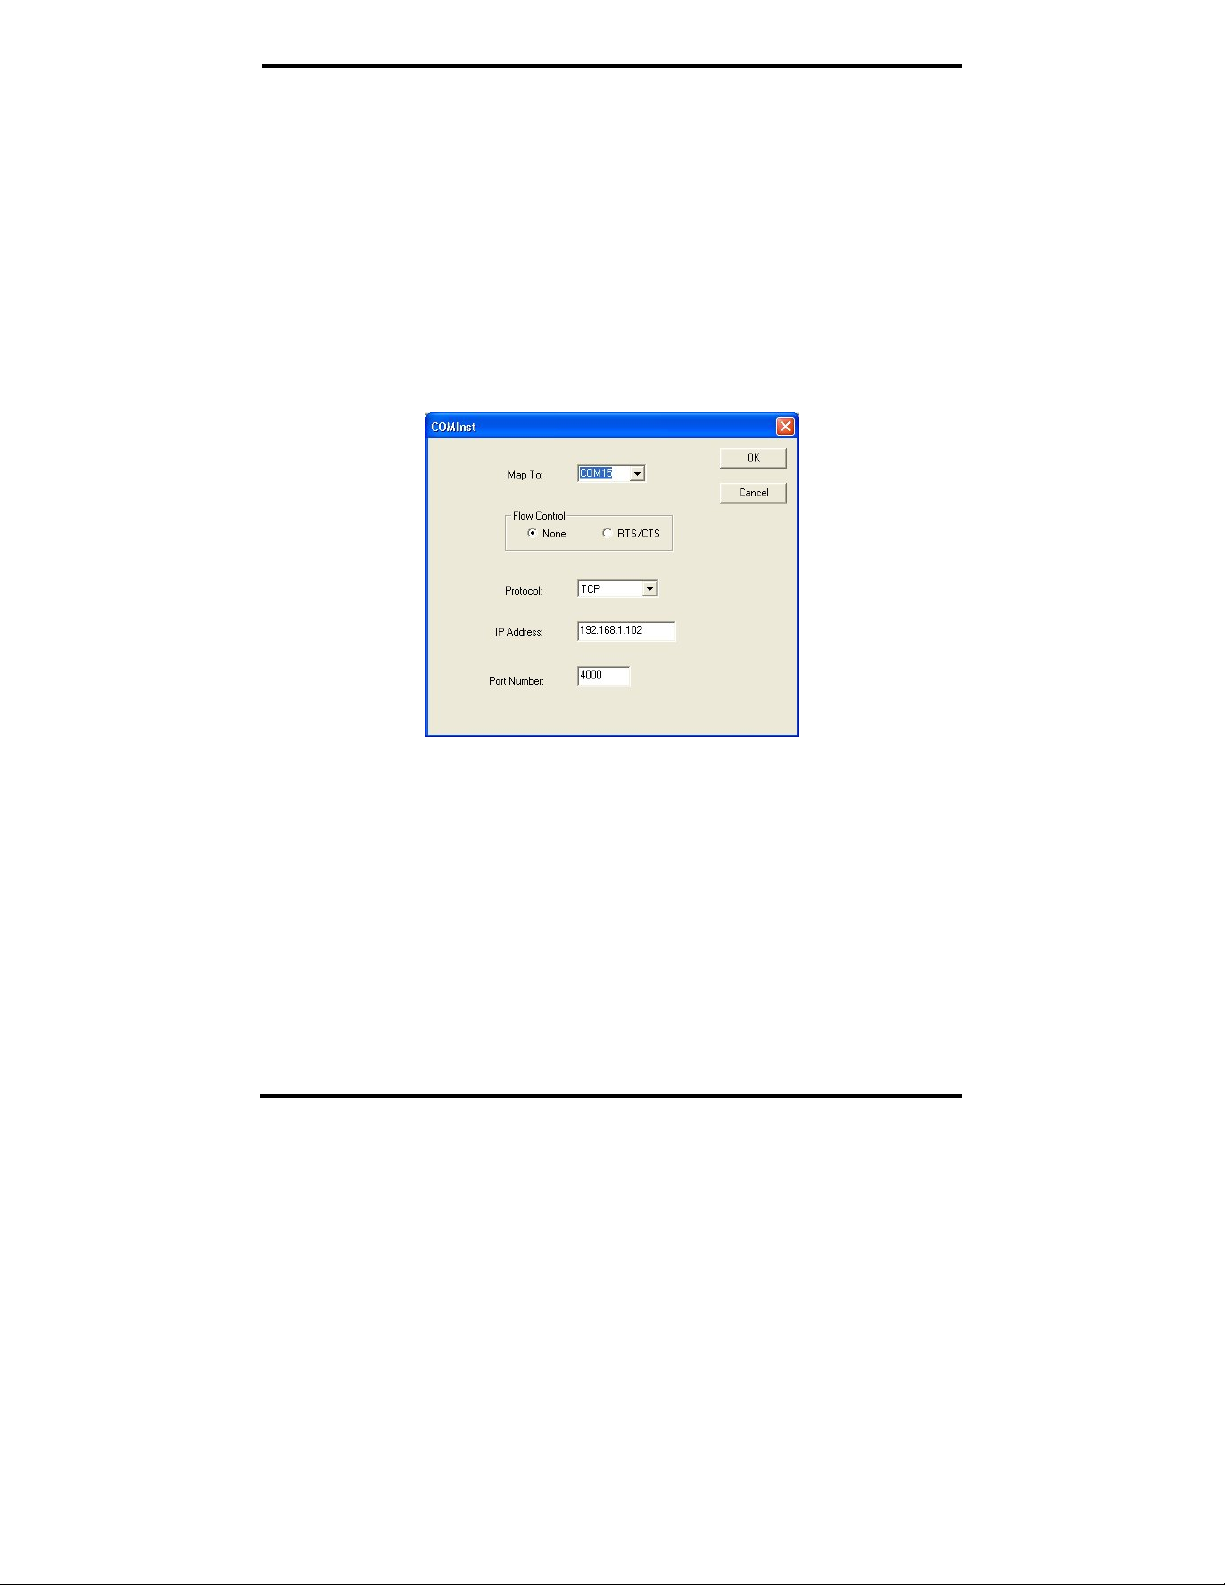
Step 3: Select a port and map it to an unused COM port (e.g. Port 15).
Configure it for TCP protocol and the appropriate IP address
(determined in the last section).
Figure 4. Configuring the Virtual COM Port
Check Communications
Step 1: From the Windows Start menu, run HyperTerminal
Step 2: Configure
configured in the last section (e.g. Port 15).
Step 3: Set
Baud Rate, Data/Parity/Stop, and Flow Control to match the
configuration of the serial device connected to the
serial port.
Step 4: Communications with the serial device should now be operational.
Manual Documentation Number ESR90x-0508m Chapter 1 7
B&B Electronics Mfg Co Inc – 707 Dayton Rd - Ottawa IL 61350 - Ph 815-433-5100 - Fax 815-433-5104 – www.bb-elec.com
B&B Electronics Ltd – Westlink Commercial Park – Oranmore, Galway, Ireland – Ph +353 91-792444 – Fax +353 91-792445 – www.bb-europe.com
HyperTerminal to connect using the COM port
Serial Server
Page 18

Introduction
8 Chapter 1 Manual Documentation Number: ESR90x-0508m
B&B Electronics Mfg Co Inc – 707 Dayton Rd - Ottawa IL 61350 - Ph 815-433-5100 - Fax 815-433-5104 – www.bb-elec.com
B&B Electronics Ltd – Westlink Commercial Park – Oranmore, Galway, Ireland – Ph +353 91-792444 – Fax +353 91-792445 – www.bb-europe.com
Page 19

Making the Hardware Connections
CChhaapptteerr 22:: MMAAKKIINNGG TTHHEE HHAARRDDWWAARREE
CCOONNNNEECCTTIIOONNSS
Package Checklist
ESR90x Serial Servers are shipped with the following items included:
9 Serial Server Module
9 This Operation Manual
9 CD-ROM disc with manual, VLINX ESP Manager and Virtual COM
Driver software for Windows 98/ME/2000/2003/XP/NT 4.0/Vista
Power
Run Console
ESR904
GND
AC In
AC/DC+ In
Backup DC + In
Voltage Range:
9-48VDC
8-24VAC
Link
R eady
Reset
Consol e
Run
DB9 Terminal
Power
ESR901
GND
AC In
AC/DC+ In
Ba ckup DC + In
Vol tage Ran ge:
9-48VDC
8-24VAC
Link
Ready
Reset
Run Console
Power
ESR902
GND
AC In
AC/DC+ In
Backup DC+ In
Volt ag e Ran ge :
9-48VD C
8-24VAC
Link
R eady
Reset
Ethern et
1
RX TX
RS-232/422/485
1
G
N
D
C
T
S
/T
X
-
T
X
/
T
X
+
1
R
X
/
R
X
+
R
T
S
/
R
X
-
1
RX TX RX TX
2
Ether net
1
1
RX TX RX TX
2
RX TX RX TX
4
Ethern et
1
3
Figure 5. Front View of the ESR901, ESR902 and ESR904
Serial Servers
Manual Documentation Number: ESR90x-0508m Chapter 2 9
B&B Electronics Mfg Co Inc – 707 Dayton Rd - Ottawa IL 61350 - Ph 815-433-5100 - Fax 815-433-5104 – www.bb-elec.com
B&B Electronics Ltd – Westlink Commercial Park – Oranmore, Galway, Ireland – Ph +353 91-792444 – Fax +353 91-792445 – www.bb-europe.com
Page 20

Making the Hardware Connections
ESR90x Indicators, Switches and Connectors
Indicators
• One bi-color Link LED (Yellow = 10BaseT, Green = 100Base T)
• One green Ready LED (flashing = system ready)
• One red Power LED
• One red RX LED and one green TX LED for each serial port
Switches
Reset
A recessed reset switch that allows the united to be reset. Insert a small
plastic tool, press lightly and hold for three seconds. The Link and Ready
lights will go out and then come back on.
Run/Console Switch
A recessed single DIP (dual inline package) switch that allows the Serial
Server to be switched between Run Mode and Console Mode. When
switched to the Console position the Serial Server enters Console Mode. This
allows you to configure the Serial Server from a PC running a terminal
program such as HyperTerminal without connecting the server to the
network. To communicate with the connected serial device the switch must
be returned to “Run” position.
DB-9/Terminal Switch (ESR901 only)
Allows connection to the serial port (RS-232, 422 or 485) via the DB-9M
connector or the five-terminal removable terminal block.
Connectors
Ethernet Connector
One standard RJ-45 receptacle that allows the Serial Server to be connected
to an Ethernet hub, switch, or wall plate using a standard straight-through RJ45 (male) Ethernet cable. To connect directly to an RJ-45 Ethernet port on a
PC or laptop a crossover Ethernet cable must be used.
10 Chapter 2 Manual Documentation Number: ESR90x-0508m
B&B Electronics Mfg Co Inc – 707 Dayton Rd - Ottawa IL 61350 - Ph 815-433-5100 - Fax 815-433-5104 – www.bb-elec.com
B&B Electronics Ltd – Westlink Commercial Park – Oranmore, Galway, Ireland – Ph +353 91-792444 – Fax +353 91-792445 – www.bb-europe.com
Page 21

Making the Hardware Connections
Serial Port(s)
• ESR901: One serial port with two connector options: one (DB-9M) or
one five-terminal removable terminal block (DIP switch selectable)
• ESR902: Two serial port connectors (DB-9M)
• ESR904: Four serial port connectors (DB-9M)
NNoottee::
Refer to Appendices A, B and C for connection pin-outs.
Power Connector
The power connector is a removable terminal block with four terminals.
From top to bottom the terminals are:
Terminal Connect to Description
Negative side of DC
power supply (if DC
GND
AC In
AC/DC +
In
Backup
DC+ In
power used)
Also connect negative
side of Backup DC
power supply (if used)
One side of AC power
supply (if AC power
used)
The other side of AC
power supply (if AC
power used)
OR
Positive side of DC
power supply (if DC
power used)
Positive side of
Backup DC power
supply
Internally, the chassis ground of the Serial
Server is connected to this terminal.
Either AC or DC power can be used to
power ESR Serial Servers. Power supply can
voltages range from 9 V to 48 VDC or 8 V
to 24 VAC.
Backup power must be DC voltage and can
be any voltage between 9 VDC and 48 VDC.
Serial Server/Port Operational Modes
Using the ESP Manager, Web Server or Telnet the Serial Server can be put
into Console Mode, Default Mode or Upgrade Mode. The serial ports can be
configured for RS-232, RS-422, RS-485H (half duplex) or RS-485F (full
duplex) operation. The server also can be put into
the Run/Console switch in the Console position.
Manual Documentation Number: ESR90x-0508m Chapter 2 11
B&B Electronics Mfg Co Inc – 707 Dayton Rd - Ottawa IL 61350 - Ph 815-433-5100 - Fax 815-433-5104 – www.bb-elec.com
B&B Electronics Ltd – Westlink Commercial Park – Oranmore, Galway, Ireland – Ph +353 91-792444 – Fax +353 91-792445 – www.bb-europe.com
Console Mode by placing
Page 22

Making the Hardware Connections
Default Mode
When Default Mode is selected and the server properties are Updated
(
Saved) all the configuration settings return to their default values.
NNoottee::
Refer to Chapter 5 for details on Serial Server Configuration settings. See
Chapter 12 for Serial Server default parameters.
Console Mode
In Console Mode the Configuration Menu can be accessed from a PC by
connecting its RS-232 serial port to the ESR901 serial port or ESR902/904
Serial Port 1. Since the computer is a DTE device, and the serial ports are
configured as DTEs (with DB-9M connectors), a null modem crossover cable
must be used.
In
Console Mode the default serial port settings are: 9600 baud, 8 data bits,
No parity, and 1 stop bit. From Windows, HyperTerminal with VT100
terminal emulation can be used for
NNoottee::
Refer to Chapter 9 for details on Console Mode
Upgrade Mode
Console Mode configuration.
In Upgrade Mode firmware can be uploaded from a PC via its serial port to
the ESR901 serial port or ESR902/904 Serial Port 1. Upgrading also can be
accomplished via the network connection, using the ESP Manager software
and a virtual COM port.
NNoottee::
Refer to Chapter 8 for details on Upgrade Mode
RS-232 Mode
In RS-232 Mode the currently selected serial port is configured as an RS-232
interface supporting eight RS-232 signal lines plus Signal Ground and is
configured as a DTE, like a computer. Signals are single ended and
referenced to Ground. To use handshaking, Flow Control must be set to
RTS/CTS during configuration.
12 Chapter 2 Manual Documentation Number: ESR90x-0508m
B&B Electronics Mfg Co Inc – 707 Dayton Rd - Ottawa IL 61350 - Ph 815-433-5100 - Fax 815-433-5104 – www.bb-elec.com
B&B Electronics Ltd – Westlink Commercial Park – Oranmore, Galway, Ireland – Ph +353 91-792444 – Fax +353 91-792445 – www.bb-europe.com
Page 23

Making the Hardware Connections
RS-422 Mode
In RS-422 Mode the currently selected serial port is configured as an RS-422
interface supporting four RS-422 signal channels with full duplex operation
for
Receive, Transmit, RTS (Request To Send) and CTS (Clear To Send).
The data lines are differential pairs (A & B) in which the B line is positive
relative to the A line in the idle (mark) state. Ground provides a common
mode reference. To use handshaking, Flow Control must be set to RTS/CTS
during configuration.
RS-485H Mode
In RS-485H Mode the currently selected port is configured as a two-wire RS485 interface supporting DataB(+) and DataA(-) signal channels using halfduplex operation. The data lines are differential with the Data B line positive
relative to Data A in the idle (mark) state. Ground provides a common mode
reference.
RS-485F Mode
In RS-485F Mode the currently selected port is configured as a four-wire RS485 interface supporting transmit lines TXDB(+) and TXDA(-) and receive
lines RXDB(+) and RXDA(-) for full duplex operation. The lines are
differential with the B line positive relative to A in the idle (mark) state.
Ground provides a common mode reference.
RS-485 Receiver Biasing
RS-485 Receiver Biasing can be implemented from the Serial Server if the
network does not supply it. Remove the four screws from the cover of the
Serial Server, slide the cover off and re-position the bias jumpers as indicated
in the diagrams and tables below. Note that ESR Serial Servers provide
separate jumpers for RS-485 half duplex and RS-422/485 full duplex
operation. Also, the ESR901 provides separate jumpers for the terminal block
and DB-9 connectors. Biasing jumpers are also provided for CTS inputs.
Manual Documentation Number: ESR90x-0508m Chapter 2 13
B&B Electronics Mfg Co Inc – 707 Dayton Rd - Ottawa IL 61350 - Ph 815-433-5100 - Fax 815-433-5104 – www.bb-elec.com
B&B Electronics Ltd – Westlink Commercial Park – Oranmore, Galway, Ireland – Ph +353 91-792444 – Fax +353 91-792445 – www.bb-europe.com
Page 24
Making the Hardware Connections
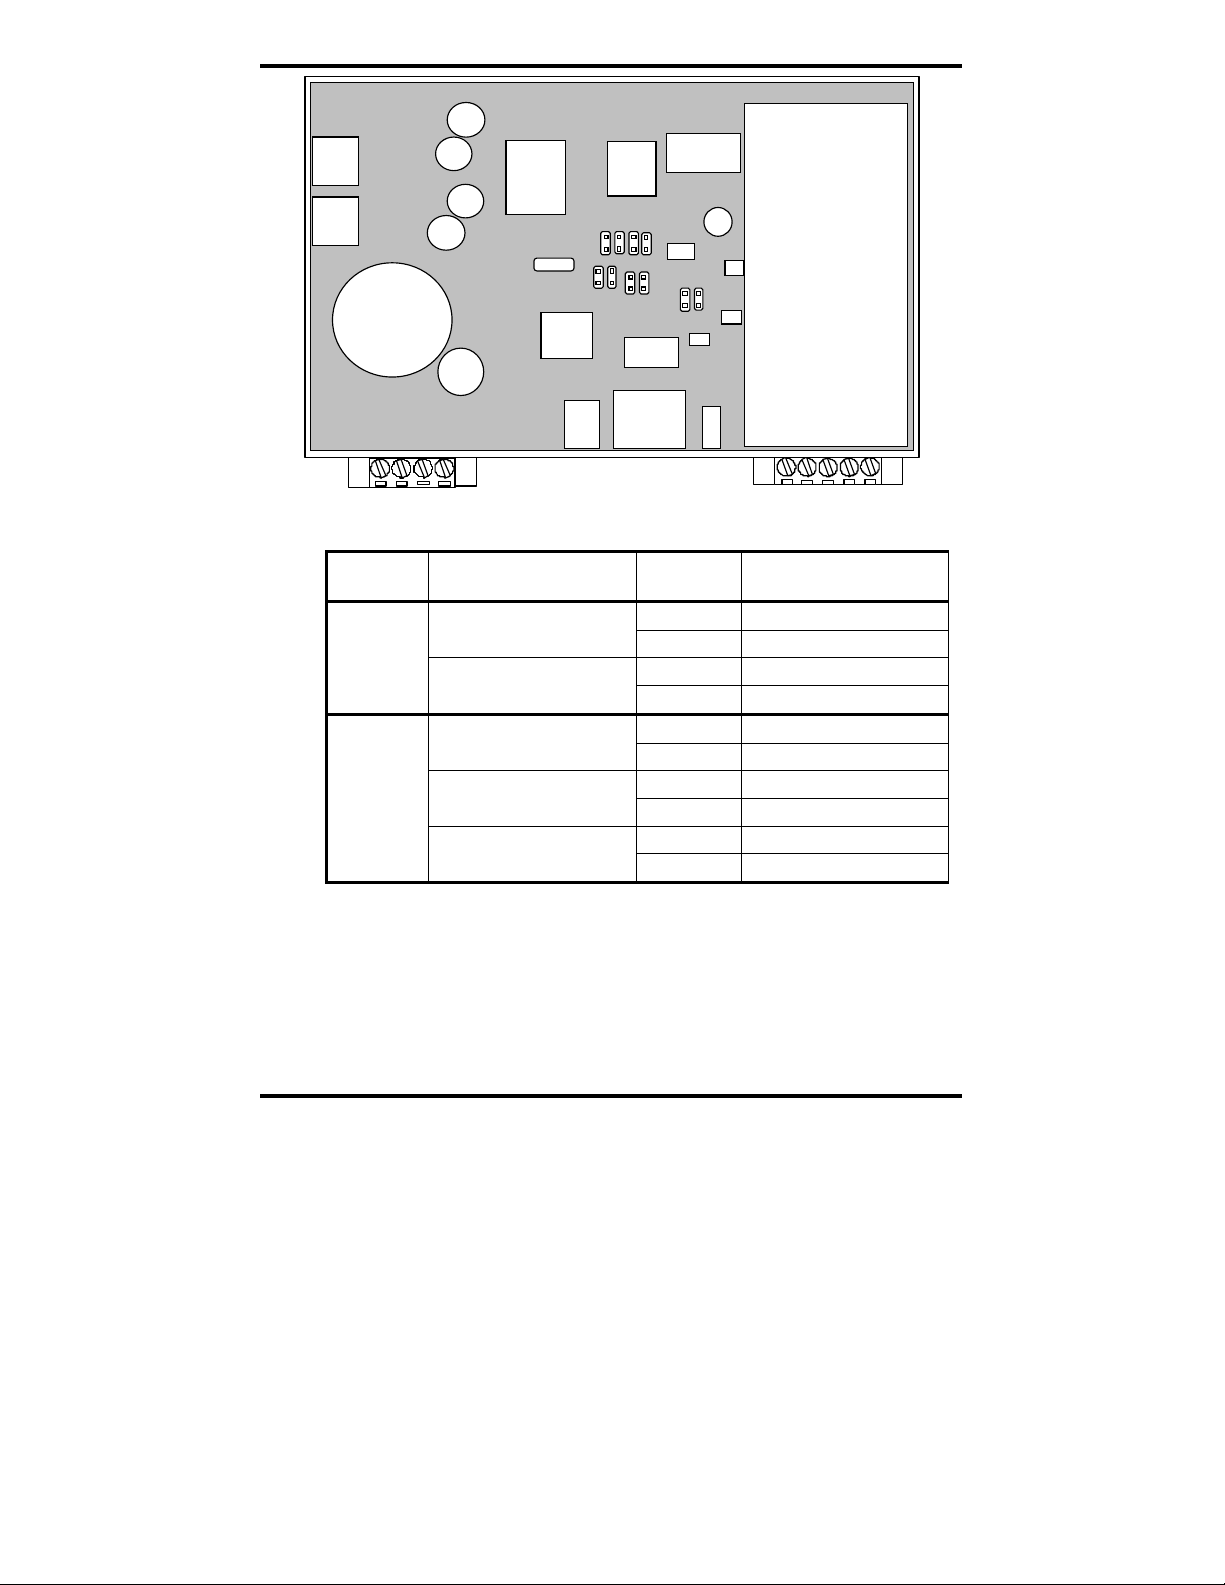
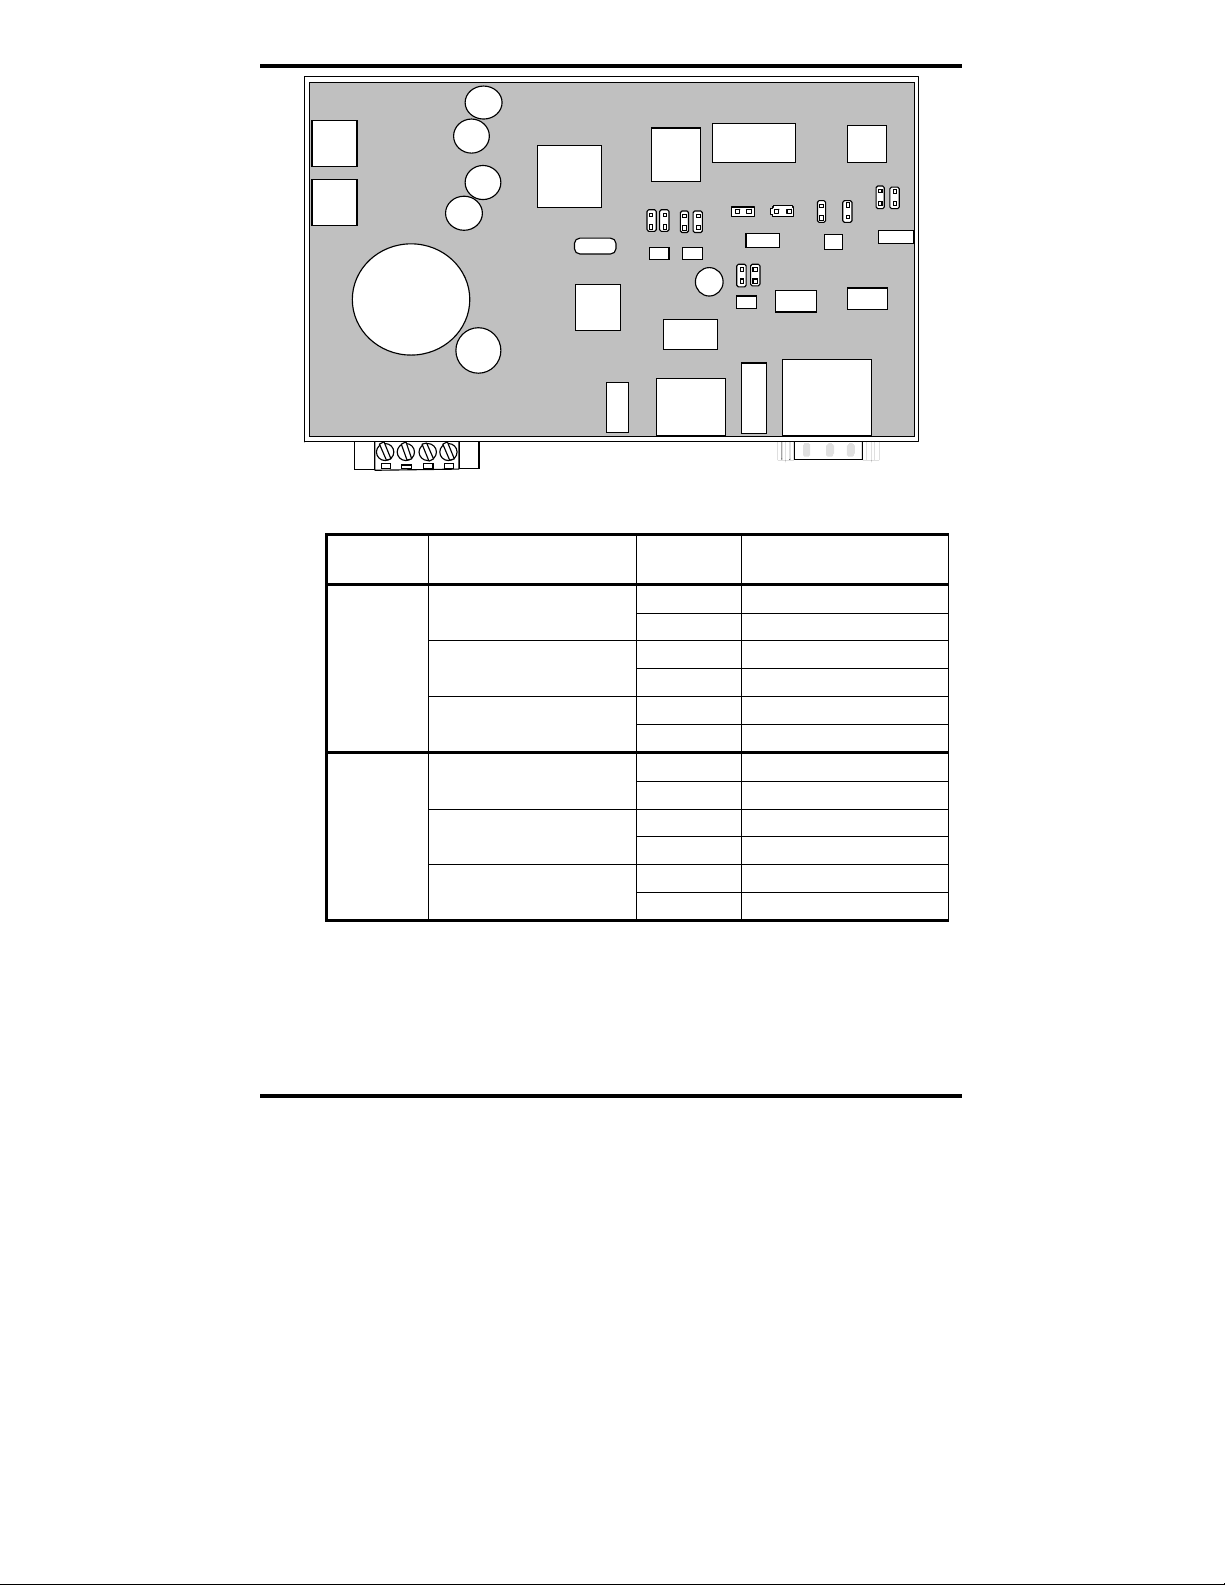
Figure 6. ESR901 Bias Jumper Locations
J7J4J13 J6
J11
J5
J12
J10
J9 J3
Connector Interface Type
485 half duplex
Terminal
block
422/485 full duplex
485 half duplex
DB-9
422/485 full duplex
CTS
Jumper
Number
Pull up/pull down
J12 pull up
J6 pull down
J7 pull up
J13 pull down
J3 pull up
J9 pull down
J5 pull up
J11 pull down
J4 pull up
J10 pull down
Figure 7. ESR901 Bias Jumpers
14 Chapter 2 Manual Documentation Number: ESR90x-0508m
B&B Electronics Mfg Co Inc – 707 Dayton Rd - Ottawa IL 61350 - Ph 815-433-5100 - Fax 815-433-5104 – www.bb-elec.com
B&B Electronics Ltd – Westlink Commercial Park – Oranmore, Galway, Ireland – Ph +353 91-792444 – Fax +353 91-792445 – www.bb-europe.com
Page 25
Making the Hardware Connections
J11
J16
J9
J7
J3
J13
J14
J4
J2
J10
J15
J6
Figure 8. ESR902 Bias Jumper Locations
Port Interface Type
485 half duplex
1
422/485 full duplex
CTS
485 half duplex
2
422/485 full duplex
CTS
Jumper
Number
Pull up/pull down
J2 pull up
J10 pull down
J4 pull up
J14 pull down
J7 pull up
J6 pull down
J9 pull up
J15 pull down
J3 pull up
J13 pull down
J11 pull up
J16 pull down
Figure 9. ESR902 Bias Jumpers
Manual Documentation Number: ESR90x-0508m Chapter 2 15
B&B Electronics Mfg Co Inc – 707 Dayton Rd - Ottawa IL 61350 - Ph 815-433-5100 - Fax 815-433-5104 – www.bb-elec.com
B&B Electronics Ltd – Westlink Commercial Park – Oranmore, Galway, Ireland – Ph +353 91-792444 – Fax +353 91-792445 – www.bb-europe.com
Page 26
Making the Hardware Connections
J14
J22
J17
J13
J9
J7 J21
J3
J28
J20 J8
J2
Figure 10. ESR904 Bias Jumper Locations
J12 J27
J26J11
J6
J16 J24
J10 J25
J19
J5 J18
16 Chapter 2 Manual Documentation Number: ESR90x-0508m
B&B Electronics Mfg Co Inc – 707 Dayton Rd - Ottawa IL 61350 - Ph 815-433-5100 - Fax 815-433-5104 – www.bb-elec.com
B&B Electronics Ltd – Westlink Commercial Park – Oranmore, Galway, Ireland – Ph +353 91-792444 – Fax +353 91-792445 – www.bb-europe.com
Page 27

Making the Hardware Connections
Port Interface Type
485 half duplex
1
422/485 full duplex
CTS
485 half duplex
2
422/485 full duplex
CTS
485 half duplex
3
422/485 full duplex
CTS
485 half duplex
4
422/485 full duplex
CTS
Jumper
Number
Pull up/pull down
J22 pull up
J17 pull down
J7 pull up
J21 pull down
J13 pull up
J9 pull down
J3 pull up
J2 pull down
J8 pull up
J20 pull down
J14 pull up
J28 pull down
J12 pull up
J27 pull down
J6 pull up
J19 pull down
J11 pull up
J26 pull down
J16 pull up
J24 pull down
J5 pull up
J18 pull down
J10 pull up
J25 pull down
Figure 11. ESR904 Bias Jumpers
NNoottee::
(For more information on RS-485 Receiver Biasing, see B&B Electronics RS422/485 Application Note available at www.bb-elec.com)
Manual Documentation Number: ESR90x-0508m Chapter 2 17
B&B Electronics Mfg Co Inc – 707 Dayton Rd - Ottawa IL 61350 - Ph 815-433-5100 - Fax 815-433-5104 – www.bb-elec.com
B&B Electronics Ltd – Westlink Commercial Park – Oranmore, Galway, Ireland – Ph +353 91-792444 – Fax +353 91-792445 – www.bb-europe.com
Page 28

Making the Hardware Connections
18 Chapter 2 Manual Documentation Number: ESR90x-0508m
B&B Electronics Mfg Co Inc – 707 Dayton Rd - Ottawa IL 61350 - Ph 815-433-5100 - Fax 815-433-5104 – www.bb-elec.com
B&B Electronics Ltd – Westlink Commercial Park – Oranmore, Galway, Ireland – Ph +353 91-792444 – Fax +353 91-792445 – www.bb-europe.com
Page 29

Installing the VLINX Software
CChhaapptteerr 33:: IINNSSTTAALLLLIINNGG TTHHEE VVLLIINNXX
The Windows-based ESP Manager and Virtual COM Port software makes
configuration fast and easy. If using Windows, installing the ESP Manager
software and setting up virtual COM ports to configure the Serial Server is
recommended.
Software Installation
The VLINX software includes:
• ESP Manager
• Install Virtual COM Ports
• Uninstall Virtual COM Ports
Automatic Installation
Step 1a: Inserting the VLINX CD in the CD-ROM should automatically
launch the Install Shield Wizard.
Manual Installation
SSOOFFTTWWAARREE
Step 1b: To manually start the software installation, from the Windows
Desktop, click Start button. At the Run command line type
D:start.exe then click OK. (D: is the drive letter for the CD ROM.)
Figure 12. The Run Dialogue Box
The Install Shield Wizard window will be displayed.
Manual Documentation Number: ESR90x-0508m Chapter 3 19
B&B Electronics Mfg Co Inc – 707 Dayton Rd - Ottawa IL 61350 - Ph 815-433-5100 - Fax 815-433-5104 – www.bb-elec.com
B&B Electronics Ltd – Westlink Commercial Park – Oranmore, Galway, Ireland – Ph +353 91-792444 – Fax +353 91-792445 – www.bb-europe.com
Page 30

Installing the VLINX Software
Figure 13. The Install Shield Wizard Window
Step 2: When the VLINX ESP Setup window appears, click Next.
Figure 14. VLINX ESP Setup Window
Figure 15. The Choose Destination Window
Step 3: When Choose Destination Location appears, click Next.
The installation progress will be shown until complete.
20 Chapter 3 Manual Documentation Number: ESR90x-0508m
B&B Electronics Mfg Co Inc – 707 Dayton Rd - Ottawa IL 61350 - Ph 815-433-5100 - Fax 815-433-5104 – www.bb-elec.com
B&B Electronics Ltd – Westlink Commercial Park – Oranmore, Galway, Ireland – Ph +353 91-792444 – Fax +353 91-792445 – www.bb-europe.com
Page 31

Installing the VLINX Software
Figure 16. The Install Shield Wizard Complete Window
Step 4: Click Finish when the Install Shield Wizard Complete dialogue
appears. When finished, dialogue box will close.
Updating an Existing Installation
If an older version of the ESP Manager software is already installed, the
Modify, repair or remove the program window will appear when the
installation process is initiated:
Figure 17. The InstallShield Wizard Modify, Repair or Remove
Screen
Manual Documentation Number: ESR90x-0508m Chapter 3 21
B&B Electronics Mfg Co Inc – 707 Dayton Rd - Ottawa IL 61350 - Ph 815-433-5100 - Fax 815-433-5104 – www.bb-elec.com
B&B Electronics Ltd – Westlink Commercial Park – Oranmore, Galway, Ireland – Ph +353 91-792444 – Fax +353 91-792445 – www.bb-europe.com
Page 32
Installing the VLINX Software
The recommended procedure is to Remove all installed components first.
Once the software has been removed, Install the new software.
Opening the ESP Manager
Step 5: If the Serial Server is not already connected to the network or to the
Ethernet port on the computer, connect it. Set the Run/Console
switch to the Run position. Apply power.
The
Power indicator should light red, the Link light should indicate
which type of Ethernet connection has been made and the
LED will flash indicating configuration can begin.
Ready
Step 6: Start the
Start → Programs → B&B Electronics → VLINX → ESR Servers
→ VLINX ESP Manager
As soon as the
Server and after a few seconds the Serial Server List will display
all (ESP90x and ESR90x) Serial Servers on the network.
ESP Manager software. In Windows Desktop, click:
.
ESP Manager opens it will initiate Searching
Figure 18. ESP Manager Displaying all ESR90x Serial Servers
22 Chapter 3 Manual Documentation Number: ESR90x-0508m
B&B Electronics Mfg Co Inc – 707 Dayton Rd - Ottawa IL 61350 - Ph 815-433-5100 - Fax 815-433-5104 – www.bb-elec.com
B&B Electronics Ltd – Westlink Commercial Park – Oranmore, Galway, Ireland – Ph +353 91-792444 – Fax +353 91-792445 – www.bb-europe.com
Page 33
Using ESP Manager
CChhaapptteerr 44:: UUSSIINNGG EESSPP MMAANNAAGGEERR
The ESP Manager software allows:
• Searching for servers connected to the network
• Displaying and changing the configuration of those servers
• Installing virtual COM ports on a computer
• Displaying and configuring virtual COM ports
• Uninstalling virtual COM ports on a computer
• Upgrading the Serial Server firmware
• Monitoring Port Status
• Saving and Loading Configuration Files
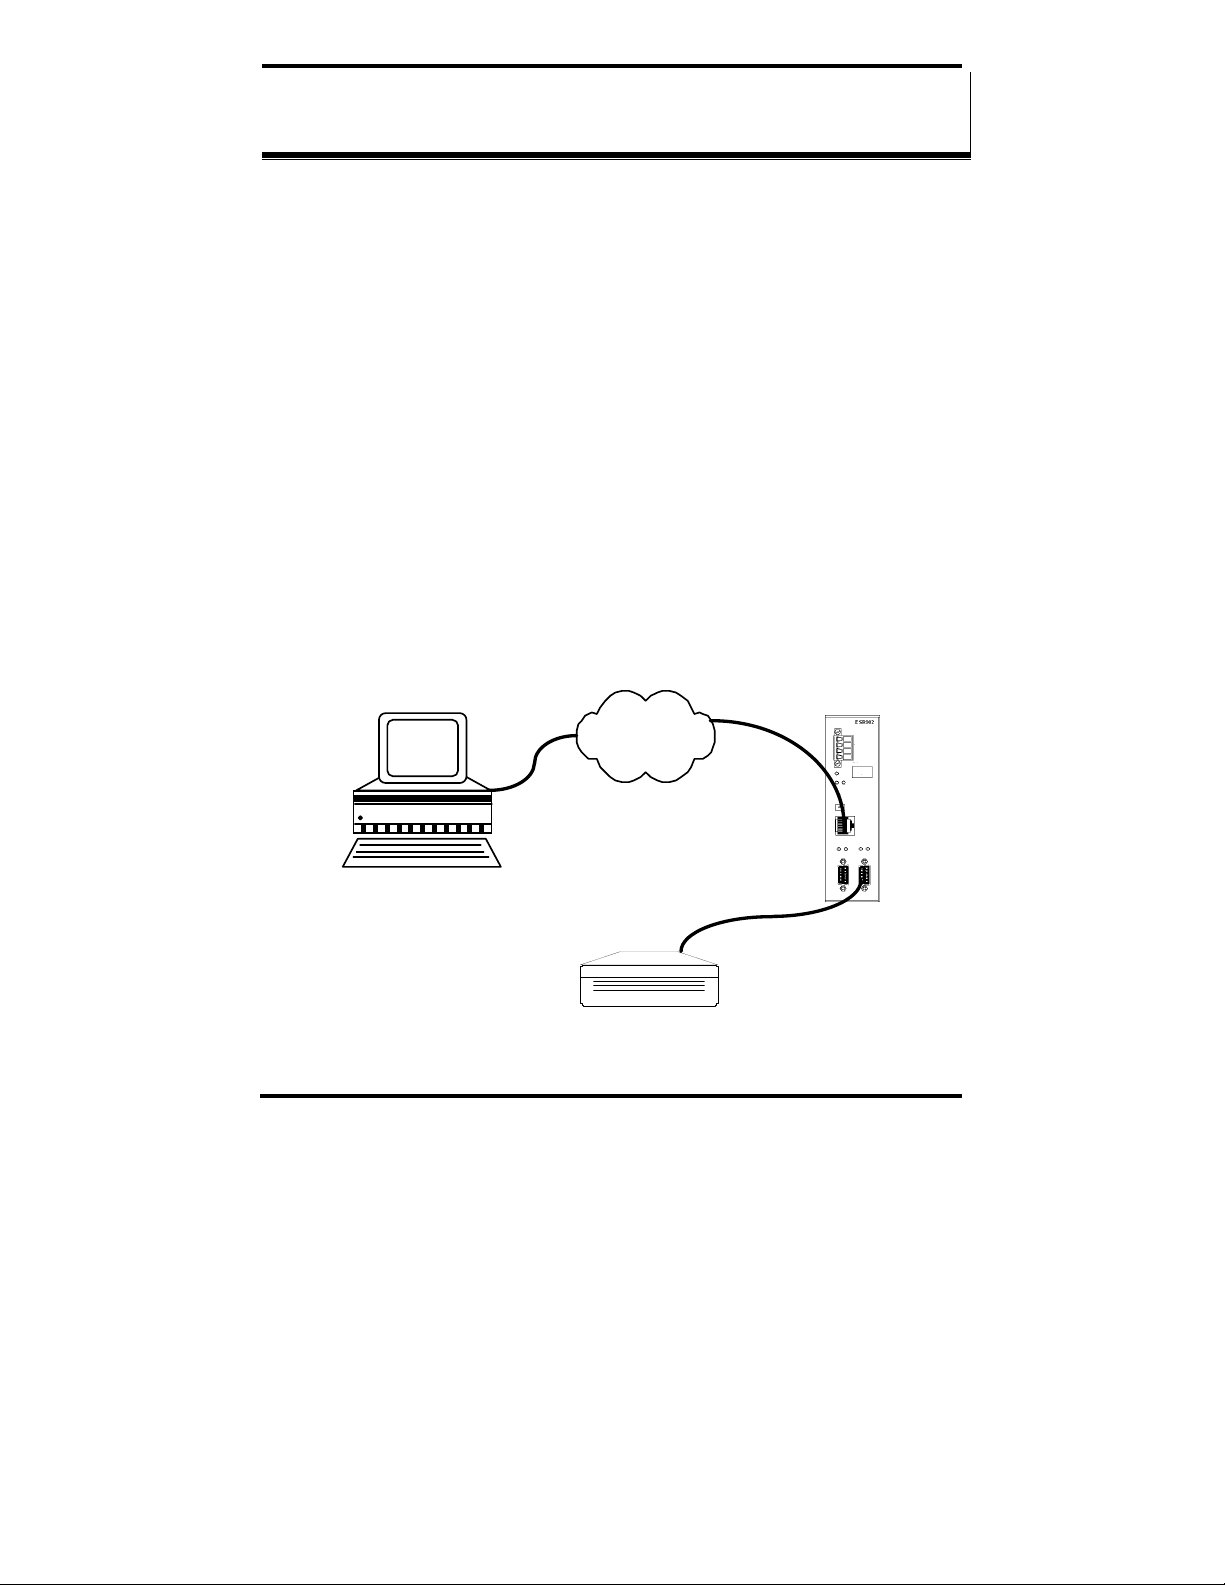
Hardware Setup
Step 1: Connect the Serial Server to the LAN or to a computer Ethernet
port. Set the Run/Console DIP switch on the Serial Server to the
Run position
Ethe rnet
cable
LAN
Etherne t
cable
PC
Ser ial Devic e
Figure 19. Ethernet Connection via a LAN
Manual Documentation Number: ESR90x-0508m Chapter 4 23
B&B Electronics Mfg Co Inc – 707 Dayton Rd - Ottawa IL 61350 - Ph 815-433-5100 - Fax 815-433-5104 – www.bb-elec.com
B&B Electronics Ltd – Westlink Commercial Park – Oranmore, Galway, Ireland – Ph +353 91-792444 – Fax +353 91-792445 – www.bb-europe.com
ESR902
RS-232
cable
Page 34
Using ESP Manager
Et h e r n et
crossover
cable
PC
ESR902
RS-232
cable
Figure 20. Direct Ethernet Connection using a Crossover Cable
NNoottee::
Use an Ethernet Crossover Cable if connecting directly to a computer LAN
card.
Step 2: Apply power. The red Power indicator will light, the Link indicator
lights when an Ethernet connection is made, and the Ready indicator
will flash.
Software Setup
Step 3. To run the ESP Manager, from the Windows Desktop click:
Start → Programs → B&B Electronics → VLINX → ESR Servers
→ VLINX ESP Manager
As soon as the
Server
all (ESP90x and ESR90x) Serial Servers on the network.
Serial Device
ESP Manager opens it will initiate Searching
and after a few seconds the Serial Server List will display
24 Chapter 4 Manual Documentation Number ESR90x-0508m
B&B Electronics Mfg Co Inc – 707 Dayton Rd - Ottawa IL 61350 - Ph 815-433-5100 - Fax 815-433-5104 – www.bb-elec.com
B&B Electronics Ltd – Westlink Commercial Park – Oranmore, Galway, Ireland – Ph +353 91-792444 – Fax +353 91-792445 – www.bb-europe.com
Page 35

Using ESP Manager
Figure 21. The VLINX ESP Manager Window
Software Overview
The VLINX ESP Manager window provides the following information:
Menus (Server, View, Exit, Help)
•
Server Icons (Firmware Upgrade, Virtual COM Configuration,
•
Searching Server, Uninstall Virtual COM, Monitor Port Status)
Serial Server / Virtual COM Lists
•
•
Software Status (Ready, Updating, Searching, etc)
Menus
Server
• Firmware Upgrade - Used when downloading new firmware to the
Serial Server.
NNoottee::
See Chapter 8 for more information on upgrading firmware.
• Virtual COM Configuration - Selects the Virtual COM List. Double
clicking on any COM port in the
that allows changing the virtual COM settings such as
Protocol, IP address, and Port Number. Virtual COM settings must
match Serial Server port settings.
Manual Documentation Number: ESR90x-0508m Chapter 4 25
B&B Electronics Mfg Co Inc – 707 Dayton Rd - Ottawa IL 61350 - Ph 815-433-5100 - Fax 815-433-5104 – www.bb-elec.com
B&B Electronics Ltd – Westlink Commercial Park – Oranmore, Galway, Ireland – Ph +353 91-792444 – Fax +353 91-792445 – www.bb-europe.com
Virtual COM List brings up a window
Flow Control,
Page 36

Using ESP Manager
• Searching Server - Searches for Serial Servers on the network and
brings back configuration information that will be displayed in the
Server Properties window.
Uninstall Virtual COM - Allows virtual COM ports to be uninstalled
•
from the ESP Manager window.
Monitor Port Status - Brings up a screen that displays the following
•
information associated with the selected serial port:
Save Configuration File - Allows the user to save the current
•
configuration information to a file with a .vcom extension.
Load Configuration File - Allows the user to load a configuration file.
•
o Serial TX: Displays the number of bytes of data sent to the
serial device since the IP connection was established.
o Serial RX: Displays the number of bytes of data received from
the connected
serial device since the IP connection was
established.
o DTR/RTS: The
DTR/RTS Port Status indicator displays the
current logic state of the DTR and RTS hardware handshake
(output) lines for the selected Serial Server port (1 = asserted, 0
= not asserted).
o DCD/DSR/CTS: The
DCD/DSR/CTS Port Status indicator
displays the current logic state being received on the DCD,
DSR and CTS hardware handshake (input) lines for the selected
Serial Server port (1 = asserted, 0 = not asserted)
o Status: Indicates whether the client software has made a
connection with the Serial Server
.
o IP Address: Displays the IP address of the connected client
when there is a client connection
View
Provides three viewing options for the ESP Manager screen:
Toolbar – allows the toolbar (directly under the menu bar) to be
•
viewable or hidden
Status Bar – allows the Status Bar (at the bottom of the screen to be
•
viewable or hidden
Split – allows the position of the split between the Icons pane and the
•
Virtual COM List / Serial Server List panes to be dragged horizontally
using the mouse
26 Chapter 4 Manual Documentation Number ESR90x-0508m
B&B Electronics Mfg Co Inc – 707 Dayton Rd - Ottawa IL 61350 - Ph 815-433-5100 - Fax 815-433-5104 – www.bb-elec.com
B&B Electronics Ltd – Westlink Commercial Park – Oranmore, Galway, Ireland – Ph +353 91-792444 – Fax +353 91-792445 – www.bb-europe.com
Page 37

Using ESP Manager
Exit
• Allows you to Exit the ESP Manager program
Help
• Accesses the About vcomui dialogue box, which indicates the software
version number
Server Icons Pane
Firmware Upgrade, Virtual COM Configuration, Searching Server,
Uninstall Virtual COM and Monitor Port Status can also be selected using
icons located in the left window.
Serial Server / Virtual COM Lists
To make management of lists of serial server easier, lists can be sorted by
clicking on any tab heading. Scrolling bars facilitate scrolling through long
lists.
Serial Server List
• Server Name - Displays the name of the Serial Server. The name is
listed once for each port.
IP Address - Displays the IP Address for the Serial Server. All ports in a
•
Serial Server have the same the same IP address.
Protocol - Displays the currently selected TCP or UDP mode for the
•
Serial Server.
Port - Displays the port number for each Serial Server port.
•
COM Name - Displays the name of the computer COM port mapped to
•
each Serial Server port. If no computer port has been mapped it displays
Not mapped.
•
Status - The Status indicates the mapped virtual COM port condition.
o
Not Connected is shown when a program does not have the
port Open.
o
Connected is shown when that mapped port is Open for use.
Virtual COM List
• COM Name - Displays the number of the COM port mapped to each
Serial Server port.
IP Address - Displays the IP Address for the Serial Server. All ports in a
•
Serial Server have the same IP address.
Manual Documentation Number: ESR90x-0508m Chapter 4 27
B&B Electronics Mfg Co Inc – 707 Dayton Rd - Ottawa IL 61350 - Ph 815-433-5100 - Fax 815-433-5104 – www.bb-elec.com
B&B Electronics Ltd – Westlink Commercial Park – Oranmore, Galway, Ireland – Ph +353 91-792444 – Fax +353 91-792445 – www.bb-europe.com
Page 38

Using ESP Manager
• Protocol - Displays the currently selected TCP or UDP mode for the
Serial Server.
Port - Displays the port number for each Serial Server port.
•
Flow Control - Indicates what type of flow control is configured for
•
each port.
Status - Indicates whether each port is currently In Use or Not Used.
•
Status Bar
Displays the current status of the software in the bottom, left corner of the screen
• Ready
• Updating
• Searching reachable servers…
Search for Servers
Upon opening the ESP Manager software it will automatically
execute Searching Server and search for all reachable ESR90x serial
servers.
Step 4: To manually initiate a search for servers, click Searching Servers
(under the Servers menu or the icon on the left side of the screen).
The Search Setup box will appear.
It provides two options for searching for servers on the network:
Specify the IP Address of the Serial Server
Search all reachable servers
Step 5: Enter the IP Address assigned to the desired Serial Server or click
Search all reachable servers, then OK. IP Address is used to find
Serial Server units that are not on the same subnet. (Routers on the
network will block the standard broadcast used to find servers if
Search all reachable servers is selected.) The user must set an IP
address that conforms to the LAN addressing scheme.
The Searching window is shown until all active Serial Servers on
the LAN are listed in the
28 Chapter 4 Manual Documentation Number ESR90x-0508m
B&B Electronics Mfg Co Inc – 707 Dayton Rd - Ottawa IL 61350 - Ph 815-433-5100 - Fax 815-433-5104 – www.bb-elec.com
B&B Electronics Ltd – Westlink Commercial Park – Oranmore, Galway, Ireland – Ph +353 91-792444 – Fax +353 91-792445 – www.bb-europe.com
Serial Server List window.
Page 39
Using ESP Manager
Configure Server Properties
The Server Properties window displays the current configuration
properties for the currently selected server.
Step 6: To open the Server Properties window, highlight the Serial Server
in the
Serial Server List window, double-click to open.
The
Server Properties window is used to configure and store the
Server configuration settings. Details for setting Properties are
described in the next chapter.
Figure 22. The Server Properties Window
NNoottee::
ESP Manager Navigation:
- Use the mouse to select the property and parameters or
- Tab to move to the next property
- Tab+Shift to move back to previous property
- Arrows t o move between properties or change values or contents of the
current property
- Enter to select update or cancel
Step 7: After configuring as needed, click Update to store the configuration
in the server.
Step 8: Click Yes to restart. A dialogue box will appear indicating the
server is restarting, then a dialogue box will ask whether you want to search
for all reachable servers again.
Step 9: Click
Manual Documentation Number: ESR90x-0508m Chapter 4 29
B&B Electronics Mfg Co Inc – 707 Dayton Rd - Ottawa IL 61350 - Ph 815-433-5100 - Fax 815-433-5104 – www.bb-elec.com
B&B Electronics Ltd – Westlink Commercial Park – Oranmore, Galway, Ireland – Ph +353 91-792444 – Fax +353 91-792445 – www.bb-europe.com
Yes.
Page 40

Using ESP Manager
After the port has been updated you may want to re-enter Server Properties
to verify the changes have taken effect, or to view/change the configuration
of other ports. Each port must be configured separately.
30 Chapter 4 Manual Documentation Number ESR90x-0508m
B&B Electronics Mfg Co Inc – 707 Dayton Rd - Ottawa IL 61350 - Ph 815-433-5100 - Fax 815-433-5104 – www.bb-elec.com
B&B Electronics Ltd – Westlink Commercial Park – Oranmore, Galway, Ireland – Ph +353 91-792444 – Fax +353 91-792445 – www.bb-europe.com
Page 41
Server Properties Configuration
CChhaapptteerr 55:: CCOONNFFIIGGUURRIINNGG TTHHEE SSEERRIIAALL
SSEERRVVEERR PPRROOPPEERRTTIIEESS
The VLINX Serial Ser ver can be configured using any of four different user
interfaces: the
Server
. The Server Properties described in this chapter can be changed
from any of these user interfaces.
ESP Manager software, Console Mode, Telnet or the Web
Figure 23. The Four Methods of Configuring Server Properties
Manual Documentation Number: ESR90x-0508m Chapter 5 31
B&B Electronics Mfg Co Inc – 707 Dayton Rd - Ottawa IL 61350 - Ph 815-433-5100 - Fax 815-433-5104 – www.bb-elec.com
B&B Electronics Ltd – Westlink Commercial Park – Oranmore, Galway, Ireland – Ph +353 91-792444 – Fax +353 91-792445 – www.bb-europe.com
Page 42

Server Properties Configuration
Description of the Server Properties
Figure 24. ESP Manager Server Properties Window
Server Name
This field displays the name that has been assigned to the Serial Server. A
new
Server Name of up to 16 characters can be entered. If more than one
Serial Server is connected on the LAN it is recommended that a new name be
assigned to each. When the
it displays the server name and IP Address allowing the user to distinguish
between Serial Servers.
ESP Manager finds a Serial Server on the LAN
Serial Number
Each Serial Server has a unique serial number.It is fixed and cannot be
changed.
Password
Entering a password activates a security feature on the Serial Server. Once a
password is entered it will be required to access the menu and make changes.
DHCP
DHCP servers are a part of numerous LAN management systems. The DHCP
field provides two choices: Disable and Enable. Disable is the normal, or
default, setting. When enabled, the Serial Server will send a DHCP request to
the DHCP server, which will assign a dynamic IP address, net mask, and
gateway to the Serial Server. If a DHCP server is not available on the
network the Serial Server will time out after 10 seconds and the default
32 Chapter 5 Manual Documentation Number: ESR90x-0508m
B&B Electronics Mfg Co Inc – 707 Dayton Rd - Ottawa IL 61350 - Ph 815-433-5100 - Fax 815-433-5104 – www.bb-elec.com
B&B Electronics Ltd – Westlink Commercial Park – Oranmore, Galway, Ireland – Ph +353 91-792444 – Fax +353 91-792445 – www.bb-europe.com
Page 43

Server Properties Configuration
values will remain. When DHCP is enabled, the IP Address, Netmask and
Gateway fields become inaccessible and cannot be changed by the user.
NNoottee::
A dynamic address assigned by the DHCP server may change if the server
loses the Ethernet connection or power is removed. The host (client)
communication software requests a connection to the specific IP address of the
serial server. If the DHCP reassigns a different IP address the software will not
be able to communicate with the hardware. Therefore, using a static IP address
is recommended.
IP Address
Software or hardware attempting to access the Serial Server via the network
must know the
remains the same each time the server is powered up or starts/restarts. The
default IP address of the Serial Server is printed on a label on its bottom
cover. Entering an appropriate address in the IP Address field and updating
the server will change the server’s IP address. The network administrator can
assign/establish the static address or group of addresses to be used.
The IP Address of the Serial Server can be confirmed using the DOS Ping
command.
IP Address of the server. A static IP address is retained and
NNoottee::
To use Ping to check for communications:
- Access a DOS window (in XP click Start, then Run)
- At run prompt enter: CMD
- In the DOS window enter: Ping xxx.xxx.xxx.xxx (IP address for the server to
be confirmed)
- The command will return the Ping results indicating 4 replies
Figure 25. Pinging using the DOS command window
Manual Documentation Number: ESR90x-0508m Chapter 5 33
B&B Electronics Mfg Co Inc – 707 Dayton Rd - Ottawa IL 61350 - Ph 815-433-5100 - Fax 815-433-5104 – www.bb-elec.com
B&B Electronics Ltd – Westlink Commercial Park – Oranmore, Galway, Ireland – Ph +353 91-792444 – Fax +353 91-792445 – www.bb-europe.com
Page 44

Server Properties Configuration
Netmask
The default LAN netmask is configured for a Class C address. The user may
change this. Default is 255.255.255.0
Gateway
The Gateway IP address allows users to access the Serial Server from outside
the LAN.
MAC Address
The MAC address is fixed and cannot be changed. It is assigned in the
factory. Every Ethernet device manufactured has it own unique MAC
address.
Version & Date
The currently loaded version of the firmware, and when it was released, is
shown here.
Link Status
Link status automatically displays the type of Ethernet connection. It will
either display 10BaseT or 100BaseTX in full duplex or half duplex. This will
depend on the LAN, switches, hubs used in the LAN topology.
Server Serial Port
This field indicates the number of the port for with Serial Server properties
are currently being displayed. Changing the number in this field will cause
all the other fields to display the properties for the specified port. Note,
however, that before changing ports, any changes to properties must be
Updated (Saved) or the n will not retain them.
Baud Rate
The serial port baud rate on the Serial Server must match the serial baud rate
of the connected device unless using Virtual COM Mode. In Virtual COM
Mode the software program will establish serial settings.
Data/Parity/Stop
Set this to match the data format used by the serial device connected when
Virtual COM Mode is not being used.
34 Chapter 5 Manual Documentation Number: ESR90x-0508m
B&B Electronics Mfg Co Inc – 707 Dayton Rd - Ottawa IL 61350 - Ph 815-433-5100 - Fax 815-433-5104 – www.bb-elec.com
B&B Electronics Ltd – Westlink Commercial Park – Oranmore, Galway, Ireland – Ph +353 91-792444 – Fax +353 91-792445 – www.bb-europe.com
Page 45

Server Properties Configuration
Flow Control
The Flow Control setting must match the requirements of the serial device
connected.
NNoottee::
Select None when setting the port as RS-485 or 4-wire RS-422.
TCP/UDP Protocol
Select TCP (Transmission Control Protocol) or UDP (User Datagram
Protocol) protocol. If the application does not require a UDP connection,
select TCP. TCP guarantees reliable communication with error checking
whereas UDP provides faster transmission.
UDP Mode
When UDP mode is chosen the Serial timeout, TCP alive timeout,
Connection mode, Connection at, Max connection and Remote
IP address fields are replaced with the following four fields:
Destination IP address range, Port number and Source IP
address range. In this mode the server can be configured to
broadcast data to and receive data from multiple IP addresses. Four
IP address range fields are provided.
Figure 26. The Server UDP Configuration Screen
Manual Documentation Number: ESR90x-0508m Chapter 5 35
B&B Electronics Mfg Co Inc – 707 Dayton Rd - Ottawa IL 61350 - Ph 815-433-5100 - Fax 815-433-5104 – www.bb-elec.com
B&B Electronics Ltd – Westlink Commercial Park – Oranmore, Galway, Ireland – Ph +353 91-792444 – Fax +353 91-792445 – www.bb-europe.com
Page 46

Server Properties Configuration
Serial Timeout
Default for the Timeout property is 0, or no timeout. Setting Timeout to any
value between 1 and 65535 seconds activates it. If
seconds and the Serial Server is configured as a
connection and communications starts. If communications are ideal for 5
seconds the
Serial Server will reset and make itself available for another
client connection.
TCP Alive Timeout
The Serial Server monitors TCP activity. If TCP activity stops for the length
of time specified in this field the connection will be closed. This field can be
set to any value between 0 and 255 minutes. If zero, or no value, is entered
into this field the server will not disconnect.
Connection Mode
The Connection Mode field has three options: Server, Client and Client (no
heartbeat). When Client or Client (no heartbeat) is selected the
Connection at
select Power up or Data Arrival).
field automatically becomes active (allowing the user to
Timeout is set to 5
Server, the Client makes a
• When using the
• When using a
• When using
up one as a
• When connecting to a server that does not support
Client (no Heartbeat).
Virtual COM Port feature, select Server.
TCP or UDP Socket program, select Server.
Paired Mode communication between two serial servers set
Client and the other as a Server.
Heartbeat, select
Delimiter HEX 1 and Delimiter HEX 2
These fields allow the user to enter two ASCII characters (in hex format) that
delimit the beginning and end of a message. When a message with both these
delimiters is received at the serial port, the data contained in the serial buffer
is placed in an Ethernet packet and sent out the Ethernet port. If only
Delimiter 1 is set (Delimiter 2 is zero or blank), upon receiving Delimiter 1
the Serial Server will put all the data in the serial buffer in an Ethernet packet
and send it out the Ethernet port. If serial data greater than 1 kilobyte is
received it will automatically be placed in an Ethernet packet and sent out the
Ethernet port.
36 Chapter 5 Manual Documentation Number: ESR90x-0508m
B&B Electronics Mfg Co Inc – 707 Dayton Rd - Ottawa IL 61350 - Ph 815-433-5100 - Fax 815-433-5104 – www.bb-elec.com
B&B Electronics Ltd – Westlink Commercial Park – Oranmore, Galway, Ireland – Ph +353 91-792444 – Fax +353 91-792445 – www.bb-europe.com
Page 47

Server Properties Configuration
Force Transmit
This field allows the user to set a maximum time limit between transmissions
of data. The value set in this field multiplied by 100 ms determines the Force
Transmit time. When the elapsed time reaches the time configured in this
field, the TCP/IP protocol will pack the data currently in the serial buffer into
a packet and send it out the Ethernet port.
Port Status
This field indicates whether a serial port is connected via the Serial Server to
a virtual COM port of a device on the network.
TCP/UDP Port
This sets the port number for connection. The default port number for the
ESR901 serial port is 4000. The default port numbers for serials ports 1, 2, 3
and 4 are
4000, 4001, 4002 and 4003 respectively.
In all modes of operation,
the Server Properties menu must match the Virtual COM or socket software
port settings.
NNoottee::
Example: The Virtual COM default setting is TCP/UDP Port 4000. If the port #
property is changed to 4001, the virtual COM port will have to be changed to
4001. The hardware settings can be changed from the ESP Manager or
Console Configuration Menu. The Virtual COM port setting also can be
changed within the Device Manager of the computer on which it is installed.
Serial Port Mode
Serial Port Mode allows configuration of the serial server for the following
modes of operation:
Console – When this mode is selected and the server is updated, a PC
•
running a communications program such as HyperTerminal can
communicate with the Serial Server via the
(the serial Port on ESR901 or Port 1 on ESR902/904), displaying the
Server Properties screen and allowing configuration of the server and
its ports.
Upgrade – When this mode is selected and the server is updated,
•
firmware can be uploaded into the Serial Server via the
serial port or a virtual COM port mapped to the number of the
serial port.
Mode
Direct IP or Virtual COM, the port number set in
Console Mode serial port
Console Mode
Console
Manual Documentation Number: ESR90x-0508m Chapter 5 37
B&B Electronics Mfg Co Inc – 707 Dayton Rd - Ottawa IL 61350 - Ph 815-433-5100 - Fax 815-433-5104 – www.bb-elec.com
B&B Electronics Ltd – Westlink Commercial Park – Oranmore, Galway, Ireland – Ph +353 91-792444 – Fax +353 91-792445 – www.bb-europe.com
Page 48

Server Properties Configuration
• Default – When this mode is selected and the server is updated, it will
revert the server to its default configuration.
RS-232 – When this mode is selected and the server updated, the
•
selected serial port will become an RS-232 serial port on the server.
RS-422 – When this mode is selected and the server updated, the
•
selected serial port will become an RS-422 serial port on the server.
RS-485H – When this mode is selected and the server updated, the
•
selected serial port will become a two-wire, half-duplex RS-485 serial
port on the server.
RS-485F – When this mode is selected and the server updated, the
•
selected serial port will become a four-wire, full-duplex RS-485 serial
port on the server.
Connection At
When the Connection Mode field is set to Client or Client (no heartbeat),
this field becomes active, allowing the Serial Server (acting as a client) to
connect to the server either on
arriving).
Max Connection
This field allows the user to configure the Serial Server to have up to eight
TCP connections.
Power up or on Data Arrival (first character
Remote IP Address
This is a security feature activated by entering the IP address of the desired
client. The Serial Server will only communicate with the listed IP address
and all other requests for connection will be filtered out. The Serial Server
must be set up as a
setting is 255.255.255.255.
If
Paired Mode is not being used, do not change this setting until the
application has been tested and is communicating properly. Then activate the
address filtering feature.
NNoottee::
Refer to Chapter 1 Paired Mode
38 Chapter 5 Manual Documentation Number: ESR90x-0508m
B&B Electronics Mfg Co Inc – 707 Dayton Rd - Ottawa IL 61350 - Ph 815-433-5100 - Fax 815-433-5104 – www.bb-elec.com
B&B Electronics Ltd – Westlink Commercial Park – Oranmore, Galway, Ireland – Ph +353 91-792444 – Fax +353 91-792445 – www.bb-europe.com
TCP or UDP Server to use this feature. The default
Page 49

Server Properties Configuration
Update/Save
Server properties must be updated separately for each serial port. Updating
varies slightly depending on which of the four configuration user interfaces
are used.
Updating the Server Properties in ESP Manager
From the Server Properties screen, click the Update button to store the
configuration settings for the currently selected port. The vcomui dialogue
box will appear indicating you must restart the device before the new settings
will take effect. Click
whether you want to search for all reachable servers again. Click Yes.
Yes. After several seconds a dialogue box will ask
After that port has been updated you may want to re-enter
to verify the changes have taken effect, or to view/change the configuration
of other ports. Each port must be configured separately.
Saving Configuration Data in Console Mode or Telnet
Saving (updating) server properties is done from the Configuration screen.
Access the Configuration screen by tabbing through the list of screens on the
left side of the window and highlighting
There are four options shown on the right side of the
Save, Default, Running and Reset. Use Tab, Backspace, or arrow keys to
move the cursor to the option position, and then press
• Save stores the configuration data to the Serial Server flash memory and
resets it.
• Default restores the configuration data to factory default settings.
• Running restores the configuration data to the last values stored in the
flash memory.
• Reset re-boots the Serial Server, making it available for a client
connection.
Web Server Interface
• The Web Server interface provides the same updating options as
Console Mode and Telnet. These are located at the bottom of all three
Web Server pages. If a field is changed, you must click Save before
leaving that page or the changes will be ignored.
NNoottee::
If you leave any Web Server page without saving, any changes you have made
will be ignored.
Server Properties
Configuration.
Configuration screen:
Enter.
Manual Documentation Number: ESR90x-0508m Chapter 5 39
B&B Electronics Mfg Co Inc – 707 Dayton Rd - Ottawa IL 61350 - Ph 815-433-5100 - Fax 815-433-5104 – www.bb-elec.com
B&B Electronics Ltd – Westlink Commercial Park – Oranmore, Galway, Ireland – Ph +353 91-792444 – Fax +353 91-792445 – www.bb-europe.com
Page 50

Server Properties Configuration
40 Chapter 5 Manual Documentation Number: ESR90x-0508m
B&B Electronics Mfg Co Inc – 707 Dayton Rd - Ottawa IL 61350 - Ph 815-433-5100 - Fax 815-433-5104 – www.bb-elec.com
B&B Electronics Ltd – Westlink Commercial Park – Oranmore, Galway, Ireland – Ph +353 91-792444 – Fax +353 91-792445 – www.bb-europe.com
Page 51

Installing Virtual COM Port
CChhaapptteerr 66:: IINNSSTTAALLLLIINNGG VVIIRRTTUUAALL CCOOMM
PPOORRTTSS
The Virtual COM Port feature allows Windows platform software, using standard API
calls, to be used in an Ethernet application.
The
Install Virtual COM Port software adds a Serial Server (COM#) port to the
computer. This shows up in the Device Manager. The COM number can be selected
from a list of available numbers. For example, in a computer already having a COM1
and COM2, COM3 to COM 254 are available for the Serial Server. It is recommended
that COM Port 5 or higher be selected. The virtual COM port looks like a standard
COM port to most Windows based applications which allows the software to open a
connection with the serial port located anywhere on the LAN/WAN. When using the
virtual COM port the
Virtual COM Port Installation
Step 1: From the Windows Desktop, click:
Serial Server is configured as a TCP or UDP Server.
Start → Programs → B&B Electronics → VLINX → ESP Servers
→ Install Virtual COM
Search Setup window will appear.
The
Step 2: Select the
Manual Documentation Number: ESR90x-0508m Chapter 6 41
B&B Electronics Mfg Co Inc – 707 Dayton Rd - Ottawa IL 61350 - Ph 815-433-5100 - Fax 815-433-5104 – www.bb-elec.com
B&B Electronics Ltd – Westlink Commercial Park – Oranmore, Galway, Ireland – Ph +353 91-792444 – Fax +353 91-792445 – www.bb-europe.com
Search all reachable servers check box, then click OK.
Figure 27. The Search Setup Window
Page 52
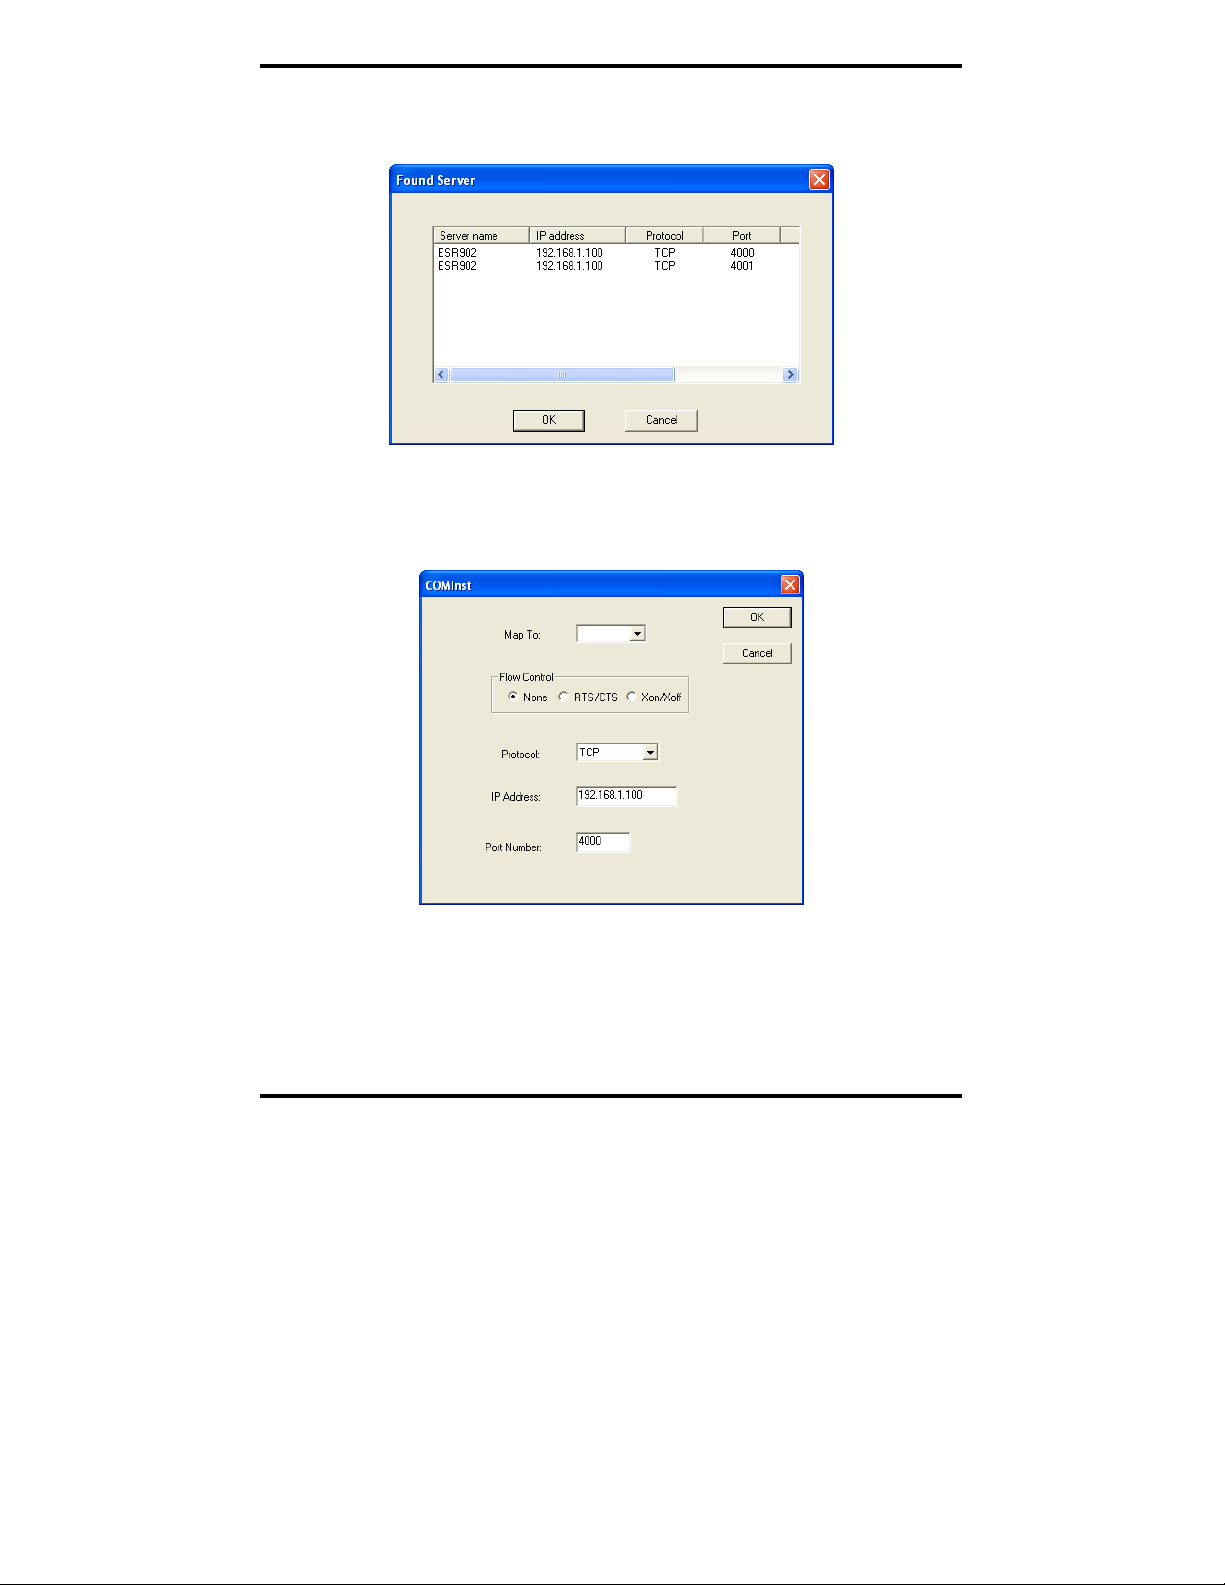
Installing Virtual COM Port
The program searches the LAN for all available Serial Servers. When
complete, the Found Server window appears and displays a list of the
servers that were found.
Step 3: Select the Serial Server at the IP Address to be mapped to a virtual
COM port, then click OK.
Figure 28. The Found Server Window
Figure 29. The COMInst Window
Step 4: In the Map To: field, select the number of the virtual COM port to
be assigned. The default
Flow Control setting is None. RTS/CTS can be
selected if used by the application program and serial hardware. The Serial
Server must be set to match. The Protocol TCP/UDP, IP Address, and Port
Number will mirror the settings of the selected serial server. Click
42 Chapter 6 Manual Documentation Number: ESR90x-0508m
B&B Electronics Mfg Co Inc – 707 Dayton Rd - Ottawa IL 61350 - Ph 815-433-5100 - Fax 815-433-5104 – www.bb-elec.com
B&B Electronics Ltd – Westlink Commercial Park – Oranmore, Galway, Ireland – Ph +353 91-792444 – Fax +353 91-792445 – www.bb-europe.com
OK.
Page 53

Installing Virtual COM Port
NNoottee::
PCs may have hardware COM ports and devices such as Modems, IR ports or
USB based COM ports that are not currently connected Try selecting a COM
number above COM4 if problems occur.
Windows XP/Vista provides a notice concerning Windows Logo testing for
XP/Vista.
Figure 30. The Windows Logo Testing Window
This XP/Vista feature simply indicates that these drivers have not yet
undergone the Microsoft testing procedures required to use the Windows
XP/Vista Logo on the packaging. Driver compatibility is not affected.
Step 5: Click
Continue Anyway to proceed with the installation.
Step 6: After setting all Serial Server serial ports as virtual COM ports, click
Cancel on the Found Server form.
Manual Documentation Number: ESR90x-0508m Chapter 6 43
B&B Electronics Mfg Co Inc – 707 Dayton Rd - Ottawa IL 61350 - Ph 815-433-5100 - Fax 815-433-5104 – www.bb-elec.com
B&B Electronics Ltd – Westlink Commercial Park – Oranmore, Galway, Ireland – Ph +353 91-792444 – Fax +353 91-792445 – www.bb-europe.com
Page 54

Installing Virtual COM Port
Matching the Serial Server and Virtual COM Port
Settings
The settings of the virtual COM ports in the Device Manager and the Serial
Server
Configuration Menu must match. If the settings do not match, the
virtual COM ports will not work. If these settings are changed in the Device
Manager, it will only affect the operation of the virtual COM port. It will not
change the settings stored in the Serial Server. Use the
change the Serial Server settings.
ESP Manager to
Step 1: Use Device Manager to
View New Ports
Confirm the virtual COM ports in the Device Manager.
Step 2: Double-click
Ports to view the list of COM port numbers.
The installed Virtual COM port will be displayed as
VLINX ESP (COM #).
Figure 31. The Device Manager Window
44 Chapter 6 Manual Documentation Number: ESR90x-0508m
B&B Electronics Mfg Co Inc – 707 Dayton Rd - Ottawa IL 61350 - Ph 815-433-5100 - Fax 815-433-5104 – www.bb-elec.com
B&B Electronics Ltd – Westlink Commercial Park – Oranmore, Galway, Ireland – Ph +353 91-792444 – Fax +353 91-792445 – www.bb-europe.com
Page 55
Installing Virtual COM Port
Step 3: In the Device Manager select a VLINX ESP COM#. Double-click it to
bring up the Properties window.
.
Figure 32. The VLINX ESR (COM3) Properties Window
Step 4: Click the Configuration or Port Settings tab. This screen allows the
settings to be changed if necessary. Click
Cancel to keep the
existing settings.
Step 5: Click
OK to change the settings. Use Refresh in the Device Manager
if Windows does not auto refresh.
Manual Documentation Number: ESR90x-0508m Chapter 6 45
B&B Electronics Mfg Co Inc – 707 Dayton Rd - Ottawa IL 61350 - Ph 815-433-5100 - Fax 815-433-5104 – www.bb-elec.com
B&B Electronics Ltd – Westlink Commercial Park – Oranmore, Galway, Ireland – Ph +353 91-792444 – Fax +353 91-792445 – www.bb-europe.com
Page 56

Installing Virtual COM Port
46 Chapter 6 Manual Documentation Number: ESR90x-0508m
B&B Electronics Mfg Co Inc – 707 Dayton Rd - Ottawa IL 61350 - Ph 815-433-5100 - Fax 815-433-5104 – www.bb-elec.com
B&B Electronics Ltd – Westlink Commercial Park – Oranmore, Galway, Ireland – Ph +353 91-792444 – Fax +353 91-792445 – www.bb-europe.com
Page 57

Removing Virtual COM Ports
CChhaapptteerr 77:: RREEMMOOVVIINNGG VVIIRRTTUUAALL CCOOMM
PPOORRTTSS
The ESP Manager software Uninstall Virtual COM Port feature will remove a
mapped COM port in the Device Manager of Windows 2000 and XP operating
systems. It may also be removed in the Device Manager of Windows 98, ME,
NT, 2000, and XP. Windows 98 users also will find a
feature in the Programs file.
Removing the Virtual COM port with ESP Manager
Step1: From the Windows Desktop, click:
Start → Programs → B&B E lectronics → VLINX → ESR Ser vers → VLINX
ESP Manager
Step 2: In the
Highlight the mapped COM port number to be removed.
ESP Manager window click the Virtual COM List tab.
Remove Virtual COM
Figure 33. The ESP Manager Window
Manual Documentation Number: ESR90x-0508m Chapter 7 47
B&B Electronics Mfg Co Inc – 707 Dayton Rd - Ottawa IL 61350 - Ph 815-433-5100 - Fax 815-433-5104 – www.bb-elec.com
B&B Electronics Ltd – Westlink Commercial Park – Oranmore, Galway, Ireland – Ph +353 91-792444 – Fax +353 91-792445 – www.bb-europe.com
Page 58

Removing Virtual COM Ports
Step 3: Click the
conformation. Click
Uninstall Virtual COM icon. The Manager will ask for
OK to complete the uninstall procedure.
Removing the Virtual COM Port using Device
Manager
NNoottee::
The screen shots were taken from a Windows XP operating system
Step 1: From the Windows Desktop click:
Start → Settings → Control Panel.
Step 2: Click the
System icon when the manager window opens.
Figure 34. The Control Panel Window
Step 3: Click Device Manager in the Systems Properties window. In the
Device Manager dialogue click the + next to Ports (COM LPT) to
expand.
48 Chapter 7 Manual Documentation Number: ESR90x-0508m
B&B Electronics Mfg Co Inc – 707 Dayton Rd - Ottawa IL 61350 - Ph 815-433-5100 - Fax 815-433-5104 – www.bb-elec.com
B&B Electronics Ltd – Westlink Commercial Park – Oranmore, Galway, Ireland – Ph +353 91-792444 – Fax +353 91-792445 – www.bb-europe.com
Page 59
Removing Virtual COM Ports
Figure 35. The Device Manager Window
Step 4: Highlight ESP (COM #) to be removed and click the Action tab at the
top of window, then click Uninstall. A confirm Device Removal
window will appear.
Figure 36. Confirm Device Removal
Step 5: Click OK to proceed.
The
ESP COM # will be removed and the Device Manager window will
refresh and display the remaining COM ports
Manual Documentation Number: ESR90x-0508m Chapter 7 49
B&B Electronics Mfg Co Inc – 707 Dayton Rd - Ottawa IL 61350 - Ph 815-433-5100 - Fax 815-433-5104 – www.bb-elec.com
B&B Electronics Ltd – Westlink Commercial Park – Oranmore, Galway, Ireland – Ph +353 91-792444 – Fax +353 91-792445 – www.bb-europe.com
Page 60

Removing Virtual COM Ports
50 Chapter 7 Manual Documentation Number: ESR90x-0508m
B&B Electronics Mfg Co Inc – 707 Dayton Rd - Ottawa IL 61350 - Ph 815-433-5100 - Fax 815-433-5104 – www.bb-elec.com
B&B Electronics Ltd – Westlink Commercial Park – Oranmore, Galway, Ireland – Ph +353 91-792444 – Fax +353 91-792445 – www.bb-europe.com
Page 61

Upgrade Mode
CChhaapptteerr 88:: UUPPGGRRAADDIINNGG TTHHEE SSEERRIIAALL
SSEERRVVEERR FFIIRRMMWWAARREE
New Serial Server firmware updates may become available through the
B&B Electronics website for installation into the server. The firmware can be
uploaded using either a virtual COM port connection or hardware COM port
connection.
Downloading the Firmware
Make a folder to receive the firmware file. Download the compressed
software file from the B&B Electronics website. Unzip or expand the file
into the (.hex) format so it will be ready to upload to the Serial Server.
Upgrading Via ESP Manager
The ESP Manager software can upload new firmware to the server using a
direct PC connection via the ESR901 serial port, ESR902/904 Port 1, or
using a virtual COM port.
NNoottee::
If connecting directly to a computer serial port, use a null modem cable
between the Computer RS-232 port and the ESR901 serial port or ESR902 Port
1.
Preparing the Software
Step 1: In the ESP Manager Serial Server List window, double click the
server to be upgraded. The
Step 2: If using a direct connection to upload the firmware to the
Server, set the baud rate to 115200 for the fastest possible upload.
Step 3: Set the
(Ensure that the Run/Console switch is in the Run position.)
Step 4: Click
Manual Documentation Number: ESR90x-0508m Chapter 8 51
B&B Electronics Mfg Co Inc – 707 Dayton Rd - Ottawa IL 61350 - Ph 815-433-5100 - Fax 815-433-5104 – www.bb-elec.com
B&B Electronics Ltd – Westlink Commercial Park – Oranmore, Galway, Ireland – Ph +353 91-792444 – Fax +353 91-792445 – www.bb-europe.com
Serial Port field to upgrade and click the Update button.
Yes on the vcomui dialogue to restart the Serial Server.
Server Properties window will appear.
Serial
Page 62

Upgrade Mode
Upgrading the Firmware
Step 5: Double-click the Firmware Upgrade icon (or click the Server menu
and
Firmware Upgrade)
Step 6: In the
appear. Locate the folder on your PC that contains the firmware .hex
file.
Select the file and click Open. The Open dialogue box will
disappear.
Step 7: In the
transferring the firmware.
a. If connected directly from the PC to a Serial Server port it
b. If using a virtual COM port to upgrade via the network,
Step 8: Click
Upgrade
Step 9: In the
Parity and Stop bits to the same values as set up in the Server
Properties
Upgrade window, click Browse. The Open dialogue box will
Upgrade window select the serial port to be used in
will typically be COM1 or COM2
identify the virtual COM number and address mapped to
Port 1 on the Serial Server.
Port Settings window set the Bits per second, Data bits,
window. Click OK.
Figure 37. The Port Settings Window
Step 10: Upgrade progress will be shown until the Upgrade finished!
message is shown. Click OK.
52 Chapter 8 Manual Documentation Number: ESR90x-0508m
B&B Electronics Mfg Co Inc – 707 Dayton Rd - Ottawa IL 61350 - Ph 815-433-5100 - Fax 815-433-5104 – www.bb-elec.com
B&B Electronics Ltd – Westlink Commercial Park – Oranmore, Galway, Ireland – Ph +353 91-792444 – Fax +353 91-792445 – www.bb-europe.com
Page 63

Using Console Mode
CChhaapptteerr 99:: UUSSIINNGG CCOONNSSOOLLEE MMOODDEE
Before the Serial Server is installed on a LAN the Console Mode can be
used to change the settings from the defaults. The Serial Server is shipped in
the
RS-232 Mode. Connect a crossover (null modem) cable between the
COM port on the computer and the appropriate serial port on the Serial
Server.
NNoottee::
See Chapter 5 for details of each Server Property Settings.
Console Mode Setup
Step 1: Apply power to the Serial Server. The power and ready LED will
light.
Step 2: Using a VT100 Terminal emulation program (typically
HyperTerminal in Windows) open the computer COM port
connected to the Serial Server (via an RS-232 crossover cable).
Step 3: In the HyperTerminal
o Baud rate: 9600
o Data bits: 8
o Parity: None
o Stop bits: 1
o Flow control: None
Port Settings window set:
Click
OK
Step 4: Ensure the
Step 5: To view the
will appear within a few seconds.
Manual Documentation Number: ESR90x-0508m Chapter 9 53
B&B Electronics Mfg Co Inc – 707 Dayton Rd - Ottawa IL 61350 - Ph 815-433-5100 - Fax 815-433-5104 – www.bb-elec.com
B&B Electronics Ltd – Westlink Commercial Park – Oranmore, Galway, Ireland – Ph +353 91-792444 – Fax +353 91-792445 – www.bb-europe.com
Run/Console switch is in the Console position.
Configuration Menu, press the space bar. The menu
Page 64
Using Console Mode
Navigating the Configuration Menus
There are six Console Mode screens: Server, Network, Serial Mode,
Operation, Monitor and Configuration. Tab, Back Space and arrow keys
can be used to highlight the desired function on the screen list. Pressing
Enter moves the cursor to the first field with the current screen. The
configuration fields can be changed by pressing
list that appears. The
Pressing the
Space Bar refreshes the page.
Escape key moves the cursor back to the screen list.
Enter and selecting from the
Figure 38. Console Mode Configuration Screens
54 Chapter 9 Manual Documentation Number: ESR90x-0508m
B&B Electronics Mfg Co Inc – 707 Dayton Rd - Ottawa IL 61350 - Ph 815-433-5100 - Fax 815-433-5104 – www.bb-elec.com
B&B Electronics Ltd – Westlink Commercial Park – Oranmore, Galway, Ireland – Ph +353 91-792444 – Fax +353 91-792445 – www.bb-europe.com
Page 65

Using Console Mode
Step 5: Once all the changes have been made move to the
screen, select
Figure 39. Saving and Restarting the Configuration
Save and press Enter.
The restart message will appear.
Step 6: Select
Yes to save changes. This is necessary to write the settings to
the server.
Configuration
Using a Password
If a password is used it must be entered before the Configuration screen can
be seen. If the server is accessed with a password but no changes are made,
Reset to end before disconnecting.
Manual Documentation Number: ESR90x-0508m Chapter 9 55
B&B Electronics Mfg Co Inc – 707 Dayton Rd - Ottawa IL 61350 - Ph 815-433-5100 - Fax 815-433-5104 – www.bb-elec.com
B&B Electronics Ltd – Westlink Commercial Park – Oranmore, Galway, Ireland – Ph +353 91-792444 – Fax +353 91-792445 – www.bb-europe.com
Page 66

Using Console Mode
56 Chapter 9 Manual Documentation Number: ESR90x-0508m
B&B Electronics Mfg Co Inc – 707 Dayton Rd - Ottawa IL 61350 - Ph 815-433-5100 - Fax 815-433-5104 – www.bb-elec.com
B&B Electronics Ltd – Westlink Commercial Park – Oranmore, Galway, Ireland – Ph +353 91-792444 – Fax +353 91-792445 – www.bb-europe.com
Page 67
Using the Web Server
CChhaapptteerr 1100:: UUSSIINNGG TTHHEE WWEEBB SSEERRVVEERR
The Web Server can be used to configure the Serial Server from any web
browser software (such as Internet Explorer). Server properties can be set up
using three browser pages.
NNoottee::
See Chapter 5 for details on Server Properties.
Setting Server Properties
In Internet Explorer type the IP Address of the Serial Server into the address
field near the top of the window and press the Enter key. The following
window will appear:
Figure 40. The Web Server Page
Manual Documentation Number: ESR90x-0508m Chapter 10 57
B&B Electronics Mfg Co Inc – 707 Dayton Rd - Ottawa IL 61350 - Ph 815-433-5100 - Fax 815-433-5104 – www.bb-elec.com
B&B Electronics Ltd – Westlink Commercial Park – Oranmore, Galway, Ireland – Ph +353 91-792444 – Fax +353 91-792445 – www.bb-europe.com
Page 68

Using the Web Server
Navigate and change properties as required using the mouse and keyboard.
To change serial port properties, click
Serial Port on the left side of the
browser window. The following page will appear:
Figure 41. The Web Server Serial Port Properties Page
To change other operational properties, click Operation on the left side of
the browser window. The following page will appear:
58 Chapter 10 Manual Documentation Number: ESR90x-0508m
B&B Electronics Mfg Co Inc – 707 Dayton Rd - Ottawa IL 61350 - Ph 815-433-5100 - Fax 815-433-5104 – www.bb-elec.com
B&B Electronics Ltd – Westlink Commercial Park – Oranmore, Galway, Ireland – Ph +353 91-792444 – Fax +353 91-792445 – www.bb-europe.com
Page 69

Using the Web Server
Figure 42. The Web Server Operation Page
Click Save to store changes to the Serial Server. Settings for each Port must
be saved separately.
NNoottee::
If new property settings are not saved before leaving this page they will n ot
take effect.
Return to the main Server page by clicking on Server on the left side of the
browser window.
Manual Documentation Number: ESR90x-0508m Chapter 10 59
B&B Electronics Mfg Co Inc – 707 Dayton Rd - Ottawa IL 61350 - Ph 815-433-5100 - Fax 815-433-5104 – www.bb-elec.com
B&B Electronics Ltd – Westlink Commercial Park – Oranmore, Galway, Ireland – Ph +353 91-792444 – Fax +353 91-792445 – www.bb-europe.com
Page 70

Using the Web Server
60 Chapter 10 Manual Documentation Number: ESR90x-0508m
B&B Electronics Mfg Co Inc – 707 Dayton Rd - Ottawa IL 61350 - Ph 815-433-5100 - Fax 815-433-5104 – www.bb-elec.com
B&B Electronics Ltd – Westlink Commercial Park – Oranmore, Galway, Ireland – Ph +353 91-792444 – Fax +353 91-792445 – www.bb-europe.com
Page 71

Using Telnet
CCHHAAPPTTEERR 1111:: UUSSIINNGG TTEELLNNEETT
Telnet can be used to configure the Serial Server from any PC on the LAN.
The
Telnet window displays the same configuration information shown in
Console Mode and allows server properties to be configured.
NNoottee::
See Chapter 5 for details on Server Properties.
Configuration Using Telnet
Step 1: Ensure the PC and Serial Server are connected to the LAN.
Step 2: Apply power to the Serial Server. The power and ready LED will
light.
Step 3: Ensure Serial Server is in Run Mode. If the Run/Console switch is
in the Console position, switch it to the Run position. The Serial
Server will revert to the operational mode it was in before the switch
was set to Console.
Step 4: From the
open.
Desktop, click Start, then Run. The Run dialogue box will
Step 5: Type in
Telnet and the IP address of the Serial Server to be
configured, then click OK.
Figure 43. The Run dialogue box
Manual Documentation Number: ESR90x-0508m Chapter 11 61
B&B Electronics Mfg Co Inc – 707 Dayton Rd - Ottawa IL 61350 - Ph 815-433-5100 - Fax 815-433-5104 – www.bb-elec.com
B&B Electronics Ltd – Westlink Commercial Park – Oranmore, Galway, Ireland – Ph +353 91-792444 – Fax +353 91-792445 – www.bb-europe.com
Page 72

Using Telnet
Step 6. The Telnet window will open (unless the server is still in Console
NNoottee::
The Serial Server must be in RS-232, RS-422 or RS-485 mode before you can
Telnet to it and access the configuration screens. If it was last configured in
Console mode you may not be able to access it using Telnet. In this case use
ESP Manager, Console Mode or Web Server for configuration.
mode) and the Server screen will appear.
62 Chapter 11 Manual Documentation Number: ESR904-0508m
B&B Electronics Mfg Co Inc – 707 Dayton Rd - PO Box 1040 - Ottawa IL 61350 - Ph 815-433-5100 - Fax 815-433-5104 – www.bb-elec.com
B&B Electronics Ltd – Westlink Commercial Park – Oranmore, Galway, Ireland – Ph +353 91-792444 – Fax +353 91-792445 – www.bb-europe.com
Page 73

Using Telnet
Navigating the Configuration Menu
There are six Telnet screens: Server, Network, Serial Mode, Operation,
Monitor and Configuration. Tab, Back Space and arrow keys can be used
to highlight the desired function on the screen list. Pressing
cursor to the first field with the current screen. The configuration fields can
be changed by pressing
Escape key moves the cursor back to the screen list. Pressing the Space Bar
Enter and selecting from the list that appears. The
refreshes the page.
Enter moves the
Figure 44. Telnet Configuration Screens
Manual Documentation Number: ESR90x-0508m Chapter 11 63
B&B Electronics Mfg Co Inc – 707 Dayton Rd - Ottawa IL 61350 - Ph 815-433-5100 - Fax 815-433-5104 – www.bb-elec.com
B&B Electronics Ltd – Westlink Commercial Park – Oranmore, Galway, Ireland – Ph +353 91-792444 – Fax +353 91-792445 – www.bb-europe.com
Page 74

Using Telnet
Step 7: Once all the changes have been made move to the Save field and
Step 8: Select Yes to save changes. This is necessary to write the settings to
select Enter. The restart message will appear.
Figure 45. Saving and Restarting the Configuration
the server. The Telnet window will disappear.
Step 9: To view the changes re-enter
Telnet and re-establish
communications. The configuration menu will appear and display
the current settings.
64 Chapter 11 Manual Documentation Number: ESR904-0508m
B&B Electronics Mfg Co Inc – 707 Dayton Rd - PO Box 1040 - Ottawa IL 61350 - Ph 815-433-5100 - Fax 815-433-5104 – www.bb-elec.com
B&B Electronics Ltd – Westlink Commercial Park – Oranmore, Galway, Ireland – Ph +353 91-792444 – Fax +353 91-792445 – www.bb-europe.com
Page 75

ESR90x Technical Data
CChhaapptteerr 1122:: EESSRR9900xx TTEECCHHNNIICCAALL DDAATTAA
Hardware and
Included
Accessories
Dimensions
Power &
Environment
Indicators
Connectors
ESR901, ESR902 or ESR904 Serial Server modules
Manual: Paper copy of this manual, PDF available
CD-ROM disc: VLINX ESP Manager and Virtual COM Driver software
for Windows 98/ME/2000/2003/XP/NT 4.0/Vista
ESR901/ESR902: 1.75 x 6.1 x 4.1 in (4.46 x 15.52 x 10.46 cm)
ESR904: 1.75 x 7.1 x 4.1 in (4.46 x 18.03 x 10.46 cm)
Power Supply Voltage Requirements:
9V to 48 VDC or 8V to 24VAC
Power Consumption:
ESR901: 320mA @ 12VDC
ESR902: 340 mA @ 12VDC
ESR904: 360 mA @ 12VDC
Power supply startup time ≤24ms
Operating
Temperature: -10 to 80 °C
Storage
Temperature: −20 to 85 °C
Humidity: 5 – 98% R.H.
Approvals: CE, FCC, IP30 case
Power: Red LED
Link: Yellow or green LED (10BaseT or 100 BaseTX)
Ready: Flashing green LED
Ethernet: Single RJ-45 female
Serial: ESR901: one 9 pin D-type male (DB-9M) and one
removable terminal block (connector selectable using
DB-9/Terminal switch, interface type software selectable
as RS-232, RS-422, RS-485H or 485F)
ESR902: Two 9 pin D-type male (DB-9M), (interface
type software selectable as RS-232, 422, RS-485H or
RS-485F
ESR904: Four 9 pin D-type male (DB-9M) DTE,
(interface type software selectable as RS-232, RS-422,
RS-485H or 485F)
DC Power: Removable four terminal screw-type terminal block
Manual Documentation Number: ESR90x-0508m Chapter 12 65
B&B Electronics Mfg Co Inc – 707 Dayton Rd - Ottawa IL 61350 - Ph 815-433-5100 - Fax 815-433-5104 – www.bb-elec.com
B&B Electronics Ltd – Westlink Commercial Park – Oranmore, Galway, Ireland – Ph +353 91-792444 – Fax +353 91-792445 – www.bb-europe.com
Page 76

ESR90x Technical Data
Serial Interfaces
Memory
I/P Port Addresses
Network
Communications
Protocols
Configuration
Options
Optional
Accessories
RS-232(DTE): TXD, RXD, RTS, CTS, DTR, DSR, DCD, GND
(ESR901 Terminal block option: TXD, RXD, RTS,
CTS, GND)
RS-422: TXDB(+), TXDA(−), RXDB(+), RXDA(−),
RTS(+), RTS(−), CTS(+), CTS(−) and GND
(ESR901 Terminal block option: (TXDB(+),
TXDA(−), RXDB(+), RXDA(−), GND)
RS-485 H: Data B (+), Data A (–) and GND
RS-485F: TXDB(+), TXDA(−), RXDB(+), RXDA(−),
and GND
(ESR901 Terminal block option: (TXDB(+),
TXDA(−), RXDB(+), RXDA(−), GND)
Baud Rate: 110 bps to 230.4 k bps
Parity: None, Even, Odd, Mark, Space
Data Bits: 5, 6, 7 or 8
Stop Bits: 1, 1.5 or 2
Serial Memory: 8K byte per port
Network Memory: 48K byte
5300 Heartbeat & Configuration setting in TCP Mode (i.e.
Pair Mode)
8888 Vlinx update
8890 Vlinx monitor
8889 Set configuration in UDP mode
LAN: 10/100 Mbps Auto-detecting 10 BaseT or 100
BaseTX
TCP, IP, ARP, DHCP, Telnet, HTTP, UDP, ICMP
Console Mode: Using RS-232 with VT100 emulation
Telnet Mode: Using HyperTerminal with VT100 emulation
ESP Manager: Using Windows 98/ME/2000/XP or NT software
Web Server: Using Internet Explorer web browser
232NM9 Null Modem Crossover Cable for DTE to DTE connection
ERS35 one-meter length of steel 35mm DIN Rail
66 Chapter 12 Manual Documentation Number: ESR90x-0508m
B&B Electronics Mfg Co Inc – 707 Dayton Rd - Ottawa IL 61350 - Ph 815-433-5100 - Fax 815-433-5104 – www.bb-elec.com
B&B Electronics Ltd – Westlink Commercial Park – Oranmore, Galway, Ireland – Ph +353 91-792444 – Fax +353 91-792445 – www.bb-europe.com
Page 77

ESR90x Technical Data
Default Server
Settings
Server Name ESR901 or ESR902 or ESR904
Serial Number: xxxxxxxxx (printed on bottom of unit)
Password: Blank
DHCP: Disable
IP Address: 192.168.0.1
Net Mask: 255.255.255.0
Gateway: 192.168.0.254
MAC Address: Fixed – see bottom label
Version&Date: current firmware version number & date
Serial server port: 1
Baud Rate: 9600
Data//Stop: 8-1
Parity: None
Flow Control: None
TCP/UDP Protocol: ESR901 serial port: TCP
ESR902 Ports 1 & 2: TCP
ESR902 Ports 1, 2, 3 & 4: TCP
Serial timeout: 0 seconds
TCP alive timeout: 0 minutes
Connection Mode: Serve r
Delimiter HEX 1: 00
Delimiter HEX 2: 00
Force transmit: 0 ms
TCP/UDP port: ESR901/902/904 Port 1: 4000
ESR902/904 Port 2: 4001
ESR904 Port 3: 4002
ESR904 Port 4: 4003
Serial port mode: ESR901/902/904 (all ports): RS-232
Max connection: 1
Remote IP Address: 255.255.255.255
DIP switch settings: ESR901: 1 = Run
2 = DB9
ESR902: Run
ESR904: Run
Manual Documentation Number: ESR90x-0508m Chapter 12 67
B&B Electronics Mfg Co Inc – 707 Dayton Rd - Ottawa IL 61350 - Ph 815-433-5100 - Fax 815-433-5104 – www.bb-elec.com
B&B Electronics Ltd – Westlink Commercial Park – Oranmore, Galway, Ireland – Ph +353 91-792444 – Fax +353 91-792445 – www.bb-europe.com
Page 78

ESR90x Technical Data
15.5 2 cm
15.5 2 c m
Link
Ready
Reset
Run
DB9 Termi nal
RX TX
1
Link
Ready
Reset
Run Consol e
1
RX TX RX TX
4.46 cm
Power
Cons ole
1
RS-232/422/485
C
T
R
R
ESR901
GND
AC I n
AC/DC+ In
Bac kup D C+ In
Vol tage R ange:
9-48VDC
8-24VAC
G
N
D
T
S
/
T
X
-
X
/
T
X
+
X
/
R
X
+
T
S
/
R
X
-
0.76 c m
1.09 cm
3.23 c m
7.62 cm
Ethe rnet
1
2.60 cm
0.96 cm
0.48 cm
10.46 c m
9.70 c m
Figure 46. Dimensional Diagram of the ESR901
10.4 6 cm
9. 70 c m
Power
4.46 cm
ESR902
GND
AC In
AC/DC+ In
Backup D C+ In
Vol tage Range:
9-48VDC
9-48VAC
Ether net
0.76 cm
1.09 cm
3.23 cm
7.62 cm
4.44 cm
0.61 cm
3.01 cm
0.81 cm
1.44 cm
12.6 5 c m
1.44 cm
2.66 cm
0.97 cm
1.72 cm 6.84 cm
6.96 cm
0.81 c m
4.44 cm
0.61 cm
3.01 cm
0.81 cm
1.44 cm
12.65 cm
1.72 cm 6.84 cm
6.96 cm
2
1
2.60 cm
0.96 cm
0. 48 c m
1.44 cm
2.66 cm
0.97 cm
0.81 c m
Figure 47. Dimensional Diagram of the ESR902
68 Chapter 12 Manual Documentation Number: ESR90x-0508m
B&B Electronics Mfg Co Inc – 707 Dayton Rd - Ottawa IL 61350 - Ph 815-433-5100 - Fax 815-433-5104 – www.bb-elec.com
B&B Electronics Ltd – Westlink Commercial Park – Oranmore, Galway, Ireland – Ph +353 91-792444 – Fax +353 91-792445 – www.bb-europe.com
Page 79

ESR90x Technical Data
15.5 2 cm
Link
Ready
Reset
Run Console
RX TX RX TX
2
RX TX RX TX
4
10. 46 c m
9.70 c m
1
Power
4.46 cm
ESR904
GND
AC I n
AC/DC+ In
Backup DC + In
Voltage Range:
9-48VDC
8-24VAC
Ether net
0.76 c m
1.09 cm
3.23 cm
6.77 cm
1
3.74 cm
3
3.25 cm
Figure 48. Dimensional Diagram of the ESR904
4.44 cm
0.61 c m
3.01 cm
0.81 cm
1.44 cm
6.84 cm
15.2 0 c m
1.44 cm
2.66 cm
0.97 c m
4.26 cm
6.96 cm
0.81 cm
Manual Documentation Number: ESR90x-0508m Chapter 12 69
B&B Electronics Mfg Co Inc – 707 Dayton Rd - Ottawa IL 61350 - Ph 815-433-5100 - Fax 815-433-5104 – www.bb-elec.com
B&B Electronics Ltd – Westlink Commercial Park – Oranmore, Galway, Ireland – Ph +353 91-792444 – Fax +353 91-792445 – www.bb-europe.com
Page 80

RS-232 Connections
AAPPPPEENNDDIIXX AA:: RRSS--223322 CCOONNNNEECCTTIIOONNSS
Serial Server DB-9 Pin-outs in RS-232 Mode
RS-232
Signal Name
Carrier Detect In DCD 1
Receive Data In RXD 2
Transmit Data Out TXD 3
Data Terminal Ready Out DTR 4
Signal Ground --- GND 5
Data Set Ready In DSR 6
Request To Send Out RTS 7
Clear To Send In CTS 8
Ring Indicator In RI 9
DTE RS-232 DB-9M
Pin
Figure 49. RS-232 Connections in a DB-9 Connector
70 Appendix A Manual Documentation Number: ESR90x-0508m
B&B Electronics Mfg Co Inc – 707 Dayton Rd - Ottawa IL 61350 - Ph 815-433-5100 - Fax 815-433-5104 – www.bb-elec.com
B&B Electronics Ltd – Westlink Commercial Park – Oranmore, Galway, Ireland – Ph +353 91-792444 – Fax +353 91-792445 – www.bb-europe.com
Page 81
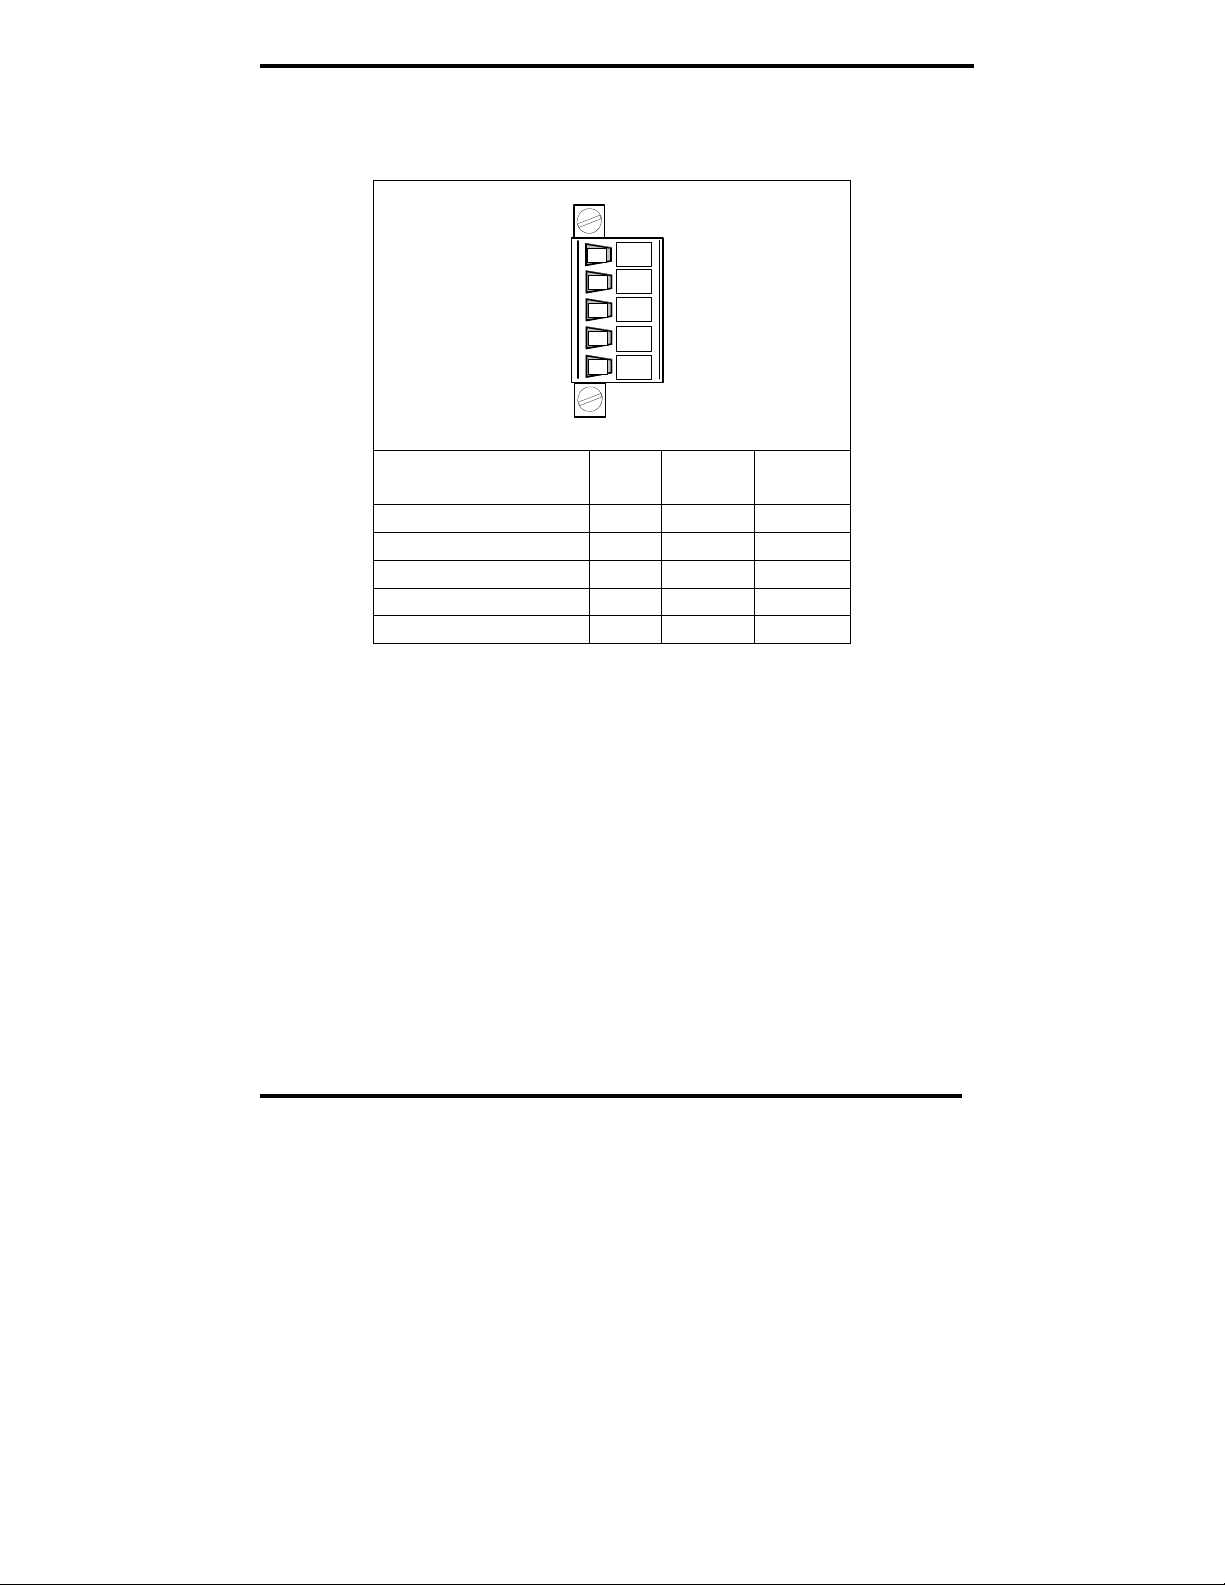
RS-232 Connections
ESR901 Terminal Block Pin-out in RS-232 Mode
G
N
D
C
T
S
/
T
X
-
T
X
/
T
X
+
R
X
/
R
X
+
RT
S
/
R
X
-
1
2
3
4
5
RS-232
Signal Name
DTE RS-232 Terminal
Signal Ground --- GND 1
Clear To Send In CTS 2
Transmit Data Out TXD 3
Receive Data In RXD 4
Request To Send Out RTS 5
Figure 50. ESR901 Terminal Block Pin-out in RS-232 Mode
Manual Documentation Number: ESR90x-0508m Appendix A 71
B&B Electronics Mfg Co Inc – 707 Dayton Rd - Ottawa IL 61350 - Ph 815-433-5100 - Fax 815-433-5104 – www.bb-elec.com
B&B Electronics Ltd – Westlink Commercial Park – Oranmore, Galway, Ireland – Ph +353 91-792444 – Fax +353 91-792445 – www.bb-europe.com
Page 82

RS-422 Connections
AAPPPPEENNDDIIXX BB:: RRSS--442222//448855
ESR90x DB-9 Pin-out in RS-422 Mode
RS-422
Signal Name
Receive Data A (−) In RXDA (−) 1
Receive Data B (+) In RXDB (+) 2
Transmit Data B (+) Out TXDB (+) 3
Transmit Data A (−) Out TXDA (−) 4
Signal Ground --- GND 5
Clear to Send A (−) In CTSA (−) 6
Clear to Send B (+) In CTSB (+) 7
Request to Send B (+) Out RTSB (+) 8
Request to Send A (−) Out RTSA (−) 9
Direction
CCOONNNNEECCTTIIOONNSS
RS-422
DB9M
Pin
Figure 51. RS-422 Connections in a DB-9 Connector
72 Appendix B Manual Documentation Number: ESR90x-0508m
B&B Electronics Mfg Co Inc – 707 Dayton Rd - Ottawa IL 61350 - Ph 815-433-5100 - Fax 815-433-5104 – www.bb-elec.com
B&B Electronics Ltd – Westlink Commercial Park – Oranmore, Galway, Ireland – Ph +353 91-792444 – Fax +353 91-792445 – www.bb-europe.com
Page 83

RS-422 Connections
ESR901 Terminal Block Pin-out in RS-422 Mode
G
N
D
C
T
S
/
T
X
-
T
X
/
T
X
+
R
X
/
R
X
+
RT
S
/
R
X
-
Signal Name RS-422 Direction Terminal
Signal Ground GND --- 1
Transmit Data (-) TXD(-) Out 2
Transmit Data (+) TXD(+) Out 3
Receive Data (+) RXD(+) In 4
Receive Data (-) RXD(-) In 5
Figure 52. ESR901 Terminal Block Pin-out in RS-232 Mode
In the RS-422 mode, TXD lines are outputs and RXD lines are inputs.
Connect the Serial Server TXDB(+) line to the RXDB(+) line of the serial
device, and the Serial Server TXDA(-) to the RXDA(-) of the serial device.
1
2
3
4
5
If Flow Control is set for RTS/CTS, connect the Serial Server RTSB(+) to
CTSB(+) of the serial device and the Serial Server RTSA(-) line to the
CTSA(-) of the serial device. Connect from the Serial Server CTSB(+) line to
the RTSB(+) of the serial device and from the Serial Server CTSA(-) line to
the RTSB(+) line of the serial device.
If connecting to Receive Only RS-422 devices, connect from the Serial
Server TXDB(+) and TXDA(-) lines to the receive pairs on all serial devices.
Ground is signal ground and provides a common mode reference for the RS422 Receiver and Transmitters.
Manual Documentation Number: ESR90x-0508m Appendix B 73
B&B Electronics Mfg Co Inc – 707 Dayton Rd - Ottawa IL 61350 - Ph 815-433-5100 - Fax 815-433-5104 – www.bb-elec.com
B&B Electronics Ltd – Westlink Commercial Park – Oranmore, Galway, Ireland – Ph +353 91-792444 – Fax +353 91-792445 – www.bb-europe.com
Page 84

RS-485 Connections
AAPPPPEENNDDIIXX CC:: RRSS--448855 CCOONNNNEECCTTIIOONNSS
ESR90x DB-9 Pin-out in RS-485H (two-wire, half duplex) Mode
RS-485
Signal Name
Data B (+) In/Out DATA B (+) 3
Data A (−) In/Out DATA A (−) 4
Signal Ground --- GND 5
Figure 53. DB-9 Pin-out in RS-485 Mode
Direction RS-485 DB9M
Pin
74 Appendix C Manual Documentation Number: ESR90x-0508m
B&B Electronics Mfg Co Inc – 707 Dayton Rd - Ottawa IL 61350 - Ph 815-433-5100 - Fax 815-433-5104 – www.bb-elec.com
B&B Electronics Ltd – Westlink Commercial Park – Oranmore, Galway, Ireland – Ph +353 91-792444 – Fax +353 91-792445 – www.bb-europe.com
Page 85

RS-485 Connections
ESR90x DB-9 Pin-out in RS-485F (four-wire, full duplex) Mode
RS-422
Signal Name
Direction
RS-422
DB9M
Pin
Receive Data A (−) In RXDA (−) 1
Receive Data B (+) In RXDB (+) 2
Transmit Data B (+) Out TXDB (+) 3
Transmit Data A (−) Out TXDA (−) 4
Signal Ground --- GND 5
Clear to Send A (−) In CTSA (−) 6
Clear to Send B (+) In CTSB (+) 7
Request to Send B (+) Out RTSB (+) 8
Request to Send A (−) Out RTSA (−) 9
Figure 54. RS-422 Connections in a DB-9 Connector
NNoottee::
Some RS-485 devices are marked opposite the RS-485 standard, which
defines the Data B line as positive relative to Data A during a Mark state before
enabling the transmitter, and after transmitting before tri-stating. If an RS-485
device does not respond, try swapping the Data B and Data A lines.
Manual Documentation Number: ESR90x-0508m Appendix C 75
B&B Electronics Mfg Co Inc – 707 Dayton Rd - Ottawa IL 61350 - Ph 815-433-5100 - Fax 815-433-5104 – www.bb-elec.com
B&B Electronics Ltd – Westlink Commercial Park – Oranmore, Galway, Ireland – Ph +353 91-792444 – Fax +353 91-792445 – www.bb-europe.com
Page 86

RS-485 Connections
ESR901 Terminal Block Pin-out in RS-485F (four-wire, full duplex) Mode
G
N
D
C
T
S
/
T
X
-
T
X
/
T
X
+
R
X
/
R
X
+
RT
S
/
R
X
-
1
2
3
4
5
Signal Name RS-422 Direction Terminal
Signal Ground GND --- 1
Transmit Data (-) TXD(-) Out 2
Transmit Data (+) TXD(+) Out 3
Receive Data (+) RXD(+) In 4
Receive Data (-) RXD(-) In 5
Figure 55. ESR901 Terminal Block Pin-out in RS-232 Mode
76 Appendix C Manual Documentation Number: ESR90x-0508m
B&B Electronics Mfg Co Inc – 707 Dayton Rd - Ottawa IL 61350 - Ph 815-433-5100 - Fax 815-433-5104 – www.bb-elec.com
B&B Electronics Ltd – Westlink Commercial Park – Oranmore, Galway, Ireland – Ph +353 91-792444 – Fax +353 91-792445 – www.bb-europe.com
Page 87

Network Connections
AAPPPPEENNDDIIXX DD:: NNEETTWWOORRKK
CCOONNNNEECCTTIIOONNSS
Standard Ethernet Cable RJ-45 Pin-out
RJ-45 Pin Signal Wire Color RJ-45 Pin
1 TX+ White-Green 1
2 TX+ Green 2
3 RX+ White-Orange 3
4 Not used Blue 4
5 Not used White-Blue 5
6 RX- Orange 6
7 Not used White-Brown 7
8 Not used Brown 8
Figure 56. Pin-out for a Standard Ethernet Cable
Manual Documentation Number: ESR90x-0508m Appendix D 77
B&B Electronics Mfg Co Inc – 707 Dayton Rd - Ottawa IL 61350 - Ph 815-433-5100 - Fax 815-433-5104 – www.bb-elec.com
B&B Electronics Ltd – Westlink Commercial Park – Oranmore, Galway, Ireland – Ph +353 91-792444 – Fax +353 91-792445 – www.bb-europe.com
Page 88

Network Connections
Crossover Ethernet Cable RJ-45 Pin-out
RJ-45 Pin Signal Wire Color RJ-45 Pin
1 TX+ White-Green 3
2 TX+ Green 6
3 RX+ White-Orange 1
4 Not used Blue 4
5 Not used White-Blue 5
6 RX- Orange 2
7 Not used White-Brown 7
8 Not used Brown 8
Figure 57. Pin-out for a Crossover Ethernet Cable
78 Appendix D Manual Documentation Number: ESR90x-0508m
B&B Electronics Mfg Co Inc – 707 Dayton Rd - Ottawa IL 61350 - Ph 815-433-5100 - Fax 815-433-5104 – www.bb-elec.com
B&B Electronics Ltd – Westlink Commercial Park – Oranmore, Galway, Ireland – Ph +353 91-792444 – Fax +353 91-792445 – www.bb-europe.com
Page 89

International Headquarters
B&B Electronics Mfg. Co. Inc.
707 Dayton Road
Ottawa, IL 61350 USA
Phone (815) 433-5100 -- General Fax (815) 433-5105
Website: www.bb-elec.com
Sales e-mail: orders@bb-elec.com
Technical Support e-mail: support@bb.elec.com
European Headquarters
B&B Electronics Ltd.
Westlink Commercial Park
Oranmore, Co. Galway, Ireland
Phone +353 91-792444 -- Fax +353 91-792445
Website: www.bb-europe.com
Sales e-mail: sales@bb-europe.com
Technical Support e-mail: support@bb-europe.com
© B&B Electronics – April 2005
Revised January 2008
-- Fax (815) 433-5109
-- Fax (815) 433-5104
Manual Documentation Number: ESR90x-0805m 79
B&B Electronics Mfg Co Inc – 707 Dayton Rd - Ottawa IL 61350 - Ph 815-433-5100 - Fax 815-433-5104 – www.bb-elec.com
B&B Electronics Ltd – Westlink Commercial Park – Oranmore, Galway, Ireland – Ph +353 91-792444 – Fax +353 91-792445 – www.bb-europe.com
Page 90

80 Manual Documentation Number: ESR90x-0508m
B&B Electronics Mfg Co Inc – 707 Dayton Rd - Ottawa IL 61350 - Ph 815-433-5100 - Fax 815-433-5104 – www.bb-elec.com
B&B Electronics Ltd – Westlink Commercial Park – Oranmore, Galway, Ireland – Ph +353 91-792444 – Fax +353 91-792445 – www.bb-europe.com
 Loading...