

Page 1
RC Duo 2
Bidirectional remote control
eneral information
G
1
The RC Duo 2 remote control functions bidirectionally with the sensor. This means that changes to the sensor settings are immediately signalled
back by the sensor to the remote control. RC Duo 2 is compatible with Hercules 2, Hercules 2s, Reflex, and UniScan sensors.
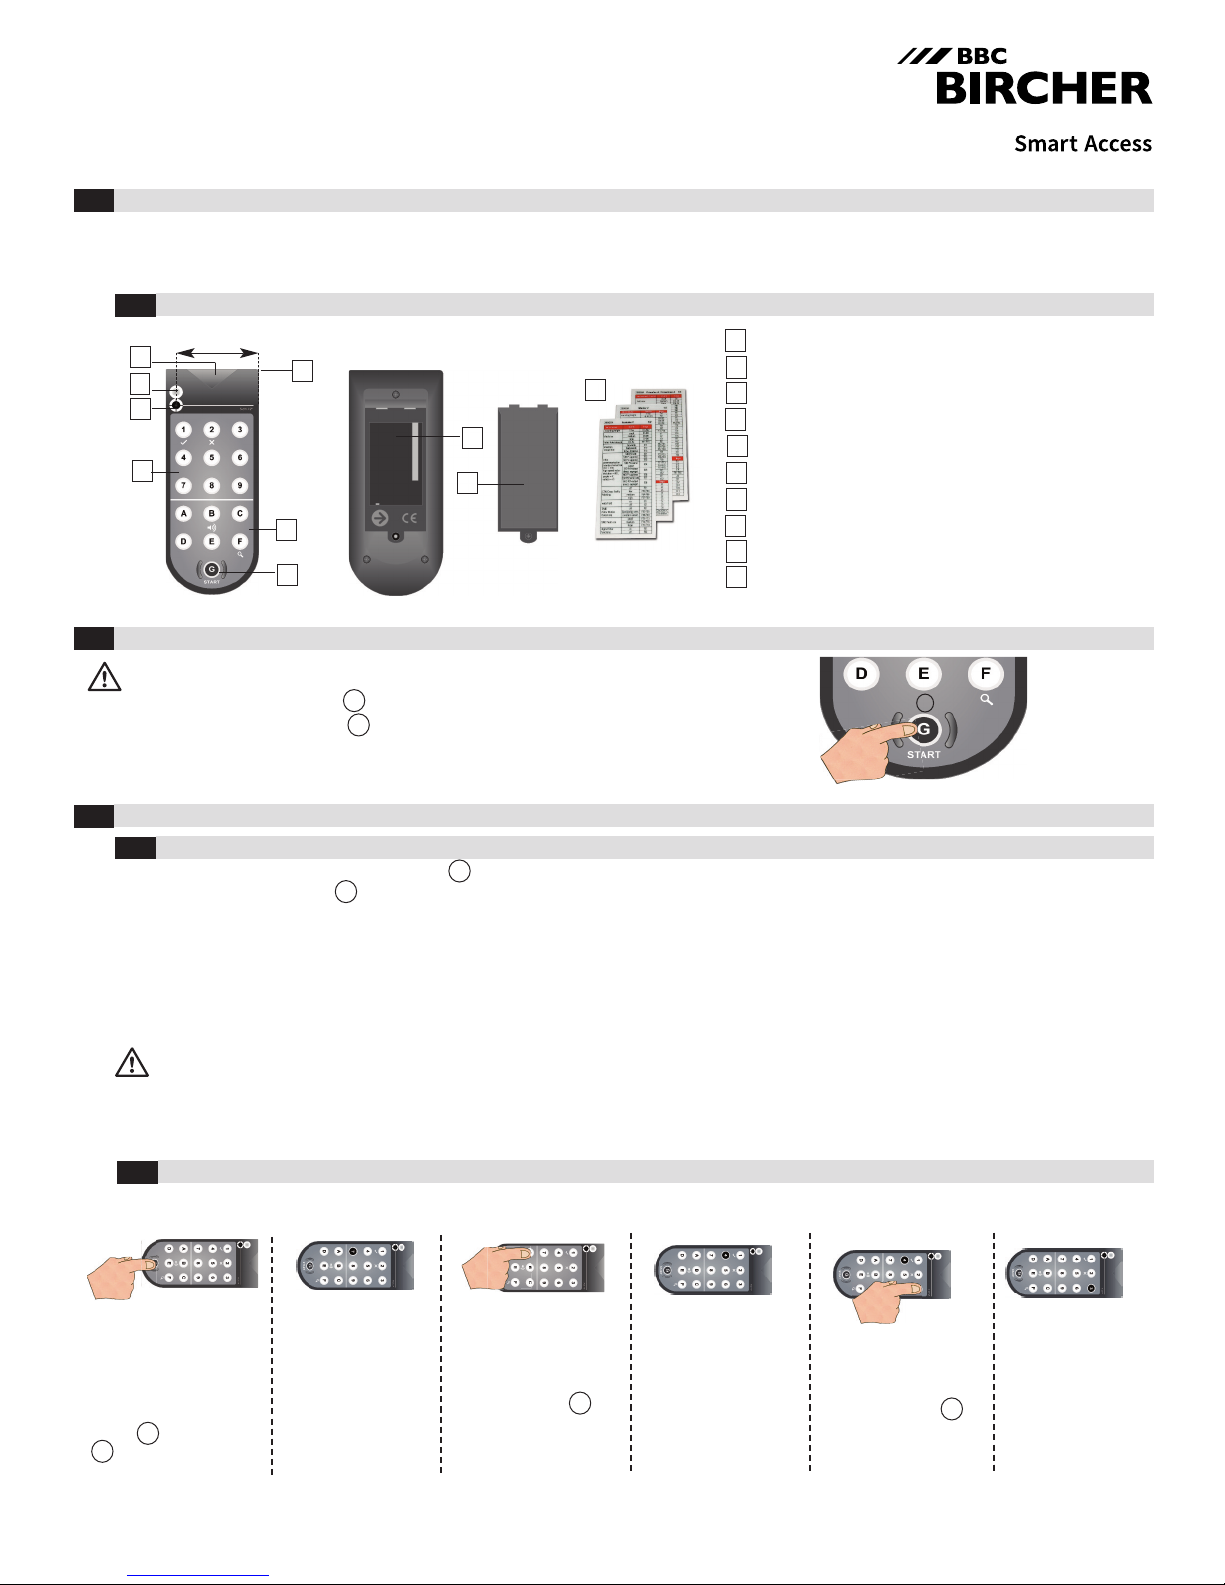
Parts of the remote
1.1
A
B
C
Powering on the remote
2
2’’ (5 cm)
E
J
H
D
F
G
I
The RC Duo 2 must be powered on before it can communicate with the sensor.
POWER ON: Press and hold G for 2 seconds
POWER OFF*: Press and hold G for 2 seconds
*The remote will automatically turn off after 2 minutes if no button is pressed.
Communication with the sensor
3
Establishing connection with the sensor
3.1
Once the remote has been powered on, G will illuminate in red and begin to blink. To establish a connection with a particular sensor, aim
at the sensor and press G . The sensor’s address (1 - 7) will illuminate on the keypad. The sensor’s LED will briefly illuminate to confirm
communication. The RC Duo 2 is now ready to program the sensor. For help in selecting a particular sensor out of several, see section 4.3,
sensor scan mode.
A
Transmitter/receiver (infrared)
B
Status indicator LED
C
Safety curtain infrared spot detector
D
Numerical keys (1 to 9)
E
2” (5 cm) spacing for safety curtain infrared spot finder
F
Function keys (A to F)
G
Start button - power on (2 sec) & establish connection
H
Battery compartment
I
Battery compartment cover
J
Quick reference guides
(stored in slot on battery compartment cover)
ower ON: Press G for 2 sec
P
The connection between the RC Duo 2 and the sensor can only be established while the sensor is in configuration mode.
Configuration mode is activated as soon as the sensor is powered on. For safety reasons, this mode is exited automatically 30 minutes
after the last setting has been made.
The connection can be re-established in one the following ways:
- Pressing a button on the sensor OR
- Interrupting the electrical power supply to the sensor OR
- Using the "access code" function on the remote control (only available on some sensor models)
Please refer to the sensor user manual for more information.
Setting sensor parameters
3.2
EXAMPLE: the steps for setting the Hercules 2s sensor mounting height (parameter A) are shown below:
Ensure remote is
powered on (section 2)
and sensor is in configuration mode (section
3.1)
Once G blinks, press
The sensor’s
address illuminates
on the keypad.
EXAMPLE: address
7 (factory default)
G again to establish
connection.
Note: If any buttons are blinking, programming failed. In this case, repeat programming.
Select the desired
parameter.
EXAMPLE: mounting
height - Press A
Page 1
The sensor acknowledges it’s current
set value by illuminating it on the keypad.
EXAMPLE:
4 = 13-16.5 ft (4- 5 m),
factory default
Now press desired new
value.
EXAMPLE: For 10-13 ft
(3.0-4 m) Press 3
The new setting is immediately saved and
displayed on the keypad.
Programming of this
parameter is now
complete. Repeat for
other parameters.
Page 2
Additional functions
4
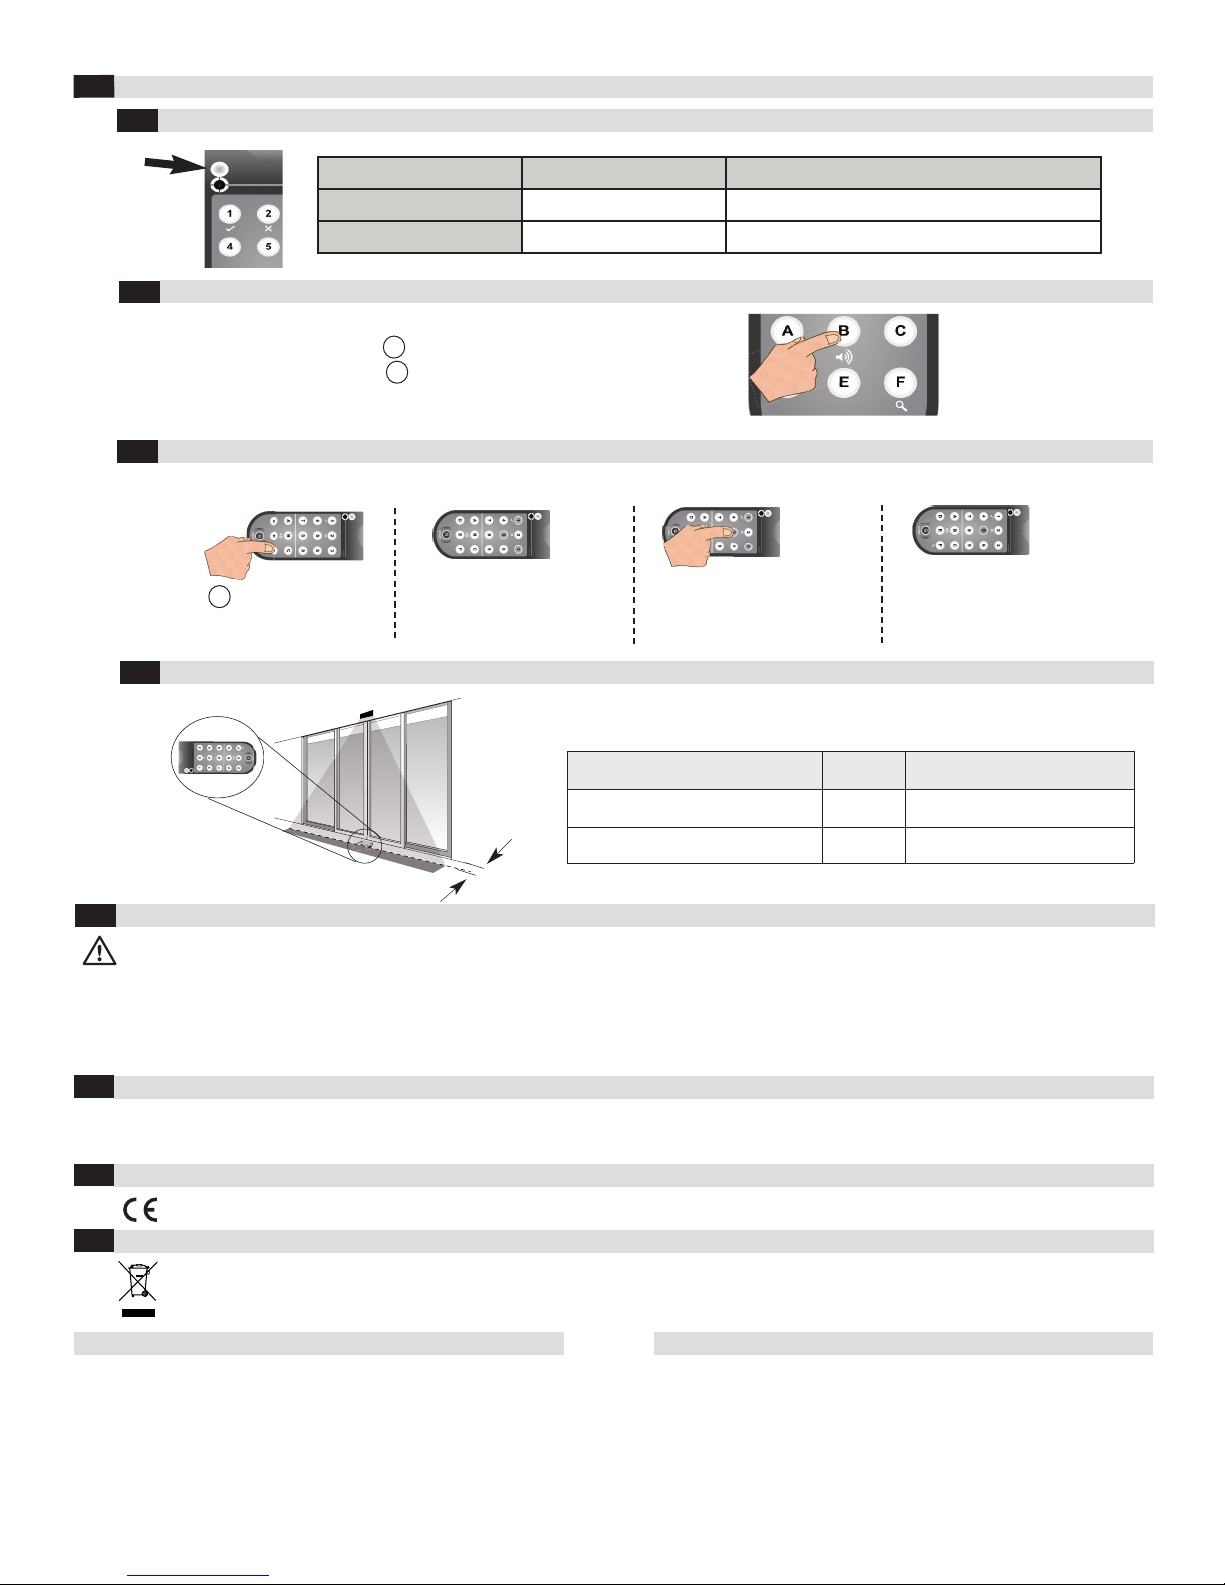
LED indicator
4.1
ED
L
Green Red
On Continuously Idle
ow battery
L
4.2
eeper function
B
linking
B
Remote must be turned on to access beeper function
BEEPER ON: Press and hold B for 2 seconds
BEEPER OFF*: Press and hold B for 2 seconds
*Beeper function turns off when remote turns off. This setting must be
re-activated each time the remote is turned on.
Sensor scan mode
4.3
Use sensor scan mode to determine available sensor addresses.
Press F for 2 seconds to
enter sensor scan mode.
Safety curtain spot detector
4.4
All addresses assigned to
sensors in proximity are illuminated on the keypad.
Use the 2” width mark on the RC Duo 2 to determine e.g. when the infrared
safety curtain is 2” from the face of a sliding door.
Safety curtain spot detected
afety curtain spot detected AND low battery
S
Select the corresponding address to establish communication with a specific sensor.
The active address is now
illuminated on the keypad.
Status Display
Beeper function
(if turned on - see section 4.2)
No Safety curtain spot detected Green No beeping
Safety curtain spot detected Red Constant beeping
2” (5 cm)
Safety instructions
5
Only use this remote for it’s intended purpose.
Do not point the IR beam towards your eyes or those of others!
Observe all national and international door safety regulations.
Only trained, qualified personnel may install sensors.
This unit may only be opened and repaired by the manufacturer.
Always consider the safety functions of your application as a whole, never just in relation to one individual section of the system.
The installer is responsible for carrying out a risk assessment and installing sensors and door systems correctly.
Technical data
6
Technology: Active infrared, 40 kHz
Operating temperature: -20°C to 40°C
7
EU Declaration of Conformity
See attachment
WEEE
8
Devices with this symbol must be treated separately during disposal. This must be done in accordance with the laws of
the respective countries for environmentally sound disposal, processing and recycling of electrical and electronic equipment.
Max. air humidity: 90%, non-condensing
Batteries: 3 AAA (1.5 V) batteries
Important Note
BBC Bircher Smart Access reserves the right to change any
information in this document without notice.
For the latest version, please visit www.bircher.com
or call 800-252-1272 to request a copy.
Designed in Switzerland / Made in China
Contact / Importer
BBC Bircher Smart Access
Bircher America Inc.
870 Pratt Avenue N
Schaumburg, IL 60193
Phone: 847-952-3730
Toll-Free: 800-252-1272
Fax: 847-952-2005
Email: [email protected]
Web: www.bircher.com
Page 2
8
1
/
9
0
C
0
9
6
8
4
3
 Loading...