


1
Foremost Technology for Absolute Acoustic Reproduction
B-BAND A3T
B-BAND A3T USER´S GUIDE (EN)
BEDIENUNGSANLEITUNG B-BAND A3T (DE)
MANUEL D’UTILISATION DU PRÉAMPLI B-BAND A3T (FR)
GUIDA PER L’UTENTE – ACCORDATORE A3T B-BAND (IT)
AFINADOR B-BAND A3T – MANUAL DEL USUARIO (ES)
B-Band A3T 取扱説明書 (JP)
B-Band A3T 使用说明书 (CN)
1.0 - 30.11.2006

2

3
3
4
ENGLISH
6
GERMAN
9
FRENCH
12
ITALIAN
14
SPANISH
17
JAPANESE
19
CHINESE

4
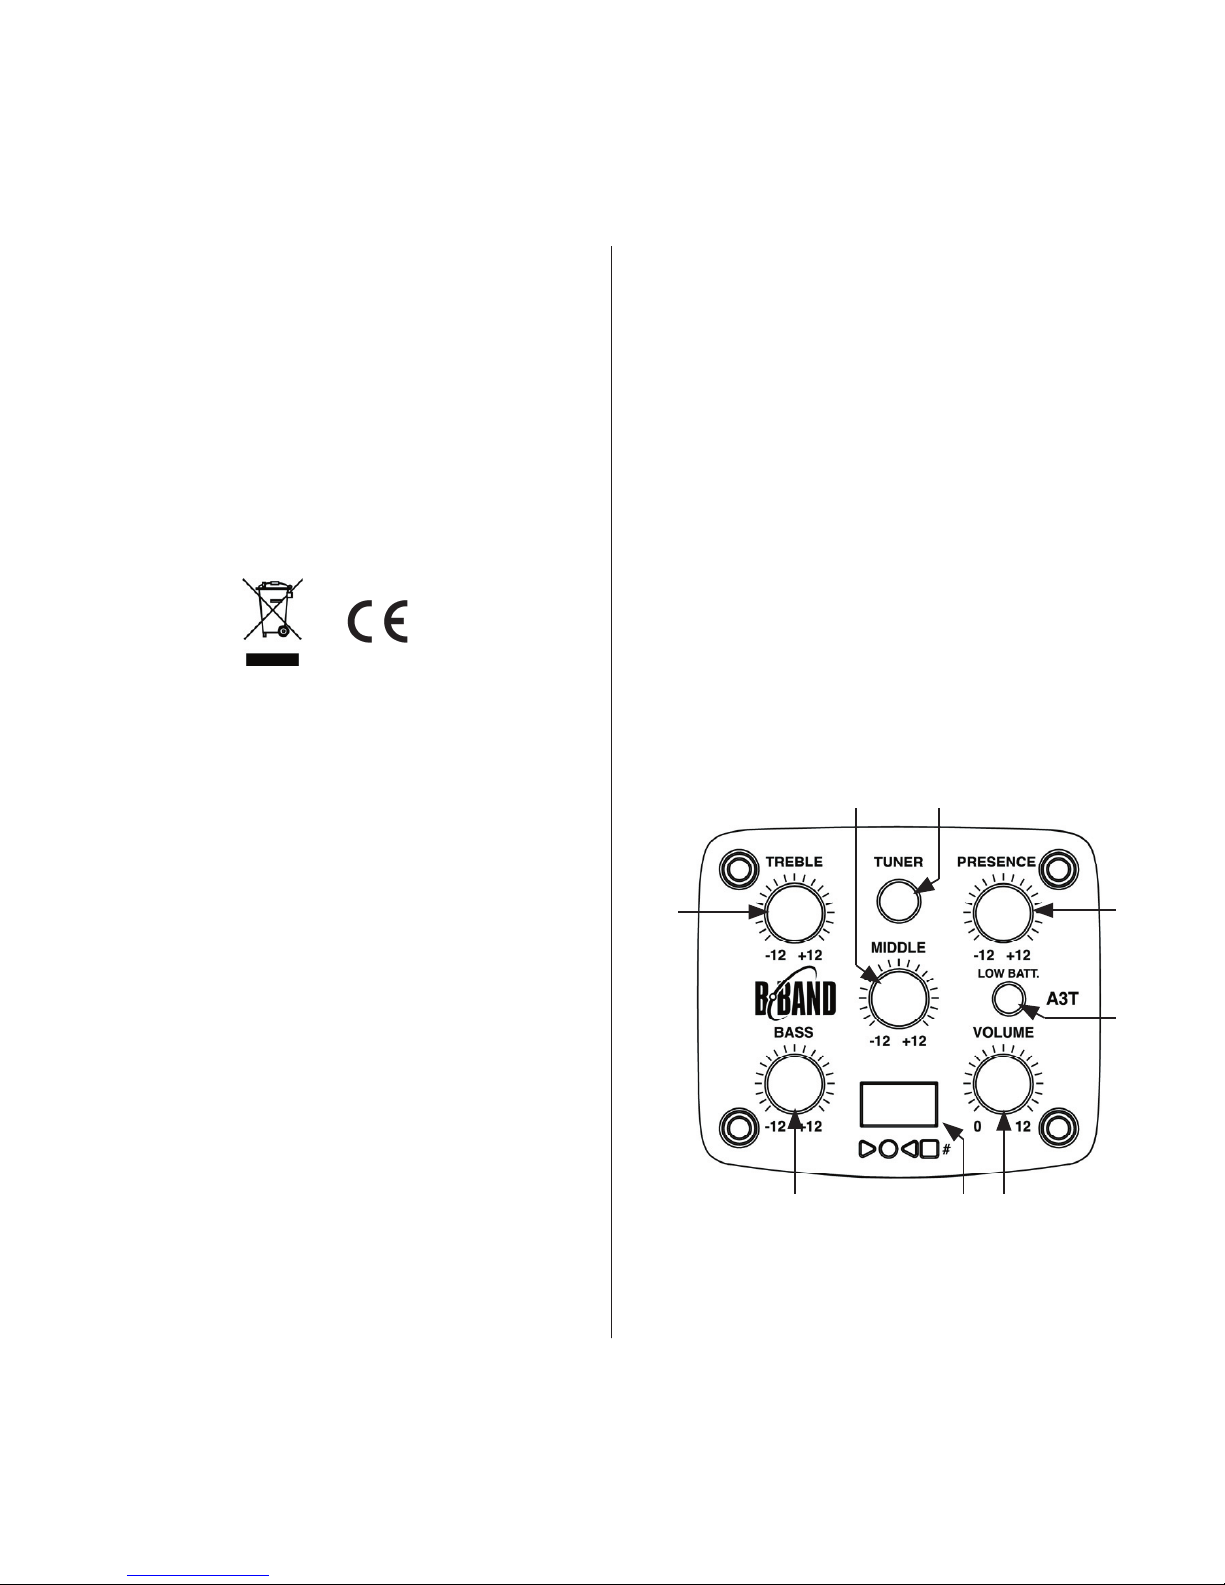
DESCRIPTION OF CONTROLS
1. VOLUME
The VOLUME controls the output volume. At “0” it
is completely OFF. At “12” it is LOUD!
2. BASS (for bass tones)
3. MIDDLE (for midrange tones)
4. TREBLE (for high tones)
5. PRESENCE (for very high tones)
The BASS, MIDDLE, TREBLE, and PRESENCE
controls are a 4-band equalizer for controlling
tone.
The BASS TREBLE and PRESENCE tone controls
are normal boost / cut shelving controls.
The MIDDLE (midrange) tone control is a normal
boost / cut tone filter.
The center detent on these tone controls yields a
flat tone response. “+12” boosts the tone; “-12“
cuts the tone.
6. LOW BATT. (LOW BATTERY LED LIGHT)
The LED will light when the battery has lost power.
Replace the battery when this light is on.
This LED light will flash when a cable is connected
to the output jack of the pickup system. This shows
the battery is good.
BATTERY
A 9-volt battery powers the B-Band A3T preamp.
Before connecting the instrument to an amplifier or
mixer please check that a fully charged 9-volt bat
-
B-BAND A3T USER’S GUIDE
Congratulations and thank you for purchasing this
fine instrument with the included B-Band pickup
system. B-Band is committed to providing the high
est quality product that is manufactured in the true
spirit of acoustic / electric instrument aficionados.
Reading this manual thoroughly will give you the
information necessary to fully understand the ca
pabilities of this instrument and make the operation
a simple and pleasurable experience.
CONTROLS
1. VOLUME
2. BASS
3. MIDDLE
4. TREBLE
5. PRESENCE
6. LOW BATT. (LOW BATTERY LED LIGHT)
7. CHROMATIC TUNER
8. TUNER ON / OFF BUTTON
12 7
6
5
8
3
4

5
5
tery is connected.
7. CHROMATIC TUNER
8. TUNER ON / OFF BUTTON
The tuner will work with or without a cable plugged
into the output jack.
Pushing the tuner button (8) turns ON the tuner.
When the tuner is active the pickup system output
is muted. No sound will go to the amplifier or mixer
when the tuner is active.
Pushing the tuner button (8) again turns the tuner
OFF and the pickup system output will be active
and sound will go to the amplifier.
If the tuner is ON and the tuner button is not pushed
within 2 minutes the tuner will turn OFF automati
cally and sound returned to the output.
The tuner has a seven Note Readout Display; Halfstep (#) LED; Sharp arrow LED; Flat arrow LED and
In-Tune LED.
The tuner Note Readout Display shows the near
est note of one plucked string’s sound. If the note
showing is a half step (for example A#; C#, D# and
so), the half-step (#) LED will light.
If the Sharp LED is showing the string needs to be
lowered in pitch.
If the Flat LED is showing the string needs to be
raised in pitch.
When the In-Tune LED lights the string is at the cor
rect pitch of the note displayed at the Note Readout Display.
SETTING UP THE PREAMP FOR USE
Tune the guitar. See the tuner instructions at 7 and
8.
Before plugging a cable into the guitar’s output
jack, turn the volume control OFF (“0”), turn the
4-band EQ controls to the middle position center
detent (half way between “-12” and “+12”) and turn
the tuner OFF.
Check that the 9-volt battery is good.
Make sure that the amplifier or mixer volume is OFF
and the EQ tone controls are at flat or off. Plug a
guitar cable into the output jack of the guitar and
into the input of the amplifier or mixer.
Turn the volume control of the A3T half way up (half
way between “0” and “+12”). Turn the volume of
the amplifier or mixer up enough to get a good level
of sound. Refer to the amplifier or mixer instruc
tions on how to set up best gain structure with an
instrument for the cleanest possible sound.
Once the desired volume level is found use the EQ
on the A3T preamp to find your tone.
Try turning the MIDDLE CONTROL down a little to
cut this tone. This will bring some smoothness to
the sound. Turn up the BASS control some to add
fullness to the sound. Use the PRESENCE control
Note readout display
Sharp LED
In-tune LED
Flat LED
Half step LED
6
to brighten the sound. Experiment and find a tone
that suits your taste.
Use the EQ tone controls at the amplifier or mixer
to fine-tune the tone.
Good luck and turn it UP!
B-Band, B-Band logo and A3T are either trademarks of BBand Ltd in the United States and / or other countries. All
specifications are subject to change without prior notice. All
rights reserved. Copyright © 1996–2007 B-Band Ltd.
B-BAND A3T – BEDIENUNGSANLEITUNG
Herzlichen Glückwunsch zum Erwerb dieses hervorragenden Geräts mit B-Band-Tonabnehmer
system. Vielen Dank für Ihr Vertrauen. B-Band hat
sich der Idee verschrieben, nur Produkte höchster
Qualität anzubieten, die von wahren Liebhabern
akustischer/elektrischer Instrumente hergestellt
werden
Die gründliche Lektüre dieser Bedienungsanleitung
verschafft Ihnen die nötigen Informationen, um
alle Möglichkeiten dieses Instruments voll auszus
chöpfen und zeigt Ihnen wie einfach die Bedienung
ist, damit Sie viel Freude an ihrem Gerät haben.
BEDIENELEMENTE UND REGLER
12 7
6
5
8
3
4

7
7
Die LED leuchtet, wenn die Batterie zu schwach
ist. Wechseln Sie die Batterie, sobald das Licht
aufleuchtet.
Diese LED blinkt, wenn ein Kabel am Ausgang
des Tonabnehmersystems angeschlossen wird.
Dadurch wird angezeigt, dass die Batterie aus
reichend geladen ist.
BATTERIE
Eine 9-Volt-Batterie versorgt den Vorverstärker
des B-Band-A3T. Bevor das Instrument an einen
Verstärker oder ein Mischpult angeschlossen wird,
sollten Sie prüfen ob eine voll geladene 9-Volt-Bat
terie eingelegt ist.
7. CHROMATISCHES STIMMGERÄT
8. TUNER EIN-/AUSSCHALTER
Das Stimmgerät arbeitet unabhängig davon, ob ein
Kabel an der Ausgangsbuchse angeschlossen ist
oder nicht.
Mit der Tuner-Taste (8) wird das Stimmgerät einge
schaltet. Wenn das Stimmgerät aktiv ist, wird der
Ausgang des Tonabnehmersystems stumm geschaltet. Bei aktiviertem Stimmgerät wird kein Signal an Verstärker oder das Mischpult gesendet.
Durch nochmaliges Drücken der Tuner-Taste (8)
schaltet das Stimmgerät aus, der Ausgang des
1. VOLUME (Lautstärke)
2. BASS (Bassregler)
3. MIDDLE (Mittenregler)
4. TREBLE (Höhenregler)
5. PRESENCE (Höhenregler in der Endstufe)
6. LOW BATT. (Batteriestandsanzeige / LED-Anzeige)
7. CHROMATISCHES STIMMGERÄT
8. TUNER EIN-/AUSSCHALTER
BESCHREIBUNG DER REGLER
1. VOLUME / Lautstärkeregler
Der Lautstärkeregler “VOLUME” steuert die Aus
gabelautstärke. “0” bedeutet AUS, “12” bedeutet
LAUT, also maximale Lautstärke.
2. BASS (Bassregler)
3. MIDDLE (Mittenregler)
4. TREBLE (Höhenregler)
5. PRESENCE (Höhenregler in der Endstufe)
Die Regler BASS, MIDDLE, TREBLE und PRES
ENCE dienen als Vierband-Equalizer der Klangeinstellung.
Die Klangregler BASS und PRESENCE sind nor
male Boost/CutShelving-Regler (Kuhschwanz
regler).
Der Mittenregler (MIDDLE) ist ein normaler Boost/
Cut-Tonfilter.
In der Mittelstellung bleibt das Klangbild unverän
dert. Die Stellung “+12” verstärkt den Klang und
“-12” dämpft den Klang.
6. LOW BATT. (Batteriestandsanzeige / LED-An
zeige)
Notenanzeige
Sharp LED / zu hoch
In-tune LED / richtig gestimmt
Flat LED / zu tief
Halbschritt LED

8
Tonabnehmersystems wird aktiv und das Signal
geht an den Verstärker.
Wenn das Stimmgerät eingeschaltet ist und die
Tuner-Taste 2 Minuten lang nicht gedrückt wird,
schaltet sich das Stimmgerät automatisch aus und
am Ausgang liegt wieder das Signal an.
Das Stimmgerät verfügt über eine Sieben-NotenAnzeige und LEDs für die Versatzstimmung, eine
Halbschritt-LED (#), eine Sharp-LED für zu hohe
Töne, eine Flat-LED für zu tiefe Töne und eine InTuneLED für richtig gestimmte Töne.
Die Notenauslese-Anzeige des Stimmgeräts zeigt
die dem Ton einer gezupften Saite am nächsten
liegende Note an. Wenn die angezeigte Note eine
Halbschritt-Note ist (beispielsweise A#, C#, D#
usw.), leuchtet die Halbschritt-LED (#).
Leuchtet die Sharp-LED, muss die Saite tiefer
gestimmt werden.
Leuchtet die Flat-LED, muss die Saite höher
gestimmt werden.
Leuchtet die In-Tune-LED, ist die Saite exakt auf
die Tonhöhe derjenigen Note gestimmt, die auf der
Notenanzeige angezeigt wird.
VORVERSTÄRKER EINSTELLEN
Stimmen Sie die Gitarre. Siehe Stimmanweisungen
bei 7 und 8.
Bevor Sie eine Kabelverbindung zur Ausgangsbu
chse der Gitarre herstellen, stellen Sie den Lautstärkeregler auf AUS (“0”), die Regler des Vier
band-EQ jeweils in die Mitte, also genau zentriert
zwischen “-12” und “+12”, und schalten Sie den
Tuner aus.
Überprüfen Sie, ob die 9-Volt-Batterie geladen ist.
Vergewissern Sie sich, dass der Ton des Verstärk
ers oder Mischpults ausgeschaltet, und die Regler
des Vierband-EQ auf neutral (flat) stehen oder
ausgeschaltet sind. Stecken Sie ein Gitarrenkabel
in die Ausgangsbuchse der Gitarre und in die Ein
gangsbuchse des Verstärkers oder Mischpults.
Stellen Sie den Lautstärkeregler des A3T auf halbe
Lautstärke (zentriert zwischen “0” und “+12”). Stel
len Sie die Lautstärke des Verstärkers oder Mischpults so ein, dass Sie einen guten Klangpegel
erhalten. Informieren Sie sich in der Bedienungsanleitung des Verstärkers oder des Mischpults,
wie Sie für ein bestimmtes Instrument die beste
Tonstruktur einstellen, um einen möglichst reinen
Klang zu erzielen.
Wenn Sie die gewünschte Lautstärke gefunden ha
ben, verwenden Sie den EQ am A3T-Vorverstärker,
um auch den gewünschten Sound zu ermitteln.
Versuchen Sie den Mittenregler MIDDLE etwas
herunter zu drehen, um diesen Frequenzbereich zu
dämpfen. Dadurch wird der Klang weicher. Dre
hen Sie den Bassregler BASS ein wenig höher, um
den Klang voller zu machen. Mit dem PRESENCE
Höhenregler können Sie den Klang stärker strahlen
lassen. Experimentieren Sie mit den Einstellungen,
um den gewünschten Klang zu finden.
Mit den EQ-Klangreglern an Verstärker oder Mis
chpult können Sie den Sound noch feiner einstel
len.

9
9
Gutes Gelingen und viel Freude beim AUFDREHEN!
B-Band, das B-Band-Logo und A3T sind Warenzeichen der
B-Band Ltd. in den USA und/oder weiteren Staaten. Alle
technischen Daten können ohne vorherige Ankündigung
geändert werden. Alle Rechte vorbehalten. Copyright ©
1996–2007 B-Band Ltd.
Manuel d’utilisation du préampli B-BAND A3T
Félicitations! Nous vous remercions d’avoir acheté cet
instrument de qualité équipé du système de micros
B-Band. B-Band s’engage à fournir un produit de
qualité supérieure, fabriqué dans le véritablpassionnés
d’instruments acoustiques ou électriques.
Une lecture approfondie de ce manuel vous fournira les
informations nécessaires pour comprendre pleinement
les possibilités de cet instrument et rendre son utilisation
simple et conviviale.
COMMANDES
1. VOLUME
2. BASS (GRAVES)
3. MIDDLE (MEDIUMS)
4. TREBLE (AIGUS)
5. PRESENCE (AIGUS EXTREMES)
6. LOW BATT. (VOYANT DE PILE FAIBLE)
7. ACCORDEUR CHROMATIQUE
12 7
6
5
8
3
4

10
fonctionne correctement.
PILE
Le préampli B-Band A3T est alimenté par une pile
9 volts. Avant de connecter l’instrument à un am
plificateur ou à une table de mixage, vérifiez qu’il
contient une pile 9 volts complètement chargée.
7. ACCORDEUR CHROMATIQUE
8. BOUTON DE MISE SOUS/HORS TENSION DE
L’ACCORDEUR
L’accordeur fonctionne, qu’un câble soit branché
sur le jack de sortie ou non.
Appuyez sur le bouton de l’accordeur (8) pour
l’allumer. Lorsque l’accordeur est allumé, la sortie
du micro est désactivée. Aucun son n’est transmis
à l’amplificateur ou à la table de mixage lorsque
l’accordeur est allumé.
Appuyez à nouveau sur le bouton de l’accordeur (8)
pour l’éteindre. La sortie du micro est alors activée
et permet la transmission du son à l’amplificateur.
Si l’accordeur est allumé et que le bouton n’est
pas actionné dans les deux minutes qui suivent,
l’accordeur s’éteint automatiquement et le son est
renvoyé vers la sortie.
L’accordeur dispose d’un afficheur indiquant la
8. BOUTON DE MISE SOUS/HORS TENSION DE
L’ACCORDEUR
DESCRIPTION DES COMMANDES
1. VOLUME
Le bouton VOLUME permet de contrôler le volume
de sortie. Réglé sur « 0 », le son est coupé. Réglé
sur « 12 », le volume est au maximum.
2. BASS (commande des graves)
3. MIDDLE (commande des médiums)
4. TREBLE (commande des aigus)
5. PRESENCE (commande des aigus extrêmes)
Les commandes BASS, MIDDLE, TREBLE et
PRESENCE constituent un égaliseur à 4 bandes
qui permet de contrôler la tonalité du son.
Les commandes de tonalité BASS, TREBLE et
PRESENCE sont des commandes linéaires clas
-
siques d’amplification/atténuation.
La commande MIDDLE (médiums) est un filtre clas
-
sique d’amplification/atténuation de tonalité.
La position centrale de ces commandes de tonalité
offre une réponse neutre. « +12 » amplifie la to
-
nalité, « -12 » coupe la tonalité.
6. LOW BATT. (VOYANT DE PILE FAIBLE)
Le voyant s’allume lorsque le niveau de la pile
est faible. Remplacez la pile lorsque ce voyant
s’allume.
Ce voyant clignote lorsqu’un câble est branché au
jack de sortie du micro. Cela indique que la pile
Afficheur de note
Voyant Dièse
Voyant de note juste
Voyant Bémol
Voyant de demi-ton

11
11
note jouée, et de quatre voyants indiquant que la
note jouée est une note intermédiaire (#), qu’elle
est trop aiguë, trop grave ou qu’elle est juste.
L’afficheur de note de l’accordeur indique la note
la plus proche du son de la corde jouée. Si la note
affichée est une note intermédiaire (la dièse, do
dièse, ré dièse, par exemple), le voyant de demiton (#) s’allume.
Si le voyant Dièse s’allume, vous devez abaisser la
hauteur de la corde.
Si le voyant Bémol s’allume, vous devez augmenter
la hauteur de la corde.
Lorsque le voyant de note juste s’allume, la hauteur
de la corde est correcte pour la note indiquée par
l’afficheur de note.
RÉGLAGE DU PRÉAMPLI
Accordez la guitare. Reportez-vous aux instructions
d’utilisation de l’accordeur aux sections 7 et 8.
Avant de brancher un câble sur le jack de sortie de
la guitare, coupez le volume (commande à « 0 »),
placez les commandes de l’égaliseur 4 bandes en
position centrale (à mi-chemin entre « -12 » et « +12
») et éteignez l’accordeur.
Vérifiez que la pile 9 volts fonctionne correcte
-
ment.
Vérifiez que le volume de l’amplificateur ou de la ta
ble de mixage est à zéro et que les commandes de
tonalité de l’égaliseur sont neutres ou désactivées.
Branchez un câble de guitare entre le jack de sortie
de la guitare et la prise d’entrée de l’amplificateur
ou de la table de mixage.
Montez le volume du préampli A3T à mi-course (à
mi-chemin entre « 0 » et « +12 »). Montez le volume
de l’amplificateur ou de la table de mixage suf
fisamment de manière à obtenir un niveau sonore
adéquat. Consultez le manuel de l’amplificateur ou
de la table de mixage pour savoir comment régler
de manière optimale le gain afin d’obtenir le son le
plus pur possible.
Une fois le volume réglé comme vous le souhaitez,
utilisez les commandes d’égalisation du préampli
A3T pour trouver votre son.
Essayez d’atténuer les médiums en tournant la
commande MIDDLE vers la gauche. Cela permet
d’adoucir le son. Tournez la commande BASS vers
la droite pour donner plus d’ampleur au son. Utili
sez la commande PRESENCE pour ajouter de la
brillance au son. Essayez différents réglages pour
trouver le son qui vous convient le mieux.
Utilisez les commandes d’égalisation de
l’amplificateur ou de la table de mixage pour régler
le son de manière plus précise.
Bonne chance et profitez bien du son!
B-Band, le logo B-Band et A3T sont des marques commerciales de B-Band Ltd aux États-Unis et/ou dans d’autres
pays. Toutes les caractéristiques sont susceptibles d’être
modifiées sans préavis. Tous droits réservés. Copyright ©
1996–2007 B-Band Ltd.

12
ACCORDATORE B-BAND A3T - GUIDA
PER L’UTENTE
Congratulazioni e grazie per avere acquistato
questo eccellente strumento, che include il siste
ma pickup B-Band. B-Band si impegna a fornire
prodotti della massima qualità, concepiti per sod
disfare gli appassionati di strumenti acustici ed
elettrici.
La lettura completa di questo manuale vi darà le
informazioni necessarie per comprendere piena
mente le capacità di questo strumento e per ren
dere il suo utilizzo semplice e piacevole.
COMANDI
1. VOLUME
2. BASS (BASSI)
3. MIDDLE (MIDRANGE)
4. TREBLE (ALTI)
5. PRESENCE (MOLTO ALTI)
6. LOW BATT. (LED DI SPIA PILA QUASI SCARICA)
7. ACCORDATORE CROMATICO
8. PULSANTE ON/OFF ACCORDATORE
DESCRIZIONI DEI COMANDI
1. VOLUME
La manopola VOLUME controlla il volume di uscita.
A “0” è completamente SPENTO. A “12” è MOLTO
ALTO!
2. BASS (per i toni bassi)
3. MIDDLE (per i toni midrange)
4. TREBLE (per i toni alti)
5. PRESENCE (per i toni molto alti)
I comandi BASS, MIDDLE, TREBLE e PRESENCE
agiscono come equalizzatore a 4 bande per il con
-
trollo dei toni.
Le manopole per i toni BASS, TREBLE e PRES
ENCE controllano filtri shelving normali per
l’enfatizzazione o il taglio delle frequenze.
La manopola per i toni MIDDLE (midrange) controlla
un filtro normale di enfatizzazione o di taglio delle
frequenze.
La posizione centrale di queste manopole – eviden
ziata da un piccolo scatto – fornisce una risposta
tonale piatta. “+12” enfatizza la tonalità; “-12“ la
taglia.
12 7
6
5
8
3
4

13
13
6. LOW BATT. (LED DI SPIA PILA QUASI SCARICA)
Il LED si illumina quando la pila è quasi scarica.
Sostituire la pila quando la spia è accesa.
Questo LED lampeggia quando si collega un cavo
alla presa jack di uscita del sistema pickup. Ciò
segnala che la pila è carica.
PILA
Il preamplificatore A3T B-Band è alimentato da una
pila a 9 volt. Prima di collegare lo strumento ad un
amplificatore o ad un mixer, verificare che sia col
-
legata una pila a 9 volt completamente carica.
7. ACCORDATORE CROMATICO
8. PULSANTE ON/OFF ACCORDATORE
L’accordatore funziona con o senza il cavo inserito
nella presa jack di uscita.
Premere il pulsante dell’accordatore (8) per ac
cenderlo. Quando l’accordatore è attivo, l’audio in
uscita dal sistema pickup è interrotto e non viene
inviato alcun segnale audio all’amplificatore o al
mixer.
Se si preme nuovamente il pulsante (8), l’accordatore
si spegne, l’uscita del sistema pickup diviene at
tiva e il segnale audio va all’amplificatore.
Se l’accordatore è acceso e il pulsante
dell’accordatore non viene premuto entro 2 minuti,
l’accordatore si spegne automaticamente e il seg
-
nale viene nuovamente inviato in uscita.
L’accordatore è dotato di un display di visualizzazi
one delle sette Note; di un LED per i semitoni (#);
di un LED a freccia per le note basse; di un LED
a freccia per le note alte e di un LED che indica
quando la nota è perfettamente accordata.
Il display di visualizzazione delle note
dell’accordatore indica la nota più vicina al suono
prodotto da una corda pizzicata. Se la nota indi
cata è un semitono (per esempio la#; do#, re# e
così via), il LED semitono (#) si illumina.
Se si accende il LED per le note alte, va abbassata
l’intonazione della corda.
Se si accende il LED per le note basse, va alzata
l’intonazione della corda.
Quando si accende il LED per le note intonate, la
corda è accordata all’intonazione corretta per la
nota visualizzata sul display.
IMPOSTAZIONE DEL PREAMPLIFICATORE PER L’USO
Accordare la chitarra. Vedere le istruzioni
sull’accordatore ai paragrafi 7 e 8.
Prima di collegare un cavo nella presa jack della chi
tarra, ruotare la manopola del volume su OFF (“0”),
ruotare le manopole dell’equalizzatore a 4 bande
nella posizione a scatto centrale (a metà tra “-12” e
“+12”) e quindi spegnere l’accordatore.
Verificare che la pila a 9 volt sia carica.
Display di visualizzazione note
LED nota alta
LED nota intonata
LED nota bassa
LED semitono

14
Assicurarsi che il volume dell’amplificatore o del mixer sia completamente abbassato e che le manopole
dell’equalizzatore siano nella posizione centrale o
spenta. Collegare un cavo per chitarra nella presa
jack della chitarra e nell’ingresso dell’amplificatore
o del mixer.
Ruotare la manopola del volume dell’A3T in una po
sizione intermedia (a metà tra “0” e “+12”). Alzare il
volume dell’amplificatore o del mixer in modo da ottenere livello sonoro adeguato. Consultare le istruzi
oni dell’amplificatore o del mixer per informazioni su
come impostare il guadagno in modo dastrumento
musicale.
Dopo aver impostato il livello di volume desiderato,
usare l’equalizzatore presente sul preamplificatore
dell’accordatore A3T per selezionare il tono desid
erato.
Provare a ruotare la manopola MIDDLE leggermente
verso il basso per ridurre i toni medi. Ciò conferisce
morbidezza al suono. Ruotare la manopola BASS
per aumentare i toni bassi e rendere il suono più pi
eno. Usare la manopola PRESENCE per rendere il
suono più brillante. Provare varie impostazioni per
trovare un tono che si adatta al proprio gusto.
Regolare i comandi dell’equalizzatore
sull’amplificatore o mixer per regolare ulteriormente
il tono.
Buona fortuna e dateci dentro!
B-Band, il logo B-Band e A3T sono marchi di B-Band Ltd
negli Stati Uniti e / o in altri paesi. Tutte le specifiche sono
soggette a modifica senza preavviso. Tutti i diritti riservati.
Copyright © 1996–2007 B-Band Ltd.
AFINADOR B-BAND A3T – MANUAL DEL
USUARIO
Enhorabuena y gracias por adquirir este estupendo
instrumento con el sistema de pastilla B-Band in
cluido. B-Band pone todo su empeño en suministrar un producto de la mejor calidad, fabricado
con el verdadero espíritu de los aficionados a los
instrumentos acústicos y electrónicos.
La lectura cuidadosa de este manual le propor
cionará la información necesaria para entender
plenamente las posibilidades que ofrece este instrumento y hacer que su utilización sea una expe
riencia fácil y agradable.
CONTROLES
12 7
6
5
8
3
4

15
15
1. VOLUME (VOLUMEN)
2. BASS (GRAVES)
3. MIDDLE (MEDIOS)
4. TREBLE (AGUDOS)
5. PRESENCE (PRESENCIA)
6. LOW BATT. (LED DE BATERÍA BAJA)
7. AFINADOR CROMÁTICO
8. BOTÓN DE ENCENDIDO/APAGADO DEL AFINADOR
DESCRIPCIÓN DE LOS CONTROLES
1. VOLUME (VOLUMEN)
Con el control de VOLUMEN se ajusta el volumen
de salida. En la posición “0” no hay sonido. En la
posición “12” el sonido es máximo.
2. BASS (control de tonos graves)
3. MIDDLE (control de tonos medios)
4. TREBLE (control de tonos agudos)
5. PRESENCE (control de tonos muy agudos)
Los controles BASS, MIDDLE, TREBLE y PRES
ENCE forman un ecualizador de 4 bandas para
controlar el tono.
Los controles de tono BASS (graves), TREBLE
(agudos) y PRESENCE (presencia) son controles
normales escalonados de refuerzo o supresión.
El control de tono MIDDLE (medio) es un filtro de
tono normal de refuerzo o supresión.
En la posición de retenida central de estos con
troles de tono se crea una respuesta plana. Ha
cia la posición “+12” se refuerza el tono; hacia la
posición “-12” se suprime.
6. LOW BATT. (LED DE BATERÍA BAJA)
El LED se ilumina cuando se ha agotado la energía
de la batería. Cambie la batería cuando se enci
-
enda esta luz.
Este LED parpadea cuando se conecta un cable a
la toma de salida de la pastilla, lo que indica que la
batería se encuentra en buen estado.
BATERÍA
El preamplificador del B-Band A3T se alimenta con
una batería de 9 voltios. Antes de conectar el in
strumento a un amplificador o a una mezcladora,
compruebe que esté instalada una batería de 9
voltios completamente cargada.
7. AFINADOR CROMÁTICO
8. BOTÓN DE ENCENDIDO/APAGADO DEL AFI
NADOR
El afinador funciona con o sin cable conectado a la
toma de salida.
El afinador se enciende pulsando el botón TUNER
(8). Cuando el afinador está funcionando, el sonido
de la pastilla se desactiva. Por tanto, cuando el
afinador está funcionando, no llega sonido al am
plificador o a la mezcladora.
Al volver a pulsar el botón del afinador (8), éste se
Pantalla LED
LED de sostenido
LED de nota afinada
LED de bemol
LED de semitono

16
apaga, se restablece el sonido de la pastilla y el
sonido llega al amplificador.
Si el afinador está encendido y no se pulsa el botón
en 2 minutos, éste se apaga automáticamente y se
restablece el sonido.
El afinador está provisto de una pantalla LED que
indica las siete notas, semitono (#), flecha de sos
-
tenido, flecha de bemol y nota afinada.
La pantalla LED del afinador muestra la nota más
cercana al sonido de la cuerda que se pulsa. Si la
nota indicada es un semitono (por ejemplo A#, C#,
D#, etc.), se ilumina el LED de semitono (#).
Si se ilumina el LED de sostenido, significa que se
debe bajar el tono de la cuerda.
Si se ilumina el LED de bemol, significa que se
debe subir el tono de la cuerda.
Cuando se ilumina el LED de nota afinada, significa
que el tono de la cuerda coincide con la nota in
-
dicada en la pantalla.
CONFIGURACIÓN DEL PREAMPLIFICADOR PARA SU USO
Afine la guitarra. Consulte las instrucciones del afinador
en los puntos 7 y 8.
Antes de conectar un cable a la toma de salida de la gui
tarra, desactive el volumen (control en la posición “0”),
sitúe los controles del ecualizador de 4 bandas en la
posición de retenida central (posición media entre “-12”
y “+12”) y apague el afinador.
Compruebe que la batería de 9 voltios se encuentre en
buen estado.
Verifique que el volumen del amplificador o de la mezcladora esté desactivado y que los controles de tono
del ecualizador se encuentren en posición de respuesta
plana o desactivados. Conecte un cable a la toma de
salida de la guitarra y a la toma de entrada del amplifica
-
dor o de la mezcladora.
Suba a la mitad el volumen del afinador A3T (posición
media entre “0” y “+12”). Suba el volumen del ampli
ficador o de la mezcladora lo suficiente para obtener
un buen nivel de sonido. Consulte en las instrucciones
del amplificador o de la mezcladora la mejor manera de
ajustar la estructura de ganancia para obtener el sonido
más limpio posible.
Una vez encontrado el volumen adecuado, utilice el
ecualizador del preamplificador en el afinador A3T para
ajustar el tono.
Pruebe bajando un poco el control MIDDLE (medios)
para atenuar este tono. Esto suavizará el sonido en cier
ta medida. Suba ligeramente el control BASS (graves)
para dar cuerpo al sonido. Utilice el control PRESENCE
(presencia) para dar brillo al sonido. Continúe experi
mentando hasta encontrar un tono que se ajuste a sus
preferencias.
Utilice los controles de ecualización del amplificador o
de la mezcladora para efectuar un ajuste fino del tono.
¡Buena suerte y dale FUERTE!
B-Band, el logotipo B-Band y A3T son marcas comerciales de BBand Ltd en Estados Unidos u otros países. Todas las especificaciones están sujetas a modificaciones sin previo aviso. Todos los
derechos reservados. Copyright © 1996–2007 B-Band Ltd.

17
17
B-BAND A3T取扱説明書
この度はB-Bandピックアップシステム付きの本製品を
お買い上げいただき、誠にありがとうございます。BBandは、アコースティック/エレクトリックギターのプレ
イヤースピリットにのっとった最高の製品を、責任を持
ってお届けします。
このマニュアルには、簡単に楽しく操作を行うために
必要な製品機能が説明されていますので、よくお読み
ください。
コントロール類
1. VOLUME
2. BASS
3. MIDDLE
4. TREBLE
5. PRESENCE
6. LOW BATT. (低電池残量LEDライト)
7. クロマチックチューナー
8.チューナーON/OFFボタン
コントロール類の操作説明
1. VOLUME
出力する音量を調整します。「0」に合わせると完全に
OFFになります。「12」に合わせると大音量になります。
2. BASS(低音域を調節する)
3. MIDDLE(中音域を調節する)
4. TREBLE(高音域を調節する)
5. PRESENCE(TREBLEよりさらに高い音域を調節する)
BASS、MIDDLE、TREBLE、PRESENCEコントロールは
音質を調節するための4バンドイコライザーです。
BASS、TREBLE、PRESENCEコントロールは通常のシェ
ルビングタイプのブースト/カットコントロールです。
MIDDLE(中音域)コントロールは、通常のブースト/カット
フィルターです。
それぞれのトーンコントロールはセンタークリックの位
置でフラット、「+12」側がブースト、「-12」側がカットとな
ります。
6. LOW BATT. 電池容量が不足するとこのLEDが点灯
します。LEDが点灯したら電池を交換してください。
LEDライトはこのピックアップシステムのアウトプットジ
ャックにケーブルが接続されたときに瞬間的に点灯し
ます。これは電池残量が十分であることを示します。
BATTERY
B-BAND A3Tプリアンプは9ボルト電池で作動します。
アンプやミキサーにつなぐ前に、電池の容量が十分で
あることを確認してください。
12 7
6
5
8
3
4

18
クロマチックチューナー
7. チューナーON/OFFボタン
チューナーはアウトプットジャックにギターケーブルが
差し込まれている、いないにかかわらず動作します。
チューナーボタン(8)を押してチューナーをONにしてく
ださい。チューナーの動作中はこのピックアップシステ
ムから音は出ません。チューナーの動作中はアンプや
ミキサーに音は伝達されません。
チューナーボタン (8)をもう一度 押すとチューナー が
OFFになり、ピックアップシステムの出力が可能とな
り、音がアンプに伝達されます。
チューナーがONになっている状態でチューナーボタン
が2分以内に押されないと、自動的にOFFになり、出力
から音が出るようになります。
このチューナーには7音分の読取ディスプレイと、半
音、シャープ、フラット、イン・チューンのLEDがありま
す。
チューナーの音名読取 ディスプレイ部には、 弾いた
弦に最も近い音が表示されます。また、A#、C#、D#な
ど#付きの音の場合は半音LED(#)が点灯します。
シャープLEDが点灯している場合は弦を緩めてチュー
ニングを下げる必要があります。
フラットLEDが点灯している場合は弦を締めてチューニ
ングを上げる必要があります。
イン・チューンLEDが点灯しているときは音名読取ディ
スプレイに表示された音に弦のチューニングが合って
いる状態です。
プリアンプセットアップ方法
ギターをチューニングします。7と8のチューナー方法を
参照してください。
ギターのアウトプットジャックにケーブルをつなぐ前に、
ボリュームコントロールをOFF(「0」)に、4バンドイコライ
ザーを真ん中のクリック位置(「-12」と「+12」の中間)に
し、チューナーをOFFにしてください。
9ボルト電池の残量が十分であることを確認してくださ
い。
アンプやミキサーのボリュームがOFF、イコライザート
ーンコントロールがフラット(OFF)であることを確認して
ください。ギターケーブルをギターのアウトプットジャッ
クにつなぎ、アンプもしくはミキサーのインプットに挿し
込んでください。
A3Tのボリュームコントロールを真ん中(「0」と「+12」の
中間)に合わせてください。次に、アンプやミキサーの
ボリュームをちょうどよい音量まで上げてください。ア
ンプやミキサーの説明書を参照して、できる限りクリー
ンな音が出る最も良いゲインになるようセットアップし
てください。
最適な音量が見つかったらA3Tプリアンプ上のイコラ
イザーコントロールを使用してお好みのトーンを見つ
けてください。
MIDDLEコントロールを下げてこの音域を少しカット
してみてください。サウンドが少し滑らかになります。
BASSコントロールを少し上げればサウンドが豊かにな
ります。PRESENCEコントロールを使用するとサウンド
を明るくすることができます。いろいろ試してみてお好
音名読取ディスプレイ
シャープLED
イン・チューンLED
フラットLED
半音LED


24
MANUFACTURER´S CONTACT INFORMATION
International
B-Band Ltd
Konttisentie 8
FI-40800 VAAJAKOSKI
FINLAND
Tel: +358 14 332 9050
Fax: +358 14 332 9001
Email: sales@band.com
Internet: www.b-band.com
Americas
B-Band, Inc.
10909 Vanowen Street, Suite 300
North Hollywood, CA 91605
U.S.A.
Tel: (818) 508-9412
Fax: (818) 508-9413
Email: sales@b-bandusa.com
Internet: www.b-band.com
B-Band, B-Band logo and A3T are either registered trademarks or trademarks of B-Band Ltd in United States and/or other countries. Patented, patents pending. All
specifications are subject to change without prior notice. All rights reserved. Copyright © 1996-2007 B-Band Ltd.
 Loading...