

Page 1
Zlinx
series
Wireless Modbus I/O Modules
Models:
RT12-0044-ZP-12
RT12-2222-ZP-12
RT12-4444-9T-W20
Documentation Number: RT-12 series-4006m (pn#7331)
This product designed and manufactured in Ottawa, Illinois USA
of domestic and imported parts by
707 Dayton Road -- P.O. Box 1040 -- Ottawa, IL 61350 USA
Phone (815) 433-5100 -- General Fax (815) 433-5105
Phone (815) 433-5100 -- General Fax (815) 433-5105
Website: www.bb-elec.com
Sales e-mail: orders@bb-elec.com
Technical Support e-mail: support@bb.elec.com
European Headquarters
Westlink Commercial Park -- Oranmore, Co. Galway, Ireland
Phone +353 91-792444 -- Fax +353 91-792445
Website: www.bb-europe.com
Sales e-mail: sales@bb-europe.com
Technical Support e-mail: support@bb-europe.com
B&B Electronics Mfg. Co. Inc. -- October 2006
-- Fax (815) 433-5109
-- Fax (815) 433-5104
B&B Electronics
DO NOT OPERATE ANY EQUIPMENT UNTIL THIS MANUAL
IS READ IN ITS ENTIRETY
2006 B&B Electronics. No part of this publication may be reproduced or transmitted in any form or by any
©
means, electronic or mechanical, including photography, recording, or any information storage and retrieval
system without written consent. Information in this manual is subject to change without notice, and does not
represent a commitme n t on the part of B&B Electroni c s .
B&B Electronics shall not be liable for incidental or consequential damages resulting from the furnishing,
performance, or use of this manual.
All brand names used in this manual are the registered trademarks of their respective owners. The use of
trademarks or other designations in this publication is f or reference purposes only and does not constitute an
endorsement by the trademark holder.
This document contains information that is proprietary and confidential to B&B Electronics Mfg. Co. Inc. The
methods described herein are for the exclusive use of B&B Electronics authorized per sonnel. Any unauthorized
use or dissemination of the information contained in the document is strictly forbidden.
B&B Electronics Mfg Co Inc – 707 Dayton Rd - PO Box 1040 - Ottawa IL 61350 - Ph 815-433-5100 - Fax 815-433-5104 – www.bb-elec.com
B&B Electronics – Westlink Commercial Park – Oranmore, Galway, Ireland – Ph +353 91-792444 – Fax +353 91-792445 – www.bb-europe.com
Manual Documentation Number: RT-12 series-4006m
Page 2

Wireless I/O Modules – from B&B Electronics
We value our customers. If you have any suggestion to improve o ur system please
contact us at: support@bb-elec.com
RT12-4444-9T-W20
RT12-0044-ZP-S12
B&B Electronics Mfg Co Inc – 707 Dayton Rd - PO Box 1040 - Ottawa IL 61350 - Ph 815-433-5100 - Fax 815-433-5104 – www.bb-elec.com
B&B Electronics – Westlink Commercial Park – Oranmore, Galway, Ireland – Ph +353 91-792444 – Fax +353 91-792445 – www.bb-europe.com
Manual Documentation Number: RT-12 series-4006m
RT12-2222-ZP-S12
B&B Electronics Mfg Co Inc – 707 Dayton Rd - PO Box 1040 - Ottawa IL 61350 - Ph 815-433-5100 - Fax 815-433-5104 – www.bb-elec.com
B&B Electronics – Westlink Commercial Park – Oranmore, Galway, Ireland – Ph +353 91-792444 – Fax +353 91-792445 – www.bb-europe.com
Manual Documentation Number: RT-12 series-4006m
Page 3

Table of Contents
Chapter 1 – Introduction............................................................................................1
THEORY OF OPERATION..............................................................................................1
MODBUS OVERVIEW...................................................................................................3
MODBUS FUNCTIONS SUPPORTED...............................................................................5
MODBUS REGISTER MAPS ..........................................................................................6
PEER TO PEER OVERVIEW...........................................................................................8
Chapter 2 – System Identification...........................................................................10
RT12-4444-9T-W20 – FRONT PANEL IDENTIFICATION............................................10
RT12-4444-9T-W20 – EXTERNAL BATTERY BACK-UP............................................13
RT12-2222-ZP-S12 – FRONT PANEL IDENTIFICATION .............................................14
RT12-2222-ZP-S12 – EXTERNAL BATTERY BACK-UP.............................................17
RT12-0044-ZP-S12 – FRONT PANEL IDENTIFICATION .............................................18
RT12-0044-ZP-S12 – EXTERNAL BATTERY BACK-UP.............................................21
HARDWARE SET-UP ..................................................................................................22
Typical Application: Peer-to-Peer......................................................................22
Typical Application: Modbus..............................................................................24
Typical Application: Well Monitor and Control (Peer-to-Peer)........................25
Typical Application: Well Monitor and Control (Mo dbus) ...............................26
Typical Application: 4-20 mA to Voltage Conversion........................................27
Configuration Cable Description........................................................................28
Chapter 3 – Configuration & Programming..........................................................29
CONFIGURATION/MONITORING SOFTWARE SYSTEM MAP........................................29
CONFIGURATION/MONITORING SOFTWARE MAIN PAGE...........................................30
CONTROLLER CONFIGURATION ................................................................................31
CURRENT CONTROLLER SETTINGS ...........................................................................32
CONNECTING / DISCONNECTING...............................................................................35
Master, Slave, Modbus, Peer-to-Peer.................................................................36
MODBUS CONFIGURATION........................................................................................37
DIGITAL INPUT TYPES ..............................................................................................38
RTU ALARMS...........................................................................................................39
ANALOG OUTPUTS RESTING VOLTAGE.....................................................................42
UPDATING/SENDING CONFIGURATION TO RTU........................................................45
THIRD PARTY COMMUNICATIONS PROTOCOL SUPPORT ...........................................46
STATUS BAR.............................................................................................................47
DIGITAL OUTPUTS ....................................................................................................48
Manual Documentation Number: RT-12 series-4006m Table of Contents i
B&B Electronics Mfg Co Inc – 707 Dayton Rd - PO Box 1040 - Ottawa IL 61350 - Ph 815-433-5100 - Fax 815-433-5104 – www.bb-elec.com
B&B Electronics – Westlink Commercial Park – Oranmore, Galway, Ireland – Ph +353 91-792444 – Fax +353 91-792445 – www.bb-europe.com
ii Table of Contents Manual Documentation Number: RT-12 series-4006m
B&B Electronics Mfg Co Inc – 707 Dayton Rd - PO Box 1040 - Ottawa IL 61350 - Ph 815-433-5100 - Fax 815-433-5104 – www.bb-elec.com
B&B Electronics – Westlink Commercial Park – Oranmore, Galway, Ireland – Ph +353 91-792444 – Fax +353 91-792445 – www.bb-europe.com
Page 4

Chapter 1 – Introduction
Theory of Operation
This manual will refer to two types of SCADA communications to pologies, Peer to
Peer (P2P) and Modbus.
The Peer to Peer topology
and digital I/O is communicated between the Master and Slave.
The Modbus topology
Modbus slaves. The Modbus master is responsible for requesting data from a
respective Modbus slave.
The ‘RT’ serie s RTU’s have se veral unique functions and features and has been
designed to replicate a wired sensor system. Transmission distances of up to 40 miles
(64 km), (depending on the radio type and with modified antennas), user
programmable sample/polling rates from 10 sam ples/sec to one sample every 20
seconds, programmable transmission retries, user programmable “full scale”
engineering units allow users to enter full scale for a respective sensor, just to name a
few.
The hardware architecture for RT series RTU’s are identical. Number of analog or
digital I/O depends on the type of RTU. Each respective RTU has Bi-directional
analog signal flow.
Other features include:
-Battery backup and in -circuit charging sys tem,
-MODBUS-RTU-Slave Enhancements,
-Programmable main voltage failure alarm,
-Low and high input voltage alarm,
-Communications failure alarm,
-Programmable resting voltages on communication failure,
-Programmable Output to Active High or Low during Communications Failure,
-Report by exception if a respective input changes by a +/- percentage,
-Configurable Inputs to Digital, Frequency or Accumulato r/Total.
An enhanced monitoring and configuration windows based program, allows you to
configure each controller as well as monitor data.
consists of one “Master” and one “Slave” RTU. Analog
consists of one Modbus Master, and as many as 255
Your system may consist of two RT type wireless analo g bridges or RTU. In Peer to
Peer mode, one controller must be programmed as the master and the other as the
slave. It is critical that your system be programmed properly. Confi rm your system
configuration before using your system.
All configuration parameters may be retrieved by connecting to the respective
device’s serial configuration port. The wireless type and other parameters may be
adjusted or viewed.
For Peer-to-Peer mode, check and confirm the following:
___ Your system consists of one MASTER and one SLAVE. Do not allow two
masters or two slaves to communicate with each other. The devices may communicate
but a systems failure will occur.
___ Make sure the system ID’s and RF-Network ID’s match.
WARNING:
ID numbers for the Master and Slave must match and must not be repeat ed with
any other Master/Slave pairs with the same RF-Network ID within the radio
range of each respective wireless pair. Doing so will cause cross talk between
master/slave pairs.
___ Make sure both Master and Slave have an antenna attached and installed correctly.
___ Make sure that the input power supply doe s NOT exceed 28 Vdc.
___ Make sure that the input power supply does N OT fall below 8.5 Vdc.
___ When power is applied to both the master and slave both units will communicate
with each other.
For Modbus Slave RTU mode, check and confirm the following:
___ Your system does not consist of two RT RTU/devices with the same Slave ID
numbers.
___ Each RTU/device has the same Radio ID and RF-Network ID numbers. Your
Modbus Master device will need to be connected to our Packaged Modbus Modem
(PMM) and will need to be configured with the same Radio ID and RF-Network ID
numbers as the Modbus Slave devices. The PMM may be configured to allow for an
RS-232 or RS-485 communications port.
Manual Documentation Number: RT-12 series-4006m 1
B&B Electronics Mfg Co Inc – 707 Dayton Rd - PO Box 1040 - Ottawa IL 61350 - Ph 815-433-5100 - Fax 815-433-5104 – www.bb-elec.com
B&B Electronics – Westlink Commercial Park – Oranmore, Galway, Ireland – Ph +353 91-792444 – Fax +353 91-792445 – www.bb-europe.com
2 Manual Documentation Number: RT-12 series-4006m
B&B Electronics Mfg Co Inc – 707 Dayton Rd - PO Box 1040 - Ottawa IL 61350 - Ph 815-433-5100 - Fax 815-433-5104 – www.bb-elec.com
B&B Electronics – Westlink Commercial Park – Oranmore, Galway, Ireland – Ph +353 91-792444 – Fax +353 91-792445 – www.bb-europe.com
Page 5

Modbus Overview
This section is written for the person who will use the RT series RTU’s with Modicon
Modbus protocols for communication in Modicon programmable controller
applications. It describes the different types of Modbus registers supported. The RT
Series RTU’s support Modbus, Slave RTU mode.
The Modbus protocol provides the internal standard that the Modicon controllers use
for parsing messages. During communications on a Modbus network, the protocol
determines how each controller will know its device address, recognize a message
addressed to it, determine the kind of action to be taken, and extract any data or other
information contained in the message.
All of the RT series RTU’s use a common Modbus communications protocol. All data
is sent and received raw units.
Engineering Note: It may be necessary to force your PLC or Modbus master device
to delay between Modbus packet transmissions. Some devices transmit without a
break in data packets. Because of the nature of half-duplex radio you may need to
configure or program your device with a 30-50 mS delay between packets and a 1.5-
2.0 second timeout.
Modbus Data: Some Modbus devices send data differently than others. This example
shows Slave address 9, using fu n ction 3 and 16. It also shows he full data address of
40001. The RT series RTU’s do not send the full address. The Modbus protocol
allows a system to assume the data address based on the function type. This is true of
all Modbus functions for the RT series RTU’s.
09 03 9C 40 00 01 91 7E
09 10 9C 40 00 01 02 00 00 9E 54
09 = Slave 9
03 = Read Holding Registers
9C = Starting Address High -\
40 = Starting Address Low -/ 40001
00 = Number of Points High-\
01 = Number of Points Low -/ Read 1 Point
91 = Check Sum
7e = Check Sum
This is an example showing what data would look like for
the RT series RTUs.
09 = Slave 9
03 = Read Holding Registers
00 = Starting Address High -\
00 = Starting Address Low -/ 40001
00 = Number of Points High-\
01 = Number of Points Low -/ Read 1 Point
91 = Check Sum
7e = Check Sum
Manual Documentation Number: RT-12 series-4006m 3
B&B Electronics Mfg Co Inc – 707 Dayton Rd - PO Box 1040 - Ottawa IL 61350 - Ph 815-433-5100 - Fax 815-433-5104 – www.bb-elec.com
B&B Electronics – Westlink Commercial Park – Oranmore, Galway, Ireland – Ph +353 91-792444 – Fax +353 91-792445 – www.bb-europe.com
4 Manual Documentation Number: RT-12 series-4006m
B&B Electronics Mfg Co Inc – 707 Dayton Rd - PO Box 1040 - Ottawa IL 61350 - Ph 815-433-5100 - Fax 815-433-5104 – www.bb-elec.com
B&B Electronics – Westlink Commercial Park – Oranmore, Galway, Ireland – Ph +353 91-792444 – Fax +353 91-792445 – www.bb-europe.com
Page 6

Modbus Functions Supported
01 Read Coil Status: Reads the ON/OFF status of discrete outputs (0X references,
coils) in the slave. Broadcast is not supported.
02 Read Input Status: Reads the ON/OFF status of discrete inputs (1X references) in
the slave. Broadcast is not supported.
03 Read Holding Registers: Reads the binary contents of holding registers (4X
references) in the slave. Broadcast is not supported.
04 Read Input Registers: Reads the binary contents of input registers (3X references)
in the slave. Broadcast is not supported.
05 Force Single Coil: Forces a single coil (0X reference) to either ON or OFF.
06 Preset Single Register: Presets a value into a single holding registe r (4X
reference).
15 (0F Hex) Force Multiple Coils: Forces each coil (0X reference) in a sequence of
coils to either ON or OFF.
16 (10 Hex) Preset Multiple Registers: Presets values into a sequence of holding
registers (4X references).
Modbus Register Maps
RT12-4444 Modbus Map
Function 1
00001 Digital Input 1
00002 Digital Input 2
00003 Digital Input 3
00004 Digital Input 4
Function 2
10001 Digital Input 1
10002 Digital Input 2
10003 Digital Input 3
10004 Digital Input 4
Function 3 (Holding Reg)
40001 AO 1
40002 AO 2
40003 AO 3
40004 AO 4
40005 Freq Input 1
40006 Freq Input 2
40007 Totalize 1 Low
40008 Totalize 1 High
40009 Totalize 2 Low
40010 Totalize 2 High
40011 Time to Save Counter
Function 4 (Inputs)
30001 AI 1 12bit
30002 AI 2 12bit
30003 AI 3 12bit
30004 AI 4 12bit
30005 Vin 10bit
RT12-0044 Modbus Map
Function 1
00001 Digital Input 1
00002 Digital Input 2
00003 Digital Input 3
00004 Digital Input 4
Function 2
10001 Digital Input 1
10002 Digital Input 2
10003 Digital Input 3
10004 Digital Input 4
Function 3 (Holding Reg)
40001 FQ1 (Input-1)
40002 FQ2 (Input-2)
40003 Totalize 1 Low
40004 Totalize 1 High
40005 Totalize 2 Low
40006 Totalize 2 High
40007 Time To Save Counter
Function 4 (Inputs)
30001 Main Vin 10Bit
30002 Batt Vin 10Bit
Manual Documentation Number: RT-12 series-4006m 5
B&B Electronics Mfg Co Inc – 707 Dayton Rd - PO Box 1040 - Ottawa IL 61350 - Ph 815-433-5100 - Fax 815-433-5104 – www.bb-elec.com
B&B Electronics – Westlink Commercial Park – Oranmore, Galway, Ireland – Ph +353 91-792444 – Fax +353 91-792445 – www.bb-europe.com
6 Manual Documentation Number: RT-12 series-4006m
B&B Electronics Mfg Co Inc – 707 Dayton Rd - PO Box 1040 - Ottawa IL 61350 - Ph 815-433-5100 - Fax 815-433-5104 – www.bb-elec.com
B&B Electronics – Westlink Commercial Park – Oranmore, Galway, Ireland – Ph +353 91-792444 – Fax +353 91-792445 – www.bb-europe.com
Page 7

RT12-2222 Modbus Map
Function 1
00001 Digital Input 1
00002 Digital Input 2
Function 2
10001 Digital Input 1
10002 Digital Input 2
Function 3 (Holding Reg)
40001 AO 1
40002 AO 2
40003 Freq Input
40004 Freq-2/Input 1
40005 Freq-3/Input 2
40006 Total Count 1_Low
40007 Total Count 1_High
40008 Total Count 2_Low
40009 Total Count 2_High
40010 Time To Next Save
Function 4
30001 AI 1
30002 AI 2
30003 Battery Input
30004 Main Input
Manual Documentation Number: RT-12 series-4006m 7
B&B Electronics Mfg Co Inc – 707 Dayton Rd - PO Box 1040 - Ottawa IL 61350 - Ph 815-433-5100 - Fax 815-433-5104 – www.bb-elec.com
B&B Electronics – Westlink Commercial Park – Oranmore, Galway, Ireland – Ph +353 91-792444 – Fax +353 91-792445 – www.bb-europe.com
Peer to Peer Overview
Peer to Peer mode can be described as a Wireless Signal Re plicator. The product line
of RT series RTU’s can be configured as a Peer to Peer device. Two of the same type
RTU’s are required to create a peer to peer system, one Master and one Slave.
The master or slave is determined by the way It is
configured. The only difference between a master and
slave is, the master is responsible for starting the
communication process.
Both the master and slave must contain the same Radio ID
and Subnet Value. Only the respective peer-to-peer
systems may have the same Radio ID and RF-Network
numbers. Failure to do so will cause erratic output
voltages, AO’s or Digital Outputs, DO’s.
Each respective “RT” RTU device has the same number of Analog Inputs (AI’s),
Analog Outputs (AO’s), Digital Inputs (DI’s) and Digital Outputs (DO’s).
The number and type of I/O will depend on the type of RTU. Each RTU, including
I/O, is described in this manual.
Peer to Peer mode will allow you to transmit a 0-5 Vdc analog input, or a Digital
Input, from a Master device to a Slave device and vice-versa. A master’s analog or
digital inputs, become a slave’s analog or digital outputs, and vice-versa. This allows
for a full-duplex, looped system.
An application example would be a remote PLC with the RT12-2222’s analog and
digital I/O connected to it, this RTU will be conf igured as a Master. The Slave device
would monitor and control a water well system and would be connected to several
sensors, pump status indicators, current sensor, etc.
The PLC will view the analog and digital signals from the slave device as if the PLC
was connected directly to the several sensors, pump status indicators, current sensor,
etc. See “Typical Application – Well Monitor and Control, Peer-to-Peer” in this
manual.
8 Manual Documentation Number: RT-12 series-4006m
B&B Electronics Mfg Co Inc – 707 Dayton Rd - PO Box 1040 - Ottawa IL 61350 - Ph 815-433-5100 - Fax 815-433-5104 – www.bb-elec.com
B&B Electronics – Westlink C ommercial Park – Oranmore, Ga lway, Ireland – Ph +353 91-792444 – Fax +353 91-792445 – www.bb-europe.com
Page 8
Note: This section assumes that your computer is equipped
with a serial port and you have installed the RT series
configuration software.
To Connect to a Controller:
1) Install the configuration software (setup.exe).
2) Apply Power to the controller. The heartbeat/sanity LED will begin to FLASH.
3) Connect the programming cable to your PC’s serial Port.
4) Launch the “Configuration” software.
5) You must select a communications port. Select “Comm”, “Serial” then the desired
serial port.
6) The “Connect” box will be Red.
7) Press the “Connect” Button. The “Asserting” check box will become checked.
8) If the software successfully connects to the controller,
9) The “Connect” check box will become checked and the “Connect” butt on will turn
Green.
10) The software will begin retrieving configuration data from the controller you are
connected to. If all data boxes are not filled in refer back to step #6 in this section.
11) The software will indicate the type of device, Master or Slave.
12) For further programming features see, “Configuration/Programming Software
Setup.”
Chapter 2 – System Identification
RT12-4444-9T-W20 – Front Panel Identification
All analog voltage inputs and outputs are 12-bit, 0- 5 Vdc. All digital inputs are from 0
to 12 Vdc. Digital inputs must fall to 0 Vdc as a LOW. Digital o utputs are Open
Drain.
Connection Screw Terminal Description
PIN NAME DESCRIPTION
1 AO 1 Analog Output-1
2 AO 2 Analog Output-2
3 AO 3 Analog Output-3
4 AO 4 Analog Output-4
5 DO 1 Digital Output-1
6 DO 1 Digital Output-2
7 DO 1 Digital Output-3
8 DO 1 Digital Output-4
9 GND (-) Power Input. Ground.
10 PWR (+) Power Input. 10-28 Vdc.
11 AI 1 Analog Input-1
12 AI 2 Analog Input-2
13 AI 3 Analog Input-3
14 AI 4 Analog Input-4
15 DI 1 Digital Input-1
16 DI 2 Digital Input-2
17 DI 3 Digital Input-3
18 DI 4 Digital Input-4
19 BAT (+) Battery I/O. 10.5-28 Vdc.
20 GND (-) Battery.
Manual Documentation Number: RT-12 series-4006m 9
B&B Electronics Mfg Co Inc – 707 Dayton Rd - PO Box 1040 - Ottawa IL 61350 - Ph 815-433-5100 - Fax 815-433-5104 – www.bb-elec.com
B&B Electronics – Westlink Commercial Park – Oranmore, Galway, Ireland – Ph +353 91-792444 – Fax +353 91-792445 – www.bb-europe.com
10 Manual Documentation Number: RT-12 series-4006m
B&B Electronics Mfg Co Inc – 707 Dayton Rd - PO Box 1040 - Ottawa IL 61350 - Ph 815-433-5100 - Fax 815-433-5104 – www.bb-elec.com
B&B Electronics – Westlink C ommercial Park – Oranmore, Ga lway, Ireland – Ph +353 91-792444 – Fax +353 91-792445 – www.bb-europe.com
Page 9

Power: 10.5~28 Vdc
Most DC power supplies rated from 10.5 to 28 Vdc @ 1000mA, will work with the
RT12-4444-9T-W20. Do not use a power supply rated less than 1000mA. Doing so
may cause the RT12-4444-9T-W20 to continuously reset. Make sure that the power
supply voltage is maintained between the programmable HIGH and LOW supply
voltage limits or an alarm may occur. If a rechargeable battery is used or if you ar e
supplying voltage to a sensor using the same power used to power the RT12-4444-9TW20, then the input volt age will need to be adjusted to th e proper voltage to mainta i n
respective equipment. Never exceed 28 Vdc. Damage by overheating to the controller
will occur causing the system to malfunction.
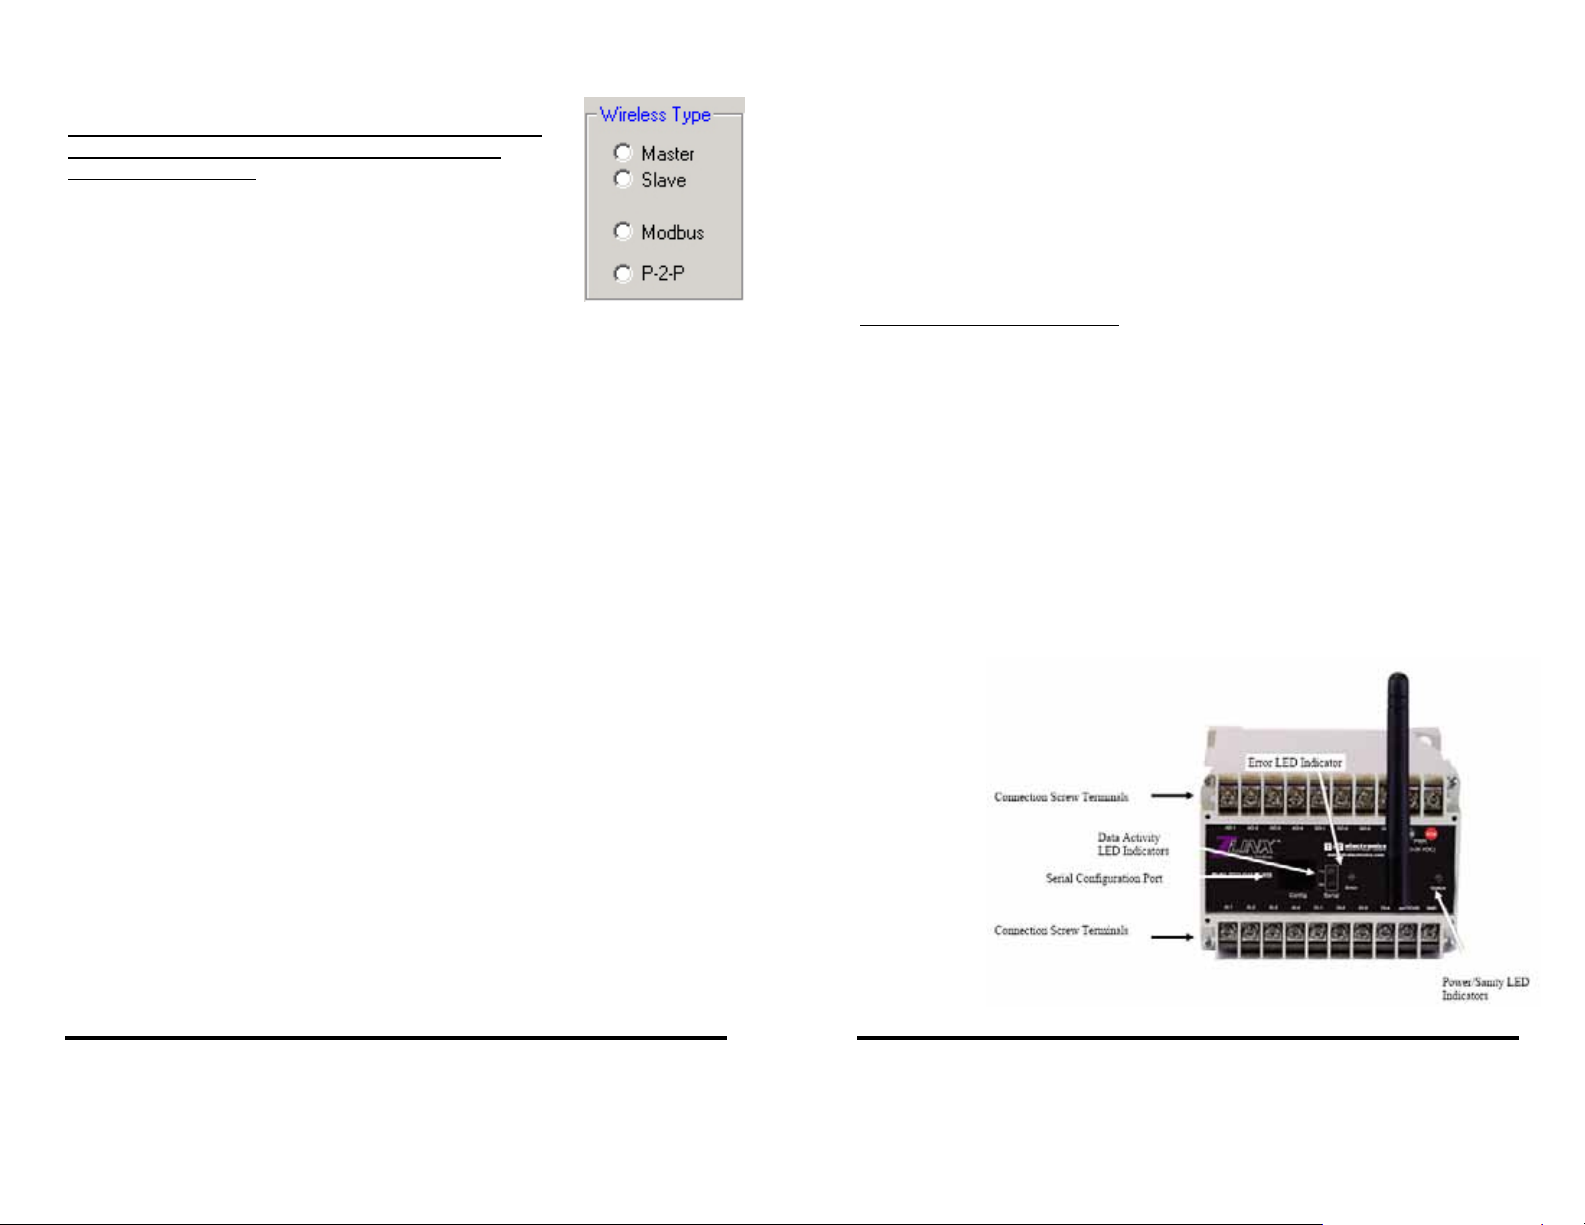
Data Activity LED Indicators
The RT12-4444-9T-W20 RTU is equipment with four LED indicators. The
RED/GREEN pair labeled “SERIAL”, indicate data transmit and data received. The
RED LED will blink when data is being transmitted The GREEN LED will blink any
time data is received, this is true for the MASTER and SLAVE.
Link/Sanity LED Indicators
The yellow LED indicator labeled “Status” indicates proper system operation. The
second yellow LED indicator, labeled “Error”, will flash any time an alarm is
programmed and the respective alarm is active.
Serial RS-232 Interface
Used to configure the RTU. See “Software Setup”.
The RT12-4444-9T-W20 has two rows of 10, screw type, connections. Using a
common type screwdriver, loosen the respective te rminal screw, insert the respective
wire and tighten.
The front panel is stenciled with each Connection number. Listed below are the
respective Connection numbers and Connection description.
Connection Screw Terminals Description
Pin 1: “AO 1” (+) Analog Output - 1, 0-5 Vdc
Pin 2: “AO 2” (+) Analog Output - 2, 0-5 Vdc
Pin 3: “AO 3” (+) Analog Output - 3, 0-5 Vdc
Pin 4: “AO 4” (+) Analog Output - 4, 0-5 Vdc
Pin 5: “DO 1” (+) Digital Output - 1, Open Drain, Act ive Low, Output
Pin 6: “DO 2” (+) Digital Output - 2, Open Drain, Act ive Low, Output
Pin 7: “DO 3” (+) Digital Output - 3, Open Drain, Act ive Low, Output
Pin 8: “DO 4” (+) Digital Output - 4, Open Drain, Act ive Low, Output
Pin 9: “GND” (-) Main Supply GROUND
Pin 10: “VIN+” (+) Main Supply 10.5 to 28.0, Must be > 13.0 to Charge
External Battery. Do Not Exceed 28 Vdc
Pin 11: “AI 1” (+) Analog Input - 1, 0-5 Vdc
Pin 12: “AI 2” (+) Analog Input - 2, 0-5 Vdc
Pin 13: “AI 3” (+) Analog Input - 3, 0-5 Vdc
Pin 14: “AI 4” (+) Analog Input - 4, 0-5 Vdc
Pin 15: “DI 1” (+) Digital Input - 1, Active Low, 0~12 Vdc
Pin 15: “DI 2” (+) Digital Input - 2, Active Low, 0~12 Vdc
Pin 15: “DI 3” (+) Digital Input - 3, Active Low, 0~12 Vdc
Pin 15: “DI 4” (+) Digital Input - 4, Active Low, 0~12 Vdc
Pin 19: “Batt” (+) Battery Charge During Normal Main Power Input.
Battery Backup during Main Power Fa ils.
Pin 20: “GND” (-) Battery Ground
Manual Documentation Number: RT-12 series-4006m 11
B&B Electronics Mfg Co Inc – 707 Dayton Rd - PO Box 1040 - Ottawa IL 61350 - Ph 815-433-5100 - Fax 815-433-5104 – www.bb-elec.com
B&B Electronics – Westlink Commercial Park – Oranmore, Galway, Ireland – Ph +353 91-792444 – Fax +353 91-792445 – www.bb-europe.com
12 Manual Documentation Number: RT-12 series-4006m
B&B Electronics Mfg Co Inc – 707 Dayton Rd - PO Box 1040 - Ottawa IL 61350 - Ph 815-433-5100 - Fax 815-433-5104 – www.bb-elec.com
B&B Electronics – Westlink C ommercial Park – Oranmore, Ga lway, Ireland – Ph +353 91-792444 – Fax +353 91-792445 – www.bb-europe.com
Page 10

RT12-4444-9T-W20 – External Battery Back-up
Connecting an Optional External Backup Battery to RT12-4444-9T-W20
!WARNING: Use Caution When Connecting Any Rechargeable Battery to any
of the RT series RTU’s. Make sure that the BATTERY is NOT connected until
the connection is made to the controller first. This will minimize the chance of
damage to the controller if the charging wiring harness is connected incorrectly.
Use only Nickel Cadmium 12Vdc and a minimum of 1.5 Amp Hour batteries.
Use only fused cable. The RTU is internall y fused as well.
RT12-2222-ZP-S12 – Front Panel Identification
All analog voltage inputs and outputs are 12-bit, 0-5 Vdc. All digital inputs are from 0
to 12 Vdc. Digital inputs must fall to 0 Vdc as a LOW. Digital o utputs are Open Drain.
Connection Screw Terminal Description
PIN NAME DESCRIPTION
1 BATT (+) Battery I/O. 10.5~28 Vd c
2 GND (-) Battery
3 DI 3 Frequency Input. <5 KHz
4 PWR (+) Power Input. 10~28 Vdc
5 DO 2 Digital Output-2
6 DI 2 Digital Output-2
7 DO 1 Digital Output-1
8 AO 2 Analog Output-2
9 AO 1 Analog Output-2
10 DI 1 Digital Input-1
11 AI 2 Analog Input-2
12 AI 1 Analog Input-1
1) Connect the RED wire from the Charging wiring harness to pin 19, “BATT”
of the respective RTU device. The Master and Slave controllers are identical
in wiring, features and programming. Be sure a 1 Amp FAST blow fuse is
installed.
2) Connect the BLACK wire from the Charging wiring harness to pin 20,
,“Gnd”, of the respective device.
3) Confirm the above instructions. If the connectio ns are c orrect, connect the
RED wire to the (+) of the battery and the black wire to the (-). The RTU will
begin to operate.
Manual Documentation Number: RT-12 series-4006m 13
B&B Electronics Mfg Co Inc – 707 Dayton Rd - PO Box 1040 - Ottawa IL 61350 - Ph 815-433-5100 - Fax 815-433-5104 – www.bb-elec.com
B&B Electronics – Westlink Commercial Park – Oranmore, Galway, Ireland – Ph +353 91-792444 – Fax +353 91-792445 – www.bb-europe.com
14 Manual Documentation Number: RT-12 series-4006m
B&B Electronics Mfg Co Inc – 707 Dayton Rd - PO Box 1040 - Ottawa IL 61350 - Ph 815-433-5100 - Fax 815-433-5104 – www.bb-elec.com
B&B Electronics – Westlink C ommercial Park – Oranmore, Ga lway, Ireland – Ph +353 91-792444 – Fax +353 91-792445 – www.bb-europe.com
Page 11

Power: 10.5~28 Vdc
Most DC power supplies rated from 10.5 to 28 Vdc @ 200mA, will work with the
RT12-2222-ZP-S12. Do not use a power supply rated less than 200 mA, doing so may
cause the RT12-2222-ZP-S12 to continuously reset. Make sure that the power supply
voltage is maintained between the programmable HIGH and LOW supply voltage
limits or an alarm may occur. If a rechargeable battery is used or if you are supplying
voltage to a sensor using the same power used to power the RT12-2222-ZP-S12, then
the input voltage will need to be adjusted to the proper voltage to maintain respective
equipment. Never exceed 28 Vdc damage, overheating to the controller will occur
causing the system to malfunction.
Data Activity LED Indicators
The RT12-2222-ZP-S12 RTU is equipment with three LED indicators. The
RED/GREEN pair labeled “RX” and ”TX”, indica te data transmit and data received.
The RED LED will blink when data is being transmitted The GREEN LED will blink
any time data is received.
Link/Sanity LED Indicators
The yellow LED indicator is locate internally and indicates proper system operation.
The second yellow LED indicator, labeled “Error”, will flash any thing an alarm is
program and the respective alarm is active. The Status LED indicator may be seen
through a small hole on the top of enclosure.
Serial RS-232 Interface
Used to configure the RTU. See “Software Setup”.
The RT12-2222-ZP-S12 has two rows of 6, screw type, connections. Using a common
type screwdriver, loosen the respective terminal screw, insert the re spective wire and
tighten.
The front panel is stenciled with each Connection PIN number. Listed below are the
respective Connection numbers and Connection description.
Connection Screw Terminals Description
Pin 1: “Batt” (+) Battery Charge During Normal Main Power Input.
Battery Backup during Main Power Fails
Pin 2: “GND” (-) Power and Battery Ground
Pin 3: “DI 3” (+) Frequency Input. Do Not Exceed 5 KHz
Pin 4: “PWR” VIN(+) Main Supply 10.5 to 28.0, Must be > 13.0 to Charge
External Battery. Do Not Exceed 28 Vdc
Pin 5: “DO 2” (+) Digital Output - 2, Open Drain, Active Low, Output
Pin 6: “DI 2” (+) Digital Input - 2, Active Low, 0~12 Vdc
Pin 7: “DO 1” (+) Digital Output - 1, Open Drain, Active Low, Output
Pin 8: “AO 2” (+) Analog Output - 2, 0-5 Vdc
Pin 9: “AO 1” (+) Analog Output - 1, 0-5 Vdc
Pin 10: “DI 1” (+) Digital Input - 1, Active Low, 0~12 Vdc
Pin 11: “AI 2” (+) Analog Input - 2, 0-5 Vdc
Pin 12: “AI 1” (+) Analog Input - 1, 0-5 Vdc
Manual Documentation Number: RT-12 series-4006m 15
B&B Electronics Mfg Co Inc – 707 Dayton Rd - PO Box 1040 - Ottawa IL 61350 - Ph 815-433-5100 - Fax 815-433-5104 – www.bb-elec.com
B&B Electronics – Westlink Commercial Park – Oranmore, Galway, Ireland – Ph +353 91-792444 – Fax +353 91-792445 – www.bb-europe.com
16 Manual Documentation Number: RT-12 series-4006m
B&B Electronics Mfg Co Inc – 707 Dayton Rd - PO Box 1040 - Ottawa IL 61350 - Ph 815-433-5100 - Fax 815-433-5104 – www.bb-elec.com
B&B Electronics – Westlink C ommercial Park – Oranmore, Ga lway, Ireland – Ph +353 91-792444 – Fax +353 91-792445 – www.bb-europe.com
Page 12

RT12-2222-ZP-S12 – External Battery Back-up
Connecting an Optional External Backup Battery to RT12-2222-ZP-S12
!WARNING!
Use Caution When Connecting Any Rechargeable Battery to any of the
RT series RTU’s. Make sure that the BATTERY is NOT connected until the
connection is made to the controller first. This will minimize the chance of damage to
the controller if the charging wiring harness is connected incorrectly. Use only Nickel
Cadmium 12Vdc and a minimum of 1.5 Amp Hour batteries. Use only fused cable.
The RTU is internally fused as well.
1) Connect the RED wire from the Charging wiring harness to pin 19, “BATT” of
the respective RTU device. The Master and Slave controllers are identical in
wiring, features and programming. Be sure a 1 Amp FAST blow fuse is installed.
2) Connect the BLACK wire from the Cha rg in g wiring harness to pin 20 ,“Gnd”, of
the respective RTU.
3) Confirm the above in structions. If the connections are correct, conn e ct the RED
wire to the (+) of the battery and the black wire to the (-). The RTU will begin to
operate.
RT12-0044-ZP-S12 – Front Panel Identification
All analog voltage inputs and outputs are 12-bit, 0- 5 Vdc. All digital inputs are
from 0 to 12 Vdc. Digital inputs must fall to 0Vdc as a LOW. Digital outputs are
Open Drain.
Connection Screw Terminal Description
PIN NAME DESCRIPTION
1 BATT (+) Battery I/O. 10.5~28 Vdc
2 GND (-) Battery
3 DO 4 Digital Output-4
4 PWR (+) Power Input. 10~28 Vdc
5 GND Ground
6 DI 4 Digital Input-4
7 DO 3 Digital Output-3
8 DO 2 Digital Output-2
9 DO 1 Digital Output-1
10 DI 3 Digital Input-3
11 DI 2 Digital Input-2
12 DI 1 Digital Input-1
Manual Documentation Number: RT-12 series-4006m 17
B&B Electronics Mfg Co Inc – 707 Dayton Rd - PO Box 1040 - Ottawa IL 61350 - Ph 815-433-5100 - Fax 815-433-5104 – www.bb-elec.com
B&B Electronics – Westlink Commercial Park – Oranmore, Galway, Ireland – Ph +353 91-792444 – Fax +353 91-792445 – www.bb-europe.com
18 Manual Documentation Number: RT-12 series-4006m
B&B Electronics Mfg Co Inc – 707 Dayton Rd - PO Box 1040 - Ottawa IL 61350 - Ph 815-433-5100 - Fax 815-433-5104 – www.bb-elec.com
B&B Electronics – Westlink C ommercial Park – Oranmore, Ga lway, Ireland – Ph +353 91-792444 – Fax +353 91-792445 – www.bb-europe.com
Page 13

Power: 10.5~28 Vdc
Most DC power supplies rated from 10.5 to 28 Vdc @ 200 mA, will work with the
RT12-0044-ZP-S12. Do not use a power supply rated less than 200 mA, doing so may
cause the RT12-0044-ZP-S12 to continuously reset. Make sure that the power supply
voltage is maintained between the programmable HIGH and LOW supply voltage
limits or an alarm may occur. If a rechargeable battery is used or if you are supplying
voltage to a sensor using the same power used to power the RT12-0044-ZP-S12, then
the input voltage will need to be adjusted to the proper voltage to maintain respective
equipment. Never exceed 28 Vdc damage, overheating to the controller will occur
causing the system to malfunction.
Data Activity LED Indicators
The RT12-0044-ZP-S12 RTU is equipment with three LED indicators. The
RED/GREEN pair labeled “RX” and ”TX”, indica te data transmit and data received.
The RED LED will blink when data is being transmitted The GREEN LED will blink
any time data is received.
Link/Sanity LED Indicators
The yellow LED indicator is locate internally and indicates proper system operation.
The second yellow LED indicator, labeled “Error”, will flash any thing an alarm is
program and the respective alarm is active. The Status LED indicator may be seen
through a small hole on the top of enclosure.
Serial RS-232 Interface
Used to configure the RTU. See “Software Setup”.
The RT12-0044-ZP-S12 has two rows of 6, screw type, connection s. Using a common
type screwdriver, loosen the respective terminal screw, insert the re spective wire and
tighten.
The front panel is stenciled with each Connection number. Listed below are the
respective Connection numbers and Connection description.
Connection Screw Terminals Description
Pin 1: “Batt” (+) Battery Charge During Normal Main Power Input.
Battery Backup during Main Power Fails
Pin 2: “GND” (-) Power and Battery Ground
Pin 3: “DO 4” (+) Digital Output 4. Open Drain, Active Low, Output
Pin 4: “PWR” VIN(+) Main Supply 10.5 to 28.0 Vdc, Must be > 13.0 to Charge
External Battery. Do Not Exceed 28 Vdc
Pin 5: “GND” (-) Main Supply GROUND
Pin 6: “DI 4” (+) Digital Input - 4, 0-12 Vdc
Pin 7: “DO 3” (+) Digital Output - 3, Open Drain, Active Low, Output
Pin 8: “DO 2” (+) Digital Output - 2, Open Drain, Active Low, Output
Pin 9: “DO 1” (+) Digital Output - 1, Open Drain, Active Low, Output
Pin 10: “DI 3” (+) Digital Input - 3, 0-12 Vdc
Pin 11: “DI 2” (+) Digital Input - 2, 0-12 Vdc
Pin 12: “DI 1” (+) Digital Input - 1, 0-12 Vdc
Manual Documentation Number: RT-12 series-4006m 19
B&B Electronics Mfg Co Inc – 707 Dayton Rd - PO Box 1040 - Ottawa IL 61350 - Ph 815-433-5100 - Fax 815-433-5104 – www.bb-elec.com
B&B Electronics – Westlink Commercial Park – Oranmore, Galway, Ireland – Ph +353 91-792444 – Fax +353 91-792445 – www.bb-europe.com
20 Manual Documentation Number: RT-12 series-4006m
B&B Electronics Mfg Co Inc – 707 Dayton Rd - PO Box 1040 - Ottawa IL 61350 - Ph 815-433-5100 - Fax 815-433-5104 – www.bb-elec.com
B&B Electronics – Westlink C ommercial Park – Oranmore, Ga lway, Ireland – Ph +353 91-792444 – Fax +353 91-792445 – www.bb-europe.com
Page 14

RT12-0044-ZP-S12 – External Battery Back-up
Connecting an Optional External Backup Battery to RT12-0044-ZP-S12
!WARNING! Use Caution When Connecting Any Rechargea ble Battery to any of the
RT series RTU’s. Make sure that the BATTERY is NOT connected until the
connection is made to the controller first. This will minimize the chance of damage to
the controller if the charging wiring harness is connected incorrectly. Use only Nickel
Cadmium 12Vdc and a minimum of 1.5 Amp Hour batteries. Use only fused cable.
The RTU is internally fused as well.
1) Connect the RED wire from the Charging wiring harness to pin 19, “BATT” of
the respective RTU device. The Master and Slave controllers are identical in
wiring, features and programming. Be sure a 1 Amp FAST b low fuse is in stalled.
2) Connect the BLACK wire from the Ch a r ging wiring harness to pin 20 ,
“Gnd”, of the Respective RTU.
3) Confirm the above in structions. If the connections are correct, conn e ct the RED
wire to the (+) of the battery and the black wire to the (-). The RTU will begin
to operate.
Hardware Set-up
Typical Application: Peer-to-Peer
Below is a typical overview of the communications method for the MASTER and
SLAVE allow analog data to be passed from the master to the slave and vise-versa.
Manual Documentation Number: RT-12 series-4006m 21
B&B Electronics Mfg Co Inc – 707 Dayton Rd - PO Box 1040 - Ottawa IL 61350 - Ph 815-433-5100 - Fax 815-433-5104 – www.bb-elec.com
B&B Electronics – Westlink Commercial Park – Oranmore, Galway, Ireland – Ph +353 91-792444 – Fax +353 91-792445 – www.bb-europe.com
22 Manual Documentation Number: RT-12 series-4006m
B&B Electronics Mfg Co Inc – 707 Dayton Rd - PO Box 1040 - Ottawa IL 61350 - Ph 815-433-5100 - Fax 815-433-5104 – www.bb-elec.com
B&B Electronics – Westlink C ommercial Park – Oranmore, Ga lway, Ireland – Ph +353 91-792444 – Fax +353 91-792445 – www.bb-europe.com
Page 15

Typical Application: Peer-to-Peer
Typical Application: Modbus
This typical application shows the INPUT voltage signals from the Master
controller is sent to the Slave controller. The save output voltages reflect the
Masters input voltages.
The Slave INPUT voltage signals are sent to the Master and converted to the Master’s
OUTPUT voltages signals and reflect the SLAVE inputs voltages.
This typical application shows two Slave Modbus controllers. Modbus slave controller
can be address from 1 to 255.
Manual Documentation Number: RT-12 series-4006m 23
B&B Electronics Mfg Co Inc – 707 Dayton Rd - PO Box 1040 - Ottawa IL 61350 - Ph 815-433-5100 - Fax 815-433-5104 – www.bb-elec.com
B&B Electronics – Westlink Commercial Park – Oranmore, Galway, Ireland – Ph +353 91-792444 – Fax +353 91-792445 – www.bb-europe.com
24 Manual Documentation Number: RT-12 series-4006m
B&B Electronics Mfg Co Inc – 707 Dayton Rd - PO Box 1040 - Ottawa IL 61350 - Ph 815-433-5100 - Fax 815-433-5104 – www.bb-elec.com
B&B Electronics – Westlink C ommercial Park – Oranmore, Ga lway, Ireland – Ph +353 91-792444 – Fax +353 91-792445 – www.bb-europe.com
Page 16

Typical Application: Well Monitor and Control (Peer-to-Peer)
Below is a typical Peer to Peer monitoring and control a pplication.
Typical Application: Well Monitor and Control (Modbus)
Below is a typical Modbus monitoring and control application.
Manual Documentation Number: RT-12 series-4006m 25
B&B Electronics Mfg Co Inc – 707 Dayton Rd - PO Box 1040 - Ottawa IL 61350 - Ph 815-433-5100 - Fax 815-433-5104 – www.bb-elec.com
B&B Electronics – Westlink Commercial Park – Oranmore, Galway, Ireland – Ph +353 91-792444 – Fax +353 91-792445 – www.bb-europe.com
26 Manual Documentation Number: RT-12 series-4006m
B&B Electronics Mfg Co Inc – 707 Dayton Rd - PO Box 1040 - Ottawa IL 61350 - Ph 815-433-5100 - Fax 815-433-5104 – www.bb-elec.com
B&B Electronics – Westlink C ommercial Park – Oranmore, Ga lway, Ireland – Ph +353 91-792444 – Fax +353 91-792445 – www.bb-europe.com
Page 17

Typical Application: 4-20 mA to Voltage Conversion
This section will describe how a typical system is converted from a 4-20mA or 020mA current signal to a 1-5Vdc or 0-5Vdc voltage signal.
The RT series RTU’s do not allow for a direct 4-20mA connection. A s imple 250
Ohm, 1%, ¼ Watt, resistor from the input of the respective terminal to ground will
convert the current signal to a voltage signal. If a 250 Ohm resistor is not available a
249 Ohm, 1%, ¼ Watt, resistor will work.
The same example is true for a 0-20mA current signal. The only exception is the
voltage will swing from 0-5Vdc. If a current source is applied to a respective input
without a resistor the data will not be correct and a signal error will occur.
The example below shows analog Input 1 converted from 4-20 to 1-5Vdc. Keep in
mind, if an RTU is used in Peer to Peer mode, the receiving device will output a 15Vdc voltage on the respective output.
Configuration Cable Description
Serial cable used in configuration and connectivity of B&B Electronics’ RT-series
controllers.
Pin# Connection (color) Description
DB9-Pin#2 Green TX
DB9-Pin#3 Red RX
DB9-Pin#5 Yellow GND
DB9-Pin#7 Black CTS
-Use a straight-through, common, Category 5 cable (available from B&B Electronics) for
connection to the RT-series RTU’s.
Manual Documentation Number: RT-12 series-4006m 27
B&B Electronics Mfg Co Inc – 707 Dayton Rd - PO Box 1040 - Ottawa IL 61350 - Ph 815-433-5100 - Fax 815-433-5104 – www.bb-elec.com
B&B Electronics – Westlink Commercial Park – Oranmore, Galway, Ireland – Ph +353 91-792444 – Fax +353 91-792445 – www.bb-europe.com
28 Manual Documentation Number: RT-12 series-4006m
B&B Electronics Mfg Co Inc – 707 Dayton Rd - PO Box 1040 - Ottawa IL 61350 - Ph 815-433-5100 - Fax 815-433-5104 – www.bb-elec.com
B&B Electronics – Westlink C ommercial Park – Oranmore, Ga lway, Ireland – Ph +353 91-792444 – Fax +353 91-792445 – www.bb-europe.com
Page 18

Chapter 3 – Configuration & Programming
Configuration/Monitoring Software System Map
Programmable and monitoring features may be accessed using the configuration software.
Programmable features such as polling rates, id number, subnets, labels, full scale
engineering units, etc, may be easily changed. This section will show you many of the RT
series features.
The configuration and monitoring software will allow you to save and load configuration
profiles. The profile may be uploaded to the respective RTU.
To load a profile, from the task bar, select “Profile” --> “Load Profile” --> then select the
desired file. The default file is “default_rt_config.cff”, It is recommended that you do not
over-write this file.
To save a profile, from the task bar, select “Profile” --> “Save Profile” --> Name the file
you wish to save, --> select “Save”.
The status bar at bottom of the main window shows what profile data is being displayed.
“Profile = RTU ” mea n s t he da ta be ing displaye d was retrieved from the respect i v e RTU.
“Profile = File” means the data being displayed was retrieved from a file.
Note: Remember to ALWAYS confirm programming changes by pressing “Disconnect”
then “Connect”. This will retrieve the programmed data from the respective RTU. Confirm
each field within the main window “Controller Programming Parameters.”
Configuration/Monitoring Software Main Page
During the initial start-up process you will need to select a serial port. Refer to your
PC’s users guide to select a valid serial port. The most common port selected is COM1
or COM2 but may differ on your computer. This will set the correct communications
port for configuring, displaying or monitoring the controller.
!WARNING!
This will cause a communications failure on the opposing link. Depending on features
selected, a communications error may cause your system to malfunction.
Note: The system must be connected to perform most of the functions described in
the following sections.
!WARNING!
connecting after a change or changes. This will allow the system to retrieve data from
any RTU you’re connected to and confirm changes.
Features supported are:
-Comm (Communications) -Third Party Communications
-About -Support
-Profiles -About
-Communications WDT -MODBUS Slave
Connecting to a RTU device will disrupt the wireless communications.
Always confirm any changes that you make by disconnecting and re-
Manual Documentation Number: RT-12 series-4006m 29
B&B Electronics Mfg Co Inc – 707 Dayton Rd - PO Box 1040 - Ottawa IL 61350 - Ph 815-433-5100 - Fax 815-433-5104 – www.bb-elec.com
B&B Electronics – Westlink Commercial Park – Oranmore, Galway, Ireland – Ph +353 91-792444 – Fax +353 91-792445 – www.bb-europe.com
30 Manual Documentation Number: RT-12 series-4006m
B&B Electronics Mfg Co Inc – 707 Dayton Rd - PO Box 1040 - Ottawa IL 61350 - Ph 815-433-5100 - Fax 815-433-5104 – www.bb-elec.com
B&B Electronics – Westlink C ommercial Park – Oranmore, Ga lway, Ireland – Ph +353 91-792444 – Fax +353 91-792445 – www.bb-europe.com
Page 19

Controller Configuration
Selecting the “Get Setup Information From Device” button will allow you to view
existing setup parameters saved by the master or slave controller. The task bar on the
bottom of the Main screen should indicate “Profile = RTU”
This section will identify each parameter as well give a descrip tion of it respective
function. This section assumes that the Monitoring software is loaded and running.
To capture/display data from the Master or Slave controller:
a) Connect the serial programming cable into your computer’s serial
communications port.
b) Connect the remaining end of the programming cable into the programming jack
labeled “Program”. Make sure the controller has powered applied.
c) Press the “Connect” button. Keep in mind that the data flow between the
controller being configured and its respectiv e mate will stop. If the “Set Rest
Voltage on Comm Error” is set on the mating controller, it will alarm and set the
outputs to its programmed resting voltage.
d) You may need to disconnect and connect several times to make a valid
connection.
e) When the software makes a connection with the controller the “Connec ted”
indicator will show as “Marked”, the “Controller Time” and date will b e
displayed as well as all other data listed in each box. The “Connect” button will
also turn green.
Manual Documentation Number: RT-12 series-4006m 31
B&B Electronics Mfg Co Inc – 707 Dayton Rd - PO Box 1040 - Ottawa IL 61350 - Ph 815-433-5100 - Fax 815-433-5104 – www.bb-elec.com
B&B Electronics – Westlink Commercial Park – Oranmore, Galway, Ireland – Ph +353 91-792444 – Fax +353 91-792445 – www.bb-europe.com
Current Controller Settings
This configuration block will allow you to set the res pective RTU parameters such as
ID, subnet, polling rate, etc. These setting are vital
to the operation and performance
of your wireless system.
Parameters not set correctly may cause the system to malfunction or not communicate.
This block will affect different fields depending on the Wireless Type.
ID: Displays the current controller ID number between 0 and 255.
!WARNING! In Peer-to-Peer Mode, the ID numbers for the Master and Slave must
match and must not be repeated with any other Master/Slave Pairs with the same RFNetwork ID within the radio range of each respective wireless pair. Doing so will cause
cross talk between master/slave pairs and may cause harm to the equipment attached.
Polling Rate: In Peer-to -Peer mode, this parameter determines the sampling rate of
data passed between the Master and Slave controllers. It is also the update rate for the
Master and Slave’s analog and digital I/O. This parameter has no affect in Modbus
mode. The Master is responsible for starting the communications process. Therefore the
Polling rate is only configured on the Master controller.
32 Manual Documentation Number: RT-12 series-4006m
B&B Electronics Mfg Co Inc – 707 Dayton Rd - PO Box 1040 - Ottawa IL 61350 - Ph 815-433-5100 - Fax 815-433-5104 – www.bb-elec.com
B&B Electronics – Westlink C ommercial Park – Oranmore, Ga lway, Ireland – Ph +353 91-792444 – Fax +353 91-792445 – www.bb-europe.com
Page 20

If your system is configured on Peer-to-Peer mode, by default, if the Slave unit does not
receive a response from the master within 20 seconds of any polling seque nce, and if the
”Set Rest Voltage On Comm Error” is enabled, an alarm will sound on the Slave unit
and depending on alarm parameters set, would cause the Slave’s outputs to be set with
the user defined resting voltages.
Retries: In Peer-to-Peer mode, this parameter
determines the number of consecutive failed polling
attempts before a communications failure occurs. It
is not recommended to set the number of retries
higher than 10 attempts. Large numbers may cause
an unnecessary delay in communications failure
response time; a low number may cause the system
to prematurely fail. This parameter has no affect in
Modbus mode.
Output Power: This parameter determines the RF
Power output on some RTU’s. If a respective RTU
does not support a variable RF power out the
parameter will continue to display “Output Power”.
The “ID” field has a dual purpose, as the controller number when in peer-to-peer
mode and the Modbus slave address field when in MODBUS mode.
If Modbus is selected, the Radio ID will automatically appear and the “ID” field will
automatically change to “MODBUS ID.”
If your controller is programmed in Modbus mode, the ID field will change to the
Modbus Slave address. Valid addresses are from 1 to 255. Keep in mind that the
Modbus master you are interfacing to may not support the full spectrum of slave
address IDs. Please refer to your device user’s manual.
Manual Documentation Number: RT-12 series-4006m 33
B&B Electronics Mfg Co Inc – 707 Dayton Rd - PO Box 1040 - Ottawa IL 61350 - Ph 815-433-5100 - Fax 815-433-5104 – www.bb-elec.com
B&B Electronics – Westlink Commercial Park – Oranmore, Galway, Ireland – Ph +353 91-792444 – Fax +353 91-792445 – www.bb-europe.com
34 Manual Documentation Number: RT-12 series-4006m
B&B Electronics Mfg Co Inc – 707 Dayton Rd - PO Box 1040 - Ottawa IL 61350 - Ph 815-433-5100 - Fax 815-433-5104 – www.bb-elec.com
B&B Electronics – Westlink C ommercial Park – Oranmore, Ga lway, Ireland – Ph +353 91-792444 – Fax +353 91-792445 – www.bb-europe.com
Page 21

Connecting / Disconnecting
Connect: Pressing the “Connect” button will force the software
to make an attempt to connect to the controller your PC. The
programming cable must be connected. The connect button will
start RED and will remain RED until a connection is made.
The “Assert” check box will indicate “Checked” whe n the
software makes the attempt to connect.
Once connected, the “Connected” check box will indicate,
“Checked” and the “Connect” button will turn gre en.
Disconnect: Pressing the “disconnect” button will force the
software to disconnect from the controller your PC is connected
to. Both the “Assert” and “Connected” check boxes will indicate
“Unchecked”.
NOTE: The controller must be “Disconnected” for the master
and slave to communicate with each other.
You may need to make several attempts to connect. Make sure the “Connected” box is
check and the “Connect” button is GREEN, before pr oceeding.
During the “Connect” process you will notice a series a check marks, in the “Update”
configuration Block, located next to each of the subsystems. This is confirmation that
the configuration software is collecting data from the respective RTU.
Master, Slave, Modbus, Peer-to-Peer
Master: If the controller you are connected to is a Master Peer to
Peer device, the Wireless type will indicate “Master”.
Slave: If the controller you are connected to is a Slave Peer to Peer
device, the Wireless type will indicate “Slave”.
MODBUS: If the controller you are connected to is in MODBUS
mode the Wireless type will indicate “MODBUS”.
P-2-P: P-2-P is also Peer to Peer.
If your system is configured as a Peer to Peer system,
the system must consist of one Master and one Slave.
The Master controller is responsible for starting the
polling sequence.
If your controller is configured as a MODBUS
controller then typical Modbus, Slave, RTU, protocol
applies. Do not allow for duplicate Slave address
within the same system, unless It is on a separate
Radio Id and/or RF-Network ID.
Manual Documentation Number: RT-12 series-4006m 35
B&B Electronics Mfg Co Inc – 707 Dayton Rd - PO Box 1040 - Ottawa IL 61350 - Ph 815-433-5100 - Fax 815-433-5104 – www.bb-elec.com
B&B Electronics – Westlink Commercial Park – Oranmore, Galway, Ireland – Ph +353 91-792444 – Fax +353 91-792445 – www.bb-europe.com
36 Manual Documentation Number: RT-12 series-4006m
B&B Electronics Mfg Co Inc – 707 Dayton Rd - PO Box 1040 - Ottawa IL 61350 - Ph 815-433-5100 - Fax 815-433-5104 – www.bb-elec.com
B&B Electronics – Westlink C ommercial Park – Oranmore, Ga lway, Ireland – Ph +353 91-792444 – Fax +353 91-792445 – www.bb-europe.com
Page 22

Modbus Configuration
The Modbus configuration menu will allow you to
adjust the base address for the I/O to be displayed
or controlled. When in Modbus mode, the radio ID
number is within the Modbus configuration menu.
Digital Input Types
The RT series RTU’s support the ability
to configure DI-1 and DI-2 as Digital or
Frequency/Accumulator inputs. Some
RTU have an additional, dedicated,
“Freq” input.
Clicking on a respective “Input” box,
will check and uncheck, the respective
input box.
If a respective Input Box is Checked,
the input will be configured as a digital
discrete input. To save this setting to
the respective RTU, press the “Send
Parameters To Device” button.
If a respective Input Box is Unchecked, the input will be
configured as a Counter/Accumulator/Freq uency input.
To save this setting to the respective RTU, press the
“Send Parameters To Device” button.
The Counter/ Accumulator/Frequency mode is rese rved
for Modbus mode. The Accumulator and Frequency
values are held in separate registers.
The RT12-4444 is equipped with a configurable communications watch dog timer.
The timer was designed to detect the absence of data traffic will attempt to reset the
communications system. Setting the timer to “0” will d isable the timer. The timer is in
seconds. To set the timer, make sure you are connected to the respective device, enter
a timer value from 1 to 65535 and press “Send Parameters To Device”. It is not
recommended to enter a value smaller than 60.
Manual Documentation Number: RT-12 series-4006m 37
B&B Electronics Mfg Co Inc – 707 Dayton Rd - PO Box 1040 - Ottawa IL 61350 - Ph 815-433-5100 - Fax 815-433-5104 – www.bb-elec.com
B&B Electronics – Westlink Commercial Park – Oranmore, Galway, Ireland – Ph +353 91-792444 – Fax +353 91-792445 – www.bb-europe.com
38 Manual Documentation Number: RT-12 series-4006m
B&B Electronics Mfg Co Inc – 707 Dayton Rd - PO Box 1040 - Ottawa IL 61350 - Ph 815-433-5100 - Fax 815-433-5104 – www.bb-elec.com
B&B Electronics – Westlink C ommercial Park – Oranmore, Ga lway, Ireland – Ph +353 91-792444 – Fax +353 91-792445 – www.bb-europe.com
Page 23

RTU Alarms
The RT series RTU’s have several types of
alarms. Below is a description of each alarm. To
modify or change any of the alarms, click on the
respective box or boxes, and press the “Send
Parameters To Device”. Make sure you are
“Connected”. Alarms are local to the RTU. Each
RTU has a built in beeper alarm. Most alarms
will sound at the master as well as the slave units.
Most of the alarms apply even in Modbus mode.
Update On Change: Not used at this time and is used
for future enhancements.
Alarm On Comm Fail: If enabled, will sound an
alarm on a Local RTU Level. If in peer to peer mode,
the alarm may sound at the Master as well as the Slave.
A communications failure is determined by repeated,
consecutive, failed attempts made by the Master to
contact the Slave unit. The number of at tempts made
depends on the parameter “Retries”. The slave unit
defaults to a 20 second time out if it does not make
contact with the Master.
Set Rest Voltage on Comm Error: If enabled, will cause a local and remote alarm if
a communications failure occurs. This will also force the analog outputs to the
programmed “Analog Resting Voltages” and if enabled will cause the discrete output
to be set to an active high or active low state. “Alarm On Comm Fail” must also be
enabled. In Modbus mode, the comm. fail delay time is 2 minutes.
This parameter also applies if the respective RTU is configured as a Modbus Slave
device.
Alarm On Input Voltage Limit Error: If enabled will cause a local and remote
alarm if the main input voltage falls below or rises abo ve your set limits. These limits
are located in the same section “Analog Resting Voltages”. This alarm will not affect
any of the outputs; the alarm will cause an audible alarm.
Alarm On Main Power Supply Failure: If enabled will cause a local and remote
alarm if the main input voltage completely fails. The backup battery MUST be
connected for this function to operate properly or a communications failure will occur.
This alarm will not affect any of the outputs; the alarm will cause an audible alarm.
Discrete Output-1 Comm Fail Output: If enabled and a communications alarm occurs,
this parameter will cause DO-1, on all RT series RTU’s, to become “Active High” or
“Active Low”. The Output level will depend on how the output is configured. If
enabled, this output can not be controller in peer to peer or Modbus mode. This feature
was added to notify other equipment of a communications failure. This feature may
also be used to activate an external auditable or visual alarm, such as a Horn or Light.
Manual Documentation Number: RT-12 series-4006m 39
B&B Electronics Mfg Co Inc – 707 Dayton Rd - PO Box 1040 - Ottawa IL 61350 - Ph 815-433-5100 - Fax 815-433-5104 – www.bb-elec.com
B&B Electronics – Westlink Commercial Park – Oranmore, Galway, Ireland – Ph +353 91-792444 – Fax +353 91-792445 – www.bb-europe.com
40 Manual Documentation Number: RT-12 series-4006m
B&B Electronics Mfg Co Inc – 707 Dayton Rd - PO Box 1040 - Ottawa IL 61350 - Ph 815-433-5100 - Fax 815-433-5104 – www.bb-elec.com
B&B Electronics – Westlink C ommercial Park – Oranmore, Ga lway, Ireland – Ph +353 91-792444 – Fax +353 91-792445 – www.bb-europe.com
Page 24

Input Voltage Alarm Limits
Analog Outputs Resting Voltage
(Note: Four analog outputs available on specific RT-12 series models.)
The RT series RTU’s is capable of monitoring its input voltage. This section w ill
describe how to set and enable the “Input Voltage Alarm Limits”.
If the “Alarm On Input Voltage Limit Error” is enabled and the INPUT supply voltage
rises above the “High Limit” or falls below the “Low Limit” the respective RTU will
sound an alarm.
The alarm will stop sounding when the input suppl y voltage returns to ”normal” by
returning between the +/- limits determined by the “High /Low Limit Dead Band”. The
“Normal” +/- limits are calculated by subtracting the “High/Low Limit Dead Band”
from the “High limit” and adding the “High/Low Limit Dead Band” to the “Low Limit”
The configuration shown above will cause a HIGH alarm if the input supply voltage
rises above 28.0 VDC and will return to normal when the inpu t s upply voltage falls to
26.01 VDC.
The configuration above will cause a LOW alarm if the i nput supply voltage falls below
9.99 VDC and will return to normal when the input supply voltage rises to 11.98 VDC.
Manual Documentation Number: RT-12 series-4006m 41
B&B Electronics Mfg Co Inc – 707 Dayton Rd - PO Box 1040 - Ottawa IL 61350 - Ph 815-433-5100 - Fax 815-433-5104 – www.bb-elec.com
B&B Electronics – Westlink Commercial Park – Oranmore, Galway, Ireland – Ph +353 91-792444 – Fax +353 91-792445 – www.bb-europe.com
(Note: Four analog outputs available on specific RT-12 series models.)
This section applies to Peer to Peer and Modbus systems. In peer to peer mode, the
master and slave communicate with each other and during the comm unication p rocess
they share information. In the event of a communication failure, the updating process
will stop and if the Communications alarm is disabled the analog outputs for the
master and slave will be the last valid update.
A communications error will occur if the number of consecutive failed polling
attempts exceeds the programmed number of re tries. This count is reset if even one
valid communications update occurs before the number of retries expires and if the
RTU is a Modbus device, a communications of 2 minutes must laps.
The analog output resting voltages provide a means to program the voltage outputs in
the event of a communications error.
Due to the nature of wireless systems, communication failures may occur. The RT
series RTU’s allow you to program each of the analo g outputs with a preset level in
the event of a communications failure. Each ana log output can be programmed with
independent levels from 0 volts to 5 Vdc.
If the RTU is programmed to respond to a communications ala rm and a
communications failure occurs, the respective RTU will force the outputs with your
preset levels. The outputs will return to normal once communications is reestablished.
To program the RTU to respond to communications failures select t he “Set Rest
Voltage on Comm Error” and update the configuration by pressing the “Send Changes
To Device”.
42 Manual Documentation Number: RT-12 series-4006m
B&B Electronics Mfg Co Inc – 707 Dayton Rd - PO Box 1040 - Ottawa IL 61350 - Ph 815-433-5100 - Fax 815-433-5104 – www.bb-elec.com
B&B Electronics – Westlink C ommercial Park – Oranmore, Ga lway, Ireland – Ph +353 91-792444 – Fax +353 91-792445 – www.bb-europe.com
Page 25

(Note: Four analog outputs available on specific RT-12 series models.)
To program each analog resting output voltage, enter a voltage from 0.0 to 5.0, into
each box representing Analog Output 1, Analog Output 2, Analog Output 3, and
Analog Output 4. Then press “Send Resting and Limits Æ Device”. This data is saved
and remains resident within the respective RTU. This process is valid ONLY if the
RTU is “Connected”.
The respective RTU is also equipped with the ability to turn on or off its output if a
Communications error occurs. This is true for the Master and Slave.
The output is an Open Drain output and should be used to sink not s ource current,
1Amp MAX. This typically means that the Output will supply a “Ground” to the
device to turn it on or off.
The respective RTU also has the ability to control its respective Out put during a
communications failure. The output may be configu red to an ACTIVE HIGH or
ACTIVE LOW state during a communications failure. This can be useful as an alarm
output or to turn a device on or off. A “Check” mark next to the “Discrete Output Comm
Fail Enable” will force the output to an active HIGH or LOW, (depending on what is
selected for an Active High or Active Low), during a communications failure. If you
use the output to respond during a communicatio ns failure, you will not have control
using the Modbus protocol. If you wish to use the output for something other than a
comm. failure you will need to disable the “Discrete Output Comm Fail Enable”.
Manual Documentation Number: RT-12 series-4006m 43
B&B Electronics Mfg Co Inc – 707 Dayton Rd - PO Box 1040 - Ottawa IL 61350 - Ph 815-433-5100 - Fax 815-433-5104 – www.bb-elec.com
B&B Electronics – Westlink Commercial Park – Oranmore, Galway, Ireland – Ph +353 91-792444 – Fax +353 91-792445 – www.bb-europe.com
44 Manual Documentation Number: RT-12 series-4006m
B&B Electronics Mfg Co Inc – 707 Dayton Rd - PO Box 1040 - Ottawa IL 61350 - Ph 815-433-5100 - Fax 815-433-5104 – www.bb-elec.com
B&B Electronics – Westlink C ommercial Park – Oranmore, Ga lway, Ireland – Ph +353 91-792444 – Fax +353 91-792445 – www.bb-europe.com
Page 26

Updating/Sending Configuration to RTU
This section assumes the system is connected.
Pressing the “Get Setup Information From Device” w ill request information from the
respective RTU you are connected to.
Once pressed, the MAIN form will remove data from all respective data fields and
replace them with refreshed data.
Pressing the “Send Changes To Device” will force the information located within the
data fields into the respective RTU’s internal configuration.
!WARNING!
Be sure that all the respective data fields are filled with the correct
data. If a parameter is left blank the system will interpret the data as a ZERO “0”. This
may cause your system to fail if parameter such as the ID or RF network is set
incorrectly. Confirm all configuration data by requesting data from the respective
RTU or Press the Disconnect then Connect to update and view the most current data.
Third Party Communications Protocol Support
Third party communications support was added to allow for different type of
communications protocols such as Modbus RTU, etc. As we develop and enhance
support of other protocols we will
To select a communications type, click on the communications type bar, select the
type of communications then “Send Parameters To Device”.
Communications Type
Manual Documentation Number: RT-12 series-4006m 45
B&B Electronics Mfg Co Inc – 707 Dayton Rd - PO Box 1040 - Ottawa IL 61350 - Ph 815-433-5100 - Fax 815-433-5104 – www.bb-elec.com
B&B Electronics – Westlink Commercial Park – Oranmore, Galway, Ireland – Ph +353 91-792444 – Fax +353 91-792445 – www.bb-europe.com
46 Manual Documentation Number: RT-12 series-4006m
B&B Electronics Mfg Co Inc – 707 Dayton Rd - PO Box 1040 - Ottawa IL 61350 - Ph 815-433-5100 - Fax 815-433-5104 – www.bb-elec.com
B&B Electronics – Westlink C ommercial Park – Oranmore, Ga lway, Ireland – Ph +353 91-792444 – Fax +353 91-792445 – www.bb-europe.com
Page 27

Status Bar
The status bar is a quick view of system status. Functions such as connection status,
communications port, number of event saved by the master or slave, profile type, time
and date, etc.
Profile status is an indicator of where data is being retrieved from, a file or the
respective RTU.
Digital Outputs
Note: Third party communications protocols available as custom modifications.
(Contact B&B Electronics Mfg. Co. Inc.)
Depending on the RT12 you are configuring or using, it may be equipped with one or
more digital outputs, (DO’s). These outputs are typically high current outputs that
will sink current, also known as “Low Side Drivers”.
Typically, each digital output can sink up to 500 milliamps of current. Below is a
typical digital output application.
Manual Documentation Number: RT-12 series-4006m 47
B&B Electronics Mfg Co Inc – 707 Dayton Rd - PO Box 1040 - Ottawa IL 61350 - Ph 815-433-5100 - Fax 815-433-5104 – www.bb-elec.com
B&B Electronics – Westlink Commercial Park – Oranmore, Galway, Ireland – Ph +353 91-792444 – Fax +353 91-792445 – www.bb-europe.com
48 Manual Documentation Number: RT-12 series-4006m
B&B Electronics Mfg Co Inc – 707 Dayton Rd - PO Box 1040 - Ottawa IL 61350 - Ph 815-433-5100 - Fax 815-433-5104 – www.bb-elec.com
B&B Electronics – Westlink C ommercial Park – Oranmore, Ga lway, Ireland – Ph +353 91-792444 – Fax +353 91-792445 – www.bb-europe.com
 Loading...