

Page 1
UNDERCABINET LIGHTING
CONNECTION OF DEVICE
BRANCHEMENT DE L’APPAREIL
Power cable
Câble d’alimentation
Connect the power cable
to IR controller.
Connecter le câble
d’alimentation au contrôleur
infrarouge.
Infrared receiver
Capteur infrarouge
Strip light
Ruban lumineux
IR controller
Contrôleur infrarouge
ÉCLAIRAGE DE SOUS-COMPTOIR
Installation Instructions
Instructions d’installation
U16035RD
IMPORTANT SAFETY DIRECTIONS
Please read these informations carefully
before installing or using this product.
1. Consult a local licensed electrician or electrical contractor if you
are not sure about the installation.
2. All electrical connections must be in accordance with electrical
codes in effect in your region.
3. Do not use in wet locations. This product is not intended for
lighting of aquariums.
4. Use indoors only.
5. Route and secure the cables so that they will not be pinched or
damaged.
6. Use only insulated staples or plastic ties to secure cords, do not
damage the cables.
7. The strip light is not suitable for dimmers, motion sensor or
electric timer.
* NOTE: Model U16035RD - Linkable up to 2 units.
CONSIGNES DE SÉCURITÉ IMPORTANTES
Merci de lire ces informations avec attention avant de commencer
l’installation ou la mise en marche de ce produit.
1. Consulter un électricien certié si vous n’êtes pas certain de
l’installation de ce produit.
2. Toutes les connexions électriques doivent être conformes aux
codes électriques en vigueur dans votre région.
3. Ne pas utiliser dans un endroit humide. Ce produit n’est pas conçu
pour l’éclairage d’aquariums.
4. Ce produit est conçu pour une utilisation intérieure seulement.
5. Acheminer et xer les câbles de manière à ne pas les pincer ou les
endommager.
6. Utiliser seulement des agrafes isolées ou des attaches en plastique
pour xer les câbles.
7. Le ruban n'est pas compatible avec les gradateurs, détecteurs de
mouvements ou minuteries électriques.
* NOTE: Modèle U16035RD - Branchement en série jusqu’à 2 unités.
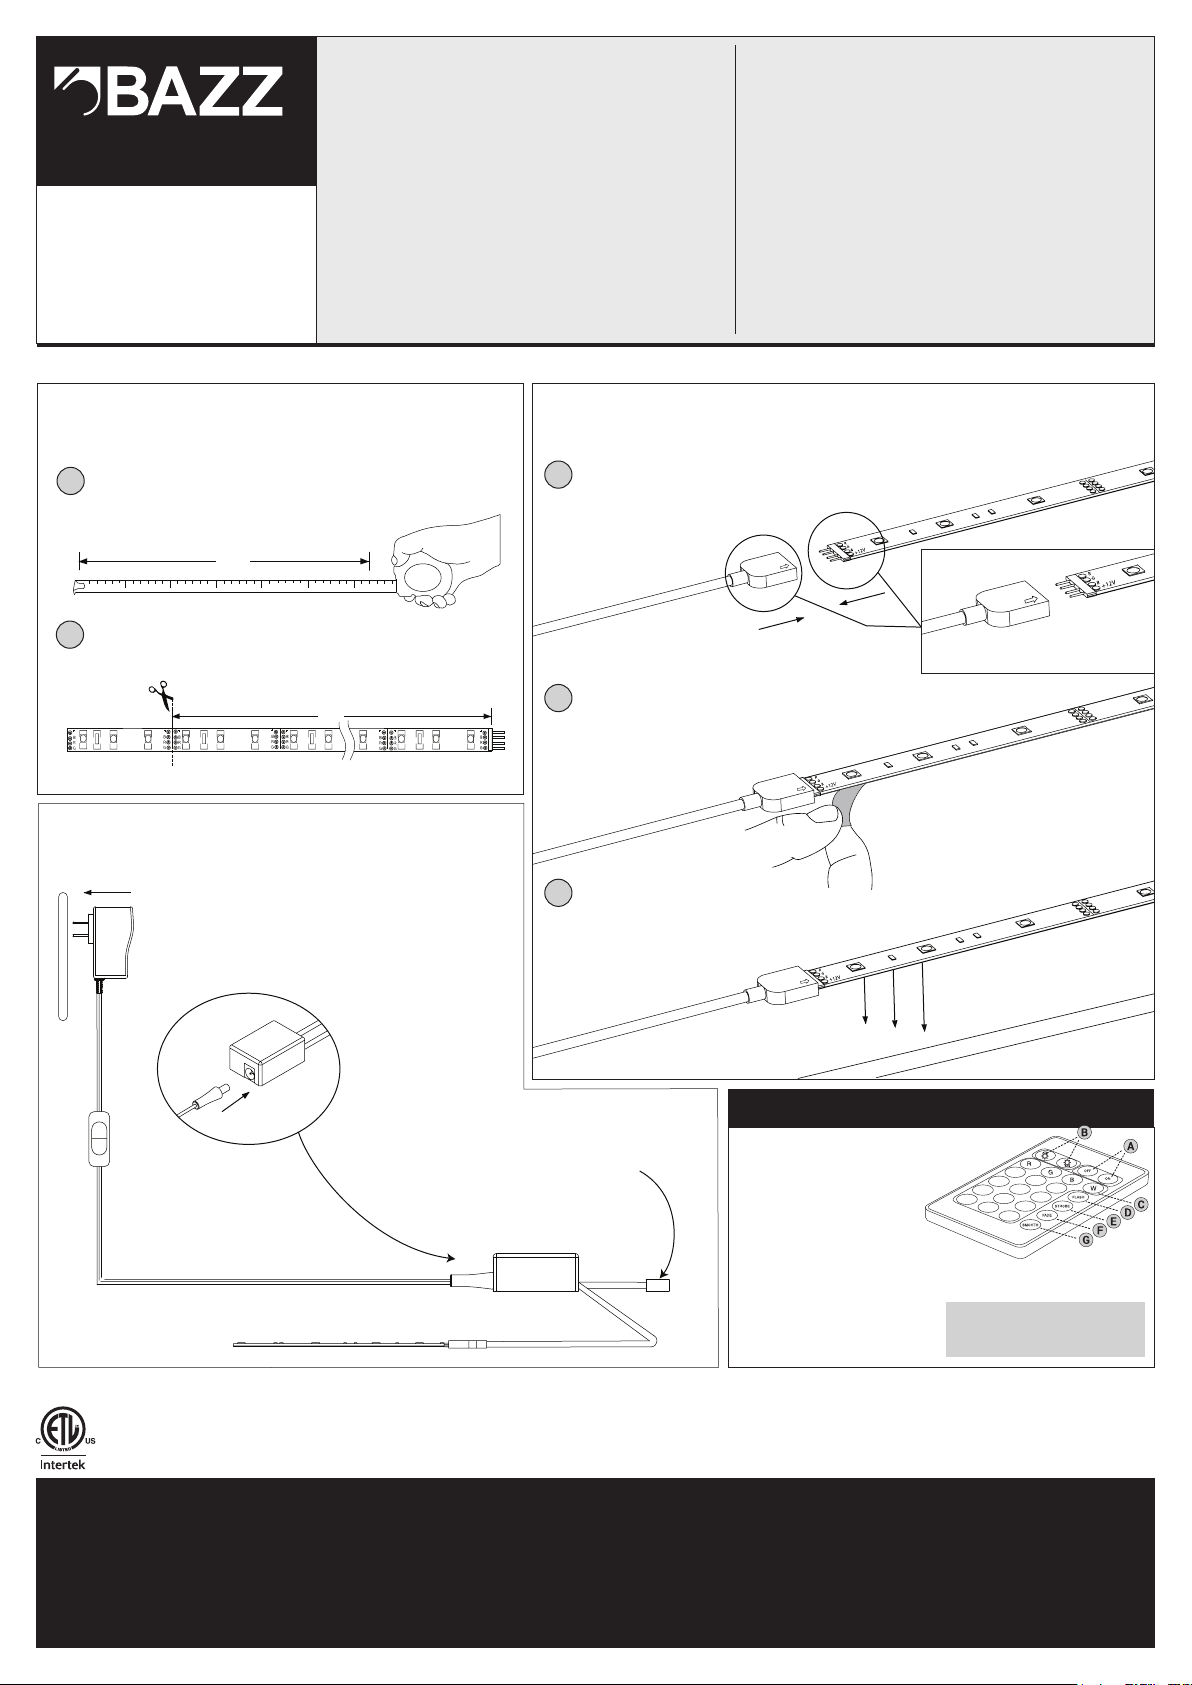
BEFORE INSTALLING
AVANT L’INSTALLATION
Mesure the desired space for the LED strip installation.
1
Mesurer l’espace prévu pour l’installation du ruban DEL.
X
Cut the LED strip to desired length along indicated cut marks.
2
Couper le ruban DEL à la longueur désirée suivant
les repères de coupe indiqués.
X
INSTALLATION
Connect strip light to IR controller.
3
Connecter le ruban lumineux au contrôleur infrarouge.
Remove the protective film
4
(1 foot at a time).
Retirer la pellicule protectrice
(1 pied à la fois).
Stick the strip on a clean surface
5
and press for a proper adhesion.
Coller le ruban sur une surface
bien nettoyée et appuyer
pour une bonne adhérence.
NOTE
Align the arrow with the +12V stem of the RGB strip.
Aligner la flèche avec la tige de +12V du ruban RVB.
WARRANTY
BAZZ’s warranty applies to manufacturing defects affecting its products which existed at the time of the purchase of
the product, that are non-apparent, and are unknown to the buyer, for a period of 3 years. This warranty applies to the
product only and does not cover the installation of the product. The warranty does not apply to material, economic, and/or
physical damages or losses caused by the product. This warranty will not apply to any damages and/or losses caused by
an incorrect use, installation or maintenance of the product. The manufacturer is therefore not liable for damages to the
product or material, economic and/or physical damages or losses caused by an incorrect use, installation or maintenance
of the product. If the buyer considers that the product is affected by a defect, the buyer should return the product to the
point of purchase or send an email to [email protected]. Should the buyer decide to send an email to [email protected], a
description of the alleged problem should be included in the email and a proof of purchase as well as the picture clearly
illustrating the alleged defect should be attached to the email. The buyer should also return the product to BAZZ at his/
her own expense. After product inspection, if the warranty applies, BAZZ will repair or replace the product free of charge.
REMOTE CONTROL - TÉLÉCOMMANDE
A. On/Off switch
Bouton marche/arrêt
B. Bright key. On static state: it can increase or
decrease the color brightness. On dynamic state: it
slows down or accelerates the color change.
Boutons de contrôle de l’intensité lumineuse.
Permet également d’augmenter ou de réduire la
vitesse de délement des couleurs.
C. R,G,B,W : Choose color. Red, Green, Blue, White.
R,G,B,W : Sélection de couleurs. Rouge, Vert,
Bleu, Blanc.
D. Flash key : Fast alternating colors.
Bouton ash : alternance rapide de couleurs.
E. Strobe key : Strobe color effect.
Bouton strobe : Pulsation de la couleur.
F. Fade key : Gradual change of 8 colors.
Bouton fade : Les 8 couleurs changent
graduellement en alternance.
GARANTIE
BAZZ garantit ce produit contre tout vice de fabrication existant au moment de la vente, non apparent et non connu de
l’acheteur, et ce, pour une période de 3 ans. La garantie se limite au produit seulement et ne vise pas l’installation du
produit. La garantie ne s’applique pas aux dommages ou pertes matérielles, économiques et/ou physiques causés par
le produit. La garantie est inapplicable si les dommages ou les pertes, sont causés par une mauvaise utilisation, une
mauvaise installation, ou un mauvais entretien du produit. Le fabricant n’est donc pas responsable des dommages au
produit ainsi que des dommages matériels, physiques et/ou économiques découlant d’une mauvaise utilisation, d’une
mauvaise installation, ou d’un mauvais entretien du produit. Si l’acheteur considère que le produit est affecté d’un vice, il
devra retourner le produit au point d’achat ou envoyer un courriel à [email protected]. Si l’acheteur choisit d’adresser un
courriel à [email protected], il devra décrire le problème allégué et joindre une preuve d’achat ainsi qu’une photo du produit
faisant clairement état du vice allégué ainsi que retourner à ses frais le produit en question à BAZZ. Après inspection du
produit, si la garantie s’applique, BAZZ réparera ou remplacera le produit à ses frais.
G. Smooth key : Slow alternate color change (3 colors).
Bouton smooth: Les couleurs changent très lentement,
en alternance (3 couleurs).
NOTE: Direct the remote control towards the infrared
receiver to manipulate RGB colors.
Orienter la télécommande vers le capteur d’infrarouge
pour contrôler les couleurs RVB.
U16035RD-Inst_V2
 Loading...