

Bazooka SCION TC Installation Manual
SCION tC 2005 - VSE SUBWOOFER (BAZOOKA®)
Preparation
Part Number: PTS20-21050
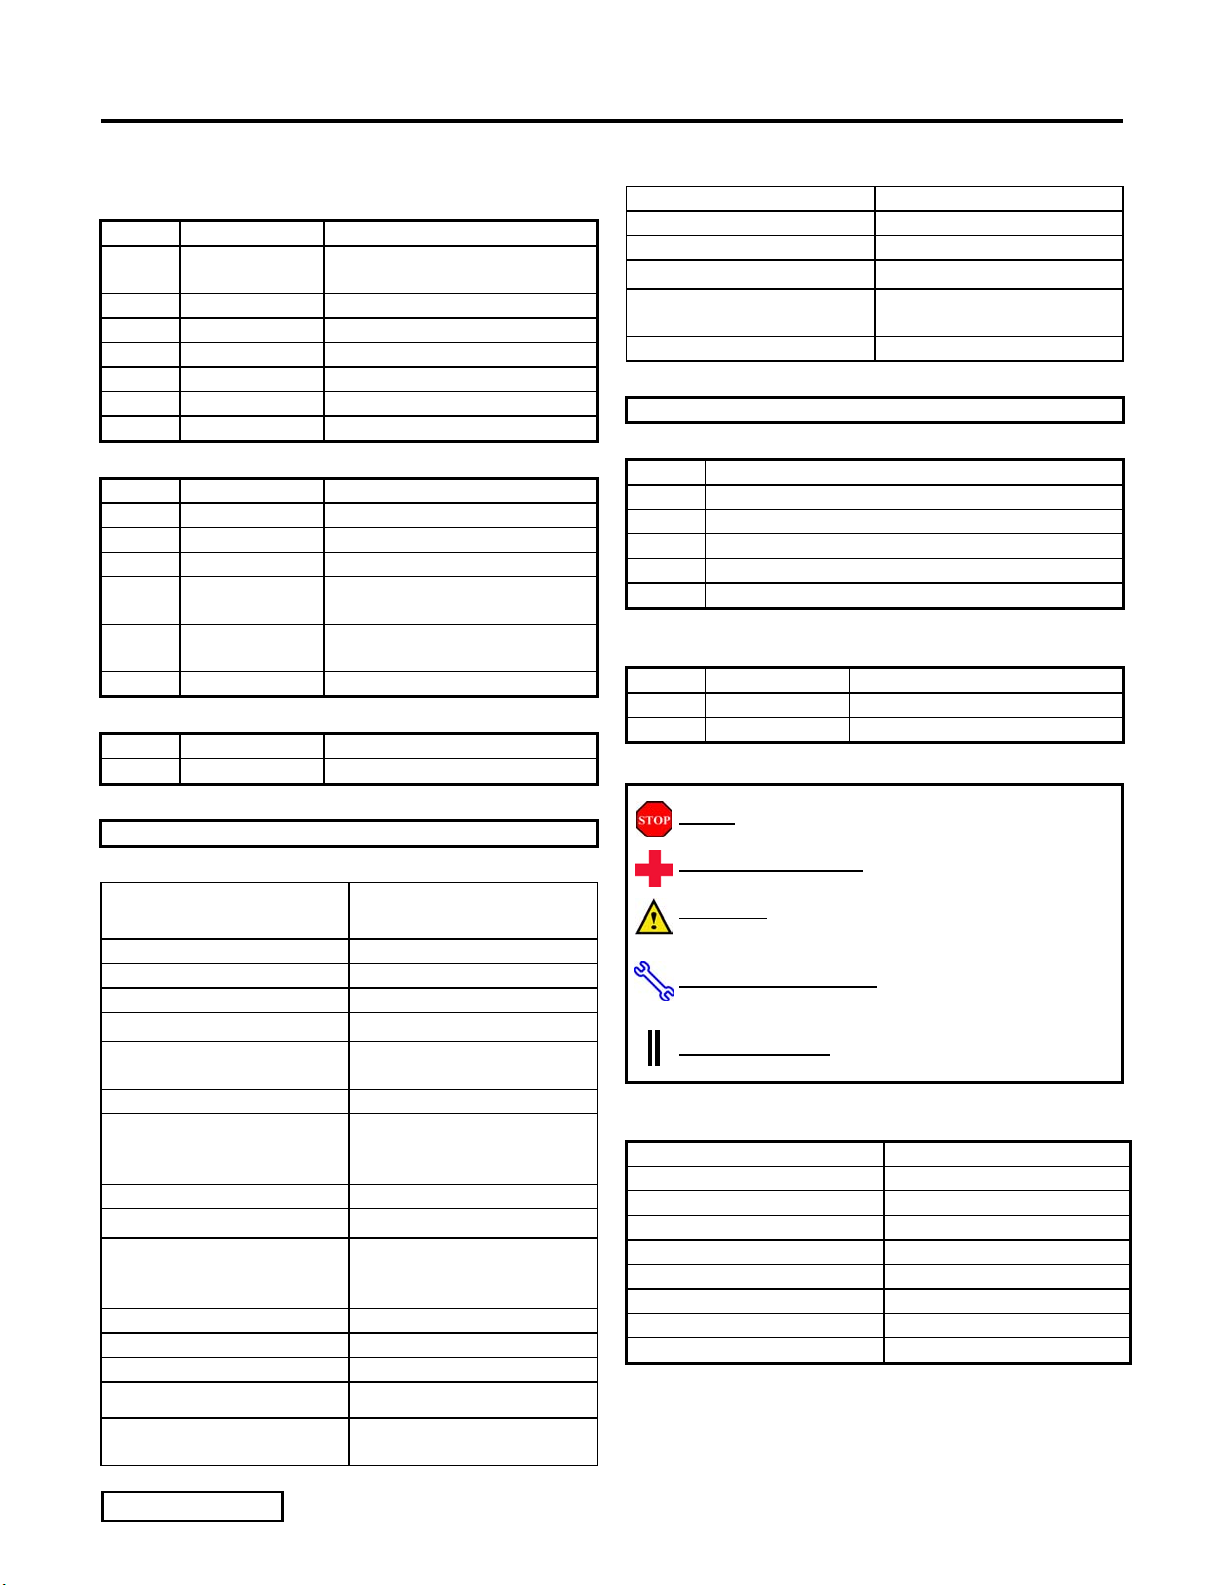
Kit Contents
Item # Quantity Reqd. Description
1 1 Vehicle Specific Enclosure
(VSE) Subwoofer
2 1 Wire Harness
3 1 Hardware Bag
4 1 Installation Instructions
5 1 Product Feature Placard
6 1 Service Care Card
Hardware Bag Contents
Item # Quantity Reqd. Description
1 2 7” Wire Ties
2 2 4” Wire Ties
3 8 Philips Head Screws
4 1 Upper Mounting Hardware
Assembly
5 1 Lower Mounting Hardware
Assembly
Additional Items Required For Installation
Item # Quantity Reqd. Description
1
NOTE: Part number of this accessory may not be
the same as the part number shown.
Screwdriver Magnetized Philips # 2
Electric Drill Philips # 2 Drill Bit
Special Chemicals Notes
Cleaner 3MTM Prep Solvent–70 (if
required)
General Applicability
ALL SCION tC
Recommended Sequence of Application
Item # Accessory
1 Security / Audio / Satellite Tuner
2 Rear Cargo Mat / Cargo Liner
3 VSE Subwoofer
4 Door Sills
*Mandatory
Vehicle Service Parts (may be required for reassembly)
Item # Quantity Reqd. Description
1
Legend
Conflicts
SCION tC Cargo Net – PN: PT347-52051
Recommended Tools
Personal & Vehicle
Notes
Protection
Vehicle Protection Seat/Floor Covers Part Protection Blankets
Special Tools Notes
Arch Punch 5/8” Hole Diameter
(McMaster PN: 3427A17)
Mallet Rubber Mallet
Screwdriver 1.5” Long Narrow Blade
Flat Head (Craftsman PN:
41541 or equivalent)
Installation Tools Notes
Nylon Panel Removal Tool e.g. Panel Pry Tool #1
Toyota SST # 00002-06001-
01
Socket/Ratchet 10mm, 12mm & 13mm
Socket Extension 6 inch (optional)
Ratcheting Box End Wrench 13mm
Torque Wrench
Pliers 1. Diagonal Cutters
3 lbf·ft , and 15 lbf·ft
2. Long Nose (optional)
STOP: Damage to the vehicle may occur. Do not
proceed until process has been complied with.
OPERATOR SAFETY:
injury.
CAUTION:
in order to reduce the risk of damage to the
accessory/vehicle and to ensure a quality installation.
TOOLS & EQUIPMENT:
specific tools and equipment recommended for this
process.
REVISION MARK:
installation with respect to previous issue.
VSE Subwoofer Specifications
Woofer Size 10 Inch Voice Coil Size 1.5 Inch Magnet Size 34 oz Frequency Response 28Hz-100Hz +/-3dB Efficiency 96 dB Power Handling 150 watts (woofer) Dimensions 745mm x 390mm x 370mm Weight 22 lbs Impedance Dual 2 Ohms
Use caution to avoid risk of
A process that must be carefully observed
Used in Figures calls out the
This mark highlights a change in
Issue: A 04/15/04
Page 1 of 17 pages
SCION tC 2005 - VSE SUBWOOFER (BAZOOKA®)
Procedure
Care must be taken when installing this accessory to ensure damage does not occur to the vehicle. The installation of this
accessory should follow approved guidelines to ensure a quality installation.
These guidelines can be found in the "Accessory Installation Practices" document.
This document covers such items as:-
• Vehicle Protection (use of covers and blankets, cleaning chemicals, etc.).
• Safety (eye protection, rechecking torque procedure, etc.).
• Vehicle Disassembly/Reassembly (panel removal, part storage, etc.).
• Electrical Component Disassembly/Reassembly (battery disconnection, connector removal, etc.).
Please see your Toyota dealer for a copy of this document.
1. Pre-installation Precautions
(a) Use Seat & Floor Protectors and Fender
Covers/Blankets to avoid damage to surfaces.
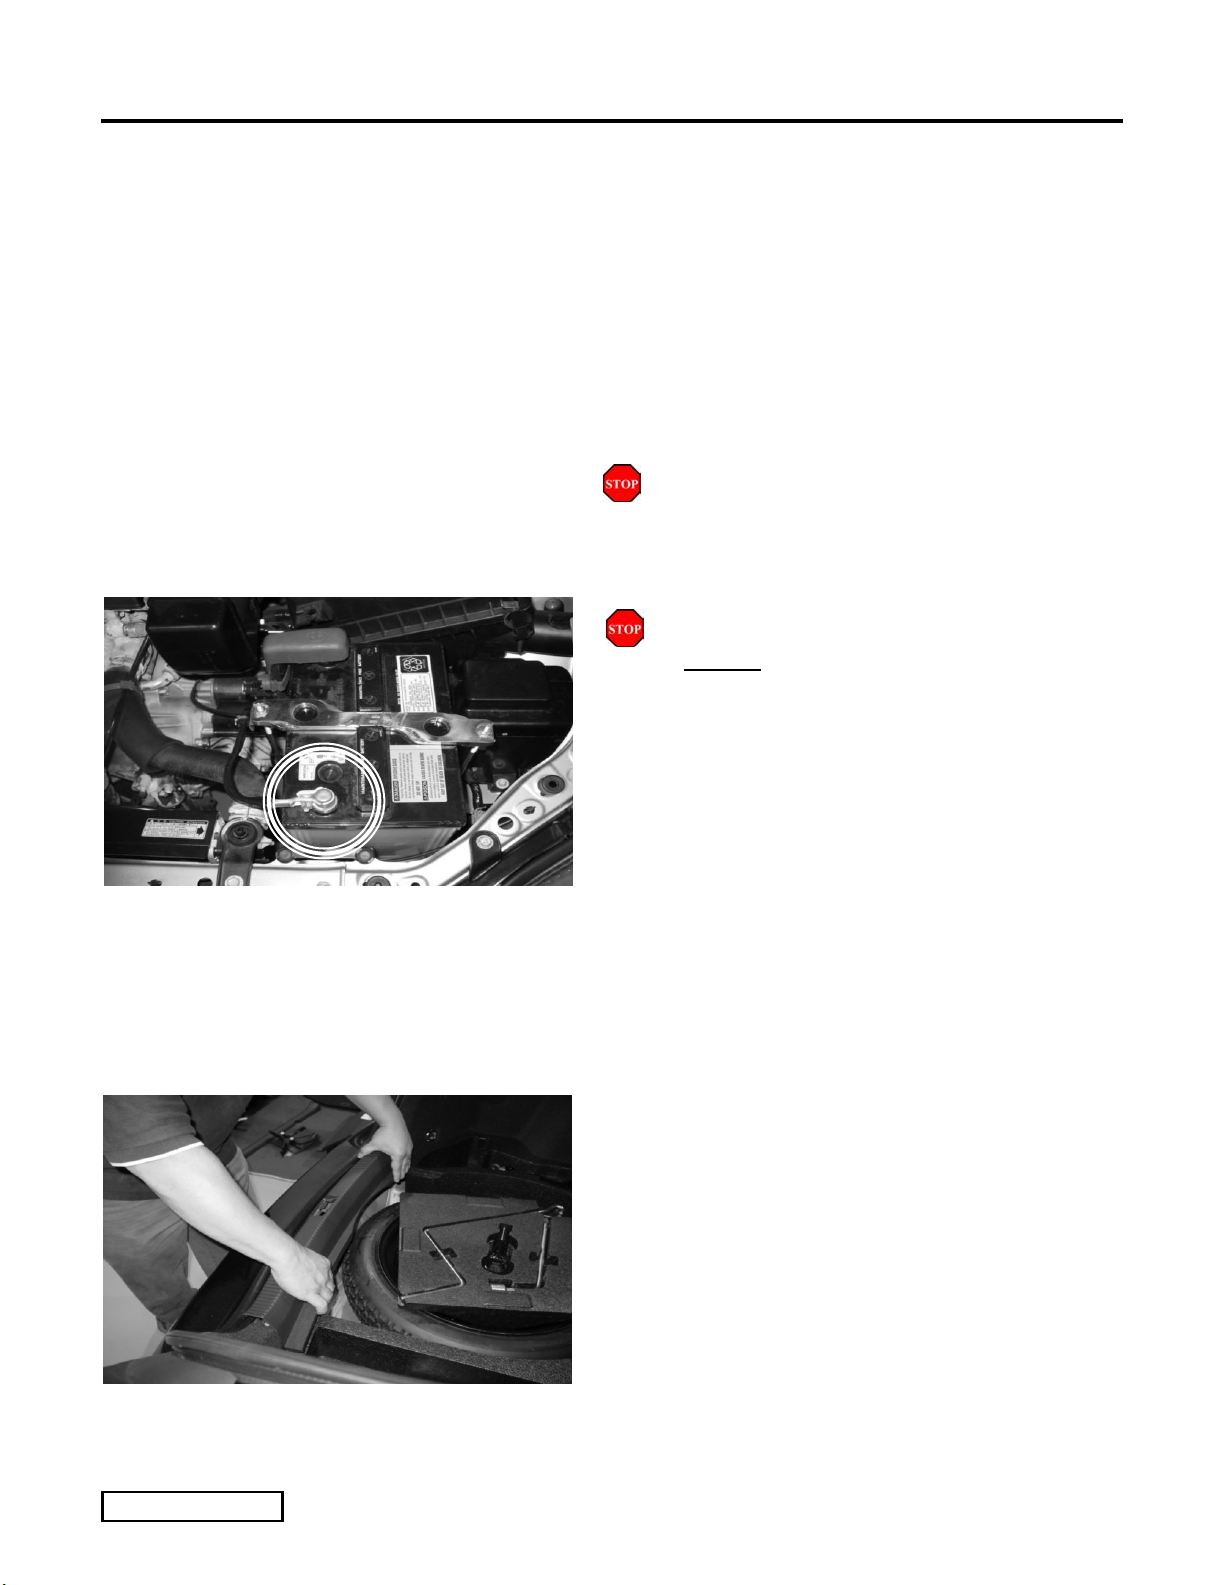
2. Battery Disconnect
(a) NOTE: Be sure to open the rear hatch,
Fig. 2-1
PRIOR to disconnecting the battery.
(b) For vehicles equipped with automatic
transmission, place the shifter in the N
(neutral) position and set the parking brake
prior to disconnecting the battery.
(c) Remove the NEGATIVE (-) battery terminal
using a 10mm socket before any disassembly
starts. (Fig. 2-1)
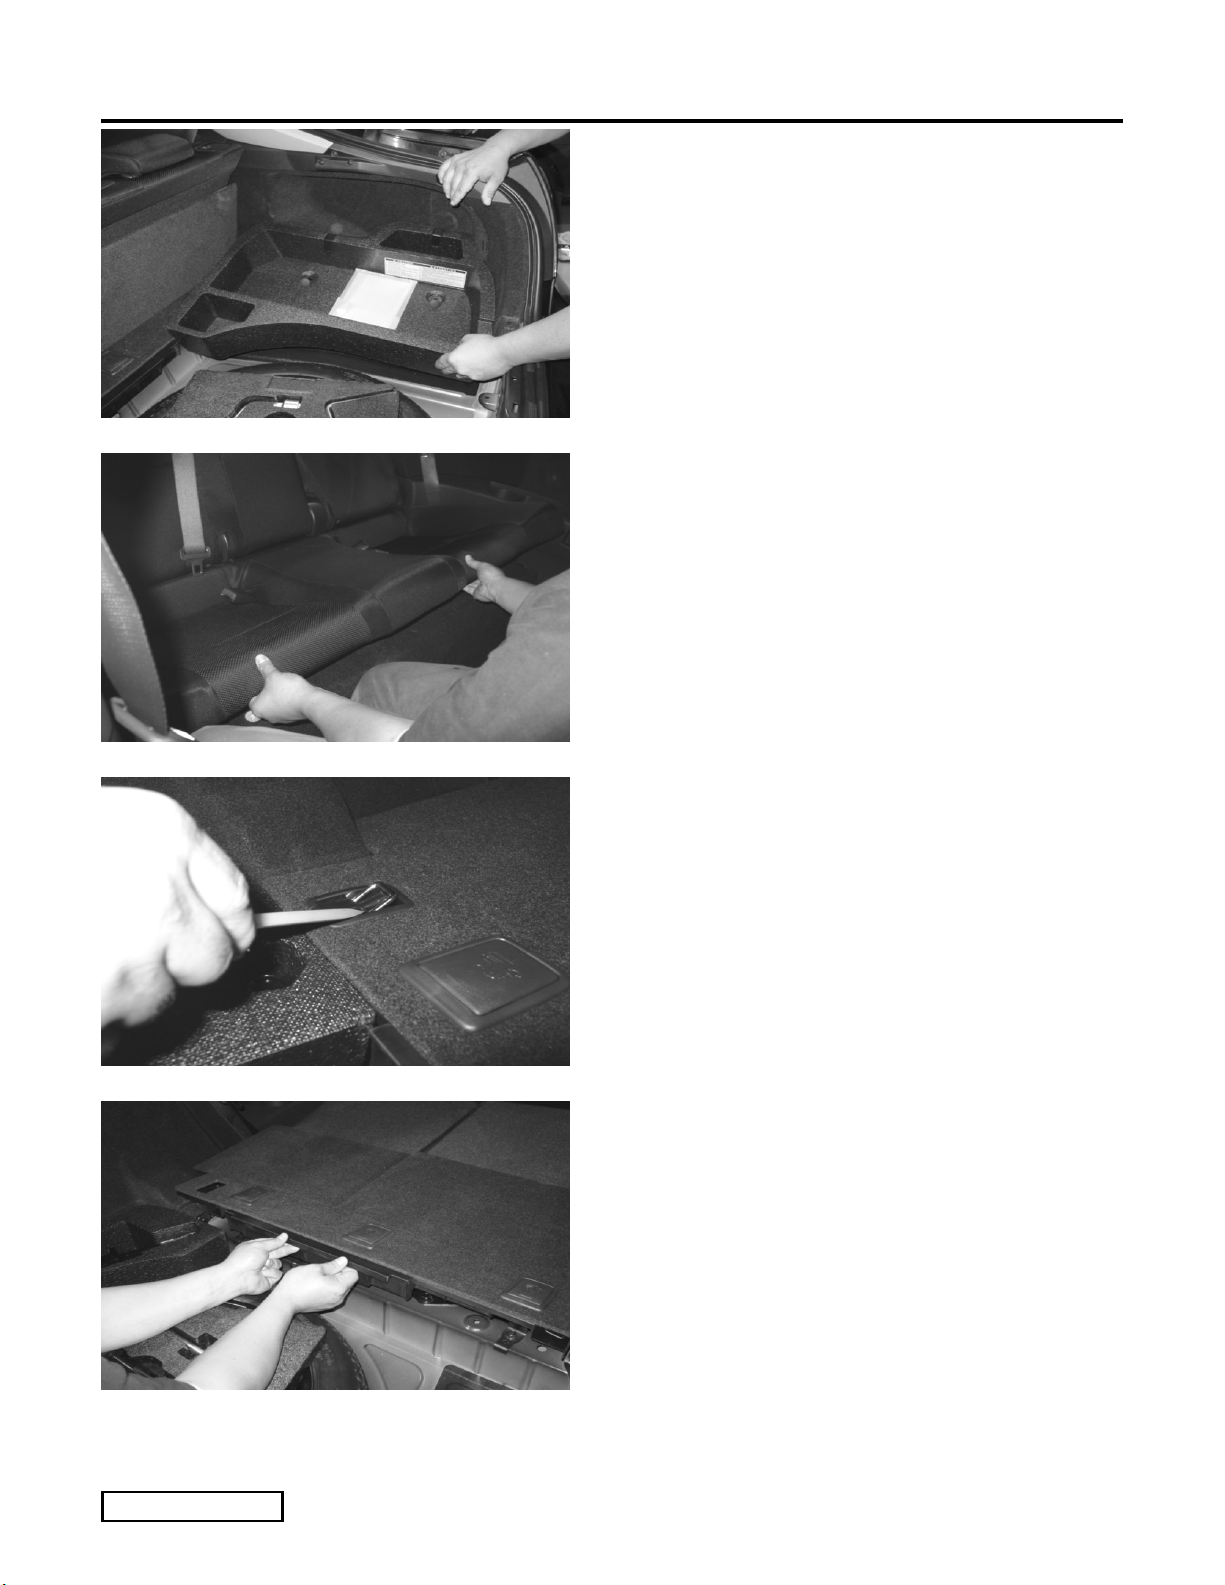
3. Disassemble Rear Cabin Interior Components
NOTE: ALL INTERIOR COMPONENTS THAT ARE REMOVED FROM THE VEHICLE MUST BE PLACED ON A CLEAN & PROTECTED SURFACE (i.e. Blanket)
(a) Starting at the rear of the vehicle, remove and
secure the rear Tonneau Cover.
(b) Proceed to unlock the two (2) knob locks and
Fig. 3-1
Issue: A 04/15/04
(c) Proceed to remove and secure the rear cargo
Page 2 of 17 pages
remove and secure the rear Cargo Floor panel
& floor mat (if equipped).
entry scuff plate by pulling upwards.(Fig. 3-1)
SCION tC 2005 - VSE SUBWOOFER (BAZOOKA®)
Procedure
(d) Proceed to remove and secure the rear foam
passenger side storage compartment.
(1) Remove the two (2) plastic plugs and pull
the block straight up. (Fig. 3-2)
Fig. 3-2
(e) Proceed to remove and secure the rear bench
seat, by pulling upwards on each corner, to
release the two (2) mounting clips. (Fig. 3-3)
(f) Using the 2 release handles, lower the driver
Fig. 3-3
Fig. 3-4
and passenger side rear seat backs.
(g) Using the NRT, release the plastic bolt covers
from the two (2) D-Ring holders. (Fig. 3-4)
(1) Using the 10mm socket, remove the two
(2) 10mm D-Rings.
(h) From the center of the rear seat trim cover,
unsnap and remove panel. (Fig. 3-5)
Fig. 3-5
Issue: A 04/15/04
Page 3 of 17 pages
SCION tC 2005 - VSE SUBWOOFER (BAZOOKA®)
k
Procedure
(i) Using a 10mm socket, remove the passenger
Fig. 3-6
Fig. 3-7
Release with Screwdriver
Plastic Hoo
rear D-Ring (Tie Down Hook) (discard) and
save the 10mm bolt for reuse.
(j) Remove and save, the Philips head screw from
the upper rear passenger panel & save for
reuse.
(k) Remove & discard passenger rear taillight
access panel.
(l) Using the 1.5” narrow blade flat head
screwdriver, gently insert into the passenger
plastic cargo net hook & rotate to remove.
(Fig.3-6)
(m) Gently release the lower portion of rear
passenger side trim, then using a NRT, gently
pry off the rear cargo passenger side inner
panel. (Fig.3-7)
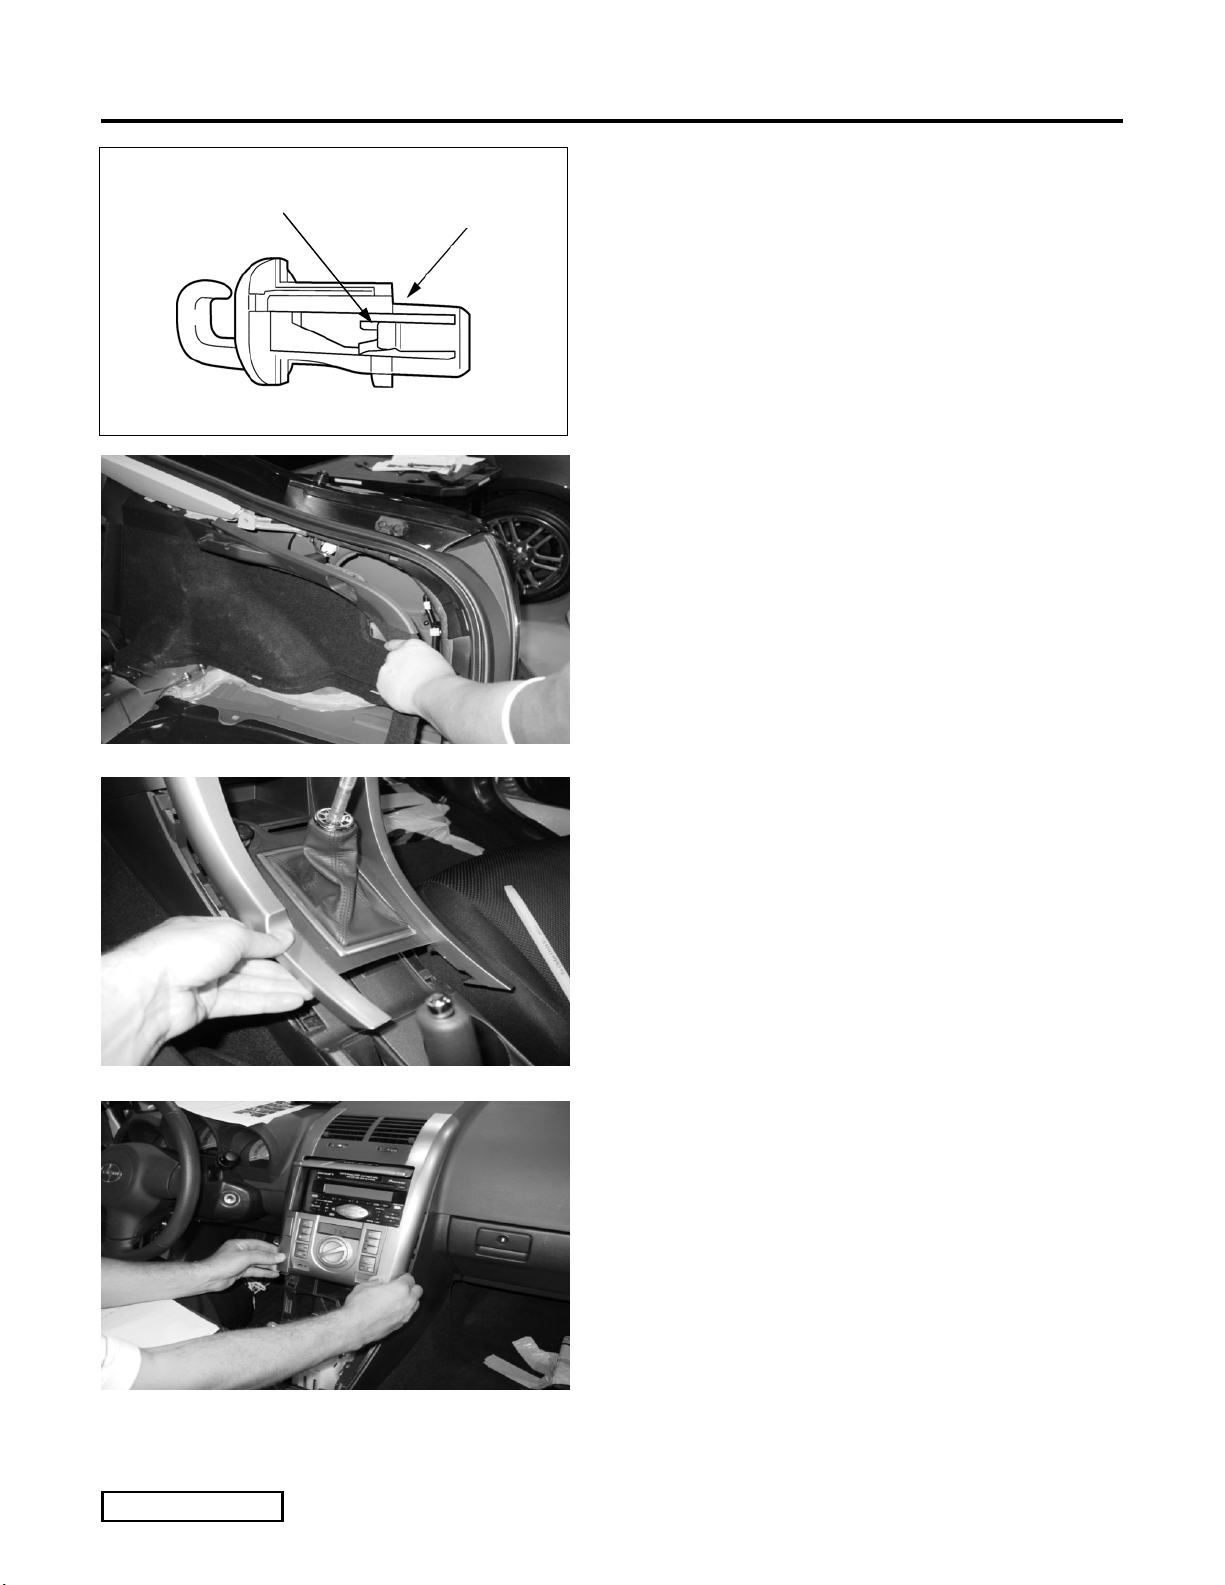
Fig. 4-1
4. Disassemble Front Cabin Interior Components
(a) Unscrew OE Shift Knob Counter-Clockwise
until OE Shift Knob is removed.
(b) Use a NRT to remove the shift surround
console. (Fig.4-1)
(1) Disconnect the cigarette lighter wire
harness from underneath the shift surround
console prior to removal.
(c) Using a NRT, pry off the Upper Center
Instrument Panel (IP). (Fig.4-2)
(1) Make sure the radio cover door is closed.
(2) Disconnect the center IP main harness
Fig. 4-2
from the backside of the center IP prior to
removal.
Issue: A 04/15/04
Page 4 of 17 pages
SCION tC 2005 - VSE SUBWOOFER (BAZOOKA®)
Procedure
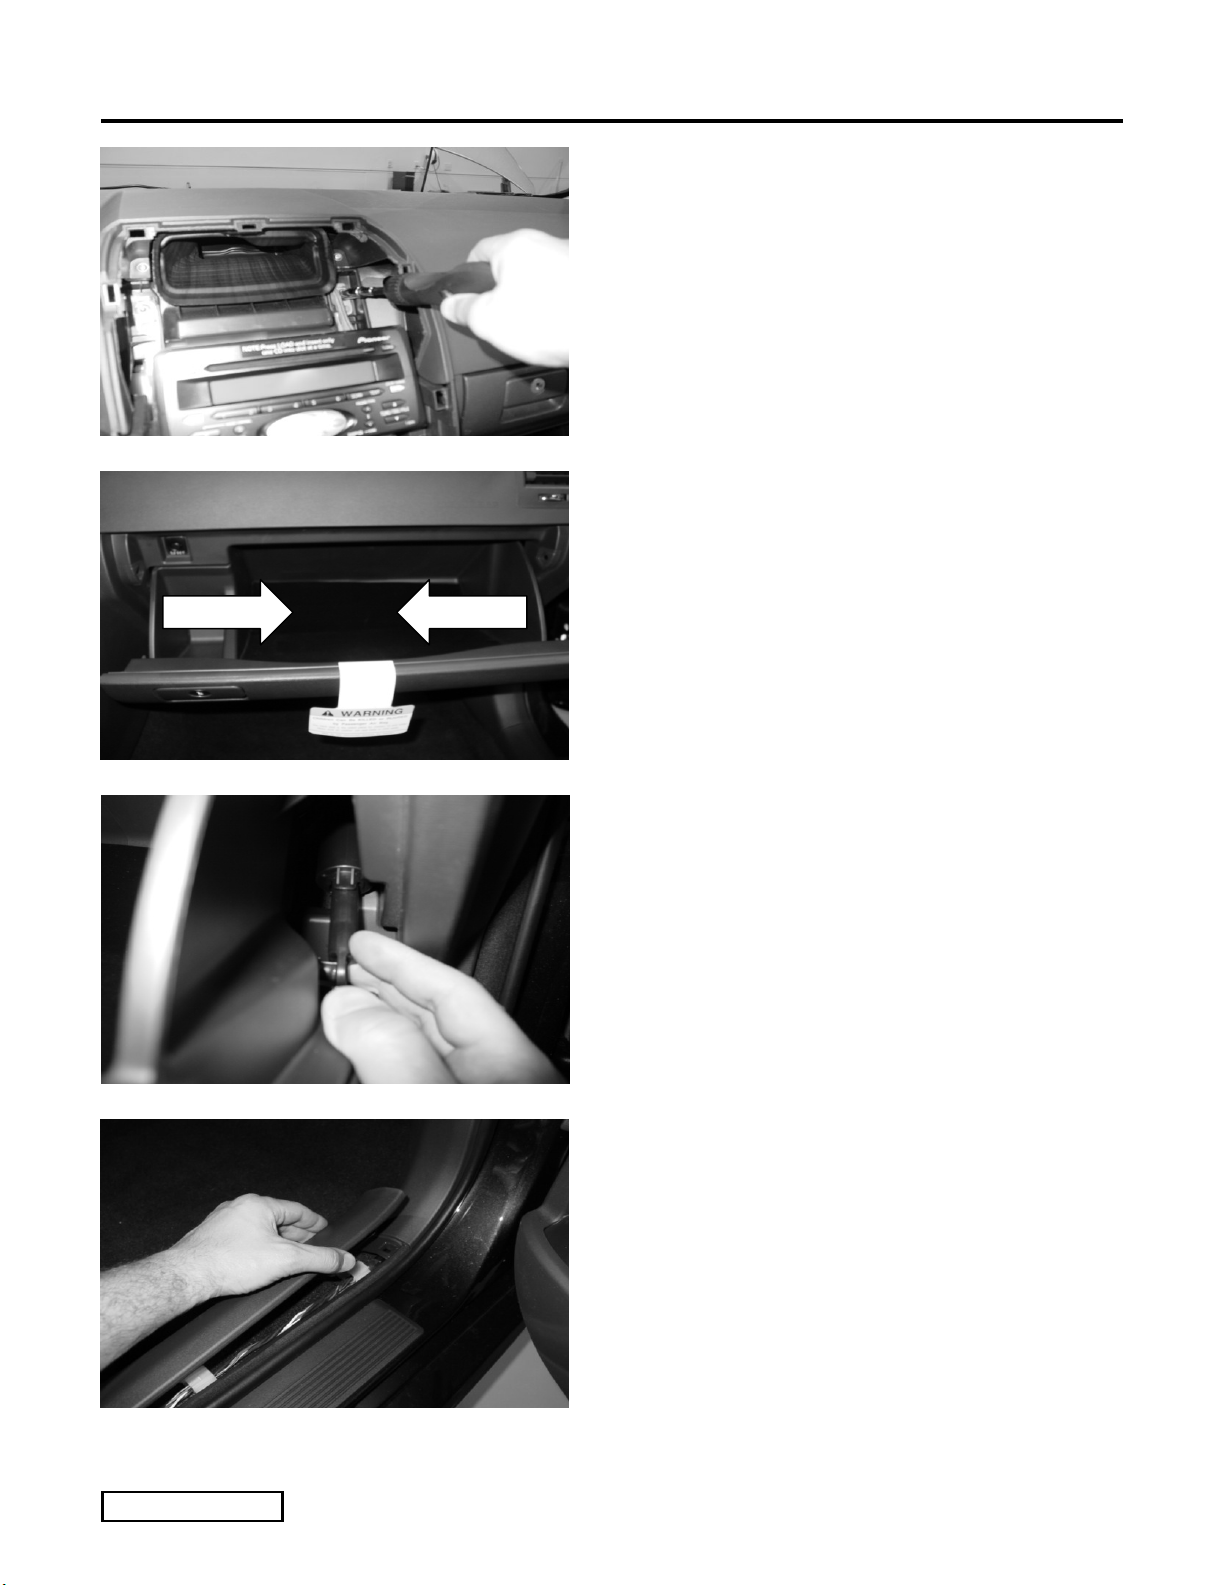
(d) Remove the radio unit, by removing the two
(2) top 10mm nuts and two (2) bottom screws
from the radio bracket. (Fig.4-3)
Fig. 4-3
Fig. 4-4
(e) Open the glove compartment latch and press
the outside edges of the glove compartment
inwards, to remove. (Fig.4-4)
(1) Detach the glove compartment damper
prior to removal. (Fig.4-5)
Fig. 4-5
Fig. 4-6
Issue: A 04/15/04
(f) Using a NRT, remove passenger front scuff
(g) Remove passenger kick panel by removing the
Page 5 of 17 pages
plate by carefully pulling upward. (Fig.4-6)
(1) NOTE: If a clip remains on the vehicle,
remove it and replace it back into the
plastic doorsill cover.
plastic screw (located near firewall) & pulling
out the kick panel.
SCION tC 2005 - VSE SUBWOOFER (BAZOOKA®)
Procedure
Fig. 5-1
Fig. 5-2
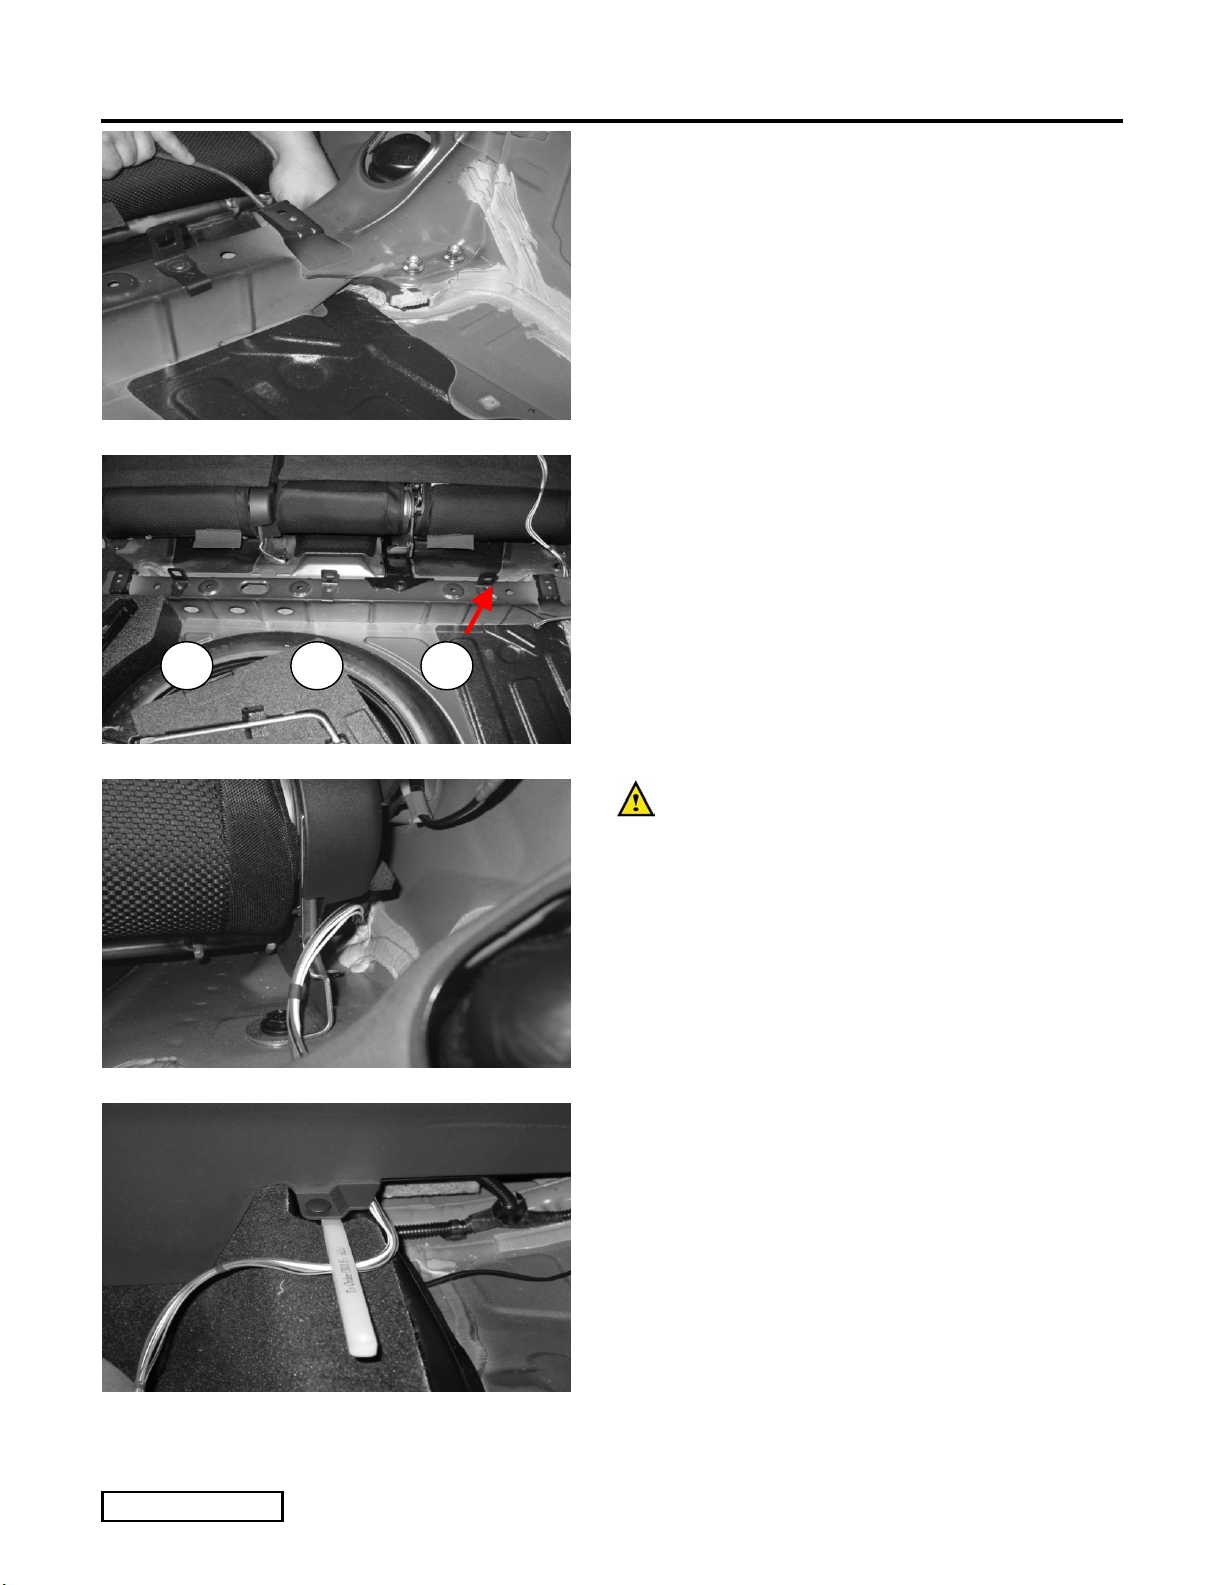
5. Routing Wire Harness
(a) Starting at the rear of the vehicle, route the pig
tail end underneath the rear strut
reinforcement access panel, and route towards
rear passenger side taillight. (Fig.5-1)
3 2 1
(b) Using the 12mm socket, remove the #3 Child
Restraint bracket bolt, & re-install groud ring
underneath bracket. (Fig.5-2)
(1) Torque bolt to 15 lbf·ft
(c) Run the T-Harness portion of the W/H
forward between the passenger seat bracket
and inner wheel well. (Fig.5-3)
(d) From inside the back seat, route W/H behind
seat belt & tuck under the rear passenger
Fig. 5-3
Fig. 5-4
Issue: A 04/15/04
(e) Using a NRT, remove the panel-fastening clip.
(f) Route wire harness forward through existing
Page 6 of 17 pages
speaker / cup holder panel.
(Fig.5-4)
(1) Proceed to route the wire harness
underneath clip tab, and back underneath
panel, with the T-Harness portion of the
wire harness exiting at the passenger side
entry way.
vehicle-accommodated clips.
 Loading...