

Page 1
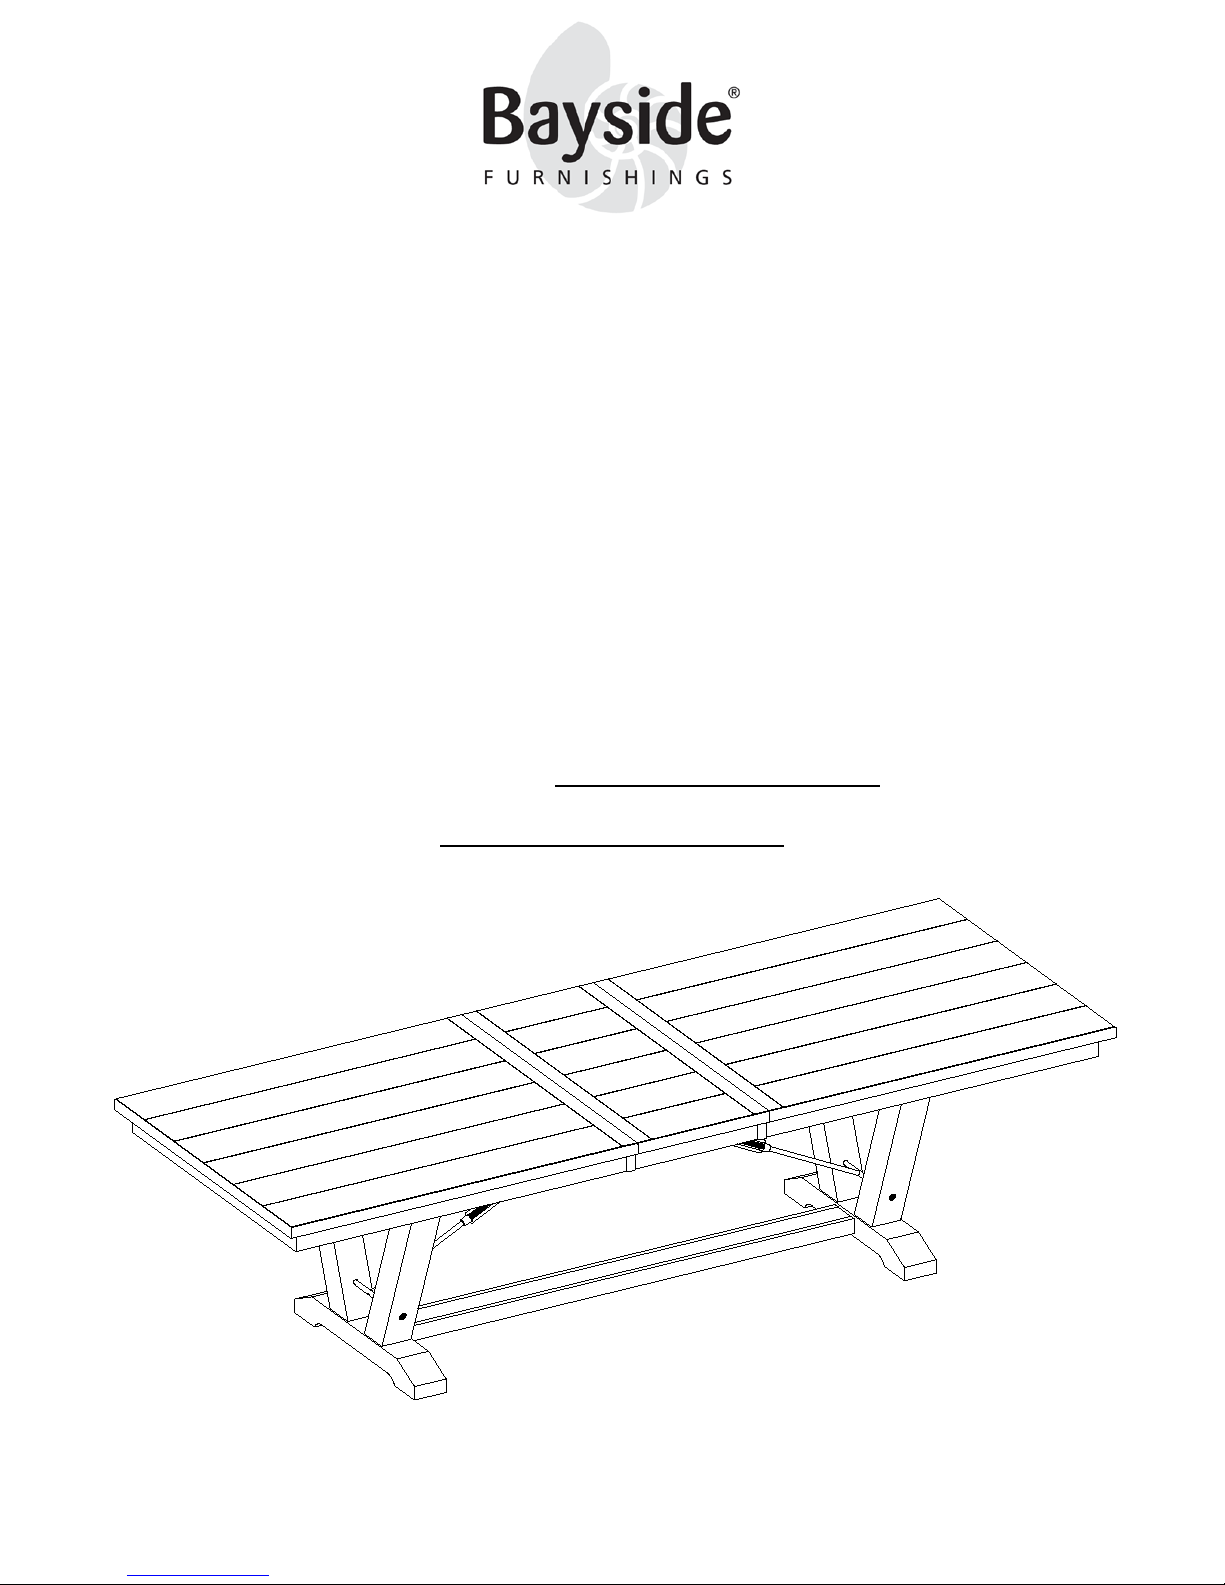
9-Piece Dining Set
ITM. / ART. 1119053
Model # CSC9PD-4
ASSEMBLY INSTRUCTIONS
IMPORTANT, RETAIN FOR FUTURE
REFERENCE: READ CAREFULLY
If you have any questions regarding asse mbly or if parts are missing, DO NOT return this ite m to the
store where it was purchased. Please call our toll-free customer service number and have your
instructions and parts list ready to provide the model name, part name or factory number:
1-877-494-2536 (English, French and Spanish)
Pacific Standard Time: 8:30 a.m. - 4:30 p.m., Monday to Friday
(In U.S. and Canada only)
Or visit our website www.baysidefurnishings.com
For customer service outside of North America, please e-mail your request to
Date 2018-02-01 Rev. 0001-A Factory: ZHIVIE
Page 2

MAXIMUM RECOMMENDED WEIGHT LOADS
Please make sure you have all parts before beginning assembly. Do not fully tighten all bolts until you
THIS UNIT IS INTENDED FOR USE ONLY WITH THE MAXIMUM
WEIGHTS INDICATED. USE WITH LOAD HEAVIER THAN THE MAXIMUM
GENERAL INFORMATION AND TIPS
1. This product is for indoor domestic use only.
2. Please read the Assembly Instructions prior to assembling this product.
3. To avoid damage, assemble the product on a non-abrasive surface such as a carpet surface.
4. Make sure all bolts and screws are tightly fastened before the unit is used.
5. Check that all bolts, screws and knobs are tight at least every 3 months or as needed.
6. Refer to your assembly manual for maximum weight capacities.
7. Do not push furniture, especially on carpeted floor. Have someone help you lift the item and place it in its
new location.
finish assembling all parts. Once assembled, go back and fully tighten all bolts. This will make the assembly
easier. We recommend using two people for assembly.
1. Maximum load weight on table is 181. 4 kg / 400 lb.
WEIGHTS INDICATED MAY RESULT IN INSTABILITY CAUSING POSSIBLE INJURY.
2
Page 3
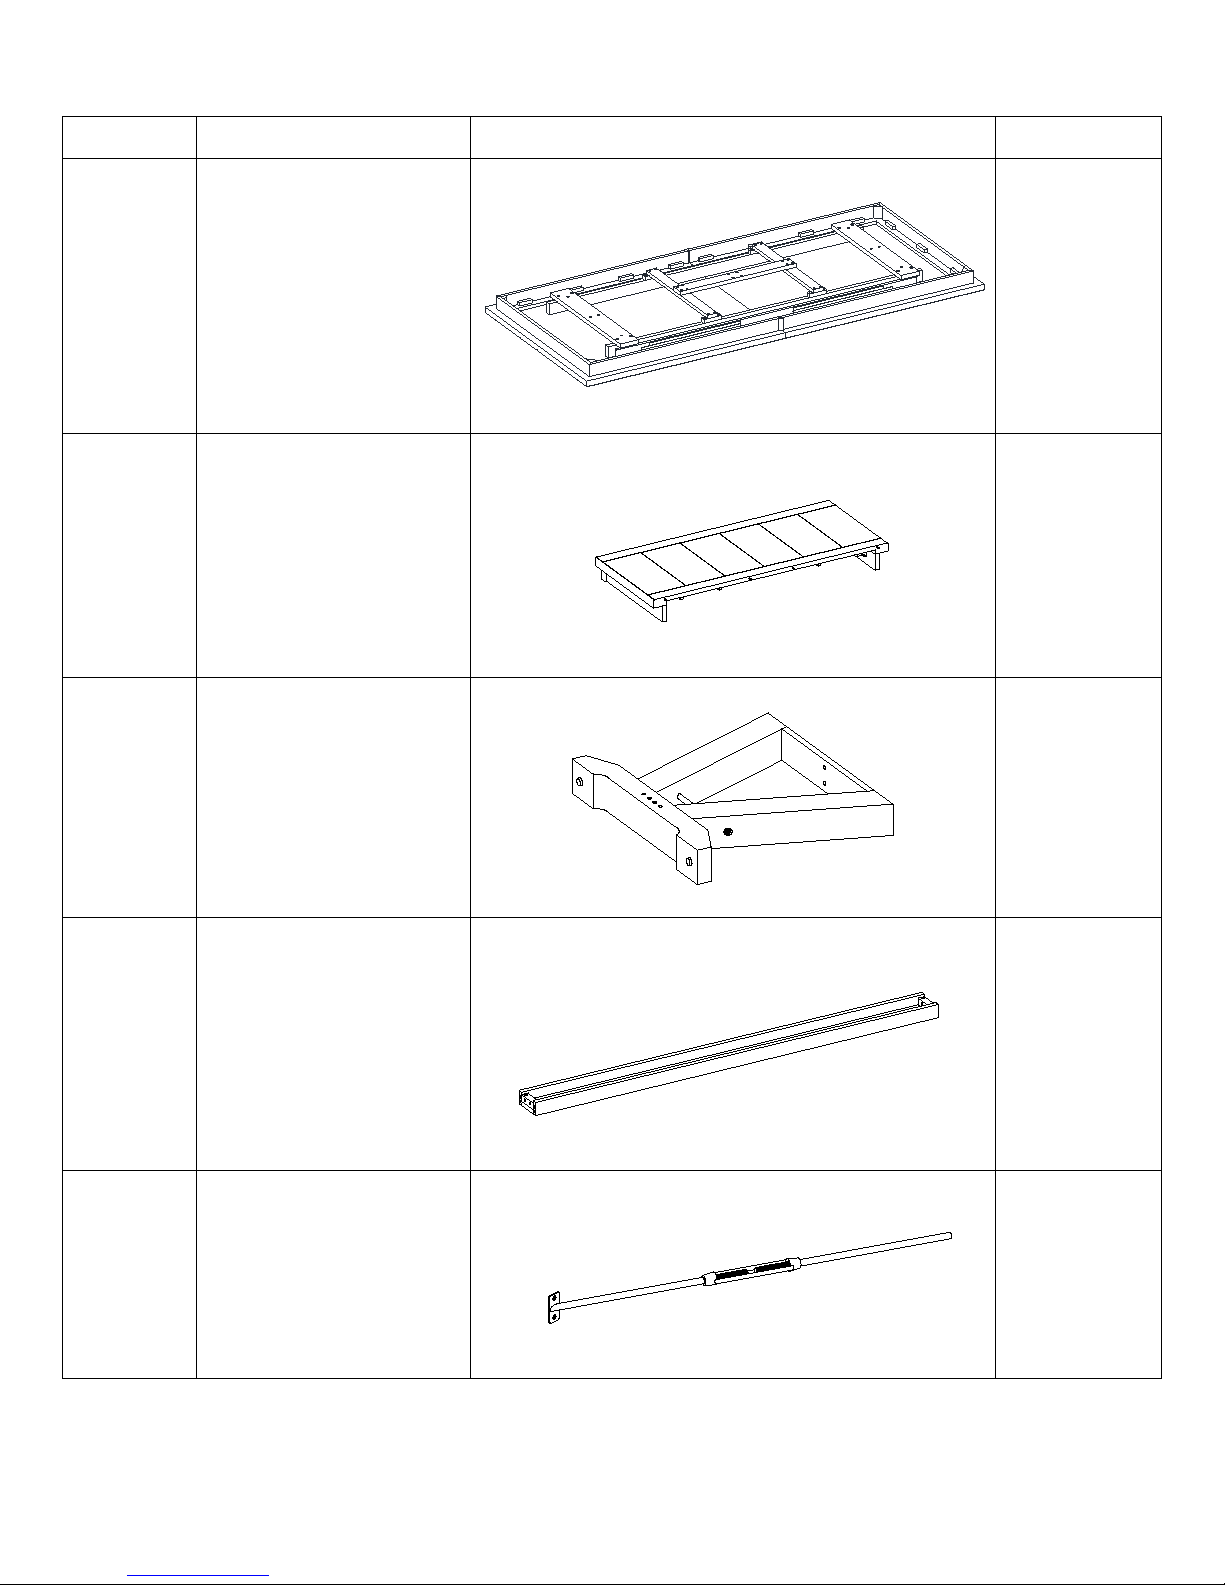
Parts and Hardware List
PART # PART DESCRIPTION PART FIGURE QUANTITY
A Table Top
B Removable Leaf
C Leg
1
1
2
D Stretcher
E Metal Bar
1
2
3
Page 4
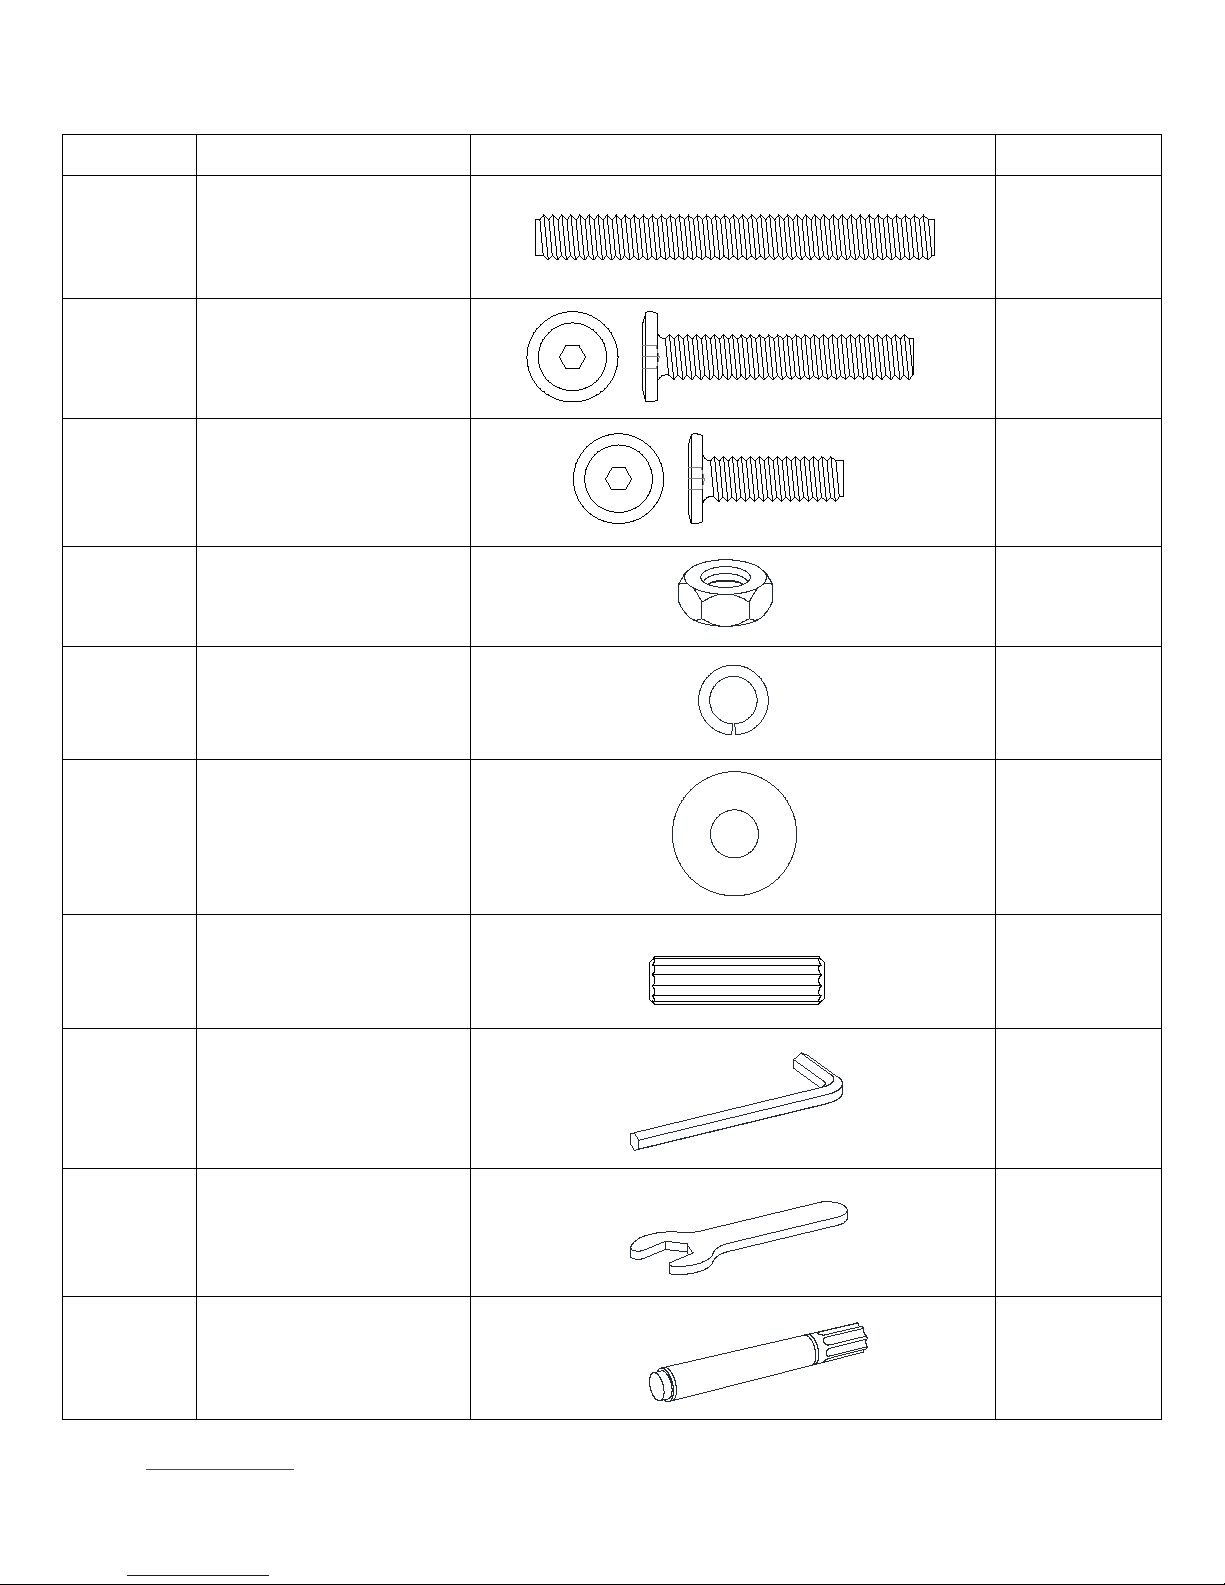
Parts and Hardware List
PART # PART DESCRIPTION PART FIGURE QUANTITY
AA Threaded Rod
BB Bolt
CC Bolt
DD Hex Nut
EE Lock Washer
4+1 extra
10+1 extra
4+1 extra
4+1 extra
16+1 extra
FF Flat Washer
GG Wood Dowel
Hex Wrench
Open Wrench
Touch-up Pen
16+1 extra
4+1 extra
1
1
1
Tools required: Hex wrench and open wrench (included) and Phillips screwdriver (not included).
4
Page 5
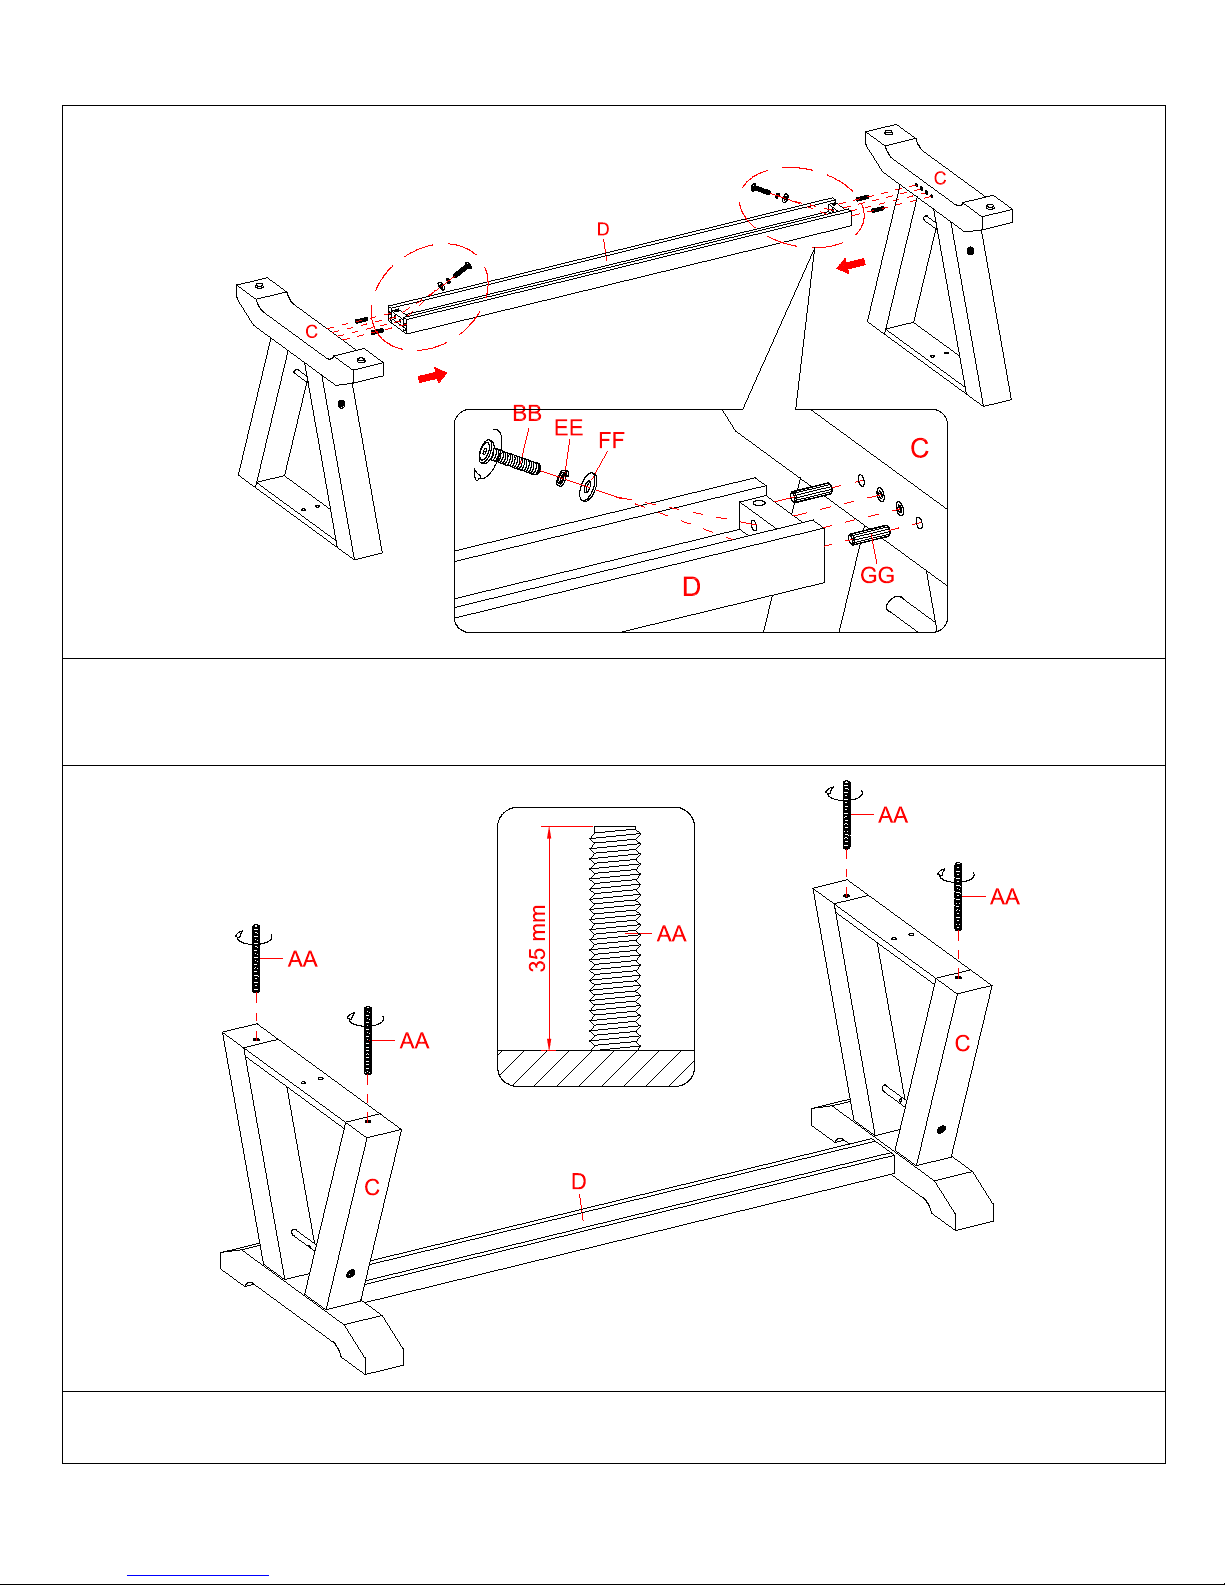
Assembly Instructions
Flip around the assembled base and screw four threaded rods (AA) into the threaded inserts on the top of
1. Insert four wood dowels (GG) into the end holes on the stretcher (D).
2. Attach the stretcher (D) between two legs (C) with four bolts (BB) and four washers (EE and FF).
3.
both legs (C) with 35 mm threads stand out as shown.
5
Page 6
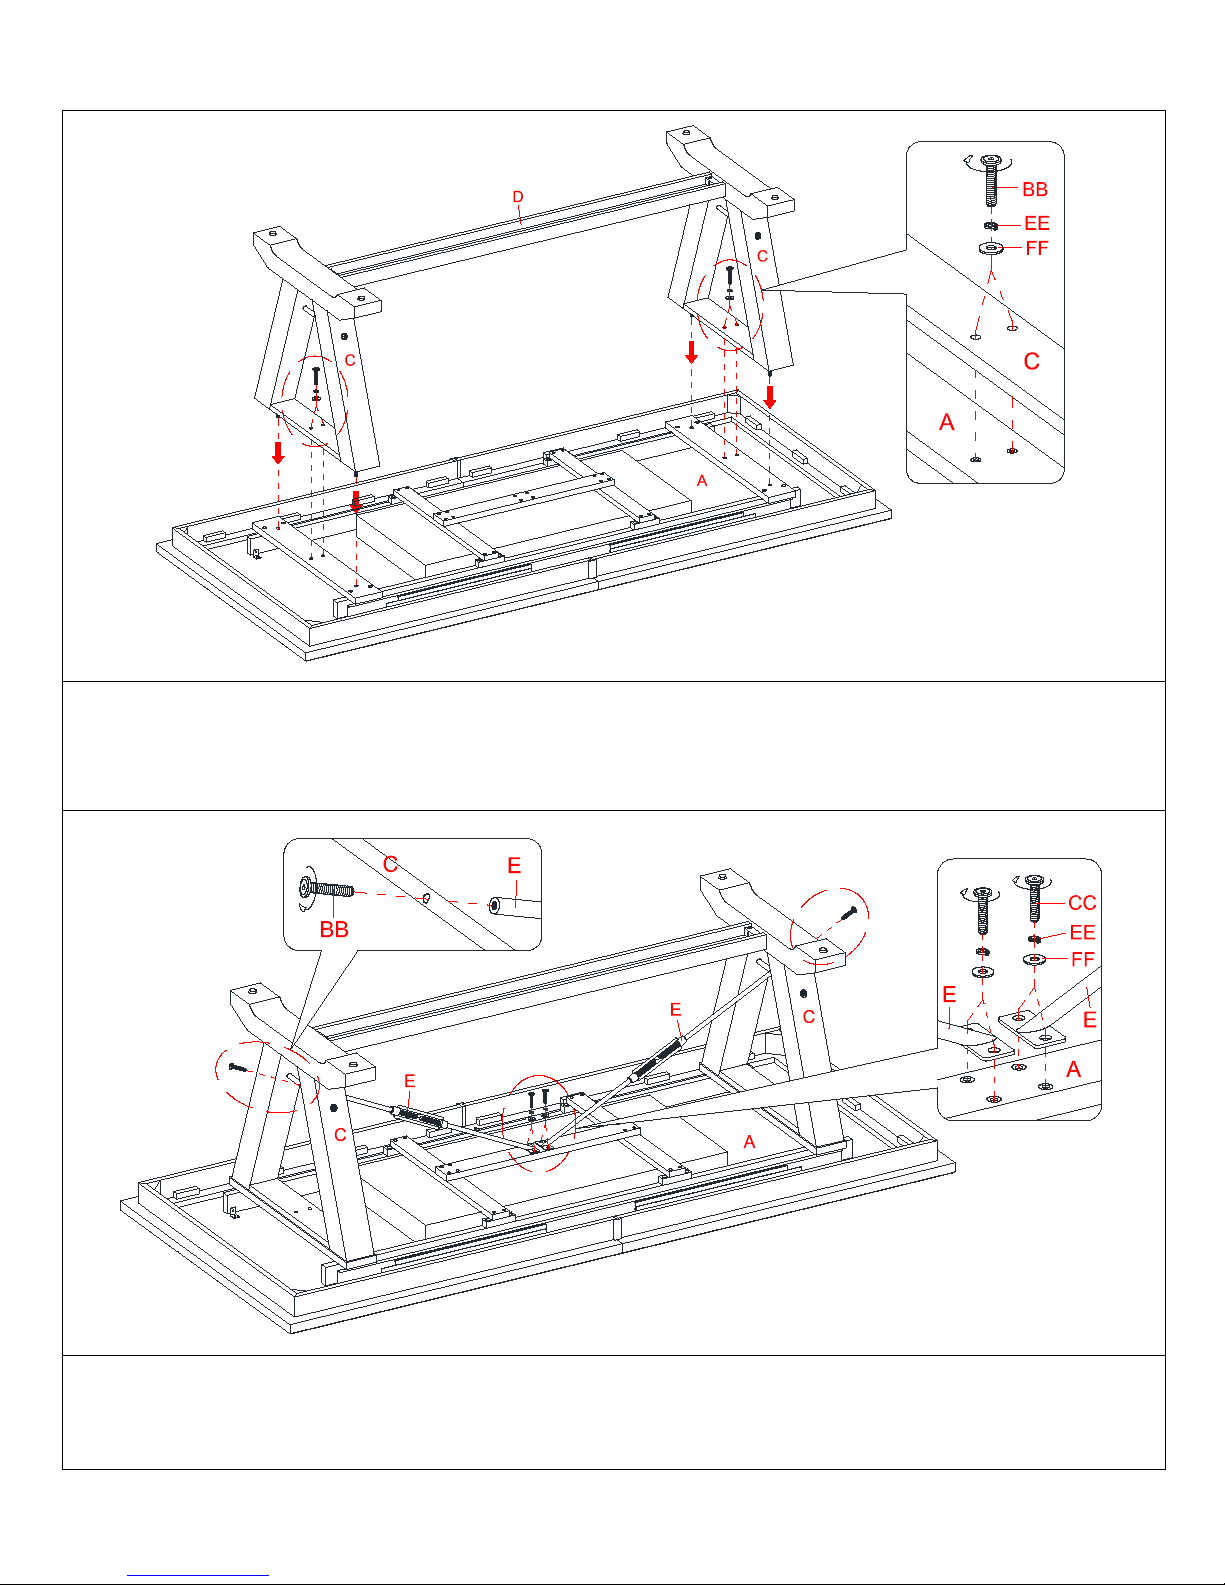
Assembly Instructions
4. Position the tabletop (A) upside down on a smooth and protective surface.
5. Flip the assembled base upside down and align the installed threaded rods (AA) on the legs (C) with the
through holes on the mounting boards on the table top (A). Secure the legs to the mounting boards with four
bolts (BB) and four washers (EE and FF).
6. Attach the metal bars (E) to the bottom rail of the legs (C) with two bolts (BB).
7. Fasten the metal bars (E) to the center support of the table top (A) with four bolts (CC) and four washers
(EE and FF).
6
Page 7
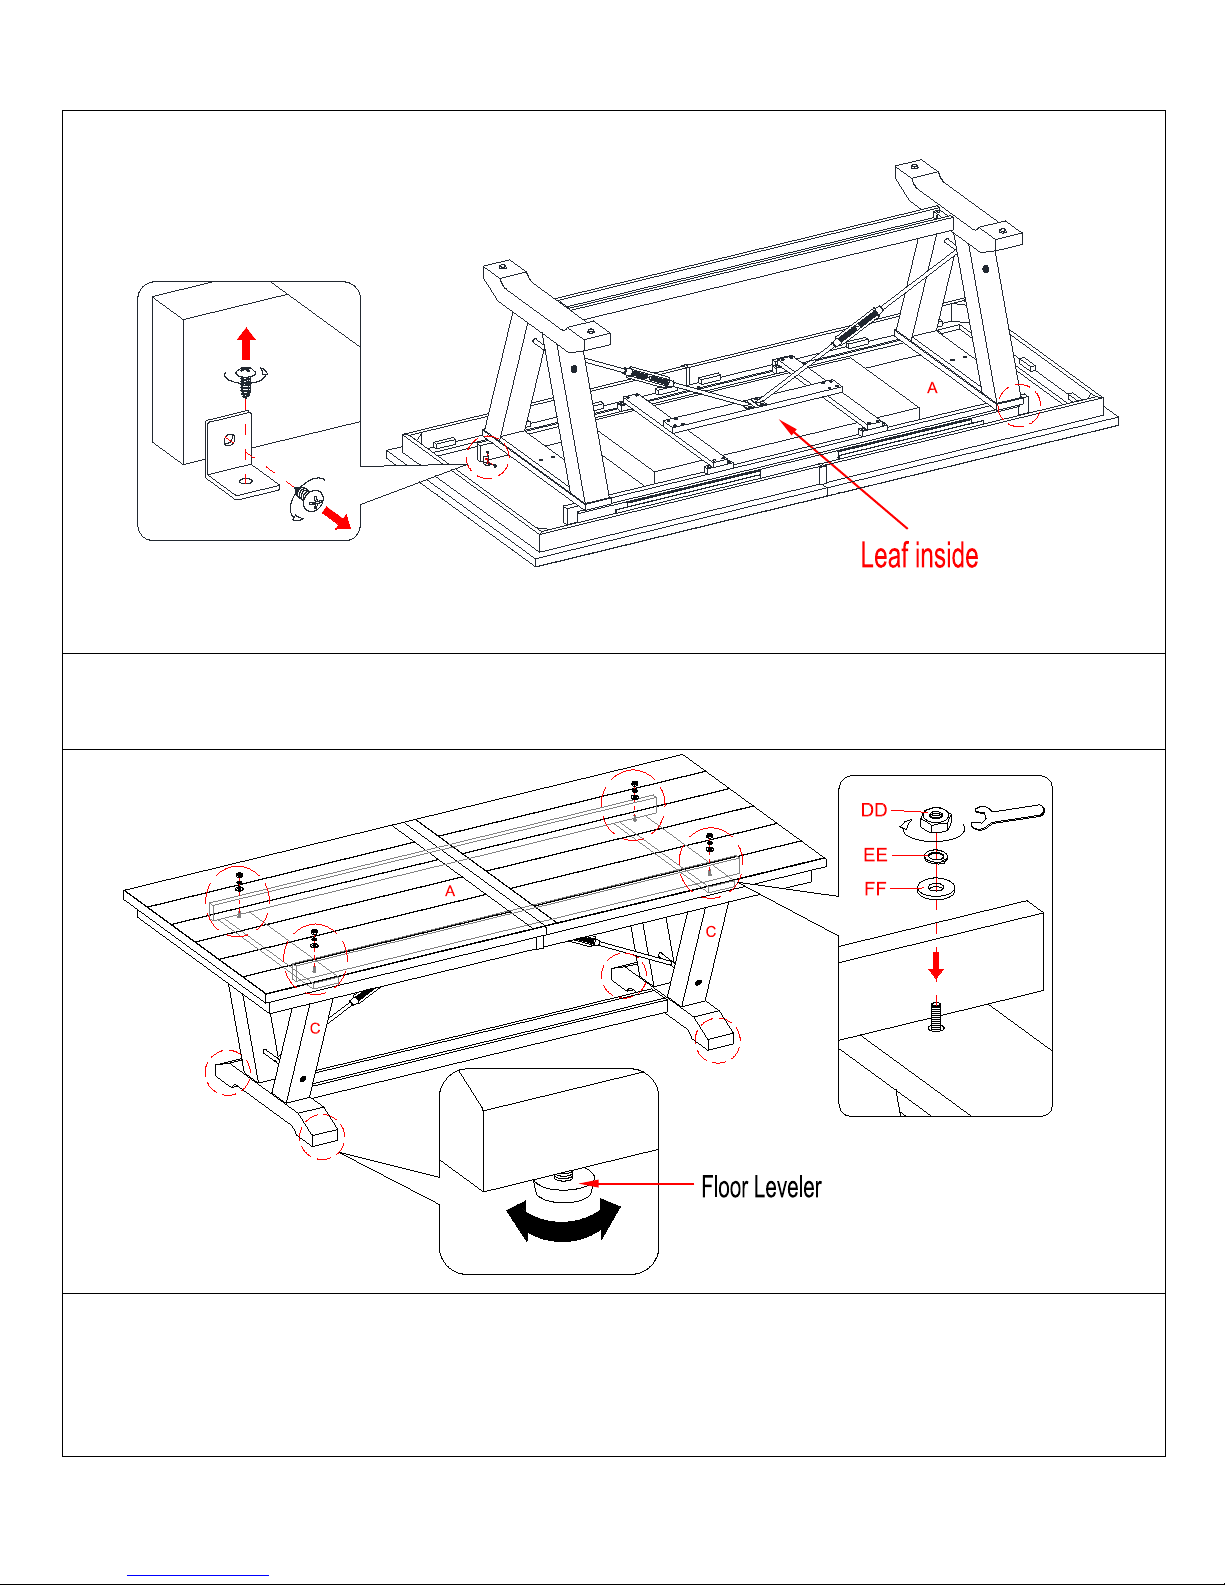
Assembly Instructions
8. Use a Phillips screwdriver to remove the additional metal brackets which hold the wood slides into place.
9. Ask for assistance to lift the unit upright and position it at the desired location. If necessary, adjust the pre-
So that you can pull the table top wide open and take out the leaf inner box. These are used for shipping
purposes only. After removing them, please discard.
attached floor levelers at the bottom of legs to level the unit.
10. Fasten the legs (C) to the mounting boards under the table top (A) by fitting the flat washer (FF), lock
washer (EE) and hex nut (DD) onto each threaded rod. Securely tighten the nuts with the provided open
wrench.
7
Page 8
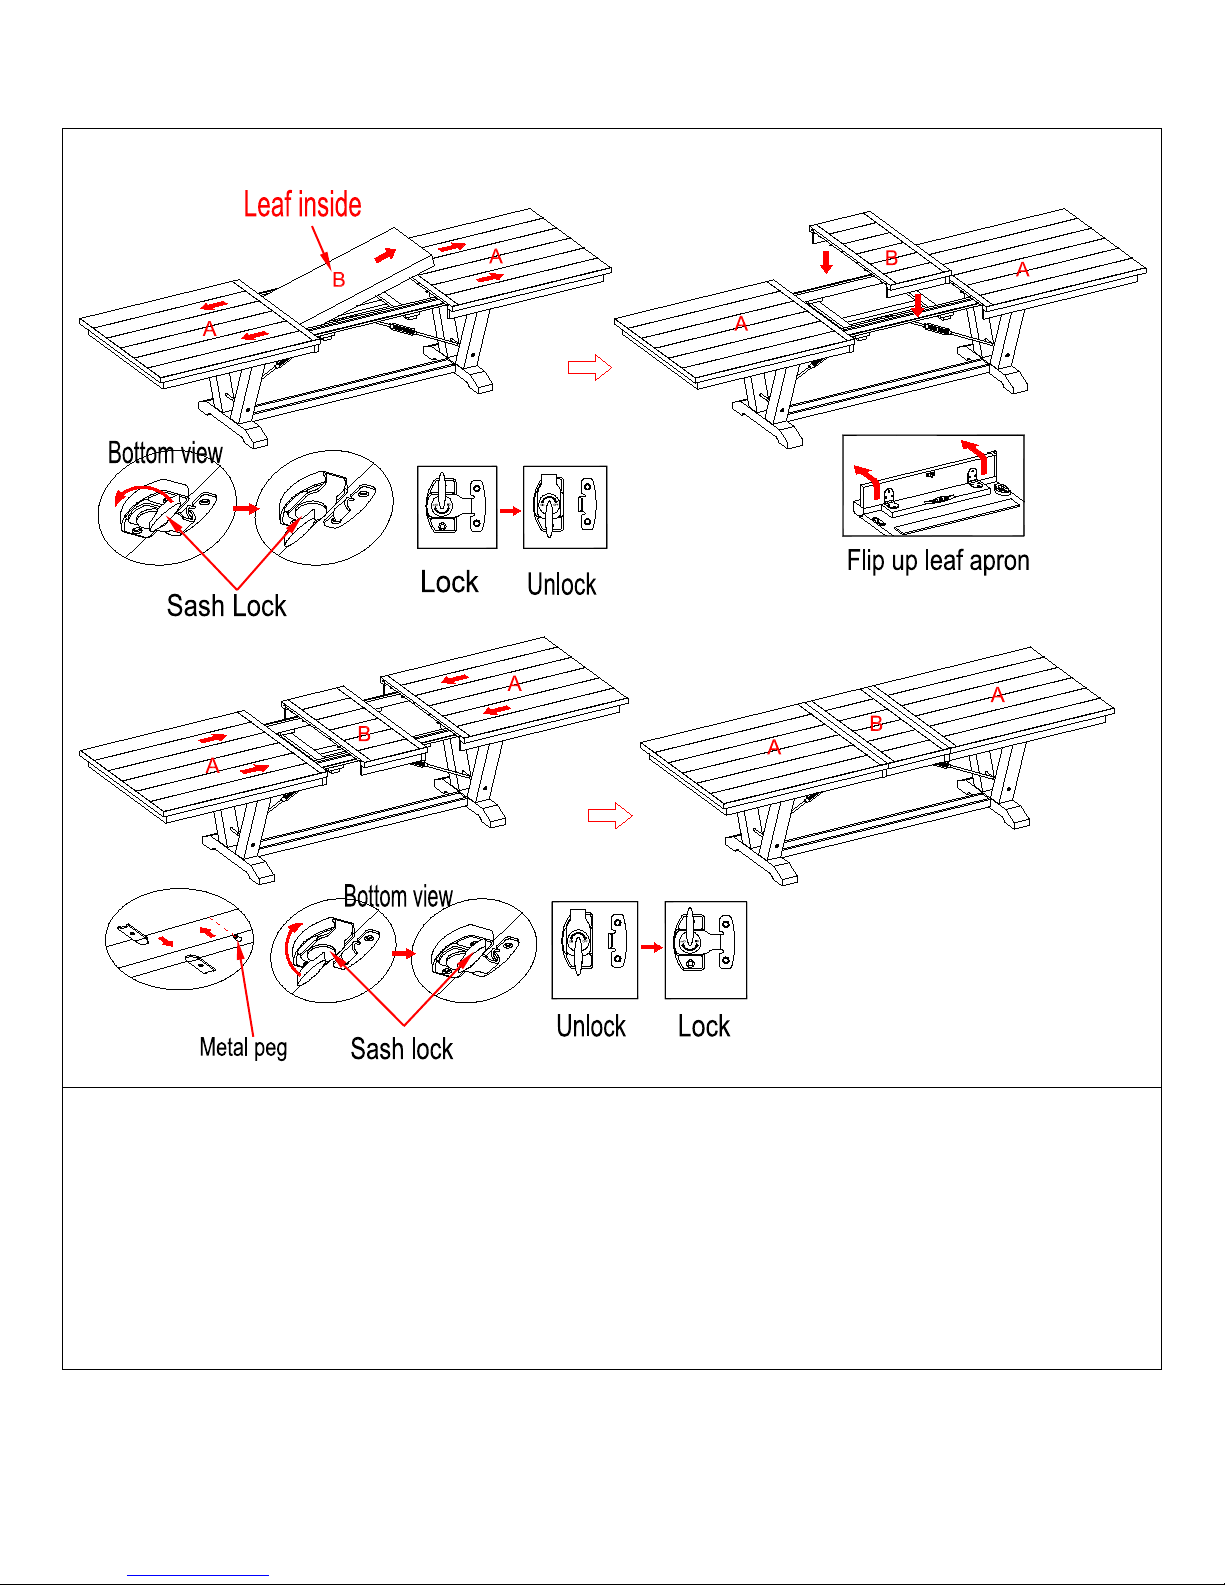
Assembly Instructions
11. To add the leaf extension, unlock the sash locks underneath the table top (A) by rotating the lock handle all
the way to the “OFF” marking on the sash locks and then pull the table top wide open equally from both
ends.
12. Lift the removable leaf (B) from the compartment of the table top (A).
13. Unfold the leaf aprons and rest the leaf (B) on the top surface of wood sliders carefully. Make sure that the
metal pegs pre-attached on one end of the leaf properly aligned with the metal sockets on the table top (A).
14. Push the table top (A) from both ends to close and lock the sash locks underneath the table top by rotating
the lock handle all the way to the “ON” marking.
8
Page 9
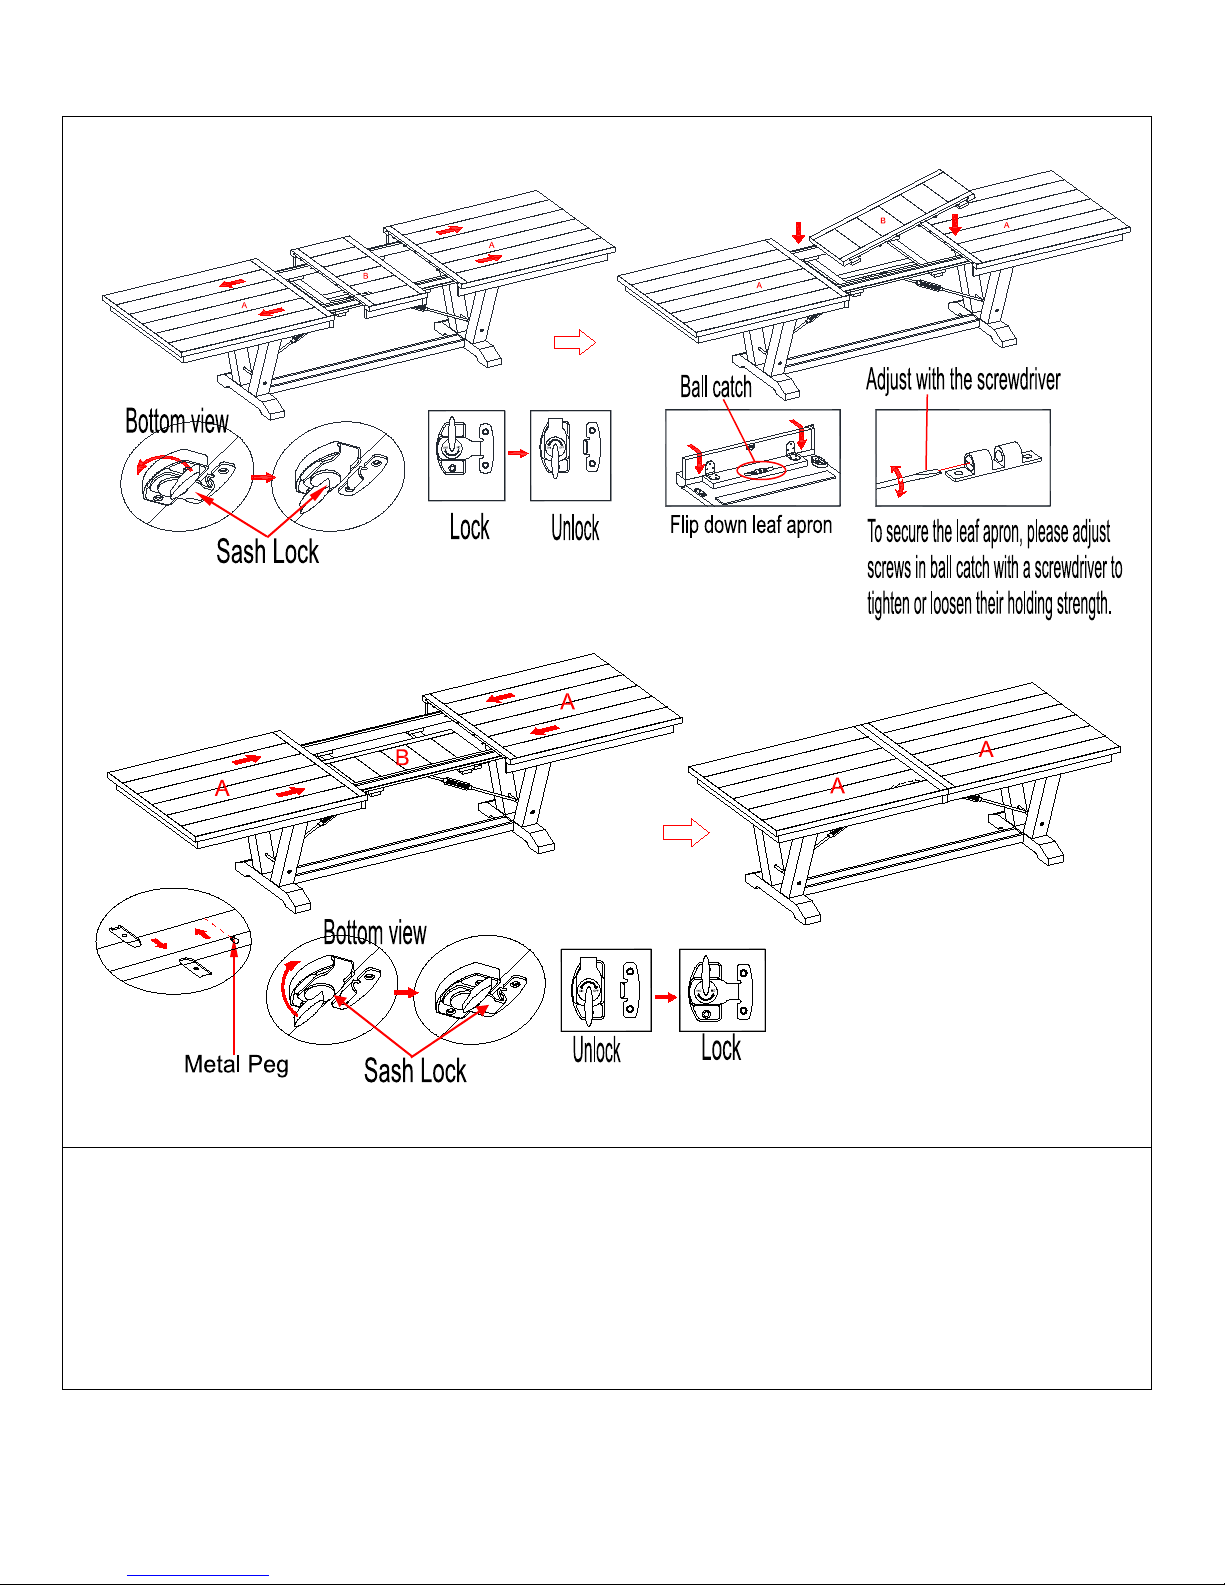
Assembly Instructions
15. To store the leaf extension when not in use, unlock the sash locks underneath the table top (A) by rotating
the lock handle all the way to the “OFF” marking on the sash locks and then pull the table top wide open
equally from both ends.
16. Take out the leaf (B). Flip down the leaf aprons and put inside the provided fabric bag, then slide it onto
the support bars underneath the table top (A).
17. Push the table top (A) from both ends to close and lock the sash locks underneath the table top by rotating
the lock handle all the way to the “ON” marking.
9
Page 10

Care and Maintenance
MADE IN VIETNAM / FABRIQUÉ AU VIETNAM / HECHO EN VIETNAM
Use a soft, clean cloth that will not scratch the surface when dusting.
Use of furniture polish is not necessary. Should you choose to use polish, test first in an inconspicuous area.
Using solvents of any kind on your furniture may damage the finish.
Never use water to clean your furniture as it may cause damage to the finish.
Always use coasters under beverage glasses and flowerpots.
Liquid spills should be removed immediately. Using a soft, clean cloth, blot the spill gently. Avoid rubbing.
Always use protective pads under hot dishes and plates. Heat can cause chemical changes that may create
spotting within the furniture finish.
In the event that your furniture is stained or otherwise damaged during use, we recommend that you call a
professional to repair your furniture.
Check bolts/screws periodically and tighten them if necessary.
Further Advice about Wood Furniture Care
It is best to keep your furniture in a climate-controlled environment. Extreme temperature and humidity
changes can cause fading, warping, shrinking and splitting of wood. It is advised to keep furniture away from
direct sunlight as sun may damage the finish.
Proper care and cleaning at home will extend the life of your purchase. Following these important and helpful
tips will enhance your furniture as it ages.
A touch-up pen has been provided to minimize the small nicks or scratches that may occur during
assembly or shipping.
We hope you enjoy your purchase for many years.
Thank you for your purchase!
Quality Guarantee (Not Valid in Mexico)
We are confident that you will be delighted with your Bayside Furnishings® purchase.
Should this product be defective in workmanship or materials or fail under normal use, we will repair or
replace it for up to one (1) year from date of purchase. Every Bayside Furnishings® product is designed to meet
your highest expectations. We guarantee that you will immediately see the value of our fine furniture.
This warranty gives you specific legal rights and you may also have other rights which vary from state to state
or province to province.
AUSTRALIA: Our goods come with guarantees that cannot be excluded under the Australian
Consumer Law. You are entitled to a replacement or refund for a major failure and for compens ation for any
other reasonabl y for eseeab le los s or dama ge. You are als o en titl ed to h av e the good s rep aired or r epl aced i f th e
goods fail to be of acceptable quality and the failure does not amount to a major failure.
Customer Service: 1-877-494-2536 (English, French, Spanish)
Pacific Standard Time: 8:30 a.m. - 4:30 p.m., Monday to Friday
(Valid in US and Canada only)
www.baysidefurnishings.com
10
 Loading...