

Page 1

Installing the
BayStack 400-ST1
Cascade Module
Part No. 304433-A Rev 00
November 1998
Page 2

© 1998 by Bay Networks, Inc.
All rights rese rved.
Trademarks
Bay Networks is a registered trademark and BayStack is a trademark of Bay
Networks, Inc. All other trademarks and registered trademarks are property of their
respective owners.
Statemen t of Con di tio ns
In the interest of improving internal design, opera tional function, and/or reliabi lity,
Bay Networks, Inc. reserves the right to make changes to the products described in
this document without notice.
Bay Networks, Inc. does not assume any liability that may occur due to the use or
application of the product(s) or circuit layout(s ) des cribed herein.
Federal Communications Commission (FCC) Compliance Notice:
Radio Frequency Notice
Note: This equipment has been tested and found to comply with the limits for a
Class A digital device, pursuant to Part 15 of the FCC rules. These limits are
designed to provide reasonable protection against harmful interference when the
equipment is operated in a commercial environment. This equipment generates,
uses, and can radiate radio frequency energy. If it is not installed and used in
accordance with the instruction manual, it may cause harmful interference to radio
communications. Operation of this equipment in a residential area is likely to cause
harmful interferenc e, in which case user s will be requir ed to take whatever
measures may be necessary to correct the interference at their own expense.
EN 55 022 Declaration of Conformance (UPDATE THIS FOR 400-ST1)
This is to certify that the Bay Networks BayStack 400-ST1 Cascade Module are
shielded against the generation of radio interference in accordance with the
application of Council Directiv e 89/336/EEC, Article 4a. Conformity is declared by
the application of EN 55 022 Class A (CISPR 22).
Warning: This device is a Class A product. In a domestic en vironment, this product
may cause radio interference, in which case, the user may be required to take
appropriate measures.
These products conform to the provisions of Council Directive 89/336/EEC and
72/23/EEC. The Declaration of Conformity is available on the Bay Networks World
Wide Web site at www. baynetworks.com.
Page 3
Intr oduction
This guide provides pr ocedures for installing the BayStack
400-ST1 Cascade Modules into supported Bay Networks
BayStack 450 switches that are configured with BayStack
450 software version V1.1.0 or later. You can determine
the software version of your switches by accessing the
System Characteristics screen for each switch.
Note:
BayStack 400-ST1 Cascade Module
The
will n ot oper ate with BayStack 450 switches that
are configured with BayStack 450 software
versions earlier than version V1.1.0.
If you need to upgrade your BayStack 450 switches, refer
to “
Upgrading the BayStack 450 Switch Firmware” on
page 36
of this guide. You must upgrade the switch before
installing the BayStack 400-ST1 Cascade Module.
If you are upgrading your BayStack 450 switches, be sure
to obtain the latest version of the Using the BayStack 450
10/100/1000 Series Switch guide. That guide provides
instructions for settin g up your stack configuration after
you install the 400-ST1 Cascade Modules.
You can obtain the latest updates to your product
documentation, including release notes, by visiting the
Bay Networks Web site at the following location:
www.support.baynetworks. com/library/tpubs
1
Page 4

Find the Bay Networks product for which you need
documentation. Then locate the specific category and
model or version for your hardware or software product.
Using Adobe Acrobat Reader, you can open the manuals
and release notes, search for the sections you need, and
print them on most standard printers. You can download
Acrobat Reader free from the Adobe Systems Web site,
www.adobe.com.
This guide also describes how to connect 400-ST1
Cascade Modules to create a stack of (up to eight)
BayStack 450 switches, and how to modify existing stack
configurations.
For information about: Go to page:
The contents of the shipping box 3
The 400-ST1 front panel components 4
The base unit 7
Stack configurations 10
The redundant cascade stacking feature 14
Insta lling the 400-ST1 Cascade Module 16
Modifying an existing stack configuration 26
Upgrading the BayStack 450 Switch
Firmware
36
2
Page 5
Contents of Shipment
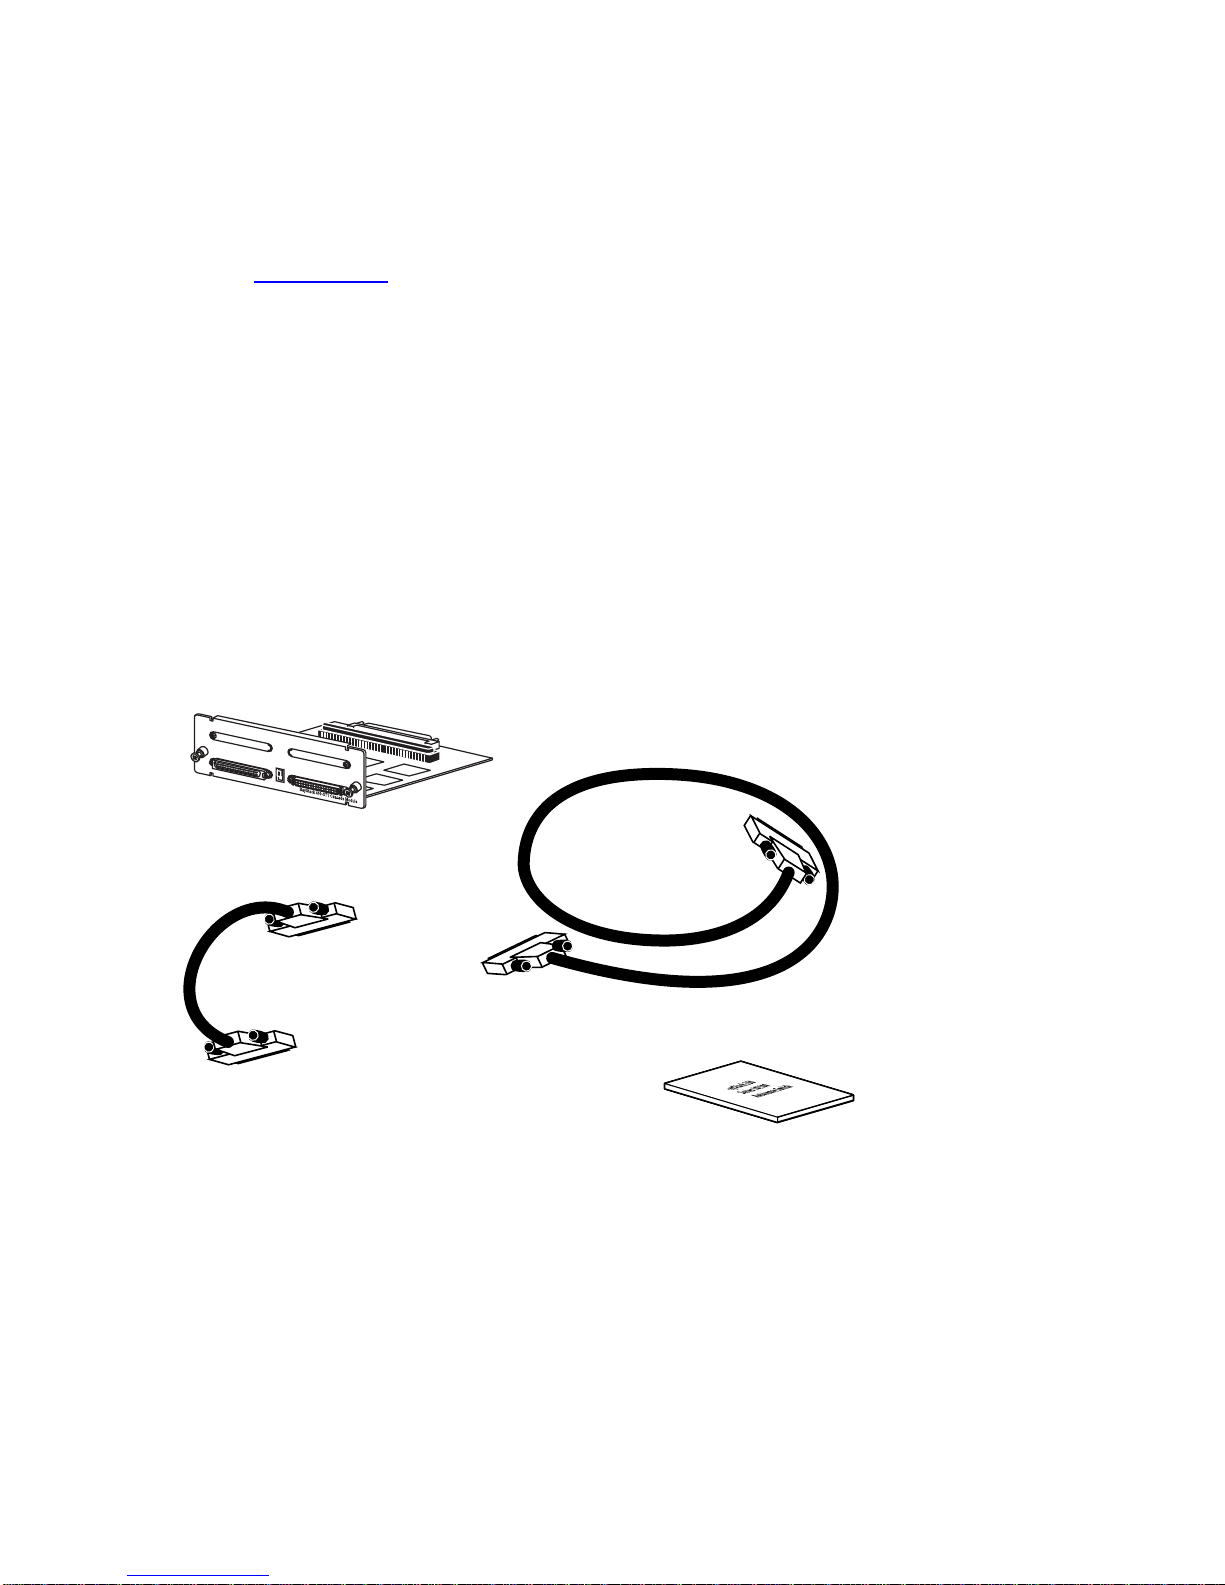
Each BayStack 400-ST1 shipment includes the following
items (Figure 1
):
• One BayStack 400-ST1 Cascade Module
• One .30 meter (12 inch) cascade cable; part number
303978-A.
• This guide (Installing th e BayStac k 400 -ST 1 C as cade
Module).
BayStack 400-ST1
cascade module
0.30 m (12 in.) cascade
cable (PN 303978-A)
Optional:
1 m (39.27 in.)
cascade max-return
cable (PN 303979-A)
Installing the BayStack 400-ST1
Cascade Module
BS0030A
Figure 1. Contents of Shipment
For stacking three or more units (maximum 8 units per
stack), order the optional 1 meter (39.27 inch) cascade
max-return cable (Bay Networks Order No. AL2018001).
3
Page 6
If any items are missing or damaged, contact the sales
agent or the customer service representative from whom
you purchased the BayStack 400-ST1 cascade module.
You will need a Phillips screwdriver for the installation.
Note:
Unless otherwise specified, the terms
“switch” and “unit” are used interchangeably in
this guide.
BayStack 400-ST1 Front Panel Components
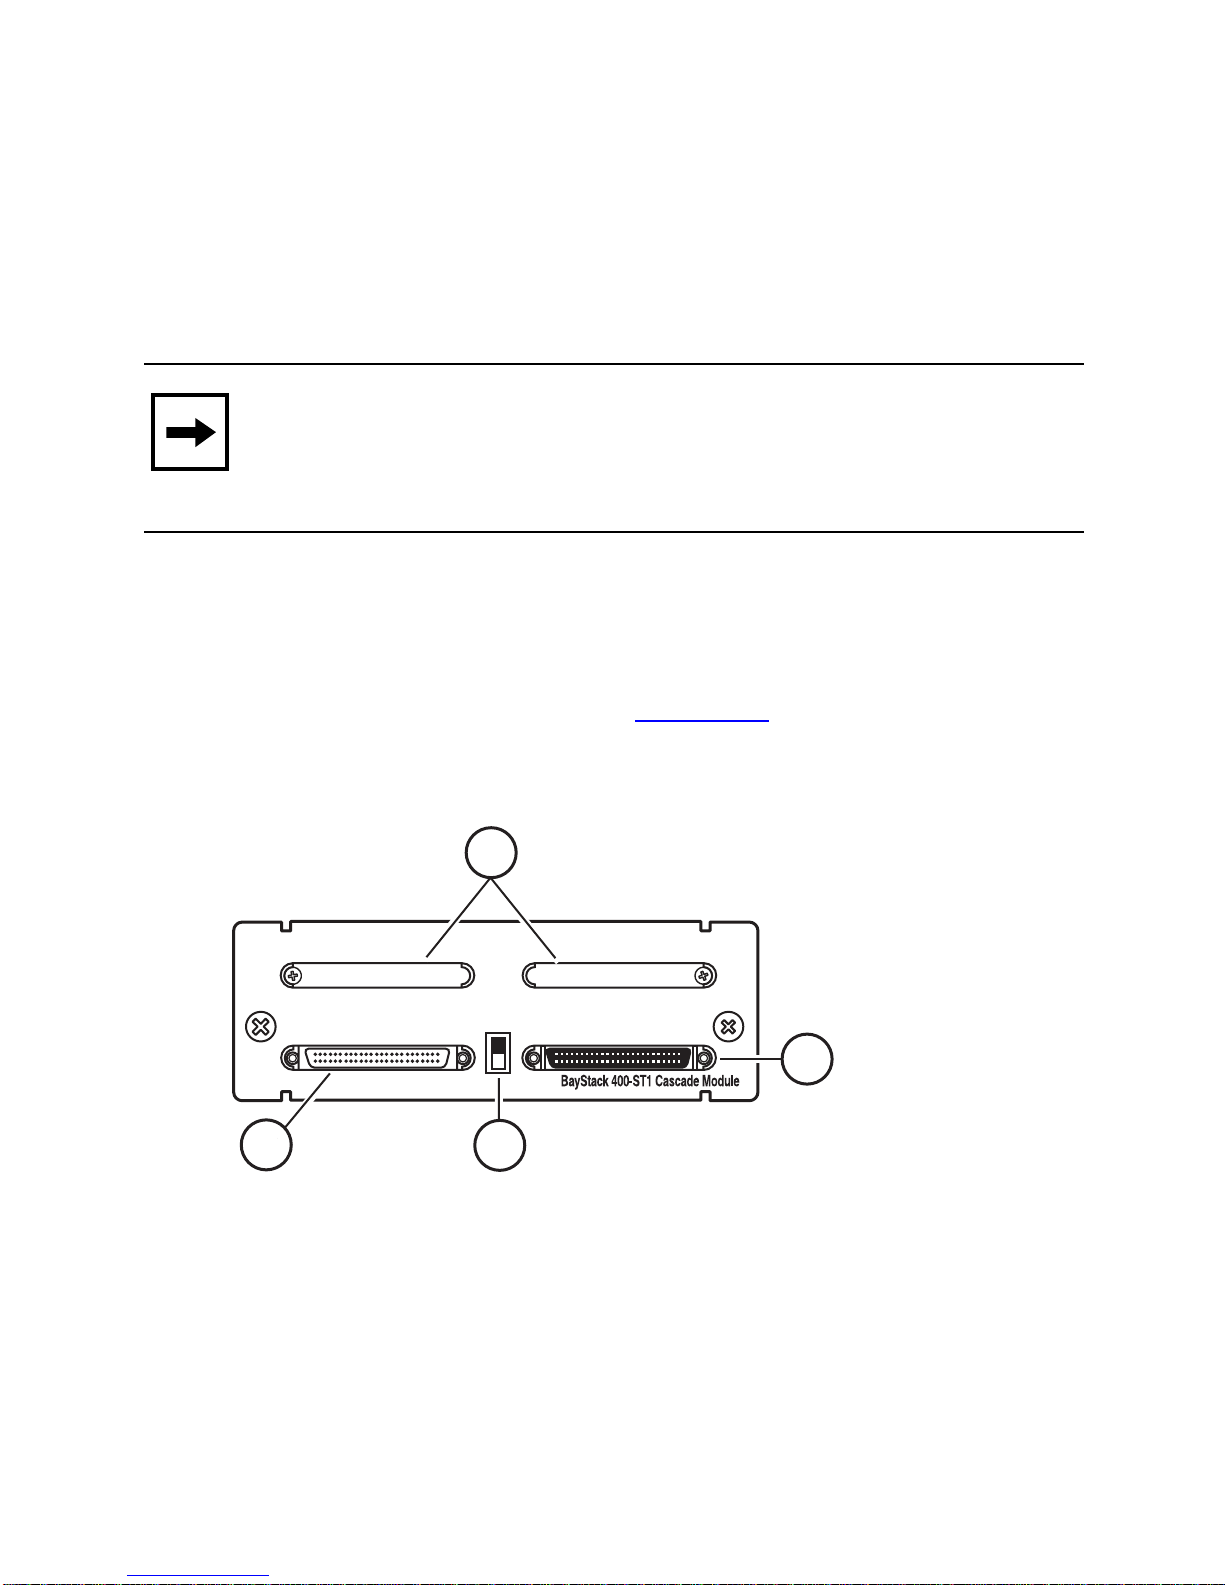
The front-panel components of the BayStack 400-ST1
Cascade Module are shown in Figure 2
. Component
descriptions fo llow the figure.
1
Cascade A Out
2
1 = Blank connectors (unused)
2 = Cascade A Out connector
3 = Unit Select switch
4 = Cascade A In connector
Figure 2. Front Panel Components
Unit Select
3
Base
Cascade A In
4
BS0031A
4
Page 7
Cascade A Out Connector
Provides an attachment point for connecting this unit to
another unit via the cascade cable. A return cable from
another unit’s Cascade A Out connecto r to this unit’s
Cascade A In connector completes the stack connection
(see the example shown in Figure 3
Note: For stacking three or more units
).
(maximum 8 units per stack), order the optional
1 meter (39.27 inch) cascade max-return cable
(Bay Networks Order No. AL2018001).
Unit Select Switch
The Unit Select switch (up = Base) det ermin es the base
unit for the stack configuration (see “
Base Unit
Description” on page 7). The Unit Select switch status is
displayed on the B ayStack 450 LE D display panel (see the
Using the BayStack 450 10/100/1000 Series Switch guide
for details). When in the Base (up) po sition, all other Unit
Select switches in the stack configuration must be set to
Off (down).
5
Page 8
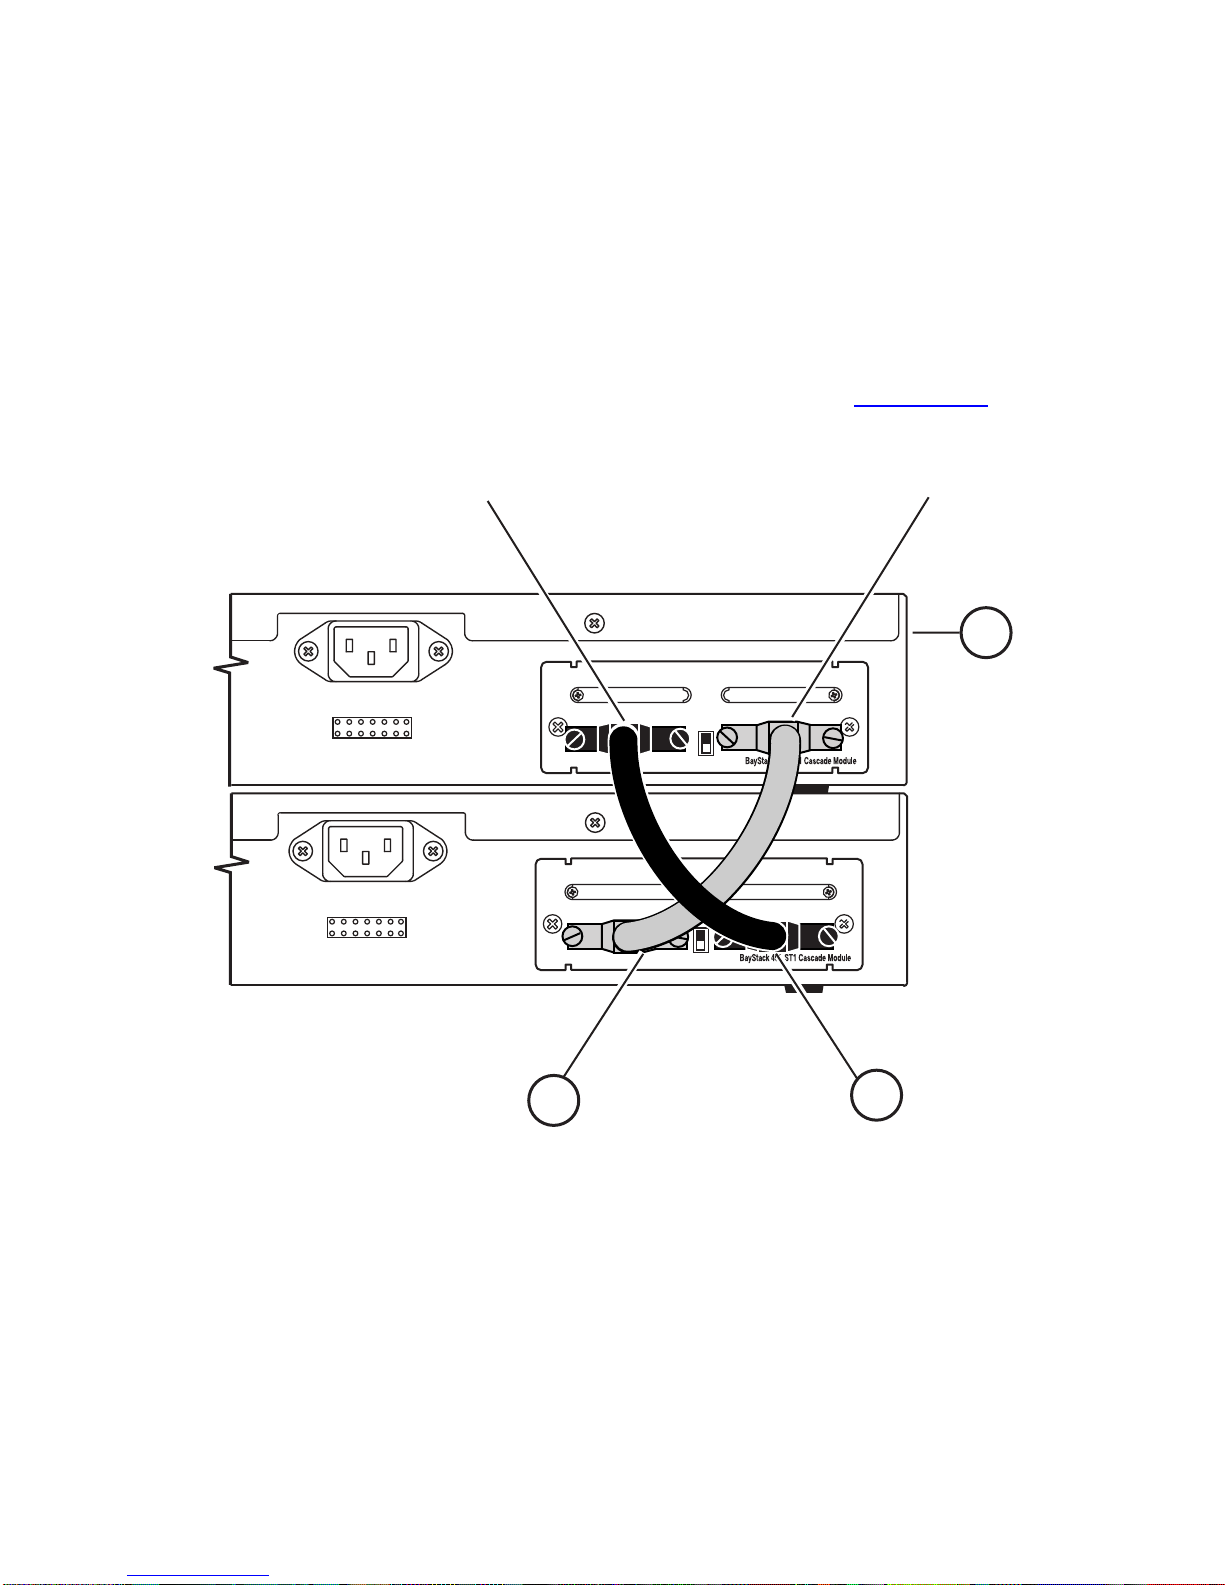
Cascade A In Connector
Provides an attachment point for accepting a cascade cable
connection from an adjacent unit in the stack. A return
cable from this unit’s Cascade A Out connector to the
adjacent unit’s Cascade A In connector completes the
stack connection (see the example shown in Figure 3
Cascade A Out
Unit 1
Cascade A Out
Unit 2
Cascade A Out
Cascade A In
Cascade A InUnit Select
Cascade A InUnit Select
).
1
1 = Base unit
2 = 303978-A cascade cable
3 = 303978-A cascade cable (used for return)
Figure 3. Connecting Cascade Cables
3
2
BS0032A
6
Page 9

Base Unit Description
The base unit is a un i que stack un it that can b e selected by
the Unit Select switch on the front-panel of the 400-ST1
cascade module. One unit in the stack configuration must
be assigned as the base unit; all other units in the s tack
must have their Unit Select switch set to Off (see “
Unit
Select Switch” on page 5). Any single unit in the stack can
be assigned as the base unit.
The physical ordering of all of the other units in the stack
are determined by the position of the base unit within the
stack. This is important for management applications that
view the physic al ordering of the units within the stack.
Some characteristics of the base unit are:
•
Initial installation
--- during the initial installation of
the stack, the software automatically determines the
physical order of all units in the stack according to the
position of the base unit within the stack.
For example, when the stack is powered up, the base
unit becomes un it 1 and the unit that the base unit
connects to (via the Cascade A Out cable) becomes
unit 2 (and the next unit is unit 3 and so on), until the
maximum stack con figuration (up to 8 units) is
reached.
If the base unit is ch anged to anoth er unit i n the stack,
the ne w b ase uni t keep s it s or igi nal uni t number i n t he
stack.
7
Page 10

Note:
You can renumber the units when you
perform the initial setup of the stack as described
in the Using the BayStack 450 10/100/1000
Serie s Swit ch gu ide.
• Stack IP MAC address --- The stack IP MAC address is
automatically assigned during the stack initialization:
The base unit’s MAC address, with a software offset,
is used for the stack IP MAC address.
For example, if the base unit’s MAC address is:
00-00-82-99-44-00
and the Stack software offset is: 1F
then the Stack IP MAC address becomes:
00-00-82-99-44-1F
If another unit in the stack is assigned as the base unit,
the MAC address of the new base unit (with offset)
now applies to the stack configuration. The original
stack IP address still applies to the new base unit.
8
Page 11

• Temporary Base Unit --- If an assigned base unit fails,
the next unit in the stack order automatically becomes
the new tempor ar y bas e unit. This change is indi cated
by the Base LED on the temporary base unit’s LED
display panel t urning o n (yellow).
The automatic base unit chang e to the next unit in the
stack order is a temporary safeguard which allows
you time to replace the failed unit, or reassign the
temporary base unit as the new base unit.
Note:
If you do not reassign the temporary base
unit as the new base unit, and the temporary base
unit fails, the automatic failover to another
temporary base unit will not occur.
Set the Unit Select switch on the temporary base unit
to Base (up =Base) to reassign it as the new base unit.
•
Removing a unit from the stack--- if a unit is removed
from the stack (therefore operating in standalone
mode), the following switch configuration se ttings
revert back to the settings configured before the unit
became a member of the stack:
• IP address
• console password
• TELNET password
• SNMP community strings
9
Page 12

Stack Configurations
As shown in Figure 4
, the cascade connectors and cables
on the 400-ST1 front-panel provide the ability to stack up
to eight BayStack switches. With 400-4TX MDAs
installed in each switch, the stack can accommodate a
maximum of 224 switch ports.
Because stack parameters ar e associated with the b ase unit
(see “
Base Unit Description” on page 7), the physical
stack order depends on the base unit’s position and
whether the stack is configured stack up or stack down.
Stack Up Configurations
In Figure 4, data flows from the base unit (unit 1) to th e
next switch , which is assign ed as unit 2, and continue s
until the last switch in the stack is assigne d as unit 8. The
physical order of the switches is fr om bottom to top (unit 1
to unit 8).
Stack Down Configurations
In Figure 5, data flows from the base unit (unit 1) to th e
next switch , which is assign ed as unit 2, and continue s
until the last switch in the stack is assigne d as unit 8. The
physical order of the switches is fr om top to bottom (unit 1
to unit 8).
10
Page 13
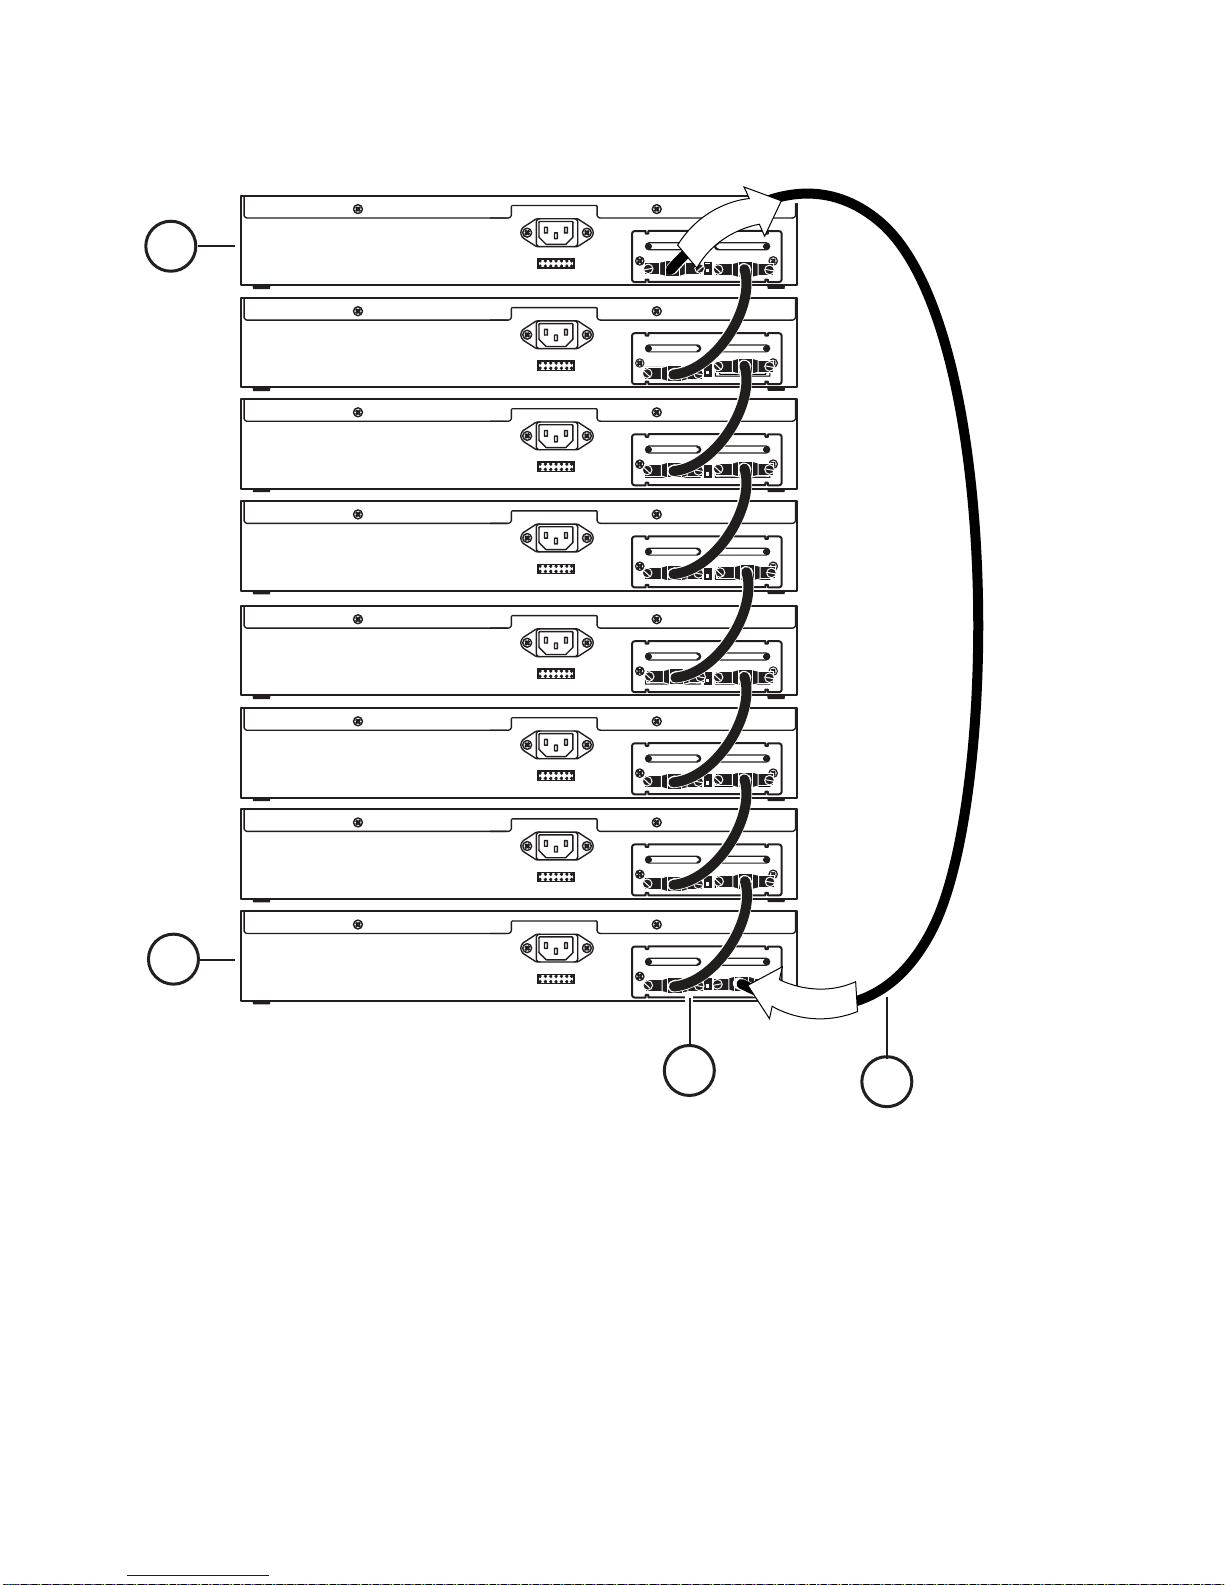
t
u
1
O
Unit 8
Unit 7
Unit 6
Unit 5
Unit 4
Unit 3
Unit 2
2
Unit 1
I
n
1 = Last unit
2 = Base unit
3
4
3 = Cascade cable (PN 303978-A)
4 = Cascade max-return cable (PN 303979-A)
Figure 4. Stack Up Configuration Example
BS0033A
11
Page 14
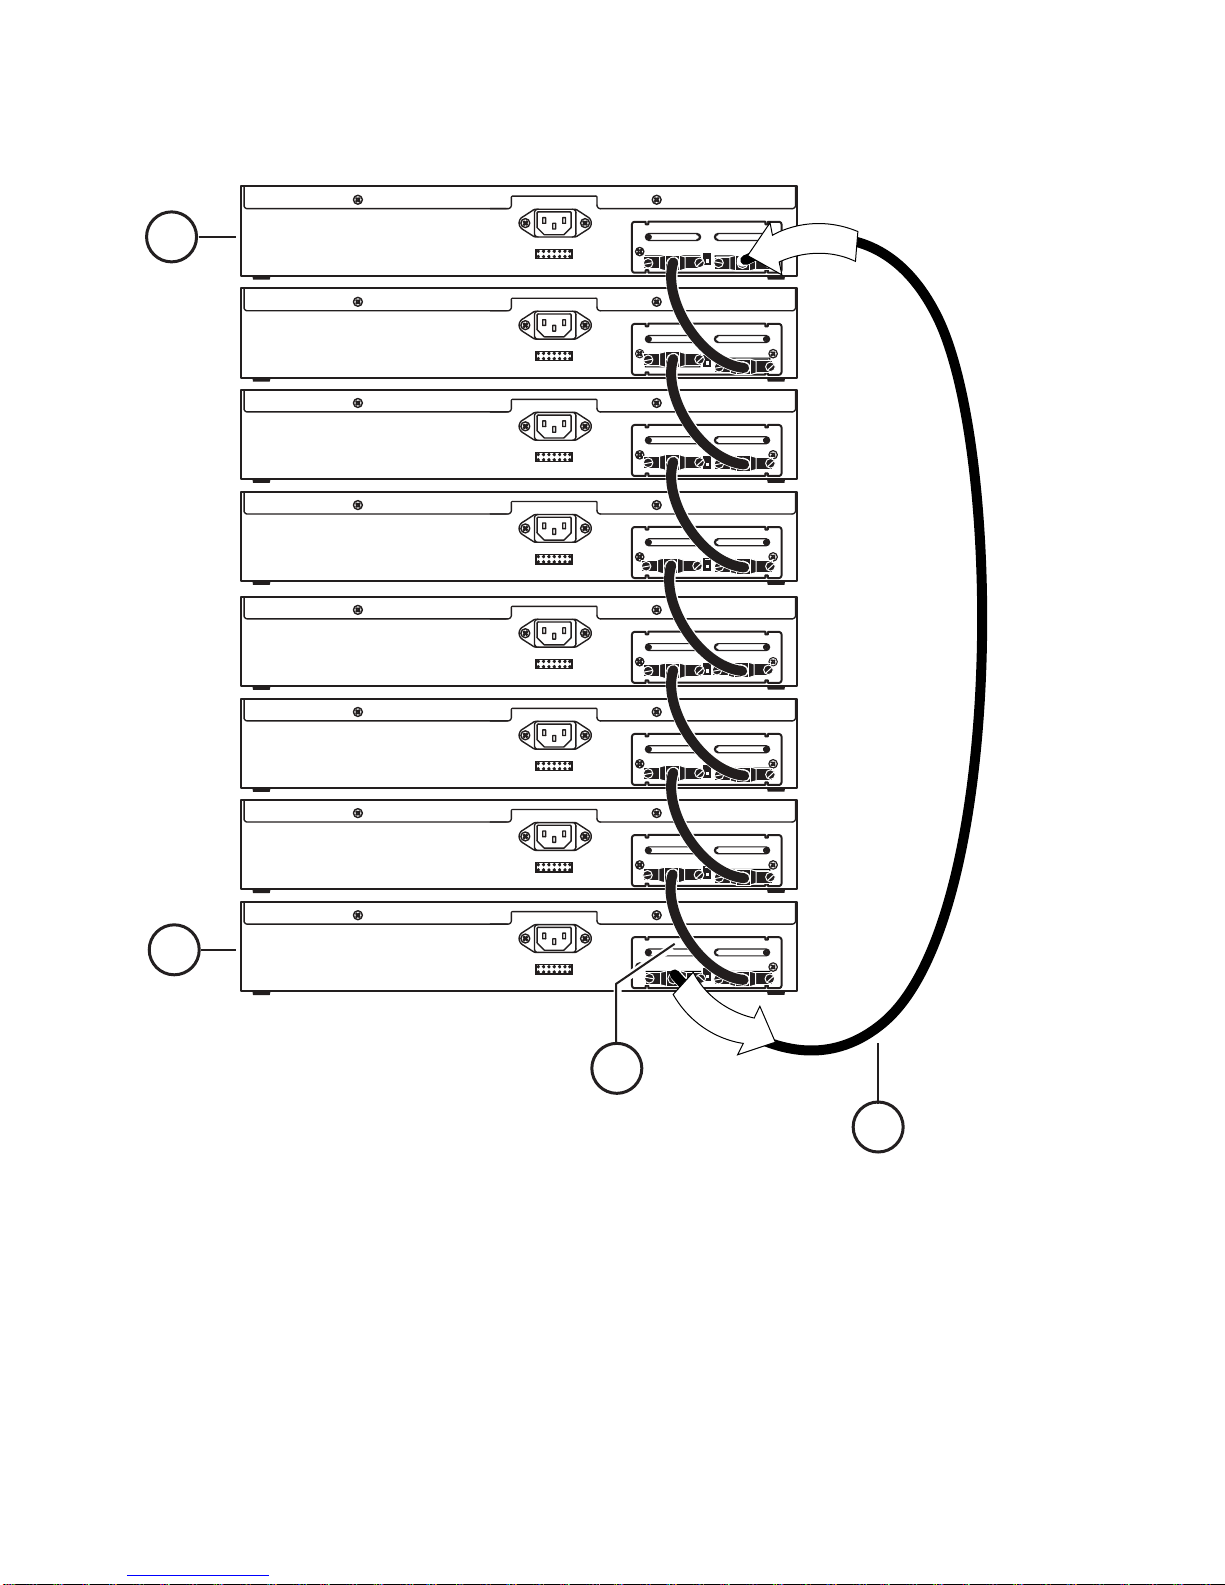
Unit 1
1
n
I
Unit 2
Unit 3
Unit 4
Unit 5
Unit 6
Unit 7
Unit 8
2
O
u
1 = Base unit
2 = Last unit
3
t
3 = Cascade cable (PN 303978-A)
4 = Cascade max-return cable (PN 303979-A)
4
BS0034A
Figure 5. Stack Down Configuration Example
12
Page 15

Certain network management station (NMS) applications
assume a stack down configuration for the graphical user
interface (GUI) that represents the stack (see Figure 5
page 12
). For this reason, Bay Networks recom mend s that
on
you always configure the top unit in the stack as the base
unit.
In any stack configuration, the following applies:
• The entire stack powers up as a single logical unit
within 30 seconds after the base unit initialization.
• You can attach an RS-232 communications cable to
the Console/Comm port of any switch in the stack.
• You can downline upgrade the entire stack from any
switch in the stack.
• You can access and manage the stack using a
TELNET connection or any generic SNMP
management tool throug h any switch port that is part
of the stack configuration.
• When stacking three or more switches , the longer
(1-meter) cascade max- return cable (PN 303979-A) is
used to complete the link from the last unit in the
stack to the base unit.
13
Page 16

Redundant Cascade Stacking Feature
BayStack 400-ST1 Cascade Modules allo w you to connect
up to 8 units into a redundant cascade stack. If any single
unit fails or if a cable is accidently disconnected, other
units in the stack remain o perational, without interruption.
Figure 6
shows an example of how a stack configuration
reacts to a failed or powered down unit in the stack
configuration:
a. As shown in Figure 6
unit 3 becomes
nonoperational.
This can be the result of a failed unit, or simply
because the unit was powered down.
b. Unit 2 and unit 4, directly upstream and
downstream from unit 3, sense the loss of link
signals from unit 3.
c. Unit 2 and unit 4 automatically lo op their
internal s tack si gnals ( A and B).
The Cas Up LED for unit 2 and the Cas Dwn
LED for unit 4 turn on (yellow) to indicate the
stack signals are looped.
d. The remaining stack un its remain connected.
Although the example shown in Figure 6
unit causing the stack to loop signals at the points of
failure (A and B), the system reacts the same way if a
cable is removed (either deliberately or accidently).
shows a failed
14
Page 17
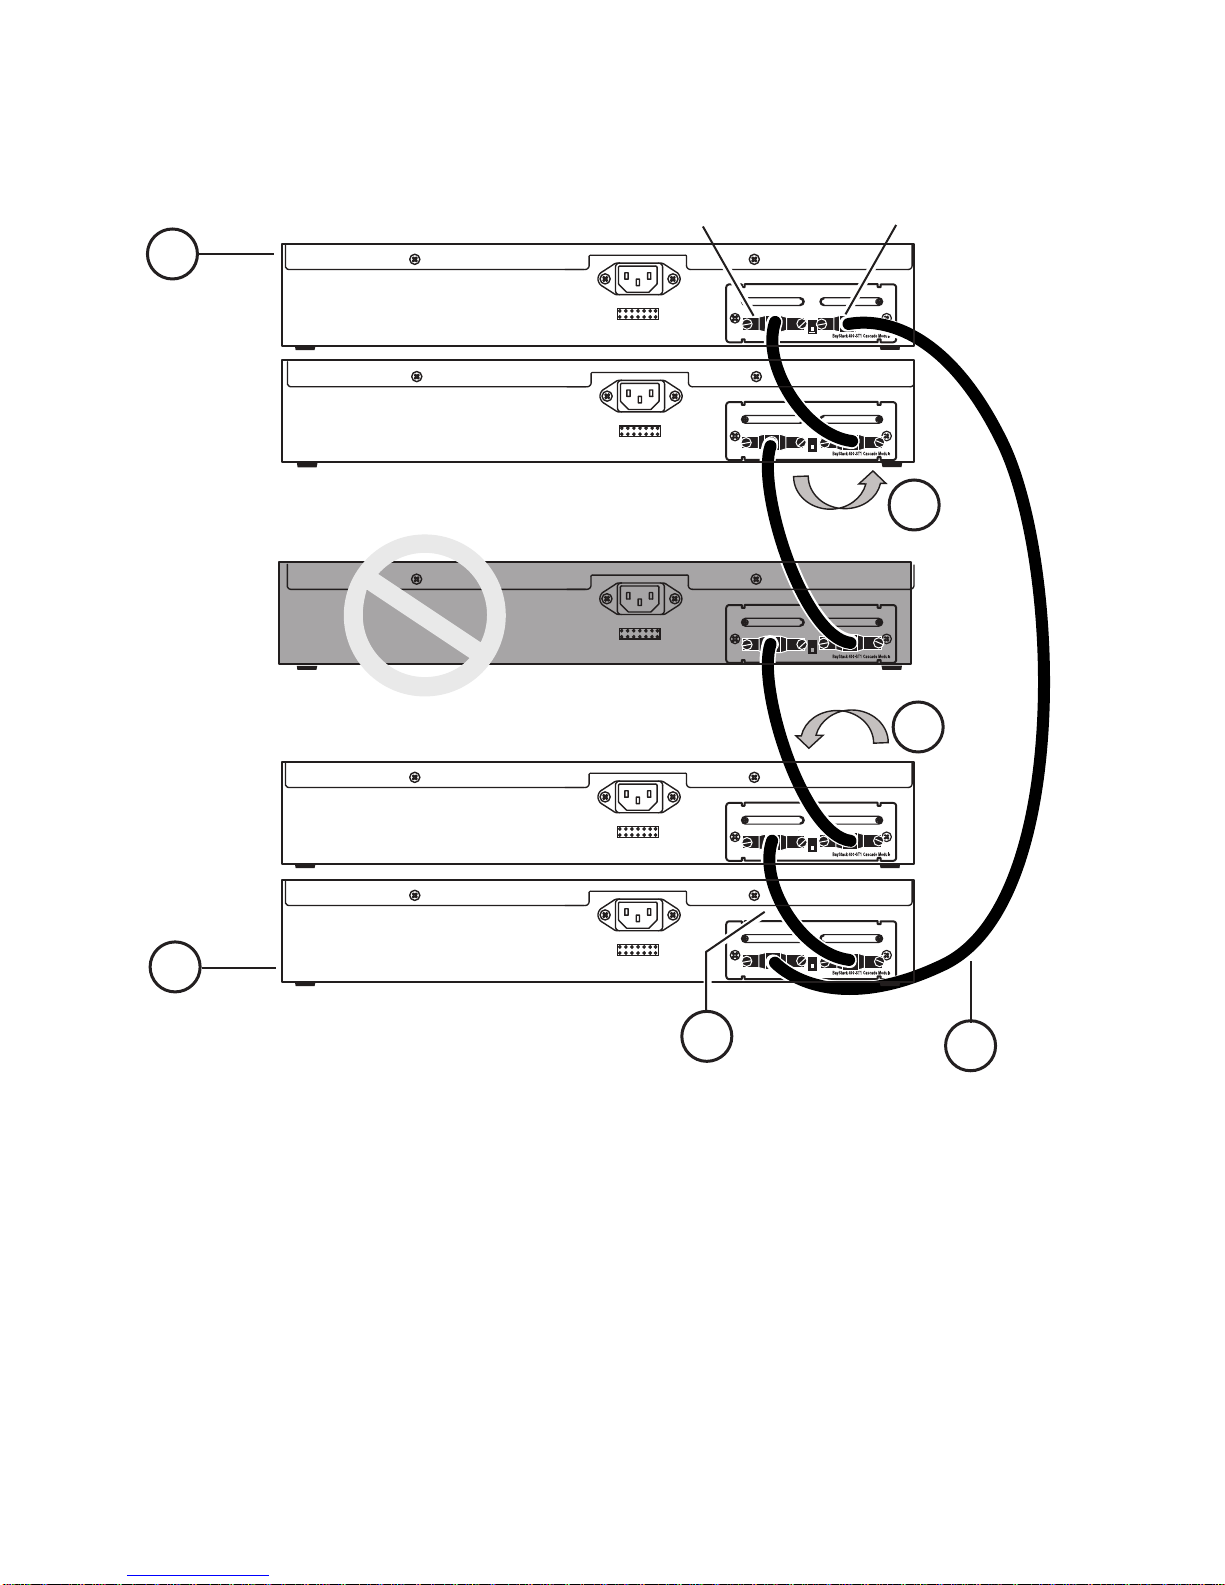
1
Unit 1
Unit 2
Unit 3
Cascade A Out
Cascade A In
A
B
Unit 4
Unit 5
2
1 = Base unit
2 = Last unit
3
4
3 = Cascade cable (PN 303978-A)
4 = Cascade max-return cable (PN 303979-A)
BS0035A
Figure 6. Redundant Cascade Stacking Feature
15
Page 18

Installation
This section describes how to connect up to eight
BayStack 10/100/1000 Series switches into a redundant
stack. The switch stack can consist of any combination of
BayStack 450-24T and BayStack 450-12T switch models.
Before installing your equipment, review the previous
sections of this guide.
Note: For stacking three or more units
(maximum 8 units per stack), order the optional
1 meter (39.27 inch) cascade max-return cable
(Bay Networks Order No. AL2018001).
This section include s the following topics:
• Installing the 400-ST1 Cascade Module
• Installing and connecting multiple switches
• Connecting power
• Verifying the installation
After verifying the installation as described in
“
Verifying the Installation” on page 24 of this guide, refer
to the Using the BayStack 450 10/100/1000 Series Switch
guide to set up the stack and customize the stack
configuration according to your system requirements.
16
Page 19
Installing the 400-ST1 Cascade Module
The Cascade Module slot on the BayStack 450 switch can
accommodate a single 400-ST1 Cascade Module.
To install a 400-ST1 Cascade Module into the Cascade
Module slot, follow these steps:
1. Unplug the AC power cord from the back of the
switch.
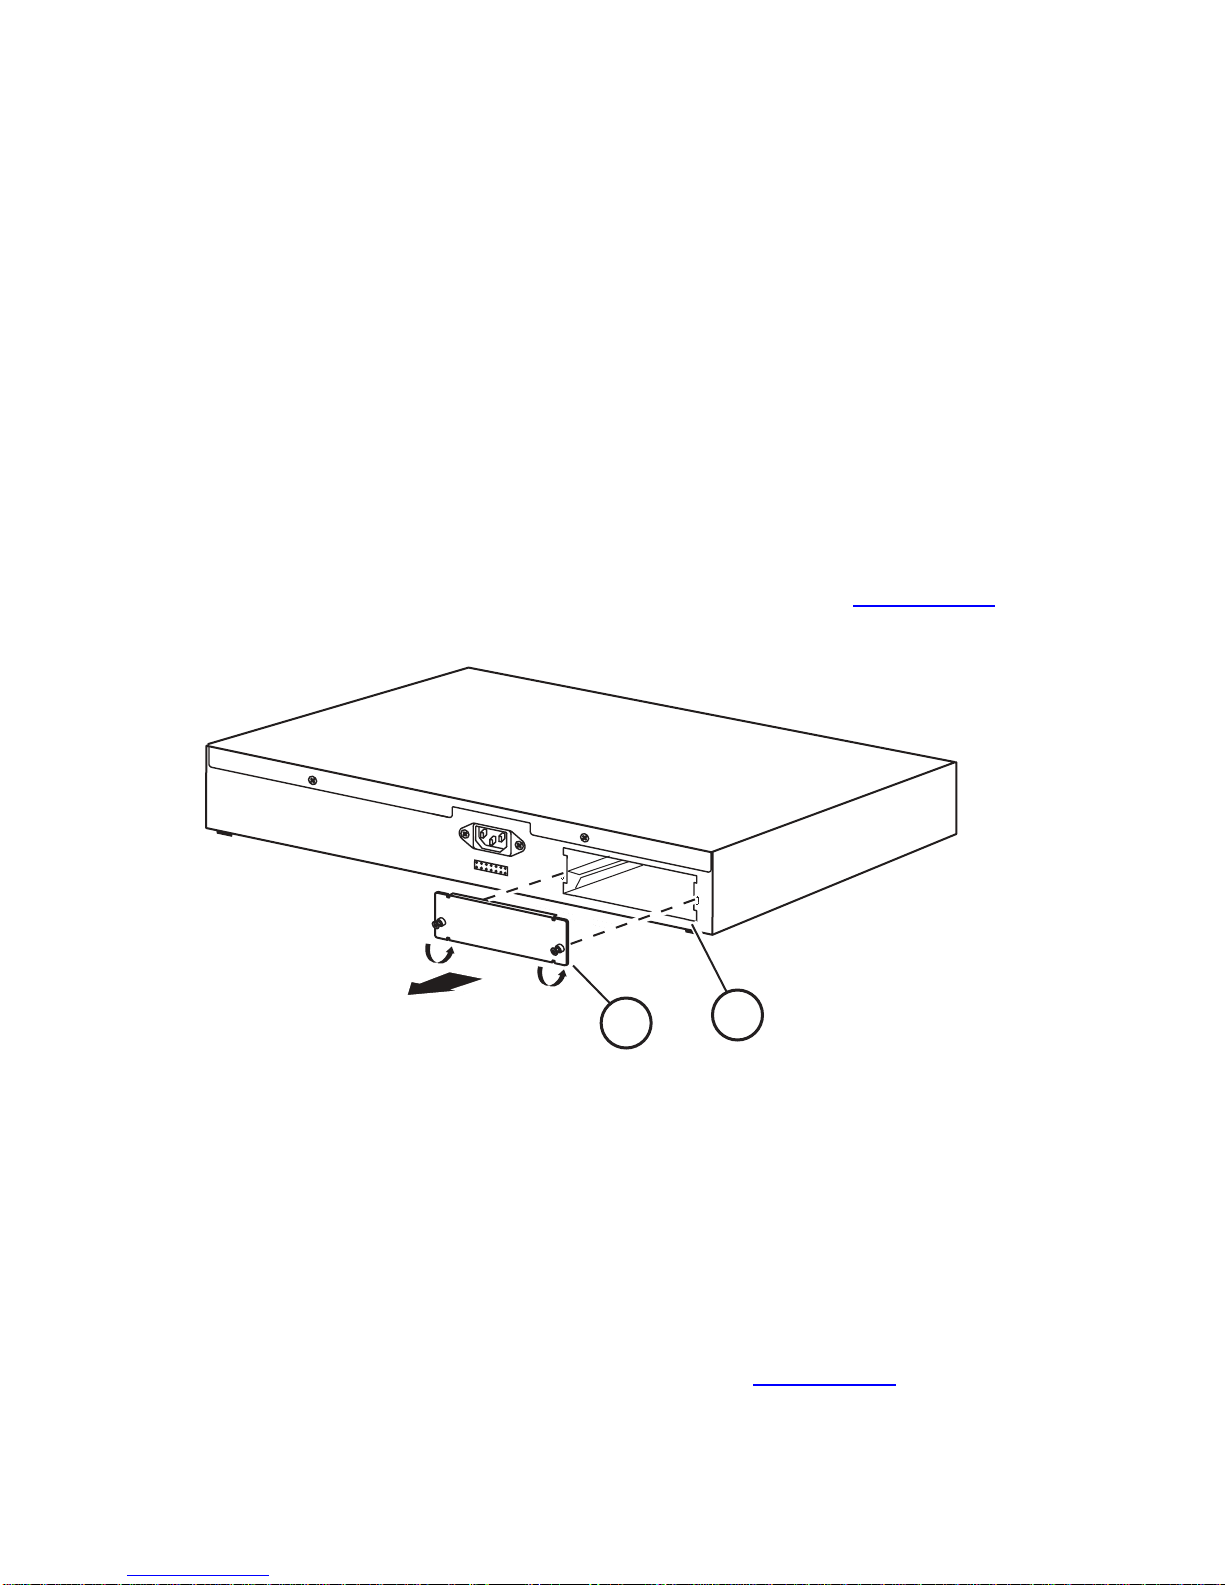
2. Loosen the thumbscrews and remove the filler
panel from the Cascade Module slot (Figure 7
1 = Filler panel
2 = Cascade module slot
).
1
2
BS0036A
Figure 7. Removing the Filler Panel
3. Insert the 400-ST1 Cascade Module into the
chassis slot taking car e to slide the module into the
guides p rovided on th e chassis (Figure 8
).
17
Page 20
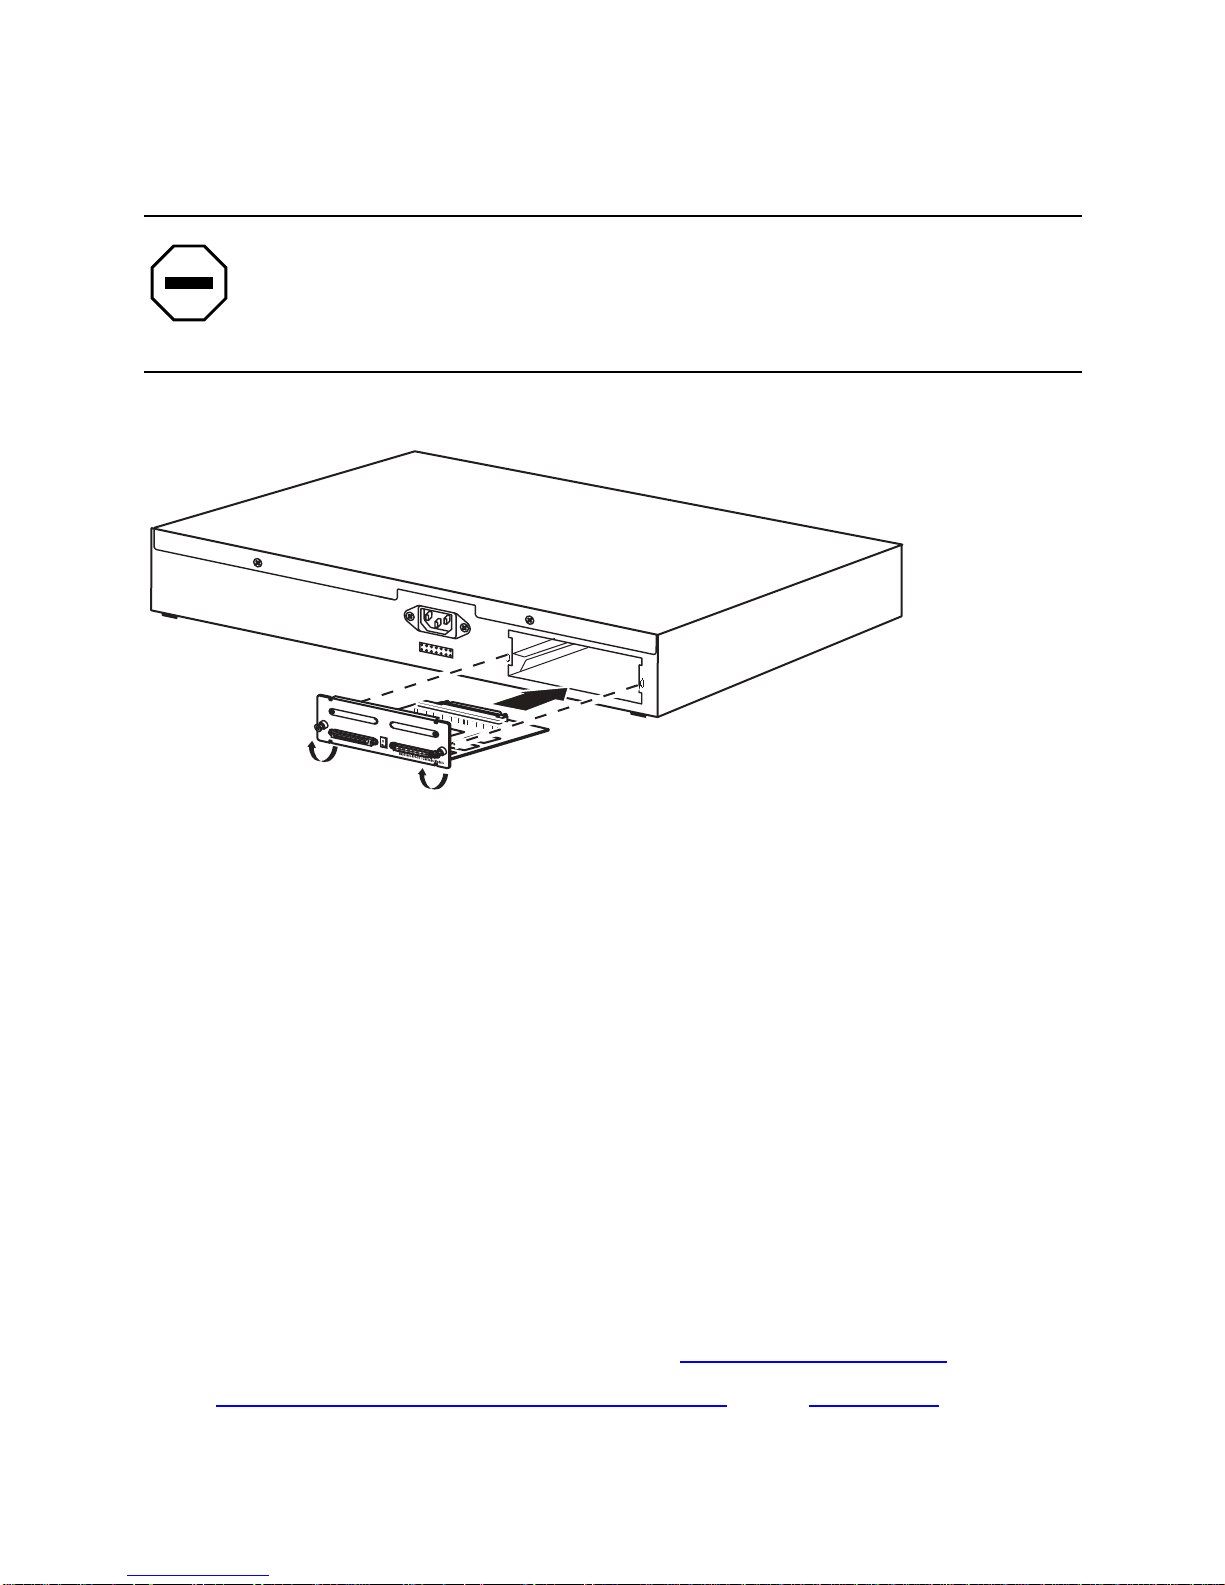
Caution: Be sure that the module slides in on the
guides pro vided. Failure to align the guides could
result in bent and broken pins
Cascade A Out
Unit Select
B
ase
Cascade A In
BS0037A
Figure 8. Installing a 400-ST1 Cascade Module
4. Pr ess the module firmly into the chassis slot. Be
sure that the module is fully seated into the mating
connector.
5. Secure the module in the chassis by tightening the
thumb screws on the module front panel.
6. Repeat Steps 1 to 5 for each switch that is to be
conf igured with the 400-ST1 Cascade Module.
7. Proceed to the next section “
Connecting Multiple Switch es” on page 19.
Install ing and
18
Page 21

Installing and Connecting Multiple Switches
The procedure to install and co nnect multiple switches is
similar for tabletop, shelf, or standard 19-in ch utility rack
installations.
To install multiple switches, follow these steps:
1. Install one unit at a time in the rack or on the shelf
or table top.
Refer to the Using the BayStack 450 10/100/1000
Serie s Swit ch guide for requirements and instructions
for installing the B a yStack 450 switch on a tabletop,
shelf, or in a standard 19-inch utility rack.
2. Disconnect the AC power cords (if previously
connected) from the units you are configuring in
the stack.
3. Determine the stack order configuration, stack up
or stack down, you are installing (refer to “
Stack
Configurations” on page 10).
4. Position the unit you want to be the base unit at the
top (or bottom) of the stack.
Note:
Bay Networks recommends that you
always configure the top unit in the stack as the
base un it.
19
Page 22
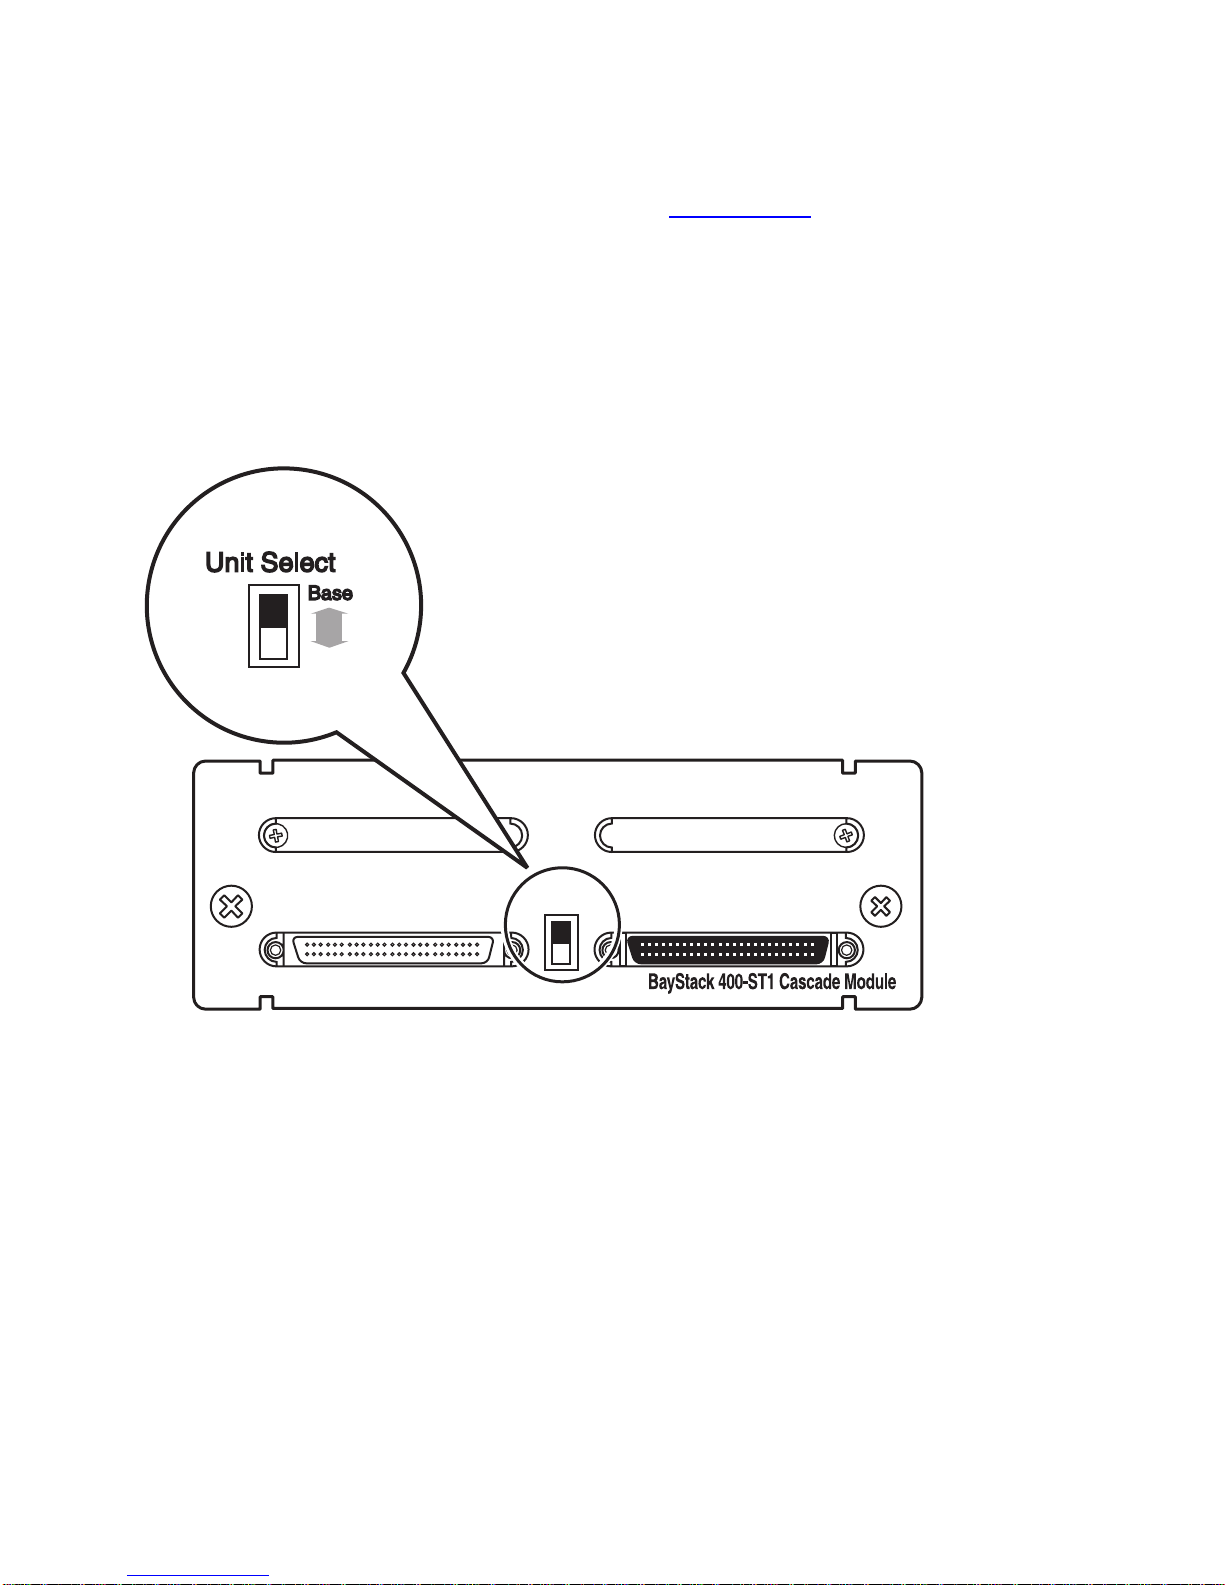
5. Set the Unit Select switch for the base unit to the
Base (up = Base) position ( Figu re 9
).
6. Set the Unit Select switch for all other units in the
stack to the Off (down = Off) position
Only one unit in the stack can be th e base u nit.
Off
Cascade A Out
Unit Select
Base
Cascade A In
BS0038A
Figure 9. Setting the Unit Select Switch
20
Page 23
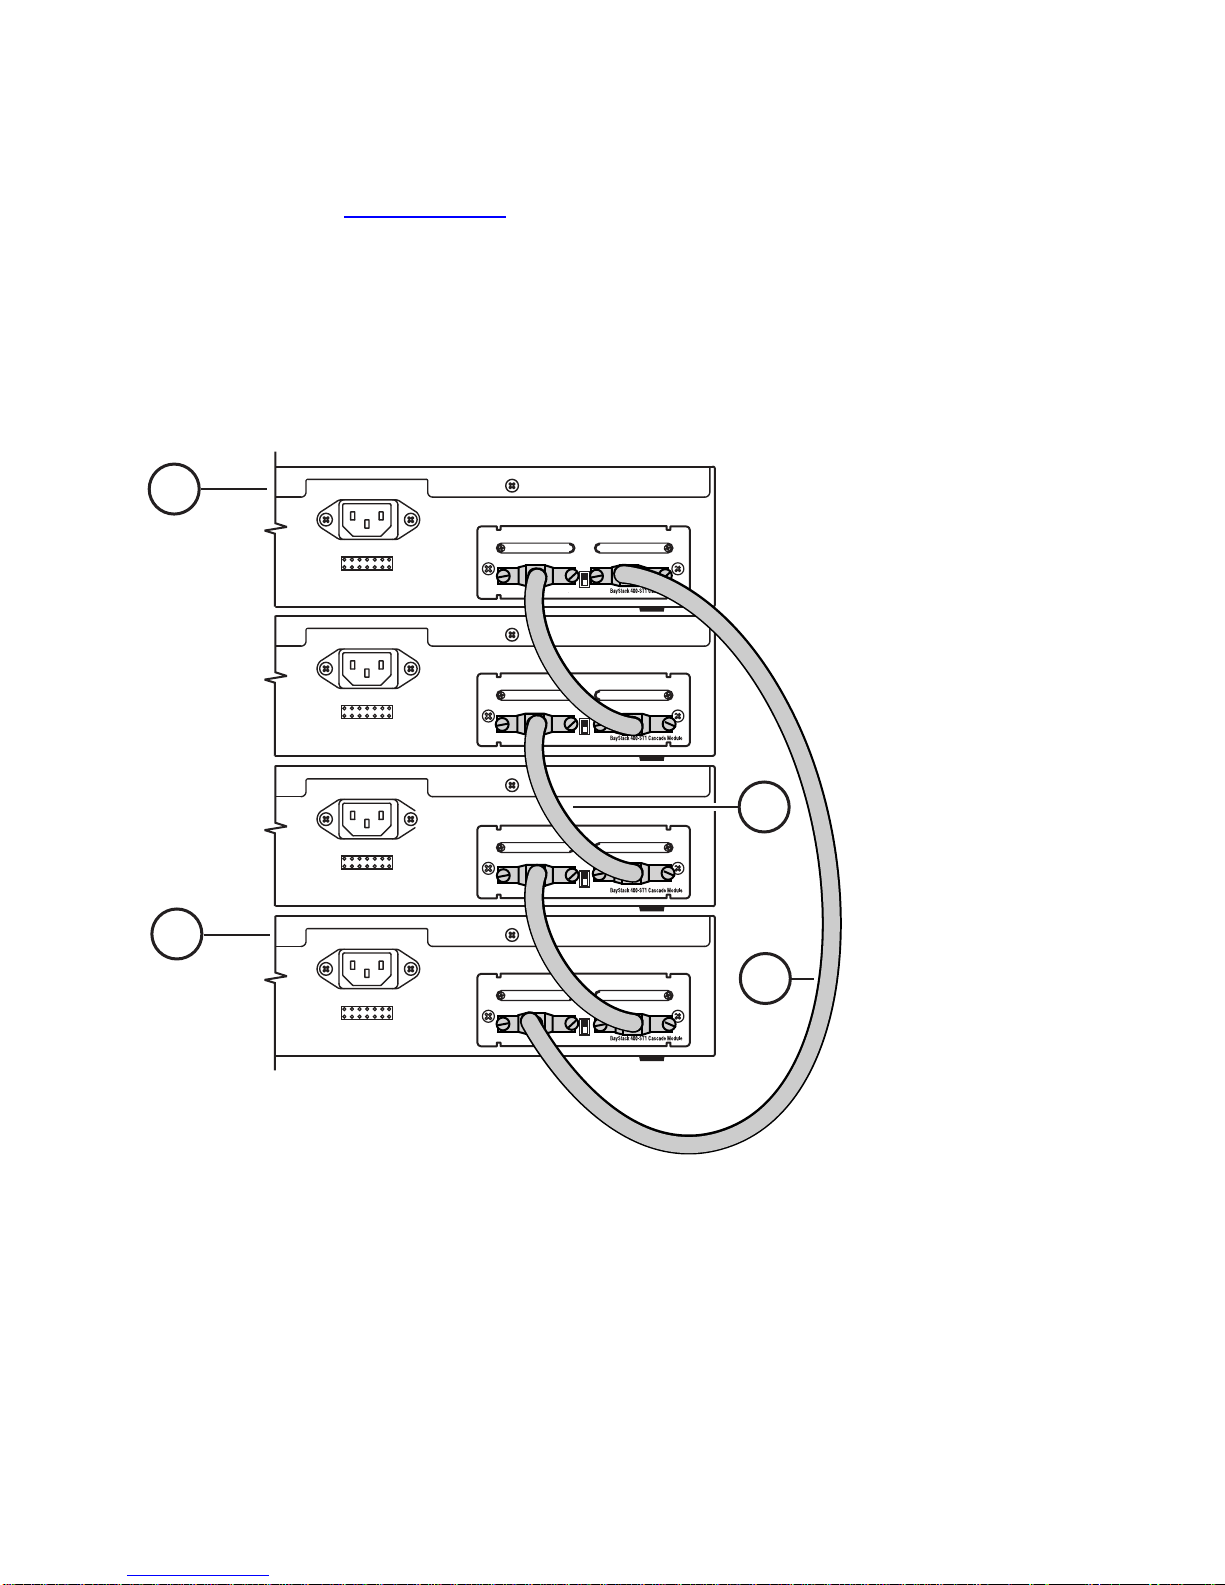
7. Connect the units using the supplied cascade
cables (Figure 10
).
a. Connect one end of a cascade cable to the
Cascade A Out connector on the Base Unit
(unit 1).
1
Unit 1
Unit 2
Cascade A Out
Cascade A Out
Cascade A InUnit Select
Cascade A InUnit Select
3
Unit 3
Cascade A Out
Cascade A InUnit Select
2
4
Unit 4
Cascade A Out
Cascade A InUnit Select
1 = Base unit
2 = Last unit
3 = Cascade cable (PN 303978-A)
4 = Cascade max-return cable (PN 303979-A)
BS0039A
Figure 10. Installing Cascade Cable s
21
Page 24

b. Connect the other end of the cascade cable to
the cascade A In connector on the unit just
below the base unit (unit 2) , or ju st above the
base unit if cascading up the stack.
c. Continue attaching the cascade cables until
the last unit is configured.
A maximum of eight units can be configured per
stack.
d. At the last unit in the stack, connect one end of
a cascade max-return cable to the Cascade A
Out connector. Connect the other end of the
cascade max-return cable to the cascade A In
connector on the base unit.
When stacking 3 or more units, the (optional) 1
meter (39.27 inch) cascade max-return cable is
required (Bay Networks P art Number 303 979-A).
8. Be sure all cable connections to the cascade
connectors are secur ed f irmly by the thumb screws
on the cascade cable plugs.
9. Procee d to “
Connecting Power ” on page 23.
22
Page 25

Connecting Power
When the stack is initially powered up, the software
automatically assigns unit numbers to the units (the
individual switches in the stack). The unit numbers
correspond to the physical stack power up/initialization
sequence, beginning with the base unit as unit 1.
The stack initializatio n sequence takes approximately 30
seconds for completion. If any switch in the stack
configuration does not power up or initialize within 15
seconds, it is assigned a unit number that may be out of
sequence with the stacking order.
If this happens, you can renumber the units when you
perform the initial setup of the stack as described in the
Using the BayStack 450 10/100/1000 Series Switch guide.
Note:
Bay Networks recommends that you
connect all of the switch AC power cords to one
or two AC power strips that c an apply power to
all of the switches simultaneously.
Power up the stack configuration as follows:
1. Plug the AC power cord, for each switch in the
stack configuration, into the AC power receptacle
on each switch back panel.
2. Plug the other ends of the AC power cords into a
grounded AC power strip.
23
Page 26

One or two AC power strips may be required to
accommodate the quantity of switches in the stack.
3. Apply power to the AC power strip.
Set the AC power strip On/Off switch to On (or
connect the AC power strip to a grounded AC power
outlet).
4. Procee d to “
Verifying the Installation” following
this section.
Verifying the Installation
When installation is complete an d power is applied to the
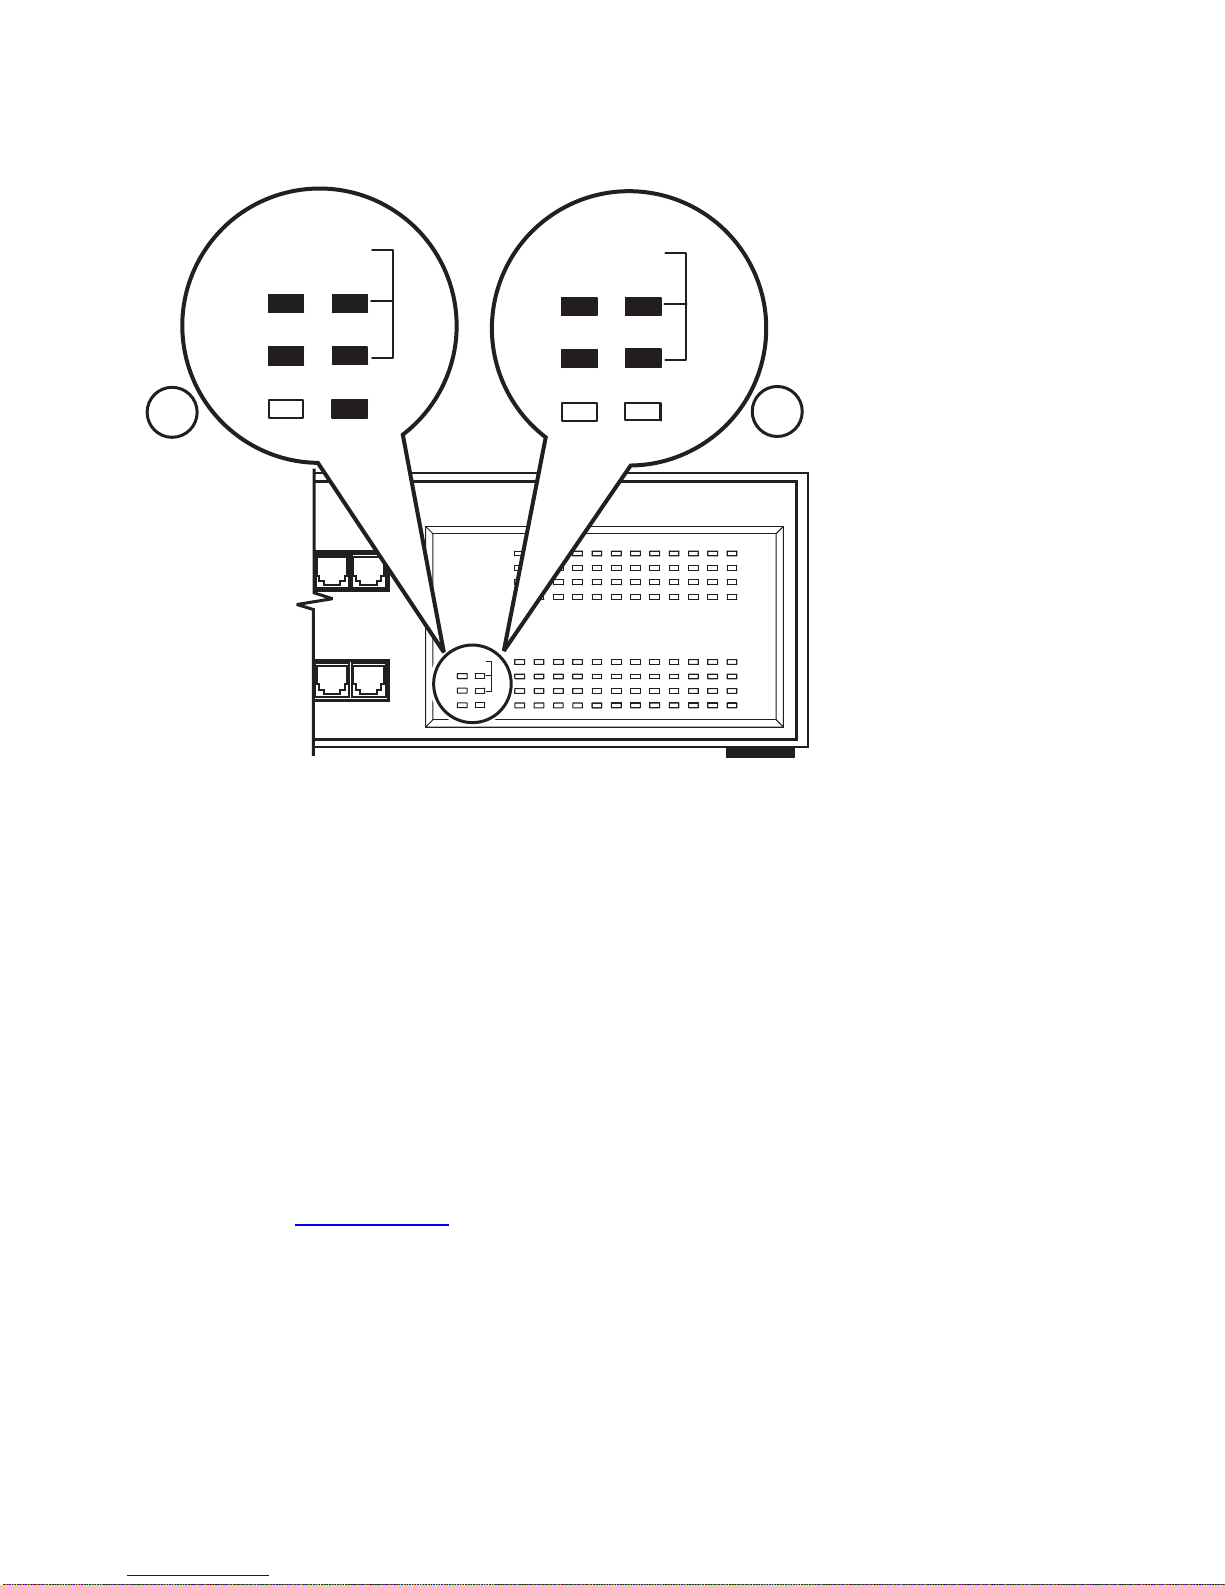
stack configuration, check to see that the following LED
indicati ons are displayed on the switch LED display
panels for all units configured in the stack (Figure 11
):
• The Pwr LED and Status LED for all units in the
stack are all on (green).
If the Pwr or Status LED for any unit in the stack is
of f, or bl inking, r efer to the t roublesho oting chapt er in
the Using the BayStack 450 10/100/1000 Series
Switch guide.
• The Cas Up/Dwn LEDs for all units in the stack are
all on (green).
If the Cas Up/Dwn LED for any unit in the stack is
off, or yellow, check the cable connections to and
from the 400-ST1 cascade connectors.
24
Page 27
Cas
Pwr
Status
RPSU
Up
Dwn
Base
1
1211
2423
1 = Base unit only
2 = All other units in stack
BayStack
Cas
Pwr
Status
RPSU
450-24T Switch
Cas
Up
Dwn
Base
2
BS0040A
Figure 11. Ve rifying the Installation
• The Base LED for the base unit o nly is on.
If one (or more) Base LEDs are blinking, no unit (or
more than one unit) is configured as the base unit.
If the LEDs on any of the units in the stack are not as
shown in Figure 11
, cycle the power to the stack and v erify
the LEDs. Refer to Using the BayStack 450 10/100/1000
Serie s Swit ch guide to set up the stack an d for detailed
information abou t stacking, including troubleshootin g.
25
Page 28

Modifying an Existing Stack
Configuration
This section provides examples of how to modify an
existing stack configuration. The examples assume the
stack configur ation is operation al with connected stations.
Always notify the attached stations that there may be a
temporary disruption of the network services before you
begin the modification.
To maintain the unit numbering within the stack, Bay
Networks recommends that you renumber the entire stack
after any modification involving configuration changes.
Note: Renumbering causes the entire stack to be
reset with the current configuration settings. The
Reset can take up to 30 seconds for completion.
Notify the connected stations that there will be a
short disruption of network services before
renumbering the stack.
See the Using the BayS tack 450 10/100/1000 Series
Switch guide for more information about renumbering.
This section include s the following topics:
• Assigning a new base unit to the stack
• Adding units to the stack
• Removing/replacing units from the stack
26
Page 29
Assigning a New Base Unit to the Stack
To assign a new base unit to the s tack, complete the
following steps:
Note:
Bay Networks recommends that you
always configure the top unit in the stack as the
base un it.
1. Set the Unit Select switch on the original base unit
to the Off position.
See Figure 9
on page 20 for details about the Unit
Select switch.
2. Set the Unit Select switch on the new base unit to
the Base posi tion.
3. Renumber the Stack.
See the Using the BayS tack 450 10/100/1000 Series
Switch guide for detailed information on how to
renumber the stack configurati on .
27
Page 30
Adding Units to the Stack
This sectio n des cri b es how to add one or more units to t he
middle of a stack or to the end of a stack.
Note:
Refer to Using the BayStack 450
10/100/100 0 Series S witc h for in formation about
installing units on a tabletop or in a standa rd
19-inch utility rack.
Adding Units to the Middle of a Stack
To add one or more units to the middle of a stack,
complete the following steps:
1. Determine the position of the new units in the
existing stack (Figure 12
).
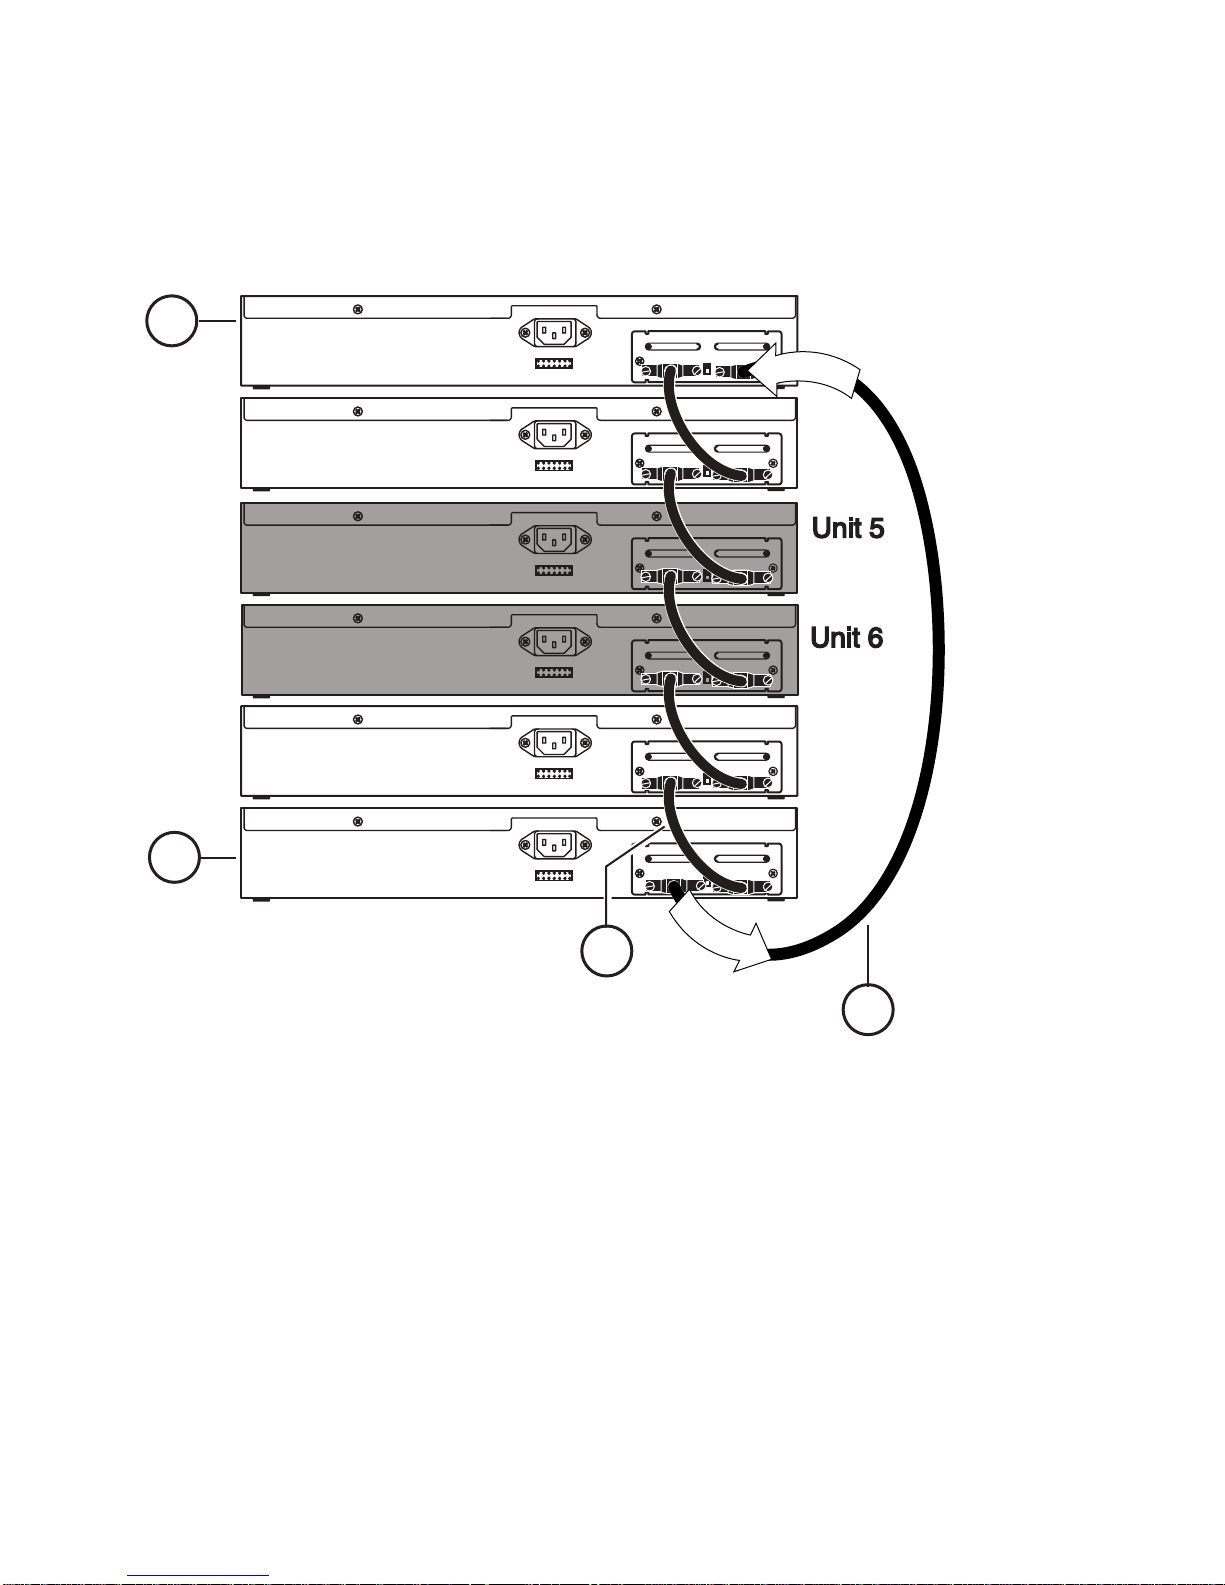
For example, the shaded units (units 5 and 6) in
Figure 12
show two new units to be added to the
stack. The ne w units are numbered as unit 5 and unit 6
because they are additions to an existing 4 unit st ack.
2. Disconnect the cascade cable from the Cascade A
In connector at unit 3.
Leave the other end of the cascade cable connected to
the Cascade A Out connector at unit 2.
3. For 19-inch rack configurations, move the units
two spaces lower in the rack.
28
Page 31
For tabletop configurations, temporarily move units 1
and 2 to allow space for units 5 and 6.
1
2
Unit 1
I
n
Unit 2
Unit 3
Unit 4
O
u
1 = Base unit
2 = Last unit
3 = Cascade cable (PN 303978-A)
4 = Cascade max-return cable (PN 303979-A)
3
t
4
BS0041A
Figure 12. Adding to Middle of Stack
4. Add the new units to t h e desir e d locati on.
For tabletop configurations, replace units 1 and 2
(temporarily moved in Step 4).
29
Page 32

5. Reconnect the cascade cable from unit 2 to the
Cascade A In connector of (new) unit 5.
6. Connect a cascade cable from the Cascade A Out
connector of unit 5 to the Cascade A In connector
of unit 6.
7. Connect a cascade cable from the Cascade A Out
connector of unit 6 to the Cascade A In connector
of unit 3.
8. Renumber the order of the units for the new stack
configuration (if desired).
You can renumber the unit numbers as described in
“Setting Up the Stack Conf iguration” in the Using t he
BayStack 450 10/100/1000 Series Switch guide.
Adding Units to the End of a Stack
To add one or more units to the end of a stack,
complete the following steps:
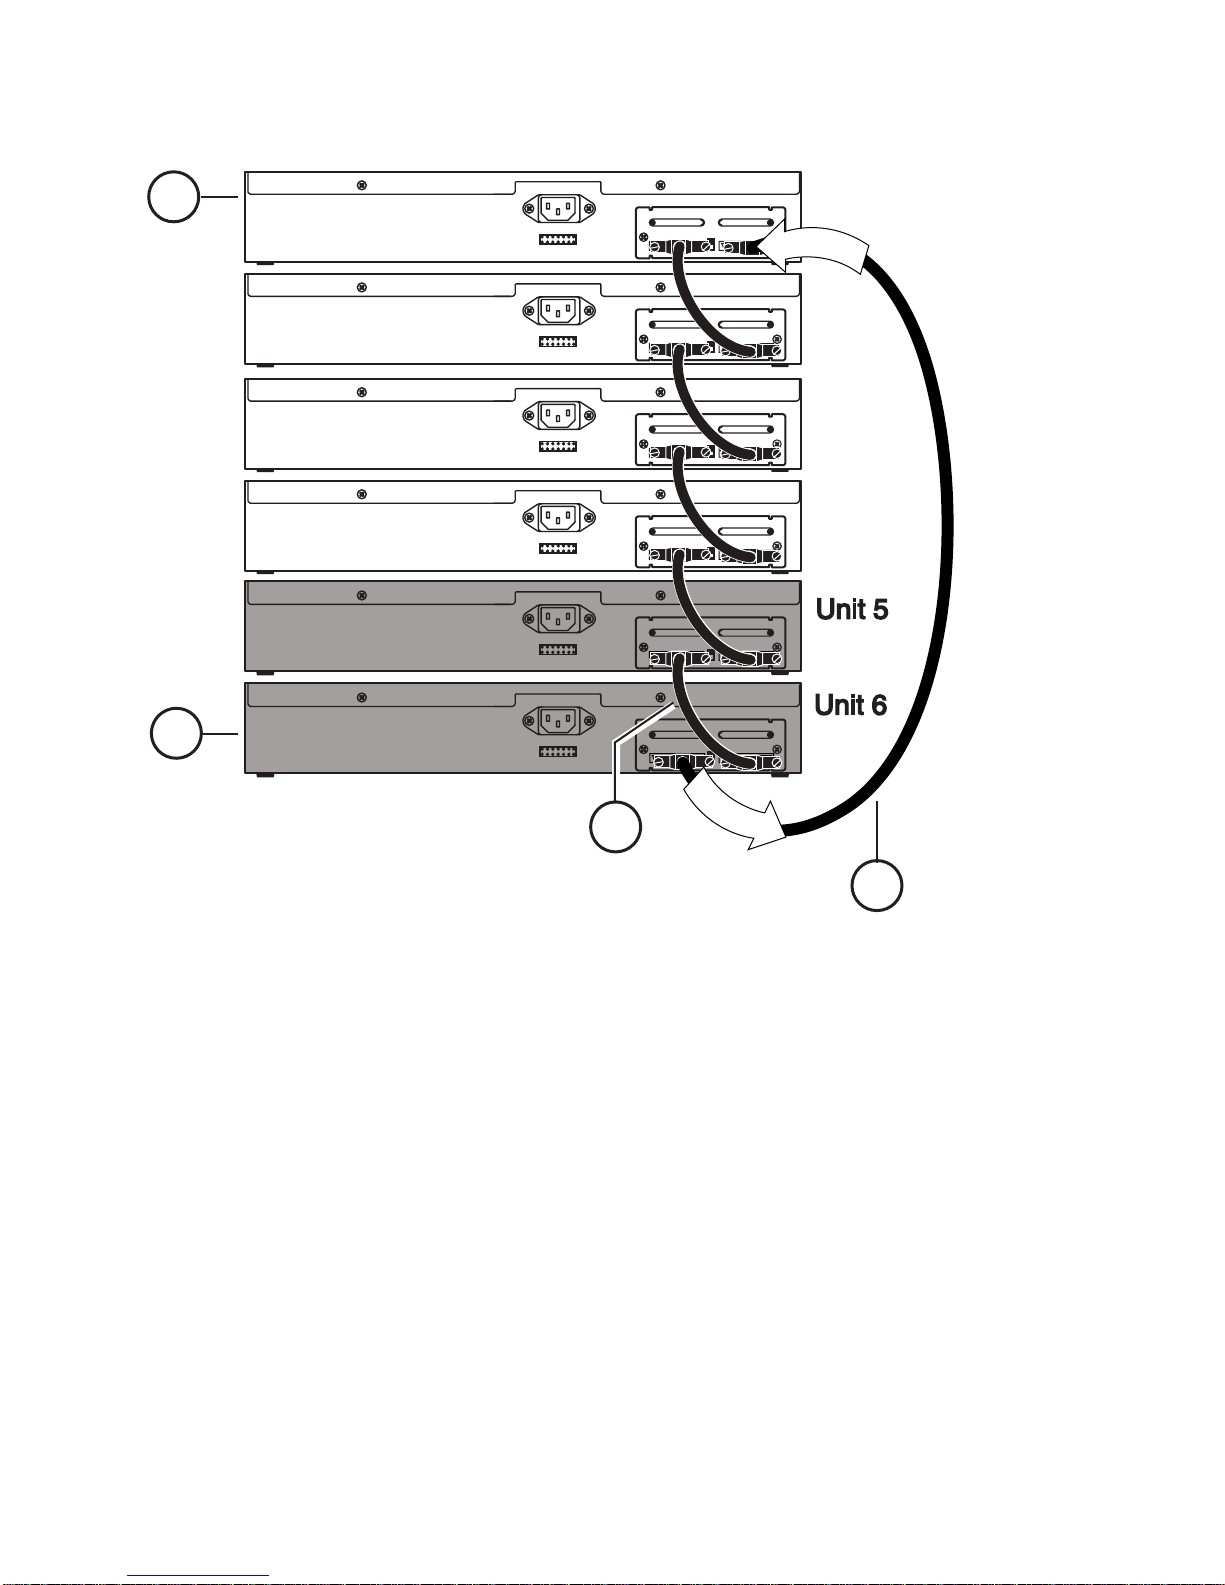
1. Determine the position of the new units in the
existing stack (Figure 13
).
For example, the shaded units (units 5 and 6) in
Figure 13
show the two new units to be added to the
stack. The ne w units are numbered as unit 5 and unit 6
because they are additions to the end of an existing 4
unit stack.
30
Page 33
1
Cascade Module
Cascade Module
Cascade Module
Cascade Module
Cascade Module
Cascade Module
Unit 1
I
n
Unit 2
Unit 3
Unit 4
2
O
u
1 = Base unit
3
t
2 = Last unit
3 = Cascade cable (PN 303978-A)
4
4 = Cascade max- return cable (PN 303979-A)
BS0042A
Figure 13. Adding to End of Stack
2. Disconnect the cascade max-return cable (item 4)
from the Cascade A Out connector at unit 4.
Leave the other end of the cascade max-return cable
connected to the Cascade A In connector at unit 1.
3. Add the new units (units 5 and 6) to the end of the
stack configuration.
31
Page 34

4. Connect a cascade cable from the Cascade A Out
connector of unit 4 to the Cascade A In connector
of unit 5.
5. Connect a cascade cable from the Cascade A Out
connector of unit 5 to the Cascade A In connector
of unit 6.
6. Reconnect the cascade max-retur n cable fr om unit
1 to the Cascade A Out connector of unit 6.
7. Renumber the order of the units for the new stack
configuration (if desired).
You can renumber the unit numbers as described in
“Setting Up the Stack Conf iguration” in the Using t he
BayStack 450 10/100/1000 Series Switch guide.
Removing/Replacing Units from the Stack
This section describes how to remove and/or replace units
in an operating stack.
Because the Redundant Cascade Stacking feature allows
signals to loopback at a single point of failure, adjacent
contiguous cabled units can be removed and replaced as a
single unit from the stack.
For more information about the Redundant Cascade
Stacking feature see “
Redundant Cascade Stacking
Feature” on page 14.
32
Page 35
Removing/Replacing Adjacent Units
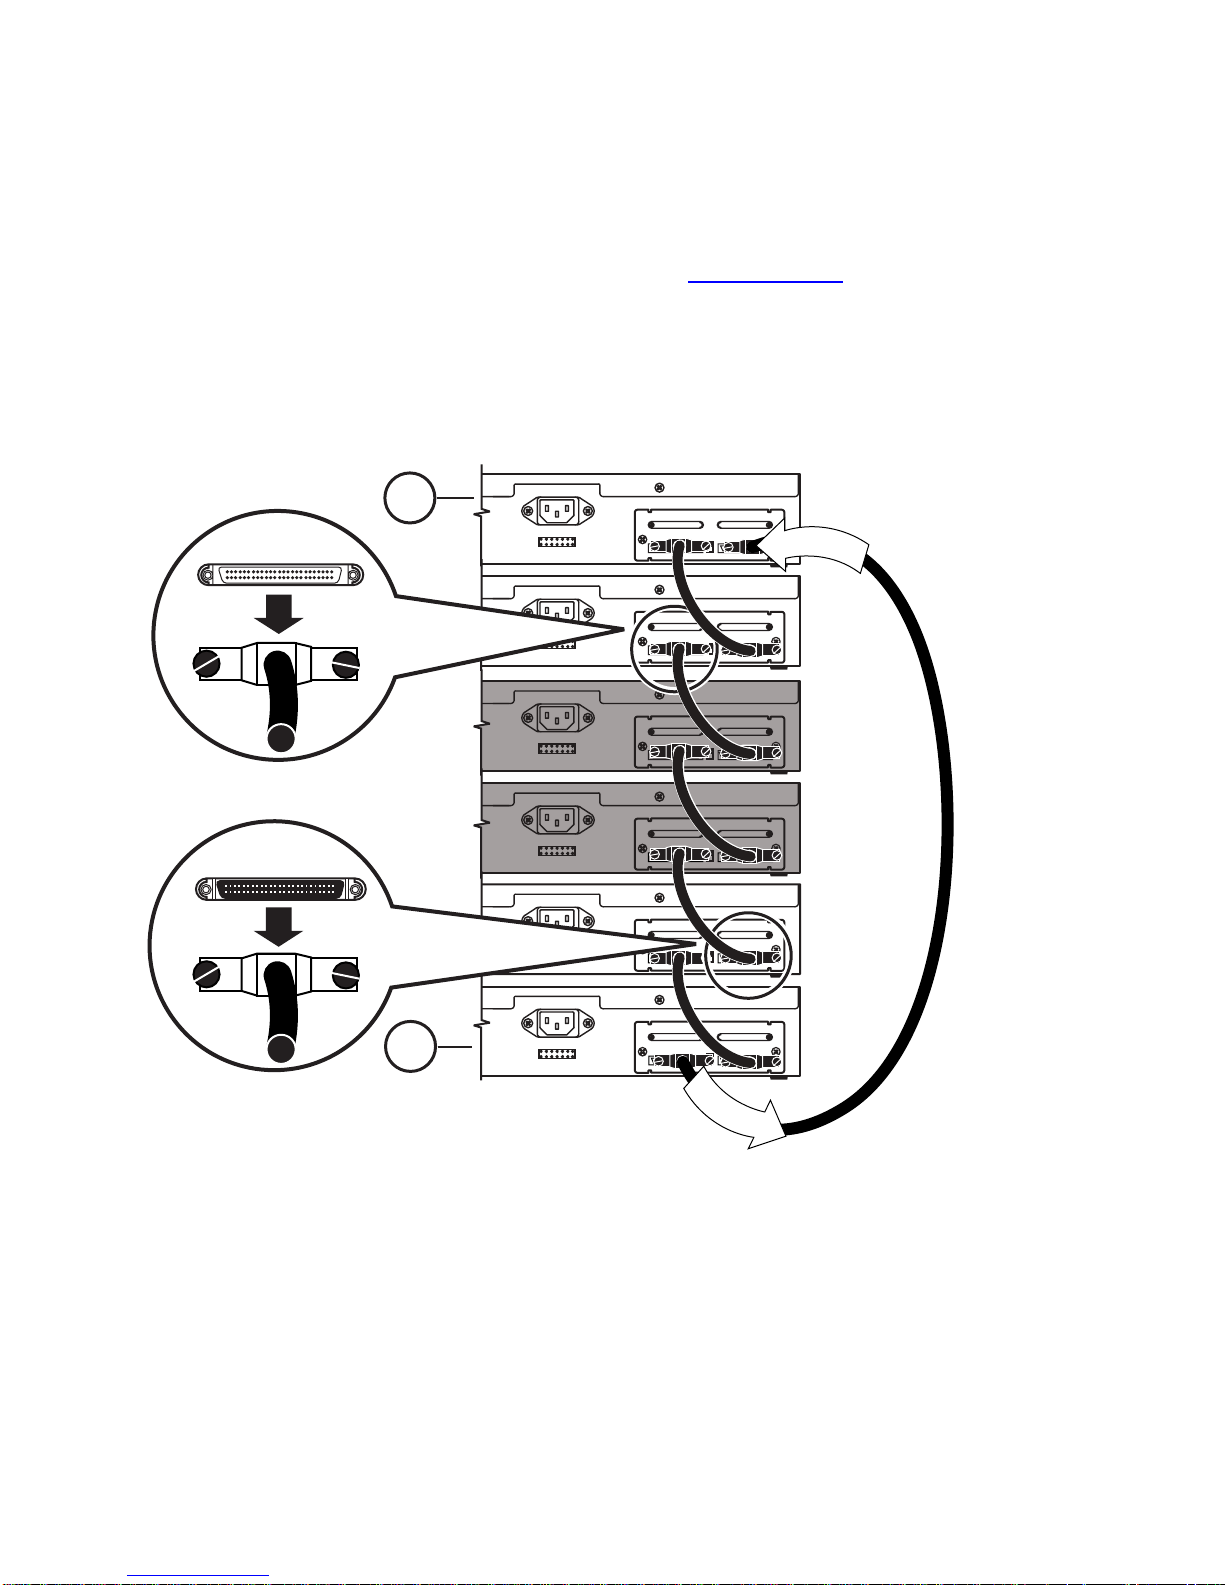
To remove/replace adjacent units from an operating stack,
complete the following steps (see Figure 14
):
1. Remove the casc ade cable from the Cascade A Out
connector at unit 2.
1
Cascade A Out
Unit 1
I
n
Unit 2
Unit 3
Unit 4
Cascade A In
2
O
u
t
1 = Base unit
2 = Last unit
Figure 14. Removing Adjacent Units
Unit 5
Unit 6
BS0043A
33
Page 36

2. Remove the cascade cable from the Cascade A In
connector at unit 5.
3. Remove the units (units 3 a nd 4) and insta ll
replacement units as required.
4. Renumber the order of the units for the new stack
configuration (if desired).
You can renumber the unit numbers as described in
“Setting Up the Stack Conf iguration” in the Using t he
BayStack 450 10/100/1000 Series Switch guide.
Removing/Replacing Nonadjacent Units
Note: Remove and replace the units individually
to avoid segmenting th e stack configuration.
To remove/replace nonadjacent units from an operating
stack, complete the following steps (see Figure 15
):
1. Remove the cascade cable from the Cascade A In
connector at unit 3.
2. Remove the casc ade cable from the Cascade A Out
connector at unit 3.
3. Remove the u n it (unit 3) and inst all the
replacement unit as required.
4. Reconnect the cascade cables (removed in Steps 1
and 2) to unit 3.
34
Page 37
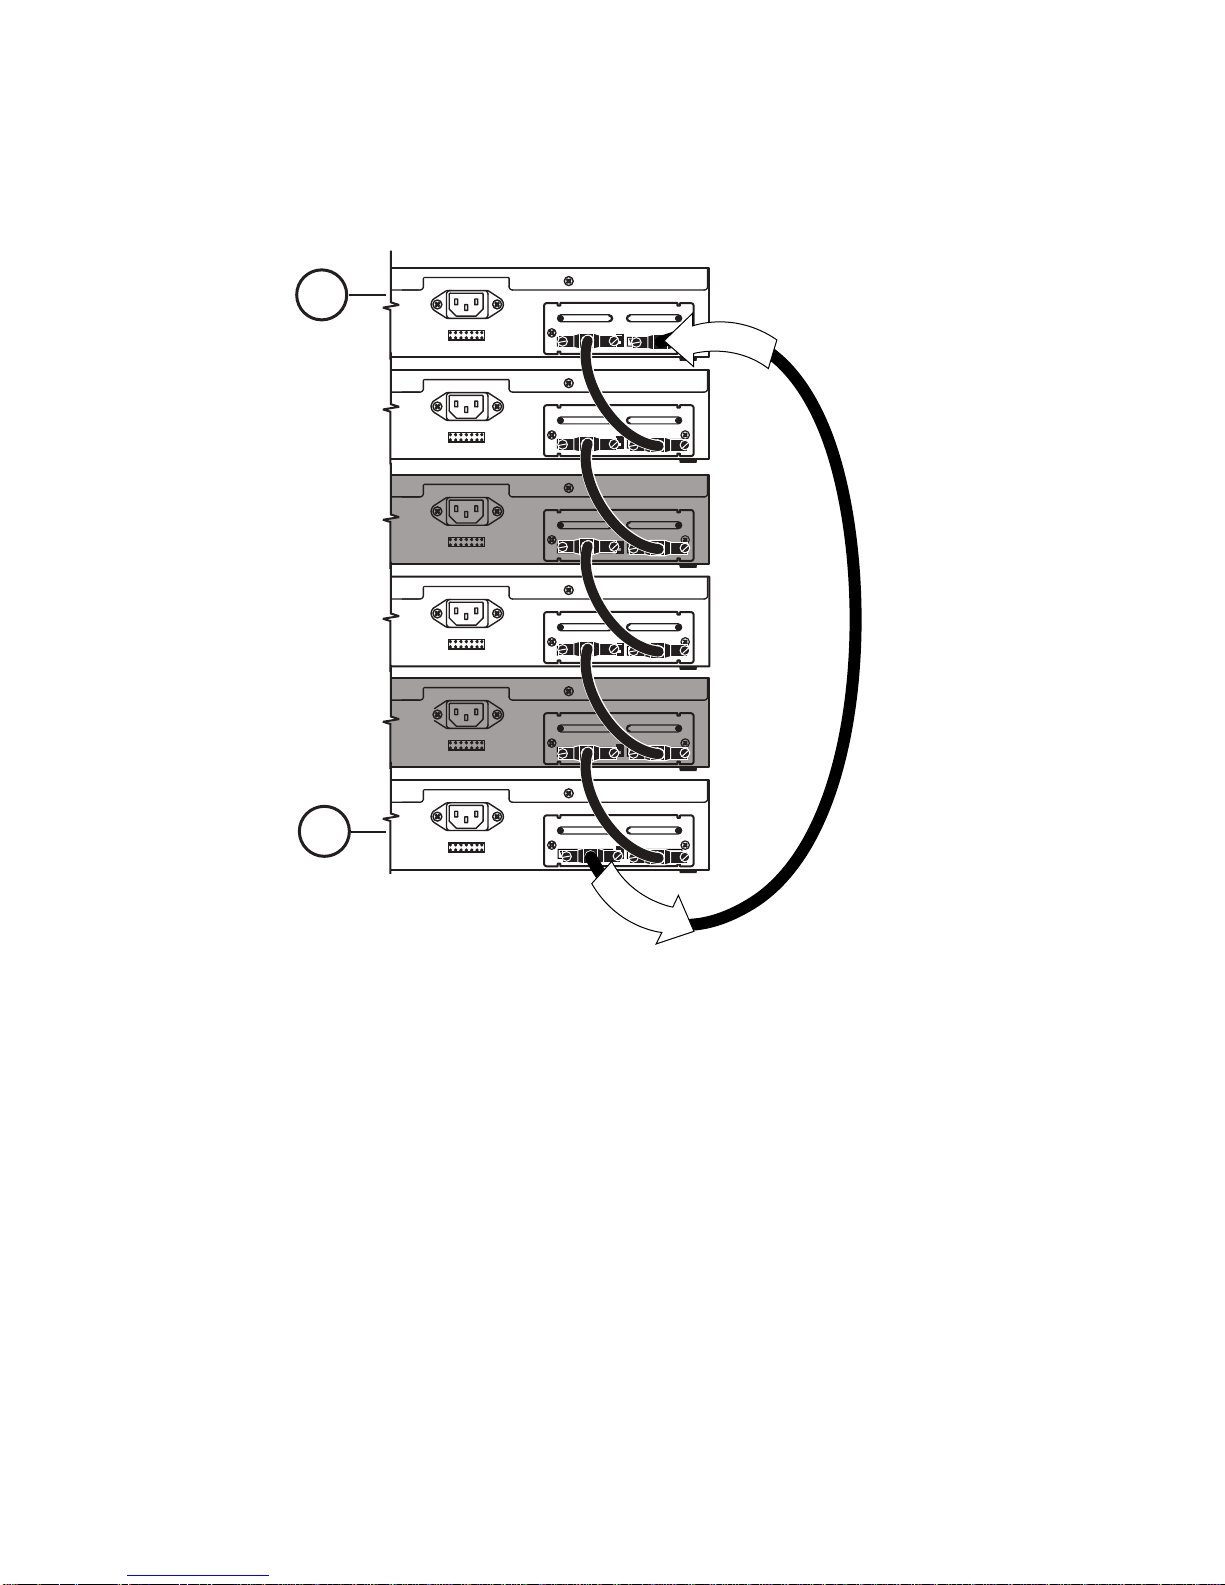
5. Repeat Steps 1 to 4 for unit 5.
1
2
Unit 1
I
n
Unit 2
Unit 3
Unit 4
Unit 5
Unit 6
O
u
1 = Base unit
2 = Last unit
t
BS0044A
Figure 15. Removing Nonadjacent Units
6. Renumber the order of the units for the new stack
configuration (if desired).
You can renumber the unit numbers as described in
“Setting Up the Stack Conf iguration” in the Using t he
BayStack 450 10/100/1000 Series Switch guide.
35
Page 38

Upgrading the BayStack 450 Switch
Firmware
The BayStack 450 switch firmware provides a code load
facility that allows you to upgrade the firmware image
over any switch port, including any MDA ports.
You must upgrade the BayStack 450 switch firmware
image before you install the BayStack 400-ST1 Cascade
Module.
Note:
software version V1.1.0, you must download
images
proper operation of the switch. The new boot code
image must be downloaded
downloaded.
When upgrading the firmware image to
two
(the
boot code image
and the
before
agent image
the agent image is
) for
Accessing the Firmware Images
You can access the firmware image files directly on the
World Wide Web, as follows:
1. Go to support.baynetworks.com/software/ethernet/
baystack_450.html
2. Under the Operational Software heading, click on
Version 1.1.0 at the BayStack 450 boot code link.
Follow the prompts to download the BayStack 450
boot code image. The boot code image filename is
b4501101.img
36
Page 39

3. After the BayStack 450 boot code image is
downloaded , click on Version 1. 1.0 at the Ba yStack
450 agent link.
Follow the prompts to download the BayStack 450
agent image. The agent image filename is
b4501102.img
Be sure to download the BayStack 450 boot code image
first, then download the BayStack 450 agent image.
Accessing the Latest Documentation
If you are upgrading your BayStack 450 switches, be sure
to obtain the latest version of the Using the BayStack 450
10/100/1000 Series Switch guide. This guide provides
instructions for settin g up your stack configuration after
you install the 400-ST1 Cascade Modules.
You can obtain the latest updates to your product
documentation, including release notes, by visiting the
Bay Networks Web site at the following location:
www.support.baynetworks. com/library/tpubs
Upgrade Restrictions
The following restrictions apply when upgrading the
switch firmware:
• The firmware cannot be upgraded through a port that
is configured for tagged traffic.
37
Page 40

• The port connection to the load host cannot be
through a MultiLink Trunk.
• During the load process, the ports are configured as
follows:
• Twisted-pair ports: autonegotiation enabled.
• Fiber optic ports: 100 Mb/s, half-duplex.
• Gigabit MDA ports: autonegotiation disabled,
Preferred Ph y set to Righ t.
For detailed information about downloading a new
software image, see “Chapter 3, “Using the Console
Interface,” in the Using the BayStack 450 10/100/1000
Serie s Swit ch gu ide.
38
 Loading...