


Engine Serial Numbers
Port: ____________________________________________________
Starboard: _______________________________________________
Hull Identification Number:__________________________________
Hull Identification Number
• The Hull Ide ntification Number (HIN) is
located on the starboard side of the transom.
• Record the HIN (and the e ngine serial
numbers) in the space provided above.
• Include the HIN with any corr esp onde nce
or orders.
© 2005 Bayliner Technical Publications. All rights reserved.
No part of this publication may be reproduced, st ored in any retr ieval sys tem, or t ransmitt ed in any f orm by any means, elect ronic, mechanical,
photocopying, recording or otherwise, without prior written permission of Bayliner.
Printed in the United States of America.
General Notes
The material in this document is for information only and is subject to change without notice. While reasonable efforts have been made in the
preparation of this document to assure its accuracy, Bayliner assumes no liability resulting from errors or omissions in this document, or from
the use of information contained herein.
Due to our commitment to product improvement, Bayliner reserve s t he right to make changes in the product design, specifications , and equipment at any time without notice or obligation. Illustrat ions and/or photos may show optional equipment.
All Bayliner products meet or exceed USCG (United States Coast Guard) and /or NMMA (National Marine Manufacturer’s Association) construction standards. Manufactured with 1,1,1 Trichloroethane, a substance which harms public health and environment during the manufacturing process by destroying ozone in the upper atmosphere.
Proprietary Rights
This document discloses subject matter in which Bayliner has proprietary rights. The information and design disclosed herein were originated
by and are the property of Bayliner . Neither recei pt nor p ossession thereof confers or tran sfers any right t o repr oduce, copy, alter or di sclo se the
document or any part thereof, any information contained therei n, or to construct boats or any item from it, except by written pe rmission from or
written agreement with Bayliner. This document is to be returned upon request to Bayliner.
HIN LOCATION
Part Number
1794330

CONTENTS
1 Chapter 1: Welcome Aboard!
1 Dimensions & Tank Capacities
1 Layout Views
1 Dealer Service
2 Warranty Information
2 Boating Experience
2 Qualified Maintenance
3 Engine & Accessory Guidelines
3 Engine & Accessory Literature
3Propellers
4 Safety Standards
5 Special Care for Moored Boats
5 Sacrificial Anode (Zinc)
6 Boat Lifting
7 Carbon Monoxide (CO)
7CO Facts
7 Factors that Increase the Effects of
CO Poisoning
8 Where and How CO Can Accumulate
8 How to Protect Yourself and Others From CO
9CO Checklists
9CO Monitors
10 More Information
11 Chapter 2: Locations
11 Exterior Views
11 Hull Views
12 Deck Views
13 Helm
14 Component Locations
27 Chapter 3: Propulsion &
Related Systems
27 Engines
27 Bilge Blower System
28 Fuel System
29 Fuel Fill & Vent
29 Gas Engine Fuel Filters
29 Anti-siphon Valves (Gas Engines Only)
30 Fuel Filter/Water Sepa ra tor s (Dies el
Engines Only)
30 Electronic Fuel Shut-off Valves (Diesel
Engines Only)
31 Quick Oil Drain System
31 Settin g Up the Quick Oil Drain System
33 Using the Quick Oil Drain System
34 Engine Hatch Lift System (If Equipped)
34 Fire Suppression System (If Equipped)
35 Chapter 4: Controls & Gauges
35 Steering
35 Shift/Throttle Controls
35 Power Trim & Tilt
36 Trim Tabs
37 Gauges
37 Cleaning the Gauges
37 Gauge Fogging
37 Radio Transmission Interference
37 Fuel Gauge
37 Twin Engine Readings
38 Chapter 5: Navigation &
Communication Equipment
38 Compass
38 Depth Finder
38 VHF Radio (If Equipped)
39 Global Positioning System (GPS)
(If Equipped)

40 Chapter 6: Plumbing
40 Bilge Pumps
41 Bilge Pump Testing
43 Seawater Systems
43 Seacocks
43 Seawater Strainers
44 Seawater Washdown
45 Freshwater System
46 Freshwater System Winterization
47 City Water Inlet
47 Transom Shower (If Equipped)
48 Water Heater
48 Winterizing the Water Heater
49 Drain Systems
49 Deck Drains
49 Sink Drains
50 Shower Sump Pump System
50 Sump Box Cleaning
50 Sump System Winterization
51 Marine Head & Holding Tank
51 Electric Flush Head with Holding Tank
(If Equipped)
52 Vacuum Flush Head System (If Equipped)
53 Macerator (If Equipped)
54 Chapter 7: Deck Equipment
54 Cleats & Tow Eyes
54 Windlass
55 Canvas
55 Bimini Top
56 Camper Top (If Equipped)
57 Vinyl Curtains (If Equipped)
58 Canvas Care
59 Clear Vinyl Care
60 Chapter 8: Appliances &
Entertainment Systems
60 Electric Stove
60 Refrigerator
60 Audio Equipment
61 Chapter 9: Convertible Seats,
Beds, & Tables
61 Dinette to V-berth Conversion
62 L-lounge Conversion
63 Cockpit Table Storage
64 Chapter 10: Lights
64 Care & Maintenance
64 Interior & Exterior Lights
64 Navigation Lights
64 Spotlight (If Equipped)
65 Chapter 11: Air Conditioner System
(If Equipped)
66 Chapter 12: Electrical System
67 12-Volt DC System
67 Batteries
67 Battery Switches
68 Battery Switch Positions
68 Fuses & Circuit Breakers
68 12-Volt DC Accessory Outlet(s)
68 Alternators
69 Battery Charger (If Equipped)
70 110-Volt AC System
71 Shore P ower
72 Connecting to Shore Power
72 Parallel Switch (If Equipped with
Dual Shore Power)
73 Generator (If Equipped)
75 Electrical Routings
75 12-Volt DC Deck Harnesses
76 12-Volt DC Hull Harnesses
77 110-Volt AC Deck Harnesses
78 110-Volt AC Hull Harnesses
79 Battery Cable System
80 Wiring Diagrams
80 Engine Electrical Systems
81 12-Volt DC System
82 110-Volt AC System, Si ngle Shor e Pow er
83 110-Volt AC System, Dual Shore Power
84 Important Records
85 Float Plan

Hazard Boxes & Symbols
The hazard boxes and symbols shown below are used throughout this supplement to call attention to potentially dangerous situations which could lead to either personal injury or product damage. Read all warnings carefully and follow all safety instructions.
This box alerts you to immediate hazards whi ch WILL cause severe personal injury or death if
the warning is ignored.
DANGER!
!
This box alerts you to hazards or unsafe pract ice s whic h COULD r esul t i n seve re personal
injury or death if the warning is ig nored.
WARNING!
!
This box alerts you to hazards or unsafe pract ice s whic h COULD r esul t i n minor pe rsonal
injury or cause product or property damage if the warning i s ig nored.
CAUTION
!
This box calls attention to inst all ati on, ope rati on or m ai ntena nce i nform at ion, whi ch is im portant to proper operation but is no t hazard related.
NOTICE
EXPLOSION
HAZARD!
NO OPEN
FLAME!
HOT
HAZARD!
ROTATING
PROPELLER HAZARD!
FALLING
HAZARD!
ELECTRICAL
HAZARD!
CO POISO N ING
HAZARD!
FIRE
HAZARD!
RUN BILGE BLOWERS
FOR 4 MINUTES!

1
325 • Owner’s Manual Supplement
Chapter 1: Welcome Aboard!
• This Owner’s Manual Supplement provides infor mation about your boat that is not covered in the Cruiser & Yacht
Owner’s Manual.
• Before using your boat, study this Owner’s Manual Supplement, the Cruiser & Yacht Owner’s Manual, and all
engine an d accessory l iterature carefully.
• Keep this Owner’s Manual Supplement and the Cruiser & Yacht Owner’s Manual on your boat in a secure, yet
readily available place.
Dimensions & Tank Capacities
Layout Views
Dealer Service
• Your dealer is your key to service.
• Ask your dealer to explain all systems before taking delivery of your boat.
• Contact your dealer if you have any problems with your new boat.
• If your dealer cannot help, call our customer service hotline: 360-435-8957 or send us a FAX: 360-403-4235.
• Buy replacement parts from any authorized Bayliner dealer.
Overall
Length
Length
Rigged
Bridge
Clearance
Beam
Draft
(Hull)
Draft
(Maximum)
Fuel
Capacity
Freshwater
Capacity
Holding Tank
Capacity
35' 0" 35' 11" 10' 7" 11' 6" 2' 2" 3' 5" 175 Gallons 31 Gallons 30 Gallons

Chapter 1: Welcome Aboard! 325 • Owner’s Manual Supplement
2
Warranty Information
• Bayliner offers a Limited Warranty on each new Bayliner purchased through an authorized Bayliner dealer.
• A copy of the Limited Warranty was included in your owner’s packet.
• If you did not receive a copy of the Limited Warranty, please contact your Bayliner dealer or call 360-435-8957
for a copy.
Boating Experience
If this is your first boat or if you are changing to a type of boat you are not familiar with, for your own comfort and
safety, obtain handling and operating experience before assuming command of this boat.
Take one of the boating safety classes offered by the U.S. Power Squadrons or the U.S. Coast Guard Auxiliary. For
more course information, including dates and locations of upcoming classes, contact the organizations directly:
• U.S. Power Squadrons: 1-888-FOR-USPS (1-888-367-8777) or on the Internet at: http://www.usps.org
• In Canada, for the CPS courses call 1-888-CPS-BOAT.
• U.S. Coast Guard Auxiliary: 1-800-368-5647 or on the Internet at: http://www.cgaux.org
Outside the United States, your selling dealer, national sailing federation, or local boat club can advise you of local
sea school s or competent instructors.
Qualified Maintenance
• Failure to maintain your boat’s systems (listed in the warning above) as designed could violate the laws in your
jurisdiction and could expose you and other people to the danger of bodily injury or accidental death.
• Follow the instructions provided in the Cruiser & Yacht Owner’s Manual, this supplement, the engine owner’s
manua,l and all accessory literature.
CONTROL HAZARD!
A qualified operator MUST be i n cont rol of the boat at ALL times. Do NOT operate your boat
while under the influence of alcohol or dr ugs.
WARNI NG!
!
To maintain the integrity and safety of your boat, allow ONLY qualif ied personnel to perform
maintenance on, or in any way modify the:
• Steering sys tem
• Propulsion system
• Engine control system
• Fuel system
• Environmental control s y st em
• Electrical system
• Navigational system
WARNING!
!

325 • Owner’s Manual Supplement Chapter 1: Welcome Aboard!
3
Engine & Accessory Guidelines
• Your boat’s engines and accessories were selected to provide optimum performance and service.
• Installing different engines or other accessories may cause unwanted handling characteristics.
• Should you choose to install different engines or accessories that will affect your boat’s running trim, have an
experienced marine technician perform a safety inspection and handling test before operating your boat again.
Engine & Accessory Literature
• The engines and accessories installed on your boat come with their own operation and maintenance manuals.
• Read thes e manuals before using the engines and accessories.
• Unless noted otherwise, all engine and accessory literature referr ed to in this supplement is included in your
owner’s packet.
Propellers
• Keep the propellers in good repair and at the correct pitch for your particular situation.
• A slightly bent or nicked propeller will adversely affect the performance of your boat.
When storing your boat, please r ef er t o your e ngine ’s operation and maintenance manuals.
NOTICE
Certain modifications to your boat WILL result in cancellation of your warra nty protection.
ALWAYS check with your dealer BEFORE making any modificat ions to your boat.
NOTICE
ENGINE DAMAGE HAZARD!
The factory standard propell ers may no t be t he best for your particular boat and load condi tions. Refer to the engine manual for e ngine RPM rat ings . The engi nes s hould reach, but not
exceed their full rated RPM when ful l-t hrottle is applied.
Immediately contact your local Bayliner dealer if:
• The engines cannot reach their f ull rate d RPM when f ull-throttle is appl ied, or ;
• The engines exceed their full rated RPM when full- throttle is applied.
CAUTION
!

Chapter 1: Welcome Aboard! 325 • Owner’s Manual Supplement
4
Safety Standards
• Your boat’s mechanical and electrical systems were designed to meet safety standards in effect at the time it
was built.
• Some of these standar ds were mandated by l aw, and all of them were designed t o insu re your safe ty a nd the safet y
of other people, vessels and property.
In addition to this supplement, please read the Cruiser & Yacht Owner’s Manual and all accessory instructions for
important safety standards and hazard information.
FA LLING an d ROTATI NG PROPEL LER HAZAR D!
• NEVER allow anyone to ride on parts of the boat NOT designed for
such use.
• Sitting on seat backs, lounging on the forward deck, bow r iding , gun-
wale riding or occupying the transom plat form while underway is e speciall y hazardous and
WILL cause personal injury or death.
DANGER!
!
FALLING, ROTATING PROPELLER and CARBON
MONOXIDE POIS ONING HAZA RD!
• NEVER allow anyone to occupy , or ha ng from, the
back deck or swim platform while the engine(s)
are running.
• Teak surfing, dragging, or water skiing within 20 feet
of a moving watercraft can be fatal.
DANGER!
!
DANGER
PERSONAL SAF ETY HAZARD!
ALWAYS secure the anchor and ot her loose objects BEFORE getting underway. The anchor
and other items that are NOT pr operly secured can come loos e when the boat is movi ng and
cause personal injury or death.
DANGER!
!
A wide variety of components used on this vessel cont ain or emit chemicals known to the State
of California to cause cancer and birth defects and other reproductive harm.
Examples Include:
• Engine and generator exhaust
• Engine and generator fuel, and other liquids such as cool ants and oi l, especially used
motor oi l
• Cooking fuels
• Cleaners, paints, and substances used for vesse l repair
• Waste material s t hat result from wear of ves sel component s
• Lead from battery terminals and from other sources such as ballast or fishing sinkers
To Avoid Harm:
• Keep away from engine, generator, and cooking fuel exhaust fumes.
• Wash exposed skin t horoughly with soap and water after handli ng t he subst ances above.
WARNI NG!
!

325 • Owner’s Manual Supplement Chapter 1: Welcome Aboard!
5
Special Care for Moored Boats
• Whether moored in saltwater or freshwater, your boat will collect marine growth on its hull bottom.
• This will detract from your boat’s beauty, greatly affect its performance, and may damage the gelcoat.
• There are two methods of slowing marine growth:
1. Periodically haul your boat out of the water and scrub the hull bottom with a bristle brush and a solution of soap
and water.
2. Occasionally re-paint the hull below the waterline with a good grade of anti-fouling paint.
Sacrificial Anode (Zin c)
Your boat is equipped with a sacrificial anode (zinc) to protect underwater metal parts from excessive deterioration.
Check the zinc regularly and replace it if it has deteriorated
more than 70% .
Many factors affect the rate at which the zinc deteriorates,
including:
• Water temper ature
• Salinity
• Water pollution
• Stray electrical current
Stray electrical current from your boat, another boat, or the
dock may cause complete deterioration of the zinc in just a
few weeks. If there is rapid zinc deterioration, measure the
electrolytic corrosion around your boat with a corrosion
test meter.
NOTICE
• To help seal the hull bottom a nd reduce the chance of gelcoat bli ste ring whi le y our boat is
moored, apply an epoxy barrier coa ti ng.
• Cover the barrier coating with several coats of anti-fouling paint.
• Many states regulate the chemical co ntent of bottom paints in order to meet env ironmental
standards. Check with your local deale r about recommended bottom paints, and about the
laws in effect in your area.
• Do NOT pai nt be tween t he zi nc and t he metal surface it contacts and do NOT paint over
the zinc.
• If the zinc is NOT bonded correctly, it will NOT provide protection.
NOTICE
NEW SACRIFICIAL ANODE
DETERIORATED SACRIFICIAL ANODE

Chapter 1: Welcome Aboard! 325 • Owner’s Manual Supplement
6
Boat Lifting
• Always follow the lift equipment’s instructions and requirements.
• When lifting your boat, always position the lifting slings at the port an d starboard li fting sling label positions as
shown in the illustration.
PERSONAL INJURY and/or PRODUCT or PROPERTY DAMAGE HAZARD!
• Lifting slings may slip on the hull.
• Avoi d ser ious injury or death by securing the li ft ing s li ngs t oget her BEFORE lifting.
WARNI NG!
!
PERSONAL INJURY and/or PRODUCT or PROPERTY DAMAGE HAZARD!
• NEVER lift any boat using the cleats, or the bo w and ste rn eye s.
WARNI NG!
!
PERSONAL INJURY and/or PRODUCT or PROPERTY DAMAGE HAZARD!
• Water in the bi lge can shi ft and change the balance of the load.
• If water is present in the bilg e, pump or drai n the water out of the bilge ar eas BEFORE lift-
ing your boat.
WARNI NG!
!
PRODUCT or PROPERTY DAMAGE HAZARD!
• When lifting any boat, ALWAYS use a spreader bar. The spreader bar MUST be equal to the
width of your boat at each lifting poi nt.
CAUTION
!
28.8"
168"
LIFTING SLING LABELS
(TYPICAL PORT & STARBOARD)

325 • Owner’s Manual Supplement Chapter 1: Welcome Aboard!
7
Carbon Monoxide (CO)
CO Facts
• CO poisoning causes a significant number of boating deaths each year.
• Called the "silent killer", CO is an extremely toxic, colorless, odorless and tasteless gas.
• CO can harm or even kill you inside or outside your boat.
• CO can affect you whether you’re underway, moored, or anchored.
• CO symptoms are similar to seasickness or alcohol intoxication.
• CO can make you sick in seconds. In high enough concentrations, even a few breaths can be fatal.
• Breathing CO blocks the ability of your blood to carry oxygen.
• The effects are cumulative. Even low levels of exposure can result in injury or death.
Factors that Increase the Effects of CO Pois oning
• Age
• Smokers or people exposed to high concentrations of cigarette smoke
• Consumption of alcohol
• Lung disorders
• Heart problems
• Pregnancy
• Carbon monoxide gas (CO) is colorless, odorless, t asteless, and
extremely dangerous.
• ALL engines, generators, and f uel burning appliances produce CO
as exhaust.
• Prolonged exposure to low conce ntra tions or very quick exposure to high
concentrations WILL cause BRAIN DAMAGE or DEATH.
• Teak surfing, dragging, or water skiing within 20 feet of a moving water-
craft can be fatal.
DANGER!
!

Chapter 1: Welcome Aboard! 325 • Owner’s Manual Supplement
8
Where and How CO Can Accumulate
Stati onary Conditions That Increase CO Accumulations Include:
To correct stationary situations A and/or B:
• Close all windows, portlights and hatches.
• If possible, move your boat away from source of CO.
Running Conditions That Increase CO Accumulations Include:
To correct running situations C and/or D:
• Trim bow down.
• Open windows and canvas.
• When possible, run boat so that prevailing winds help dissipate exhaust.
How to Protect Yourself and O thers From CO
• Know where and how CO may accumulate in and around your boat (see above).
• Always maintain fresh air circulation throughout your boat.
• Know where your engine and generator exhaust outlets are located and keep everyone away from these areas.
• Never sit on, or hang onto, the back deck or swim platform while the engines are running.
• Never enter the areas under swim platforms where exhaust outlets are located.
• Although CO can be present without the smell of exhaust fumes, if exhaust fumes are detected on your boat, take
immediate action to dissipate these fumes.
• Treat sympt oms of se asick ness as possib le CO pois oning. Get the pe rson into f resh a ir immediately. Seek medical
attention—unless you’re sure it’s not CO.
• Install and maintain CO monitors i nside yo ur boat. Never igno re any al arm. Rep lace monit ors as r ecommended by
the monitor manufacturer.
• Follow the checklists provided on the next page.
• Get a Vessel Safety Check.
For information on how to get a free VESSEL SAFETY CHECK, visit www.vesselsafetycheck.org or contact your
local U.S. Coast Guard Auxiliary or United States Power Squadrons®.
• U.S. Coast Guard Auxiliary: 1-800-368-5647 or on the Internet at: http://www.cgaux.org
• U.S. Power Squadrons: 1-888-FOR-USPS (1-888-367-8777) or on the Internet at: http://www.usps.org
A. Using engine, generator, or other fuel burn-
ing device when boat is moored in a confined space.
B. Mooring too close to another boat that is
using its engine, generator, or other fuel
burning device.
C. Running boat with trim angle of bow too high. D. Running boat without through ventilation
(station wagon effect).

325 • Owner’s Manual Supplement Chapter 1: Welcome Aboard!
9
CO Checklists
Trip Checklist
❏ Make sure you know where the exhaust outlets are located on your boat.
❏ Educate all passengers about the symptoms of CO poisoning and where CO may accumulate.
❏ When docked, or rafted with another boat, be aware of exhaust emissions from the other boat.
❏ Listen for any change in exhaust sound, which could indicate an exhaust component failure.
❏ Test the operation of each CO monitor by pressing the test button.
Monthly Checklist
❏ Make sure all exhaust clamps are in place and secure.
❏ Look for exhaust leaking from exhaust system components. Signs include rust and/or black streaking, water
leaks, or corroded or cracked fittings.
❏ Inspect rubber exh aust hose s for burne d, cra cked, o r det erior ated secti ons. All ru bber hoses shoul d be pliable and
free of kinks.
Annual Checklist
Have a Qualified Marine Technician:
❏ Replace exhaust hoses if cracking, charring, or deterioration is found.
❏ Ensure that your engines and generators are properly tuned, and well maintained.
❏ Inspect each water pump impeller and the water pump housing. Replace if worn. Make sure cooling systems are
in working condition.
❏ Inspect all metallic exhaust components for cracking, rusting, leaking, or loosening. Make sure they check the
cylinder head gasket, exhaust manifold, water inje ct ion elbo w, and the threaded adapter nipple betw ee n the manifold and the elbow.
❏ Clean, inspect, and confirm proper operation of the generator cooling water anti-siphon valve (if equipped).
CO Monitors
• Do not disconnect the CO monitors.
• Read the manufacturer’ s in struc tions f or your CO moni tors . If you did not get t he manufact ur er’s instructions,
call (800) 383-0269 and they will be mailed to you.
If your boat is not equipped with a CO monitor, consider purchasing one from your dealer or marine supply store.
• The stereo memory and CO monitors place a small, but constant drain on the battery.
• If your boat will be unattended for an extended amount of time, plug into shore power with
the battery charger turned On.
NOTICE

Chapter 1: Welcome Aboard! 325 • Owner’s Manual Supplement
10
More Information
For more informati on about h ow you can p revent ca rbon monoxid e pois oning on r ecreati onal boat s and oth er ways t o
boat more sa fely, contact:
For information on how to get a free VESSEL SAFETY CHECK, visit www.vesselsafetycheck.org or contact your
local U.S. Coast Guard Auxiliary or United States Power Squadrons®.
• U.S. Coast Guard Auxiliary: 1-800-368-5647 or on the Internet at: http://www.cgaux.org
• U.S. Power Squadrons: 1-888-FOR-USPS (1-888-367-8777) or on the Internet at: http://www.usps.org
U
nited States Coast Guard
O
ffice of Boating Safety (G-OPB-3)
2
100 Second Street SW
W
ashington, DC 20593
w
ww.uscgboating.org
1
-800-368-5647
National Marine Manufacturers
Association (NMMA)
200 East Randolph Drive
Suite 5100
Chicago, IL 60601-9301
www.nmma.org
312-946-6200
American Boat & Yacht Council, In
c.
(ABYC)
3069 Solomon’s Island Road
Edgewater, MD 21037- 1416
www.abycinc.org
410-956-1050

11
325 • Owner’s Manual Supplement
Chapter 2: Locations
Exterior Views
Hull Views
DECK DRAIN
ENTERTAINMENT
CENTER SINK DRAIN
PORTLIGHTS
PORTLIGHTS
DECK DRAIN
AFT BILGE
HOLDING
GENERATOR EXHAUST
(IF EQUIPPED)
PUMP DRAIN
TANK VENT
AIR CONDITIONER
DRAIN (IF EQUIPPED)
GALLEY SINK DRAIN
LOCKER DRAIN
BOARDING
TRIM TAB
TRIM TAB
STERN EYE
STERN EYE
SACRIFICIAL ZINC
ANODE PLATE
BOW EYE
LADDER
PORT HULLSIDE
STARBOARD HULLSIDE
TRANSOM
WASHDOWN
WATER HEATER
DRAIN
STORAGE LOCKER
DRAIN
STORAGE
LOCKER
DRAIN
MULTI-PORT THRU-HULL DRAIN:
FORWARD BILGE PUMP, SHOWER
SUMP PUMP, & HEAD SINK

Chapter 2: Locations 325 • Owner’s Manual Supplement
12
Deck Views
WINDLASS
SPOTLIGHT
(IF EQUIPPED)
NAVIGATION LIGHT
WINDLASS
FOOT CONTROLS
ANCHOR ROLLER
CLEAT
WIPERS
HATCHES
GRAB RAILS
BOW RAIL
VHF ANTENNA
(IF EQUIPPED)
ALL-ROUND
LIGHT
HORN
GRAB RAIL
GRAB HANDLE
TRANSOM DOOR
FRESHWATER FILL
DECK FITTING
VENTED FUEL FILL
DECK FITTING
TRANSOM STORAGE LOCKER
HOLDING TANK PUMPOUT DECK FITTING
CITY WATER INLET
GRAB RAIL
GPS SOCKET
WASHDOWN
LOCKER
(IF EQUIPPED)
(TYPICAL PORT &
STARBOARD)
NAVIGATION LIGHT
(TYPICAL PORT &
STARBOARD)

325 • Owner’s Manual Supplement Chapter 2: Locations
13
Helm
ACTUAL LAYOUT MAY VARY DEPENDING
ON ENGINE AND ACCESSORY OPTIONS.
NOTE: TYPICAL HELM LAYOUT SHOWN.
COMPASS
OIL PRESSURE
TEMPERATURE
VOLTAGE
TRIM & TILT
SPEEDOMETER TACHOMETERTACHOMETER
TRIM & TILT
TEMPERATURE
VOLTAGE
OIL PRESSURE
DEPTH FINDER
FUEL
VHF RADIO (IF EQUIPPED)
12-VOLT DC PUSH-TO-
RESET CIRCUIT BREAKERS
CHARTPLOTTER
STEREO REMOTE CONTROL
(IF EQUIPPED)
SPOTLIGHT CONTROL
(IF EQUIPPED)
FIRE INDICATOR LIGHT
(IF EQUIPPED)
SHIFT/THROTTLE LEVERS
(IF EQUIPPED)
PORT ENGINE
EMERGENCY
SHUT-DOWN
SWITCH
STARBOARD ENGINE
EMERGENCEY SHUT-
DOWN SWITCH
12-VOLT DC IGNITION
PUSH-TO-RESET
CIRCUIT BREAKERS
TRIM & TILT SWITCHES
IN LEVER HANDLE

Chapter 2: Locations 325 • Owner’s Manual Supplement
14
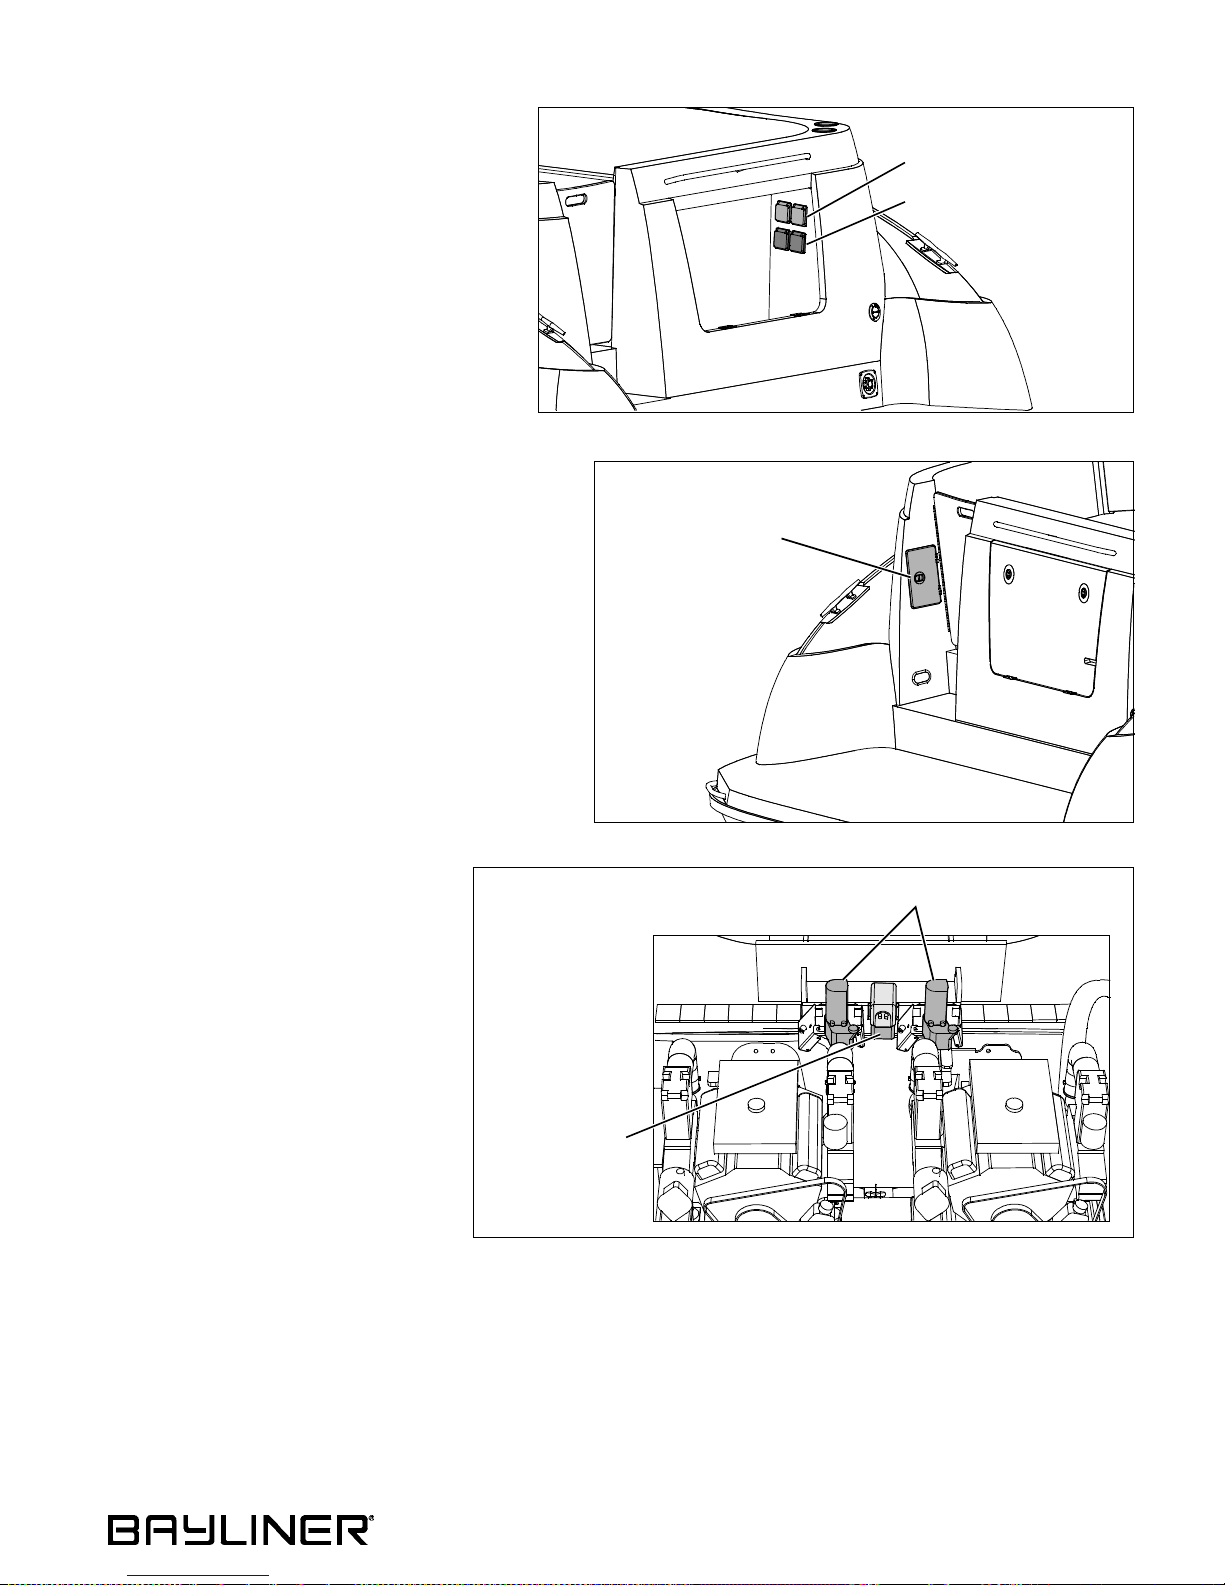
Component Locations
12-Volt DC Accessory Outlets (4 total):
• Two are located at the helm, and;
• One is located on the audio/visual panel behind
the forward seatback cushion in the v-berth, and;
• One is located on the starb oard aft wall panel in
the v-berth.
12-VOLT DC
OUTLETS
12-VOLT DC OUTLET
(FOR TELEVISION)
12-VOLT DC
OUTLET

325 • Owner’s Manual Supplement Chapter 2: Locations
15
12-Volt DC Circuit Breakers:
• The 12-volt DC push-to-reset circuit breakers
are located at the helm.
• The 12-volt DC main circuit breaker switch
and standby-load push-t o-re set cir cuit breaker s
are located on the battery switch panel.
110-Volt AC Master Panel: Located in the galley
cabinet above the refrig erator.
BATTERY SWITCH PANEL
12-VOLT DC STAND-BY
LOAD PUSH-TO-RESET
CIRCUIT BREAKERS
12-VOLT DC
MAIN CIRCUIT
BREAKER SWITCH
12-VOLT DC
PUSH-TO-RESET
CIRCUIT BREAKERS
110-VOLT
AC PANEL

Chapter 2: Locations 325 • Owner’s Manual Supplement
16
Air Conditioner Seawater Intake Seacock
(If Equipped): Located in the forward area of the
engine room bilge.
Audio/Visual Panel: Located behind the forward seatback cushion in the v-berth.
Batteries: Located in the port forward corner of
the engine room.
Battery Charger: Located on th e port hulls ide in
the engine room.
Battery Switch Panel : Located inside the cock pit entertainment center hatch.
AIR CONDITIONER
INTAKE SEACOCK
AUDIO/VISUAL PANEL
BATTERY
BATTERIES
CHARGER
BATTERY SWITCH PANEL

325 • Owner’s Manual Supplement Chapter 2: Locations
17
Bilge Pump - Aft: Located in
the aft end of the engine room
bilge.
Bilge Pump - Forward:
• Located in the bilge under the entry stairs.
• Access through the forward wal l hatch in the
aft berth.
Blower Switches:
• One is located on the lower switch panel at
the helm.
• One is located on the 110-volt AC master
panel (if equipped with a generator).
BILGE PUMP &
AUTOFLOAT SWITCH
AFT
WALL
HATCH
BLOWER
SWITCH
BLOWER SWITCH

Chapter 2: Locations 325 • Owner’s Manual Supplement
18
CO Monitor - Salon: Located on the port
wall panel.
CO Monitor - Aft Berth: Located on the port
side ceiling of the aft berth.
Depth Finder Transducer:
• Located in the bilge under the entry stairs.
• Access through the forwar d wall hatch in the
aft berth.
CO MONITOR
CO MONITOR
WALL
HATCH

325 • Owner’s Manual Supplement Chapter 2: Locations
19
Engine Hatch Lift Hydraulic Fluid Reservoir (If Equipped): Located on the engine
room wall, forward of the port engine.
Engine Hatch Lift Switch (If Equipped):
Located at the helm on the upper switch panel.
Freshwater Pump: Located on the
port side of the engine room, next to
the water heater.
HYDRAULIC FLUID
RESERVOIR
ENGINE HATCH
LIFT SWITCH
WATER
FRESHWATER
PUMP
HEATER

Chapter 2: Locations 325 • Owner’s Manual Supplement
20
Freshwater Pump Switch:
• Located inside the head vanity.
• Access through the vanity door.
Freshwater Tank: Located in the
port aft corner of the engine room, aft
of the water h eater.
Freshwater Fill Deck Fitting (marked
WATER): Located on the port aft corner of the
deck, near the transom door.
VANITY DOOR
FRESHWATER
WATER
HEATER
TANK
FRESHWATER FILL
DECK FITTING
TRANSOM DOOR

325 • Owner’s Manual Supplement Chapter 2: Locations
21
Fuel Tank:
• Located under the aft berth floor.
• Access to the tank fittings i s in the for ward
area of the engine room.
Fuel Fill Deck Fitting (marked GAS or
DIESEL): Located on the starboard aft deck.
Fuel Tank Sending Unit: Access through
the hatch under the aft berth mattress.
Generator (If Equipped): Located in the forward area
of the engine room.
FUEL TANK
& FITTINGS
FUEL FILL
DECK FITTING
HATCH
GENERATOR

Chapter 2: Locations 325 • Owner’s Manual Supplement
22
Generator Circuit Breaker (If Equipped): Located
on the generator.
Generator Contro l Panel (If Equipped): Located on
the genera tor.
Generator Remote Start/St op Panel
(If Equipped): In the galley cabinet
above the refrigerator.
Generator Seawater Intake Seacock &
Strainer (If Equipp ed): In the engine
room bilge, aft of the generator.
CIRCUIT BREAKER
CONTROL PANEL
CIRCUIT BREAKER
CONTROL PANEL
DIESEL GENERATOR
GAS GENERATOR
GENERATOR REMOTE
START/STOP PANEL
GENERATOR SEAWATER
INTAKE SEACOCK
GENERATOR
SEAWATER
STRAINER

325 • Owner’s Manual Supplement Chapter 2: Locations
23
Holding Tank: Located on the starboard
aft side of the engine room.
Holding Tank Pump-out Deck Fitting (marked
WASTE): Located on the starboard side of
the transom.
Macerator Underwater Discharge
Seacock (If Equipped): Located in
the engine room, forward of the
holding tank.
Macerator Switches (If Equipped) : Located
to the right of the helm.
HOLDING TANK
HOLDING TANK PUMPOUT DECK FITTING
MACERATOR UNDERWATER
DISCHARGE SEACOCK
MACERATOR SWITCHES

Chapter 2: Locations 325 • Owner’s Manual Supplement
24
Marine Hea d (Electric) Seawater Intake
Seacock (If Equipped):
• Located in the bilge under the entry stairs.
• Access through the forward wall hatch in
the aft berth.
Marine Head Vacuum Flush Switch (If
Equipped):
• Located inside the head vanity.
• Access through the vanity door.
Navigation Lights:
• Separate red and
green running lights
are located on the
forward deck.
• A white all-round
light is located on the
radar arch.
WALL
HATCH
VANITY DOOR
WHITE ALL-ROUND LIGHT
RED RUNNING
LIGHT
GREEN RUNNING
LIGHT
325 • Owner’s Manual Supplement Chapter 2: Locations
25
Shore Power Inlet(s): Located inside the tran som storage locker on the starboard side.
Shore Power Master Circuit Breaker(s):
Located inside the transom storage locker on
the starboard side.
Transom Shower (If Equipped): Located aft of the
transom door.
Trim Tab Hydraulic Fluid Reservoir:
Located on the transom w all of the
engine room.
Trim & Tilt Pumps: Located on the
transom wall of the engine room.
SHORE POWER INLET(S)
SHORE POWER MASTER
CIRCUIT BREAKER(S)
TRANSOM SHOWER
HYDRAULIC FLUID
RESERVOIR
TRIM & TILT PU M PS

Chapter 2: Locations 325 • Owner’s Manual Supplement
26
Water Heater: Located on the port
side of the engine room.
Windlass Circuit Breaker:
Located in the engine room on
the port hullside, above the battery charger.
Windlass Controls:
• Foot controls are
located on the forward deck, next to the
starboard navigation
light.
• A control switch is
located on the upper
switch panel at
the helm.
WATER
HEATER
WINDLASS
CIRCUIT BREAKER
BATTERY CHARGER
WINDLASS
SWITCH
WINDLASS
FOOT
CONTROLS

27
325 • Owner’s Manual Supplement
Chapter 3: Propulsion & Related Systems
Engines
Read the engine operation and maintenance manuals before starting or working on the engines.
Bilge Blower System
• The bilge blower system removes explosive fumes
from the engine and bilge areas.
• Fresh air is drawn into the engine and bilge areas
through the vents.
To make sure the engine and bilge areas are
properly ventilated:
• Use the "sniff test " to check the engine and bilge
areas for fuel vapors before starting the engi nes or the
generator (if equipped).
• Always run the bilge blower system for at least four
minutes before starting the engines or the generator
(if equipped).
• Continue to run the bilge blower system until your boat has reached cruising speed.
• Always run the bilge blower system when running your boat below cruising speed.
FIRE/EXPLOSION HAZARD
• Use of the bilge blower system is NOT A GUARANTEE that explosive fumes have
been removed.
• BEFORE starting the engines or the generator, ALWAYS use the "sniff test" to ch eck t he
engine and bilge areas fo r fue l vapo rs.
• If you smell fuel, do NOT start the engines or the generator and do NOT turn On any
electrical devices.
• If you smell fuel and the engines and/or generat or ar e alr ea dy running , shut Off the engines
and/or generator and turn Off ALL electrical devices. Investigate IMMEDIATELY.
• Do NOT obs truct or modi fy t he vent il ati on system.
WARNI NG!
!
BLOWERSVENTILATION HOSES

Chapter 3: Propulsion & Related Systems 325 • Owner’s Manual Supplement
28
Fuel System
FIRE, EXPLOSION, and OPEN FLAME HAZARD!
• It is very important that the fuel system be ins pected thor oughly the fir st time it is fi lled and
at each subsequent filling.
• The fueling instructions in the Cruis er & Yacht Owner’s Manua l and t he fue l recommenda-
tions in the engine operation manual MUST be followed.
WARNING!
!
CAUTION
Avoid the storage or handling of ge ar near the f uel lines, fittings and tank.
!
• On diesel engine models, air in the diesel suppl y sys tem ca n stop a n engi ne or s everely
restrict performance.
• If you suspect air in the fuel lines, refer to your engine operation manual fo r det ail ed
instructions on how to bleed the syste m.
NOTICE
Carefully read the fuel section of both the Cruiser & Yacht Owner’s Manua l and t he engi ne
operation manual, paying special atte ntion to the subject of fuel recommendations .
NOTICE
DIESEL ENGINES FUEL SYSTEM (IF EQUIPPED)
FUEL FILTER/WATER SEPARATORS
ELECTRONIC FUEL SHUT-OFF VALVES
FUEL TANK
PORT ENGINE FUEL RETURN LINE
PORT ENGINE FUEL FEED LINE
STARBOARD ENGINE FUEL RETURN LINE
STARBOARD ENGINE FUEL FEED LINE
VENTED FUEL FIL L DEC K FI T TING

325 • Owner’s Manual Supplement Chapter 3: Propulsion & Related Systems
29
Fuel Fill & Vent
• Depending on engine type, the fuel fill deck fitting is marked either GAS, or DIESEL.
• If you have problems filling the fuel tank, see if the fuel fill hose or fuel tank vent hose is kinked or collapsed.
• If there are no visible signs of a problem, contact your local dealer.
Gas Engine Fuel Filters
• The fuel pickup tubes, located inside the fuel tank, are equipped with fine mesh screen filters.
• If your boat features MPI engines, there may be an inline fuel filter on each fuel line.
• Also, when supplied by the engine manufacturer, a fuel filter is installed on the engine.
• Periodically replace the fuel filters t o make sure they remain cle an and free of debris.
• Talk to your selling dealer or local marina about fuel additives that help prevent fungus or other buildup in your
fuel tank.
Anti-siphon Valves (Gas Engine s Only)
• The anti-siphon valves are vital fuel system parts.
• If a fuel line ruptures, th is valve will prevent the fu el from siphoning from the tank.
• The valves are located on the fuel tank, where the fuel feed lines attach to the tank.
• These valves are spring loaded and are opened by fuel pump vacuum.
VENTED FUEL FILL DECK FITTING
FUEL FILL HOSE
STARBOARD ENGINE FUEL LINE
PORT ENGINE FUEL LINE
FUEL TANK
INLINE FUEL FILTERS
(MPI ENGINES ONLY) (IF EQUIPPED)
ANTI-SIPHON VALVES & FUEL PICKUPS
FUEL TANK VENT HOSE
GAS ENGINES FUEL SYSTEM (IF EQUIPPED)
• If an engine running problem is diagnosed a s fuel starvat ion, check the anti-siphon valve.
• If the valve is stuck or clogged, ONLY change or replace it whi le the e ngine i s Off.
• NEVER run either engine with its anti-siphon v alve r e mo ved, exc ept i n an emer gency.
NOTICE

Chapter 3: Propulsion & Related Systems 325 • Owner’s Manual Supplement
30
Fuel Filter/Water Separators (Diesel Engine s Only)
• Each fuel feed line features a fuel fi lter/water separator.
• Service instructions fo r the fuel filter/water separators
are provided on the filters.
Electronic Fuel Shut-off Valves (Diesel Engin es Only)
• Your diesel engines are equipped with electronic fuel
shut-off valv es.
• When you start your engines, the electronic fuel shut-
off valves open to allow fuel to the engines.
• When you turn off the engines, the electronic fuel
shut-off valves close, stopping the fuel from going to
the engines.
• If one of the electronic fuel shut-off valves malfunc-
tions, it has a manual override.
• Turn the manual override clockwise to open the elec-
tronic fuel shut-off valve.
• The frequency of water draining or ele ment replacement is determined by the cont amina-
tion level in the fuel.
• Inspect the collection bowls for water daily.
• Replace the elements at least once a ye ar, or when a loss of power is noticed, whic hever
comes first.
NOTICE
VENT PLUG
DRAIN PLUG
HAND PRIMER
SERVICE INSTRUCTIONS
ONOFF
MANUAL OVERRIDE
KNOB

325 • Owner’s Manual Supplement Chapter 3: Propulsion & Related Systems
31
Quick Oil Drain System
• A quick oil drain assembly is attached to the oil pan on each engine.
• Some setup is needed before you can use this system.
Setting Up the Quick O il Drain System
1. Unscrew the factory installed bilge plug from the
bilge drain.
NOTE: Keep the factory bilge plug on your boat
as a spare.
2. On the starboard engine, unclip the oil drain hose
assembly and the bilge p lug assemb ly from the
wire loop.
QUICK OIL DRAIN SYSTEM COMPONENTS
HOSE STOP CLAMP
OIL DRAIN HOSE
BILGE PLUG CABLE
BILGE PLUG
SWIVEL CLIP
OIL DRAIN PLUG CABLE
OIL DRAIN PLUG
TRANSOM
BILGE PLUG
BILGE
DRAIN
BILGE
CUTAWAY VIEW OF TRANSOM & AFT BILGE
WIRE LOOP
BILGE PLUG
ASSEMBLY
OIL DRAIN HOSE
ASSEMBLY

Chapter 3: Propulsion & Related Systems 325 • Owner’s Manual Supplement
32
3. Unclip the bilge p lug
swivel clip from the
cable on the end of
the oil drain hose.
NOTE: This bilge
plug assembly will
be your spare. Keep
it in the same location as the factory
bilge plug removed
in step 1.
4. Feed the oil drain hose into the bilge area aft of the engine.
5. Thread the oil drain
hose, cable, and plug out
through the bilge drain.
6. Adjust the hose stop
clamp so that no more
than 12 inches of hose,
including the oil drain
plug, can extend out of
the bilge drain.
7. Push the oil drain hose and the
oil drain plug b ack in to the bilge ,
but leave the drain hose cable
outside of the bilge drain.
OIL DRAIN
BILGE PLUG
SWIVEL CLIP
HOSE CABLE
OIL DRAIN
HOSE
OIL DRAIN HOSE
BILGE DRAIN
OIL DRAIN PLUG
OIL DRAIN
HOSE CABLE
HOSE STOP
CLAMP
OIL DRAIN HOSE
BILGE DRAIN
OIL DRAIN PLUG
OIL DRAIN HOSE CABLE

325 • Owner’s Manual Supplement Chapter 3: Propulsion & Related Systems
33
8. Repeat steps 2 through 7 on t he port engine’s quick oil drain assembly. The only difference being; the bil ge plug
assembly, unclipped in step 3, will be used in step 9.
• At this point, both of the oil drain
hose cables should be han ging out
of the bilge drain.
9. Clip the bilge plug swivel clip to both of the oil
drain hose cables.
10. Push the oil drain hose cables and the bilge plug
swivel clip and cable i nto the bilge.
11. Screw the bilge plug into the bilge drain and
tighten firmly.
Using the Quick Oil D rain System
1. Remove your boat from the water.
2. Unscrew the bilge plug.
3. Pull the bilge plug cable out of the bilge drain
until the swivel clip and the oil drain hose cables
appear.
4. Unclip one of the oil drain hose cables from the
swivel clip . NOTE: Make sure the other drain
cable remains attached to the swivel clip.
5. Pull the unclipped hose cable until the oil drain
plug and the oil drain hose slide out of the bilge
drain.
6. Place the end of the oil drain hose into a suitable container.
7. Unscrew the oil drain plug and drain the engine oil.
8. Screw the oil drain plug back into the oil drain hose and tighten firmly.
9. Push the oil drain hose and oil drain plug back into the bilge.
10. Reclip the oil drain hose cable back onto the swivel clip.
11. Repeat steps 4 through 10 beginning with unclipping the other oil drain hose cable.
12. Push all of the cables back into the bilge and screw the bilge plug into the bilge drain and tighten firmly.
13. Dispose of the wast e oil in accordance with local regulation s.
OIL DRAIN HOSE CABLES
OIL DRAIN
SWIVEL CLIP
BILGE PLU G
HOSE CABLES
BILGE PLU G
CABLE

Chapter 3: Propulsion & Related Systems 325 • Owner’s Manual Supplement
34
Engine Hatch Lift System (If Equipped)
• The engine hatch hydraulic lif t pump is contr olled
by a rocke r switch at the helm.
• Periodically (at least once a year) check the fluid
level in the li ft pump hydraulic fluid res er voir and
refill as needed. For the location of the fluid
reservoir, see the Component Locations section of
Chapter 2 in this supplement.
Fire Suppression System (If Equipped)
• The fire suppression system is designed
to extinguish engine compartment fires.
• Before using your boat for the first time,
read the fire suppression syst em’s
instruction and maint ena nce manua l a nd
follow all warnings.
• The system will dischar ge automatically
whenever direct heat from a fire is
detected in the engine compartment.
• The system can be discharged manually
by pulling the T-handle (labeled FIRE)
at the helm.
• The system can only be dischar ged once.
• After the s ystem is discharged, it must
be refilled and refurbished before it can
be used again.
• Remove any items from the top of the engine hatch BEFORE Opening.
• Close all entertainment center doors and hatches BEFORE Opening and/ or Cl osi ng the
engine hatch.
NOTICE
ENGINE HATCH
LIFT SWITCH
FIXED
T-HANDLE
FIRE BOTTLE

35
325 • Owner’s Manual Supplement
Chapter 4: Controls & Gauges
Steering
• Your boat features a power assisted rack-and-pinion steering system.
• For information about the 'power-assist fluid reservoir', refer to the engine operation and maintenance manual.
• Boat steering is not self-centering.
• Refer to the engine manual for more steering system details.
Shift/Throttle Controls
Read all of the information about the shift/throttle controls in the shift/throttle manual, the engine operation manual,
and the Cruiser & Yacht Owner’s Manual.
Power Trim & Tilt
• The stern drives on your boat are equipped with power trim and tilt.
• Trim and tilt instructions are provided in the engine operation manual and the shift/throttle manual.
LOSS OF CONTROL HAZARD!
Improper maintenance of the shif t/ throttle hardware may cause a sudden l oss o f cont rol!
WARNING!
!

Chapter 4: Controls & Gauges 325 • Owner’s Manual Supplement
36
Trim Tabs
• Before using the trim
tabs, read th e trim tab
operation manual.
• The trim tabs can be
used to help keep your
boat level at cruising
speeds.
• The trim tabs are con-
trolled by two rocker
switches at the helm.
• Once cruising speed is
reached, the port or starboard trim switch may
be used (one at a time)
to level your boat.
• Perform trim tab adjust-
ments with several short touches to the switch, rather than one long one.
• After each short touch, allow several seconds for the hull to react.
• Periodically (at least once a year) check the fluid level in the trim tab hydraulic fluid reservoir and refill as needed.
For the location of the fluid reservoir, see the Component Locations section of Chapt er 2 in this supplement.
LOSS OF CONTROL HAZARD!
Improper use of trim tabs WILL cause loss of control!
• Do NOT allow anyone unfamiliar with trim tabs to use them.
• Do NOT us e t rim t abs i n a f oll owing s ea as the y WILL cause broaching or othe r unsaf e han-
dling characteristics.
• Do NOT use tri m tabs t o compens ate for excessive unequal weight distri buti on.
WARNI NG!
!
TRIM TAB
TRIM TAB
SWITCHES

325 • Owner’s Manual Supplement Chapter 4: Controls & Gauges
37
Gauges
Cleaning the Gauges
Gauge Fogging
• Moisture may occasionally find its way into the gauges causing lens fogging.
• Turning On the gauge lights will help dry the lenses.
• Fogging will not harm the gauges.
Radio Transmission Interference
VHF or other radio transmissions may cause brief erratic readings on the tachometer. This will not damage the
tachometer gauge or affect its accuracy when not transmitting.
Fuel Gauge
It is normal for the pointer on your fuel gauge to bounce as fuel sloshes back and forth in the fuel tank.
Twin Engine Readings
It is normal for tachometers and other gauges to have slightly different readings between engines.
PRODUCT or PROPERTY DAMAGE HAZARD!
• Use only mild soap and water to clean the gauge lenses and bez els .
• Use of other cleaners, including common window cleaning solutions, may cause the lenses
to crack.
• Lenses cracked in this manner will NOT be covered by our warranty.
CAUTION
!

38
325 • Owner’s Manual Supplement
Chapter 5: Navigation & Communication Equipment
Read the manuals for all navigation & communication equipment before using these systems.
Compass
Depth Finder
VHF Radio (If Equipped)
• Your boat may include a VHF (Very High Frequency) radio.
• As permitted by the FCC (Federal Communications Commission), the VHF radio can be used to access weather
reports, summon assistance, or contact other vessels.
• Contact the FCC for licensing, rules and regulations concerning VHF radio usage.
• Compass accuracy can be affected by many factors.
• Have a qualified technician calibrate your compass.
• Make sure the technician gives you a deviation car d which shows the corr ections to apply in
navigational calculations.
• Keep a copy of the deviation card at the helm.
NOTICE
• Do NOT use the de pth f inder as a nav igat iona l ai d to prevent collision, grounding, boat
damage or personal injury.
• When the boat is moving, submerged objects will NOT be s een unt il the y are already under
the boat.
• Bottom depths may change too quickly to allow ti me for the boa t to react.
• If you suspect shallow water or submerged obje cts , run t he boat at very slow speeds.
WARNING!
!

325 • Owner’s Manual Supplement Chapter 5: Navigation & Communication Equipment
39
Global Positioning System (GPS) (If Equipped)
• The GPS system should NOT be relied upon as t he ONLY aid to navigation.
• A qualified operator MUST monitor the GPS system at ALL times and keep a look-out for
other marine traffic and possible co lli si on situations.
WARNI NG!
!
Τhe GPS system is ONLY an aid to nav igat ion. I t's acc uracy can be affected by:
• Equipment failure or defects
• Environmental conditions
• Improper handling or use
NOTICE

40
325 • Owner’s Manual Supplement
Chapter 6: Plumbing
Bilge Pumps
• Y our boat is equi pped with two
bilge pumps for pumping wa ter
out of the bilge.
• The bilge pumps are cont rolled
by automatic float switches
(autofloat switches) and/or
switches at the helm.
• The bilge pumps are wired
directly to the battery.
• Unless the battery is dead, the
pumps should work even wh en
your boat is unattended.
NOTICE
Discharge of oil, oil waste, or fue l i nto nav igabl e wate rs i s prohibited by law. Violators are
subject to legal action by the l ocal author it ies .
FORWARD BILGE PUMP
AFT BILGE PUMP &
AUTOFLOAT SWITCH
& AUTOFLOAT SWITCH
MULTIPORT THRU-
THRU-HULL DRAIN
HULL DRAIN

325 • Owner’s Manual Supplement Chapter 6: Plumbing
41
Bilge Pump Testing
• The bilge pumps are vital to the safety of your boat.
• Test the bilge pumps often.
1. One at a time, turn On each bilge pump swi tch at the helm.
2. Make sure that water in the bilge is pumped overboard.
• If there is water i n the bi lge and t he pum p motor is ru nning but not pumpi ng, inspe ct the discha r ge h ose for a ki nk
or collapsed area.
• If the discharge hose looks okay, check the bilge pump housing for clogging debris (see below).
Checking for clogging debris:
1. Remove the pump mo tor from the
housing:
a. Lift the tab while rotating the
fins counter-clockwise.
b. Lift out the pump motor.
c. Clear the housing of debris.
2. Reinstall the pump motor:
a. Make sure the "O" ring is prop-
erly seated.
b. Coat the "O" ring with a light
film of vegetable or mineral oil.
c. Align the cams on either side of
the pump motor with the slots
on the housing.
d. Press the pump motor into the housing while twisting clockwise.
3. Check the reinstallation by trying to twist the fins counter-clockwise without lifting the tab; the pump motor
should stay in place.
PUMP
MOTOR
SLOT (TYPICALCAM (TYPICAL
OPPOSITE SIDE)
HOUSING
OPPOSITE SIDE)
"O" RINGTAB
FIN

Chapter 6: Plumbing 325 • Owner’s Manual Supplement
42
Autofloat Switches
• The automatic bilge pumps use float (autofloat) switches to automatically turn On the pumps whe never water
rises to a preset level in the bilge.
• The autofloat switches are normally mounted next to the bilge pumps they control.
• Test the autofloat switches often.
Autofloat testing:
1. Lift the float switch test button
to turn On the bilge pump.
• If the pump does not turn On,
check the push-to-reset
circuit breaker.
• If the fuse is good but the switch
still doesn’t work, it may mean
the switch is bad or possibly the
battery is low.
2. After testing, push the test but-
ton all the way down to return
the float switch to auto mod e.
PUSH SWITCH DOWN
LIFT SWITCH UP
(BILGE PUMP SHOULD TURN ON) (BILGE PUMP SHOULD TURN OFF)
AUTOFLOAT SWITCH
TEST BUTTON
TESTING
When the test is completed on each f loat swit ch, you MUST push the te st but ton ALL THE
W AY DOWN to return the switch to auto mode!
CAUTION
!

325 • Owner’s Manual Supplement Chapter 6: Plumbing
43
Seawater Systems
Seacocks
Thru-hull inlet or outlet fittings near or below the waterline fea ture seacock valves. You can close a seacock to stop water entry:
• If the hose connected to the seacock fails, or;
• To work on equipment served by the seacock.
Seacocks are used on your boat in seawater intake or liquid discharge systems including, but not limited to:
• Air conditioner (if equipped)
• Marine head (toilet)
Before using any system with a se acock, make sure the sea cock is Open and stays Open until the system is shut Off.
Seawater Strainers
• Seawater strainers are used to filter incoming seawater in some seawater intake systems. NOTE: Not all seawater
intake sys t ems have seawater strainers.
• If equipped, the seawa ter strainer is located ne ar the seawater intake system’s seacock.
• Check the strainers for leaks and/or debris every time you use your boat.
• Refer to the seawater strainer instruction sheet for cleaning a nd maintenance information.
FLOODING and SWAMPING HAZARD!
• Close the seacock(s) when leaving your boat unattended for any leng th of ti me.
• If a seacock is left open, a hose failure could flood the bilge, swamp the bat te rie s and th e
engines, and even sink your boat.
WARNI NG!
!
SYSTEM DAMAGE HAZARD!
• BEFORE using any system that has a seacock, make sure that the s yst em’s seacock is Open.
• Inspect and lubricate all seacocks annuall y.
CAUTION
!
HULL
SEACOCK GASKET
SEACOCK (TYPICAL)
SEACOCK
LEVER
SECTION
SEACOCK & THRU-HULL
COMPONENTS (TYPICAL)
90 DEGREE
THRU-HULL INTAKE
STRAINER
FLOODING HAZARD!
• BEFORE taking apart a seawater strainer for cleaning or other maintenance, Close the
seacock that sends seawater to that strainer.
• Failure to close the seacock before taking apart the seawater strainer may allow large
amounts of water to flood the bilge, which c ould s wamp th e batt eri es a nd the e ngines, and
even sink the boat.
• Keep the seacock Closed until the s eawate r st raine r i s com ple tel y reassembled.
SYSTEM DAMAGE HAZARD!
• After putting the seawater strainer back t oget her, make sure that the seacock v alve is Open
BEFORE using the component/system.
CAUTION
!

Chapter 6: Plumbing 325 • Owner’s Manual Supplement
44
Seawater Washdow n
FLOODING and SWAMPING HAZARD!
• NEVER leave your boat unattended while using the seawat er was hdown syst em.
• Any leak or break in this system may allow large amounts of water to flood the bil ge, which
could swamp the batteries and the engines, and e ven si nk your boat.
• Close the intake seacock when leaving your boat unattended for any le ngth of ti me.
WARNI NG!
!
SYSTEM DAMAGE HAZARD!
BEFORE turning On the seawater washdown system, make sure the i n take seac ock i s Open.
CAUTION
!
INTAKE SEACOCK &
PUMP FILTER
WASHDOWN FITTING
WASHDOWN HOSE
INTAKE PUMP
THRU-HULL STRAINER

325 • Owner’s Manual Supplement Chapter 6: Plumbing
45
Freshwater System
• Read the Freshwater Sys-
tem section in the Cruiser
& Yacht Owner’s Manual.
• The freshwater fill deck
fitting is marked
"WATER".
• Pressurize the freshwat er
system by either:
a. turning On th e freshwater pump switch (the battery switch must also be
On) or;
b. connecting to city water
(if equipped).
• For the locations of the
freshwater pump switch
and the city water inlet,
see the Component Loca-
tions section of Chapter 2
in this supplement.
• Turn Off the freshwater
pump switch when your
boat is not in use or when
the freshwater tank
is empty.
• Inspect an d clean the
freshwater filter often (the
filter is located on the
freshwater pump).
• If your boat is to be left
unattended for a long
period of time, pump the
freshwater tank dr y to prevent stored water from
becoming stagnant
and distasteful.
• If the freshwater system
needs to be disinfected,
ask your dealer about
treatments available for
your boat’s system.
• ONLY use safe drinking (potable) water in y our boat ’s freshwater system.
• ONLY use FDA approved "drinking water safe" hos es when f il li ng the f reshwater tank or
connecting to city water.
• NEVER use common garden hoses for drinking water.
WARNI NG!
!
GALLEY FAUCET
HEAD FAUCET
ENTERTAINMENT
CENTER FAUCET
FRESHWATER PUMP
FRESHWATER TANK
WATER HEATER
VENTED FRESHWATER
FILL DECK FITTING
TRANSOM SHOWER
(IF EQUIPPED)
DRAIN PLUG
CITY WATER INLET
HOT WATER
COLD WATER
WATER HEATER
DRAIN

Chapter 6: Plumbing 325 • Owner’s Manual Supplement
46
Freshwater System Winterization
1. Turn Off the water heater breaker switch.
NOTE: Tag or Mark the water heater breaker switch to prevent it from being turned On while the water heater
tank is empty.
2. Turn On the freshwater pump switch.
3. Open all of the faucets and showers and let the freshwater system drain completely.
4. Turn Off the freshwater p ump switch.
All of the remaining water must be removed from the water lines . There are two ways to remov e th e remai ning wa ter
from the lines:
• Compressed Air
• Gravity Draining
Compressed Air
You must have an air compressor with an air hose and
an air nozzle.
1. Remove the water line from the outlet side of the
freshwater pump (opposite side from filter).
2. Open the faucet that is furthest away from the freshwater pump.
3. Place the air nozzle against the end of the just
removed water line and blow air t hrough the sys tem.
4. When water stops coming out of the faucet , stop the
air and Close the faucet.
5. One at a time, repeat this process on all faucets
and showers.
Gravity Draining
1. Open all faucets and showers.
2. Remove the drain plug from the tee fitting on the
freshwater tank.
3. When the water has stopped draining from the
freshwate r tank and the water lines, replace the
drain plug.
FRESHWATER SYSTEM DAMAGE HAZARD!
• A faucet must be open when compressed air is blown through the freshwater sys tem.
• NEVER blow compressed air thr ough t he wate r sys tem when ALL of the faucets are Closed.
CAUTION
!
TYPICAL VIEW
NOTE: LOCATION OF TEE FITTING
& DRAIN PLUG MAY VARY
FRESHWATER TANK
FILTER
FRESHWATER
OUTLET SIDE
WATER LINE
INLET SIDE
WATER LINE
DRAIN PLUG
TEE FITTING
PUMP

325 • Owner’s Manual Supplement Chapter 6: Plumbing
47
City Water Inlet
• Read the “City Water Hookup” portion
of the Freshwater System section in the
Cruiser & Yacht Owner’s Manual.
• The freshwater pump switch must be
Off while the freshwater sys tem is being
pressurized by a city water supply.
Transom Shower (If Equipped)
• Read the ma nufacturer’s instruc-
tions before using the transom
shower for the first time.
• T o use the transom shower , your boat
must be connected to a dockside
freshwater supply, or the freshwater
pump switch must be turned On.
FLOODING and SWAMPING HAZARD!
• NEVER leave your boat unattended while the freshwater system is pressurized by city water .
• Any leak or break in this system may allow large amounts of water to flood the bil ge, which
could swamp the batteries and the engines, and e ven si nk your boat.
• ALWAYS turn Off the city water suppl y on t he dock be fore leaving your boat unattended.
WARNI NG!
!
CITY WATER INLET
TRANSOM SHOWER

Chapter 6: Plumbing 325 • Owner’s Manual Supplement
48
Water He ate r
• Read the water heater instruction manual and heed the warnings above.
• The water heater is connected to the 110-volt AC power system.
• To heat the water, turn On the water heater circuit breaker on the 110-volt AC master panel.
Winterizing the Water Heate r
1. Turn Off the water heater breaker.
2. Disconnect the hose (A) attached to the pressure
relief valv e (B).
3. If there is any water in th is hose, drain it into the
bilge or into a bucket.
4. Open the pressure relief valve (B).
5. Open the drain valve (C).
• Leave the pressure re lief a nd drai n valves Open until
you fit out your boat after storage.
SCALDING HAZARD!
Water heated by the water heater can be hot e nough to scal d the skin.
WARNI NG!
!
WATER HEATER DAMAGE HAZARD!
• Do NOT turn On the water heater ci r cuit br eaker on the 110-volt AC master panel until the
water heater tank is COMPLETELY filled with water.
• The tank is full if water flows from the tap when the hot water is turned On in the galley.
• Even brief water heater operation with a dry tank WILL damage the he ati n g el ements .
• Warranty replacements will NOT be made on elements damaged in this manner.
• Drain the water heater and turn the power Off when the chance of f reezing exists (see the
winterizing instructions be low).
CAUTION
!
If 1 10- volt AC power i s bei ng provided by shore power or genera tor po wer, but the water
heater is not working:
• Make sure the water heater ci rcuit breaker on t he 110-volt AC master panel is switched On.
• If the circuit br eaker is On, but the water heater is still no t w ork in g, ask your dealer how
to check the push-to-re set circuit breaker lo cat ed on t he wate r heat er.
NOTICE
NOTICE
The freshwater system MUST be drained BEFORE winterizing the water heater (se e the
Freshwater System W int eri zat ion I nstr uctions earlier in this section).
A
B
C

325 • Owner’s Manual Supplement Chapter 6: Plumbing
49
Drain Systems
Deck Drains
• Water on the
deck is drained
overboard
through the deck
drains.
• Keep the deck
drains free of
debris.
Sink Drains
The galley sink, head sink and entertainment center sink are above the waterline and are gravity drained overboard.
STORAGE LOCKER
DECK DRAIN
DRAIN THRU-HULL
THRU-HULL
STORAGE LOCKER
DRAIN THRU-HULL
DECK DRAIN
THRU-HULL
VIEWS ARE UNDERSIDE OF DECK
WASHDOWN
LOCKER DRAIN
TO THRU-HULL

Chapter 6: Plumbing 325 • Owner’s Manual Supplement
50
Shower Sump Pu mp System
• The shower drains into the
sump pump box.
• The sump pump box has an
autofloat switch.
• When the drain water rises
to a preset level, the autofloat switch turns On the
sump pump, and the drain
water is pumped overboard.
Sump Box Cleaning
Periodically clean the sump box (A), filter, and pump as follows:
1. Remove the cover screws (B) and the cover (C).
2. Remove any debris from the box and the filter.
3. Clean the sump pump as outlined in the Bilge Pump sec tion of
this chapter.
Sump System Winterizatio n
Drain the sump pump system in the months when not in use.
1. Disconnect and drain all lines to the unit.
2. Remove the screws from the mounting feet (D) and drain
the system.
3. Reinstall the screws in the mounting feet and reconnect the system.
SUMP PUMP BOX
SHOWER DRAIN
MULTI-PORT
THRU-HULL DRAIN
A
B
D
C

325 • Owner’s Manual Supplement Chapter 6: Plumbing
51
Marine Head & Holding Tank
Electric Flush He ad with Holding Tank (If Equi pped)
• Read the marine head operation
and maintenance manual before
using the marine head for the
first time.
• The electr ic flush marine head
uses seawater to flush waste from
the toilet into the holding.tank.
• The seawater intake valve (sea-
cock) must be Open for the head
to work.
• Check the content level of the
holding tank often by looking at
the side of tank.
• Empty the holding tank at every
opportunity.
• The holding tank is plumbed to a
fitting on the deck for dockside
pump-out.
• Keep the intake seacock Closed
while your boat is underway or
when the s ystem will not be used
for long periods of time.
Winterizing the System
Read the marine head operation and
maintenance manual for
winterizing instructio ns.
Check with local authorities for regulations regard ing t he legal use of marine head systems.
NOTICE
FLOODING and SWAMPING HAZARD!
• Close the seawater int ake s eacoc k when leaving your boat unattended for any length of
time.
• If the seacock is left open, a hose fail ure could flood the bilge, swamp the batt eri es a nd the
engines, and even sink your boat.
WARNI NG!
!
HEAD
SEAWATER
INTAKE
HOLDING
HOLDING
TANK VENT
HEAD
TANK
SEACOCK
HOLDING TANK PUMPOUT DECK FITTING

Chapter 6: Plumbing 325 • Owner’s Manual Supplement
52
Vacuum Flush Head System (If Equipped)
• Read the vacuum flush operation and
maintenance manual.
• The vacuum flush head system uses
freshwater from the freshwater tank
and a vacuum pump to flush waste
from the toilet into the holding tank.
• Check the holding tank content level
often by looking at the side of tank.
• The holding tank is plumbed to a fit-
ting on the deck for dockside
pump-out.
• Empty the holding tank at every
opportunity.
Winterizing the System
Read the vacuum flush head’s operation
and maintenance manual for winterizing
instructions.
HOLDING
HOLDING
TANK VENT
HEAD
TANK
VACUUM PUMP
HOLDING TANK
VENT FILTER
FRESHWATER HOSE
HOLDING TANK PUMPOUT DECK FITTING

325 • Owner’s Manual Supplement Chapter 6: Plumbing
53
Macerator (If Equipp ed)
To use the macerator to
pump waste directly overboard (where regulations
permit):
1. Open the underwater
discharge seacock.
2. Press both macerator
switches at the same
time to run the pump.
3. Stop running the macerator as soon as the holding tank is empty.
4. Close the underwater
discharge sea cock when
you are done pumping.
UNDERWATER
DISCHARGE
SEACOCK
HOLDING TANK VENT
HOLDING TANK
HOLDING TANK PUMP-
OUT DECK FITTING
FROM HEAD
MACERATOR PUMP

54
325 • Owner’s Manual Supplement
Chapter 7: Deck Equipment
Cleats & Tow Eyes
Read the section on towing in the Cruiser & Yacht Owner’s Manual before:
• Towing anything behind your boat.
• Being towed by another vessel.
Windlass
• Read and follow the manufacturer’s instruction manual
before using the ancho r windlass for the first time.
• The windlass can be controlled from a switch at the helm
or from the deck foot switches.
• Make sure that the windlass circuit breaker is turned On
before using the anchor windlass.
• T o raise the anchor, use engine power (not the windlass) to
move your boat to, and directly above, the anchor.
• Dislodge the anchor from the bottom by pulling it straight
up with the windlass.
• Make sure the anchor is secured before getting underway.
PERSONAL INJURY and/or PRODUCT or PROPERTY DAMAGE HAZARD!
NEVER lift your boat using the bow and stern eyes or the cle ats.
WARNING!
!
DANGER
PERSONAL SAF ETY HAZARD!
• ALWAYS secure the anchor and othe r lo ose obj ects BEFORE getting underway.
• The anchor and other items that are NOT properly secured can come l oose when your boat
is moving and cause personal injury or death.
DANGER!
!
PRODUCT DAMAGE HAZARD!
Do NOT pull your boat to the anc hor using the windlass or continue to run the windlass if it has
stalled or is overloaded.
CAUTION
!
WINDLASS
CIRCUIT BREAKER

325 • Owner’s Manual Supplement Chapter 7: Deck Equipment
55
Canvas
Bimini Top
1. Slide the main
bow’ s end eyes
into the aft hinges
on top of each
side-windshield
and insert the
securing pins.
2. Unfold the bimini
top and, starting
with the center
snaps, snap the
aft edge of the
bimini top to the
radar arch.
3. Slide the brace
end eyes into the
forward hinges
on top of each
side-windshield
and insert the
securing pins.
• The jaw slides
should not n eed t o
be adjusted.
• If you think the
jaw slides need to
be adjusted, obtain
the measurements
from your selling
dealer.
PRODUCT or PROPERTY DAMAGE HAZARD!
Take down and securely stow ALL canvas BEFORE transporting your boat by road.
CAUTION
!
Two people are needed fo r most of the tasks listed in this sect io n.
NOTICE
BEFORE cleaning and/or stowing your canvas or vinyl , r e ad the sections later in this chapter,
Canvas Care and Vinyl Care.
NOTICE
END EYE
HINGE
SECURING
JAW
SLIDE
RADAR ARCH
PIN
MAIN BOW
FORWARD
HINGE
BRACE
NOTE: STARBOARD SIDE
AFT HINGE
SIDE-WINDSHIELD
SHOWN, PORT SIDE TYPICAL

Chapter 7: Deck Equipment 325 • Owner’s Manual Supplement
56
Camper Top (If Equipped)
1. Slide the main bow’s end eyes
into the forward hinges and
insert the securing pins.
2. Unfold th e camper top and,
starting wi th the center s naps,
snap the forward edge of the
camper top to the radar arch.
3. Slide the brace e nd eyes into the
aft hinges a nd insert the securing pins.
• The jaw slides should not need to
be adjusted.
• If you think the jaw slides nee d to
be adjusted, obtain the measurements from your selling dealer.
END EYE
HINGE
SECURING
JAW
SLIDE
RADAR ARCH
PIN
FORWARD
HINGE
NOTE: STARBOARD SIDE SHOWN, PORT SIDE TYPICAL
AFT HINGE
BRACE
MAIN BOW

325 • Owner’s Manual Supplement Chapter 7: Deck Equipment
57
Vinyl Curtains (If Equipped)
Forward Bimini Curtain
1. At the top center of the curtain there are two zippers. Zip four to six inches of each zipper to the bimini top.
2. Starting at the bottom center of the curtain and working outwards, press the sockets over the studs on the windshield frame.
3. Fasten the top corner curtain studs to the bimini sockets.
4. Finish zipping the top zippers.
Side Bimini Curtains
1. Starting on either side, zip four to six inches of the top zipper to the bimini top.
2. Zip three to four inches of the forward vertical zipper to the forward bimini curtain.
3. Start with the top aft snap and work your way down snapping the curtain to the radar arch.
4. Now work your way forward snapping the curtain to the side-windshield frame.
5. Finish zipping the forward vertical zipper.
6. Finish zipping the top zipper.
7. Repeat steps one through six on the other side.
Side Camper Curtains
1. Starting on either side, zip four to six inches of the top zipper to the camper top.
2. Fasten the top aft corner curtain stud to the camper top socket.
3. Start with the top forward snap and work your way down snapping the curtain to the radar arch.
4. Now work your way aft snapping the curtain to the deck.
5. Finish zipping the top zipper.
6. Repeat steps one through five on the other side.
Aft Camper Curtains
1. Zip together four to six inches of all camper top to curtain zippers.
2. Snap all curtain snaps to the deck.
3. Finish zipping all zippers.
When taking down the forward bimini curta in, avoid socket /stud pr oblems by using t he following method to unfasten the curtain socke ts from the studs on the windshield frame:
• Grasp the edge of the curtain just below each soc ket a nd r oll the edge upwards. The socket
should pop off easily.
NOTICE

Chapter 7: Deck Equipment 325 • Owner’s Manual Supplement
58
Canvas Care (see a lso ‘Clear Vinyl Care’ on next pa ge)
• After each use, especially in saltwater, rinse the canvas with cold freshwater.
• Before stowing, let the canvas air-dry completely.
• The canvas can be rolled or folded for stowage.
Cleaning the Canvas
Regularly clean the canvas to prevent dirt, pollen, and etc. from embedding in the fabric. Generally, it is easiest to
wash the canvas while it is installed on your boat.
• Use a soft-bristled brush to remove all dust and loose dirt.
1. Hose down the canvas with freshwater.
2. Gently wash the canvas with a solution of lukewarm water (no more than 100° F) and non-detergent soap, such
as Lux or Ivory Flakes.
3. Rinse thoroughly to remove the soap.
4. Before stowing, let the canvas air-dry completely.
Stubborn Stains
Some stubborn stains may resist normal washing and you can try the methods below. However, these methods may
remove the waterproof finish of the fabric and may also decrease the life of the polyester thread used in the canvas.
Reapply a water repellent treatment as needed.
Method 1
1. Add 1/8 cup (2 oz.) of non-chlorine bleach to one gallon of water and mix thoroughly.
2. Thoroughly wet the canvas and then gently scrub the stained area with the weak bleach solution.
3. Rinse with cold water to remove all of the solution.
Method 2
1. Add 1/2 cup (4 oz.) of non-chlorine bleach and 1/2 cup (4 oz.) Ivory Flakes to one gallon of water and
mix thoroughly.
2. Soak the canvas in this solution for about 20 minutes.
3. Rinse with cold water to remove all of the solution.
NEVER use detergents when washin g t he canvas . Detergents can destr oy t h e water repellency,
and mildew/UV resistant fini sh of your ca nvas.
CAUTION
!
• Soaking in bleach solutions may remove the waterproof finish of the fabric and may also
decrease the life of the polyester thread used in the canvas .
• If needed, a water repellent treatment should be reapplie d to your canvas. Ask your dealer
about the treatments availabl e f or your boat’s canvas.
CAUTION
!

325 • Owner’s Manual Supplement Chapter 7: Deck Equipment
59
Clear Vinyl Care
• After each use, especially in saltwater, rinse the clear vinyl with cold freshwater.
• Before stowing, the c lear v inyl mus t b e comple tely d ry. Air drying is best, but you c an als o ca reful ly dr y the vi nyl
with a chamois or soft cotton cloth.
• The clear vinyl can be
rolled or laid out flat
for stowage.
• Never fold or crease the
clear vinyl parts as
cracking will occur.
Cleaning the Clear
Vinyl
Regularly clean the clear
vinyl to prevent dirt, pollen, and etc. from marring
the surface. Generally, it is
easiest to clean the clear
vinyl while it is installed
on your boat.
1. Hose down the clear
vinyl with freshwater.
2. Using a soft cotton
cloth (paper towels
are abrasive and
should never be us ed
on clear vinyl), gen tly
wash the clear vinyl
with soap and water.
3. Rinse thoroughly to
remove the soap.
4. Before stowing, the
clear vinyl must be
completely dry. Air
drying is best, but you can also carefully dry the vinyl with a chamois or soft cotton cloth.
• Ask your dealer about products available to keep the clear vinyl polished and looking new.
• NEVER store the clear vinyl piece s wet, a s thi s wil l c ause a mi lky f il m to deve lop.
• NEVER fold or crease the clear vinyl pieces as cracking will occur.
• Clear vinyl is NOT intended for use when yo ur boat is i n st orage or bei ng moored.
• Clear vinyl does NOT hold up well against ultraviolet rays.
• Under direct sunlight conditions, do NOT let the clear vinyl touch the framework. The
framework radiates heat and can burn the clear vinyl .
CAUTION
!
FOLDING OR OTHERWISE CREASING
CLEAR VINYL WILL CAUSE DAMAGE
SUCH AS CRACKING TO OCCUR
AFTER CLEAR VINYL PARTS HAVE
COMPLETELY AIR DRIED THEY CAN BE
ROLLED OR SIMPLY LAID FLAT FOR STOWAGE
NEVER FOLD OR CREASE CLEAR VINYL!

60
325 • Owner’s Manual Supplement
Chapter 8: Appliances & Entertainment Systems
• The separate instruction sheets or manuals for all appliances and entertainment systems contain detailed instruc-
tions and important safeguards.
• Read these instruction sheets and manuals before using your boat’s appliances and entertainment systems.
• If applicable, make sure the 110-volt AC bre aker is turned On for the applia nce or ent ertai nment sys tem you wish
to use.
Electric Stove
Refrigerator
The refrigerator runs on 12-volt DC power unless 110-volt AC power is being supplied by shore power or generator
power and the refrigerator’s circuit breaker on the 110-volt AC master panel is On.
Audio Equipment
NOTICE
ALWAYS keep an approved ABC-type fi r e ext ingui sher in gal ley area.
BURN/SCALDING and/or FIRE HAZARD!
• Read the stove’s ins truc ti on manual BEFORE using.
• ALWAYS keep an approved ABC-type fire extinguisher in galley area.
• Do NOT use the stove while underway.
• Any non-cooking devices on or near your stove dur ing use are potential fire hazards !
• Do NOT touch burners, grates or nearby surfaces as they may be hot even when they are
dark in color.
• Areas near burners and grates may become hot enough t o caus e burns .
• During and after use, do NOT touch or let clothi ng or ot her f lammable materi al come in
contact with heated units or ar eas near t he uni ts ( burner tops, main frame sides and back,
sea rails and pot holders) until the y have ha d suff ic ient time to cool.
WARNI NG!
!
AM radio reception may be impaired anytime the engine is running.
NOTICE

61
325 • Owner’s Manual Supplement
Chapter 9: Convertible Seats, Beds, & Tables
Dinette to V-berth Conversion
1. Pull out the table supports (A).
2. Turn control knob (B) on the table leg.
3. Lower the table top (C) by pushing down firmly.
4. Place filler cushion (D) on the table top (C).
A
B
C
D
C

Chapter 9: Convertible Seats, Beds, & Tables 325 • Owner’s Manual Supplement
62
L-lounge Conversion
1. Remove table top (A).
2. Remove the two tall support posts
(B).
3. Remove the two short support posts
from the storage clips under the transom bench (C).
4. Place the two tall support posts (B)
into the storage clips under the transom bench (C).
5. Place the two short support posts (D)
into the post bases (E).
6. Slide out the lounge supports (F).
7. Place the table top (A) onto the two
short support posts (D) and the
lounge supports (F).
8. Place the filler cushion (G) on the
table top.
B
C
A
D
C
E
F
E
F
F
D
A
G
D
D

325 • Owner’s Manual Supplement Chapter 9: Convertible Seats, Beds, & Tables
63
Cockpit Table Storage
1. Remove table top (A) from the two support posts (B).
2. Remove the two support posts (B).
3. Place the two tall support posts (B) into the storage
clips under the transom bench (C).
4. Put the table top inside of the table storage bag (D).
5. Place the table storage bag (D) in the table storage
box (E).
B
C
A
D
E

64
325 • Owner’s Manual Supplement
Chapter 10: Lights
Care & Maintenance
All of the lights installed on your boat ar e of to p quality, but you should be aware that failure ma y per io dic ally occur
for a variety of reasons:
1. There may be a blown fuse - replace the fuse.
2. The bulb may be burned out - carry spare bulbs for replacement.
3. A wire may be damaged or may have come loose - repair as required.
4. The bulb base may be corroded - clean the base and coat it with non-conductive electrical lubricant.
Interior & Exterior Lights
• The lights are powered by your boat’s 12-volt DC system.
• The battery switch must be turned On for the lights to work.
Navigation Lights
Spotlight (If Equipped)
Read the spotlight operating instructions before using the spotlight.
• Be conservative in the use of battery power.
• Prolonged use of cabin interior light s (ov erni ght) WILL result in a drained battery.
CAUTION
!
Avoid the storage of gear where it would block navigation li ghts from view.
CAUTION
!
Running lights are leg all y required to show boat direction and right-of-way at nig ht.
NOTICE

65
325 • Owner’s Manual Supplement
Chapter 11: Air Conditioner System (If Equipped)
• Read the air conditioner manual
before using the air conditioning
system.
• Before using the air conditioning
system, make sure the breaker s on
the 110-volt AC master panel are
turned On and that the system’s
seawater intake seacock is Open.
• The seaco ck must remain Open
while the air conditioner is in use.
• Check the seawater strainer for
debris before each use of the air
conditioning system.
• If the strainer n eeds to be cleaned
out, follow the directions in the
Seawater Systems section of
Chapter 6 in this supplement.
CARBON MONOXIDE POISONIN G HAZARD!
• Dangerous carbon monoxide gas (CO) can be brought into your boat
through the air condit ionin g sy ste m.
• Read the Carbon Monoxide (CO) section of Chapter 1 in this supplement.
DANGER!
!
SYSTEM DAMAGE HAZARD!
The air conditioning s yste m’s seawater intake seacock MUST be Opened BEFORE turning On
the air conditioner and MUST stay Open duri ng use.
CAUTION
!
SEAWATER
INTAKE SEACOCK
SEAWATER
STRAINER
AIR CONDITIONER
THRU-HULL DRAIN
GALLEY VENT
SALON VENT
AFT BERTH VENT
HEAD VENT
SEAWATER PUMP

66
325 • Owner’s Manual Supplement
Chapter 12: Electrical System
EXTREME FIRE, SHOCK & EXPLOSION HAZARD!
• To minimize the risks of fire and explosion, NEVER install knif e switches or ot her arcing
devices in the fuel compartment.
• NEVER substitute automotive parts for marine par ts. Mari ne el ect ric al, i gnit ion and fuel
system parts were designed and manufact ured to comply with rules and regulations that
minimize risks of fire and expl osi on.
• Do NOT modif y the ele ctr ica l sys tems o r relevant drawings.
• Have qualified personnel install batter ies and/or perform electrical syste m maintenance.
• Make sure that ALL battery switches are turned Off BEFORE performing any work in the
engine spaces.
DANGER!
!
FIRE & EXPLOSION HAZARD!
• Fuel fumes are heavier than air and wi ll coll ect in t h e bi lge a reas where they can be ac ci-
dently ignited.
• Visually and by smell (s nif f te st) , check the engines and bilge ar eas f or f umes or accumula-
tion of fuel.
• ALWAYS run the bilge blower(s) for at least four minutes prior to engine starting, el ectric al
system maintenance or activati on of ele ctr ical devices.
• NEVER expose the batteries to open flame or sparks, a nd NEVER smoke anywhere near
the batteries.
WARNI NG!
!
SHOCK & ELECTRICAL SYSTEM DAMAGE HAZARD!
When the engines are running, NEVER turn Off the batte ry swi tch or disconnect the
battery cables. Doing eithe r could cause damage to your boat ’ s engine and/or el ectri cal
system.
CAUTION
!
Electrical connections ar e prone to corros ion. To reduce corr osi on- caused ele ctri cal problems:
• Keep ALL electrical connections clean.
• Apply a spray-on protectant that is designed to protect conne cti ons f rom corrosion.
NOTICE

325 • Owner’s Manual Supplement Chapter 12: Electrical System
67
12-Volt DC System
Batteries
• The batteries supply electricity for lights, 12-volt accessories, engine starting and, if equipped, generator starting.
• The Electrical section of Chapter 8 in the Cruiser & Yacht Owner’s Manual provides battery care and mainte-
nance ins tructions.
Battery Switches
• A separate battery s wit ch i s
provided for each battery
(or battery bank).
• Standby-loads, such as the
automatic bilge pumps and
the stereo memory, are not
affected by the battery
switches since they are
wired directly to the batteries (see the Wiring Di a-
grams section of this
chapter for more details).
• Turn the battery switches
Off whenever your boat
will be unoccupied fo r l ong
periods of time.
• If an engine will not start
because of a dead battery,
the emergency battery parallel switc h allows you to
use the other batteries for
engine starting.
SHOCK and ELECTRICAL SYSTEM DAMAGE HAZARD!
When the engines are running, NEVER turn Off the main batt ery s witc hes or disconnect the battery cables. Doing either could cause damage to your boat’s engines and/or
electrical system components .
CAUTION
!
Make sure your selling dea ler ful ly ex plai ns how to use the battery switches.
NOTICE
PORT ENGINE &
GENERATOR (IF EQUIPPED)
PARALLEL SWITCH
STARTING BATTERY SWITCH
PORT
START
EMERG
PARALLEL
STBD
START
STARBOARD ENGINE
STARTING BATTERY &
HOUSE BATTERY
BANK SWITCH
12-VOLT DC STAND-BY
LOAD PUSH-TO-RESET
CIRCUIT BREAKERS
12-VOLT DC
MAIN CIRCUIT
BREAKER SWITCH

Chapter 12: Electrical System 325 • Owner’s Manual Supplement
68
Battery Switch Posi tions
Fuses & Circuit B reakers
• Circuit breakers for engines and main accessory power are on the 12-volt DC push-to-reset circuit breaker panel
and on the battery switch panel.
• Some equipment may have secondary fuse protection at the unit, behind the battery switch panel, or at
the batteries.
• For the locations of the battery switch panel and the 12-volt DC push-to-reset circuit breakers, see the Component
Locations section of Chapter 2 in this supplement.
12-Volt DC Accessory Outlet(s)
• Your boat is equipped with one or more 12-volt DC accessory outlets.
• The outlet(s) can be used with any 12-volt device which draws 15-amps or less.
• Each 12-volt DC accessory outlet is protected by a 15-amp breaker on the 12-volt DC push-to-reset circuit
breaker panel.
Alternators
The alternators will keep the batteries properly charged when the engines are running at, or above, cruising speeds.
BATTERY
SWITCHES
ENGINE
STARTING
ACCESSORIES
& LIGHTS
ENGINE
ALTERNATOR
BATTERY
CHARGER
PORT
START
Battery 1 Provides
Startin g Power to Por t
Engine and Generator
(If Equipped)
NA
Charges
Battery 1
Charges ALL
Batteries
STARBOARD
START
Battery 2 and House
Battery Provide
Starting Power to
Starboard Engine
Battery 2 and House
Battery Pro vide Pow er
for Accessories and
Lights
Charges Bat-
tery 2
and
House Battery
Charges ALL
Batteries
EMERGENCY
PARALLEL
ALL Batteries Provide
Starting Power
ALL Batteries Provide
Power for Accessories
and Lights
Charges ALL
Batteries
Charges ALL
Batteries
Since your boat’s batteries were inst all ed by your deal er, the battery switch positions li ste d
below may vary . Make sure your selling deal er f ully explains how to use the battery switches.
NOTICE
Do NOT use the 12-volt accessory outlet with a cigarette or cigar li ghter. High temperatures
may melt the outlet.
CAUTION
!

325 • Owner’s Manual Supplement Chapter 12: Electrical System
69
Battery Charger (If Eq uipped)
• Before using the battery char ger , read all instruct ions and wa rnings: (1) on the battery char ger , (2) on the batteries ,
and (3) in the battery charger manual.
• The battery charger will automaticall y charge your boat ’s batteries when 110-volt AC power is bei ng provided by
shore power or generator power (if equipped), and the battery charger circuit breaker on the 110-volt AC master
panel is On.
• The battery switches can be in any position during charging.
• During battery charging you may use 12-volt accessories, such as the lights and stereo, but battery charging will
take longer.
ENGINE and ELECTRICAL SYSTEM DAMAGE HAZARD!
NEVER run your boat’s engines and the battery charger at the same time.
CAUTION
!
• The battery charging systems (alternator and ba tte ry charger) installed on your boat are
designed to charge conventional l ead- acid ba tte ries.
• BEFORE installing gel-cell or other new technol ogy batter ies, consu lt with t he battery man-
ufacturer about charging syst em requirements.
CAUTION
!

Chapter 12: Electrical System 325 • Owner’s Manual Supplement
70
110-Volt AC System
• To gain a basic understanding of your boat’s
110-volt AC system, read the handbook A
Boater’s Guide T o AC El ect ri cal Systems. If this
handbook is not in your owner’s packet, call
360-435-8957 and the handbook will be mailed
to you.
• The 110-volt AC s ystem is ene rgized by
shore power.
• The 110-volt AC system can be energized by
shore power, or generator power (if equipped).
• Individual breakers on the 110-volt AC master
panel must be turned On to supply power to the
accessori es you wish to use.
• The 110-volt AC master panel may contain cir-
cuit breakers for accessories that are not available for your boat.
FIRE and ELECTRICAL SYSTEM DAMAGE HAZARD!
If equipped with a generator, using both shore power and generator power at t he same t ime
WILL cause major electrical system damage and could s tar t a f ire!
• The power source lockouts on the 110-volt AC master panel prevent the use of shore power
and generator power at the same time.
• NEVER bypass the power source lockouts .
WARNI NG!
!
WATER HEATER DAMAGE HAZARD!
• Do NOT turn On the water heater ci r cuit br eaker on the 110-volt AC master panel until the
water heater tank is COMPLETELY filled with water.
• The tank is full if water flows from the tap when the hot water is turned On in the galley.
• Even brief water heater operation with a dry tank WILL damage the he ati n g el ements .
• Warranty replacements will NOT be made on elements damaged in this manner.
CAUTION
!
• Whether using shore power or generator power, the use of several 110-vo lt AC ac cess ori es
at the same time can result in a n overl oaded c ircuit.
• You may have to turn Off one or more acce ssories to use another accessory.
NOTICE
110-VOLT AC MASTER PANEL (SINGLE SHORE POWER)
AC VOLTS
RECEPTACLES
WATER HEATER
RANGE
REFRIGERATOR
AIR/HEAT
MICROWAVE
ACCESSORY
AC MAIN
BATTERY
CHARGER
REVERSE
POLARITY
110-VOLT AC MASTER PANEL (DUAL SHORE POWER)

325 • Owner’s Manual Supplement Chapter 12: Electrical System
71
Shore Power
FIRE, EXPLOSION and SHOCK HAZARD!
• Do NOT alter the shore power connectors and use ONLY compatible c onnect ors.
• Turn Off ALL breakers and swit ches on t he 110-volt AC master panel BEFORE plugging in
or unplugging the shore power cord.
• To prevent shock or i njury from drop
p
ing a "hot" cord into the water:
a. ALWAYS plug the shore power cord into the boat i n let fi rst , and the n int o the
dockside outlet.
b. When unplugging fr o m shore power, ALW AYS unplug the shore power cord from the
dockside outlet first.
• NEVER leave the shore power cord plugge d int o the docksi de out let ONLY.
• ONLY use shore power cords appr o ved fo r ma rine use. NEVER use or dinary indoor or out-
door extension cords.
DANGER!
!
SHOCK and ELECTRICAL SYSTEM DAMAGE HAZARD!
• Monitor the polarity indicator lig hts EVER Y TI ME you c onnect to s hore power.
• If a reversed polarity light turns On when you ar e co nnect ing t o shore power, do NOT turn
On the main bre aker s witc hes.
• Instead, IMMEDIATELY unplug the shore power cord (ALWAYS from the dockside outlet
first) and alert marina management.
WARNI NG!
!
SHOCK and ELECTRICAL SYSTEM DAMAGE HAZARD!
• BEFORE each use, check the shore power cord for defec ts or damage.
• NEVER use a damaged or faulty cord since the danger of f ire and electrical shock exis ts.
• Do NOT pinch the shore power cord in doors or ha tches , or c oil the s hore power cord too
tightly, since these situations can generate enough heat to re sult in a f ire.
• If a shore power cord is dropped into the water, COMPLETELY dry the blades and contact
slots BEFORE using.
WARNI NG!
!
ELECTRICAL SYSTEM DAMAGE HAZARD!
• NEVER connect to dockside power outside of North America unles s you hav e the inte r-
national electrical conversi on opti on.
• Using several 1 10 -vol t AC acc essories at the same time can r esul t i n an over loade d ci rcuit.
You may have to turn Off one or more accessories to use another access ory.
• Use double insulated or three-wire protected el ect ric al appl iances whenever possible.
CAUTION
!

Chapter 12: Electrical System 325 • Owner’s Manual Supplement
72
• Single shore power 110-volt/60-hertz AC systems feature one 110-volt/30-amp shore power receptacle.
• If your boat has an air conditioning system, a second (dual) 110-volt/30-amp inlet has been installed.
• Dual shore power inlets are labeled LINE 1 and LINE 2, which corresponds to the SHORE POWER 1 and
SHORE POWER 2 master breakers on the 110-volt AC master panel.
• LINE 1 and LINE 2 are independent of each other except when the parallel switch is used.
Connecting to Shore Power
1. Review all hazard information at the begin-
ning of this section, Shore Power.
2. Turn Off the shore power master circuit
breaker(s) and all switches and breakers on
the 110-volt AC master panel.
3. Attach the shore powe r cord(s) to the boat
inlet(s) firs t, then to the dockside outl et(s).
4. Turn On the SHORE POWER 1 and SHORE
POWER 2 (if equipped) master br eaker (s) on
the 110-volt AC master panel.
5. As needed, turn On t he individu al component
breakers on the 110-volt AC master panel.
Parallel Switch (If Equi pped with Dual S hore Power)
When only one dockside outlet is available, you can use the parallel switch to provide power to both lines.
1. Connect to shore power as described in the section Connecting to Shore Power earlier in this chapter.
2. Switch th e parallel switch On instead of the SHORE POWER 2 master breaker.
3. Turn On the individual component breakers as required.
SHOCK and ELECTRICAL SYSTEM DAMAGE HAZARD!
• Monitor the polarity indicator lig hts EVER Y TI ME you c onnect to s hore power.
• If a reversed polarity light turns On when you ar e co nnect ing t o shore power, do NOT turn
On the main bre aker s witc hes.
• Instead, IMMEDIATELY unplug the shore power cord (ALWAYS from the dockside outlet
first) and alert marina management.
WARNI NG!
!
SHORE PO W E R INL E T ( S )
SHORE PO W E R MAS TER
CIRCUIT BREAKER(S)
• When using the parallel switch do NOT exceed 30 total amps.
• The amperage of each component breaker is shown on the breaker itself.
• The voltage on each line can be read on the volt me ter on the 110-volt AC master panel.
NOTICE

325 • Owner’s Manual Supplement Chapter 12: Electrical System
73
Generator (If Equipp ed)
• When your boat is not connected to shore power, the generator can supply 110-volt/60-hertz power.
• Before using the generator, read the generator operation manual for pre-start checks and break-in procedures.
• Refer to the generator manual for starting/stopping instructions.
Important generator notes:
• Polarity has been established in the installati on of t he generator. Therefore, the polar i ty li ght s will not function in
this mode.
• Fuel to run th e main genera tor is supplied from the starboard fuel tank.
• Periodically replace the fuel filter on the generator to make sure it remains cle an and free of debris.
• Diesel generators also have a fuel filter/water separator. Service instructions are provided on the fuel
filter/water separator.
• The coolant mixture installed at the factory consists of equal parts of water and antifreeze (Ethylene Glycol).
• Check the generator’s seawater strainer for leaks and/or debris before each use.
CARBON MONOXI DE POISON ING HAZARD!
• Generators are a source of danger ous carbon monoxide gas (CO). Check the
generator exhaust system for lea ks BEFORE each use.
• Read the Carbon Monoxide (CO) s ect ion o f Chapt er 1 in this supplement.
DANGER!
!
FIRE/EXPLOSION HAZARD!
• Use the bilge blowers for a minimum of four minutes BEFORE start ing th e gene rato r.
• Leave the blowers On while the generato r is running.
• Use of the blower system is NOT A GUARANTEE that explos ive fumes hav e been removed.
ALWAYS use the 'sniff test' to check the bilge areas for fuel vapors.
• If you smell any fuel, do NOT start the genera tor.
• If the generator is already runni ng, IMMEDIATELY shut Off the generator and ALL electri-
cal accessories and investi gate .
• Do NOT obstruct or modify the ventilation sys tem.
WARNI NG!
!
SYSTEM DAMAGE HAZARD!
• ALWAYS make sure the generator’s seawat er intake seacock is Open BEFORE starting, and
during running of the generator.
• NEVER run the generator starter for more than 30 seconds. If the generator does not start,
wait at least 30 seconds BEFORE trying again.
• After the generator starts, let the ge nerat or s tabi lize BEFORE turning On the component
breakers on the 110-volt AC master panel.
CAUTION
!

Chapter 12: Electrical System 325 • Owner’s Manual Supplement
74
EXHAUST THRU-HULL
MUFFLERSEAWATERSEAWATER STRAINER
GENERATOR
FUEL PICKUP
& ANTI-SIPHON VALVEINTAKE SEACOCK
SEAWATER ANTI-
SIPHON VALVE
FUEL
FILTER
GAS GENERATOR SYSTEM
MUFFLER
FUEL FILTER/
SEAWATER ANTI-
SEAWATER
GENERATOR
INTAKE SEACOCK
WATER SEPARATOR
SIPHON VALVE
SEAWATER
STRAINER
FUEL RETURN
FITTING
FUEL PICKUP &
ELECTRIC FUEL
SHUT-OFF VALVE
(NOT SHOWN)
EXHAUST
THRU-HULL
FUEL RETURN
LINE
FUEL FEED
LINE
DIESEL GENERATOR SYSTEM

325 • Owner’s Manual Supplement Chapter 12: Electrical System
75
Electrical Routings
12-Volt DC Deck Harnesses
WINDLASS
WINDLASS FOOT CONTROLS
SPOTLIGHT (IF EQUIPPED)
PORT NAVIGATION LIGHT
STARBOARD NAVIGATION LIGHT
COURTESY LIGHT
PORT SPEAKER
STARBOARD SPEAKER
GALLEY LIGHT
GALLEY HARNESS
SALON LIGHTS
V-BERTH CO MONITOR
V-BERTH LIGHT
HELM HARNESS
HEAD HARNESS
PORT WIPER
STARBOARD WIPER
AFT BERTH ENTRY LIGHT
TO RADAR ARCH HARNESS
ENTRY LIGHT SWITCH
ENTRY LIGHT
ENGINE ROOM LIGHT
BATTERY SWITCH PANEL
FUEL FILL GROUND
V-BERTH LIGHT
SALON LIGHT
SALON LIGHT
AFT BERTH LIGHTS
COURTESY LIGHT
AFT BERTH LIGHTS
GALLEY LIGHT
AFT BERTH CO MONITOR
VIEW IS UNDERSIDE OF DECK
SHIFT/THROTTLE
AUDIO/VISUAL PANEL
PORTSTARBOARD

Chapter 12: Electrical System 325 • Owner’s Manual Supplement
76
12-Volt DC Hull Harnesses
SEAWATER WASHDOWN PUMP
COURTESY LIGHT
GALLEY
HEAD
HELM
FIRE INDICATOR
FUEL SENDER
MACERATOR (IF EQUIPPED)
VACUUM FLUSH (IF EQUIPPED)
STARBOARD ENGINE
TRIM & TILT PUMP
AFT BILGE PUMP
TRIM TAB PUMP
PORT ENGINE
BLOWERS
FRESHWATER PUMP
BATTERY SWITCH PANEL
BATTERY CHARGER
BATTERIES
FIXED FIRE BOTTLE
ENGINE HATCH LIFT PUMP
FORWARD BILGE PUMP
WINDLASS CIRCUIT BREAKER
TRIM & TILT PUMP
(IF EQUIPPED)
(IF EQUIPPED)
(IF EQUIPPED)
SEAWATER WASHDOWN
INTAKE SEACOCK BONDING
HEAD INTAKE
SEACOCK BONDING
GENERATOR INTAKE
SEACOCK BONDING
(IF EQUIPPED)
MACERATOR INTAKE
(IF EQUIPPED)
SEACOCK BONDING
AIR CONDITIONER
INTAKE SEACOCK
BONDING (IF EQUIPPED)
BONDING BUSS
& BONDING
& BONDING
PORT STARBOARD
SHOWER DRAIN
SUMP PUMP
SACRIFICIAL ZINC
ANODE BONDING
COCKPIT REFRIGERATOR
(IF EQUIPPED)

325 • Owner’s Manual Supplement Chapter 12: Electrical System
77
110-Volt AC Deck Harnesses
SHORE POWER INLET(S)
& SHORE POWER
110-VOLT AC MASTER PANEL
MASTER BREAKER(S)
VIEW IS UNDERSIDE OF DECK
PORTSTARBOARD

Chapter 12: Electrical System 325 • Owner’s Manual Supplement
78
110-Volt AC Hull Harnesses
GALLEY RECEPTACLE
110-VOLT AC MASTER PANEL
AIR CONDITIONER UNIT
AIR CONDITIONER
SEAWATER PUMP
GENERATOR (IF EQUIPPED)
BATTERY CHARGER
WATER HEATER
COCKPIT REFRIGERATOR
DINETTE RECEPTACLE
AFT BERTH RECEPTACLE
(IF EQUIPPED)
(IF EQUIPPED)
(IF EQUIPPED)
AIR CONDITIONER CONTROL
PANEL (IF EQUIPPED)
REFRIGERATOR
MICROWAVE
ELECTRIC STOVE
STARBOARDPORT

325 • Owner’s Manual Supplement Chapter 12: Electrical System
79
Battery Cable System
H
S
P
12-VOLT DC PUSH-TO-RESET
BATTERY
HOUSE BATTERY
GENERATOR
(IF EQUIPPED)
BUSS BAR
STARBOARD ENGINE
PORT ENGINE
GROUND BLOCKS
POSITIVE:
NEGATIVE:
PORT ENGINE &
STARBOARD
CIRCUIT BREAKERS
SWITCH PANEL
POSITIVE BATTERY CABLES ARE RED
NEGATIVE BATTERY CABLES ARE YELLOW
NOTES:
BATTERY
GENERATOR
BATTERY

Chapter 12: Electrical System 325 • Owner’s Manual Supplement
80
Wiring Diagrams
Engine Electrical Systems
325 • Owner’s Manual Supplement Chapter 12: Electrical System
81
12-Volt DC System
Chapter 12: Electrical System 325 • Owner’s Manual Supplement
82
110-Volt AC System, Single Shore Po wer

325 • Owner’s Manual Supplement Chapter 12: Electrical System
83
110-Volt AC System, Dual Shore P ower

325 • Owner’s Manual Supplement
84
Important Records
Selling Dealer
Name Of Dealership
Address
Phone/FAX/E-mail
Sales Manager
Service Manager
Engines
Port Engine Serial Number Starboard Engine Serial Number
Oil Type/SAE Quarts per Engine Filter Type
Propeller
Manufacturer Pitch
Model Number
Generator
Manufacturer Model Name/Number
Serial Number
Oil Type/SAE Quarts Filter Type
Fuel System
Fuel Capacity Filter Type
Key Numbers
Ignition Other
Electronics
Manufacturer Model Name/Number
Serial Number
Manufacturer Model Name/Number
Serial Number
Manufacturer Model Name/Number
Serial Number
Manufacturer Model Name/Number
Serial Number
Manufacturer Model Name/Number
Serial Number

325 • Owner’s Manual Supplement
85
Float Plan
Before going boating, fill out a copy of this float plan (or similar) and leave it with a reliable person whom you can
depend on to contact the Coast Guard or other rescue organization, if you do not return as scheduled.
Description of Boat
Registration/Documentation Number
Length Make Type
Hull Color Trim Color
Fuel Capacity Engine Type Number of Engines
Distinguishing Features
Distinguishing Features
Operator of Boat
Full Name
Male or Female Ag e Health
Address
Address
Phone/FAX/E-mail
Operator’s Experience
Persons Onboard
Full Name
Age Health Phone Number
Full Name
Age Health Phone Number
Full Name
Age Health Phone Number
Full Name
Age Health Phone Number
Full Name
Age Health Phone Number
Full Name
Age Health Phone Number
Full Name
Age Health Phone Number
Full Name
Age Health Phone Number

Float Plan 325 • Owner’s Manual Supplement
86
Survival Equipment
Marine Radio (Yes/No) Type Frequencies
Number of PFDs Flares (Yes/No) Mirror (Yes/No)
Smoke Signals (Yes/No) Flashlight (Yes/No) Food (Yes/No)
Water (Yes/No) Anchor (Yes/No) Raft/Dinghy (Yes/No)
Paddles (Yes/No) EPIRB (Yes/No) Other
Other Other Other
Vehicle Description
Make Model
Color License Number
Where is the Vehicle Parked?
Trip Expectations
Departing From
Departure Date Departure Time
Stopover 1
Arrive No Later Than: Date Arrive No Later Than: Time
Stopover 2
Arrive No Later Than: Date Arrive No Later Than: Time
Stopover 3
Arrive No Later Than: Date Arrive No Later Than: Time
Stopover 4
Arrive No Later Than: Date Arrive No Later Than: Time
Stopover 5
Arrive No Later Than: Date Arrive No Later Than: Time
Stopover 6
Arrive No Later Than: Date Arrive No Later Than: Time
Final Destination Port (If Different Than Home Port)
Arrive No Later Than: Date Arrive No Later Than: Time
If not returned by the date and time list ed abov e, call
the Coast Guard or other local authority.
Coast Guard Phone Number
Local Authority Phone Number

Owner’s Notes

Owner’s Notes


Bayliner • P.O. Box 9029 • Everett, WA 98206 • 360-435-5571
 Loading...