


THE NEW FACE
of Glucometer
®
Diabetes Care System
U
SERGUIDE
For Use With
Ascensia
E
LITE
™
XL
Blood Glucose Meter
Need Help with Reimbursement?
Call Our Bayer Care Help Line: 1-877-787-1912

2 The Meter
ii
Test
end
Meter
end
Test
Strip
Icon
Button
Display
Test slot

Testing Materials 2
iii
• Ascensia
E
LITE
™ Test Strip –
use for blood or control testing.
Insert into Meter before drawing
in blood or control sample.
• Ascensia
E
LITE
™ Check Strip
– use to check if the Meter is
working properly before running
a blood glucose test.
• Ascensia
E
LITE
™ Code Strip
– use to set the Meter (calibrate)
to match the box of Test Strips.
• MICROLET®Adjustable
Lancing Device – use for finger
puncture with a MICROLET
®
Lancet.
• NORMAL CONTROL
SOLUTION – use to confirm
system is working correctly.
• BATTERIES – replace when
necessary.
test end
meter end

iv
• Two-step testing process:
1. Insert Test Strip in Meter
2. Touch TEST END to blood
• Test results are displayed in 30
seconds.
• Meter turns on when inserting a
strip and turns off when removing the strip.
• Up to 120 test results may be
stored in the Meter and can be
recalled when necessary.
• Stored results may be transferred
to a computer and analyzed with
Win
Glucofacts™XL software.
• Agrees with laboratory serum/
plasma glucose results (values
10–15% higher than whole
blood glucose results).
• Capillary action at the end of the
Test Strip automatically draws a
small amount of blood into the
reaction chamber.
The Ascensia
E
LITE
™XLDiabetes Care System
is a blood glucose monitoring system for diabetes
management in home or professional use.
The system is based on electrode sensor technology. Convenient
features of the system are:
Automatic Strip-filling Action

1
What do I do first?
If needed, install batteries and set the time— test the Meter
electronics with a Check Strip—code the Meter to match
Ascensia
E
LITE
Test Strips —and then run a control test to test
the whole system before running a blood glucose test.
What does blood glucose monitoring do for me?
Blood glucose levels change during the day due to medication,
exercise, diet, insulins or hypoglycemics (oral agents) or possibly
stress and illness. Blood glucose testing provides information that
will help you understand the changes.This information can help
you manage your diabetes to keep your blood sugar levels within
your target range.
Do I need to read this book?
This instruction guide is provided as a reference as you operate
the system.
It is important for you to read through the User
Guide to understand how the whole system operates and
what information is available for your needs.
For short simple instructions, a quick reference guide is also provided for your convenience with procedures and information
most often needed. It can be useful when traveling.
If you have any concerns or questions as you learn how
to use the system, please call our Customer Service
Dept. 1-800-348-8100 or visit our website at
www.ascensia.com or www.bayercarediabetes.com
Frequently Asked Questions 2

2 Important Information
2
• The Ascensia
E
LITE
™XLBlood Glucose Meter has been
designed for use with Ascensia
E
LITE
™ Test Strips.The performance characteristics of the Meter may not be valid for any
other brand of Test Strips.The use of other Test Strips may
cause erroneous results. Bayer Corporation does not warrant
the use of the Ascensia
E
LITE
XL
Blood Glucose Meter with any
Test Strip other than Ascensia
E
LITE
Test Strips.
• Glucose levels below 50 or above 250 mg/dL (below 2.8 or
above 13.9 mmol/L) may indicate a potentially serious medical
condition. If your glucose is below 50 mg/dL or above
250 mg/dL, contact your healthcare professional immediately.
CAUTION: Before using any product to test your blood glucose
(sugar), read all instructions and practice the test. Do all quality
control checks as directed and consult with a diabetes health
professional. These recommendations apply to all blood glucose
monitoring systems and are supported by the American
Association of Diabetes Educators,* the American Diabetes
Association, the Food and Drug Administration and Health
Industry Manufacturers Association.
*You may call the American Association of
Diabetes Educators for the location of a
Certified Diabetes Educator (CDE) near you
1-800-338-DMED.

User Guide Contents 2
3
SECTION PAGE
Set Up For Testing
1 Install Batteries 4
2 Set the Alarm,Time and Units 5
3 Check Strip Test 6
4 Code the Meter 7
5 Control Test 8
Testing
6 Blood Glucose Test 11
7 Important to Remember 15
Test Result Management
8 Stored Test Results 17
9 Data Management 18
Taking Care
10 Meter and Test Strip Care 19
11 Meter and Test Strip Problems 21
Technical Support Information
12 Service 25
13 Limitations of the Procedure 27
14 Specifications 28
15 Supplies 29
16 Warranty 31

SECTION
1 Install Batteries
4
1. Press firmly on “open” arrow
and slide forward in the direction of the arrow. The lid
releases.
2. Place new batteries into the bat-
tery compartment with the “+”
side up. Slide lid back into place,
lining up with open slots, and
close firmly. Test results stored in
the memory are not erased
when batteries are changed, but
time must be reset.
NOTE: Two 3 volt (CR2032) lithium batteries
are furnished with the Meter.
WARNING: Keep batteries
away from children. Lithium
batteries are poisonous.
If swallowed, immediately
contact your physician or
poison control center.
Discard batteries according
to your local environmental
regulations.
Install batteries when the Meter is new if
needed. Replace batteries when the Meter
displays the battery symbol .
SECTION
Set the Alarm,Time and Units 2
5
Some Meter options may need to be reset
when the Meter is new and when batteries
are changed. The options may be changed any
time to fit your needs.
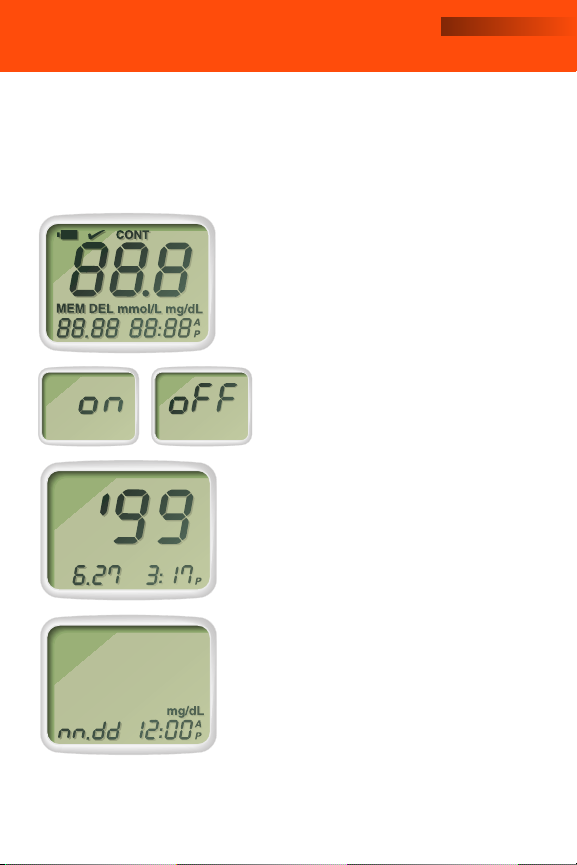
How do I set the Meter?
Hold the button for five seconds to
place Meter in “set up” mode. Press
the button to change item as it
flashes (you have five seconds to
make a change).
Display 1.
Press button to
switch: Beeper on to beeper off
if you wish to turn off the sound.
Display 2.
Press button
to set:
• Minute • Day
• Hour* • Month
• Year
Display 3.
Press button to
for-
mat (preset at factory to match country)
:
• Clock (12- or 24-hour day)
• Date (day/month or month/day)
• Units (mg/dL or mmol/L)
Meter returns to full display and
turns off automatically.
*Note am (A) or pm (P) if clock is formatted
for a 12-hour day.

SECTION
3 Check Strip Test
6
Check your Meter when new or any time after use,
to make sure that electronics are working properly.
HOW:
1. Remove the Check Strip from
the package (save the package).
2. Insert the Check Strip (“check”
side up) fully into the Meter
until you hear a beep.A full
display* shows, followed by
another beep and then the
Check Strip result.
3. The Check Strip result must be
within the range listed on the
Check Strip package insert. If
not, see the problem solving
chart in Section 11.
4. At the end of the test, carefully
remove the Check Strip from the
Meter and return it to its
package.
*A full display, as shown here, indi-
cates that all characters are working.
If ever all the display segments do
not appear, see Section 11.
SECTION
Code the Meter 4
7
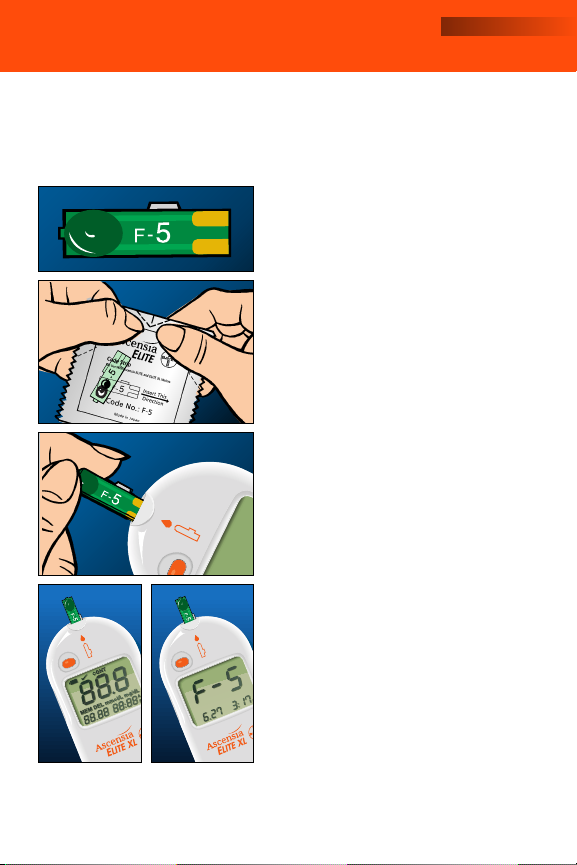
Code the Meter whenever a new box of Test Strips
is opened.* This will match the Meter to the Test
Strip reactivity.
HOW:
You will need the Code Strip found
in the new box of strips.
1. Tear open the packet found in
the new carton of Test Strips
and remove the Code Strip (save
the packet).
2. Insert the Code Strip into the
test slot as shown. A beep
sounds and a full display appears
briefly. Another beep sounds and
the Code Number (for example
F-5) appears in the display.
3. Remove the Code Strip and
store in packet.
*You do not need to code the Meter if
the new Code Strip number matches
the previous Code Strip number.
 Loading...