

Page 1
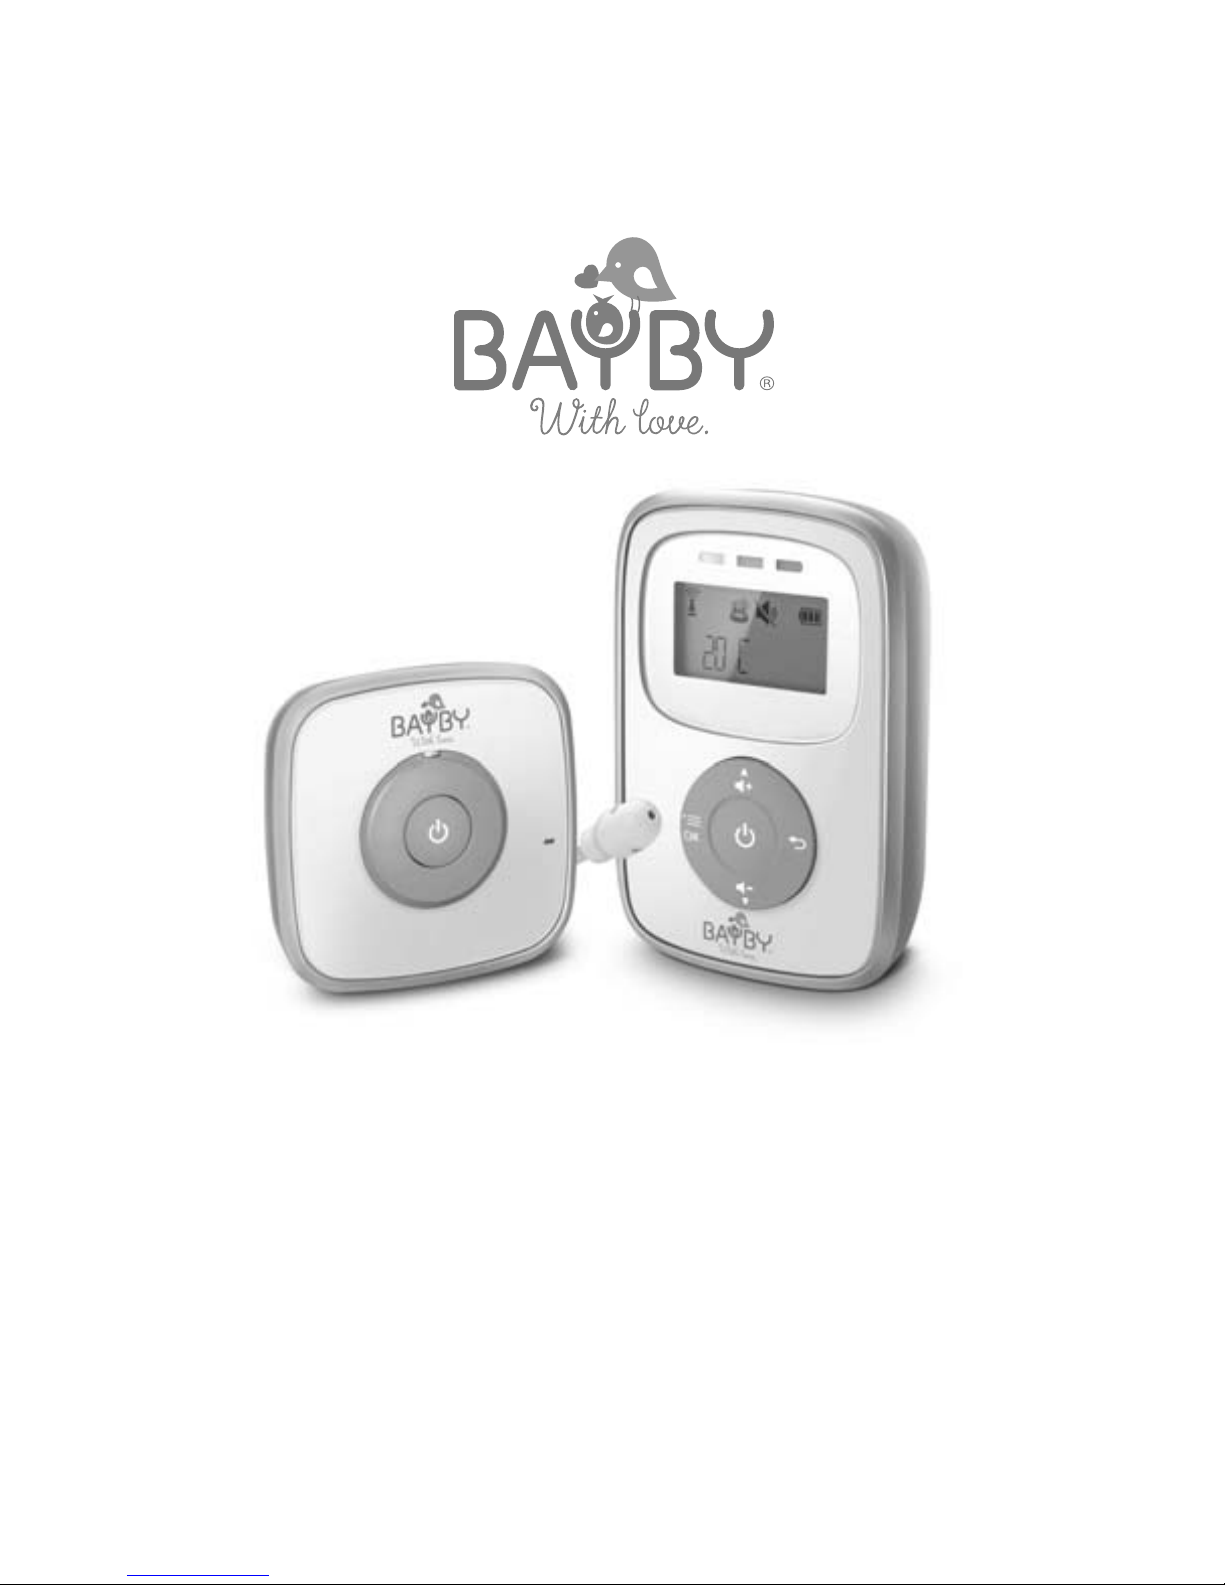
EN / Digital Audio Baby Monitor ■ User’s manual
CZ /
Digitální audio chůvička ■ Návod k obsluze
SK /
Digitálna audio opatrovateľka ■ Návod na obsluhu
HU /
Digitális audió babaőrző ■ Használati útmutató
BBM 7010
Page 2

EN
.............................................................................................................................................. 3
CZ
............................................................................................................................................. 23
SK
............................................................................................................................................. 43
HU
............................................................................................................................................. 63
Page 3

3
Digital Audio Baby Monitor EN
Table of Contents
Introduction ......................................................................................................................................................4
Safety instructions and important notes ............................................................................................................5
Description of the accessories ..........................................................................................................................7
Description of the baby unit ..............................................................................................................................8
Description of the parent unit ............................................................................................................................9
Description of the parent unit display ..............................................................................................................10
Installation location of the baby unit and parent unit ........................................................................................11
Power source ................................................................................................................................................. 11
Using the baby monitor .................................................................................................................................13
General information about using the baby monitor ..........................................................................................16
Displaying air temperature ..............................................................................................................................16
ECO mode .....................................................................................................................................................16
Troubleshooting ..............................................................................................................................................17
Cleaning and maintenance .............................................................................................................................18
Technical specifi cations ..................................................................................................................................18
Explanation of symbols used on the product, its accessories and packaging ..................................................19
Instructions and information about the handling of used packaging ...............................................................20
Warranty conditions ........................................................................................................................................21
Page 4

Digital Audio Baby Monitor
EN
4
Introduction
■ Thank you for selecting the Bayby BBM 7010 Digital Audio Baby Monitor. This digital baby monitor is agreat
child care accessory that enables you to hear your baby when you are not in the same room. Nevertheless,
it is important to understand that it cannot serve as asubstitute for responsible adult supervision.
■ The sound detected by the baby unit is transmitted to the parent unit. DECT digital wireless technology is
utilised for transmitting the audio signal. This guarantees very high quality audio transmission up to arange
of 300 metres.
■ The encrypted wireless transmission and automatic available channel selection features guarantee privacy
and the peace of mind that you will hear only your child.
■ The parent unit is equipped with three elements – asound alert signal, an LCD display and an LED indicator
– that will safely inform you about the signal range being exceeded, its loss or interference.
■ Amongst other things, on the LCD display it is possible to see the battery power level, recharging status,
the volume setting and temperature in the room in which the baby unit is located.
■ Volume of the transmitted audio can be set to 5 levels. When the parent unit is set to alow volume level,
audio transmission will be indicated by the respective LED indicator. And when the volume is turned off,
you will no doubt take advantage of the sound alert feature that indicates that the transmitted audio has
exceeded acertain level.
■ When the sound alert or the weak battery signal is triggered, or when you perform user settings on the
parent unit, the backlight on the LCD display will be lit to improve legibility.
■ The baby monitor automatically switches to ECO mode when no audio is being transmitted. This reduces
the transmission power to ensure power effi cient operation and minimisation of radiation.
■ The baby unit is powered from the grid. The parent unit shall be powered using apower adapter or
rechargeable batteries.
Page 5

5
Digital Audio Baby Monitor EN
Safety instructions and important notes
■ Before fi rst use, thoroughly read the user'smanual. Keep this user'smanual for future use.
Attention:
This baby monitor meets all relevant standards and its use is safe when all the instructions contained in
this manual are followed.
■ The baby monitor serves to monitor your child when you are not in the same room and cannot supervise it
directly. Nevertheless, it is important to keep in mind that your child'ssafety comes fi rst and therefore this
baby monitor cannot serve as asubstitute for supervision by aresponsible adult.
■ This baby monitor is intended for home (private) use only. It is not intended for commercial purposes.
■ After unpacking the baby monitor and its accessories from the packaging material, place the plastic bags in
asafe location out of the reach of children. In the presence of children, plastic bags may present asuffocation
hazard.
■ Only use the baby monitor with the original adapters that came with it.
■ Never use the baby monitor with accessories that are not approved by the manufacturer.
■ Before connecting the power adapter to apower socket, make sure the voltage stated on its rating label
corresponds to the voltage in the power socket. Position the power cord of the power adapter so that it
will not be tripped over.
■ The baby monitor may only be operated by adults.
■ Children must not play with the baby monitor. Keep the baby monitor, power adapters and rechargeable
batteries out of the reach of children.
■ Before fi rst using the baby monitor, acquaint yourself with its functions and before every use, make sure
that both the baby and parent unit are in working order and that the rechargeable batteries are not fl at when
they are used to power the parent unit.
■ Ensure that the baby monitor and the power adapter do not come into contact with hot surfaces or sharp
objects.
■ Do not place the baby monitor in the vicinity of water containers or appliances that are sources of heat.
■ Do not cover the baby monitor and do not place any items on it.
■ Do not use the baby monitor in an excessively dusty or humid environment. Do not subject it to extreme
temperature changes and electromagnetic fi elds.
■ Do not submerge the baby monitor and its accessories in water or rinse under running water.
■ Always disconnect the baby monitor from the power socket when not using it, after the batteries have been
recharged and before cleaning it.
Page 6

Digital Audio Baby Monitor
EN
6
■ Do not disconnect the power adapter from the power socket by pulling on the power cord. This could
damage the power adapter or the power socket. Disconnect the power adapter from the power socket
by pulling on the plug.
■ For powering the parent unit from an internal power source, only use Ni-MH type AAA batteries (2× 1.2 V/
400 mAh).
■ When not using the baby monitor for an extended period of time, remove the batteries from the parent unit.
■ Keep the batteries out of the reach of children as they may present ahazard to achild. In the event that
achild swallows abattery, immediately seek medical help.
■ Do not attempt to short circuit or break the battery or throw it into afi re. Do subject the battery to direct
sunlight, fi re, etc.
■ Do not make any alterations to the baby monitor that would change its electrical or mechanical properties.
■ The baby monitor must not be operated with auxiliary amplifi ers of high-frequency power or directional
antennas.
■ Do not use the baby monitor if it is in any way damaged or if the power adapter is damaged.
■ Do not attempt to repair the baby monitor yourself. Have all repairs or adjustments performed at an authorised
service centre. By tampering with the product you risk voiding your legal rights arising from unsatisfactory
performance or quality warranty.
■ We recommend saving the original box, packaging material, receipt and responsibility statement of the vendor
or warranty card for the duration of warranty. It is appropriate to transport the baby monitor in its original box.
Page 7
7
Digital Audio Baby Monitor EN
Description of the accessories
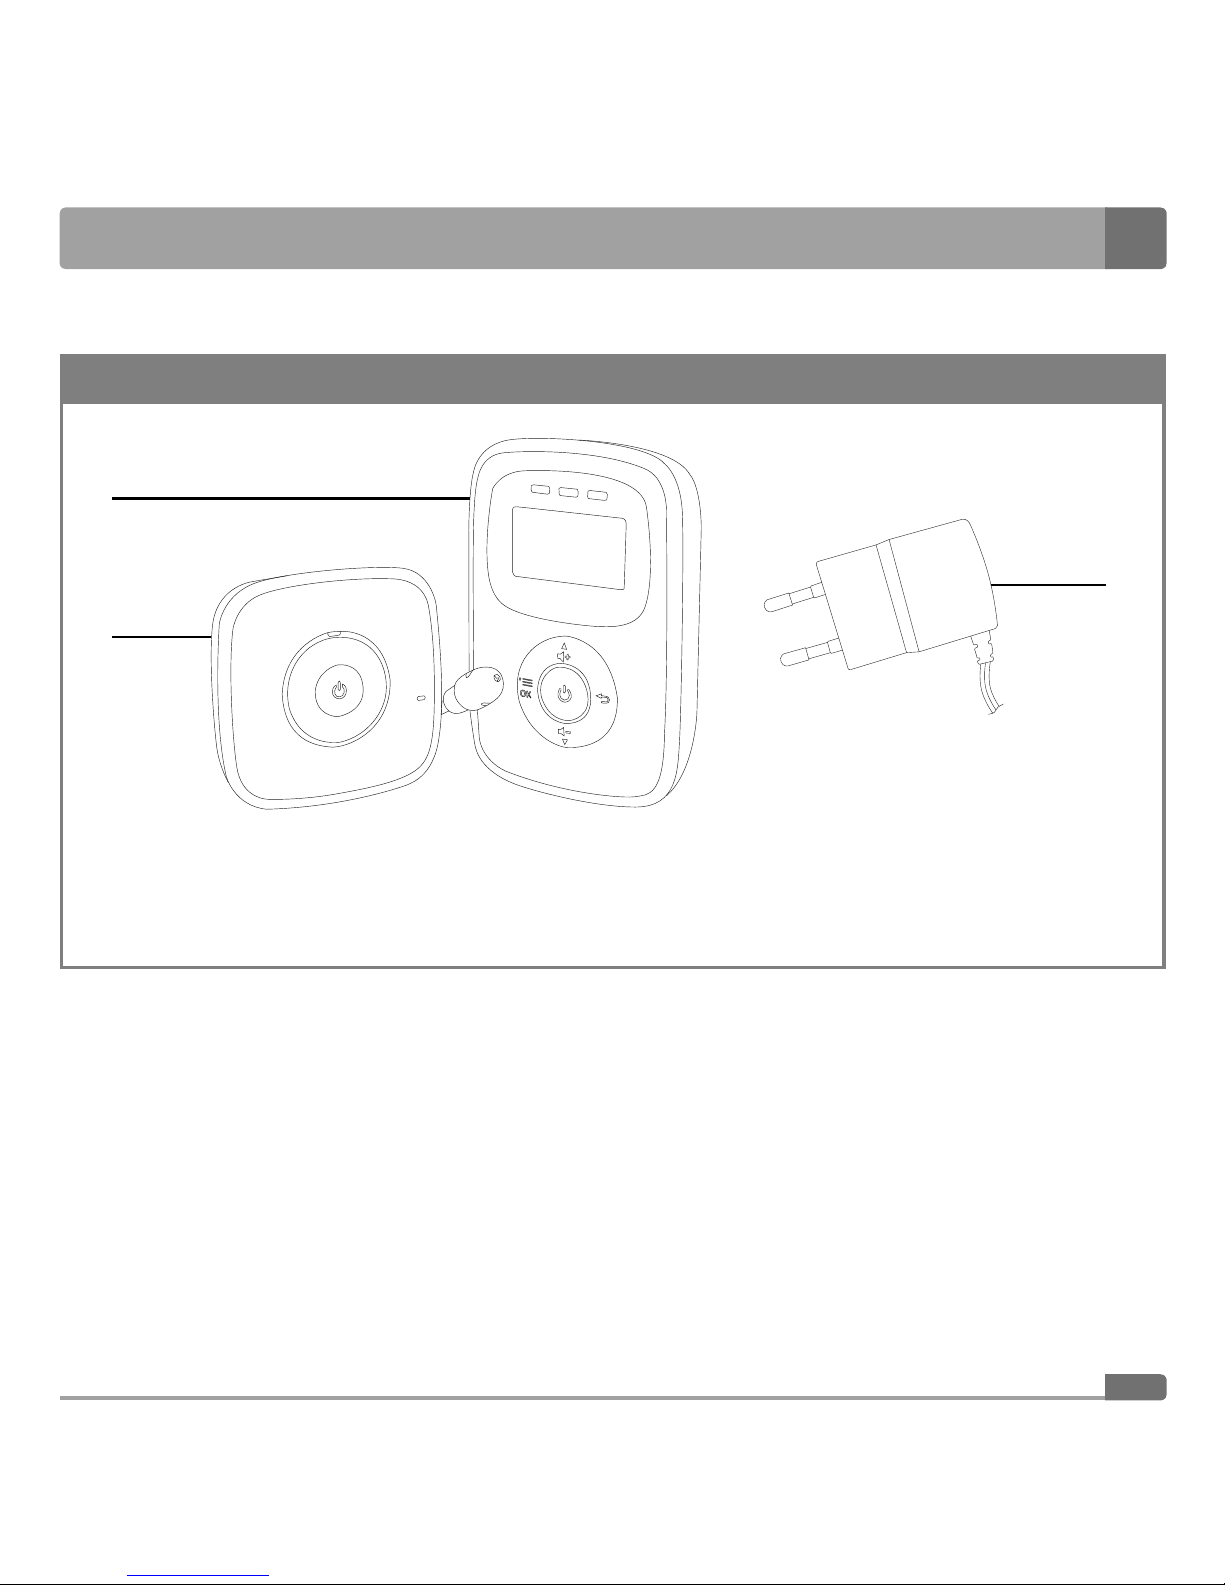
A
1
3
2
1 Parent unit*
2 Baby unit
3 Power adapter (2 pcs)
The adapters are identical.
Note*:
The parent unit comes with two type AAA rechargeable batteries (2× 1.2 V/ 400 mAh).
Page 8
Digital Audio Baby Monitor
EN
8
Description of the baby unit
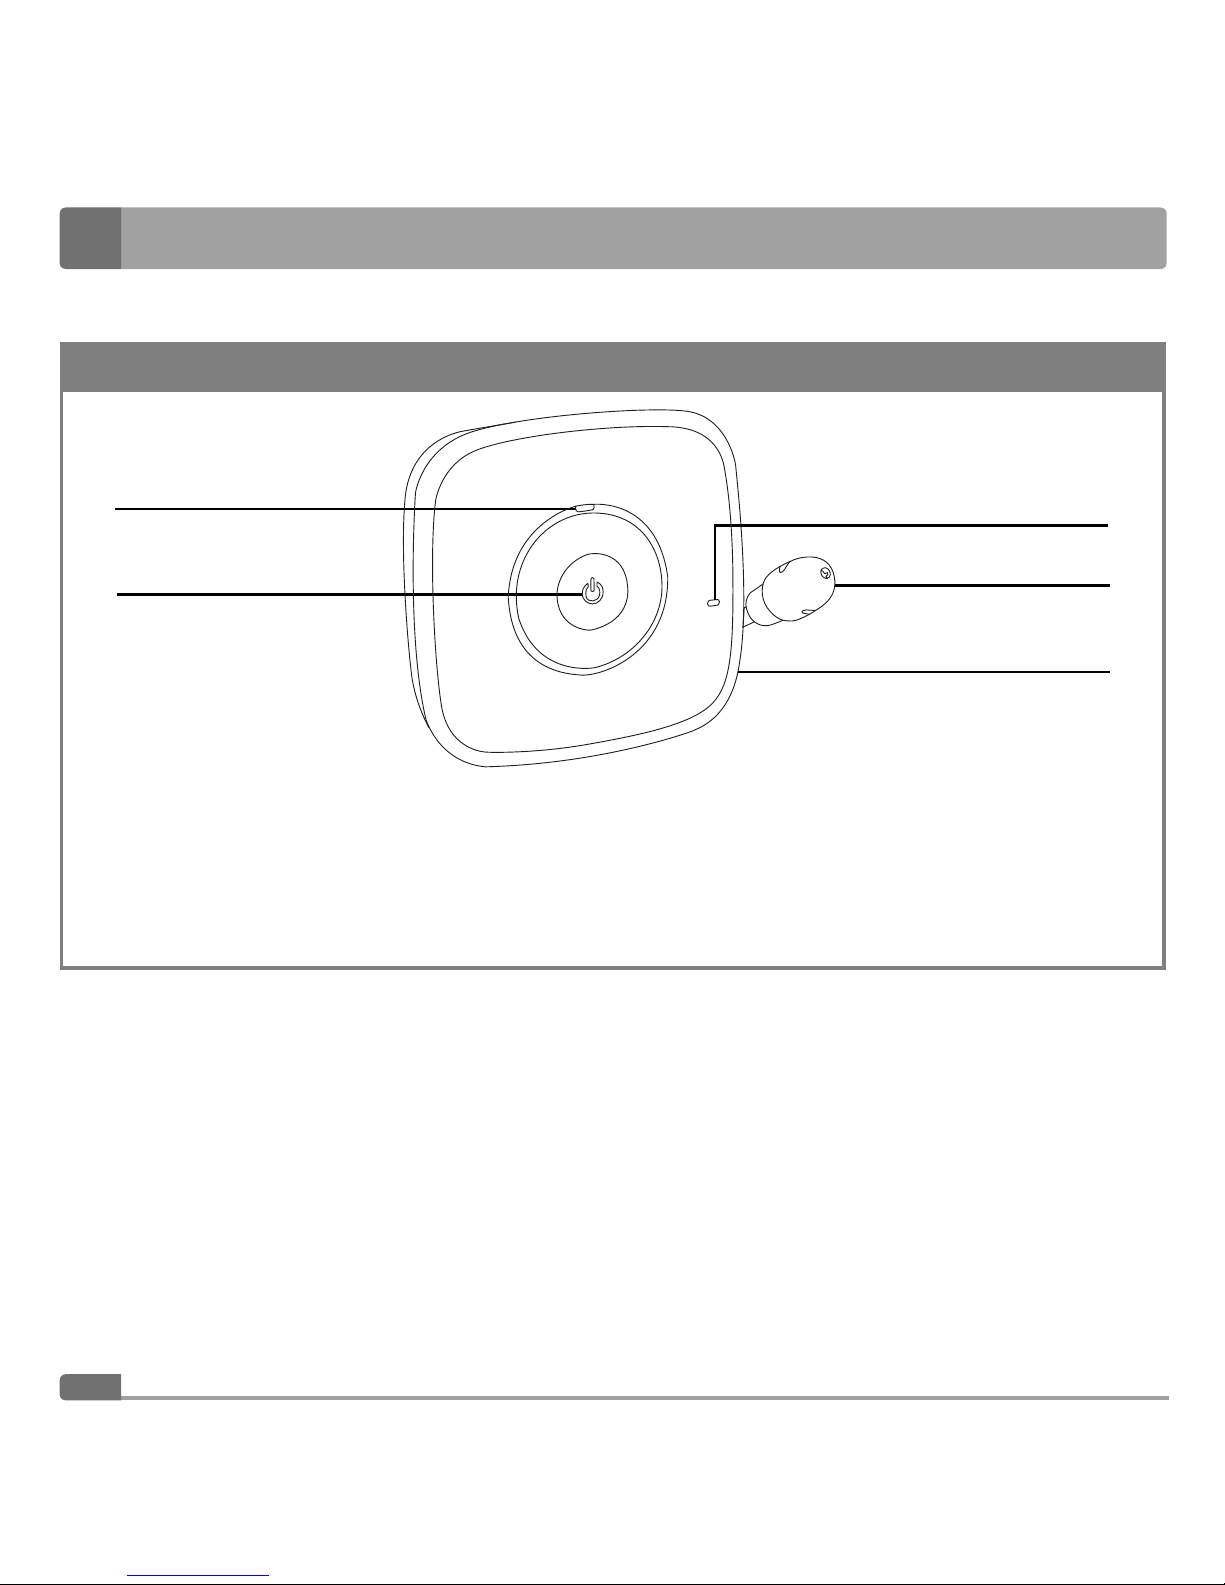
B
1
3
4
2
1 Power On LED indicator
2 Button for turning the baby unit on and off
3 Microphone
4 Temperature sensor
5 Power adapter socket (not shown),
it is located at the rear of the baby unit.
5
Page 9
9
Digital Audio Baby Monitor EN
Description of the parent unit
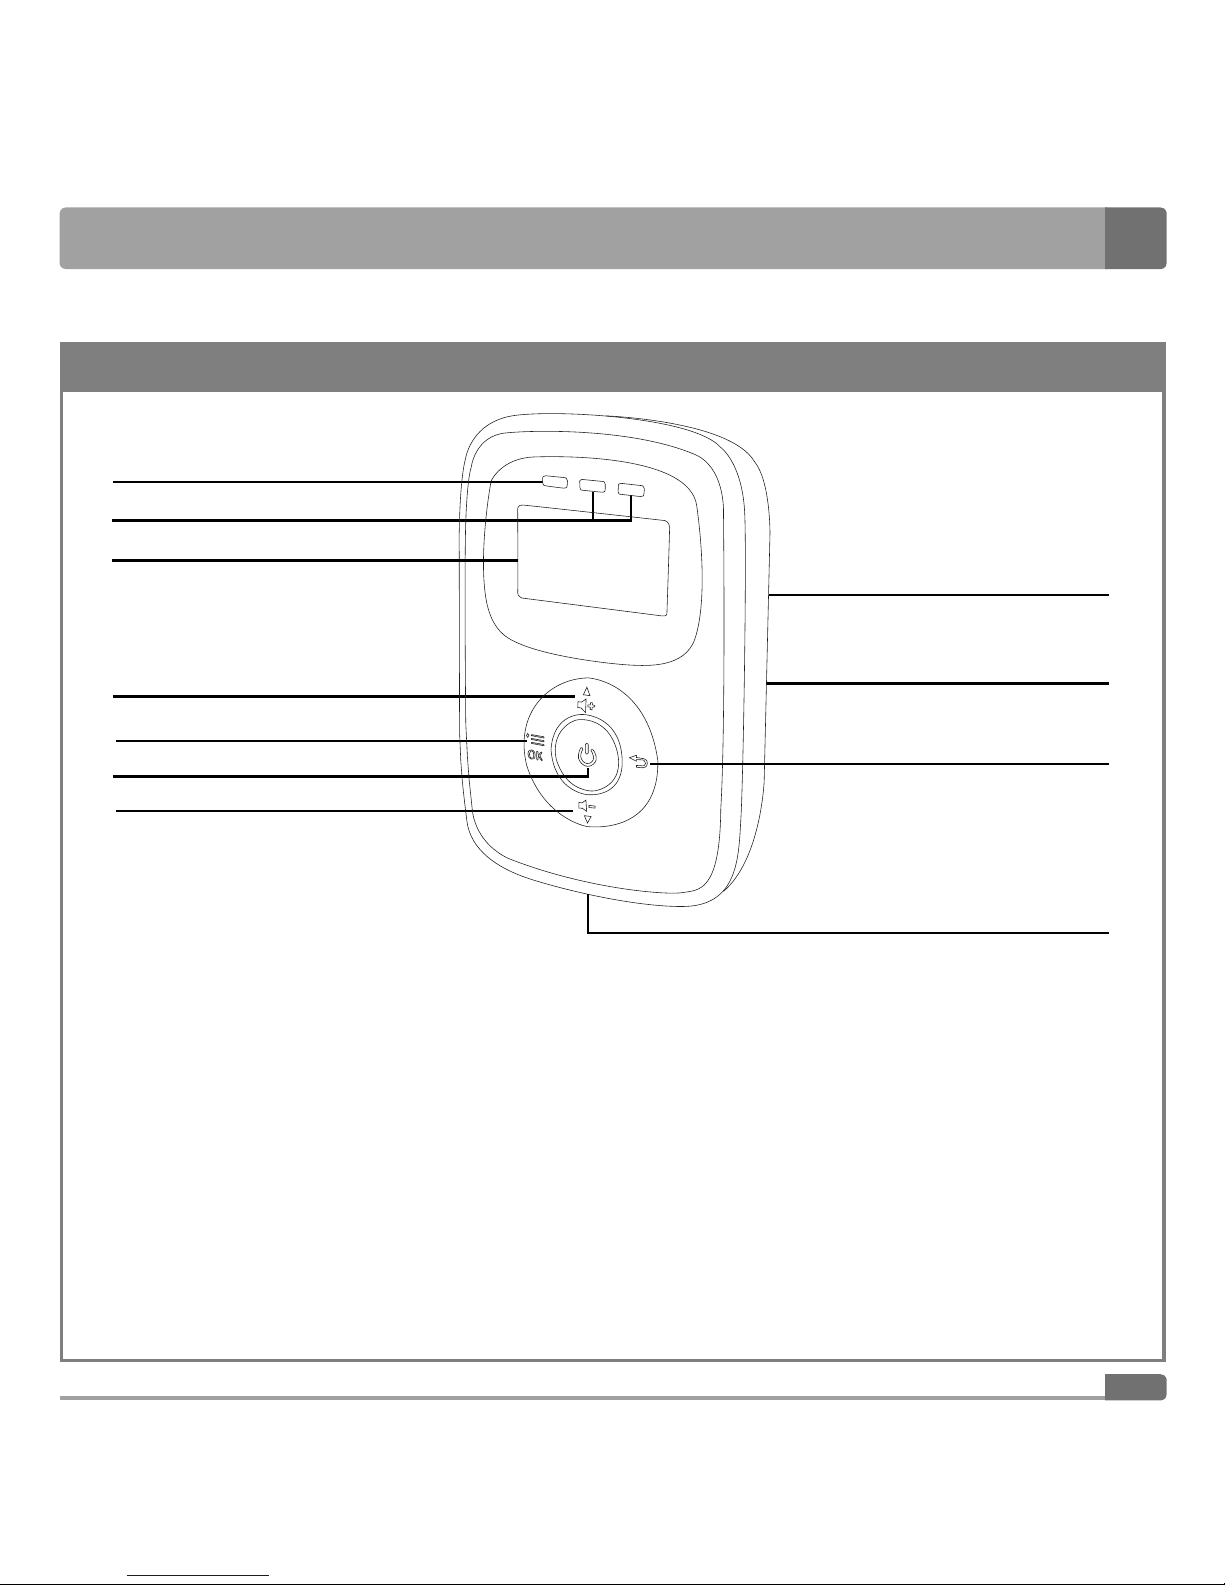
C
1
9
8
2
1 Connection/On LED indicator
2 Volume LED indicator
3 LCD display
4 Increase volume button
5 MENU/OK button
serves to display the items in the main MENU
and SUBMENU and to confi rm user settings.
6 Button for turning the parent unit on and off
7 Decrease volume button
8 Loudspeaker (not shown)
it is located at the rear of the parent unit.
9 Battery compartment (not shown)
it is located at the rear of the parent unit.
0 BACK button
When selecting items in the main MENU
or SUBMENU, use this button to go back
one level.
qa Power adapter socket (not shown)
it is located at the bottom of the parent unit.
6
4
5
3
7
0
qa
Page 10
Digital Audio Baby Monitor
EN
10
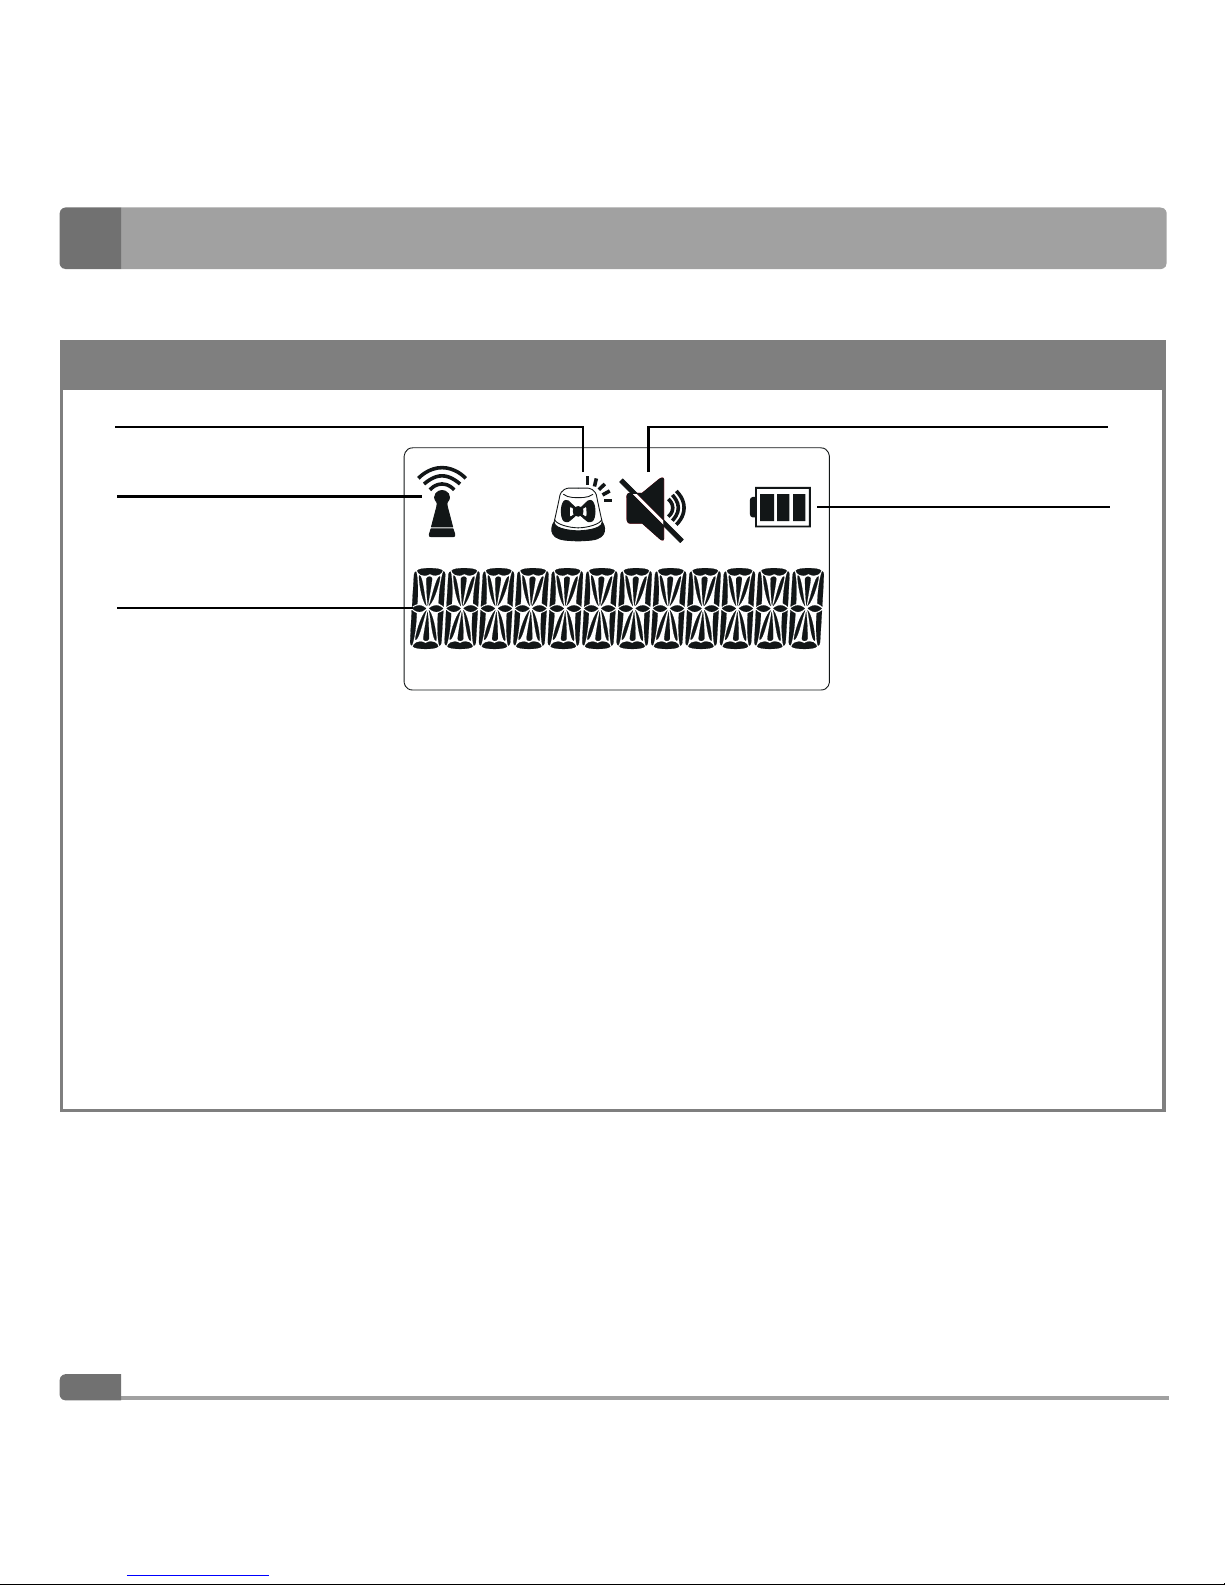
Description of the parent unit display
D
1 4
5
2
1 Sound alert symbol
This symbol is lit on the display when the
sound alert function is set. When the sound
alert function is activated, the symbol will start
fl ashing.
2 Connection symbol
This symbol is lit on the display when there
is aworking connection between the parent
and baby unit. This symbol will fl ash when no
connection is made, or when it is interrupted
or when the parent unit is located outside the
signal range.
3 These segments will appear for ashort time
on the display when the parent unit is turned
on. When the parent unit is in operation, this
part of the display shows the air temperature
in the room and other information described
in chapter Using the baby monitor.
4 Volume off symbol
This symbol appears on the display when the
volume is turned off.
5 Battery power level symbol
Shows the battery power level and the
charging progress.
3
Page 11
11
Digital Audio Baby Monitor EN
Installation location of the baby unit and parent unit
1. Baby unit
■ Locate the baby unit A2 within reach of apower socket on an even, dry and stable surface in the room
where you want to monitor your child. We recommend an elevated location (e.g. chest of drawers or ashelf)
at asuffi cient distance away from equipment and devices that could cause signal interference.
■ The baby unit A2 should be located at least 1 m away from your child to minimise the effects of electro-
smog.
Attention:
Never locate the baby unit A2 or the power adapter A3 in the baby'sbed or within the reach of your
child.
2. Parent unit
■ Put the parent unit A1 in the room where you will be located. When the parent unit A1 is to be powered
from the grid, locate it within reach of apower socket.
Power source
1. Baby unit
■ External power source and its use
– For powering the baby unit A2, use only the original power adapter A3 model number
RJ-AS060450E002 (input 6 V , 450 mA).
– Insert the connector of the power adapter A3 into the socket B5 that is located at the rear of the
baby unit A2. Insert the plug of the power adapter A3 into apower socket.
2. Parent unit
■ External power source and its use
– For powering the parent unit, use only the original power adapter A3 model number
RJ-AS060450E002 (input 6 V , 450 mA).
– Insert the connector of the power adapter A3 into the socket Cqa that is located at the bottom of the
parent unit A1. Insert the plug of the power adapter A3 into apower socket.
Page 12
Digital Audio Baby Monitor
EN
12
Attention:
For safety reasons, the parent unit A1 when powered from an external power source can only be put
into operation with rechargeable batteries inserted inside.
■ Internal power source and its use
– For powering the parent unit from an internal power source, use the supplied Ni-MH type AAA
batteries (2× 1.2 V/ 400 mAh).
– From the rear of the parent unit A1, remove the cover of the battery compartment C9. Insert
rechargeable batteries into this compartment C9. When inserting the batteries, make sure that
you maintain the correct polarity, which is marked in the battery compartment C9. Close the cover.
– The rechargeable batteries must be charged for at least 16 hours before the parent unit A1 can be
used for the fi rst time independently of the external power source. The batteries will start charging
when the parent unit A1 is connected to an external power source. The number of segments in
the symbol D5 cyclically increases and decreases thereby signalling that the batteries are being
charged. The number of permanently lit segments in symbol D5 corresponds to the battery power
level. You may use the parent unit A1 while it is charging.
Note:
Subsequent recharging will require only approximately 10 hours.
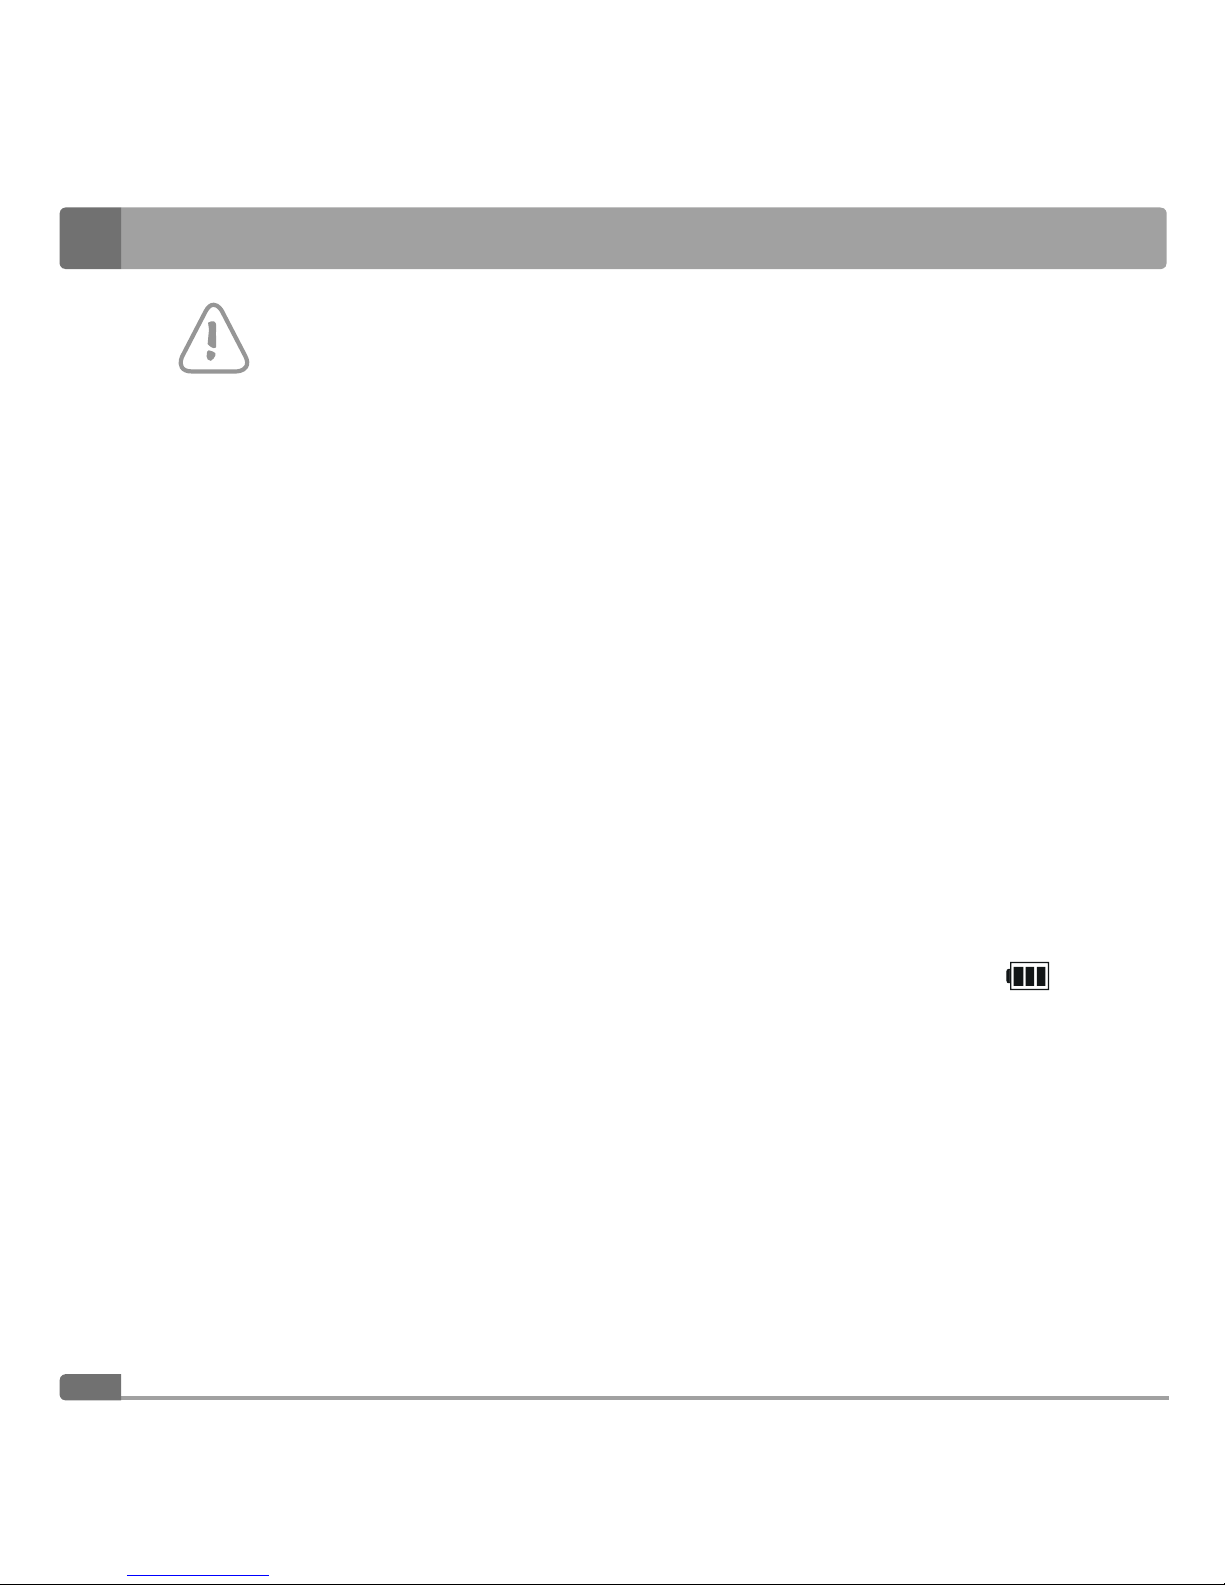
– When the batteries are fully charged, the symbol D5 will show all the segments . When you
disconnect the parent unit A1 from the power socket after charging it, you may use it independently
of an external power source.
– Fully charged batteries will provide approximately 10 hours of operation. The operating time depends
on the power level of the batteries, their capacity, operating mode of the parent unit, etc. The
maximum battery capacity is achieved after they have been fully charged several times. The lifetime
of the batteries depends on many factors such as recharging frequency, ambient temperature at
which the batteries are charged and stored, etc.
– We recommend that the batteries are charged and kept at room temperature and at least once
every six months to allow them to fully discharge in the parent unit A1 and subsequently recharge
them fully.
– Battery operation minimises electro-smog which arises due to the effect of alternating electric and
magnetic fi elds.
Page 13

13
Digital Audio Baby Monitor EN
– In the event that the batteries are almost fl at, a sound alert will be made approximately every
30 seconds while the display will light up for ashort time. Symbol D5
and "LOW BATT" (almost
fl at batteries) will fl ash on the display C3. These elements will inform you that the parent unit A1
needs to be connected to an external power source in order for the batteries to recharge. If you do
not connect the parent unit A1 to an external power source, it will turn itself off automatically after
acertain time. The On LED indicator C1 and the LCD display C3 will turn off.
Note:
The interval after which the parent unit A1 automatically turns off depends on the mode in which the
parent unit A1is, the battery capacity, battery age, etc.
– In the event that you are planning not to use the baby monitor for an extended period of time, take the
batteries out of the parent unit A1 and store them out of the reach of children.
Using the baby monitor
1. Baby unit
■ Turning on and off
– The baby unit A2 will turn on automatically when it is connected to aworking power socket. This is
signalled by the LED indicator B1 being lit.
– To turn off the baby unit A2, press the On/Off button B2 and hold it down for approximately
2 seconds. The turned off state of the baby unit A2 is signalled by the LED indicator B1 turning off.
– To turn the baby unit A2 that is connected to apower socket on again, it is necessary to press the
On/Off button B2 and hold it down for approximately 2 seconds.
– When you have fi nished using it, always turn off the baby unit A2 and disconnect the power adapter
A3 from the power socket.
2. Parent unit
■ Turning on and off
– The parent unit A1 automatically turns on when it is connected to aworking power socket or after the
batteries are inserted, unless they are completely fl at. When the parent unit A1 is turned on, all the
segments on the display C3 will be shown for ashort time. Then symbol D2 will start fl ashing on the
display C3 and the message "NOT LINKED" (no connection) will appear and the Connection/On LED
indicator C1 will start fl ashing. These elements signal that no connection has been made. In the event
that the baby unit A2 is turned on and located within signal range, the connection will soon be made
automatically. This is signalled by the message "NOT LINKED" turning off and the LED indicator C1
and symbol D2 on the display C3 being lit permanently. Instead of the message "NOT LINKED", the
air temperature measured by the baby unit A2 in the room where it is located will be shown.
Page 14

Digital Audio Baby Monitor
EN
14
Attention:
For safety reasons, the parent unit A1 when powered from an external power source can only be put
into operation with rechargeable batteries inserted inside.
– In the event that the parent unit A1 was turned off manually after the batteries were inserted or after
being connected to apower socket, it is necessary to press the On/Off button C6 and hold it down
for approximately 2 seconds to turn it on again.
– Turn off the parent unit A1 by again pressing the On/Off button C6 and holding it down for
approximately 2 seconds. The turned off state of the parent unit A1 is signalled by the LED indicator
B1 turning off.
■ Language settings
– To set the language in which information is to be shown on the LCD display C3, perform the
following procedure. To display the main MENU, press button C5. The text "language" will appear
on the display C3. To display the language menu, press button C5. The text "English" will appear
on the display. Available languages are as follows: English, German, French, Italian, Spanish and
Portuguese. To scroll through the individual languages in the menu, use buttons C4 andC7. To
confi rm the language selection, press button C5. Confi rmation will appear on the display C3 for
ashort time and the display C3 will switch back to the air temperature display mode.
■ Setting the volume, turning audio on and off
– Buttons C4 andC7 can be used to increase and decrease the volume on the parent unit A1.
Volume can be set to 5 levels. The text "Volume" and the number on the LCD display C3 indicate
the set volume level. Pressing button C4 or C7 is accompanied by aconfi rmation acoustic signal
and LED indicator C2 is lit for ashort time. The maximum volume setting is indicated by both volume
LED indicators C2 being lit for ashort time. If the setting is outside the possible volume range,
asound alert will be made when button C4 or C7 is pressed.
– To turn off the sound on the parent unit A1, keep pressing button C7 until the message "Volume Off"
appears. This text will turn off after ashort time and the display C3 will switch to the air temperature
display mode. Turned off volume is signalled by the symbol D4 being shown on the display C3.
– To turn on the volume, press button C4 and set the required volume level.
Page 15

15
Digital Audio Baby Monitor EN
■ Setting the sound alert
– When sound is turned off on the parent unit A1 whilst at the same time the sound alert function is
set, an acoustic signal and fl ashing symbol D1 and the text "Sound Alert" will inform you that the
transmitted audio has exceeded acertain volume.
– Set the sound alert function as follows. To display the main MENU, press button C5. To scroll
through the main MENU, use buttons C4 andC7. Select "Sound Alert". Confi rm the selection by
pressing button C5. The text "On?" will appear on the display C3. Confi rm the selection by pressing
button C5. The text "Saved" will appear on the display C3 for ashort time and then the display will
switch to the air temperature display mode. Symbol D1 will be shown on the display C3. When the
volume on the parent unit A1 is not turned off, the function will remain set but will not be activated.
It will be activated when the volume is turned off.
– Turn off the sound alert by pressing button C5. The main MENU will appear. To scroll through the
main MENU, use buttons C4 andC7. Select "Sound Alert". Confi rm the selection by pressing
button C5. The text "Off?" will appear on the display C3. Confi rm the selection by pressing button
C5. The text "Saved" will appear on the display C3 for ashort time, symbol D1 will turn off and the
display C3 will switch to the air temperature display mode.
■ Reset to default settings
– To delete the user setting proceed as follows.
– To display the main MENU, press button C5. To scroll through the main MENU, use buttons C4
andC7. Select "Reset". Confi rm the selection by pressing button C5. The text "Confi rm?" will
appear on the display C3 . Confi rm the selection by pressing button C5. Then the default settings
will be restored and the display C3 will switch to the air temperature display mode.
Default settings:
Language English
Sound alert Off
Volume level 3
Note:
If when performing user settings, you do not confi rm the selection of an item by pressing button C5, the
setting will not be made and after ashort time the display C3 will automatically switch to the air temperature
display mode.
User settings will remain saved in the memory of the parent unit A1 even when it is disconnected from
apower socket or when the batteries are removed.
For the purpose of explaining the items that appear on the display, the language of the default settings
was used.
Page 16

Digital Audio Baby Monitor
EN
16
General information about using the baby monitor
■ Before using the baby monitor for monitoring your child, always check that both the baby and parent unit
A2 andA1 are in working order, that there is aconnection between the units and that audio is being
transmitted.
■ We recommend that you perform all user settings before using the baby monitor for monitoring your child.
■ The sound detected by the baby unit A2 is transmitted to the parent unit A1. When you set the volume
to alow level, you will be informed about audio transmission by LED indicators C2. When the volume is
turned off completely, we recommend the use of the sound alert user setting.
■ In the event that there is no connection between the baby and parent unit A2 andA1 (baby unit A2 is
turned off or out of signal range), the connection/On LED indicator C1 will start fl ashing, and at the same
time symbol D2 and the text "Not Linked" will fl ash on the display C3 and asound alert will be made
(beeping).
■ To increase the signal range, place the baby unit A2 in an elevated location as close as possible to the
door or window.
■ Other radio waves may interfere with the signal transmission. For this reason, do not place the baby monitor
in the vicinity of appliances such as e.g. amicrowave oven or WLAN devices, etc.
■ The following factors may interfere with the signal or reduce its range:
– one of the units is covered,
– obstacles in the signal transmission direction such as furniture, walls, trees, etc.
– weather events such as fog, rain, etc.
Displaying air temperature
■ The baby unit A2 continuously monitors the air temperature in the room in which it is located. The current
temperature is shown on the LCD display C3 of the parent unit A1. In the event that the air temperature
exceeds 39 °C (102.2 °F), the text "High Temp" will start fl ashing on the display C3. In the event that
the air temperature falls below 14 °C (57.2 °F), the text "Low Temp" will start fl ashing on the display C3.
Note:
The temperature measured by the baby unit A2 is only approximate and may differ slightly from the actual
temperature.
ECO mode
■ The baby monitor automatically switches to ECO mode when no audio is being transmitted. This reduces
the transmission power to minimum to ensure power effi cient operation and limits unnecessarily exposing
your child to radiation.
Page 17
17
Digital Audio Baby Monitor EN
Troubleshooting
Problem Solution
LED indicator B1 does not light
up when the baby unit A2 is
turned on.
Check that the power adapter A3 is connected to aworking power socket
and that the plug on the power cord is properly inserted into socket B4.
When you turn on the parent
unit A1, the LCD display C3
and LED indicator C1 do not
start fl ashing/are not lit.
Check that rechargeable batteries are inserted in the parent unit A1.
Check that the power adapter A3 is connected to aworking power socket
and that the plug on the power cord is properly inserted into socket C6.
Check whether the rechargeable batteries need to be recharged and check
them for damage. In the event that the batteries are fl at, recharge them.
Damaged batteries must be replaced with new ones of the same type.
The parent unit A1 is making
asound alert.
Check that the signal range has not been exceeded.
Check that the baby unit A2 is plugged into apower socket.
Check that the baby unit A2 is turned on.
The rechargeable batteries inside the parent unit A1 may be fl at or
damaged. In the event that the batteries are fl at, recharge them. Damaged
batteries must be replaced with new ones of the same type.
Ahigh tone is coming out of the
parent unit A1.
The units are located too close to each other. Move the parent unit A1
farther away from the baby unit A2. The parent unit A1 should be located
at least 1 metre away from the baby unit A2.
Transmitted audio cannot be
heard.
The volume on the parent unit A1 is turned off or set to alow level. Set
ahigher volume using button C4.
The parent unit A1 turns off
automatically.
The rechargeable batteries are weak. Recharge them.
Weak signal, signal interference
or the connection is repeatedly
interrupted.
If there is any equipment located in the signal transmission direction, e.g.
amicrowave oven, move it elsewhere or turn it off.
Check whether there are any obstacles in the signal transmission direction,
e.g. trees. Move the units so that apermanent connection is made.
Check that the units are within the signal range.
Page 18

Digital Audio Baby Monitor
EN
18
Cleaning and maintenance
■ Before cleaning the baby monitor, disconnect it from the power socket. If it becomes soiled, wipe the
external parts of the baby and parent units A2 andA1 using acloth lightly dampened in lukewarm water.
Then wipe everything so that it is thoroughly dry.
■ To clean the adapters A3, use aclean, dry cloth.
■ For cleaning, do not use abrasive cleaning products, solvents, thinners, etc. Never submerge the baby
monitor or its power adapters A3 in water or rinse under running water.
Technical specifi cations
Model number .................................................................... BBM 7010
Frequency broadcast band ................................................. 1 880–1 900 MHz
Number of channels ........................................................... 120
Transmission power ............................................................ 20 dBm (100 mW)
Range in open space .......................................................... up to 300 m
Audio transmission .............................................................one way communication
Type of display .................................................................... LCD
Voltage and amperage draw ............................................... 6 V
, 450 mA
Power source ..................................................................... power adapter, RJ-AS060450E002
input: 100–240 V~, 50/60 Hz, 150 mA,
output: 6 V
, 450 mA
or
rechargeable batteries Ni-MH type AAA,
2× 1.2 V/ 400 mAh (only the parent unit)
Electrical shock protection
class (power adapter) ......................................................... II
Battery operating time ........................................................ approximately 10 hours with fully charged batteries
(parent unit)
Page 19

19
Digital Audio Baby Monitor EN
Explanation of symbols used on the product, its accessories and packaging
This symbol indicates that this appliance meets all the basic requirements of EU directives related
to it.
This symbol indicates that the product has protection class II.
This symbol indicates the polarity of the power cord connectors.
This symbol indicates that it is aproduct that may be used indoors.
LOT.
This abbreviation serves to designate the production lot number.
This symbol indicates that the requirements of directive 2011/65/EU (RoHS II) have been met for
limiting the use of certain hazardous substances in electrical and electronic equipment.
This symbol on products or original documents means that used electric or electronic products
must not be added to ordinary municipal waste. For proper disposal, renewal and recycling hand
over these appliances to determined collection points. Alternatively, in some European Union
states or other European countries you may return your appliances to the local retailer when
buying an equivalent new appliance. Correct disposal of this product helps save valuable natural
resources and prevents potential negative effects on the environment and human health, which
could result from improper waste disposal. Ask your local authorities or collection facility for
more details. In accordance with national regulations penalties may be imposed for the incorrect
disposal of this type of waste.
For business entities in European Union states
If you want to dispose of electric or electronic appliances, ask your retailer or supplier for the
necessary information.
Disposal in other countries outside the European Union.
This symbol is valid in the European Union. If you wish to dispose of this product, request the
necessary information about the correct disposal method from the local council or from your retailer.
Batteries contain environmentally damaging substances and therefore do not belong in standard
household waste. Take the batteries to an appropriate collection point, which will take care of
their ecological disposal. You can obtain the contact for the nearest collection point from you
town council or from your retailer.
Page 20

Digital Audio Baby Monitor
EN
20
Instructions and information about the handling of used packaging
Dispose of used packaging material at asite designated for waste in your municipality.
This appliance meets the requirements of directive 1999/5/ES. A valid declaration of conformity can be found at
www.bayby.com.
The Czech language is the original version of the user'smanual. Changes to text and technical parameters are
reserved.
 Loading...