

Page 1
V.2.2
20180207
ES-EN-FR-DE
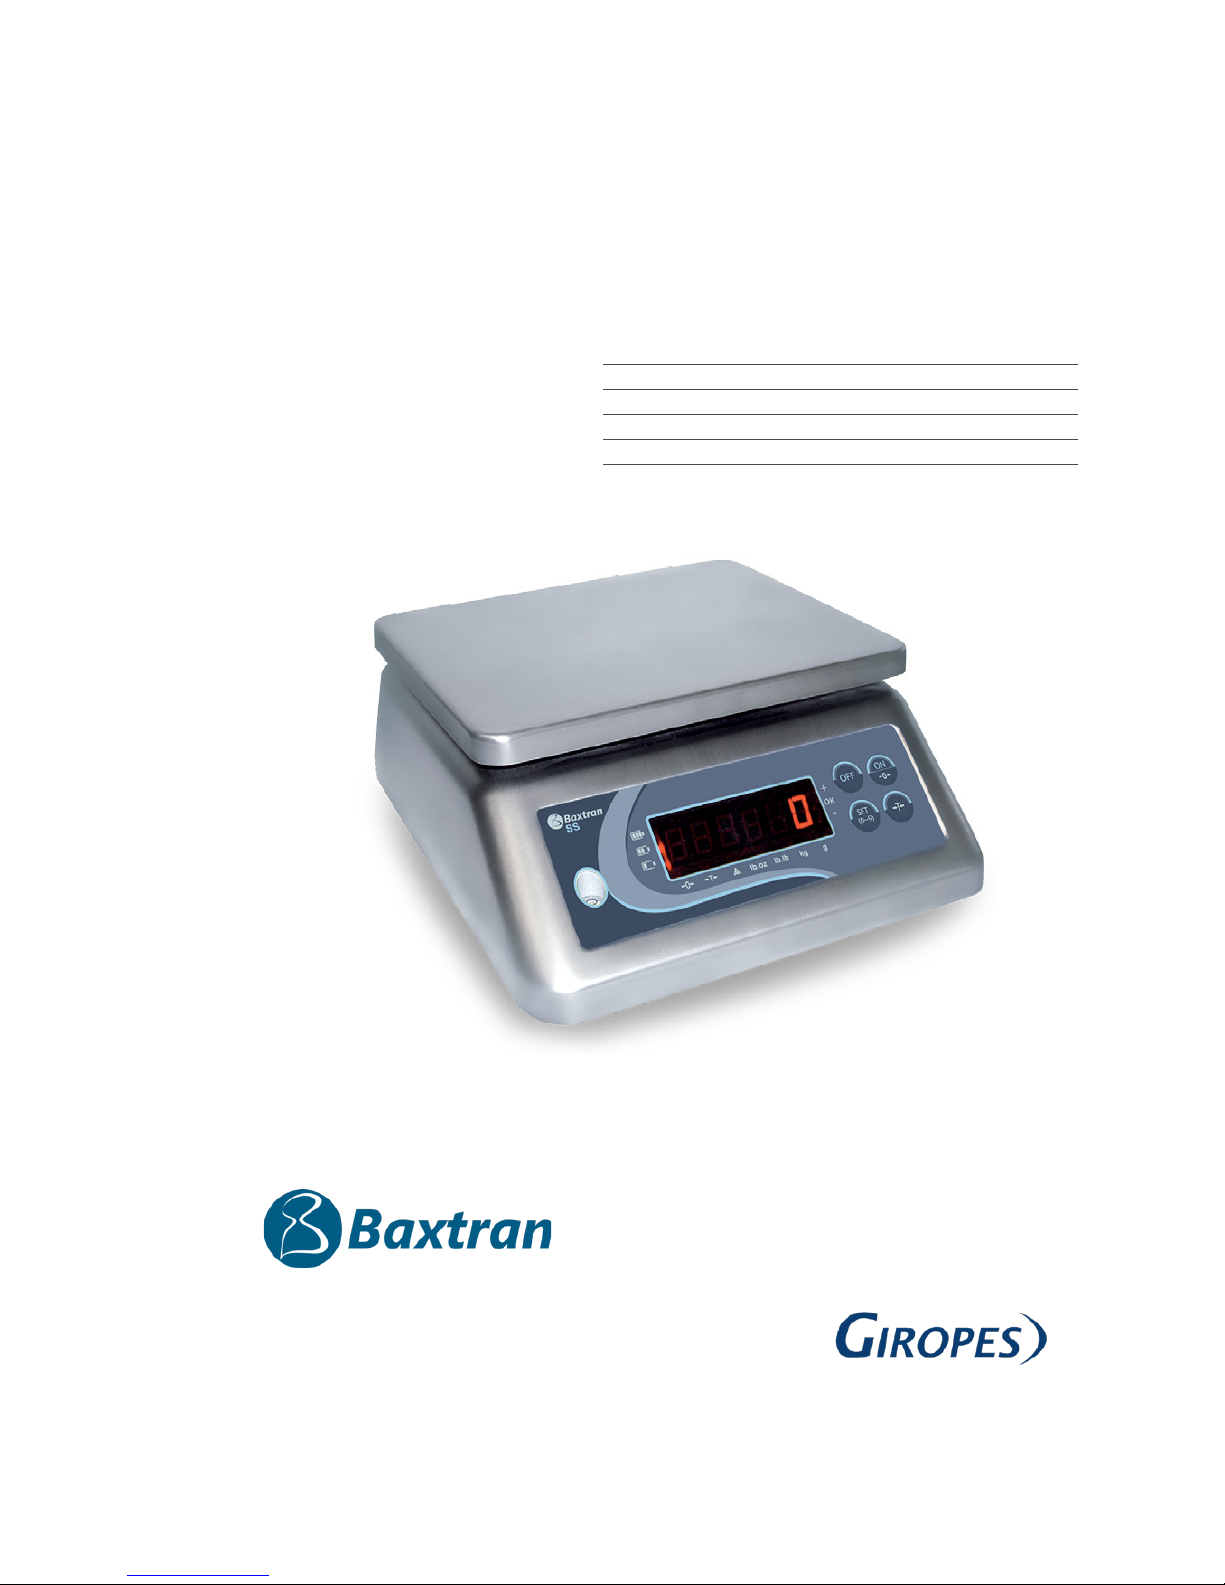
BALANZAS SOLO PESO
BALANCE SEUL POIDS
CHECK WEIGHT SCALE
BILANCE SOLO PESO
TISCHWAAGEN UND GEWICHTSKONTROLLE
SS
marca propiedad de | est une marque de | trade mark propiety of eine | marke von:
Pol. Empordà Internacional Calle F. Parcela 15-16
17469 VILAMALLA - (Girona) SPAIN
T. (34) 972 527 212 - F. (34) 972 527 211
El fabricante se reserva el derecho de modificar sin previo aviso las características de sus productos para introducir mejoras técnicas o cumplir con nuevas regulaciones oficiales./Le
constructeur se réserve le droit de modifier les caractéristiques de ses produits en vue d’y apporter des améliorations techniques ou de respecter de nouvelles réglamentations./The
manufacturer reserves the right to modify the specifications of its products in order to make technical improvements or comply with new regulations.
MANUAL DE USUARIO | MANUEL D’UTILISATION| USER’S MANUAL | MANUEL D´UTILISATION |BEDIENUNGSANLEITUNG
Page 2
2
SS
1. CARACTERÍSTICAS PRINCIPALES 4
2. TECLADO Y MENSAJES DE PANTALLA 4
2.1 TECLADO 4
2.2 MENSAJES DE PANTALLA 4
3. GUÍA DE OPRACIONES 5
3.1 PREPARACIÓN 5
3.2 ENCENDER O APAGAR 5
3.3 CERO 5
3.4 PESADO 5
3.5 PESADO TARA 5
3.6 FUNCIÓN AHORRO DE ENERGÍA 5
3.7 INDICACIÓN DE BATERÍA 5
3.8 CARGA 6
3.9 PARÁMETROS 6
3.10 GRADUAR EL BRILLO DE LOS LED 7
4. NOTAS 7
5. CALIBRACIÓN 7
1. CARACTÉRISTIQUES TECHNIQUES PRINCIPALES 8
2. CLAVIER ET MESSAGES DE L’ÉCRAN 8
2.1 CLAVIER 8
2.2 MESSAGES DE L’ÉCRAN 8
3. GUIDE D’OPERATIONS 9
3.1 PRÉPARATION 9
3.2 ALLUMER OU ÉTEINDRE 9
3.3 ZÉRO 9
3.4 PESAGE 9
3.5 PESAGE TARE 9
3.6 FONCTION D’ÉCONOMIE D’ÉNERGIE 9
3.7 INDICATION DE BATTERIE 9
3.8 CHARGE 10
3.9 PARAMÉTRES 10
3.10 CHOISIR LE BRILLATION DES LED 11
4. NOTES 11
5. CALIBRATION 11
1. MAIN TECHNICAL INDEX 12
2. KEYBOARD AND CHARACTER PROMPT 12
2.1 KEYBOARD 12
2.2 MDISPLAY MESSAGES 12
3. OPERATION GUIDE 13
3.1 PREPARATION 13
3.2 TURN ON OR TURN OFF 13
3.3 ZERO 13
3.4 WEIGHING 13
3.5 TARE WEIGHING 13
3.6 SAVE POWER FUNCTION 13
3.7 BATTERY INDICATE 13
3.8 CHARGE 13
3.9 SET PARAMETER 14
3.10 LED LIGHTING 15
4. NOTES 15
5. CALIBRATION 15
ES
FR
EN
Page 3

3
SS
1. GRUNDLEGENDE TECHNISCHE EIGENSCHAFTEN 20
2. TASTATUR UND MELDUNGEN IM DISPLAY 20
2.1 TASTATUR 20
2.2 MELDUNGEN IM DISPLAY 20
3. BETRIEBSANLEITUNG 21
3.1 VORBEREITUNG 21
3.2 EIN- ODER AUSSCHALTEN 21
3.3 NULL 21
3.4 WIEGEN 21
3.5 ENERGIESPARFUNKTION 21
3.6 ENERGIESPARFUNKTION 21
3.7 BATTERIESTATUS 21
3.8 LADUNG 21
3.9 PARAMETER 22
3.10 DIE HELLIGKEIT DER LEDs ANPASSEN 22
4. HINWEISE 23
5. KALIBRIERUNG 23
1. CARATTERISTICHE PRINCIPALI 16
2. TASTIERA E MESSAGGI DELLO SCHERMO 16
2.1 TASTIERA 16
2.2 MESSAGGI DELLO SCHERMO 16
3. GUIDA OPERATIVA 17
3.1 PREPARAZIONE 17
3.2 ACCENDERE O SPEGNERE 17
3.3 ZERO 17
3.4 PESO 17
3.5 PESO TARA 17
3.6 FUNZIONE RISPARMIO ENERGETICO 17
3.7 INDICAZIONE DI BATTERIA 17
3.8 CARICO 18
3.9 PARAMETRI 18
3.10 MODULARE LA LUMINOSITA’ DEI LED 19
4. NOTE 19
5. TARATURA 19
IT
DE
Page 4

ESMANUAL DE USUARIO SS
4
Gracias por utilizar nuestra balanza de la serie SUPER SS con displays en ambos lados, y protegida contra la humedad y el agua. La
balanza SUPER SS es una balanza de acero inoxidable. La balanza incluye avances técnicos de altas prestaciones. Incluye una alta
precisión en el pesado, con facilidades de transporte y un precio bajo.
Es resistente y de larga duración. Puede ser utilizada en almacenes para pesar diferentes paquetes de productos, así como en lugares
con humedad alta gracias a su alta protección contra la humedad.
1. CARACTERÍSTICAS TÉCNICAS PRINCIPALES
1.1. INFORMACIÓN BÁSICA
SS3 SS6 SS15 SS30
CAPACIDAD MÁXIMA (kg) 3 6 15 30
CAPACIDAD MÍNIMA 20e
DIVISIONES DE PANTALLA (g) 0,2 0,5 1 2
TARA MÁXIMA 100% de la capacidad máxima
CLASE
DIMENSIONES DEL PLATO (mm) 230 x 190
1.2. TEMPERATURA DE FUNCIONAMENTO: -5 ~ +35ºC
1.3. TEMPERATURA DE ALMACENAMIENTO: -5 ~ +35ºC
1.4. ALIMENTACIÓN: Batería recargable 6VAh de 90horas de duración
1.5. PESO NETO: 3,6 Kg
1.6. GRADO DE PROTECCIÓN IP: IP67
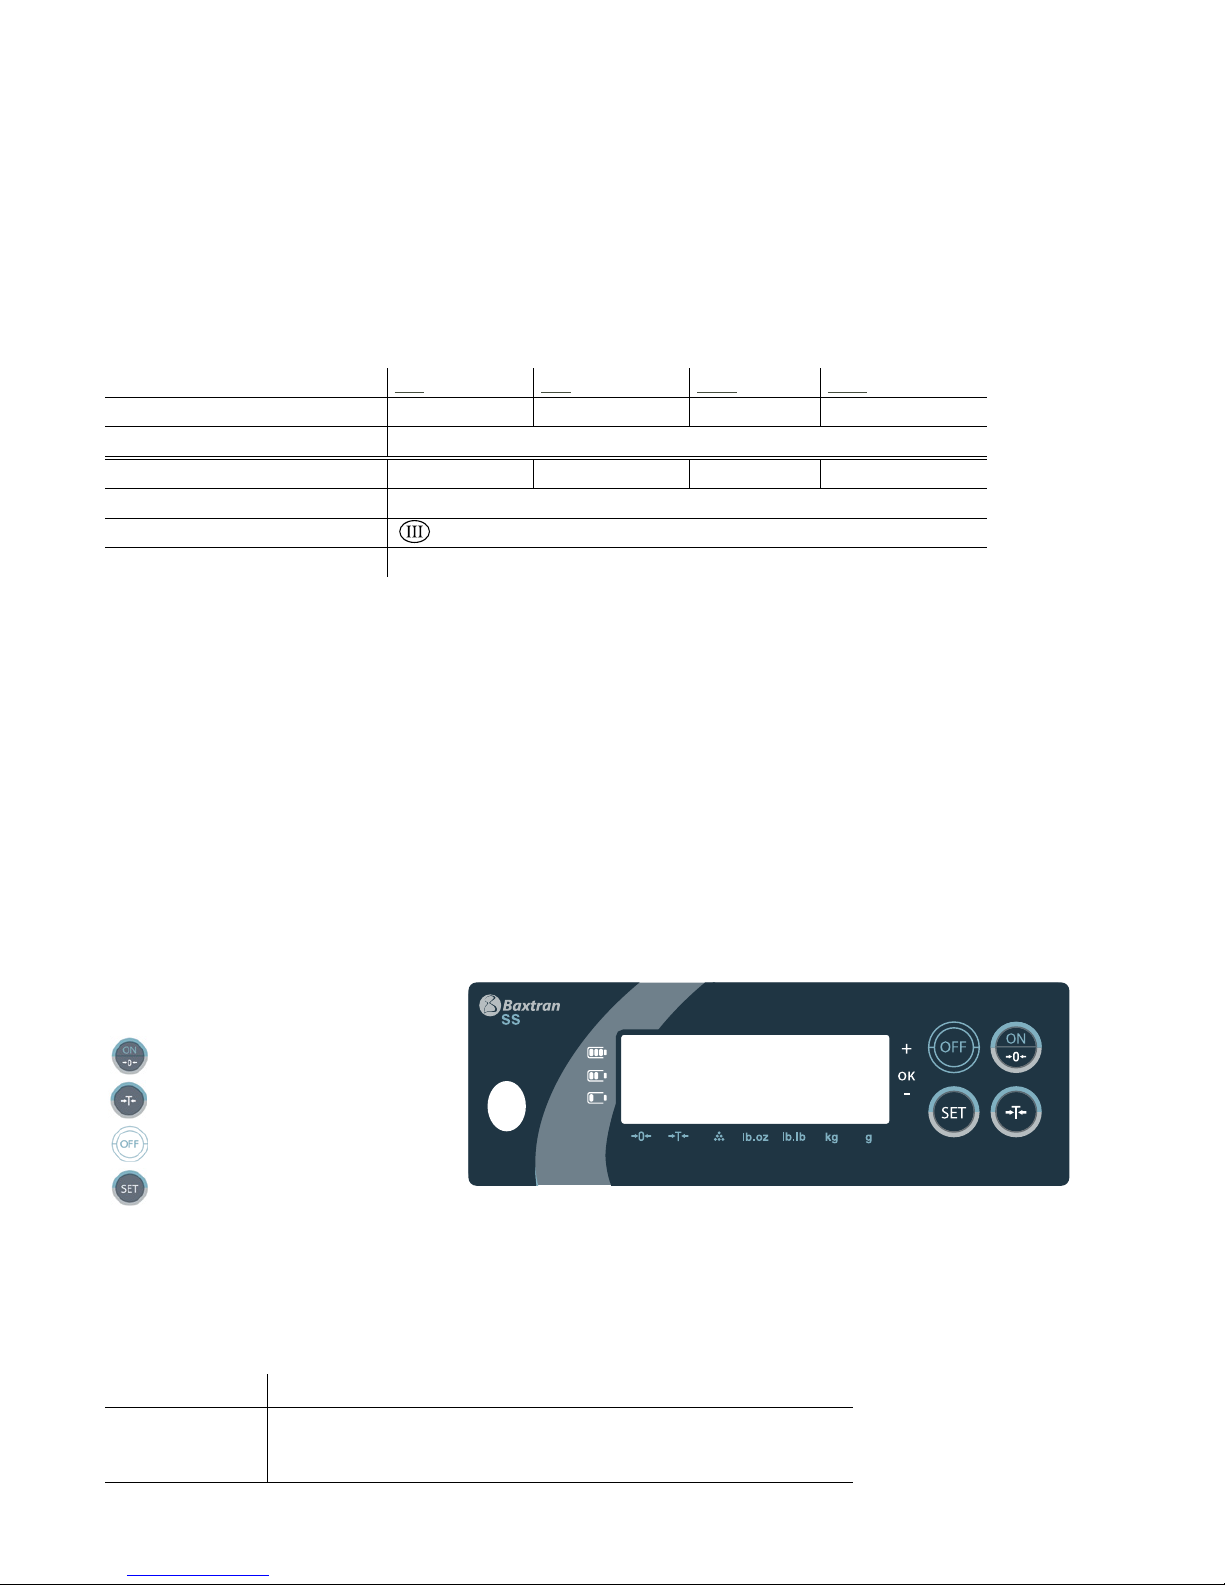
2. TECLADO Y MENSAJES DE PANTALLA
2.1. TECLADO:
Enciende la balanza y cero.
Botón tara.
Apaga la balanza.
Parámetros y modos de funcionamiento.
2.2. MENSAJES DE PANTALLA:
dc x.xx
Significa que el voltaje de la batería es x.xx V.
------
Aparece este señal cuando el peso está cerca del 100% FS+9e, si suena una
señal acústica significa que hay sobrecarga y por lo tanto el usuario debe
reducir el peso.
Page 5
5
ESMANUAL DE USUARIO SS
AdC
Cuando se sobrepasa el valor del A/D la pantalla lo mostrará con la señal
sonando.
-BatLo-
Batería baja. La balanza se puede utilizar un período corto de tiempo y debe
recargarla inmediatamente.
C End
La recarga ha terminado
Err-0
Célula de carga mal conectada o error en A/D
Err-1
Interruptor de calibración en OFF durante la calibración
Err-2
Cantidad de muestra insuficiente (durante el modo cuentapiezas)
Err-3
Peso de calibración demasiado pequeño
3. GUÍA DE OPERACIONES
3.1. PREPARACIÓN:
Ajuste los pies de la base, vigile el nivel, sitúe la bandeja horizontalmente.
3.2. ENCENDER O APAGAR:
3.2.1 ENCENDER
Presione el botón , la balanza pitará, la pantalla mostrará el número de versión, el nivel de batería y 9, 8, 7, ..., 1, 0, se encenderá
el LED de “→ 0 ← ”. Ahora la balanza está en estado de pesar.
3.2.2 APAGAR
Presione durante unos segundos el botón .
3.2.3 AUTO APAGADO
Después de 10 minutos en cero, se apagará automáticamente.
3.2.4. AUTO APAGADO DE BATERÍA BAJA:
Cuando el nivel de batería es inferior a 5.6V la balanza se apaga.
3.3. CERO:
Cuando sin tara el peso mostrado en la pantalla es ≤ 4% de la capacidad máxima, presione el botón , la pantalla mostrará “0 ”,
el LED de “ → 0 ←” se encenderá.
3.4. PESADO:
Sitúe el peso en la bandeja.
3.5. PESAJE TARA:
Presione el botón , el peso mostrado es “0 ”, el LED de “ → 0 ←” se encuentra apagado y el LED de → T ← encendido. Retire el
peso y el contenedor, el peso mostrado es negativo, el LED de → 0 ← está encendido, presione el botón , la pantalla muestra “0 ”,
el led de → T ← se encuentra apagado.
3.6. FUNCIÓN AHORRO DE ENERGÍA
Después de 40 segundos de cero, se activa la función de ahorro de energía, la pantalla muestra “O ”.
Coloque un peso para empezar a pesar.
3.7. INDICACIÓN DE BATERÍA
Led de batería: Significa que el nivel de batería es superior a 6,3 V, que se encuentra entre 6 V y 6,3 V, significa el
nivel de batería es inferior a 6 V.
Page 6
ESMANUAL DE USUARIO SS
6
3.8. CARGA
La energía es suministrada por una batería interna recargable de ácido de plomo de 6V/4Ah. Cuando muestre -BAtLo- por favor,
apague y cargue la batería inmediatamente. El tiempo de recarga completa es de 12 a 14 horas.
3.9. PARÁMETROS
Presione el botón SET/0~9 durante 3 segundos. Ahora muestra el menú. Presione el botón secuencialmente, la pantalla mostra-
rá:
rAngE (Fijar límites)
UnIt5 (elegir unidad)
A-OFF (elegir auto apagado)
FILt (filtro del display)
2ero (fijar auto cero)
bU22Er (fijar alarma)
d (elegir división)
d-dP (Elegir mono o doble pantalla)
3.9.1 Fijar límites:
Cuando muestra “rAngE”, presione y después para elegir o , empieza la función, sale, presione para
confirmar.
Cuando elija y presione , ahora pesará con límites, el led “-”(límite inferior) se enciende, el primer dígito parpadea, presione
para incrementar el dígito activo, presione para confirmar y pasar al siguiente dígito; una vez configurados todos los dígitos
de -, al presionar se enciende el led “+”, configure de igual modo el límite superior, cuando termine sale automáticamente al
modo de pesaje con los límites activos.
Cuando el límite inferior > límite superior, muestra “oFF” entonces sale.
Precaución: cuando la pantalla no está estable, los leds no se encienden.
Indicaciones de alarma: si el parámetro “bu22er” está en activado, la alarma suena cuando el peso encima del plato se
encuentra en la franja OK
3.9.2 Cambio de unidad
Cuando muestra “UnIt5”, presione , entonces presione para elegir, entonces presione para confirmar y salir.
Unidades: x9 (kg), pc5 (cuentapiezas),lb.lb (lb), Lb.o2 (lb.oz), 9 (g).
Cuentapiezas: cuando la pantalla muestra “pc5” presione . Ahora se enciende el led . Presione largamente ,
muestra count y vuelve a 0. Entonces coloque la muestra y presione . Presione y para introducir la cantidad de piezas
que compone la muestra. Después de acabar muestra “pc5” y se enciende el led “ ”.
Para salir de la función cuentapiezas, elija una unidad.
Precaución: Coloque cantidades de como máximo 30000.
3.9.3 A-oFF (elegir auto apagado)
Cuando el menú muestra A-oFF, presione para entrar, presione para elegir “n ” o “y ”, “n ” significa que no se utiliza el
auto apagado, “y ” significa que después de 10 minutos en cero la balanza se apagará automáticamente.
3.9.4 Cambiar el filtro del display:
Cuando muestre “FILtX” (FILt1 significa un escalón cambia el display, FILt2 significa 3-4 escalones cambian el display, FILt3
significa 6-8 escalones cambian el display) Presione para cambiar, presione para confirmar y salir.
3.9.5 Fijar el rango de auto cero:
Cuando la balanza muestre 2ero, presione ahora mostrará 2ero x.x (x.x es el rango: 0.5d, 1d, 1,5d, 2d, 2.5d, 3d, 3.5d, 4d,
4.5d, 5d. “d” es el valor de división cuando n=3000). Presione para cambiar, presione para confirmar y salir.
3.9.6 bUZZEr (fija el sonido de la alarma)
Cuando el menú muestra bU22Er, presione para entrar, presione para elegir o , presione para confirmar.
3.9.7 Cambiar el valor de división
Cuando el menú muestra d, presione para entrar, presione para elegir la división.
Page 7
7
ESMANUAL DE USUARIO SS
3.9.8 d-dP (elegir mono o doble pantalla)
Cuando el menú muestra d-dP, presione para entrar, presione para elegir “n” o “y”, “n” significa mono-pantalla, “y” significa doble pantalla. Presione para confirmar.
3.10. GRADUAR EL BRILLO DE LOS LED
Con la balanza encendida, presione largamente , aparece LC- presione para elegir LU-0, LU-1,
LU-2 o LU-3.
Presione para confirmar.
4. NOTAS
1. Debe cargar la batería como mínimo cada 3 meses cuando usted no utilice la balanza durante un período largo de tiempo. La
carga durará unas 12 horas.
2. No sobrecargue la balanza. No tire violentamente objetos pesados sobre la balanza. El daño por sobrepeso no se encuentra
dentro del rango de garantía de mantenimiento.
3. No utilice objetos afilados para manejar el teclado. Si la goma está dañada, ello afectará la garantía contra agua y humedad
de la balanza.
4. Mantenga la balanza limpia para asegurar un pesado correcto.
5. Hay un precinto de plomo en la parte inferior de la balanza. Los usuarios no deben quitar este precinto. Si se daña el precinto
no se garantiza el correcto mantenimiento de la balanza.
5. CALIBRACIÓN
Esta operación sólo puede realizarla el personal autorizado competente por las leyes de cada país.
• Con la balanza apagada, desprecintar el precinto del interruptor de modificación de división situado en la cara inferior de la
balanza.
Las nuevas SS con versión de firmware 3S-8.1H, ya no calibran con el procedimiento habitual de mantener presionada la tecla tara
durante unos segundos. Ahora hay que seguir el procedimiento siguiente:
Situar el switch interno en la posición
Encender el equipo, una vez estemos en modo pesaje,
presionar
y a la vez y esperar a escuchar un bip (6s aprox)
La pantalla mostrará S-Unit , presionar
La pantalla mostrará 1P , presionar
La pantalla mostrará la capacidad máxima del equipo, presionar
(Si fuese necesario, con la tecla SET se puede cambiar de capacidad)
Ahora la pantalla debe mostrar 0, sea o no sea así, presionar
Situar 1/3 de FS sobre el plato, esperar que estabilice y presionar
La pantalla mostrará la capacidad con el digito parpadeante, con la tecla incrementamos el valor y con la tecla nos desplazamos hacia la derecha. Hay que introducir el valor de la pesa que hemos cargado en el plato y presionar hasta llegar a la
posición de la derecha del todo. Una vez allí, presionar una vez más.
La pantalla mostrará C0, descargar el plato, esperar que estabilice a cero y presionar para confirmar.
La balanza volverá automáticamente a modo de pesaje, habiéndose realizado la calibración.
Situar el switch nuevamente en la posición OFF
NOTA: DURANTE LA CALIBRACIÓN, SI USTED DESEA SALIR, PRESIONE ON/→ T ←
Page 8
FRMANUEL D´UTILISATION SS
8
Merci par utiliser notre série SUPER SS de produit avec double écran protégé contre l’humidité et l’eau.
La SUPER SS est une balance d’acier inoxydable. La balance inclut des avances techniques d’haute performance. Elle inclut une gran-
de précision des pesages, avec des facilités du transport et un prix sous. Elle est résistant et de longue durée. Elle peut être utilisée
en magasins et pour peser différents paquets de produits, ainsi qu’en lieux avec grand niveau d’humidité grâce à sa haute protection
contre l’humidité.
1. CARACTÉRISTIQUES TECHNIQUES PRINCIPALES
1.1. INFORMATION BASIQUE
SS3 SS6 SS15 SS30
PORTÉE MAXIMALE (kg) 3 6 15 30
PORTÉE MINIMALE 20e
DIVISIONS D’ÉCRAN (g) 0,2 0,5 1 2
TARA MAXIMALE 100% de la portée maximale
CLASSE
DIMENSIONS DU PLATEAU (mm) 230 x 190
1.2. TEMPÉRATURE DE FONCTIONNEMENT: -5 ~ +35ºC
1.3. TEMPÉRATURE D’EMMAGASINAGE: -5 ~ +35ºC
1.4. PUISSANCE: Batería recargable 6VAh de 90horas de duración
1.5. POIDS NET: 3,6 Kg
1.6. DEGRÉ DE PROTECTION IP: IP67
2. CLAVIER ET MESSAGES DE L’ÉCRAN
2.1. CLAVIER:
Cette touche allume la balance et zéro.
Touche Tare.
Pour éteindre la balance.
Paramètre et modes de fonctionnement.
2.2. MESSAGES DE L’ÉCRAN:
dc x.xx
Il signifie que la puissance de la batterie est x.xx V.
------
Ce signal apparaît quand le poids ce tout près du 100% FE+9e, s’il sonne un
signal il signifie qu’il y a surcharge et c’est pourquoi l’usager doit réduire le
poids.
Page 9

9
FRMANUEL D´UTILISATION SS
AdC
Quand on surpèse le valeur du A/D l’écran le montrera avec un signal sonnant.
-BatLo-
La batterie est faible. La balance peut être utilisée une courte période de temps
et doit immé- diatement la recharger.
C End
La recharge a terminé.
Err-0
Capteur mauvaise connectée ou erreur du A/D.
Err-1
Switch de calibrage en OFF pendant le calibrage
Err-2
Quantité de l’échantillon insuffisant(pendant le mode compteuse)
Err-3
Poids de calibrage très petit
3. GUIDE D’OPÉRATIONS
3.1. PRÉPARATION:
Ajuster le pied fonde, surveiller le niveau, situer le plateau horizontalement.
3.2. ALLUMER OU ÉTEINDRE:
3.2.1 ALLUMER
Presione el botón , la balanza pitará, la pantalla mostrará el número de versión, el nivel de batería y 9, 8, 7, ..., 1, 0, se encenderá
el LED de “→ 0 ← ”. Ahora la balanza está en estado de pesar.
3.2.2 ÉTEINT
Appuyer pendant quelques secondes sur la touche .
3.2.3 AUTO ÉTEINT
Après 10 minutes à zéro, elle s’éteindra automatiquement.
3.2.4 AUTO ÉTEINT DE BATTERIE BAISSE:
Quand le niveau de batterie est inférieure à 5.6V la balance s’éteindra.
3.3. ZÉRO:
Quand sans tare le poids montré sur l’écran est ≤ 4% de capacité maximale, appuyer sur la touche , et l’écran montrera “0 ”, le
led → 0 ← s’allumera.
3.4. PESAGE:
Situer le poids sur le plateau.
3.5. PESAGE TARE:
Appuyer sur la touche , le poids montré est “0 ”, le led de → T ←. devient éteinte et le led de → T ← allumée. Retirer le poids et le
container, le poids montré il est négatif, le led → 0 ← est allumée, appuyer sur la touche , l’écran montre “0 ”, le led de → T ← devient
éteinte.
3.6. FONCTION D’ÉCONOMIE D’ÉNERGIE
Zéro après 40 secondes, fonction auto sauve, montre “O ”.
Placer un poids pour peser.
3.7. INDICATION DE BATTERIE
Lumière de batterie: signifie que le niveau de batterie est supérieure à 6.3 V; signifie que le niveau de batterie se trouve
entre 6V et 6.3 V, et signifie que le niveau de batterie est inférieure à 6V.
Page 10

FRMANUEL D´UTILISATION SS
10
3.8. CHARGE
L’énergie est suppléée par une batterie lead acide de recharge interne (6V/4Ah). Quand elle montrera -BAtLo-” s’il vous plaît éteindre
et charger immédiatement la batterie. Le temps de recharge complète c’est de 12 à 14 heures.
3.9. PARAMÈTRES
Appuyer sur la touche SET/0~9 pendant 3 secondes. L’écran montrera le menu. Appuyer sur la touche séquentiellement, l’écran
montrera:
rAngE (Fixer des limits)
UnIt5 (Changement d’unité)
A-OFF (Choisir éteindre automatiquement)
FILt (Filtre d’écran)
2ero (Fixer l’auto zéro)
bU22Er (Fixer l’alarme)
d (Choisir la division)
d-dP (Choisir mono-écran ou double écran)
3.9.1 Fixer des limits:
Quand l’écran montrera rAngE, appuyer sur la touche et après pour choisir “on” ou “oFF”, “on” commence la
fonction, “oFF” sorts, Appuyer sur la touche pour confirmer.
Quand vous choisies et appuies sur la touche , la balance pèsera avec des limites, le led “-” (limite inferieur) s’allumera,
la première chiffre clignote, appuyer sur pour augmenter le chiffre actif, appuyer sur pour confirmer et changer le chiffre
suivant; après d’avoir modifié tous les chiffres du “-”, appuyant sur , s’allumera le led “+” également définir le limite supérieur;
quand elle finisse sots automatiquement au mode de pesage avec limites actif.
Quand le limite inférieur > limite supérieur, montre “oFF” alors elle sorts.
Attention : quand l’écran n’est pas stable, aucun led ne s’allume.
Indications d’alerte: Si le bu22er est activée, l’alarme sonne si le poids sur le plateau est dans la bande OK
3.9.2 Changement d’unité
Quand l’écran montre “UnIt5”, appuyer sur , appuyer sur pour choisir, alors appuyer sur pour confirmer et sortir.
Unité : x9 (kg), pc5 (compteuses),lb.lb (lb), Lb.o2 (lb.oz), 9 (g).
Mode compteuse : Quand l’écran montre “pc5”, appuyer sur , le led “ ” s’allumera. Appuyer pendant quelque secondes sur
, elle montre count et retourne à 0. Alors placer un échantillon et appuyer sur .
Appuyer sur et pour écrire le nombre de pièces qui composent l’échantillon. Après de finir elle montre
“pc5” et le led “ ” s’allume.
Pour sortir de la fonction compteuse, choisir une unité.
Attention : placer quantités maximales de 30000.
3.9.3 A-oFF (Choisir éteindre automatiquement)
Quand le menu montre A-oFF, Appuyer sur pour entrer, appuyer sur pour choisir “n ” ou “y”, “n” signifie ne utilizer pas
la fonction éteindre automatiquement, “y” signifie que après de 10 minutes en zéro, la balance s’éteindra automatiquement.
3.9.4 Changer le filtre d’écran:
Quand elle montrera “FILtx” (FILt1 signifie 1échelon pour changer l’écran, FILt2 signifie 3-4 échelons pour changer l’écran,
FILt3 signifie 6-8 échelons pour changer l’écran). Appuyer sur /0~9 pour changer, Appuyer sur pour confirmer et sortir.
3.9.5 Fixer l’auto zéro:
Quand la balance montrera 2ero, appuyer sur , elle montrera maintenant 2ero x.x (x.x est le rang : 0.5d, 1d, 1.5d, 2d, 2.5d, 3d,
3.5d, 4d, 4.5d, 5d. “d” est la valeur de division quand n=3000). Appuyer sur pour choisir et pour confirmer.
3.9.6 bUZZEr (Définit le son d’alarme)
Quand le menu montre bU22Er, appuyer sur pour entrer, appuyer sur pour choisir « on » ou « oFF », appuyer sur
pour confirmer.
3.9.7 Changer la valeur de division
Quand le menu montre d, Appuyer sur pour entrer, appuyer sur pour choisir la division.
Page 11

11
FRMANUEL D´UTILISATION SS
3.9.8 d-dP (mono-écran ou double écran)
Quand le menu montre d-dP, appuyer sur pour entrer, appuyer sur pour choisir “n” ou “y”, “n” signifie mono-écran, “y”
signifie double-écran. Appuyer sur pour confirmer.
3.10. RÉGLER LA LUMINOSITÉ DES LEDS
Avec la balance allumée, appuyer pendant quelque secondes sur , apparêitra LC-, appuyer sur pour choisir
LU-0, LU-1, LU-2 ou LU-3. Appuyer sur pour confirmer.
4. NOTES
1. On doit charger la batterie comme minimum chaque 3 mois quand on n’utilisera pas la balance pendant une période longue
de temps. La charge durera quelques 12 heures.
2. Ne surcharger pas la balance. Ne jeter pas violemment objets pesés sur la balance. Le dommage par sur- charge ne se
trouve pas dans le rang de garantie de subsistance.
3. N’utiliser pas objets aiguisés pour manier le clavier. Si la gomme est endommagée, cela affectera la garantie contre l’eau et
l’humidité de la balance.
4. Maintenir la balance propre pour assurer un pesage correct.
5. Il y a une pose des scellés de plomb à la partie inférieure de la balance. Les usagers ne doivent pas enlever cette pose des
scellés. S’il s’endommage la pose des scellés on ne assure pas la correcte subsistance de la balance.
5. CALIBRATION
Cette opération peut être réalisée seulement par personnel autorisé par les lois de chaque pays.
• Avec la balance éteinte, enlever la pose des scellés de l’interrupteur de modification de division situé à la part inférieure de la
balance.
SS nouvelle version de firmware 3S-8.1H,, ne calibrent pas avec la procédure habituelle de maintenir la touche de tare pendant
quelques secondes. Maintenant, nous devons suivre la procédure suivante:
Placez le commutateur interne en position ON
Allumer l’appareil, une fois que nous sommes en mode de pesage,
Appuyez sur les touches SET et ON à la fois et d’attendre pour entendre un bip (environ 6s)
L’écran affiche S-Unit , presionar
L’écran affiche 1P , appuyez sur la touch
L’écran affiche la portée maximale de l’appareil, appuyez la touche
(Si c’est nécessaire, avec la touche SET est possible de charger la portée)
Maintenant l’écran doit afficher 0, ensuite appuyez ON
Situer 1/3 de FS sur le plateau, attendre à stabiliser et appuyez
L’écran affiche la capacité avec le chiffre clignotant avec la touche augmentons la valeur et avec la Touche nous passons
à droite. Vous devez saisir la valeur du poids que nous avons chargé sur le plateau et appuyez sur jusqu’à encore la position de
l’extrême droite. Une fois là, appuyez sur la touche une fois encore.
L’écran affiche C0, déchargez le plateau, attendez à stabiliser à zéro et appuyez sur la touche pour confirmer.
La balance retourne automatiquement en mode de pesée, avec la calibration réalisée.
Placez l’interrupteur en position OFF
NOTE: PENDANT LA CALIBRATION, SI VOUS VOULEZ SORTIR, APPUYEZ ON/→ T ←
Page 12

ENUSER’S MANUAL SS
12
Thank you for using our SUPER SS serial double side displays product of electronic waterproof counting scale. SUPER SS are a
stainless steel scale. The scale is manufactured with advanced hi-techniques. It has the characteristics of satisfactory in perfomance
accurate in weighing, convenient for carrying, cheap in price. It is sturdy and durable and widely used in not only retail stores and
weighing of ration packing of commodities but also in high humidity surroundings because of it’s well waterproof function.
1. MAIN TECHNICAL INDEX
1.1 BASIC DATA
SS3 SS6 SS15 SS30
MAX. CAPACITY (kg) 3 6 15 30
MIN. CAPACITY 20e
DISPLAY DIV. (g) 0,2 0,5 1 2
MAX. TARE 100% of the maximum capacity
ACCURACY
PAN SIZE (mm) 230 x 190
1.2. WORKING TEMPERATURE: -5 ~ +35ºC
1.3. STORAGE TEMPERATURE: -5 ~ +35ºC
1.4. POWER: Rechergeable batterry 6VAh of 90 hours of duration
1.5. NET WEIGHT: 3,6 Kg
1.6. IP: IP67
2. KEYBOARD AND CHARACTER PROMPT
2.1. KEYBOARD:
Turns the scale on and → 0 ←
Tare key.
Power off.
Parameters and modes setting.
2.2. DISPLAY MESSAGES:
dc x.xx
Mean the voltage of battery is x.xx V.
------
Show this as the weight over 100% FS+9e, with the ding sounding, this means
over load, reduce the weight.
Page 13

13
ENUSER’S MANUAL SS
AdC
As the A/D change overflowing, display shows this with the ding sounding.
-BatLo-
The voltage is lower. You can use a short while and chage immediately.
C End
Recharge is end.
Err-0
Loadcell bad connected or A/D error
Err-1
Calibration switch placed at OFF during calibration
Err-2
No enough sample (on piece counting mode)
Err-3
Calibration weigh too small
3. OPERATION GUIDE
3.1. PREPARATION:
Adjust the base foot, watch the level, make the pan in horitzontal.
3.2. TURN ON OR TURN OFF:
3.2.1 TURN ON
Press the key, the ding sound, it displays version No. and the battery voltage level and 9, 8, 7, ..., 1, 0, the “→ 0 ←”. led lighting.
Now the scale is in a working state.
3.2.2 TURN OFF
Long-press key.
3.2.3 AUTO-OFF:
After 10 minutes in zero, scale will auto-off.
3.2.4 LOW VOLTAGE AUTO-OFF
When the voltage lower than 5.6V, then power-off.
3.3. ZERO:
When without taring the weight display is ≤ 4% Max. capa., press the key, the display shows “0 ”, the → 0 ← led lighting.
3.4. WEIGHING:
Put weight to pan.
3.5. TARE WEIGHT:
Press the key, the weight display is “0 ”, the → 0 ← led off, the → T ← led lighting. Pick up the weight, the weight display is negative, the → 0 ← lighting, press the key, the → T ← led off.
3.6. FUNCIÓN AHORRO DE ENERGÍA
Zero after 40 seconds, auto save power, shows “O ”.
Put a weight start weighing.
3.7. BATTERY INDICATE
Battery led: means voltage higher than 6.3V, means voltage between 6V and 6.3V; and means voltage lower than 6V.
3.8. CHARGE
Power supplied by a internal rechargeable lead acid battery (6V/4Ah). When it shows “-bAtLo-”. Please turn off and charge immediately. The time of full charging is 12 - 14 hours.
Page 14

ENUSER’S MANUAL SS
14
3.9. SET PARAMETER
Press key 3 seconds. The screen will shows the menu. Now show menu. Press SET/0~9 sequentially it displays:
rAngE (set limit)
UnIt5 (choose unit)
A-OFF (choose auto power off)
FILt (display filter)
2ero (set auto → T ←)
bU22Er (set buzzer)
d (choose division)
d-dP (choose single or dual display)
3.9.1 Set range of auto-zero:
When it shows “rAngE”, press and then SET to choose “on” or “oFF”, “on” is start the function, “oFF” is exit, press to
confirm.
When choose “on” and press , now you will weigh with limit; led “-”(under limit) lighting, first digit is blinking, press once to
increase the current digit, press to confirm and edit next digit; once you finish to set all “-“ digits, when you press , led “+”
turns on, then you can config upper limit with the same procedure; when finishing auto exit and set “over” after setting into weighing.
When low limit > high limit, it displays “oFF”, then exit.
Caution: when the display is not stable, no led lights.
Alarming indicate: if bu22er parameter is set to on, alarm will sound if the weigh over the pan is on ok zone.
3.9.2 Change Unit
When shows “UnIt5”, press , then press SET/0~9 to choose, then press to confirm and exit.
Units: x9 (kg), pc5 (counting),lb.lb (lb), Lb.o2 (lb.oz), 9 (g).
Counting: when the screen shows “pc5” press → T ←. Now the led ir turned on. Press longer ON/→ 0 ←, shows count and returns
to 0. Then place the sample and press . Pres and to introduce the number of pieces that compose the sample.
After to finish the sample “pc5” and the led “ ” is turned on.
To exit from the counting function, select the unit.
Caution: Enter quantities of up to 30000.
3.9.3 A-oFF (Choose to turn off automatically)
When menu displays A-oFF, press to enter, press to choose “n” o “y”, “n” is not auto power off, “y” means, after 10
minutes in zero, auto-off.
3.9.4 Change display filter:
When it displays “FILtX” (FILt1 means one step change display, FILt2 means 3-4 steps change display, FILt3 means 6-8 steps change display) Press to change, press to confirm and exit.
3.9.5 Set range of auto-zero:
When it displays 2ero, press , now shows 2ero x.x (x.x is the range: 0.5d, 1d, 1.5d, 2d, 2.5d, 3d, 3.5d, 4d, 4.5d, 5d. “d” is the
division value when n=3000). Press to choose and to confirm.
3.9.6 bUZZEr (set buzze)
When menu displays bU22Er, press to enter, press to choose “on” or “oFF”, press to confirm.
3.9.7 Change division value
When menu displays d, press to enter, press to choose division.
Page 15

15
ENUSER’S MANUAL SS
3.9.8 d-dP (choose single or dual display)
When menu displays d-dP, press → T ← to enter, press to choose “n” or “y”, “n” is single display, “y” is dual display. Press → T ←
to confirm.
3.10. LED LIGHTING
On powering on, long time press , it shows LC-, press to choose LU-0, LU-1, LU-2, or LU-3. Press → T ← to confirm.
4. NOTE
1. Not overloading. Not throw heavy things on the scale violently. The damage for overloading is not within the range of guaran-
teed maintenance.
2. Don’t use sharp thing to operation the keyboard. if the rubber is damaged it will influence the performance of waterproof.
3. Keep the scale clean in order to weighing well.
4. There is a lead seal on the bottom of the scale. Users are not allowed to remove the seal. If the seal is da- maged the scale is
not guaranteed for maintenance.
5. a. You must charge the battery at least per 3 months when you don’t use the scale for long time.
b. Please correctly connect line between adapter and battery, black to black, red to red.
c. If after charging the used time becomes short than often, please change a new battery
5. CALIBRATION
This operation can only be done by competent authorized personnel according to the laws of each country.
• With the scale turned off, unseal the seal of the division modification switch. This switch is located in the inferior face of the
scale.
SS new firmware version 3S-8.1H, no longer calibrated with the usual procedure of holding down the tare key for a few seconds.
Now we must follow the following procedure:
Place the internal switch in the ON position.
Turn on the computer, once we are in weighing mode,
Press
and at once and listen for a beep (approx 6s)
The display will show S-Unit , press
The display will show 1P , press
The display will show the maximum capacity of the computer, press
(If necessary, with the SET key can be changed capacity)
The display should now show 0, whether or not, press
Place 1/3 de FS on the pan, wait for stabilization
The display will show the capacity with the flashing digit with the SET key increase the value and the key we move to the right.
You must enter the value of the weight that we have loaded on the plate and press to reach the position of the far right.
Once there, press again.
The display will show C0, unload the pan, wait for stabilization and press to confirm.
The balance will automatically return to weighing mode, the calibration has been made.
NOTE: DURING CALIBRATION, IF YOU WANT TO EXIT, PRESS ON/→ T ←
Page 16

ITMANUALE UTENTE SS
16
Grazie per utilizzare la nostra bilancia della serie SUPER SS con display in entrambi i lati, e protetta contro l’umidità e l’acqua. La bilancia
SUPER SS è una bilancia in acciaio inossidabile. La bilancia include tecnologie avanzate a prestazioni elevate. Include un’alta precisione
nella pesata, con delle facilitazioni di trasporto e un prezzo basso.
È resistente e di lunga durata. Può essere utilizzata in magazzini per pesare diversi pacchetti di prodotti, nonché in luoghi molto umidi
grazie alla sua alta protezione contro l’umidità.
1. PRINCIPALI CARATTERISTICHE TECNICHE
1.1. INFORMAZIONI DI BASE
SS3 SS6 SS15 SS30
CAPACITA’ MASSIMA (kg) 3 6 15 30
CAPACITA’ MINIMA 20e
DIVISIONI DELLO SCHERMO (g) 0,2 0,5 1 2
TARA MASSIMA 100% della capacità massima
CLASSE
DIMENSIONI DEL PIATTO (mm) 230 x 190
1.2. TEMPERATURA DI FUNZIONAMENTO: -5 ~ +35ºC
1.3. TEMPERATURA DI CONSERVAZIONE: -5 ~ +35ºC
1.4. ALIMENTAZIONE: Batteria ricaricabile 6VAh di 90 ore di autonomia
1.5. PESO NETTO: 3,6 Kg
1.6. GRADO DI PROTEZIONE IP: IP67
2. TASTIERA E MESSAGGI DELLO SCHERMO
2.1. TASTIERA:
Accensione della bilancia e azzeramento.
TASto tara.
Spegne la bilancia.
Parametri e modalità di funzionamento.
2.2. MESSAGGI DELLO SCHERMO:
dc x.xx
Significa che la tensione della batteria è x.xx V.
------
Si visualizza questo segnale quando il peso è vicino al 100% FS+9e, se un
segnale sonoro si attiva significa che c’è un sovraccarico e pertanto l’utente
deve ridurre il peso.
Page 17

17
ITMANUALE UTENTE SS
AdC
Quando si supera il valore dell’A/D lo schermo lo mostrerà con il segnale
suonando.
-BatLo-
Batteria bassa La bilancia può essere utilizzata per un periodo di tempo limitato
e deve essere ricaricata immediatamente.
C End
La ricarica è terminata
Err-0
Cella di carico collegata male o errore in A/D
Err-1
Interruttore di taratura su OFF durante la taratura
Err-2
Quantità di campione insufficiente (durante la modalità contapezzi)
Err-3
Peso di taratura troppo piccolo
3. GUIDA OPERATIVA
3.1. PREPARAZIONE:
Regolare i piedi della base, controllare il livello, posizionare il piatto orizzontalmente.
3.2. ACCENDERE O SPEGNERE:
3.2.1 ACCENDERE
Premere il tasto , la bilancia emetterà un bip, lo schermo visualizzerà il numero di versione, il livello di batteria e 9, 8, 7, ..., 1, 0,
si accenderà il LED di “→ 0 ← ”. Ora la bilancia è pronta per pesare.
3.2.2 SPEGNERE
Premere per alcuni secondi il tasto .
3.2.3 SPEGNIMENTO AUTOMATICO
Dopo 10 minuti a zero, si spegnerà automaticamente.
3.2.4. SPEGNIMENTO AUTOMATICO DELLA BATTERIA BASSA:
Quando il livello della batteria è inferiore a 5.6V la bilancia si spegne.
3.3. ZERO:
Quando senza tara il peso mostrato sullo schermo è ≤ 4% della capacità massima, premere il tasto , lo schermo visualizzerà “0
”, il LED di “ → 0 ←” si accenderà.
3.4. PESATURA:
Posizionare il peso sul piatto.
3.5. PESATURA DELLA TARA:
Premere il tasto , il peso mostrato è “0 ”, il LED di “ → 0 ←” è spento e il LED di → T ← acceso. Ritirare il peso e il contenitore, il
peso mostrato è negativo, il LED di → 0 ← è acceso, premere il tasto , lo schermo visualizza “0 ”, il led di → T ← è spento.
3.6. FUNZIONE RISPARMIO ENERGETICO
Dopo 40 secondi a zero, si attiva la funzione di risparmio energetico, lo schermo visualizza “O ”.
Posizionare un peso per cominciare a pesare.
3.7. INDICAZIONE DELLA BATTERIA
Led di batteria: Significa che il livello di batteria è superiore a 6,3 V, che si trova tra 6 V e 6,3 V, significa che il livello
di batteria è inferiore a 6 V.
Page 18

ITMANUALE UTENTE SS
18
3.8. CARICA
L’energia è fornita da una batteria interna ricaricabile di piombo-acido di 6V/4Ah. Quando visualizza -BAtLo- spegnere e caricare la
batteria immediatamente. Il tempo di carica completa è di 12-14 ore.
3.9. PARAMETRI
Premere il tasto SET/0~9 per 3 secondi. Ora visualizza il menù. Premere il tasto sequenzialmente, lo schermo visualizzerà:
rAngE (Definire limiti)
UnIt5 (scegliere unità)
A-OFF (selezionare spegnimento automatico)
FILt (filtro del display)
2ero (definire azzeramento automatico)
bU22Er (definire allarme)
d (selezionare divisione)
d-dP (Selezionare mono o doppio schermo)
3.9.1 Definire limiti:
Quando visualizza “rAngE”, premere e poi per selezionare o , iniziare la funzione, uscire, premere per
confermare.
Quando sceglie e preme , ora peserà con limiti, il led “-”(limite inferiore) si accende, la prima cifra lampeggia, premere per
aumentare la cifra attiva, premere per confermare e passare alla cifra successiva; una volta configurate tutte le cifre di -, premendo
si accende il led “+”, configurare allo stesso modo il limite superiore, quando termina uscire automaticamente dalla modalità di
pesatura con i limiti attivi.
Quando il limite inferiore > limite superiore, visualizzare “oFF” poi uscire.
Attenzione: quando lo schermo non è stabile, i led non si accendono.
Indicazioni di allarme: se il parametro “bu22er” è attivato, l’allarme suona quando il peso sopra il piatto si trova nella fascia OK
3.9.2 Cambio di unità
Quando visualizza “UnIt5”, premere , poi premere per selezionare, poi premere per confermare e uscire.
Unità: x9 (kg), pc5 (contapezzi),lb.lb (lb), Lb.o2 (lb.oz), 9 (g).
Contapezzi: quando lo schermo visualizza “pc5” premere . Ora si accende il led . Premere a lungo ,
visualizza count e torna a 0. Poi posizionare il campione e premere . Premere e per inserire la quantità di pezzi di cui è
composto il campione. Una volta terminato visualizzerà “pc5” e si accende il led “ ”.
Per uscire dalla funzione contapezzi, selezionare un’unità.
Attenzione: Posizionare le quantità di almeno 30000.
3.9.3 A-oFF (selezionare spegnimento automatico)
Quando il menù visualizza A-oFF, premere per entrare, premere per selezionare “n ” o “e ”, “n ” significa che non si utilizza lo
spegnimento automatico, “e ” significa che dopo 10 minuti a zero la bilancia si spegnerà automaticamente.
3.9.4 Cambiare il filtro del display:
Quando visualizza “FILtX” (FILt1 significa un gradino cambia il display, FILt2 significa 3-4 gradini cambiano il display, FILt3 significa
6-8 gradini cambiano il display) Premere per cambiare, premere per confermare e uscire.
3.9.5 Definire il range di azzeramento automatico:
Quando la bilancia visualizza 2ero, premere ora visualizzerà 2ero x.x (x.x è il range: 0.5d, 1d, 1,5d, 2d, 2.5d, 3d, 3.5d, 4d, 4.5d,
5d. “d” è il valore di divisione quando n=3000). Premere per cambiare, premere per confermare e uscire.
3.9.6 bUZZEr (definire il segnale acustico)
Quando il menù visualizza bU22Er, premere per entrare, premere per selezionare o , premere per confermare.
3.9.7 Cambiare il valore di divisione
Quando il menù visualizza d, premere per entrare, premere per selezionare la divisione.
3.9.8 d-dP (selezionare mono o doppio schermo)
Quando il menù visualizza d-dP, premere per entrare, premere per selezionare “n” o “e”, “n” significa mono-schermo, “e”
significa doppio schermo. Premere per confermare.
Page 19

19
ITMANUALE UTENTE SS
3.10. MODULARE LA LUMINOSITA’ DEI LED
Con la bilancia accesa, premere a lungo , visualizza LC- premere per selezionare LU-0, LU-1,
LU-2 o LU-3.
Premere per confermare.
4. NOTE
1. Deve caricare la batteria come minimo ogni 3 mesi quando non utilizza la bilancia per un periodo di tempo prolungato. La
carica durerà circa 12 ore.
2. Non sovraccaricare la bilancia. Non gettare violentemente oggetti pesanti sulla bilancia. Il danno per sovrappeso non è inclu-
so nel range di garanzia di manutenzione.
3. Non utilizzare oggetti affilati per manipolare la tastiera. Se la gomma è danneggiata, questo inciderà sulla garanzia contro
l’acqua e l’umidità della bilancia.
4. Tenere la bilancia pulita per assicurare una pesatura corretta.
5. Nella parte inferiore della bilancia c’è un sigillo di piombo. Gli utenti non devono togliere questo sigillo. Se viene danneggiato
il sigillo, la corretta manutenzione della bilancia non è garantita.
5. TARATURA
Questa operazione può essere eseguita esclusivamente da personale autorizzato competente secondo le normative di ogni paese.
• Con la bilancia spenta, togliere il sigillo dall’interruttore di modifica di divisione posizionato nella parte inferiore della bilancia.
Le nuove SS con versione di firmware 3S-8.1H non calibrano più con la procedura abituale di mantenere premuto il tasto tara per
alcuni secondi. Ora è necessario seguire la procedura seguente:
Posizionare lo switch interno nella posizione corretta
Accendere il dispositivo, una volta entrati in modalità pesatura,
premere
e alla volta e attendere un bip (6 sec. circa)
Lo schermo visualizzerà S-Unit , premere
Lo schermo visualizzerà 1P , premere
Lo schermo visualizzerà la capacità massima del dispositivo, premere
(Se fosse necessario, con il tasto SET si può cambiarne la capacità)
Ora lo schermo deve visualizzare 0, anche se non è così, premere
Posizionare 1/3 di FS sul piatto, attendere che si stabilizzi e premere
Lo schermo visualizzerà la capacità con la cifra lampeggiante, con il tasto incrementare il valore e con il tasto spostarsi a
destra. È necessario inserire il valore del peso che abbiamo caricato sul piatto e premere fino ad arrivare completamente alla
posizione di destra. Una volta lì, premere ancora una volta.
Lo schermo visualizzerà C0, scaricare il piatto, attendere che si stabilizzi a zero e premere per confermare.
La bilancia tornerà automaticamente in modalità pesatura, avendo eseguito la taratura.
Posizionare di nuovo lo switch in posizione OFF
NOTA: DURANTE LA TARATURA, SE DESIDERA USCIRE, PREMERE ON/→ T ←
Page 20

DEBEDIENUNGSANLEITUNG SS
2020
Vielen Dank, dass Sie unsere Waage der Serie SUPER SS verwenden, mit Display auf beiden Seiten und Schutz vor Feuchtigkeit und
Wasser. Die Waage SUPER SS ist eine Waage aus Edelstahl. Sie ist mit den neuesten technischen Standards ausgestattet. Sie verfügt
über hohe Präzision beim Wiegen, lässt sich einfach transportieren und ist günstig.
Sie ist widerstandsfähig und hat eine lange Lebensdauer. Die Waage kann in Lagerhallen verwendet werden, um unterschiedliche Produkte zu wiegen, oder an Orten mit hoher Feuchtigkeit, da sie vor Feuchtigkeit geschützt ist.
1. GRUNDLEGENDE TECHNISCHE EIGENSCHAFTEN
1.1. GRUNDLEGENDE INFORMATIONEN
SS3 SS6 SS15 SS30
MAXIMALLAST (kg) 3 6 15 30
MINDESTLAST 20e
DISPLAYAUFTEILUNG (g) 0,2 0,5 1 2
MAXIMAL TARA 100% de la capacidad máxima
ART
MAßE DER WÄGEPLATTE (mm) 230 x 190
1.2. BETRIEBSTEMPERATUR: -5 ~ +35ºC
1.3. LAGERTEMPERATUR: -5 ~ +35ºC
1.4. STROMVERSORGUNG: Wiederaufladbare Batterien 6VAh mit 90 Stunden Laufzeit
1.5. NETTOGEWICHT: 3,6 Kg
1.6. SCHUTZART IP: IP67
2. TASTATUR UND MELDUNGEN IM DISPLAY
2.1. TASTATUR:
Schaltet die Waage ein und auf Null
Tara Taste.
Schaltet die Waage aus.
Parameter und Funktionsweise.
2.2. MELDUNGEN IM DISPLAY:
dc x.xx
Die Leistung der Batterie beträgt x.xx V.
------
Dieses Zeichen erscheint, wenn das Gewicht in der Nähe von 100 % FS+9e ist.
Wenn ein akustisches Signal ertönt, ist die Waage überladen und der Benutzer
muss das Gewicht reduzieren.
AdC
Wenn der A/D-Wert überschritten wird, erscheint eine Anzeige im Display und
ein Signal ertönt.
Page 21

DEBEDIENUNGSANLEITUNG SS
2121
-BatLo-
Schwache Batterie. Die Waage kann kurzzeitig verwendet werden bevor die
Batterien wieder aufgeladen werden müssen.
C End
Das Wiederaufladen ist beendet
Err-0
Wägezelle falsch angeschlossen oder Fehler bei A/D
Err-1
Kalibrierschalter steht während der Kalibrierung auf OFF.
Err-2
Probemenge nicht ausreichend (im Stückzählmodus)
Err-3
Kalibriergewicht zu gering
3. BETRIEBSANLEITUNG
3.1. VORBEREITUNG:
Passen Sie die Füße der Waage an, kontrollieren Sie das Niveau und platzieren Sie die Wägeplatte horizontal.
3.2. EIN- ODER AUSSCHALTEN:
3.2.1 EINSCHALTEN
Drücken Sie die Taste . Es ertönt ein Ton und im Display erscheint die Seriennummer, der Batteriestand und 9, 8, 7, ..., 1, 0. Die
LED für “→ 0 ← ” leuchtet auf. Jetzt ist die Waage bereit für den Wiegevorgang.
3.2.2 AUSSCHALTEN
Drücken Sie die Taste für einige Sekunden.
3.2.3 AUTOMATISCHES AUSSCHALTEN
Nach 10 Minuten im Nullmodus schaltet sich die Waage automatisch aus.
3.2.4. AUTOMATISCHES AUSSCHALTEN BEI SCHWACHER BATTERIE:
Wenn der Ladezustand der Batterie weniger als 5,6 V beträgt, schaltet sich die Waage aus.
3.3. NULL:
Wenn das im Display angezeigte Gewicht ohne Tara ≤ 4 % der Maximalkapazität ist, drücken Sie die Taste , Im Display erscheint
“0 “ und die LED für “ → 0 ←” leuchtet auf.
3.4. WIEGEN:
Platzieren Sie das Gewicht auf der Wägeplatte.
3.5. ENERGIESPARFUNKTION
Drücken Sie die Taste , das angezeigte Gewicht ist “0”, die LED für “→ 0 ←” erlischt und die LED für leuchtet auf. Entfernen
Sie das Gewicht und den Behälter. Das angezeigte Gewicht ist negativ, die LED für “→ 0 ←” leuchtet auf. Drücken Sie die Taste , im
Display erscheint “0 “ und die LED für erlischt.
3.6. ENERGIESPARFUNKTION
Nach 40 Sekunden im Nullmodus wird die Energiesparfunktion aktiviert und das Display zeigt “O ” an. Platzieren Sie ein Gewicht auf
der Waage, um mit dem Wiegen zu beginnen.
3.7. BATTERIESTATUS
Batterie LED: Der Ladezustand der Batterie beträgt mehr als 6,3 V, ist zwischen 6 V und 6,3 V, ist niedriger als 6 V.
3.8. LADUNG
Der Strom wird durch eine interne wiederaufladbare Bleisäure-Batterie mit 6 V/4 Ah bereitgestellt. Wenn -BAtLo- angezeigt wird,
schalten Sie die Waage aus und laden Sie die Batterie umgehend auf. Die Gesamtaufladezeit beträgt 12 bis 14 Stunden.
Page 22

DEBEDIENUNGSANLEITUNG SS
2222
3.9. PARAMETER
Drücken Sie die Taste SET/0~9 für 3 Sekunden. Es erscheint das Menü. Drücken Sie die Taste nacheinander, im Display erscheint:
rAngE (Grenzwerte festlegen)
UnIt5 (Einheit auswählen)
A-OFF (automatisches Ausschalten auswählen)
FILt (Displayfilter)
2ero (Auto-Null festlegen)
bU22Er (Alarm festlegen)
d (Unterteilung auswählen)
d-dP (Einzel- oder Dual-Display auswählen)
3.9.1 GRENZWERTE FESTLEGEN:
Wenn “rAngE” angezeigt wird, drücken Sie und dann , um „on“ oder “oFF“ auszuwählen. “On“ startet die Funktion, „oFF“
beendet sie. Drücken Sie , um zu bestätigen.
Wenn Sie „on“ auswählen und drücken, wiegen Sie mit Grenzwerten, die LED “-“(Mindestwert) leuchtet auf, das erste Zeichen
blinkt. Drücken Sie , um den Wert zu erhöhen, drücken Sie , um zu bestätigen und zum nächsten Zeichen zu gelangen. Haben
Sie alle Zeichen konfiguriert, drücken Sie , die LED “+“ leuchtet auf. Konfigurieren Sie nun den Höchstwert wie im vorigen Schritt.
Beim Beenden springt die Waage automatisch in den Wiegemodus mit den aktiven Grenzwerten.
Wenn Mindestwert > Höchstwert, erscheint im Display “oFF“ und es schaltet sich aus.
Vorsicht: wenn das Display nicht konstant anzeigt, leuchten die LEDs nicht auf.
Warnsignal: wenn der Parameter “bu22er” auf ON ist, ertönt der Alarm, wenn sich das Gewicht auf der Wägeplatte im OK-Bereich
befindet.
3.9.2 Änderung der Einheit
Wenn im Display “UnIt5” angezeigt wird, drücken Sie , dann drücken Sie , um auszuwählen. Dann drücken Sie , um zu
bestätigen und das Menü zu verlassen.
Einheiten: x9 (kg), pc5 (Stückzählung),lb.lb (lb), Lb.o2 (lb.oz), 9 (g).
Stückzählung: wenn im Display “pc5” erscheint, drücken Sie → T ←. Nun leuchtet die LED auf. Drücken Sie lange auf . Es
erscheint count und die Waage kehrt zurück auf 0. Platzieren Sie dann die Probe auf der Waage und drücken Sie . Drücken Sie
und , um die Stückmenge der Probe festzulegen. Nach dem Beenden wird “pc5” angezeigt und die LED leuchtet auf.
Um die Funktion Stückzählung zu verlassen, wählen Sie eine Einheit aus.
Vorsicht: Platzieren Sie nur Mengen von maximal 30.000.
3.9.3 A-OFF (automatisches Ausschalten auswählen)
Wenn das Menü A-oFF anzeigt, drücken Sie , um zu beginnen. Drücken Sie dann und wählen Sie “n” oder “y”. “n” bedeutet, dass automatisches Ausschalten deaktiviert ist, “y” bedeutet, dass sich die Waage nach 10 Minuten im Null-Modus automatisch
ausschaltet.
3.9.4 Displayfilter ändern:
Wenn “FILtX” angezeigt wird (FILt1 bedeutet eine Stufe ändert das Display, FILt2 bedeutet 3-4 Stufen ändern das Display, FILt3
bedeutet 6-8 Stufen ändern das Display). Drücken Sie SET/0~9, um eine Änderung vorzunehmen, drücken Sie dann , um zu
bestätigen und das Menü zu verlassen.
3.9.5 Den Auto-Null Bereich festlegen:
Wenn die Waage Null anzeigt, drücken Sie . Nun erscheint Null x.x (x.x ist der Bereich: 0,5d, 1d, 5d, 2d, 2,5d, 3d, 3,5d, 4d, 4,5d,
5d. „d“ ist der Wert der Unterteilung wenn n=3000). Drücken Sie , um eine Änderung vorzunehmen, drücken Sie dann , um
zu bestätigen und das Menü zu verlassen.
3.9.6 Buzzer (Alarmton festlegen)
Wenn das Menü bU22Er anzeigt, drücken Sie , um zu beginnen, dann drücken Sie , um “on“ oder “oFF“ auszuwählen. Dann
drücken Sie , um zu bestätigen.
Page 23

DEBEDIENUNGSANLEITUNG SS
2323
3.9.7 Den Unterteilungswert ändern
Wenn das Menü d anzeigt, drücken Sie , um zu beginnen, dann drücken Sie , um die Unterteilung auszuwählen.
3.9.8 d-dP (elegir mono o doble pantalla)
Wenn das Menü d-dP, anzeigt, drücken Sie , um zu beginnen, dann drücken Sie , um „n“ oder „y“ auszuwählen. „n“ steht
für Einzeldisplay, „y“ steht für Dual-Display. Drücken Sie , um zu bestätigen.
3.10. DIE HELLIGKEIT DER LEDS ANPASSEN
Drücken Sie bei eingeschalteter Waage lange auf . Es erscheint LC- . Drücken Sie , um LU-0, LU-1, LU-2 oder LU-3 auszuwählen. Drücken Sie LC- , um zu bestätigen.
4. HINWEISE
1. Die Batterie muss mindestens alle 3 Monate aufgeladen werden, wenn Sie die Waage für längere Zeit nicht benutzen. Die
Aufladung dauert ungefähr 12 Stunden.
2. Überladen Sie die Waage nicht. Ziehen Sie keine Gegenstände über die Waage. Schäden durch Überlast werden nicht von der
Wartungsgarantie abgedeckt.
3. Verwenden Sie keine spitzen Gegenstände für die Bedienung der Tastatur. Wenn die Versiegelung beschädigt ist, wirkt sich
dies auf die Garantie für Wasser- und Feuchtigkeitsmängel aus.
4. Halten Sie die Waage sauber, um ein korrektes Wiegen zu gewährleisten.
5. Im Inneren der Waage befindet sich eine Bleiplombe. Diese darf durch die Verwender nicht entfernt werden. Wird die Plombe
beschädigt, kann das korrekte Funktionieren der Waage nicht mehr garantiert werden.
5. KALIBRIERUNG
Diese sollte nur von autorisiertem Personal durchgeführt werden, gemäß den jeweiligen Landesvorschriften.
• Ist die Waage ausgeschaltet, entplomben Sie den Modifikationsschalter für die Unterteilung, der sich auf der Unterseite der
Waage befindet.
Die neuen Waagen der SS Serie mit Firmwareversion 3S-8.1H, kalibrieren nicht mehr wie üblich durch längeres gedrückt halten der
Taste Tara. Dies muss nun wie folgt durchgeführt werden:
Schalten Sie den internen Schalter auf ON
Schalten Sie das Gerät ein. Wenn Sie im Wiegemodus sind,
drücken Sie gleichzeitig SET und ON und warten Sie auf ein Piepen (ca. 6 s).
Das Display zeigt S-Unit . Drücken Sie → T ←
Das Display zeigt P. Drücken Sie → T ←
Im Display erscheint die Maximalkapazität des Gerätes. Drücken Sie
(Falls notwendig, können Sie mit der Taste SET die Kapazität ändern).
Jetzt sollte im Display 0 erscheinen, ansonsten drücken Sie ON
Platzieren Sie 1/3 von FS auf der Wägeplatte, warten Sie auf eine konstante Anzeige und drücken Sie
Im Display erscheint die Kapazität in blinkenden Zeichen. Mit der Taste SET erhöhen Sie den Wert und mit der Taste springt man
weiter nach rechts. Nun muss der Wert des gewogenen Gewichts eingegeben werden, dann drücken Sie bis Sie ganz rechts
außen ankommen. Dort angekommen, drücken Sie noch einmal .
Im Display erscheint C0. Nehmen Sie das Gewicht von der Wägeplatte, warten Sie auf eine konstante Nullanzeige und drücken
Sie → T ←, um zu bestätigen. Die Waage kehrt automatisch in den Wiegemodus zurück nachdem die Kalibrierung durchgeführt wurde.
Schalten Sie den internen Schalter jetzt auf OFF
HINWEIS: MÖCHTEN SIE WÄHREND DER KALIBRIERUNG BEENDEN, DRÜCKEN SIE ON/→ T ←
Page 24

marca propiedad de | est une marque de | trade mark propiety of:
Pol. Empordà Internacional Calle F. Parcela 15-16
17469 VILAMALLA - (Girona) SPAIN
T. (34) 972 527 212 - F. (34) 972 527 211
 Loading...