


RTN
El fabricante se reserva el derecho de modicar sin previo aviso las características de sus productos para introducir
mejoras técnicas o cumplir con nuevas regulaciones ociales./Le constructeur se réserve le droit de modier les
caractéristiques de ses produits en vue d’y apporter des améliorations techniques ou de respecter de nouvelles
réglamentations./The manufacturer reserves the right to modify the specications of its products in order to
make technical improvements or comply with new regulations.
BALANZA PRECIO PESO IMPORTE
BALANCE POIDS PRIX
PRICE COMPUTING SCALE
Manual de usuario | Manuel d’usager | User’s guide
v3.20140429

RTN Balanza precio-peso-importe | Balance poids-prix | Price-compung scale ENG FR ES
Manual de usuario | Manuel d’usager | User’s guide

RTN Balanza precio-peso-importe | Balance poids-prix | Price-compung scale ENG FR ES
Manual de usuario | Manuel d’usager | User’s guide
3
ÍNDICE
1. PRECAUCIONES
5
2. INTRODUCCIÓN 5
3. ESPECIFICACIONES 6
4. INSTALACIÓN 6
5. DESCRIPCIÓN BÁSCULA, TECLADO Y
DISPLAY 7
6. OPERACIÓN 9
6-1. Operación básica 9
6-1-1. Encendido ON/OFF 9
6-1-2. Cero 9
6-1-3. Tara 9
6-1-4. Conguración Unidad de Precio 9
6-2. Modo báscula 10
6-2-1. Modo ventas 10
6-2-2. Memoria acumulación 10
6-2-3. Cambio y borrar memoria
comerciante 11
6-2-4. Anulación de transacción 11
6-3. Operación PLU 12
6-3-1. Programar contenido PLU 12
6-3-2. Mostrar PLU 14
6-4. Acumulación/Operación Venta 14
6-5. Informe venta 15
6-5-1. Informe PLU diario 15
6-5-2. Informe diario 15
6-5-3. Informe producto 16
6-5-4. Borrar todas las ventas 16
6-5-5. Uso memoria venta 17
6-6. Formatos de impresión 17
6-7. Cambiar rollo de papel 18
7. PARÁMETROS 18
7-1. Teclas de parámetro 18
7-2. Introducir en la conguración
parámetro 18
7-3. Conguración parámetros 19
8. SALIDA RS232 20
9. DESPIECE 21
10. GARANTÍA 22
INDEX
1. MAINTENANCE
23
2. INTRODUCTION 23
3. SPÉCIFICATIONS 24
4. INSTALLATION 24
5. DESCRIPTION BASCULE, CLAVIER ET
ÉCRAN 25
6. OPERATION 27
6-1. Opération basique 27
6-1-1. Allumage ON/OFF 27
6-1-2. Zéro 27
6-1-3. Tare 27
6-1-4. Conguration unité de prix 27
6-2. Mode bascule 28
6-2-1. Mode ventes 28
6-2-2. Mémoire accumulation 28
6-2-3. Change et effacer mémoire
commerçante 29
6-2-4. Annulation de la transaction 29
6-3. Opération PLU 30
6-3-1. Programmer le contenu PLU 30
6-3-2. Montrer PLU 32
6-4. Accumulation/Opération Vente 32
6-5. Information vente 33
6-5-1. Rapport PLU quotidien 33
6-5-2. Rapport quotidien 33
6-5-3. Information Produit 34
6-5-4. Effacer toutes les ventes 34
6-5-5. Utiliser mémoire de vente 35
6-6. Formats de l’impression 35
6-7. Changer rouleaux de papier 36
7. PARAMÈTRES 36
7-1. Touches en paramètre 36
7-2. Entrer dans la conguration
des paramètres 36
7-3. Conguration des paramètres 37
8. SORTIE RS232 38
9. DÉPEÇAGE 39
10. GARANTIE 40
INDEX
1. PRECAUTIONS
41
2. INTRODUCTION 41
3. SPECIFICATIONS 42
4. INSTALLATION 42
5. PARTE AND KEYS DESCRIPTION 43
6. OPERATION 45
6-1. Basic operation 45
6-1-1. Power ON/OFF 45
6-1-2. Zero 45
6-1-3. Tare 45
6-1-4. Unit price setting 45
6-2. Scale mode 46
6-2-1. Sales mode 46
6-2-2. Recall accumulation 46
6-2-3. Change and vendor memory
clear 47
6-2-4. Transaction cancellation 47
6-3. PLU operation 48
6-3-1. Set PLU content 48
6-3-2. Scan PLU 50
6-4. Accumulation/Sale operation 50
6-5. Sales report 51
6-5-1. Today PLU report 51
6-5-2. Daily report 51
6-5-3. Product report 52
6-5-4. Clear all sales 52
6-5-5. Sale memory usage 53
6-6. Print formats 53
6-7. Change paper roll 54
7. PARAMETER 54
7-1. Keys in parameter 54
7-2. Enter into the parameter
settings 54
7-3. Parameter settings 55
8. RS232 OUTPUT 56
9. EXPLODED 57
10. WARRANTY 58

4
Manual de usuario | Manuel d’usager | User’s guide
ES FR ENG Balanza precio-peso-importe | Balance poids-prix | Price-compung scale RTN
Manual de usuario
RTN Balanza precio-peso-importe ENG FR ES
AtENCIóN

Manual de usuario
5
RTN Balanza precio-peso-importe ENG FR ES
1. PRECAUCIONES
AtENCIóN
DESCONECTE TODA POTENCIA A ESTA UNIDAD ANTES DE INSTALARLA, LIMPIARLA
O UTILIZARLA. SI NO TIENE EN CUENTA ESTA PRECAUCIÓN PUEDE PROVOCAR
ALGÚN DAÑO O AVERÍA AL CUERPO DE ESTA UNIDAD.
PRECAUCIóN
Solo personas autorizadas pueden proceder al uso de este instrumento.
Antes de conectar o desconectar alguno de los componentes, retire la conexión a la electricidad.
Si no tiene en cuenta estas advertencias puede causar una avería o daño, o incluso la destrucción del
equipo.
Evite instalar la balanza a la luz directa del sol, ya que ello puede provocar una decoloración. >
Evite la sobrecargar que pueda dañar la balanza. >
Si la balanza no se va a utilizar durante un largo período de tiempo, retire la batería del compartimento >
de la batería para evitar pérdidas.
Evite almacenar materiales sobre la balanza cuando la balanza no esté en uso. >
Evite mesas inapropiadas. Las mesas o el suelo debe ser rígido y no vibrar. No sitúe la balanza cerca de >
maquinaria vibrante.
Evite fuentes de potencia inestables. No utilice la balanza cerca de grandes usuarios de electricidad tales >
como equipos de soldadura o motores grandes.
Utilice solo el adaptador original JP, otros adaptadores pueden dañar la balanza. >
2. INtROdUCCIóN
La serie de balanzas de pesar RTN son aptas como balanzas comerciales peso-precio-importe. >
Capacidades de 6 kg a 45 kg. >
Ventas de 3 vendedores al mismo tiempo. >
Modo de Venta y Compra. >
99 PLU: >
Contenidos PLU: nombre Producto, código Producto, Pesado/No pesado, Precio Ventas, Selección tipo
impuesto, Pre-Tara.
1000 ventas record y 350 ventas record pueden ser guardadas en memoria. >
Empotrar Impresora THERMAL; el papel se carga con facilidad y el soporte también continua imprimiendo >
el papel.
Impresiones: Informe PLU con fecha, informe de venta diario, informe de inventario con fecha, informe de >
falta de inventario, etiqueta, tíquet.
Batería recargable que proporciona hasta 90 horas de uso continuado (sin luz trasera). >
Conexión opcional para conectar plataforma externa. >
Función de control de inventario. >
RS232 opcional/conexión de Bluetooth para conectar PC. >
28 programa PLU directo y 99 PLU indirecto. >
Adaptador AC/batería recargable. >
LCD grande de 20 mm con pantalla LED blanca de luz trasera. >
50 teclas mecánicas. >

6
Manual de usuario
ES FR ENG Balanza precio-peso-importe RTN
Manual de usuario
7
RTN Balanza precio-peso-importe ENG FR ES
CARgAR BAtERíA
INStALACIóN
dESCRIPCIóN BáSCULA
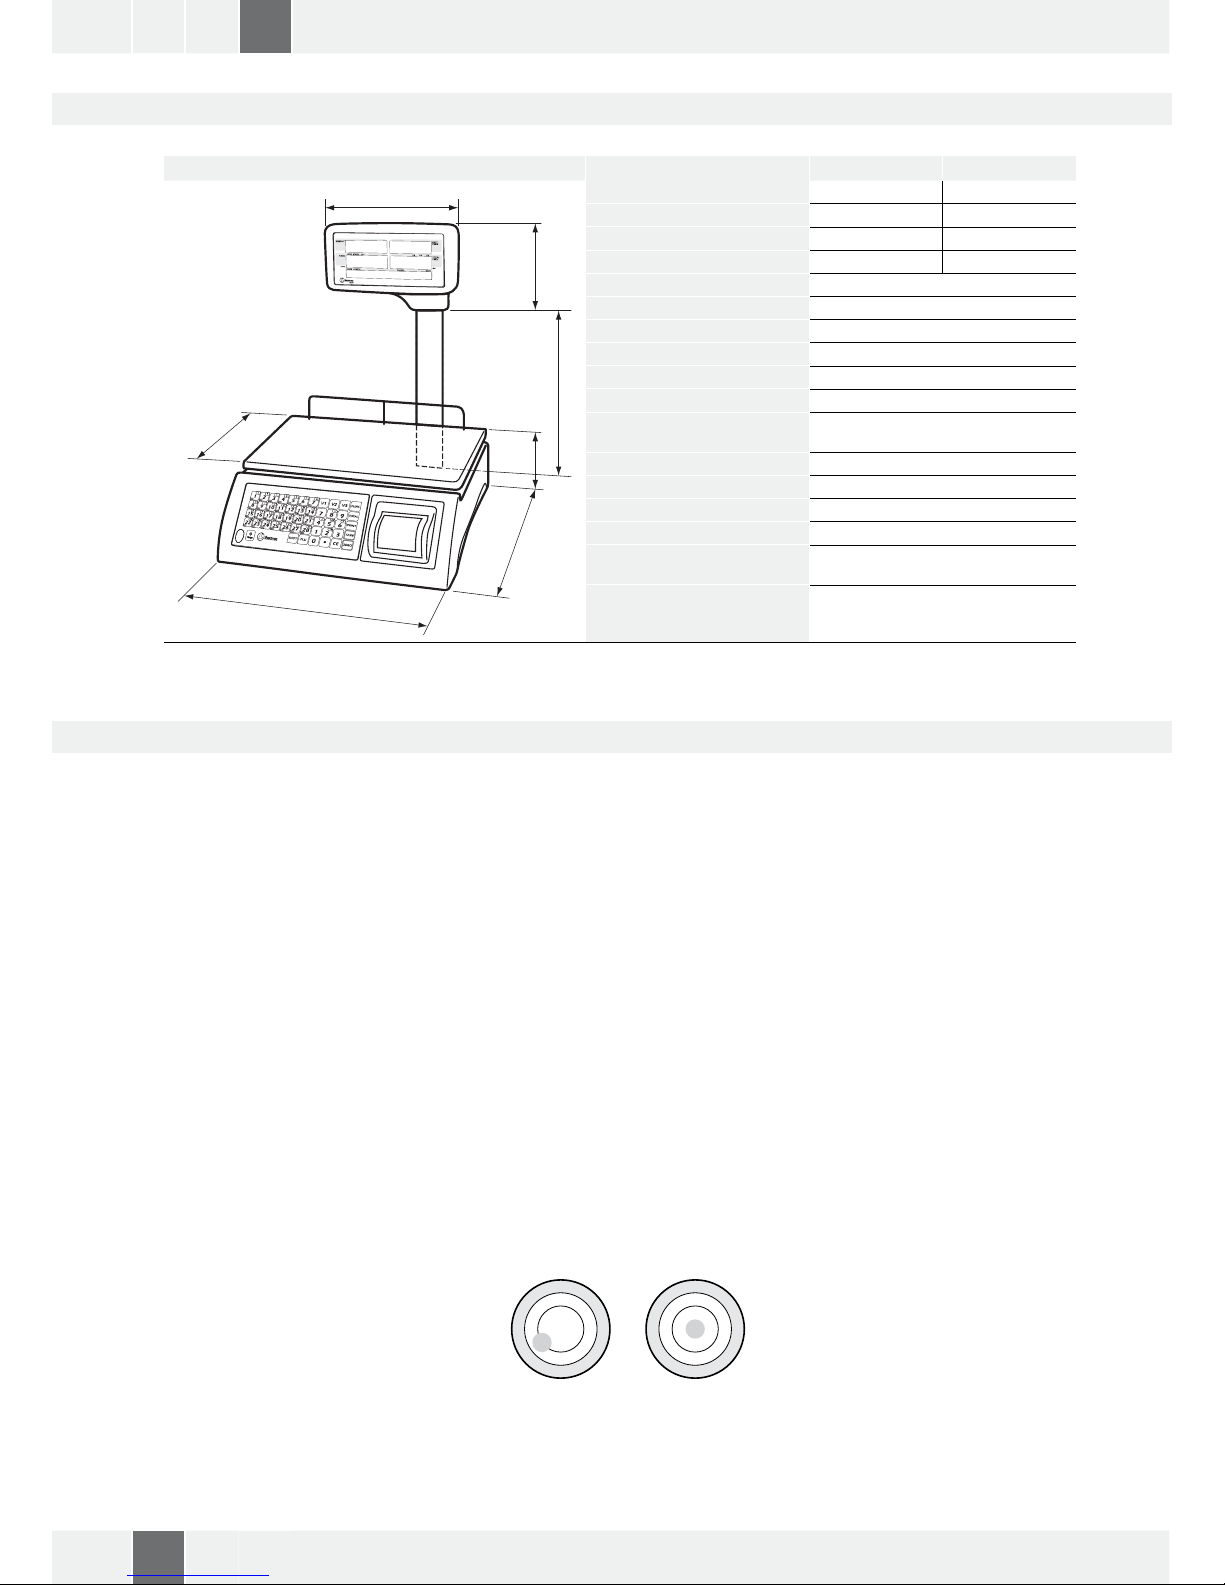
3. ESPECIfICACIONES
(dimensiones en mm)
MODEL RTN-15 RTN-30
370
240
150
320
125
360
240
Capacidad máxima (kg) 6/15 15/30
Precisión (g) 2/5 5/10
Rango tara (kg) -15 -30
Peso mínimo (g) 40 100
Resolución 3000/6000/Dual range
Tiempo de estabilización 2 segons
Tiempo de calentamiento 10 min.
Unidades de peso kg/g
Interfaz Salida opcional RS232
Calibración Externa automática
Pantalla
Pantalla LCD retroiluminada con
6 dígitos de 20 mm
Carcasa Plástico ABS
Dimensiones plato (mm) 240x370
Dimensiones totales (mm) 370x360x125
Peso Bruto (kg) 5,8
Alimentación
100/240 V AC 50 Hz Adaptador:
12V/500mA
Temperatura de
funcionamiento
-10oC +40oC/14oF +140oF
4. INStALACIóN
dESEmBALAjE
Retire la balanza de su embalaje con cuidado, asegúrese que no está dañada y que todos los accesorios están
incluidos.
Retire el Indicador de la caja. >
Retire la cubierta protectora. Almacene el embalaje para posterior uso si usted necesita transportar la >
balanza más adelante.
Inspeccione la balanza y el terminal por si se ha producido algún daño >
Asegúrese que todos los componentes están incluidos >
Accesorios:
Balanza >
Adaptador >
Bandeja >
Producto Manual >
AjUStAR NIvEL
Sitúe la balanza sobre una mesa
Compruebe la marca de agua. Si la burbuja no se encuentra en el centro ajuste el pie del nivel hasta que la
burbuja se sitúe en el centro. Compruebe el nivel cuando usted cambie de situación.
NOT LEVEL LEVEL

Manual de usuario
7
RTN Balanza precio-peso-importe ENG FR ES
CARgAR BAtERíA
Para cargar la batería inserte la clavija adaptadora al gato, el gato está situado por debajo de la balanza. >
El adaptador simplemente se conecta a la potencia principal. La balanza no necesita estar encendida.
La batería debe cargarse durante 12 horas para llegar a su capacidad máxima. >
En el lado izquierdo de la pantalla hay un LED para indicar el estado de la carga de la batería. Cuando >
la balanza está conectada a la potencia principal, se recargará la batería interna. Si el LED se encuentra
verde ello indica que la batería está en plena carga. Si está rojo, la batería está cerca de una descarga, y
si está amarillo la batería se está cargando.
No utilice ningún otro tipo de cargador que aquel que se proporciona con la báscula. >
Verique que el enchufe de potencia AC de la toma de corriente está protegido adecuadamente. >
Nota: Por favor cargue la batería antes de utilizar la balanza por primera vez.
INStALACIóN
Sitúe la balanza sobre una mesa >
Sitúe cuidadosamente la bandeja en los cuatro agujeros de la cubierta más encima >
Ajuste la burbuja al nivel de marca de agua >
Conecte la clavija adaptadora al gato adaptador. El gato adaptador está situado por debajo del lado dere- >
cho de la balanza
El adaptador se conecta en su enchufe de potencia AC. El equipo a conectar debe ser instalado cerca de >
una fuente de potencia fácilmente accesible con un contacto protegido al suelo/tierra.
Encienda el conector de encendido. La tecla ON/OFF está situado por debajo del lado derecha de la ba- >
lanza. Presione la tecla hacia adelante para encender la balanza. Si quiere apagar la balanza, presione la
tecla otra vez hacia atrás.
En pantalla aparecerá la capacidad de la balanza y empezará también la auto comprobación >
Después de la auto comprobación, la pantalla volverá al modo normal de pesar >
Después usted puede empezar a realizar su operación >
Nota: Arranque inicial
Un tiempo de calentamiento de 15 minutos estabiliza los valores mesurados después del encendido.
5. dESCRIPCIóN BáSCULA, tECLAdO y dISPLAy
dESCRIPCIóN BáSCULA
1
2
3
4
5
6
1. ON/OFF
2. Adaptador Jack
3. Pies ajustables en altura.
4. Soporte para columna/display
5. Función/Interruptor CAL
6. Salida RS232 (opcional)

8
Manual de usuario
ES FR ENG Balanza precio-peso-importe RTN
Manual de usuario
9
RTN Balanza precio-peso-importe ENG FR ES
6-1. OPERACIóN BáSICA
6-1-1. ENCENdIdO/APAgAdO
6-1-2. CERO
6-1-3. tARA
6-1-4. CONfIgURACIóN UNIdAd dE PRECIO
dESCRIPCIóN tECLAdO
TECLA DESCRIPCIÓN TECLA DESCRIPCIÓN
Programar la pantalla a cero
a
Teclas de venta
Introducir el borrado de pesos tara. Almacenar el
peso actual como un valor tara. Substraer el valor
tara del peso total . En pantalla aparecerá el resultado como peso neto
a
Para seleccionar el PLU directo, presione y mantenga presionada la tecla 3 durante 3 segundos.
Estas teclas sirven para recordar la información
de PLU.
Para imprimir la información anterior Para introducir los números de PLU
Buscar el precio acumulado para cada tecla de
venta
Para recordar el PLU 29 a 56 presionando las teclas de 1 a 28
Para introducir la conguración de las funciones
Borrar las entradas incorrectas y las condiciones
de error
tECLAS dE LA CONfIgURACIóN dE PARámEtROS
TECLA DESCRIPCIÓN TECLA DESCRIPCIÓN
Para introducir la función y la conguración de los
parámetros.
Desplazarse hacia abajo a los sub parámetros.
y
Desplazarse de función a parámetro.
Escapar de la conguración de parámetros y volver
al modo de pesar normal.
dESCRIPCIóN dISPLAy
DISPLAY WEIGHT DESCRIPCIÓN DISPLAY UNIT PRICE DESCRIPCIÓN
ZERO Mostrar cero.
V1/V2/V3 Teclas vendedor.STABLE Estabilidad de pantalla.
NET Peso Neto.
DISPLAY TARE DESCRIPCIÓN DISPLAY TOTAL PRICE DESCRIPCIÓN
STOCK Almacenar modo. CHANGE Modo cambio.
REMOTE
Remoto balanza. BATT. Batería.

Manual de usuario
9
RTN Balanza precio-peso-importe ENG FR ES
6. OPERACIóN
ARRANQUE INICIAL
Calentar la báscula durante 15 minutos para estabilizar los valores de mesurar después de encender la balanza.
6-1. OPERACIóN BáSICA
6-1-1. ENCENdIdO/APAgAdO
Encender la balanza presionando la tecla Encendido/apagado.
La pantalla se enciende y el test empieza, si se desea apagar la balanza, presione la tecla de ir atrás.
6-1-2. CERO
Las condiciones ambientales pueden llevar a la balanza a cero aunque la plataforma no lleve a cabo ninguna
presión. Sin embargo, usted puede programar la pantalla de su balanza a cero en cualquier momento presio-
nando la tecla
y por tanto asegurarse que la pesada empieza a cero.
6-1-3. tARA
El peso de cualquier contenedor puede ser tarado presionando la tecla
para que cualquier pesada que se
realice a continuación el peso neto del objeto que es pesado aparezca siempre en pantalla.
Cargar el peso sobre la plataforma >
Presionar la tecla >
. Aparece cero en pantalla, se resta la tara.
Retire el peso de sobre la plataforma. El peso tarado aparece en pantalla. Sólo puede ser programado un >
valor tara. Aparecerá en pantalla con un valor negativo.
Presione G/N para cambiar entre peso neto y peso bruto. >
Para borrar el valor tara, retire la carga y presione la tecla >
. Aparece en pantalla CERO, el peso tara
es borrado.
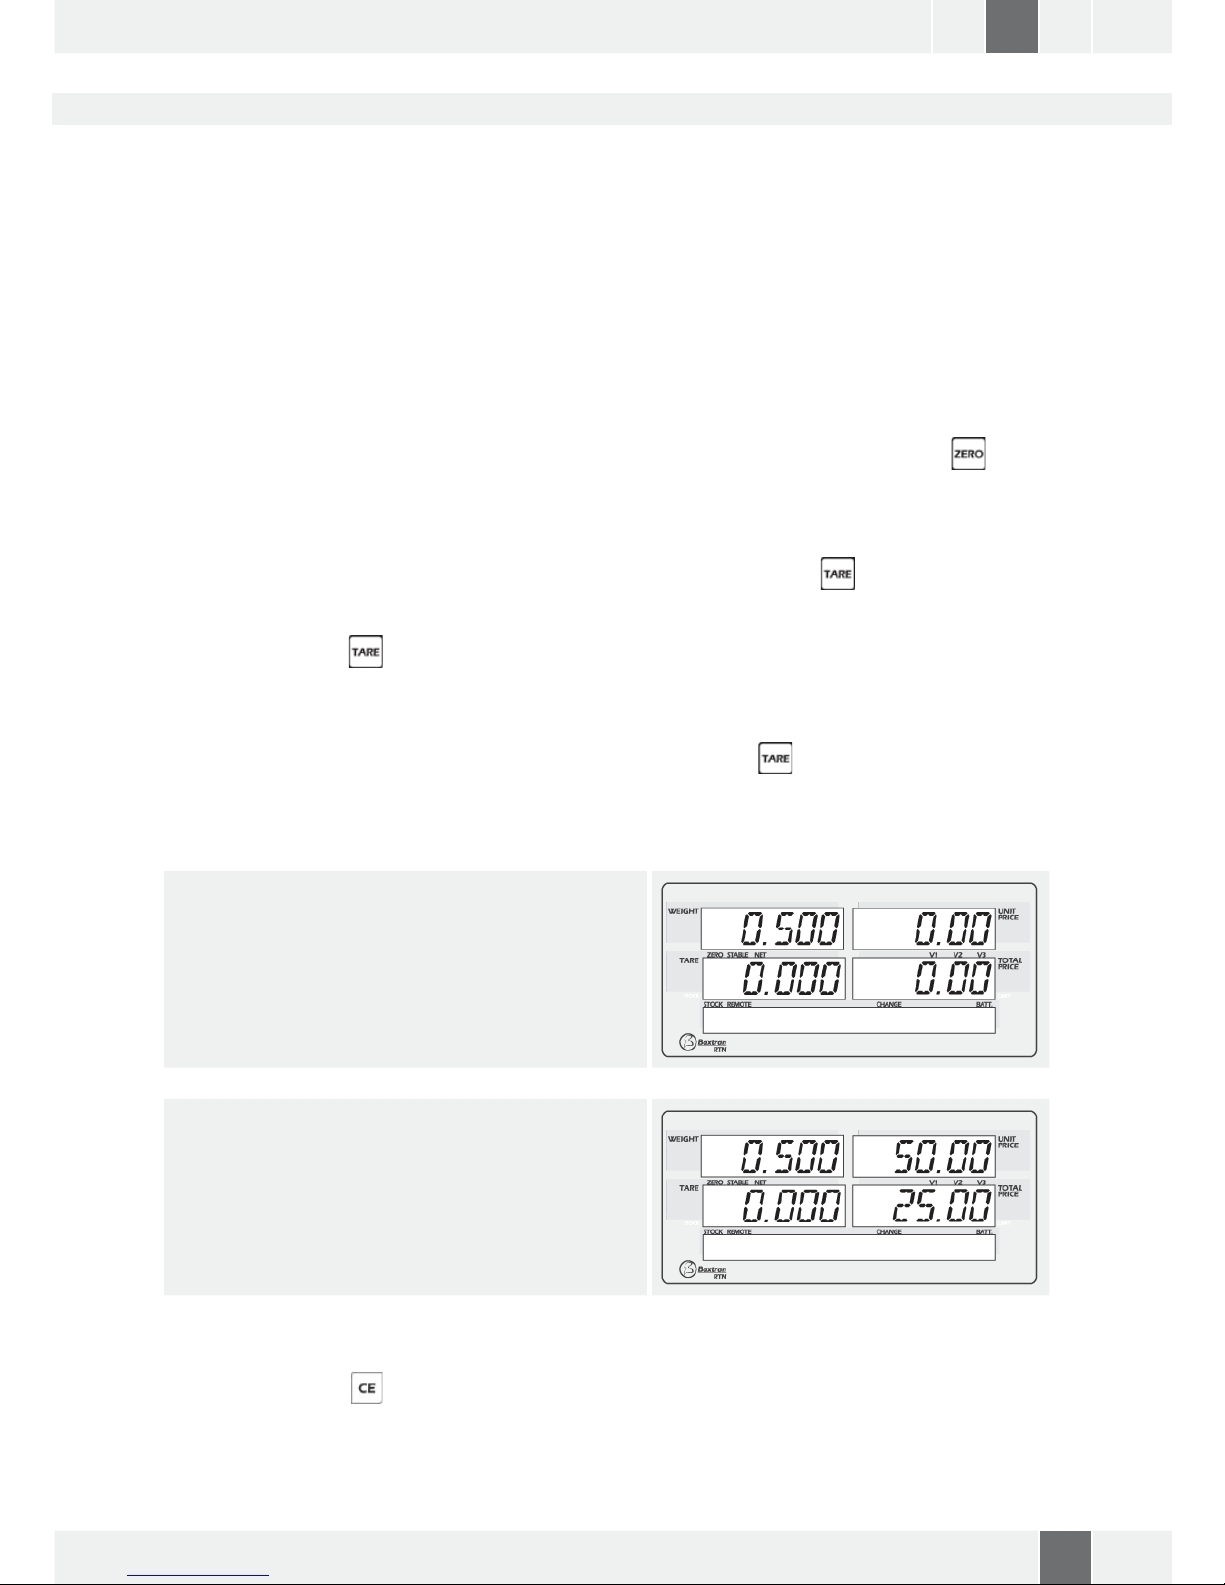
6-1-4. CONfIgURACIóN UNIdAd dE PRECIO
Situar los objetos sobre la plataforma
Introducir la unidad de precio presionando las teclas numéricas. Por ejemplo: 50.00
La unidad de precio aparecerá en el valor introducido y el precio total de la pantalla aparecerá en el precio >
de los productos.
Presione la tecla >
para reemplazar las unidades de precio previas.

10
Manual de usuario
ES FR ENG Balanza precio-peso-importe RTN
Manual de usuario
11
RTN Balanza precio-peso-importe ENG FR ES
6-2. mOdO BALANzA
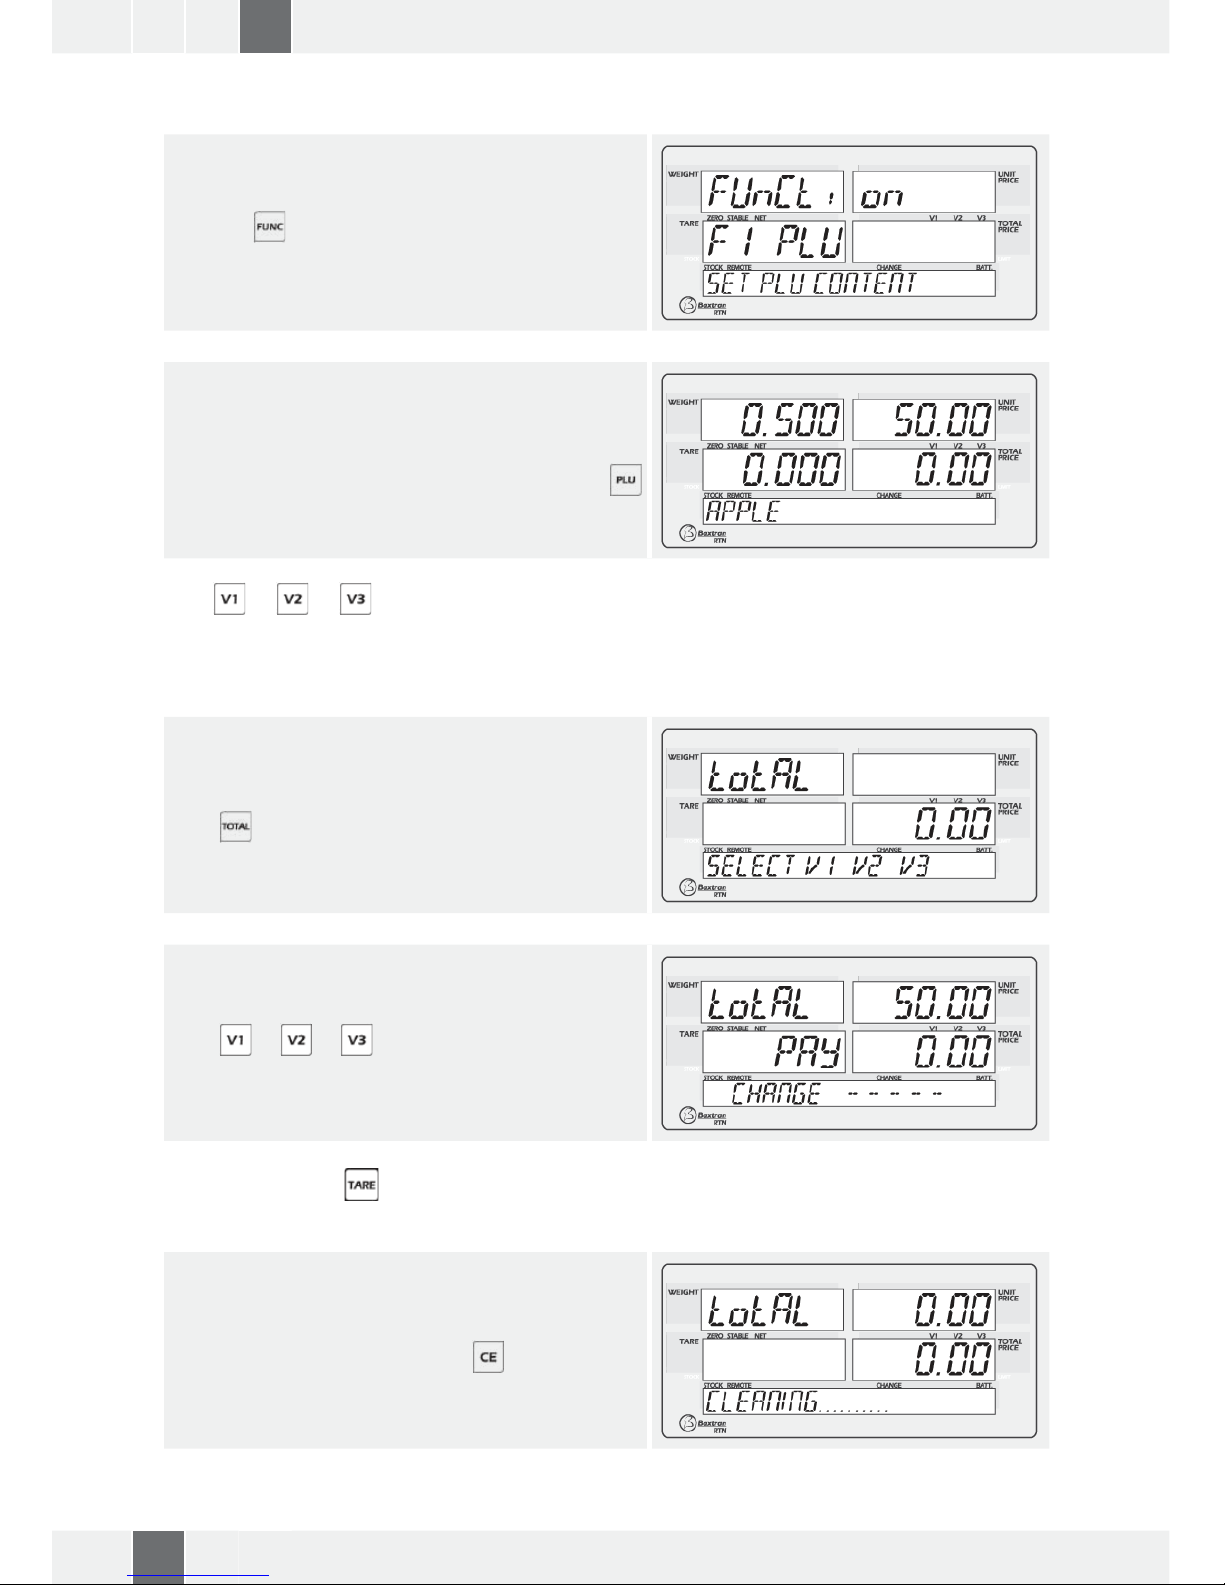
6-2-1. mOdO vENtAS
Presione la tecla , en pantalla aparecerá:
Ello puede realizar la acumulación (ventas), recordar
memoria.
Operación
Sitúe los objetos sobre la plataforma, e introduzca la
unidad de precio o seleccione PLU presionando la tecla
de PLU directo o presionando la tecla
e introduzca
el número PLU.
Presione las teclas o o , y escuchará un sonido de alarma largo.
La información será guardada en la memoria de venta y el valor del producto almacenado será reducido de la
memoria almacenada. Puede continuar realizando operaciones hasta llegar al record de 999 ventas.
6-2-2. RECORdAR ACUmULACIóN
Presionar la tecla , en pantalla aparecerá:
Presione las teclas o o , en pantalla aparecerá el precio total y 000 aparecerá intermitentemente
en pantalla para introducir la cantidad pagada.
Para obtener la impresión presionar la tecla , la impresora presionará los detalles de las ventas del ven-
dedor.
BORRAR MEMORIA VENDEDOR
Con la salida de la impresión de la cantidad pagada, si
presiona la tecla
, se borrará la memoria del vende-
dor con la salida de la impresión.

Manual de usuario
11
RTN Balanza precio-peso-importe ENG FR ES
RECORDAR LISTA DE VENTAS
Presione la tecla
, puede comprobar las lista de ven-
tas una por una presionando las teclas o .
CANCELE VENTA DE LA LISTA DE VENTAS
Seleccione el detalle de venta, después presione y
mantenga presionada la tecla
. Se oirá un sonido
de alarma y después blincará en pantalla ACC 2 de la
venta seleccionada. Se cancelará la venta del vendedor
y el impreso mostrará los detalles de cancelar pulsando
6-2-3. CAmBIO y BORRAdO mEmORIA dE vENtAS
Introducir la cantidad pagada, si la cantidad pagada es
superior a la cantidad total, la pantalla mostrara la cantidad cambiada, y que cantidad se supone que debe pagarse de nuevo. Presionar la tecla para conrmar,
la impresora imprimirá los detalles de venta del vendedor con los detalles del pago.
NOTA: Cuando introduzca la cantidad pegada y después presione la tecla , se imprimirán los detalles del pago
y los detalles de memoria del vendedor se borrarán automáticamente.
6-2-4. ANULACIóN dE tRANSACCIóN
TRANSACCIÓN DE UNA UNIDAD DE PRECIO NORMAL
Introducir el precio a cancelar. Mantener la tecla
presionada hasta que aparezca el símbolo (-) delante
del valor introducido.
Pulsar la tecla del vendedor correspondiente
o
o .
Introducir las unidades necesarias para igualar el precio. Pulsar el vendedor correspondiente nuevamente, y
seleccionar el tipo de impuesto
.
Para imprimir el tiquet pulsar
+ + .

12
Manual de usuario
ES FR ENG Balanza precio-peso-importe RTN
Manual de usuario
13
RTN Balanza precio-peso-importe ENG FR ES
TRANSACCIÓN DE UNA UNIDAD DE PRECIO DE PLU
Seleccionar la PLU de la que se desea cancelar el precio.
Introducir el precio a cancelar. Mantener la tecla
presionada hasta que aparezca el símbolo (-) delante
del valor introducido.
Pulsar la tecla del vendedor correspondiente
o
o .
Introducir las unidades necesarias para igualar el precio. Pulsar el vendedor correspondiente nuevamente.
Para imprimir el tiquet pulsar
+ + .
6-3. OPERACIóN PLU
6-3-1. PROgRAmAR CONtENIdO PLU
El PLU es utilizado para almacenar la información sobre los objetos utilizados comúnmente. Puede guardar
hasta 99 contenidos PLU: nombre Producto, código producto, Pesado/No pesado, precio producto, Selección
tipo impuesto, Pre-Tara.
Presionar la tecla , la pantalla mostrará F1 PLU
Mode intermitentemente, presione las teclas o
para cambiar la pantalla. La pantalla realizará un parpadeo y ya puede presionar la tecla para cambiar la
opción y seleccionar el sub-menú SET PLUContent.
Cuando aparezca SET PLUContent se producirá un parpadeo, entonces debe presionar la tecla
para con-
rmar.
SELECCIONAR EL CONTENIDO PLU
Aparecerá en pantalla PLU 00 parpadeando.
Presione el número PLU utilizando las teclas de PLU di-
recto o utilizando las teclas numéricas.
Por ejemplo: presione la tecla directa o presione
las teclas numéricas , .
Aparecerá en pantalla la señal ( _ ), que parpadeará
para introducir el NOMBRE DEL PRODUCTO.
Manual de usuario
13
RTN Balanza precio-peso-importe ENG FR ES
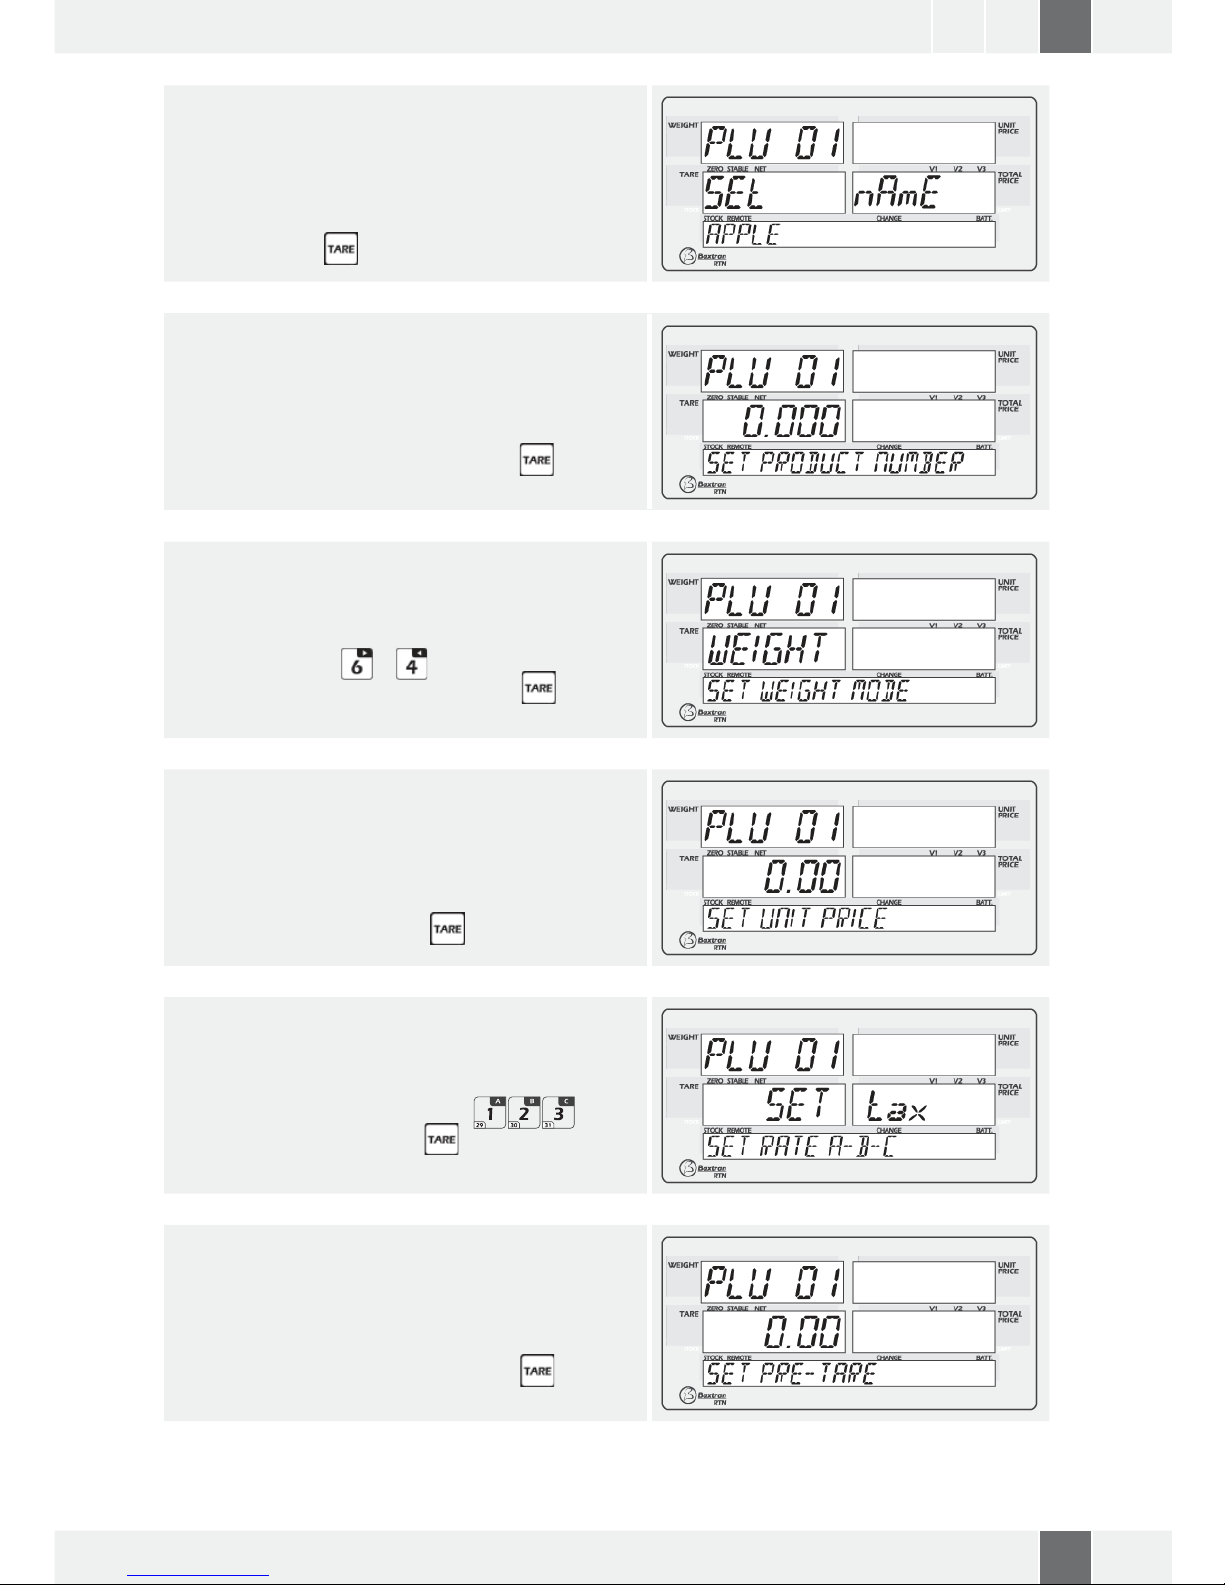
NOMBRE PRODUCTO
Presione directamente las teclas PLU para introducir el
NOMBRE DEL PRODUCTO.
Por ejemplo: presionar las teclas para APPLE.
Presionar la tecla
para conrmar.
NUMERO PLU
Aparecerá en pantalla 0000 y parpadeará para introducir el NÚMERO DEL PRODUCTO.
Presionar las teclas numéricas para introducir el NÚME-
RO DEL PRODUCTO y presionar la tecla
para con-
rmar.
MODO DE PESAR PLU/QTY
Aparecerá en pantalla WEIGHT y parpadeará para se-
leccionar el PESO o CANTIDAD para el MODO DE PESAR.
Presionar las teclas
o para cambiar la pantalla
de PESO a CANTIDAD y presionar la tecla para con-
rmar.
PROGRAMAR UNIDAD DE PRECIO
Aparecerá en pantalla 000 y parpadeará para introducir
la UNIDAD DE PRECIO.
Presione las teclas numéricas para introducir la UNIDAD
DE PRECIO y presione la tecla
para conrmar.
PROGRAMAR EL TIPO DE IMPUESTO
Para programar el tipo de IVA correspondiente al PLU,
seleccione la tasa A, B o C pulsando
respec-
tivamente y presione la tecla para conrmar.
PROGRAMAR PRE-TARA
Aparecerá en pantalla 000 y parpadeará para introducir
la PRE-TARA.
Presione las teclas numéricas para introducir LOS VA-
LORES DE PRE-TARA y presione la tecla
para con-
rmar.
14
Manual de usuario
ES FR ENG Balanza precio-peso-importe RTN
Manual de usuario
15
RTN Balanza precio-peso-importe ENG FR ES
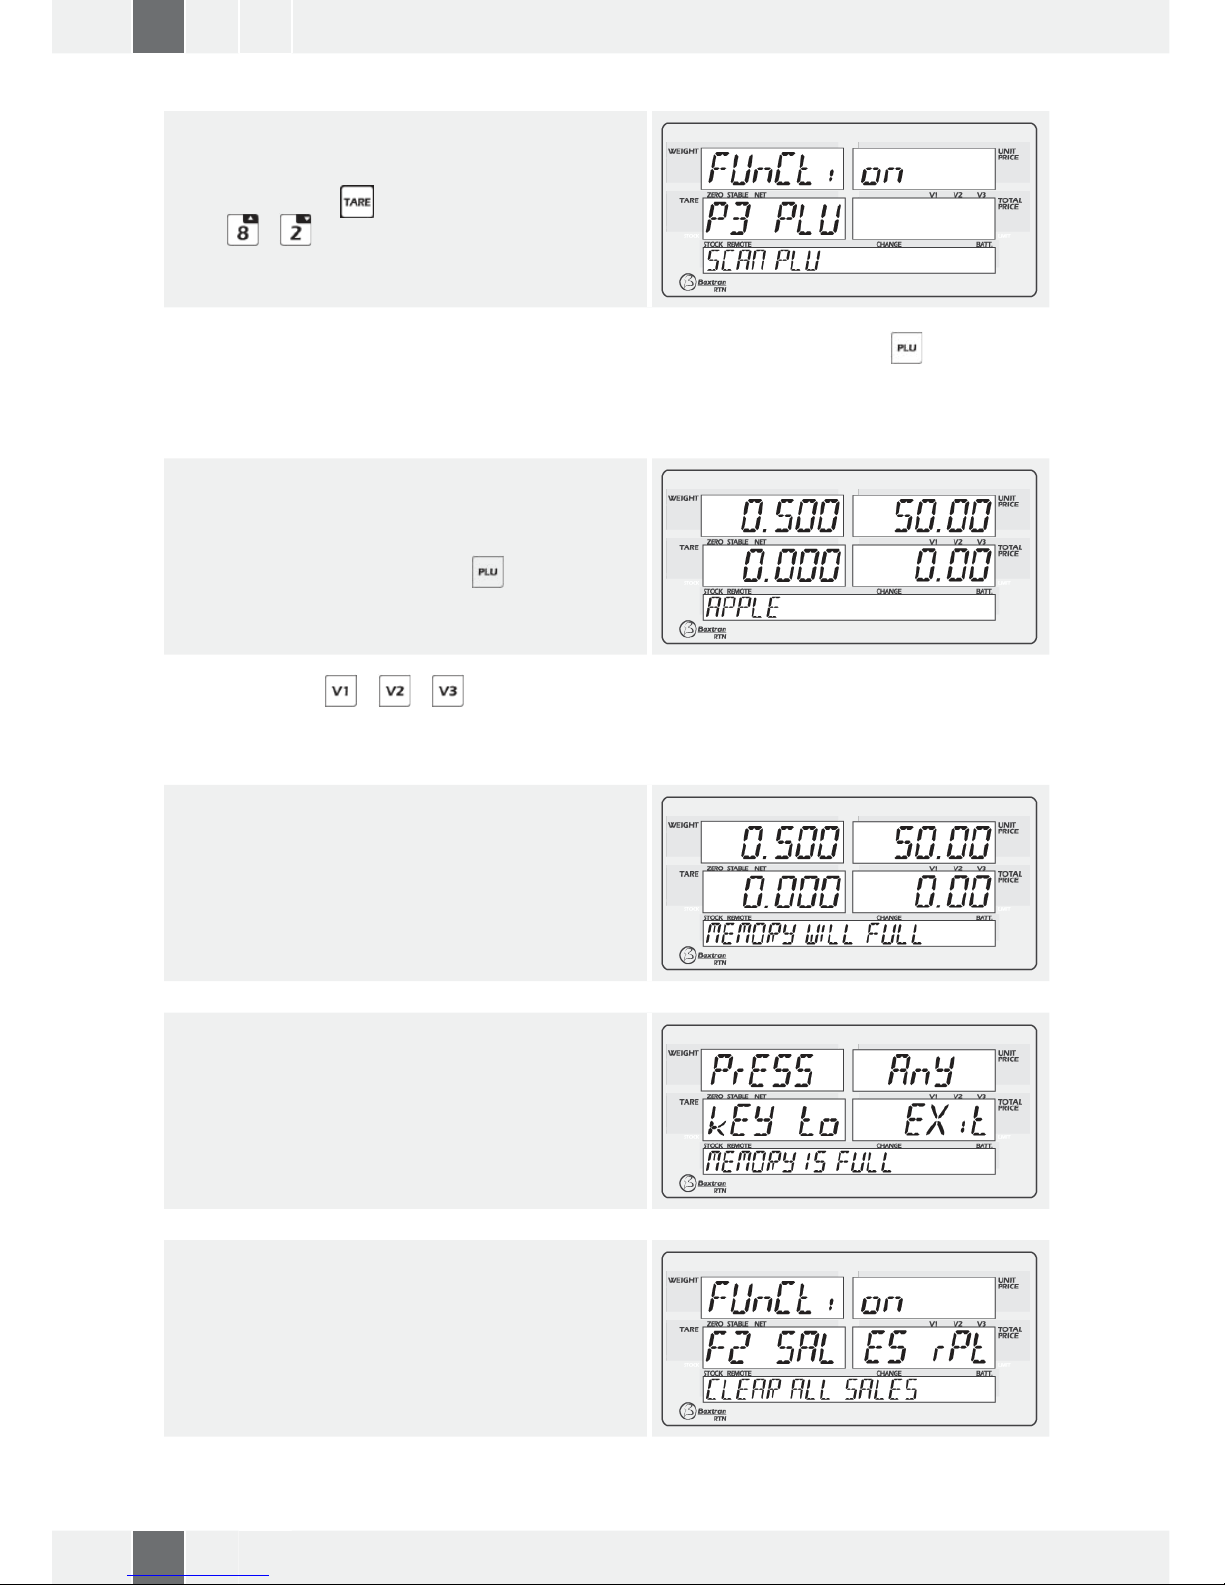
6-3-2. mOStRAR PLU
Cuando sea necesario comprobar los detalles de PLU
debe seleccionarse los parámetros MOSTRAR PLU.
Presionara la tecla
para conrmar y presionar las
teclas o para cambiar la lista PLU, puede verse
el nombre PLU, la unidad de precio, el valor pre-tara y
todo lo demás.
En el modo de pesar normal, presione y mantenga presionada la tecla PLU directo o la . Puede introducirse
en la lista PLU de escaneo.
6-4. ACUmULACIóN /OPERACIóN vENtA
Sitúe los objetos sobre la plataforma e introduzca la
unidad de precio o seleccione PLU presionando la tecla
PLU directo, o bien presionando la e introduciendo
el número PLU.
Presione las teclas o o , y se oirá un largo sonido de alarma.
La información será guardada en la memoria de venta y el stock del producto se reducirá de la memoria de
stock.
Puede continuar realizando operaciones de hasta 999 records de venta.
Una vez se alcancen las 989 operaciones, la pantalla
empezará a mostrar el mensaje LA MEMORIA SE
LLENARÁ.
Puede continuar realizando operaciones hasta alcanzar
las 999 operaciones. Una vez llegue a las 999, aparecerá
en pantalla el mensaje LA MEMORIA ESTÁ LLENA.
En este momento no podrá realizar más operaciones de
venta hasta que no borre toda la memoria de venta del
parámetro.
FUNCIÓN>VENTAS RPT F2>BORRAR TODAS LAS VENTAS
Manual de usuario
15
RTN Balanza precio-peso-importe ENG FR ES
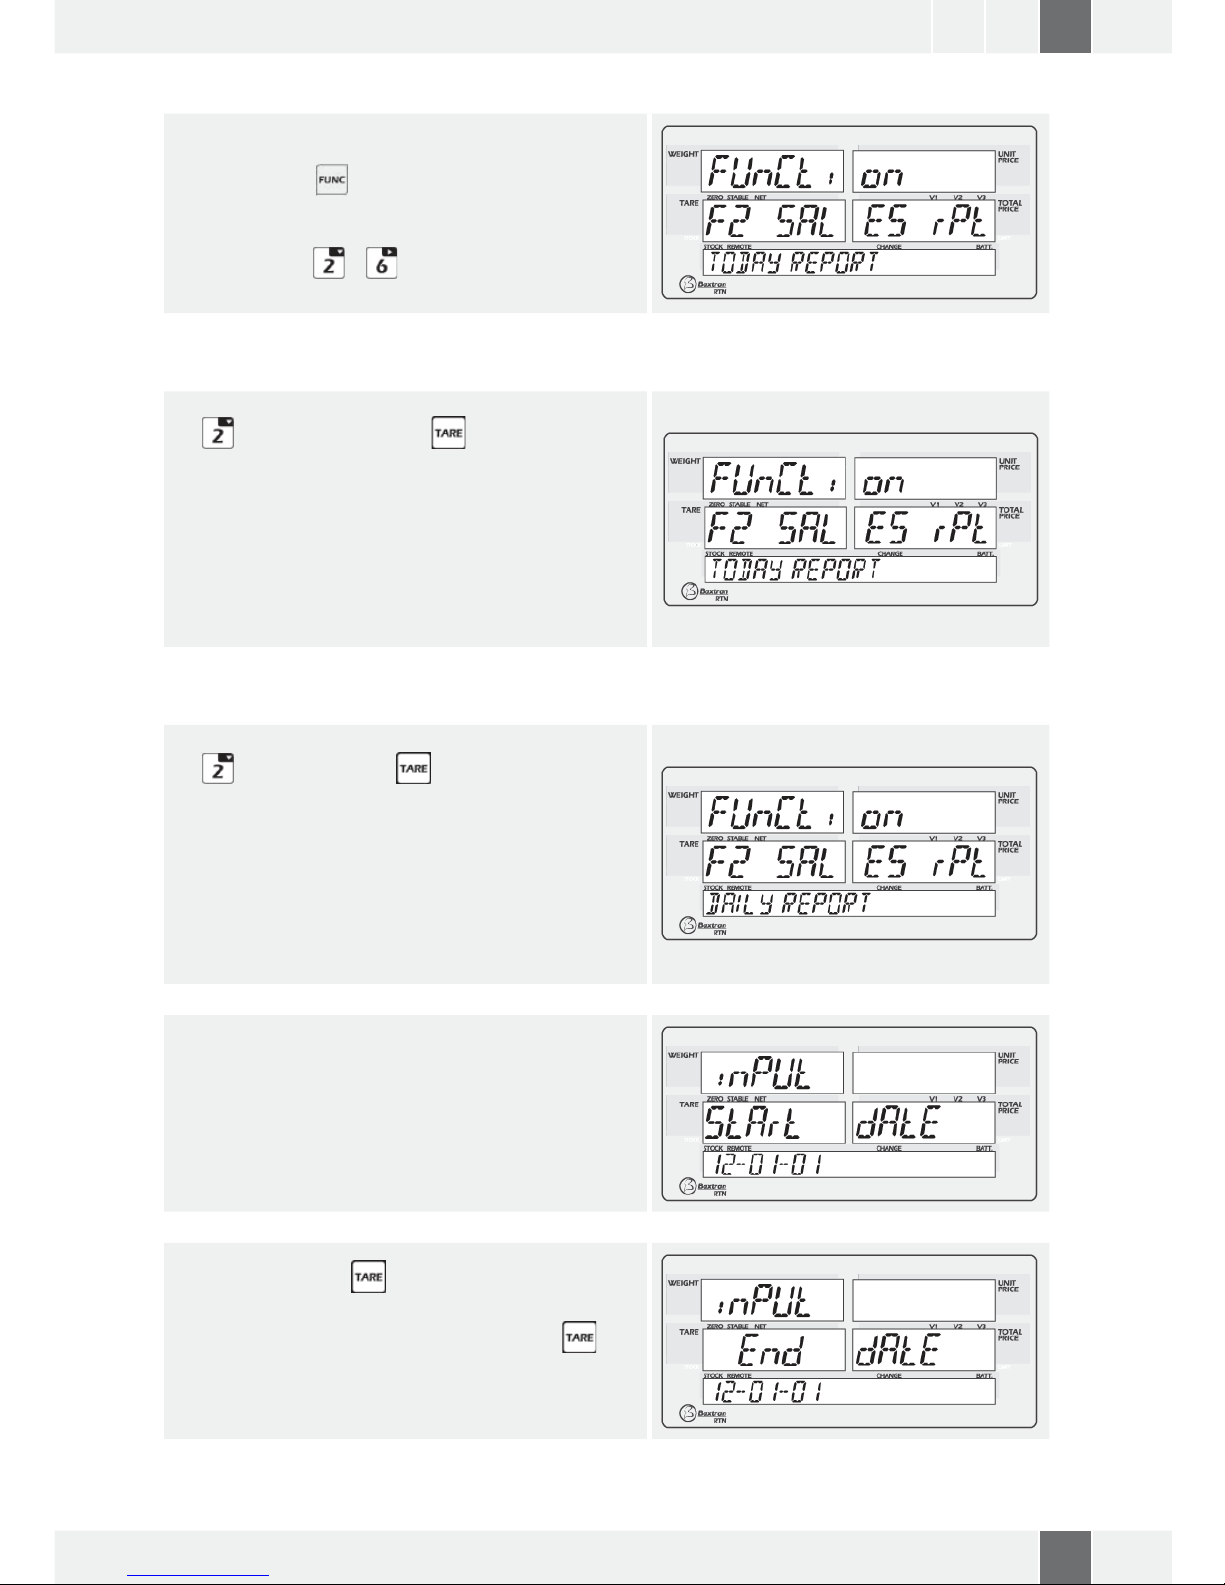
6-5. INfORmE dE vENtAS
Presione la tecla , aparecerá en pantalla el mensaje
FUNCIÓN.
Usted puede seleccionar el INFORME DE VENTAS presio-
nando las teclas
y .
6-5-1. INfORmE PLU dIARIO
Puede seleccionarse TODAY REPORT presionando la te-
cla y presionando la tecla .
Aparecerá en pantalla: Normal y Reducido (reduce).
- Presione N, si quiere el informe normal con IVA
desglosado.
- Presione R, si quiere el informe reducido sin IVA
desglosado.
Se imprimirá el informe del día, del total de ventas realizadas usando PLU
6-5-2. INfORmE POR fECHA
Puede seleccionar el DAILY REPORT presionando la te-
cla y después la tecla .
Aparecerá en pantalla: Normal y Reducido (reduce).
- Presione N, si quiere el informe normal con IVA
desglosado.
- Presione R, si quiere el informe reducido sin IVA
desglosado.
Se imprimirá el informe del día, del total de ventas realizadas usando PLU
Aparecerá en pantalla la opción para introducir la fecha
de comienzo.
Para obtener informe de este día más adelante sólo
debe introducirse la fecha señalada.
Y presionar la tecla para conrmar, aparecerá la
pantalla para introducir la fecha nal.
Introducir la fecha nal y presionar la tecla
para
conrmar.
Se imprimirá el informe del día, del total de ventas rea-
lizadas usando PLU

16
Manual de usuario
ES FR ENG Balanza precio-peso-importe RTN
Manual de usuario
17
RTN Balanza precio-peso-importe ENG FR ES
6-5-3. INfORmE PROdUCtO
Se puede seleccionar el INFORME DEL PRODUCTO pre-
sionando la tecla y presionando la tecla .
Aparecerá en pantalla: Normal y Reducido (reduce).
- Presione N, si quiere el informe normal.
- Presione R, si quiere el informe reducido.
Aparecerá la pantalla para introducir la fecha de comienzo.
De hoy en adelante para obtener el informe sólo debe
introducirse la fecha en concreto.
Y presionar la tecla para conrmar. Aparecerá la
pantalla para introducir la fecha de cierre.
Si se desea introducir la fecha de cierre, debe presionarse la tecla para conrmar. Aparecerá en pantalla 0000 y parpadeará para introducir el número del
producto.
Introducir el número del producto y presionar la tecla
para conrmar. La impresora imprimirá el informe
del producto seleccionado.
6-5-4. BORRAR tOdAS LAS vENtAS
Una vez que la memoria está llena o no es necesario
guardar los datos almacenados, se puede borrar toda la
memoria de ventas des de el parámetro BORRAR TODAS
LAS VENTAS.
Se puede seleccionar BORRAR TODAS LAS VENTAS pre-
sionando la tecla
y presionando la tecla para
conrmar.
Aparecerá la pantalla:

Manual de usuario
17
RTN Balanza precio-peso-importe ENG FR ES
Presionar la tecla para conrmar.
Toda la memoria de ventas será borrada. Aparecerá la
pantalla:
6-5-5. USO dE mEmORIA dE vENtA
RTN puede comprobar la memoria del total de las ventas almacenadas. Para revisar la memoria almacenada
el usuario debe seleccionar USO DE MEMORIA DE VEN-
TAS presionando la tecla . A continuación debe presionar la tecla para conrmar.
En pantalla aparecerá:
Cuando la memoria de venta llegue a 999 debe borrar
todas las ventas para utilizarla para futuras ventas.
6-6. fORmAtOS dE ImPRESIóN
FORMATO-TÍQUET FORMATO-ETIQUETA
ABC MALL
CHINA
2012-01-01 11.10.00 (V1)
Weight (kg) EUR/kg Price
#001 APPLE
2000 10.00 20.00
#002 SUGAR
2000 5.00 10.00
#003 RICE
2000 12.50 25.00
(The end)
Total price: 55.00 EUR
Payment: 100.00 EUR
Change: 45.00 EUR
THANK YOU
ABC MALL
CHINA
APPLE
2012-01-01 11.12.47 (V1)
Weight: Unit Price
2.000 kg 10.00 EUR/kg
Total price:
20.00 EUR
THANK YOU

18
Manual de usuario
ES FR ENG Balanza precio-peso-importe RTN
Manual de usuario
19
RTN Balanza precio-peso-importe ENG FR ES
FORMATO INFORME DE HOY FORMATO INFORME DIARIO
Sales Report-Today
Print Time: 2012-01-01 11:11:11
APPLE
Subtotal: 10.00 kg 20.00EUR
SUGAR
Subtotal: 5.00 kg 10.00EUR
RICE
Subtotal: 12.50 kg 25.00EUR
Total: 35.00 EUR
Sales Report-Today
Print Time: 2012-02-01 11:11:11
Start Date: 12/01/01
End Date: 12/02/02
Weight (kg) EUR/kg Price
12/01/02
#001 APPLE
2000 10.00 20.00
#002 SUGAR
2000 5.00 10.00
#003 RICE
2000 12.50 25.00
Subtotal: 55.00 EUR
12/01/02
#001 APPLE
2000 10.00 20.00
#002 SUGAR
2000 5.00 10.00
#003 RICE
2000 12.50 25.00
Subtotal: 55.00 EUR
Total: 110.00 EUR
6-7. CAmBIAR ROLLO dE PAPEL
Cambiar el rollo de papel es fácil.
1) Estire la cubierta de la impresión del rollo
2) Retire el viejo rollo. Inserte el nuevo rollo de papel
3) Alimente el papel, a través de espacio exterior de la cubierta
4) Cierre la cubierta
Tamaño papel térmico normal >
Diámetro: 47mm >
Ancho: 56 mm >
7. PARámEtROS
7-1. tECLAS EN PARámEtRO
TECLA DESCRIPCIÓN
Para introducir la conguración de función y parámetros.
Para conrmar los bloques de parámetro.
Para salir del menú.
y
Para cambiar el menú de parámetro.
Para cancelar las entradas incorrectas.
7-2. INtROdUCIR EN EL PARámEtRO dE CONfIgURACIóN
En el modo normal de pesar presione y mantenga presionada la tecla para introducir la conguración de
parámetros.

Manual de usuario
19
RTN Balanza precio-peso-importe ENG FR ES
7-3. CONfIgURACIóN PARámEtROS
PARÁMETRO
SUB
PARÁMETRO
OPCIONES DE
SUB PARÁMETRO DESCRIPCIONES
F1
bASiC SEt
F1-1
bACk LiGHt
BACK LIGHT AUTO
Luz trasera programada para encenderse automáticamente. Cuando empiece el
uso de la báscula ésta se conectará.
BACK LIGHT ON Luz trasera programada para encenderse siempre.
BACK LIGHT OFF Luz trasera programada para estar siempre apagada.
F1-2
SCALE id
SCALE ID Programar la balanza ID.
F1-3
PLUCLr
CLEAR PLU UNLOAD La balanza vuelve a modo de peso normal cuando retiramos la muestra.
CLEAR PLU STANDY
Si no hay una operación de teclado numérico o el peso no se cambia en un periodo
de 3 minutos, la balanza entrará en un modo de standby, y también saldrá de un
modo PLU.
DO NOT CLEAR La balanza mantiene el precio en pantalla cuando retiramos la muestra.
F1-4
StAndbY
DISP BANNER
La ventana del nombre del producto muestra la pieza publicitaria cuando la balanza no se encuentre en el modo PLU. Por ejemplo GIROPES.
DISP TIME
La ventana del nombre del producto muestra la hora en que la balanza no se
encuentra en modo PLU.
F1-5
bAnnEr
Programar los contenidos de la pieza publicitaria. Por ejemplo: GIROPES.
F2
No programable.
F3
CLoCk
F3-1
SEt dAtE
20XX-XX-XX Programar la fecha.
F3-2
SEt timE
hh: mm: ss Programar la hora.
F3-3
d-tYPE
YY--MM--DD
MM--DD--YY
DD--MM--YY
Programar el formato de fecha.
F4
SEt Print
F4-1 P
FormAt
RECEIP 1 Imprimir el formato del tíquet.
LABEL 1 Imprimir el formato de la etiqueta.
F4-2 P
CoPY
COPY 1
COPY 2
COPY 3
COPY 4
COPY 5
Seleccionar imprimir las copias necesarias.
F4-3
HEAdEr 1
Programar contenido cabezal 1 para impresión.
F4-4
HEAdEr 2
Programar contenido cabezal 2 para impresión.
F4-5
HEAdEr 3
Programar contenido cabezal 3 para impresión.
F4-6
HEAdEr 4
Programar contenido cabezal 4 para impresión.
F4-6
FootEr 1
Programar contenido pie de página 1 para impresión.
F5 SEt
SEriES
F5-1 5
modE
NONE Programar el cierre de puerto de serie.
CONTINUE SEND Programar el puerto de serie como continuación.
F5-2 5
bAUd
600
1200
2400
4800
9600
Velocidad de transmisión.
F5-3 5
vErFY
VERIFY MODE 8N1
VERIFY MODE 7E1
VERIFY MODE 7O1
Vericar modo.
F6 tECH
Permite el acceso a los parámetros técnicos utilizando una contraseña. Solo para personal autorizado.
F7
SEt tax
Pulsar para entrar. Introducir PIN: 99999999 y pulsar TARE.
Tax on
Tax off
Para programar el tipo de impuesto de Rate A, B y C.
F8 Lang
Pulsar para entrar. Introducir PIN: 99999999 y pulsar TARE.
C
hange on
Change off
Para activar la visualización del cambio a devolver al cliente.
Pulsar ZERO para volver al modo de peso normal.
F9
No programable.

20
Manual de usuario
ES FR ENG Balanza precio-peso-importe RTN
Manual de usuario
21
RTN Balanza precio-peso-importe ENG FR ES
8. SALIdA RS232
La serie de la balanza RTN puede pedirse con una salida RS232 opcional.
Especicaciones:
Salida RS232 de información de peso. >
Código ASCII. >
Velocidad 4800. >
8 bit de información. >
Sin paridad. >
RS232 (9 clavijas conector tipo D)
1 2 3 4 5
6 7 8 9
PIN 2 RXD Entrada Recibir información
PIN 3 TXD Salida Transmisión información
PIN 4 GND - Señal de suelo
9 clavijas conector tipo D
INDICADOR ORDENADOR/IMPRESORA
PIN 2 PIN 3
PIN 3 PIN 2
PIN 5 PIN 5
Formato de información: código ASCII, 10 bits por marco de información, bit 1: bit empezar, bit 2 - bit 8: bits
de información, bit 9: bit de vericación (igual).
STX ± k g p CR LF
- WEIGHT DATA - - WEIGHT UNIT -
p= 01x1xx2x3x4x5x6
Stable: x6=1 Unstable: x6=0
Over: x5=1 Otherwise: x5=0
Negative: x4=1 Plus: x4=0
Zero: x3=1 Otherwise: x3=0
Net zero: x2=1 Otherwise: x2=0
Tare: x1=1 Otherwise: x1=0

Manual de usuario
21
RTN Balanza precio-peso-importe ENG FR ES
9. dESPIECE
Listado de piezas:
Nº NOMBRE DE LA PIEZA UNIDADES MATERIAL ESPECIFICACIONES
1 Bandeja 1 SST
2 Tapa batería 1 ABS
3 Espuma 1 CR 79x556
4 Batería recargable 1 Lead acid 6V/10Ah
5 Carátula trasera 1 PC
6 Carátula trasera columna 1 PC
7 Carcasa trasera display columna 1 ABS
8 Número placa 1 90x22
9 Carcasa delantera display columna 1 ABS
10 Tornillo auto rosca 2 20Mn 3x10
11 Carátula delantera display columna 1 PC
12 CPU Display trasero columna 1
13 CPU Display delantero columna 1
14 Tornillo autorosca 12 20Mn 3x8
15 Arandela aislante 12 EDPM M3
16 Tornillo interno hexagonal 2 M4x12
17 Arandela de resorte 2 M4
18 Arandela 2 65Mn M4
19 Columna 1 AL
20 Soporte columna para carcasa delantera 1 ABS
21 Soporte columna para carcasa trasera 1 ABS
22 Tanca soporte columna 1 SPCC
23 Tornillo de estrella 6 20Mn M4x12
24 Tornillo autorosca 3 20Mn 3x12
25 CPU impresora 1
26 Célula de carga 1 AL L6D
27 Tuerca hexagonal 4
28 Arandela 4 65Mn M6
29 Arandela de resorte 4 M6
30 Tornillo interno hexagonal 4 M6x16
31 Adaptador AC Jack 1
32 Interruptor de encendido 1
33 Fijador de pie 4 ABS
34 Pie ajustable 4 PVC
35 Soporte impresora 1 ABS
36 Tornillo de estrella 12 20Mn M4x12
37 Tornillo de estrella 1 20Mn M4x8
38 Carátula del teclado 1 PC
39 Plástico protector del teclado 1 SPCC
40 Carcasa superior de la balanza 1 ABS
41 Botón táctil luz 50 PE
42 Arandela aislante 9 EDPM M4
43 Tornillo autorosca 9 20Mn 4x10
44 CPU teclado 1
45 Carcasa impresora 1 ABS
46 Placa de comunicación 1 Opcional
47 Impresora 1
48 Soporte para bandeja 4 Rubber
49 Soporte superior para célula de carga 1 AL
50 Tornillo hexagonal 4 20Mn M4x16
51 Tornillo autorosca 4 20Mn 4x20
52 Soporte inferior para célula de carga 1 AL
53 CPU principal 1
54 Nivel burbuja 1
55 Carcasa inferior de la balanza 1 ABS
56 Hoja junta 1
57 Etiqueta sellar 1

22
Manual de usuario
ES FR ENG Balanza precio-peso-importe RTN
Manuel d’usager
RTN Balance poids-prix ENG FR ES
10. gARANtíA
Esta balanza está garantizada contra todo defecto de fabricación y de materiales, por un período de un año a
partir de la fecha de entrega.
Durante este periodo, GIROPÈS SL, se hará cargo de la reparación de la balanza.
Esta garantía no incluye los daños causados por uso indebido, sobrecarga, o no haber seguido las recomenda-
ciones descritas en este manual.
La garantía no cubre los gastos de envío necesarios para la reparación de la balanza.
AtENCIóN

Manuel d’usager
23
RTN Balance poids-prix ENG FR ES
1. mAINtENANCE
AtENCIóN
DÉBRANCHEZ DE LA PRISE ELECTRIQUE CETTE UNITÉ AVANT DE L’INSTALLER,
AVANT DE LA NETTOYER OU AVANT DE L’UTILISER. SI VOUS NE TENEZ PAS EN COMP-
TE CETTE PRÉCAUTION, VOUS POUVEZ ENDOMMAGER PROVOQUER UNE PANNE.
PRÉCAUtION
Seul des personnes autorisées peuvent utiliser cet instrument.
Avant de connecter ou de déconnecter un des composants, retirez la connexion à l’électricité.
Si vous n’avez pas pris en compte ces avertissements cela peut causer une avarie ou un dommage, ou même
la destruction de l’équipement.
Évitez d’installer la balance à la lumière directe du soleil, puisque cela peut provoquer une décoloration >
du carter.
Évitez la surcharger qu’il peut abîmer la balance. >
Si la balance ne va pas être utilisé pendant une longue période, retirer la batterie du compartiment de la >
batterie pour éviter des pertes d’énergie.
Évitez de stocker du matériel sur la balance quand la balance n’est pas utilisé. >
Évitez des tables inadéquates. Des postes ou le sol ne doit pas subir de vibration. Ne pas positionner la >
balance près des machines vibrantes.
Évitez les sources instables de puissance. N’utilisez pas la balance près d’appareil utilisant de grandes >
sources d’électricité comme des postes de soudure ou de gros moteurs.
Utilisez seulement l’adaptateur original JP, d’autres adaptateurs peuvent abîmer à la balance. >
2. INtROdUCtION
La série des balances RTN sont des balances commerciales poids - prix. >
Portées de 6 kg à 45 kg . >
Ventes de 3 vendeurs en même temps. >
Mode de Vente et Achat. >
99 PLU: >
Contens PLU: nom Produit, code Produit, Pesage/Non pesage, Prix de ventes, Sélectionner le type
d’impôt, Pré-Tare.
Vous pouvez garder en mémoire 1000 ventes enregistrés et 350 ventes peuvent être également sauvegar- >
dées.
Imprimante THERMIQUE; le papier se charge avec facilité. >
Des impressions: Rapport PLU, rapport quotidien de la vente, information quotidient d’achat, rapport >
d’inventaire, rapport de perte d’inventaire, étiquette, ticket.
Batterie rechargeable qui fournit jusqu’à 90 heures d’utilisation continuelle >
(sans fonction rétro éclairage).
Connexion optionnelle pour connecter une plate-forme externe. >
Fonction de contrôle d’inventaire. >
RS232 optionnelle/connexion Bluetooth pour connecter à un PC. >
28 programmes PLU direct et 99 PLU indirect. >
Adaptateur AC/batterie rechargeable. >
Grand LCD de 20 mm avec écran LED blanc en rétro éclairage. >
50 touches mécaniques. >

24
Manuel d’usager
ES FR ENG Balance poids-prix RTN
Manuel d’usager
25
RTN Balance poids-prix ENG FR ES
CHARgER LA BAttERIE
INStALLAtION
dESCRIPtION BASCULE
3. SPECIfICAtIONS
(dimensions en mm)
TYPE RTN-15 RTN-30
370
240
150
320
125
360
240
Portée maximale (kg) 6/15 15/30
Précision (g) 2/5 5/10
Rang tare (kg) -15 -30
Poids minimum (g) 40 100
Résolution 3000/6000/Dual range
Temps de stabilisation 2 s.
Temps de chauffement 10 min.
Unités de mesure kg/g
Interface Sortie optionnelle RS232
Calibration Externe automatique
Écran
Écran LCD rétro éclairage avec 6
digits de 20 mm
Couvercle Plastique ABS
Dimensions plateau (mm) 240x370
Dimensions totales (mm) 370x360x125
Poids brut (kg) 5,8
Alimentation
100/240 V AC 50 Hz Adaptateur:
12V/500mA
Température de
fonctionnement
-10oC +40oC/14oF +140oF
4. INStALLAtION
dÉBALLAgE
Retirer la balance de son emballage attentivement, assurez vous que rien ne soit abîmé et que tous les accessoires soient inclus.
Retirez l’Indicateur du colis. >
Retirez la couverture protectrice. Stockez l’emballage pour un usage postérieur si vous avez besoin de >
transporter la balance.
Inspectez la balance et le terminal voir si aucun dommage ne se soit produit. >
Assurez vous que tous les composants soient inclus. >
Accessoires:
Balance >
Adaptateur >
Plateau >
Produit Manuel >
AjUStER LE NIvEAU
Situer la balance sur une table.
Vériez la bulle d’eau. Si la bulle ne se trouve pas au centre ajustez le pied du niveau jusqu’à ce que la bulle
se situe au centre. Vériez le niveau quand vous changerez de lieu.
NOT LEVEL LEVEL

Manuel d’usager
25
RTN Balance poids-prix ENG FR ES
CHARgER LA BAttERIE
Pour charger la batterie, brancher l’adaptateur à la prise balance, elle est située au-dessous de la ba- >
lance. L’adaptateur est simplement à connecter sur le secteur principal. La balance n’a pas besoin d’être
allumée.
La batterie doit se charger durant 12 heures pour arriver à sa capacité maximale. >
Dans le côté gauche de l’écran il y a un LED pour indiquer l’état de la charge de la batterie. Quand la ba- >
lance est branchée sur la puissance principale, la batterie interne sera rechargée. Si le LED se trouve vert
cela indique que la batterie est en pleine charge. S’il est rouge, la batterie est proche d’être déchargée,
et s’il est jaune la batterie se charge.
N’utilisez pas d’autres type de chargeur que ceux qui vous ont été livrés avec la bascule. >
Vériez que la prise de courant de puissance AC soit convenablement protégée. >
Remarque: Chargez la batterie avant d’utiliser la balance pour la première fois.
INStALLAtION
Positionner la balance sur une table. >
Positionner soigneusement le plateau dans les quatre trous sur le dessus du carter. >
Ajustez le niveau à bulle. >
Branchez la prise adaptateur à la prise de la balance. elle est située au-dessous, du côté droit de la ba- >
lance.
L’adaptateur est connecté dans sa prise de courant de puissance AC. L’équipement à connecter doit être >
installée près d’une source de puissance facilement accessible avec avec une prise de terre.
Allumez le connecteur d’allumage. La touche on/off est située au-dessous du côté droit de la balance. >
Appuyez sur l’avant de la touche pour allumer la balance. Si vous voulez éteindre la balance, appuyez de
nouveau sur l’arrière de la touche.
Sur l’écran il apparaîtra la capacité de la balance et elle commencera aussi l’auto vérication. >
Après l’auto vérication, l’écran reviendra en mode normal de peser. >
Après vous pouvez commencer à réaliser vos opérations. >
Remarque: A l’allumage initial
Un temps de chauffage de 15 minutes stabilise les valeurs mesurées après l’allumage.
5. dESCRIPtION BASCULE, CLAvIER Et ÉCRAN
dESCRIPtION BASCULE
1
2
3
4
5
6
1. Interrupteur ON/OFF
2. Adaptateur Jack
3. Pieds d’ajustement.
4. Support colonne/écran
5. Fontion/Interrupteur CAL
6. Sortie RS232

26
Manuel d’usager
ES FR ENG Balance poids-prix RTN
Manuel d’usager
27
RTN Balance poids-prix ENG FR ES
6-1. OPÉRAtION BASIQUE
6-1-1. ALLUmER/ÉtEINdRE
6-1-2. zÉRO
6-1-3. tARE
6-1-4. CONfIgURAtION PRIX
dESCRIPtION CLAvIER
TOUCHE DESCRIPTION TOUCHE DESCRIPTION
Programmer l’écran a zéro.
à
Touches de vente.
Introduire l’effacement de poids tare. Stocker le
poids actuel comme une valeur tare. Soustraire la
valeur tare du poids total. Sur l’écran le résultat
apparaîtra comme poids net.
à
Pour sélectionner le PLU direct, appuyez et maintenez appuyée la touche 3 durant 3 seconds. Ces
touches servent à rappeler l’information de PLU.
Pour imprimer l’information d’avant. Pour introduire les numéros de PLU.
Chercher le prix accumulé pour chaque touche de
vente.
Pour rappeler le PLU 29 à 56 en appuyant les
touches de 1 à 28.
Pour introduire la conguration des fonctions.
Biffer les entrées incorrectes et les conditions
d’erreur.
tOUCHES dE CONfIgURAtION dES PARAmEtRES
TOUCHE DESCRIPTION TOUCHE DESCRIPTION
Pour entrer la fonction et la conguration de paramètres.
Se deplacer dans les sub parametres.
et
Se deplacer des fonction à un paramètre.
Échapper à la conguration de paramètres et revenir en mode de pesage normal.
dESCRIPtION ÉCRAN
DISPLAY WEIGHT DESCRIPTION DISPLAY UNIT PRICE DESCRIPTION
ZERO Montrer zéro.
V1/V2/V3 Touches vendeur.STABLE Stabilité écran.
NET Poids Net.
DISPLAY TARE DESCRIPCTION DISPLAY TOTAL PRICE DESCRIPTION
STOCK Stocker mode. CHANGE Mode change.
REMOTE
Balance branche. BATT. Batterie.
Manuel d’usager
27
RTN Balance poids-prix ENG FR ES
6. OPÉRAtION
MISE EN MARCHE INITIAL
Laissez chauffer la bascule durant 15 minutes pour stabiliser les valeurs de mesure après avoir allumé la
balance.
6-1. OPÉRAtION BASIQUE
6-1-1. ALLUmER/ÉtEINdRE
Allumer la balance en appuyant la touche Allumé / éteint.
L’écran s’allume et le test commence, si on désire éteindre la balance, appuyez sur l’arrière de la touche.
6-1-2. zÉRO
Les conditions environnementales peuvent enlever le zéro de la balance bien qu’il n’y ait rien sur le plateau.
Cependant, vous pouvez programmer à l’écran le zéro à tout moment en appuyant la touche
. C’est pour-
quoi, assurez-vous que la pesée commence à zéro.
6-1-3. tARE
Le poids de n’importe quel conteneur, peut être taré en appuyant la touche
, le poids net de l’objet qui
est pesé apparait toujours à l’écran.
Charger un poids sur le plateau. >
Pousser la touche >
. Zéro apparaît sur l’écran, la tare est soustraite.
Retirez le poids de la plate-forme. Le poids taré apparaît à l’écran. Seulement 1 valeur tare peut être >
programmée. Il apparaîtra à l’écran avec une valeur négative.
Pousser G/N pour changer entre poids net et poids brut. >
Pour effacer la valeur tare, retirez la charge et appuyez la touche >
. Zéro apparaît sur l’écran, le poids
tare est effacé.
6-1-4. CONfIgURAtION PRIX
Placez un object sur le plateau
Entrer le prix en appuyant les touches numériques. Par
example: 50.00
L’unité de prix apparaîtra dans la valeur introduite et le prix total à l’écran, apparaîtra dans le prix des >
produits.
Poussez la touche >
pour remplacer les unités préalables de prix.

28
Manuel d’usager
ES FR ENG Balance poids-prix RTN
Manuel d’usager
29
RTN Balance poids-prix ENG FR ES
6-2. mOdE BALANCE
6-2-1. mOdE vENtES
Appuyez sur la touche , à l’écran il apparaîtra:
Cela peut réaliser l’accumulation (des ventes), rappeler
mémoire.
Opération
Situez les objets sur la plate-forme, et introduisez l’unité
de prix ou sélectionnez PLU en appuyant la touche de
PLU direct ou en appuyant la touche
et introduisez
le nombre PLU.
Appuyez les touches ou ou , et il y aura alors une alarme bip.
L’information sera gardée dans la mémoire de vente et la valeur du produit stocké sera réduite de la mémoire
stockée. Vous pouvez continuer de réaliser des opérations jusqu’à arriver au record de 999 ventes.
6-2-2. RAPPELER ACCUmULAtION
Appuyer la touche , sur l’écran il apparaîtra:
Appuyez les touches ou ou , sur écran il
apparaîtra le prix total et 000 intermittence sur l’écran
pour entrer la quantité payée.
Pour obtenir l’impression appuyer la touche , l’imprimante appuiera les détails des ventes du vendeur.
EFFACER MÉMOIRE VENDEUR
Avec la sortie de l’impression de la quantité payée,
appuyer sur la touche
, la mémoire du vendeur
s’effacera avec la sortie de l’impression.

Manuel d’usager
29
RTN Balance poids-prix ENG FR ES
RAPPELER LISTE DE VENTES
Appuyez la touche
, on peut vérier la liste des ven-
tes une par une en appuyant les touches ou .
ANNULEZ VENTE DE LA LISTE DES VENTES
Sélectionnez le détail de vente, après, appuyez et maintenez appuyée la touche
. Un son d’alarme sera en-
tendu et après basculera sur l’écran ACC 2 de la vente sélectionnée. La vente du vendeur sera annulée et
l’imprimé montrera les détails d’annulation appuyant
sur la touche .
6-2-3. CHANgE Et EffACE mÉmOIRE dES vENtES
Introduire la quantité payée, si la quantité payée est
supérieure à la quantité totale, l’écran montrera la
quantité changée, et suppose que le client doit payer à nouveau. Appuyer la touche pour conrmer,
l’imprimante imprimera les détails de vente du vendeur
avec les détails du paiement.
NOTE: Quand il introduira la quantité exact et après il appuiera la touche , les détails du paiement seront
imprimés et les détails de mémoire du vendeur s’effaceront.
6-2-4. ANNULAtION dE LA tRANSACtION
TRANSACTION D’UN PRIX À L’UNITÉ
Introduire la quantité à annuler. Maintenir la touche
jusqu’à le symbole (-) apparaître sur l’ecran.
Appuyer sur la touche
o o correspondante.
Introduire les unitees nécessaires pour égaler le prix.
Appuyer sur la touche
o o correspondan-
te à nouveau, et après sélectionner le type d’impôt
.
Pour la impression du ticket appuyer sur les touches
+ + consécutivement.

30
Manuel d’usager
ES FR ENG Balance poids-prix RTN
Manuel d’usager
31
RTN Balance poids-prix ENG FR ES
TRANSACTION D’UNE UNITE DE PRIX DU PLU
Sélectionner la PLU à annuler la quantité.
Introduire la quantité à annuler. Maintenir la touche
jusqu’à le symbole (-) apparaître sur l’ecran.
Appuyer sur la touche
o o correspondante.
Introduire les unitees nécessaires pour égaler le prix.
Appuyer sur la touche
o o correspondante
à nouveau.
Pour la impression du ticket appuyer sur les touches
+ + consécutivement.
6-3. OPERAtION PLU
6-3-1. PROgRAmmER CONtENU PLU
Le PLU est utilisé pour stocker l’information sur les produits utilisés communément. Il peut garder jusqu’à 99
contenus PLU: nom Produit, code Produit, Pesage/Non pesage, Prix de ventes, Sélectionner le type d’impôt,
Pré-Tare.
Appuyez sur la touche , l’écran montrera la fonction
F1 PLU Mode apparaîtra par intermittence, poussez les
touches ou pour changer l’écran. L’écran réalisera un clignotement et on peut appuyer sur la touche
pour changer l’option pour sélectionner le sub-me-
nu SET PLUContent.
Quand il apparaîtra SET PLUContent se produira un
clignotement, alors on doit pousser sur la touche
pour conrmer.
SÉLECTIONNER LE CONTENU PLU
Il Apparaitra sur l écran le message PLU 00 clignotera.
Appuyez le nombre PLU en utilisant les touches de PLU
directement ou en utilisant les touches numériques.
Par exemple: appuyez la touche directe PLU ou
appuyez les touches numériques , .
Il apparaîtra sur écran Le signal ( _ ) qui clignotera pour
introduire le NOM DU PRODUIT.

Manuel d’usager
31
RTN Balance poids-prix ENG FR ES
NOM PRODUIT
Appuyez directement les touches PLU pour introduire le
NOM DU PRODUIT.
Par exemple: on appuiera les touches pour APPLE.
Appuyer la touche
pour conrmer.
NOMBRE PLU
Il apparaitra sur écran et 0000 clignotera pour introduire le NOMBRE DU PRODUIT.
Appuyer les touches numériques pour introduire le
NOMBRE DU PRODUIT et appuyer la touche
pour
conrmer.
MODE DE PESAGE PLU/QTY
Il apparaitra sur écran et WEIGHT il clignotera pour sélectionner le POIDS ou QUANTITÉ pour LE MODE PESER.
Appuyer les touches
ou pour changer changer
l’écran de POIDS ou QUANTITÉ et appuyer sur la touche
pour conrmer.
PROGRAMMER UNITÉ de PRIX
Il Apparaîtra sur écran et 000 clignotera pour introduire
l’UNITÉ de PRIX.
Appuyez les touches numériques pour introduire l’UNITÉ
de PRIX et appuyez la touche
pour conrmer.
PROGRAMMER LE TYPE D’IMPÔT
Pour programmer le type d’impôt correspondant à le
PLU, sélectionner l’impôt A, B ou C appuyant
respectivement, et appuyez la touche pour conr-
mer.
PROGRAMMER PRE-TARE
Il apparaîtra sur l’écran 000 clignotera pour introduire
la PRE-TARE.
Poussez les touches numériques pour introduire LES
VALEURS de PRE-TARE et appuyez la touche
pour
conrmer.

32
Manuel d’usager
ES FR ENG Balance poids-prix RTN
Manuel d’usager
33
RTN Balance poids-prix ENG FR ES
6-3-2. mONtRER PLU
Quand il est nécessaire de vérier les détails de PLU on
doit sélectionner les paramètres MONTRER PLU.
Pousser la touche
pour conrmer et pour pousser
les touches ou pour changer la liste PLU, on
peut voir le nom PLU, l’unité de prix, la valeur pré-tare
et tout le reste.
Dans le mode pesage normal, appuyez et maintenez appuyée, la touche PLU directement ou la touche . Il
peut entrer dans la liste PLU de scanning.
6-4. ACCUmULAtION/OPÉRAtION vENtE
Situer les objets sur la plate-forme et introduisez l’unité
de prix ou sélectionnez PLU en appuyant la touche PLU
direct, ou bien en appuyant la touche et en intro-
duisant le nombre PLU.
Appuyez les touches ou ou , et un long son d’alarme sera entendu.
L’information sera gardée dans la mémoire de vente et le stock du produit sera réduit de la mémoire de
stock.
Vous pouvez continuer à réaliser des opérations jusqu’à 999 records de vente.
Une fois les 989 opérations se rejoignent, l’écran commencera à montrer le message LA MÉMOIRE SE REM-
PLIRA.
Vous Pouvez continuer de réaliser des opérations jusqu’à
atteindre les 999 opérations. Une fois arrivez aux 999,
le message apparaîtra dans un écran LA MÉMOIRE EST
PLEINE.
A ce moment on ne pourra pas réaliser plus d’opérations
de vente jusqu’à ce qu’on n’efface toute la mémoire de
vente du paramètre.
FONCTION>DES VENTES RPT F2>EFFACER TOUTES LES VENTES

Manuel d’usager
33
RTN Balance poids-prix ENG FR ES
6-5. RAPPORt dE vENtES
Appuyez la touche , le message FONCTION appa-
raîtra sur l’écran.
Vous pouvez sélectionner le RAPPORT de VENTES en
appuyant les touches
et .
6-5-1. RAPPORt PLU QUOtIdIEN
On Peut sélectionner TODAY REPORT en appuyant la
touche et en appuyant la touche .
Apparaîtra sur l’ecran: Normal et Réduit.
- Appuyer N, pour un rapport normal avec TVA ventilée.
- Appuyer R, pour un rapport réduit sans TVA ventilée.
On imprimera le rapport du jour, du total des ventes
réalisées en utilisant PLU
6-5-2. RAPPORt PAR dAtE
On peut sélectionner le RAPPORT PAR DATE en appu-
yant la touche et après la touche .
Apparaîtra sur l’ecran: Normal et Réduit.
- Appuyer N, pour un rapport normal avec TVA ventilée.
- Appuyer R, pour un rapport réduit sans TVA ventilée.
On imprimera le rapport du jour, du total des ventes
réalisées en utilisant PLU
Il apparaîtra sur l’écran L’option pour introduire la date
de commencement.
Pour obtenir un rapport de ce jour plus loin on doit
seulement introduire la date marquée.
Et appuyer la touche l’écran apparaîtra pour introduire la date nale.
Introduire la date nale et appuyer la touche
pour
conrmer.
On imprimera le rapport du jour, du total des ventes
réalisées en utilisant PLU

34
Manuel d’usager
ES FR ENG Balance poids-prix RTN
Manuel d’usager
35
RTN Balance poids-prix ENG FR ES
6-5-3. INfORmAtION dU PROdUIt
On peut sélectionner le RAPPORT DU PRODUIT en appu-
yant la touche et en appuyant la touche .
Apparaîtra sur l’ecran: Normal et Réduit.
- Appuyer N, pour un rapport normal.
- Appuyer R, pour un rapport réduit.
Vous devez entrer une la date de début d’opération.
Pour obtenir un rapport plus loin on doit seulement
introduire la date marquée.
Et appuyer sur la touche pour conrmer. Il apparaîtra sur l’écran une date de fermeture.
Si on désire entrer la date de fermeture, la touche
doit être appuyée pour conrmer. Il apparaîtra sur écran
0000 clignotera pour entrer le nombre du produit.
Entrer le nombre du produit et appuyer la touche
pour conrmer. L’imprimante imprimera le rapport du
produit sélectionné.
6-5-4. EffACER tOUtES LES vENtES
Dès que la mémoire est pleine ou n’est pas nécessaire
de garder les données stockées, On peut effacer toute
la mémoire de vente du paramètre EFFACER TOUTES
LES VENTES.
On peut sélectionner EFFACER TOUTES LES VENTES en
poussant les touches
et la touche pour conr-
mer.
L’écran apparaîtra:

Manuel d’usager
35
RTN Balance poids-prix ENG FR ES
Appuyer sur la touche pour conrmer.
Toute la mémoire de ventes sera effacée. L’écran appa-
raîtra:
6-5-5. USAgE dE LA mÉmOIRE dE vENtE
RTN peut vérier la mémoire du total des ventes stockées. Pour réviser la mémoire stockée l’utilisateur doit
sélectionner USO DE MEMORIA DE VENTAS en appuyant
la touche . Ensuite il doit appuyer la touche
pour conrmer.
Sur écran il apparaîtra:
Quand la mémoire de vente arrivera à 999 on doit effa-
cer toutes les ventes pour l’utiliser pour des ventes futures.
6-6. fORmAtS d’ImPRESSION
FORMAT - TICKET FORMAT – ÉTIQUETTE
ABC MALL
CHINA
2012-01-01 11.10.00 (V1)
Weight (kg) EUR/kg Price
#001 APPLE
2000 10.00 20.00
#002 SUGAR
2000 5.00 10.00
#003 RICE
2000 12.50 25.00
(The end)
Total price: 55.00 EUR
Payment: 100.00 EUR
Change: 45.00 EUR
THANK YOU
ABC MALL
CHINA
APPLE
2012-01-01 11.12.47 (V1)
Weight: Unit Price
2.000 kg 10.00 EUR/kg
Total price:
20.00 EUR
THANK YOU

36
Manuel d’usager
ES FR ENG Balance poids-prix RTN
Manuel d’usager
37
RTN Balance poids-prix ENG FR ES
FORMAT INFORMATION DU JOUR FORMAT INFORMATION DU JOUR
Sales Report-Today
Print Time: 2012-01-01 11:11:11
APPLE
Subtotal: 10.00 kg 20.00EUR
SUGAR
Subtotal: 5.00 kg 10.00EUR
RICE
Subtotal: 12.50 kg 25.00EUR
Total: 35.00 EUR
Sales Report-Today
Print Time: 2012-02-01 11:11:11
Start Date: 12/01/01
End Date: 12/02/02
Weight (kg) EUR/kg Price
12/01/02
#001 APPLE
2000 10.00 20.00
#002 SUGAR
2000 5.00 10.00
#003 RICE
2000 12.50 25.00
Subtotal: 55.00 EUR
12/01/02
#001 APPLE
2000 10.00 20.00
#002 SUGAR
2000 5.00 10.00
#003 RICE
2000 12.50 25.00
Subtotal: 55.00 EUR
Total: 110.00 EUR
6-7. CHANgER ROULEAU dE PAPIER
Changer le rouleau de papier est facile.
1) Ouvrez le capot.
2) Retirez le vieux rouleau. et insérez le nouveau rouleau de papier.
3) Alimentez le papier, à travers d’un espace extérieur du capot.
4) Fermez le capot.
Taille papier thermique normale >
Diamètre: 47mm >
Largeur: 56 mm >
7. PARAmètRES
7-1. tOUCHES EN PARAmètRES
TOUCHE DESCRIPTION
Pour entrer la conguration de fonction et paramètres.
Pour conrmer les blocs des paramètreso.
Pour sortir du menu.
et
Pour changer le menu des paramètreso.
Pour annuler les entrées incorrectes.
7-2. ENtRER dANS LE PARAmètRE dE CONfIgURAtION
En mode normale de pesage poussez et maintient appuyée la touche pour entrer dans la conguration des
paramètres.

Manuel d’usager
37
RTN Balance poids-prix ENG FR ES
7-3. CONfIgURAtION dES PARAmètRES
PARAMèTRE
SUB
PARAMèTRE
OPTIONS DE SUB
PARAMèTRE DESCRIPTIONS
F1
bASiC SEt
F1-1
bACk LiGHt
BACK LIGHT AUTO
Rétro éclairage programmé pour s’allumer automatiquement. Quand vous commencerez l’utilisation de la bascule celle-ci s’allumera.
BACK LIGHT ON Retro éclairage programmé pour s’allumer toujours.
BACK LIGHT OFF Retro éclairage programmé pour s’éteindre toujours.
F1-2
SCALE id
SCALE ID Programmer la balance ID.
F1-3
PLUCLr
CLEAR PLU UNLOAD La balance retourne à mode du pesage normal quand l’échantillon est retiree.
CLEAR PLU STANDY
S’il n’y a pas d’opération de clavier numérique ou le poids ne change pas dans une
période de 3 minutes, la balance entrera dans le mode standby, et aussi sortira
du mode PLU.
DO NOT CLEAR La balance garde le prix à l’ecran quand l’échantillon est retiree.
F1-4
StAndbY
DISP BANNER
La fenêtre du nom du produit montre la pièce publicitaire quand la balance ne se
trouvera pas en mode PLU. Par exemple GIROPES.
DISP TIME
La fenêtre du nom du produit montre l’heure dans laquelle la balance ne se trouve
pas dans le mode PLU.
F1-5
bAnnEr
Programmer les contenus de la pièce publicitaire. Par exemple: GIROPES.
F2
Non programmable.
F3
CLoCk
F3-1
SEt dAtE
20XX-XX-XX Programmer la date.
F3-2
SEt timE
hh: mm: ss Programmer l’heure.
F3-3
d-tYPE
YY--MM--DD
MM--DD--YY
DD--MM--YY
Programmer le format de la date.
F4
SEt Print
F4-1 P
FormAt
RECEIP 1 Imprimer le format du ticket.
LABEL 1 Imprimer le format de l’étiquette.
F4-2 P
CoPY
COPY 1
COPY 2
COPY 3
COPY 4
COPY 5
Sélectionner imprimer les copies nécessaires.
F4-3
HEAdEr 1
Programmer contenue entête 1 pour impression.
F4-4
HEAdEr 2
Programmer contenue entête 2 pour impression.
F4-5
HEAdEr 3
Programmer contenue entête 3 pour impression.
F4-6
HEAdEr 4
Programmer contenue entête 4 pour impression.
F4-6
FootEr 1
Programmer contenue pied page 1 pour impression.
F5 SEt
SEriES
F5-1 5
modE
NONE Programmer la fermeture du port de série.
CONTINUE SEND Programmer le port de série comme continuation.
F5-2 5
bAUd
600
1200
2400
4800
9600
Vitesse de transmission.
F5-3 5
vErFY
VERIFY MODE 8N1
VERIFY MODE 7E1
VERIFY MODE 7O1
Vérier mode.
F6 tECH
Il permet l’accès aux paramètres techniques en utilisant un mot de passe. Seul le personnel autorisé.
F7
SEt tax
Appuyer sur la touche pour entrer. Introduire PIN: 99999999 et appuyer TARE.
Tax on
Tax off
Pour programmer le type d’impôt de Rate A, B et C.
F8 Lang
Appuyer sur la touche pour entrer. Introduire PIN: 99999999 et appuyer TARE.
C
hange on
Change off
Pour activer la visualisation du rendu monnaie.
Appuyer ZERO pour retourner à mode de pesage normal.
F9
Non programmable.

38
Manuel d’usager
ES FR ENG Balance poids-prix RTN
Manuel d’usager
39
RTN Balance poids-prix ENG FR ES
8. SORtIE RS232
La série de balance RTN peut être demandée avec une sortie RS232 optionnelle.
Spécications:
Sortie RS232 d’information de poids. >
Code ASCII. >
Vitesse 4800. >
8 bit d’information. >
Sans Parité. >
RS232 (9 broches connecteur type D)
1 2 3 4 5
6 7 8 9
PIN 2 RXD Entrée Recevoir information
PIN 3 TXD Sortie Transmission information
PIN 4 GND - Signal du sol
9 CHEVILLES CONNECTEUR D
INDICATEUR ORDENATEUR/IMPRIMANTE
PIN 2 PIN 3
PIN 3 PIN 2
PIN 5 PIN 5
Format d’information : code ASCII, 10 bits par cadre d’information, biT 1 : bit commencer, bit2-bit8, bits information, bit 9 : bit vérication (égale).
STX ± k g p CR LF
- WEIGHT DATA - - WEIGHT UNIT -
p= 01x1xx2x3x4x5x6
Stable: x6=1 Unstable: x6=0
Over: x5=1 Otherwise: x5=0
Negative: x4=1 Plus: x4=0
Zero: x3=1 Otherwise: x3=0
Net zero: x2=1 Otherwise: x2=0
Tare: x1=1 Otherwise: x1=0

Manuel d’usager
39
RTN Balance poids-prix ENG FR ES
9. dÉPEçAgE
Liste des elements:
Nº DESIGNATION QUANTITÉ MATÉRIEL SPÉCIFICATIONS
1 Plateau 1 SST
2 Capot batterie 1 ABS
3 Caoutchouc 1 CR 79x556
4 Batterie rechargeable 1 Lead acid 6V/10Ah
5 Lexan arrière 1 PC
6 Lexan arrière colonne 1 PC
7 Carter arrière écran colonne 1 ABS
8 Plaque signelitique 1 90x22
9 Carter écran colonne 1 ABS
10 Vis auto letage 2 20Mn 3x10
11 Lexan écran colonne 1 PC
12 CPU écran arrière colonne 1
13 CPU écran avant colonne 1
14 Vis auto letage 12 20Mn 3x8
15 Rondelle isolante 12 EDPM M3
16 Vis interne hexagonale 2 M4x12
17 Ressort 2 M4
18 Rondelle 2 65Mn M4
19 Colonne 1 AL
20 Fixation support colonne avant 1 ABS
21 Fixation support colonne arrière 1 ABS
22 Fixation support colonne 1 SPCC
23 Vis cruciforme 6 20Mn M4x12
24 Vis auto letage 3 20Mn 3x12
25 CPU imprimante 1
26 Capteur de chargement 1 AL L6D
27 Boulon hexagonale 4
28 Rondelle 4 65Mn M6
29 Ressort 4 M6
30 Vis interne hexagonale 4 M6x16
31 Adaptateur AC Jack 1
32 Interrupteur allumage 1
33 Fixation du pied 4 ABS
34 Pied adjustable 4 PVC
35 Fixation imprimante 1 ABS
36 Vis cruciforme 12 20Mn M4x12
37 Vis cruciforme 1 20Mn M4x8
38 Lexan du clavier 1 PC
39 Blister clavier 1 SPCC
40 Couvercle supérieur de la balance 1 ABS
41 Bouton tactile rétro éclairage 50 PE
42 Rondelle isolante 9 EDPM M4
43 Vis auto letage 9 20Mn 4x10
44 CPU clavier 1
45 Couvercle imprimante 1 ABS
46 Communication CPU 1 Optionnel
47 Imprimante 1
48 Support plateau 4 Gomme
49 Fixation supérieur capteur 1 AL
50 Vis hexagonale 4 20Mn M4x16
51 Vis auto letage 4 20Mn 4x20
52 Fixation inférieur capteur 1 AL
53 CPU principal 1
54 Niveau à bulle 1
55 Couvercle inférieur de la balance 1 ABS
56 Feuille joint 1
57 Étiquette scellée 1

40
Manuel d’usager
ES FR ENG Balance poids-prix RTN
User’s guide
RTN Price-compung scale ENG FR ES
10. gARANAtIE
Cette balance est garantie contre tout défaut de fabrication et de matériel pendant 1 an à partir de la date
de livraison.
Durant cette période, GIROPÈS SL. se chargera de la réparation de la balance.
Cette garantie n’inclut pas les dommages causés par une utilisation impropre, surcharge ou par le non respect
des recommandations décrites dans ce manuel.
La garantie ne couvre pas les frais d’envois nécessaires à la réparation de la balance.
WARNINg

User’s guide
41
RTN Price-compung scale ENG FR ES
1. PRECAUtIONS
WARNINg
DISCONNECT ALL POWER TO THIS UNIT BEFORE INSTALLING, CLEANING, OR
SERVICING. FAILURE TO DO SO COULD RESULT IN BODILY HARM OR DAMAGE THE
UNIT.
CAUtION
Permit only qualied persons to service the instrument
Before connecting or disconnecting any components, remove the power.
Failure to observe these precautions bodily harm or damage to or destruction of the equipment.
Avoid installing the scale in direct sunlight, which may cause discoloration. >
Avoid overloading that could cause damage to the scale. >
If the scale is not to be used for a long period of time, remove battery from the battery compartment to >
avoid leakage.
Avoid stack materials on the scales, when scale is not in use. >
Avoid unsuitable tables. The tables or oor must be rigid and not vibrate. Do not place near vibrating ma- >
chinery.
Avoid unstable power sources. Do not use near large users of electricity such as welding equipment or large >
motors.
Only use original JP adaptor, other could cause damage to the scale. >
2. INtROdUCtION
The RTN series weighing scales are suitable for price computing, general weighing and accumulation ope- >
rations.
Capacities from 6 kg to 45 kg. >
Sale to 3 vendors at time. >
Sale and Purchase mode. >
99 PLU: >
PLU Contents: Product name, Product code, Weight/Not weight, Sales Price, Select Tax, Pre-Tare.
1000 sales records and 350 purchase records can save into the memory. >
Built in Thermal Printer; easy to load paper and also support continues label paper. >
Printouts: PLU Report, Daily sales report, Daily purchase report, Inventory Report, Lack inventory Report, >
Label, Receipt.
Rechargeable battery provide up to 90 hours of continues use (with out backlight). >
Optional connection to connect external platform. >
Inventory Control function. >
Optional RS232/Bluetooth connection to connect PC. >
28 Sets direct PLU and 99 indirect PLU. >
AC Adaptor/Rechargeable battery. >
Large 20mm LCD with white LED back light display. >
50 mechanical keys. >
42
User’s guide
ES FR ENG Price-compung scale RTN
User’s guide
43
RTN Price-compung scale ENG FR ES
CHARgINg BAttERy
INStALLAtION
SCALE dESCRIPtION
3. SPECIfICAtIONS
(dimensions in mm)
MODEL RTN-15 RTN-30
370
240
150
320
125
360
240
Maximum Capacity (kg) 6/15 15/30
Readability (g) 2/5 5/10
Tare Range (kg) -15 -30
Minimum Weight (g) 40 100
Resolution 3000/6000/Dual range
Stabilization time 2 segons
Warm up time 10 min.
Units Of Measure kg/g
Interface Salida opcional RS232
Calibration Externa automática
Display
Pantalla LCD retroiluminada con
6 dígitos de 20 mm
Housing Plástico ABS
Pan Size (mm) 240x370
Overall Dimensions (mm) 370x360x125
Gross Weight (kg) 5,8
Power supply
100/240 V AC 50 Hz Adaptador:
12V/500mA
Operating Temperature
-10oC +40oC/14oF +140oF
4. INStALLAtION
UNPACKINg
Carefully take the balance out of its package, make it sure its not damaged and all accessories are included.
Remove the Indicator from the carton. >
Remove the protective covering. Store the packaging and to use if you need to transport the scale later. >
Inspect the scale and terminal for damage. >
Make sure all components are included. >
Accessories:
Balance >
Adaptor >
Pan >
Product manual >
LEvEL AdjUStINg
Place the scale on a table.
Check the water mark. If, bubble is not centre adjust the leveling feet until reach centre. Check the level
when you change the location.
NOT LEVEL LEVEL

User’s guide
43
RTN Price-compung scale ENG FR ES
CHARgINg BAttERy
To charge the battery insert the adaptor pin to jack, jack is locating below the scale. Adaptor simply plug >
into the mains power. The scale no needs to be turned on.
The battery should be charged for 12 hours for full capacity. >
Left side of the display there is an LED to indicate the status of battery charging. When the scale is plug- >
ged into the mains power the internal battery will be recharged. If the LED is green, the battery has a full
charge. If it is red, the battery is nearly discharged and if yellow, the battery is being charged.
Do not use any other type of power adaptor than the one supplied with the scale. >
Verify that the AC power socket outlet is properly protected. >
Note: Please charge the battery before using the scale for the rst time.
INStALLAtION
Place the scale on a table. >
Carefully place the pan to the four holes on the top cover >
Adjust the water mark bubble level. >
Connect the adaptor pin to the adaptor jack. Adaptor jack is locating below the right side of the scale. >
Adaptor connects into your AC power socket. Pluggable equipment must be installed near an easily acces- >
sible socket outlet with a protective ground/ earth contact.
Turn on the power switch. On / Off switch is locating below the right side of the scale. Press switch forward >
to turn on the scale. If you want to turn off, press again the switch backward.
Display will be show the scale capacity and will be starting self checking. >
After self checking, display will be come to normal weighing mode. >
Then you can start your operation >
Note: Initial Start Up
Warm-up time of 15 minutes stabilizes the measured values after switching on.
5. SCALE, KEyPAd ANd dISPLAy dESCRIPtION
SCALE dESCRIPtION
1
2
3
4
5
6
1. ON/OFF switch
2. Adaptor Jack
3. Adjusting feet.
4. Display bracket
5. Function/CAL Switch
6. RS232 output

44
User’s guide
ES FR ENG Price-compung scale RTN
User’s guide
45
RTN Price-compung scale ENG FR ES
6-1. BASIC OPERAtION
6-1-1. POWER ON/Off
6-1-2. zERO
6-1-3. tARE
6-1-4. UNIt PRICE SEttINg
KEyPAd dESCRIPtION
KEYS DESCRIPTION KEYS DESCRIPTION
Set the display to zero.
to
Vender keys.
Enter the clear tare weights, Storing the current
weight as tare value. Subtracting the tare value
from the total weight and displays the result as
net weight.
to
To select direct PLU, press and hold 3 seconds
these keys to recall PLU information.
To print the previous data. To enter the PLU numbers.
Look up the accumulated price of the each vendor
keys.
To recall the PLU 29 to 56 by pressing 1 to 28.
To enter into the function settings. Clear incorrect entries and error conditions.
KEyS IN tHE PARAmEtER SEttINgS
KEYS DESCRIPTION KEYS DESCRIPTION
To enter into the function and parameter settings.
Scroll down to the sub parameters.
&
Scroll to function or parameter.
Escape from the parameter settings and return to
the normal weighing mode.
dISPLAy dESCRIPtION
DISPLAY WEIGHT DESCRIPTION DISPLAY UNIT PRICE DESCRIPTION
ZERO Zero display
V1/V2/V3 Vendor keysSTABLE Stability Display
NET Net Weight
DISPLAY TARE DESCRIPTION DISPLAY TOTAL PRICE DESCRIPTION
STOCK Stock mode CHANGE Change mode
REMOTE
Remote Scale BATT. Battery

User’s guide
45
RTN Price-compung scale ENG FR ES
6. OPERAtION
INITIAL START-UP
Warm-up time of 15 minutes stabilizes the measured values after switching on.
6-1. BASIC OPERAtION
6-1-1. POWER ON/Off
Switch on the balance by pressing power On/ Off key. The display is switched on and the test is started and if
want to switched off, press backward the key.
6-1-2. zERO
Environmental conditions can lead to the balance exactly zero in spite of the platform not taking any strain.
However, you can set the display of your balance to zero any time by pressing
key and therefore ensure
that the weighing starts at zero.
6-1-3. tARE
The weight of any container can be tared by pressing
button so that with subsequent weighing the net
weight of the object being weighed is always displayed.
Load weight on the platform >
Press >
key. Zero is displayed, and tare is subtracted.
Remove weight on the platform. Tared weight is displayed. It can set only one tare value. It will be shown >
with a minus value.
Press G/N to change between gross weight and net weight >
To clear the tare value, remove the load and press >
. key. Zero is displayed, tare weight is cleared.
6-1-4. UNIt PRICE SEttINg
Place the goods on the platform
Enter the unit price by pressing numeric keys.
For e.g.: 50.00
Unit price display will be shown the entered value and total price display will be shown price of the go- >
ods.
Press >
key to replace the previous unit price.
46
User’s guide
ES FR ENG Price-compung scale RTN
User’s guide
47
RTN Price-compung scale ENG FR ES
6-2. SCALE mOdE
6-2-1. SALES mOdE
Press the key, display will show:
It can do the accumulation (sales), memory recall.
Operation
Place the goods on the platform, and input unit price or
select PLU by pressing direct PLU key or by pressing
key and input PLU number.
Press or or keys, and will be hear a long beep sound. Data will save into the sale memory and
product stock value will be reduce from the stock memory. It can continue operations up to 999 sale records.
6-2-2. RECALL ACCUmULAtION
Press key, display will be show:
Press or or keys, display will be show total
price and 000 will be blink for to input paid amount.
To get printout press key, printer will be print vendor sales details.
VENDOR MEMORY CLEAR
With out input paid amount,If press
key, it will clear
that vendor memory with out printing.
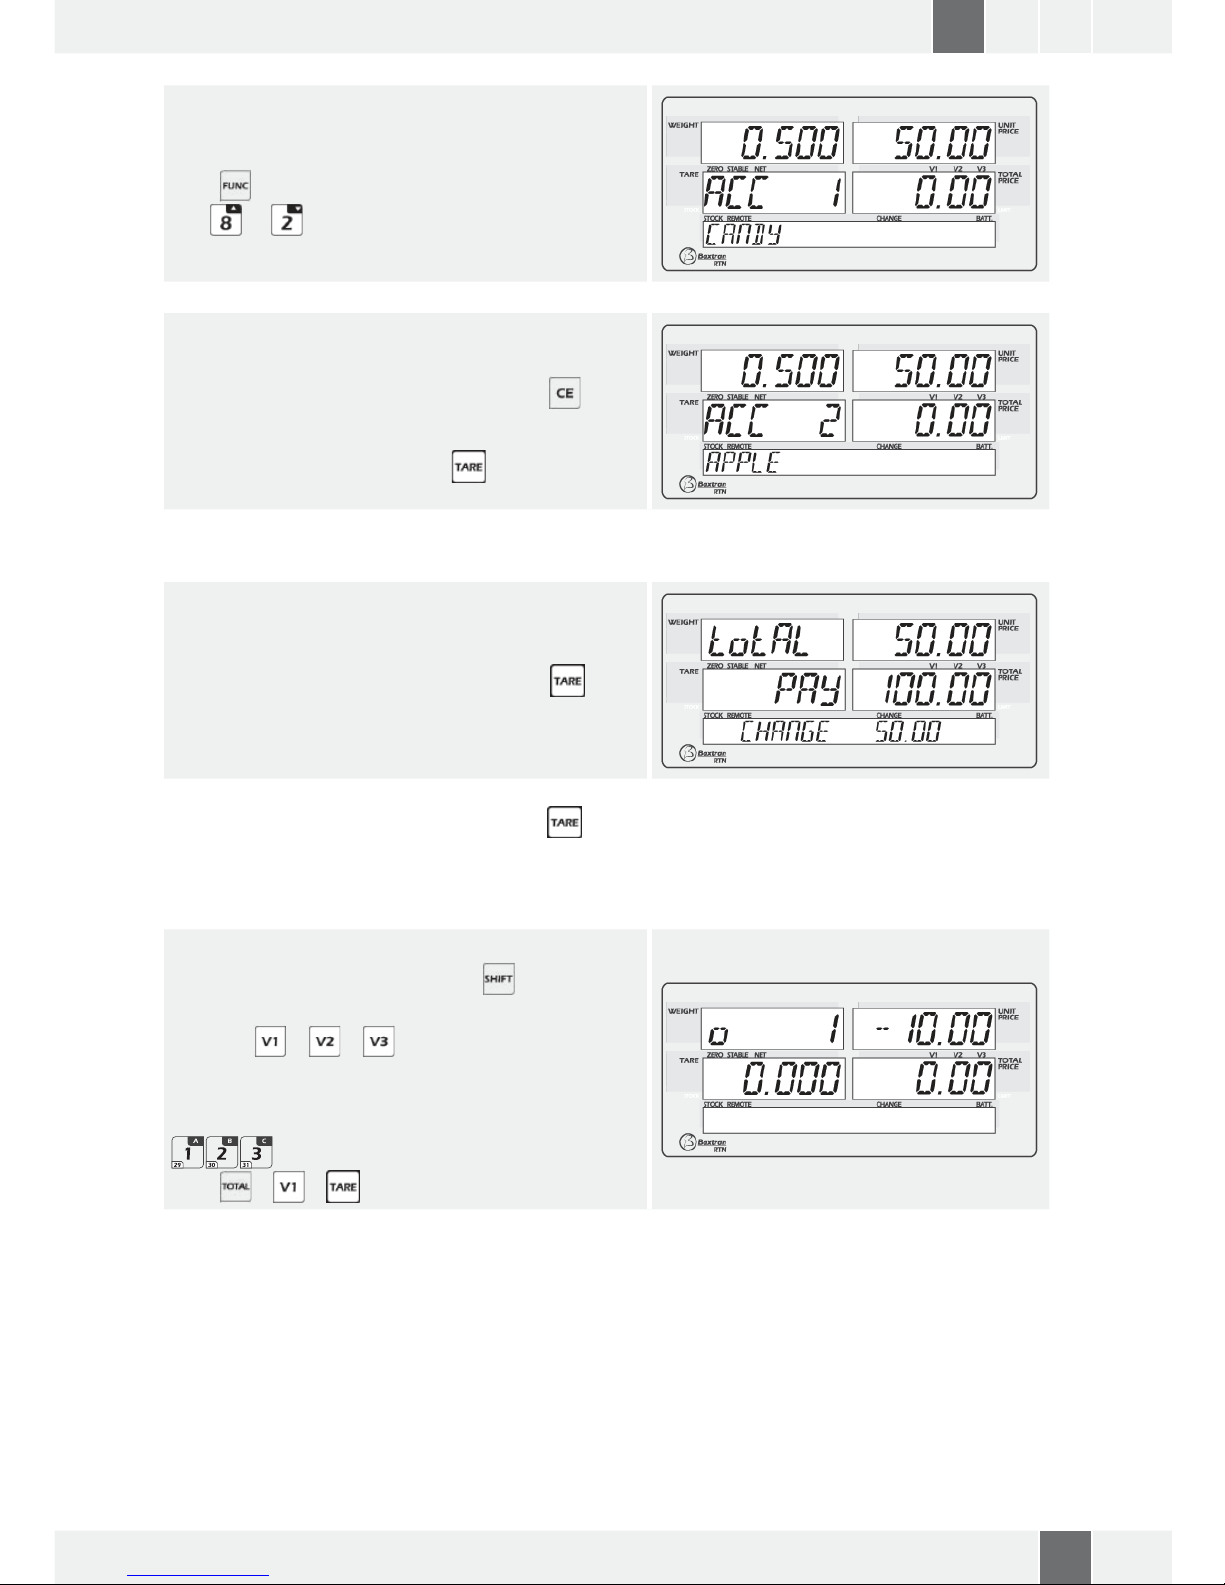
User’s guide
47
RTN Price-compung scale ENG FR ES
RECALL SALES LIST
Press
key, it can check sales list one by one by pres-
sing or .
CANCEL SALE FROM THE SALES LIST
Select the sale detail, then press and hold
key, it
will be hear a beep sound then blink ACC 2 selected
sale. It will cancel from the vendor sale and print out
will show cancel details pressing .
6-2-3. CHANgE ANd vENdOR mEmORy CLEAR
Input paid amount, if the paid amount is higher than the
total amount, display will be show change amount, and
how much is supposed to pay back and press key to
conrm, printer will be print vendor sales details with
payment details.
NOTE: When input the paid amount and press key, it will print with payment details and that vendor memory
details will be clear automatically.
6-2-4. tRANSACtION CANCELLAtION
TRANSACTION OF A NORMAL UNIT PRICE
Enter price to be cancelled. Hold
key up to be
shown the minus symbol (-) on the display.
Press the
o o key of the corresponding se-
ller.
Enter necessary units to equalise price. Press again the
key of the corresponding seller, and select tax A, B or C
.
Press
+ + consecutively to print ticket.

48
User’s guide
ES FR ENG Price-compung scale RTN
User’s guide
49
RTN Price-compung scale ENG FR ES
TRANSACTION OF A PLU UNIT PRICE
Select corresponding PLU.
Enter price to be cancelled. Hold
key up to be
shown the minus symbol (-) on the display.
Press the
o o key of the corresponding se-
ller.
Enter necessary units to equalise price. Press again the
key of the corresponding seller.
Press
+ + consecutively to print ticket.
6-3. PLU OPERAtION
6-3-1. SEt PLU CONtENt
PLU is used to store information’s about the commonly used items It can save 99 PLU contents: Product name,
product code, weight/not weight, product price, select tax, pre-tare.
Press the key, the display will show function F1 PLU
Mode will be blink, press or key to change the
display. Display will be blink and press the key to
change option to down for select to choose sub-menu
SET PLUContent.
When display shows SET PLUContent will be blink and
press
key to conrm.
SELECT PLU CONTENT
Display will be show and PLU 00 will be blink.
Press PLU number by using direct PLU keys or by using
numeric keys.
For Eg: Press direct PLU key or press numeric keys
, .
Display will be show and ( _ ) will be blink for to input
PRODUCT NAME.

User’s guide
49
RTN Price-compung scale ENG FR ES
PLU NAME
Press direct PLU keys for to input PRODUCT NAME.
For Ego: Press keys are for APPLE.
Press
key to conrm.
PLU NUMBER
Display will be show
and 0000 will be blink for to input PRODUCT NUMBER.
Press numeric keys for to input PRODUCT NUMBER and
press
key to conrm.
PLU MODE WEIGHING/QTY
Display will be show and WEIGHT will be blink for to
select WEIGHT or AMOUNT for WEIGHING MODE.
Press
or keys to change display to WEIGHT or
AMOUNT and press key to conrm.
SET UNIT PRICE
Display will be show and 000 will be blink for to input
UNIT PRICE.
Press numeric keys to input UNIT PRICE and press
key to conrm.
SET TAX
To set corresponding tax on PLU, select tax A, B or C
pressing
respectively and then press
key to conrm.
SET PRE-TARE
Display will be show and 000 will be blink for to input
PRE-TARE.
Press numeric keys to input PRE-TARE value and press
key to conrm.

50
User’s guide
ES FR ENG Price-compung scale RTN
User’s guide
51
RTN Price-compung scale ENG FR ES
6-3-2. SCAN PLU
When it’s required to check the PLU details select parameter SCAN PLU.
Press
key to conrm and press or keys to
change PLU list, it can see PLU name, unit price, pretare value and all.
In the normal weighing mode, press and hold direct PLU key or key. It can enter into the PLU scan list.
6-6. ACCUmULAtION/SALE OPERAtION
Place the goods on the platform, and input unit price or
select PLU by pressing direct PLU key or by pressing
key and input PLU number.
Press or or keys, and will be hear a long beep sound. Data will be save into the sale memory and
product stock will be reduce from the stock memory.
It can continue operations up to 999 sale records.
Once reach 989 operations, display will start to show
MEMORY WILL FULL.
It can continue operations until to reach 999 operations.
Once reach 999, display will be show MEMORY IS FULL.
Then, cannot do further sale operation until to clear all
sales memory from the parameter.
FUNCTION > F2 SALES RPT > CLEAR ALL SALES

User’s guide
51
RTN Price-compung scale ENG FR ES
6-5. SALES REPORt
Press key, display will show FUNCTION.
It can select to SALES REPORT by pressing
and
keys.
6-5-1. tOdAy PLU REPORt
It can select to TODAY REPORT by pressing key and
press key.
The screen will show: Normal and Reduce.
- Press N, if you want a normal report with a VAT
breakdown.
- Press R, if you want a reduced report without a VAT
breakdown.
It will print today report, of total sales done using PLU
6-5-2. dAILy REPORt
It can select to DAILY REPORT by pressing key and
press key.
The screen will show: Normal and Reduce.
- Press N, if you want a normal report with a VAT
breakdown.
- Press R, if you want a reduced report without a VAT
breakdown.
It will print today report, of total sales done using PLU
Display will be show to input starting date.
Which date onwards want to get report a report, want
to input that date.
And press key to conrm, display will be show to
input end date.
Input end date and press
key to conrm.
It will print today report, of total sales done using PLU

52
User’s guide
ES FR ENG Price-compung scale RTN
User’s guide
53
RTN Price-compung scale ENG FR ES
6-5-3. PROdUCt REPORt
It can select to PRODUCT REPORT by pressing key
and press key.
The screen will show: Normal and Reduce.
- Press N, if you want a normal report.
- Press R, if you want a reduced report.
Display will be show to input starting date.
Which date onwards want to get report a report, want
to input that date.
And press key to conrm, display will be show to
input end date.
Want to input end date and press key to conrm,
display will be show and 0000 will be blink for to input
product number.
Input product number and and press
key to conrm,
printer will be print selected product report.
6-5-4. CLEAR ALL SALES
Once memory is full or no need to keep old records,
then want to clear all sales memory from the CLEAR
ALL SALES parameter.
It can select to CLEAR ALL SALES by pressing
key
and press key to conrm.
Display will be show:

User’s guide
53
RTN Price-compung scale ENG FR ES
Press key to conrm.
All sales memory will be clear. And display will be
show:
6-5-5. SELL mEmORy USAgE
RTN can check total stored sales memory. To check the
stored memory It can select to SELL MEM USE by pres-
sing key and press key to conrm.
Display will be show:
Once reach this sale memory 999, should be want to
clear all sales, then only can use further sales.
6-6. PRINt fORmAtS
RECEPIT-FORMAT LABEL- FORMAT
ABC MALL
CHINA
2012-01-01 11.10.00 (V1)
Weight (kg) EUR/kg Price
#001 APPLE
2000 10.00 20.00
#002 SUGAR
2000 5.00 10.00
#003 RICE
2000 12.50 25.00
(The end)
Total price: 55.00 EUR
Payment: 100.00 EUR
Change: 45.00 EUR
THANK YOU
ABC MALL
CHINA
APPLE
2012-01-01 11.12.47 (V1)
Weight: Unit Price
2.000 kg 10.00 EUR/kg
Total price:
20.00 EUR
THANK YOU

54
User’s guide
ES FR ENG Price-compung scale RTN
User’s guide
55
RTN Price-compung scale ENG FR ES
TODAY REPORT FORMAT DAILY REPORT- FORMAT
Sales Report-Today
Print Time: 2012-01-01 11:11:11
APPLE
Subtotal: 10.00 kg 20.00EUR
SUGAR
Subtotal: 5.00 kg 10.00EUR
RICE
Subtotal: 12.50 kg 25.00EUR
Total: 35.00 EUR
Sales Report-Today
Print Time: 2012-02-01 11:11:11
Start Date: 12/01/01
End Date: 12/02/02
Weight (kg) EUR/kg Price
12/01/02
#001 APPLE
2000 10.00 20.00
#002 SUGAR
2000 5.00 10.00
#003 RICE
2000 12.50 25.00
Subtotal: 55.00 EUR
12/01/02
#001 APPLE
2000 10.00 20.00
#002 SUGAR
2000 5.00 10.00
#003 RICE
2000 12.50 25.00
Subtotal: 55.00 EUR
Total: 110.00 EUR
6-7. CHANgE PAPER ROLL
It can easy to change new paper roll:
1) Pull the printer roll cover.
2) Remove the old roll pin. Insert the new paper roll.
3) Feed the paper, out of the roll cover.
4) Close the cover
Normal thermal paper size >
Diameter: 47mm >
Width: 56 mm >
7. PARAmEtERS
7-1. KEyS IN PARAmEtER
KEYS DESCRIPTION
To enter into the function and parameter settings.
To conrm the parameters blocks.
To escape from the menu.
and
To change the parameter menu.
To cancel incorrect entries.
7-2. ENtER INtO tHE PARAmEtER SEttINgS
In the normal weighing mode press and hold key to enter into the parameter settings.

User’s guide
55
RTN Price-compung scale ENG FR ES
7-3. PARAmEtER SEttINgS
PARAMETER
SUB
PARAMETER
SUB PARAMETER
OPTIONS DESCRIPTIONS
F1
bASiC SEt
F1-1
bACk LiGHt
BACK LIGHT AUTO Backlight set to automatic, when start to use it will turned on.
BACK LIGHT ON Backlight set to always on.
BACK LIGHT OFF Backlight set to always off.
F1-2
SCALE id
SCALE ID Set the scale ID.
F1-3
PLUCLr
CLEAR PLU UNLOAD The scale returns to normal mode of weigh when sample is removed.
CLEAR PLU STANDY
If there is no keypad operation or weight is not changed within 3 minutes. The
scale goes into standby mode, and also escape from the PLU mode.
DO NOT CLEAR The scale keeps the price onthe screen when sample is removed.
F1-4
StAndbY
DISP BANNER
The product name window displays the banner when the scale is not in PLU mode.
For Eg: GIROPES.
DISP TIME The product name window displays the time when the scale is not in PLU mode.
F1-5
bAnnEr
Set the banner contents. For Eg: GIROPES.
F2
Not programmable.
F3
CLoCk
F3-1
SEt dAtE
20XX-XX-XX Set the date.
F3-2
SEt timE
hh: mm: ss Set the time.
F3-3
d-tYPE
YY--MM--DD
MM--DD--YY
DD--MM--YY
Set the date formate.
F4
SEt Print
F4-1 P
FormAt
RECEIP 1 Print receipt format.
LABEL 1 Print label format.
F4-2 P
CoPY
COPY 1
COPY 2
COPY 3
COPY 4
COPY 5
Select print out required copies.
F4-3
HEAdEr 1
Set header 1 content for print out.
F4-4
HEAdEr 2
Set header 2 content for print out.
F4-5
HEAdEr 3
Set header 3 content for print out.
F4-6
HEAdEr 4
Set header 4 content for print out.
F4-6
FootEr 1
Set footer 1 content for print out.
F5 SEt
SEriES
F5-1 5
modE
NONE Set the series port off.
CONTINUE SEND Set the series port mode as continue.
F5-2 5
bAUd
600
1200
2400
4800
9600
Baud rate.
F5-3 5
vErFY
VERIFY MODE 8N1
VERIFY MODE 7E1
VERIFY MODE 7O1
Verify mode.
F6 tECH
Allows access to the Technical parameters using a password. Only authorized personnel
F7
SEt tax
Press key to enter. Enter PIN: 99999999 and press TARE.
Tax on
Tax off
To set tax of Rate A, B and C.
F8 Lang
Press key to enter. Enter PIN: 99999999 and press TARE.
C
hange on
Change off
To activate the giving change on the screen.
Press ZERO key to return at normal weight mode.
F9
Not programmable.

56
User’s guide
ES FR ENG Price-compung scale RTN
User’s guide
57
RTN Price-compung scale ENG FR ES
8. RS232 OUtPUt
The RTN Series of scales can be ordered with an optional RS232 output.
Specications:
RS232 output of weighing data. >
ASCII code. >
4800 Baud. >
8 data bits. >
No Parity. >
RS232 (9pin D type connector)
1 2 3 4 5
6 7 8 9
PIN 2 RXD Input Receiving data
PIN 3 TXD Output Transmission data
PIN 4 GND - Signal ground
9pin D Connecter
INDICATOR COMPUTER/PRINTER
PIN 2 PIN 3
PIN 3 PIN 2
PIN 5 PIN 5
Data format: ASCII code, 10 bits per frame data, bit 1: start bit, bit2~bit8: data bits, bit 9: verify bit (even).
STX ± k g p CR LF
- WEIGHT DATA - - WEIGHT UNIT -
p= 01x1xx2x3x4x5x6
Stable: x6=1 Unstable: x6=0
Over: x5=1 Otherwise: x5=0
Negative: x4=1 Plus: x4=0
Zero: x3=1 Otherwise: x3=0
Net zero: x2=1 Otherwise: x2=0
Tare: x1=1 Otherwise: x1=0

User’s guide
57
RTN Price-compung scale ENG FR ES
9. EXPLOdEd
Parts list:
Nº PARTS NAME QTY MATERIAL SPECIFICATIONS
1 Pan 1 SST
2 Battery cover 1 ABS
3 Foam 1 CR 79x556
4 Rechargeable battery 1 Lead acid 6V/10Ah
5 Rear overlay 1 PC
6 Pole rear overlay 1 PC
7 Pole rear display cover 1 ABS
8 Name plate 1 90x22
9 Pole display cover 1 ABS
10 Self thread screw 2 20Mn 3x10
11 Pole display overlay 1 PC
12 Pole rear display PCB 1
13 Front display PCB 1
14 Self thread screw 12 20Mn 3x8
15 Insulative Washer 12 EDPM M3
16 Internal hexagon screw 2 M4x12
17 Spring washer 2 M4
18 Washer 2 65Mn M4
19 Pole 1 AL
20 Pole bracket front cover 1 ABS
21 Pole bracket rear cover 1 ABS
22 Pole bracket fence 1 SPCC
23 Star (+) screw 6 20Mn M4x12
24 Self Thread screw 3 20Mn 3x12
25 Printer PCBA 1
26 Load cell 1 AL L6D
27 Hexagon nut 4
28 Washer 4 65Mn M6
29 Spring washer 4 M6
30 Internal hexagon screw 4 M6x16
31 AC adaptor Jack 1
32 Power switch 1
33 Foot xer 4 ABS
34 Adjustable foot 4 PVC
35 Printer bracket 1 ABS
36 Star (+) screw 12 20Mn M4x12
37 Star (+) screw 1 20Mn M4x8
38 Key panel 1 PC
39 Key board mask 1 SPCC
40 Top cover 1 ABS
41 Light touch button 50 PE
42 Insulative washer 9 EDPM M4
43 Self thread screw 9 20Mn 4x10
44 Key PCBA 1
45 Printer name 1 ABS
46 Communication PCBA 1 Opcional
47 Printer 1
48 Pan support 4 Rubber
49 Load cell upper bracket 1 AL
50 Hexagon screw 4 20Mn M4x16
51 Self thread screw 4 20Mn 4x20
52 Load cell lover bracket 1 AL
53 Main PCBA 1
54 Level bubble 1
55 Bottom housing 1 ABS
56 Seal sheet 1
57 Seal Label 1

58
User’s guide
ES FR ENG Price-compung scale RTN RTN Balanza precio-peso-importe | Balance poids-prix | Price-compung scale ENG FR ES
Manual de usuario | Manuel d’usager | User’s guide
10. WARRANty
This scale is warranted against defects of manufacturing and materials for a period of 1 year, from the delivery
date.
During this period, GIROPÈS SL will take charge of repairing the scale.
This warranty does not cover defects or damaged caused by misuse, overloading or improper installation con-
trary to the recommendations described in this manual.
This warranty does not cover shipping costs for the reparation of the balance.

Manual de usuario | Manuel d’usager | User’s guide
59
NOtAS - NOtES

60
Manual de usuario | Manuel d’usager | User’s guide
ES FR ENG Balanza precio-peso-importe | Balance poids-prix | Price-compung scale RTN
NOtAS - NOtES


Pol. Empordà Internacional
C/ Molló, 15-16
17469 VILAMALLA
(Girona) SPAIN
T. (34) 972 527 212
F. (34) 972 527 211
marca propiedad de /
marque propriété de /
trade mark propiety of:
 Loading...