

Page 1
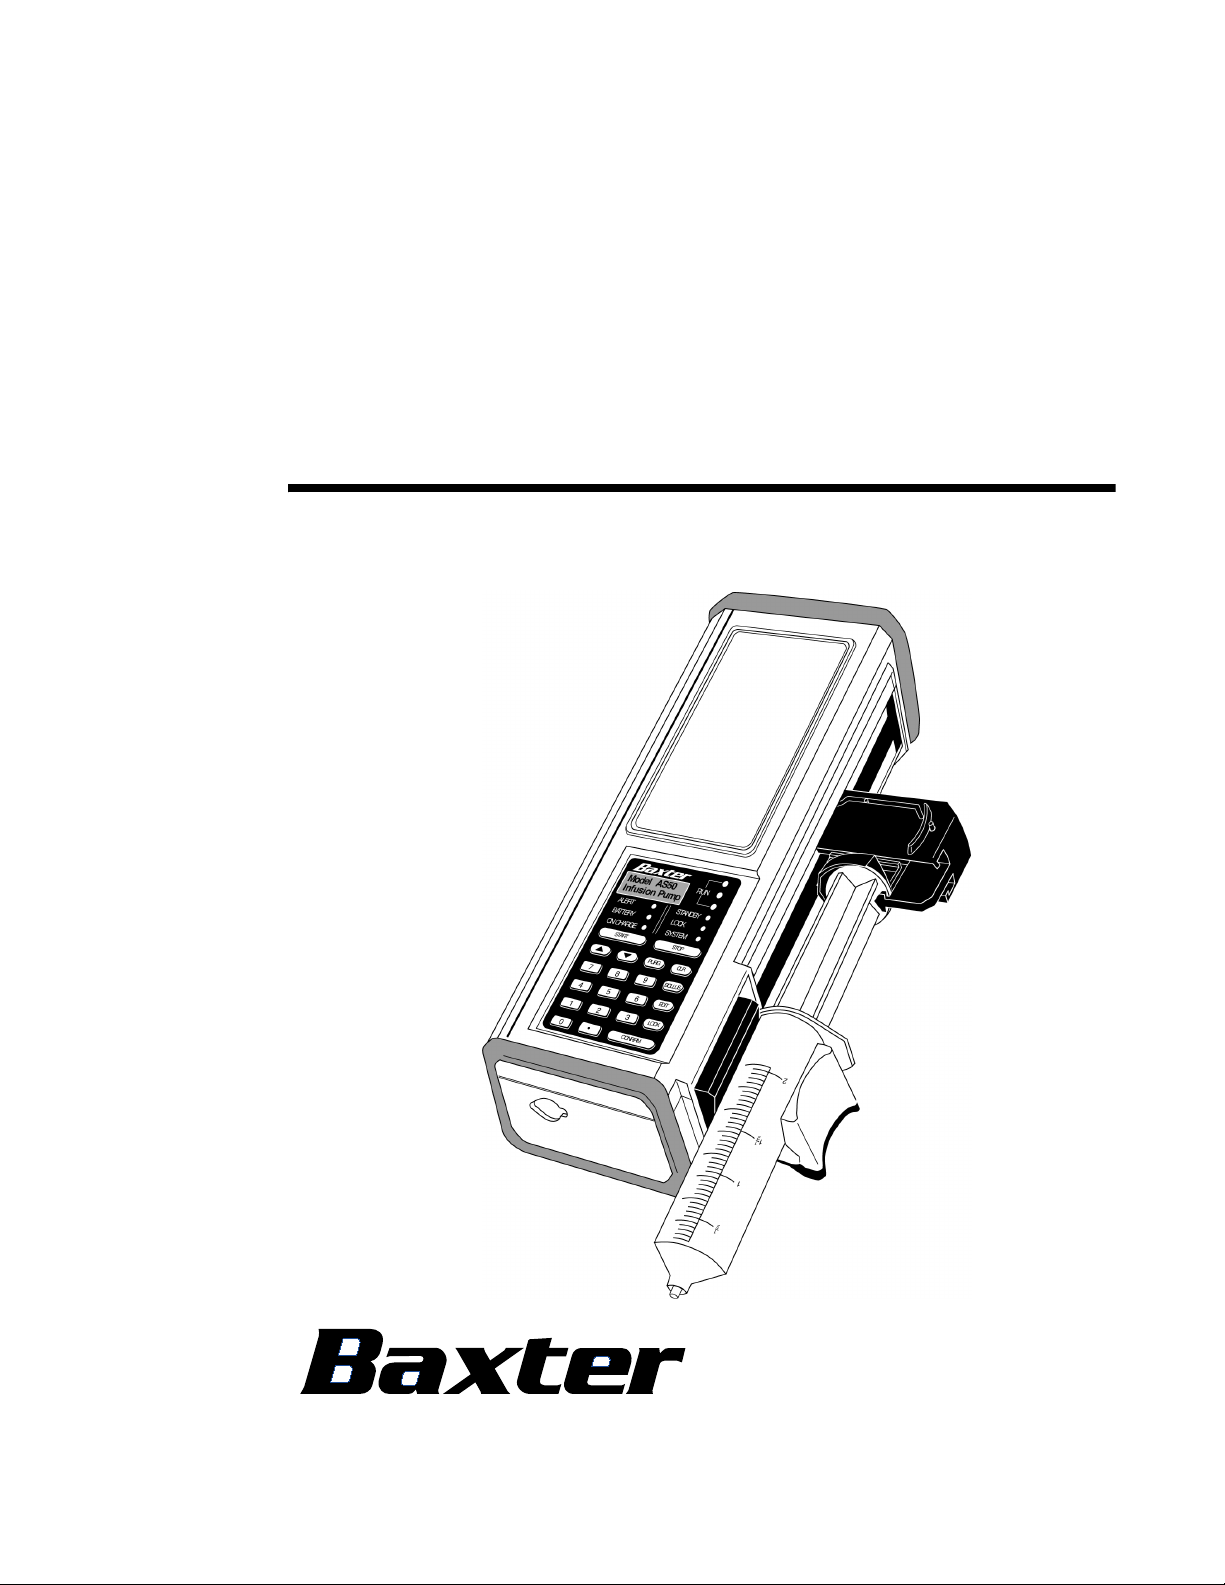
Operator’s Manual
Auto Syringe
AS50
Model AS50 Infusion Pump
Page 2

Warning
There are risks associated with using anything other than the recommended IV extension sets with this device. Sets
designated for use with this device are identified in the section “Simplified Instructions”. Baxter’s warranty on this
device will be null and void and Baxter will assume no responsibility for incidents which may occur if the product is
not used in accordance with product labeling. See the section “Precautions” for a complete list of warnings and
cautions.
Computer Software Copyrights
©Copyright 1999, Baxter Healthcare Corporation. All rights reserved.
For use only by Baxter Healthcare Corporation. The software contains proprietary information belonging to Baxter
Healthcare Corporation. The software must not be reproduced or disclosed to others without prior written approval.
Any unauthorized use of this information may subject the user to substantial liability.
Documentation Copyrights
Duplication or distribution of this manual and any information contained within is strictly prohibited without the
express written permission of Baxter. This manual and any information contained within, may not be reproduced,
distributed, or transmitted in any form, or by any means, for any purpose, without the express written permission of
Baxter. To order additional copies of this manual, or other related manuals, contact your local Baxter Service Center.
Disclaimer
The information in this document has been carefully examined and is believed to be entirely reliable. However, no
responsibility is assumed for inaccuracies. Furthermore, Baxter reserves the right to make changes to any products
herein to improve readability, function, or design. Baxter does not assume any liability arising out of the application
or use of any product or circuit described herein; neither does it cover any license under its patent rights nor the rights
of others.
Trademark Information
Baxter, the Baxter wordmark, Micro-Volume, and Auto Syringe are trademarks of Baxter International Inc. in the
U.S. Other trademark applications pending. Terumo is a trademark of Terumo Medical Corporation. ASCEND,
and Hi-Tor Plus are trademarks of Huntington Professional Products. LpH SE and Septisol are trademarks of
Steris Corporation. Cidex 7 is a trademark of Johnson & Johnson.
are the property of their respective owners.
Other product names appearing in this manual
TOR,
Page 3

Table of Contents
About This Manual . . . . . . . . . . . . . . . . . . . . . . . . . . . . . . . . . . . . . . . . . . . . . . . . . . . . 1
Notations Used in this Manual . . . . . . . . . . . . . . . . . . . . . . . . . . . . . . . . . . . . . . . 1
Device Description . . . . . . . . . . . . . . . . . . . . . . . . . . . . . . . . . . . . . . . . . . . . . . . . . . . . 3
Precautions . . . . . . . . . . . . . . . . . . . . . . . . . . . . . . . . . . . . . . . . . . . . . . . . . . . . . . . . . . 5
Special Precautions for Epidural Administration. . . . . . . . . . . . . . . . . . . . . . . . . . 7
Simplified Instructions . . . . . . . . . . . . . . . . . . . . . . . . . . . . . . . . . . . . . . . . . . . . . . . . . 9
Operation . . . . . . . . . . . . . . . . . . . . . . . . . . . . . . . . . . . . . . . . . . . . . . . . . . . . . . . 9
Programming . . . . . . . . . . . . . . . . . . . . . . . . . . . . . . . . . . . . . . . . . . . . . . . . . . . 11
Programming the Continuous Infusion Modes . . . . . . . . . . . . . . . . . . . . . . . . . . 12
Programming the Timed Infusion Modes . . . . . . . . . . . . . . . . . . . . . . . . . . . . . . 13
General Information . . . . . . . . . . . . . . . . . . . . . . . . . . . . . . . . . . . . . . . . . . . . . . . . . . 15
Technical Specifications . . . . . . . . . . . . . . . . . . . . . . . . . . . . . . . . . . . . . . . . . . . 15
The Status Display . . . . . . . . . . . . . . . . . . . . . . . . . . . . . . . . . . . . . . . . . . . . . . . 16
The Keypad . . . . . . . . . . . . . . . . . . . . . . . . . . . . . . . . . . . . . . . . . . . . . . . . . . . . 18
The Status Panel . . . . . . . . . . . . . . . . . . . . . . . . . . . . . . . . . . . . . . . . . . . . . . . . 19
Operating States. . . . . . . . . . . . . . . . . . . . . . . . . . . . . . . . . . . . . . . . . . . . . . . . . 20
Standby State . . . . . . . . . . . . . . . . . . . . . . . . . . . . . . . . . . . . . . . . . . . . . 20
Run State. . . . . . . . . . . . . . . . . . . . . . . . . . . . . . . . . . . . . . . . . . . . . . . . . 20
Data Display and Entry. . . . . . . . . . . . . . . . . . . . . . . . . . . . . . . . . . . . . . . . . . . . 20
Protocol Library Feature . . . . . . . . . . . . . . . . . . . . . . . . . . . . . . . . . . . . . . . . . . . 21
Bypassing the Protocol Library Feature. . . . . . . . . . . . . . . . . . . . . . . . . . 22
Serial Communication Feature . . . . . . . . . . . . . . . . . . . . . . . . . . . . . . . . . . . . . . 22
Infusion Modes . . . . . . . . . . . . . . . . . . . . . . . . . . . . . . . . . . . . . . . . . . . . . . . . . . 23
Continuous Infusion Modes . . . . . . . . . . . . . . . . . . . . . . . . . . . . . . . . . . . 23
Timed Infusion Modes . . . . . . . . . . . . . . . . . . . . . . . . . . . . . . . . . . . . . . . 24
Syringe Data Tables . . . . . . . . . . . . . . . . . . . . . . . . . . . . . . . . . . . . . . . . . . . . . . 25
Infusion Rate Ranges . . . . . . . . . . . . . . . . . . . . . . . . . . . . . . . . . . . . . . . 25
Deliverable Volumes . . . . . . . . . . . . . . . . . . . . . . . . . . . . . . . . . . . . . . . . 26
Detailed Instructions. . . . . . . . . . . . . . . . . . . . . . . . . . . . . . . . . . . . . . . . . . . . . . . . . . 27
Preliminary Operations . . . . . . . . . . . . . . . . . . . . . . . . . . . . . . . . . . . . . . . . . . . . 28
Manual Purge. . . . . . . . . . . . . . . . . . . . . . . . . . . . . . . . . . . . . . . . . . . . . . 28
Mount the Syringe . . . . . . . . . . . . . . . . . . . . . . . . . . . . . . . . . . . . . . . . . . 28
Turn the Pump On and Off. . . . . . . . . . . . . . . . . . . . . . . . . . . . . . . . . . . . 30
Check the Lamp Test. . . . . . . . . . . . . . . . . . . . . . . . . . . . . . . . . . . . . . . . 31
Programming . . . . . . . . . . . . . . . . . . . . . . . . . . . . . . . . . . . . . . . . . . . . . . . . . . . 32
Using Protocols . . . . . . . . . . . . . . . . . . . . . . . . . . . . . . . . . . . . . . . . . . . . 32
Programming mL/hr and mL/min Mode . . . . . . . . . . . . . . . . . . . . . . . . . . 33
Programming Units/hr, Units/min, mUnits/hr, and mUnits/min Modes. . . 35
07-19-B3-430 Auto Syringe AS50 Infusion Pump Operator’s Manual Page i
Page 4

Programming mg/hr, mg/min, mcg/hr, and mcg/min Modes . . . . . . . . . . 36
Programming mg/kg/hr, mg/kg/min, mcg/kg/hr, and mcg/kg/min Modes 37
Programming CUSTOM DILUTION Mode. . . . . . . . . . . . . . . . . . . . . . . . 39
Programming SINGLE DOSE Mode . . . . . . . . . . . . . . . . . . . . . . . . . . . . 41
Programming MANUAL SCHEDULE Mode . . . . . . . . . . . . . . . . . . . . . . 42
Programming AUTO SCHEDULE Mode . . . . . . . . . . . . . . . . . . . . . . . . . 45
General Programming Information. . . . . . . . . . . . . . . . . . . . . . . . . . . . . . . . . . . 48
Data Entry . . . . . . . . . . . . . . . . . . . . . . . . . . . . . . . . . . . . . . . . . . . . . . . . 48
Field Selection. . . . . . . . . . . . . . . . . . . . . . . . . . . . . . . . . . . . . . . . . . . . . 48
Editing in Standby State . . . . . . . . . . . . . . . . . . . . . . . . . . . . . . . . . . . . . 48
Programming Notes. . . . . . . . . . . . . . . . . . . . . . . . . . . . . . . . . . . . . . . . . 50
Editing in Run State. . . . . . . . . . . . . . . . . . . . . . . . . . . . . . . . . . . . . . . . . 50
Edit Cancellation . . . . . . . . . . . . . . . . . . . . . . . . . . . . . . . . . . . . . . . . . . . 50
Number Out of Range . . . . . . . . . . . . . . . . . . . . . . . . . . . . . . . . . . . . . . . 51
Data Test. . . . . . . . . . . . . . . . . . . . . . . . . . . . . . . . . . . . . . . . . . . . . . . . . 51
Additional Functions and Operations. . . . . . . . . . . . . . . . . . . . . . . . . . . . . . . . . . . . 53
Purge Function. . . . . . . . . . . . . . . . . . . . . . . . . . . . . . . . . . . . . . . . . . . . . . . . . . 53
Purge Procedure . . . . . . . . . . . . . . . . . . . . . . . . . . . . . . . . . . . . . . . . . . . 53
Purge Delivery Table. . . . . . . . . . . . . . . . . . . . . . . . . . . . . . . . . . . . . . . . 54
Bolus Function . . . . . . . . . . . . . . . . . . . . . . . . . . . . . . . . . . . . . . . . . . . . . . . . . . 55
Bolus Units . . . . . . . . . . . . . . . . . . . . . . . . . . . . . . . . . . . . . . . . . . . . . . . 55
Bolus Size Limits . . . . . . . . . . . . . . . . . . . . . . . . . . . . . . . . . . . . . . . . . . . 55
Bolus Rate. . . . . . . . . . . . . . . . . . . . . . . . . . . . . . . . . . . . . . . . . . . . . . . . 56
Bolus Programming. . . . . . . . . . . . . . . . . . . . . . . . . . . . . . . . . . . . . . . . . 56
Bolus Programming Notes. . . . . . . . . . . . . . . . . . . . . . . . . . . . . . . . . . . . 57
Bolus Delivery . . . . . . . . . . . . . . . . . . . . . . . . . . . . . . . . . . . . . . . . . . . . . 57
Bolus Delivery Notes . . . . . . . . . . . . . . . . . . . . . . . . . . . . . . . . . . . . . . . . 57
Bolus Review. . . . . . . . . . . . . . . . . . . . . . . . . . . . . . . . . . . . . . . . . . . . . . 57
Bolus Editing . . . . . . . . . . . . . . . . . . . . . . . . . . . . . . . . . . . . . . . . . . . . . . 58
Repeating a Bolus Delivery . . . . . . . . . . . . . . . . . . . . . . . . . . . . . . . . . . . 58
Changing the Syringe. . . . . . . . . . . . . . . . . . . . . . . . . . . . . . . . . . . . . . . . . . . . . 58
Lock and Auto Lock Functions. . . . . . . . . . . . . . . . . . . . . . . . . . . . . . . . . . . . . . 59
The Total Delivered Display . . . . . . . . . . . . . . . . . . . . . . . . . . . . . . . . . . . . . . . . 59
Expanded Data Display . . . . . . . . . . . . . . . . . . . . . . . . . . . . . . . . . . . . . . . . . . . 60
Backlight Feature . . . . . . . . . . . . . . . . . . . . . . . . . . . . . . . . . . . . . . . . . . . . . . . . 60
Configuration. . . . . . . . . . . . . . . . . . . . . . . . . . . . . . . . . . . . . . . . . . . . . . . . . . . . . . . . 61
Configuration Review . . . . . . . . . . . . . . . . . . . . . . . . . . . . . . . . . . . . . . . . . . . . . 61
Date and Time Display. . . . . . . . . . . . . . . . . . . . . . . . . . . . . . . . . . . . . . . . . . . . 61
Software and Configuration Version Display . . . . . . . . . . . . . . . . . . . . . . . . . . . 61
Reviewing Configuration Options. . . . . . . . . . . . . . . . . . . . . . . . . . . . . . . . . . . . 61
Configuration Review Table . . . . . . . . . . . . . . . . . . . . . . . . . . . . . . . . . . 62
Configurable Options . . . . . . . . . . . . . . . . . . . . . . . . . . . . . . . . . . . . . . . . . . . . . 63
Protocol Library Group (
VIEW LIBRARY) . . . . . . . . . . . . . . . . . . . . . . . . . . 63
Modes Group (VIEW MODES) . . . . . . . . . . . . . . . . . . . . . . . . . . . . . . . . . . 63
Page ii Auto Syringe AS50 Infusion Pump Operator’s Manual 07-19-B3-430
Page 5

Syringes Group (VIEW SYRINGES). . . . . . . . . . . . . . . . . . . . . . . . . . . . . . . 63
Defaults Group (VIEW DFAULTS) . . . . . . . . . . . . . . . . . . . . . . . . . . . . . . . . 64
Miscellaneous Group (VIEW MISC) . . . . . . . . . . . . . . . . . . . . . . . . . . . . . . 64
Alerts Group (VIEW ALERTS). . . . . . . . . . . . . . . . . . . . . . . . . . . . . . . . . . . 65
Identifier . . . . . . . . . . . . . . . . . . . . . . . . . . . . . . . . . . . . . . . . . . . . . . . . . . 66
Terminating Configuration Review . . . . . . . . . . . . . . . . . . . . . . . . . . . . . . . . . . . 67
Custom Configuration. . . . . . . . . . . . . . . . . . . . . . . . . . . . . . . . . . . . . . . . . . . . . 67
Factory Standard Configuration . . . . . . . . . . . . . . . . . . . . . . . . . . . . . . . . . . . . . 67
Protocol Libraries. . . . . . . . . . . . . . . . . . . . . . . . . . . . . . . . . . . . . . . . . . . 68
Pump Maintenance . . . . . . . . . . . . . . . . . . . . . . . . . . . . . . . . . . . . . . . . . . . . . . . . . . . 69
Charging the Battery. . . . . . . . . . . . . . . . . . . . . . . . . . . . . . . . . . . . . . . . . . . . . . 69
IV Pole Clamp. . . . . . . . . . . . . . . . . . . . . . . . . . . . . . . . . . . . . . . . . . . . . . . . . . . 70
IV Pole Loop . . . . . . . . . . . . . . . . . . . . . . . . . . . . . . . . . . . . . . . . . . . . . . . . . . . . 71
Cleaning . . . . . . . . . . . . . . . . . . . . . . . . . . . . . . . . . . . . . . . . . . . . . . . . . . . . . . . 71
Routine Cleaning and Disinfection Techniques . . . . . . . . . . . . . . . . . . . . 71
Conditions Requiring Service Cleaning . . . . . . . . . . . . . . . . . . . . . . . . . . 73
Periodic Maintenance . . . . . . . . . . . . . . . . . . . . . . . . . . . . . . . . . . . . . . . . . . . . . 74
Daily Check . . . . . . . . . . . . . . . . . . . . . . . . . . . . . . . . . . . . . . . . . . . . . . . 74
Battery Replacement . . . . . . . . . . . . . . . . . . . . . . . . . . . . . . . . . . . . . . . . 74
Display, Battery, and Syringe Sensor Check. . . . . . . . . . . . . . . . . . . . . . 75
Keypad Check . . . . . . . . . . . . . . . . . . . . . . . . . . . . . . . . . . . . . . . . . . . . . 75
Battery Voltage Check . . . . . . . . . . . . . . . . . . . . . . . . . . . . . . . . . . . . . . . 76
In Case of Difficulty. . . . . . . . . . . . . . . . . . . . . . . . . . . . . . . . . . . . . . . . . . . . . . . 76
Alerts and Alarms . . . . . . . . . . . . . . . . . . . . . . . . . . . . . . . . . . . . . . . . . . . . . . . . . . . . 77
Alerts. . . . . . . . . . . . . . . . . . . . . . . . . . . . . . . . . . . . . . . . . . . . . . . . . . . . . . . . . . 78
Alarms. . . . . . . . . . . . . . . . . . . . . . . . . . . . . . . . . . . . . . . . . . . . . . . . . . . . . . . . . 81
Failsafe Alarms. . . . . . . . . . . . . . . . . . . . . . . . . . . . . . . . . . . . . . . . . . . . . . . . . . 83
Warranty and Service Information . . . . . . . . . . . . . . . . . . . . . . . . . . . . . . . . . . . . . . . 85
Warranty . . . . . . . . . . . . . . . . . . . . . . . . . . . . . . . . . . . . . . . . . . . . . . . . . . . . . . . 85
Service Information. . . . . . . . . . . . . . . . . . . . . . . . . . . . . . . . . . . . . . . . . . . . . . . 85
07-19-B3-430 Auto Syringe AS50 Infusion Pump Operator’s Manual Page iii
Page 6

This page is intentionally blank.
Page iv Auto Syringe AS50 Infusion Pump Operator’s Manual 07-19-B3-430
Page 7

About This ManualChapter 1
The Auto Syringe AS50 Infusion Pump Operator’s Manual is intended for use by trained
healthcare professionals familiar with infusions and infusion pump procedures.
Notations Used in this Manual
Note: Important information is preceded by the word “Note” in boldface type.
BOLD ITALIC TEXT Denotes text prompts as they appear on the pump’s status
display. For example,
bottom line of the status display when selecting the mL/hr
infusion mode.
BOLD TEXT Denotes the keys on the pump’s keypad. For example, the
text “press
“1,” “2,” and “3,” and then press the key labeled “
ML/HR is the text that appears on the
123, CONFIRM” means: press the keys labeled
CONFIRM.”
(hh:mm) Denotes hours and minutes. The left two digits represent
hours, and the right two digits represent minutes.
Important precautions are denoted by an exclamation point enclosed in a triangle, as shown
below:
IMPORTANT: Read and understand all operating instructions and the “Precautions” on page 5
before using the Auto Syringe AS50 Infusion Pump.
!
07-19-B3-430 Auto Syringe AS50 Infusion Pump Operator’s Manual Page 1
Page 8

About This Manual
This page is intentionally blank.
Page 2 Auto Syringe AS50 Infusion Pump Operator’s Manual 07-19-B3-430
Page 9

Device DescriptionChapter 2
The Auto Syringe AS50 Infusion Pump (hereinafter referred to as “the pump”) is designed
to meet the fluid and drug delivery requirements of today’s changing clinical environment.
It provides accurate, continuous or intermittent infusion of intravenous solutions, drug
solutions, whole blood, and packed red blood cells.
The pump is indicated for infusion via intravenous (IV), intra-arterial (IA), epidural, or
subcutaneous routes of administration. It can be piggybacked into an ongoing infusion
line to deliver secondary solutions automatically, precisely, and economically. Infusion
rates are programmable from 0.01 to 438 mL/hr.
The pump accepts standard disposable syringes from 1 mL to 60 mL in size. A numeric
keypad simplifies programming and makes the pump easy to use. During programming,
the status display prompts the user to enter data about the syringe and the infusion.
While the pump is running, the status display shows information about the infusion.
Safety and effectiveness are reinforced by pre-programmable bolus operation, titration of
a dose without interruption of fluid flow, and easily understood alarm and alert messages.
The pump includes an optional serial communication feature, which provides remote
computer control and monitoring capabilities. A standard 9-pin connector allows an
RS-232 communication link between the pump and the host computer. The “Auto Syringe
AS50 Infusion Pump Programmer’s Manual” describes the use of this feature.
The pump can be custom-configured to select key features that meet specific
requirements. Configurable options include:
● Audio range
● Auto default to previous mode
● Backlight
● Infusion mode selections
● Keypad auto lock
● Maximum infusion rates
● Occlusion pressure sensitivity
● Protocol library
● Remote computer control
● Syringe manufacturer, type and size selections
07-19-B3-430 Auto Syringe AS50 Infusion Pump Operator’s Manual Page 3
Page 10

Device Description
The selected options can easily be reviewed and the chosen configuration can be
changed to meet new or different requirements.
The pump operates on an internal rechargeable battery pack and can also be operated
while attached to a “900-Series” battery charger (model number CAS40-01-900) or to a
Multi-Charger (product code 1M8563).
The pump is supplied with a pole clamp and a built-in IV pole loop. The pump can also be
used on a tabletop.
Information on writing custom software for the pump is available in the Auto Syringe AS50
Infusion Pump Programmer’s Manual. Information on troubleshooting and repair of the
pump is available in the Auto Syringe AS50 Infusion Pump Service Manual.
Page 4 Auto Syringe AS50 Infusion Pump Operator’s Manual 07-19-B3-430
Page 11
PrecautionsChapter 3
!
Federal (USA) law restricts this device to sale by or on the order of a physician.
The charger port is to be used only with “900 Series” chargers or other accessories that are
labeled specifically for use with Auto Syringe AS40A or AS50 Series Infusion Pumps, including
!
the 1M8563 Multi-Charger.
CAUTION: Refer all service, repair, and calibration to qualified technical
!
!
● Though the factory-supplied configuration settings are suitable for most therapies, the
personnel.
CAUTION: Do not operate the Auto Syringe AS50 Infusion Pump in the
presence of flammable anesthetics, oxygen-enriched, or explosive
atmospheres.
operator and hospital professionals should verify that the pump’s settings are
appropriate for the clinical application.
● The Protocol Library feature is a configuration option developed to facilitate infusion
programming. Before using a protocol for any specific drug, refer to the full
prescribing information supplied by the drug manufacturer.
● As with all medical electronic equipment, care must be exercised to avoid exposing
this device to powerful sources of electromagnetic interference.
● Do not expose the pump to X-rays, gamma rays, or other ionizing radiation, or to
strong electric or magnetic fields.
● Do not autoclave, steam sterilize, EtO sterilize, or subject the pump or charger to
temperatures in excess of 104° F (40° C).
● Do not use the following chemicals on the device, as they will damage the front panel:
acetone, acetoaldehyde ammonia, benzene, hydroxytoluene, methylene chloride,
and ozone, Do not use cleaners containing n-alkyl dimethyl ethylbenzyl ammonium
chloride unless they appear in the list of recommended cleaners in the Pump
Maintenance section of this manual.
● Do not use hard or sharp objects on the keypad.
07-19-B3-430 Auto Syringe AS50 Infusion Pump Operator’s Manual Page 5
Page 12

Precautions
● If a LINE OCCLUDED alarm occurs, RELIEVE THE RESIDUAL PRESSURE IN THE
SYRINGE BY RELEASING THE PLUNGER DRIVER. If the pressure is not relieved
prior to clearing the occlusion, an unintentional bolus delivery may occur when the
blockage is cleared. Check for kinked tubing, clogged catheter, closed stopcocks, etc.
Check for foreign material preventing movement of the pump mechanism.
● Be sure to PURGE THE SYSTEM OF ALL AIR BEFORE ADMINISTERING ANY
MEDICATION. Failure to follow this normal infusion procedure could precipitate
serious consequences.
● Remember that the volume of fluid contained in the connecting tubing is a residual
amount and cannot be infused. Allow for this extra volume of fluid when initially filling
the syringe.
● In MANUAL SCHEDULE mode, START must be pressed to deliver each dose and
continue the infusion regimen. Pressing any other key silences the audio portion of
DOSE DUE alarm and leaves the pump in Standby state, without initiating a dose
the
delivery.
● Although extreme care has been taken in assembly, component selection, and quality
control during manufacture of the Auto Syringe AS50 Infusion Pump, routine checks
and maintenance procedures must be performed so that patients receiving infusions
can be assured of trouble-free operation.
● Caution must be exercised in the selection of drugs intended to be delivered via any
infusion pump. If the drug contained in the syringe will be exposed to extreme
environmental conditions for prolonged time periods, IT IS IMPORTANT TO SELECT
DRUGS THAT WILL NOT CHANGE PHARMACOLOGICALLY UPON SUCH
EXPOSURE.
● As with all automatic infusion devices, whenever a TOXIC OR DANGEROUS LEVEL
of drug is stored in the reservoir, CONSTANT MONITORING of the infusion is
required.
● CAUTION must be employed to assure that the Auto Syringe AS50 Infusion Pump is
in good working order before putting it into use. If the pump is being operated on
battery power alone, ensure that the battery has been charged as described in this
manual.
● When the pump is first turned on, verify that the Lamp Test is accurate (see “Display,
Battery, and Syringe Sensor Check” on page 75).
● Verify all program data before pressing START.
● Wipe off spills immediately. Do not allow fluid or residues to remain on the pump.
● Repeated incorrect identification of syringe size by Syringe Recognition may signify a
pump fault condition, or that a syringe manufacturer has made a dimensional change.
The pump should be removed from service as soon as possible, so that the problem
can be investigated.
Page 6 Auto Syringe AS50 Infusion Pump Operator’s Manual 07-19-B3-430
Page 13

● If the Size Override configuration option is enabled, an operator can manually
override the Syringe Recognition feature. Incorrect syringe information may cause
delivery errors.
Special Precautions for Epidural Administration
● Epidural administration of anesthetics is limited to short-term infusion (not to exceed
96 hours) with indwelling catheters specifically indicated for short-term anesthetic
epidural drug delivery.
● Epidural administration of analgesics is limited to use with indwelling catheters
specifically indicated for either short- or long-term analgesic epidural drug delivery.
● To prevent infusion of drugs that are not indicated for epidural use, do not use IV
extension sets that incorporate injection sites during epidural delivery.
● It is strongly recommended that pumps used for epidural drug delivery be clearly
differentiated from pumps used for other routes of administration.
WARNING: Epidural administration of drugs other than those indicated
!
for epidural use could result in serious injury to the patient.
Precautions
07-19-B3-430 Auto Syringe AS50 Infusion Pump Operator’s Manual Page 7
Page 14

Precautions
This page is intentionally blank.
Page 8 Auto Syringe AS50 Infusion Pump Operator’s Manual 07-19-B3-430
Page 15
Operation
ew
ack
ew
5
6
0
5
ew
op
ew
3
r
y
CA
Simplified InstructionsChapter 4
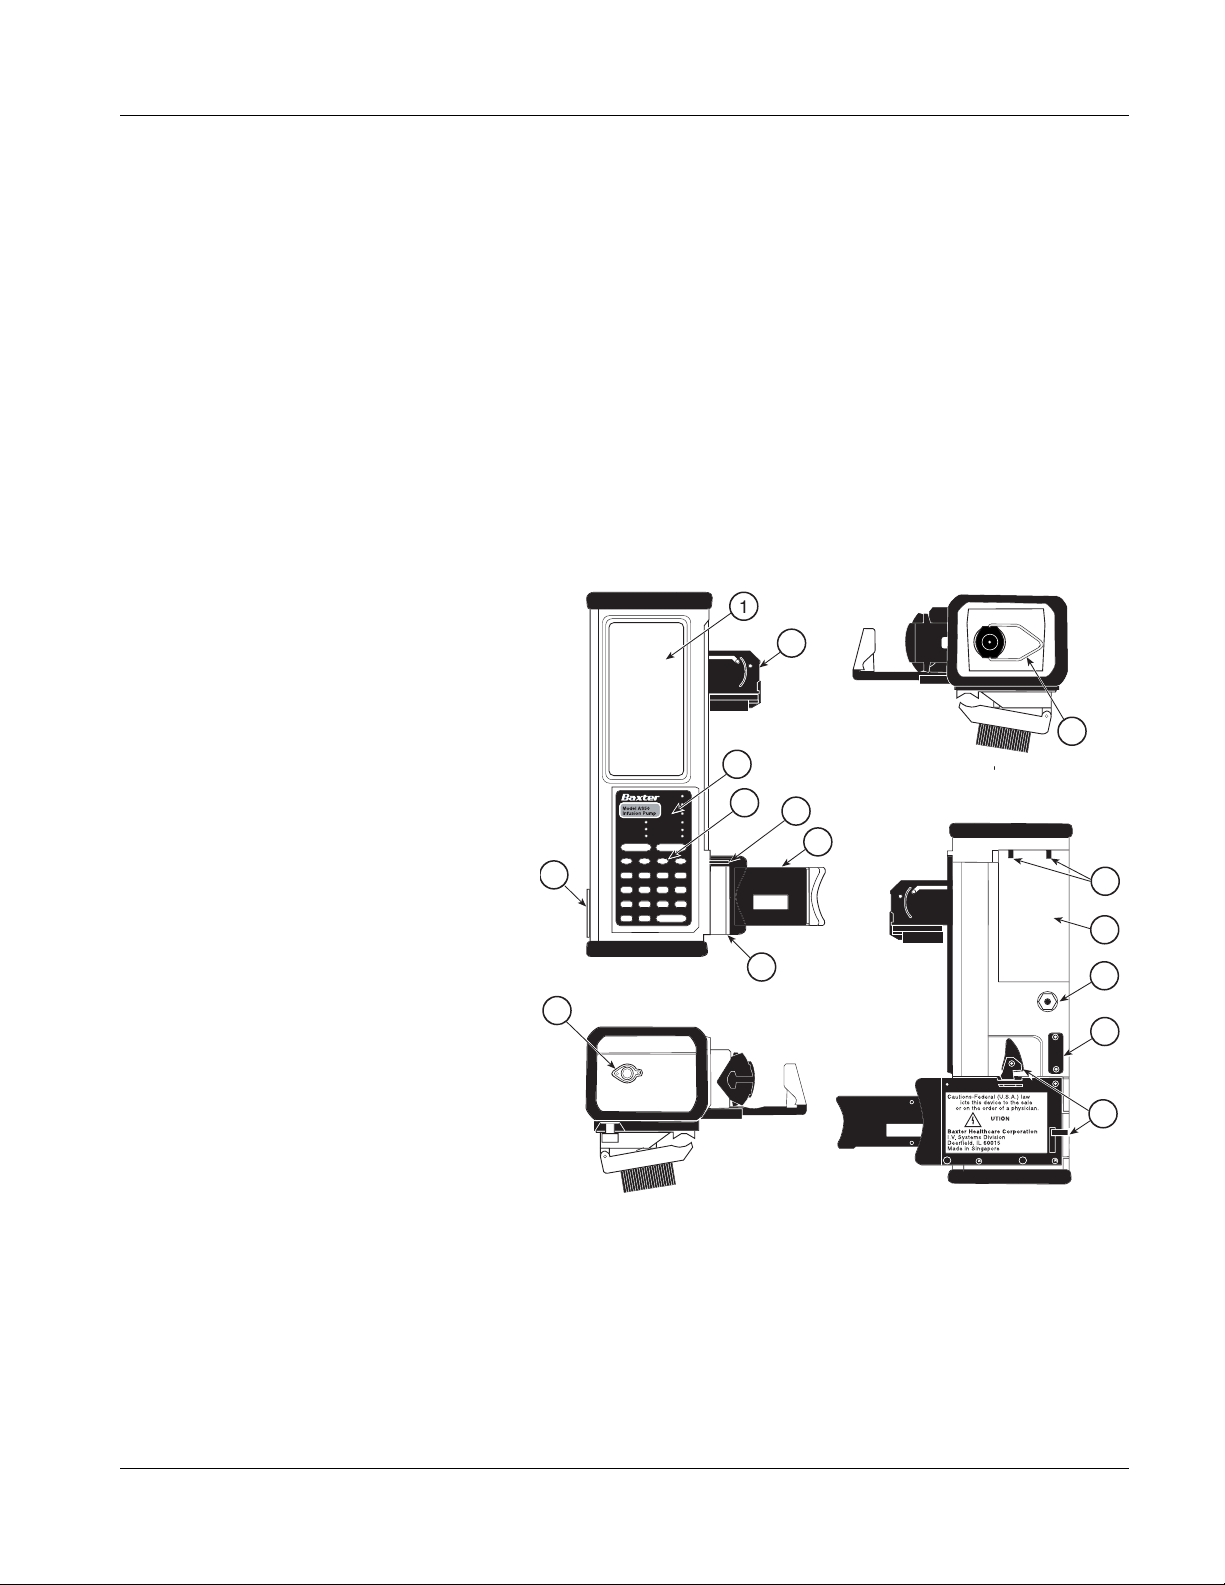
Refer to the figure below for the location and description of the pump’s operating controls.
The item numbers shown in the figure are referenced throughout the operating
instructions also.
1. Status Display
2. Plunger Assembly
(Finger Grip, Plunger
Clamp, Plunger Driver)
3. Status Panel
4. Keypad
5. Flange Slot
6. Barrel Clamp
7. Cradle
8. Charger Port
9. IV Pole Loop
10. Pole Clamp Mounting
Pins
11. Battery Cover
12. Pole Clamp Attach
Recess
13. Barrel Clamp Release
Levers
14. ON/OFF Switch
15. DB-9 RS-232 Serial
Communication Port
Front
Bottom
1
1
rest
b
B
1
07-19-B3-430 Auto Syringe AS50 Infusion Pump Operator’s Manual Page 9
Page 16

Simplified Instructions
GE
R
Note: Steps 1 and 2 can be performed after programming the pump if necessary (for
example, if using CUSTOM DILUTION mode).
1. Attach an IV extension set to the syringe and manually purge the air from the filled
syringe and tubing. Baxter recommends the following IV extension sets.
Catalog
Number Description
2N3345 36” Micro-Volume IV extension set
2N3346 36” High Flow Rate IV extension set
2N3347 36” Micro-Volume IV extension set with 0.22 micron filter
2N3348 60” Micro-Volume IV extension set
2N3349 60” High Flow Rate IV extension set
2N3350 60” Micro-Volume IV extension set with 0.22 micron filter
PLUNGE
FLAN
2. Mount the syringe on the pump.
• Pull out the plunger driver (2), slide it to top of the pump, and release it.
• Using the lever (13) on the side or rear of the pump, release the barrel clamp (6).
• Place the syringe in the cradle (7), making sure the syringe flange fits into
the slot (5).
• Close the barrel clamp (6) firmly against the syringe barrel.
• Pull out the plunger driver (2), slide it down to capture the top of the syringe
plunger, and push in firmly to capture syringe plunger.
3. Slide the ON/OFF switch (14) to the ON position.
4. Program the pump (see “Programming” on page 11).
5. Purge the syringe and tubing again to remove slack from the plunger driver.
• Press PURGE, START to begin purging. Repeat if necessary.
• Press STOP if necessary to stop purging.
6. Connect the IV extension set to the patient.
7. Press START to begin the infusion.
Page 10 Auto Syringe AS50 Infusion Pump Operator’s Manual 07-19-B3-430
Page 17

Programming
Note: If the Protocol Library feature is enabled, a ▲▼ SELECT LIBRARY prompt is dis-
1. At the SELECT MODE ▲▼ prompt, use ▲ or ▼ as necessary to display the available
infusion mode selections. Press
2. Select the syringe manufacturer and size using ▲ or ▼ as necessary and complete
the data entry by pressing
Override” on page 64.)
3. Enter the remaining program data as required. The current field is the one that is
flashing.
• Press number keys to enter the desired value.
Simplified Instructions
played first. Use ▲, ▼ and
CONFIRM as required to select a protocol library. Next,
select a protocol from the library.
If the selected protocol specifies a default infusion mode, the pump skips step 1.
CONFIRM to select an infusion mode.
CONFIRM. (For use of the Size Override feature, see “Size
• Press CONFIRM to complete the data entry.
4. To change programmed data:
• Press ▲ or ▼ to move to the desired field.
• Press EDIT. The current value flashes.
• Press ▲, ▼, or number keys to change the value.
• Press CONFIRM to complete the data entry.
5. To program or edit the bolus size:
• Press BOLUS, EDIT.
• Set the bolus size using the number keys.
• Press START to deliver a bolus, or CONFIRM to store the bolus size.
6. To clear the Total Delivered display:
• Use ▲ or ▼ to move to the TOTAL mL field.
• Press EDIT, CLR to reset the total to 0.00.
07-19-B3-430 Auto Syringe AS50 Infusion Pump Operator’s Manual Page 11
Page 18

Simplified Instructions
Programming the Continuous Infusion Modes
Programming for each infusion mode proceeds in the sequence shown in the following
table, in top-to-bottom order.
Continuous Infusion Modes
Units/hr
Units/min
mL/hr
Step
1 Select mode,
2 Enter target rate in
3 Enter body weight
4 Enter drug
5 Enter infusion rate
6 Enter final volume
mL/min
syringe
manufacturer,
syringe size.
in mL/hr or mL/
min.
mUnits/hr
mUnits/min
Select mode,
syringe
manufacturer,
syringe size.
concentration in
Units/mL.
Enter dose in
Units/hr, Units/min,
mUnits/hr, or
mUnits/min.
mcg/min
mcg/hr
mg/min
mg/hr
Select mode,
syringe
manufacturer,
syringe size.
Enter drug
concentration in
mg/mL.
Enter dose in
mcg/hr, mcg/min,
mg/hr, or mg/min.
mcg/kg/min
mcg/kg/hr
mg/kg/min
mg/kg/hr
Select mode,
syringe
manufacturer,
syringe size.
in kg.
Enter drug
concentration in mg/
mL.
Enter dose in
mcg/kg/hr,
mcg/kg/min,
mg/kg/hr, or
mg/kg/min.
CUSTOM
DILUTION
Select mode,
syringe
manufacturer,
syringe size.
mL/hr.
Enter body weight
in kg.
Enter drug
concentration in mg/
mL.
Enter target dose in
mcg/kg/min.
in mL.
7 Enter volume limit
in mL.
8 Enter bolus size in
mL.
Notes:
• mL = milliliters, kg = kilograms, mg = milligrams, mcg = micrograms,
mUnits = milliunits.
• If the Protocol Library feature is active, these modes can be accessed directly by selecting
SELECT LIBRARY or SELECT PROTOCOL programming step.
the
• The mode, rate, concentration, dose, bolus size, and maximum bolus rate may be initialized automatically if a
protocol is selected.
• Bolus programming is optional. Bolus programming may be disallowed if a protocol is selected.
Note: Custom Dilution mode:
•Press
Page 12 Auto Syringe AS50 Infusion Pump Operator’s Manual 07-19-B3-430
CONFIRM to acknowledge the displayed Drug Volume. Mix the indicated drug volume with sufficient IV fluid
to produce the Final Volume and fill the syringe. Follow manual purging and mounting procedures (see “Operation”
on page 9).
Enter bolus size in
Units.
Enter bolus size in
mg.
Enter bolus size in
mcg/kg or mg/kg.
See last Note
below.
Enter bolus size in
mcg/kg.
NONE (if available) at
Page 19

Simplified Instructions
Programming the Timed Infusion Modes
Programming for each infusion mode proceeds in the sequence shown in the following
table, in top-to-bottom order.
Timed Infusion Modes
Steps SINGLE DOSE MANUAL SCHEDULE AUTO SCHEDULE
1 Select mode, syringe
manufacturer, syringe size.
2
INFUSE field: Enter dose in mL. INFUSE field: Enter dose in mL. INFUSE field: Enter dose in mL.
3
OVER field: Enter dose duration
in hours and minutes (hh:mm).
4
5
6 When the
Note:
• If the Protocol Library feature is active, these modes can be accessed directly by selecting
Select mode, syringe
manufacturer, syringe size.
OVER field: Enter dose duration
in hours and minutes (hh:mm).
EVERY field: Enter dose Interval
in hours and minutes (hh:mm).
NEXT DOSE IN field: Enter delay
to start of first dose in hours and
minutes (hh:mm).
To start the first dose without delay,
program
NEXT DOSE IN field to
0:00.
DOSE DUE alarm
occurs, press START to deliver
one dose.
Select mode, syringe
manufacturer, syringe size.
OVER field: Enter dose duration
in hours and minutes (hh:mm).
EVERY field: Enter dose Interval
in hours and minutes (hh:mm).
NEXT DOSE IN field: Enter
delay to start of first dose in hours
and minutes (hh:mm).
To start the first dose without
delay, program
field to
SELECT LIBRARY or SELECT PROTOCOL programming step.
0:00.
NEXT DOSE IN
NONE (if available) at the
07-19-B3-430 Auto Syringe AS50 Infusion Pump Operator’s Manual Page 13
Page 20

Simplified Instructions
This page is intentionally blank.
Page 14 Auto Syringe AS50 Infusion Pump Operator’s Manual 07-19-B3-430
Page 21

General InformationChapter 1
Technical Specifications
Model: Auto Syringe AS50 Infusion Pump
Catalog Code: 1M8550
Size: approx. 3.4" x 2.6" x 10" (8.6 x 6.7 x 25 cm)
Weight: approx. 3.2 lb. (1.45 kg)
Flow Rate Accuracy: ± 3% of full scale plunger travel (not including syringe
Volume Accuracy: ± 3%, or ± 0.007" of travel, whichever is greater (not
tolerance)
including syringe tolerance)
Syringes: B-D 1, 3, 5, 10, 20, 30, 60 mL plastic
Sherwood Monoject 1, 3, 6, 12, 20, 35, 60 mL
Terumo 1, 3, 5, 10, 20, 30, 60 mL
Flow Rate Range: 0.01 mL/hr to 438 mL/hr, depending on the syringe
Deliverable Volume: Full syringe volume for 1-60 mL syringes
Data Display: Self-prompting, multi-field LCD (Liquid Crystal Display)
Status Display: Nine-LED (Light Emitting Diode) array
Power Requirement: AC: 105-125V 60 Hz (battery charger)
DC: internal rechargeable battery pack
Battery Operating Time: 5 hours of operation at 100 mL/hr, or 12 hours of operation
at 2 mL/hr using a 60 mL syringe, following a charge of no
less than 16 hours.
o
Temperature Range: 50
Keypad: Elastomeric type, with tactile feedback
F to 104o F (10o C to 40o C) Delivery of high viscosity
fluids at low temperatures is not recommended.
Construction: Water-resistant, high-impact plastic case with removable
elastomeric protective bumpers
07-19-B3-430 Auto Syringe AS50 Infusion Pump Operator’s Manual Page 15
Page 22
General Information
OD
g
OSE
g
r
GE
siz
C
s
g
USE
gr
ams
g
V
GE
z
USE
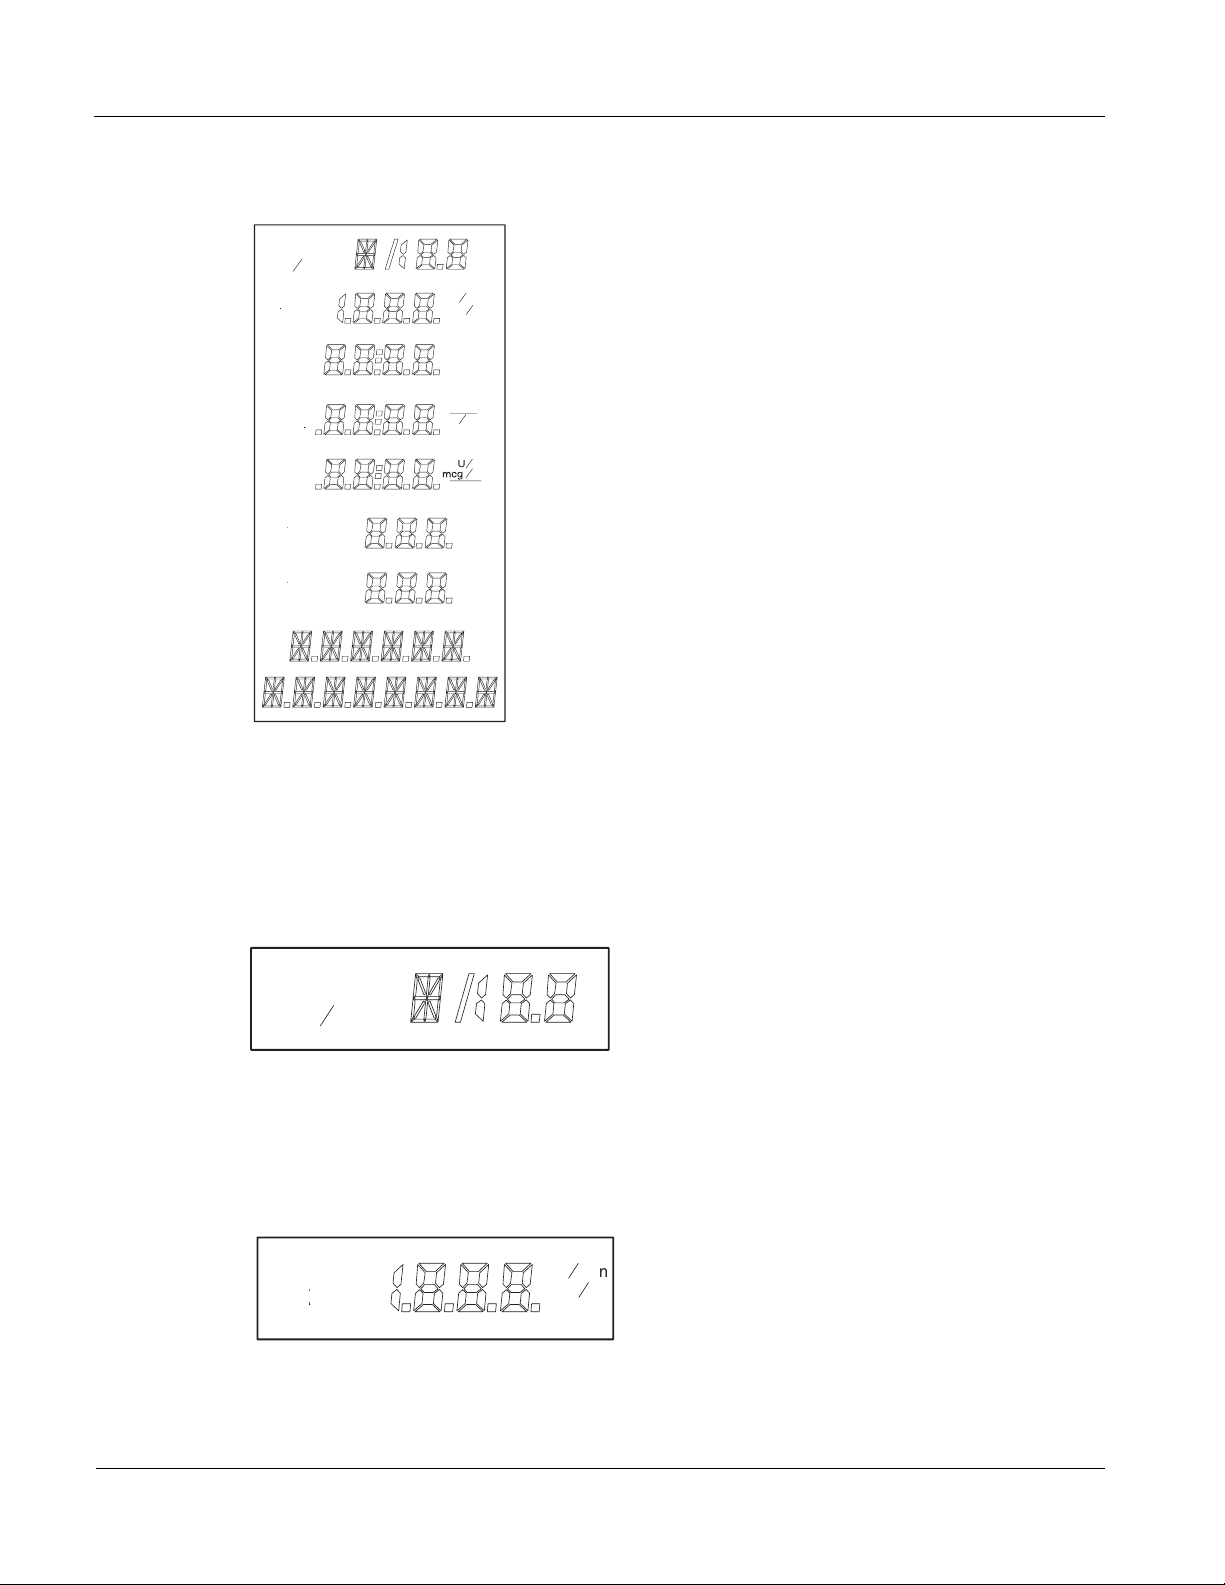
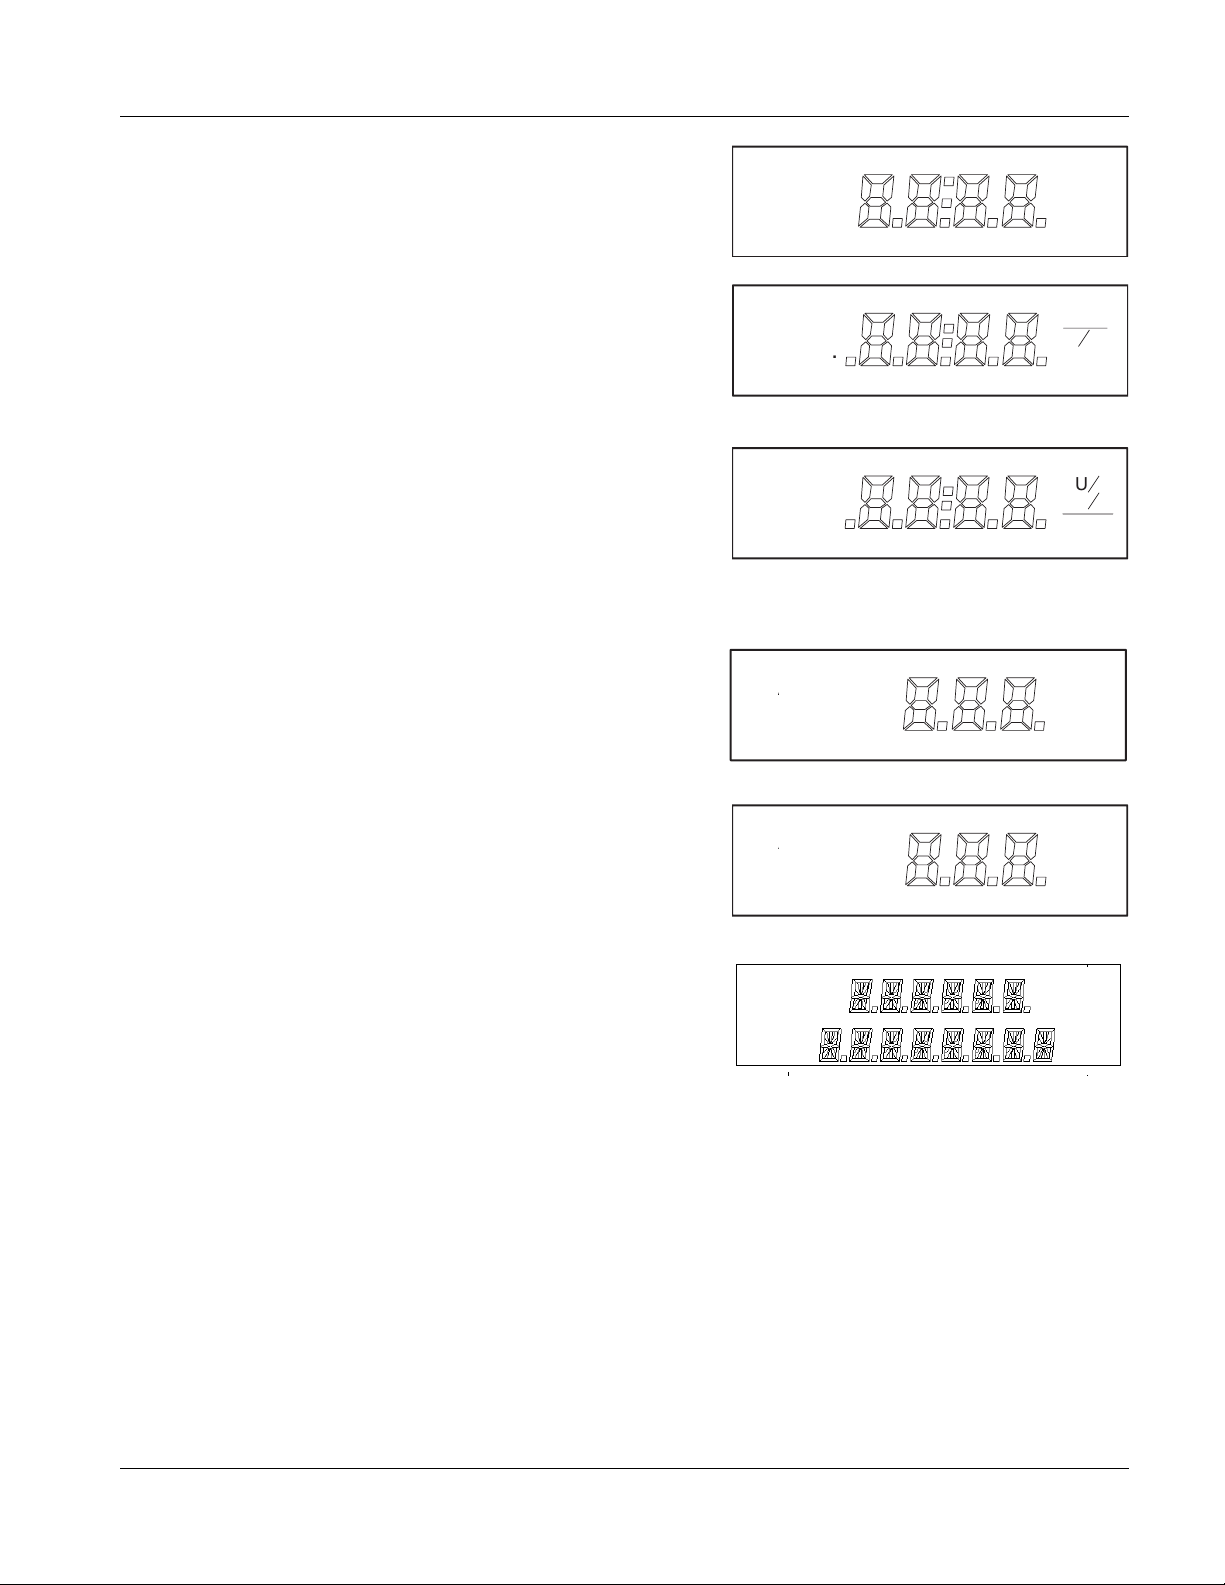
The Status Display
YRIN
The status display has eight information areas, called
fields. Except for the text field at the bottom, each field
displays three types of information:
INF
B
D
N
L LIMIT
k
nit
m
mgh
m
mLmc
● The markings on the left and right side of each field are
called annunciators. The left annunciators identify the
type of data contained in the field, while the right
annunciators identify the units of measure.
● The central portion of each field displays variable
k
numeric data, either decimal numbers or time. This data
generally represents either infusion program information
or an active display such as a running total of the
amount of drug infused.
● The bottom field of the status display is a two-line text
display, used to prompt the programming sequence or to
display a message about the infusion.
After the infusion mode has been selected, the pump
automatically displays the necessary fields to be
programmed. When the pump needs information, it
provides a text prompt and flashes the current field.
Note: The pump’s backlight is on whenever the charger is connected and the pump is
switched on. The pump can also be configured to turn the backlight on for a specified time (0 to 60 minutes) after each keypress when the charger is not connected. See the Auto Syringe AS50 Infusion Pump Technical Manual for details.
YRIN
code and syringe size in mL.
i
[B]
= B-D
[M]
= Monoject
[T]
= Terumo
Field #1 displays the syringe manufacturer
INF
Page 16 Auto Syringe AS50 Infusion Pump Operator’s Manual 07-19-B3-430
Field #2 displays the volume to be infused
(mL), or the infusion rate (mL/hr or mL/min).
Page 23
General Information
OD
g
C
s
g
OSE
g
g
TOT
s
g
O
TOT
O
Field #3 displays dose duration (HH:MM), or
patient body weight (kg).
Field #4 displays dose interval (
HH:MM), drug
concentration (mg/mL, or U/mL), or bolus size
(Units or mL).
Field #5 displays time remaining until the next
dose is due (hh:mm), dose size (mcg/min,
mcg/hr, mg/min, mg/hr, mcg/kg/min, mcg/kg/hr,
mg/kg/min, mg/kg/hr, mU/min, mU/hr, U/min, or
U/hr) or bolus size (mg, mcg/kg, mg/kg, or
Units).
Field #6 displays total delivered (mL, mcg, mg,
or grams), volume limit (mL), bolus size (mL),
or final volume (mL).
B
N
D
V
k
nit
m
m
mcgk
ram
mLmc
Field #7 displays total delivered (mL), or drug
volume to be mixed with infusion base solution
(mL).
Field #8 displays text prompts and messages.
V
07-19-B3-430 Auto Syringe AS50 Infusion Pump Operator’s Manual Page 17
Page 24
General Information
S
5
GLR
OCK
3
M
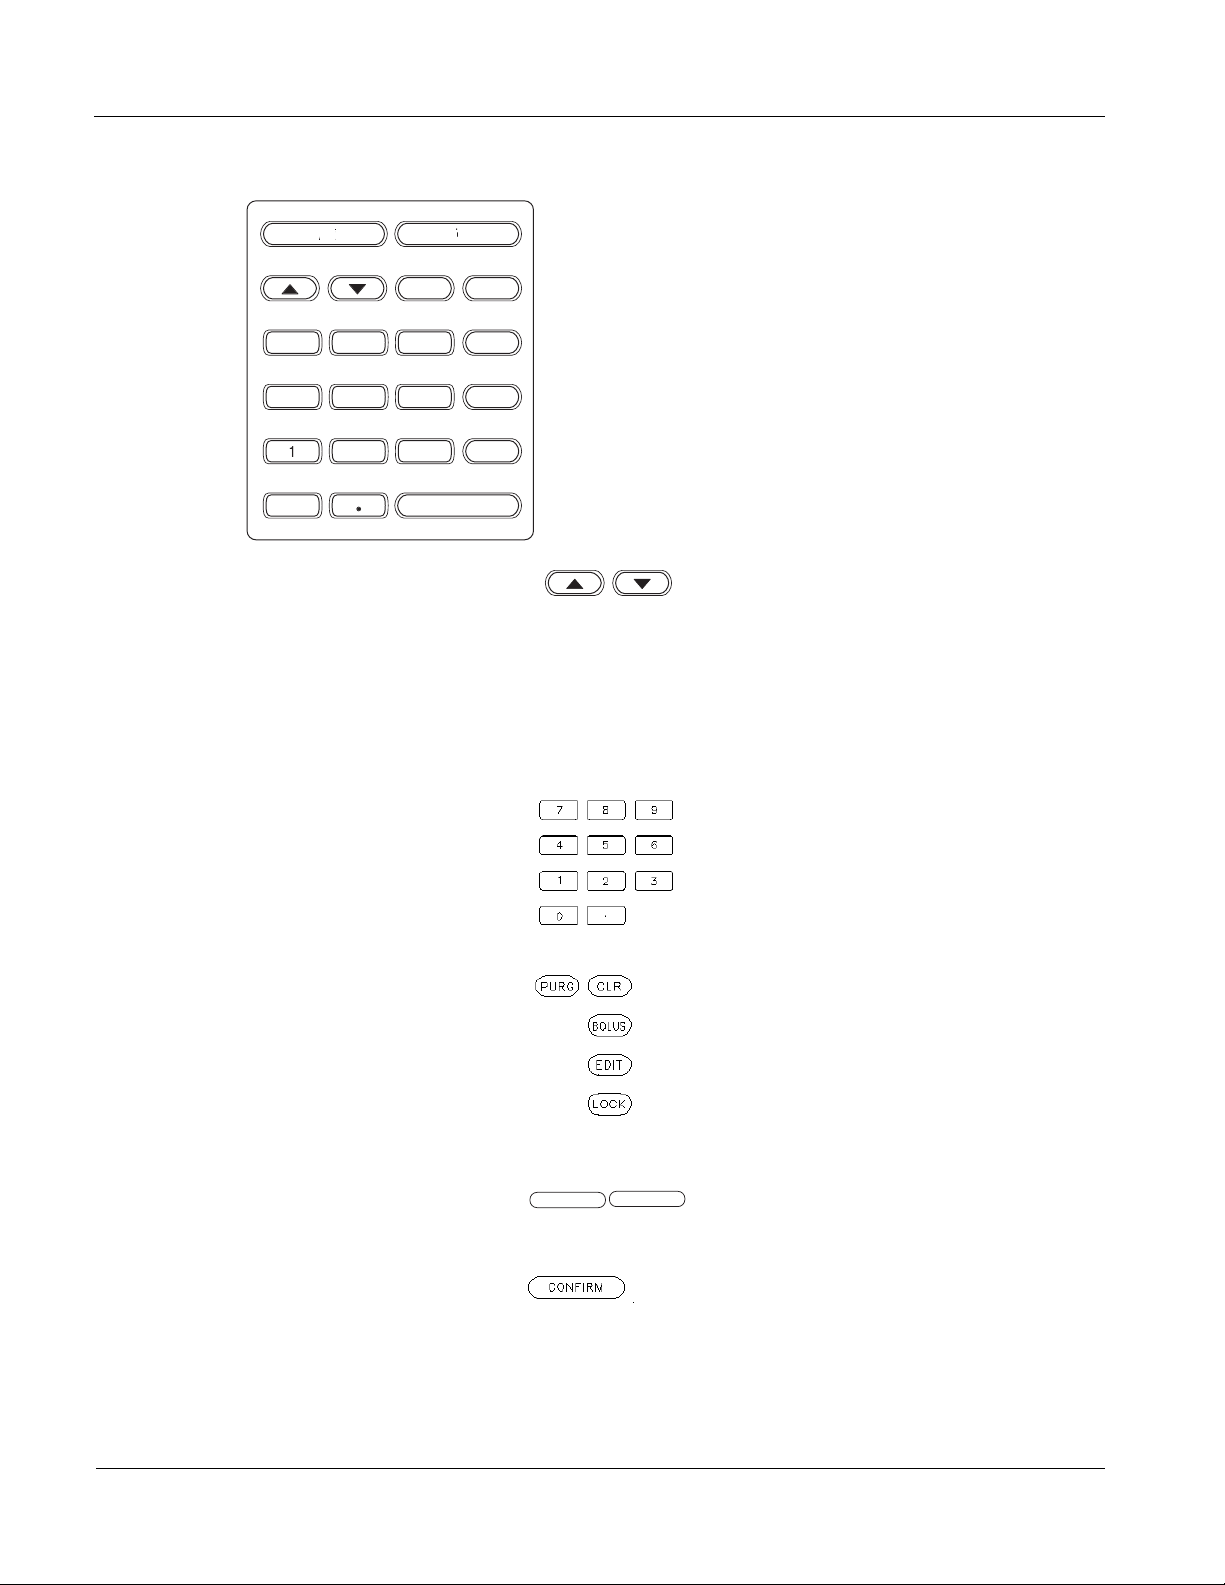
The Keypad
Arrow Keys The up arrow key (▲) increases a number,
The keypad includes a standard set of number keys and
decimal point (referred to in this document as digit keys),
arrow keys, and various function keys.
PUR
BOLU
L
NFIR
selects a different field, or displays the
next item in a list.
The down arrow key (▼) decreases a
number, selects a different field, or
displays the previous item in a list.
Digit Keys The digit keys are used to enter numeric
values directly.
Function Keys These keys activate specific functions.
Action Keys These keys start and stop the pump motor.
START
STOP
Confirm Key This key is used to complete a
programming step, to respond to a
prompt, or to display additional infusion
program information.
Page 18 Auto Syringe AS50 Infusion Pump Operator’s Manual 07-19-B3-430
Page 25

The Status Panel
RUN lights When the pump is in
General Information
the Run state, one or
more of the green
RUN
lights are on.
When the pump is
infusing, the three
RUN
lights flash in
sequence, in a “falling
drop” pattern.
When the pump is counting time until an infusion is to
begin, only the top
RUN light flashes.
When a bolus or purge is in progress, all three
flash simultaneously.
ALERT The red
ALERT light flashes during an alert or alarm. The
status display and remaining status lights may display
additional information.
BATTERY When flashing, the red
battery charge is low. If the battery discharges significantly,
BATTERY light stays on constantly and the pump goes
the
into a fail-safe alarm state.
ON CHARGE The green
ON CHARGE light indicates that the battery
charger is plugged in.
STANDBY The yellow
STANDBY light flashes to indicate that the pump
is in Standby state.
LOCK The yellow
SYSTEM The red
LOCK light indicates that the keypad is locked.
SYSTEM light indicates a malfunction. The pump
cannot operate until the problem is corrected. The infusion
must then be reprogrammed.
RUN lights
BATTERY light indicates that the
07-19-B3-430 Auto Syringe AS50 Infusion Pump Operator’s Manual Page 19
Page 26

General Information
Operating States
Standby State
When the pump is in Standby state, the infusion is stopped and the STANDBY light
flashes. If the pump is left in Standby state for more than two minutes, a
alert or alarm occurs.
Run State
There are two Run states: Run Delivering state and Run Counting state.
In Run Delivering state, the infusion program is running and the pump is delivering an
infusion. The three
In Run Counting state, the infusion program is counting time until the next dose is due,
and the pump is not delivering an infusion. The top
PUMP IS IDLE
RUN lights flash in a “falling drop” pattern.
RUN light flashes.
Note: Bolus and Purge operations are special infusion states. The
unison when bolusing or purging in both Standby and Run states.
Data Display and Entry
Numeric Data Numbers are displayed in a right-justified format. A leading
Time Data Fields In time fields, values are displayed right justified. Leading
Automatic Decimal If a number is entered without a decimal point, the pump
Flashing Data The data within a field flashes to show that the field has
Flashing Annunciators The annunciators for the current field flash. The current
RUN lights flash in
zero appears before decimal values when the field size
permits. For example, the value “.12” is displayed as
0.12.
zero(es) are automatically entered if needed. For example,
1 minute is entered by pressing
displayed as
0:01.
1, CONFIRM and is
automatically enters a decimal point to the right of the
number when
CONFIRM is pressed.
been opened and is ready to be programmed or edited.
field will be opened for editing when
EDIT is pressed.
Data Test All entered data is tested when
CONFIRM is pressed. If the
entered value is too large or too small, the pump issues a
PUMP LIMIT alert and substitutes the nearest acceptable
value. Press
CONFIRM to accept the value, or enter a
different value.
Page 20 Auto Syringe AS50 Infusion Pump Operator’s Manual 07-19-B3-430
Page 27

Arrow Keys Arrow keys can be used instead of individual digits for
Key Sounds An audible click provides confirmation of each keypress.
Dashes Dashes are displayed when a field is clear and open for
Protocol Library Feature
The Protocol Library feature is a configurable option that allows authorized personnel to
store named sets or protocols of frequently used programming data. Protocols may also
be grouped into libraries.
General Information
selecting predefined responses, incrementing or
decrementing fields. In general, arrow keys cannot be used
to initialize fields that have been cleared to dashes, except
for syringe size and manufacturer fields.
The pump indicates an invalid keypress by sounding a short
beep. Simultaneous keypresses are ignored.
programming. In general, digit keys must be used to enter a
value in a dashed field. If an arrow key is pressed while
dashes are displayed, the pump beeps and displays the
message
USE DIGITS.
Using a protocol can simplify the programming process by providing default selections at
some of the data entry steps. For instructions on selecting a protocol, see “Using
Protocols” on page 32.
The Protocol Library feature is enabled or disabled through the pump configuration mode.
This procedure can be done by authorized personnel on site, and is described in the Auto
Syringe AS50 Infusion Pump Service Manual.
A protocol may specify any of the following:
Default Infusion Mode If a protocol specifies a default infusion mode, the infusion
mode programming step is skipped. The pump briefly
displays the infusion mode name before proceeding directly
to the syringe manufacturer programming step.
Default Concentration If a protocol specifies a default concentration, the default
value appears automatically at the start of the
concentration programming step. This value may be
changed, or it may be accepted by pressing
CONFIRM.
Default Dose or Rate If a protocol specifies a default dose or rate, the default
value appears automatically at the start of the
ENTER RATE programming step. This value may be
or
changed, or it may be accepted by pressing
ENTER DOSE
CONFIRM.
Bolus Prevention If a protocol specifies bolus prevention, the pump will not
allow a bolus to be programmed or delivered. If
pressed, the pump beeps and displays the message
ALLOWED
07-19-B3-430 Auto Syringe AS50 Infusion Pump Operator’s Manual Page 21
.
BOLUS is
NOT
Page 28

General Information
Default Bolus Size If a protocol specifies a default bolus size, the default value
appears automatically when the Bolus Size field is first
opened for editing. This value may be changed, or it may be
accepted by pressing
Bolus Maximum Rate The bolus delivery rate is normally limited to the smaller of:
the limit specified by the RATE RANGE configuration
option, or the maximum rate for the programmed syringe. If
a protocol specifies a bolus maximum rate, the pump will
further limit the bolus delivery rate so it does not exceed the
specified bolus maximum rate, which is defined in terms of
dosage (such as mcg/kg/min).
Bypassing the Protocol Library Feature
Note: The NONE selection may not be available, depending upon configuration.
CONFIRM.
Selecting
Protocol Library feature and allows infusion mode selection and programming to proceed
in the normal way.
NONE at the SELECT LIBRARY or SELECT PROTOCOL step bypasses the
Serial Communication Feature
The pump provides remote control and monitoring capabilities. A standard 9-pin
connector (DB9) allows the connection of an RS-232 cable between the pump and a
computer. The cable allows an operator at a remote computer to control pump operations
and to query the pump for data such as infusion totals, program values, and operational
status. The remote control feature is a configurable option. See the Auto Syringe AS50
Infusion Pump Programmer’s Manual for details.
Page 22 Auto Syringe AS50 Infusion Pump Operator’s Manual 07-19-B3-430
Page 29

Infusion Modes
The pump provides 18 infusion modes, which fall into two major categories: continuous
and timed infusions. Continuous infusions deliver at a steady, programmed rate. Timed
infusions deliver one or more equal doses according to a programmed schedule. The
infusion modes are briefly described below. For more information see “Detailed
Instructions” on page 27.
Continuous Infusion Modes
mL/hr and mL/min: The rate of infusion is programmed in mL/hr or
Units/hr, Units/min, mUnits/hr and mUnits/min: The drug concentration is entered in
mg/hr, Mg/min, mcg/hr and mcg/Min: The drug concentration is entered in mg/mL, and
General Information
mL/min, depending on the mode selected. A volume limit
can be programmed for these modes only.
units/mL, and the dose is entered in Units/hr, Units/min,
mUnits/hr or mUnits/min, depending on the mode selected.
The pump automatically displays the effective rate in mL/hr.
the dose is entered in mg/hr, mg/min, mcg/hr or
mcg/min, depending on the mode selected. The pump
automatically displays the effective rate in mL/hr.
mg/kg/hr, mg/kg/min, mcg/kg/hr and mcg/kg/min: The patient's body weight is
entered in kg, the drug concentration is entered in mg/mL,
and the dose is entered in mg/kg/hr, mg/kg/min, mcg/kg/hr
or
mcg/kg/min, depending on the mode selected. The pump
automatically displays the effective rate in mL/hr.
CUSTOM DILUTION: In this mode the pump is programmed for a continuous
infusion and the drug concentration is adjusted for a target
infusion rate and dose. The target rate is entered in mL/hr,
the patient’s body weight is entered in kg, the initial drug
concentration is entered in mg/mL, the target dose is
entered in mcg/kg/min, and the final volume is entered in
mL. The pump calculates and displays the volume of drug
(in mL) to be added to the infusion base solution to produce
a final concentration that achieves the target rate and target
dose. The final concentration is displayed when the infusion
is initiated.
07-19-B3-430 Auto Syringe AS50 Infusion Pump Operator’s Manual Page 23
Page 30

General Information
Timed Infusion Modes
SINGLE DOSE: In this mode, the pump is programmed to infuse a single
MANUAL SCHEDULE: In this mode, the pump is programmed to infuse a dose
AUTO SCHEDULE: In this mode, the pump is programmed to infuse a dose
dose over a specified period of time. The dose is entered in
mL, and the time period is entered in hours and minutes.
over a specified period of time, and to repeat the dose at
specified intervals. The dose is entered in mL, and the time
period and interval are entered in hours and minutes.
The pump alerts the operator when a dose is due to start.
The operator must then press
START to initiate each dose.
over a specified period of time, and to repeat the infusion at
specified intervals. The dose is entered in mL, and the time
period and interval are entered in hours and minutes.
Whereas
to press
MANUAL SCHEDULE mode requires the operator
START to initiate each dose, AUTO SCHEDULE
mode automatically starts each dose when it is due.
Page 24 Auto Syringe AS50 Infusion Pump Operator’s Manual 07-19-B3-430
Page 31

Syringe Data Tables
This table shows the performance ranges for infusion delivery parameters, which are a
function of the syringe dimensions.
Infusion Rate Ranges
General Information
Syringe
Manufacturer
B-D Plastic 1
Monoject 1
Te r um o 1
Syringe
Size
(mL)
3
5
10
20
30
60
3
6
12
20
35
60
3
5
10
20
30
60
Minimum
Flow
Rate
(mL/hr)
0.01
0.02
0.03
0.1
0.1
0.1
0.1
0.01
0.02
0.03
0.1
0.1
0.1
0.1
0.01
0.02
0.03
0.1
0.1
0.1
0.2
Maximum
Flow
Rate
(mL/hr)
11
38
74
107
188
241
366
11
41
83
126
208
285
366
11
41
87
129
210
276
438
Minimum
Flow Rate
(mL/min)
0.001
0.001
0.001
0.002
0.002
0.002
0.002
0.001
0.001
0.001
0.002
0.002
0.002
0.002
0.001
0.001
0.001
0.002
0.002
0.002
0.004
Maximum
Flow Rate
(mL/min)
0.183
0.633
1.233
1.783
3.13
4.01
6.1
0.183
0.683
1.383
2.1
3.46
4.75
6.1
0.183
0.683
1.45
2.15
3.5
4.6
7.3
Maximum Flow Rates shown apply to pumps configured for:
Rate Range = H (High).
Rate Range = High limits maximum rate to maximum rate for syringe used.
Rate Range = Medium limits maximum rate to 120 mL/hr (2 mL/min).
Rate Range = Low limits maximum rate to 15 mL/hr (0.25 mL/min).
07-19-B3-430 Auto Syringe AS50 Infusion Pump Operator’s Manual Page 25
Page 32

General Information
Deliverable Volumes
This table shows the minimum and maximum programmable settings for all syringes that
can be used with the pump. The limits shown apply to bolus, volume limit, single dose,
and scheduled dose deliveries.
Syringe
Manufacturer Syringe Size (mL)
B-D Plastic 1
3
5
10
20
30
60
Monoject 1
3
6
12
20
35
60
Te ru mo 1
3
5
10
20
30
60
Minimum Volume
(mL)
0.03
0.08
0.1
0.1
0.1
0.1
0.1
0.03
0.08
0.1
0.1
0.1
0.1
0.1
0.03
0.08
0.1
0.1
0.1
0.1
0.1
Maximum Volume
(mL)
1
3
5
10
20
30
60
1
3
6
12
20
35
60
1
3
5
10
20
30
60
Page 26 Auto Syringe AS50 Infusion Pump Operator’s Manual 07-19-B3-430
Page 33

Detailed InstructionsChapter 1
This section provides detailed descriptions of the seven basic steps required to operate
the pump:
Note: Steps 1 and 2 can be performed after programming the pump if necessary (for
example, if using CUSTOM DILUTION mode).
1. Attach a Baxter 2N series (or equivalent) extension set to the syringe and manually
purge the air from the filled syringe and tubing.
2. Mount the syringe on the pump.
3. Slide the ON/OFF switch (7) to the “on” position (refer to figure on the following page).
4. Program the pump.
5. Purge the syringe and tubing again to remove slack from the plunger driver.
6. Connect the extension set to the patient.
7. Press START to begin the infusion.
07-19-B3-430 Auto Syringe AS50 Infusion Pump Operator’s Manual Page 27
Page 34

Detailed Instructions
Preliminary Operations
Manual Purge
1. Attach a Baxter 2N Series or equivalent IV extension set to the filled syringe.
2. Remove the sterile cap from the end of the tubing.
3. Manually purge until a drop of fluid is visible at the end of the tubing.
4. Replace the sterile cap on the end of the tubing.
Mount the Syringe
1. Grasp the FINGER GRIP (1) on the PLUNGER DRIVER (2) and pull it all the way out.
2. Slide the PLUNGER DRIVER to the top of the pump and release the FINGER GRIP.
Page 28 Auto Syringe AS50 Infusion Pump Operator’s Manual 07-19-B3-430
Page 35

Detailed Instructions
3. Open the BARREL CLAMP (3) by moving either of the BARREL CLAMP RELEASE
LEVERS (4). Allow the barrel clamp to slide all the way open.
4. Place the syringe in the CRADLE (5). Be sure the syringe is centered in the V of the
cradle, and that the flange of the syringe fits into the FLANGE SLOT (6).
5. Push the BARREL CLAMP (3) in firmly so that it securely grips the syringe barrel. The
barrel clamp is shaped to fit the heel of the hand, making it easy to firmly clamp the
syringe.
07-19-B3-430 Auto Syringe AS50 Infusion Pump Operator’s Manual Page 29
Page 36

Detailed Instructions
/OF
C
6. Grasp the FINGER GRIP (1) on the DRIVER (2) and pull it all the way out. Slide the
DRIVER down until it contacts the syringe plunger, then release.
7. Push the PLUNGER CLAMP in firmly to capture the syringe plunger.
Turn the Pump On and Off
The ON/OFF switch is on the left side of the pump, near the bottom. Turn the pump on by
sliding the switch up to the
Note: If the syringe is improperly mounted, the pump displays one of the following alert
messages:
syringe and correct the indicated problem. If a combination of conditions is
sensed, the pump displays a
The pump is turned off by sliding the switch down to the
N
WIT
ON position.
CHECK BARREL, CHECK FLANGE, or CHECK PLUNGER. Examine the
CHECK SYRINGE alert or alarm message instead.
OFF position.
Page 30 Auto Syringe AS50 Infusion Pump Operator’s Manual 07-19-B3-430
Page 37

Check the Lamp Test
OD
g
OSE
g
r
GE
siz
C
s
g
USE
gr
ams
g
V
Detailed Instructions
As soon as the pump is turned on, an automatic self-test
begins. This includes the Lamp Test, which tests the status
display and the status panel lights. Verify that all the lights
illuminate and that all parts of the status display are legible.
Carefully check the Lamp Test daily, or once per shift. See
“Display, Battery, and Syringe Sensor Check” on page 75.
To examine the status display more closely during the
Lamp Test, press and hold
STOP while the status display
characters are all visible. The Lamp Test will complete
STOP is released.
when
CONFIRM is pressed during the Lamp Test, the battery
If
voltage will be displayed in the text field immediately
following completion of the Lamp Test.
The Lamp Test ends with a short beep. If the pump is
configured to show an identifier message, it will appear in
the text field at the bottom of the status display.
This completes the preliminary operations.
INF
B
D
YRIN
N
L LIMIT
m
k
nit
m
mLmc
h
k
07-19-B3-430 Auto Syringe AS50 Infusion Pump Operator’s Manual Page 31
Page 38

Detailed Instructions
Programming
The pump is ready for programming when the preliminary operations have been
completed. The initial programming prompt is determined as follows:
● If the Protocol Library feature is enabled, a protocol selection prompt is displayed.
Continue with the “Using Protocols” section below.
● If the Protocol Library feature is not enabled, a mode selection prompt is displayed.
Skip to the appropriate mode programming section below.
For additional information about programming the pump, see “General Programming
Information” on page 48.
Using Protocols
If the Protocol Library feature is enabled, the pump display alternates the prompts
SELECT LIBRARY and ▲▼ SELECT PROTOCOL.
▲▼
Selecting a Protocol Library
If ▲▼SELECT LIBRARY is displayed, use the ▲ and ▼ keys as necessary to display the
name of the desired protocol library and press
Note: If the
NONE selection is available, the Protocol Library feature may be bypassed
by selecting
NONE. Continue with the appropriate mode programming section
CONFIRM to complete the selection.
below.
Selecting a Protocol
If ▼▲ SELECT PROTOCOL is displayed, use the ▲ and ▼ keys as necessary to display
the name of the desired protocol, and press
Note: The protocol name is continuously displayed in the text field except when a mes-
sage or prompt must be displayed.
NONE selection is available, the Protocol Library feature may be bypassed
If the
by selecting
NONE. Continue with the appropriate mode programming section
below.
CONFIRM to complete the selection.
Page 32 Auto Syringe AS50 Infusion Pump Operator’s Manual 07-19-B3-430
Page 39

Selecting an Infusion Mode
If a default mode has been assigned to the selected protocol, the pump sets the infusion
mode automatically. The name of the mode is displayed briefly in the text field, and
programming continues with syringe manufacturer selection.
If no default mode has been assigned to the selected protocol, the pump displays a
SELECT MODE ▼▲ prompt.
Continue with the appropriate mode programming section below.
For additional information about the Protocol Library, see “Protocol Library Feature” on
page 21.
Programming mL/hr and mL/min Mode
In these modes, the pump runs at a programmed, constant rate. A volume limit can also
be programmed in these modes.
Note: If a protocol has been selected, the infusion mode may appear automatically.
Detailed Instructions
1. At the SELECT MODE ▲▼ prompt, use ▲ or ▼ to display the available infusion mode
selections. Press
2. Use ▲ or ▼ and CONFIRM as required to select the syringe manufacturer and size.
CONFIRM to select the desired infusion mode.
Note: If a protocol has been selected, a default infusion rate may appear automatically.
Use ▲ and ▼ or the digit keys to modify this value as necessary.
3. Enter the infusion rate in mL/hr or mL/min, depending on the infusion mode selected.
4. Press CONFIRM to complete the entry.
Volume Limit
The Volume Limit feature is a configurable option available only in the mL/hr and mL/min
modes. The pump stops when the programmed volume limit has been delivered.
Enter the desired volume limit. When the delivery begins, the VOL LIMIT field displays the
amount of drug remaining until the programmed volume limit is reached. The pump stops
when the VOL LIMIT field reaches zero.
The Volume Limit feature can be temporarily disabled without reconfiguring the pump by
programming zero (
0) in the VOL LIMIT field.
07-19-B3-430 Auto Syringe AS50 Infusion Pump Operator’s Manual Page 33
Page 40

Detailed Instructions
Bolus in mL/hr and mL/min Modes
Note: If a protocol has been selected, bolus delivery may be disallowed or a default
If the infusion program is to include a bolus delivery:
1. Press BOLUS to obtain the bolus programming display.
2. Press EDIT, then use the digit keys to set the bolus size (in mL).
3. Press CONFIRM to store the bolus size and return to the normal display. The bolus
infusion rate is automatically set.
See “Bolus Function” on page 55 for more information on bolus delivery.
Note: For mL/min mode, the bolus rate is displayed in mL/min. For all other modes, it is
bolus size may appear automatically. If a default bolus size is displayed, use ▲
and ▼ or the digit keys to modify the value as necessary.
displayed in mL/hr.
mL/hr and mL/min Programming Notes
1. See “Syringe Data Tables” on page 25 for minimum and maximum infusion rates for
each syringe.
2. Pressing CONFIRM during delivery briefly displays additional program data.
3. A bolus can only be programmed, edited, or delivered after the syringe size has been
programmed.
Page 34 Auto Syringe AS50 Infusion Pump Operator’s Manual 07-19-B3-430
Page 41

Programming Units/hr, Units/min, mUnits/hr, and mUnits/min Modes
In these modes, the pump runs at a programmed, constant rate. The infusion is
programmed in terms of drug concentration and dose.
Note: If a protocol has been selected, the infusion mode may have been selected auto-
matically.
1. At the SELECT MODE ▲▼ prompt, use ▲ or ▼ to display the available infusion mode
selections. Press
2. Use ▲ or ▼ and CONFIRM as required to select the syringe manufacturer and size.
Note: If a protocol has been selected, a default drug concentration may appear automat-
ically. If a default drug concentration is displayed, use
modify this value as necessary, and press
3. At the ENTER CONCENTR prompt, enter the drug concentration (CONC.) in Units/mL.
Press
CONFIRM to complete the data entry.
CONFIRM to select the desired infusion mode.
▲ and ▼ or the digit keys to
CONFIRM to complete the data entry.
Detailed Instructions
Note: If a protocol has been selected, a default dose may appear automatically. Use
and ▼ or the digit keys to modify this value as necessary, and press CONFIRM to
complete the data entry.
4. At the ENTER DOSE prompt, enter the dose in Units/hr, Units/min, mUnits/hr, or
mUnits/min (mUnits = milliUnits), depending on the infusion mode selected. Press
CONFIRM to complete the data entry. The pump automatically calculates and displays
the equivalent rate in mL/hr.
Bolus in Units/hr, Units/min, mUnits/hr, and mUnits/min Modes
Note: If a protocol has been selected, bolus delivery may be disallowed or a default
bolus size may appear automatically. If a default bolus size is displayed, use ▲
and ▼ or the digit keys to modify the value as necessary.
In these modes, bolus size is entered in Units or mUnits. The pump automatically
calculates the equivalent bolus size in mL and displays both values. Bolus rate is
displayed in mL/hr. See “Bolus Function” on page 55 for more information on bolus
delivery.
▲
07-19-B3-430 Auto Syringe AS50 Infusion Pump Operator’s Manual Page 35
Page 42

Detailed Instructions
Programming Notes
1. The drug concentration range is from 0.01 Units/mL to 9999 Units/mL. The dose limits
are determined by the drug concentration and syringe selection. See “Syringe Data
Tables” on page 25 for minimum and maximum infusion rates for each syringe.
2. The CONC. field cannot be reprogrammed once the infusion has been started.
3. Pressing CONFIRM during delivery briefly displays additional program data.
4. A bolus can only be programmed, edited, or delivered after the drug concentration
CONC.) has been programmed.
(
Programming mg/hr, mg/min, mcg/hr, and mcg/min Modes
In these modes, the pump runs at a programmed, constant rate. The infusion is
programmed in terms of drug concentration and dose.
Note: If a protocol has been selected, the infusion mode may have been selected auto-
matically.
1. At the SELECT MODE ▲▼ prompt, use ▲ or ▼ to display the available infusion mode
selections. Press
2. Use ▲ or ▼ and CONFIRM as required to select the syringe manufacturer and size.
CONFIRM to select the desired infusion mode.
Note: If a protocol has been selected, a default drug concentration may appear automat-
ically. If a default drug concentration is displayed, use ▲
modify this value as necessary, and press
3. Enter the drug concentration (CONC.) in mg/mL. Press CONFIRM to complete the data
CONFIRM to complete the data entry.
and ▼ or the digit keys to
entry.
Note: If a protocol has been selected, a default dose may appear automatically. Use
▲
and ▼ or the digit keys to modify this value as necessary, and press CONFIRM to
complete the data entry.
4. Enter the dose in mg/hr, mg/min, mcg/hr or mcg/min, depending on the infusion mode
selected. Press
CONFIRM to complete the data entry. The pump automatically
calculates and displays the equivalent rate in mL/hr.
Page 36 Auto Syringe AS50 Infusion Pump Operator’s Manual 07-19-B3-430
Page 43

Detailed Instructions
Bolus in mg/hr, mg/min, mcg/hr, and mcg/min Modes
Note: If a protocol has been selected, bolus delivery may be disallowed or a default
bolus size may appear automatically. If a default bolus size is displayed, use
▲
and ▼ or the digit keys to modify the value as necessary.
In these modes, bolus size is entered in mg or mcg. The pump automatically calculates
the equivalent bolus size in mL and displays both values. Bolus rate is displayed in mL/hr.
See “Bolus Function” on page 55 for more information on bolus delivery.
Programming Notes
1. The drug concentration range is from 0.0001 mg/mL to 100.0 mg/mL. The dose limits
are determined by the drug concentration and syringe selection. See “Syringe Data
Tables” on page 25 for minimum and maximum infusion rates for each syringe.
2. The CONC. field cannot be reprogrammed once the infusion has been started.
3. Pressing CONFIRM during delivery briefly displays additional program data.
4. A bolus can only be programmed, edited, or delivered after the drug concentration
CONC.) has been programmed.
(
Programming mg/kg/hr, mg/kg/min, mcg/kg/hr, and mcg/kg/min Modes
In these modes, the pump runs at a programmed, constant rate. The infusion is
programmed in terms of patient body weight, drug concentration and dose.
Note: If a protocol has been selected, the infusion mode may have been selected auto-
matically.
1. At the SELECT MODE ▲▼ prompt, use ▲ or ▼ to display the available infusion mode
selections. Press
2. Use ▲ or ▼ and CONFIRM as required to select the syringe manufacturer and size.
3. Enter the patient body weight (BODY WT) in kg. Press CONFIRM to complete the data
entry.
Note: If a protocol has been selected, a default drug concentration may appear automat-
ically. If a default drug concentration is displayed, use
modify this value as necessary, and press
CONFIRM to select the desired infusion mode.
▲ and ▼ or the digit keys to
CONFIRM to complete the data entry.
4. Enter the drug concentration (CONC.) in mg/mL. Press CONFIRM to complete the data
entry.
07-19-B3-430 Auto Syringe AS50 Infusion Pump Operator’s Manual Page 37
Page 44

Detailed Instructions
Note: If a protocol has been selected, a default dose may appear automatically. Use ▲
5. Enter the dose in mg/kg/hr, mg/kg/min, mcg/kg/hr or mcg/kg/min, depending on the
infusion mode selected. Press
automatically calculates and displays the equivalent rate in mL/hr.
Bolus in mg/kg/hr, mg/kg/min, mcg/kg/hr, and mcg/kg/min Modes
Note: If a protocol has been selected, bolus delivery may be disallowed or a default
In mg/kg/hr and mg/kg/min modes, bolus size is entered in mg/kg. In mcg/kg/hr and mcg/
kg/min, the bolus size is entered in mcg/kg. The pump automatically calculates the
equivalent bolus size in mL and displays both values. The bolus rate is displayed in mL/hr.
See “Bolus Function” on page 55 for more information on bolus delivery.
and ▼ or the digit keys to modify this value as necessary, and press
CONFIRM to
complete the data entry.
CONFIRM to complete the data entry. The pump
bolus size may appear automatically. If a default bolus size is displayed, use ▲
and ▼ or the digit keys to modify the value as necessary.
Programming Notes
1. The patient body weight range is from 0.01 to 200.0 kilograms (kg). The drug
concentration range is from 0.0001 mg/mL to 100.0 mg/mL. The concentration range
may be further limited for very large or small body weights. The dose limits are
determined by the drug concentration and syringe selection. See “Syringe Data
Tables” on page 25 for minimum and maximum infusion rates for each syringe.
2. The CONC. and BODY WT fields cannot be reprogrammed once the infusion has been
started.
3. Pressing CONFIRM during delivery briefly displays additional program data.
4. A bolus can only be programmed, edited, or delivered after the drug concentration
CONC.) has been programmed.
(
Page 38 Auto Syringe AS50 Infusion Pump Operator’s Manual 07-19-B3-430
Page 45

Programming CUSTOM DILUTION Mode
In this mode, the pump runs at a programmed, constant rate. The infusion is programmed
in terms of target rate, patient body weight, initial drug concentration, target dose, and
final volume. The pump calculates and displays the drug volume to be mixed with
sufficient IV base fluid to yield the programmed final volume. The final concentration is
displayed when a bolus or infusion is initiated.
Note: The rate, body weight, concentration, and dose fields will not be editable after the
confirm key is pressed. Power the pump off and then back on to make these fields
editable again.
1. At the SELECT MODE ▲▼ prompt, use ▲ or ▼ to display the available infusion mode
selections. Press
2. Use ▲ or ▼ and CONFIRM as required to select the syringe manufacturer and size.
3. Enter the target rate (RATE) in mL/hr. Press CONFIRM to complete the data entry.
4. Enter the patient body weight (BODY WT) in kg. Press CONFIRM to complete the data
entry.
CONFIRM to select the CUSTOM DILUTION mode.
Detailed Instructions
5. Enter the initial drug concentration (CONC.) in mg/mL. Press CONFIRM to complete
the data entry.
6. Enter the target dose (DOSE) in mcg/kg/min. Press CONFIRM to complete the data
entry.
7. Enter the final volume (FINAL VOL) in mL. Press CONFIRM to complete the data entry.
8. In the DRUG VOL field, the pump displays the volume of drug that must be mixed with
IV base fluid to yield the programmed final volume. The text field displays
Press
9. Mix the indicated drug volume (DRUG VOL) with sufficient IV base fluid to produce the
final volume that was programmed (
CONFIRM to acknowledge the drug volume.
FINAL VOL).
DRUG VOL.
Note: The solution may be mixed directly in the syringe, or may be mixed in an IV bag
and then drawn up into the syringe.
10. Attach a 2N Series (or equivalent) IV extension set to the syringe and manually purge
the air from the filled syringe and tubing.
11. Mount the syringe.
12. Perform a purge operation to remove slack from the plunger driver.
13. After completing the purge procedures, press START. The new final concentration will
be displayed in the concentration field.
07-19-B3-430 Auto Syringe AS50 Infusion Pump Operator’s Manual Page 39
Page 46

Detailed Instructions
Bolus in CUSTOM DILUTION Mode
In this mode, bolus size is programmed in mcg/kg. The pump automatically calculates the
equivalent bolus size in mL and displays both values. Bolus rate is displayed in mL/hr.
See “Bolus Function” on page 55 for more information on bolus delivery.
Programming Notes
!
For maximum accuracy in measuring the drug volume, select the smallest syringe that
will contain the entire
IMPORTANT: If the FINAL VOL field is altered after the solution has been
mixed, the solution must be re-mixed using the new
DRUG VOL quantity.
DRUG VOL quantity.
When
CONFIRM is pressed to confirm the DRUG VOL value, the target rate field (RATE) is
updated to show the actual infusion rate that will be used. (Usually the actual rate is very
close to or the same as the programmed target rate.)
The program data fields all remain displayed and available for editing until an infusion or
bolus is started. At that point, the pump replaces the original drug concentration (
with the final drug concentration, and clears the fields containing the final volume (
) and the drug volume (DRUG VOL). The rate of infusion, patient body weight and
VOL
dose remain displayed. Pressing
CONFIRM temporarily displays the hidden program data
CONC.)
FINAL
(original drug concentration, final volume, and drug volume).
Target rate (
RATE) limits are determined by the syringe selection and Rate Range
configuration (see “Syringe Data Tables” on page 25 for minimum and maximum infusion
rates for each syringe). The patient body weight range is from 0.01 to 200.0 kilograms
(kg). The drug concentration range is from 0.0001 mg/mL to 100.0 mg/mL. The
concentration range may be further limited for very large or small body weights. Target
dose limits are determined by the drug concentration and syringe selection. Final Volume
range is from 30 mL to 250 mL.
CONC. and BODY WT fields cannot be reprogrammed once the infusion has been
The
started.
A bolus can only be programmed, edited, or delivered after the pump has been fully
programmed.
Page 40 Auto Syringe AS50 Infusion Pump Operator’s Manual 07-19-B3-430
Page 47

Programming SINGLE DOSE Mode
SINGLE DOSE mode delivers a programmed volume of drug over a specified period of
time. The infusion is programmed in terms of dose volume and dose duration.
1. At the SELECT MODE ▲▼ prompt, use ▲ or ▼ to display the available infusion mode
selections. Press
2. Use ▲ or ▼ and CONFIRM as required to select the syringe manufacturer and size.
3. Enter the dose volume (INFUSE) in mL. Press CONFIRM to complete the data entry.
4. Enter the dose duration (OVER) in hours and minutes. Press CONFIRM to complete
the data entry.
CONFIRM to select the desired infusion mode.
Detailed Instructions
07-19-B3-430 Auto Syringe AS50 Infusion Pump Operator’s Manual Page 41
Page 48

Detailed Instructions
SINGLE DOSE Mode Programming Notes
1. All time displays use standard time notation: the two digits to the left of the colon show
hours, the two digits to the right show minutes.
2. If either the INFUSE field or the OVER field is edited, the pump treats the result as a
new infusion. As a reminder,
Example: Program the pump to infuse 5 mL over 5 minutes, using a B-D 30 mL syringe.
Stop the infusion when the TOTAL ML field shows that about 2 mL have been delivered.
Now edit the OVER field to 6 minutes (note that DOSE CANCELED appears for a few seconds),
and start the infusion.
When the pump stops after 6 minutes, about 7 mL will have been delivered; 2 mL from the
original infusion, and 5 mL from the edited infusion.
3. The pump issues a DOSE COMPLETE alarm at the end of the infusion if the Dose
Complete Alarm option is enabled.
DOSE CANCELED appears for a few seconds.
4. Bolus operation is not available in this delivery mode.
5. Pressing CONFIRM during delivery briefly displays additional programming data.
Programming MANUAL SCHEDULE Mode
MANUAL SCHEDULE mode is a timed infusion mode for use when a programmed dose
is to be repeated at regular intervals. The infusion is programmed in terms of dose
volume and dose duration, and the time from the start of one dose to the start of the next.
Each dose delivery must be manually initiated.
MANUAL SCHEDULE mode also allows a delay to the start of the first dose, allowing a
time delay before the infusion regimen begins.
1. At the SELECT MODE ▲▼ prompt, use ▲ or ▼ to display the available infusion mode
selections. Press
2. Use ▲ or ▼ and CONFIRM as required to select the syringe manufacturer and size.
3. Enter the dose volume (INFUSE) in mL. Press CONFIRM to complete the data entry.
CONFIRM to select the desired infusion mode.
Page 42 Auto Syringe AS50 Infusion Pump Operator’s Manual 07-19-B3-430
Page 49

Detailed Instructions
4. Enter the dose duration (OVER) in hours and minutes. Press CONFIRM to complete
the data entry.
5. Enter the interval (EVERY) in hours and minutes. This is the time from the start of one
dose to the start of the next dose. Press
6. Enter the delay (NEXT DOSE IN), then press CONFIRM. This is the time interval from
START is pressed until the first dose becomes due. Enter 0:00 to begin infusing
when
CONFIRM to complete the data entry.
the first dose immediately.
Dose Due
Note: START must be pressed to begin infusing each dose.
The
NEXT DOSE IN field shows the time remaining until the next dose is due to be
delivered. When this time counts down to 0:00, the pump signals that the dose is due by
flashing the
in the text field. START must be pressed to begin infusing each dose.
DUE
ALERT and STANDBY lights, sounding continuous beeps, and showing DOSE
When a dose is due, pressing any key other than
DOSE DUE prompt and ALERT light, and leaves the pump in Standby state, but does not
START silences the audio, turns off the
begin dose delivery.
“Counting Time” Display
The three RUN lights flash in a “falling drop” pattern while the pump is infusing. When the
pump is counting time between scheduled doses, only the top
RUN light flashes.
07-19-B3-430 Auto Syringe AS50 Infusion Pump Operator’s Manual Page 43
Page 50

Detailed Instructions
Programming Notes
!
1. For MANUAL SCHEDULE mode it is recommended that the Idle Alarm feature be
enabled (configured), and that the Auto Lock feature be disabled (not configured).
2. All time displays use standard time notation: the two digits to the left of the colon show
hours, the two digits to the right show minutes.
3. The programmed delivery can be stopped at any time by pressing STOP. The RUN
light(s) then turn off, the
counting up. Press
Precaution: In MANUAL SCHEDULE mode, START must be pressed to
deliver each dose and continue the infusion regimen. Pressing any other
key silences the audio portion of the DOSE DUE alarm and leaves the
pump in Standby state, without initiating a dose delivery.
STANDBY light begins flashing, and the TOTAL ML field stops
START to continue the infusion program.
Note: Pressing
STOP affects the NEXT DOSE IN time field in two different ways, depend-
ing on the pump’s infusion status at the time:
• If STOP is pressed while the pump is infusing a dose (the three RUN lights are
flashing in sequence), the
is pressed again. This feature allows the schedule to be delayed while ensuring
delivery of the full dose.
NEXT DOSE IN field will stop counting down, until START
• If STOP is pressed while the pump is counting down the time to the next dose (only
the top
while the pump is stopped. This feature allows editing during idle time, without
altering the overall schedule. If a dose becomes due while the pump is stopped,
the
immediately when
RUN light is flashing), the NEXT DOSE IN field will continue to count down
DOSE DUE alarm will be suppressed and delivery of the dose will begin
START is pressed.
Page 44 Auto Syringe AS50 Infusion Pump Operator’s Manual 07-19-B3-430
Page 51

4. If either the INFUSE field or the OVER field is edited, the pump treats the
result as a new infusion. As a reminder,
few seconds.
Example: Program the pump to infuse 5 mL over 5 minutes, using a B-D 30 mL syringe.
Stop the infusion when the TOTAL ML field shows that about 2 mL have been delivered.
Now edit the OVER field to 6 minutes (note that DOSE CANCELED appears for a few seconds),
and start the infusion.
When the pump stops after 6 minutes, about 7 mL will have been delivered; 2 mL from the
original infusion, and 5 mL from the edited infusion.
5. Pressing CONFIRM during delivery briefly displays additional program
data.
6. Bolus operation is not available in this delivery mode.
Programming AUTO SCHEDULE Mode
Detailed Instructions
DOSE CANCELED appears for a
AUTO SCHEDULE mode is a timed infusion mode for use when a
programmed dose is to be repeated at regular intervals. The infusion is
programmed in terms of dose volume and dose duration, and the time from
the start of one dose to the start of the next. Each dose delivery is
automatically initiated.
AUTO SCHEDULE mode also adds a delay to the start of the first dose,
allowing a time delay before the infusion regimen begins.
1. At the SELECT MODE ▲▼ prompt, use ▲ or ▼ to display the available
infusion mode selections. Press
CONFIRM to select the desired infusion
mode.
2. Use ▲ or ▼ and CONFIRM as required to select the syringe manufacturer
and size.
3. Enter the dose volume (INFUSE) in mL. Press CONFIRM to complete the
data entry.
4. Enter the dose duration (OVER) in hours and minutes. Press CONFIRM to
complete the data entry.
5. Enter the interval (EVERY) in hours and minutes. This is the time from the
start of one dose to the start of the next dose. Press
CONFIRM to complete
the data entry.
6. Enter the delay (NEXT DOSE IN), then press CONFIRM. This is the time
interval from when
0:00 to begin infusing the first dose immediately.
Enter
07-19-B3-430 Auto Syringe AS50 Infusion Pump Operator’s Manual Page 45
START is pressed until the first dose becomes due.
Page 52

Detailed Instructions
Dose Initiation
The NEXT DOSE IN field on the display shows the time remaining until the next
dose is due to be delivered. When this time counts down to 0:00, the pump
automatically begins infusing the dose.
“Counting Time” Display
The three RUN lights flash in a “falling drop” pattern while the pump is infusing.
When the pump is counting time between scheduled doses, only the top
RUN
light flashes.
Programming Notes
1. All time displays use standard time notation: the two digits to the left of the
colon show hours, the two digits to the right show minutes.
2. The programmed delivery can be stopped at any time by pressing STOP.
RUN light(s) then turn off, the STANDBY light begins flashing, and the
The
TOTAL ML
program.
field stops counting up. Press START to continue the infusion
3. Pressing STOP affects the NEXT DOSE IN time field in two different ways,
depending on the pump's infusion status at the time:
• If STOP is pressed while the pump is infusing a dose (the three RUN
lights are flashing in sequence), the
counting down, until
START is pressed again. This feature allows the
schedule to be delayed while ensuring delivery of the full dose.
NEXT DOSE IN field will stop
• If STOP is pressed while the pump is counting down the time to the
next dose (only the top
will continue to count down while the pump is stopped. This feature
allows editing during idle time, without altering the overall schedule. If a
dose becomes due while the pump is stopped, delivery of the dose will
begin immediately when
4. If either the INFUSE field or the OVER field is edited, the pump treats the
result as a new infusion. As a reminder,
few seconds.
RUN light is flashing), the NEXT DOSE IN field
START is pressed.
DOSE CANCELED appears for a
Page 46 Auto Syringe AS50 Infusion Pump Operator’s Manual 07-19-B3-430
Page 53

Detailed Instructions
Example: Program the pump to infuse 5 mL over 5 minutes, using a B-D 30 mL syringe.
Stop the infusion when the TOTAL ML field shows that about 2 mL have been delivered.
Now edit the OVER field to 6 minutes (note that DOSE CANCELED appears for a few seconds),
and start the infusion.
When the pump stops after 6 minutes, about 7 mL will have been delivered; 2 mL from the
original infusion, and 5 mL from the edited infusion.
Note: Pressing CONFIRM during delivery briefly displays additional program
data.
Bolus operation is not available in this delivery mode.
07-19-B3-430 Auto Syringe AS50 Infusion Pump Operator’s Manual Page 47
Page 54

Detailed Instructions
General Programming Information
Data Entry
The digit keys are used to enter program data.
Before pressing
changed by pressing ▲ or ▼ or can be replaced by pressing
a new value. A value that appears automatically (as a result of selecting a
protocol) can be changed by pressing ▲ or ▼ or can be replaced by entering a
new value without pressing
Field Selection
The currently selected field on the pump’s status display flashes. Use ▲ and ▼
to select the next field. Press
editing. When a field is opened for editing, the annunciators stop flashing and
the value itself begins flashing.
Editing in Standby State
All modes except CUSTOM DILUTION modes:
Almost all program data can be changed (edited). The exceptions are:
● Once a protocol library, protocol or infusion mode has been selected, the
CONFIRM to complete a program data entry, the value can be
CLR and entering
CLR.
EDIT to open the currently selected field for
only way to select a different protocol library, protocol or infusion mode is
to turn the pump off, then turn it back on and reprogram.
● The drug concentration (CONC.) and patient body weight (BODY WT) fields
cannot be changed (edited) once an infusion or bolus has been started.
To edit a programmed field:
1. Use ▲ and ▼ to select the field to be changed.
2. Press EDIT. Use ▲, ▼, and the digit keys as necessary to enter the new
value. Press
CONFIRM to complete the change.
Page 48 Auto Syringe AS50 Infusion Pump Operator’s Manual 07-19-B3-430
Page 55

Detailed Instructions
CUSTOM DILUTION mode:
To make a change to syringe manufacturer, syringe size, target rate, body
weight or initial concentration before a value is entered for final volume:
1. Press CONFIRM while dashes are displayed in the FINAL VOL field.
2. Use ▲ and ▼ to select the field to be changed.
3. Press EDIT. Use ▲, ▼, and the digit keys as necessary to enter the new
value. Press
4. Use ▲ and ▼ to return to the FINAL VOL field.
5. Press EDIT. Use ▲, ▼, and the digit keys as necessary to enter the final
volume. Press
6. Finish programming.
Only the final volume field will be editable after the confirm key has been
pressed and the pump starts running or delivers a bolus. To make a change to
the final volume field:
CONFIRM to complete the change.
CONFIRM to complete the entry.
7. Press EDIT. Use ▲, ▼, and the digit keys as necessary to enter the new
value. Press
CONFIRM to complete the change.
The final concentration is displayed when a bolus or infusion is initiated.
07-19-B3-430 Auto Syringe AS50 Infusion Pump Operator’s Manual Page 49
Page 56

Detailed Instructions
Programming Notes
!
Editing in Run State
If the FINAL VOL field is altered after the solution has been
mixed, the solution must be re-mixed using the new
DRUG VOL
quantity.
1. For maximum accuracy in measuring the drug volume, select the smallest
syringe that will contain the entire
2. The DRUG VOL field may not be edited at any time, once it has been
DRUG VOL quantity.
programmed.
3. Refer to “Programming Notes” on page 40.
The fields that can be edited while the pump is in Run state are listed below:
Edit Cancellation
Example: Select mL/hr mode, and program a B-D 60 mL syringe.
Enter 99 in the RATE field and a volume limit of 60 mL.
Mode Fields
mL/hr, mL/min RATE, TOTAL ML
SINGLE DOSE, MANUAL/AUTO SCHEDULE TOTAL ML
CUSTOM DILUTION DOSE, TOTAL ML
All other modes RATE, DOSE,
TOTAL ML
The
TOTAL ML field can be cleared while the infusion is running. (The TOTAL
field is a data display, and cannot be edited.)
ML
If a field has been opened for editing, pressing EDIT again restores the
previous value and cancels the edit operation. The pump displays
CANCELED
for a few seconds.
EDIT
The RATE field annunciators flash to show it is the current field.
Pressing CLR at this point only results in an “invalid key” error beep.
Press EDIT. Enter another valid number.
Press EDIT again. This will undo the change, restore the previous value (99), and display EDIT
CANCELED.
Page 50 Auto Syringe AS50 Infusion Pump Operator’s Manual 07-19-B3-430
Page 57

Number Out of Range
Data Test
Detailed Instructions
Every programmable field is limited to a particular range of allowed program
values, depending on the syringe, drug concentration, and other factors.
Attempting to program a value outside the acceptable range results in a
alert. The pump beeps and substitutes the nearest acceptable value.
LIMIT
Press
CONFIRM to accept the value, or program a new value.
PUMP
Whenever a data field is edited, the pump tests the remaining program data
fields for range limits. If there is a conflict, the affected fields are cleared to
dashes, and the first cleared field is automatically opened for editing. As each
cleared field is reprogrammed, the next cleared field (if any) is automatically
opened. All cleared fields must be reprogrammed before the infusion can be
started.
Example: Reprogramming the SYRINGE MFR field automatically clears the
SYRINGE SIZE field.
07-19-B3-430 Auto Syringe AS50 Infusion Pump Operator’s Manual Page 51
Page 58

Detailed Instructions
This page is intentionally blank.
Page 52 Auto Syringe AS50 Infusion Pump Operator’s Manual 07-19-B3-430
Page 59

Additional Functions and
Purge Function
The Purge function advances the syringe plunger driver a preset distance. Manually
purge the syringe and IV extension set before mounting the syringe in the pump. Perform
the Purge function after the syringe is mounted on the pump, (before connecting to the
patient) to eliminate slack in the drive mechanism and thus ensure prompt fluid delivery
when the infusion starts.
Precaution: To prevent unintended delivery to the patient, the IV
!
The “Purge Delivery Table” on page 54 lists the nominal amount of fluid delivered in one
complete Purge cycle, if there were no slack in the drive mechanism. Use this information
for calculating the excess fluid allowance when filling the syringe.
extension set must be disconnected from the patient while purging.
OperationsChapter 1
Purge operation is allowed only when the pump is in Standby state.
Purge Procedure
!
1. After programming the pump, press STOP (if necessary), to put the pump in Standby.
2. Press PURGE. The normal display is temporarily replaced by a display showing the
Note: If
3. Press START to begin delivering the fixed purge volume.
Precaution: To prevent unintended delivery to the patient, the IV
extension set must be disconnected from the patient while purging.
purge rate in mL/hr, and the message
START is not pressed within 10 seconds, the purge function is canceled and the
pump reverts to Standby state.
If a steady drip of fluid is observed before the full purge volume is delivered, purging can be stopped immediately by pressing
The accumulating purge volume is displayed while purging is in progress, then the
normal Standby state display resumes, and the text field reads
a few seconds. The purge may be repeated until the required volume is achieved. The
PURGE READY.
STOP.
PURGE COMPLETE for
07-19-B3-430 Auto Syringe AS50 Infusion Pump Operator’s Manual Page 53
Page 60

Additional Functions and Operations
purge accumulated volume will disappear when the START key is pressed and will not
be included in the total volume.
4. Repeat steps 2 and 3 as often as necessary to obtain a steady drip at the end of the
tubing.
Purge Delivery Table
Syringe
Manufacturer
Syringe Size
(mL)
Approximate
Purge
Vol ume (m L)
Purge Rate
(mL/hr)
Purge Rate
(mL/min)
B-D Plastic 1
3
5
10
20
30
60
Monoject 1
3
6
12
20
35
60
Ter um o 1
3
5
10
20
30
60
NOTE: Purge volume and rate information shown applies to pumps configured for Rate Range = H (High).
NOTE: Purge volumes are approximately the amount delivered in a single complete purge delivery, without
slack in the drive system.
NOTE: The volume of purged fluid is not added to the amount in the TOTAL mL field.
0.02
0.08
0.15
0.22
0.39
0.50
0.75
0.02
0.09
0.17
0.26
0.43
0.59
0.75
0.02
0.09
0.18
0.27
0.44
0.58
0.75
11
38
74
107
188
241
366
11
41
83
126
208
285
366
11
41
87
129
210
276
438
0.19
0.63
1.2
1.7
3.1
4.0
6.1
0.19
0.68
1.3
2.1
3.4
4.7
6.1
0.19
0.69
1.4
2.1
3.5
4.6
7.3
Page 54 Auto Syringe AS50 Infusion Pump Operator’s Manual 07-19-B3-430
Page 61

Bolus Function
Note: If a protocol is selected, the bolus function may not be allowed. If the protocol dis-
allows the bolus function, the pump beeps and displays the message
NOT ALLOWED when BOLUS is pressed.
A bolus is a fixed dose which may be programmed and delivered, either during an
infusion or while the pump is in Standby state. The pump allows the operator to program
the rate of infusion for a bolus, and to program the bolus size either in terms of dose or
volume where applicable.
Bolus Units
Additional Functions and Operations
Infusion Mode Bolus Size Units
mL/hr, mL/min mL (milliliters)
Bolus Size Limits
The minimum programmable bolus size is approximately the same as the minimum
deliverable volume (see “Syringe Data Tables” on page 25).
The maximum programmable bolus size is the lesser of:
● The syringe size (the entire syringe may be programmed as a single bolus).
● 9999 Units, 9999 mg, 9999 mg/kg or 9999 mcg/kg (depending on the selected mode).
Units/hr, Units/min mUnits/hr,
mUnits/min
mg/hr, mg/min mcg/hr, mcg/min mg (milligrams)
mg/kg/hr, mg/kg/min,
CUSTOM DILUTION
mcg/kg/hr, mcg/kg/min mcg/kg (micrograms of drug per
SINGLE DOSE, MANUAL SCHEDULE,
AUTO SCHEDULE
Units
mg/kg (milligrams of drug per
kilogram of patient body weight)
kilogram of patient body weight)
Bolus not allowed.
07-19-B3-430 Auto Syringe AS50 Infusion Pump Operator’s Manual Page 55
Page 62

Additional Functions and Operations
Bolus Rate
The bolus infusion rate is the smallest of:
● The maximum infusion rate for the syringe (see “Syringe Data Tables” on page 25).
● The maximum rate established by the RATE RANGE configuration option.
● The bolus maximum rate specified by the selected protocol (if applicable).
Example 1: If a pump is configured for Rate Range = Medium, the overall maximum infusion
rate is 120 mL/hr.
However, the maximum infusion rate for a B-D 10 mL syringe is 107 mL/hr. Therefore, if a B-D
10 mL syringe is used, the bolus rate will be the lesser of the two limits, or 107 mL/hr.
Example 2: Assume that the same pump and syringe from Example 1 are used.
A protocol is selected that specifies a bolus maximum rate of 120 mcg/kg/hr.
If a patient body weight of 50 kg is programmed and the concentration is 0.1 mg/mL, the bolus
maximum rate of 100 mcg/kg/hr will translate to a rate of 60 mL/hr, and the bolus rate will be
limited to 60 mL/hr.
Bolus Programming
A bolus may be programmed during an infusion without interrupting the normal delivery.
Note: If a protocol is selected, the bolus function may not be allowed. If the protocol dis-
Note: If a protocol has been selected, a default bolus value may appear automatically.
1. Press BOLUS. The status display changes to the Bolus display.
• If there is no programmed bolus size, the pump displays PRESS EDIT TO SET
• If a bolus size has been programmed, the pump displays BOLUS READY. Press
allows the bolus function, the pump beeps and displays the message
NOT ALLOWED when BOLUS is pressed.
Use ▲ and ▼ or the digit keys to modify this value as necessary, and press
to complete the data entry.
FIRM
BOLUS SIZE
START within 10 seconds to begin bolus delivery, or proceed to step 2 to change
the programmed bolus size, or press
. Proceed to step 2.
CONFIRM to save the bolus data and return
CON-
to the normal display.
Page 56 Auto Syringe AS50 Infusion Pump Operator’s Manual 07-19-B3-430
Page 63

2. Press EDIT, then use the ▲, ▼ or digit keys as necessary to program the bolus size.
When a bolus is fully programmed, the pump displays
3. Press START to begin bolus delivery immediately or press CONFIRM to save the bolus
data and return to the normal display.
Bolus Programming Notes
For mL/min mode, the bolus rate is displayed in mL/min. For all other modes it is
displayed in mL/hr.
Additional Functions and Operations
BOLUS READY.
Pressing
cancels bolus programming and restores the normal display immediately.
A bolus can be programmed and delivered from Standby state, even when the infusion
has not been fully programmed. The minimum program data required for bolus operation
are: Syringe manufacturer and size, body weight (if applicable), and drug concentration (if
applicable). In addition, for CUSTOM DILUTION mode, all remaining fields must be
programmed.
Bolus Delivery
During bolus delivery, the text display reads BOLUS RUNNING and all three RUN lights
flash simultaneously.
1. To halt bolus delivery before the full bolus amount has been delivered, press STOP.
The normal display and operating state resumes. The text field reads
STOPPED
2. If the pump is allowed to deliver the full bolus amount, the normal display and
operating state are automatically restored. The text field reads
a few seconds. In addition, if the
sounds two beeps and flashes the ALERT light.
Bolus Delivery Notes
BOLUS during the BOLUS READY or PRESS EDIT TO SET BOLUS SIZE display
BOLUS
for a few seconds.
BOLUS COMPLETE for
BOLUS COMPLETE alert is enabled, the pump
During bolus delivery, the display shows the amount of the bolus that has been infused.
If bolus delivery is started during an infusion, the infusion resumes automatically once the
bolus delivery ends. If the bolus delivery is stopped prematurely by pressing
pump displays
The bolus volume is added to the
DOSE RESUMES for a few seconds.
TOTAL ML display after the bolus operation stops.
STOP, the
Bolus Review
Press BOLUS to review the Bolus display. The bolus information will be displayed for
about 10 seconds, or the normal display can be restored immediately by pressing
CONFIRM.
or
07-19-B3-430 Auto Syringe AS50 Infusion Pump Operator’s Manual Page 57
BOLUS
Page 64

Additional Functions and Operations
Bolus Editing
The bolus size can be edited during bolus programming and after a bolus has been fully
programmed. A bolus may be edited during an infusion without interrupting normal
delivery.
1. Press BOLUS to display the PRESS EDIT TO EDIT BOLUS SIZE prompt.
2. Press EDIT to open the bolus size field.
3. Use ▲ and ▼ or the digit keys to modify the value as necessary, and press CONFIRM
to complete the edit.
The pump displays
4. Press START to begin bolus delivery immediately or press CONFIRM to save the bolus
data and return to the normal display.
Repeating a Bolus Delivery
To repeat a bolus delivery:
1. Press BOLUS to display the bolus size.
2. Review the bolus program data.
3. Press START.
Changing the Syringe
To continue an infusion when a syringe becomes empty or to flush a line, the syringe may
be replaced when the pump is in the Standby state.
If the new syringe does not have the same barrel size as the currently programmed
syringe:
1. The pump displays VERIFY (NAME), where “name” refers to the currently programmed
syringe manufacturer.
BOLUS READY.
Use ▲ and ▼ as needed to select the correct syringe manufacturer and press
CONFIRM to complete the entry.
2. The pump displays VERIFY (SIZE) where “size” is the new syringe size recognized by
the pump.
Press
Note: Changing syringe size may invalidate the contents of other fields (e.g.
CONFIRM after verifying that the pump is displaying the correct syringe size.
VOL LIMIT).
In such cases, the pump automatically clears the necessary field(s). The infusion
cannot be continued until all cleared fields have been reprogrammed.
Page 58 Auto Syringe AS50 Infusion Pump Operator’s Manual 07-19-B3-430
Page 65

Additional Functions and Operations
TOT
TOT
s
g
● If the syringe is improperly mounted, the pump displays one of the following alert or
alarm messages:
CHECK BARREL, CHECK FLANGE, or CHECK PLUNGER. Examine
the syringe and correct the indicated problem.
If a combination of such conditions is sensed, the pump displays a
alert or alarm message instead.
Lock and Auto Lock Functions
The Lock function serves two purposes. First, it reduces risk of accidental key activations
by disabling all keys except
program the pump in advance of delivery by disabling the audio portion of the
IDLE
alert or alarm.
The Lock function is activated by pressing
operation. The
LOCK light remains on while the Lock function is active.
Note: The pump will not allow the Lock function to be active during a
alarm condition.
The Auto Lock feature can be enabled through pump configuration. During an infusion,
the Auto Lock feature automatically sets the Lock function two minutes after the last key is
pressed. This feature is available only while the pump is in Run state.
If the pump enters Standby State because of an alarm condition, the keypad is
automatically unlocked.
LOCK. Second, the Lock function makes it convenient to
CHECK SYRINGE
PUMP IS
LOCK. Pressing LOCK again restores normal
LINE OCCLUDED
The Total Delivered Display
The Total Delivered display indicates the accumulated total volume (in mL) that has been
delivered. Some infusion modes also show the total delivery in other units, such as mcg,
mg, or grams.
The Total Delivered display cannot be programmed, but can be cleared (reset to zero). To
clear the total delivered information, press ▲ or ▼ to move to the
annunciators will flash, then press
Total Delivered display to zero, the previous value cannot be restored.
ram
mLmc
TOTAL mL field. The
EDIT and CLR to clear the display. After resetting the
07-19-B3-430 Auto Syringe AS50 Infusion Pump Operator’s Manual Page 59
Page 66

Additional Functions and Operations
Note: Purge volumes are not included in the total, because purged fluid is not intended
to be infused into the patient.
Display totals are rounded up at the digit displayed at the far right.
Example: if a total delivered value is 0.005, the pump displays
30.15, the pump displays
30.2.
0.01. If a total delivered value is
If an accumulated total becomes too large to display (that is, over 999), the field changes to
Expanded Data Display
The status display generally displays only the most important infusion information.
Pressing
CONFIRM when the pump is fully programmed causes the pump to temporarily
display additional program, syringe, and battery voltage information. Press
again to restore the normal display immediately. If no key is pressed, the normal display
automatically resumes in a few seconds.
Backlight Feature
The status display backlight is lit whenever the charger is connected and the pump power
is on.
Control of the backlight when the charger is not connected is determined by the
BACKLITE
is enabled for use, the pump turns on the backlight for the preconfigured time period
following a keypress.
configuration option group. When the charger is not connected and this option
EEE.
CONFIRM
SET
Page 60 Auto Syringe AS50 Infusion Pump Operator’s Manual 07-19-B3-430
Page 67

The pump can be custom-configured to meet particular needs, or to simplify infusion
programming. Instructions for setting configuration options are given in the Auto Syringe
AS50 Infusion Pump Technical Manual.
Configuration Review
The Configuration Review feature allows the pump’s configuration to be examined without
risk of accidental alteration. This feature is activated by entering the code number
the initial prompt (
occur when
ignored.
SELECT MODE ▲▼ or SELECT PROTOCOL ▲▼). The error beeps that
123 is entered are provided to discourage patient tampering and may be
Date and Time Display
After 123 is entered, the date and time are briefly displayed. The time is displayed in hours
and minutes, separated by a decimal point (
ConfigurationChapter 1
123 at
HH.MM).
Software and Configuration Version Display
Following the time and date display, the software and configuration version numbers are
briefly displayed.
The first line of the text display indicates the pump software version. The second line is
divided into two fields. The left field displays the factory configuration version, and the
right field displays a four character checksum that uniquely identifies the current
configuration (including protocols), as shown below.
Example: The display for software version 6.00, factory configuration version D1, and a current
configuration checksum of 3AC5, would be shown on the display as follows:
software version →
factory configuration → D 1 3 A C 5 ← configuration checksum
The checksum field allows a high-confidence rapid comparison of configurations between
two pumps.
V 7.0 0
Reviewing Configuration Options
The configurable options are organized into several groups, each of which begins with a
prompt that requires a “yes” or “no” response. Each option group is identified by name in
the text display field (for example:
Y (for “yes”), which represents the pending response.
VIEW MODES). The syringe manufacturer field displays
07-19-B3-430 Auto Syringe AS50 Infusion Pump Operator’s Manual Page 61
Page 68

Configuration
To begin reviewing the options within the current group, press CONFIRM to accept the
pending
CONFIRM to view each additional option. When the last option in a group has been
displayed, the next option group prompt is displayed (for example:
Y response. The text field will display only the options that are configured. Press
VIEW SYRINGES).
To skip an option group, press either ▲ or ▼ to change the
CONFIRM to advance to the next option group.
To review the Modes group, the initial prompt is VIEW MODES. Answering Y (the default
response) opens up that group for review. Answering N skips that group and prompts for the
manufacturers group (VIEW MFRS).
Y to N (for “no”). Press
The following table shows the configuration groups, and the options within each group.
Note: Inactive options are not shown in Configuration Review mode.
Configuration Review Table
GROUP PROMPT GROUP SELECTIONS
VIEW LIBRARY List of enabled protocol libraries.
VIEW MODES ML/HR MG/HR MCG/KG/HR
ML/MIN MG/MIN MCG/KG/MIN
UNITS/HR MCG/HR CUSTOM DILUTION
UNITS/MIN MCG/MIN SINGLE DOSE
MUNITS/HR MG/KG/HR MANUAL SCHEDULE
MUNITS/MIN MG/KG/MIN AUTO SCHEDULE
VIEW SYRINGES B-D MONOJECT TERUMO
VIEW DEFAULTS DFAULT LIBRARY DFAULT MODE
DFAULT PROTOCOL DFAULT MFR
VIEW MISC REMOTE CONTROL PSI RANGE AUTO LOCK
LIBRARY AUDIO RANGE SET BACKLITE
SIZE OVERRIDE RATE RANGE ENABLE DB9 PORT
VIEW ALERTS IDLE ALARM BOLUS COMPLETE VOLUME LIMIT
NEAR END DOSE COMPLETE
Page 62 Auto Syringe AS50 Infusion Pump Operator’s Manual 07-19-B3-430
Page 69

Configurable Options
The option groups and configurable options are listed here and in the table above. Each
option is described in the following paragraphs. The option is displayed exactly as listed in
the paragraph title unless otherwise noted.
Protocol Library Group (VIEW LIBRARY)
This option group displays the drug protocols that are enabled. The pump displays a
VIEW (library name) prompt for each enabled protocol library. A pending Y response is
also displayed. To select a library, press
skip a library, press ▲ or ▼ to change the
Configuration
CONFIRM to accept the pending response. To
Y to N and press CONFIRM.
When a library has been selected, the pump displays a
each enabled protocol. A pending
protocol, press
▼ to change the
CONFIRM to accept the pending response. To skip a protocol, press ▲ or
Y to N and press CONFIRM.
Y response is also displayed. To begin reviewing a
VIEW (protocol name) prompt for
For each selected protocol, the default mode (if any) is displayed in the text field (for
example,
MG/KG/HR), and concentration, dose and rate default values (if any) are shown
in their usual fields.
Press
Press
CONFIRM to view the default bolus size. BOLUS SIZE is displayed in the text field.
CONFIRM again to view the bolus maximum rate. BOLUS MAX RATE is displayed in
the text field.
Note: Dashes are displayed whenever a default value is not specified by the protocol.
If the protocol specifies bolus prevention,
BOLUS SIZE.
If no defaults are specified by the protocol,
NO BOLUS is displayed instead of
ALL MODES is displayed when the pro-
tocol is initially selected.
Press
been presented for viewing, the next
CONFIRM to advance to the next protocol. When the last protocol in a library has
VIEW (library name) prompt is displayed.
See the Auto Syringe AS50 Infusion Pump Technical Manual for instructions on creating
and editing protocols.
Modes Group (VIEW MODES)
This option group displays the name of each enabled infusion mode. Each listing shows
only the mode name (for example
ML/HR) in the text field. For a list of the supported
infusion modes, see the “Configuration Review Table” on page 62.
Syringes Group (VIEW SYRINGES)
This option group displays the enabled syringe sizes for each enabled syringe
manufacturer.
07-19-B3-430 Auto Syringe AS50 Infusion Pump Operator’s Manual Page 63
Page 70

Configuration
For each enabled manufacturer, the pump displays a VIEW (name) prompt, where (name)
is the manufacturer’s name. A pending
the enabled syringe sizes for that manufacturer, press
Y response is also displayed. To begin reviewing
CONFIRM to accept the Y
response.
Syringe size descriptions are displayed in the text field. Press
additional syringe.
To skip a manufacturer, press either ▲ or ▼ to change the
The available manufacturer names and sizes are listed in the “Syringe Data Tables” on
page 25.
Defaults Group (VIEW DFAULTS)
This option group displays the default options that are enabled. The pump allows four
default options: Default Library (
PROTOCOL
), Default Mode (DFAULT MODE) and Default Manufacturer (DFAULT MFR).
The defaults enable the pump to recall the selection that was used for the previous
infusion, and to provide that selection in response to the first ▼ or ▲ keypress. This
feature is especially useful when a particular protocol library, protocol, infusion mode, or
syringe manufacturer is likely to be used repeatedly.
Miscellaneous Group (VIEW MISC)
This displays the miscellaneous options that are enabled. The Miscellaneous group
options are: Remote Control, Protocol Library, Size Override, Occlusion Sensitivity, Audio
Range, Rate Range, Auto Lock, Backlight, and Enable DB9 Port.
CONFIRM to view each
Y to N and press CONFIRM.
DFAULT LIBRARY), Default Protocol (DFAULT
Remote Control
This option allows the operator to control the pump from a remote device, such as a
computer. A standard 9-pin connector (DB9) located on the rear of the pump is provided
for an RS-232(C) communications link between the pump and the computer. See the
“Auto Syringe AS50 Infusion Pump Programmer’s Manual” for details.
Protocol Library (LIBRARY)
This option allows the operator to select from one or more protocol libraries containing
frequently used program data. Protocols are defined by authorized personnel according
to procedures detailed in the “Auto Syringe AS50 Infusion Pump Service Manual.”
Size Override
SIZE OVERRIDE modifies the syringe programming process by allowing the operator to
select a syringe size that differs from the size detected by the pump. Instead of a
xx ML prompt, the pump displays SELECT SIZE ▼ ▲. When ▼ or ▲ is pressed, the pump
displays the syringe size that best matches the syringe. However, the operator can press
▼ or ▲ to select a different size. When
CONFIRM is pressed to complete the syringe
selection, if the syringe size selected appears different from the detected syringe size, the
pump displays a
VERIFY AGAIN prompt and the operator must press CONFIRM again to
complete the selection.
VERIFY
Page 64 Auto Syringe AS50 Infusion Pump Operator’s Manual 07-19-B3-430
Page 71

Configuration
Note: To restart the syringe selection process, press CLR before pressing CONFIRM to
complete syringe selection.
Occlusion Sensitivity (PSI RANGE)
This option sets the occlusion detection system operating range. Three choices are
available:
H (Highest back pressure), M (Medium setting), L (Lowest back pressure). For
more details see the “Auto Syringe AS50 Infusion Pump Technical Manual.”
Audio Range
The audio volume level can be configured for: H (High) or L (Low). The recommended
setting is
H. The quieter L setting should only be used in noise-sensitive environments
where the infusion is constantly monitored.
Rate Range
RATE RANGE can be configured for H (High, up to 438 mL/hr), M (Medium, 120 mL/hr) or
L (Low, 15 mL/hr). The maximum delivery rate will be limited to the lesser of the Rate
Range option setting or the syringe maximum (see the “Syringe Data Tables” on
page 25).
The minimum delivery rate is as shown in the table, regardless of the Rate Range setting.
Auto Lock
If an infusion has been programmed and the pump is in the Run state, the Auto Lock
feature automatically turns on the Lock function two minutes after the last keypress.
Backlight (VIEW BACKLITE)
The status display backlight is lit whenever the charger is connected and the pump is
powered on. The
charger is not connected. The backlight turns off automatically after a preset time period
elapses (0 to 60 minutes). Press
Enable DB9 Port
When this option is set to Y (yes), the standard 9-pin connector (DB9) located on the rear
of the pump is enabled as the serial RS-232(C) communication link (to allow remote
control operation). When this option is set to
link is disabled.
Alerts Group (VIEW ALERTS)
This option group displays the alert and alarm options that are enabled. The Alerts group
options are:
COMPLETE ALARM
IDLE ALARM, NEAR END ALERT, BOLUS COMPLETE ALERT, DOSE
VIEW BACKLITE option turns the backlight on after a keypress when the
CONFIRM to view the current setting.
N (no), the RS-232(C) serial communication
, and VOLUME LIMIT ALARM.
07-19-B3-430 Auto Syringe AS50 Infusion Pump Operator’s Manual Page 65
Page 72

Configuration
Idle Alarm
This option enables the pump to issue a continuous audible alarm when a PUMP IS IDLE
condition occurs. If the option is disabled, the pump beeps 15 times at two minute
intervals when a
PUMP IS IDLE condition occurs.
Near End Alert (NEAR END)
This option enables the pump to issue an alert during an infusion prior to an expected
VOL LIMIT or EMPTY alarm. The option specifies the number of minutes prior to the alarm
that the expected alert will be issued and the number of beeps in the alert.
The form of a Near End alert display is xx
MIN VOL LIM, xxMIN EMPTY or xxMIN (protocol).
The value xx is the configured number of minutes. The first and second forms apply to
impending
third form applies to either condition when a protocol has been selected. Press
VOLUME LIMIT or EMPTY conditions when no protocol has been selected. The
CONFIRM
to view the current settings.
Note: When an infusion is started, no
ured number of minutes remain before an
occur. For example, if the
utes remains before the volume limit is reached, no
START is pressed.
when
NEAR END alert will occur if fewer than the config-
EMPTY or VOL LIMIT alarm is due to
NEAR END alert is configured for 10 minutes and 9 min-
NEAR END alert will occur
Bolus Complete Alert (BOLUS COMPLETE)
This option enables the pump to issue an alert when a bolus completes.
Dose Complete Alarm (DOSE COMPLETE)
This option enables the pump to issue an alarm when a dose completes in SINGLE
DOSE mode.
Volume Limit Alarm (VOLUME LIMIT)
This option applies to mL/hr and mL/min modes only. During initial programming, the
pump prompts the operator to enter a volume limit value in mL. The Volume Limit feature
triggers an alarm after the pump has delivered the pre-programmed volume of drug. With
this option enabled, a
NEAR END alert is issued when the Volume Limit will be reached
within a preconfigured time period at the current rate of infusion. See “Near End Alert” on
page 66.
Identifier
The Identifier is not a configuration group, but is included here for reference purposes.
The Identifier is a short message (up to eight characters) that is displayed for three
seconds following the Lamp Test. The Identifier can be created or edited during the pump
configuration process.
Page 66 Auto Syringe AS50 Infusion Pump Operator’s Manual 07-19-B3-430
Page 73

Terminating Configuration Review
When the last configuration group option has been reviewed, the pump automatically
restarts the Lamp Test, as if it had just been turned on.
To cancel Configuration Review at any time, turn the pump off.
Custom Configuration
The pump can be reconfigured as often as desired, to select features that best suit the
needs of the healthcare facility.
If there is any question regarding the pump’s current configuration or applicability for a
particular clinical application, the operator and healthcare professionals should verify that
the settings are appropriate.
While no special tools are needed, the configuration should be changed only by
authorized personnel.
Factory Standard Configuration
Configuration
The factory standard configuration is:
Protocol Library: See the chart on the following page.
Modes: ML/HR MCG/KG/MIN
SINGLE DOSE MCG/KG/HR
MCG/MIN
Manufacturers and Sizes: B-D 1, 3, 5, 10, 20, 30, 60 mL Plastic
Monoject 1, 3, 6, 12, 20, 35, 60 mL
Terumo 1,3,5,10, 20, 30, 60 mL
Defaults: All enabled
Misc: PSI RANGE = M (Medium)
AUDIO RANGE = H (High)
RATE RANGE = H (High)
BACKLITE = 2 MINUTES
LIBRARY=N
Alerts: IDLE ALARM enabled
MINALERT= 10, 5 (10 Minutes, 5 Beeps)
DOSE COMPLETE enabled
VOLUME LIMIT enabled
07-19-B3-430 Auto Syringe AS50 Infusion Pump Operator’s Manual Page 67
Page 74

Configuration
Protocol Libraries
Library Name Drug Name
Protocol
Name
Default
Mode
Default
Concentration
(mg/mL)
Bolus
Allowed
NONE Protocol
Selection Option
ANALGESC
ANES-HYP
CARDIO
MUSRELAX
Alfentanil
Remifentanil
Sufentanil
Propofol
Dobutamine
Dopamine
Isoproterenol
Nitroglycerine
Nitroprusside
Norepinephrine
Atracurium
Mivacurium
Rocuronium
Succinylcholine
ALFENTAN
REMIFENT
SUFENTAN
PROPOFOL
DOBUTAMI
DOPAMINE
ISOPROTE
NITROGLY
NITROPRU
NOREPINE
ATRACURI
MIVACURI
ROCURONI
SUCCINYL
mcg/kg/min 0.05 No Yes
mcg/kg/min 0.05 No
mcg/kg/hr 0.05 No
mcg/kg/min 10 No Yes
mcg/kg/min 5 No Yes
mcg/kg/min 3.2 No
mcg/min 0.004 No
mcg/min 0.4 No
mcg/kg/min 0.2 No
mcg/min 0.004 No
mcg/kg/min 0.5 No Yes
mcg/kg/min 2 No
mg/kg/min 10 No
mg/min 2 No
Vec u roni um
For NONE Library Selection Option, see “Using Protocols” on page 32.
Page 68 Auto Syringe AS50 Infusion Pump Operator’s Manual 07-19-B3-430
VECURONI
mcg/kg/min 0.2 No
Page 75

Charging the Battery
ACLE
GE
U
0VACOU
T
GE
The battery charger cord plugs into the bottom of the pump.
Note: The plug and receptacle are shaped to fit only one way. DO NOT force the
plug into place.
For the best battery operating time, the battery should be charged for at least 16 hours
before using the pump. Disconnect the charger if the pump is not to be used within the
next 72 hours. Prolonged overcharge and high temperature shorten the battery operating
time and service life.
Pump MaintenanceChapter 1
The battery voltage may be displayed by pressing
or by pressing
CONFIRM after the pump has been programmed.
CONFIRM briefly during the Lamp Test,
Note: Battery voltage display is only an approximate indication of the battery’s remaining
charge. If the battery voltage is less than 6.1 volts, or is dropping rapidly, assume
that the charge remaining in the battery is minimal. Recharge the battery.
Do not charge or store the pump in direct sunlight, or under excessively warm conditions.
Replacement of the battery every 16 months is recommended for optimal pump
performance.
Use only “900 Series” chargers or other accessories that are labeled
!
specifically for use with Auto Syringe AS40A or AS50 Series Infusion
Pumps. The standard battery charger (USA) is Model #C-AS40-01-900.
12
TLE
HAR
HAR
PL
07-19-B3-430 Auto Syringe AS50 Infusion Pump Operator’s Manual Page 69
Page 76

Pump Maintenance
a
e
60015
e
IV Pole Clamp
The pump is supplied with a
detachable, adjustable pole clamp
which allows it to be mounted to a
standard vertical IV pole. The pole
clamp can also be adjusted to allow
the pump to be used on a horizontal
pole.
To attach the pole clamp to the pump,
first slide the clamp in place, so that
the MOUNTING PIN CUTOUTS (1)
on the clamp engage the MOUNTING
PINS (5) built into the rear of the
pump. Tighten the MOUNTING
SCREW (4) into the threaded
RECESS (6) just below the battery
cover. Tools are not required for this
operation.
Cautions-Federal (U.S.A.) l
The JAW (3) clamps the pump to the
IV pole. Turn the KNOB (2)
counterclockwise to open the jaw, and
clockwise to close it. Tighten the knob
by hand only. Do not use tools to
tighten the knob.
Page 70 Auto Syringe AS50 Infusion Pump Operator’s Manual 07-19-B3-430
Page 77

IV Pole Loop
The pump includes an IV pole loop built into the top of the pump. This loop may be
swiveled as required, or folded down and out of the way when not in use.
Cleaning
All the external moving parts must be kept clean of sticky films and other foreign
substances.
If spillage onto external surfaces occurs, clean the surfaces immediately
!
by the method described below.
Routine Cleaning and Disinfection Techniques
Clean or disinfect the exterior of the device with a soft cloth or cotton swabs, sparingly
dampened with any of the recommended cleaning agents listed below. Remove the
rubber bumpers and clean or disinfect them separately.
Remove residual cleaner or disinfectant from all accessible surfaces with a soft cloth or
cotton swabs sparingly dampened with water, and allow to dry before replacing the rubber
bumpers.
07-19-B3-430 Auto Syringe AS50 Infusion Pump Operator’s Manual Page 71
Page 78

Pump Maintenance
Acceptable cleaning or disinfecting agents are:
Cleaner Manufacturer
Soapy water Various
Isopropyl alcohol Various
10% solution of chlorine
bleach and water
ASCEND germicidal
detergent
Cidex Formula 7 sterilizing
and disinfecting solution
LpHSE, Septisol
detergents
TOR, Hi-Tor Plus germicidal
detergents
germicidal
Commercially available
Huntington Professional
Products
Johnson & Johnson
Steris Corporation
Huntington Professional
Products
Note: Follow the manufacturer’s dilution instructions for concentrated cleaning and disin-
fecting agents.
Recommendation of the above cleaning or disinfecting agents is based on their
compatibility with the materials of which the pump is constructed. No representation is intended as to the effectiveness of any cleaning agent.
Surfaces to be disinfected must be free of gross (visible) foreign matter. Cleaning
the device before disinfection is recommended.
Some surfaces are not accessible with the above method. If spillage has
!
occurred onto inaccessible surfaces or into the mechanism, the device
should be Service Cleaned as soon as possible. Service Cleaning
methods are described in the Auto Syringe AS50 Infusion Pump Service
Manual.
Attempts to clean or disinfect internal parts, autoclaving or sterilization
!
by ethylene oxide gas will damage the pump and void the warranty.
Do not use the following chemicals on the device, as they will damage
!
the front panel: acetone, acetoaldehyde ammonia, benzene,
hydroxytoluene, methylene chloride, and ozone, Do not use cleaners
containing n-alkyl dimethyl ethylbenzyl ammonium chloride unless they
appear in the list of recommended cleaners in the Pump Maintenance
section of this manual.
Page 72 Auto Syringe AS50 Infusion Pump Operator’s Manual 07-19-B3-430
Page 79

Conditions Requiring Service Cleaning
Service cleaning is a procedure for removing foreign matter from areas that are not
accessible through routine cleaning methods. Service cleaning must only be performed
by qualified individuals. Instructions for service cleaning may be found in the Auto Syringe
AS50 Infusion Pump Service Manual.
Conditions which require service cleaning include:
● Spillage into the pumping mechanism, or into the barrel clamp, flange clamp, or
plunger driver mechanism.
● Accumulation of foreign matter in areas not accessible to routine cleaning.
● Excessive syringe-related alarms or alerts, such as CHECK SYRINGE, CHECK
PLUNGER, CHECK FLANGE
● Sticking of the plunger driver, the barrel clamp, or flange clamp.
, or CHECK BARREL.
07-19-B3-430 Auto Syringe AS50 Infusion Pump Operator’s Manual Page 73
Page 80

Pump Maintenance
Periodic Maintenance
Daily Check
This Daily Check should be performed prior to programming an infusion. If the pump fails
any part of the Daily Check, take it out of service.
1. Before using the pump, check for slippage of the plunger driver by applying gentle
back pressure.
2. Check the plunger driver for free travel through its full range.
3. Check the barrel clamping mechanism for proper locking, and check that it opens and
closes freely when either barrel clamp release is pressed.
4. Check that the plunger assembly opens freely to its full travel and returns to a fully
closed position without assistance.
If connecting the charger, make sure that the charger plug and socket are clean and fully
engaged, and that the
ON CHARGE light is lit when the charger is plugged in.
Battery Replacement
In general, the service life of rechargeable batteries is based on many factors, including
construction, size, usage, frequency of charging and discharging, and depth of discharge
prior to recharge. To minimize the chances of experiencing a problem with rechargeable
batteries, it is advisable to replace them before their service life is expended.
Baxter advises that pump battery replacement be made part of a regularly scheduled
maintenance program. Baxter recommends that the AS50 Pump’s rechargeable battery
be replaced every 16 months.
Page 74 Auto Syringe AS50 Infusion Pump Operator’s Manual 07-19-B3-430
Page 81

Display, Battery, and Syringe Sensor Check
OD
g
OSE
g
r
GE
z
C
s
g
USE
s
g
V
YRIN
i
INF
B
N
k
nit
m
1. Be sure that no syringe is mounted, and
that the barrel clamp is closed.
2. Press and hold the STOP key during the
normal power-up Lamp Test. Compare
the display to the illustration. Verify that
all annunciators, decimal points and
digits are legible.
3. Be sure that all lights on the Status
Panel light up during the Lamp Test.
Keypad Check
1. After the pump completes the power-up Lamp Test, press every key except ▲, ▼, and
mgh
D
k
Note: If the charger is plugged in, the
CHARGE
light will be on before, during and
after the lamp test.
L LIMIT
mgrm
mLmc
4. Release the STOP key.
Note: If
CHECK BARREL, CHECK FLANGE or
CHECK PLUNGER is displayed, one of the
syringe mounting sensors may be malfunctioning. Make sure the plunger rod, flange
and barrel capture mechanisms are free.
Turn the pump off and back on again. If the
error message is repeated, remove the
pump from service.
CONFIRM in any order, one key at a time. Each keypress should result in a short
beep.
ON
2. Press any two (or more) keys simultaneously. There should be no response.
3. Press and hold any key (except ▲, ▼, START, STOP, and CONFIRM). There should be
only one beep, no matter how long the key is held down.
4. Press and hold any key (except ▲, ▼, START, STOP, and CONFIRM), then press any
other key. There should be no response to the second keypress.
5. Press and briefly hold down START and STOP, one at a time. The pump should sound
repeated beeps while each key is held down. Holding down
START for a prolonged
period of time will cause a failsafe alarm.
07-19-B3-430 Auto Syringe AS50 Infusion Pump Operator’s Manual Page 75
Page 82

Pump Maintenance
Battery Voltage Check
Note: Battery voltage display is only an approximate indication of the battery’s remaining
charge. If the battery voltage is less than 6.1 volts, or is dropping rapidly, assume
that the charge remaining in the battery is minimal. Recharge the battery.
To display the battery voltage, press
battery voltage should be more than 6.1 V if the pump is to be operated on battery power.
A charged battery displays a battery voltage of approximately 7.0 volts.
In Case of Difficulty
Check the IV extension set carefully to be sure the tubing is not pinched, and that there
are no obstructions to prevent proper fluid flow.
Problems associated with a particular syringe size or manufacturer are likely to be caused
by variations in syringe dimensions. Typical symptoms are an inability to completely
empty certain syringes, and
If you apply tape, paper stickers, or labels to the syringe, the apparent diameter of the
syringe barrel may increase, which can impair the accuracy of the Syringe Recognition
system.
Syringe Recognition problems may be caused by improperly mounted syringes. Excess
clamping force can crush the syringe barrel, which results in an erroneous barrel diameter
reading.
Frequent
in the barrel clamp cradle.
If the pump fails to operate as described, contact the Baxter Healthcare Corporation
Andover Service Center for assistance at:
CHECK BARREL messages may be caused by improperly centering the syringe
CONFIRM after the pump is fully programmed. The
LINE OCCLUDED alarms when the syringe becomes empty.
1-800-343-0366 - Customer Service
1-800-634-4602 - Technical Service
Page 76 Auto Syringe AS50 Infusion Pump Operator’s Manual 07-19-B3-430
Page 83

Alerts and AlarmsChapter 2
The pump notifies the operator when important conditions occur:
● Alert:
A condition has occurred which requires operator attention. The following indications
occur:
• The pump continues to operate
• The ALERT light flashes
• The pump beeps
• The front panel and status lights may display additional information
● Alarm:
Immediate action is required in order to proceed with operation. The following
indications occur:
• The pump stops delivering the infusion
• The ALERT light flashes
• The pump beeps
• The front panel and status lights may display additional information
● Failsafe Alarm:
A malfunction has occurred that could affect the safe operation of the device. The
pump goes into a “failsafe shutdown.” The following indications occur:
• The pump stops delivering the infusion and cannot be restarted. The infusion
must be reprogrammed after the problem is corrected.
• The SYSTEM light is on continuously
• The pump beeps
• The front panel and status lights may display additional information
• The pump must be turned off and back on to clear the alarm
If any of the aforementioned conditions occur, refer to the charts on the following pages
for instructions on correcting the alert or alarm condition.
07-19-B3-430 Auto Syringe AS50 Infusion Pump Operator’s Manual Page 77
Page 84

Alerts and Alarms
Alerts
Message Cause Correction
BOLUS COMPLETE
(may be accompanied by 2 beeps
and flashing ALERT light)
The bolus has completed. None required.
CHARGE IS LOW
(10 beeps, flashing BATTERY light)
CHECK BARREL
(single beep)
CHECK FLANGE
(single beep)
CHECK PLUNGER
(single beep)
The battery needs charging. If a
charger is not connected, or is not
charging the battery, this alert
repeats every 15 minutes.
The barrel clamp is not fully closed
on the syringe barrel, or the syringe
is not properly seated in the cradle.
The syringe flange is not seated in
the flange slot.
The plunger capture mechanism
has not captured the syringe
plunger.
Connect the charger. When the
battery charge reaches the normal
operating range, the alert
self-cancels.
If the battery voltage is very low, the
alert may repeat once or twice after
the charger is connected.
Make sure the syringe is centered in
the barrel clamp cradle, and that the
syringe flange is in the barrel clamp
flange slot. To ensure proper
seating, use the heel of the hand to
press the barrel clamp firmly against
the syringe. Motor movement is not
allowed until the syringe is properly
mounted.
Remove the syringe and remount it.
Make sure the syringe is centered in
the barrel clamp cradle, and that the
syringe flange is in the barrel clamp
flange slot. To ensure proper
seating, use the heel of the hand to
press the barrel clamp firmly against
the syringe. Motor movement is not
allowed until the syringe is properly
mounted.
Grasp the finger grip on the plunger
driver and pull it all the way out.
Slide the driver down until it
contacts the syringe plunger and
push the driver in firmly. Motor
movement is not allowed until the
syringe is properly mounted.
CHECK SYRINGE
(single beep and Standby light
flashes)
DATA MISSING
(single beep)
EMPTY LIBRARY
(single beep)
FINISH EDITING
(single beep)
Page 78 Auto Syringe AS50 Infusion Pump Operator’s Manual 07-19-B3-430
At least two of the three syringe
mounting points (flange, barrel,
plunger) are not correctly
positioned.
START, PURGE, or BOLUS was
pressed when the program
information is incomplete.
The selected protocol library
contains no protocols.
Pressing START, PURGE, or
BOLUS while a field is open for
editing.
Check flange, barrel, and plunger,
and ensure that they are mounted
correctly. Motor movement is not
allowed until the syringe is properly
mounted.
Enter the additional data required.
Select a different library.
Complete the editing process.
Page 85

Message Cause Correction
KEYPAD LOCKED
(single beep)
Pressing a key while the Lock
function is active.
Press LOCK to unlock the keypad.
LOAD SYRINGE
(single beep)
NO LIBRARY
(single beep)
NO LIBRARY IS ENABLED
(single beep)
NOT ALLOWED
(single beep)
OUT OF RANGE
(single beep)
PUMP IS IDLE
(15 beeps and ALERT light flashes)
PUMP LIMIT
(single beep)
Attempt to start an infusion without
a syringe in place.
All three syringe detection sensors
have failed.
VIEW LIBRARY was selected and
no libraries exist.
VIEW LIBRARY was selected and
no libraries are enabled.
The BOLUS key was pressed when
the bolus feature is not allowed by
the selected protocol.
No bolus is possible for the current
combination of syringe, body
weight, and drug concentration.
The pump has been in Standby
state for at least 2 minutes. Also
occurs if there is no keypress within
15 seconds after the infusion is
stopped.
Attempting to program a value
outside the pump’s acceptable
range.
Mount a syringe after manually
purging.
If alert continues to occur, have the
pump serviced.
Press CONFIRM to proceed to
VIEW MODES prompt.
Press CONFIRM to proceed to
VIEW MODES prompt.
Use the NONE protocol library
selection or the NONE protocol
selection (if available) if the bolus
feature is required.
Use a different syringe or drug
concentration if the bolus feature is
required.
The alert is self-cancelling. The
Lock function suppresses the audio
portion of this alert. Note: If the
keypad is locked, there will be no
beeps, but the PUMP IS IDLE
message will still appear.
The pump displays the nearest
acceptable value. Press CONFIRM
to accept displayed value, or enter a
different value and press CONFIRM.
SIZE MISMATCH
(single beep)
SIZE UNKNOWN
(single beep)
USE DIGITS
(single beep)
The detected syringe size is
different from the programmed size.
The pump cannot identify the
syringe size for the selected
manufacturer.
Attempt to use
▲ or ▼ to initialize a
field containing dashes.
Check to be sure the correct
manufacturer has been
programmed. Press CLR if
necessary and reprogram the
syringe manufacturer and size.
Check to be sure the correct
manufacturer has been
programmed. Ensure that the barrel
clamp is fully closed. Press CLR if
necessary and reprogram the
syringe manufacturer and size.
Use digit keys instead.
07-19-B3-430 Auto Syringe AS50 Infusion Pump Operator’s Manual Page 79
Page 86

Alerts and Alarms
Message Cause Correction
VERIFY AGAIN
(single beep)
The detected syringe size is
different from the programmed size.
Press ▲ or ▼ to change size or
CONFIRM to complete size
override.
▲▼ IN USE
(single beep)
<xx MIN EMPTY or
<xx MIN VOLUME LIMIT or
<xx MIN (protocol)
(configurable number of beeps.
ALERT light flashes until syringe is
empty or volume limit is reached)
An attempt was made to use digit
keys to edit a number that was
modified with an arrow key.
At the present rate of infusion,
approximately xx minutes remain
until the syringe will be empty or the
volume limit will be reached. If a
protocol has been selected, the
protocol name will be displayed
instead of END or VOLUME LIMIT.
Continue programming with the
arrow keys, or clear the field and
reprogram it with digit keys.
Pressing any key silences the audio
portion of the alert. The alert is reset
when a filled syringe is installed, or
when the plunger driver is moved
back.
Note: Since this function is sensitive
to variations in syringe dimensions,
the exact timing of this alert may
vary.
Page 80 Auto Syringe AS50 Infusion Pump Operator’s Manual 07-19-B3-430
Page 87

Alarms
Message Cause Correction
CHECK BARREL
(continuous beeps and flashing
ALERT light)
During motor movement the pump
has detected that the barrel clamp is
not fully closed on the syringe
barrel, or the syringe barrel is not
properly seated in the cradle.
Alerts and Alarms
Pressing any key silences the audio
portion of the alarm. Make sure the
syringe is centered in the barrel
clamp cradle, and that the syringe
flange is in the barrel clamp flange
slot. To ensure proper seating, use
the heel of the hand to press the
barrel clamp firmly against the
syringe. Motor movement is not
allowed until the syringe is properly
mounted.
CHECK FLANGE
(continuous beeps and flashing
ALERT light)
CHECK PLUNGER
(continuous beeps and flashing
ALERT light)
CHECK SYRINGE
(continuous beeps and flashing
ALERT light)
During motor movement the pump
has detected that the syringe flange
is not seated in the flange slot.
During motor movement the pump
has detected that the plunger
capture mechanism has not
captured the syringe plunger.
At least two of the three syringe
mounting points (flange, barrel,
plunger) are not correctly
positioned.
Pressing any key silences the audio
portion of the alarm. Remove the
syringe and remount it. Make sure
the syringe is centered in the barrel
clamp cradle, and that the syringe
flange is in the barrel clamp flange
slot. To ensure proper seating, use
the heel of the hand to press the
barrel clamp firmly against the
syringe. Motor movement is not
allowed until the syringe is properly
mounted.
Pressing any key silences the audio
portion of the alarm. Grasp the
finger grip on the plunger driver and
pull it all the way out. Slide the driver
down until it contacts the syringe
plunger. Push in firmly. Motor
movement is not allowed until the
syringe is properly mounted.
Pressing any key silences the audio
portion of the alarm. Check flange,
barrel, and plunger, and ensure that
they are mounted correctly. Motor
movement is not allowed until the
syringe is properly mounted.
DOSE COMPLETE
(continuous beeps and flashing
ALERT light)
DOSE DUE
(continuous beeps and flashing
ALERT light)
07-19-B3-430 Auto Syringe AS50 Infusion Pump Operator’s Manual Page 81
(Single Dose Infusion Mode only)
The programmed dose has been
delivered.
(Manual Schedule Infusion Mode
only) The NEXT DOSE IN timer has
reached 0:00, and the next dose is
due to be delivered.
Pressing any key silences the
alarm.
Pressing any key silences the audio
portion of the alarm. Press START
to deliver the scheduled dose.
Page 88

Alerts and Alarms
Message Cause Correction
EMPTY or
EMPTY (protocol)
(continuous beeps and flashing
ALERT light)
FINISH EDITING
(continuous beeps and flashing
ALERT light)
The syringe is empty. Pressing any key silences the audio
portion of the alarm. Release and
slide the plunger driver back at least
1.6 inches (4 cm) to reset the alarm.
Note: due to variability in syringe
dimensions, a LINE OCCLUDED
alarm may occur before the EMPTY
alarm. Option: The infusion may be
restarted without resetting EMPTY
condition. The pump will continue to
display EMPTY and ALERT light will
continue flashing. The infusion will
continue until STOP is pressed or a
LINE OCCLUDED alarm occurs.
The Rate or Dose field is being
edited while an infusion is in
progress, and there has been no
Pressing any key silences the audio
portion of the alarm. Complete the
editing operation.
keypress for 15 seconds.
LINE OCCLUDED
(continuous beeps and flashing
ALERT light)
PUMP IS IDLE
(continuous beeps and flashing
ALERT light)
VOLUME LIMIT
(continuous beeps and flashing
ALERT light)
There is an occlusion, line
constriction, or other condition that
causes excess plunger force.
The pump has been in Standby
state for at least 2 minutes. Also
occurs if there is no keypress within
15 seconds after the infusion is
stopped.
The programmed volume limit has
been reached.
The alarm automatically stops the
pump. Pressing any key silences the
audio portion of the alarm. Check
for empty syringe, kinked tubing,
clogged catheter, etc. Check for
foreign material preventing
movement of the pump mechanism.
RELIEVE RESIDUAL SYRINGE
PRESSURE BY RELEASING THE
PLUNGER DRIVER. If the plunger
driver is not released, an
unintentional bolus may occur when
the blockage is cleared. The
message clears when the infusion is
successfully restarted.
Pressing any key silences the audio
portion of the alarm. The Lock
function suppresses the audio
portion of this alarm.
Note: If the keypad is locked, there
will be no beeps, but the PUMP IS
IDLE message still appears.
Pressing any key silences the audio
portion of the alarm. Restarting the
pump (by pressing START or
initiating a bolus) resets the Volume
Limit field.
Page 82 Auto Syringe AS50 Infusion Pump Operator’s Manual 07-19-B3-430
Page 89

Failsafe Alarms
Failsafe alarms occur only when proper operation cannot be assured. The infusion cannot
be restarted, and must be reprogrammed after the problem has been corrected. The
pump must be turned off to clear the alarm.
Message Cause Correction
(ERROR CODE)
(continuous two-tone audio,
SYSTEM light on)
Alerts and Alarms
An internal error has been detected. Repair is required. Make a note of
all displayed error codes and the
conditions prior to the error. Take
the pump out of service.
Note: In some cases, there may not
be a legible error code display.
CHARGE DEPLETED
(continuous two-tone audio,
SYSTEM and BATTERY lights on)
FUSE FAILURE (continuous
two-tone audio, SYSTEM and
BATTERY lights on)
POWER FAULT (continuous,
two-tone long beeps, SYSTEM and
BATTERY lights on)
The battery voltage is below
minimum operating level.
Fuse self-test has detected a fuse
failure.
The pump’s internal power supply is
out of tolerance, or there is a fault in
the charger.
Connect the charger and recharge
the battery for a minimum of 16
hours.
Repair is required. Take the pump
out of service.
Repair is required. Take the pump
and charger out of service.
07-19-B3-430 Auto Syringe AS50 Infusion Pump Operator’s Manual Page 83
Page 90

Alerts and Alarms
This page is intentionally blank.
Page 84 Auto Syringe AS50 Infusion Pump Operator’s Manual 07-19-B3-430
Page 91

Warranty
Warranty and Service
InformationChapter 3
Baxter Healthcare Corporation (“Baxter”) warrants that the equipment shall be free from
defects in material and workmanship when delivered to the original purchaser. Baxter's
sole obligation shall be limited to repair or replacement at Baxter’s option and expense, of
the defective part or unit for a period of one year following the date of initial delivery. The
applicable period for batteries is limited to a period of 12 months following the date of
initial delivery.
The warranty extends only to the original purchaser and is not assignable or transferable,
and shall not apply to auxiliary equipment or disposable accessories. Baxter’s
commitment to repair or replace the product will be null and void if this product is used
contrary to the directions for use contained in the labeling. Baxter will assume no
responsibility for incidents which may occur if the product is not used in accordance with
product labeling.
THERE ARE NO OTHER WARRANTIES INCLUDING ANY IMPLIED WARRANTY AND
ANY WARRANTY OF MERCHANTABILITY OR FITNESS FOR A PARTICULAR
PURPOSE WHICH EXTEND BEYOND THE DESCRIPTION OF THE PRODUCT AND
THOSE EXPRESSLY SET FORTH IN ITS LABELING. In no event shall Baxter be
responsible for incidental, consequential, or exemplary damages. Modification, alteration,
recalibration or abuse, and service by other than a Baxter authorized representative may
void the warranty.
Service Information
While under Baxter Warranty, Service Agreement (optional), or lease agreement, the
instrument must not be opened by unauthorized personnel.
For service and repair information for this product, call the Baxter Healthcare Corporation
Andover Service Center at 1-800-343-0366 (Customer Service) or 1-800-634-4602
(Technical Service).
Shipping costs for all units returned to Baxter shall be paid for by the customer. The unit
must be packed in its original container or in a container that will provide adequate
protection during shipment. To ensure prompt return, the Baxter Healthcare Corporation
Andover Service Center must be notified before shipping any unit for repair. When calling,
please be prepared to provide the product code number and serial number of the unit. A
service authorization number will be issued and should accompany all communications. A
brief written description of the problem should be attached to the instrument when it is
returned for service.
Baxter will not be responsible for unauthorized returns or for units damaged in shipment
due to improper packing.
07-19-B3-430 Auto Syringe AS50 Infusion Pump Operator’s Manual Page 85
Page 92

Warranty and Service Information
This page is intentionally blank.
Page 86 Auto Syringe AS50 Infusion Pump Operator’s Manual 07-19-B3-430
Page 93

Index
Symbols
(hh:mm) in text, 1
▲▼ IN USE error, 80
<xxMIN (protocol) alert
<xxMIN EMPTY alert
<xxMIN VOL LIM alert
, 80
, 80
, 80
A
action keys, 18
, 66, 81
alarms
fail-safe
alerts
group
light
ALFENTAN protocol
ANALGESC library
ANES-HYP library
arrow keys
description
ATRACURI protocol
audio range
Auto Lock function
AUTO SCHEDULE mode
, 83
, 67, 78
, 65
, 19
, 68
, 68
, 68
, 21
, 18
, 68
, 65
, 59
B
backlight, 60, 65
barrel clamp
illustration
release lever illustration
battery
charging
cover illustration
light
operating time
replacement
voltage check
B-D Plastic
deliverable volumes
purge delivery
rate ranges
beeps
, 9
, 69
, 9
, 19
, 15
, 74
, 76
, 26
, 54
, 25
, 66
, 45
, 9
bolus
complete alert
CUSTOM DILUTION mode
default size
delivery
description
, 58
editing
prevention
programming
, 56
rate
repeating delivery
, 57
review
size limits
, 55
units
BOLUS COMPLETE
, 78
alert
, 66
details
bolus modes
, 66
, 40
, 22
, 57
, 55
, 21
, 56
, 58
, 55
, 34, 35
C
cancelling an edit, 50
CARDIO library
catalog code
changing the battery
changing the syringe
CHARGE DEPLETED fail-safe alarm
CHARGE IS LOW alert
charger port illustration
charging the battery
CHECK BARREL
, 81
alarm
, 78
alert
CHECK FLANGE
, 81
alarm
, 78
alert
CHECK PLUNGER
, 81
alarm
, 78
alert
CHECK SYRINGE
, 81
alarm
, 78
alert
cleaning and disinfection
conditional message displays
, 68
, 15
, 74
, 58
, 78
, 9
, 69
, 71
, 77
, 83
07-19-B3-430 Auto Syringe AS50 Infusion Pump Operator’s Manual Index-1
Page 94

configuration
custom
factory standard
configuration review
feature
table
terminating
confirm key
continuous infusion modes programming
counting time
cradle illustration
CUSTOM DILUTION mode
, 67
, 67
, 61
, 62
, 67
, 18
, 43, 46
, 9
, 39
D
dashes in display, 21
data
, 48
entry
testing
DATA MISSING error
date and time display
DB9 port
defaults
bolus size
concentration
dose or rate
group
infusion mode
deliverable volume
description, general
digit keys
disinfection and cleaning
DOBUTAMI protocol
DOPAMINE protocol
DOSE COMPLETE
alarm
details
DOSE DUE alarm
dose initiation
drug concentration selection
, 20, 51
, 78
, 61
, 65
, 67
, 22
, 21
, 21
, 64
, 21
, 15
, 3
, 18
, 71
, 68
, 68
, 81
, 66
, 81
, 46
, 17
E
EDIT key, 20
editing
cancellation
in run state
in standby state
EDITING alarm
EMPTY (protocol) alarm
EMPTY alarm
EMPTY LIBRARY error
enable DB9 port
, 50
, 50
, 48
, 82
, 82
, 82
, 78
, 65
, 12
entering data
epidural administration precautions
error code fail-safe alarm
error responses table
expanded data display
, 20
, 83
, 78
, 60
F
factory standard configuration, 67
fail-safe alarms table
field selection
FINISH EDITING error
flange slot
flashing
annunciators
, 20
data
flow rate
accuracy
range
function keys
FUSE FAILURE fail-safe alarm
, 48
, 9
, 15
, 15
, 18
, 83
, 78
, 20
, 83
G
general
description
information
, 3
, 15
H
hospital identifier, 66
I
identifier, 66
IDLE ALARM alert
infusion modes
continuous
overview
selecting
timed
infusion rate
ranges
selection
input/output port (RS232)
intended use
ISOPROTE protocol
IV pole clamp
IV pole loop
details
illustration
, 23
, 33
, 24
, 25
, 16
, 71
, 66
, 23
, 9
, 1
, 68
, 70
, 9
, 7
Index-2 Auto Syringe AS50 Infusion Pump Operator’s Manual 07-19-B3-430
Page 95

K
key sounds, 21
keypad
description
illustration
KEYPAD LOCKED error
, 18
, 9
, 79
L
LCD panel
description
illustration
LINE OCCLUDED alarm
LOAD SYRINGE error
lock
, 19
light
Lock function
, 16
, 9
activating
auto lock
, 59
, 6, 82
, 79
, 59
, 65
M
maintenance
cleaning and disinfecting
daily check
display and syringe sensor
keypad
mechanical
service cleaning
manual purge
MANUAL SCHEDULE mode
mfr codes
MIVACURI protocol
modes
AUTO SCHEDULE
by unit per time frame
factory standard configuration
MANUAL SCHEDULE
SINGLE DOSE
Monoject
deliverable volumes
purge delivery
rate ranges
MUSRELAX library
, 75
, 74
, 73
, 28
, 16
, 68
, 41
, 54
, 25
, 68
, 71
, 45
, 33
, 42
, 26
N
NEAR END alert, 66
next dose selection
NITROGLY protocol
NITROPRU protocol
NO LIBRARY error
, 17
, 68
, 68
, 79
, 42
, 67
, 75
NO LIBRARY IS ENABLED error
NOREPINE protocol
NOT ALLOWED error
number out of range
, 68
, 79
, 51
O
occlusion sensitivity, 65
on charge light
ON/OFF switch
illustration
operating instructions
battery time
charging the battery
checking lamp test
IV pole clamp
IV pole loop
manual purge
mounting the syringe
purging
simplified
states
see also maintenance, programming
OUT OF RANGE error
over body wt selection
, 19
, 30
, 9
, 15
, 69
, 31
, 70
, 71
, 28
, 28
, 53
, 10
, 20
, 79
, 17
P
plunger assembly, 9
pole clamp
attach recess
mounting pins
POWER FAULT fail-safe alarm
power requirement
precautions
epidural administration
programming
AUTO SCHEDULE mode
, 56
bolus
by unit per time frame
continuous infusion modes
CUSTOM DILUTION mode
during run state
during standby state
field selection
getting started
MANUAL SCHEDULE mode
modes
overview
selecting a protocol
selecting a protocol library
selecting an infusion mode
, 9
, 9
, 83
, 15
, 5
, 7
, 45
, 33
, 12
, 39
, 50
, 48
, 48
, 11
, 42
, 35
, 32, 48
, 32
, 32
, 33
, 79
07-19-B3-430 Auto Syringe AS50 Infusion Pump Operator’s Manual Index-3
Page 96

SINGLE DOSE mode, 41
timed infusion modes
PROPOFOL protocol
protocol library
bypassing
groups
option
overview
selecting
using
PSI range
PUMP IS IDLE
alarm
alert
PUMP LIMIT error
purging
delivery table
description
instructions
manual
, 22
, 63
, 64
, 21
, 32
, 32
, 65
, 82
, 79
, 54
, 53
, 53
, 28
, 13
, 68
, 79
R
rate range option, 65
REMIFENT protocol
remote control
reviewing configuration options
ROCURONI protocol
RS232 port
run
lights
state
, 9
, 19
, 20
editing in
, 68
, 64
, 68
, 50
S
serial communication, 22
service
, 76, 85
, 20
editing in
, 9
, 85
, 41
, 79
, 64
, 79
, 15
, 48
, 16
, 19
information
number
SINGLE DOSE mode
SIZE MISMATCH error
size override option
SIZE UNKNOWN error
specifications
standby
, 19
light
state
status display description
status panel
description
illustration
, 61
SUCCINYL protocol
SUFENTAN protocol
syringe
changing
data tables
factory standard configuration
manufacturers
mounting
sensor check
size selection
system light
, 58
, 25
group
selection
, 28
, 19
, 68
, 68
, 67
, 15
, 63
, 16
, 75
, 16
T
tables
alarms
alerts
bolus units
configuration review
error responses
fail-safe alarms
infusion rate
programming
purge delivery
technical specifications
temperature range
Terumo
deliverable volumes
purge delivery
rate ranges
testing data
text conventions
time
counting
data fields
timed infusion modes programming
total delivered display
total drug vol display
troubleshooting
, 81
, 78
, 55
, 62
, 78
, 83
, 25
continuous infusion modes
timed infusion modes
, 13
, 54
, 15
, 15
, 26
, 54
, 25
, 20, 51
, 1
, 43, 46
, 20
, 59
, 17
, 76
, 12
, 13
U
UNITS/HR, UNITS/MIN, MUNITS/HR, and MUNITS/
MIN Mode
USE DIGITS error
using protocols
, 35
, 79
, 32
Index-4 Auto Syringe AS50 Infusion Pump Operator’s Manual 07-19-B3-430
Page 97

V
VECURONI protocol, 68
VERIFY AGAIN error
version display
VIEW ALERTS?
, 65
details
group selection
VIEW DFAULTS?
, 64
details
group selection
VIEW LIBRARY?
, 63
details
group selection
VIEW MFRS?
details
, 63
group selection
VIEW MISC?
, 64
details
, 80
, 61
, 62
, 62
, 62
, 62
group selection
VIEW MODES?
, 63
details
group selection
voltage check
volume
accuracy
, 33
limit
volume limit
, 66
option
selection
VOLUME LIMIT alarm
volumes table
, 62
, 62
, 76
, 15
, 17
, 26
W
warranty, 85
, 82
07-19-B3-430 Auto Syringe AS50 Infusion Pump Operator’s Manual Index-5
Page 98

This page is intentionally blank.
Index-6 Auto Syringe AS50 Infusion Pump Operator’s Manual 07-19-B3-430
Page 99

Page 100

Baxter Healthcare Corporation
Medication Delivery Division
Deerfield, IL 60015 USA
*0719B3430_*
07-19-B3-430
© Copyright 1999, 2002, Baxter Healthcare Corporation. All Rights Reserved.
Revision B
May 2002
 Loading...