

Page 1

TM
WARRANTY
7049620
Artikel-Nummer | Item-No
BEDIENUNGSANLEITUNG
INSTRUCTION MANUAL
LIIFO 19,2 V Pneumatischer Bohrhammer
mit Lithium-Eisen-Phosphat-Akku
LIIFO 19.2 V Pneumatic Rotary Hammer
with Lithium Iron Phosphate Battery
Page 2

2 |
|2
|1
|7
|6
|3
|4
|8
|5
Page 3

| 3
deutsch english
|1 Drehrichtungsumschalter Rotation Direction Switch
|2 EIN/AUS-Schalter ON/OFF Trigger
|3 Entriegelungstaste (beidseitig) Releasing Button (on both sides)
|4 Akku Battery
|5 Anschlussbuchse für Netzteil Connector Socket for Power Supply
|6 Umschalter für Selector Switch for
Hammerbohren Hammer Drilling
Bohren/Schrauben Drilling/Screwing
|7 SDS-Plus-Aufnahme SDS-Plus-Chuck
|8 Ladekontroll-LED Charging Control LED
Übersicht | Overview
Inhalt | Content
deutsch
Sicherheitshinweise 2 |
Vor der ersten Benutzung 4 |
Einsetzen und Entnehmen des Akkus 4 |
Laden des Akkus mit Netzteil 4 |
Laden des Akkus im Bohrhammer 4 |
Einsetzen der Werkzeuge 5 |
EIN/AUS-Schalter 5 |
Umschalten der Drehrichtung 5 |
Pneumatisches Hammerwerk 6 |
Wartung und Reinigung 6 |
Technische Daten 7 |
english
Safety Notes 9 |
Before first Use 11 |
Inserting and Removing the Battery 9 |
Charging the Battery with Power Supply Unit 11 |
Charging the Battery in the Rotary Hammer 11 |
Inserting the Tools 12 |
ON/OFF Trigger 12 |
Reversing the Rotation Direction 12 |
Pneumatic Hammer Function 13 |
Maintenance and Cleaning 13 |
Technical Data 14 |
Page 4

4 |
Bitte machen Sie sich in der Reihenfolge der Kapitel mit dem Gerät vertraut und bewahren Sie diese Bedienungsanleitung für spätere Zwecke gut auf.
Diese Bedienungsanleitung enthält wichtige Hinweise zur Inbetriebnahme und Handhabung. Legen Sie
die Anleitung dem Produkt bei, wenn Sie es an Dritte weitergeben!
Bitte beachten Sie die Sicherheitshinweise! Diese sollen Ihnen den sachgemäßen Umgang erleichtern
und Ihnen helfen, Missverständnissen und Schäden vorzubeugen.
!
Beachten Sie bitte zur Vermeidung von Fehlfunktionen, Schäden und gesundheitlichen Beeinträchtigungen die beigefügten Allgemeinen Sicherheitshinweise sowie folgende Hinweise:
• Überzeugen Sie sich, dass die Netzspannung mit den Angaben auf dem Typenschild übereinstimmt .
• Personen mit eingeschränkten physischen, sensorischen oder geistigen Fähigkeiten dürfen das Gerät
nicht benutzen, es sei denn sie werden durch eine für ihre Sicherheit zuständige Person beaufsichtigt oder erhal-ten von der zuständigen Person Anweisungen, wie das Gerät zu benutzen ist.
• Bei Arbeiten an Wänden, Decken, Böden o. ä. vergewissern Sie sich, dass der Arbeitsbereich vorher
stromlos geschaltet wurde! Untersuchen Sie den Bereich vor dem Bohren nach Leitungen (Wasser-,
Gas- und Stromleitungen). Verwenden Sie dazu geeignete Hilfsmittel wie Metall- oder Leitungssuchgeräte.
• Achtung: Ändern Sie den Betriebsmodus (Bohren/Hammerbohren) nur bei Stillstand der Maschine.
• Setzen Sie das Ladegerät nur am 230 V Stromnetz ein. Laden Sie den Akku der Maschine nur mit dem
mitgelieferten Netzteil.
• Schützen Sie Akku und Netzteil vor Feuchtigkeit. Betreiben Sie das Netzteil nicht im Freien.
• Ziehen Sie bei Nichtbenutzung des Netzteils, vor der Reinigung und Wartung den Netzstecker
aus der Steckdose.
• Behandeln Sie den Akku mit Umsicht, lassen Sie ihn nicht fallen und setzen Sie ihn weder Druck,
anderen mechanischen Belastungen oder extremer Hitze und Kälte aus.
• Öffnen und reparieren Sie den Akku und das Netzteil nicht. Im Falle eines Defektes lassen Sie
Reparaturen nur von einem Elektrofachmann durch-führen oder schicken Sie es an unseren Kundenservice ein.
• Laden, benutzen und lagern Sie den Akku nur bei Umgebungstemperatu-ren zwischen 10ºC und
40ºC.
• Achtung Unfallgefahr! Schließen Sie den Akku nicht kurz, setzen Sie ihn niemals Nässe aus und
bewahren Sie ihn nicht zusammen mit Metallge-genständen auf, die die Kontakte kurzschließen
könnten. Der Akku könnte sich stark erhitzen, in Brand geraten oder explodieren.
• Verwenden Sie das Gerät nicht, wenn es nicht korrekt arbeitet oder durch Herunterfallen beschä-
digt wurde. Zerlegen Sie das Gerät nicht und unter-nehmen Sie keine eigenen Reparaturversuche.
Wenden Sie sich an die Kundenbetreuung.
Sicherheitshinweise
D
Page 5
| 5
D
Benutzung
VOR DER ERSTEN BENUTZUNG
Packen Sie den Pneumatischen Bohrhammer und das Zubehör aus und überprüfen Sie alle Teile auf evtl.
Transportschäden. Entsorgen Sie das Verpackungsmaterial oder lagern Sie es an einem für Kinder unzugänglichen Ort. Plastikbeutel usw. können zu einem gefährlichen Spielzeug für Kinder werden.
Setzen Sie nur Werkzeuge mit SDS-Plus Schaft ein! Wenn die Form des Werkzeugschaftes nicht mit der
Form des Bohrfutters übereinstimmt, darf das Werkzeug nicht verwendet werden!
EINSETZEN UND ENTNEHMEN DES AKKUS
1. Schieben Sie den Akku bis zum Anschlag auf die Akkuaufnahme des Gerätes, bis die Clips der Ent-
riegelungstasten (|3) hörbar einrasten. Achten Sie beim Einsetzen des Akkus darauf, dass sich dieser leicht und ohne Widerstand einsetzen lässt. Wenden Sie keine Gewalt an. Der Akku passt nur in
einer Stellung in die Akkuaufnahme.
2. Zur Entnahme des Akkus, erfassen Sie den Akku, drücken Sie beide Entriegelungstasten nach innen
und ziehen Sie den Akku senkrecht aus dem Gerät.
LADEN DES AKKUS MIT NETZTEIL
Laden Sie den Akku vor der ersten Inbetriebnahme.
Der Lithium-Eisen-Phosphat-Akku (Li Fe PO4) kann unabhängig vom Ladezu-stand jederzeit geladen
werden, ohne die Zellen zu schädigen.
Bei Bedarf können Sie einen Zweit-Akku unter der Artikel Nr. 93 54 11 bestellen.
1. Verbinden Sie das Netzteil mit einer Netzsteckdose und der Anschlussbuchse des Akkus.
2. Die Kontroll-LED (|8) leuchtet rot und zeigt an, dass der Akku geladen wird. Wenn die Kontroll-LED
grün leuchtet wird angezeigt, dass der Akku voll geladen ist. Der Akku und das Netzteil werden bei
dem Ladevorgang warm. Das ist normal und kein Defekt. Die Ladezeit beträgt ca. 80 Minuten bei
entladenem Akku.
3. Trennen Sie das Netzteil von der Netzsteckdose und dem Akku.
LADEN DES AKKUS IM BOHRHAMMER
1. Stecken Sie das Netzteil in eine Steckdose und verbinden Sie das andere Ende mit der Anschluss-
buchse (|5) des Akkus durch die Gehäuseöffnung im Bohrhammer.
2. Die Ladekontroll-LED (|8) leuchtet rot und zeigt an, dass der Akku geladen wird. Wenn die Ladekon-
troll-LED grün leuchtet, ist der Akku voll geladen. Der Akku und das Netzteil werden bei dem Ladevorgang warm.
3. Trennen Sie das Netzteil von der Netzsteckdose und dem Akku.
EINSETZEN DER WERKZEUGE
Die Werkzeugaufnahme des Pneumatischen Bohrhammers ist eine SDS-PlusAufnahme (|7). Mit dieser Aufnahme ist ein einfacher und bequemer Werkzeugwechsel ohne Zuhilfenahme eines Schlüssels möglich.
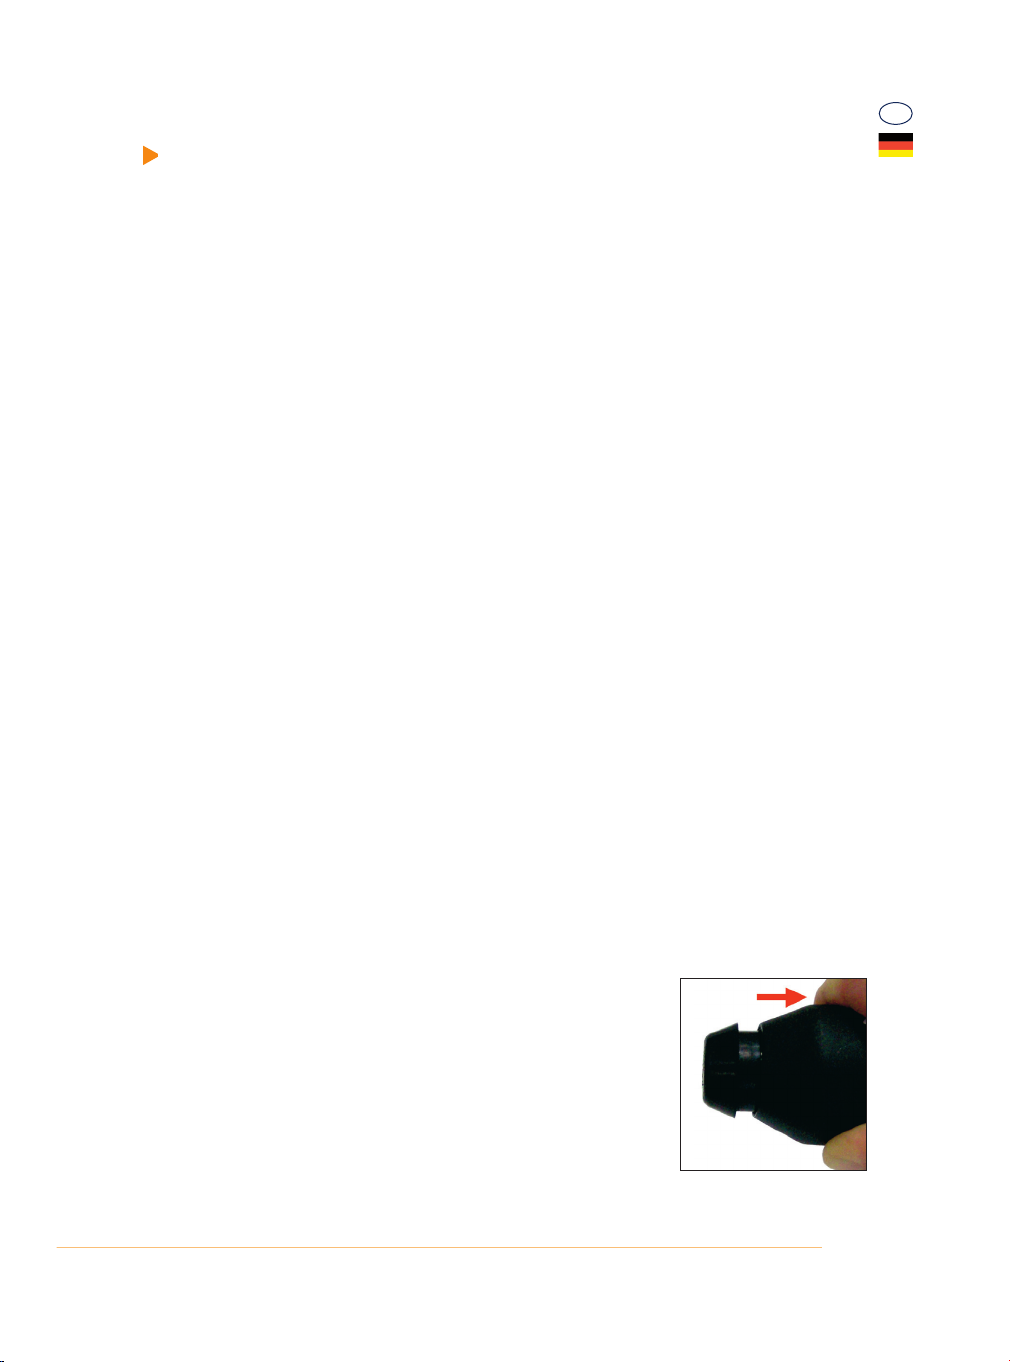
1. Vor dem Einsetzen des Werkzeugs ziehen Sie den Kunststoffring der Werk-
zeugaufnahme nach hinten.
2. Setzen Sie nun das Werkzeug ein. Eventuell müssen Sie das Werkzeug
leicht drehen, damit die Nuten im Werkzeug genau passend zu den
Stegen in der Aufnahme positioniert sind. Dann lässt sich das Werkzeug
bis zum Anschlag in die Aufnahme einführen.
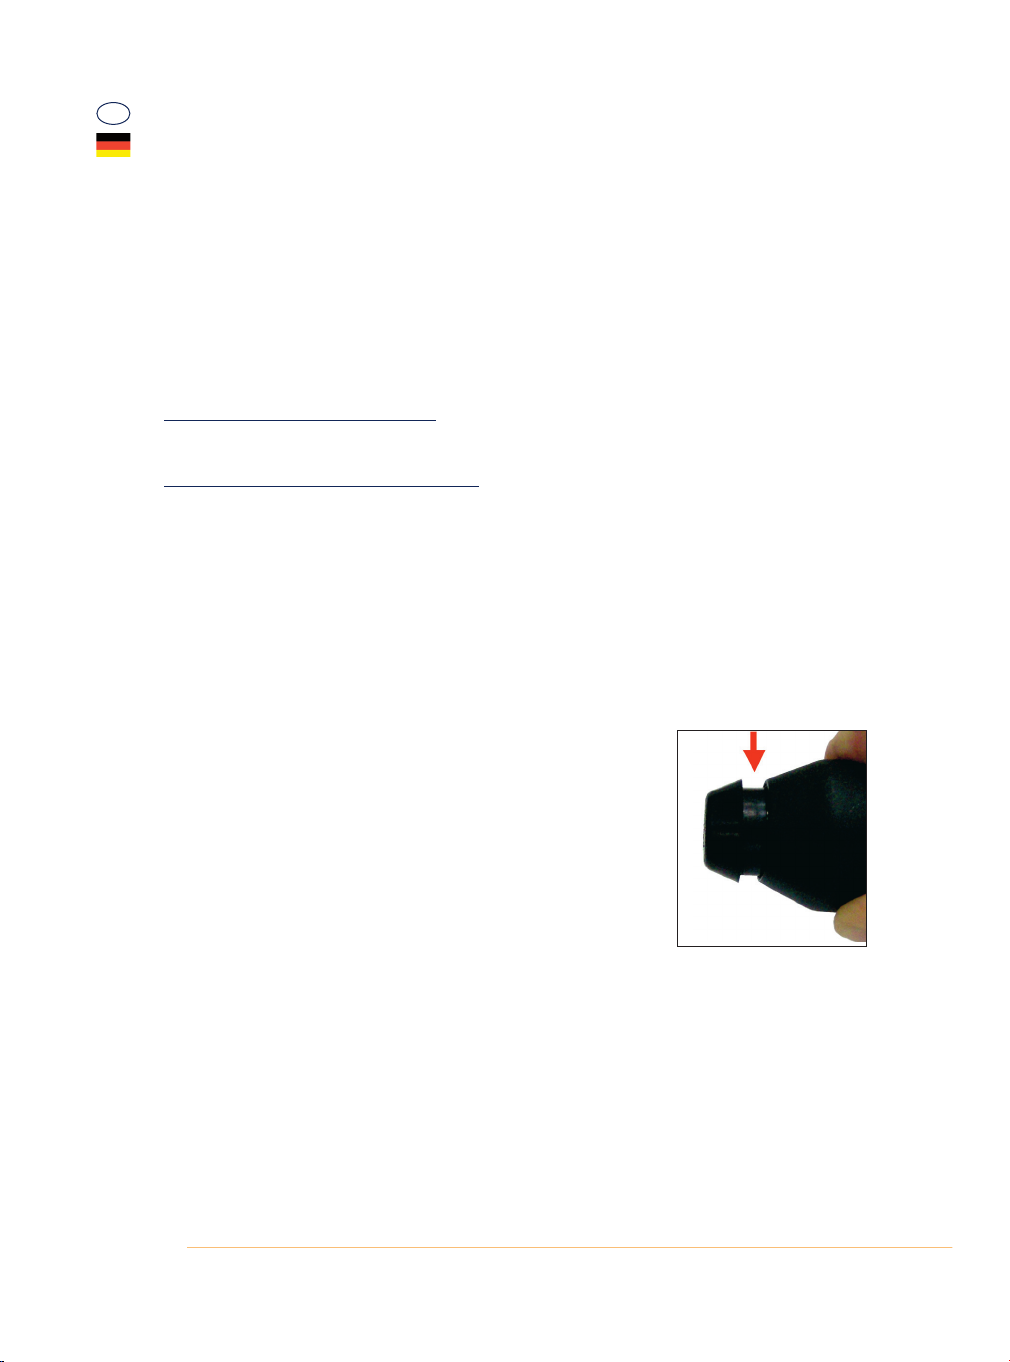
3. Lassen Sie jetzt den Kunststoffring wieder los. Dadurch wird die Metallkugel in die geschlossene Nut
einrasten und das Werkzeug in der Werkzeugauf-nahme halten.
Page 6
6 |
4. Überprüfen Sie danach die Verriegelung durch Ziehen am Werkzeug. Das Werkzeug ist in der Auf-
nahme beweglich, darf sich aber nicht herausziehen lassen.
5. Beim Entnehmen des Werkzeuges ziehen Sie den Kunststoffring der Aufnahme zurück. Jetzt können
Sie das Werkzeug aus der Aufnahme entfer-nen.
EIN/AUS-SCHALTER
1. Zum Einschalten des Bohrhammers, drücken Sie den EIN-/AUS-Schalter (|2).
2. Zum Ausschalten des Bohrhammers, lassen Sie den EIN/AUS-Schalter los.
UMSCHALTEN DER DREHRICHTUNG
Der Drehrichtungsumschalter (|1) darf nur bei Stillstand des Motors betätigt werden. Deshalb ist der Umschalter bei gedrücktem EIN/AUS-Schalter (|2) blockiert.
Drehrichtung rechts (im Uhrzeigersinn):
Zum Bohren, Schlagbohren, Setzen von Schrauben. Drücken Sie hierzu den Drehrichtungsumschalter bis
zum Anschlag nach rechts.
Drehrichtung links (gegen den Uhrzeigersinn):
Zum Herausdrehen von Schrauben. Drücken Sie hierzu den Drehrichtungsum-schalter bis zum Anschlag
nach links.
PNEUMATISCHES HAMMERWERK
Mit dem Umschalter (|6) können Sie zwischen Hammerbohren und Bohren ohne Schlagfunktion wählen.
Hiermit schalten Sie die Pneumatikfunktion ein bzw. aus. Wechseln Sie von einer Funktion zur anderen nur
bei stehendem Motor.
1. Zum Hammerbohren drehen Sie den Umschalter in Richtung „Ham-mer/Bohrer-Symbol“.
2. Zum Bohren und Schrauben drehen Sie den Umschalter in Richtung „Schraube/Bohrer-Symbol“.
WARTUNG UND REINIGUNG
• Achten Sie darauf, dass das Gerät immer sauber, trocken und frei von
Öl ist.
• Verwenden Sie zum Säubern nur ein trockenes oder leicht feuchtes Tuch.
• Verwenden Sie auf keinen Fall scharfe Reiniger und entflammbare Sub-
stanzen, wie Benzin, Verdünnung, Terpentin oder ähnliches.
• Reinigen Sie regelmäßig den Zwischenraum zwischen Werkzeugauf-
nahme und Schutzkappe der SDS-Plus-Aufnahme. Ziehen Sie dazu den
Kunststoffring der Aufnahme nach hinten und entfernen Sie Staub,
Schmutz und Fettrückstände. Bringen Sie etwas Fett in den Zwischenraum ein und schließen Sie die Schutzkappe.
D
Page 7

| 7
D
Werter Kunde, bitte helfen Sie mit, Abfall zu vermeiden.
Sollten Sie sich einmal von diesem Artikel trennen wollen, so bedenken Sie bitte, dass viele
seiner Komponenten aus wertvollen Rohstoffen bestehen und wiederverwertet werden
können. Entsorgen Sie ihn daher nicht in die Mülltonne, sondern führen Sie ihn bitte Ihrer
Sammelstelle für Elektroaltgeräte zu.
Entsorgung
Pneumatischer Bohrhammer
Typ Z1C-FA-12
Werkzeugaufnahme SDS-Plus
Drehzahl Leerlauf 0 - 900 min-1
Schlagfrequenz 0 - 4000 min-1
Schaldruckpegel LpA 84,6 dB(A)
Schallleistungspegel Lwa=95.6 dB(A) K=3dB(A)
Hand Arm Vibration 10,525 m/s2 K=1,5 m/s2
Gewicht 1350 g
Schutzklasse II
Drehmoment 10 Nm
Max. Bohrleistung
Stahl 6 mm
Beton 10 mm
Holz 16 mm
Akku
Modell Z1C-12-19.2
Batterietyp Lithium-Eisen-Phosphat-Akku Li Fe PO4
Akkuspannung 19,2 V
Bewertungsenergie 21,1 Wh
Kapazität 1,1 Ah
Ladedauer ca. 80 Minuten
Ersatz Artikelnummer 7053697
Netzteil
Modell LLC30-22130001
Nenneingangsspannung 100 V - 240 V~ 50/60 Hz
Nenneingangstrom 0,65 A
Nennausgangsspannung 20,5 V
Nennausgangsstrom 1,3 A
Schutzklasse II
Technische Daten
Page 8

8 |
Please familiarize yourself with the proper usage of the device by reading and following each chapter of
this manual, in the order presented. Keep these operating instructions for further reference.
This operating instruction contains important details for handling the device. Please pass it on along
with the unit if it is handed over to a third party!
Please read the safety instructions! These instructions will make it easier for you to handle the device
and help prevent misunderstandings and possible damage or injury.
!
Please note the included General Safety Notes and the following safety notes to avoid malfunc tions,
damage or physical injury:
• Make sure the mains voltage corresponds to the voltage stated on the rating label.
• Persons with limited physical, sensorial or mental abilities are not allowed to use the unit, unless
they are supervised for their safety by a qualified person or are briefed by the responsible person
how to use the unit.
• Before starting any work on walls, floors or similar, make sure that all power lines in the work area
are switched off at the main switchboard. Inspect the proposed drill hole location for any utility lines
(e. g. water, gas, power) before drilling. Use a suitable device such as a metal or electricity line
detecting device.
• Please notice: Only change the operating mode (drilling/impact drill-ing/chiselling) when the
machine is at a complete standstill.
• Only plug the battery charger to 230V mains power. Recharge the battery only with the provided
power mains supply unit.
• Protect battery and power supply unit from humidity. Do not operate the battery charger outdoors.
• When not in use and before cleaning and servicing, disconnect the power supply unit from power
mains.
• Take special care of the battery. Avoid dropping it onto any hard surface and do not subject it to
pressure or any other form of mechanical stress. Keep the battery away from extreme heat and cold.
• Do not open or attempt to repair the battery or the power supply unit. If any parts are damage have
them repaired by a qualified technician or contact your customer service.
• Only charge, operate and store the battery at an ambient temperature between 10ºC and 40ºC.
• Important Danger! Never short-circuit the battery or expose it to moisture. Do not store it together
with any metal parts which could short-circuit the con-tacts. The battery could overheat, start
burning or explode.
• If the machine was dropped and becomes damaged, immediately switch off the unit and do not use
it further. Do not disassemble the unit and do not try to repair it yourself. Contact our customer
service.
Safety Notes
GB
Page 9
| 9
GB
Using
BEFORE FIRST USE
Unpack the pneumatic impact hammer and the accessory and check all parts for any damage in transit. Dispose of packaging materials or store it out of reach of children. Plastic bags etc. may become a
deadly toy for children. Attention! Unplug from the power supply before cleaning, maintaining or when
not in use. Use only tool bits with SDS-Plus coupler! If the shank of the tool does not match the coupler
on the machine, the tool must not be used!
INSERTING AND REMOVING THE BATTERY
1. Slide the battery into the bottom side of the unit until the clips of the releasing buttons (|3) lock
audibly. Make sure the battery can be inserted easily. Do not force the battery. The battery fits only
in one position into the housing.
2. For removing the battery, first grasp the battery than, press both releasing buttons inwards and pull
down vertically.
CHARGING THE BATTERY WITH POWER SUPPLY UNIT
Charge the battery before first use. Regardless of the charging condition, the Lithium Iron Phosphate
battery (Li Fe PO4) can be charged at any time without damaging the cells. If desired you can order
a second battery under the article no. 93 54 11.
1. Connect the power cord of the power supply unit with a wall socket and the connecting socket of the
battery.
2. The charging control LED (|8) lights up red and indicates that the battery is charged. When the control
LED turns green it indicates that the battery is fully charged. The battery and the power supply unit
become warm while charging. This is normal and not a fault. Charging time is approx. 80 minutes for
a discharged battery.
3. Disconnect the power supply unit from power mains and the battery.
CHARGING THE BATTERY IN THE IMPACT HAMMER
1. Connect the power cord of the power supply unit with a wall socket and the connector socket (|5)
of the battery through the opening in the housing.
2. The charging control LED (|8) lights up red and indicates that the battery is charged. When the control LED turns green it indicates that the battery is fully charged. The battery and the power supply
unit become warm while charging.
3. Disconnect the power supply unit from power mains and the battery.
INSERTING THE TOOLS
The pneumatic impact hammer is equipped with an SDS-Plus drill chuck (|7).
With this chuck tool changes are executed in a simple and convenient way
without needing a wrench.
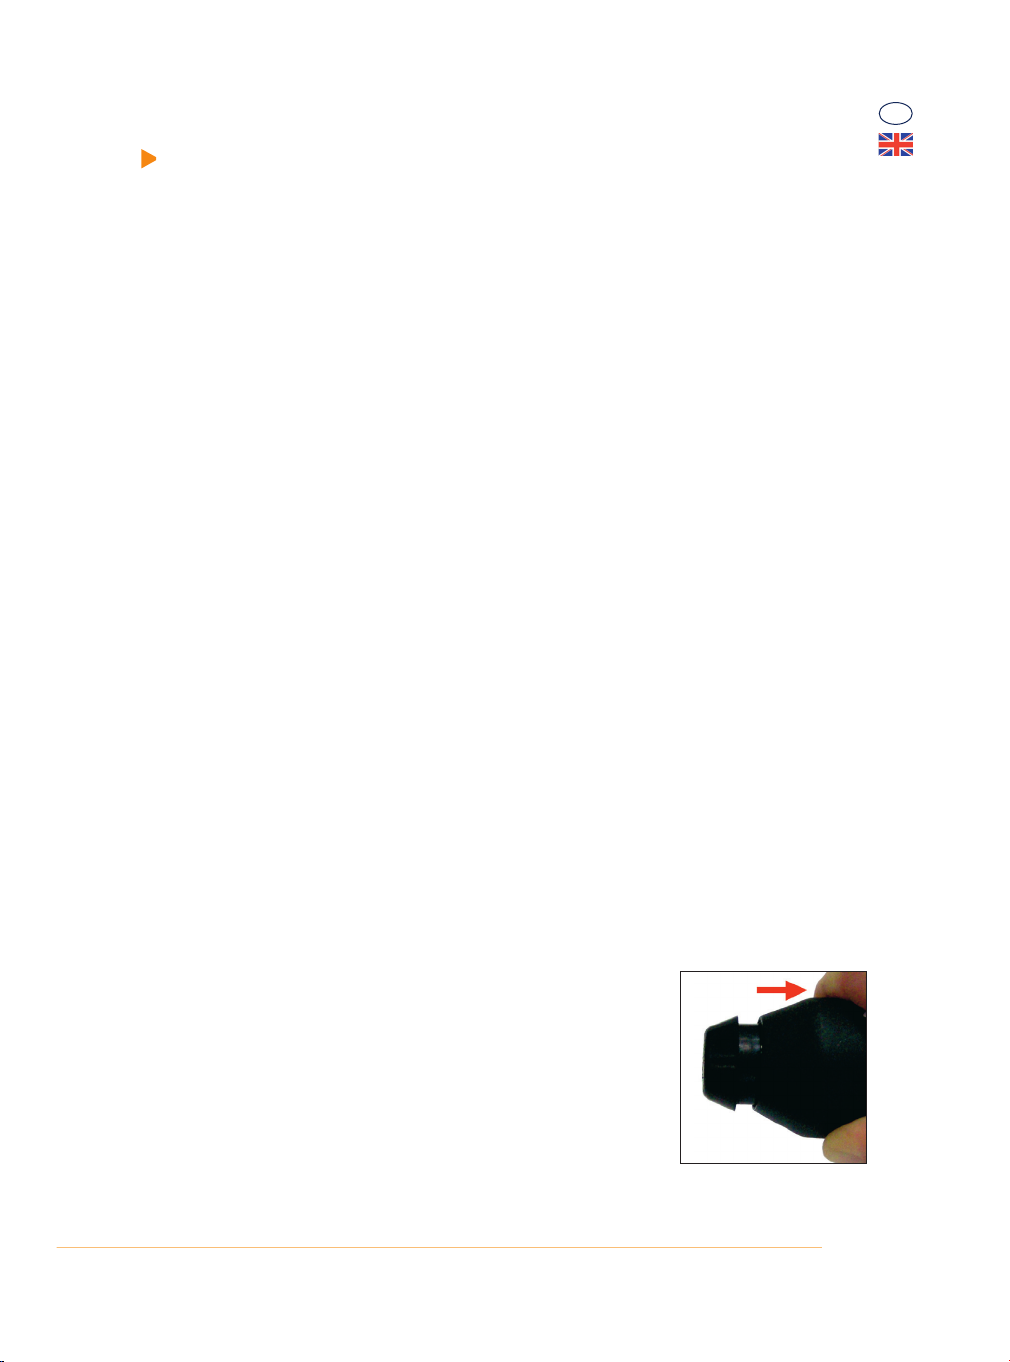
1. Before inserting the tool, pull back the rubber ring of the chuck.
2. Now insert the tool. It may be necessary to turn the tool slightly until the
slots in the tool are correctly positioned ant the tool fits exactly to the
rails in the chuck slide. Now the tool can be inserted as far as it will go.
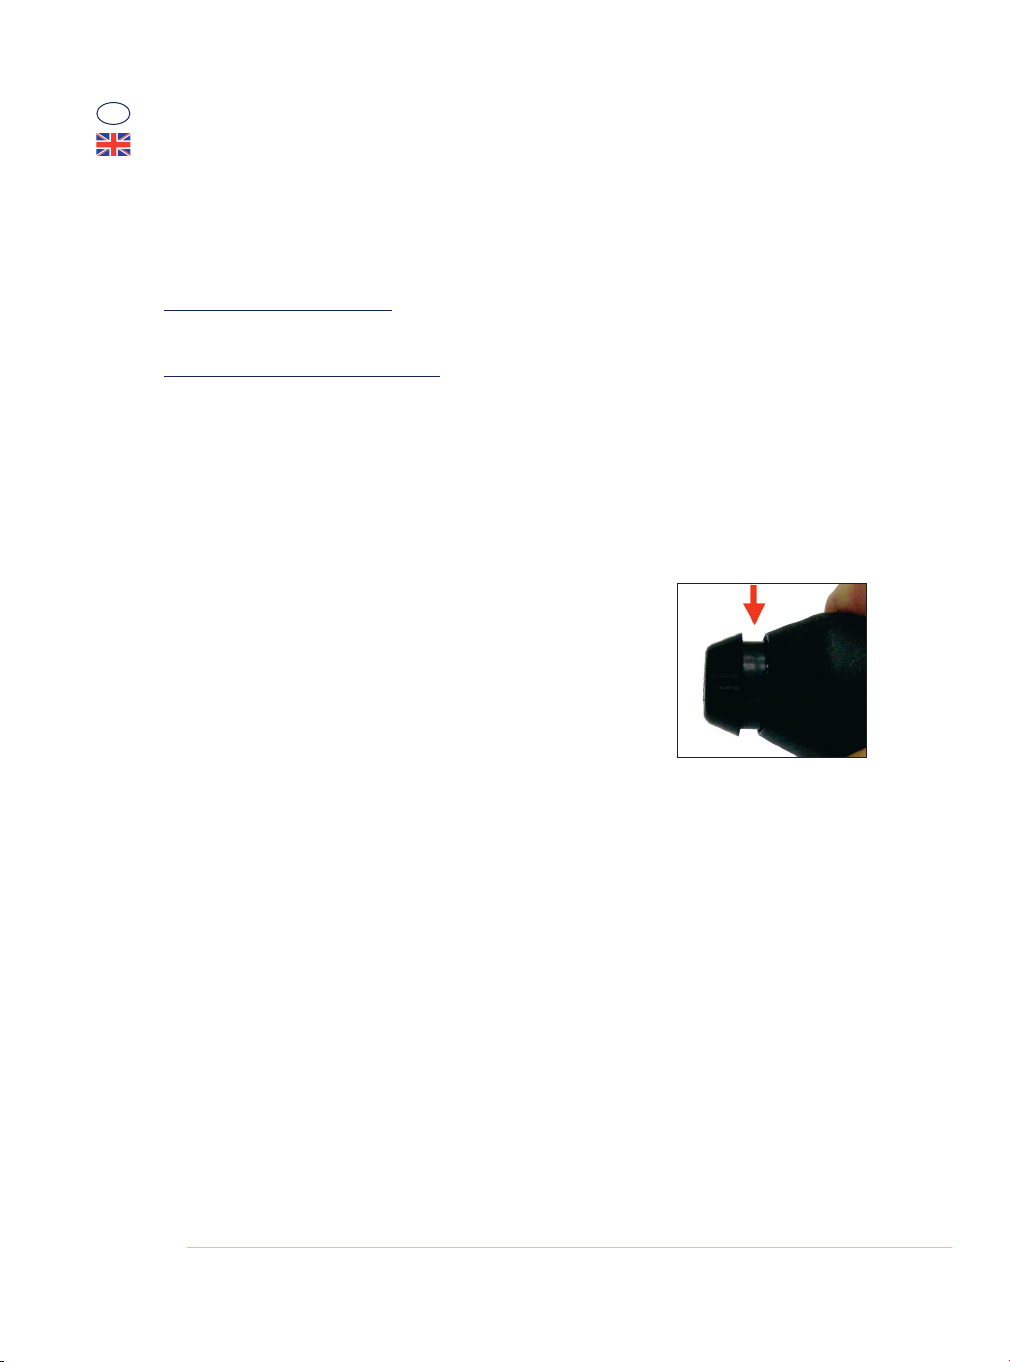
3. Now release the rubber ring. The steel ball will now hold the tool in place.
4. Check the correct fit by pulling on the tool. You should be able to move
the tool, but not able to pull it out.
5. To remove the tool, pull back the rubber ring. Now you can pull out the tool.
Page 10
10 |
GB
ON/OFF TRIGGER
1. To switch on the impact hammer, press the ON/OFF trigger (|2).
2. To switch off the impact hammer, release the ON/OFF trigger.
REVERSING THE ROTATION DIRECTION
The rotation direction switch (|1) may only be used when the motor is stopped. Therefore the switch is
blocked while the ON/OFF trigger (|2) is pressed.
Right Hand Direction (Clockwise):
Use for drilling, impact drilling, tightening screws. Press the selector switch for the direction of rotation
to the right as far as wit will go.
Left Hand Direction (Counter Clockwise):
For loosening screws. Press the selector switch for the direction of rotation to the left as far as it will go.
PNEUMATIC HAMMER FUNCTION
With the selector switch you can select Hammer Drill Function and Drill Function only without hammer
function. The toggle switch engages or disengages the hammer function. Only change-over the function
while the motor is at a complete standstill.
1. To use the Hammer Drill Function turn the selector switch in direction to the “hammer/drill symbol”.
2. To drill only and loosen screws, turn the selector switch in direction “screw/drill symbol”.
MAINTENANCE AND CLEANING
• Always keep the unit clean, dry and free from oil.
• Use only a dry or slightly moist cloth for cleaning the housing.
• Do not use abrasives or flammable substances such as benzene, solvents, turpentine or similar.
• Regularly clean the space between the rubber ring and the SDS-Plus
chuck. First open the rubber ring and remove dust, dirt and grease residues. Apply grease into the space and close the rubber ring.
Page 11

| 11
GB
Pneumatic Rotary Hammer
Model Z1C-FA-12
Tool Chuck SDS-Plus
No Load Speed 0 - 900/min.
Impact Frequency 0 - 4000 min-1
Sound Pressure Level LpA 84.6 dB(A)
Sound Power Level Lwa=95.6 dB(A) K=3dB(A)
Hand Arm Vibration 10.525 m/s2 K1.5 m/s2
Weight 1350 g
Protection Class II
Torque 10 Nm
Max. Drilling Size
Steel 6 mm
Concrete 10 mm
Wood 16 mm
Battery
Model Z1C-12-19.2
Battery Type Lithium Iron Phosphate Battery Li Fe PO4
Input Voltage 19,2 V
Rated Energy 21,1 Wh
Capacity 1.1 Ah
Charging Time approx. 80 Minutes
Replacement Article No. 7053697
Power Supply Unit
Model LLC30-22130001
Rated Input Voltage 100 V - 240 V~ 50/60 Hz
Technical Data
Dear Customer, please help avoid waste materials.
If you at some point intend to dispose of this article, then please keep in mind that many
of its components consist of valuable materials, which can be recycled. Please do not dis charge it in the rubbish bin, but check with your local council for recycling facilities in your
area.
Disposal
Page 12

12 |
Wir, die Batavia GmbH, Blankenstein 230-1b, NL-7943PG Meppel, erklären in alleiniger Verantwortung, dass das Pro-
dukt LIIFO Pneumatischer Bohrhammer, Z1C-FA-12, Artikel Nr. 7049620 den wesentlichen Schutzanforderungen ge-
nügt, die in den Europäischen Richtlinien 2006/95/EG Niederspannung (LVD), 2004/108/EG Elektromagnetische Ver-
träglichkeit (EMV), 98/37/EG Maschinen und deren Änderungen festgelegt sind. Für die Konformitätsbewertung wurden
folgende harmonisierte Normen herangezogen: EN 60745-1:2006, EN60745-2-6:2003+A1:2006+A11:2007, EN 55014-
1:2006 – EN 55014-2/A1: 2001, EN 61000-3-2:2006 – EN 61000-3-3:1995+A1+A2, EN 60335-2-29:2004 – EN 603351:2002+A1+A11+A12+A2+A13, EN 62233:2008.
Meppel, den 14 August 2009
________________________________
(Meino Seinen, Qualitätsbeauftragter)
EG-Konformitätserklärung
We, the Batavia GmbH, Blankenstein 230-1b, NL-7943PG Meppel, declare by our own responsibility that the product
LIIFO Pneumatic Rotary Hammer, Z1C-FA-12, Item-No 7049620 is according to the basic requirements, which are defi-
ned in the European Directives 2006/95/EC Low Voltage Directive (LVD), 2004/108/EC Electromagnetic Compatibility
(EMC), 98/37/EC Machinery and their amendments. For the evaluation of conformity, the following harmonized stan-
dards were consulted: EN 60745-1:2006, EN60745-2-6:2003+A1:2006+A11:2007, EN 55014-1:2006 EN 55014-2/A1: 2001,
EN 61000-3-2:2006, EN 61000-3-3:1995+A1+A2, EN 60335-2-29:2004, EN 60335-1:2002+A1+A11+A12+A2+A13, EN
62233:2008.
Meppel, 14th of August 2009
________________________________
(Meino Seinen, QA Representative)
EG-Declaration of conformity
D
GB
Page 13

Notizen | Notes
Page 14

TODAYS SOLUTIONS
Sehr geehrter Kunde, unsere Produkte unterliegen einer strengen Qualitätskontrolle. Sollte dieses Gerät nicht einwandfrei sein, so wenden Sie sich bitte immer
zuerst an unseren Kunden-Service.
Bitte bewahren Sie unbedingt den Kaufbeleg auf.
Die Garantieleistung gilt nur für Material-oder Fabrikationsfehler. Ausgeschlossen sind
Mängel die durch häufigen Gebrauch, missbräuchlicher und unsachgemäßer Behandlung oder Gewalteinwirkung verursacht worden sind.
Dear Client, if for any reason this product is not working, please ensure you contact our Client
Service Centre. Ensure you have your original receipt of purchase. This warranty covers all defects in workmanship or materials in this Batavia product for a two year period from the date of
purchase. The warranty does not cover any malfunction, or defect resulting from misuse, neglect,
alteration, or repair.
Geachte klant, onze producten ondergaan een streng kwaliteitscontrole proces. Wanneer dit product
niet correct functioneert, wend u zich alstublieft altijd eerst tot onze klantenservice.
Bewaar altijd uw
aankoopbewijs. De garantieservice is alleen van toepassing op materiaal- of productiefouten. Uitgesloten zijn gebreken veroorzaakt door intensief gebruik, misbruik en incorrecte behandeling of extern geweld.
Cher client, Si pour une raison quelconque, ce produit ne fonctionne pas, veuillez contacter notre Centre de
service après-vente. Conservez le bon d’achat original. Cette garantie couvre tous les défauts de matériau et de
main d’oeuvre constatés sur ce produit BATAVIA pendant une période de deux ans à compter de la date d’achat.
Les défauts de fonctionnement et autres résultant d’abus ou de mauvais emploi, de négligence, de modifications
ou réparations non autorisées sont exclus de la garantie.
Deutschland | Kundenservice
Montag bis Freitag von 9 bis 17 Uhr
01805 937832
*
Other European countries | Customer Services
Monday till Friday from 8am until 4pm
00800 66477400
Overige landen Europa | Klantenservice
Maandag t/m vrijdag van 9 tot 17 uur
00800 66477400
Autres pays d'Europe | Service clientèle
Lundi jusqu'a Vendredi de 9 – 17 heure
00800 66477400
Website: www.batavia.eu | Email: service@batavia.eu *Nur €0,14 /Minute aus dem dt. Festnetz, max. €0,42/Minute aus den Mobilfunknetzen.
Dieses Produkt hat
2 Jahre Garantie
Dit product heeft 2 jaar garantie
This Product has got a
2 year warranty
Ce produit a 2 ans de garantie
2 YEAR WARRANTY
WARRANTY
BATAVIA GmbH | Blankenstein 230-1B | 7943PG Meppel | Netherlands | Phone: +31 (0)522 820 200
| Fax: +31 (0)522 820 201 | www.batavia.eu | Email: info@batavia.eu
7049620/01
LIIFO 19,2 V Pneumatischer
Bohrhammer,
Z1C-FA-12
LIIFO 19.2 V Pneumatic Rotary
Hammer
Z1C-FA-12
 Loading...