

20V Cordless Jigsaw JS2
User Manual
[Revision 1.0 August 2017]
READ THIS MANUAL CAREFULLY BEFORE USE – FAILURE TO DO SO MAY RESULT IN INJURY, PROPERTY
DAMAGE AND MAY VOID WARRANTY. • KEEP THIS MANUAL FOR FUTURE REFERENCE. • Products covered by
this manual may vary in appearance, assembly, inclusions, specifications, description and packaging.
E&OE © 2017 Bäumr-AG

20V Cordless Jigsaw JS2
Safety
Read and understand all safety warnings before using the tool.
• Avoid dangerous environments. Do not operate power tools in explosive atmospheres, such as in the
presence of flammable liquids, gases or dust. Power tools create sparks which may ignite dust or fumes.
• Do not use this product if it is not completely assembled or if any parts appear to be missing or
damaged. Use of a product that is not properly and completely assembled could result in serious
personal injury.
• Inspect the tool carefully to make sure no breakage or damaged occurred during shipping.
• If any parts are damaged or missing do not operate this tool until the missing parts are replaced. Use of
this product with damaged or missing parts could result in serious personal injury.
• Do not attempt to modify this tool or create accessories not recommended for use with this tool. Any
alteration or modification is misuse that will void product warranty and could result in a hazardous
condition leading to possible serious personal injury.
• To prevent accidental starting that could cause injury, always remove the battery pack from the tool
when assembling parts.
• Keep the tool and all components away from children.
• Keep children and bystanders away while operating power tools.
• Keep the work area clean and well lit
• Keep the tool pointed away from yourself and others at all times. Keep hands and body parts away from
moving parts and use safety guards.
• Do not allow persons unfamiliar with the tool or its operation to use the tool.
• Use safety equipment. Always wear eye and ear protection. Safety equipment such as dust mask, non-
skid safety shoes and hard hat should be used in appropriate conditions.
• Only use parts and accessories recommended by manufacturer.
• Do not modify any part of the tool or its safety mechanisms.
• Do not use in ambient temperatures above 40°C (104°F).
• Do not use the tool outside of its operating parameters. For example, cutting extremely hard materials.
• Blades are sharp and may become hot during use – wear suitable protective gloves when handling
blades.
• Kick-back – "Kick-back" is a sudden reaction to a pinched, bound or misaligned saw blade. If the
reciprocating blade becomes pinched or digs into in the work-piece, the blade may stall and the motor
reaction can drive the tool rapidly back toward the operator – this is highly dangerous. To help avoid
kick-back:
• Always maintain a firm grip with both hands on the tool and position your arms to resist kick-back
forces.
• If blade is binding, or when stopping a cut before completing it for any reason, release the trigger and
hold the tool motionless until the blade comes to a complete stop. Never attempt to remove the saw
from the work-piece or pull the tool backward while the blade is in motion. If binding occurs,
investigate and take corrective actions to eliminate the cause of binding.
E&OE © 2017 Bäumr-AG 2

20V Cordless Jigsaw JS2
• When restarting the tool with the blade in the work-piece, centre the blade in the cut and check that
the teeth are not engaging the material.
• Support large work-pieces to minimize the risk of blade pinching and kick-back. Large work-pieces
tend to sag under its own weight. Supports must be placed under the work-piece on both sides of the
cut, near the line of cut and near the edge of the work-piece.
• Do not use dull or damaged blades. Dull or improperly set blades produce reduced clearance in the
cut, causing excessive friction, blade binding and kick-back.
• Ensure that the work-piece does not contain objects, such as nails etc that can cause kick-back.
• Keep hands away from the cutting area and blade – always use both hands to hold the tool when cutting.
• Never hold the work-piece being cut in your hands or across your legs, body etc. Always secure the
work-piece to a stable platform. It is important to support the work-piece properly to minimize body
exposure, blade binding, or loss of control.
• Hold the tool by the insulated handles only when cutting to help reduce the possibility of electrical shock
should the tool make contact with "live" wires.
• Always use blades of the correct size and type. Blades that do not match the mounting hardware may
fall out during cutting.
Battery and Charging Safety
• Use only with the batteries and battery charger specified by the manufacturer.
• Do not open the battery – danger of short-circuiting.
• Do not attempt to destroy or disassemble battery pack or remove any of its components.
• Do not touch the battery terminals with metal objects and/or body parts as short-circuit and/or personal
injury may result.
• Explosion hazard – protect the battery against heat; for example, direct sunlight and fire.
• Explosion hazard – do not short-circuit the battery.
• Poison hazard – battery leakage (liquid ejection) may cause irritation or burns. Under extreme
conditions, liquid may be ejected from the battery – avoid contact. If contact occurs, flush with water. If
eye contact occurs, flush with clean water for at least 10 minutes and seek medical attention.
• Care when charging. Make sure cord for the battery charger is located so that it will not be stepped on,
tripped over, or otherwise subjected to damage or stress. Do not operate the battery charger if it has a
damaged cord or plug.
• Dispose of non-serviceable batteries in an environmentally responsible manner.
Servicing
• Have your power tool serviced by a qualified repair person using only identical replacement parts. This
will ensure that safety of the tool is maintained.
Intended Use
• Cutting suitable materials (wood, plastics etc).
E&OE © 2017 Bäumr-AG 3

20V Cordless Jigsaw JS2
Table of Contents
Safety ................................................................................................................................................... 2
Parts Identification ............................................................................................................................. 5
Batteries and Battery Charging ........................................................................................................ 6
Charging .................................................................................................................................................... 6
Inserting and Removing the Battery Pack .................................................................................................. 6
Operation ............................................................................................................................................ 7
Setting Bevel Angle .................................................................................................................................... 7
Using the Dust Port .................................................................................................................................... 7
Setting the Cutting Action ........................................................................................................................... 7
Cutting ........................................................................................................................................................ 8
Guidelines for Use...................................................................................................................................... 8
Maintenance and Troubleshooting ................................................................................................ 10
Changing the Blade.................................................................................................................................. 10
Troubleshooting ....................................................................................................................................... 11
Specifications ................................................................................................................................... 11
E&OE © 2017 Bäumr-AG 4

20V Cordless Jigsaw JS2
BAUMR-AG BAUMR-AG BAUMR-AG BAUMR-AG BAUMR-AG BAUMR-AG BAUMR-AG BAUMR-AG BAUMR-AG BAUMR-AG BAUMR-AG
BAUMR-AG BAUMR-AG BAUMR-AG BAUMR-AG BAUMR-AG BAUMR-AG BAUMR-AG BAUMR-AG BAUMR-AG BAUMR-AG BAUMR-AG
Parts Identification
2
6
7
5
8
3
10
11
4
1
12
9
13
14
Note that some blades / accessories may come supplied with the tool.
No. Name No. Name
1 Tool Body 8 Trigger Safety Switch
2 Main Handle 9 Trigger
3 Secondary Handle 10 Blade Support
4 Base Plate 11 Cutting Action Selector
5 Blade 12 Dust Port
6 Blade Guard 13 Battery
7 Blade Holder 14 Battery Charger
E&OE © 2017 Bäumr-AG 5
20V Cordless Jigsaw JS2
BAUMR-AG BAUMR-AG BAUMR-AG BAUMR-AG BAUMR-AG BAUMR-AG BAUMR-AG BAUMR-AG BAUMR-AG BAUMR-AG BAUMR-AG
BAUMR-AG BAUMR-AG BAUMR-AG BAUMR-AG BAUMR-AG BAUMR-AG BAUMR-AG BAUMR-AG BAUMR-AG BAUMR-AG BAUMR-AG
Batteries and Battery Charging
Batteries for this tool are supplied in a low-charge condition for shipping reasons. • A battery that is
new or has not been used for a long period does not charge to full capacity until after approximately
5 charge/discharge cycles. • Do not recharge batteries after using them if they are not to be used for an
extended period of time. • Recharge batteries only as and when required. • If the battery is warm after use,
allow it to cool before charging, otherwise it may not fully charge.
The battery packs can be recharged again and again. However, rechargeable batteries eventually need to
be replaced. A significantly reduced working period after charging indicates that the battery is no longer
serviceable and should be replaced. Discard old batteries in an environmentally responsible manner.
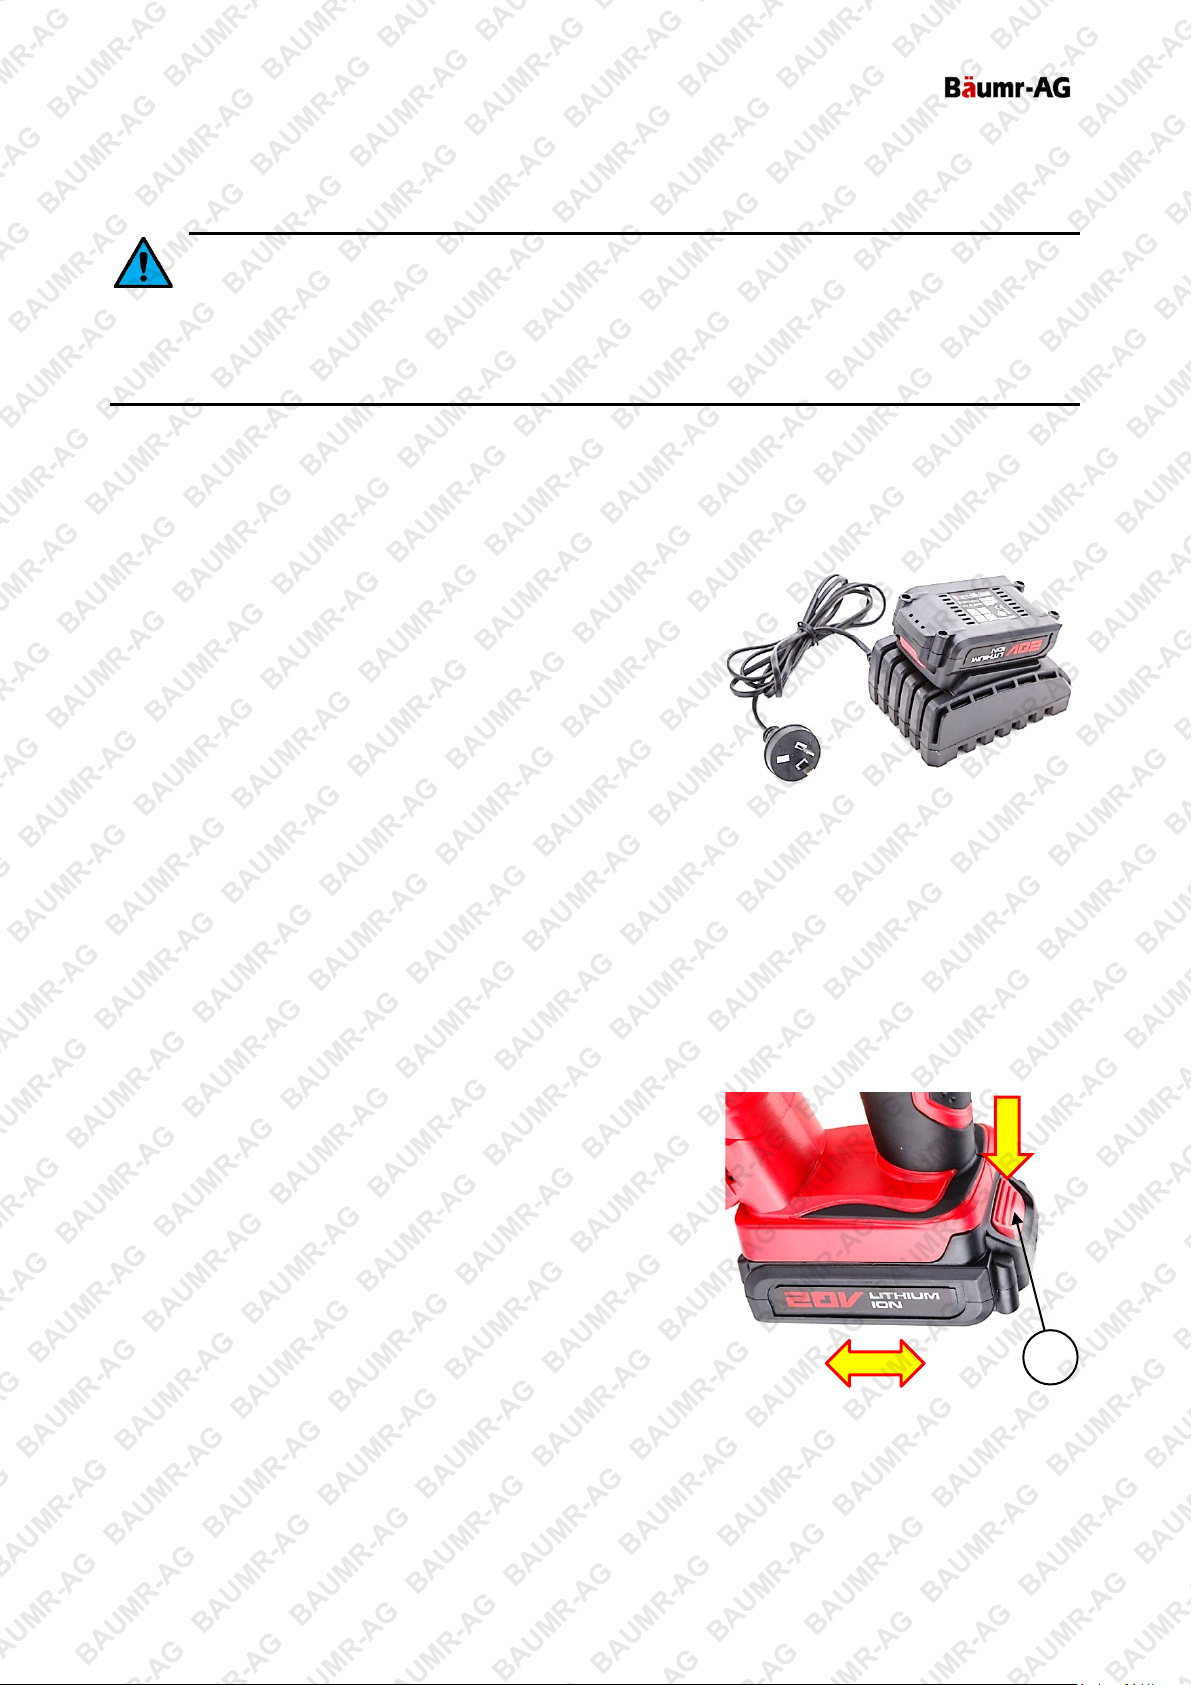
Charging
The battery charger has a charge status LED indicator:
• Red - Battery charging.
• Green - Battery fully charged.
1. Plug the battery charger power supply into a 240VAC mains
electrical outlet and switch the supply ON.
2. Slide the battery fully into the battery charger. The indicator LED on the battery charger will be red to
show the battery is charging. The indicator will become green when the battery is fully charged
(approximately 1 to 1.5 hours).
3. When the battery is fully charged, unplug the charger from power supply, then press and hold the
battery release button and simultaneously slide the battery pack from the charger.
Inserting and Removing the Battery Pack
Insert the battery pack into the tool handle until it "clicks" into place.
To remove the battery pack, press and hold the battery release
button (A) and simultaneously pull the battery from the tool.
A
E&OE © 2017 Bäumr-AG 6

20V Cordless Jigsaw JS2
BAUMR-AG BAUMR-AG BAUMR-AG BAUMR-AG BAUMR-AG BAUMR-AG BAUMR-AG BAUMR-AG BAUMR-AG BAUMR-AG BAUMR-AG
BAUMR-AG BAUMR-AG BAUMR-AG BAUMR-AG BAUMR-AG BAUMR-AG BAUMR-AG BAUMR-AG BAUMR-AG BAUMR-AG BAUMR-AG
Operation
Setting Bevel Angle
Blade cutting angle can be set anywhere in the range of 0
(perpendicular) to 45° in either direction from centre.
1. Remove the battery from the tool.
2. Loosen (rotate left) the 2 base plate (A) locking screws (B).
3. Hold the tool firmly, then rotate the base plate to alter cutting
angle.
4. Use the bevel guide (C) markings and reference arrow (D) to
set the required angle.
5. Tighten (rotate right) the base plate locking screws.
6. Re-install the battery and cut as required.
A
Using the Dust Port
The tool comes equipped with a dust port (E) that can be used to help collect
sawdust etc created by the tool. Connect a suitable vaccuum cleaner hose or
dust bag to the port when using the tool.
Setting the Cutting Action
D
B
C
E
Do not use "orbital" cutting actions for harder materials, such as hardwoods and metal.
The tool has 4 cutting actions – 1 straight and 3 "orbital". Orbital actions moves the blade forward during the
cutting stroke, producing a faster cutting action, however, with a rougher finish. Orbital cutting is best suited
to softer materials such as soft woods and plastics. Settings are:
0 – Straight Cutting.
1 – Orbital: Least Aggressive.
2 – Orbital: Medium Aggressive.
3 – Orbital: Most Aggressive.
To set the cutting action, rotate the cutting action selector (F) to the
required setting.
F
E&OE © 2017 Bäumr-AG 7

20V Cordless Jigsaw JS2
BAUMR-AG BAUMR-AG BAUMR-AG BAUMR-AG BAUMR-AG BAUMR-AG BAUMR-AG BAUMR-AG BAUMR-AG BAUMR-AG BAUMR-AG
BAUMR-AG BAUMR-AG BAUMR-AG BAUMR-AG BAUMR-AG BAUMR-AG BAUMR-AG BAUMR-AG BAUMR-AG BAUMR-AG BAUMR-AG
Cutting
Fully understand all operational safety warnings before using the tool.
1. Secure the work-piece and ensure nothing is directly below the cut line.
2. Bring the tool up to the work-piece so the front of the
base plate is resting on it, but not so that the blade is
touching the work-piece.
3. Ensure that the blade is aligned with the cut line.
4. Hold the tool firmly using both handles (G and H) –
always use both hands to hold the tool.
5. Press the trigger safety switch (I) using your finger in
and hold it in.
6. Pull the trigger (J) to activate the tool – blade speed is
controlled by how much you pull the trigger.
7. Gently tilt the tool forward until the blades begins
cutting. Allow the blade to cut into the work-piece and gradually lower the rear of the tool until the blade
is vertical and the base plate is flat against the work-piece. Then, using a steady down and forward
pressure continue the cut. Maintain sufficient pressure so the blade is cutting freely, however, is not
over-loaded or chattering (do not force the tool).
H
I
G
J
8. Continue the cut until complete, then release the trigger and allow the blade to stop completely before
withdrawing the blade.
Guidelines for Use
General Cutting
• When cutting across the grain, wood fibres have a tendency to lift and tear, slower cutting may help reduce
this effect.
• When cutting laminates and other materials where it is important not to damage the surface finish, place
tape over the work-piece along the cut-line to help minimise scratching or splintering of the top surface.
• Use slower speeds for cutting harder materials and ensure the blade type is suited to the material.
Generally, blades for harder materials have more teeth.
• When cutting metal, it is recommended to apply a suitable lubricant to the blade during cutting; for
example, cutting oil for ferrous metals.
• When cutting plastics, use blades and speeds that will not over-heat and melt the plastic during cutting.
• Do not apply lateral (sideways) pressure to the blade.
• When cutting curves, cut more slowly to help reduce binding.
• When cutting internal shapes, drill suitable holes to allow the blade to be inserted and cut from there.
• Do not use "orbital" cutting actions on harder material, such as metals and hardwoods.
E&OE © 2017 Bäumr-AG 8

20V Cordless Jigsaw JS2
BAUMR-AG BAUMR-AG BAUMR-AG BAUMR-AG BAUMR-AG BAUMR-AG BAUMR-AG BAUMR-AG BAUMR-AG BAUMR-AG BAUMR-AG
BAUMR-AG BAUMR-AG BAUMR-AG BAUMR-AG BAUMR-AG BAUMR-AG BAUMR-AG BAUMR-AG BAUMR-AG BAUMR-AG BAUMR-AG
Cutting Large Work-Pieces
• Large sheet or boards require suitable support on either side of the cut to help prevent bending or sagging
of the material. If the work-piece bends where it is being cut, the blade will have a tendency to bind,
possibly causing kick-back. Support the work-piece close to the cut and on both sides of the cut line.
E&OE © 2017 Bäumr-AG 9

20V Cordless Jigsaw JS2
BAUMR-AG BAUMR-AG BAUMR-AG BAUMR-AG BAUMR-AG BAUMR-AG BAUMR-AG BAUMR-AG BAUMR-AG BAUMR-AG BAUMR-AG
BAUMR-AG BAUMR-AG BAUMR-AG BAUMR-AG BAUMR-AG BAUMR-AG BAUMR-AG BAUMR-AG BAUMR-AG BAUMR-AG BAUMR-AG
Maintenance and Troubleshooting
Remove the battery from the tool before performing any maintenance. • The tool should be
cool enough to touch before performing maintenance activities. • Wear suitable gloves when
handling blades. • Some maintenance activities described may be beyond the scope of some users. For
procedures that you are not comfortable with or have the tools or experience for, have the unit serviced by a
service centre or qualified technician.
• Clean the tool regularly with a soft cloth – do NOT use water, solvents, abrasives etc. Remove any
debris from the guards and tool ventilation slots using a soft brush.
• Regularly lubricate the blade support roller pin with a drop of machine oil or engine oil.
Changing the Blade
1. Remove the battery from the tool.
2. Push the spring-loaded lever part of the blade holder (A) towards the centre of the tool and hold it there.
If a blade is already installed, when the lever reaches the fully unlocked position, the blade may pop out
of the tool or can be pulled from the holder.
3. Insert the blade (B) into the blade holder, teeth facing forward and the back of the blade in the blade
support groove (C), and ensure it is FULLY inserted, then release the blade holder. Pull on the blade a
little to make sure it is properly secured and check that the blade holder is locked.
A
B
CORRECT
C
INCORRECT
E&OE © 2017 Bäumr-AG 10

20V Cordless Jigsaw JS2
BAUMR-AG BAUMR-AG BAUMR-AG BAUMR-AG BAUMR-AG BAUMR-AG BAUMR-AG BAUMR-AG BAUMR-AG BAUMR-AG BAUMR-AG
BAUMR-AG BAUMR-AG BAUMR-AG BAUMR-AG BAUMR-AG BAUMR-AG BAUMR-AG BAUMR-AG BAUMR-AG BAUMR-AG BAUMR-AG
Troubleshooting
The following information may assist in identifying a problem and rectifying it.
Tool will not operate.
Possible Fault Action
No voltage Ensure the battery is charged and is correctly inserted.
Cutting is poor.
Possible Fault Action
Low voltage Ensure the battery is charged.
Blade dull or damaged Replace blade.
Material too hard Use correct blade for the material.
Excessive vibration.
Possible Fault Action
Blade dull, bent or damaged Replace blade.
Specifications
Battery Charger Electrical Requirements 240VAC / 50Hz
Battery Type 20V Lithium-Ion
Cutting Speed 0 to 2400 Strokes/Minute (no load)
Blade T-Shank Type
Maximum Cut Capacity 65mm – Wood (depending on blade length) / 8mm – Metal
E&OE © 2017 Bäumr-AG 11
20V Cordless Jigsaw JS2
Some experts believe the incorrect or prolonged use of almost any product could cause serious
injury or death. For information that may reduce your risk of serious injury or death, consult the
points below and additionally, the information available at www.datastreamserver.com/safety
• Consult all documentation, packaging and product
labelling before use. Note that some products feature
online documentation which should be printed and kept
with the product.
• Check product for loose / broken / damaged / missing
parts, wear or leaks (if applicable) before each use.
Never use a product with loose / broken / damaged /
missing parts, wear or leaks (if applicable).
• Products must be inspected and serviced (if applicable)
by a qualified specialist every 6 months assuming
average residential use by a person of average weight
and strength, above average technical aptitude, on a
property matching average metropolitan specification.
Intended use outside these guidelines could indicate
the product is not suitable for intended use or may
require more regular inspection or servicing.
• Ensure all possible users of the product have
completed an industry recognized training course
before being given access to the product.
• The product has been supplied by a general merchandise retailer that
may not be familiar with your specific application or your description
of the application. Be sure to attain third-party approval for your
application from a qualified specialist before use regardless of prior
assurances by the retailer or its representatives.
• This product is not intended for use where fail-safe operation is
required. As with any product (take an automobile, aircraft, computer
or ball point pen for example), there is always a small chance of
technical issues that needs to be repaired or may require replacement
of the product or a part. If the possibility of such failure and the
associated time it takes to rectify could in any situation inconvenience
the user, business or employee then the product is not suitable for
your requirements. This product is not for use where incorrect
operation or a failure of any kind, including but not limited to a
condition requiring product return, replacement, service by a
technician or replacement of parts could cause a financial loss, loss of
employee time or an inconvenience requiring compensation.
• If this item has been purchased in error after considering the points
above, simply contact the retailer directly for details of their returns
policy, if required.
©2017 Bäumr-AG. All rights reserved. No part of this document, including descriptive content, concepts,
ideas, diagrams or images may be reproduced or transmitted in any form or by any means, electronic or
mechanical, including photocopying, scanning or recording, or any information storage and retrieval system,
without express permission or consent from the publisher.
E&OE © 2017 Bäumr-AG 12
 Loading...