

Page 1

E FORCE
E FORCE
BEFORE USING YOUR MOWER
!
Carefully read and understand the owner’s manual.
Save this manual for future use.
Read and follow all warnings on
the mower, battries, charger,and in the Owner’s Manual.
Page 2
E FORCE
E FORCE
i
Page 3
Please read the instructions carefully before starting the machine.
English
EMERGENCY PROCEDURE | SYMBOLS |SAFETY INSTRUCTIONS | BATTERY |
DISPOSAL | GUARANTEE | SERVICE | DEFECTS SEARCHING
.
WORK INSTRUCTIONS
| MAINTENANCE |
1
Page 4
1
Assembly
2
Page 5
D
GB
F
I
NL
CZ
SK
H
Montage
Assembly
Assemblage
Montaggio
Montage
Montáž
Montáž
Szerelés
SLO
Montaža
HR
Montaža
BG
Монтаж
RO
Montaj
BIH
Battery
Montaža
2
1
3
Page 6
2
1
D
GB
F
I
NL
CZ
SK
H
Montage
Assembly
Montage
Montaggio
Montage
Montáž
Montáž
Szerelés
SLO
Montaža
HR
Montaža
BG
Монтаж
RO
Montaj
Battery
BIH
Montaža
4
Page 7
D
Montage
GB
Assembly
F
Assemblage
I
Montaggio
Cutting height
NL
Montage
CZ
Montáž
SK
Montáž
setting
H
Szerelés
SLO
HR
BG
RO
BIH
Montaža
Montaža
Монтаж
Montaj
Montaža
2
1
5
Page 8
3
Operation
6
Page 9
Mow- collect
4
7
Page 10
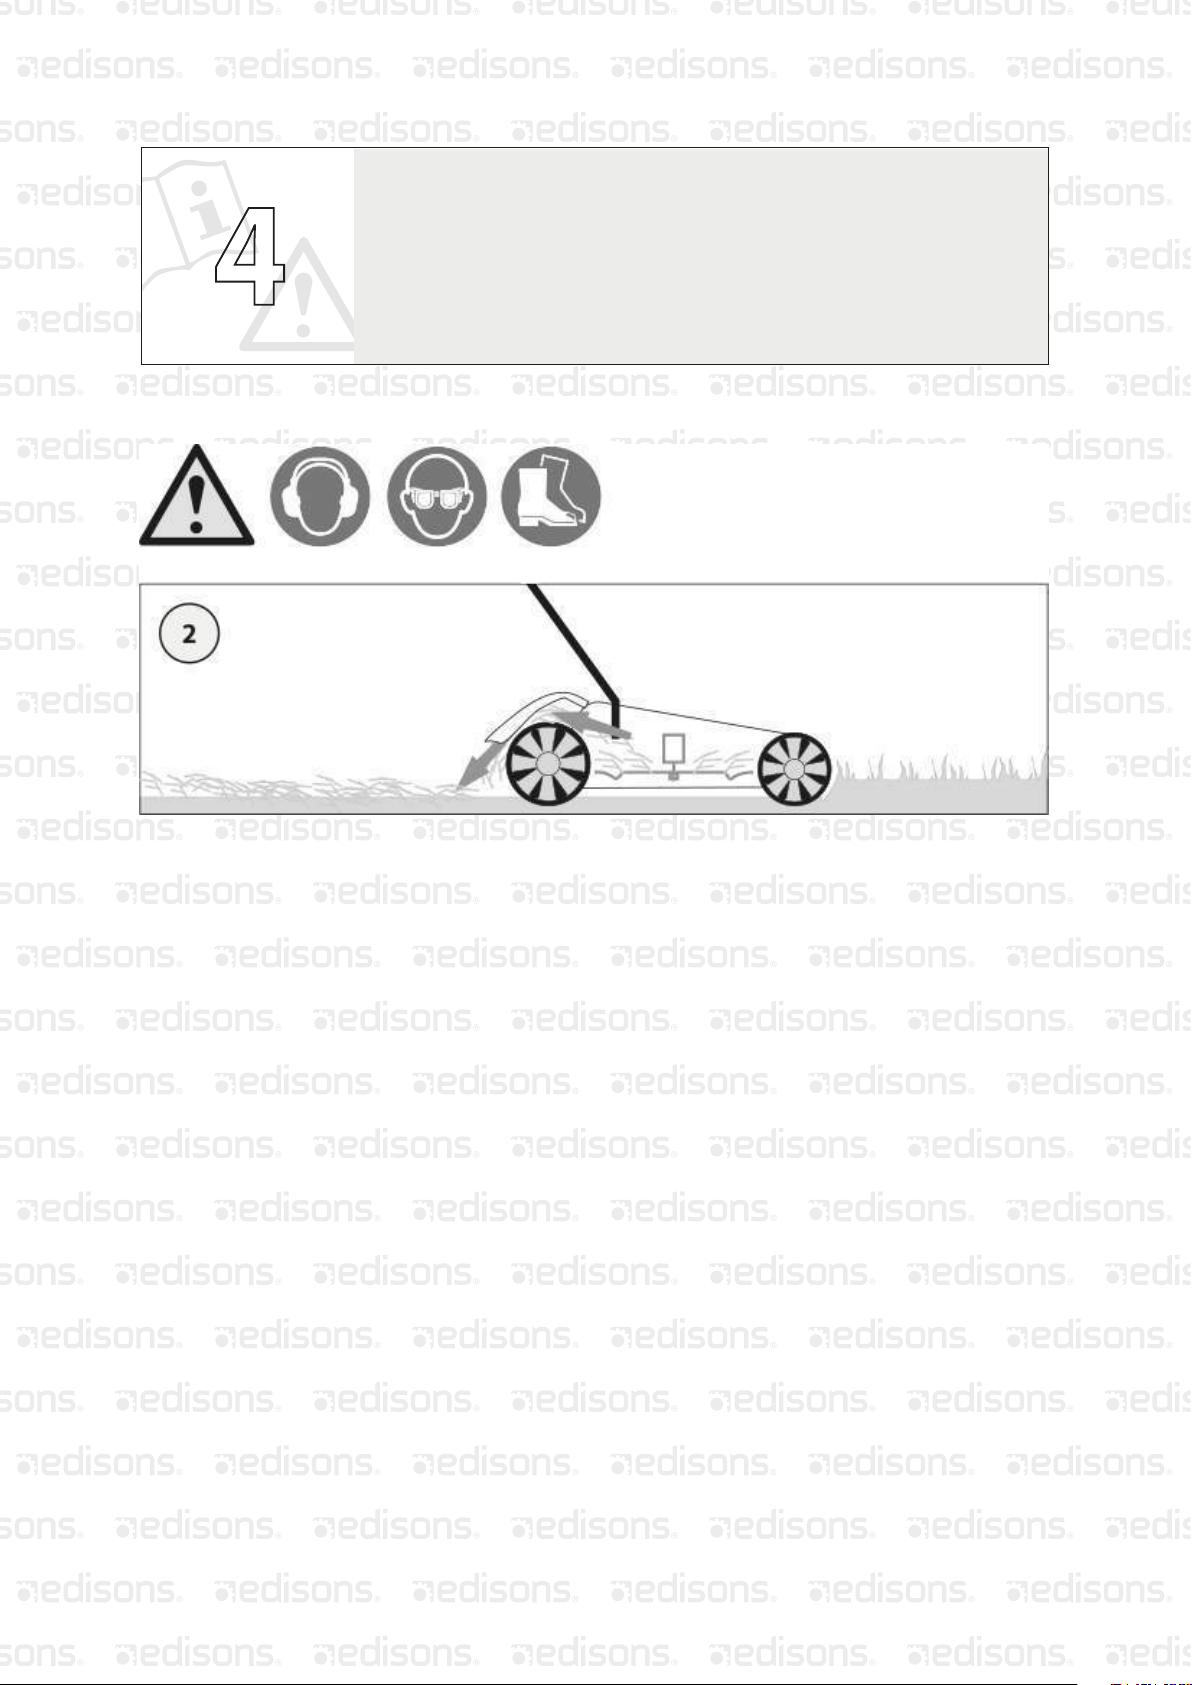
4
1
D
GB
F
I
NL
CZ
SK
H
Montage
Assembly
Assemblage
Montaggio
Montage
Mow- eject
Montáž
Montáž
Szerelés
SLO
HR
BG
RO
BIH
Montaža
Montaža
Монтаж
Montaj
Montaža
SPECIFICATIONS
30V LITHIUM LAWN MOWER:
Battery: 30V Samsung Lithium Battery
Cutting Length: 320mm
Speed: 3600rpm ±5%
Working Area: About 150m2
Grass catcher: 30L
Height adjustments: 3 position 25-65mm
Motor Type: Brushless Motor
Charger specs: 3-5 hours Charger, SAA plug
8
Page 11
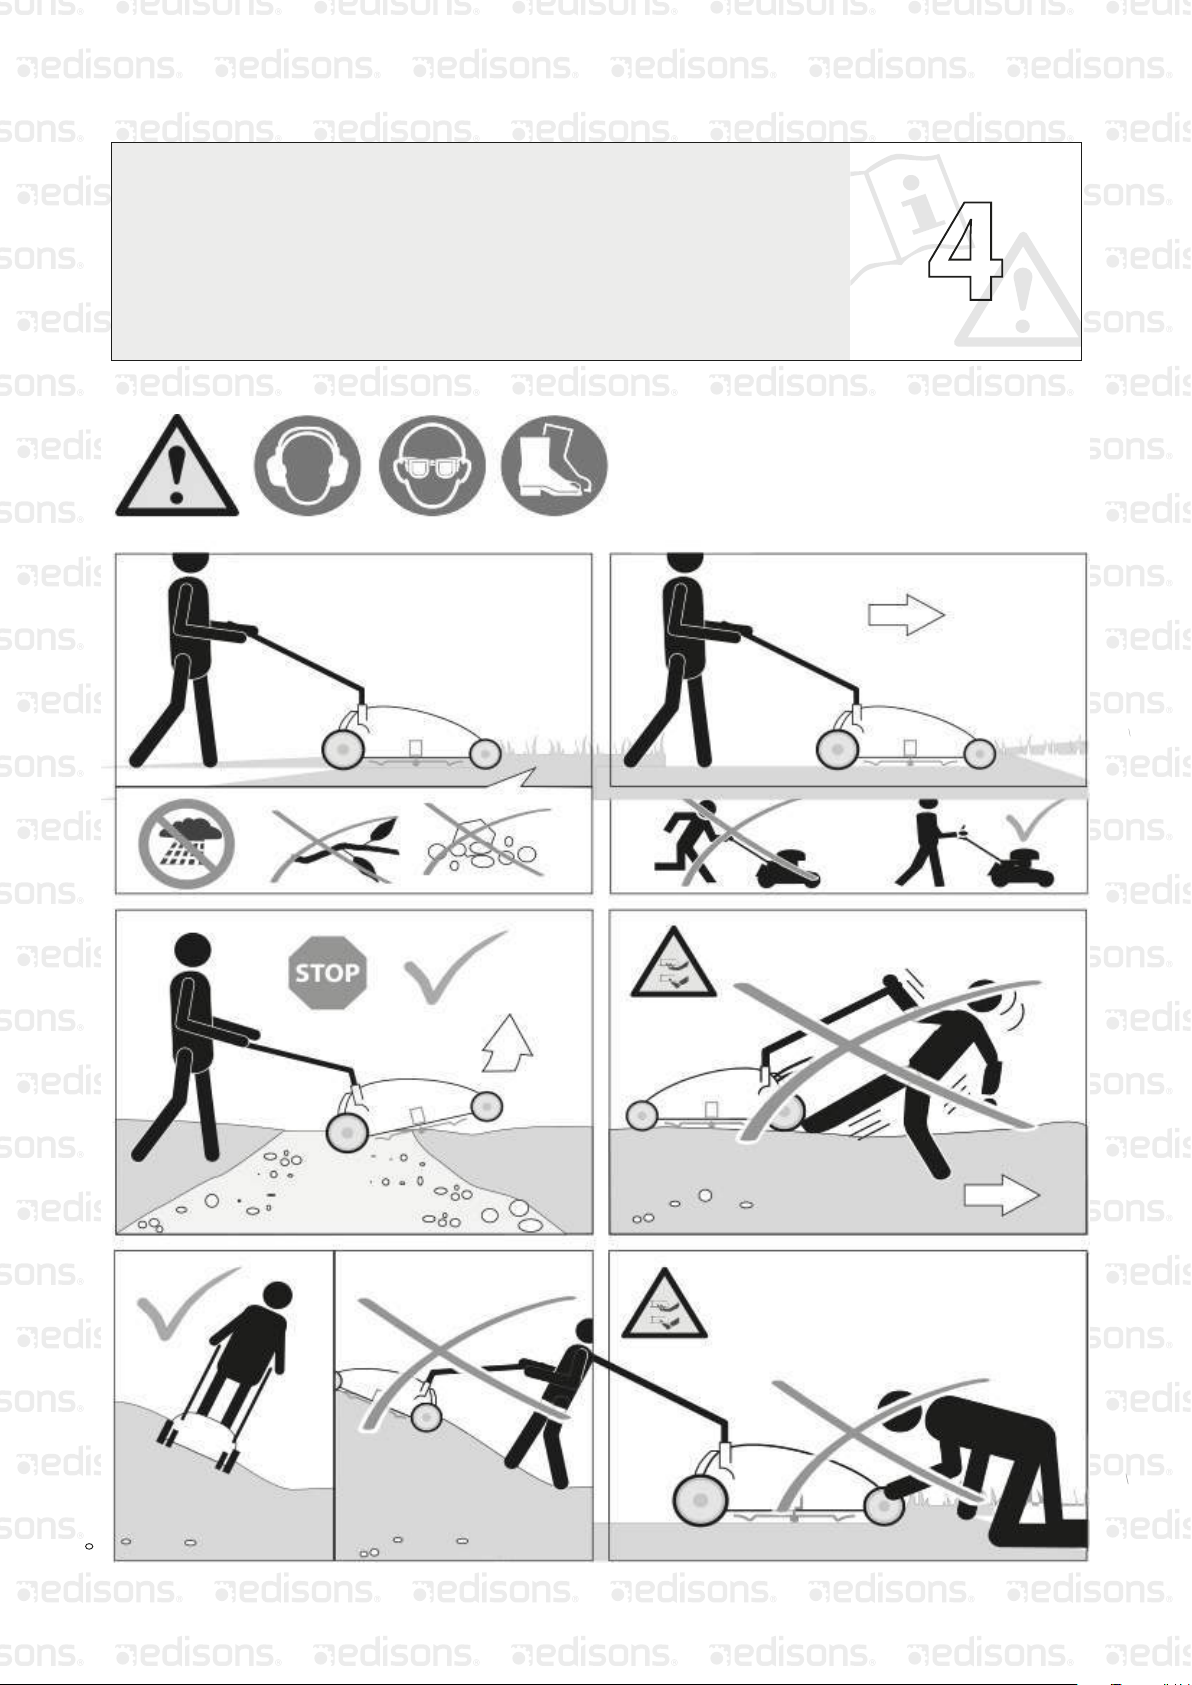
D
GB
F
I
NL
CZ
SK
H
Montage
Assembly
Assemblage
Montaggio
Montage
Montáž
Montáž
Szerelés
SLO
Montaža
HR
Montaža
BG
Монтаж
Cutting
RO
BIH
Montaj
Montaža
Instructions
4
1
9
Page 12
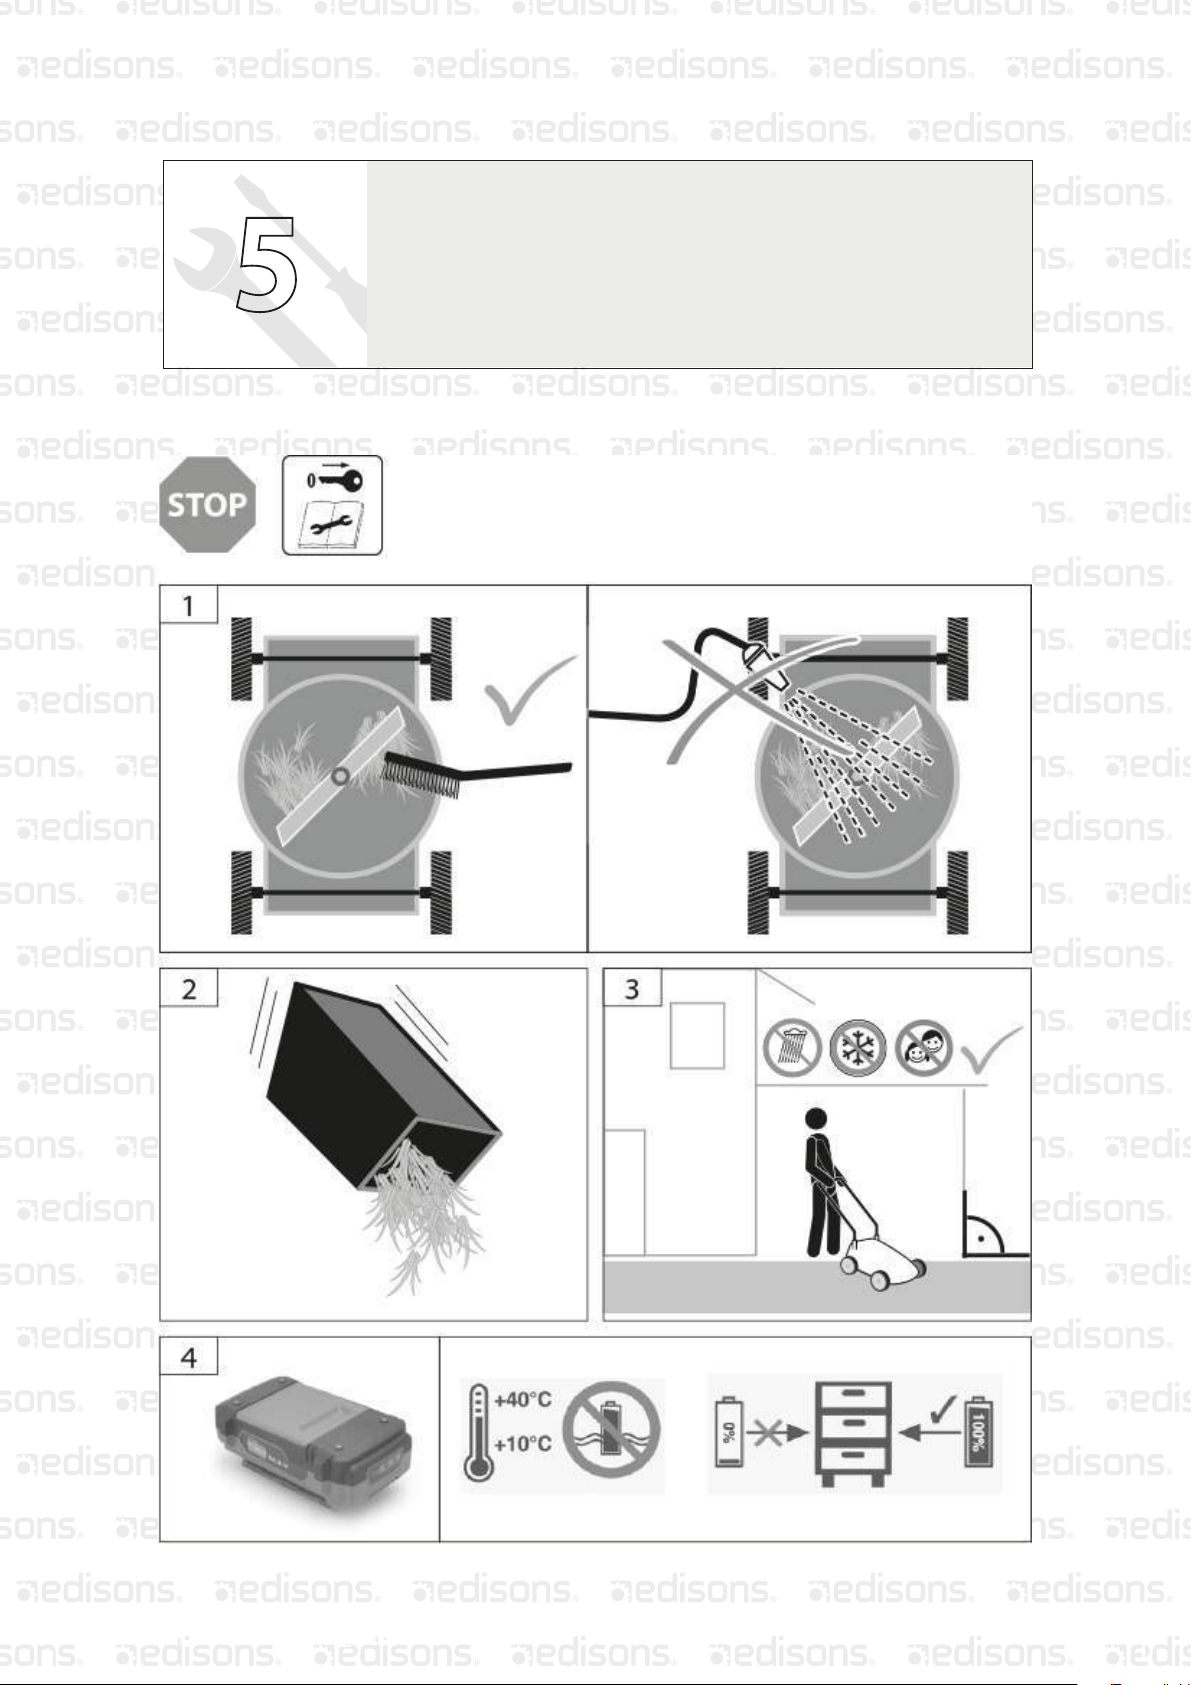
5
1
D
Montage
GB
Assembly
F
Assemblage
Cleaning
I
Montaggio
NL
Montage
CZ
Montáž
Maintenance
SK
Montáž
H
Szerelés
SLO
HR
BG
RO
BIH
Montaža
Montaža
Монтаж
Montaj
Montaža
10
Page 13

D
Technical Data
Cordless lawn mower 323/25 RM Set
Art. No
Voltage 30 V
Rated revolutions 3800 min
Cutting width 320 mm
Cutting depth 25/45/65 mm
Collection bag capacity 30 l
Weight without battery/Charging equipment
Degree of protection IP 21
Noise details
Sound pressure level L
Measured sound power level L
Guaranteed sound power level L
Measured according to
1)
pA
1)
EN 60335;
WA
2)
WA
3)
2) 3)
2000/14/EG;
1)
Uncertainty K= 3 dB (A);
78,1 dB (A)
90,6 dB (A)
96 dB (A)
2)
Uncertainty K = 1,81 dB
(A)
Wear ear protectors!
Vibration details
95529
-1
10,5 kg
Vibration emission value (triaxial vector sum) Determined properly EN 60335
Vibration emission value a
Uncertainty K = 1,5 m/s
2
h
1,513 m/s
Charging equipment 2A/25 L 25,2 V
Input voltage 100-240 V~
Frequency 50-60 Hz
Output voltage 30 V
Output current 2,0 A(Std.)
Input power 75 W
Protection class II
Charging time ca.
2 Ah - 70 min.
WARNING: The vibration emission level will vary because of the ways in which a power tool can be used and
may increase above the level given in this information sheet.
The vibration emission level may be used to compare one tool with another.
It may be used for a preliminary assessment of exposure.
2
working period.
11
Page 14
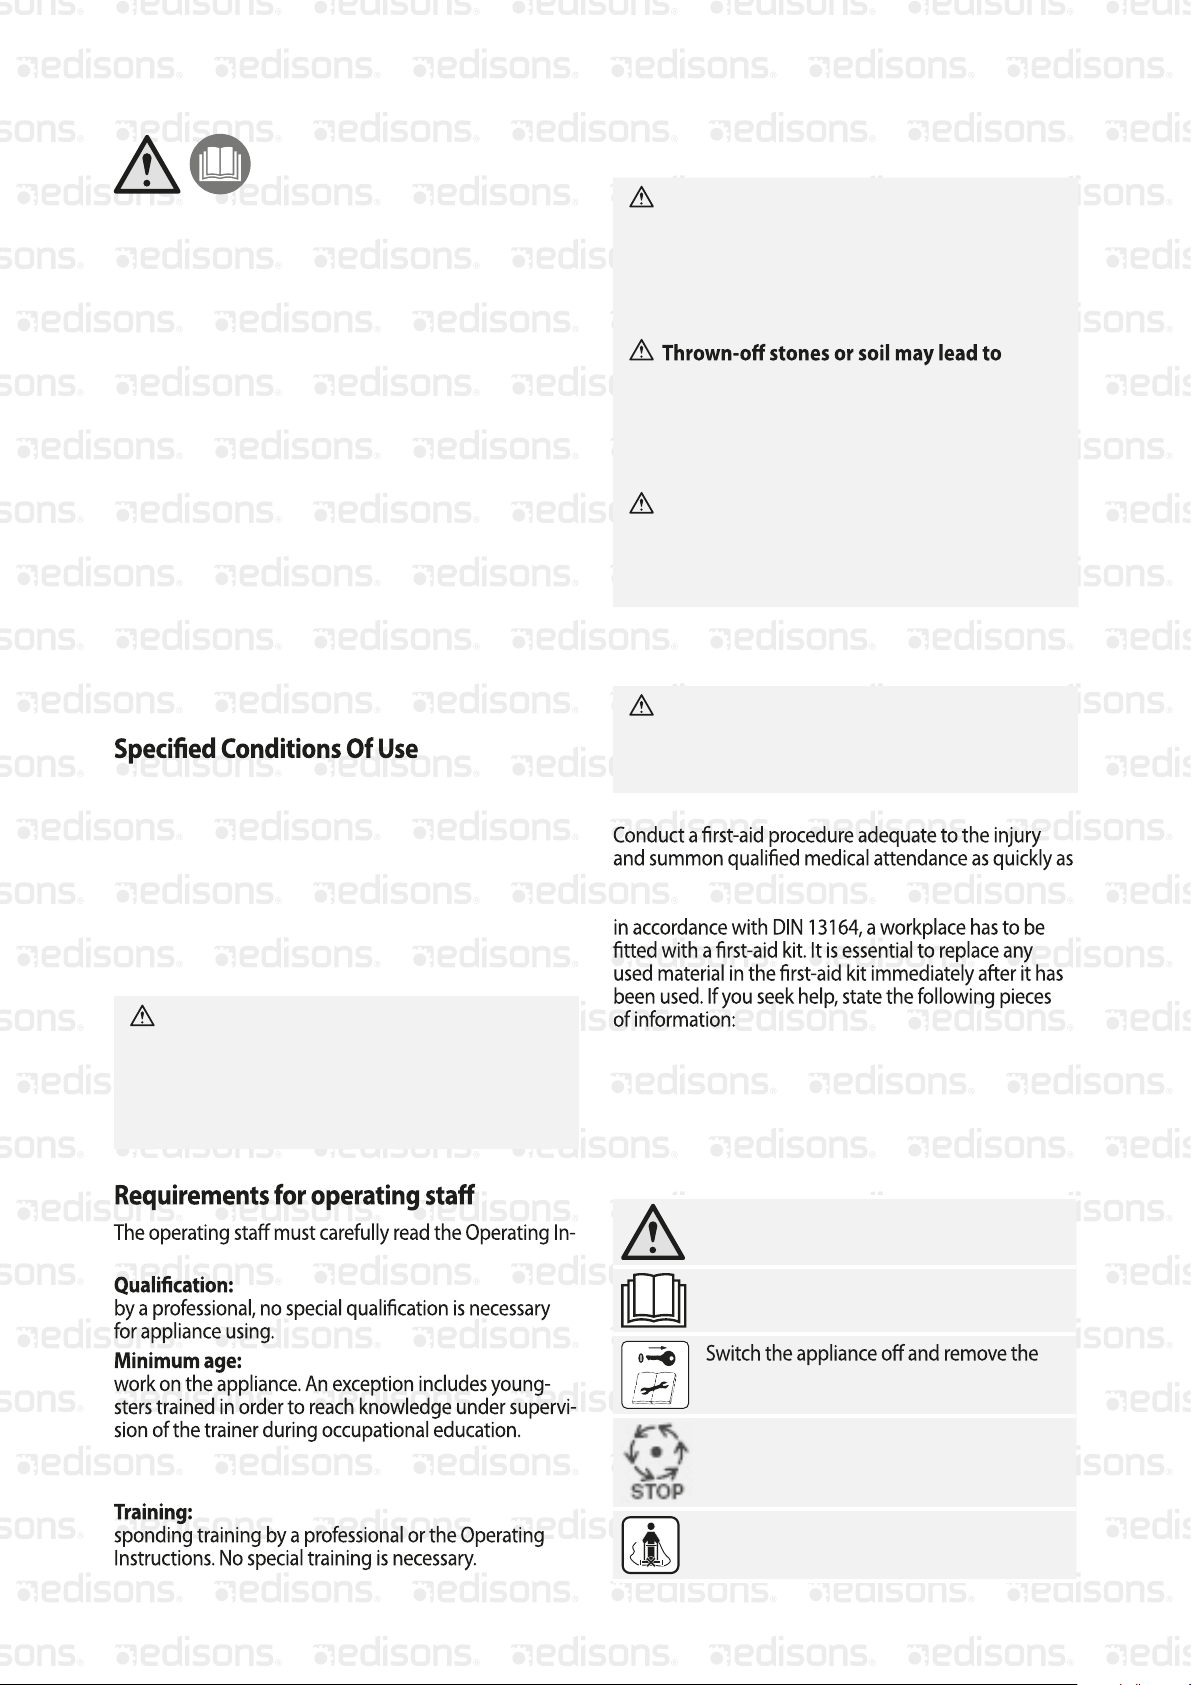
Read and understand the operating
instructions before using the
appliance. Familiarise with the
control elements and how to use the appliance properly.
Abide by all the safety measures stated in the service
manual. Act responsibly toward third parties.
The operator is responsible for accidents or risks to third
parties.
In case of any doubts about connection and operation
refer please to our customer center
This appliance is not intended for use
by children.
The machine may not be used by
persons with reduced physical, sensory
or mental capabilities or persons with
a lack of knowledge or experience
unless they are supervised by a person
responsible.
Children must be supervised in order
not to play with the machine.
The cordless lawn mower has been designed to cut small
to medium-sized grass areas in private gardens by the
house or in hobby gardens. Due to the physical danger
to the user and other persons, the lawn mower may not
be used for other purposes.
Do not use this product in any other way as stated for
normal use. Not observing general regulations in force
and instructions from this manual does not make the
manufacturer liable for damages.
Residual risks
Rotating blades may lead to serious injuries
by cutting or amputating parts of the body.
Never touch under the housing body when the
engine is running. Wear protective shoes. Never
remove the collection bag when the machine is
being operated.
injuries.
Before mowing, check the area to be mowed for
any undesirable objects. Make sure the collection
bag is properly suspended. Wear safety goggles
when working.
Poor lighting/light conditions represent a
high safety risk.
Provide adequate lighting or good lighting
conditions when working with the machine.
Emergency procedure
Danger of injury !
Never put your hands and feet near the rotating
parts. Keep a distance from the ejection opening at
all times.
possible. Protect the injured person from further harm
and calm them down. For the sake of eventual accident,
The mower must not be used for cutting
bushes, hedges and thickets, for cutting and
mulching creepers or lawns on roofs or in
balcony boxes. The mower must also not be used
as a crusher for mulching tree cuttings and
hedges or levelling any terrain roughness.
structions before using the appliance.
Apart from the detailed instructions
Persons over 18 years of age can only
L‘âge minimal de l‘utilisateur est déterminé selon les
dispositions locales.
Using the appliance only requires corre-
1. Accident site
2. Accident type
3. Number of injured persons
4. Injury type(s)
Symbols
Warning/caution!
Read the Operating Instructions
contact key before any adjustment, cleaning and servicing work.
Caution! Blades run down.Wait until all
rotating parts have stopped.
Keep the connecting cable out of reach of
the cutting blades.
12
Page 15
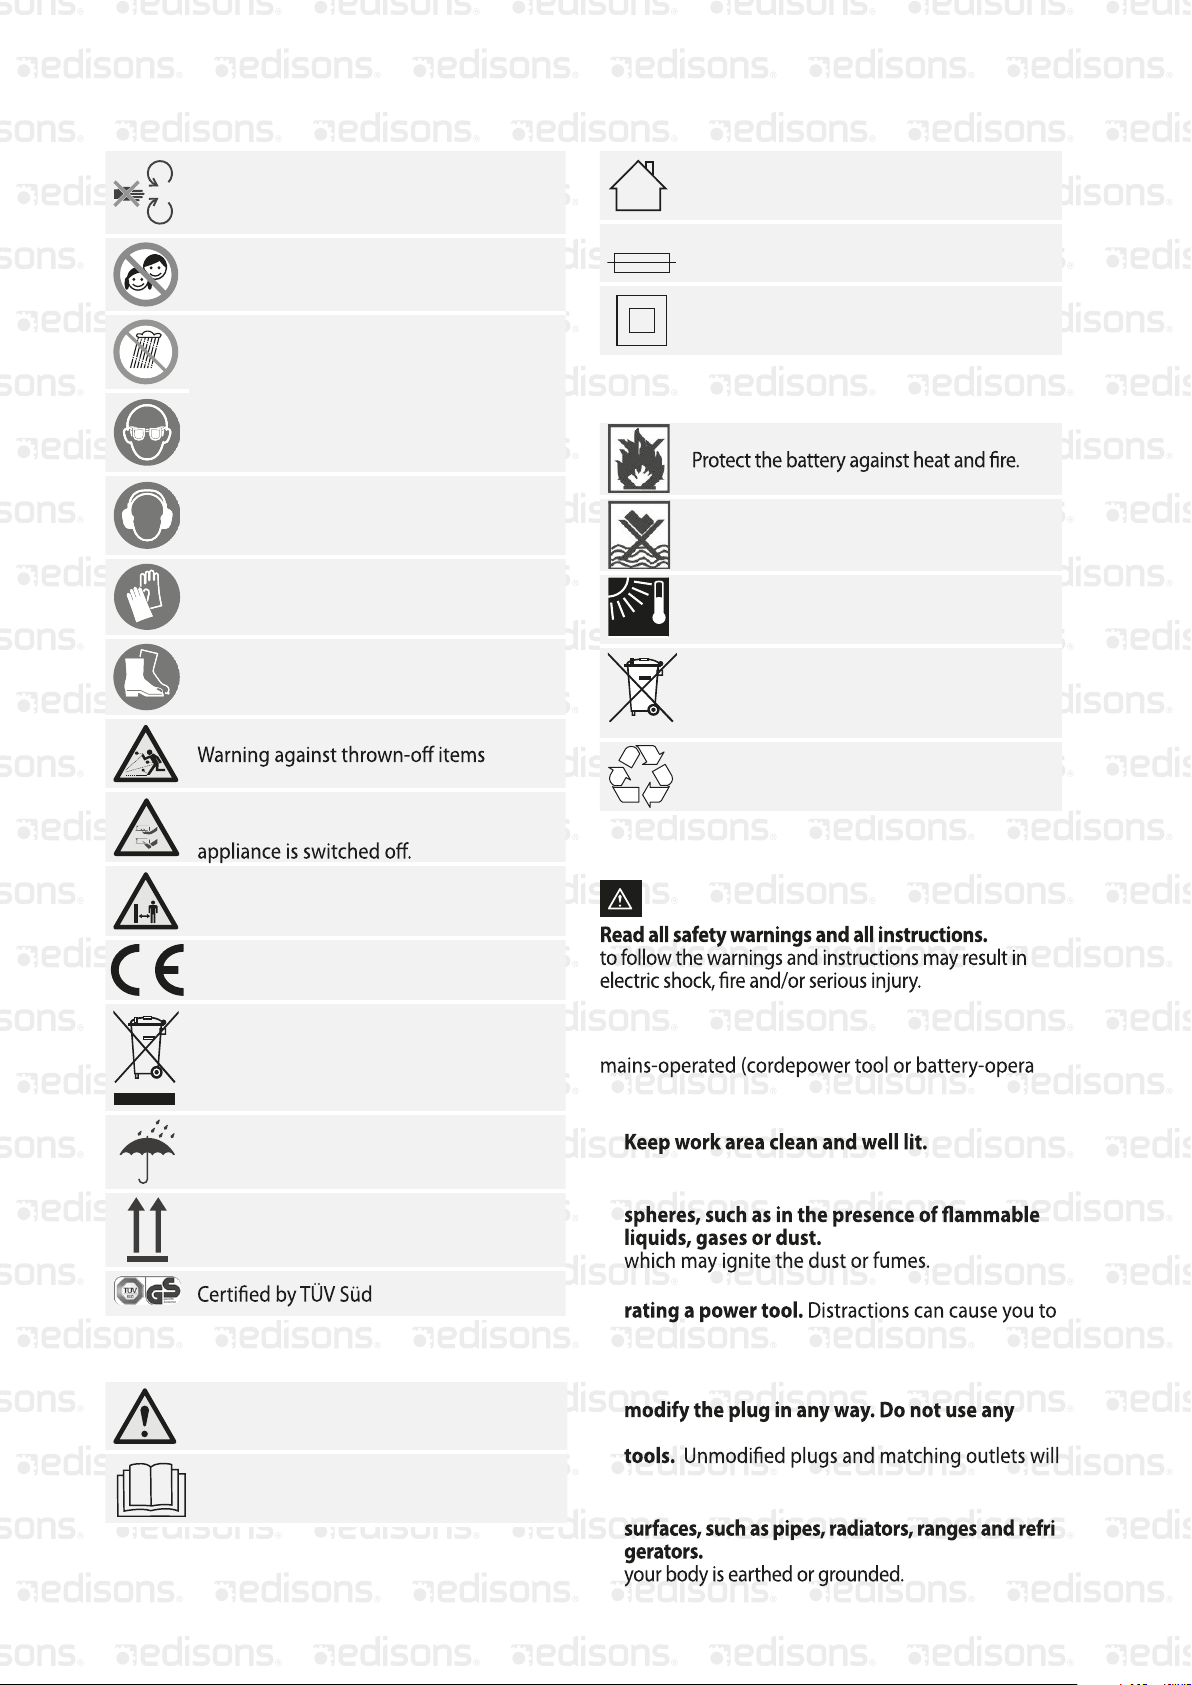
Caution, risk of drawing-in
Charger to be used in closed spaces only.
Always keep children and unauthorised
persons out of reach of the appliance.
Protect against humidity
Never expose tool to rain.
Wear eye protective goggles !
Wear ear protectors!
Wear protective gloves !
Wear safety cut through resistant shoes
with safety sole and steel toe !
Warning against sharp knives. Knives
keep running for a short time after the
Keep bystanders in safe distance from the
appliance (at least 5 m)
T2A
Appliance protection
Protection class II
Battery
Protect the battery against water and
moisture.
Protect the battery against temperatures
MAX. 40°C
above 40°C.
Do not throw the batteries in household
waste.
Li-Ion
Deliver the batteries to a collection centre of
old batteries where they will be recycled in
an environmentally friendly way.
General Power Tool Safety Warnings
WARNING
Failure
CE marking
Any damaged or disposed electric or
electronic devices must be delivered to
appropriate collection centres.
Protect against humidity
This side up
Charging equipment
Warning/caution!
Read the Operating Instructions
Save all war-
nings and instructions for future reference.
The term „power tool“ in the warnings refers to your
-
ted (cordless) power tool.
1) Work area safety
a)
Cluttered or
dark areas invite accidents.
b) Do not operate power tools in explosive atmo-
Power tools create sparks
c) Keep children and bystanders away while ope-
lose control.
2) Electrical safety
a) Power tool plugs must match the outlet. Never
adapter plugs with earthed (groundepower
reduce risk of electric shock.
b) Avoid body contact with earthed or grounded
There is an increased risk of electric shock if
-
13
Page 16

c) Do not expose power tools to rain or wet con-
c) Disconnect the plug from the power source
the risk of electric shock.
d) Do not abuse the cord. Never use the cord for
Keep cord away from heat, oil, sharp edges
increase the risk of electric shock.
e) When operating a power tool outdoors, use an
Use of
a cord suitable for outdoor use reduces the risk of
electric shock.
f) If operating a power tool in a damp location
Use of an RCD reduces the
risk of electric shock.
3) Personal safety
a) Soyez attentif, faites attention à ce que vous
faites et faites preuve de bon sens lors de
l‘utilisation de l‘appareil électrique. N‘utilisez
jamais l‘appareil électrique si vous êtes fatigué,
-
ments. A moment of inattention while operating
b) Use personal protective equipment. Always
wear eye protection.
as dust mask, non-skid safety shoes, hard hat, or
will reduce personal injuries.
c) Prevent unintentional starting. Ensure the
to power source and/or battery pack, picking
up or carrying the tool. Carrying power tools with
d) Remove any adjusting key or wrench before
before making any adjustments, changing
Such pre-
ventive safety measures reduce the risk of starting
d) Store idle power tools out of the reach of child-
the power tool or these instructions to operate
Power tools are dangerous in the
hands of untrained users.
e) Treat electric tools carefully. Check whether the
moving parts work perfectly and do not drag,
whether not broken or damaged to such an
extent that functioning of electric tools could
before using the machine.
caused by poorly maintained power tools.
f)
are less likely to bind and are easier to control.
g) Use the power tool, accessories and tool bits
taking into account the working conditions and
Use of the power
5) Using and treatment of cordless tools.
a) Charge the batteries only in chargers recom
mended by the manufacturer.
charger suitable only for a certain type of batteries
or, as appropriate, accumulators, if used for other
accumulators.
b) Use only such accumulators in this electric
appliance that have been designed for this
appliance. Use of other accumulators may lead to
Properly
-
attached to a rotating part of the power tool may
result in personal injury.
e) Do not overreach. Keep proper footing and
of the power tool in unexpected situations.
f) Dress properly. Do not wear loose clothing or
Loose clothes, jewelle
g) If devices are provided for the connection of
4) Power tool use and care
a) Do not force the power tool. Use the correct po
tool will do the job better and safer at the rate for
b) Do not use the power tool if the switch does not
controlled with the switch is dangerous and must
be repaired.
-
Use of
-
c) Do not leave an accumulator not being used
or other small metal items that could cause
contact bridging. Short circuit between accumu-
d) Liquid may leak from an accumulator if used
improperly. Prevent contact with such liquid.
of accidental contact. If liquid gets to your eye,
seek medical advice.Liquid leaking from a battery
may cause skin irritation or burns.
6) Service
a)
This will ensure that the safety of the power
tool is maintained.
Safety instructions for Cordless lawn
mower
14
Page 17
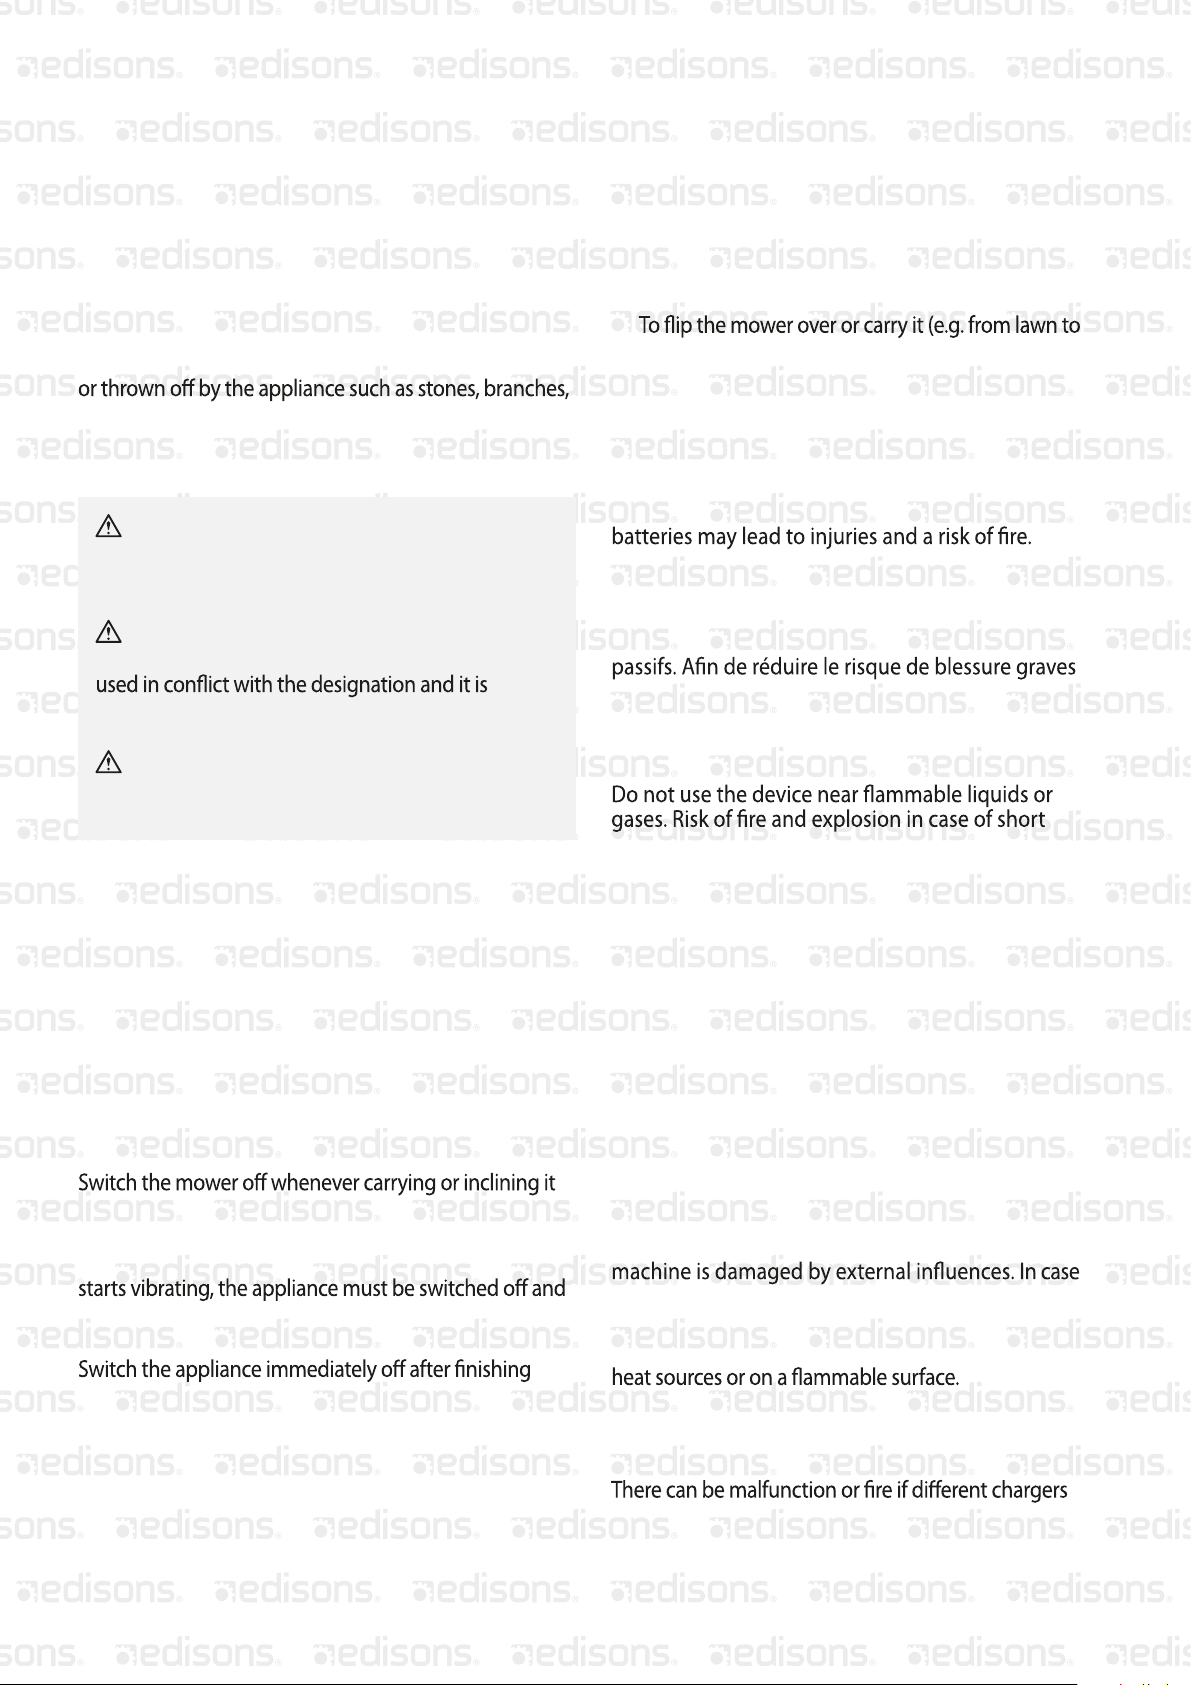
Keep children and other persons including animals in a
safe distance when using the appliance. Minimum safe
distance is 5 m.
Wear personal protective equipment. Wear solid shoes
and long trousers. Never use the appliance when
barefooted or in light sandals. Wear protective gloves if
necessary.
Carefully check the terrain where the appliance is going
to be used and remove all objects that could get caught
wires, animals, etc.
Avoid operating the equipment in wet grass, where
feasible;
Before using, always visually inspect to see that
the blades, blade bolts and cutter assembly are not
blunt, worn or damaged. Replace worn or damaged
blades and bolts in sets to preserve balance;
The protective equipment on the appliance is
strictly prohibited to be disassembled, changed,
prohibited to attach any protective equipment of
other manufacturers.
The appliance must not be used if damaged or
safety equipment is defective. Replace any worn-out
and damaged parts.
Do not start the engine before your feet are in a safe
distance from the cutting tools.
Do not incline the appliance when being started.
Do not start the appliance when you are standing in
front of the ejection opening.
Walk! Never run!
Make sure your posture is safe, especially on slopes. Do
not cut on too steep slopes. Be particularly careful when
changing travelling direction on slopes.
Pay maximum attention when turning around and
pulling the appliance to you.
or when being outside a grass area. Wait until all rotating
parts have stopped.
If an undesirable item is encountered or the appliance
the socket plug removed. Check whether the appliance
is not damaged. Repair any damage.
• To release a blocked blade.
• To adjust the mowing height.
• To empty the collection bag.
• Check the machine if working perfectly after catching
an undesirable object. Repairs must be executed
before putting the machine into operation again.
• To lift the machine or take it away.
•
lawn or across a road).
• Clean the mower or do any other works before
checking the mower.
The ON/OFF switch and safety switch must not be
locked.
Use only those batteries for the power tool that have
been designed to be used for that tool. Use of other
Avertissement: Cet outil électrique génère pendant
le fonctionnement un champ magnétique. Dans
certaines circonstances, ce champ peut perturber
le fonctionnement des implants médicaux actifs ou
ou mortelles, nous recommandons aux personnes
portant un implant médical de consulter un médecin
et le fabricant de l‘implant médical avant l‘utilisation
de l‘appareil.
circuit.
Charging station
No metal parts may enter the shaft to slide the battery (risk of short circuit).
Never use the charger in moist or wet conditions.
Suitable for indoor areas only.
Make sure the system voltage corresponds to the
charger type plate details. There is a risk of electric
shock.
Cable connections to be separated by pulling the
plug only. Pulling the cable could damage both the
cable and plug. As a result, electric safety would no
longer be guaranteed.
Never use the charger when the cable, plug or the
damage let repaired in authorized workshop
Make sure the cooling function is not limited by cove
ring the cooling slots. Do not operate the appliance near
-
your work.
• Stop the machine and take out the contact key. Wait
until all rotating parts have stopped and the unit has
cooled down. Take out the key.whenever you leave
the lawnmower.
Never open the charger. Contact a specialised work
shop in case of any defect.
The Güde charger to be used only to charge the battery.
are used.
The outer battery surface must be clean and dry before
the battery starts being charged.
15
-
Page 18
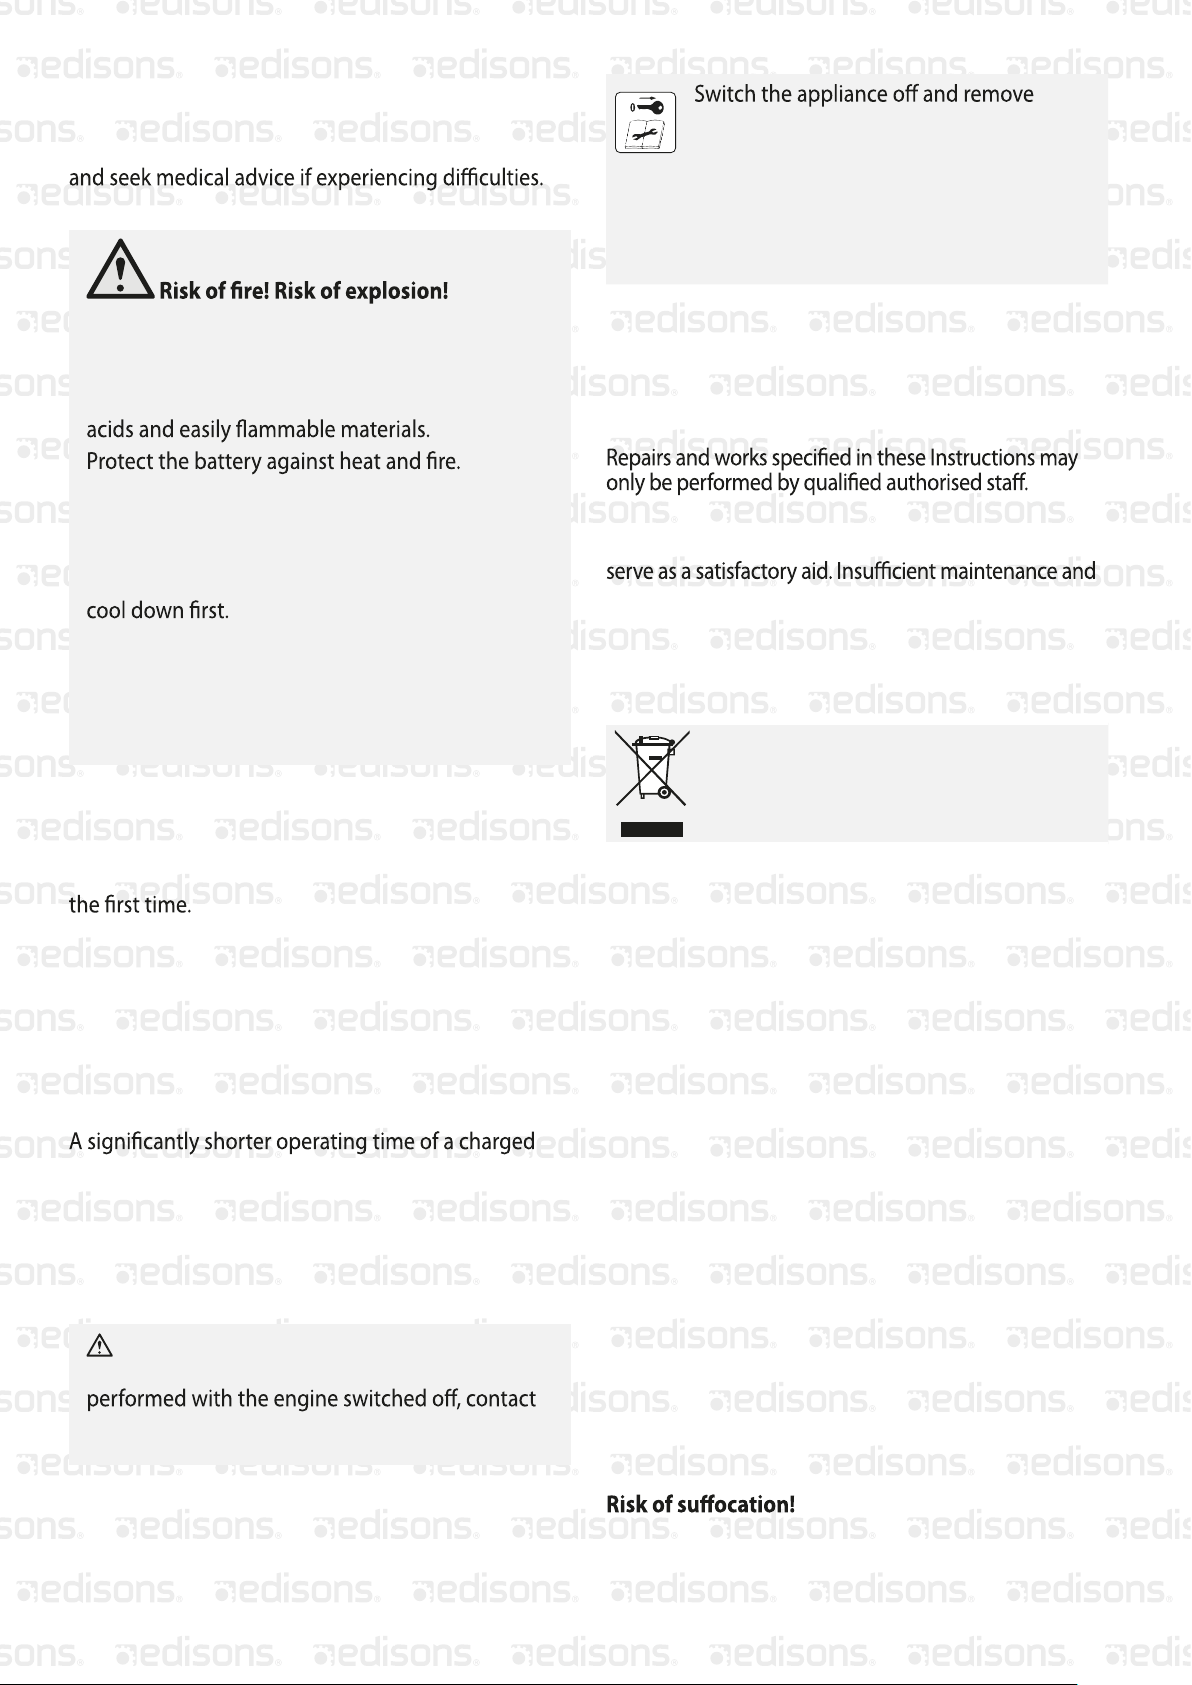
Battery
Vapours may leak out in case of unauthorised use or
when using a damaged accumulator. Bring fresh air
Vapours may irritate the respiratory system.
Never use damaged, defective or deformed accumulators. Never open or damage the accumulator
or let it fall on the ground.
Never charge the battery in an environment with
Battery to be used at the ambient temperatures
between 10°C and +40°C only.
Never put the battery on heaters and do not
expose it to strong sunlight for a long time.
After being subject to heavy load, let the battery
the contact key before any adjustment,
cleaning and servicing work. Wait until all
rotating parts have stopped and the appliance cooled down. After each use, clean
carefully the cutter bar. Wipe it with a cloth
moistened in oil or apply metal treatment
spray on it.
Keep the machine clean. Regularly clean the grass
ejection chute and machine body.
Apply environment-friendly oil to all moving parts.
Check the collection bag at regular intervals for any wear
and aging.
Use only original accessories and original spare parts.
Only a regularly maintained and treated appliance can
care can lead to unforeseen accidents and injuries.
Short circuit - do not bridge the accumulator
contacts with metal parts.
The accumulator must be packaged (plastic bag,
box) or accumulator contacts must be sealed up
for accumulator disposal, transport or storage.
Work instructions
Accumulators are supplied partially charged and
must therefore be fully charged before being used for
• Charge the accumulator when the appliance is
running slowly or stops.
• A li-ion battery may be charged at any time
without any shortening of its life. Charging process
interruption will not damage the accumulator.
• A li-ion battery is protected by the Electronic Cell
Protection against deep discharge.
battery means the battery life is over and the battery
must be replaced.
Original spare batteries to be used only.
Disposal
The disposal instructions are based on the icons
placed on the appliance or its package.
Any damaged or disposed devices must
be delivered to appropriate collection
centres.
Dispose of the batteries in an environmentally
friendly manner.
Li-ion batteries are subject to the special disposal
obligation. Have any defective batteries disposed of
by a specialised shop. The battery must be taken out
before the appliance is scrapped. Damaged batteries
may harm the environment and your health if toxic
vapours or liquids leak out of such batteries.
Therefore, never send a defective battery by post, etc.
Please contact your local recycling centre.
Dispose of the batteries when discharged. We
recommend applying an adhesive tape on the poles
to protect them against short circuit. Never open the
battery.
Maintenance
Rotating blade
Any works / adjusting on the machine to be only
key taken out and when the mowing blade is not
moving.
Transport packaging disposal
The packaging protects the machine against damage
during transport. Packaging materials are usually
chosen based on environment aspects and waste
treatment principles and are therefore recyclable. Returning the packaging into material circulation saves
raw materials and reduces waste production. Parts of
packagings (e.g. foils, styropor®) can be dangerous
for children.
Keep parts of the packagings out of reach of children
and dispose them as soon as possible.
16
Page 19

Failure removal
Cause
Battery is empty Charge the battery
Battery is defective Have it replaced in a Güde authorised
Contact key is not inserted
Main switch or safety arch is not
controlled
Unsteady running,
strong vibrations
Poor mowing/catching
performance
Blade is damaged Replace the blade
Blade is loose Check and tighten the blade clamping
Blade is blunt Have the blade sharpened or replaced
Battery is defective Have it replaced in a Güde authorised
Collection bag is blocked
Mowing height adjustment not
regulated
Grass is not collected Blocked channel
Full collection bag
Too wet grass
Removal
service centre
See „Operation“ below
See „Operation“ below
service centre
Empty the collection bag
Adjust the mowing height
Clean the ejection channel
Empty the collection bag
Cut in dry weather
6
6
7
5
17
Page 20
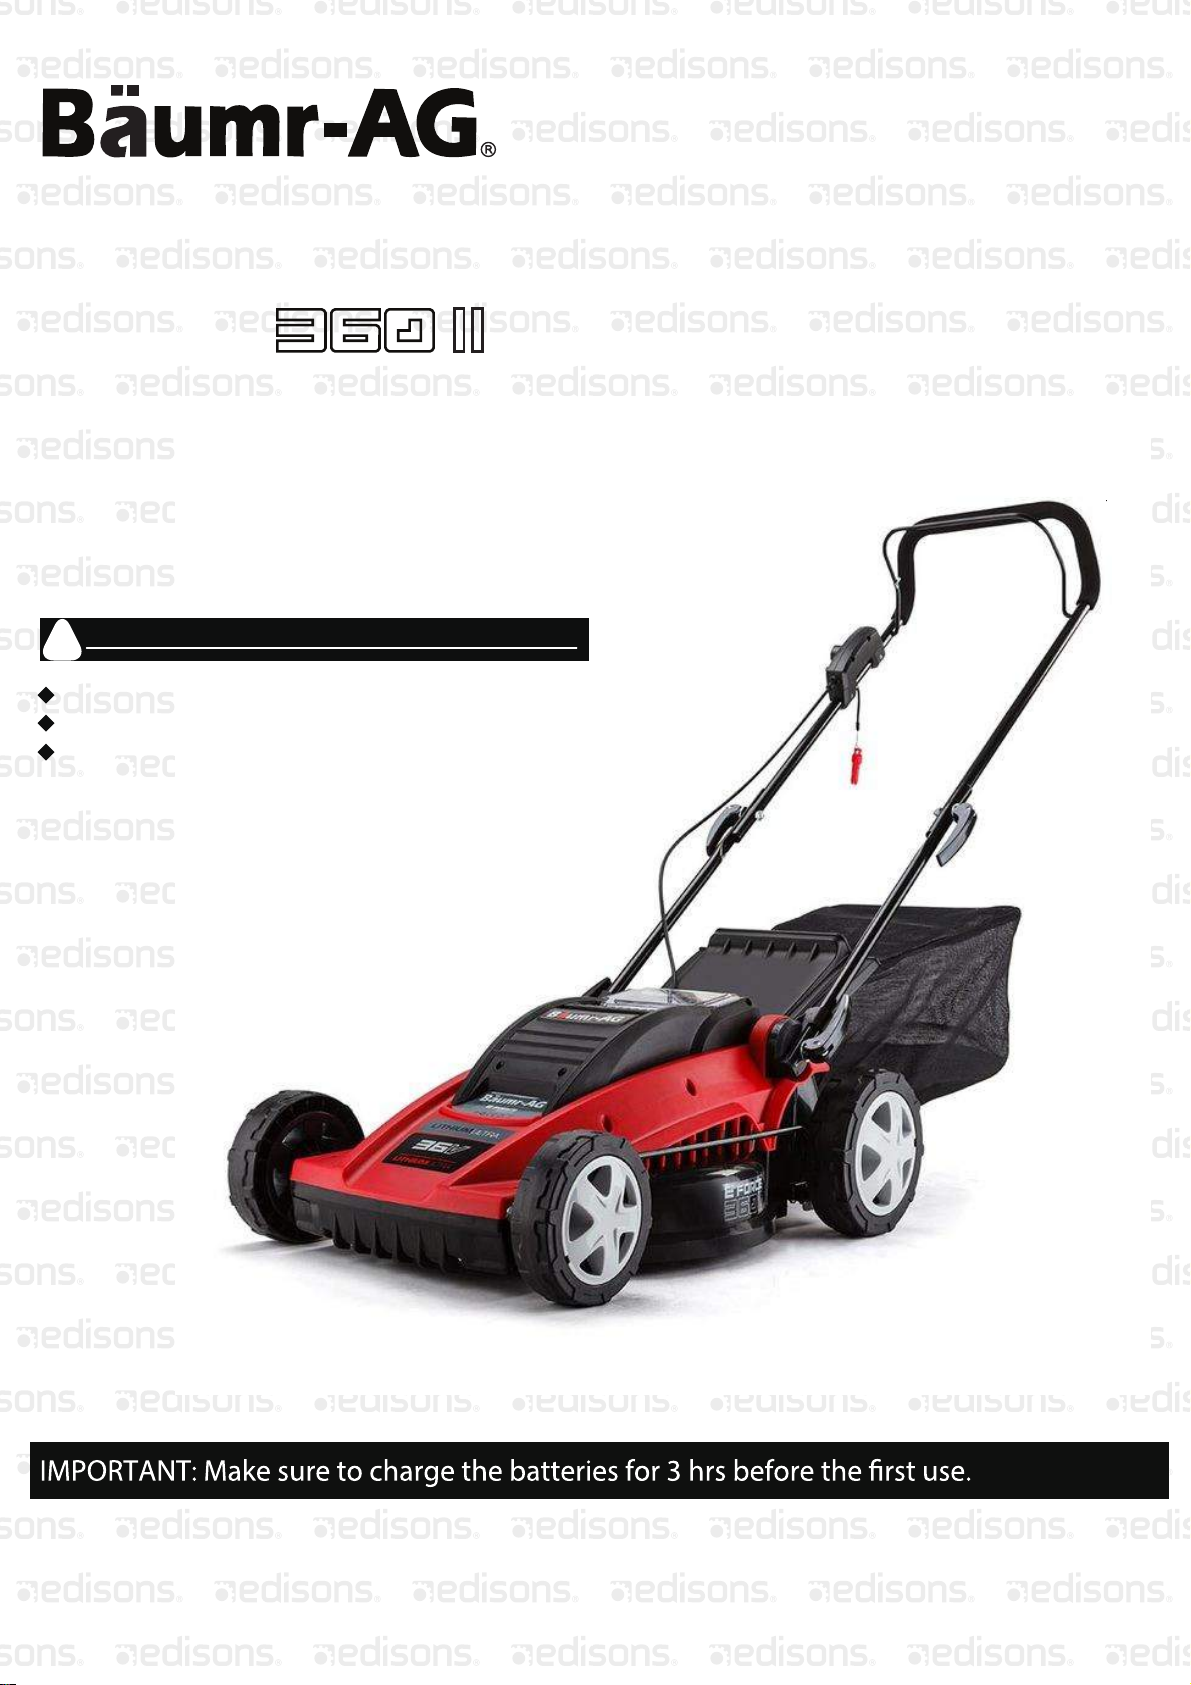
E FORCE
37CM 36V Li-Ion
Cordless Lawn Mower
OPERATOR’S MANUAL
BEFORE USING YOUR MOWER
!
Carefully read and understand the owner’s manual.
Save this manual for future use.
Read and follow all warnings on
the mower, battries, charger,and in the Owner’s Manual.
18
Page 21
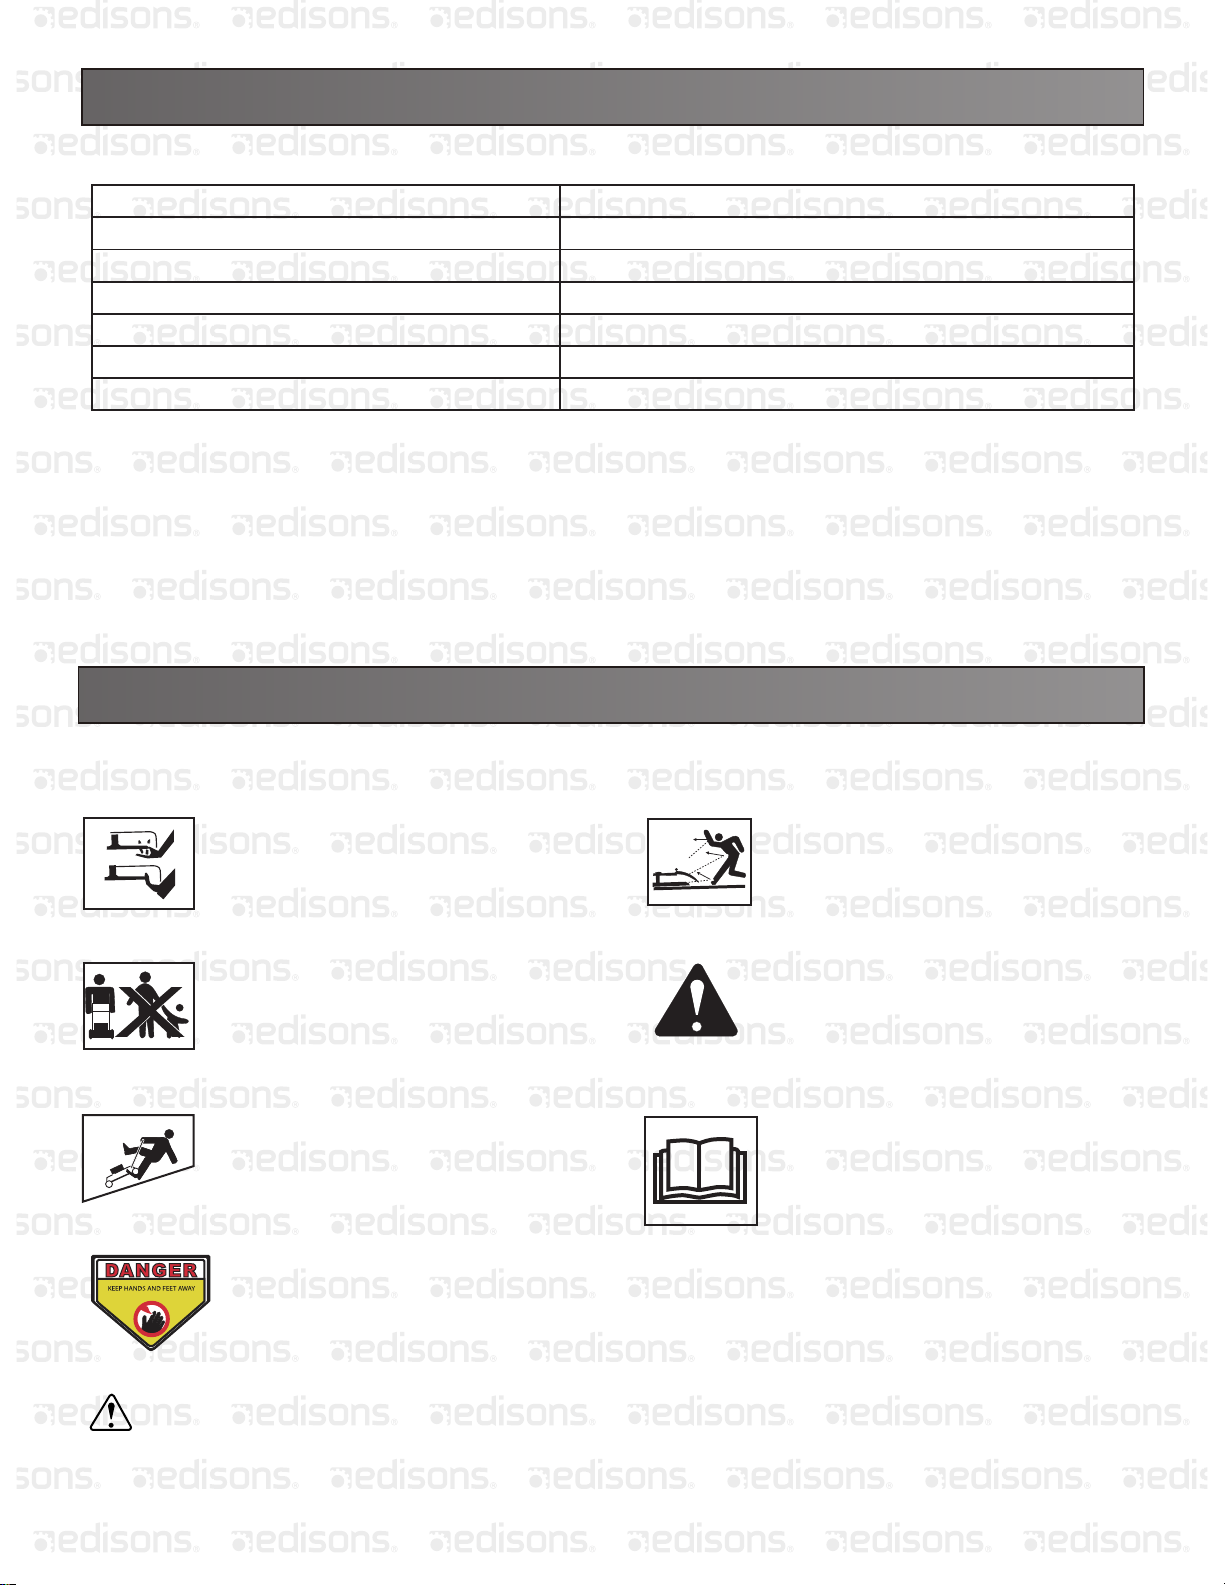
PRODUCT SPECIFICATIONS
Component
Battery Capacity
Charge Time
No-load Speed
Cutting Path
Height Adjustment
Wheels Size
Specifications
36 V d.c.
2.5-hour
3,200 /min
15 in. (370 mm)
1–3 in. ( 25mm – 75mm)
6 in. (155mm)
SYMBOLS
SYMBOL NAME SYMBOL NAME
Severing of toes or fingers - rotary
mower blade.
Keep bystanders/children away.
Slip on slope.
CPSC Danger label.
Thrown objects from mower deck.
Safety alert.
Read the operator’s manual.
Please read and understand this entire manual before attempting to assemble, operate or install the product.
These safety instructions are not meant to cover every possible conditions that could occur.
19
Page 22

SAFETY INSTRUCTIONS
WARNING: Read all instructions when using electric gardening appliances.
Basic safety precautions should always be followed to reduce the risks of fire, electric shock, and personal injury.
FOR ALL LAWN MOWERS
a) Avoid Dangerous Environments
Don’t use appliances in damp or wet locations.
b) Don’t Use In Rain.
c) Keep Children Away
All bystanders (visitors) should be kept at a safe distance from the work area.
d) Dress Properly
Do not wear loose clothing or jewellery. They can get caught in moving parts. Use of rubber gloves and substantial footwear
is recommended when working outdoors. Wear protective hair covering to contain long hair.
e) Wear safety mask/glasses
Always use face or dust mask if the place of operation is dusty.
f) Use the right appliance
Do not use appliance for any job except that for which it is intended.
g) Don’t force the appliance
It will do the job better and safer at the rate for which it was designed.
h) Don’t overreach
Keep proper footing and balance at all times.
i) Stay alert
Watch what you are doing. Use common sense. Do not operate appliance when you are tired.
j) Store idle appliances indoors
When not in use, appliances should be stored indoors in dry and high or locked-up place - it should be out of reach of children.
k) Maintain appliance with care
Keep cutting edge sharp and clean forbest and safest performance and to reduce the risk of injury. Follow instructions for
lubricating and changing accessories. Keep handles dry, clean, and free from oil and grease.
l) Check damaged parts
Before further use of the appliance, a guard or other part that is damaged should be carefully checked to determine that it
will operate properly and perform its intended function. Check for alignment of moving parts, binding of moving parts,
breakage of parts, mounting, and any other condition that may affect its operation. A guard or other part that is damaged
should be properly repaired or replaced by an authorised service centre unless indicated elsewhere in this manual.
m) Keep guards in place and in working order.
n) Keep blades sharp.
o) Keep hands and feet away from cutting area.
p) Objects struck by the lawn mower blade can cause severe injuries to persons.
The lawn should always be carefully examined and cleared of all objects prior to each mowing.
q) If lawn mower strikes a foreign object, follow these steps:
i) Stop lawn mower. Remove the safety key.
ii) Inspect for damage.
iii) Repair any damage before restarting and operating the lawn mower.
r) Use identical replacement blades only.
20
Page 23

SAFETY INSTRUCTIONS
SAFETY INSTRUCTIONS FOR BATTERY-OPERATED LAWN MOWERS
a) Do not charge the lawn mower in rain, or in wet locations.
b) Do not use battery-operated lawn mower in rain.
c) Remove or disconnect the safety key before servicing, cleaning, or removing material from the lawn mower.
d) Use only genuine LithiumUltra batteries.
e) Do not dispose of the battery inafire. The cell may explode. Check with local codes for possible special disposal
instructions.
f) Do not open or mutilate the battery. Released electrolyte is corrosive and may cause damage to the eyes or skin. It may
be toxic if swallowed.
g) Exercise care in handling batteries in order not to short-circuit the battery with conducting materials such as rings,
bracelets and keys. The battery or conductor may overheat and can cause burns.
CAUTION
The electrolyte is a dilute sulfuric acid that is harmful to the skin and eyes. It is electrically conductive and corrosive. The
following procedures should be observed:
a) Wear full eye protection and protective clothing.
b) If electrolyte makes contact with the skin, wash it off immediately with water.
c) If electrolyte makes contact with the eyes, flush thoroughly and immediately with water. Seek medical attention.
SAFETY INSTRUCTIONS FOR WALK-BEHIND MOWERS
I. GENERAL OPERATION
1. Read, understand, and follow all instructions on the machine and in the manual(s) before starting.
2. Do not put hands or feet near or under the machine. Keep clear of the discharge opening at all times.
3. Only allow responsible adults, who are familiar with the instructions, to operate this machine.
4. Clear the area of objects such as rocks, wire, toys, etc., which could be thrown by the blade. Stay behind the handle
when the motor is running.
5. Be sure the area is clear of bystanders before operating. Stop machine if anyone enters the area.
6. Do not operate machine barefooted or while wearing sandals. Always wear substantial footwear.
7. Do not pull machine backward unless absolutely necessary. Always look down and behind before and while moving
backward.
8. Never direct discharged material toward anyone. Avoid discharging material against a wall or obstruction. Material
may ricochet back toward the operator. Stop the blade when crossing gravel surfaces.
9. Do not operate machine without the entire grass catcher, rear guard, or other safety protective devices in place and
are working.
10. Never leave a running machine unattended.
11. Stop the motor, remove the safety key and wait until the blade comes to a complete stop before cleaning the machine,
. .rehctac ssarg eht gnivomer
12. Operate the machine only in daylight or good artificial light.
13. Do not operate the machine while under the influence of alcohol or drugs.
14. Never operate mower in wet grass. Always be sure of your footing; walk, never run.
15. Disengage the drive system, if equipped, before starting the motor.
16. If the machine should start to vibrate abnormally, stop the engine (motor) and check for the cause immediately.
Vibration is generally a warning of trouble.
21
Page 24

SAFETY INSTRUCTIONS
17. Always wear eye protection when operating the machine.
18. See manufacturer’s instructions for proper operation and installation of accessories.
Only use accessories approved by the manufacturer.
II. SLOPE OPERATION
Slopes are a major factor related to slip and fall accidents, which can result in severe injuries.Operation on all slopes
requires extra caution. If you feel uneasy on a slope, do not mow on it.
1. Mow across the face of slopes; never up and down. Exercise extreme caution when changing direction on slopes.
2. Watch out for holes, ruts, bumps, rocks, or other hidden objects. Uneven terrain could cause a slip-and-fall accident.
Tall grass can hide obstacles.
3. Do not mow on wet grass or excessively steep slopes. Poor footing could cause a slip-and-fall accident.
4. Do not mow near drop-offs, ditches, or embankments. You could lose your footing or balance.
III. CHILDREN
Tragic accidents can occur if the operator is not alert while children are present or nearby.
Children are oftenattracted to the machineand the mowing activity. Never assume thatchildren will remain whereyou last
saw them.
1. Keep children out of the mowing area and under the watchful eyeof a responsible adult other than the operator.
2. Be alert and turn mower off if a child enters the area.
3. Never allow children to operate the machine.
4. Use extra care when approaching blind corners, shrubs, trees, or other objects that may block your view of a child.
IV. SERVICE
GENERAL SERVICE
1. Keep all nuts and bolts tight to be sure that the equipment is in safe working condition.
2. Never tamper with safety devices. Check their proper operation regularly.
3. Keep the machine free of grass, leaves, or other debris build-up.
4. If you strike a foreign object, stop, remove the safety key and inspect the machine.
Repair, if necessary, before starting.
5. Never make any adjustments or repairs while the motor is still running.
6. Check grass catcher componentsand the mulch plug frequently and replace with manufacturer’s recommended
parts, when necessary.
7. Mower blades are sharp. Wrap the blade or wear gloves, and use extra caution when servicing them.
8. Maintain or replace safety and instruction labels, as necessary.
22
Page 25

BATTERY & CHARGER
CAUTION: USE ONLYAPPROVED REPLACEMENT BATTERIES, OTHER BATTERIES MAY CAUSE INJURIES
OR DAMAGE TO THE MOWER.
The battery that is supplied with this mower is a maintenance-free, sealed, 36 V storage battery. It can be tipped without
danger of acid spillage. The charger will require approximately 2.5 hours to recharge a fully discharged battery.
BATTERY SAFETY RULES
1. Allow at least 3 hours of battery charging before using the mower for the first time.
2. For optimal performance, charge the battery every two months, even when it is not in use.
3. Charge the battery in a cool, dry place.
4. The battery does not have to be fully discharged before recharging.
5. 2 to 3 initial charging/discharging cycles may be required in order to reach the maximum run time/capacity.
6. Do not store battery in temperatures lower than 32°F (0°C).
PROPER CARE FOR BATTERY
Off-Season Storagef
In order toensure optimal performance, it is recommendedthat the battery be charged everytwo months when not in use.
If all of the following conditions are met, the mower can be stored with the charger disconnected.
1. The mower is fully charged before storing.
2. The average temperature of the storage location is not below 50°F (10°C).
3. The battery should not be stored for more than 3 months.
CHARGER SAFETY RULES
Charge themower battery in adry area that isprotected from theweather. Donot expose the moweror the charger torain.
Do not charge the battery in a wet location. Operate the battery charger in temperatures between 32 ° and 90 ° F (0 °
and 32 ° C). In order to reduce the risk of electric shock, use only the charger that is provided by the manufacturer to
charge the battery.
DO NOT ABUSE THE CHARGER CORD. Never carry the charger by the cord. Do not disconnect the charger from
the outlet or from the mower by pulling the charger cord.
Do not service the mower with the charger connected or with the safety key installed. Do not use a damaged charger.
Replace the charger cords or the charger immediately.
Keep the mower and the charger away from water,heat sources (radiators, heaters, stoves, etc.), flames, and chemicals.
Do not dispose of this product in fire, batteries inside this product may explode or leak.
23
Page 26
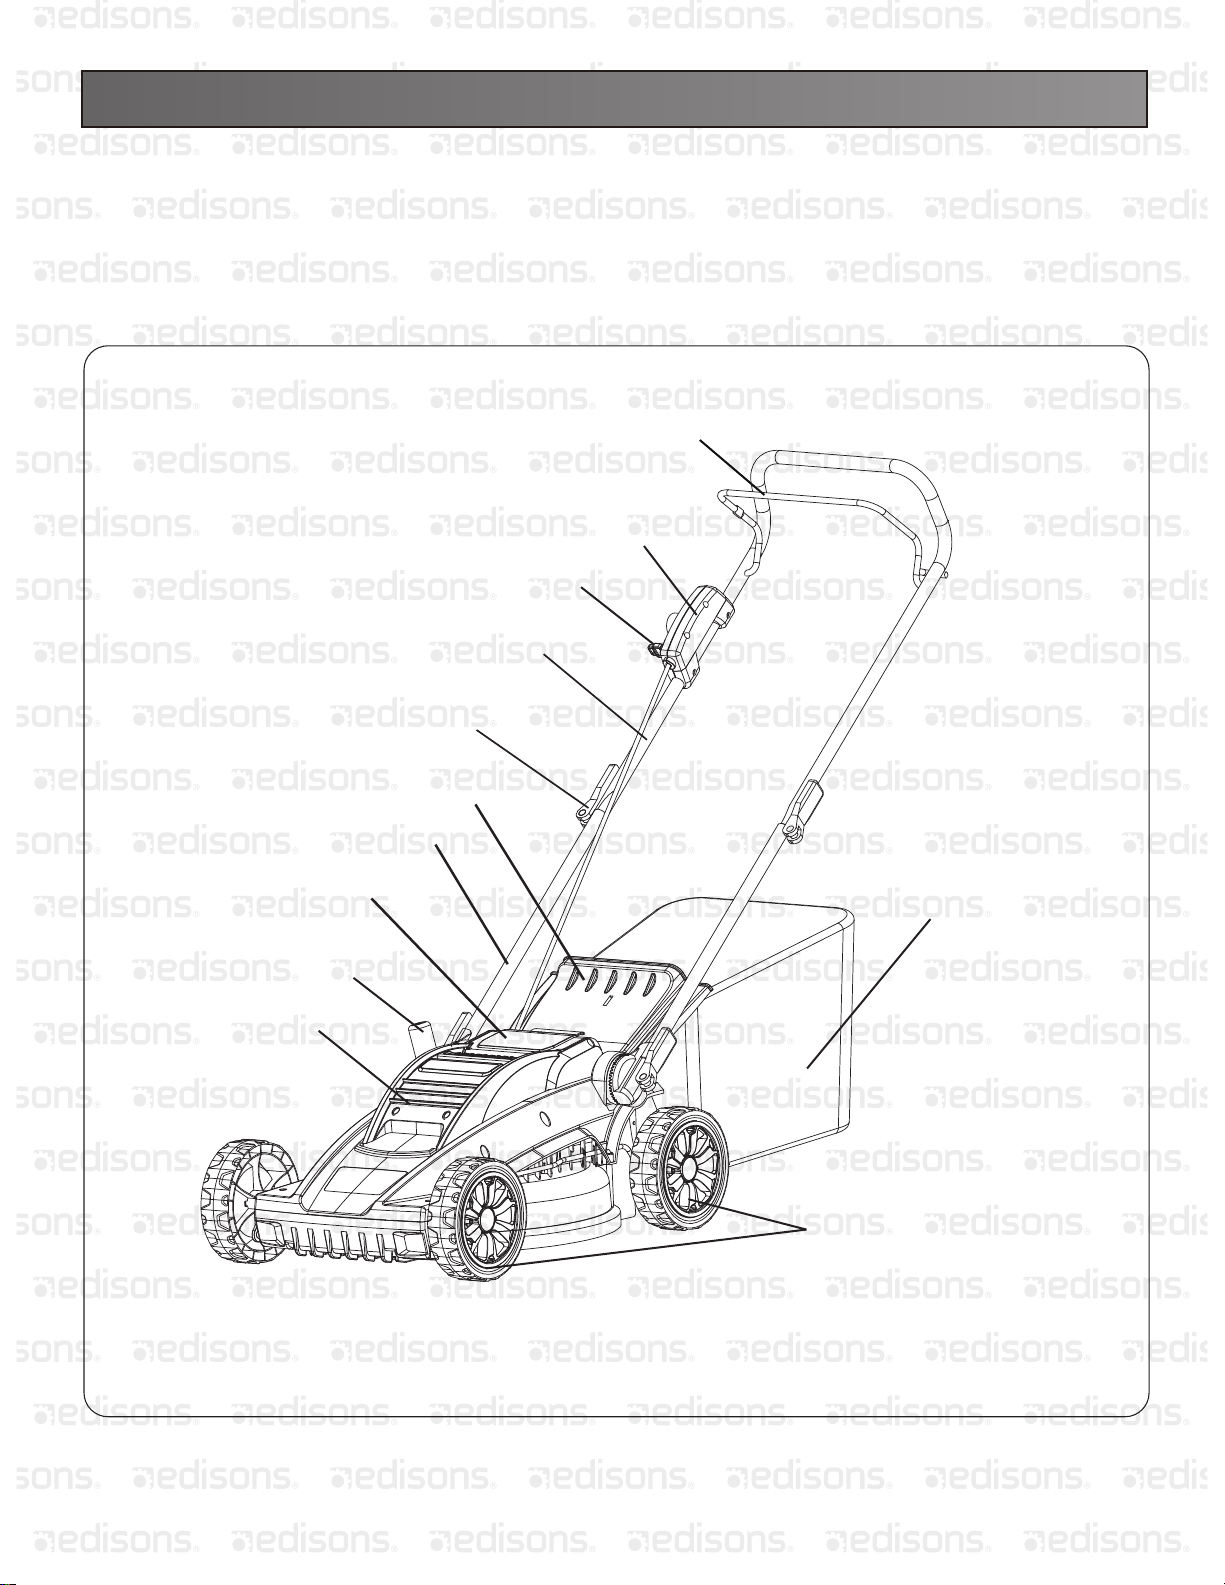
KNOW YOUR PRODUCT
KNOW YOUR PRODUCT
Read this owner's manual and safety rules carefully before operating the mower. Compare the illustration below to the
mower in order to become familiar with the location of the various controlsand adjustments. Save this manual for future
reference.
Fig.1
Start rod
Switch
Safety key
Upper handle
Lower handle
Battery cover
Height adjustment lever
Motor housing
Quick clip
Rear cover
Rear bag
Wheels
24
Page 27
ASSEMBLING YOUR LAWN MOWER
KNOW YOUR PRODUCT
Parts List
• Grass Catcher Bag
• 36V Battery (Pre-installed at the factory)
• Battery Charger
• Manual
Note:
• Carefully remove the parts from the box.
• Inspect the parts carefully in order to verify that no breakage or damage occurred during shipping.
• Do not discard the packing material until all parts have been examined.
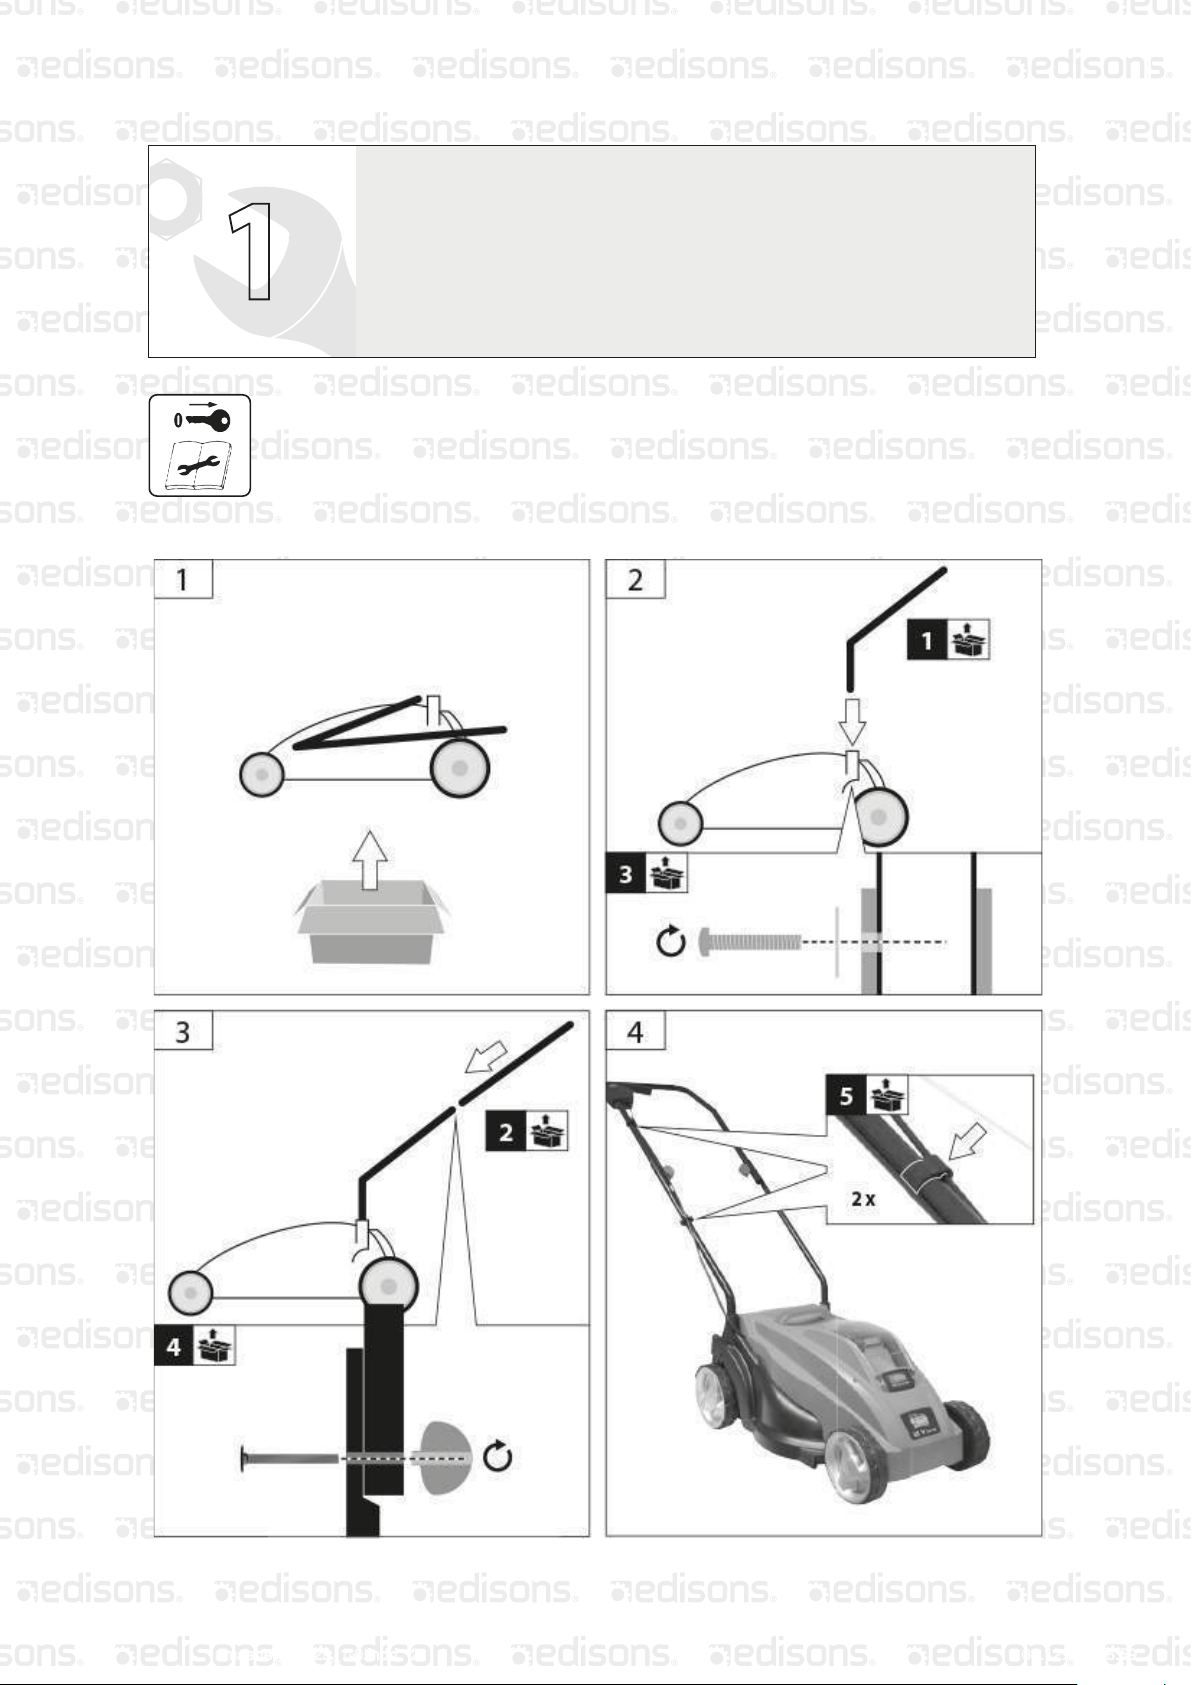
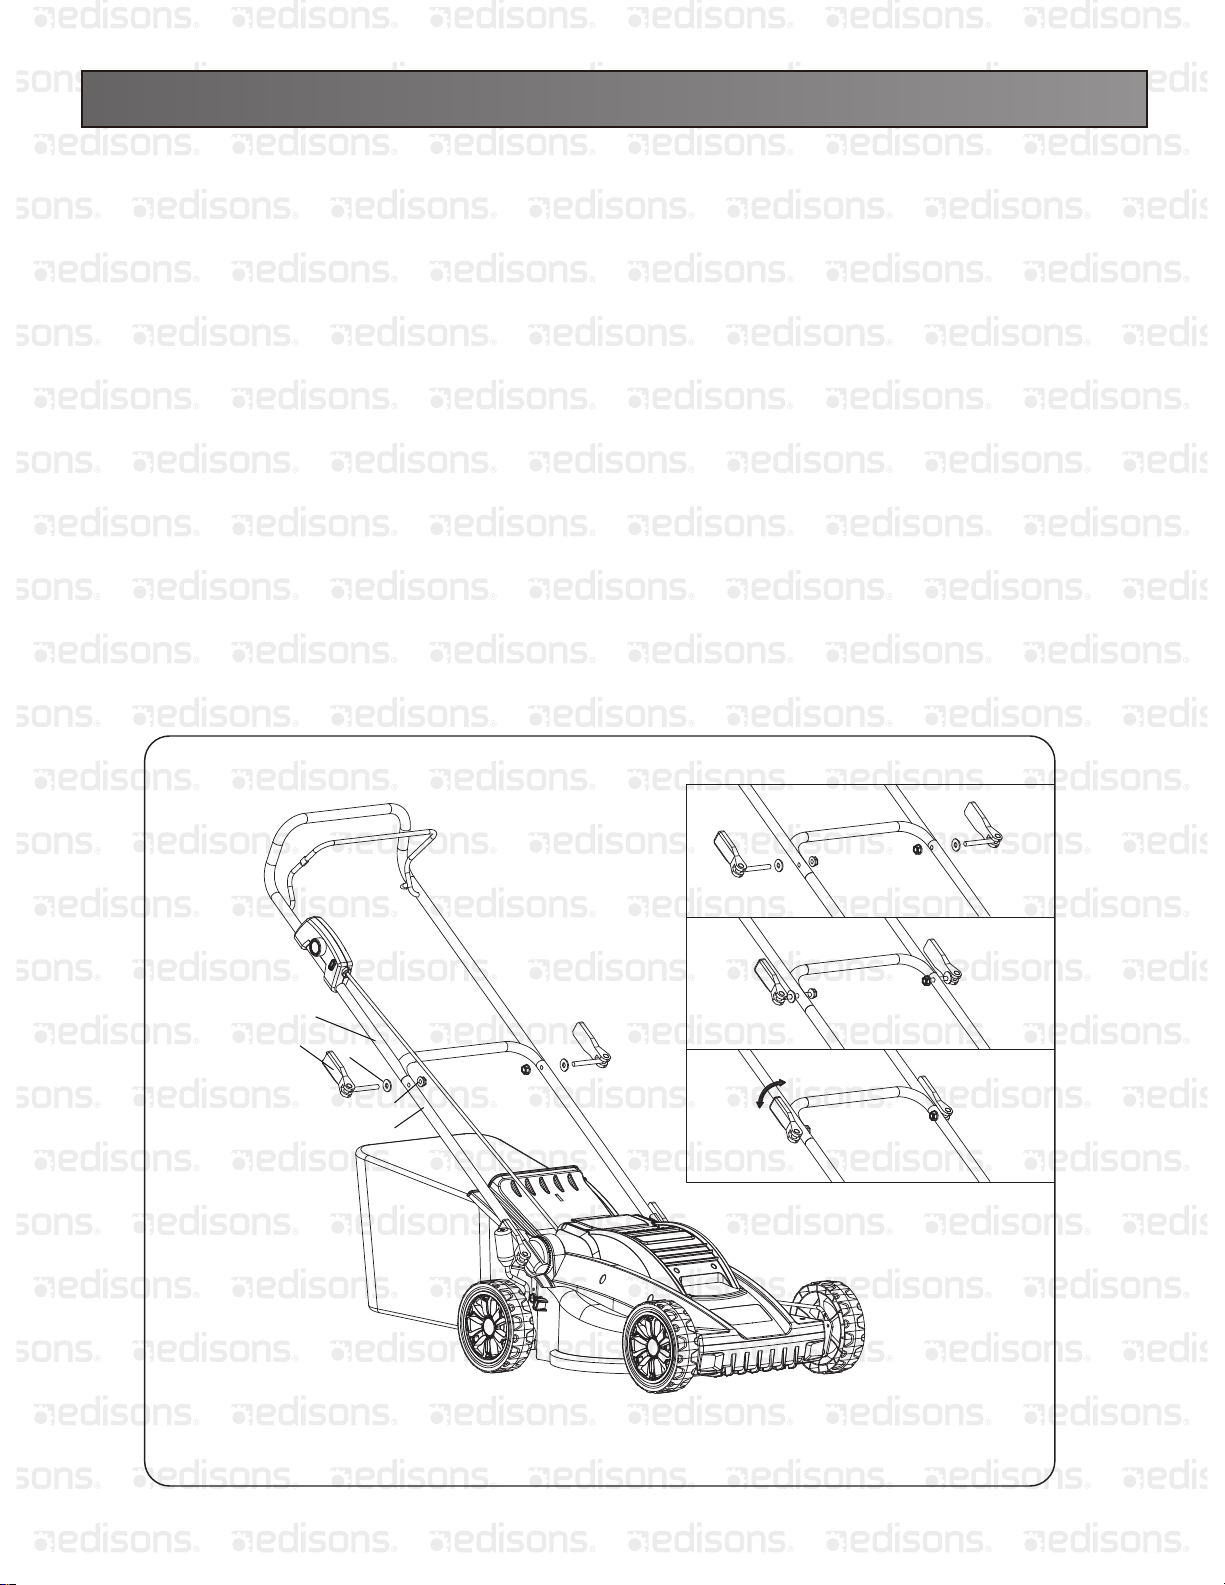
ASSEMBLING THE HANDLE
1. Remove any packing material which may have been lodged between the upper and lower handles for shipping purposes.
2. Pull up and back on the upper handle to raise the handle into the operating position. Make certain the lower handle is
seated securely into the handle mounting bracket (see Fig. 2).
3. Align the holes between the upper handle (1) and lower (5) handles. Insert the quick clip bolts (4),washer and tighten
them with the handle nut (4) provided (see Fig. 3).
4. Pull the quick clip, then lock the handle (Fig. 3).
Fig. 3-1
1
2
3
Loose
4
5
Tight
Fig. 3-2
Fig. 3-3
Fig. 2
25
Page 28
ASSEMBLING YOUR LAWN MOWER
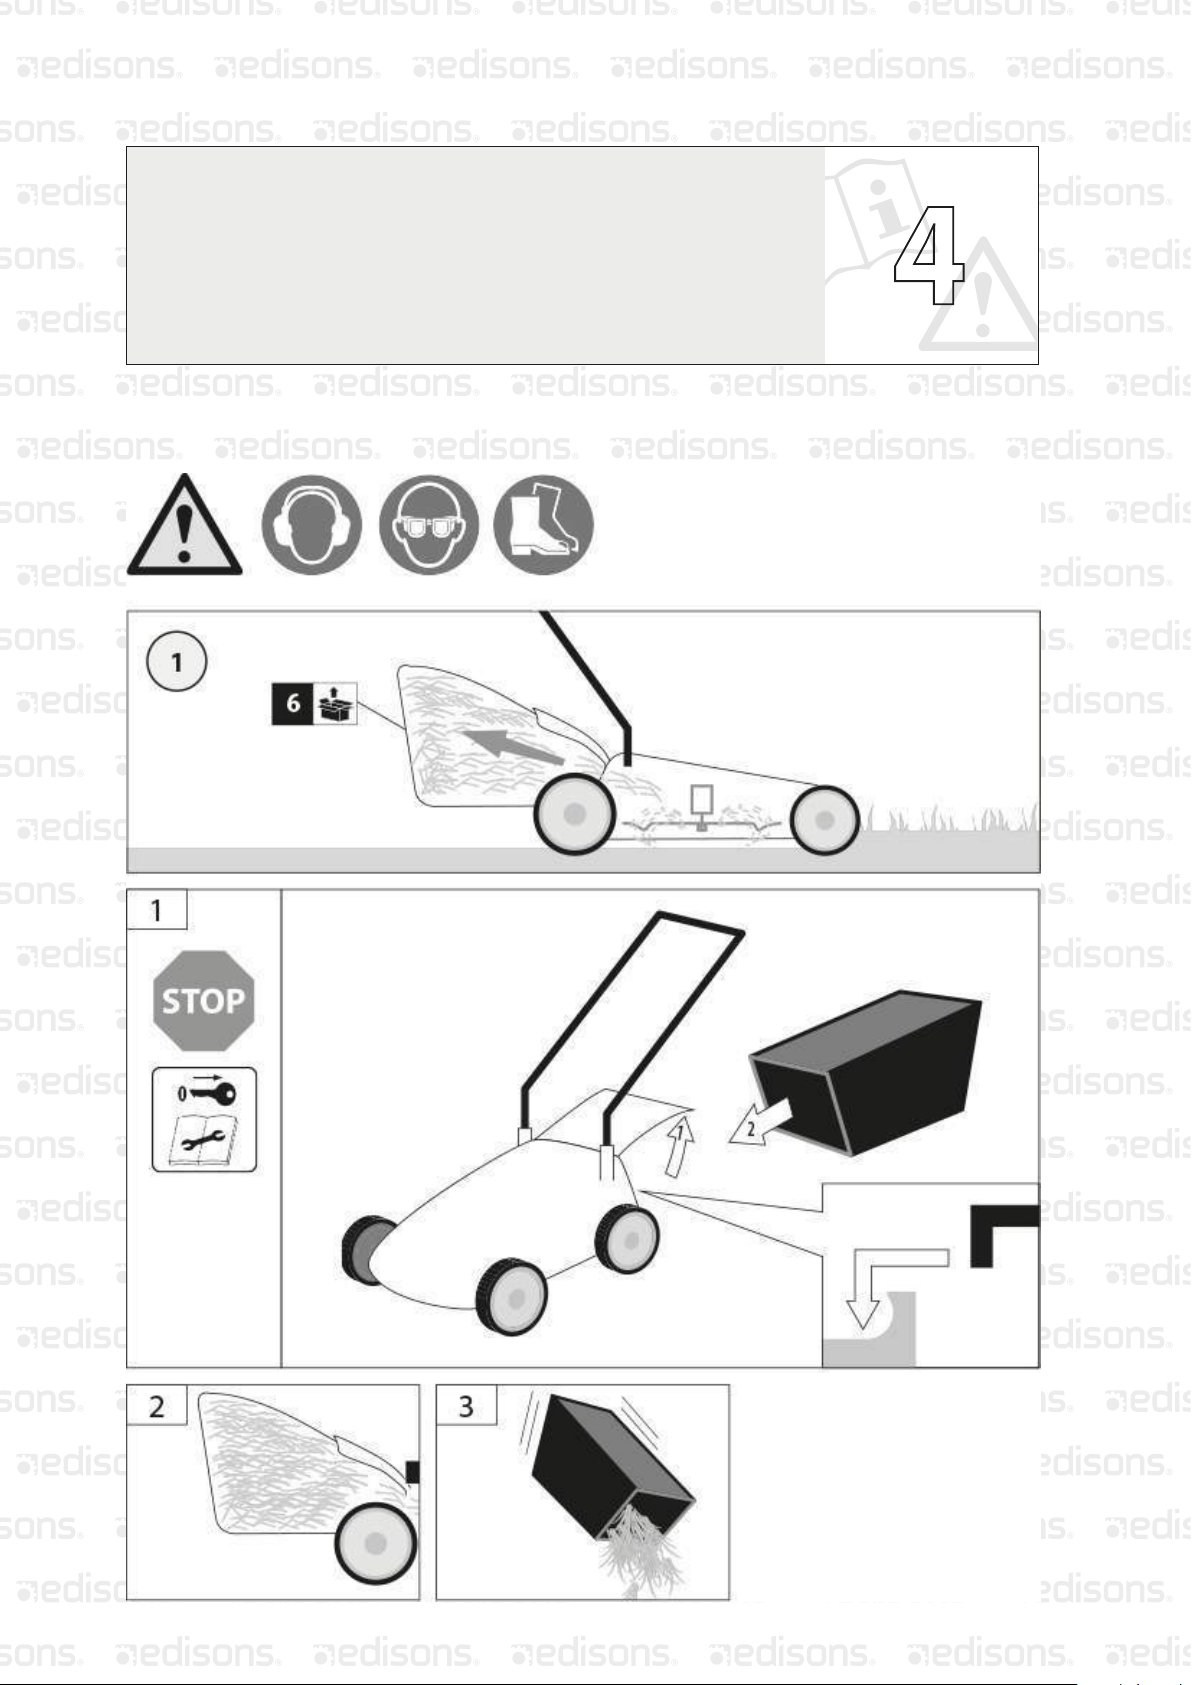
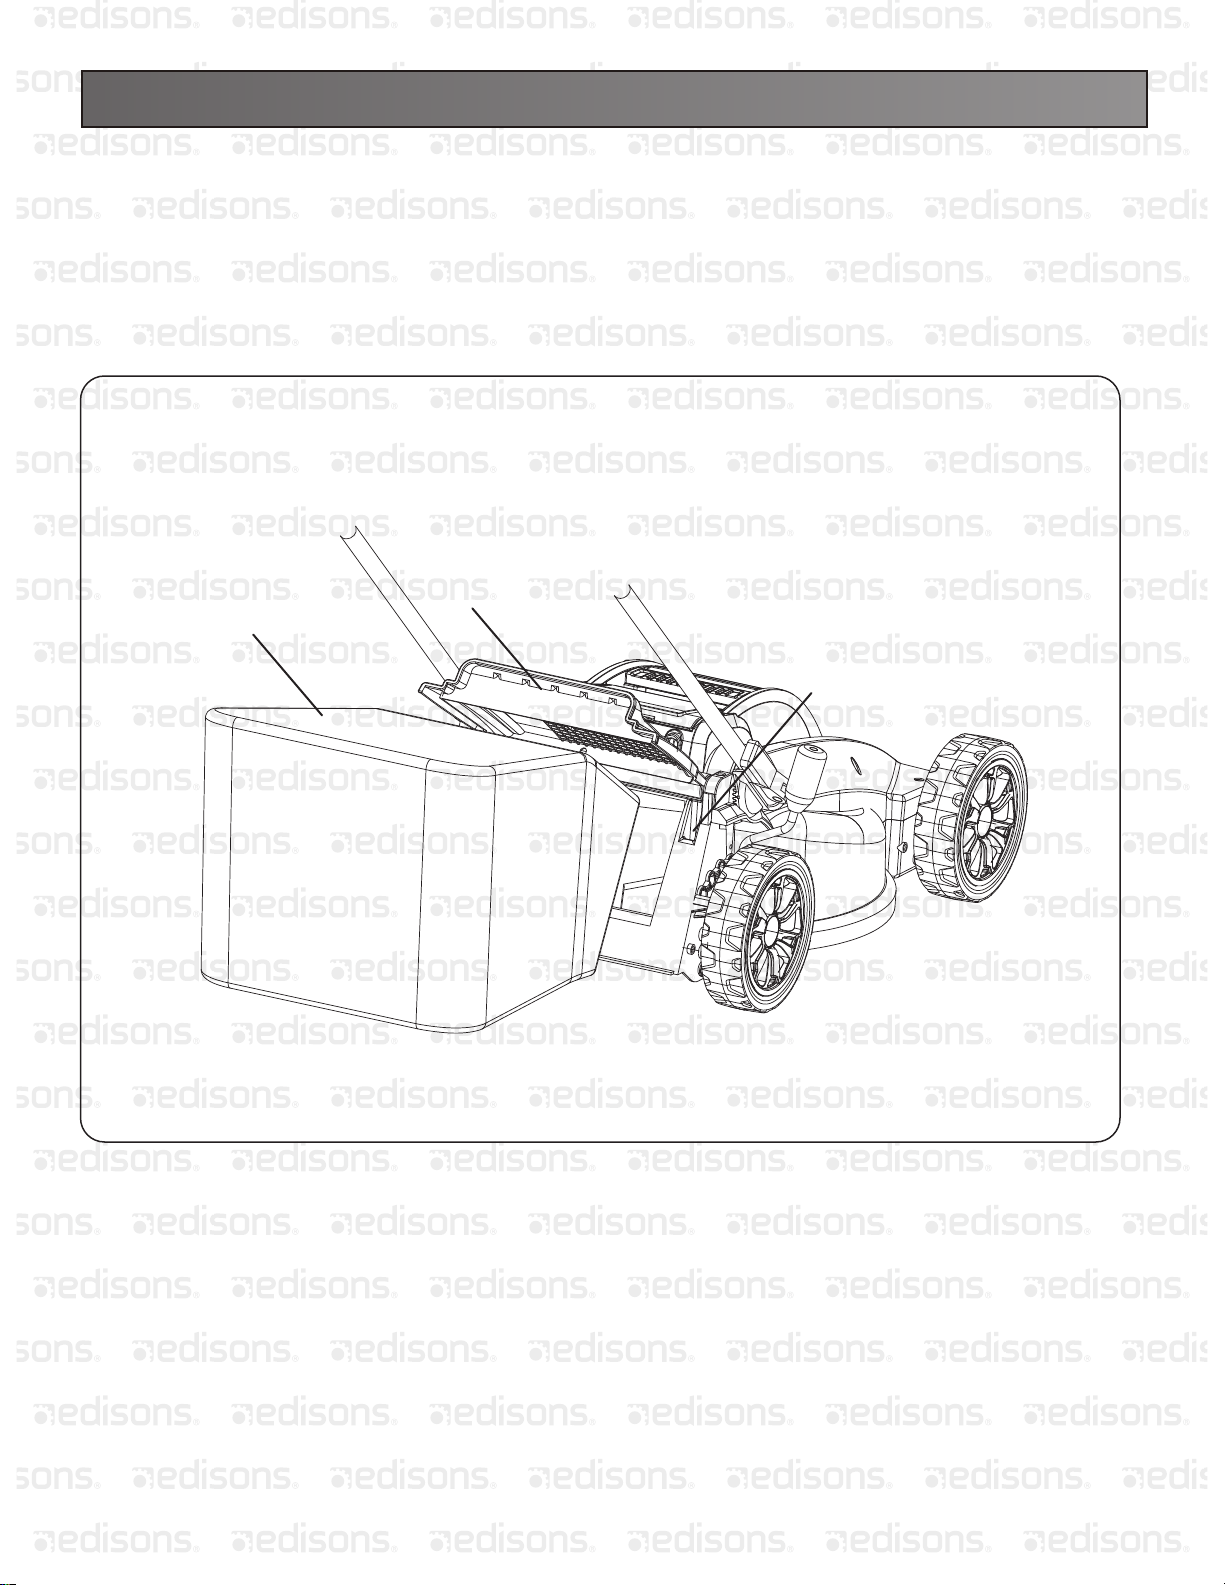
INSTALLING THE GRASS CATCHER BAG (see Fig. 4)
1. MAKE SURE THE BLADE HAS COME TO A COMPLETE STOP, UNPLUG THE SWITCH KEY AND REMOVE THE
BATTERY FROM MOWER.
2. While holding up the rear cover (1), place the grass bag hanger hooks (2) into the opening on the chute cover (1) to
allow the hanger hooks to attach to the hole(3) on the deck, which secures the chute rear cover.
Fig.4
KNOW YOUR PRODUCT
1
2
3
NOTE: For optimal performance, empty the grass bag often during use. A full grass bag will inhibit performance of the mower
and collection of grass clippings.
26
Page 29
KNOW YOUR PRODUCTOPERATING YOUR MOWER
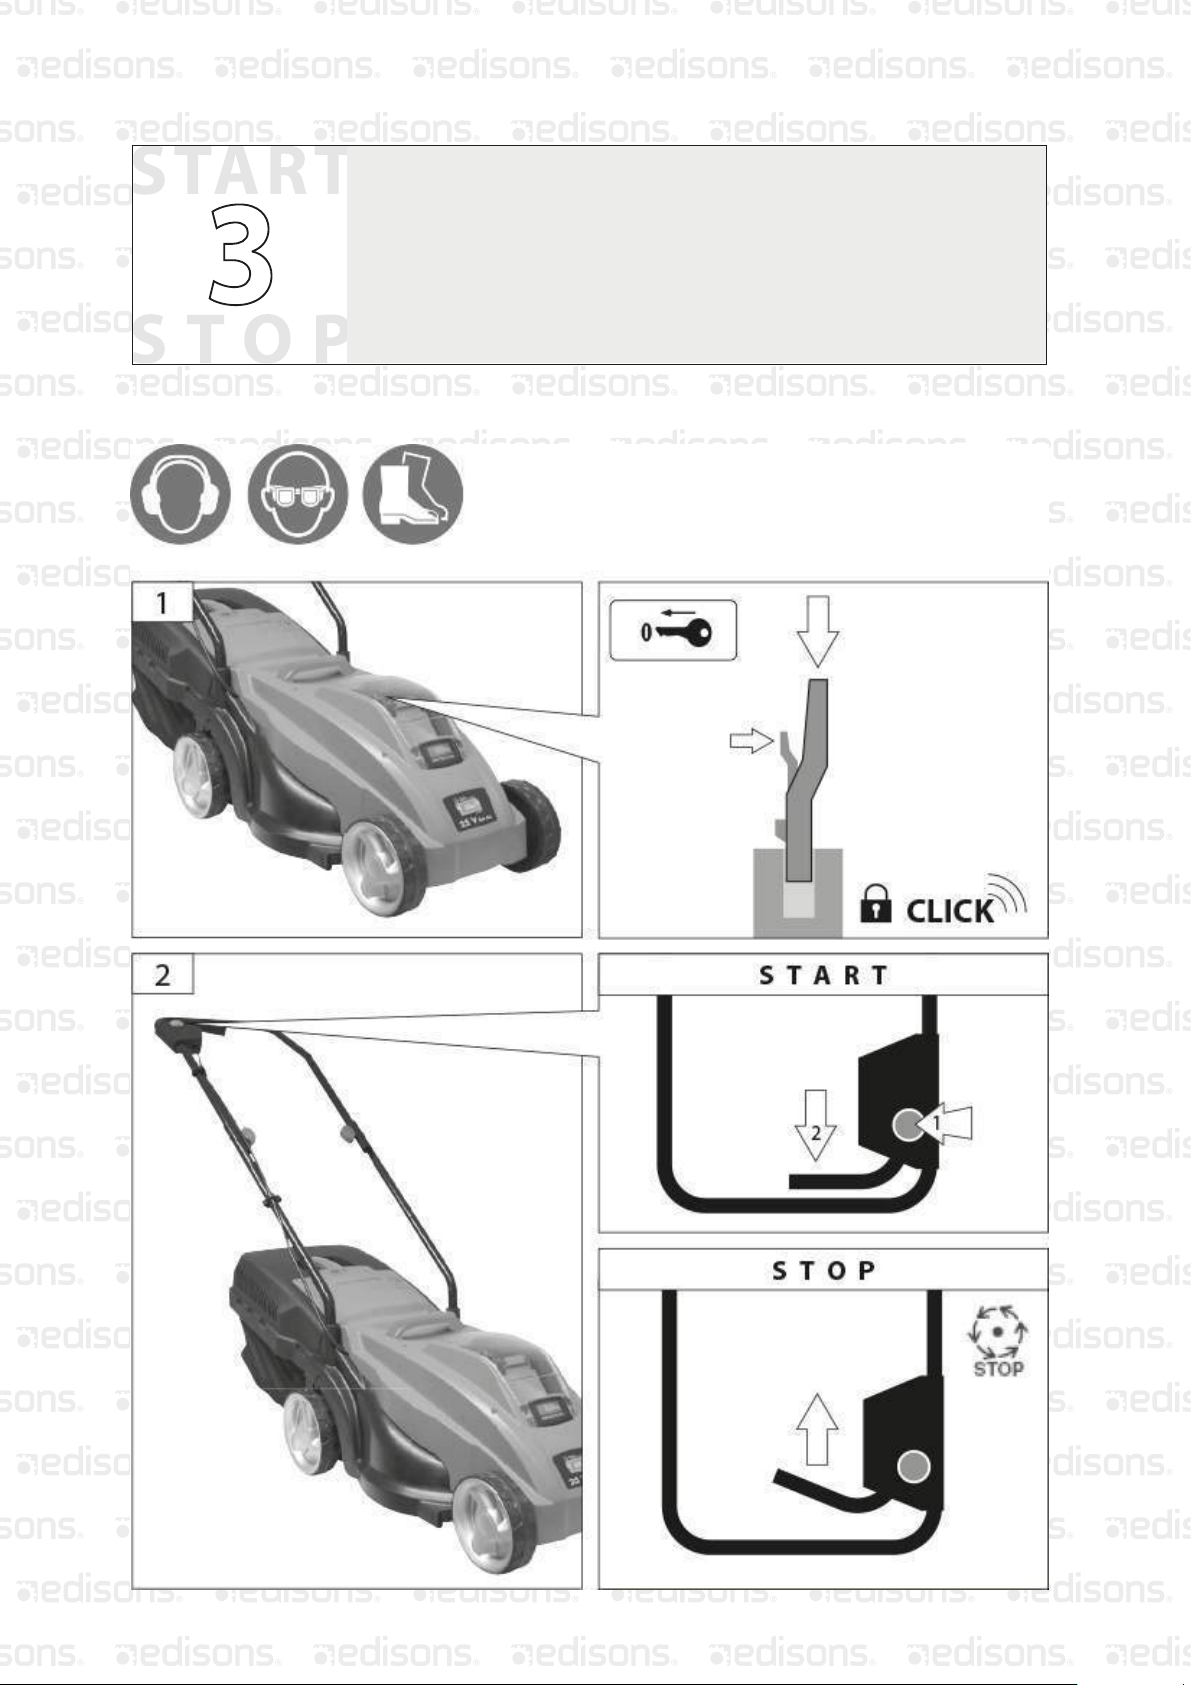
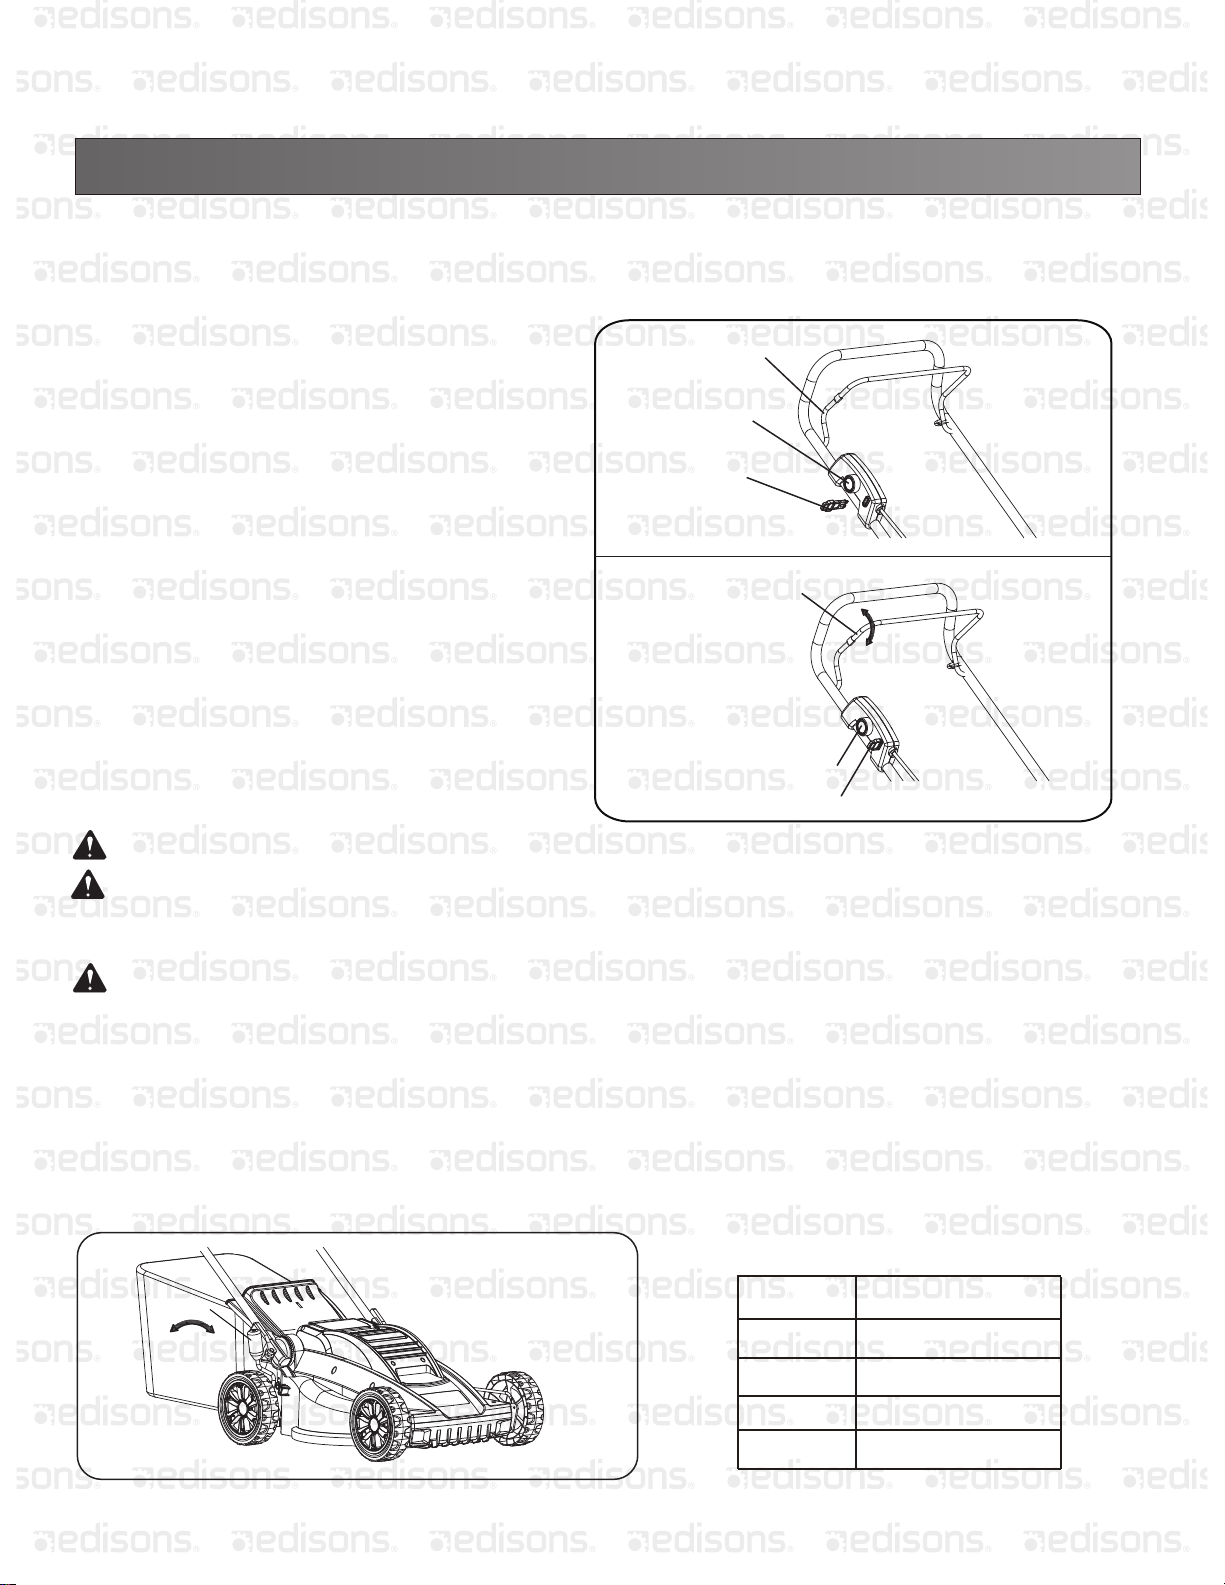
TO START & STOP THE MOWER:
Carefully follow the illustration below, in order, when starting or stopping the mower. (See Fig. 6)
STARTING/STOPPING THE MOWER
(See Fig. 6)
1. For the proper operation of this lawn mower,
you need to insert the safety key in position,
then pull the start button, then hold the control
rod, then release the start button.
2. To stop the lawn mower, just release the
control rod.
3. If your lawn mower will not be used for a
while, remove the safety key. The machine
cannot be operated even if the switch lever is
activated.
2.Pull the start button
1.Insert the safety key
Control rod
Start butto
Safety key
3.Start mower
Stop mower
Fig.6
CAUTION: Do not attempt to override the operation of the safety key or lever.
WARNING: The operation of any mower can result in foreign objects being thrown into the eyes, which can cause
severe eye damage. Always wear safety glasses while operating the mower and while performing any adjustments or
repairs.
WARNING: Ensure that other people and pets remain at least 50 ft.(15m) away when the mower is in use.
INSPECT THE CUTTING AREA
Remove all stones, sticks, wires, bones, and other debris that might be thrown by the rotating blades.
NOTE: This mower is equipped with an internal circuit protector.
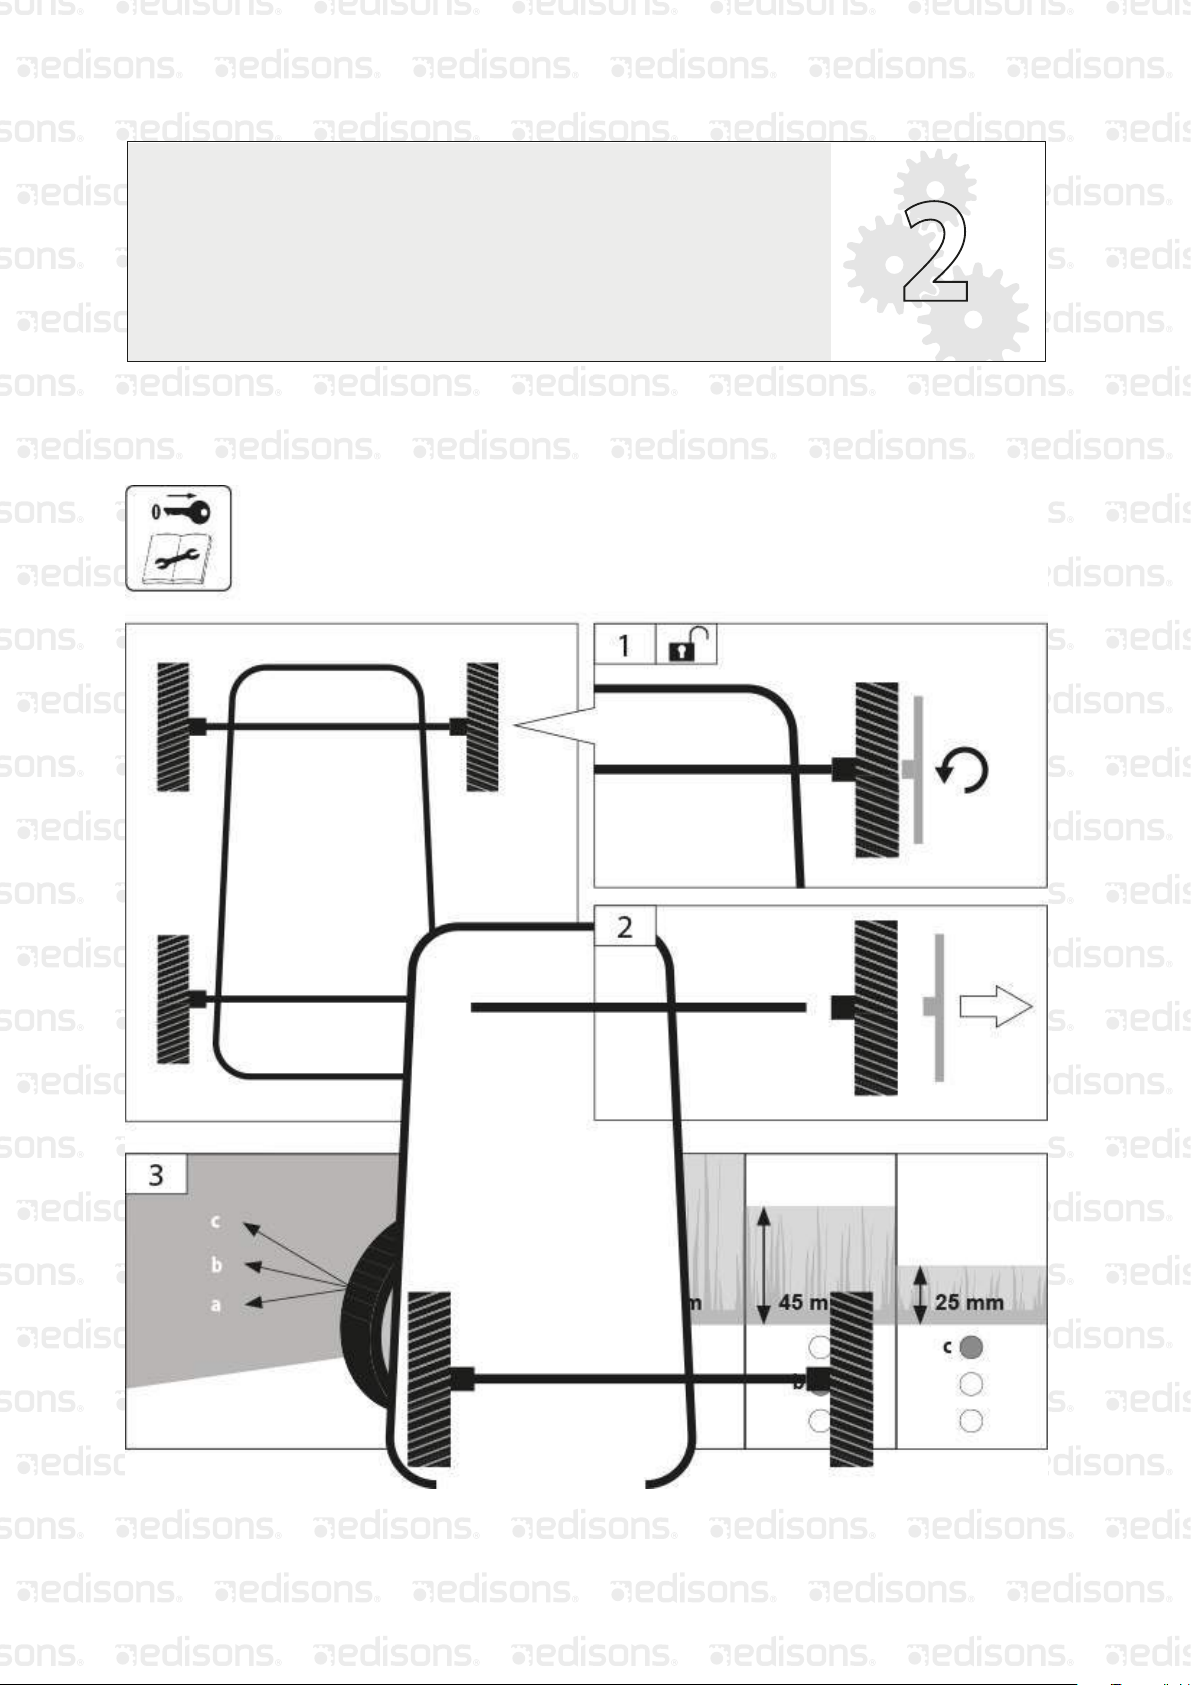
ADJUST THE CUTTING HEIGHT( See Fig. 7)
1. Simply depress the lever (1) towards the wheel and move to desired position. This sets all wheels to the same position.
2. To raise the height, pull the height adjustment lever from the current stop position towards the back of the mower.
3. To lower the height, pull the height adjustment lever from the current stop position towards the front of the mower.
5-Position Height Adjustment
1. 25mm.
2. 37mm.
HIGH
1
LOW
3. 50mm.
4. 62mm.
Fig. 7
5. 75mm.
27
Page 30
OPERATING YOUR MOWER
KNOW YOUR PRODUCT
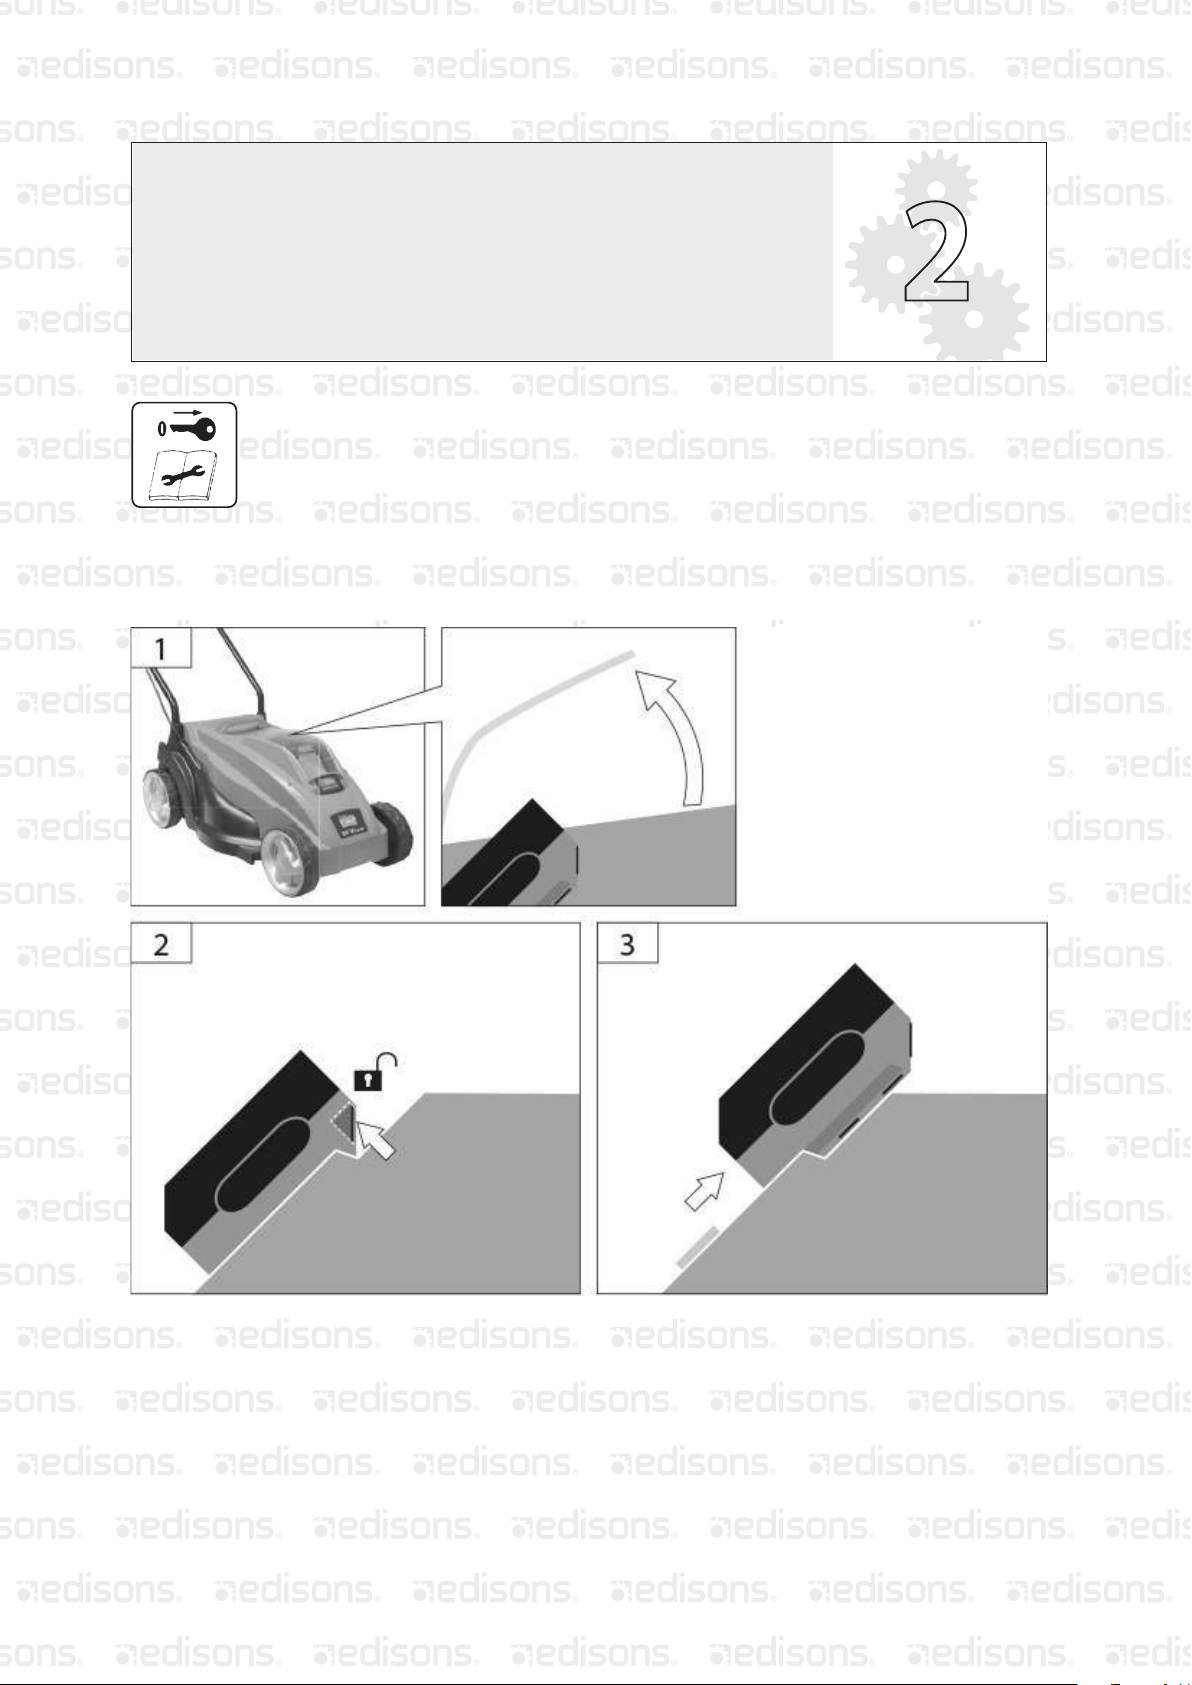
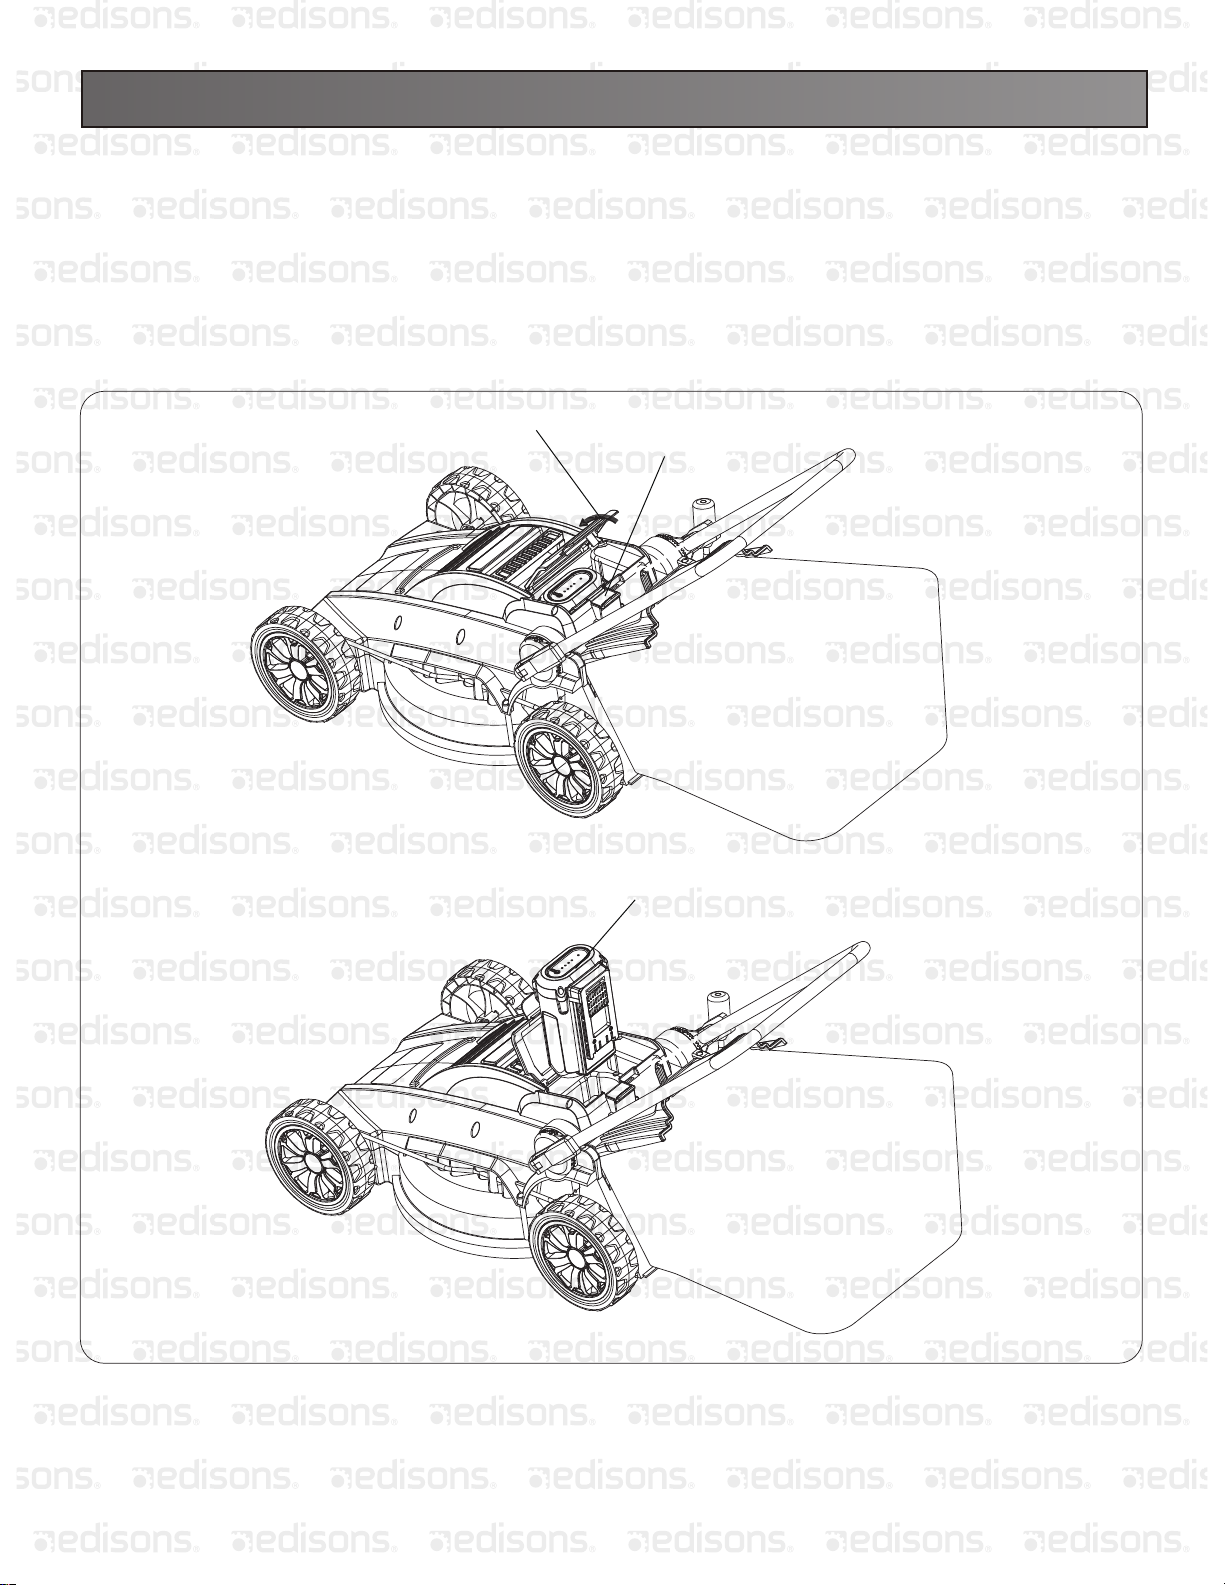
REMOVE THE BATTRY FROM MOWER
Note: The battery can be removed from the mower.
Step 1: Open the battery cover.
Step 2: Pull the fixing buckle.
Step 3: Remove the battery.
1. Open the battery cover
2. Pull the fixing buckle
3. Remove the battery
Fig. 8
28
Page 31
OPERATING YOUR MOWER
KNOW YOUR PRODUCT
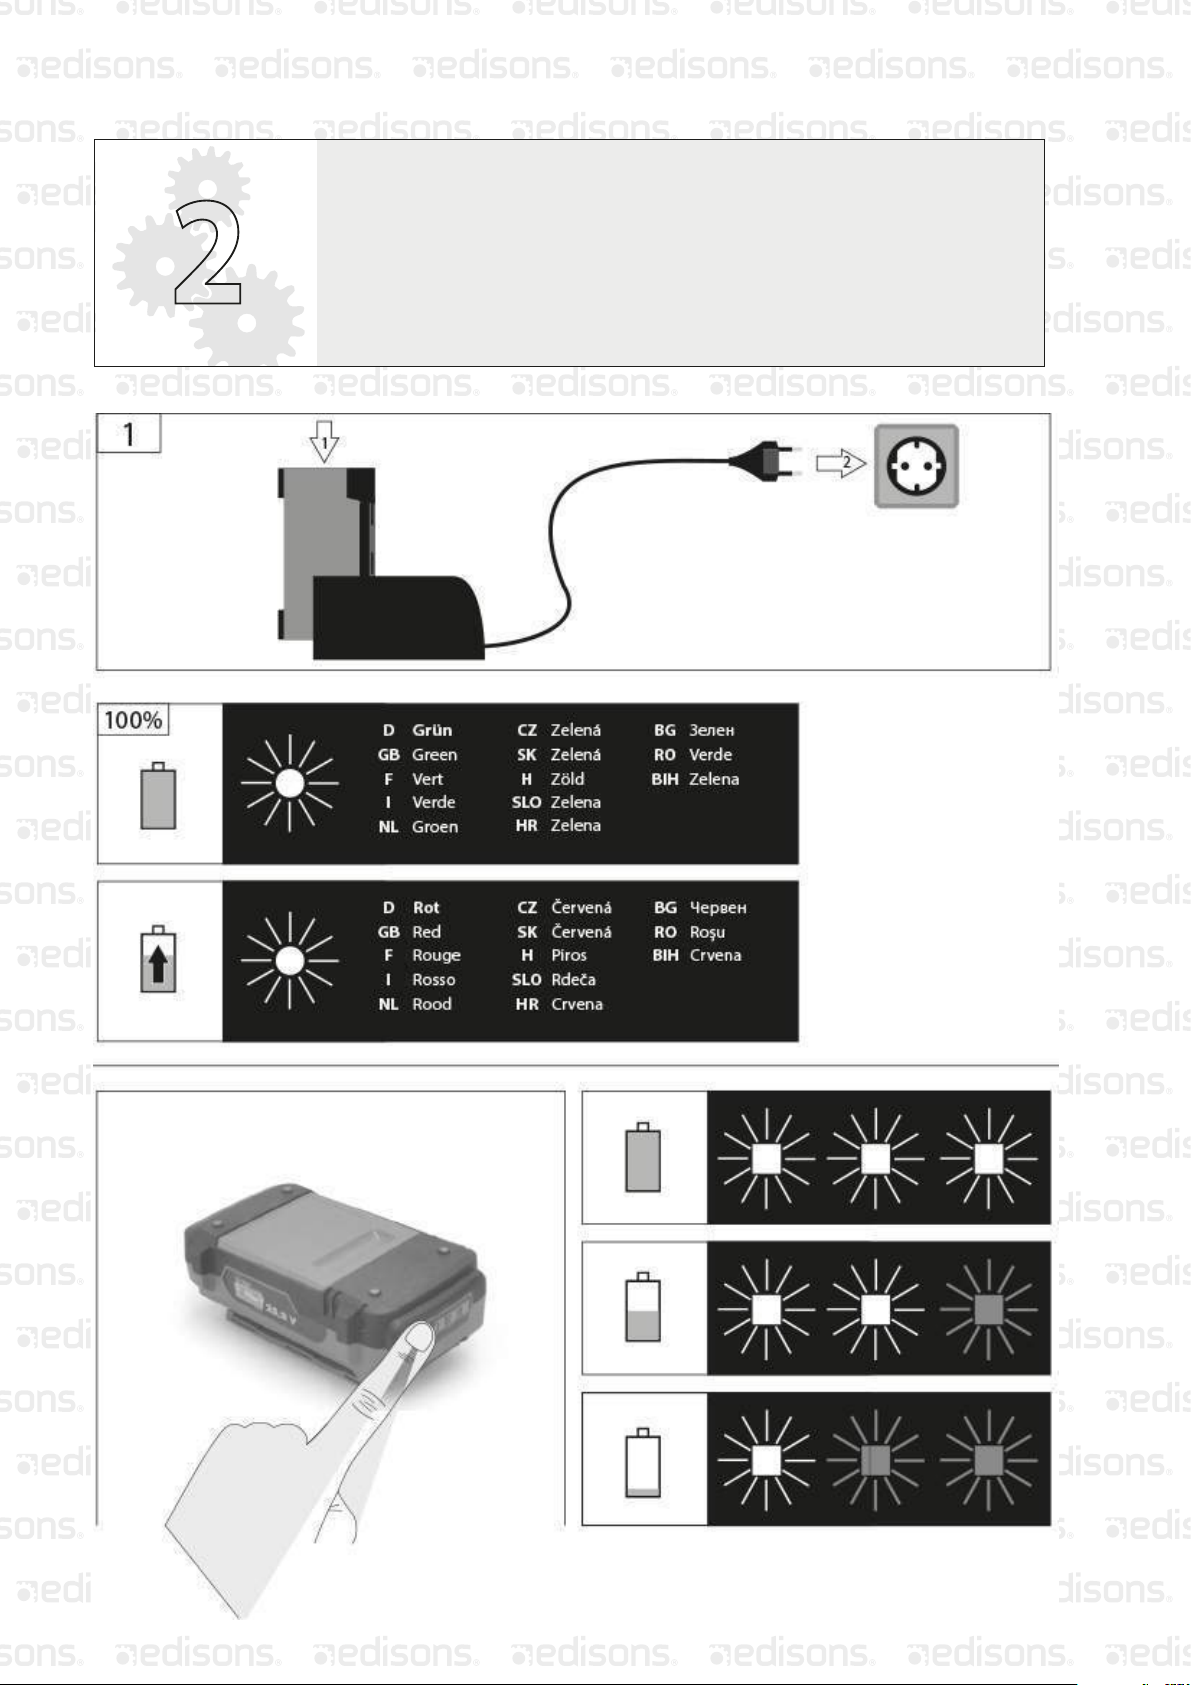
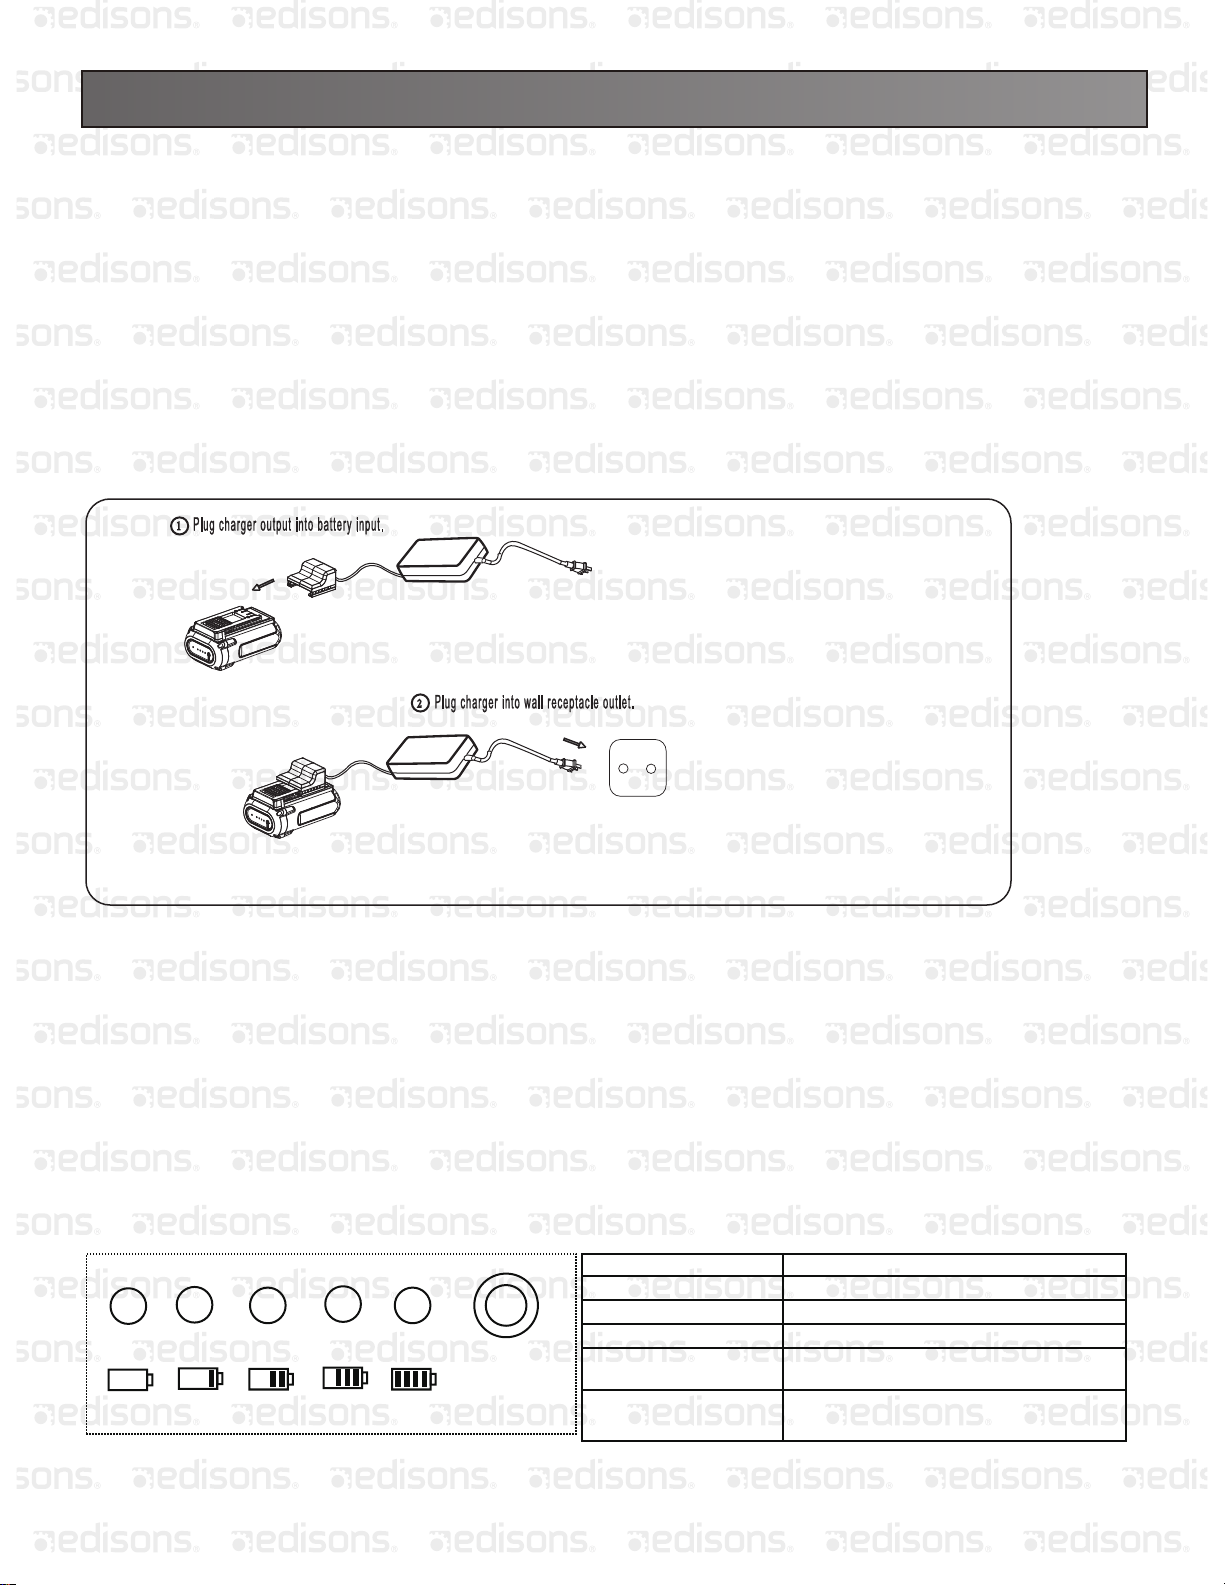
CHARGING PROCEDURES
Note: The battery can be charged in the mower. The charger that is supplied with this mower is a specially
designed 2-stage charger.
Step 1: The red light will light up during the recharge cycle.
Step 2: The green light will light up when the battery is fully charged.
1. Plug the charger connector into the jack on the battery.
2. Insert the 100-240 V plug from the charger into the electrical outlet.
3. The red light on the charger should come on, which indicates that the charger is working and the battery is being
charged. The red light will go out and the green light will come on when the battery is completely charged (it takes
approximately 2.5 hours to charge a fully discharged battery).
100-240V 50/60Hz
v
WARNING:
Do not store the battery in temperatures lower than 32°F (0°C).
Charge the battery first before storing it.
BATTERY USE
Push the Battery Capacity Indicator (BCI) switch.
The lights will indicate the battery's capacity according to the following chart:
Lights
The battery is at full capacity
The battery is at 60% capacity
The battery is at 50% capacity
The battery is at 40% capacity and
requires charging soon
The battery is at 20% capacity and
requires charging
Red
Green
Green
Green
Green
BCI switch
4 Green Lights
3 Green Lights
2 Green Lights
1 Green Light
Red Light
Fig. 9
Capacity
29
Page 32

KNOW YOUR PRODUCTOPERATING YOUR MOWER
WARNING: Do not mow a slope that has an angle of more than 15° (a rise of approximately 2 1/2 ft. (75 m) every
10 ft. (3 m)). Mow across the face of a slope, never up and down.
MOWING TIPS
NOTE:A sharp blade will greatly enhance the performance of the mower, especially when cutting high grass.
Be sure to check the blade and to sharpen it at least once per year, as described in the Maintenance section.
• Verify that the lawn is free of any stones, sticks, wires, and other objects that could damage the blades or the motor.
These objects could be accidentally thrown by the mower in any direction, and could cause serious personal injury to the
operator and to others.
• In order to prevent electric shock, do not operate the mower in damp or wet conditions.
• Do not mow in circles. Travel back and forth across the lawn.
• When cutting thick grass, reduce walking speed in order to allow for a more effective cut and a proper discharge of the
clippings. For a healthy lawn, always cut off one-third or less of the total length of the grass. The average lawn should be
approximately 1-1/2 to 2 in. (3.8 to 5 cm) long during cool months, and more than 2 in. (5 cm) long during hot months. If
there is growth, the lawn should be cut in the fall.
MULCHING TIPS
NOTE:INSPECT THE AREAWHERE THE MOWER IS TO BE USED, AND REMOVE ALLSTONES, STICKS, WIRES, AND
OTHER DEBRIS THAT MIGHT BE THROWN BY THE ROTATING BLADE.
1. Release the switch to turn the mower OFF when crossing any graveled area (stones can be thrown by the
blade).
2. Set mower to the highest cutting height when mowing on uneven ground or in tall grass.
3. For effective mulching, do not cut wet grass, because it tends to stick to the underside of the deck, preventing proper
mulching of grass clippings. New or thick grass may require a narrower cut. The ground speed should be adjusted to the
condition of the lawn. If mowing hasbeen delayed and the grass has been allowed to grow longer than 4 in. (10 cm), mow
the lawn twice in order to reduce the grass height to a maximum of 3-1/4 in. (8.3 cm).
4. Walk at a steady pace. Overlap the cutting rows. Do not let the grass get too tall. If the grass gets too long, start at the
highest cutting position and work down to the desired cutting height.
WARNING:If you strike a foreign object, stop the motor and disconnect the power cord.Thoroughly inspect the mower for
any damage. Repair any damage before operating the mower. Excessive vibration of the mower during operation is an
indication of damage. Thoroughly inspect the mower and repair any damage before operating the mower.
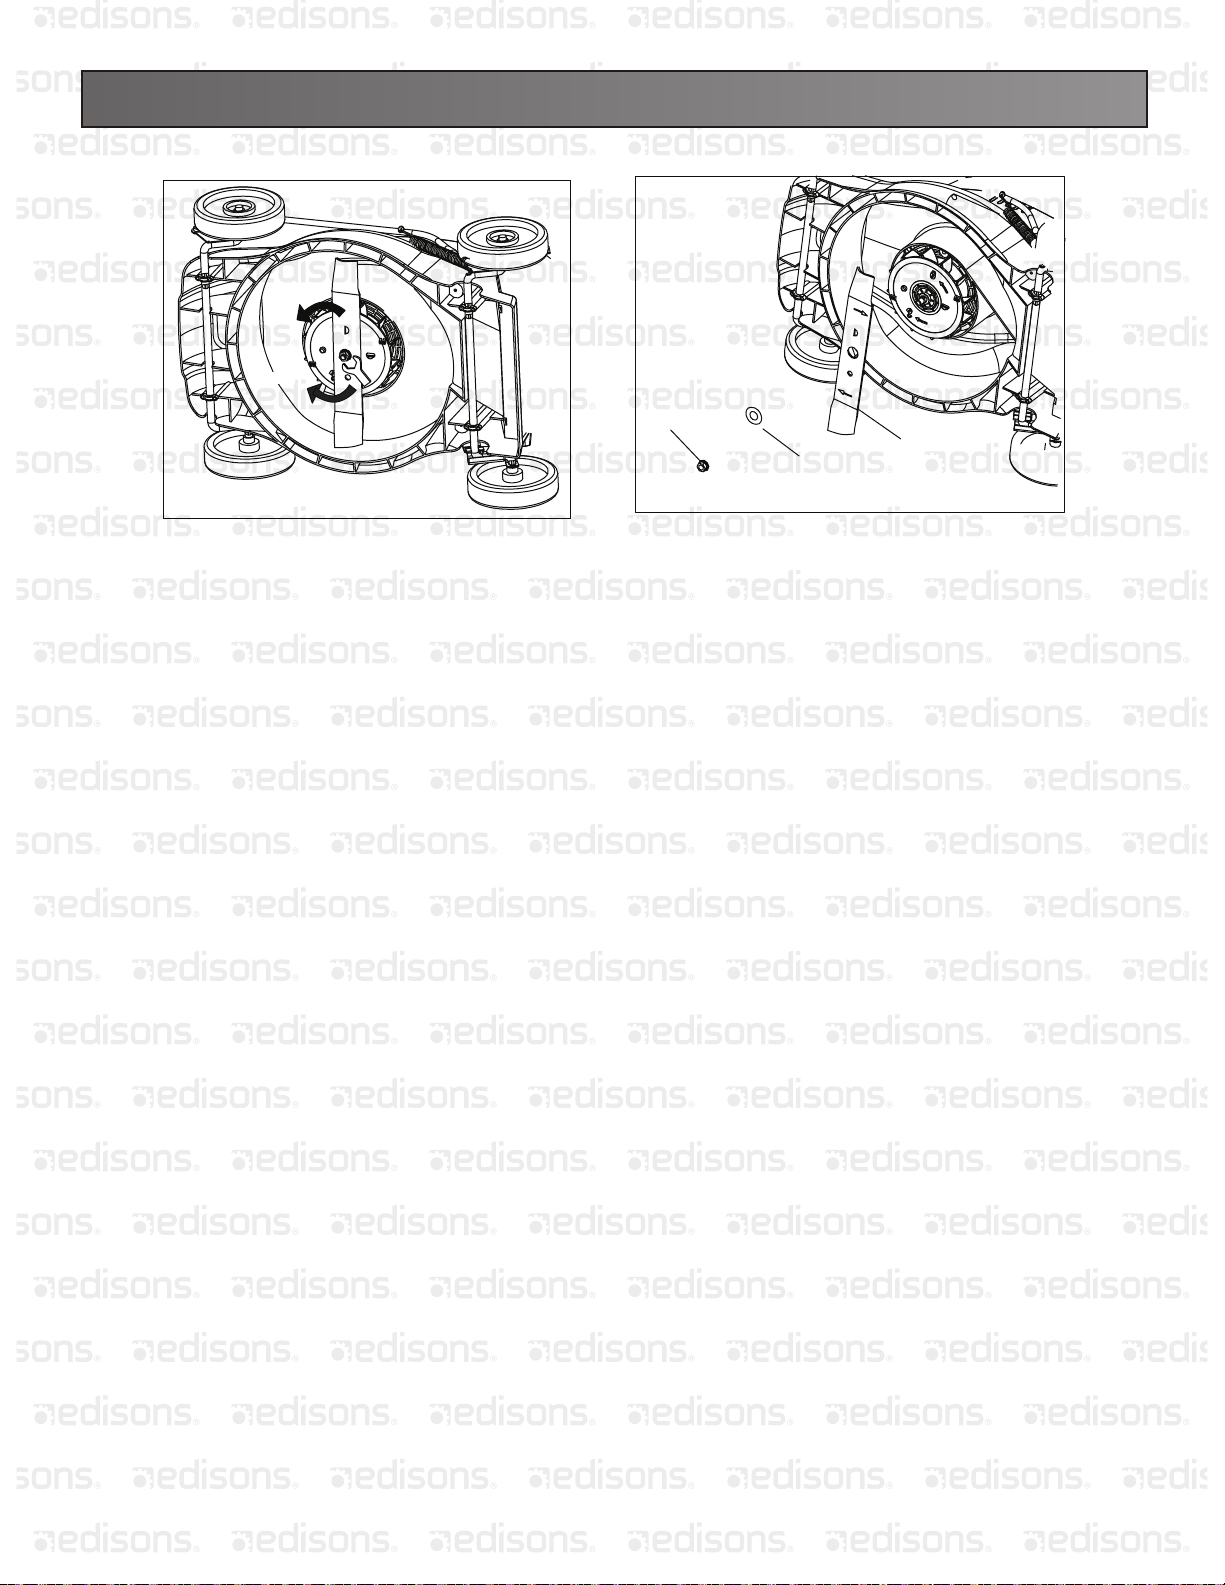
Using a 15-mm wrench or socket, turn the blade nut "CLOCKWISE” to secure the blade.
CUTTING BLADE REPLACEMENT (See Fig. 9 & Fig. 10)
WARNING: Always protect your hands by wearing heavy gloves and/or wrapping the cutting edges with
rags or other materials when performing any maintenance on the blades.
1. RELEASE THE SWITCH LEVER TOTURN THE MOWER OFF, WAIT FOR THE BLADE TO COME TOA
COMPLETE STOP,AND THEN REMOVE THE BATTERY.
2. Whilewearing leather padded gloves,wedge a block ofwood between the bladeand the mower deckin order to prevent
the blade from turning when the nut is being removed.
3. Using a 15-mm wrench or socket, loosen the blade nut (1) and remove the blade (3). Turn the nut
"COUNTERCLOCKWISE" to loosen it and "CLOCKWISE" to tighten it (this is a reverse rotation nut).
4. Remove the blade nut (1), the square washer (2), the insulator washer (3), and the blade.
5. To re-install the blade, position the blade with the cutting edges toward the ground. Assemble the blade nut, the square
washer, and the insulator washer as shown in following. Using a 15-mm wrench or socket, turn
the blade nut "CLOCKWISE” to secure the blade.
30
Page 33
Loosen
Tighten
KNOW YOUR PRODUCTOPERATING YOUR MOWER
Fig. 9 Fig. 10
1
3
2
NOTE: Be sure to replace the parts in the exact order in which they were removed. When installing the cutting blade,
verify that it is installed with the curved ends pointing toward the mower deck.
CLEANING THE MOWER
WARNING: To reduce the risk of electric shock and damage to the mower, do not expose the mower to water.
The underside of mower deck should be cleaned after each use as grass clippings, leaves, dirt and other debris will
accumulate, causing rust and corrosion.
Remove any buildup of grass and leaves on or around the motor cover (do not use water). Wipe the mower clean with a
dry cloth occasionally.
• If debris build up on the underside of the unit while using,stop the motor and REMOVE THE SAFETY KEY. Tiltthe
mower forward, or on its side, and scrape it clean with an appropriate tool.
STORAGE
The following steps should be taken to prepare the lawn mower for storage.
• Remove Safety Key.
• Clean mower as instructed in previous section.
• Inspect and replace/sharpen blade, if required. Refer to the Maintenance section.
• Store mower in a dry, clean area. Do not store next to corrosive materials, such as fertilizer and rock salt.
• Storemower indoors, in a cool,dryplace, out of the reachof children. Do not coverlawn mower with a solidplasticsheet.
Plastic coverings trap moisture around the mower, causing corrosion.
The handle may be folded away completely for storage.
• Loosen the handle knobs on the sides of the handle, and fold the upper handle down.
• Loosen the handle knobs, pull outwards on each side of the lower handle, and lift the sides of the lower handle past the
edges of the handle mounting brackets. Fold the lower handle forward. Make sure not to bend or kink the power cord.
31
Page 34

ENVIRONMENTALLY SAFE BATTERY DISPOSAL
KNOW YOUR PRODUCT
WARNING
All toxic materials must be disposed of in a specified
manner to prevent contamination of the environment.
Dispose of batteries according to local by-laws because
Lead-acid batteries contain lead that is a hazardous
material.
RE TOUR
RETURN
RECYCL
ERECYCLAGE
Pb
If the batterypack cracks or breaks, with orwithout leaks, do
not recharge itand do not use.Dispose of it and replacewith
a new battery pack. DO NOT ATTEMPT TO REPAIR IT!
To avoid injury and risk of fire, explosion, or electric shock,
and to avoid damaging the environment:
• Cover the battery's terminals with heavy-duty adhesive
tape.
• DO NOT attempt to remove or destroy any of the battery
pack components.
• DO NOT attempt to open the battery pack.
• If a leak develops, the released electrolytes are corrosive
and toxic. DO NOT let the solution get in your eyes and skin,
and do not swallow it.
• DO NOT place these batteries in your regular household
trash.
• DO NOT incinerate.
• DO NOT place them where they will become part of any
waste landfill or municipal solid waste stream.
• Take them to a certified recycling or disposal centre.
32
Page 35

KNOW YOUR PRODUCTSERVICING
1. When servicing the mower, use only replacement parts that are available from the manufacturer.
2. Before cleaning, repairing, or inspecting, verify that the blade and all moving parts have come to a complete stop, and
remove the safety key. In order to prevent accidental start-ups, remove the safety key when the mower is not in use.
REMOVE THE SAFETY KEY when making any adjustments or when any of the four wheels must be lifted off the ground.
3. Keep the handles dry, clean, and free of oil and grease.
4. In order to reduce the risk of fire, keep the motor free of grass, leaves, and debris build-up.
5. Frequently check the blade and motor mounting bolts for proper tightness. Visually inspect blade for damage (i.e.
bent, cracked, or worn).
8. For best and safest performance, maintain the mower with care. Keep the mower blade sharp and clean. Mower
blades are sharp, and can cut. Wrap the blades or wear gloves, and use extra caution when servicing.
8. Keep all nuts, bolts, and screws tight in order to be sure that the equipment is in safe working condition.
9. Never tamper with safety devices. Check them regularly for proper operation.
10. After striking a foreign object, stop the motor and remove the safety key. Thoroughly inspect the mower for any
damages. Repair any damages before operating the mower.
11. Lawn mower components are subject to wear and damage, which could expose moving parts or allow objects to be
thrown. As a safety precaution, frequently check components and replace those that show signs of wear or damage.
12. When it is not in use, store the mower indoors in a dry area, with the safety key removed, and out of the reach of
children.
33
Page 36
Some experts believe the incorrect or prolonged use of almost any
product could cause serious injury or death. For information that
may re
duc
e your risk of serious injury or death consult thepoints
below and additionally, the information available at
www.datastreamserver.com/safety
- Consult all documentation, packaging and
product labelling before use. Note that some
products feature online documentation which
should be printed and kept with the p roduct.
- Check product for loose / broken / damaged /
missing parts, wear or leaks (if applicable) before
each use. Never use a product with loose / b roken
/ damaged / missing pa rts, wear or leaks (if
applicable).
- Products must be inspected and serviced (if
applicable) by a qualified specialist every 6
months assuming average residential use by a
person of average weight and strength, ab ove
average technical aptitude, on a property
matching average metropolitan specification.
Intended use outside these guidelines could
indicate the product is not suitable for intended
use or may require more regular inspection or
servicing.
- Ensure all possible users of the p roduct have
completed an industry recognised training course
before being given access to the product.
- The product has been supplied by a general merchandise
retailer that may not be familiar with your specific applic ation or
your description of the applic ation. Be sure to attain third party
approval for your application from a qualified specialist before use
regardless of prior assurances by the retailer or its representatives.
- This product is not intended for use where fail-safe operation is
required. As with any product (take an automobile, aircraft,
computer or ball point pen for example) there is always a small
chance of a technical issue that needs to be repaired or may
require replacement of the product or a part. If the possibility of
such failure and the associated time it takes to rectify could in any
situation inconvenience the user, business or employee or could
financially affect the user, business or employee then the product
is not suitable for your requirements. This p roduct is not for use
where incorrect operation or a failure of any kind, including but
not limited to a condition requiring product return, replacement,
service by a technician or replacement of parts could cause a
financial loss, loss of employee time or an in c
onvenienc
e
requiring compensation.
- If this item has been purchased in error considering the points
above simply contact the retailer directly for details of their
returns policies if required.
 Loading...