

Page 1
1
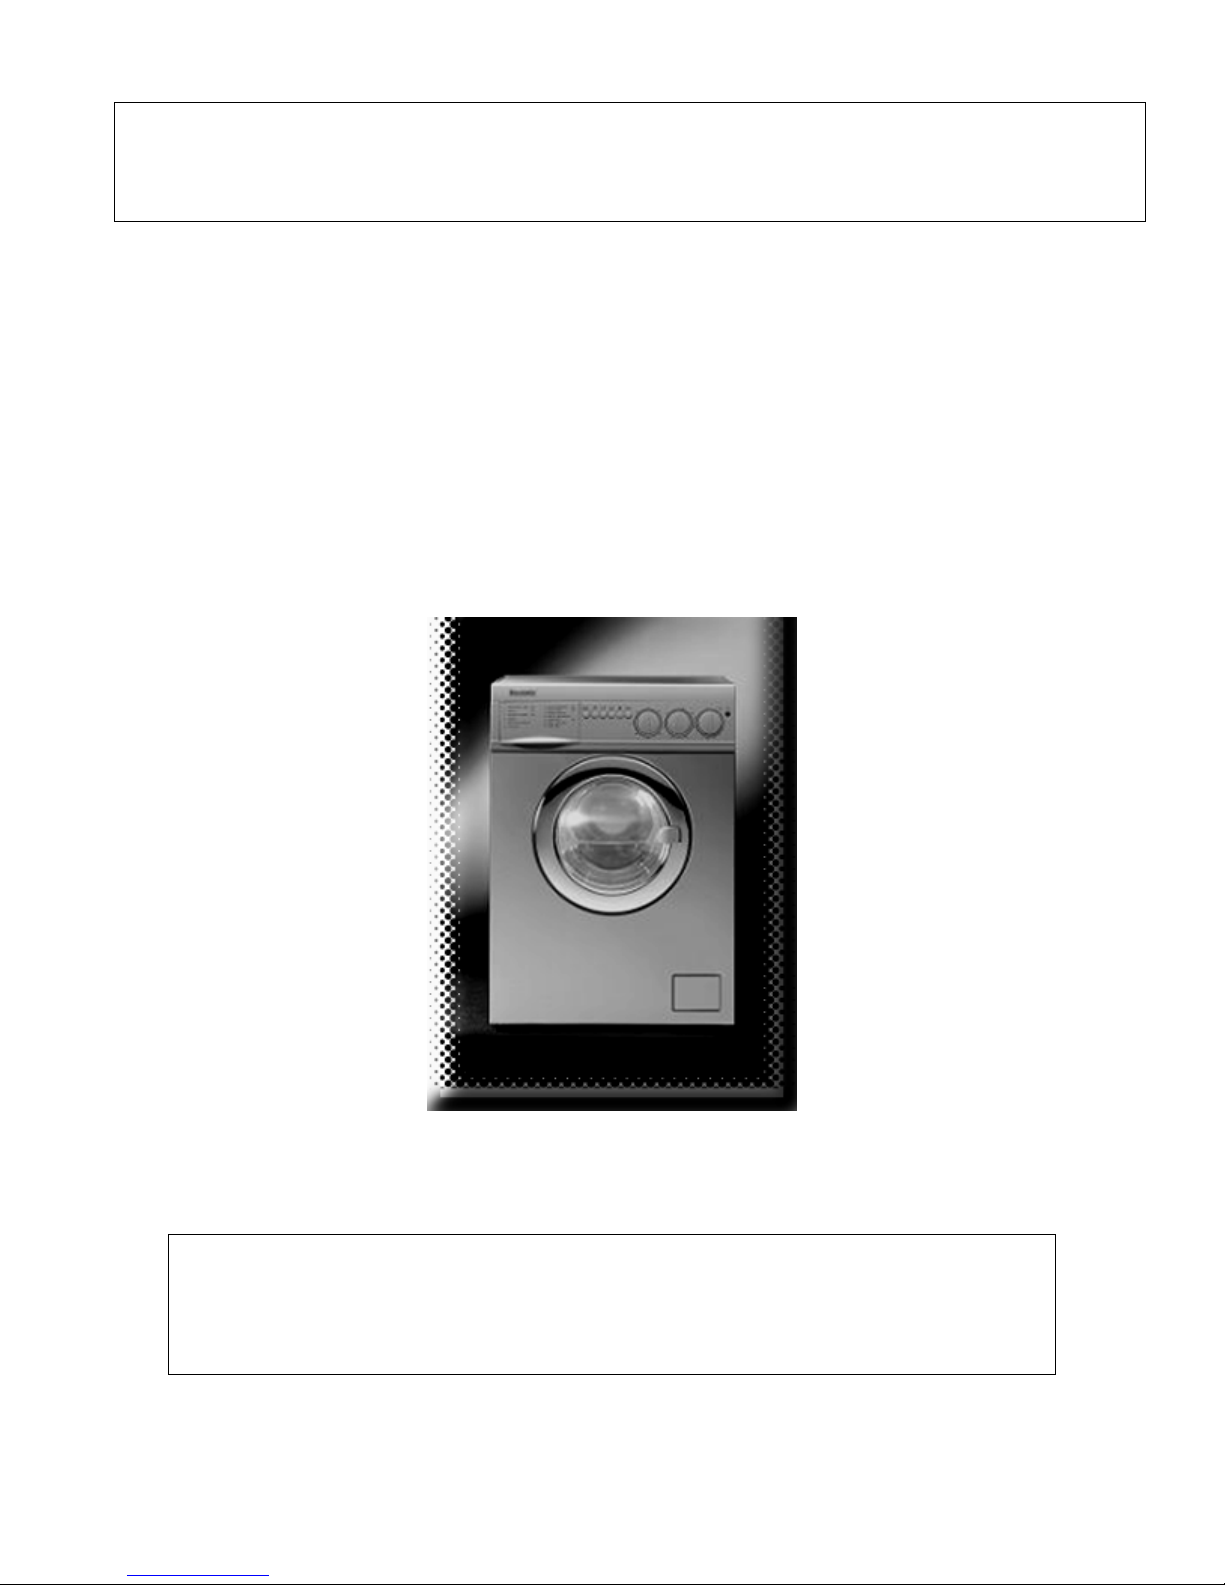
MEGAWDSS 60 cm Stainless
steel washer dryer
Page 2
Please note
make sure that you read it before using your Washing Machine for the first time. It also
contains valuable Troubleshooting tips so that you can solve faults without having to call
for a service engineer.
- this Instruction Manual contains important safety information. Please
Instruction Manual for your Baumatic
MEGAWDSS
60cm Stainless Steel
WASHER-DRYER
Please note: for fast access to using your
Washing Machine, please look at the bold-font
items listed on the Contents page (page 2).
09/08/05
1
Page 3

CONTENTS
Specifications ……….…………….……………………..………………. 3
Important Safety Information……….…..………..…..…………………..4
Your Washing Machine’s Control Panel & Features ..……..……....5-7
Cautions and Advice ………….…………..……....…………………..…8-9
Using your MEGAWD washer dryer……….….……..……………...….10
Before Loading your Washing Machine ………….…………..….……11
Tips for Loading Laundry / Guide to Washing Labels ..………..…..12
Filling your Washing Machine’s Dispenser
Drawer with Detergent …………………………………..……………13-14
Tips on Washing your Clothes / Running your Washing Machine
………………………………………………………………………………...15
WASHING PROGRAMME CHART …………………………..…….16-17
At the End of a Wash Programme ……………………………….........20
YOUR DRYER ……………………………………………………………..20
USING YOUR DRYER……………………….………………………..21-22
Continuous Wash-Dry Cycle …………………………………………..23
Starting a Washing Programme...……......……….…...18
Interrupting a Programme...………………..…………...19
Maintenance and Cleaning …………………....……………………24-26
Notes on Stains and How to Remove them
from your Clothes ........................................................................27-28
TROUBLESHOOTING ……………………………..………………….29-31
INSTALLATION INSTRUCTIONS …………………..………………..32-35
ADJUSTING THE FEET ………..………….......................……………..34
ELECTRICAL CONNECTION ………………..…………………………..34
WATER CONNECTION ……………..………………………………...34-35
Directive Conformity Confirmation ..…………………………………..36
Conditions of Guarantee……………………..….………………............37
Contact Details…………………………..….…………………………...…38
2
Page 4

R
R
W
W
*
SSPPEECCIIFFIICCAATTIIOONNSS OOFF YYOOU
EENNEERRGGYY EEFFFFIICCIIEENNCCYY
CC
CCLLAASSSS:: DD
WWAASSHHIINNGG
PPEERRFFOORRMMAANNCCEE
CCLLAASSSS:: AA
WWAASSHHIINNGG
EEXXTTRRAACCTTIIOONN
PPEERRFFOORRMMAANNCCEE::
AA,, BB,, BB wwaasshheerr rraattiinngg
U
SSPPIINN SSPPEEEEDD 550000 //11220000 RRPPMM
MMEEGGA
A
S
DDSSS
DDiimmeennssiioonnss iinn ccmm
((HHeeiigghhtt xx WWiiddtthh xx
DDeepptthh))
8855 xx 5599..55 xx 553
113
3 washing programmes
3
A – Glass door B – Filter C – Adjustable feet D – Top
cover E – Drum F – Control Panel
Wash load: 5 kg
Maximum spin speed: 1200 rpm
SSTTAAIINNLLEESSSS SSTTEEEELL DDRRUUMM AANNDD TTUUBB
++ SSAAFFEETTYY DDOOOORR LLOOCCKK
66 OOppttiioonn BBuuttttoonnss:
2) Half load 3) Spin Speed
select (500 or 1200 rpm) 4)
Rinse Hold 5) Extra Rinse 6)
On / Off
oo
++ GGLLAASSSS DDOOOORR
: 1) No Spin
++ AADDJJUUSSTTAABBLLEE TTHHEERRMMOOSSTTAAT
3
T
Page 5

IMPORTANT SAFETY INFORMATION
WARNING: THIS IS IMPORTANT SAFETY INFORMATION. PLEASE
READ THIS BEFORE USING YOUR WASHING MACHINE.
: DO NOT USE AN EXTENSION CORD OR PLUG INTO A MULTIPLE
SOCKET.
: DO NOT INSERT A PLUG WITH A DAMAGED CORD OR THAT IS
BROKEN INTO THE SOCKET.
: IF THE CORD IS DAMAGED IT SHOULD BE REPLACED BY THE
MANUFACTURER OR APPOINTED SERVICE AGENT.
: NEVER REMOVE THE PLUG FROM THE SOCKET BY PULLING FROM
THE CORD SECTION. HOLD THE PLUG AS YOU PULL IT OUT.
: DO NOT PLUG INTO THE POWER SUPPLY IF YOUR HANDS ARE WET.
: DO NOT TOUCH THE MACHINE WITH WET HANDS OR FEET.
: DO NOT OPEN THE DETERGENT DRAWER WHILE THE DEVICE IS
RUNNING.
: DO NOT FORCE OPEN THE DOOR OF THE MACHINE WHILE THE
MACHINE IS RUNNING.
: DO NOT TOUCH THE DRAIN HOSE AND WATER DURING DRAINING –
THE WASHING MACHINE CAN REACH HIGH TEMPERATURES DURING
DRAINING.
: DO NOT ATTEMPT TO REPAIR. PLEASE APPLY TO THE NEAREST
AUTHORISED SERVICER.
: DO NOT FORGET THAT THE PACKING MATERIAL OF YOUR MACHINE
MAY BE HAZARDOUS FOR CHILDREN.
: NEVER LET CHILDREN PLAY WITH YOUR WASHING MACHINE.
: KEEP PETS AWAY FROM YOUR WASHING MACHINE.
: ONLY USE YOUR WASHING MACHINE IN THE HOME. THE WARRANTY
WILL BE INVALID SHOULD YOU USE IT FOR COMMERCIAL
PURPOSES
: ALWAYS SWITCH OFF THE POWER AFTER USING YOUR APPLIANCE.
.
: ENSURE THAT YOU REMOVE AND CLEAN THE FILTER AS AND WHEN
DIRECTED IN THIS MANUAL
: THE OUTLET HOSE MUST BE FREE OF RESTRICTIONS.
.
: THE WATER PRESSURE MUST NOT BE ANY MORE THAN 1 MPa
AND NOT LESS THAN 0.05 MPa.
: DO NOT OVERLOAD THE DRUM.
4
Page 6
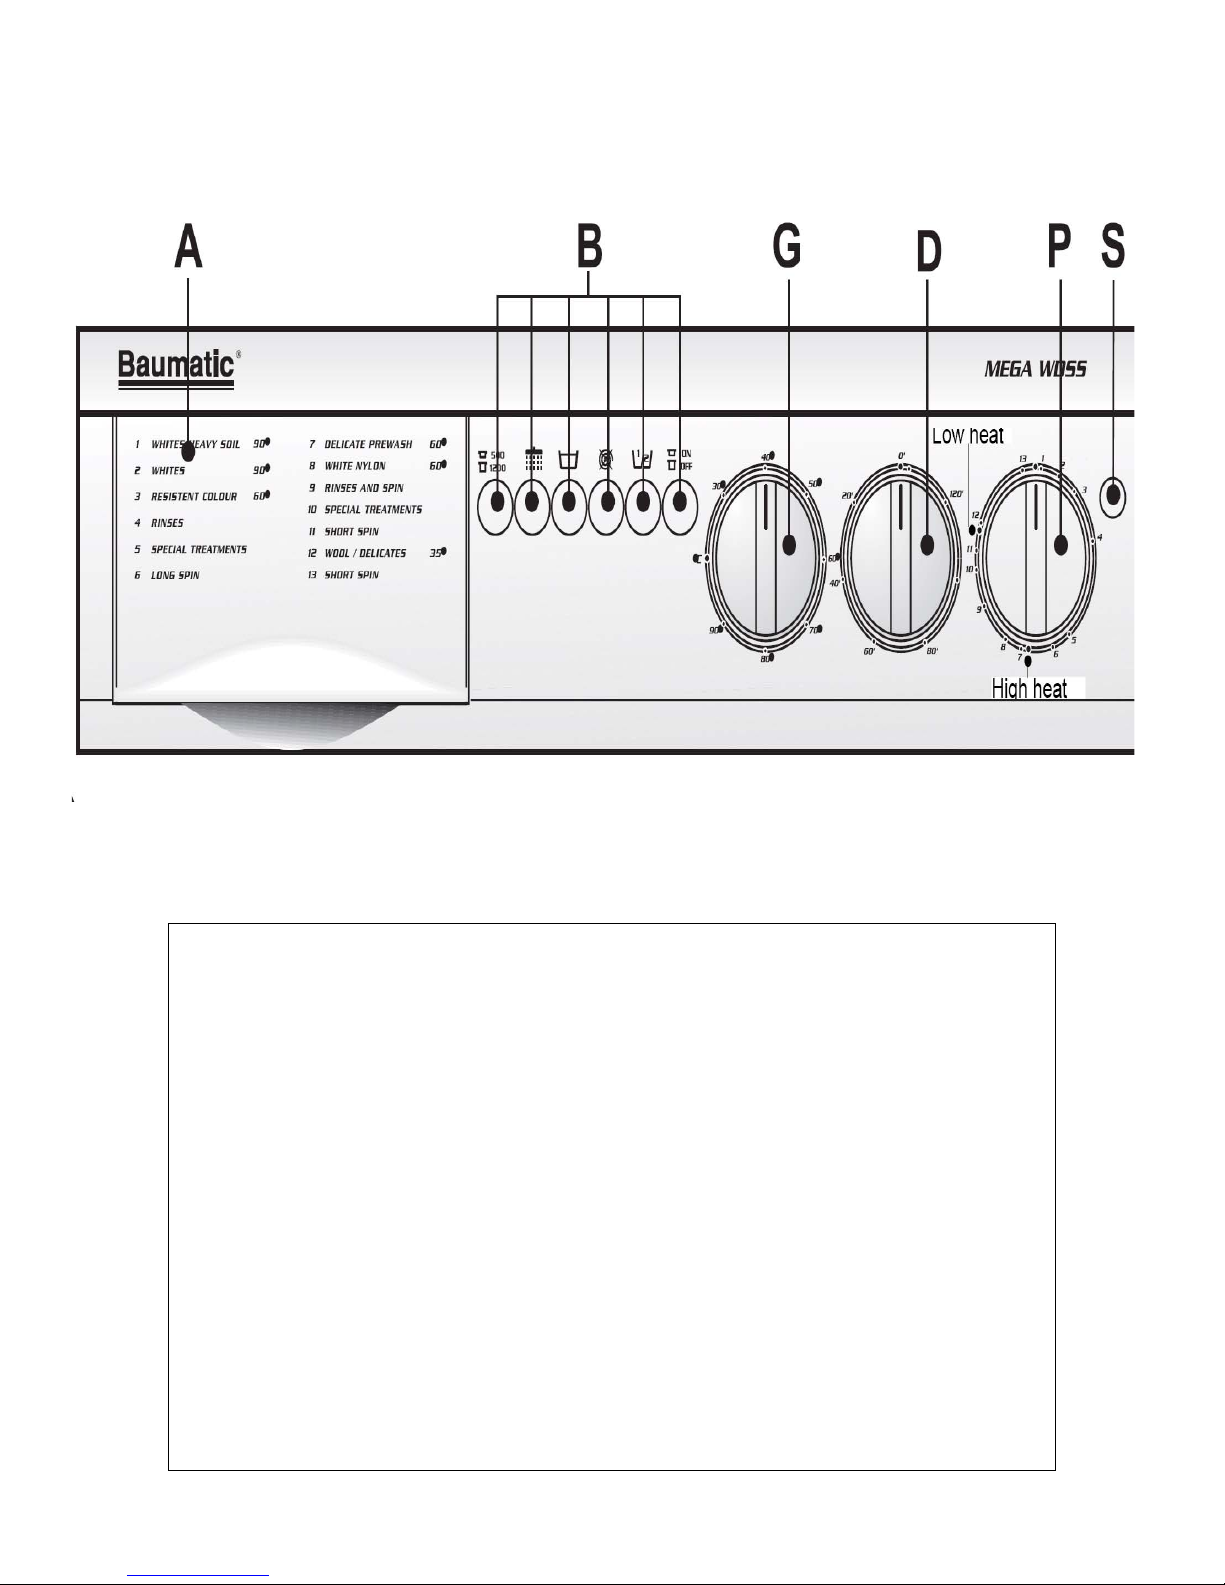
Your MEGAWDSS’s Control Panel
Key to above figure:
A – Table of Programmes (see page 16-17 for details
on use)
B - Buttons (see page 6-7 for details on use)
G – Thermostat knob
D – Drying timer knob
P – Programmer knob
S – ‘Machine On’ Indicator Light
5
Page 7

Guide to your Washer Dryer’s Buttons
* NOTE: SEE PAGE 18 FOR DETAILS ON THE PROGRAMMER KNOB
ON / OFF BUTTON
Press this to start/stop the
machine.
NO SPIN – Press this to allow your
washer dryer to carry out a normal
wash cycle without spin.
RINSE HOLD
Press this to allow your
washer dryer to stop
automatically at the end of
the last rinse cycle without
draining water.
6
HALF-LOAD
Pressing this button reduces
the amount of water used
during the wash, thus saving
both water & energy. Use this
when you have only half the
maximum recommended wash
load. NOTE: This must be used
for drying clothes, see pp.20-23.
Page 8
EXTRA RINSE BUTTON
Your MEGAWD has been
designed to reduce water
consumption to a minimum.
3 rinse cycles are normally
sufficient. For very soft
water zones or those who are
allergic to detergent residues,
pressing this button will
carry out an extra rinse.
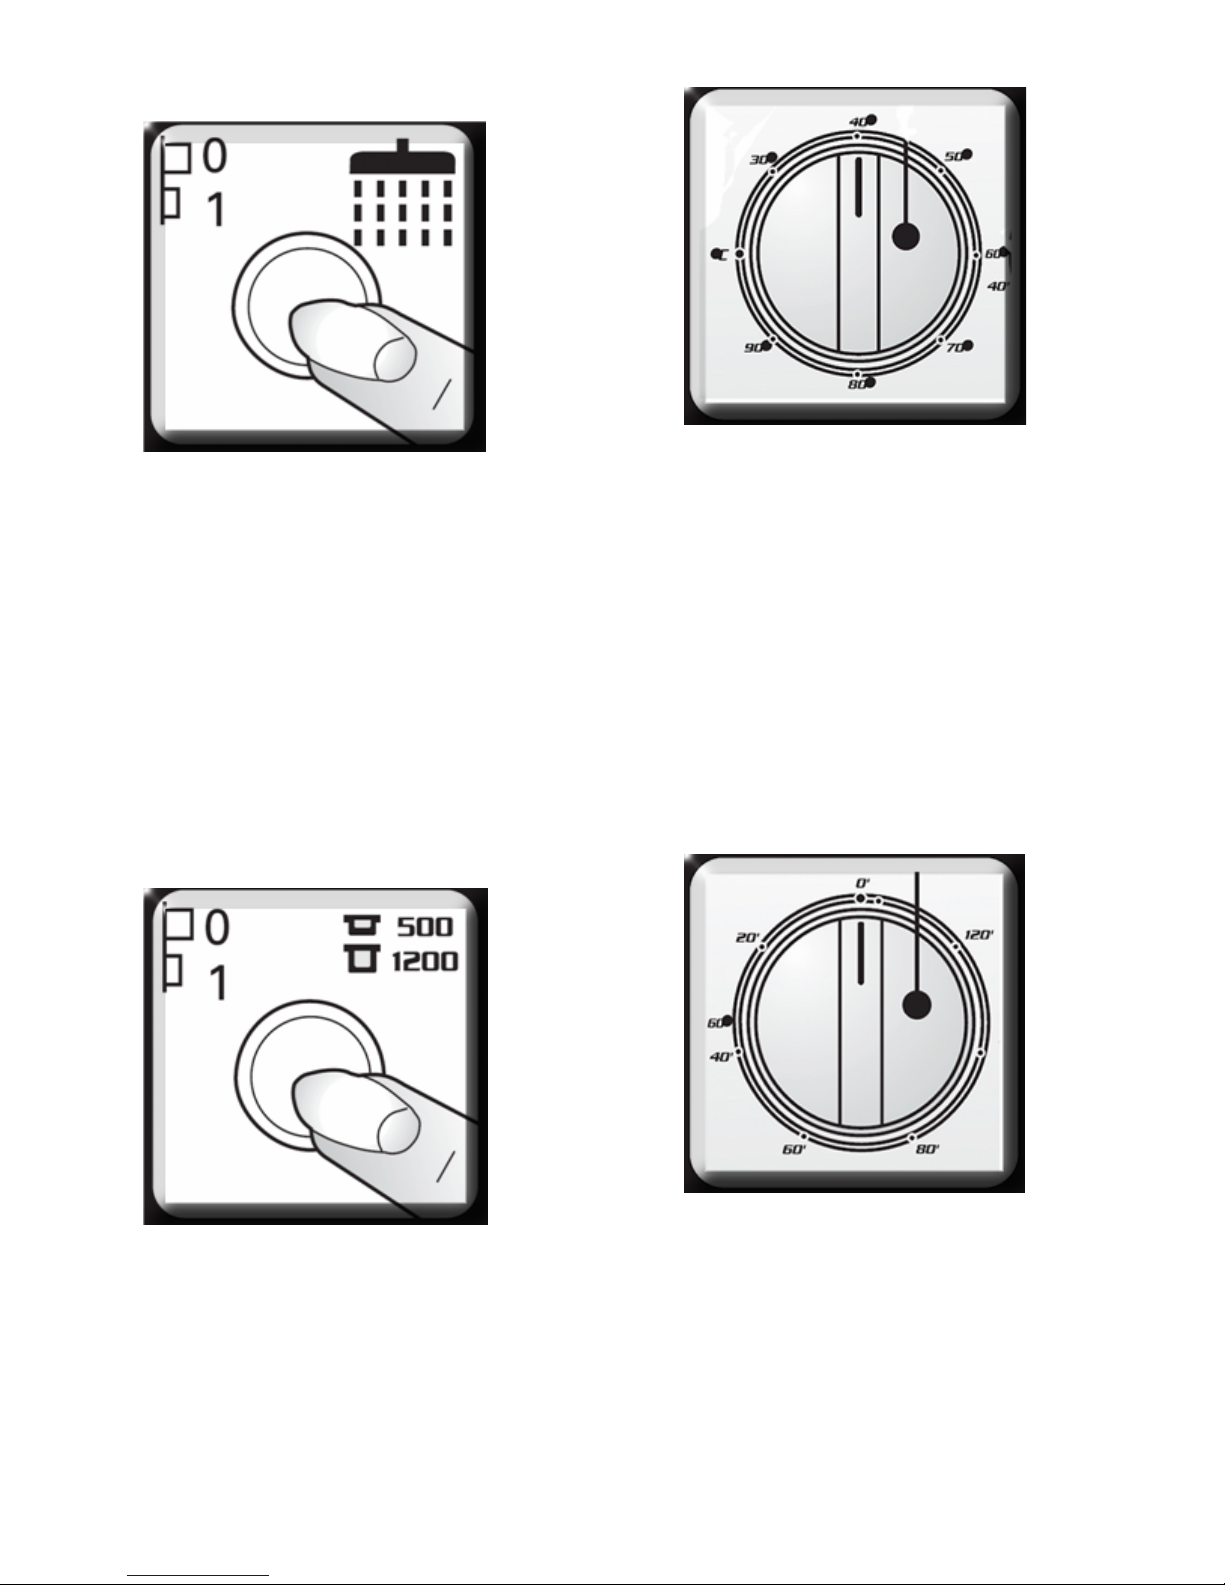
TEMPERATURE DIAL
Rotate this dial to set
your washing programme
to the required
temperature. See the
programme table (pp.16-
17) to select the correct
washing temperature.
500 / 1200 RPM
Push the button to vary the
speed of the spin-dryer from
maximum (1200 rpm) to
minimum (500 rpm).
7
TIMER KNOB
Use this to set the drying time.
Remember that in order to obtain
the best possible drying results do
not load more than the maximum
as specified.
Page 9

Cautions and advice about using your
washer dryer
In order to get maximum satisfaction and performance from your
washer dryer, please ensure you follow the instructions given
below:
9 Select the clothes load correctly and choose the
appropriate programme.
9 Before opening the door, check that there
is no water in the machine and the pilot
light is off.
9 Put the washing products in the right proportion
and in the right compartment.
9 Small garments such as socks, belts, etc.
are best put inside a bag to avoid their
being lost.
9 Before putting clothes into the washing
machine, make sure that there is nothing in the
pockets (coins, buttons, clips, etc.) and that the
zips are undone.
9 If your machine has a filter, you should
check regularly that it is clean & not
blocked. Be especially wary of coins,
brassiere wire & fluff/hair.
9 The interior of the washing machine should be
handled by specialists only. NEVER attempt
to repair or modify it yourself.
8
Page 10

9 After each
similar elastomer
wash, leave the
door ajar to
prevent the
rubber seal
from becoming
misshapen or
mouldy.
9 When the clothes
to be washed are
heavily soiled or
splattered with
mud, it is
advisable to run a
programme with
pre-wash.
materials.
9 The dryer must
be installed in a
well-ventilated
place, away
from the
influence of
gases from
other
appliances and
from defective
installations.
9 The lower
ventilation,
between the floor
9 Unless doing
half load
washing,
always put the
machine on
fully loaded to
save energy.
9 Do not use the
dryer function if
the clothes have
been treated with
any non-aqueous
solution.
9 Do not use the
dryer function for
items containing
any kind of
spongy rubber or
and the base of
the machine must
not be obstructed
(by carpet, cloths,
etc.).
9 When the
machine has
just been
installed, or
after a long
time without it
being used, it is
advisable to run
a washing
programme
with the
machine empty,
to eliminate any
rusty water in
9
the tubes.
Page 11
Using your MEGAWDSS
CAUTION: (*VERY IMPORTANT*) –
You must ensure that the
transportation bolts have been
removed before you attempt to
use your Washer Dryer,
OTHERWISE you will damage or
destroy your appliance. See page
32 for instructions.
Only once you are sure this has been done (with the
appliance successfully installed) can you do the
following
1) Plug in your machine
2) Turn on the water supply
Note on using your
Washer Dryer for
the first time:
There may be water
left inside your
machine after factory
tests and trials.
:
• The first time you run a
wash cycle, you should not
put laundry in your machine
as it may need to drain water.
• Pour half a measuring cup of
normal or all purpose detergent
into the middle compartment
(compartment II as shown on
page 13) of your detergent
dispenser and select a short
washing programme.
• Start the programme.
• Wait until the programme
finishes.
*FOR NORMAL USE, SEE NEXT PAGE
10
Page 12
Before Loading your
Washing Machine
NOTE: Before putting the clothes into the machine:
o Separate the clothes into 3 lots (cotton,
synthetics and wool).
9 Within each group, separate the coloureds from
the whites. *NOTE – see next page for tips.
9 Once the clothes have been separated, you can
put them into the drum of the washing machine,
separately and according to colour and group,
loose, piece by piece. Do not exceed the
maximum weight of clothes as given below:
Cotton Maximum: 5 kg
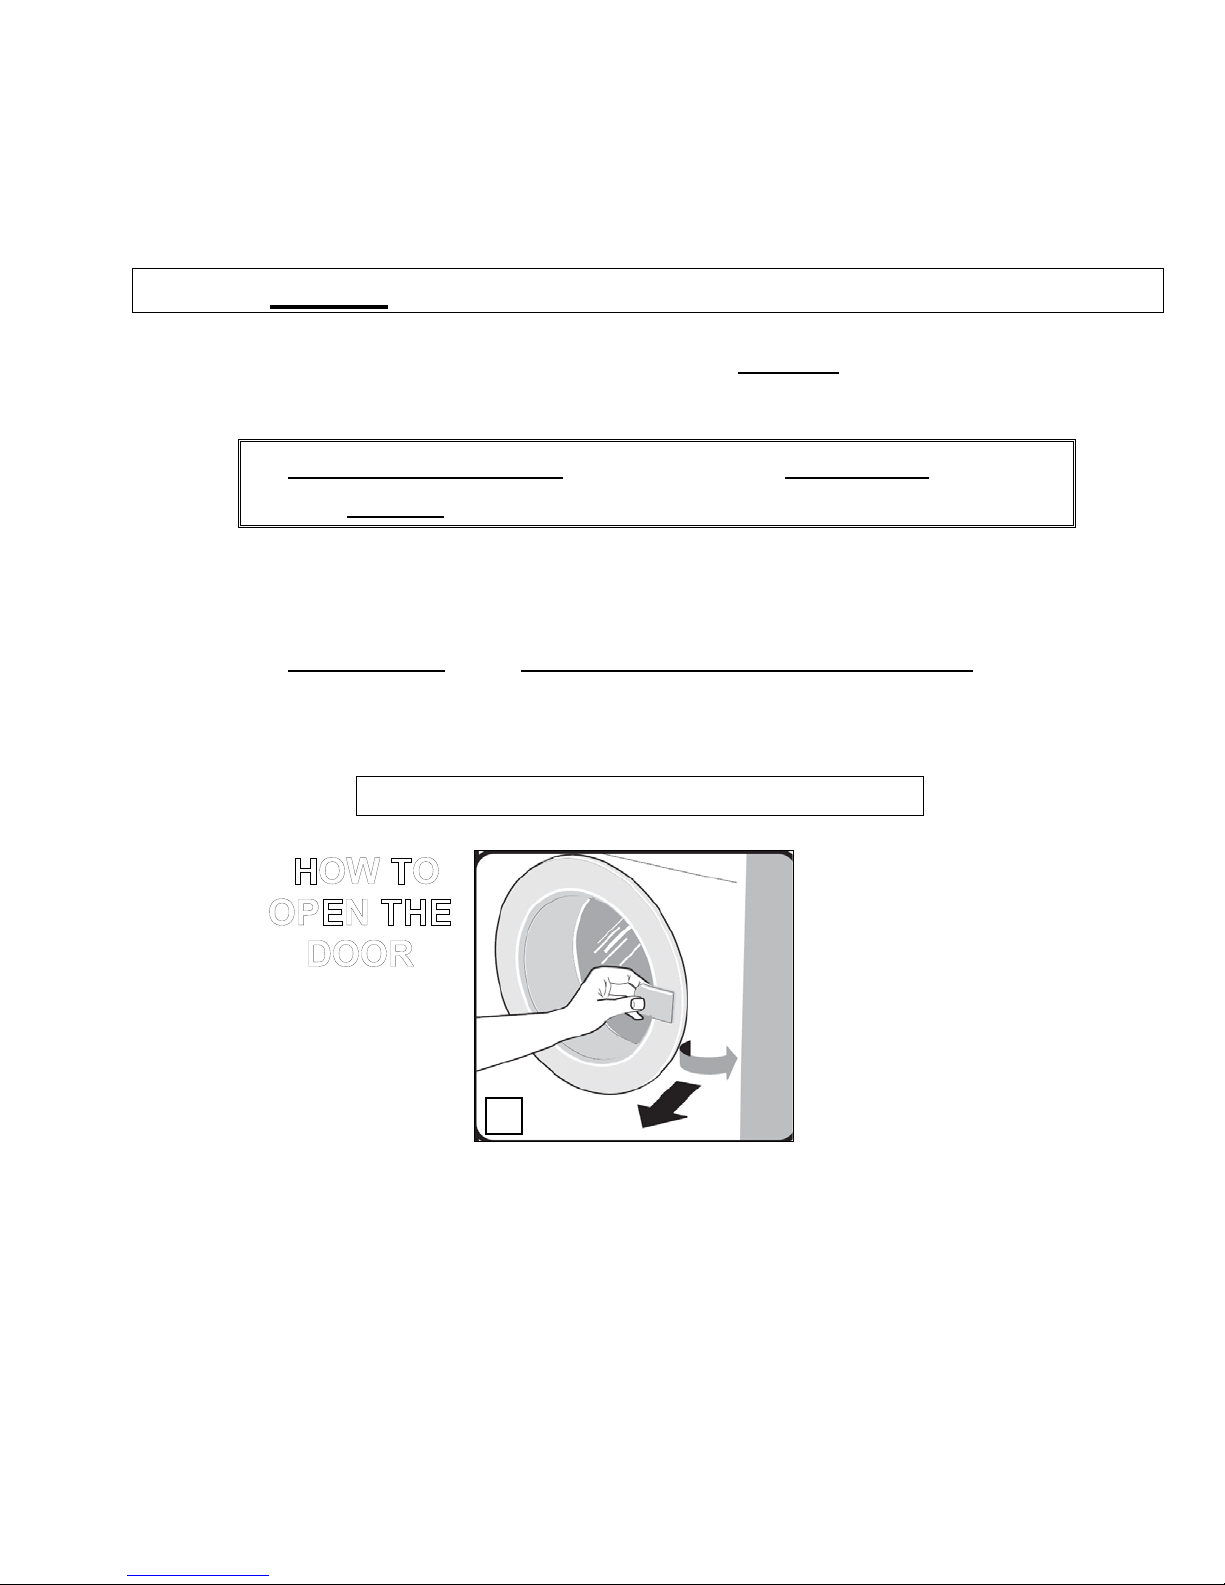
H
OW TO
OPEN THE
DOOR
o Load your clothes inside the drum one item at a
time and spread them about well.
o Shut the door of your machine, being careful
that no pieces of clothing are jammed between
the door and the gasket seal. Make sure the door
is closed tightly otherwise the programme won’t
work.
11
Page 13

Tips for loading your laundry:
: Never wash
 Be careful that
 Remove the
your white
and
coloured
clothes
together.
 Since your
new
coloured
clothes may
shed dye on
the first
wash,
wash them
separately.
no metal
pieces are in
the pockets of
your clothes.
There is the
chance of rust
residues
coming off and
causing stains.
 Zip-up and
button your
clothes.
plastic or metal
hooks of curtains
or place them
inside a washing
bag and tie.
 Pull textiles
like trousers,
knitted fabric, Tshirts and
sweatshirts inside
out.
 Wash small
clothes like socks
and handkerchiefs
in a washing bag.
HOW TO READ THE SYMBOLS ON YOUR CLOTHES LABELS
12
Page 14

Filling your Washing
Machine’s Dispenser Drawer
with Detergent
The dispenser drawer consists of three compartments
1) Pre-wash / Bio-wash Compartment
This compartment should be used only when programmes involving pre-wash or biowash have been selected. The amount of power used will depend on the fabric type
to be washed. We recommend following the detergent manufacturer’s directions.
2) Main wash Compartment
This compartment is used to store detergent that is going to be used in the main
washing cycle of any complete washing programme.
3) Fabric Conditioner Compartment
This compartment is used for fabric softeners. At the end of the washing programme,
water will automatically be siphoned out, leaving the compartment ready for the next
wash.
:
IMPORTANT!
The detergent dispenser drawer and housing must be cleaned periodically
to ensure that detergent and fabric softener do not build up and reduce
the appliance’s efficiency. To remove the drawer, pull it forward to its
fullest extent, lifting the front edge at the same time, then give a firm tug.
The dispenser drawer should now be rinsed, dried and replaced.
13
Page 15

HOW MUCH DETERGENT SHOULD I USE?
NOTE: You will need more detergent for washing cycles
containing dirtier clothes.
o For very dirty
clothes, select a
programme with prewashing, fill
compartment 1 with ¼ of
the amount of the
detergent you are putting
in compartment 2.
o For clothes that are only
slightly dirty, do not prewash and put only a
small amount of
detergent into
compartment 2 in your
washing machine’s
dispenser drawer.
CAUTION: Only use detergents for automatic
washing machines. The amount needed for different
washing loads and types will be written on the packaging
of your detergent.
NOTE: The harder the water in
your area, the more detergent you
will need to use.
SOFTENERS
9 Fill the softener compartment (far right in your detergent drawer)
with softener. Do not exceed the MAX level. Otherwise, the softener
will diffuse in the washing water through the siphon. Dilute high density
softeners first.
FLUID DETERGENTS
9 You can use fluid detergents in all programmes without prewashing. For this, move the fluid detergent level plate in the second
compartment of the detergent drawer and pour in the amount of fluid
detergent according to the levels on this plate.
14
Page 16

Tips on washing your clothes.
Dirtiness
Sort the clothes according to
dirtiness. Give special
treatment to those which are
very dirty or have got difficult
stains.
Treat very dirty areas like
collars and cuffs before
washing.
Wash clothes that are only
slightly dirty in short
programmes. In this way,
you will save energy as well
as get better results.
Wash averagely dirty clothes
in a normal wash programme.
Wash very dirty clothes in a
Long Programme with a
Prewash.
Sensitivity
Certain clothes, either because
of their fabric or the way they
are made, may be sensitive to
action of your machine. When
washing them, it is best to use
DELICATE PROGRAMMES.
You can wash woollen
garments( ) in the SPECIAL
WOOL PROGRAMME. Make
sure, first of all, that your
woollens are washable.
* * * * * * * * * * * * * * * * * * * * *
Running your
Washing Machine
IMPORTANT – The temperature used in any washing programme
you select will be determined by the setting you turn your
temperature knob to, regardless of the programme selected.
Programme Selection and Features.
Select the programme that’s right for the clothes you want
to wash according to the Table on pages 16-17.
15
Page 17

Washing Programmes
NOTE: You select the washing programme using the
programme knob and any of the option buttons. Please see
the following tables to understand which programme is
suitable for your wash load.
16
WWhhiitteenneerr,,
sscceenntteedd
ssoofftteenneerr
Page 18

WWhhiitteenneerr,,
sscceenntteedd
ssoofftteenneerr
AAUUXXIILLIIAARRYY PPRROOGGRRAAMMMMEESS FFOORR SSYYNNTTHHEETTIICCSS AANNDD WWOOOOLL
17
Page 19

Starting a Washing Programme
The Programmer Knob
2. Then, set the washing temperature that you’d like to
1. With the programme knob, you
can select the programme you’d
like to wash your clothes with. You
can adjust the programme
selection process by turning the
programme knob clockwise.
NEVER TURN IT
ANTICLOCKWISE.
You must be careful that the
marker on the programme knob
points exactly to the programme
you want to select.
use using the temperature knob (shown on page 7).
3. Ensure that you have pressed any options buttons to fine
tune your washing preference.
See pages 6-7 for a
description of these options functions.
NOTE
: TO RUN A CONTINOUS WASH-DRY CYCLE
(IE, THE WASHLOAD IS AUTOMATICALLY DRIED
FOLLOWING WASHING), PLEASE SEE PAGE 23.
YOU WILL NEED TO SELECT THE HALF LOAD
OPTION IN ORDER TO RUN A WASH-DRY CYCLE.
18
Page 20

Once you have selected the programme (using the knob
shown on previous page) & the temperatures you need for
your wash, etc., press this button to start your washing
cycle.
Note:
• The button will be depressed on the console.
• The ‘ON’ light will come on.
• The door safety mechanism will engage at this
time.
WARNING – DO NOT INSERT ANY KIND
OF PLASTIC CONTAINER FOR DETERGENTS IN
THE DRUM. THE DRYER COULD MELT THIS
AND CAUSE DAMAGE!
Interrupting a Programme
You can interrupt a programme at any time
by pressing the ‘ON/OFF’ button. Simply
do this and wait two minutes if you have to
add or remove garments. Be careful that
the water level inside the drum is not too
high and that the temperature is not very
hot.
To resume
, once you have re-closed the
door, simply press the ‘ON/OFF’ button.
The programme will pick up where it had
left off.
19
Page 21

At the end of a Wash Programme
Provided the programme completes without
interruptions, you can open the loading door 2
minutes after it has completed. Take out your
clothes. If you have just washed a full load,
take out half of the laundry from the drum.
YOUR DRYER
The drying section of the washer-dryer
operates like any other by blowing heated air onto
wet clothes. This air is then extracted from the
machine.
In your washer-dryer, the moisture-laden air is
blown over cold water which causes the moisture to
condense. It is then pumped out of the machine.
Therefore, it is important that the machine is
turned on and the drain hose is correctly located
during the drying cycle.
NOTA BENE: YOU WILL NEED TO SELECT THE
HALF LOAD OPTION IN ORDER TO RUN YOUR
DRYER. TO THIS END, YOU MUST NEVER FILL THE
DRUM WITH MORE THAN A HALF LOAD OF
WASHING OR WET CLOTHES. NOR SHOULD SUCH
LAUNDRY BE DRIPPING WET. FAILURE TO
FOLLOW THIS ADVICE WILL RESULT IN
UNSATISFYING DRYING PERFORMANCE AND
COULD POSSIBLY IMPEDE OR HARM YOUR
MACHINE.
20
Page 22

TO USE THE DRYER:
CAUTION: Before using the dryer,
please read the following notes.
 Do not attempt to dry
items treated with
solvents or petroleum
based products. Such
substances are volatile
and may cause an
explosion.
 Before using the dryer,
remove any plastic
detergent containers.
 Do not over dry the
washing. Excessive drying
may crease clothing and
make ironing difficult.
 Do not put sleeping bags,
cushions or voluminous
blankets in the machine.
These will expand during
drying and block airflow in
the machine.
REMEMBER TO PRESS THE ½ LOAD BUTTON TO DRY!
1) Place or leave a maximum of 2.5kgs of clothes (if resistant
fabrics) or 1.5kg for synthetic and mixed fabrics
of your washer-dryer.
in the drum
2) Select the drying time using the timer knob (shown on page
7).
Note the knob can be set up to a maximum of 140 minutes
(2 hours 20 minutes) but we suggest that you firstly select a
lower time of approximately 30/40 minutes. You can check if
the laundry is dry and, if not, add more minutes as needed to
prevent your clothes from being over-dried.
21
Page 23

3) Set the programmer
knob to the STOP point
(just before ‘7’ on the
dial) for a drying cycle
using high heat
low
heat drying cycle, set
. For a
the knob to the STOP
point between ‘11’ and
‘12’ on the dial.
NOTE
YOUR MACHINE WILL NOT PERFORM
A DRYING CYCLE IF THE WOOL
PROGRAMME HAS BEEN SELECTED.
NEVER ATTEMPT TO DRY OR SPIN
WOOLLEN ITEMS TOO QUICKLY – IT
4) Press the ON/OFF switch.
At the end of the drying cycle, there is a 10 minute cool
down period. This will minimise creasing due to allowing
the fabric to cool down gently.
NOTE:
through the exhaust duct. However, if you use the machine as a drier
only, or if you have washed and dried items that tend to shed threads,
you should
This will remove any threads from the drum and prevent them from redepositing during the next cycle.
• At the end of the drying cycle,
the timer knob will stop at
position ‘0’. When this
happens:
22
Normally, threads from your washing will be discharged
remove the washing and perform a rinse and spin cycle
WARNING! During the operating cycle, the glass
porthole will heat up – try to avoid touching it.
Press the On/Off
button before
removing your dried
washing.
.
Page 24

CONTINUOUS WASH-DRY CYCLE
This feature of your appliance allows a drying
cycle to follow on from a washing cycle
without your having to go anywhere near your
washer-dryer!
NOTE: You will need to set your washer-dryer to
perform this function if you do not want it to wash
and stop and then have to dry separately.
Set your washing programme as you would normally,
but REMEMBER THAT YOU MUST SELECT THE HALFLOAD FEATURE.
Set your drying timer as you would normally do for a
drying programme.
Bear the following in mind when setting this function
: Do NOT press the
‘No spin’ button.
• Set the drying time
using the timer knob,
remembering that
several short spells
are better than a long
pre-programmed one.
• Select the washing
programme,
remembering that
your appliance will
perform a drying
not
cycle if the wool
programme has been
selected.
• To start the
machine, press the
‘ON/OFF’ button.
• At the end of the
wash and dry
programme, the timer
knob will stop at
position “0”.
• Press the ON/OFF
button and
disconnect from the
power supply.
• Remove your dried
wash load.
IMPORTANT REMINDERS:
Do not dry clothes that contain plastic (including
acrylic), foam or rubber or similar materials, or those
that have not been cleaned in a water solution. DO
NOT USE A PLASTIC DETERGENT DISPENSER ORB IN
THE DRUM!
23
Page 25

MAINTENANCE AND
CLEANING:
Please note: Disconnect the power supply before
attempting maintenance or cleaning your washing machine.
Cleaning the outlet filter
If you are using the drying feature on your appliance, you
will need to clean its filter out after every 3-4 washes. If you
have been drying clothes that will leave a lot of fluff or lint,
you will then need to clean this filter out after each such
cycle.
If, however, you have only been using the washing function, you should then clean this
filter after every 25 washing cycle programmes to keep the drain pump running
efficiently (this will enable more efficient washing and rinsing).
* NOTE: If you do not fit the filter cover properly, it
will leak water!
Cleaning the Inlet Valve Filter
24
Page 26

Cleaning the Detergent Drawer
DETERGENT DRAWER
Detergents may form sediment in your detergent drawer or in the
housing of the detergent drawer over time…
• To clean the sediment, pull out the detergent drawer from time to
time and wash it out.
To pull out the detergent drawer, you will firstly need to see if
your drawer has the word ‘PUSH’ written on it in its softener
compartment (compartment 3).
If the softener compartment has ‘PUSH’ written on it:
1 OPEN THE DETERGENT DRAWER.
2 PRESS THE WORD ‘PUSH’ WITH YOUR RIGHT HAND
WHILE PULLING THE DRAWER WITH YOUR LEFT HAND
FIG. 22, ABOVE).
IF THE SOFTENER COMPARTMENT DOES NOT HAVE THE WORD
‘PUSH’ WRITTEN ON IT:
1 Open the detergent drawer.
2 Grasp it with both hands.
3 Push down slightly and pull the drawer outwards (Fig.
23, ABOVE).
AFTER THOROUGHLY CLEANING THE DRAWER AND SIPHON
PLUG SO THAT NO RESIDUES REMAIN, REVERSE THE ABOVE
PROCEDURE TO REINSTALL THE DRAWER.
25
Page 27

Cleaning the Cabinet
9 Clean the exterior surface of your machine with lukewarm water
and a cleaning substance that will not harm or scratch the cabinet.
After rinsing with clean water, wipe it with a soft and dry cloth.
PLEASE NOTE: If your washing machine is installed in a
location where the ambient temperature can fall below 0 °C, do
the following (once before you know your machine will be unused
for a long time).
o Plug in your Washing Machine.
o Close the water tap and pull out the water inlet hose or hoses from
the tap.
o Place the ends of the water drain and water inlet hoses in a cup on
the ground.
o Adjust the program knob to ‘Draining’ program.
o The ‘Program Ready’ light will come on.
o Run the program by pressing the ‘Start/Pause’ button.
o Unplug your machine when the program is over (program end light
is on).
* When you complete this process, the remaining water inside the
machine will be drained. There will now be no danger of ice forming.
When you use your washing machine again, be sure that the ambient
temperature is above 0 °C.
Cleaning the Drum
*PLEASE NOTE: Do not leave metal parts like needles, staples or
coins inside your Washer-dryer. There items cause rust build-up in
the drum. To clean these stains away, use a cleaning substance (that
doesn’t have chlorine in it) and follow the manufacturer’s guidelines.
Never use dish-washing wires or similarly rough objects.
*REMOVAL OF LIME FROM YOUR MACHINE
If you use the right amount of detergent in your washing machine,
there will be no need for lime removal. However, if you want to use
lime removers, please pay attention to their manufacturers’ warnings.
26
Page 28

NOTES ON STAINS AND HOW TO REMOVE THEM FROM YOUR
CLOTHES
27
Page 29

28
Page 30

TROUBLESHOOTING – Should your washer-
dryer have a problem, checking the problem against this
chart may keep you from needing to call for service!
PROBLEM PROBABLE CAUSE WHAT YOU CAN DO
It is unplugged Insert the plug into the socket.
Your fuse is defective. Change your fuse.
The power is off Check if the power is on or not.
Your Machine
doesn’t Work
Your Machine
isn’t taking
in Water
ON/OFF button has not
been pressed to ‘ON’.
The PROGRAMME KNOB is
In STOP (OFF) Status
The GLASS DOOR has not
been properly closed.
Water tap is closed Open water tap.
The water inlet hose may
be bent
Pressure insufficient Adjust tap to increase pressure.
The valve inlet filter is
Clogged.
Press the ‘ON/OFF’ button
Shut the door properly.
You should hear it ‘click’.
Close the door completely.
Check the water inlet hose.
Clean the pump filter
Your Machine
is vibrating
29
The clothes aren’t placed
evenly in the drum.
Your Washer-dryer’s
feet aren’t adjusted
properly.
You haven’t removed the
transportation screws!
Spread the clothes inside
the machine more evenly.
Adjust the feet to level appliance
Remove the transportation
screws!
Page 31

PROBLEM
Your Washing
Machine is
vibrating
PROBABLE CAUSE
You haven’t put enough
clothes in the drum
You have put too many
clothes in the drum
Your machine is resting
against a rigid object,
WHAT YOU CAN DO
You Washing machine’s
operation is unaffected.
Don’t put too many clothes
in the machine.
Spread your clothes more
evenly.
Make sure your Washing
Machine isn’t leaning against
a hard or rigid object.
Excessive
foam in the
Detergent
Drawer
Washing is
still dirty
You’ve put in too much
detergent.
Wrong detergent has been
used
Your laundry was too dirty
for the programme you
selected
You didn’t use enough
detergent
Press the ‘ON/OFF’
button. To prevent frothing,
dilute one tablespoon of softener
in a half-litre of water & pour it
into the detergent drawer.
Press the ‘ON/OFF’
button after 5-10 minutes.
Put the correct amount of
detergent in the next wash.
Only use detergents for
automatic Washing Machines.
Select a suitable program.
(see the tables on pp. 16-17)
Use more detergent according
to the detergent packaging.
30
Too many clothes were put
in the machine.
Don’t put as many clothes in
your next wash-load.
Page 32

r
PROBLEM
The Water
drains from
your Washing
Machine as
soon as it has
filled.
No water seen in the
drum during the washing
cycle.
Detergent residue shows
up on clothes
Grey stains show up on
the clothes
PROBABLE CAUSE
The end of the water drain
hose is in too low a
position for the machine.
Nothing wrong – the water
is in the lower part of the
drum.
Pieces of some detergents
that do not dissolve in
water may stick to your
clothes.
These stains may be the
result of oil, cream or
ointment.
WHAT YOU CAN DO
Place the water drain hose at a
better height.
You don’t need to do anything.
Set your Washer-dryer to a
‘Rinsing Cycle’ to get rid of the
stains. Brush off residue powde
with a brush when dry.
In the next washing, use the
maximum detergent amount
declared by the detergent
manufacturer.
The Spinning Cycle is not
done or starts only after
a delay
The Loading Door will
not open.
31
Nothing wrong.
Remember that your
machine has a delay
release of 2 minutes after
the end of a programme.
Your Washing Machine has an
unbalanced load control system
that will try to distribute your
clothes evenly. After your
clothes have been distributed
more evenly, the spinning
process will begin.
For the next washing cycle,
place your clothes more evenly.
Ensure that the pilot light is off,
Wait out 2 minutes and then
Open the door.
Page 33

INSTALLATION INSTRUCTIONS
REMOVING THE TRANSPORTATION SCREWS:
* PLEASE NOTE THAT FAILURE TO REMOVE THE TRANSPORTATION
SCREWS WILL RESULT IN YOUR GUARANTEE BECOMING VOID! *
o THE TRANSPORTATION SCREWS, WHICH CAN BE FOUND AT THE REAR OF YOUR
WASHER-DRYER, MUST BE TAKEN OFF BEFORE YOU CAN USE YOUR MACHINE. THEY ARE
THERE ONLY TO STABILISE YOUR APPLIANCE DURING TRANSIT.
o HOW TO REMOVE THESE SPACERS AND SCREWS
1) LOOSEN THE SCREWS WITH A SUITABLE SCREWDRIVER.
2) REMOVE THE SCREWS BY PULLING THEM OUT WHEN UNDONE (TOP LEFT
DIAGRAM, BELOW).
3) THE PLASTIC PARTS FOUND IN THE INTERIOR OF YOUR WASHING MACHINE
WILL FALL DOWN INSIDE OR UNDER THE APPLIANCE.
4) PICK UP THE PLASTIC PARTS. IF THERE ARE STILL SOME THAT HAVE NOT
FALLEN DOWN, OPEN YOUR MACHINE’S REAR PANEL TO RECOVER THEM BEFORE
REPLACING THE PANEL (BOTTOM LEFT DIAGRAM, BELOW).
5) INSERT THE PLASTIC TRANSPORTATION SCREW CAPS (THESE CAN BE
FOUND INSIDE THE ACCESSORIES BAG) IN THE HOLES WHERE THE TRANSPORTATION
SCREWS HAD BEEN (TOP RIGHT DIAGRAM, BELOW).
6) KEEP THE TRANSPORTATION SCEWS AFTER YOU HAVE REMOVED THEM
FROM THE MACHINE – YOU MAY NEED THEM SHOULD YOU MOVE HOME IN THE
FUTURE.
:
32
Page 34

INSTALLING YOUR MEGAWDSS Washer /
Dryer
Before installing, it is very important that you familiarise yourself
with your Washing Machine’s dimensions. Please see the
illustration below for details:
___
Your Washer Dryer requires the space
shown here:
595mm
530mm
850mm
33
Page 35

ADJUSTING THE FEET
CAUTION :
o DO NOT INSTALL YOUR MACHINE ON RUGS OR CARPETS.
o FOR YOUR WASHING MACHINE TO WORK SILENTLY & WITHOUT ANY VIBRATION, YOU
SHOULD POSITION IT ON FLAT, NON-SLIPPERY & TOUGH GROUND.
o YOU CAN ADJUST YOUR WASHING MACHINE’S LEVEL BY TURNING ITS FEET EITHER
UPWARDS OR DOWNWARDS (Please see DIAGRAM below).
1) FIRSTLY, LOOSEN THE PLASTIC
ADJUSTMENT NUT.
2) AFTER YOU’VE REACHED THE
LEVEL YOU WANT, TIGHTEN THE
PLASTIC ADJUSTMENT NUTS
AGAIN BY ROTATING THEM
UPWARDS (ONE FOR EACH
_________________________________________________________
FOOT).
3) NEVER PUT CARTONS, WOODEN
BLOCKS OR SIMILAR MATERIALS
UNDER THE MACHINE TO HELP MAKE
IT LEVEL TO THE GROUND.
4) NOTE: THE HIGHEST YOU CAN RAISE
THE APPLIANCE ON ITS FEET IS
30mm.
ELECTRICAL CONNECTION
YOUR WASHING MACHINE WORKS ON 220-240V & 50 Hz. IT COMES WITH ITS OWN
SPECIALLY MOULDED, EARTHED PLUG THAT HAS BEEN ATTACHED TO THE POWER
CABLE OF YOUR WASHING MACHINE. The plug must be inserted to an earthed socket
with 10 ampere. The fuse used in your plug must also be 10Amps. Should your electricity
supply not match these specifications, you should contact a qualified electrician to
accommodate this.
*REMINDER: WARNING! (PLEASE NOTE) Baumatic Ltd are not responsible for any
damages arising out of usage following failure to earth (ground) your appliance.
CONNECTING TO THE WATER MAINS
• Depending on your
appliance’s features, it may
operate with a single water
inlet (cold) or a double water
inlet (hot/cold). THE WHITEHEADED HOSE IS FOR
THE COLD WATER INLET /
THE RED-HEADED HOSE
IS FOR THE HOT WATER
INLET (but ONLY for
machines with a double
water inlet system).
34
Page 36

• To prevent leakage from the connection joints, a seal (for machines with
cold water inlet only) or seals (for machines with hot & cold water inlets)
are included in the hose packing. Fit these seals at the end of the water
inlet hoses on the tap side. If your sink only has a mixing tap, use only
one hose and connect it to the cold water valve of the machine. In this
case, screw on the supplied cap to close the hot water valve.
1) Connect the WHITE-HEADED HOSE to the WATER INLET VALVE with the
white filter & connect the RED-HEADED HOSE to the WATER INLET
VALVE with the red filer (this is only applicable to machines with double
inlet systems).
2) Tighten (but do not over-tighten) the plastic parts of the connections with
your hand. Please call a qualified plumber to ensure safer connections.
PLEASE NOTE:
35
Page 37

Environmental note
o The packaging materials that Baumatic uses are environmentally
friendly and can be recycled.
o Please discard all packaging material with due regard for the
environment.
36
Page 38

Baumatic Ltd. Conditions of guarantee
Dear Customer,
Your new Baumatic appliance comes complete with a free 12 month guarantee covering both parts and
labour costs resulting from defective materials or workmanship.
Baumatic also gives you the opportunity to automatically extend the guarantee period for a further 12
months at no extra cost, giving an initial guarantee period of 24 months. The extended guarantee period
applies to England, Scotland, Wales and Northern Ireland only.
To qualify for your full 24 months guarantee you must register your appliance within 28 days of purchase
to be covered under this guarantee. This can be done online via:
the guarantee card which can be found in each new Baumatic appliance.
* In addition, your appliance is covered by a 5 year parts warranty. Baumatic Ltd will provide free of
charge the parts required to repair the appliance, only if they are fitted by a Baumatic engineer, for any
defect that arises due to faulty materials or workmanship within a period of 5 years from the original
purchase date.
* An additional 1 to 3 year insurance scheme for labour is available should you wish to extend the
warranty period.
Should any person other than an authorised representative of Baumatic Ltd interfere with the appliance, the
policy is negated and Baumatic Ltd will be under no further liability.
The guarantee covers the appliance for normal domestic use only, unless otherwise stated.
Any claims made under the terms of the guarantee must be supported by the original invoice/bill of sale
issued at the time of purchase.
This guarantee is transferable only with the written consent of Baumatic Ltd.
If the appliance fails and is considered either not repairable or uneconomical to repair between 12 months
(2 years if registered) and five years, a free of charge replacement will not be offered.
The guarantee for any replacement will only be for the remainder of the guarantee on the original product
purchased.
The guarantee does not cover:
- Sinks and taps
- Failure to comply with the manufacturers instructions for use.
- The replacement of cosmetic components of accessories
- Accidental damage or wilful abuse.
- Subsequent loss or damage owing to the failure of the appliance or electrical supply
- Incorrect installation
- Losses caused by Acts of God, civil war, failure to obtain spare parts, strikes or lockouts
- Filters, fuses, light bulbs, external hoses, damage to bodywork, paintwork, plastic items, covers,
baskets, trays, shelves, burner bases, burner caps, decals, corrosion, rubber seals.
In the course of the work carried out it may be necessary to remove the appliance from it operating
position. Whilst all reasonable care will be taken, Baumatic Ltd cannot accept responsibility for damage
sustained to any property whatsoever in this process.
This guarantee is in addition to and does not diminish your statutory or legal rights.
Contacting Baumatic Ltd
Sales Service Spares Technical/Advice
TEL: 0118 933 6900 TEL: 0118 933 6911 TEL: 0118 933 6922 0118 933 6933
FAX: 0118 931 0035 FAX: 0118 986 9124 FAX: 0118 933 6942 0118 933 6942
For ROI (Republic of Ireland), please contact one of the numbers below:
TEL: 01 – 6266798 FAX: 01 - 6266634
Thanks you for buying Baumatic.
*
Applies to UK, Scotland, Wales & Northern Ireland only (Republic of Ireland has 1 year labour & 1 year parts warranty only)
www.baumatic.co.uk or through returning
Page 39

Headquarters
Baumatic Ltd.
Baumatic Buildings,
6 Bennet Road,
Reading,
Berkshire
RG2 0QX, United Kingdom
Sales Telephone
+44 118 933 6900
Sales Fax
+44 118 931 0035
Service Telephone
+44 118 933 6911
Service Fax
+44 118 986 9124
Spares Telephone
+44 118 933 6922
Technical / Advice Telephone
+44 118 933 6933
E-mail:
sales@baumatic.co.uk
technical@baumatic.co.uk
Http (Internet site):
www.baumatic.com
Page 40

2
2
 Loading...