

Page 1

Page 2

Thank you for your confidence in purchasing our washing machine, and
congratulations on your choice.
Your new washing machine satisfies all the requirements of a modern
treatment of laundry. It is also economical, with low consumption of energy,
water and washing agents.
Our appliances are environmentally friendly. Some of the materials may be
recycled, others are deposited or decomposed. To avoid the pollution of
environment, once your appliance is no longer useful deliver it to your local
waste appliance authority.
Instructions for use
Description of washing machine . . . . . . . . . . . . . . . . . . . . . 3
Installation and connection . . . . . . . . . . . . . . . . . . . . . . . . . 4
Operation . . . . . . . . . . . . . . . . . . . . . . . . . . . . . . . . . . . . . . . 6
- washing procedure . . . . . . . . . . . . . . . . . . . . . . . . . . . . 6
- auxiliary functions . . . . . . . . . . . . . . . . . . . . . . . . . . . . . 8
- auxiliary programs . . . . . . . . . . . . . . . . . . . . . . . . . . . . 10
Tips for washing and energy saving. . . . . . . . . . . . . . . . . . 12
Cleaning and maintenance . . . . . . . . . . . . . . . . . . . . . . . . 13
Troubleshooting guide . . . . . . . . . . . . . . . . . . . . . . . . . . . . 13
Cautions . . . . . . . . . . . . . . . . . . . . . . . . . . . . . . . . . . . . . . . 17
Table of programs . . . . . . . . . . . . . . . . . . . . . . . . . . . . . . . 18
Fabric Type . . . . . . . . . . . . . . . . . . . . . . . . . . . . . . . . . . . . . 20
Consumption chart . . . . . . . . . . . . . . . . . . . . . . . . . . . . . . 20
Page 3
Instructions for use
3
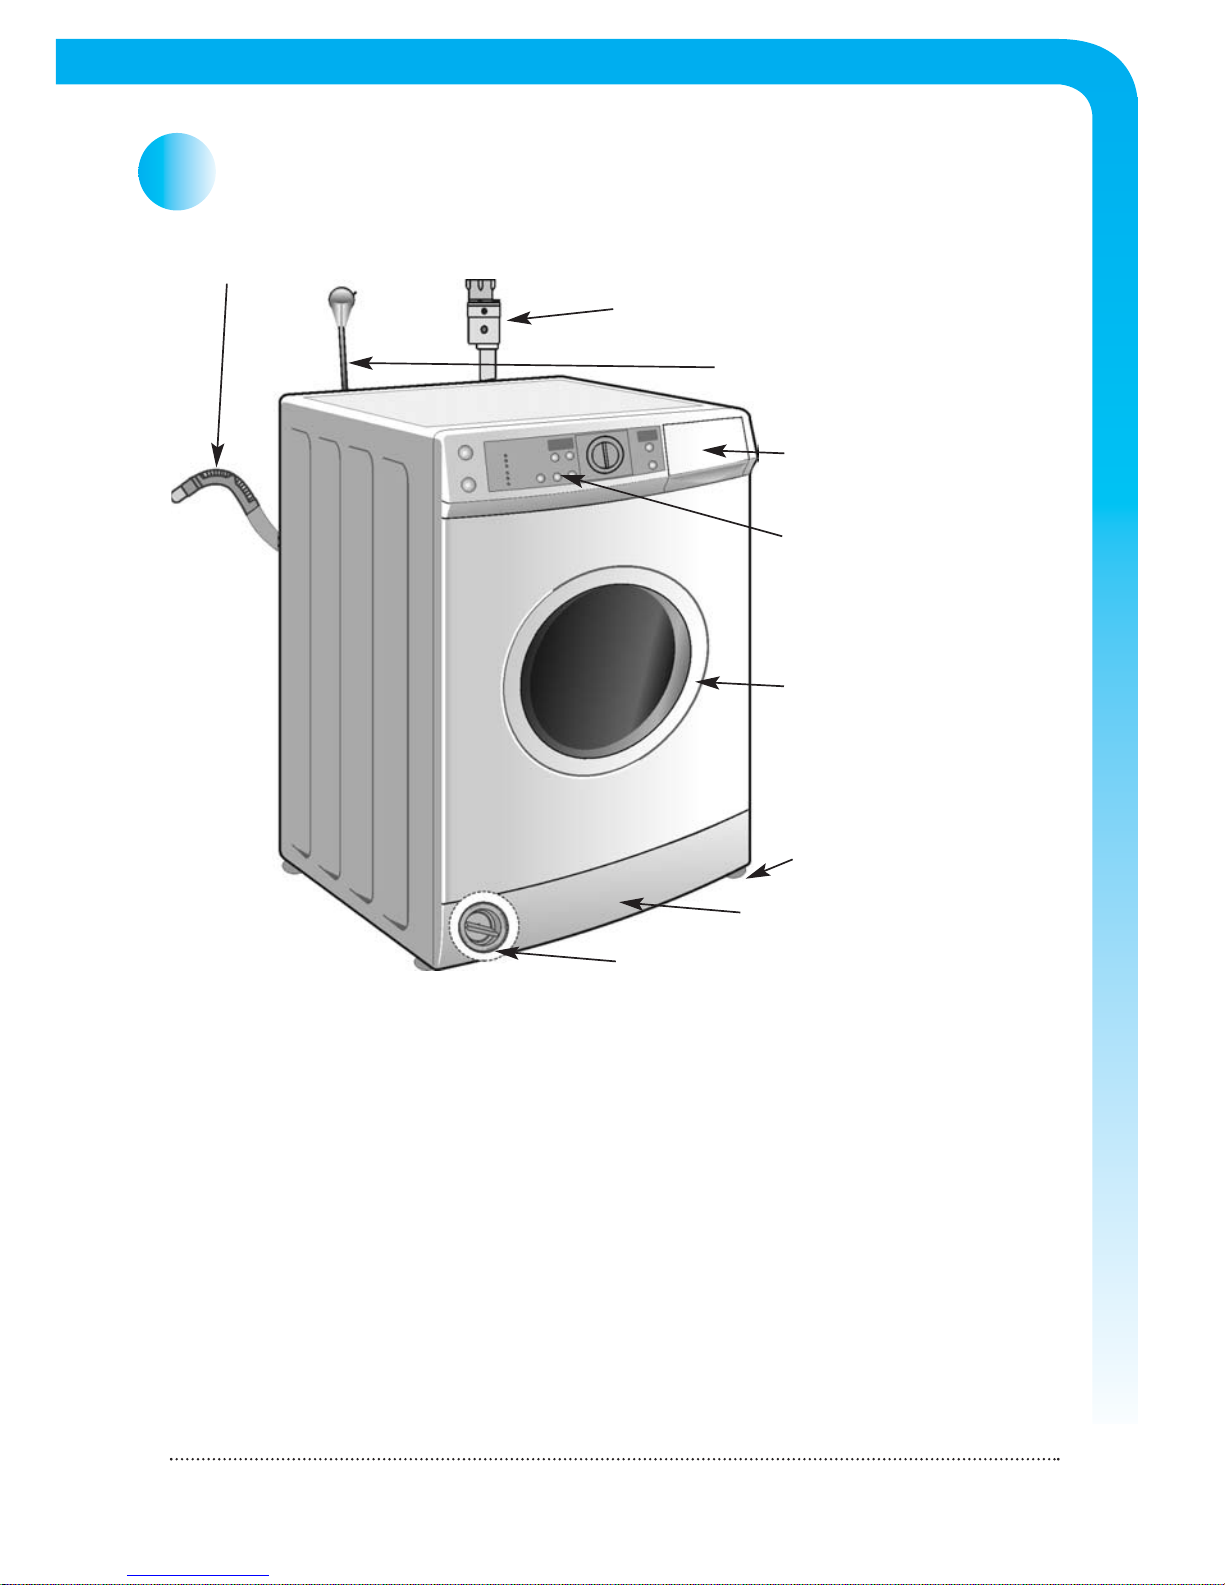
Description of washing machine
Technical information:
dimensions of the appliance (w x d x h) in cm: 60 x 60 x 85
depth of the appliance with open door: 103 cm
net weight of the appliance: 79 kg
mains voltage: 220-230 V, 50 Hz
mains power: 2200 W
max. load: 5 kg
mains connection: socket (230 V, 50 Hz, min 10 A)
water pressure: min 0,5 bar, max. 8 bar
plugtop fuse: 13amp
detergent dispenser
control panel
door
filter cover
filter
mains power lead
water inlet hose
water outlet hose
adjustable legs
Page 4
Instructions for use
4
Installation and connection
RReemmoovvee tthhee ppaacckkaaggiinngg
• Our products use environmentally friendly packaging, which can be either
recycled or disposed of in an environmentally friendly manner. To this end,
individual packaging materials are clearly marked.
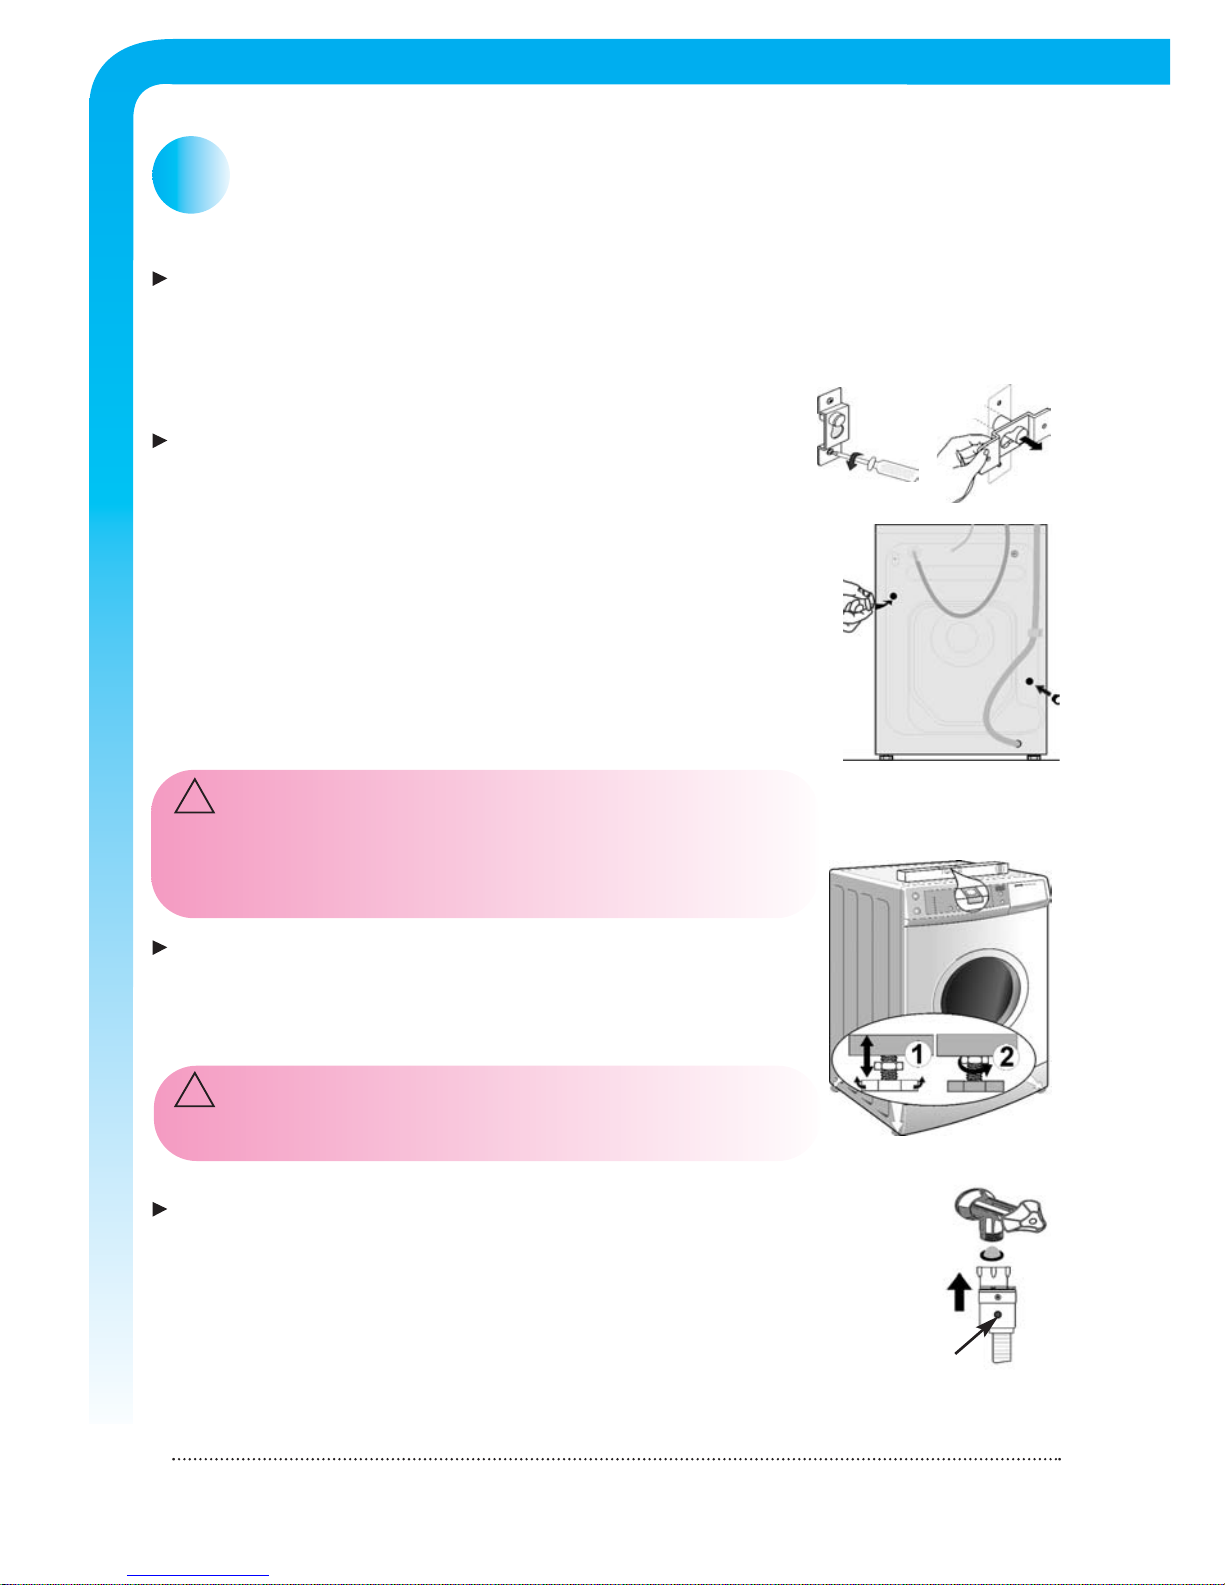
RReemmoovvee ttrraannssppoorrtt bbrraacckkeettss
• unscrew the screws at the rear plate of the appliance
• remove the brackets, turn them for 180° and pull out
the rods
• close the openings with attached plastic caps
• Disengaged parts may remain at the bottom of the
appliance since they do not obstruct the operation of
the machine.
Save the transport brackets for any transport of the
appliance at a later date.
BBee ssuurree ttoo rreemmoovvee tthhee ttrraannssppoorrtt bbrraacckkeettss pprriioorr ffiirrsstt
uussee,, ootthheerrwwiissee tthhee aapppplliiaannccee mmaayy bbee ppeerrmmaanneennttllyy
ddaammaaggeedd.. IInn ssuucchh ccaasseess tthhee wwaarrrraannttyy ccoonnddiittiioonnss aarree
vvooiidd..
LLeevveell tthhee aapppplliiaannccee
• Put the appliance in horizontal position by turning the
adjustable legs in either direction. The legs are
adjustable up to +/- 1 cm.
TThhee fflloooorr bbeellooww tthhee aapppplliiaannccee sshhoouulldd bbee ddrryy aanndd
cclleeaann,, ootthheerrwwiissee tthhee aapppplliiaannccee mmaayy sslliiddee..
CCoonnnneecctt tthhee aapppplliiaannccee ttoo wwaatteerr iinnlleett
• insert the gasket with screen into the water inlet hose thread
• screw the hose thread to the water supply
• If your appliance features hot and cold water connection you are
required to connect one pipe to the cold water supply and
another to the hot water supply, as marked by the diagram at the
back of the appliance. You will find the engraved letters C and H.
(C = cold and H = hot)
!
!
3/4”
A
Page 5
TToo eennssuurree aaccccuurraattee ooppeerraattiioonn ooff tthhee aapppplliiaannccee,, wwaatteerr pprreessssuurree iinnlleett mmuusstt
bbee bbeettwweeeenn 00,,55 aanndd 00,,88 bbaarr**..
WWaatteerr ssttoopp ssyysstteemm cclloosseess tthhee wwaatteerr iinnlleett ttoo tthhee mmaacchhiinnee aanndd tthhuuss pprrootteeccttss
aaggaaiinnsstt eevveennttuuaall ddaammaaggee aass aa rreessuulltt ooff hhoossee lleeaakkaaggee.. FFaauulltt iiss ssiiggnnaalllleedd bbyy tthhee
rreedd iinnddiiccaattoorr ""AA""..
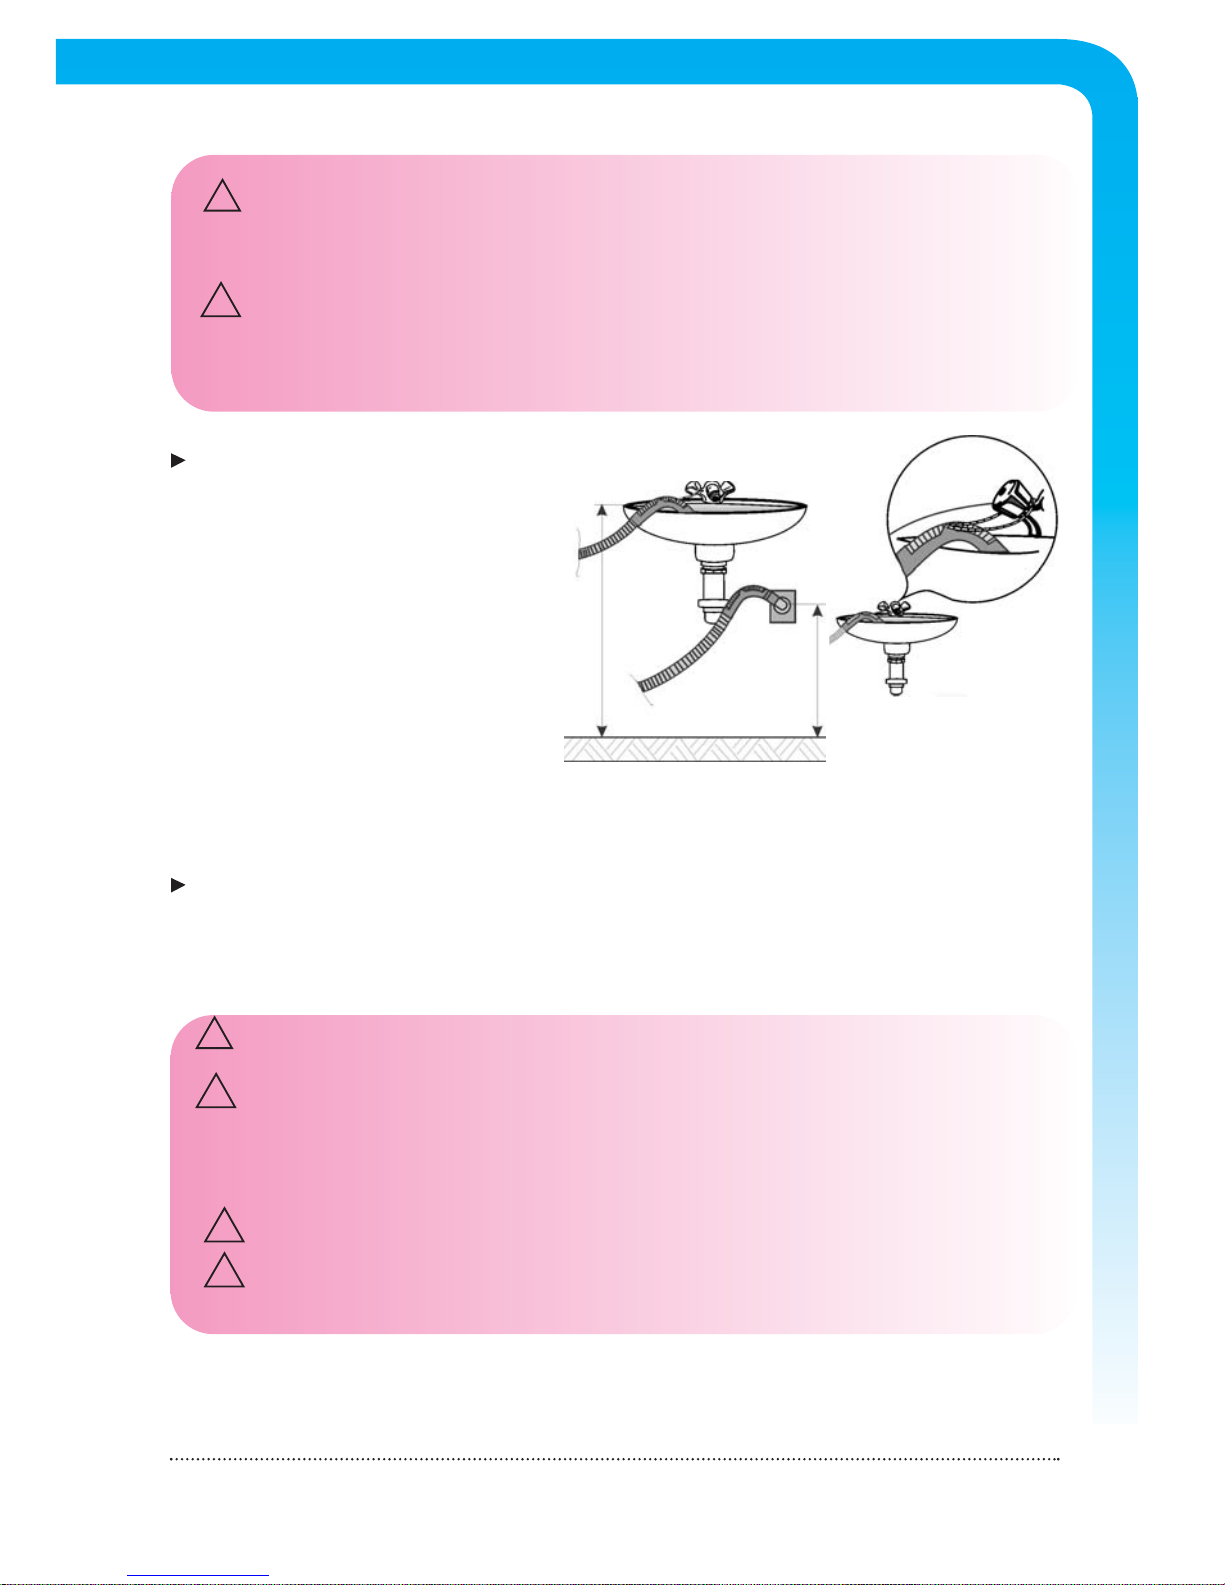
AAttttaacchh tthhee wwaatteerr oouuttlleett hhoossee
• fix the outlet hose to run into
the sink or the bathtub, or
connect it directly to the wall
drain outlet (diameter min.
4 cm)
• wall siphon drain must be
correctly fitted in such
manner to enable cleaning
• fasten the outlet hose
support with a piece of
string, to prevent the hose from slipping to the floor
The end of outlet hose should be placed between minimum 60 cm and
maximum 100 cm above the floor level.
CCoonnnneecctt tthhee aapppplliiaannccee ttoo tthhee mmaaiinnss ssuuppppllyy
• plug the mains power cable to the wall mains socket
• the required voltage and other relevant connection data are indicated on
the rating plate, placed above the door opening
TThhee wwaallll ssoocckkeett mmuusstt bbee aacccceessssiibbllee aatt aallll ttiimmeess aanndd mmuusstt bbee eeqquuiippppeedd
wwiitthh aann eeaarrtthh lleeaadd ((iinn aaccccoorrddaannccee wwiitthh tthhee llooccaall ssaaffeettyy rreegguullaattiioonnss))..
IInn ccaassee tthhee aapppplliiaannccee iiss ccoonnnneecctteedd ttoo aa ssoocckkeett pprrootteecctteedd wwiitthh ssaaffeettyy
sswwiittcchh,, tthhee ppoowweerr ooff ssuucchh ssaaffeettyy sswwiittcchh mmuusstt bbee 3300 mmAA ((mmaarrkkeedd bbyy llddnn oorr
ll∆∆nn)).. IIff tthhee iinnssttaallllaattiioonn ffeeaattuurreess ssaaffeettyy sswwiittcchh wwiitthh lleessss nnoommiinnaall ppoowweerr,, tthhee
mmaaiinnss ppoowweerr ttoo tthhee aapppplliiaannccee mmiigghhtt bbee iinntteerrrruupptteedd dduurriinngg iittss nnoorrmmaall
ooppeerraattiioonn..
TThhee ppeerrmmaanneenntt ccoonnnneeccttiioonn mmuusstt bbee ffiitttteedd bbyy aann aauutthhoorriizzeedd ppeerrssoonnnneell
oonnllyy..
DDaammaaggeedd mmaaiinnss ppoowweerr ccaabbllee mmaayy bbee rreeppllaacceedd oonnllyy bbyy tthhee pprroodduucceerr
oorr hhiiss aauutthhoorriizzeedd ppeerrssoonnnneell..
* Minimum water pressure may be measured by the quantity of water discharge: in 15 seconds a completely
open tap must discharge 3 liters of water.
Instructions for use
5
!
!
!
!
!
!
MAX 100 CM
MIN
60 CM
Page 6
Instructions for use
6
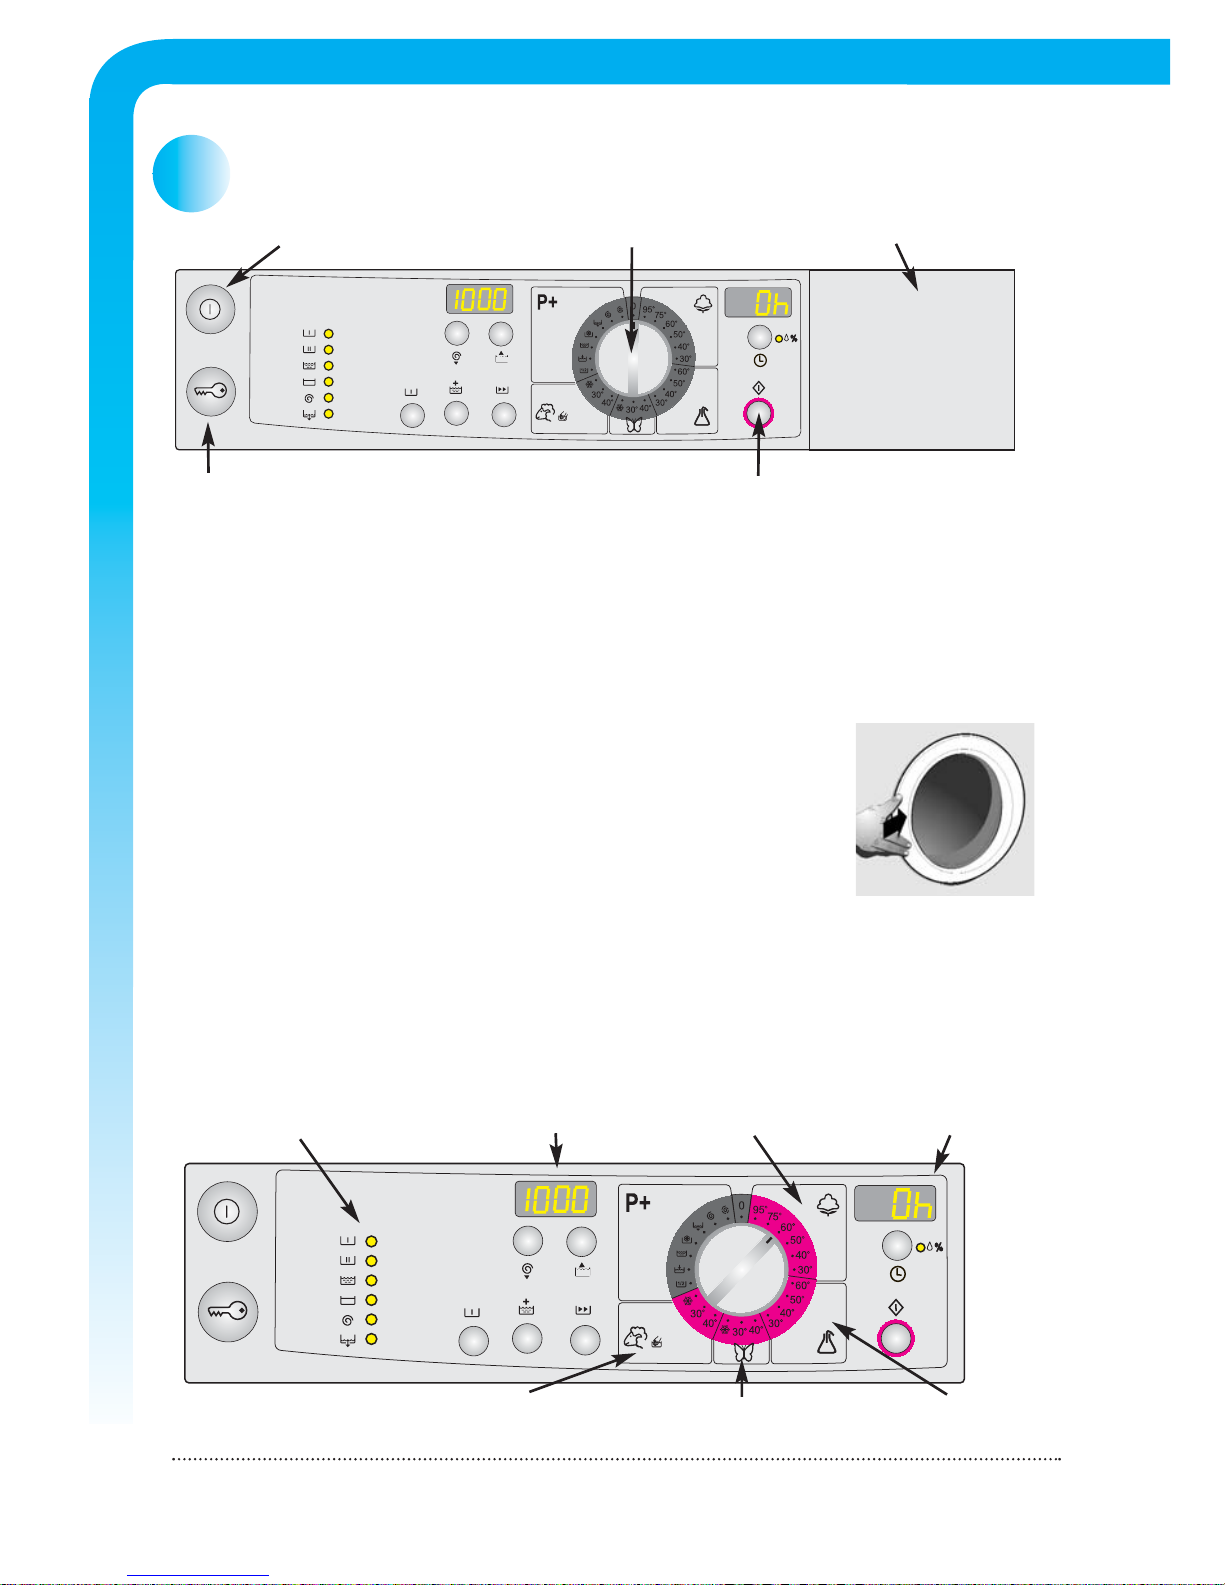
Operation
Washing procedure
11.. OOppeenn tthhee wwaatteerr iinnlleett ttaapp
22.. SSttaarrtt tthhee ooppeerraattiioonn
• push the ON/OFF button
((AA))
• the right display indicates
00hh
, washing cycle
iinnddiiccaattoorr llaammppss
are on
33.. OOppeenn tthhee ddoooorr ooff tthhee mmaacchhiinnee
by pushing the key button
((BB))
44.. LLooaadd tthhee llaauunnddrryy iinnttoo tthhee ddrruumm
55.. CClloossee tthhee ddoooorr
66.. SSeelleecctt tthhee wwaasshhiinngg pprrooggrraamm
• by turning the program selector
((CC))
select the desired
washing program according to the type of laundry washed
and the required washing temperature. The program group indicator lamp is
lit (for help use the table of programs and the selection of additional
functions at the end of this manual)
• the
rriigghhtt ddiissppllaayy
indicates washing time in minutes
• the
lleefftt ddiissppllaayy
indicates water consumption in liters
• selected program may be changed at random prior to pushing the START
button
((AA))
((BB))
((EE))
((CC))
((DD))
washing cycle indicator lamps
right displayleft display
cotton laundry
programs
synthetic laundry
programs
delicate laundry
programs
wool and manual wash
programs
Page 7
Instructions for use
7
!
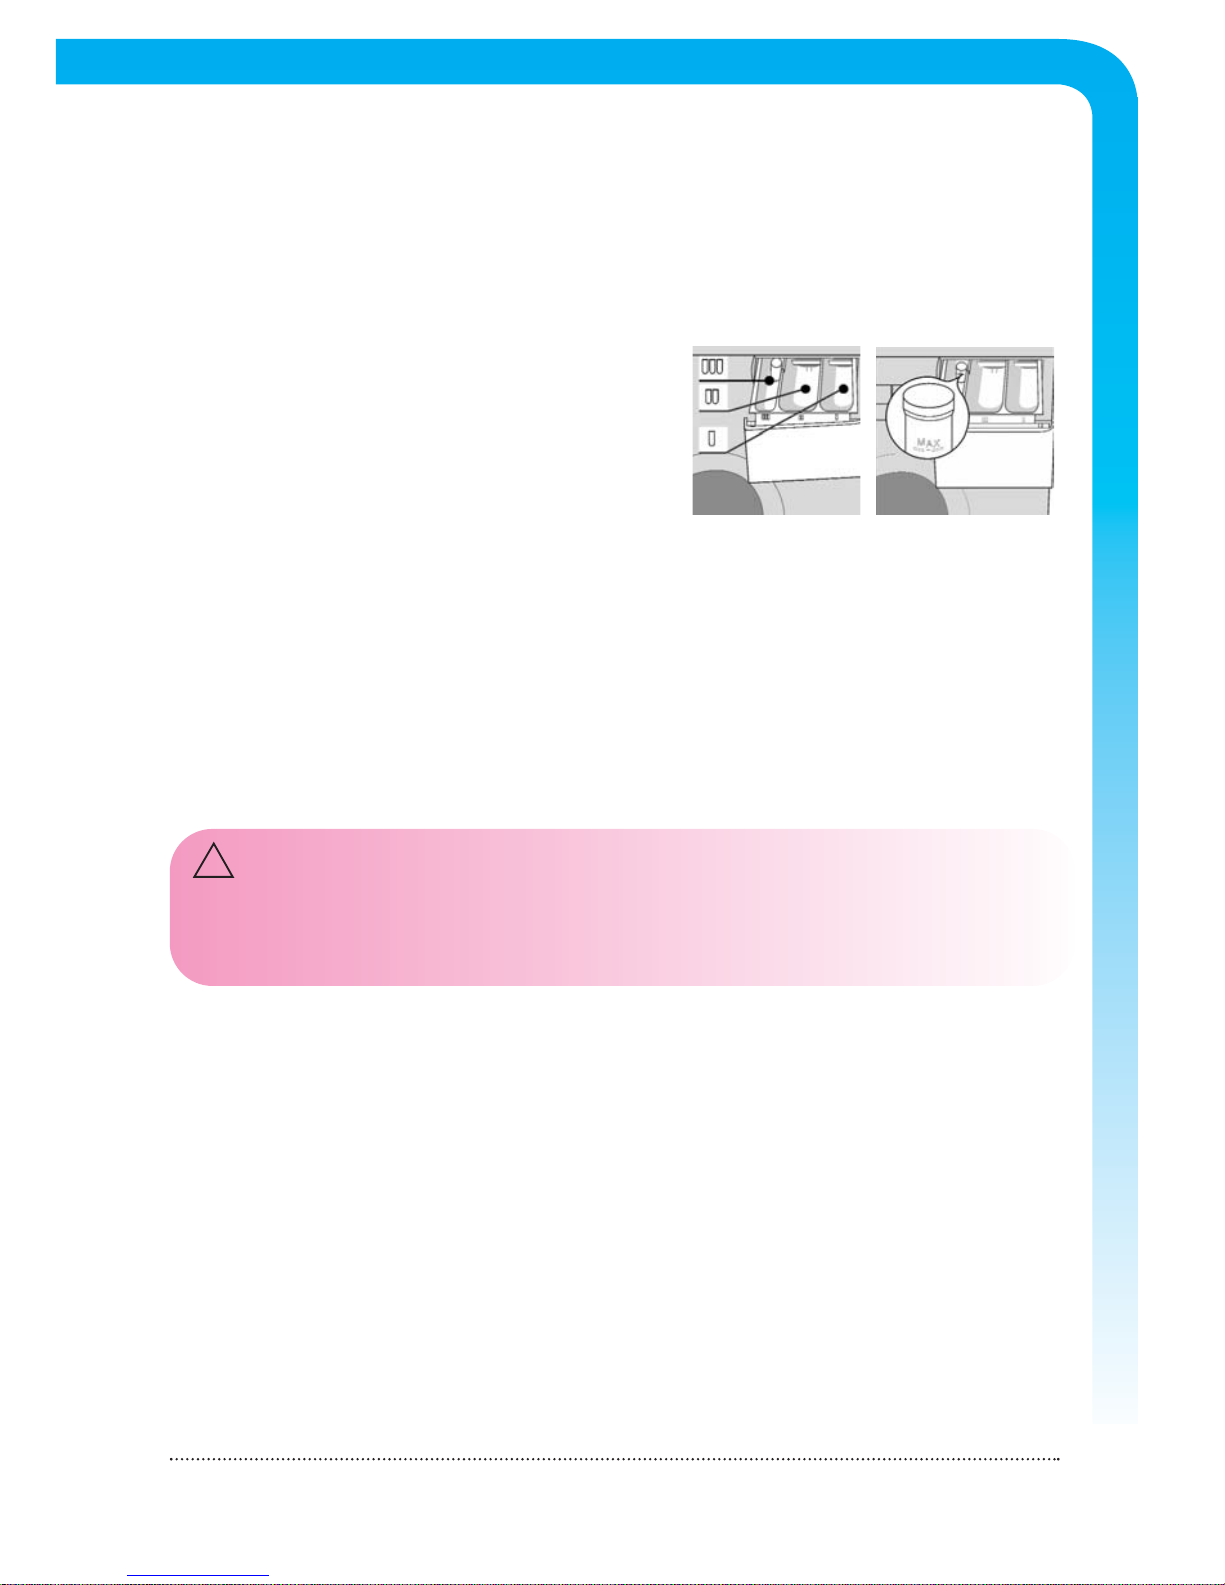
77.. AAdddd wwaasshhiinngg ddeetteerrggeenntt aanndd ssoofftteenneerr ((DD))
(see section washing tips)
• pre-wash compartment I
• main wash compartment II
• softener compartment III
• in case pre-wash function is not used,
washing detergent may be added directly
into the drum, using the measuring vessel
88.. SSttaarrtt tthhee ooppeerraattiioonn
• push the START button
((EE))
(the machine starts operation after 5 second
lapse)
• each washing cycle
iinnddiiccaattoorr llaammpp
gradually goes off as the particular
washing phase is completed
• in case you would like to alter the washing program after the initiated
washing operation, turn the program selector for one second to the
position 0, followed by the selection of a new program. Switching the
machine off deletes any previously selected additional functions, so they
have to be reactivated.
IIff aa ppoowweerr ffaaiilluurree ooccccuurrss dduurriinngg tthhee wwaasshhiinngg pprrooggrraamm,, oorr iiff tthhee mmaacchhiinnee
iiss ddeelliibbeerraatteellyy ssttooppppeedd bbyy ppuusshhiinngg tthhee SSttaarrtt//SSttoopp bbuuttttoonn,, aatt tthhee nneexxtt ssttaarrtt ooff
wwaasshhiinngg tthhee mmaacchhiinnee wwiillll rreessuummee tthhee eexxeeccuuttiioonn ooff aa pprrooggrraamm wwhheerree iitt hhaadd
bbeeeenn iinntteerrrruupptteedd..
99.. EEnndd ooff ooppeerraattiioonn
• the
rriigghhtt ddiissppllaayy
flashes the word "End" (2 min.) - the door may not be opened
• the beep signal (
rriigghhtt ddiissppllaayy
reads
""EEnndd""
) indicates that the door of the
machine may now be opened
• extract the laundry from the drum and remove any alien objects from the door
gasket
• if you wish to continue washing, turn the program selector for one second to
the position 0, and follow the procedure from step 4 above
• leave the door ajar to allow the interior to dry
• close the water inlet
• switch the machine off by pushing the ON/OFF button
Page 8

Instructions for use
8
Selection of additional functions
• additional functions alter the basic washing cycle procedure
AAddddiittiioonnaall ffuunnccttiioonnss aarree sseett aafftteerr tthhee sseelleeccttiioonn ooff bbaassiicc wwaasshhiinngg
pprrooggrraamm,, bbuutt bbeeffoorree ppuusshhiinngg tthhee SSTTAARRTT bbuuttttoonn..
PPrree--wwaasshh
••
it is used for the removal of superficial dirt (mud, dust) from the laundry
••
it may be used only in relation to the washing programs for cotton, delicate
laundry and synthetics
••
it is switched on by pushing the appropriate knob
((FF))
(and switched off by
the following push)
••
the appropriate
iinnddiiccaattoorr llaammpp
is lit when the function is activated
AAddddiittiioonnaall rriinnssee
••
it is intended for people sensitive to washing agents, or for small children
••
one push of the button
((GG))
determines one additional rinse, two pushes select
two rinses (
lleefftt ddiissppllaayy
indicates the quantity of water, while the
rriigghhtt ddiissppllaayy
reads the washing time), third push of the button disengages the function
••
it may be used only in relation to the washing programs for cotton and
synthetics.
WWaatteerr lleevveell
••
this function provides better rinse, important for people with skin irritation caused
by detergents
••
it is used for washing of heavily soiled laundry
••
one push of the button
((HH))
determines one additional water level, two pushes
select two levels up (
lleefftt ddiissppllaayy
indicates the increased quantity of water, while
the washing time on the
rriigghhtt ddiissppllaayy
remains unchanged), third push of the
button disengages the function.
!
((KK))
((FF))
((GG)) ((II))
((HH))
((JJ))
Page 9

Instructions for use
9
SShhoorrtteenneedd pprrooggrraamm
• it is intended for use with less soiled laundry
• it enables reduced consumption of detergents, water and time
• it is engaged by pressing the appropriate button
((II))
(right
ddiissppllaayy
indicates
washing time)
• the function is disengaged by the successive push of the button.
RReegguullaattiioonn ooff ssppiinn RRPPMM
• Number of spin RPM is selected by pressing the appropriate button
((JJ))
(the
lleefftt ddiissppllaayy
indicates the RPM, and the
rriigghhtt ddiissppllaayy
indicates the
percentage of humidity left in laundry) - the humidity indicator is flashing.
SSppiinn RRPPMM mmaayy bbee aalltteerreedd dduurriinngg tthhee ooppeerraattiioonn ooff tthhee wwaasshhiinngg pprrooggrraamm!!
PPuummpp ssttoopp
••
used if the laundry is expected to remain in the machine for some time -
crease prevention
••
it stops the washing procedure at the end of the washing cycle, prior spinning
- water remains in the drum
••
it is switched on by multiple consecutive pressing of the spin RPM selection
button
((JJ)) (lleefftt ddiissppllaayy
indicates the symbol )
••
indicator light adjacent to the washing cycle symbol is lit
••
the program is completed by pushing the START button, or by applying
additional programs (P+) pumping or spinning.
DDeellaayyeedd ssttaarrtt ttiimmeerr
••
delayed start of washing program may be set up to 12 hours
••
select the time by pushing the button
((KK))(rriigghhtt ddiissppllaayy
indicates the delayed time)
••
push the START button
••
when the preset time expires, the machine is automatically switched on.
!
Page 10

P+ additional programs
• they are used for laundry which you
do not intend to submit to the
complete washing program
• they are not used together with basic
programs for cotton, wool, delicate
laundry and synthetics (except the
soaking program)
• in case you might want to us several
consecutive washing programs,
before each program you must set
the program selector to 0 and wait for
one second,
sseelleecctt tthhee ddeessiirreedd pprrooggrraammmmee aanndd pprreessss tthhee ssttaarrtt bbuuttttoonn ttoo
ccoonnffiirrmm sseelleeccttiioonn..
MMiinnii pprrooggrraamm
This is an independent program intended for:
• washing small quantities of laundry and less soiled coloured laundry
• economical washing means less consumption of detergent and shorter
washing time
• carry the washing procedure from 1 to 5, then swing the program selector
to the symbol and carry on the procedures 7, 8 and 9.
• you may use it as an independent program, but if you wish to combine it
with pump stop, extra rinse and/or reduced spin RPM, press the
appropriate buttons for these functions.
SSooaakkiinngg
• removes stubborn stains
• it may be used in two ways:
aa)) iinnddeeppeennddeenntt ssooaakkiinngg
• carry on the washing procedure from 1 to 5
• turn the program selector to soaking
• add detergent into the pre-wash compartment or directly into the drum
• press the START button,
rriigghhtt ddiissppllaayy
reads 59. Upon the end of tumbling
(after 59 minutes) it reads 9h (laundry remains in water). After 9 hours
water is automatically pumped out.
bb)) SSooaakkiinngg aass aann aaddddiittiioonn ttoo tthhee oorriiggiinnaall pprrooggrraamm
• carry on the washing procedure from 1 to 5
• select the desired basic washing program with the program selector
• press the START button
• within 6 seconds (washing time is flashing on the
rriigghhtt ddiissppllaayy
) set the
program selector to soaking
Instructions for use
10
Page 11

• add detergent into the compartment I or directly into the drum (add
softener into the compartment III if you wish)
• press the START button
• at this setting the original washing program automatically starts
operating after 1 hour of soaking.
RRiinnssee
• the program is used for rinsing manually washed laundry
• for people with skin sensitive to detergents
• carry out the washing procedure from 1 to 5, then switch the program
selector to and continue with the steps 7, 8 and 9.
• it may be used as an independent program; if you wish to combine it with
the pump stop function, press the appropriate button.
SSoofftteenniinngg
• this program is intended for softening, bleaching or impregnating, and
spinning of washed laundry
• turn the program selector to and continue with the steps 7, 8 and 9.
• it may be used in combination with the reduction of spin RPM function,
since the program applies the highest possible spin RPM.
PPuummppiinngg tthhee wwaatteerr oouutt
• it is used for pumping the water out after the completed washing cycle
• turn the program selector to and continue with the steps 8 and 9.
PPoowweerrffuull ssppiinn
• for non-delicate laundry
• at highest spin RPM
• set the program selector to and continue with the steps 8 and 9.
DDeelliiccaattee ssppiinn
• for delicate laundry
• maximum 1000 spin RPM
• set the program selector to and continue with the steps 8 and 9
• a combination is possible with the reduced spin RPM function.
Instructions for use
11
Page 12

Instructions for use
12
Tips for washing and energy saving
• Before washing sort out the laundry according to the type, degree of
dirtiness and colour fastness.
• Prior selecting the washing program consult the sewn tab with information
on a particular piece of laundry (see chart).
• New coloured textile products wash separately for the first time.
• Wash heavily soiled laundry in small quantities and add more detergent.
• Treat stubborn stains with special stain remover, it will save energy.
• with lightly stained laundry the pre-wash may be omitted, use short washing
program, and select lower washing temperature. This way you may save up
to 50% of energy.
• Before washing, empty the pockets, close zip fasteners, and remove any
metal fasteners or badges that might clog the drain or damage the laundry
or drum interior.
• Loosen the stacked laundry prior inserting it into the drum.
• Use only detergents for machine wash.
• Add powder or liquid detergents according to the manufacturer's
instructions.
• In case of hard water it is recommended to use water softeners.
• In case of washing without the pre-wash program, the detergent may be
loaded directly into the drum.
• If you use thick liquid detergent it is recommended to dilute it with water, to
prevent clogging of dispenser compartment ducts.
• If the washing machine is equipped with the dispenser partition gate, you
may pour liquid detergent also into the central compartment. If you use
powder detergent the partition is lifted up, and in case of liquid detergent it
is slid down (see fig.).
• We recommend using liquid detergent with washing programme without
prewash.
• High spin RPM provides completely spinned laundry which dries out much
quicker in the tumble dryer, thereby saving the
drying energy.
• Do not wash large volume items such as duvets
or pillows
Page 13

Instructions for use
13
!
Cleaning and maintenance
DDiissccoonnnneecctt tthhee wwaasshhiinngg mmaacchhiinnee ffrroomm tthhee mmaaiinnss bbeeffoorree aannyy cclleeaanniinngg iiss
aatttteemmpptteedd!!
• The casing should be cleaned with
soft cloth and mild detergent.
• If any greasy deposits are detected
within the drum or around the door
gasket, it is recommended to clean
the machine by starting the washing
program at 60°C without any laundry
and with half the normal dosage of
detergent.
• If necessary, clean the detergent dispenser with
a brush and dry it.
• Clean frequently the water inlet hose screen
under running water.
• After each wash wipe the door rubber gasket.
This will prolong the life of the gasket.
• If the appliance is handled properly, there is no
need for special cleaning of the filter. In case
larger alien object clogged the water outlet, the
machine signals the fault, and filter must be
cleaned. Before cleaning drain the water from
the machine by placing the drain hose to the
ground and let the water out.
Remove the cover (see picture.) and clean the
filter.
Troubleshooting guide
The washing machine automatically monitors the execution of particular
functions during the operation, and reports any detected failures. In such cases
the beep is heard and the
rriigghhtt ddiissppllaayy
indicates the nature of failure (F …).
Respective signal lamp, adjacent to the washing program symbols flashes in
accordance with the nature of the detected failure.
Failures F1 and F4 are reported after the washing cycle is completed, because
the machine completes the washing program despite the heating failure, but in
such cases all heating positions are omitted.
Other failures are reported immediately when detected, and the program
operation is stopped.
RReeppaarraattiioonn ooff ffaaiilluurreess FF22 aanndd FF55 mmaayy iinn ssoommee ccaasseess bbee aatttteemmpptteedd bbyy tthhee uusseerr,,
wwhhiillee aallll ootthheerr ffaaiilluurreess rreeqquuiirree tthhee mmaacchhiinnee ttoo bbee sswwiittcchheedd ooffff aanndd tthhee ffaaiilluurree
rreeppoorrtteedd ttoo tthhee nneeaarreesstt sseerrvviicciinngg cceenntteerr..
Page 14

Instructions for use
14
Possible cause
Machine is not powered.
Door is not properly
closed.
Disturbed water inlet.
Filter is not tightly
screwed in.
Inlet pipe is not tightly
screwed to the machine
or to the water tap.
Outlet pipe fell to the
floor.
The machine is not
properly levelled.
Transport brackets are
not removed.
Uneven distribution of
laundry, especially with
very small quantities
(for ex. only the
bathrobe)
Excessive measure of
detergent.
Failure
The machine does not
work(symbols are not
illuminated).
Washing program does
not start (right display
flashes the washing
time).
Water does not enter
the machine, after
approx. 4 min the
machine reports failure
F2
Water is leaking from
the machine.
The machine moves
during operation.
The machine vibrates
during the spin.
Excessive foaming
during washing.
Remedy
Check if:
• power in the socket;
• the fuse is OK.
• plug is in the socket.
Push it towards the
machine.
Check if:
• the water tap is
open;
• inlet pipe mesh filter
is clean.
Push the START button.
Tighten the filter properly.
Tighten the inlet pipe.
Affix the outlet pipe to
the drain.
Level the machine with
the adjustable legs.
Remove transport
brackets.
This is normal, the
machine will reduce the
RPM if vibrations are too
strong.
Use washing powder
according to the
instructions by the
producer and according
to the water hardness and
soiled laundry.
Page 15

Instructions for use
15
Failure
Water is poorly pumped
out or not at all.
Failure F5 is reported.
Laundry is not spinned
as usual.
No failure is reported.
Greasy deposits appear
on the laundry.
Laundry is stained after
washing.
White powdery residues
on the laundry.
Possible cause
Water outlet is clogged.
The machine switched
on the UKS function.
Because of bad laundry
balance, the machine
has automatically
reduced spin RPM.
Too little detergent
(laundry was very
greasy).
You used liquid detergent
or detergent for coloured
laundry which does not
contain whitener.
It is not the
consequence of bad
rinsing, but because of
neo-phosphate
detergents containing
non soluble components
(zeolites) for water
softening. Such
substances may be
deposited upon the
laundry.
Remedy
Check if:
• the filter is clean;
• outlet pipe is not
jammed;
• the drain is clogged;
• outlet pipe is posi-
tioned higher than 1 m.
Push START again.
The machine operates
normally. Wash large
and small pieces of
laundry together.
Wash the laundry
again.
Add more detergent for
such soiled laundry, or
use liquid detergent.
Use the detergent
containing whitener.
• Immediately rinse the
laundry once again.
• Use liquid detergents
which do not contain
zeolites.
• Try removing the
residues with the
brush.
* UKS: stability of machine during the spining cycle
Page 16

Instructions for use
16
Failure
Detergent residues in
the dispenser.
Softener is not
completely rinsed, or
water is left in the
dispenser dish.
Washing time is longer
than the display indicated
at the beginning of the
program; during the
operation the washing
time had jumped back to
the preceding position.
Possible cause
Low water flow
pressure.
Some detergents may
stick to the dispenser
rather hard if it is wet.
Syphon cover is not
correctly positioned or
is clogged.
The machine switched on the
UKS system because of
uneven laundry load.
Because of excessive
foaming during the rinse
cycle, the machine adds extra
water and repeats draining.
Remedy
• Clean the inlet pipe
filter net.
• In case of low water
pressure increase
water level.
• Wipe the dispenser
prior loading
detergent.
Clean the dispenser
and firmly fix the cover
to its place.
Washing program time
may be prolonged for
10 minutes and the
machine still functions
perfectly.
In case you were not successful in repairing the malfunctions in spite of the
above suggestion chart, call the nearest authorized service shop.
Repairing the failure arising from inappropriate connections or use of the
appliance is not covered by the guarantee, and the repair expenses are paid
by the customer.
Page 17

Cautions
• Be sure to remove transport brackets prior first use of the appliance.
Attempted operation of the blocked machine may result in irreparable
damage which is not covered by the manufacturer's warranty!
• Remove transport brackets.
• Do not locate the machine in a room with temperature below 0°C. Parts of
the machine may be damaged if frozen.
• Install the washing machine in a perfectly horizontal position, on solid flat
floor.
•
TThhee aapppplliiaannccee mmyy nnoott bbee bbuuiilltt--iinn uunnddeerr tthhee kkiittcchheenn wwoorrkkttoopp iinn aa rrooww ooff
ccaabbiinneettss,, bbeeccaauussee tthhee uussee ooff tthhee aapppplliiaannccee wwiitthhoouutt tthhee ttoopp ccoovveerr iiss nnoott
aalllloowweedd ffoorr ssaaffeettyy rreeaassoonnss.. LLiikkeewwiissee,, tthhee rreemmoovvaall ooff tthhee rreeaarr ppaanneell aanndd tthhee
bboottttoomm ooff tthhee aapppplliiaannccee aarree aallssoo nnoott aalllloowweedd..
• The appliance should be positioned in such way to provide normal
ventilation.
• Follow the instructions for correct installation and water and mains
connections.
• Never immerse the end of the drain hose into the draining water.
• Prior starting the washing cycle lock the door by pressing them at the
designed spot.
• Door may not be open during the washing cycle.
• Use only detergents and softeners for machine wash. Manufacturer may
not assume responsibility for any damage and eventual discolouring of
gaskets and plastic components as a consequence of incorrect use of
bleach and/or colouring agents.
• For removal of lime use such agents with added anti-corrosion agents.
Follow the manufacturer's instructions. Finish the lime removal by multiple
rinsing to remove completely eventual acid residues.
• Never use detergents containing solvents, since there is a danger of
creating toxic gases which may damage the machine and result in ignition
or explosion.
• Upon completion of washing operation close the water tap.
• Before any further transport block the machine by inserting the transport
brackets. Disconnect the machine from the mains!
• Rating plate is located above the opening for laundry, below the door
frame.
Instructions for use
17
Page 18

non-delicate cotton and flax
fine cotton, synthetics/cotton mix,
colour resistant synthetics
delicate synthetics,
micro-fibres
machine wash wool, wool mixtures,
silk marked manual wash
lightly soiled coloured laundry
all except wool
manually washed laundry
washed laundry intended for
softening, bleaching and spinning
manually washed non-delicate laundry
manually washed delicate laundry
PROGRAM
TYPE OF LAUNDRY
Program chart
Instructions for use
whites/coloured
coloured
fine fibres
delicate
wool
manual wash
PP++ aaddddiittiioonnaall pprrooggrraammss
mini program
soaking
rinsing
softening
bleaching
pumping
powerful spin
delicate spin
18
Page 19

• pre-wash
• soaking
• short program
• water level selection
• pump stop
• additional rinse
• reduced RPM
• pre-wash
• soaking
• short program
• water level selection
• pump stop
• reduced RPM
• short program
• water level selection
• pump stop
• reduced RPM
• pump stop
• additional rinse
• reduced RPM
• pump stop
• reduced RPM
• reduced RPM
• reduced RPM
30 - 95
30 - 60
30 - 60
- 40
- 40
40
40
5
2,5
1,5
1
2,5
5
2,5
5
5
2,5
1600
1500
1400
1300
1200
1000
700
1000
max.
700
max.
max.
1000
ADDITIONAL FUNC-
TIONS/PROGRAMS
SPIN MAX RPM
MAXIMUM
LOAD kg
TEMPERA-
TURE°C
G
G
Instructions for use
19
Page 20

Page 21

 Loading...