

Page 1
MEGA 5SS
How to get the most
from your
Washing Machine
R
Page 2

Page 3

ENGLISH
Dear customer,
Thank you for choosing our product.
Please read these instructions carefully before connecting and using the m achine.
An awareness of how the machine operates will help guarantee its correct and safe use. The instructions
also contain some useful information on the machine’s functions that will help you get the most out of its
use.
If you decide to sell or give the washing machine to someone else, remember to give the instruction book
to the new owner.
GB
INDEX
NOTES AND USEFUL ADVICE FOR THE USER 4
DESCRIPTION OF THE MACHINE 4
INSTALLING THE MACHINE 5-7
• Unblocking the machine 5
•Positioning and levelling the machine 5
• Connecting to the water supply system 6
• Connecting to the power supply 6-7
USING THE WASHING MA CHINE 7-9
• Using the machine 7
• Use of detergents 7-8
•How to eliminate stains 8-9
• International clothing care symbols 9
MAINTENANCE 9-11
• Cleaning the machine 9
• Removing the detergent drawer 10
• Cleaning the filter 10
•Troubleshooting 10-11
TECHNICAL DATA 11
MAIN MACHINE FUNCTIONS 12
DESCRIPTION OF FUNCTIONS 12
• On/off knob or button 12
• No-drain button 12
• No-spin button 12
• Half-load button 12
• Extra rinse button 12
• 550/max spin speed button 12
•Temperature limit button 12
•Timer knob 12
•Variable spin 13
USING THE MACHINE 14
• Starting the machine 14
WASHING PROGRAMMES 14-15
MODEL: ..........................................................................................................................................................................
PRODUCTION CODE: ...............................................................................................................................................
DATE OF PURCHASE: ........................................................................................................................................................
SM1253
3
Page 4
GB
NOTES AND USEFUL ADVICE FOR THE USER
The machine must not be in-
❃
stalled outdoors, e v en if protected by a roof, in that atmospheric agents may
cause irreparable damage
This appliance has been de-
❃
signed for use as a domestic
washing machine. Any other
use is considered as improper and therefore dangerous.
The appliance must only be
❃
used by adults.
The appliance is very heavy
❃
and requires utmost care
when being moved.
If the machine is to stand on
❃
a carpeted floor , ensure that
there is suf ficient space for air
to circulate between the
floor and the bottom of the
machine.
The appliance must not be
❃
used or touched barefoot or
with wet or damp hands or
feet.
When positioning the appli-
❃
ance, ensure that the po wer
supply cable is not kinked or
squashed and is accessible.
f it becomes necessary to re-
❃
place the power supply cable, refer exclusively to an
authorised service centre.
Do not use extension leads,
❃
especially in a damp atmosphere.
Do not pull the power cable
❃
or appliance to remove the
plug from its socket.
Do not use detergents de-
❃
signed for hand washing, in
that the excessive suds produced could damage the
internal components.
When the appliance is in op-
❃
eration, avoid any contact
with the water being discharged through the drain
hose, as it may be very hot.
Do not touch the door glass,
❃
as this will tend to heat up
during a wash.
At the end of the wash, wait
❃
approximately three minutes
before opening the door, as
it is fitted with a safety de vice
that prevents it from being
opened accidentally.
It is advisable to leave the
❃
door open after completion
of the wash cycle.
In the case of faulty opera-
❃
tion, switch off the machine
by remo ving the plug from its
socket using dry hands.
Never try to access internal
components or attempt to
repair the machine, instead
refer exclusively to an author ised assistance centre.
THE MANUFACTURER WILL NOT
BE HELD RESPONSIBLE FOR
ANY ACCIDENTS THAT MAY RESULT FROM NON-COMPLIANCE
WITH THE REQUIREMENTS OF
SAFETY STANDARDS OR THIS INSTRUCTION MANUAL
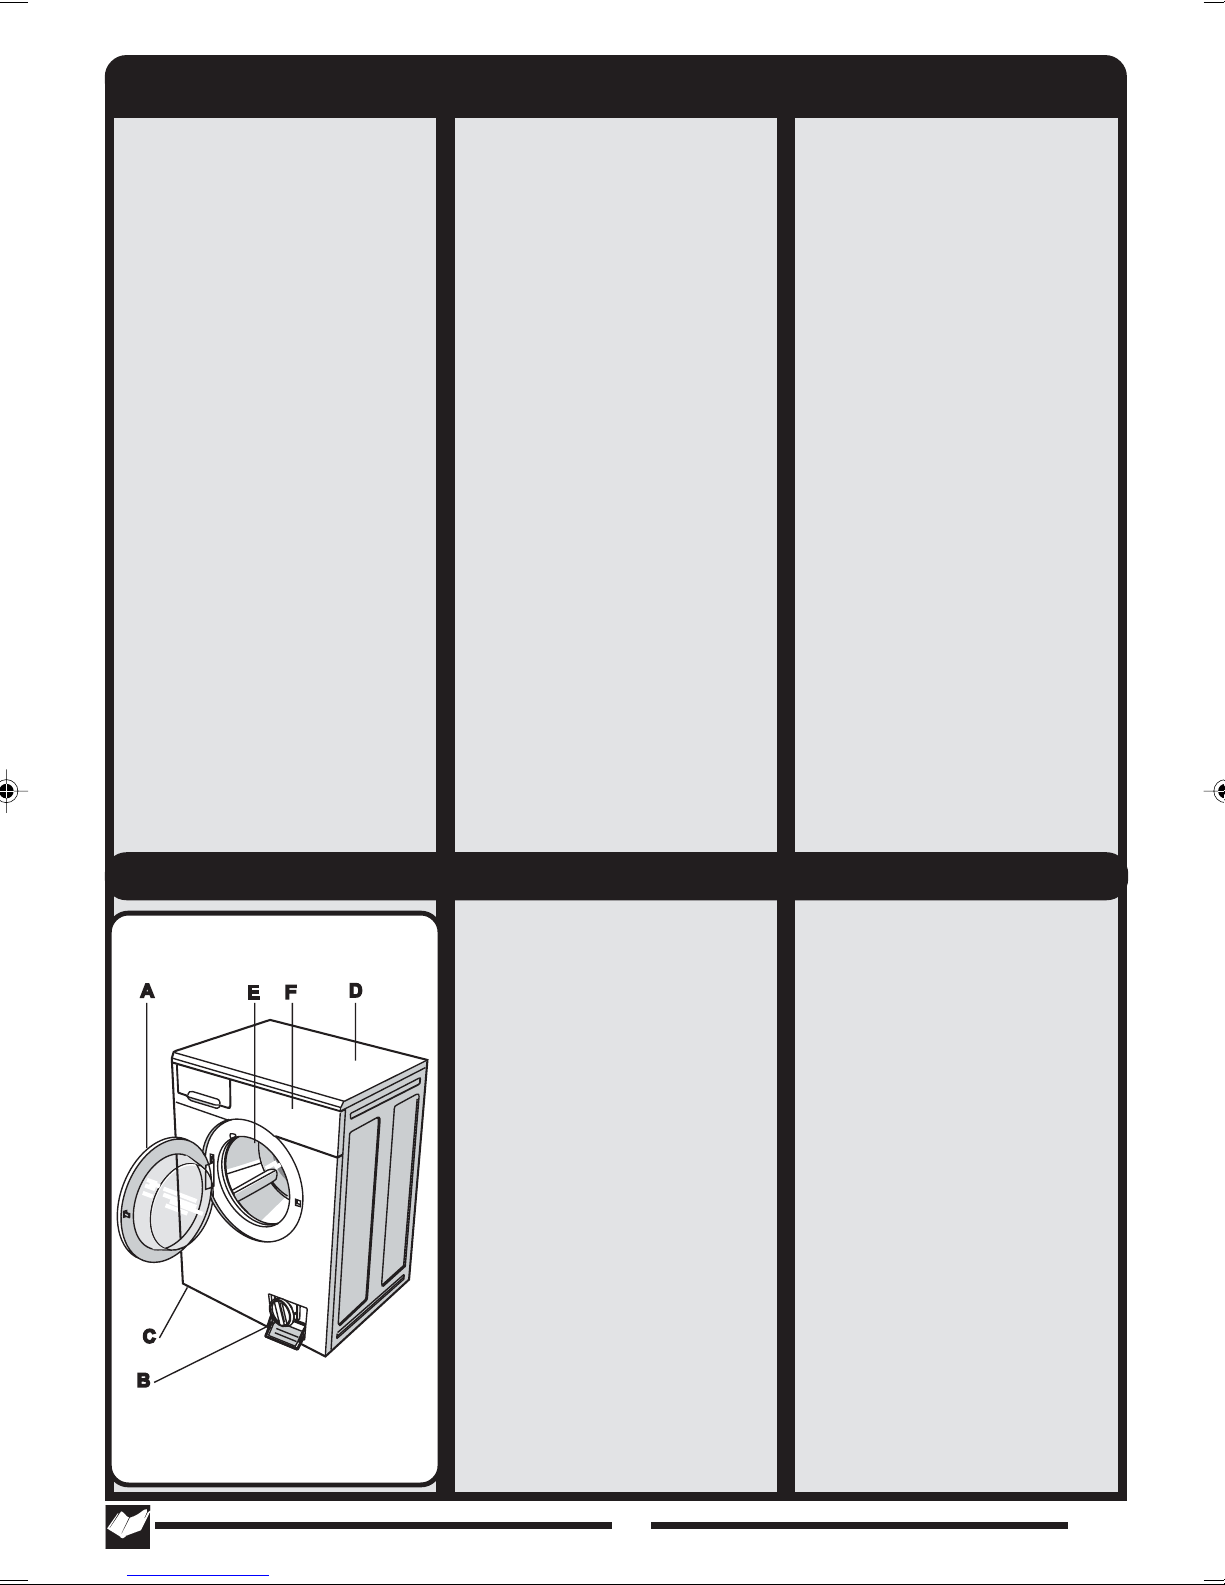
DESCRIPTION OF THE MACHINE
The washing machine is a household appliance that can wash
any type of fabric whenever you
want.
▼ The structure of the machine
is fabricated in steel sheet,
which has been worked using a special process and
then enamelled in order to
maintain its external appearance and protect it against
corrosion.
▼ The motor and all the other
moving parts are built to ensure noiseless machine operation.
▼ The large stainless steel drum
is well placed to guarantee
a good wash quality and
prolong the life of the washing.
▼ The easy to use control panel
▼ The ample glass door makes
▼ The perfect machine bal-
A - Glass door
B - Filter
C - Adjustable feet
D -Top cover
E -Drum
F - Control panel
makes the selection of any
wash or dry programme
quick and simple (see control panel and table of programmes).
loading and unloading
easier.
ance is the result of many
years of research aimed at
finding the correct balance
between the various mo ving
parts.
4
SM1253
Page 5

V
INSTALLING THE MACHINE
The machine must be installed by
professionally qualified technicians,
according to the manufacturer’s indications.
UNBLOCKING THE MACHINE MOD. A
For transport purposes the swinging unit in the machine is blocked
using 4 spacers with screws. Before starting the machine these
spacers and lock screws must be
removed, and stored f or use in the
event of a possible change of location.
Block off the holes with the plugs
provided, which can be found in
the bag containing the documents.
N.B. If the spacers fall into the inside of the machine, open the r ear
panel, recover them and then replace the panel.
(ACCORDING TO MODEL)
Incorrect installation may result in
damage to persons and property.
The machine can be installed any-
where, provided the temperature in
2
GB
the place of installation is not below 3°C and the cables and hoses
at the rear of the machine are not
crushed in any way.
3
UNBLOCKING THE MACHINE MOD. B
For transport purposes the swinging unit in the machine is blocked
using 4 spacers with screws. Before starting the machine these
screws must be removed using a
screwdriver.
Insert a screwdriver in the holes
and proceed as shown in the f igure to recover the 4 plastic
spacers.
N.B. If the spacers fall into the inside of the machine, open the rear
panel, reco v er them and then replace the panel.
After selecting a suitable position,
level the machine car efully using
the adjustable feet .
Particular care must be taken
when selecting the position, levelling the washing machine and
ensuring the safety of lock nuts.
If levelling is not carried out correctly, the washing machine will
be unstable and noisy during operation, which may result in dam-
4
SETTING THE MACHINE LEVEL
age.
If the machine stands on a carpet
floor , make sur e that air can circulate freely between the washing
machine and the floor itself.
It is not recommended that the
machine be installed in locations
where the temperature is liable to
drop below freezing.
5
6
SM1253
5
5
Page 6

GB
MIN. 60 CM
MAX.90 CM
A
▼ Check that the voltage indi-
cated on the technical data
plate on the back of the
washing machine is the
same as that of the mains
power supply (fig. 7).
▼ The fuses, electric cables
and wall socket must be
rated to withstand the maximum power load indicated
on the data plate.
▼ The power supply sock et into
which the washing machine
will be plugged must be
earthed. Otherwise, the
manufacturer will not be
held responsible for any accidents (fig. 8).
▼ If the socket to which the
machine will be connected
is faulty or does not comply
with the requirements, it must
be replaced by a qualified
▼ The mains water pressure
must be between 0.05 and
1.00 MPa (0.5 - 10 bar.)
INSTALLING THE MACHINE
CONNECTING TO THE POWER SUPPLY
CONNECTION TO THE WATER SUPPLY SYSTEM
7
electrician.
▼ The washing machine m ust not
be connected to the electricity supply using extension leads
or multi-plug adapters.
▼ During maintenance the
washing machine must be
unplugged from the power
supply socket.
▼ Do not plug-in or unplug the
8
machine with wet hands.
▼ If the power cable is dam-
aged in any way, contact
the specialised technical
service centre.
▼ Position the appliance so
that the power supply cable
can be accessed with ease,
enabling it to be disconnected when required.
▼ Before connecting the w ater
fill hose, open the valv e and
allow a quantity of water to
flow. This will censure that the
supply pipes are free from
impurities, such as sand or
rust (this operation is very
important when the washing
machine is being connected to a new supply system or if the system has not
been used for a long period
of time).
▼ Connect the hose from the
hot water tap to the valve
with red filter (if present) and
the hose from the cold water tap to the other valve (f ig.
10/B).
▼ Place the filter washer sup-
plied between the hose and
the valve and hand tighten
the connection as much as
9
10/B
possible (fig. 9).
▼ Fit the washer on the other
end of the supply hose, and
10/A
11
screw it onto the washing
machine (fig. 10/A).
▼ The water supply tap must be
6
SM1253
Page 7

INSTALLING THE MACHINE
CLOSED
OPEN
YES
NO
GB
fully open when washing.
▼ The water drain hose m ust be
placed at least 60 cm and
not more than 90 cm from
the floor (fig. 11).
▼ If the drain hose is con-
nected to a fixed drainage
system, the free end m ust be
inserted in a pipe of minimum internal diameter 40
mm.
▼ The drain hose water con-
nection to the drainage sys-
USING THE MACHINE
Attention: Before running the machine loaded for the first time, we
re-commend that you run a short
washing cycle with the machine
empty.
This makes it possible to check operation of the machine and clean
the drum.
Each time you use the machine:
▼ check that all water connec-
tions are tight, the drain hose is
positioned correctly (see connection to the water supply)
and the supply tap is open.
▼ make sure that your hands
are dry, then insert the plug
tem must not be hermetically sealed, as this would
cause air to accumulate
and the water to siphon out.
▼ If the waste w ater is to be dis-
charged into a sink or washbasin, insert the hose in the
special bracket supplied and
hook it over the edge of the
sink or washbasin. Then tie
the hose and bracket to a
tap or similar (fig. 12). T o av oid
overflowing, the sink drain
must be clear of obstructions
ADVICE BEFORE USING
13
into the power socket.
▼ divide the washing accord-
ing to fabric type (check the
labels on the clothes).
USE OF DETERGENTS
12
and must be able to empty
quickly.
14
▼ check that the clothes to be
washed have nothing in their
pockets that might damage
the washing, the washing
machine or the filter
The washing machine has a threecompartment detergent drawer.
compartment for pre-wash
or soak powder detergent
(1)
compartment for normal
wash powder detergent (2)
compartment for fabric softener, perfume, starching or
bleaching agents (3)
use a low-foam detergent and
softener (if necessary), of the type
indicated for automatic washing
machines. Use the doses recom-
SM1253
15
mended on the package.
N.B. Excessive amounts of detergent may result in too much foam,
7
7
16
and give a poor quality wash.
Insufficient amounts of detergent
may mean that the washing does
Page 8

GB
USING THE MACHINE
not come properly clean.
N.B. When filling the detergent
compartment it is important that
the detergent does not overflow
into the compartment used for
IF THE MODEL HAS A LIQUID DETERGENT COMPARTMENT
17
N.B. When using liquid detergent
(recommended for programs that
do not use the pre-wash cycle),
insert the special container (if
there is one) in centre compartment ”2” (as shown opposite),
then pour in liquid detergent up to
fabric softener, as this would result
in a rinse cycle containing soap,
which might leave the washing
with white stains.
Equally, do not allow the fabric
18
the maximum level indicated.
Remember to remove the liquid
detergent compartment when
using powder detergent.
▼ close the detergent drawer
before starting the wash.
softener to overf low into the deter gent compartment, as this would
reduce the cleaning capacity.
19
Attention! Never remove the detergent drawer when the machine
is running, as w ater may come out
of it.
Some stains cannot be removed
by just washing in a washing machine.
Before trying to remove any type
of stain by hand, first try the removal pr ocedure on a sm all area
of hidden fabric starting from the
edge of the stain and working inwards, this will prevent a dark ring
from f orming around the site of the
stain.
A few methods f or removing stains
are reported below.
● W
AX
: scrape the wax using a
blunt point in order not to
damage the fabric. Then,
with the fabric placed between two pieces of absorbent paper, run a hot iron ov er
the stain.
● B
ALL-POINT PENS AND FELT-TIP PENS
:
clean using a soft cloth
soaked in ethyl alcohol. Take
HOW TO REMOVE STAINS
care not to spread the mark.
● D
AMP AND MOULD
: if the fabric
supports the use of bleach,
perform a wash cycle adding bleach to the appropriate compartment in the dispenser (see table of programmes). Other-wise, soak
the soiled part in hydrogen
peroxide (10 volumes) and
leave for 10 to 15 minutes.
● L
IGHT SCORCH MARKS CAUSED BY IRON
ING
: follow the instructions for
mould and damp.
● R
UST
: use products specially
designed for rust stains, following the manuf acturer’s instructions written on the
packet.
● C
HEWING GUM
: rub ice ov er the
mark, scr ape away as m uch
as possible and then rub with
a cotton cloth soaked in ac-
-
etone (alternatively, use nail
varnish remover).
● P
AINT
: do not allow the paint
to dry. Rub the area with the
solvent recommended by
the paint manuf acturer (e.g.
water, turps, trichloroethylene), apply soap and then
rinse.
● L
IPSTICK
: stains on cotton or
wool can be eliminated using a cloth soaked in ether.
Stains on silk require the use
of trichloroethylene.
● N
AIL VARNISH
: place a sheet of
absorbent paper on the
stained material, then
dampen the back of the
fa bric with acetone, frequently changing the paper
placed over the stain. Continue like this until the stain
has disappeared.
8
SM1253
Page 9

USING THE MACHINE
GB
AR OR DIRT
l● T
butter over the stain, allow to
stand and then wash with oil
of turpentine.
● G
Before placing the clothes in the
washing machine and selecting the
wash programme, examine the sym-
RASS
: spread some fresh
: delicately soap the
INTERNATIONAL CLOTHING CARE SYMBOLS
stain, use diluted bleach.
Good results can be obtained on woollen f abrics using 90% alcohol.
● B
LOOD
: put into soak in cold
bols on the manufacturer’s label.
The table reported below will provide
water with added salt, then
wash with washing soap.
a useful guide to reading the symbols.
The washing machine has been designed to reduce maintenance to a
minimum.
However, it is important that you re-
CLEANING THE WASHING MA CHINE
The external structure and the
parts of the washing machine in
plastic must be cleaned with a soft
damp cloth only.
WARNING!! Ne ver use chemicals,
abrasive products, alcohol, soap,
petrol or other solvents to clean
the appliance as these may
cause damage. (fig.20)
After washing, leave the door
open for a little while to allow rubber parts to dry.
Wash out the deter gent compart-
MAINTENANCE
member to clean it regularly.
Before cleaning, make sure that the
appliance has been disconnected
from the power supply and that the
20
ments from time to time. T o do this,
extract the detergent compartment and rinse it under running
water supply tap has been turned off.
21
water, (fig. 21) then replace it.
SM1253
9
9
Page 10

GB
REMOVING THE DETERGENT DRAWER (FIG. 22 OR 23, ACCORDING TO THE MODEL).
• If the softener compartment “3” has the word
“PUSH” written on it:
- open the detergent
drawer;
-press on the word “PUSH”
with the right hand and
pull out the drawer with
the left hand (fig. 22)
MAINTENANCE
• If the softener compartment “3” does not have
the word “PUSH” written on
it:
ATTENTION!! Before starting the
operations described below,
make sure that the washing machine is empty.
Do not remove the filter while the
machine is running, or when full of
water.
Place a cloth or flat plate under
the filter to collect any w ater that
may still be inside it.
Open the filter door, unscrew the
If the appliance is not working
properly , chec k through the follo wing troubleshooting list bef ore calling for technical assistance.
The washing machine does not w ork
(warning lights are off)
• check that:
1)The mains power supply is
working
2)The plug is inserted correctly
in the socket
3)The On/Off button is pressed
or, if there is no On/Off button, the programmer knob is
pulled outwards.
The w ashing machine does not work
(warning lights are off)
• check that:
22
- open the detergent
drawer;
-grasp it with both hands,
CLEANING THE FILTER
filter and remove it, turning in an
anticlockwise direction (fig.24).
The filter must be cleaned periodically.
Rinse the filter under running water to eliminate all waste.
Replace the filter, screwing in a
clockwise direction and making
sure it is hermetically sealed.
TROUBLESHOOTING
1) The programmer knob is set
to the selected program
2)The glass door is properly
closed
3)The ”Start” button has been
pressed (electronic models
only)
4)check the indications provided under ”The washing
machine does not fill with
water”
The washing machine does not fill
with water
• check that:
1)There is water in the water
supply system
2)The water supply hose is connected to the washing ma-
23
push down slightly and
pull the drawer outwards
(fig. 23).
24
chine
3)The water supply tap is open
4)The filter is not blocked. If it is,
clean the filter after unplugging the appliance from the
power supply
The washing machine continuously
fills and drains the water:
• check that:
1)The drain hose has been installed at the proper height
(60-90 cm)
2)The end of the drain hose is
not under water
The washing machine does not drain
or spin
• check that:
10
SM1253
Page 11

assistance
pump
model
220 V
N ° 204276237
kg wash
kg dry
A
total w
heating wash
heating dryer
wash motor
spin motor
dryer motor
Hz
5 / 100 N/cm
2
MAINTENANCE
GB
1)The drain hose is properly
connected
2)The drain hose is not bent
3)The drainage filter is not
blocked
4)The no-spin function has not
been selected
The washing machine vibrates and
is noisy
• check that:
1)All the blocking elements
used for transportation have
been removed.
2)the washing machine is level
3)Bulky items such as sheets, tablecloths etc. are not all in
one part of the drum
The glass door does not open
1) Wait for 3 minutes after the
end of the cycle or, in the
case of electronic machines,
until the ”End” indicator lights
up
1)The mains power supply is
working
There is still a lot of detergent in the
compartment
• check that:
1)The water supply tap is open
2)The filter between the tap
and the supply hose is clean
The washing is not clean at the end
of the wash cy c le
• check that:
1)The drum is not overloaded
2)The correct amount of detergent has been used
3)The correct programme has
been selected
The washing has shrunk or faded
• check that:
1)The correct washing programme has been selected
2)The correct washing temperature has been selected
is not set to “0”
6)The “Half Load” button is
pressed.
7) The “No Spin” button is not
pressed
If, after trying the above remedies,
the machine still does not work,
refer the fault to the nearest authorised service centre.
When calling the service centre,
inform them of the machine
model, the serial number and the
type of fault. The data r elating the
appliance can be found on the
rating plate affixed to the filter
door.
This information will allow the technical service staff to select the
appropriate spare parts, thus
making the repair service quicker
and more efficient.
The washing has not been properly
spun
• check that:
1)The washing is evenly distributed in the drum
2) The correct spin speed has
been selected
The washing machine stops during
the wash
• check that:
MODEL
width cm.:
Dimension:
height cm.:
depth cm.:
Maximum
recommended washing
load:
Spin max: (rpm)
Water pressure
Total power consumption/ Power supply
The washing machine does not dry
(washer-dryer models only)
• Make sure that:
1)The water supply tap is open
2)The drainage filter is clean
3)The washing machine is
turned on (control light on)
4)The program dial is positioned on one of the stop
points with the dryer symbol.
5)The drying time regulator dial
TECHNICAL DATA
MEGA 5SS
min. 0,05 MPa - max. 1 MPa
see plate with technical feature
25
59.5
85.0
53.0
5,0 Kg
2,5 Kg
1,0 Kg
1200
SM1253
11
11
Page 12

MAIN MACHINE FUNCTIONS
A Table of programmes
B Buttons
S Machine “on” indicator light
G Thermostat knob
P Programmer knob
DESCRIPTION OF FUNCTIONS (Available according to the model)
ON/OFF KNOB OR BUTTON:
0
1
NO-DRAIN BUTTON:
0
1
To start the machine, pull programmer knob or if the machine has push-button, press the
start push-button .
The indicator light will be illuminated.
When this button is pushed, the washing machine will stop automatically at the end of the
last rinse cycle and before draining the water. In this case, the washing is held in the waterfilled drum to prevent creasing. This function only works for the delicate wash cycle.
NO-SPIN BUTTON:
0
1
Pushing this button the washing machine carries out a normal wash cycle but does not
spin.
HALF-LOAD BUTTON:
0
1/2
1
Pressing this button reduces the quantity of water used during the wash, thus saving both
water and energy.
Use this function when the quantity of items to wash is equal to half the maximum
recommended load (see table "Maximum recommended loads")
EXTRA RINSE BUTTON:
0
1
The washing machine has been designed to reduce water consumption to a minimum. Three
rinse cycles are normally sufficient. For very soft water zones or for those who are allergic
to detergent residues, press this button and the machine will carry out an extra rinse.
550/MAX SPIN SPEED BUTTON:
0
1
Push the button to vary the speed of the spin-dryer from maximum to minimum (the spindryer’s maximum speed varies depending on the model). If the machine has a speed
adjustment knob, rotate until the desired speed is reached.
Warning: This is only available during intensive wash programmes. For delicates and wool, the spin speed is 550 rpm regardless
of the speed setting.
TEMPERATURE LIMIT BUTTON:
0
1
Pushing this button will limit the temperature to 60° when the temperature dial is set at a
higher temperature.
TEMPERATURE CONTROL
Rotate this knob to set the required temperature. In order to select the correct wash temperature, refer
to the “Programme Table".
Important: programme changes or the selection of the above functions must always be carried out with the appliance switched off.
12
SM1253
Page 13

DESCRIPTION OF FUNCTIONS (Available according to the model)
VARIABLE SPIN:
The washing machine has a wide selection of spin speeds that can be selected before starting the wash
MAX
1000
900
500
programme. To change the speed, simply rotate knob (H) to the value required. To select the no-spin function,
rotate the knob to position .
600
NB. The maximum spin speed (MAX) will vary according to the machine model and that reported in the technical
700
800
characteristics table. The maximum selectable speed for each programme is indicated in the programme table
(if a higher spin speed is selected, the machine will only effect a spin at the value indicated in the table).
Spin load imbalance control:
This washing machine is equipped with a special electronic control system for correctly balancing the wash
load.
Prior to each spin, the system ensures that the washing is evenly distributed in the drum. If the washing is not
evenly distributed, the final spin speed is reduced, and if the load is very unbalanced, the spin is not effected.
USING THE MACHINE
ST ARTING THE MACHINE:
The washing cycle:
(By following these instructions, the
washing machine will carry out the
washing cycle, which has been
imposed).
1. Load the laundry into the tub and close
the door.
WARNING: It is prohibited to
overload the machine. It is
advisable to hand wash
garments that absorb an
enormous amount of water (for
example: rugs).
2. Pour the washing powder (which must
not produce too much foam) and the
fabric softener for automatic washing
machines into the respective drawers
(see chapter entitled: “Use of
Detergent”)
3. Close the detergent drawer.
N.B. Do not r emo v e the det er g ent
drawer while the machine is in
use, because this may cause the
water to flow out).
4. Choose and set the desired washing
cycle program and temperature using
the relative knobs.
WARNING!! Do not turn the
programming knob t o the lef t. If
you pass the desired program,
continue to tur n to the r ight until
you reach the desired position
again.
5. Press the pushbuttons that correspond
to the selected functions.
6. To start the wash, turn on the machine
by pulling out the programming knob
or (if present on the washing machine)
by pressing the On/Off pushbutton
(the indicator light will turn on).
At the end of the washing cycle, the
washing machine will stop at one of the
STOP points on the programming knob.
1. Turn off the washing machine by
pushing the programming knob in or
(if present on the washing machine)
by pressing the On/Off pushbutton.
2. Take out the laundry
3. With dry hands, unplug the machine
4. Close the water tap.
WASHING PROGRAMMES
Knob
(P)*
1
2
3
4
5
Knob
(T)**
90°
90°
60°
All the
positions
All the
positions
Programme
Cotton
linen
hemp
Cotton
linen
hemp
Cotton
#
linen
resistent
mixes
Cotton,
linen,hemp
and resistent
mixes
Cotton,linen,
hemp and
resistent
mixes
Care
label
symbol
* Position of Programmer Knob ** Position of Adjustable Thermostat Knob
# Reference program for power classification, in accordance with EN 60456
Dispenser
compartment
Examples and
degree of soiling
Program
description
INTENSIVE PROGRAMS FOR COTTON FABRICS
90
90
60
Sheets ,white and
solid colour tablecloths,
towels,underwear,
heavy soil with prewash
Sheets ,white and solid
colour tablecloths,
towels,underwear,
heavy soil
Coloured underwear,
shirts,bath robes,cotton
kinits,sheets;
normal soil
Fast rinse
Whitner, scented
softener
Prewash,main wash,
rinses,softener,
empty and final spin
Main wash,
rinses,softener,
empty and final spin
Main wash,
rinses,softener,
empty and final spin
Rinses,softener,
empty and final spin
Rinse,softener,
empty and final spin
Spin
speed
Max 1200
Max 1200
Max 1200
Max 1200
Max 1200
Use of supplementary buttons
(Available according to the model)
1/2
SM1253
13
13
Page 14

WASHING PROGRAMMES
GB
Knob
(P)*
6
7
8
9
10
11
Knob
(T)**
All the
positions
60°
60°
All the
positions
All the
positions
All the
positions
Programme
Care
label
symbol
Dispenser
compartment
Examples and
degree of soiling
Program
description
INTENSIVE PROGRAMS FOR COTTON FABRICS
Final long
spin
Intensive spin
Final long spin
GENTLE ACTION PROGRAMS FOR SYNTHETICS AND WOOL
Resistent
mixes
Resistent
mixes
Delicates
synthetics
Synthetics
Delicates
synthetics
Shirts sheets,
60
60
baby wear, nappies
heavy soil
Shirts sheets,
baby wear, nappies
heavy soil
Gentle rinse
Starch, perfume,
softener
Whitner, scented
softener
Prewash main wash,
rinses,softener,
empty and final spin
Main wash,
rinses,softener,
empty and final spin
Rinses,softener,
empty and final spin
Rinse, softener,
drain and final spin
Rinse,softener,
empty and final spin
Spin
speed
Max 1200
500
500
500
500
500
Use of supplementary buttons
(Available according to the model)
1/2
AUSILIARY PROGRAMS FOR SYNTHETICS AND WOOL
12
13
35°
All the
positions
Pure
wool
Pure
wool
Machine
washable
wool
Final spin
* Position of Programmer Knob ** Position of Adjustable Thermostat Knob
INTENSIVE PROGRAMS
FUNCTION ENABLED FUNCTION DISABLED
GENTLE ACTION PROGRAMS
High water level wash
rinses,softener,empty
and final spin
Empty and
final spin
PROGRAMS FOR WOOL
500
500
The wool wash cycle of this machine has been approved by Woolmark for the wahing of machine
washable Woolmark products provided that the garments are washed according to the instructions on
the garment label and those issued by the manufacturer of this washing machine. M.9622
NOTE
........................................................
........................................................
........................................................
........................................................
........................................................
........................................................
........................................................
........................................................
........................................................
........................................................
........................................................
........................................................
........................................................
........................................................
........................................................
........................................................
........................................................
........................................................
........................................................
........................................................
........................................................
........................................................
........................................................
........................................................
........................................................
........................................................
........................................................
........................................................
........................................................
........................................................
........................................................
........................................................
........................................................
14
SM1253
Page 15

SM1253
15
15
Page 16

461305029 CF SM1253 06/04/2003
GB
 Loading...