

Page 1

BW 1000W
BW 1200W
BWD 1300W
Page 2

2
This appliance complies with the provisions of the 89/336/EC Directive
regarding electromagnetic compatibility and the 73/23/EC directive Low
Voltage regarding electrical safety and the 93/68/EC Directive for CE
marking.
Page 3

3
1-SPECIFICATION
2- INSTALLATION
3- HANDLING
4- MAINTENANCE
5- CAUTIONS AND ADVICE
6- SAFETY FEATURES
7- CONTROLS
8- WASH PROGRAMME TABLE
INDEX
Page 4
- Dimensions...........................................Height..................................85 cm
1 - SPECIFICATION
1.1 - Technical data
Width...................................60 cm
- Washing/Drying capacity.......................Cotton.....................5,5 kg/2,75 kg
Depth...................................55 cm
- Power supply voltage (m.f.)...............................................230 V ~ 50 Hz
- Maximum power consumption-washing/Drying................2.200 W/ 1.450 W
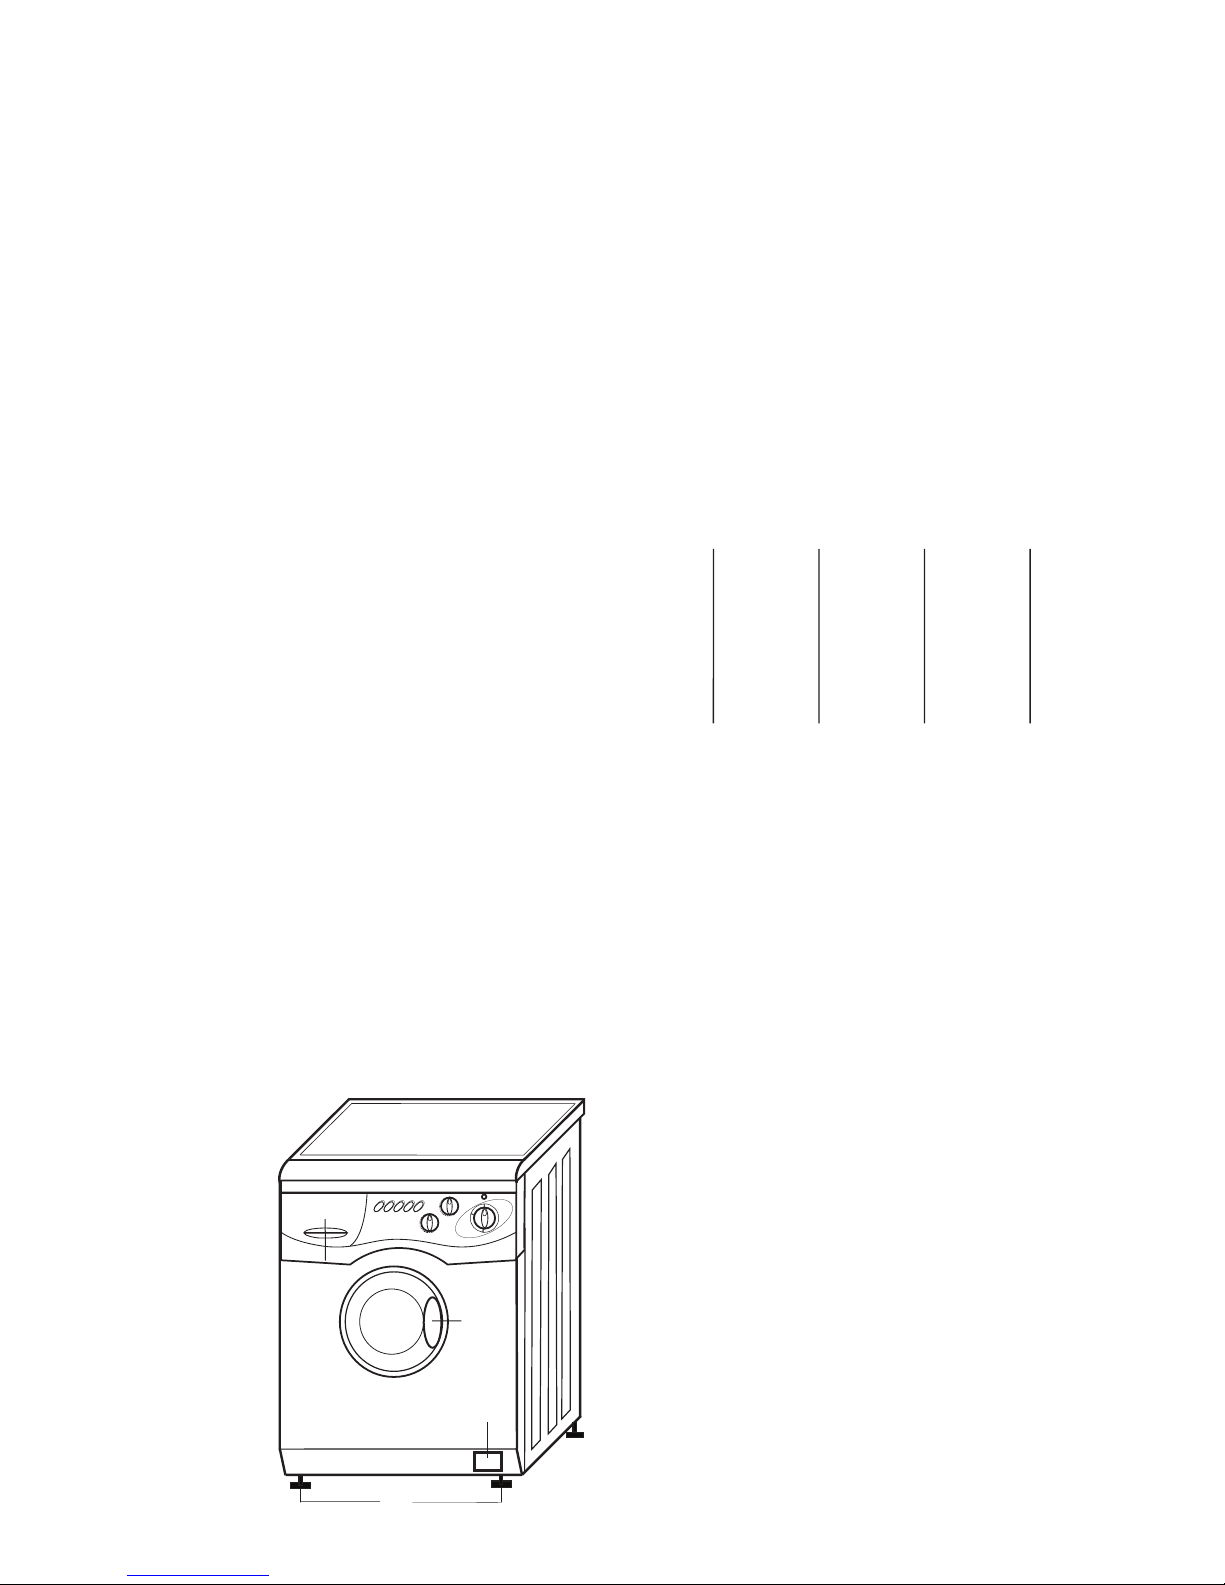
1.2 -Description of the washing machine & Washer-Dryer
- Water consumption, cotton
wash at 60ºC (without pre-w.)
- Energy consumption, cotton
wash at 60ºC (without pre-w.)
- Spin speed........................................................................
B- Detergent drawer
H- Filter door
L- Pilot lamp
P- Programme selector
T- Temperature selector
C- No spin push-button
R- 550/1000-1300 rpm push-button
U- Door opening handle
I- Adjustable feet
Y- Extra rinse push-button
- Energy consumption, drying (cotton 2,75 kg)...................................2 kWh
- Water consumption, drying (cotton 2,75 kg)........................................50 l
S- Drying time selector
X- ON/OFF push-button
4
Ap. 7 CONTROLS
M- Half load push-button
V- Spin speed selector
A- Rinse hand hold push-button
Wash/Dry
Synthetics...............2,75 kg/1,5 kg
Wool...........................1 kg
1 wash cycle + drying .................................................5,03 kWh
{
200 wash cycles + drying..........................................1.006 kWh
1 wash cycle + drying..................................................150 l
200 wash cycles + drying.........................................30.000 l
{
1300
9.800 l
rpm
206
kWh
1 cycle of wash...........
{
200 cycles of wash......
1 cycle of wash...........
200 cycles of wash.......
{
1,03
kWh
49 l
- Energy consumption
wash + 2 drying cycles
- Water consumption
wash + 2 drying cycles
1200
9.800
206
1,03
49
1000
9.800
206
1,03
49
- Models............................................................................
BW 1000W BW 1200W BWD 1300W
B
U
H
I
Page 5
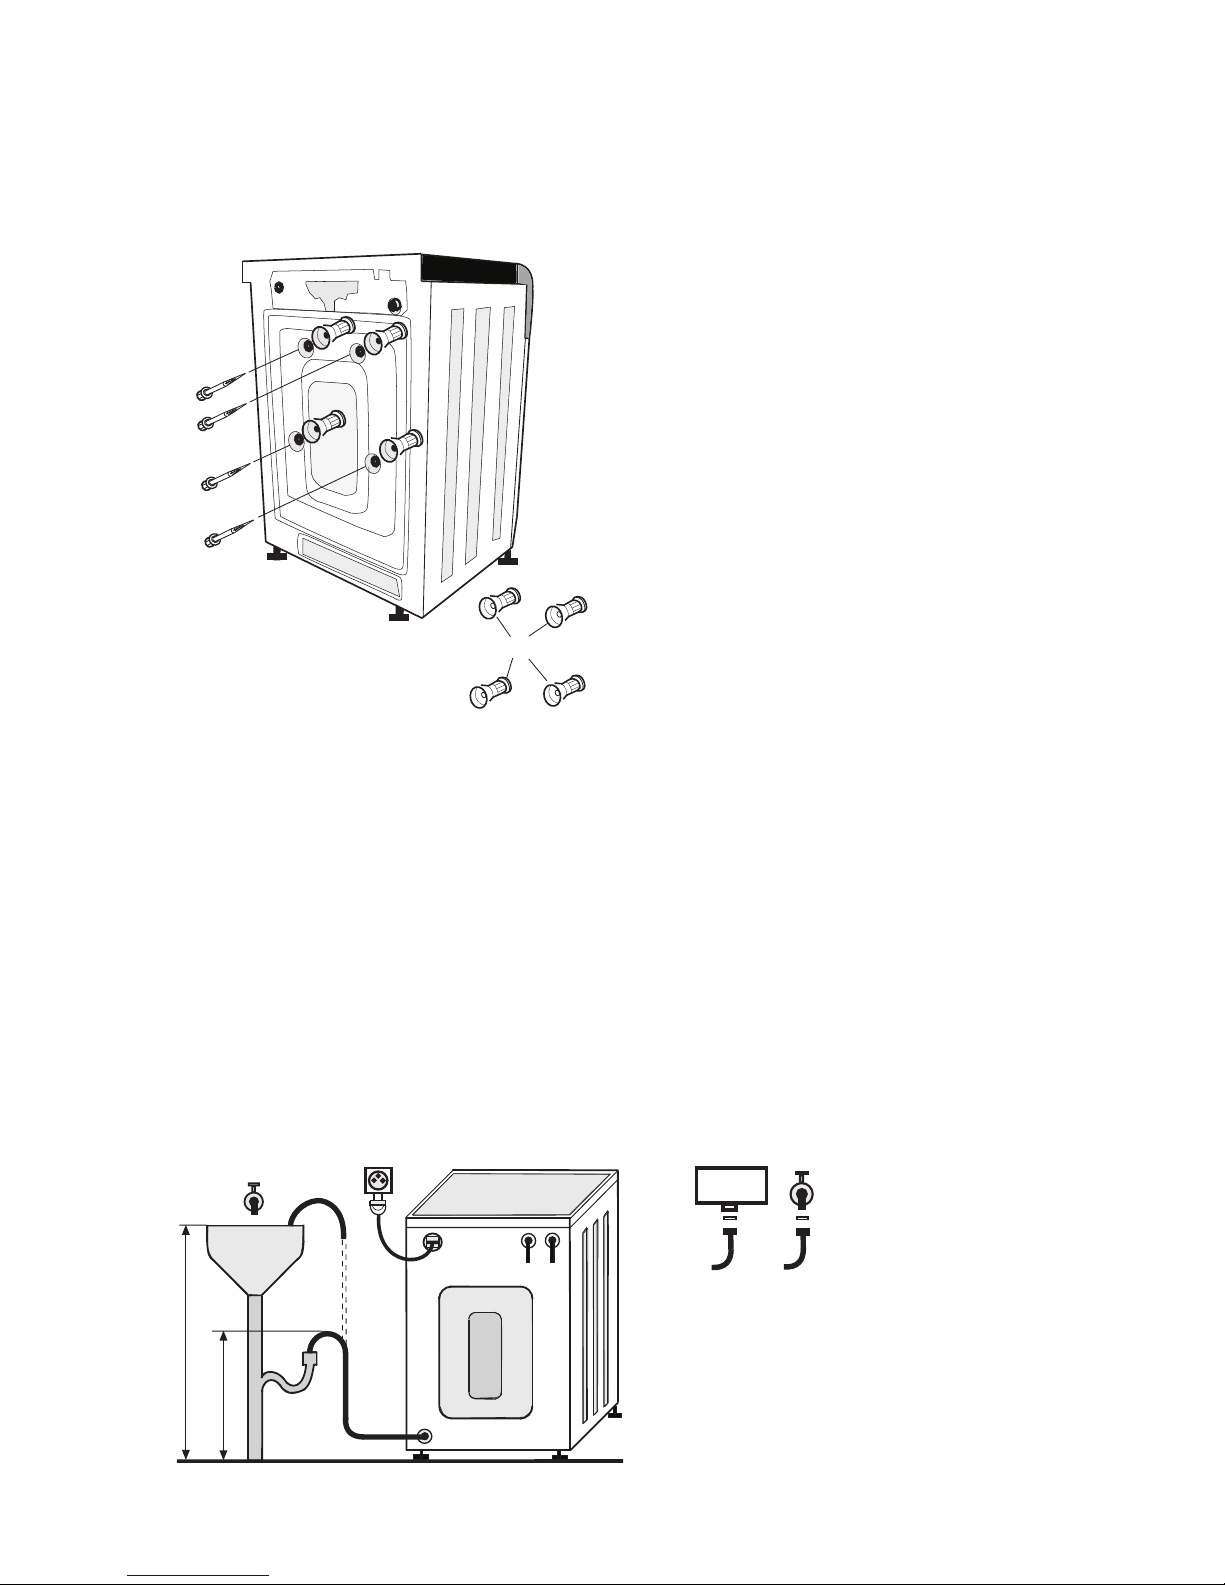
2- INSTALLATION
2.1 - Removing transit bolts
Proceed as follows:
-Let the water run for a while before connecting the hose.
-Connect the water inlet hose applying the rubber joint provided in the fittings
equipment bag.
-Position the drainage hose inside a hose of a larger diameter, or rest it well
fastened against any kind of drain at the height indicated.
-Neither of the hoses should be twisted or kinked.
2.) Push with a screwdriver at an angle
in the screw holes until the four spacers
(H) fall.
2.2 -Plumbing connection
The "H" connection can only
be applied in those machines
f itted for this (Bithermical).
H- Hot water connection.
C- Cold water connection.
After removing the external packing
the drum must be released before the
machine is used.
This is done in the following manner:
1.) Unscrew and remove the four
screws A-B-C-D.
3.) It is very important to recover these
four spacers (H) because they could
cause damage if they remain inside the
machine and also because they will be
required to move the machine in the
case of moving house.
The user will require a tap with a 3/4" gas screwthread outlet and a drain
situated between 50 and 80 cms. above floor level. The watermain pressure
must be between 0,4 and 10 bar inclusively.
5
These must be recovered and kept.
C
H
Max.80 cm.
Min.50 cm.
C
H
THERMO
D
C
B
A
H
- Use new tubes for connecting to the water supply.
Page 6

6
In order to prevent noise and vibration,
ensure that the machine is not touching any
nearby walls or furniture.
2.3 - Levelling
2.4 -Electrical connection
For the appliance to work under optimum conditions, it needs to be levelled
perfectly, i.e.horizontal and stable.
Once the levelling is done, block the
adjustable feet by tightening the nut "J".
That the power supply, is single-fhase 220-
230 V ~ (230-240 ~ for UK).
That the user's meter, limiter, fuses, power
socket and installation are of an adequate
output for the power indicated on the
characteristics plate of this washing machine.
10 A 250 V fuse (13 A 250 V for UK).
If the wall socket does not have an earth
connection, you must connect the central
earth connection of the washing machine to
good ARTIFICIAL EARTH (consult your
dealer).
THE WASHING MACHINE MUST BE WELL EARTHED.
NOTE: If the power supply cable is damaged, it should be substituted by
a specially prepared replacement cable, to be supplied by the
manufacturer, or by the off icial after salesTechnical Service Organisation.
Use a wall socket with an earth connection.
Make periodic checks that the machine is
levelled by repeating these operations if
necessary.
Before connecting the washing machine to the power supply, the following
points should be checked through:
The manufacturer declines all responsibility for any accidents on ocurrences
caused by a defective earth connection or lack thereof.
I
J
The wasing machine's plug guarantees the
machine's earthing.
Once the machine has been positioned in ist
place, work the adjustable feet "I" at the
front of the washing machine, until it is
horizontal and the four feet are resting
f irmly on the floor.
Page 7

1
2
3
4
3- HANDLING
7
Once the washing programme has finished, push the programme button (or
ON/OFF push-button) and wait 2 minutes before trying to open the door.
3.2 - Detergent drawer. Distribution of the washing products.
WARNING: When the door is open, the power supply
is cut and the machine will not operate.
To open the drawer, put your and in the lower part of
the soap drawer and pull it outwards.
SECTION 1 - Pre-wash soap (50 gr.Max.).
3.1 - Loading door-Opening
CASE A:
1. Press the hidden lever with the index and
middle f ingers 1
2. Pull outwards.
CASE B:
Pull the door lever outwards.
SECTION 2 - Main wash soap (125 gr.Max.).
SECTION 3 - Bleach (80 ml. Not concentrated).
SECTION 4 - Softener (80 ml.Max.).
Never put more than indicated by the lever in the soap
drawer.
The ideal dose of detergent depends on the hardness of
the water, how dirty the clothes are and the load.
(Consult the soap manufacturer's instructions).
Make sure that the material can support the treatment
with bleach if it is used.
B
A
1
Page 8

3.3 - Selecting the clothes load
8
Soak or treat stains before the wash, in order to reduce to need to use the
hot programme.
You save 50% energy by using the 60ºC programme.
Once the clothes have been sorted, put them into the dr um of the machine,
separately according to colour and group, loose piece by piece, as per the
following proportions:
Before putting the clothes into the machine, you should:
Separate the clothes into three lots (cotton, synthetics and wool).
Within each group, separate the coloureds from the whites.
Cotton maximum 5,5 kg.
Synthetics maximum 2,75 kg.
Wool maximum 1 kg.
3.4 - Selecting the right program
Once the clothes have been sorted into fabric types and colours, you need to
select the right program and temperature. SEE PROGRAM TABLE (Section 8).
3.6 - How to get the best performance
With the machine now loaded, the door closed, the soap drawer compartments
filled and the right prog ram chosen, to start the machine, you just need to
PULL OUT THE PROGRAMMER CONTROL BUTTON (P) OR ON THE
PUSH-BUTTON (X).
The machine automatically goes through all the operations included in the
wash cycle until it ends.
The wash is now ready to be hung out dry (or to be ironed in the case of
washer - dryers).
3.6-1 - Maximise the load (Section 8)
3.5 - Starting operation
You obtain the most efficient use of energy, water, detergent and time by
using the maximum recommended load.
You save 50% energy by washing one full load instead of two half loads.
3.6-2 - Do you need a pre-wash?
Only for deeply stained laundry !.
You save detergent, water, time and between 5 to 15% of energy through
not using the pre-wash for light and normally soiled clothes.
3.6-3 - Do you need hot water?
3.6-4 - For washer-dryers: before using the dryer
Select high (> 850 rpm) for the spin before drying, in order to save energy, water
and time during the drying period.
Page 9

9
4.2 - Cleaning the inlet valve filter.
It is advisable to periodically clean this filter (every 25 wash cycles) in order
to maintain the correct operation of the drain pump and consequently, the
washing and rinsing efficiency.
4- MAINTENANCE
4.1 - Cleaning the drain-pump outlet filter.
a) Turn off the water tap.
Any impurities in the water supply are deposited
in the filter at the inlet to the inlet valve.
To clean this f ilter:
b) Unscrew the water inlet hose at the washing
machine end.
c) Remove the filter using pointed pliers and
clean it.
d) Reverse the procedure to re-attach the hose.
4.3 - Cleaning remains of detergent.
Overfilling the prewash and main wash
compartments with too must detergent causes the
excess to be deposited inside the collector, and
could, over time, cause water to leak through the
entrance of the detergent drawer.
To clean the deposits, remove the soap drawer by
pulling it outwards, and clean it thoroughly.
In order to clean the filter carry out the following:
-Open the access door. (A). Place a container to catch
any water.
-Unscrew the cap (B) until it is loose, but do not
remove the cap completely. Pull out the filter.
After cleaning, re-insert the f ilter with the cap still
loose.
-There is only one way that the f ilter will slide
into its housing.
DO NOT USE FORCE
Now retighten fully and check for water leaks.
B
A
AVOID
CLEAN
Page 10

10
Select the clothes load correctly (section 3.3) and choose the appropriate
programme (section 8).
5- CAUTIONS AND ADVICE
In order to get maximum satisfaction and performance from this appliance, it
is important to follow the instructions indicated below:
Before starting to operate the machine, it must be released from its transit
(section 2.1).
Before opening the door, check that there is no water in the machine and
the pilot light is off.
Plug the power supply plug into a socket with an EARTH CONNECTION
and at the correct voltage.
Put in the washing products in the right proportion and the right
compartment (section 3.2).
Small garments, such as socks, belts, etc. are best put inside a bag to avoid
them being lost.
Before putting clothes into the washing machine, make sure that there is
nothing in the pockets (coins, buttons, clips, etc.) and that zips are undone.
If your machine has a filter, you should periodically check it is clean (sec. 4.1).
The interior of the washing machine should be handled by specialist only.
After each wash,leave the door ajar to prevent the rubber seal from becoming
misshapen.
When the clothes to be washed are heavily soiled or splattered with mud, it
is advisable to run a program with prewash.
Always put the machine on full, to save energy.
When the machine is installed, or after a long time without it being used, it
is advisable to run a wash program with the machine empty, to eliminate
any rusty water in the tubes.
For washer-dryers, do not use the dryer function if the clothes have been
treated with any non-aqueous solution.
Also for washer-dryers,do not use the dryer function for items containing
spongey rubber or similar elastomer materials.
The dryer must be installed in a well-ventilated place, away from the
influence of gases from other appliances and from defective installations.
The lower ventilation, between the floor and the base of the machine, must
not be obstructed (by carpet, cloths, etc.).
This washing machine is exclusively for domestic use.
Page 11

11
d) The machine is filling with water and draining at the same time.Check that:
e) The machine is vibrating or making a lot of noise. Check that:
- The block release operation has been carried out (Section 2.1).
- The washing machine is properly levelled (Section 2.3).
- The washing machine is not vibrating due to contact with fur niture or a wall.
f) The machine is leaking water. Check that:
- The filter cap is tightly closed and with the trim in ist place.
- The inlet hose is tightened on both sides and with the trim in ist place.
- The detergent used is loose powder and is not forming lumps which clog the
soap drawer.
- The washing machine is well levelled and not leaning forwards.
g) The machine is not washing to your satisfaction. Check that:
- You have chosen the right temperature an program.
- You are using the right dose of detergent.
- The filter is not clogged and so the rinses are not working properly.
h) If the loading door will not open, remember that:
- The pilot lamp (if there is one) must be off. If it is not, press the b utton to
the STOP position and wait about two minutes before trying to open it.
If after making these checks, the doubts or abnormalities continue, then
call our Technical Assistance Service who will attend to you as soon as
possible.
- The drainage hose is positioned at the right height (Section 2.2) and that it
is not syphoning because the diameters of this hose and the drain where it is
resting are very tight.
b) The machine is not filling with water. Check that:
- The tap is open and the pressure is sufficient.
- The electrovalve filter is not clogged (Section 4.2).
- The filling hose is not kinked.
c) The machine will not drain or spin.Check that:
- The drainage hose is not kinked.
- The drainage pump filter is not clogged.
In the event of any doubts or anomalies which arise, ring the TECHNICAL
ASSISTANCE SERVICE, but first, make the following checks:
a) The machine is not working. Check that:
- The door is properly closed.
- The fuses are not brown and the automatic cutout has not been triped.
- The prog rammer control button P (or the push-button X) is not in the STOP
position.
Page 12

An electro-mechanical safety device prevents the door from
opening whilst the appliance is operating,thus preventing access to the inside
of the machine and the consequent danger of injuries to the hands from coming
into contact with high temperatures or from the movement of the drum.
THE DOOR CANNOT BE OPENED FOR APROX. 2 MINUTES AFTER THE
PROGRAMME HAS ENDED.
6- SAFETY FEATURES
6.1 - The door
6.2 - The wash motor
In the event of mechanical underload or overload,a thermal safety device
automatically protects the motor.
6.3 - Heating
Heating of the wash water cannot start until the required water level is reached.
If there is not enough water or the tap is off,the machine stops (the prog ram
does not move forward).
A safety thermostat prevents excess temperatures.
6.4 - Plumbing.Water inlet
In the event of the filter being blocked the machine will never overflow.
6.5 - Child safety
The accesses to the door and to the pump motor f ilter are protected against
any accidental handling by children.
12
Page 13

13
7 - CONTROLS
BW 1000W
BW 1200W
BWD 1300W
XCY S L
PTRA
XCY T L
PVMA
XC T L
PRY
Page 14

S- Drying time selector
This control button allows the selection of drying time according to the weight
and type of material. (See the programme table).
Resistant materials drying: A drying cycle can be carried out at the end of
the washing cycle for all the available programmes for cotton by using this
button to select the adequate position as indicated in the programme table.
Delicate materials drying: In the same way, a low temperature drying cycle
can be selected at the end of the washing cycle for all the available programmes
for synthetic materials by using this button to select the adequate position
according to the programme table.
P- Programme selector
T- Temperature selector
This control button allows the temperature to be chosen for the wash which is
most suitable for the type of fabrics to be washed. A temperature equal to or
lower than that indicated in the program table can be chosen (even cold).To
select the temperature, just turn the button until it is lined up with the
corresponding marker.
This control button is used to select the programme which is adequate
according to the nature and degree of dirtiness of the clothes to be
washed.To set the programme,operate the ON/OFF button (position out)
and turn the control in a clockwise direction until the indicating mark
coincides with the chosen programme.
Starting the washing machine. Once the adequate programme has been
chosen,press the ON/OFF button again (position in).The machine will
start and automatically carry out all the wash functions until the end
of the cycle.The programme control will turn as the different functions
are carried out,until it reaches the Stop position.At this point,pres the
ON/OFF button once more (position out) to disconnect the machine from
the power supply and to be able to open the door.
V- Spin speed selector
this control button allows us to vary the spin speed of the last minutes of each
one of the cotton programmes between 550 and maximum as correspond. In
this way, the machine user can choose the most convenient spin speed for the
clothes. To set this speed, it is only necessary to turn the control button until
the corresponding mark coincides with the desired spin speed.
14
7 - CONTROLS
Page 15

15
When it is lit,indicates that the machine is switched on and that the door
locking system is activated.
In normal washing machines it goes out at the end of each programme and
door lock is not activated.
In washing-drying machines it stays on at the end of each programme and door
lock not activated.
L- Pilot lamp
R- 550/1000-1200-1300 rpm push-button
When activated "button IN", it makes the wash cycle of the synthetic and wool
programs stop during the last rinse with the drum full of water. This operation
is advisable to prevent creasing in certain fabric which need to be drip dried.
To end the cycle, press the button again "button OUT".
X- ON/OFF push-button
When activated "button IN", the spin is eliminated from all the programs
of the machine. This operation is necessary for certain types of delicate fabrics.
C- No spin push-button
When it is not operated "button OUT" the machine will automatically carry
out the programmes for cotton with a considerable saving of water.
It is only advisable when the load is equal to or less than half load. With bigger
loads it is advisable to operate this button "button IN" so that greater rinse
efficiency is obtained.
A- Rinse and hold push-button
In washing machines with automatic drying, never press this button.
Selects the spin speed of the last minutes of the cotton programmes.
Button OUT : the spin speed is 1000-1200-1300 rpm.
Button IN : the spin speed is 550 rpm.
Once the adequate programme has been selected,the washing machine can be
started by pressing this button "IN" and it will automatically carry out all the
chosen functions until the end of the programme. (Stop position). When the
push-button is pressed "OUT", the machine will not work.
Y- Extra rinse push-button
When activated (button IN), the machine automatically runs the programm
with a considerable water saving. Recommended only when the load is less
than half load.
M- Half load push-button
Never press for wool and synthetics programs.
When this button is pressed the drying function is not operate.
Page 16

a) Correctly select the load of clothes and correct programme (section 3.3 and 8).
PRACTICAL ADVICE
b) The temperature indicated in the programme table is the maximum which can be
f) All articles of clothing that bear a label with the wool symbol can be washed with
complete safety with the "wool" programme of this washing machine.
h) Bleach must only be used with white cotton materials.It must be non-concentrated
bleach for use in washing machines and it must be put in the corresponding section of
the soap drawer.
i) The "EXTRA RINSE" button permits an extra rinse when it is considered necessary.
e")The programmes for resistant materials cotton finish with a long spin, followed by
a strong drying cycle.
The programmes for synthetic materials finish a shor t spin, followed by a gentle drying
cycle. They could also finish with the dr um full of water (according to rinse and hold
push button). To f inish the cycle in this case, move the programme button one position.
The wool programmes f inish with a gentle spin. They could also finish with the drum
full of water (according to rinse and hold push button). To f inish the cycle in this case,
move the prog ramme button one position.
IN WASHER-DRYER MACHINES: see recommendations in programme table.
l) When the load is 2,75 kg. of "cotton" or lees, the machine can automatically carry
out the operations of wash+dry, by simply previously selecting the adequate
programme and drying position the corresponding control buttons.
m) When the load is greater than 2,75 kg. the wash must be carried out with the timer
control button in the "0" position.
Once the wash programme has finished, remove the load from the machine and divide
it into two equal parts. Carry out sucessive drying cycles with each one of these loads,
selecting the adequate position with the drying time selector.
n) For drying synthetic clothes, choose the corresponding programme with the programme
button and select in the same way, the drying position with drying time selector.
o) When the no-spin button is pressed, the drying function will not operate.
p) When selecting the drying function, always use the timer on the machine itself,
allowing the timer to run automatically to the Stop position "0".
Never use an external timer, in order to avoid possible functional faults.
j) The "RINSE AND HOLD" button only operates in the synthetic and wool programmes
k) Never press the ECO 1/2 load button with the wool and synthetic programmes.
c) One can choose the desired temperature with the temperature selector, but always
lower than that indicated in the programme table (section 8).
16
Page 17

8- WASH PROGRAMME TABLE
17
40/90
60
*
50
60
2.35
160
1.50
0.90
0.03
0.70
0.02
0.60
110
80
10
70
6
60
40
*
40
0.50
1.25
1.03
0.09
140
130
50
0.05
0.03
20
12
*
1
2
3
5
6
7
9
40/60
1 2 3 4
50
30
( )
PROGRAMMES
PROGRAMME
DESCRIPTION
COTTON
FABRIC
SYNTHETICS
ºC.SELECTOR
PRODUCTS
PRE-WASH
WASH
BLEACH
SOFTENER
LOAD kg
NO SPIN
CONSUMPTION
kWh
WASHING
min.
Pre.40 + wash 90 + 3/4 rinse + spin
RINSE &
HOLD
PUSH BUTTONS
Spin 550 rpm
Wash 60 + 3/4 rinse + spin
Wash 40 + 3/4 rinse + spin
3/4 rinse + spin
1 rinse + spin
6' x (550-850/1000/1200/1250) rpm
Pre.40 + wash 60 + 3 rinse + + spin
Wash 60 + 3 rinse + + spin
Wash 50 + 3 rinse + + spin
Wash 40 + 3 rinse + + spin
1 rinse + + spin
Wash 60 + 3/4 rinse + spin
60
4
0.55
125
WOOL
Wash 30 + 3 rinse + + spin
3 rinse + + spin 550 rpm
30
*
0.03
EXTRA
RINSE
COTTON DRYING
SYNTHETICS DRYING
2.00
1.50
1.00
0.75
105
85
65
50
Energetic drying
Gentle drying
Energetic drying
Gentle drying
C RY A
10
550/10001300rpm
ON/OFF
X
Fast Coloureds
Eco Quick wash
Fast Coloureds with pre-wash
Whites
Delicate Cottons
Mixed Fabrics
Delicates
Delicate Spin
Whites with pre-wash
Rinse
Softener / Freshen Up
Long Spin
Heavy Cottons
Wool Wash
Rinse
Softener / Freshen Up
Gentle Spin
90
6
0.02
8
2.20
150
Wash 90 + 3/4 rinse + spin
5,5
1
2,75
2
1,5
1
2,75
Spin 550 rpm
M
HALF LOAD
11
12
13
14
15
16
17
Page 18

Baumatic Ltd
An additional and annually renewable Insurance scheme for labour is available should you wish
to extend the warranty period.
Should any person other than a authorised representative of Baumatic Ltd interfere with the appliance,
Baumatic Ltd will be under no further liability.
In addition, your appliance is covered by a 5 year parts warranty, Baumatic Ltd will provide free
of charge the parts required to repair the appliance, only if they are fitted by a Baumatic engineer,
for any defect that arises due to faulty materials or workmanship within a period of 5 years fron
the original purchase date.
Dear customer,
The conditions of guarantee which apply to your Baumatic appliance are as follows: This product
is guaranteed for 12 months from the date of original purchase.
Baumatic Ltd will repair any defect that arises due to faulty materials or workmanship free of
charge during this period.
CONDITIONS OF GUARANTEE.
The guarantee covers the appliance for normal domestic use only, unless otherwise stated.
Any claims made under the terms of the guarantee must be supported by the original invoice/bill of
sale issued at time of purchase.
This guarantee is transferable only with the written consent of Baumatic Ltd.
If the appliance fails and is considered either not repairable or uneconomical to repair between twelve
months and five years, a free of charge replacement will not be offered.
The guarantee for any replacement appliance will only be for the remainder of the guarantee on the
original product purchased.
This guarantee does not cover:
Sinks and Taps.
Failure to comply with the manufactures instructions for use.
The replacement of cosmetic components or accessories.
Accidental damage or wilful abuse.
Subsequent loss or damage owing to the failure of the appliance or electrical supply.
Incorrect Installation.
Losses caused by Acts of God, civil war, failure to obtain spare parts, strikes or lockouts.
Filters, fuses, light bulbs, external hoses, damage to bodywork, plastic items, covers, baskets, trays,
shelves, burner bases, burner caps, decals, corrosion, r ubber seals, refrigeration system blockage.
In the course of the work carried out it may be necessary to remove the appliance from its operating
position. Whilst all reasonable care will be taken Baumatic Ltd cannot accept responsibility for
damage sustained to any property whatsoever in this process.
This guarantee is in addition to and does no diminish your statutory or legal rights.
Page 19

Contacting Baumatic
For mainland UK and Northen Ireland, please contact one the above numbers
for further information or any other query you may have.
For ROI (Republic of Ireland), please contact one of the numbers below:
TEL: 01-4030501 FAX: 01-4030503
Thank you for buying Baumatic.
SALES
TEL: 0118 933 6900
FAX: 0118 931 0035
SEVICE
TEL: 0118 933 6911
FAX: 0118 986 9124
SPARES
TEL: 0118 933 6922
FAX: 0118 986 9124
Page 20

 Loading...