

Page 1

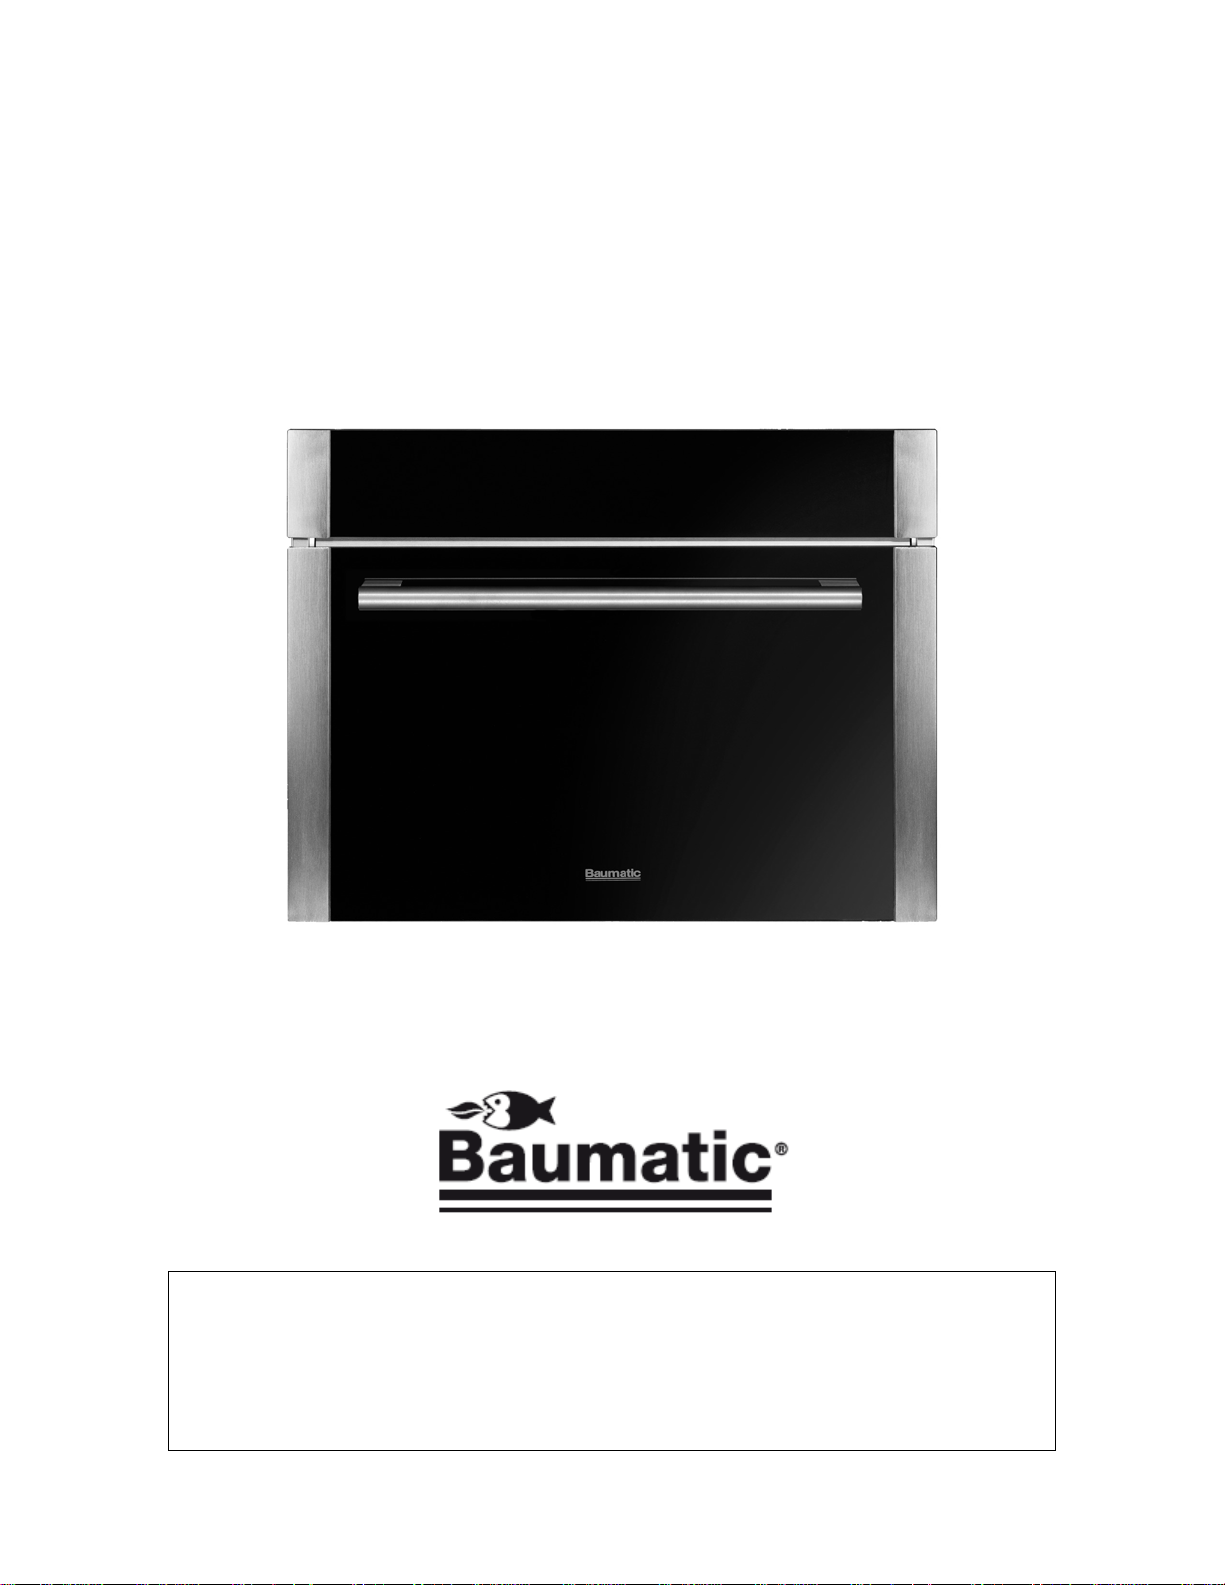
BVP460SS Vacuum-
Packer
He
Page 2
USER MANUAL FOR YOUR BAUMATIC
BVP460SS Vacuum-
Packer
NOTE: This User Instruction Manual contains important
information, including safety & installation points, which will
enable you to get the most out of your appliance. Please keep it
in a safe place so that it is easily available for future reference. for
you or any person not familiar with the operation of the appliance.
GS 21/12/10
2
Page 3

Contents
Environmental note 4
Important safety information 5–6
Specifications of your vacuum-packer 7
Using your vacuum-packer 8-10
Before switching on 8
Storing vacuum-packed products 8
Loading the vacuum-packer 9
Tips on vacuum-packed food preservation 9-10
Turning on the appliance and setting a vacuum-packing cycle 11-21
Control panel 11
Switching the appliance on 12
Preserving cycles for bags preparation 12-13
Preserving cycle for bags 13-14
Cooking cycle for bags 15-16
Tips on vacuum-packing bags 16
Preserving cycles for containers preparation 17
Brief preserving cycle for containers 18-19
Long preservation cycle for containers 19-20
Tips on vacuum-packing containers 20
Stopping a cycle in progress 21
Cleaning and Maintenance 21-25
Cleaning the external surfaces 21
Cleaning the vacuum chamber 22
Cleaning the glass lid 22
Cleaning the soldering bar 22-23
Dehumidifying the pump oil 23-24
Signals and warnings 24-25
Installation 25-35
Transport and handling 25
Unpacking the vacuum-packer 26-27
Matriculation plate data 28
Electrical connection 28-29
Installing your vacuum-packer 30-31
Installing the appliance into a housing unit 31-34
Final checks 35
Troubleshooting 36-37
Contact details 38
3
Page 4
Environmental note
Note
: Before discarding an old appliance, switch off and
disconnect it from the power supply. Cut off and render any plug
useless. Cut the cable off directly behind the appliance to prevent
misuse. This should be undertaken by a competent person. Disable
the door lock to make sure that children cannot get stuck inside
the appliance.
4
Page 5
Important safety information
Your safety is of the utmost importance to Baumatic.
Please make sure that you read this instruction booklet
before attempting to install or use the appliance. If
you are unsure of any of the information contained in
this booklet, please contact the Baumatic Advice Line.
IMPORTANT: Any installation work must be
carried out by a qualified electrician or
competent person.
Use of the appliance
o Your appliance is only designed to be used in the
home. It is suitable for vacuum-packing liquid and
solid food products and is used for preserving or
vacuum-pack cooking. If it is used for any other
purpose or it is not used correctly, then Baumatic
Ltd. will accept no liability for any damage or injury
that might be caused.
o Altering the specification of the appliance must not be attempted
for reasons of safety.
Before using your appliance
o Check the appliance for any signs of transport damage. If you
notice any damage, then you should not connect your appliance
to your mains supply and should contact your supplier.
Child safety
o Packaging material should be kept away from
children.
o Children should not be allowed to touch the
controls or play with the appliance.
General safety
o Do not pull on the power supply cable to remove the plug from
your mains supply socket.
o Do not pull out or insert the plug with wet hands.
5
Page 6

o Do not attempt to use your appliance outdoors or any place
where it is likely to come into contact with the elements.
o Before cleaning the appliance or performing maintenance work,
ensure that the appliance has been disconnected from your
mains supply.
o Always ensure that the location where you are installing your
appliance is free of stored items such as papers and other
flammable materials.
o Never block the ventilation openings of the appliance, either on
the inside or its exterior.
o Do not place any electrical devices inside of the appliance.
o This appliance is not intended for use by persons (including
children) with reduced physical, sensory or mental capabilities or
lack of experience and knowledge, unless they have been given
supervision or instruction concerning use of the appliance by a
person responsible for their safety.
Service
You should not attempt to repair the appliance
yourself, as this could cause injury or a more serious
malfunction. If you require a service call then please
contact the Customer Care Department.
6
Page 7
Specifications of your vacuum-packer
o 4 x vacuum-packing cycles
o LED display
o Electronic control operation
o Net volume: 17 litres
o Pump oil substitution indicator
o Insufficient vacuum signal
Standard accessories
o 10 large and 10 small vacuum-packing bags for preservation
cycle.
o 10 large and 10 small vacuum-packing bags for cooking cycle.
Dimensions of appliance
Height: 460 mm
Width: 597 mm
Depth: 550 mm
Dimensions of aperture*
Height: 440 mm
Width: 560 mm
Depth: 560 mm (min)
Vacuum-pack container capacity
Vacuum-pack box: Ø270 x H135mm
Jar: 1 litre
* Please refer to the installation instructions for more specific
information on the size of aperture that you will require.
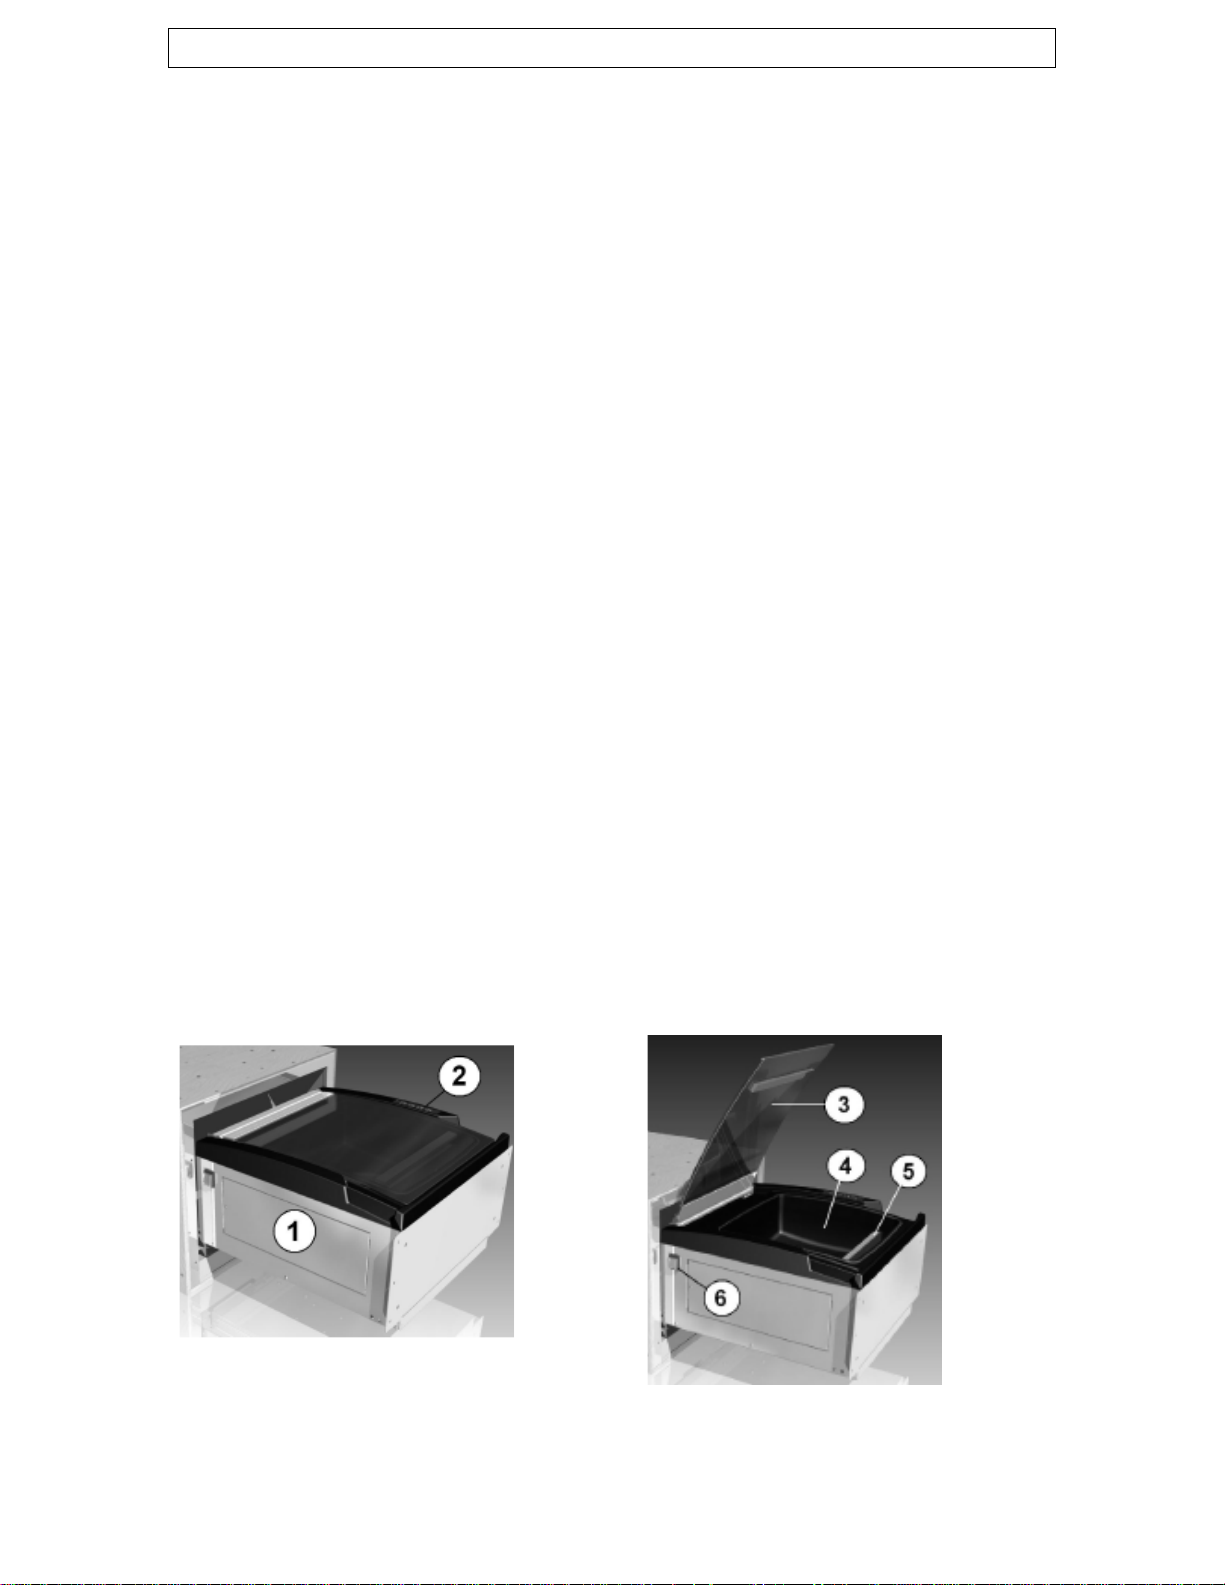
1) Vacuum-packer 4) Vacuum chamber
2) Control panel 5) Soldering bar
3) Strengthened glass lid 6) ON / OFF switch
7
Page 8

Using your Baumatic vacuum-packer
Before switching on
o Make sure that it has been installed by a suitably qualified
person, as per the information contained in Baumatic’s
installation instructions.
o Before using the appliance, it is recommended that you clean the
vacuum chamber and lid using a soft cloth which has been
dampened with tap water. Do not use strong detergents, steel
wool, scrapers or abrasive substances, acids or other such items
which could permanently damage the internal surfaces of the
vacuum-packer.
Storing vacuum-packed products
o Products which have been preserved by vacuum-packing can be
stored for considerably longer.
o They can also be cooked at low temperatures using a steam
oven which offers numerous advantages, the most important
being their nutritional properties and the food flavours which
remain unaltered over time.
o Vacuum-packing promotes the concentration of herbs and spices
and aids the diffusion of flavours, the penetration of salt and the
permeability of liquids, therefore vacuum-pack cooking means
using fewer herbs, spices and salt etc.
o Please consult the suggested storage times for various foods
listed below. These storage times are purely indicative and
depend on the initial quality of the stored product, the
storage temperature, cooling times of cooked foods and
on the level of vacuum achieved as well as the quality of
the vacuum-pack bags used.
Fresh salads: Up to 12 days
Fresh cheeses: Up to 20 days
Fresh fish: Up to 7 days
Fresh meat: Up to 15 days
Page 9

Loading the vacuum-packer
o The food should be previously prepared inside the special
vacuum-pack bags (for cooking or preserving), or inside rigid
vacuum-pack containers (“vacuum-pack boxes”).
o The bag or container should be positioned inside the vacuum
chamber where the evacuation of the air takes place and, in the
case of vacuum-pack bags, they are sealed.
Tips on vacuum-packed food preservation
Do not attempt to use the appliance to preserve foods which
are already past their best or impoverished from a nutritional
point of view. The lost quality cannot be regained.
o Foods which are kept for too long at room temperature or that
have only just finished being prepared or cooked lose humidity,
their initial qualities (colour, odour, flavour etc) and are more at
risk of bacterial contamination.
o It is advisable to only vacuum-pack products which have
been cooled in the fridge for long enough to ensure that
they are at a temperature of 3°C. This will also help
protect the pump from oxidising.
o If you use vacuum-pack bags for preserving raw or cooked food,
remember to distribute it evenly to facilitate the evacuation of
air and not to fill them excessively as this could affect the seal.
o Always fill the bags with the product to about 2/3 of their
volume.
o It is preferable for fruit and vegetables, once washed, to be
dried in order to avoid the stagnation of liquids which could
cause them to become flaccid.
o In order to preserve meat for a reasonably long time, remember
to cool it in the fridge for at least two hours to slow down the
spread of bacteria.
o Before vacuum-packing meat, dry it in order to obtain a good
percentage of air evacuation. In the case of meat on the bone,
for instance cutlets, chops or other cuts, cover it with aluminium
foil in order to avoid the bag being perforated.
o To vacuum-pack fish, first it is necessary to wash it well,
eliminate the scales, gut it and remove the gills. Dry it as for
8
Page 10

meat and cool it properly before vacuum-packing. Keep it in the
fridge at a temperature of not more than 3°C.
o For hard cheeses, such as Parmesan, Pecorino etc. it is not
necessary to undertake any special procedures. For soft
cheeses, in order to avoid them being squashed, it is a good
idea to wrap them in cellophane or to opt for preserving them in
vacuum-pack containers.
o For salamis and for salads, if you use vacuum-pack containers,
it is not necessary to undertake any special procedures. If you
do wish to pack the product in bags, make sure it is dry before
beginning to pack it.
o For sauces, once prepared, pack them in glass jars then
pasteurise them in the microwave for twelve minutes at
maximum power. Immerse the container in water and ice to cool
the sauce then vacuum-pack it by putting it into the special
vacuum-pack container.
9
Page 11
Turning on the appliance and setting a vacuumpacking cycle
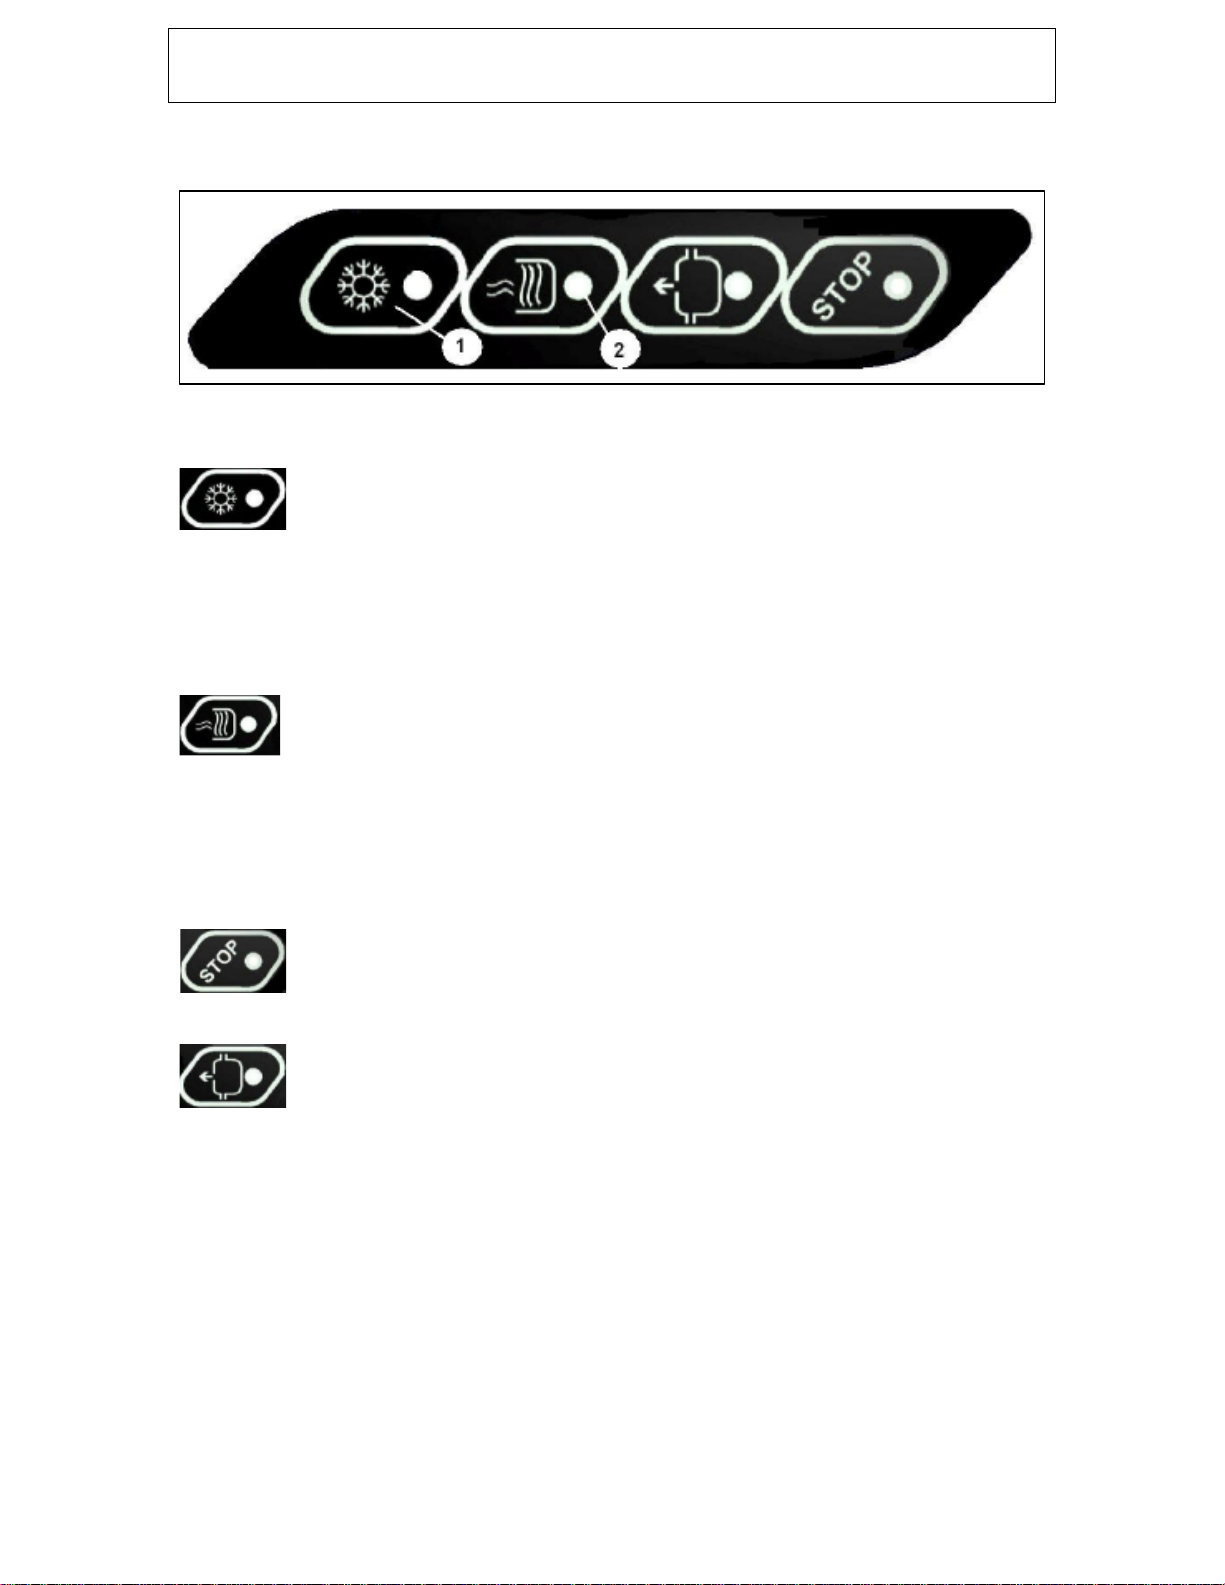
Control panel
1) Control buttons
2) LED displays
o Press to select the preserving cycle. The cycle lasts
approximately three minutes. The vacuum inside the
sealed bags, in best conditions, can reach 0.002 - 0.005 bar.
o Once the cycle has started, if the button is pressed again, the
appliance moves directly to soldering the bags.
o Press to select the cooking cycle. The cycle lasts
approximately four minutes. The vacuum inside the
sealed bags, in best conditions, can reach 0.002 – 0.005 bar.
o Once the cycle has started, if the button is pressed again, the
appliance moves directly to soldering the bags.
o Press this button to interrupt the cycle in progress.
o Press to select the short vacuum cycle for containers.
The cycle lasts approximately one minute. The vacuum
inside the container reaches around 0.3 bar.
o If pressed for five seconds, the long vacuum cycle for containers
is activated. The cycle lasts approximately three minutes. The
vacuum inside the containers, in best conditions, can reach
0.005 – 0.010 bar.
10
Page 12

Switching the appliance on
o Turn the appliance on using the ON / OFF switch located on the
right of the main body of the machine.
o A short beep is emitted which indicates the appliance is in “initial
start-up” mode. This mode is also signalled by all four of the LED
displays switching on simultaneously on the control panel.
REMEMBER: Before touching the buttons, a self-calibration
period of around two seconds must be completed.
Preserving cycles for bags
Preparation
o Open the appliance drawer as far as it will go as signalled by a
stoppage “click”.
o Turn the vacuum-packer on using the ON / OFF switch on the
side.
o Choose a bag depending on the usage (preservation or cooking),
which is adapted to the size of the product. The product should
not occupy more than 2/3 of the volume of the bag.
o Open the lid of the appliance and ensure that the vacuum
chamber is empty and the product to be packed is dry. When
inserting the food into the bag, be careful not to dirty or dampen
the internal part near to the opening in
order to not affect the efficiency of the
seal.
o Position the bag support grill depending
on the size of the product. For small
bags rest on the supports. For larger
bags rest on the horizontal side.
12
Page 13

o Place the bag on the grill, in a central position on the soldering
bar (A), in order for the open flap to overlap it by around 2 cm.
o When packing liquid products, do not fill the bag more than
half full. Insert the grill into the basin with its support folded
towards the inside. This will form an inclined surface which the
bag with the liquid contents can rest on, which then rests on the
bottom surface.
o Close the lid of the device.
Preserving cycle
This is a forced vacuum level. The air inside the bag is
removed completely. The length of the cycle is
approximately three minutes.
o After following the steps, outlined in the preparation section on
pages 12-13, select the preserving button (above) and close the
lid pressing lightly on its front. This will begin the preserving
cycle.
o When the cycle starts, an acoustic short beep will sound.
13
Page 14

The cycle proceeds automatically in the following order:
o The evacuation phase is signalled by the LED of the
preservation cycle button blinking for around two minutes.
o The soldering phase is signalled by the LED of the preservation
cycle button coming on. This phase lasts approximately nine
seconds. A cooling phase will then follow which lasts around five
seconds.
o During the next discharge phase, all the LED displays revert to
the initial start-up mode. The discharge valve is open for
approximately twenty seconds. During this time, the appliance
does not respond to any commands.
o When the vacuum chamber is decompressed and an acoustic
signal sounds, it is possible to open the lid and extract the sealed
bag at the end of the discharge phase.
o The product will appear closely wrapped and compressed by the
bag. The appliance is now ready for a new cycle.
By pressing the preservation cycle button during the air
evacuation phase, the vacuum-packer will pass to the soldering
phase.
The cycle can be interrupted early by pressing the stop button.
In this case, the vacuum-packer will not carry out the soldering
phase and the chamber will be decompressed.
Please wait for approximately twenty seconds and for the
acoustic signal before starting a new cycle.
14
Page 15

Cooking cycle
This is a forced vacuum level. The air is removed both from
the food and its internal parts, in such a way as to obtain the
transmission of heat from the outside to the inside of the product in
the next cooking phase in the steam oven. The length of this cycle is
approximately four minutes.
o Once the steps in the preparation section, outlined on pages 12-
13, have been followed, select the cooking cycle button (above)
and close the lid by pressing on its front. The cooking cycle will
then begin.
o When the cycle starts, an acoustic short beep will sound.
The cycle proceeds automatically in the following order:
o The evacuation phase is signalled by the LED of the cooking
cycle button blinking for approximately three minutes.
o The soldering phase is signalled by the LED of the cooking cycle
button coming on. This phase last about nine seconds. A cooling
phase will then follow which lasts approximately five seconds.
o During the next discharge phase, all the LED’s revert back to
the initial start-up mode. The discharge valve is open for about
twenty seconds. During this time, the machine does not accept
commands.
o The product will appear closely wrapped and compressed by the
bag. The appliance is now ready for a new cycle.
15
Page 16

By pressing the cooking cycle button during the air evacuation
phase, the appliance will pass to the soldering phase.
The cycle can be interrupted early by pressing the stop button.
In this case, the appliance will not carry out the soldering and
the chamber will be decompressed.
Please wait for approximately twenty seconds and for the
acoustic signal before starting a new cycle.
Tips on vacuum-packing bags
o The bags which are used for preserving foods by vacuum-
packing and / or for cooking foods are characterised by an
external layer of nylon (barrier layer), which stops oxygen from
passing from the outside to the inside of the bags which
preserves the nutritional properties of the packaged food.
The appropriate bags for the uses described in this manual are:
PA/PE bags for preserving food: The external barrier layer is made
of nylon (polyamide) and the sealing layer inside is made of
polyethylene. They are smooth and opaque and normally have a
thickness of 90 micron. They are indicated for preserving foods and
suitable for contact with food, in line with the legislation in force.
They are not indicated for vacuum-packing cooking techniques.
OPA/PP bags for cooking food: These are different from preserving
bags as their sealing layer is made of polypropylene. They are smooth
and clear and normally have a thickness of 75 – 85 micron. They are
indicated for preserving and vacuum-packing cooking.
o Using this technique, the maximum temperature reached is
100°C for some types of vegetables, while most other foods are
cooked at 60 - 65°C. These bags, therefore, are able to resist
temperatures of up to 100°C.
o Vacuum-pack bags are indicated for packing products which are
not excessively sensitive to being squashed e.g. meat, sliced
meats, hard cheeses, pulses etc. They should be perfectly
sealed, and this can be distinguished by a well-marked sealing
line which has no burn marks.
16
Page 17

Preserving cycles for containers
Preparation
In all cases where liquid foods are to be vacuum-packed, the
containers can be filled to a maximum of ¾ of their usable
volume.
o Based on the type of container chosen, the corresponding jar
cycle will be set e.g. brief if the vacuum-packing container is
made of plastic which can be squashed or long for the rigid,
professional types.
o The lid of the containers (A) must be sufficiently loosened or
valves (B) must be open in order to enable the air to be
evacuated from the inside.
o Position the container inside the vacuum chamber.
o Close the lid of the appliance.
17
Page 18

Brief preserving cycle for containers
This cycle can be used for plastic (polycarbonate)
containers. This cycle lasts approximately on
o After following the steps in the preparation section, outlined on
page 17, select the brief preserving button (above) and close the
lid by pressing lightly on its front. This will start the preserving
cycle.
o When the cycle begins an acoustic short beep sounds.
The cycle proceeds automatically in the following order:
o The evacuation phase is signalled by the LED for the brief
preserving cycle button flashing. This phase lasts about thirty
seconds.
o During the next discharge phase, all the LED’s revert to the
initial start-up mode. The discharge valve remains open for
approximately twenty seconds.
o At the end of the cycle, an acoustic short beep will sound which
indicates that the appliance is ready for a new cycle.
o The basin appears decompressed which enables the container to
be extracted.
o Close the container air-evacuation valve quickly in order to avoid
air coming back into the container.
e minute.
18
Page 19

The cycle can be interrupted early by pressing the stop button.
The vacuum obtained by this cycle is around 80% of the
vacuum which can be reached and is suitable for plastic
containers and not intended for professional use.
Long preserving cycle for containers
This cycle is used for rigid and resistant forced vacuum-pack
containers (e.g. made of thick glass, vacuum-pack
containers for professional use). The cycle lasts approximately three
minutes.
o After following the steps, outlined in the preparation section on
page 17, select the preserving cycle button (above). Hold the
button down for five seconds to activate the longer cycle.
Close the lid by pressing lightly on its front.
o When the cycle starts, an acoustic short beep will sound.
The cycle proceeds automatically in the following order:
o The evacuation phase is signalled by the LED for the preserving
cycle button flashing. This phase lasts approximately three
minutes.
o During the following discharge phase, all the LED’s revert to the
initial start-up mode. The discharge valve is open for about
twenty seconds.
o At the end of the cycle, an acoustic short beep will sound which
indicates that the appliance is ready for a new cycle. The basin
appears decompressed enabling the container to be extracted.
o Close the container air-evacuation valve quickly, in order to
avoid air coming back into the container.
19
Page 20

The cycle can be interrupted early by pressing the stop button.
The vacuum obtained by this cycle is around 100% of the
vacuum which can be reached and, consequently, is only
suitable for very resistant and thick plastic containers or those
made of glass or stainless steel.
Tips on vacuum-packing containers
o The vacuum-pack containers are usually made of transparent
plastic, designed for domestic use at non-professional levels of
vacuum-packing e.g. around 80% absolute vacuum.
o The lids of these containers are equipped with a special valve,
which is used for evacuating the air.
o These containers are used both for preserving foods that are
sensitive to being squashed and for preserving liquid foods.
They should not be used for vacuum-pack cooking
techniques.
o In order to avoid breakage or the excessive deformation of these
containers by the high levels of vacuum reached, the appliance is
equipped with a special working cycle, which automatically stops
the air evacuation at a vacuum level which guarantees the food
is well preserved and which also maintains the integrity of the
container at the same time.
o If, on the other hand, you have highly rigid containers available,
made of stainless steel or glass, which are able to resist the high
vacuum, levels reached, it is possible to set the longer cycle.
The following types of containers can be used:
Plastic, domestic-use with a valve in the lid
Professional with a valve on the lid e.g. “GreenVac”
Glass jars with lids which have seals e.g. “Bormioli”
Pans or dishes with special lids for vacuum-packing.
20
Page 21

Stopping a cycle in progress
o By pressing the stop button, an acoustic signal will
warn you that the cycle will be immediately
interrupted. In this case, the appliance will not carry
out the soldering phase and the chamber will be decompressed.
o After the discharge phase all the LED’s will revert to the initial
start-up mode.
Cleaning and maintenance
WARNING: PLEASE ENSURE THAT YOUR
APPLIANCE IS DISCONNECTED FROM
YOUR MAINS SUPPLY BEFORE
ATTEMPTING TO CLEAN IT.
o Do not clean the appliance by pouring water onto it or spraying
water over it.
o Clean the containers separately with soap and water.
o Do not use abrasive products, detergents or soaps. Do not
scrape the surface with sharp objects.
o After washing the appliance, wipe over the area that you have
cleaned with a damp cloth and then dry it carefully and
thoroughly.
Cleaning the external surfaces
o The external surfaces of the vacuum-packer are made of
stainless steel and should be cleaned with a soft cloth or a
sponge and neutral detergent.
o After cleaning it is advisable to protect the external surfaces with
specific oil-based products for stainless steel.
During cleaning do not remove the matriculation plate. It
provides important information on the device for the service
centre.
o The control panel has “soft-touch” commands that do not use
protruding buttons. Therefore, an appropriate cleaning product
for glass surfaces is suitable for cleaning the control panel. Use
a soft cloth with only a little detergent and carefully dry.
21
Page 22

Cleaning the vacuum chamber
o In order to guarantee the hygiene and quality of the packaged
food products, internal cleaning of the vacuum chamber should
be undertaken after each use.
o The shape of the chamber enables fast cleaning. The use of a
soft cloth or non-abrasive sponge is recommended and a
neutral detergent.
Cleaning the glass lid
o It is recommended to clean the glass lid after each use. Use a
soft cloth or non-abrasive sponge which has been soaked in tap
water or a specific glass cleaning product.
Cleaning the soldering bar
o On a monthly basis it is recommended to clean the surface of the
soldering bar in order to remove residues that could affect the
bag sealing quality.
o In order to do so, lift the soldering bar (A) upwards and extract
the two screws (B).
22
Page 23

o Clean using a soft cloth or non-abrasive sponge and a neutral
detergent.
o When finished, insert the bar into the two screws (B) centering
the two holes on the lower part of the bar and ensuring that it is
correctly inserted.
WARNING: Do not remove the black Teflon strip. Do not use
scrapers or abrasive utensils.
o When cleaning is complete, dry your hands and then reconnect
the plug to your mains supply.
o If it should not be used for a long period, it is wise to clean and
disconnect the appliance from the electricity supply.
Dehumidifying the pump oil
The main element of the vacuum-packer is the vacuum pump. Steps
should be taken to ensure that the pump does not oxidise on its
internal surfaces and consequently cause a blockage of the rotors. This
can occur due to residues of rust, which are formed when water
vapour is drawn in with the air, which then condenses and remains
inside the pump for long periods of time. To prevent this happening
you can:
1) Vacuum-pack products when they are cold, possibly at a
temperature of 3 – 4°C. The hotter the product, the
shorter the preservation and the greater the formation of
condensation inside the pump which can cause rust and
damage.
2) If this device is only used occasionally, before packing the
products, run at least two – three complete long
preservation container cycles with the chamber empty.
This enables the temperature of the pump oil to reach the
right level and the water vapour to be evacuated.
It is recommended that you undertake a
dehumidifying cycle of the pump oil once a week by
pressing the preserving cycle button for five seconds.
If the appliance is switched back on after a long period of
inactivity the dehumidifying cycle should be carried out
before the appliance is used. The cycle lasts approximately
twenty minutes.
23
Page 24

Baumatic Ltd declines any responsibility for work carried out on
the appliance which is not in line with the instructions reported
in this manual.
Signals and warnings
Pump oil substitution warning
o The vacuum-packer is equipped with a high-performance
vacuum pump, which is lubricated by special oil, designed for
this appliance.
o During the use of the vacuum-packer, the oil undergoes normal
deterioration due to the absorption of impurities and liquids.
o In order not to compromise the performance of the appliance, it
is necessary to undertake an oil change every 2500 cycles, which
equals around 150 hours of usage.
o The appliance will signal when an oil change is required as all the
LED’s will flash and a long beep will sound.
WARNING: The oil change must only be carried out by an
authorised service engineer.
Insufficient vacuum signal
o The vacuum-packer is installed with a mechanism which reveals
the level of vacuum reached inside the chamber and monitors
whether the appliance is working as it should be.
o If the minimum level of vacuum (350 millibar pressure inside the
chamber) is not reached after around one minute, the cycle is
automatically disrupted.
o The appliance signals the fault through the stop button flashing
for approximately twenty seconds along with an acoustic signal.
o The signal stops when a new cycle is activated. If the cause is
not remedied, the signal will repeat.
o If the insufficient vacuum signal should occur, check that the lid
is properly closed and the seal is properly inserted.
24
Page 25

o If the fault persists then call the Baumatic Ltd Customer Care
Helpline.
WARNING: Do not attempt to repair or adjust the appliance
yourself. It could be dangerous and affect your guarantee. Only
authorised and qualified technicians should be entrusted to do
so.
Installation
IMPORTANT: Before installation and usage read
all the instructions and make sure that the
voltage (V) and the frequency (Hz) indicated on
the rating plate are exactly the same as the
voltage and frequency in your home.
The installation must only be carried out by an authorised and
qualified technician.
The manufacturer declines all responsibility in the event of the installer
failing to observe all the accident prevention regulations in force,
which are necessary for normal use and the regular operation of the
electric system.
Transport and handling
o Two people are required for handling this appliance.
WARNING: The vacuum pump contains oil. Ensure the
appliance remains in a horizontal position at all times to avoid
oil leakage from the pump.
When handling the appliance, all necessary precautions must
be taken to avoid damage occurring to the product, people and
other items by following the instructions in this manual.
25
Page 26

Unpacking the vacuum-packer
Handling of the appliance should always be carried out by two
people, using the stainless steel handles inserted in the
packaging. Use sticky tape to hold them securely.
They can be hooked onto the two sides of the external container and
should be inserted into the two upper holes as shown in the diagrams
below:
The handles should be inserted completely so that the two ends
come out of the two lower holes. Otherwise, there is a risk of
scratching the plastic basin inside the container.
Open the cardboard packaging and extract the two blocking brackets
for the appliance and the bag containing:
o 4 x Self-tapping 4.2 x 13 screws for fixing the front of the
appliance to the blocking brackets.
o 16 x wood 4.5 x 16 screws for fixing the blocking brackets to the
unit panels.
o 1 x Plexiglas template for correctly marking the unit bracket
holes.
26
Page 27

Then remove the polystyrene blocks from the top and using the
protective gloves lift the appliance with the help of the two handles.
o After removing the packaging, immediately check the appliance
for transport damage. If faults are found, do not operate the
appliance and contact the retailer.
In order to ensure that the drawer does not come out during
handling and installation in the unit, it is fixed within its
container by a safety strip.
Do not remove the safety strip until the vacuum-packer is
placed inside its unit in a safe and balanced position.
o Remove the protective PELD bag and keep it out of reach of
children. If traces of adhesive should remain, remove them
delicately with a soft cloth and a neutral detergent.
o It is recommended not to use steel wool, scrapers or abrasive
substances to remove residues.
27
Page 28

Matriculation plate data
The matriculation plate data are positioned on:
o 1 label on the external cardboard packaging.
o 2 device plates, positioned at the centre top of the container and
below the drawer.
WARNING: Do not remove, damage or adjust the matriculation
plate attached to the device.
Electrical connection
We recommend that the appliance is connected by a
qualified electrician, who is a member of the N.I.C.E.I.C.
and who will comply with the I.E.E. and local regulations.
o Your vacuum-packer comes supplied with a standard 16A Schuko
plug and a power cable which is 150 cm long. The plug should
have a 10A fuse and be easily accessible.
WARNING: If the full length of the cable is not used DO NOT
wind it back on itself. Leave it unwound and ensure that it is
not a tripping hazard.
o The wiring in the mains lead is coloured as follows:
Brown Live
Blue Neutral
Green and yellow Earth
o As the colours of the wires in the appliance’s mains lead may not
correspond with the coloured markings identifying the terminals
in your spur box, please proceed as follows:
The brown wire must be connected to the terminal marked “L”
(live), or coloured red.
28
Page 29

The blue wire must be connected to the terminal marked “N”
(neutral), or coloured black.
The green and yellow wire must be connected to the terminal
marked “E” (earth), or by the earth symbol, or coloured green
and yellow.
o When the connection is completed, no stray strands or cut wire
should be present. The cord clamp must be secured over the
outer sheath.
29
Page 30

Installing your vacuum-packer
WARNING: The unit (column or
support base) must be solidly
anchored to the walls using screws or
plugs of the right size.
o The vacuum packer should be
o The appliance is supplied with special
o It should be fixed first to the two
o Then the container should be
positioned inside the unit.
brackets to fix the container to the
inside of the compartment.
sides of the compartment using eight
4.5 x 16 wood screws for each side.
inserted as far as it will go and
blocked using four self-tapping 4.2 x
13 screws.
o It is recommended that you don’t position the appliance in closed
rooms at high temperatures with little air circulation, in direct
sunlight or with other atmospheric agents or near heat sources.
o When choosing the position for the appliance, ensure that there
is enough space to completely extract the drawer to its full
potential which is around 510 mm.
o You should also consider the working space needed when the
drawer is open, bearing in mind that the user is in front of the
appliance.
30
Page 31

The power cable is 150 cm long and due to problems connected
with overheating, it is not possible to use extension cords to
lengthen it. Bear in mind the position of the sockets when
locating your vacuum-packer.
Installing the appliance into a housing unit
o Please use the above diagram as a guide when fitting the
appliance into a housing unit.
o With the help of the Plexiglas template, mark the fixing points
for the screws on the two internal sides of the compartment.
o Line up the template with the front corner of the compartment
and mark the points on the front part of the eyelet as shown
below:
31
Page 32

o Fix the blockage brackets on the two internal sides of the
compartment using eight 4.5 x 16 screws for the chipboard
panels.
o The brackets must rest on the horizontal surface and be
vertically aligned with the two sides of the unit.
o Place the appliance on the horizontal surface and insert it 5 cm
from the edge of the unit.
o Cut the strip and slide it off the compartment. Immediately
afterwards, push the appliance in until it reaches the back of the
unit being careful not to open the drawer.
32
Page 33

o The appliance must be central within the compartment.
o Open the drawer to around 15 cm and screw the device to the
blockage brackets using the four self-tapping screws that are
supplied, using a short Phillips cross screwdriver.
o If you have not attached the door, first proceed with the two
lower screws which can be tightened with the drawer closed.
33
Page 34

Only extract the drawer completely after fixing the appliance
into the unit.
o In order to fix the door, put the seal included with the vacuum-
packer between the appliance panel and the door, inserting it
between the upper edge of the vacuum-packer and the door.
Neither glue nor adhesives are necessary.
o The working room temperature should not be greater than 35°C.
Above this, the performance of the appliance is not guaranteed.
34
Page 35

Final checks
Before switching the appliance on, it is recommended that you carry
out the following checks:
o If the vacuum-packer has been transported in a non-
vertical position e.g. on it’s back, or it has been
tipped during installation, check the level of the oil in
the pump using the inspection hole.
1) Oil top-up cap
2) Pump
3) Oil level
4) Oil drainage cap
5) Oil replacement lid
o Disconnect the appliance from the electricity supply.
o Dismantle the side inspection panel as shown above left.
o Check the correct oil level. If necessary, clean any drips and top
up the pump with SW40 oil.
o Check the appliance is correctly connected to the electricity
supply.
After carrying out these checks:
o Check the absorption with an ammeter.
o Carry out at least one complete cycle of vacuum-packing for
bags.
35
Page 36

Troubleshooting
For common problems and solutions please see the table below.
This table should only be regarded as a general guide. Errors
and faults are relative to individual circumstances.
Fault Possible causes Solution
All the lights on
the command
panel are
blinking.
The stop button
light is flashing
and an alarm is
sounding.
When switched
on, all the LED’s
flash for 3
seconds and an
alarm sounds
The cycle starts
but the pump
does not
The appliance
will not switch
on
Low vacuum
level in the bag
Overheating: circuit board
damage.
Insufficient vacuum in the
chamber. Minimum
vacuum power has not
been reached.
Oil change warning due to
having reached 2500
cycles.
Pump thermal protection
intervention due to
overheating.
Energy shortage. Check the electrical connection.
1) Irregular bag
soldering.
2) Dirty or perforated
bag.
3) Bag size not
suitable for the
size of the
product.
4) Insufficient pump
performance.
Turn the appliance off and wait for
about 15 minutes for it to cool
down and for the thermal
protection to be automatically
restored.
If, on switching the machine back
on, the same problem occurs call
the Baumatic Ltd Customer Care
Helpline to arrange for an engineer
to replace the power board.
o Lid not pressed down at the
start of the cycle.
o Lid of the container badly
positioned.
o Lid seal worn or badly
positioned.
o A technician is required to
check the air circuit, the
sensor board and vacuum
pump.
o A technician is required to
check the correct electro
valve opening.
o Vacuum pump in thermal
protection state: switch the
appliance off and wait for
15 minutes.
Technician required to change the
pump oil.
Switch the device off and wait for
15 minutes before turning it back
on.
1) Position the bag correctly.
Check the state of the
Teflon cover. Technician
required to change the
Teflon and check the
soldering resistance.
2) Change the bag.
3) Choose a bag where the
volume of the product is not
more than 2/3 of the
volume.
4) Technician required to
36
Page 37

check the pump.
The appliance
does not solder
the bags
1) Dirty contacts.
2) Soldering
resistance bar
broken.
3) Power shortage.
4) 3-way electro
valve blocked or
dirty.
1) Remove the soldering bar
from the two screws and
clean the two bar contact
holes with a small brush.
2) Technician required to
change the bar.
3) Technician required to
check the leads and power
board.
4) Technician required to
replace valve.
IMPORTANT: If your appliance appears not to be
operating correctly, then you should disconnect it
from your mains supply and then contact
Baumatic Customer Care on telephone number
(0118) 933 6911.
DO NOT ATTEMPT TO REPAIR THE APPLIANCE
YOURSELF.
Please note that if an engineer is asked to attend whilst the product is
under guarantee and finds that the problem is not the result of an
appliance fault, then you may be liable for the cost of the call out
charge.
The appliance must be accessible for the engineer to perform
any necessary repair. If your appliance is installed in such a
way that an engineer is concerned that damage will be caused
to the appliance or your kitchen, then he will not complete a
repair.
This includes situations where appliances have been tiled in,
sealed in with sealant, have wooden obstructions placed in
front of the appliance, like plinths. Or any installation other
than the one specified by Baumatic Ltd. has been completed.
Please refer to the conditions of guarantee that appear on the
warranty card that you receive with the appliance.
37
Page 38

United Kingdom
Baumatic Ltd.,
Baumatic Buildings,
6 Bennet Road,
Reading, Berkshire
RG2 0QX
United Kingdom
Sales Telephone
(0118) 933 6900
Sales Fax
(0118) 931 0035
Customer Care Telephone
(0118) 933 6911
Customer Care Fax
(0118) 986 9124
Spares Telephone
(01235) 437244
Advice Line Telephone
(0118) 933 6933
E-mail:
sales@baumatic.co.uk
customercare@baumatic.co.uk
spares@baumatic.co.uk
technical@baumatic.co.uk
Website:
www.baumatic.co.uk
Republic of Ireland
Service Telephone
1-890 812 724
Spares Telephone
091 756 771
Czech Republic
Baumatic CR spol s.r.o.
Průmyslová zóna Sever 696
460 11 Liberec 11
Czech Republic
+420 483 577 200
www.baumatic.cz
Slovakia
Baumatic Slovakia, s.r.o.
Galvániho 7/D
Slovakia
+421 255 640 618
Germany
Baumatic Gmbh
Lilienthalstrasse 1
320 52 Herford
Deutschland
+49 5221 694 99-0
www.baumatic.de
Italy
Baumatic Italia S.R.L.
Via Galvani N.3
35011 Campodarsego (PD)
+3904 9920 2297
www.baumatic.it
Holland
Baumatic Benelux B.V.
Grindzuigerstraat 22
1333 MS ALMERE
Nederland
+3136 549 1555
www.baumatic.nl
Page 39

2
Page 40

29
 Loading...