

Page 1
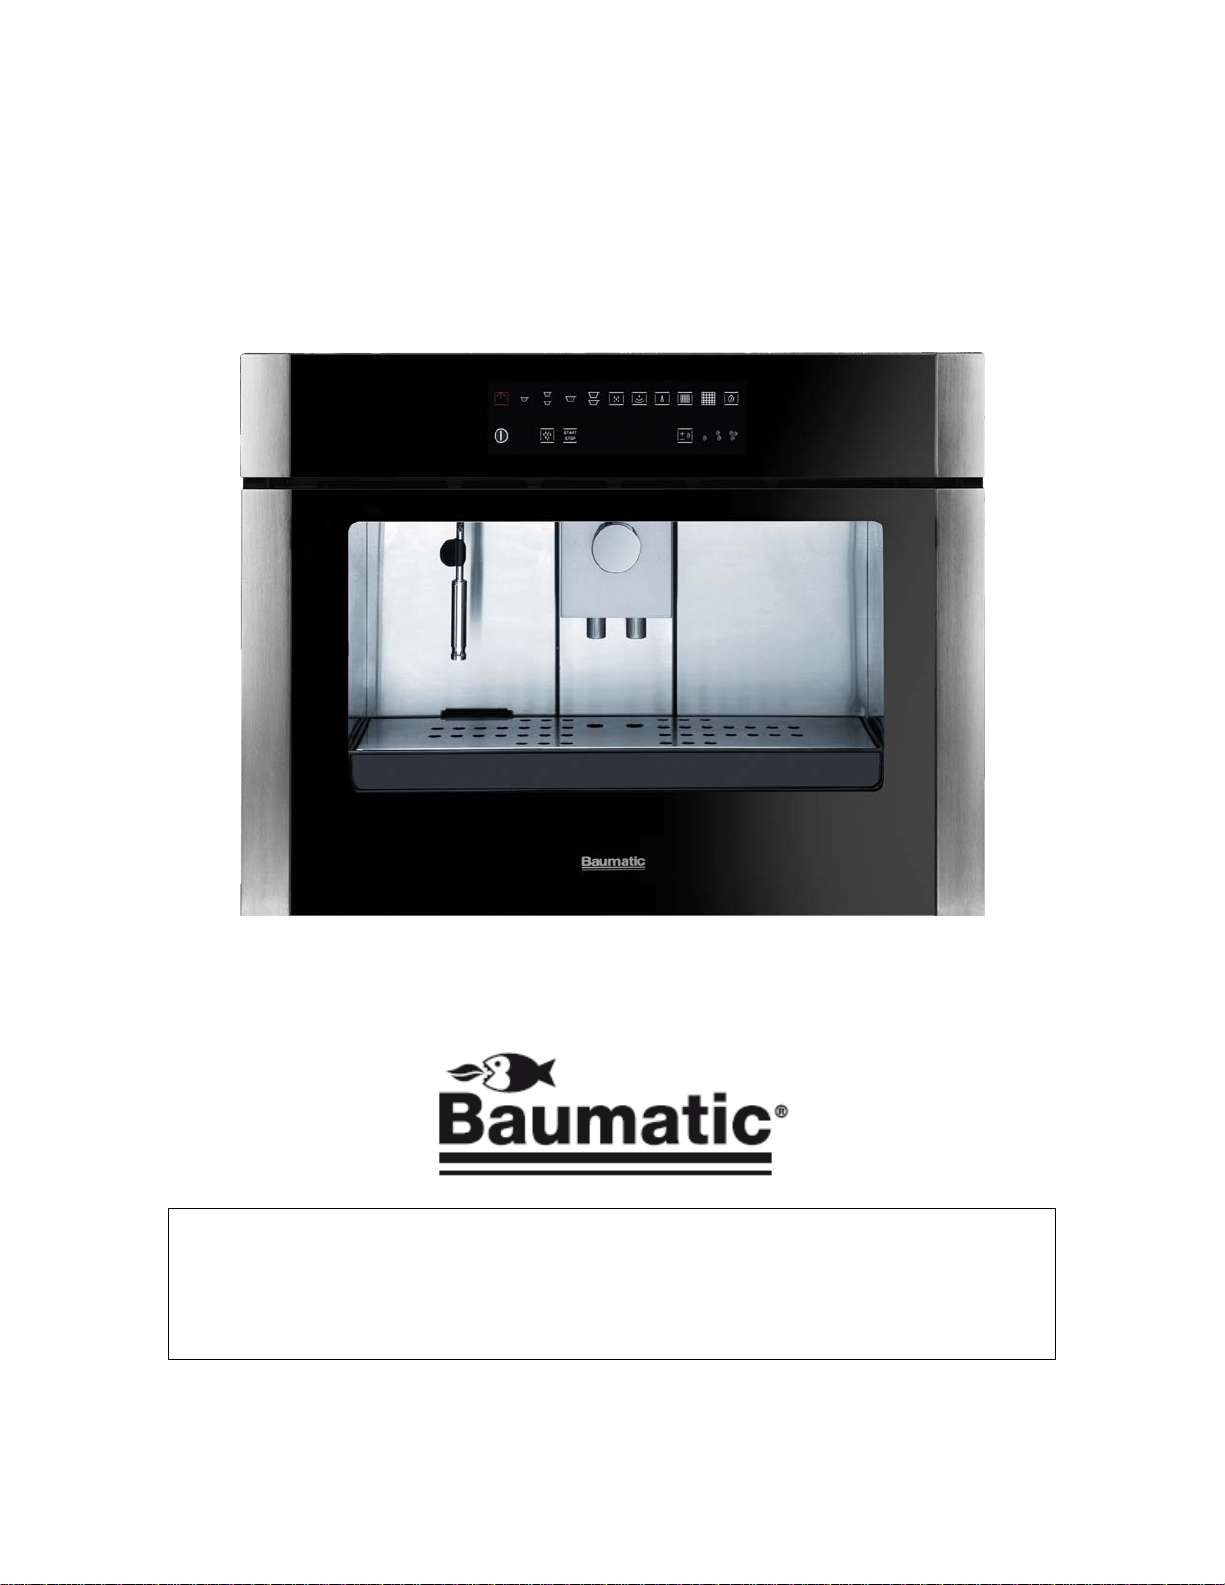
BEC461SS
Fully automatic built in
coffee machine
1
Page 2
User Manual for your Baumatic
BEC461SS
Fully automatic built-in coffee machine
NOTE: This User Instruction Manual contains important
information, including safety & installation points, which will
enable you to get the most out of your appliance. Please keep it
in a safe place so that it is easily available for future reference; for
you or any person not familiar with the operation of the appliance.
GS 28/11/11
2
Page 3

Contents
Environmental note 4
IMPORTANT SAFETY INFORMATION 5 – 7
Specifications 7 – 11
Product and aperture dimensions 7
Product specifications 8
Standard accessories 8
Technical specifications 8
Description of the coffee machine 9
Control panel 10 - 11
Before first use 12 - 14
Cleaning 12
Filling the water tank 12 – 13
Filling with coffee beans 13 - 14
Using your coffee machine 14 – 19
Turning the coffee machine on 14 – 15
Coffee grind regulation 15
Making coffee 16
Dispensing hot water 17
Dispensing steam 18 - 19
Settings 19 – 20
Programming the quantity of ground coffee 19
Programming the grinding time 19
Programming the coffee cup quantity 19 – 20
Restoring the factory settings 20
Using the coffee machine light 20
Warnings 20 – 22
Fill water tank warning 20 – 21
Replace the filter warning 21
Empty coffee grounds warning 21
Coffee probe malfunction warning 21
Malfunction warning 21 – 22
Recipes 22 - 23
Cleaning and maintenance 24 – 26
Stainless steel sections 24
Steam nozzle 24
Drip tray 25
Water tank 25
Emptying the used coffee grounds 25 – 26
Self-cleaning cycle 26
Installation 27 – 31
Installation components 27
Electrical connection 28
Installing the coffee machine into a kitchen cabinet 29
Positioning 29
Installation of the coffee machine 30 - 31
Troubleshooting 32
Coffee glossary 33
Baumatic consumables 35
Contact details 36
3
Page 4
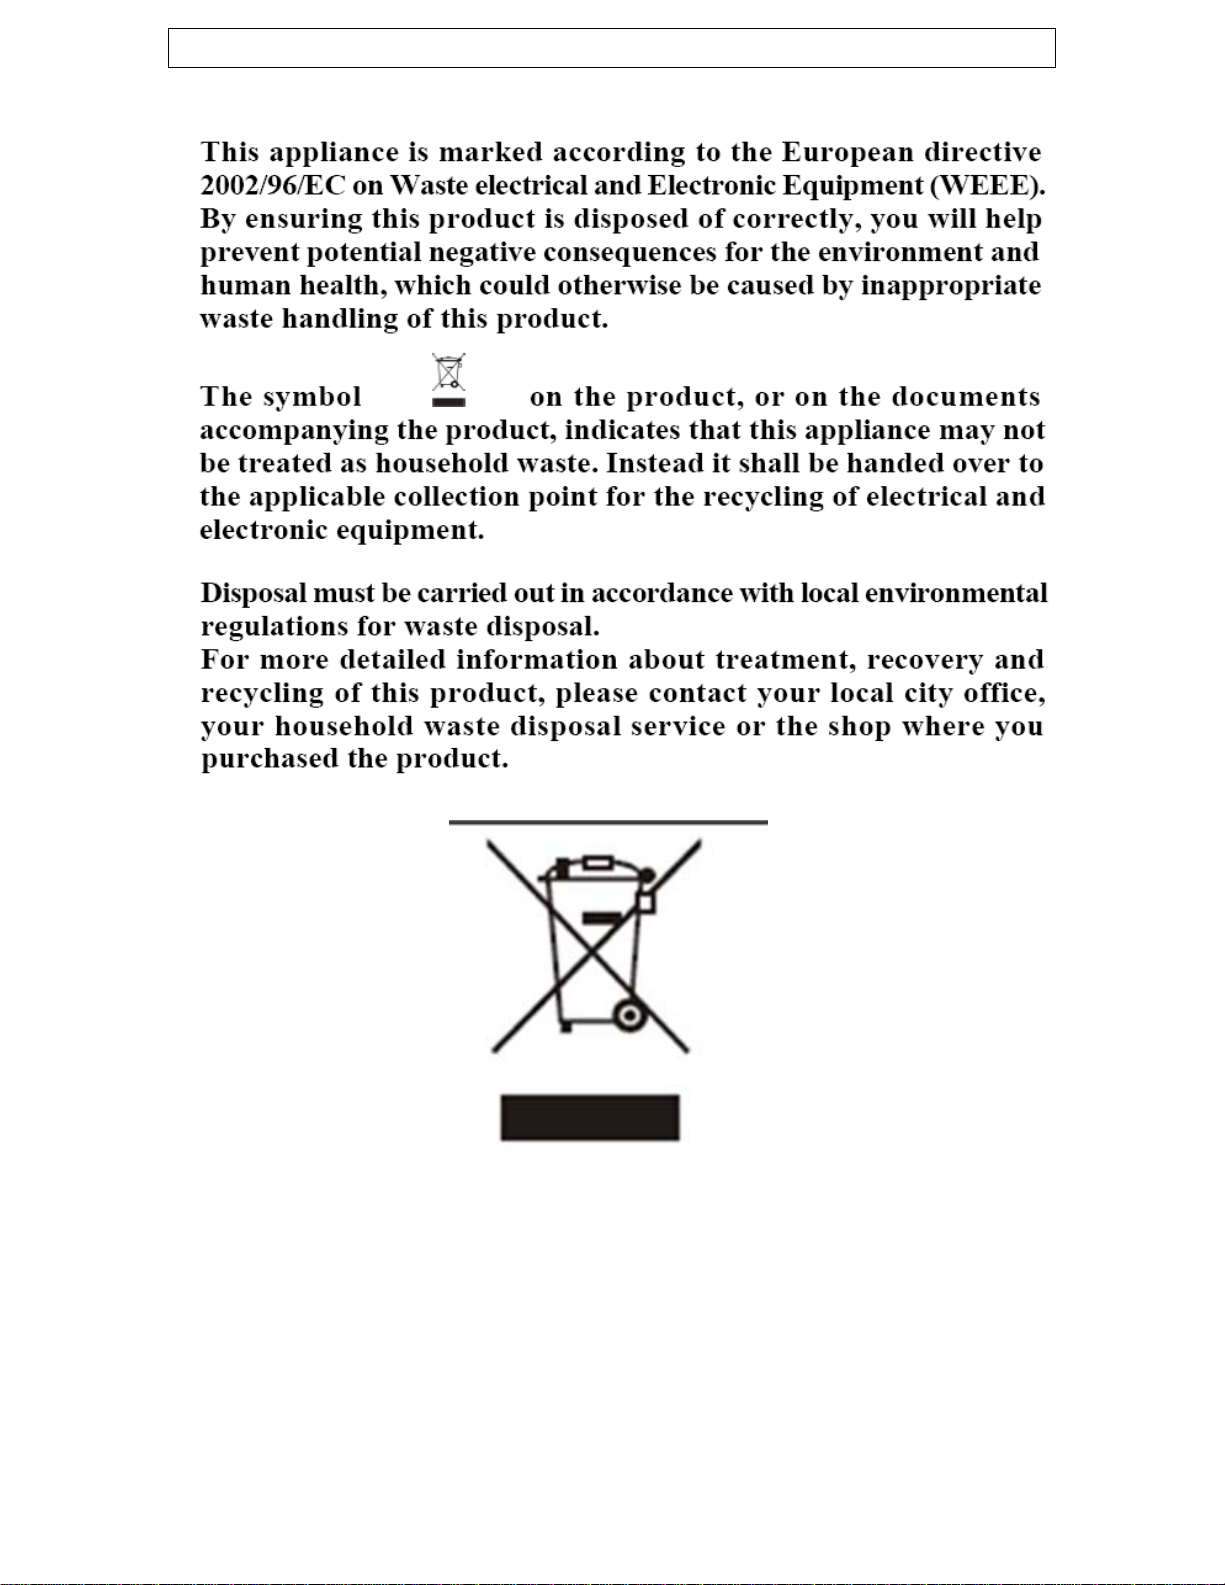
Environmental note
o The packaging materials that Baumatic uses are environmentally
friendly and can be recycled.
o Please discard all packaging material with due regard for the
environment.
4
Page 5
IMPORTANT SAFETY INFORMATION
Your safety is of the utmost importance to Baumatic.
Please make sure that you read this instruction booklet
before attempting to install or use the appliance. If you
are unsure of any of the information contained in this
booklet, please contact the Baumatic Advice Line.
General Information
o This appliance is designed for domestic household use only. It
can ONLY be built into a standard kitchen cabinet or housing
unit and should NOT be used as a freestanding appliance.
o The use of this appliance for any other purpose or in any other
environment without the express agreement of Baumatic Ltd.
will invalidate any warranty or liability claim.
o Your new appliance is guaranteed against electrical or
mechanical defects, subject to certain exclusions that are noted
in Baumatic’s Conditions Of Guarantee. The foregoing does not
affect your statutory rights.
o Repairs may only be carried out by Baumatic service
engineers or their authorised service agent.
Warning and safety instructions
o This appliance complies with all current European
safety legislation. Baumatic do wish to emphasise
that this compliance does not remove the fact
that the appliance surfaces will become
extremely hot during use and retain heat after
operation.
o Extreme care MUST be taken when removing any of the
filters or nozzles. They should be allowed to cool before
they are removed from the appliance.
5
Page 6

Child Safety
o Baumatic strongly recommend that babies and young children
are prevented from being near to the appliance and not allowed
to touch the appliance at any time.
o If it is necessary for younger family members to be in the
kitchen, please ensure that they are kept under close supervision
at all times.
General Safety
o Do not leave the coffee machine unattended when
in use.
o Do not allow electrical fittings or cables to come into contact
with areas on the appliance that get hot.
o Do not install the appliance next to curtains or soft furnishings.
Cleaning
o Cleaning of the coffee machine should be carried
out on a regular basis.
o Great care should be taken whilst using this appliance and when
following the cleaning procedure.
o IMPORTANT: The appliance must be disconnected from the
mains before following the cleaning procedure.
Installation
This appliance must be installed by a suitably
qualified person, strictly in accordance with the
manufacturer’s instructions.
o Baumatic Ltd. declines any responsibility for injury or
damage, to any person or property, as a result of
improper use or installation of this appliance.
6
Page 7
o The manufacturer declares that the coffee machine is built
using certified materials and requires the appliance to be
installed in accordance with the standards currently in
force. This appliance must be used by a trained person for
domestic purposes only.
Specifications
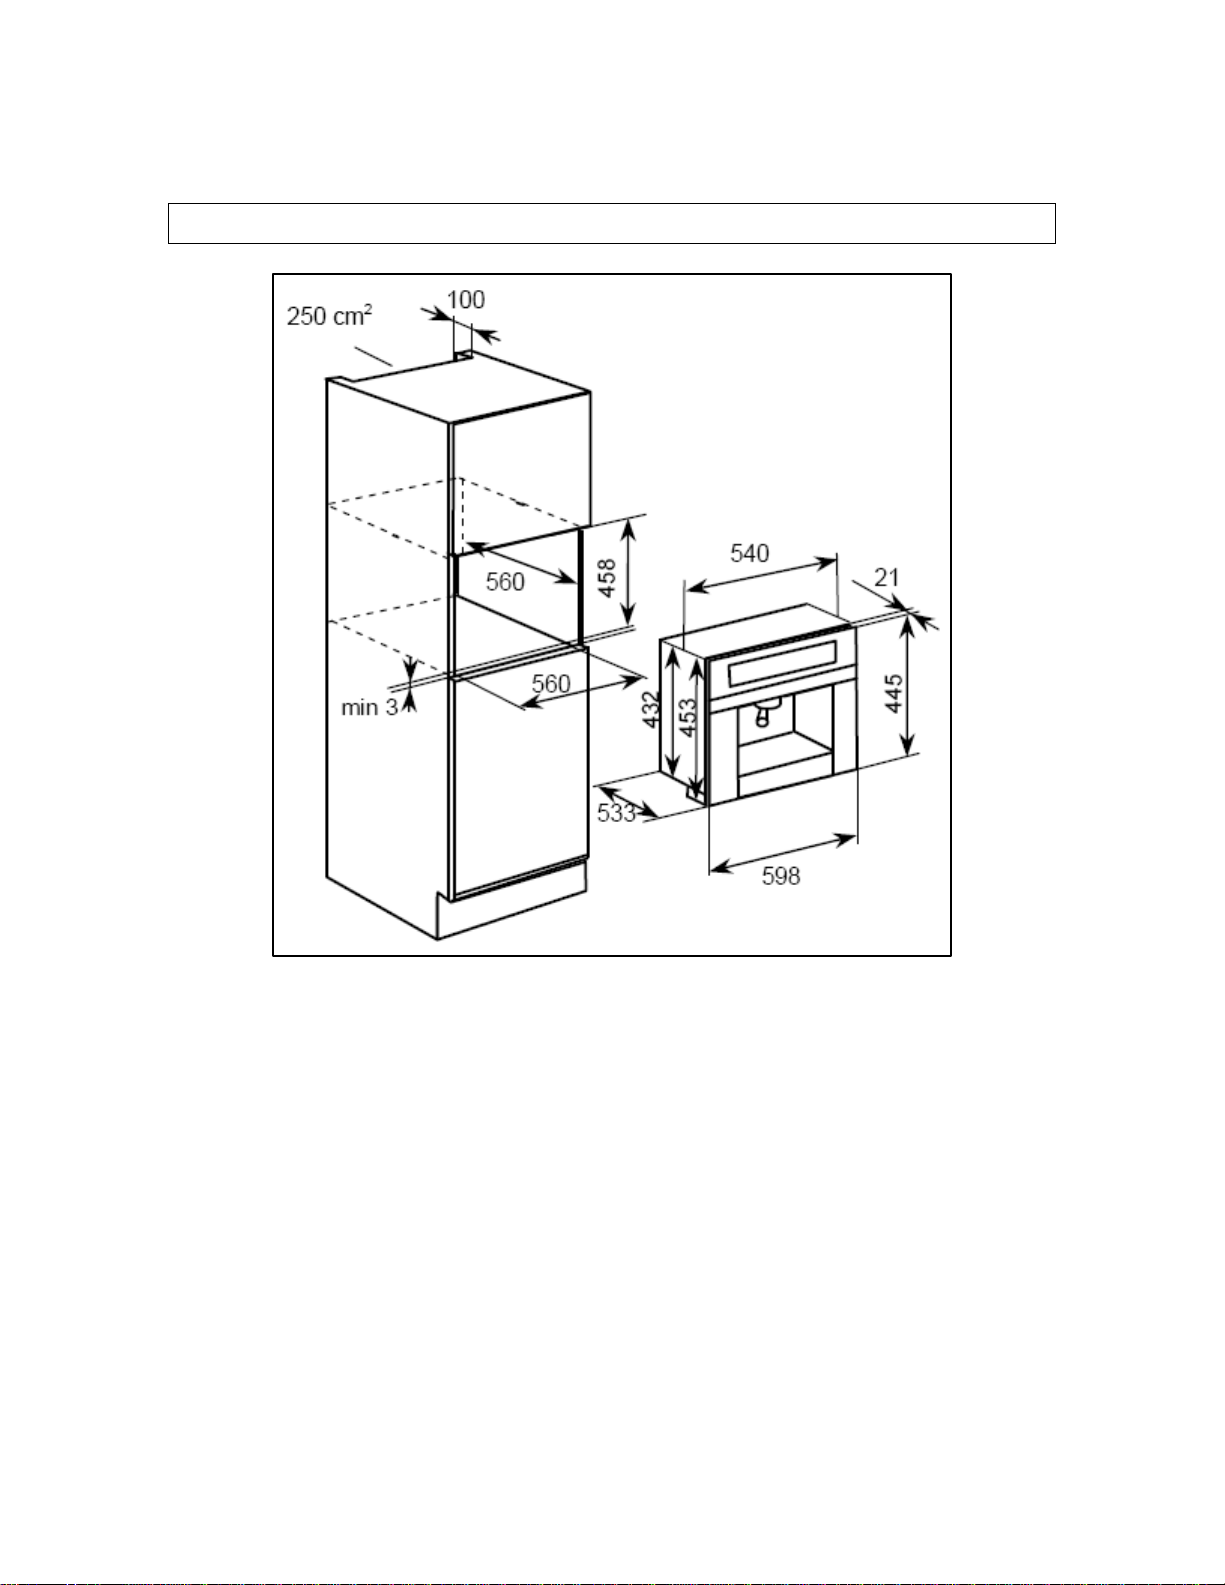
Product Dimensions
Height: 453 mm
Width: 598 mm
Depth: 533 mm
Product specifications
o Touch control operation
o Mark resistant coating
o Choice of 1 or 2 cups
o Steam spout for cappuccino, hot chocolate, tea and instant
coffee
o Coffee quantity regulation
o Drawer for coffee beans (capacity 400g)
o Regulation knob for grinding coffee beans
Aperture Dimensions
Height: 458 mm
Width: 560 mm
Depth: 560 mm
7
Page 8

o Empty water tank indicator
o Empty coffee grounds container indicator
o Pull-out drawer for coffee waste
o Self-cleaning cycle
Standard accessories
o Telescopic runners for appliance extraction
Technical specifications
o Coffee / steam pump pressure: 12 bar
o Coffee boiler output 500 W
o Steam boiler output 1200 W
o Water tank capacity: 2.5 litres
o MAX connected load: 2.00 kW
o Power supply 230 Vac 50 – 60 Hz
o Supply connection 13 A (double pole switched fused
outlet with 3 mm contact gap)
o Mains supply lead 3 x 1.5mm²
For future reference please record the following information which can
be found on the rating plate and the date of purchase which can be
found on your sales invoice. The rating plate for your coffee machine
can be located by opening the pull out drawer at the bottom of the
coffee maker.
Model Number ……………………………….
Serial Number ……………………………….
Date of Purchase ………………………………
8
Page 9
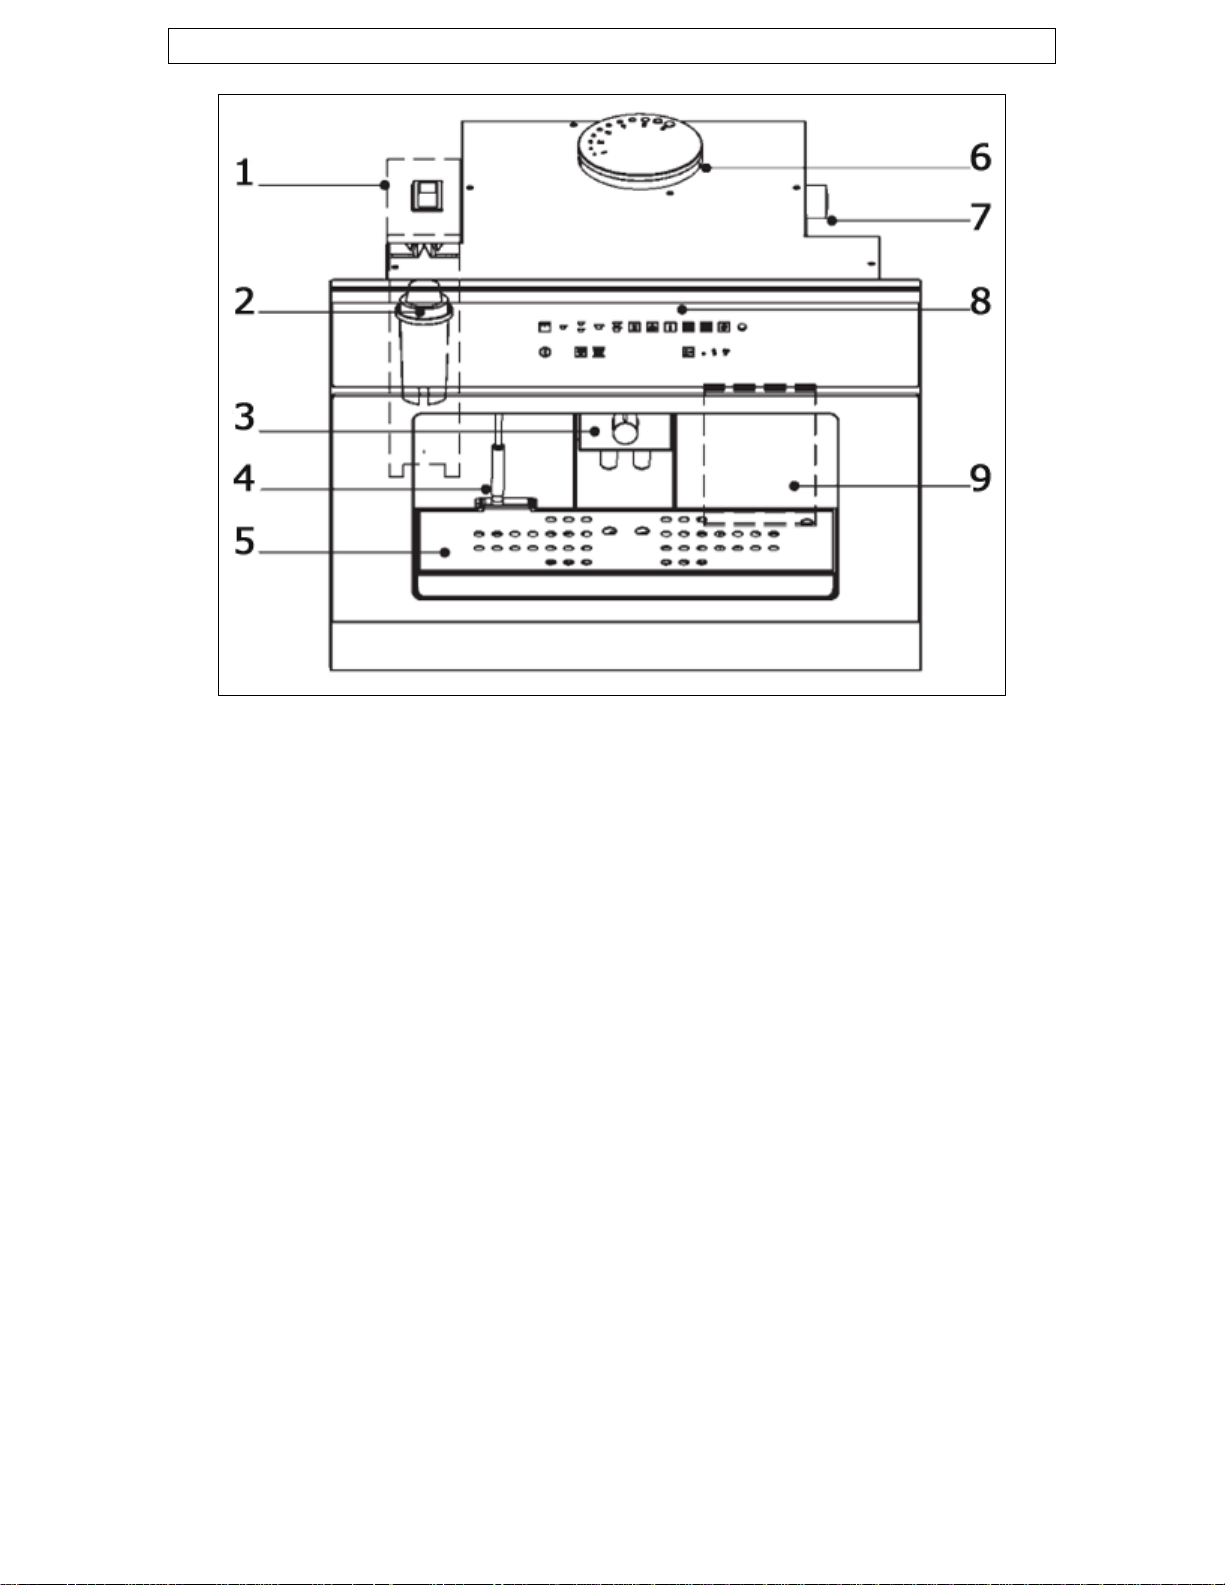
Description of the coffee machine
1) Water tank
2) Decalcifying filter
3) Dispenser
4) Water / steam dispensing nozzle
5) Drip tray
6) Coffee container
7) Grind regulation knob
8) Control panel
9) Door / tray for emptying the coffee grounds
9
Page 10
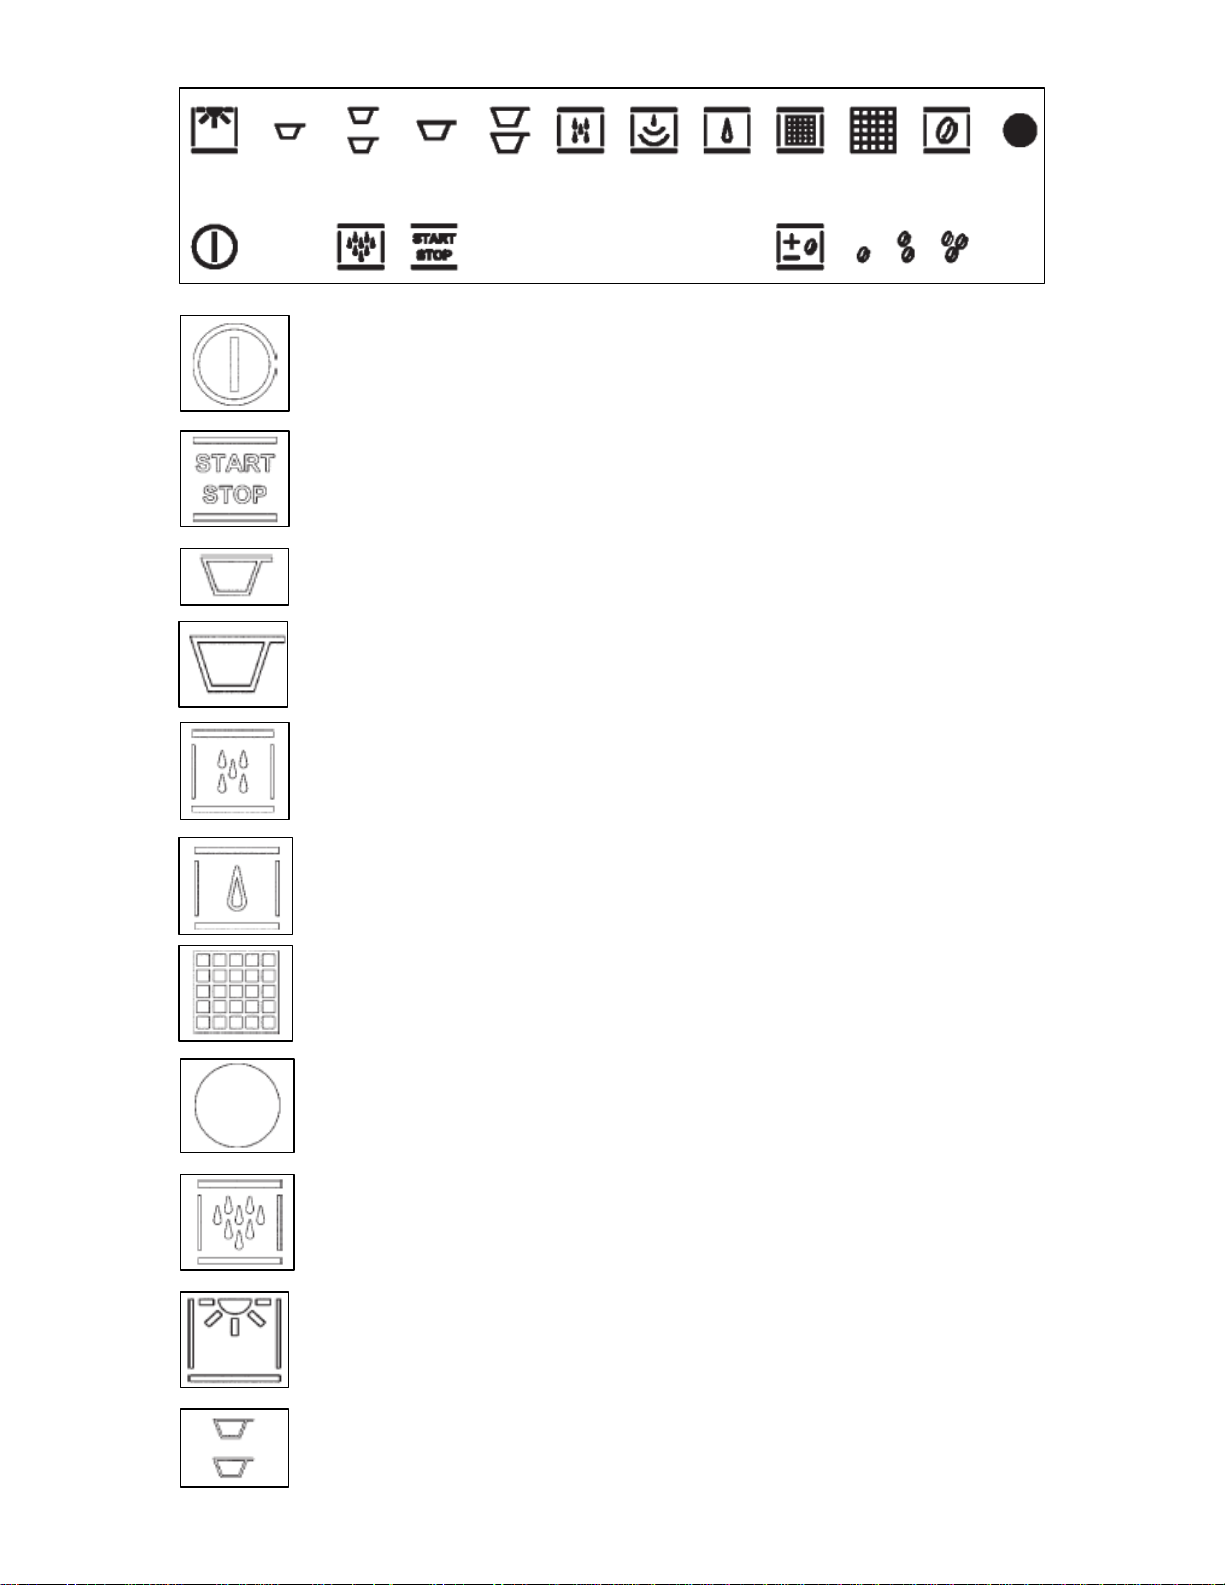
Control panel
ON / OFF button
START / STOP button
ESPRESSO COFFEE button
REGULAR COFFEE button
WATER button
Fill water tank indicator
Empty coffee grounds indicator
Malfunction warning indicator
SELF-CLEANING cycle button
LIGHT button
TWO ESPRESSO COFFEES button
10
Page 11
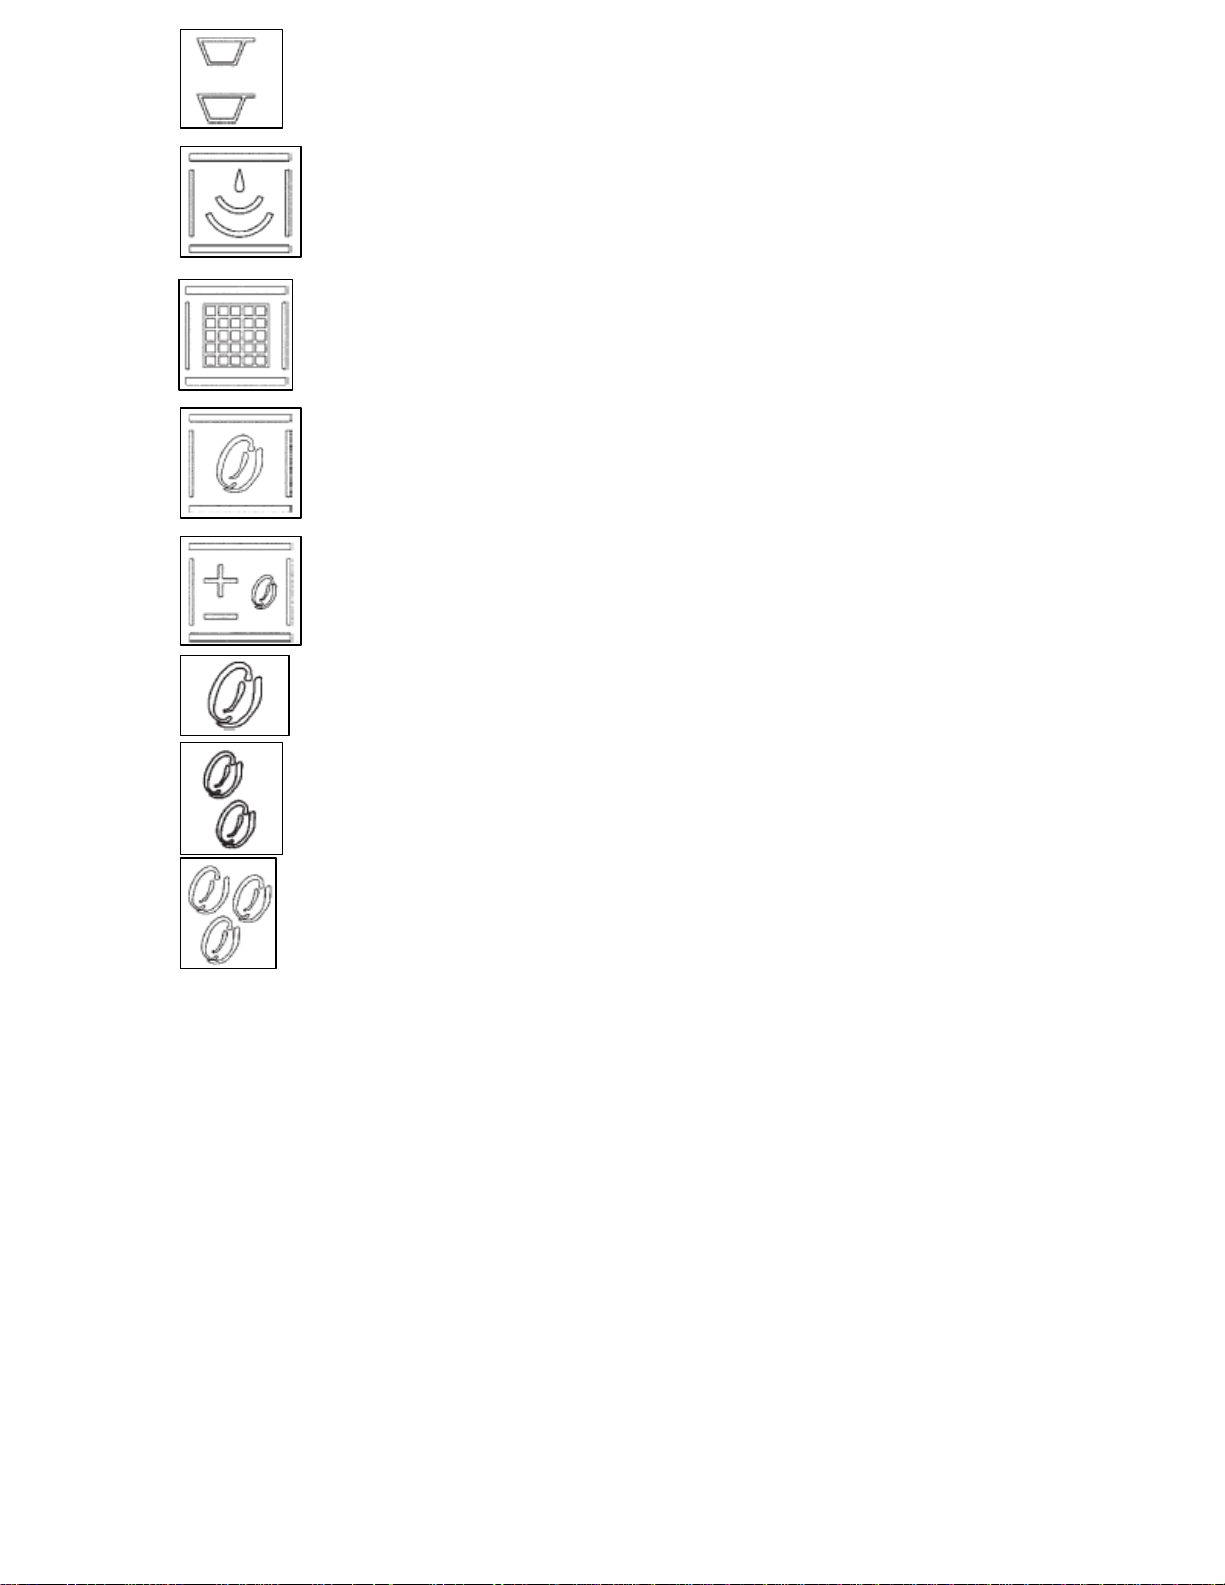
TWO REGULAR COFFEES button
STEAM button
Replace filter indicator
Coffee probe malfunction indicator
COFFEE QUANTITY REGULATION button
Light coffee indicator
Medium coffee indicator
Strong coffee indicator
11
Page 12

Before first use
1) Cleaning
o It is strongly recommended to clean the appliance
prior to its first use. Particular attention should be
paid to the water tank.
o For further information on cleaning the appliance, please refer to
the cleaning instructions on pages 24 - 26.
o Install the appliance as per the installation instructions contained
within this booklet.
2) Filling the water tank
o Before filling the water tank, ensure that the decalcifying filter is
soaked in cold water for at least 20 minutes. You should always
follow the manufacturer’s instructions.
o Remove the drip tray from the
machine as shown in the diagram
on the left.
o Press the unlocking lever under the
drip tray, in the directions shown in
the diagram on the left, and pull
the machine towards you.
o Carefully pull the coffee machine
out of the furniture housing by
sliding it on its telescopic runners.
12
Page 13

o Remove the water tank lid and
insert the decalcifying filter as
shown in the diagram on the left.
Press the filter into place until
you hear a click.
o The water in the tank should be
changed regularly, especially if
the machine has not been used
in a long time.
o Replacement filters can be
purchased from many appliance
stores or supermarkets.
o Remove the water tank by pulling
it upwards out of the coffee
machine as shown in the diagram
on the left.
o Fill the water tank with drinking
water. The tank can hold a
maximum of 2.5 litres of water.
o Place the water tank back into
the coffee machine by sliding it
down carefully.
o You should ensure that the two
connection points at the bottom
match up.
3) Filling with coffee beans
o IMPORTANT: Before pouring coffee beans into the
container, you should check that there are no foreign
bodies inside.
13
Page 14

o Open the coffee container lid
and pour approximately 200g of
coffee beans into the container
as shown in the diagram on the
left.
o Carefully push the machine
back into the furniture housing
until you hear a click. This
indicates that the machine is
locked into place.
Using your coffee machine
Turning the coffee machine on
o Pull the machine out of the
furniture housing as
described in the previous
section.
o Turn the main switch,
located at the back of the
machine, to position ‘1’ as
shown in the diagram on
the left.
o Push the machine back into
the furniture housing. The
appliance will now be in
stand-by mode.
14
Page 15

o Press the ON / OFF button. The LED lights will flash
before turning on which indicates that the machine is
ready to use.
o IMPORTANT: If the coffee machine is not used
for 45 minutes, it will return to stand-by mode.
Coffee grind regulation
IMPORTANT: The fineness of the coffee grind is
initially set at the default factory setting. The
fineness can be adjusted to suit personal taste.
o A grind that is too coarse produces coffee that flows too quickly
without creaminess and body. On the other hand, a grind that is
too fine produces coffee that flows very slowly with an intense
taste and a burnt smell.
o The average pouring time for a regular espresso coffee is
between 20 – 30 seconds.
o To regulate the coffee grind you should pull the machine out of
the furniture housing as described in the “Before First Use”
section on page 12.
o Locate the grind
regulation knob on the
right hand side of the
machine and rotate the
knob accordingly.
o Turning the knob
clockwise produces a
finer grind and
stronger coffee.
Turning the knob
anticlockwise produces
a coarser grind and
lighter coffee.
o The grinding fineness can be viewed on the lid of the coffee bean
container.
o Push the machine back into the furniture housing until it clicks
into place.
15
Page 16

Making coffee
o The dispensing time for an excellent espresso coffee is about 15
– 25 seconds. Factors that can influence the dispensing time are
the fineness of the coffee grind and the quantity of ground
coffee. You can adjust either of these settings by following the
relevant instructions in this manual.
o Place one or two cups under the dispenser and adjust the height
of the dispenser nozzle. Turning the dial raises or lowers the
nozzle accordingly.
o Press the relevant button
for the number of coffees
and type that you need.
o Press the START / STOP button within 10 seconds of
making your selection and the coffee making process
will begin.
o The dispensing of the coffee will end automatically
when the quantity of coffee selected has been poured.
You can stop the dispensing of coffee at any time by
pressing the START / STOP button.
o IMPORTANT: If the START / STOP button is not pressed
within 10 seconds of making your coffee selection, the
machine will cancel the selection.
16
Page 17

Dispensing hot water
IMPORTANT: Please note that the main boiler and
the steam boiler CANNOT be operated at the same
time.
o IMPORTANT: You should not dispense hot water
immediately after dispensing steam.
o Before dispensing hot water, place the water / steam nozzle in a
suitable position and place a container beneath it.
o Press the WATER button.
o Press and hold the START / STOP button within 10
seconds of selecting the hot water function.
o The water will be dispensed all the time the button is held down.
To stop the dispensing of hot water, release the button.
o IMPORTANT: If the START / STOP button is not pressed
within 10 seconds of making your selection, the machine
will cancel the selection.
17
Page 18

Dispensing steam
IMPORTANT: Please note that the main boiler and
the steam boiler CANNOT be operated at the same
time.
o Press the STEAM button. The indicator light will flash
for about 15 seconds. When the indicator light stops
flashing and remains on this shows that the machine
is ready to produce steam.
o Place the water / steam nozzle in a suitable position and place
the container of liquid to be heated below the nozzle.
o You should ensure that the nozzle is fully immersed in the liquid.
o Press and hold the START / STOP button and the
steam will be dispensed. The steam will continue to
flow until you release the button.
o If you are preparing milk for a cappuccino it is recommended
that you agitate the milk for best results.
o IMPORTANT: If the START / STOP button is not pressed
within 10 seconds of the steam being ready, the machine
will cancel the selection.
o WARNING: During this operation, extreme
caution should be exercised, as the
dispensing pipe will get hot.
o When releasing steam, avoid directing the
steam towards your person. There is a
danger of scalding.
18
Page 19

o Always use a container or a mug underneath the
dispensing pipe whilst dispensing steam.
Settings
Programming the quantity of ground coffee
o You are able to choose from 3 strengths of coffee
which are light, medium and strong.
o To change the strength of coffee, press the COFFEE
QUANTITY REGULATION button repeatedly. The LED
for the selected coffee strength will light.
o One bean indicates a light strength,
two beans indicate a medium strength
and 3 beans indicate a strong coffee.
Programming the grinding time
o You can program the grinding time for the strong coffee setting
and the medium and light coffee settings will adjust accordingly.
o To enter the programming mode, press and hold the
START / STOP button for about 5 seconds when the
machine is in stand-by mode.
o The LEDs on the upper left line light up to indicate the
grinding time. Press the COFFEE QUANTITY
REGULATION button to increase the time.
o Press the START / STOP button to decrease the time.
When you have set the correct grind time press the
ON / OFF button to confirm the changes and exit the
programming mode.
Programming the coffee cup quantity
o All of the coffee making options have a preset quantity, except
for hot water and steam. The machine is initially set to the
default factory setting to dispense the ideal quantity of coffee for
an espresso or regular cup.
o When coffee is being dispensed you can stop the flow
before the preset time by pressing the START / STOP
button.
19
Page 20

o You can also lengthen the pouring time for a larger quantity of
coffee by holding down the START / STOP button within 3
seconds from the end of the preset time. The coffee will keep
pouring until the button is released for up to a maximum of 20
seconds.
Restoring the factory settings
o The coffee machine is programmed at the factory for Italian-
style espresso coffee and German-style regular coffee.
o If changes have been made to the settings and you
wish to revert to the default factory programming, you
must press and hold the COFFEE QUANTITY
REGULATION button for about 6 seconds when the
machine is in stand-by mode.
o All of the LEDs, except the ON / OFF button will flash
for 5 seconds and after this the factory settings will be
restored.
o Press the ON / OFF button to begin making coffee using the
default programming.
Using the coffee machine light
o The coffee machine has LEDs for illuminating the dispensing
compartment for easier usage and observation.
o To turn the light on, press the LIGHT button once.
Press this button once again to turn the light back
off.
o The light function is only available when the machine is turned
on and not when it is in stand-by mode.
Warnings
o The coffee machine may display a warning which prompts you to
carry out an action or alerts you to a problem with the machine.
Fill water tank warning
o The machine is equipped with a sensor which detects water in
the water tank.
o If there is no water in the tank, the fill water tank
indicator will light. The coffee machine will not function
until the water tank is filled.
20
Page 21

o Before attempting to use the coffee machine, you should fill the
water tank by following the instructions outlined on pages 12 –
13.
Replace the filter warning
o When the coffee machine has dispensed 80 litres of
water, the replace filter indicator will start to flash.
o When the machine has dispensed 100 litres of water,
the replace filter indicator will turn on.
o This prompts you to replace the decalcifying filter with a new one
by following the instructions on pages 12 – 13.
o It is recommended that the filter is replaced within 3 months
from when the replace filter indicator turns on.
Empty coffee grounds warning
o After the machine has made 15 cups of coffee, the
empty coffee grounds indicator will turn on.
o The coffee machine will not operate until the coffee
grounds tray has been emptied. You should empty the coffee
grounds tray by following the instructions outline on pages 25 26 of this manual.
Coffee probe malfunction warning
o The coffee machine warns you when the coffee unit
probe is malfunctioning. When this occurs, the coffee
probe malfunction indicator will flash.
o You should turn the machine off and then on again to
try and rectify the problem. If the issue persists you should call
the Baumatic Customer Care Department.
Malfunction warning
o If the malfunction warning indicator lights, this shows that there
is a problem with the coffee machine. The indicator can light for
a variety of reasons which include:
1) The coffee dispensing unit is blocked.
2) The actions of the coffee dispensing unit did not occur correctly.
3) The door for removing coffee grounds is open.
4) The appliance did not detect the movement of water.
5) The temperature probe is not working correctly.
6) There is no water in the tank.
21
Page 22

o You should turn the machine off and then on again to try and
rectify the problem. If the issue persists you should call the
Baumatic Customer Care Department.
Recipes
Cappuccino
An espresso topped with an equal amount of
steamed milk and froth.
o IMPORTANT: When making a cappuccino, the
steam boiler should be heated before the
main boiler in order to reduce the time taken
to heat up the main boiler.
o After making a cup of espresso, you should follow the dispensing
steam section on pages 18 – 19.
o Using a suitable jug fill approximately 150 - 200 ml of milk
required for frothing.
o Heat the jug of milk using the steam function. Move the
container of milk up and down very slowly whilst simultaneously
rotating the container at the same time.
o The temperature of the milk should be monitored by carefully
touching the container with the palm of your hand.
o Milk should not be overheated, in order to avoid it being diluted.
o When the required froth has been achieved, release the START /
STOP button to turn off the steam.
o Put the espresso shot into a large cup and then pour the heated
milk from the jug into it. The froth achieved during the frothing
process should be spooned over the top or alternatively add
whipped cream over the top for a Viennese cappuccino.
o IMPORTANT: To get the best results, milk should
be semi-skimmed and preferably at room
temperature.
22
Page 23

Cold espresso chilled in a shaker
o Make an espresso by following the relevant instructions in this
manual. Add sugar and then immediately pour into a shaker with
large cubes of ice and shake for several seconds.
o Serve in a tumbler or flute glass.
Irish coffee
o Make a regular coffee by following the relevant instructions in
this manual. Pour in a single measure of whiskey and cane
sugar.
o Add freshly whipped cream by sliding it on with the lower part of
a spoon to create a light layer of cream over the hot coffee.
Mexican coffee
o Make a regular coffee by following the relevant instructions in
this manual. Pour in a teaspoon of chocolate syrup and add
cinnamon and then mix well.
o In a separate small cup mix one dose of double cream, a
teaspoon of cinnamon, a pinch of nutmeg and sugar. Whip
together before using to top the coffee. Garnish with a teaspoon
of vanilla-flavoured whipped cream.
Cappuccino ice-cream
o Make two cups of espresso by following the relevant instructions
in this manual. Heat in a pan with ¾ cup of whipping cream and
½ cup of sugar and bring to the boil. Remove from the heat and
allow to cool.
o When the mixture is lukewarm, place it in the freezer for 4 – 5
hours.
o Allow the ice-cream to cool in the refrigerator for ½ hour before
serving.
o Put two or three scoops in a bowl and garnish with toasted coffee
beans.
23
Page 24

Cleaning and maintenance
Cleaning operations must only be carried out
when the coffee maker is cold.
The appliance should be disconnected from your
mains supply before commencing any cleaning
process.
Stainless steel sections
o The stainless steel sections should
be cleaned using warm soapy water.
o No abrasive detergents or cleaners
should be used.
o No abrasive sponges or steel wool
should be used on any area of the
appliance.
o Dry the appliance afterwards
thoroughly with a soft cloth.
o We would recommend that an appropriate stainless steel cleaner
and polish is regularly used on the stainless steel surfaces.
Steam nozzle
o You should flush the steam nozzle thoroughly with steam after
each use.
o NOTE: When milk cools, it creates impurities which may block
the steam discharge hole and cause the appliance to function
poorly.
o If you have used the steam nozzle, you should dismantle the
device and wipe both the sections using a clean sponge or a
damp cloth.
24
Page 25

Drip tray
o Remove the drip tray from the coffee machine as shown in the
diagram below.
o Make sure that you empty the drip tray regularly to avoid liquid
spills that could ruin the furniture below.
o The basin and metal grill can be washed in warm soapy water or
placed in a dishwasher.
Water tank
o If you have not used the coffee machine in a long time, it is
recommended that you change the water in the tank.
o The water tank should be cleaned regularly to avoid lime-scale
build-up. The water tank can be washed in warm soapy water or
placed in a dishwasher.
Emptying the used coffee grounds
IMPORTANT: Do not empty the coffee grounds tray
when the machine is ON or still hot to avoid
accidental contact with hot parts.
o In order to open the door of the coffee grounds compartment
you must first remove the drip tray as shown in the diagram on
the next page.
25
Page 26

o Remove the coffee grounds tray, empty the coffee grounds and
wash the tray with warm soapy water or place it in the
dishwasher.
o Replace the coffee grounds
tray back into its correct
position.
Self-cleaning cycle
o You are able to set the coffee machine to carry out a
self-cleaning cycle when the machine is turned on
and not in stand-by mode.
o Press the SELF-CLEANING CYCLE button followed by
the START / STOP button and the coffee machine will
begin the washing process.
o If a coffee selection button is pressed during the wash cycle, the
self-cleaning cycle LED will turn off and the process will end.
26
Page 27

INSTALLATION
Installation of this appliance must be carried
out by a suitably qualified person, in
accordance with the current version of the
following.
o UK Regulations and Safety Standards or their European
Norm Replacements.
o Building Regulations (issued by the Department of the
Environment).
o Building Standards (issued by the Scottish Development
Department).
o IEE Wiring Regulations.
o Electricity At Work Regulations.
Installation components
o The installation components shown below are supplied with the
machine.
1) Fixed machine support
2) 13 x Self-threading screws (3.9 x 19)
3) 1 x Power cord support
4) 2 x Lateral guides
5) 2 x Lateral 1 mm plates
6) 2 x Lateral 2 mm plates
27
Page 28

Electrical connection
Before connecting the appliance, make sure that the supply voltage
marked on the rating plate corresponds with your mains supply
voltage.
WARNING: THIS APPLIANCE MUST BE EARTHED.
o This appliance should be wired into a 13 A double pole
switched fused spur outlet, having 3 mm contact separation and
placed in an easily accessible position adjacent to the appliance.
The spur outlet must still be accessible even when your coffee
machine is located in its housing.
o If you have to change the coffee machine power cord, the
earthing (yellow/green) conductor must always be 10 mm longer
than the line conductors.
o Care must be taken to ensure that the temperature of the mains
supply cable does not exceed 50°C.
o If the mains supply cable is damaged, then it must be replaced
with a suitable cable.
o Connect the power cord to
the back of the coffee
machine as shown in the
diagram on the left.
28
Page 29

Installing the coffee machine into a kitchen cabinet
Positioning
o Ensure that the aperture that you will be fitting the coffee
machine into is of the size given in the diagram above.
o Ensure that the rear panel of the furniture housing unit has been
removed and that the ventilation cut out shown is adhered to.
o It is recommended to install the appliance at a certain distance
from refrigerators or freezers as the heat it emits could affect
their operation.
29
Page 30

Installation of the coffee machine
o Position the fixed machine support
(1) by resting it on the base surface
of the furniture cut-out.
o The width of the furniture housing cut-out will be affected by the
thickness of the sides of the furniture. The side plates can be
used to compensate for any empty spaces.
o Four plates are supplied to compensate for the different width
measures. There are two which are 2mm thick (6) and two
which are 1 mm thick (5). They can be used to obtain the
required width dimensions for installation of 560 mm.
30
Page 31

o Then mount the 2 lateral
guides (4) onto either side
of the housing using the
remaining self-threading
screws.
o Insert the coffee
machine into the
housing unit by
matching up the guides
on the sides of the
machine with the
supports already
mounted in the
housing unit.
o Slide the coffee machine all the
way in until the safety stops click,
locking the appliance into
position.
31
Page 32

TROUBLESHOOTING
My coffee machine will not work at all.
o Check your mains supply and the electrical connection.
My coffee machine will not dispense water.
o Check that the water tank is filled with water.
Is it ‘OK’ to leave my espresso machine switched ON?
o The appliance should not be left unattended when the drinks
making process is in progress.
o The appliance will go in a stand by mode when not in use after
approximately 45 minutes. To restart press the ON / OFF button.
A warning indicator has turned on.
o Refer to pages 20 – 22 for instructions.
o Switch off the appliance and restart after approximately
60 minutes. If the error still persists, contact the
Baumatic Customer Care Department to arrange an
engineer’s visit.
32
Page 33

Coffee glossary
Caffe- Italian word for a standard espresso
Caffe Americano- a thin espresso with water added
Caffe latte- a double espresso mixed in a large cup
with hot milk. It should be topped with little or no
foam.
Caffe mocha- made from equal parts milk and
cocoa.
Caffeine- espresso’s caffeine content is only a third or
half of that found in coffee. The stronger the roast, the
less caffeine the espresso will contain.
Cappuccino- is espresso frothed with milk. It is
equal parts of espresso, foam and hot milk.
Crema- this is the sign of the perfect cup of
espresso; a fine, nutty or cinnamon brown foam on the surface of the
espresso. This is only created when the pressure is sufficiently high.
The crema contains the foamed oils which are rich in flavour and
aroma.
Espresso- see “caffe”.
Macchiato- espresso carrying a dollop of hot, foaming milk to give a
dappled look.
33
Page 34

IMPORTANT: If your appliance appears not to be
operating correctly, then you should disconnect it
from your mains supply and then contact the
Customer Care Department on telephone number
(0118) 933 6911.
DO NOT ATTEMPT TO REPAIR THE APPLIANCE
YOURSELF.
The manufacturer has the right to change any specifications on
the product without giving prior notice.
Please note that if an engineer is asked to attend whilst the product is
under guarantee and finds that the problem is not the result of an
appliance fault, then you may be liable for the cost of the call out
charge.
The appliance must be accessible for the engineer to perform
any necessary repair. If your appliance is installed in such a
way that an engineer is concerned that damage will be caused
to the appliance or your kitchen, then he will not complete a
repair.
This includes situations where appliances have been tiled in,
sealed in with sealant, have wooden obstructions placed in
front of the appliance, like plinths. Or any installation other
than the one specified by Baumatic Ltd. has been completed.
Please refer to the conditions of guarantee that appear on the
warranty card that you receive with the appliance.
IMPORTANT: Baumatic Ltd. operates a policy of continuous
improvement and reserves the right to adjust and modify its
products without prior notification.
34
Page 35

Baumatic consumables
o BC001 Degreaser for Dishwashers (200g)
o BC002 Descaler for Washing Machines and Dishwashers (200g)
o BC003 Ceramic Hob Cleaner (250ml)
o BC004 Oven Cleaner (250ml)
o BC005 Stainless Steel Cleaner and Protector (250ml)
o BC007 E-Cloth – General Purpose Cloth
o BC008 Microwave Cover
To order a Baumatic consumable product please call 0123 5437 244
and quote the product code. You can also order online from
eshop.baumatic.co.uk
35
Page 36

United Kingdom
Baumatic Ltd.,
Baumatic Buildings,
6 Bennet Road,
Reading, Berkshire
RG2 0QX
United Kingdom
Sales Telephone
(0118) 933 6900
Sales Fax
(0118) 931 0035
Customer Care Telephone
(0118) 933 6911
Customer Care Fax
(0118) 986 9124
Spares Telephone
(01235) 437244
Advice Line Telephone
(0118) 933 6933
E-mail:
sales@baumatic.co.uk
customercare@baumatic.co.uk
spares@baumatic.co.uk
technical@baumatic.co.uk
Website:
www.baumatic.co.uk
Facebook:
www.facebook.com/baumatic.uk
Republic of Ireland
Service Telephone
1-890 812 724
Spares Telephone
091 756 771
Czech Republic
Baumatic CR s.r.o.
Lípová 665
460 01, Liberec 4
Czech Republic
+420 483 577 200
www.baumatic.cz
Slovakia
Baumatic Slovakia, s.r.o.
Galvániho 7/D
Slovakia
+421 255 640 618
Germany
Baumatic Gmbh
Bachstr.10-12
D-32257 Bünde
Germany
+49 (0) 5223 99408 0
www.baumatic.de
Italy
Baumatic Italia S.R.L.
Via Galvani N.3
35011 Campodarsego (PD)
+3904 9920 2297
www.baumatic.it
Holland
Baumatic Benelux B.V.
Dukdalfweg 15d
1332 BH ALMERE
Nederland
+31(0)36 549 1553
www.baumatic.nl
36
Page 37

37
Page 38

38
Page 39

39
Page 40

40
 Loading...