

Page 1
BDW71S
60cm Freestanding
Dishwasher
Page 2

Dear Customer,
Congratulations on purchasing your new product from Think Appliances.
To register your parts and labour warranty (some conditions apply please refer to your
warranty card for more details) please contact out Customer Care team on:
1800 444 357
Our Customer Care centre is there to ensure you get the most out of your appliance. For
example, should you want to learn more about recommended cooking temperatures, the
various cooking functions available, how to set and program your LED clock, and importantly
taking care of your appliance when cleaning, please call us because we are here to help you.
It is important that you read through the following use and care manual thoroughly to
familiarize yourself with the installation and operation requirements of your appliance to
ensure optimum performance.
We also carry a complete range of spare parts for all Think products. For all your spare parts
enquiries please contact our team at Pronto Parts on:
1300 306 973
Again, thank you for choosing an appliance brought to you by Think Appliances and we look
forward to being of service to you.
Kind regards
Management
Think Appliances
Page 3
Witheachwashcycle.
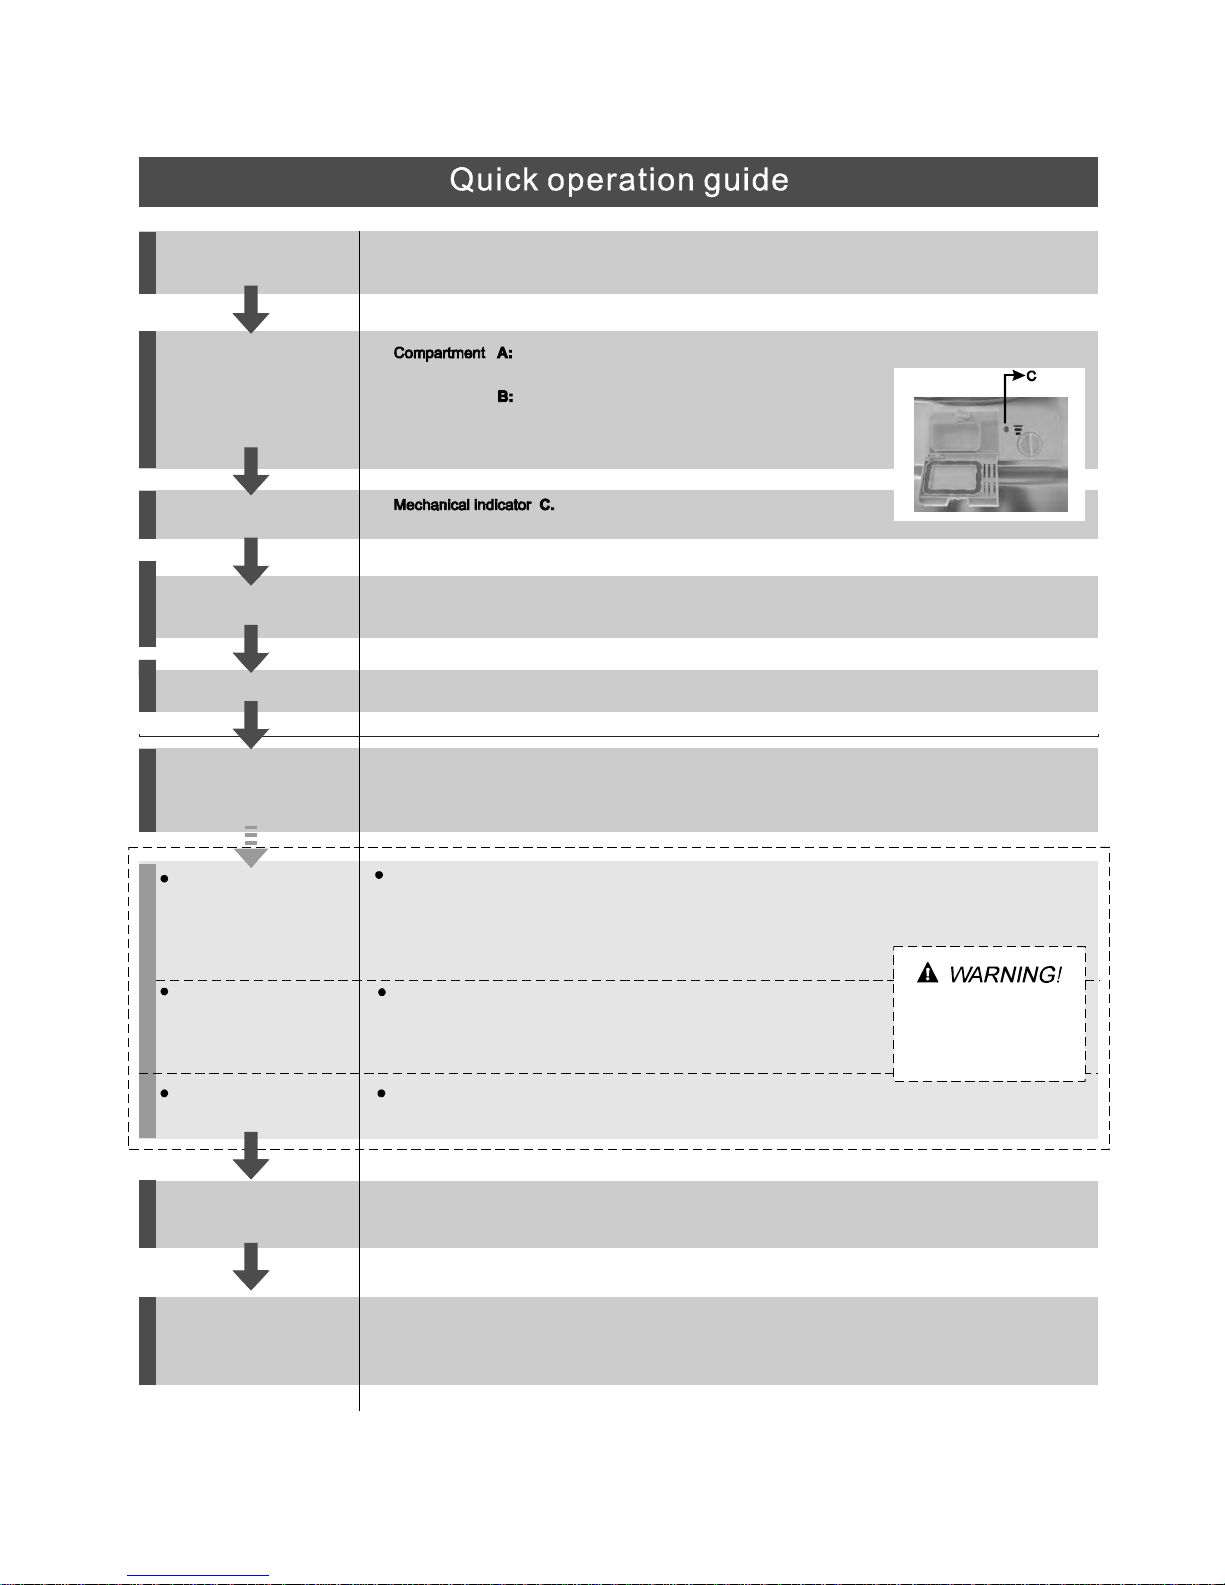
Compartment
For programmes with pre-wash only.
(Follow the user instructions!)
Electric indicator oncontrol panel (if provided).
Check the rinse aid level
Load the baskets
Select a programme
Running the dishwasher
Switch off the appliance
Turn off the water tap,
unload the baskets
Fill the detergent dispenser
Warning: wait a few minutes (about 15 minutes) before unloading the dishwasher to avoid handling
the dishes and utensils while they are still hot and more susceptible to break.
They willa lso dry better.Unload t he appliance,startingfrom the lowerb asket.
Changing t he programme
Add forgottendishes in the
dishwasher.
Scrapeoff any large amount of leftoverfood. Softenremnants of burntfoodin pans,
thenloadthebaskets. Refer to the dishwasher loading instructions.
When the working cycle has finished, the buzzer of the
dishwasher will sound 8 times, then stop.
Turn off the appliance using the On/Off Button.
If the appliance is switched
off during a wash cycle.
Open t he door carefully.
Hotsteam m ay escape
when the door is opened!
If the appliance is switched off during a wash cycle, when switched
on again, please re-select the washing cycle and operate the dishwasher
according to the original Power-on state ).
Switch on the appliance
Fordetailedoperating methodread the correspondingcontent on the instructionmanual.
Close the door, t urn on the water tap. The machine will start working
after about 10 seconds.
Press the Programme Button, the selected programme indicator lights up.
( See the section entitled Operationg instruction )“”
Open the door, press the On/Off button to switch on the appliance.
1. A running cycle can only be modified if it has been running for a short time. Otherwise the detergent
may have already been released and the water already drained. If this is the case, the detergent
dispenser must be refilled.
2. Open the door
, press the program button more than 3 seconds, the machine will be in
standby state, then you can change the program to the desired cycle setting.
1.Open the door a little to stop the washing.
2.After the spray arms stop working, you can open the door
completely.
3.Add forgotten dishes.
4.Close the door, the dishwasher will run after 10 seconds.
AB
Page 4
To re view the section on t roublesho oting Tip s
will helpyouto solvesomecommon problems
byyourself .
Dear Cu stom er,
Pleasecarefully read th ismanualbeforeusingthe
dishwasher, i twillhelpyouto use andmainta inthe
dishwasher properly.
Passit ontoany subsequentownerof the appliance.
Thismanualcontainssectionson safetyInstructions,
Operating I nstructions, Insta llation I nstructions an d
Troubles ho o tin g Tips, et c.
The man ufacturer, fol lowing a p olicy of c onstant
development a nd updati ng of t he product, may
make m odifications without giving prior notice.
Keep i t as a re f er in the later da ys .
Ifyou can not solve the pro blems b y yourself ,
please ask fo r the help of professiona l technician s.
This a ppli ance is in tended to b e used in hous ehold
andsimilar applications such as:
-staff kitchen areas in s hops, offices and other
working en viro nme nts;
-farm houses;
-by cli ents in hotels, motels and other residential
ty pe env i ro nments ;
-bed andbreakfast typeenvironments.
DishwasherFeatures.................................... . ..2
AttentionbeforeorafterloadingtheDishwasher
Baskets..........................................................6
FilteringSystem.............................................10
Caringforthe Dishwasher..................... .........11.
A FilltheRinse Aid Dispenser............. .. ..3、 ..... ...
B Functionof Detergent .........................4、 ........
............ ..7
The M ethod Load ing Normal Dishw are
WashCycleTable...........................................8
Turning on th eAppl ian ce ... ... ... ... ... .... .. . ......... .8
ChangetheProgramme.............. ................9....
At the E nd of the WashCycle...........................9
Positioning theAppliance................... ..........12..
Water Connec t i on...... .... . ... .. .... ... .. . ..... ... .......1 3.
AboutPo werConnection........................ .......12.
Startof dishwasher................................ ......14..
Befo re cal lin g fo r serv ic e..... .. .. . ... ... . ... .. .. ... .....1 5.
Errorcodes.................................... ..............16.
Technicalinformation.............................. .....17..
Contro l Pan e l.... ... . ... ... ... . . ... . ... ... ... . . ... . ... ... .. .. . ..2
Page 5
This appliance must be grounded. In the event of a
malfunction or breakdown, grounding will reduce
the risk of anelectric shock by providing a path of
least resistance of electric current. This appliance
is equipped with a cord having an equipmentgrounding conductor and a grounding plug.
The plug must be plugged into an appropriate outlet
that is installed and grounded in accordance with
all local codes and ordinances.
Keep children away from detergent and rinse aid, keep
child away from the open door of the dishwasher,
there could still be some detergent left inside.
ren
Donotabuse,siton,orstandonthedoorordish
rack of the dishwasher.
Do not touch the heating element during or
immediately after use.
(This instruction is only applicable to machines
with a visual heating element.)
Do not wash plastic items unless they are marked
dishwasher safe or the equivalent. For plastic items
n
ot so marked, check the manufacturer's
recommendat ions.
Use o nly detergent and rinse additives
design ed for an autom atic dis hwa sher.
Never us e so ap, laundry detergent, or hand
washing detergent in your dishwasher. Ke ep
these pr odu cts o ut of the reac h of chi ld r en.
During i nstallatio n, t he power su pply must n ot
be exce ssive ly or dange rously bent or fl attened.
Do not tamper with controls.
Do not place any heavy objects the
door when it is open. The appliance could tip
forward.
on or standon
When l oading items to be washed :
1) Locat e sharp items so that they are not likel y
to damage t he door seal;
2 Warning: Knives and other u tensils with
sharp points must be loade d in the basket
with their poi nts down or place d i n a
horizontalposition.
)
When using y our dishwasher, yo u s hould
pr ev en t p lastic it ems f rom com i ng into co nta c t
with the h eating element.(T his instruction is only
applicable to machines with a visual heating
element. )
Ifthe supplycord is damaged, itmust be replaced
bythemanufactureroritsserviceagentora
similar ly quali fied pers on in orde r to avoid a
hazar d .
Pleased ispose of packin g m aterials properly.
Use the dishwasher only for its intended function.
Remove the door to the washing compartment when
removing an old dishwasher from service or discarding it.
Dishwasher detergents are strongly alkaline, they
can be extremel y da ngerous if swallowed. Avoid
contact with skin and eyes and kee p children away
from the dishwasher when the door is ope n.
Check that th e deterg ent c omparm ent i s empty
after com pletion of the wa sh c ycle.
The a pplianc e is to be connected to t he water
mains u sing new hose set s and th at old hose-sets
should no t be re used.
The maxi mum number of pl ace settings to be
washed i s 14.
The maxi mum permissible inlet water pressure is
1Mpa.
The mi nimum permissible inlet water pressure is
0.04Mpa.
Children should be supervised to ensure that they do
not play with the appliance.
This appliance is not intended for use by persons
(including children with reduced physical, sensory or
mental capabilities, or lack of experience and
knowledge ,unless they have been given supervision
or instruction concerning use of the appliance by a
person responsible for their safety.
)
When using y our dishwasher, fo l l ow t he precautions list ed b el ow:
The d oor should not be left open,
since this coul d increase t he risk of tripping.
Improper connection of the equipment-grounding
conductor can result in the risk of an electric shock.
Check with a qualified electrician or service
representative if you are in doubt whether the
appliance is properly grounded. Do not modify the
plug provided with the appliance; If it does not fit
the outlet. Have a proper outlet installed by a
qualified electrician.
Do not operate your dishwasher unless all
enclosure panels are properly in place. Open
the door very carefully if the dishwasher is
operating, there is a risk of water squirting out.
Page 6
before using it for the firsttime.
To g etthe best performancefromyour dishwasher, read all operatinginstructions
10
11
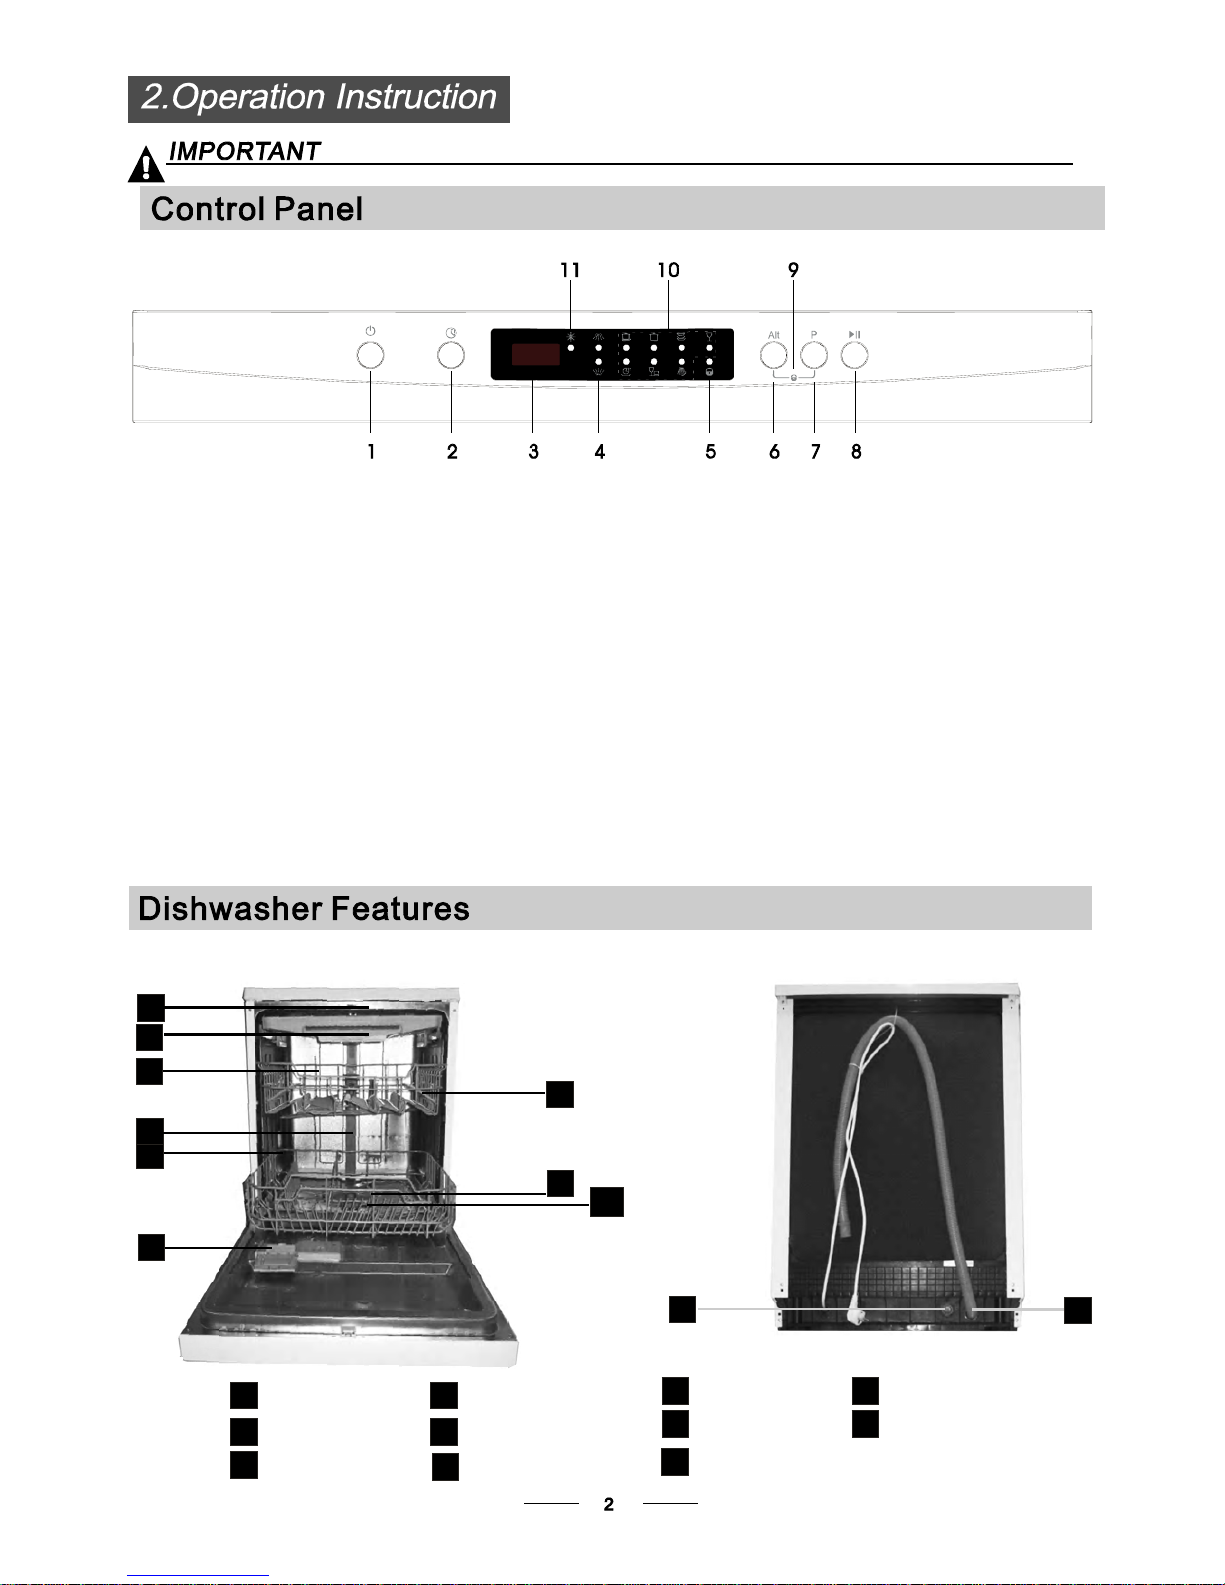
Back Vie w
1
2
3
4
5
6
7
8
9
Front vi ew
Lower basket
Dispenser
Cupshelf
Spra y a rm s
Fil t er as sembly
Inlet pipeconnector
Drainpipe
Upper basket
Cutlery rack
Top spray arm
1
Inner pipe
5
6
7
8
9
11
10
3
2
4
Program in dicators: to show which prog ram you
have ch ose;
Power Button: To turnon/off the powersupply.
Program Button:To Press the button toselect
appropriate Progra m.
1.
11.
8.
7.
Alt B utton: Dual zone wash function, press the bu tton
tosele ct either upper ba sket or low er basket loaded, and
the response i ndicator will blinking.
9.
Delay Button : ToPr es s the button t o delay.
Start /Pause button: Tostart the selecte d
washing program o r pause the w ashing program
when th e m achine is working.
3.
Display screen: to sho w the de lay t i me ,remain
t ime ,or error codes indicator.
4.
2.
Childlock button:pressthe two buttons for 3 seconds
simul t ane ou s ly to l ock t he pr og ram .
10.
Childlock indicator.
6.
Spra y A rms ind icato rs : t o sh ow w hic k s pr ay a r m s
willwork.
5.
rinse aid warn ing li ghts: Toshow w hen t he
dispenser need to be ref illed.
Page 7
Before using y our dishwas her for the fir st time:
A. Fill the rinseaiddispenser
B. Fill in deterge nt
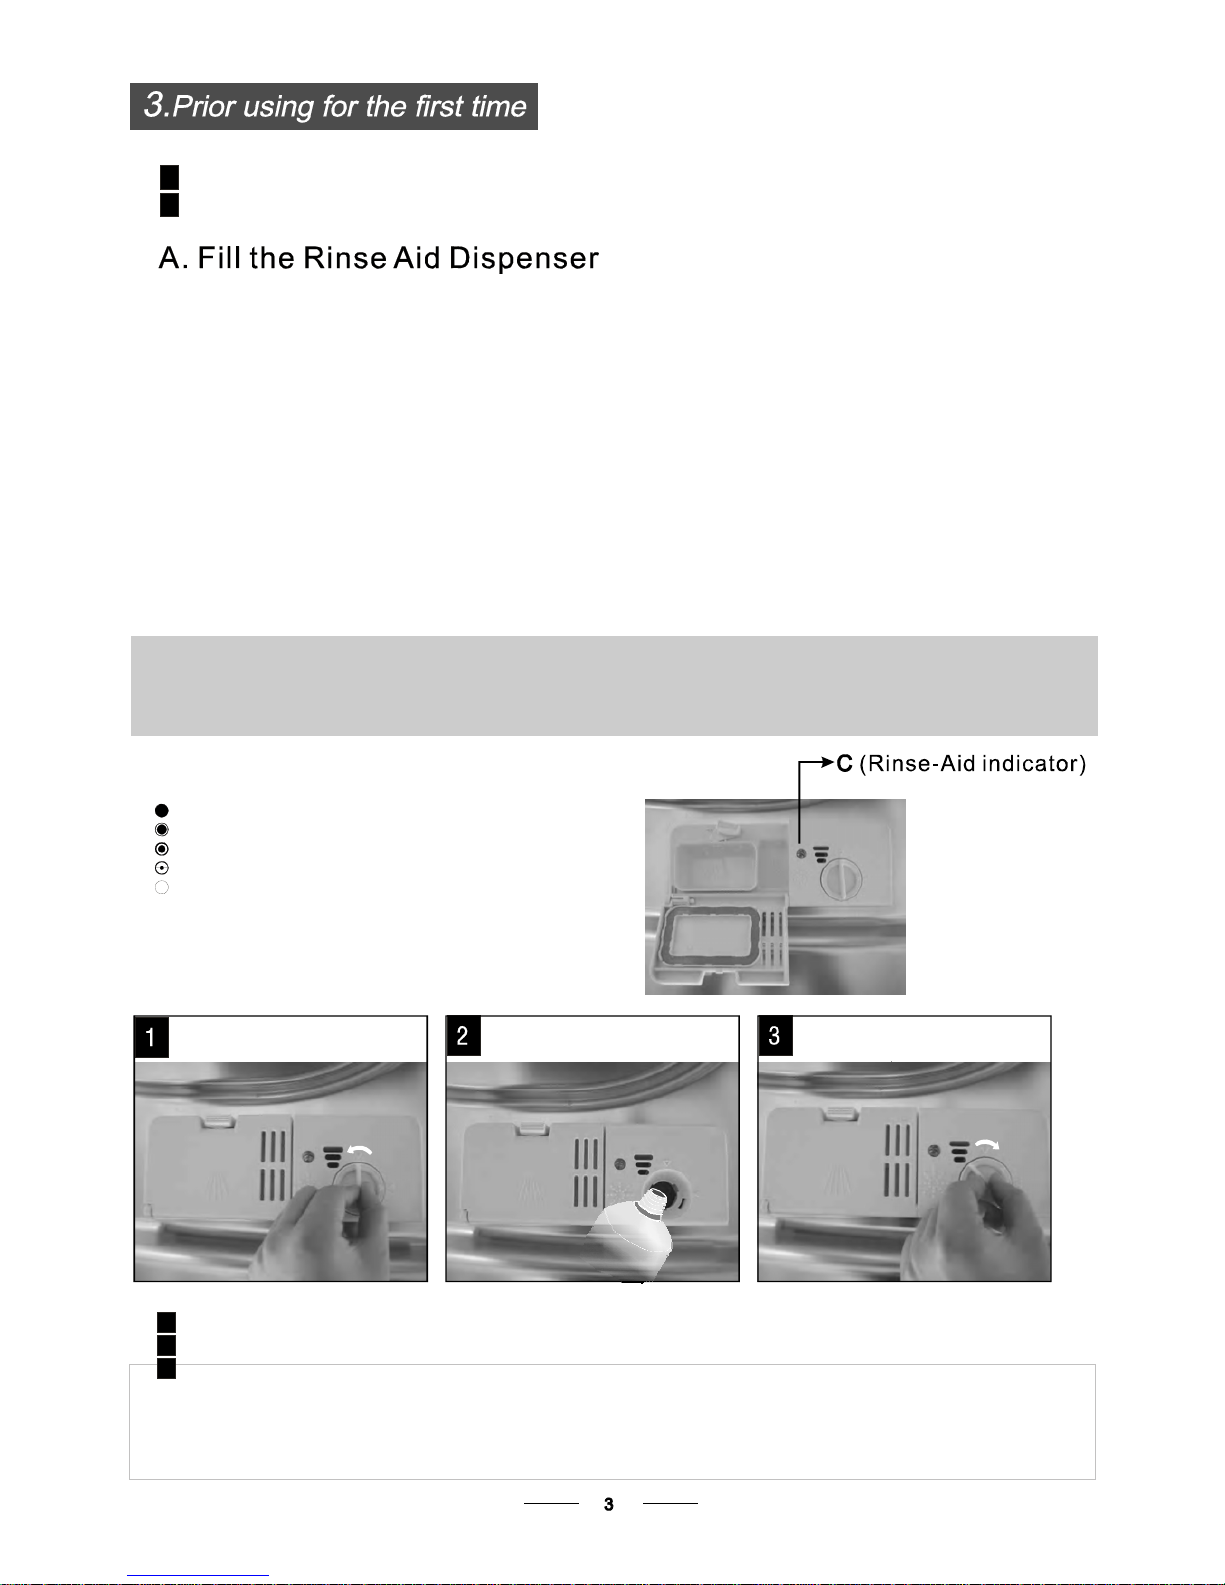
The rinse aid isreleasedduring the final rinseto preventw ater from formingdroplets on your dishes,which can
leave spotsandstreaks. Italsoimproves dryingby allowing watertorolloffthedishes.Your dishwasher is
designedto use liquidrinseaids. The rinseaid dispenser is located insidethedoornexttothedetergent dispenser.
To fil l the dispenser,open the cap a nd pour the rinse aid into the di spenser until the level indi cator turns complet ely
black. The volumeofthe rinseaidcontaineris about 110ml.
Rins eAi d D isp ens er
Functi on of Rin seAid
Rinse aid is automati call y added durin g the l ast rin se, ensuri ng thoro ugh rinsi ng, and spot and strea k fr ee dryi ng.
Attenti on!
Only use brandedrinse aidfordishwasher. Never filltherinse a id dispenser with any othersubstances
(e.g. Dishwasher c leaning a gent , l iquid de tergen t). This would damage t he applia nce.
As the rinse aid dim inishes, the size of the bl ack dot
on the rinse ai d l ev el i ndicat or changes, as illustrated be low.
Full
3/4full
1/2full
1/4full-Shouldrefilltoeliminatespotting
Empty
If t here is no ri nse-aid warnin g light in the c ontrol pane l, you can judge th e amount of rinse-aid by the colorof t he
optical level
indicator "C" loca ted next to the cap. W hen the rinse-ai d co ntainer is full, the whole indica tor will be dark . As the
rinse-aid
diminishes, the size of the dark dot decreases . You shoul d never let the r inse aid get below 1 / 4 ful l.
When to Ref ill the Rin seAid Dis pense r
RINSEAID DISPENSER
To open the dispenser,turn the cap to th e "ope n" (left) arrow and lift it out.
Pour the rinse ai d into the di spen se r, bei ng care ful no t to overf ill.
Replace the cap by insertingitaligned with " open"arrow and turningittotheclosed(right) arrow.
Be car eful not to over fill t he dispense r,because this could cause over sudsing. Wipe away any spills
witha damp cloth.Don'tforgetto replace the c ap before you closedishwasherd oor.
Attention!
Clean up any rinse aid split during filling with an absorbent cloth to a void exce ss f oaming
during t he next w ash.
1
2
3
Page 8
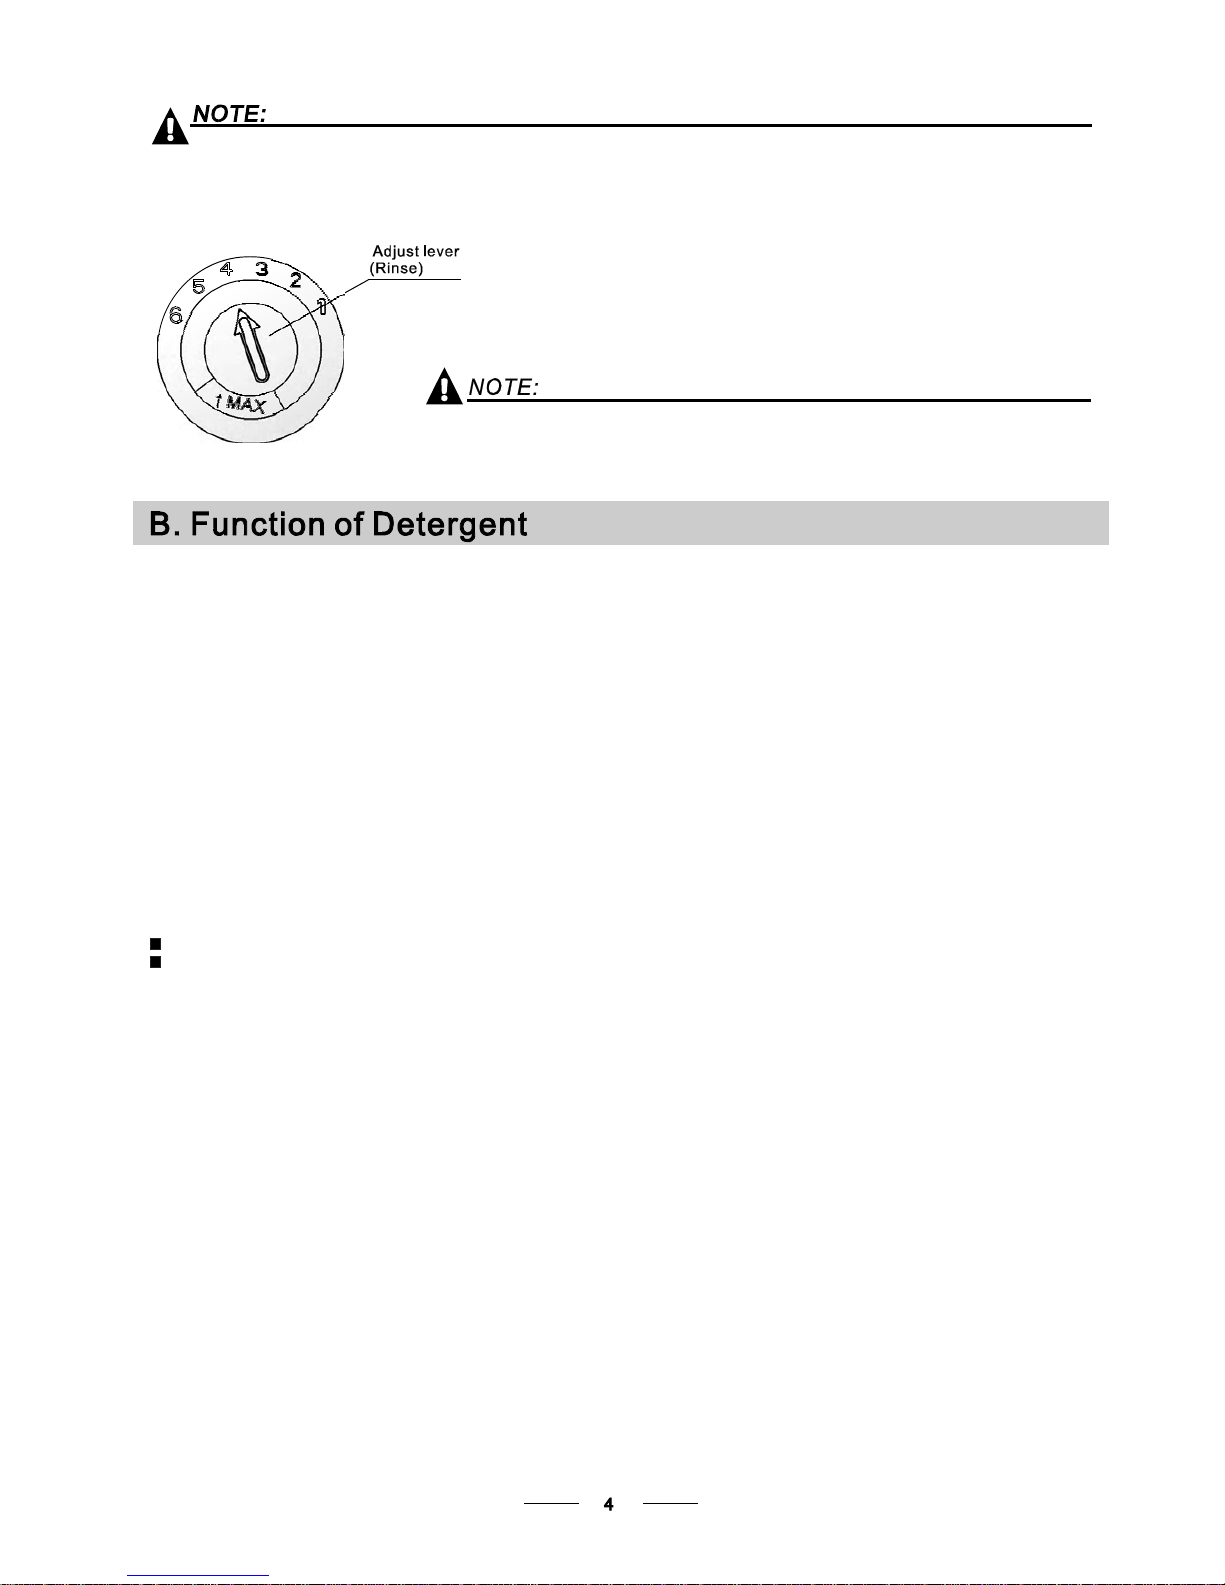
Adjust ing RinseAi d Dispenser
The ri nse aid dispen ser h as six or f our settin gs.Always start with the dispenser
set o n " 4" . If s pots and poor dryi ng are a pro ble m,increa se the amount of rinse
aid dispensed byremoving thedispenser lid androtatingthedialto"5". If the
dishes still are not drying p roperly or are show spots, adjust t he dial to t he next
higher lever u ntil your dishes are spot-fr ee. T he recommended setting is "4".
(Factoryvalue is "4".)
Increase the dose if th ere are d rops of water o r lime spots on the dishes a fter washing .
Reduce i t if th ere are sticky whitish stains on your dishes or a blu ish film on gl assware or
knifeblades.
during thenextwash. Don't forget t o replace t he cap before you clo se d ishwasher door.
Clean u p any ri nse aid spi lled while during filling with a n absorbent cloth to avoid excessive foaming
Detergents with its c hemic al ingredients are necessary to remove dirt, crush dirt and transport it out of the dishw asher.
Most of th e co mmerci al quality detergent s a re suitable for this purpose.
Detergen ts
There a re 3 sor ts of d etergents
1.Withphosphate and with c hlori ne
2.Withphosphate and without chlorine
3.Withoutphosphate and without chlorine
Based ontheir chemicalcomposition, detergentscanbesplitin two basictypes:
Detergent tablets of di fferent brands di ssolve at different speeds. For this reason some
detergent tablets cannot dissolve and develop their f ull cleaning power during short
programs. Therefore please use long programs when u sing detergent tabl ets, to
ensure the completeremoval of detergentresiduals.
Thedispensermust be refilledb eforethestart of eachwash cycle followingthe instructions
provided in the was h cycle t able .Yourdishwasher uses less detergent and ri nse aid th an
Conventional dishwash er.Generally, onl y on e tablespoon of detergent is needed for
a normal wash load. Moreheavily soileditems needmore detergent.Always addthe
detergent just before starting the dishwashe r,otherw ise i t could g et damp and wil l not
dissolve properly.
Concentrated Detergent
Detergent Ta blets
DetergentDispenser
conventional , al kaline detergents with caustic components
low a lkal ine c oncentr ated detergents with natural enzymes
Normally new pulverised detergent is without phosphat e.Thus the water softener function of
phosphate is not g iven. In this case we recommend to fi ll salt in the salt container even w hen
thehardnessofwater isonly 6 dH. If detergents without phosphate are usedinthe c aseof hardwater
often white spots appear o n dishes and glasses. In th is case ple ase add m ore detergent to reach
better results. Detergents without chlori ne do onl y bl each a li ttle. Strong and coloured sp ots will n ot
be removed c ompletel y.In t his case please choose a progra m w ith a higher te mperat ure.
°
Page 9
Amountof Detergentto Use
Proper Use ofDetergent
Use o nly detergent specifically made for the use in dish washers. Keep your d etergent fresh and dry.
Don't put powder ed d et ergent into the di spenser until you're ready to wash dishes.
Dishwasher detergentiscorrosive! Takecaretokeep it out of reachofchildren.
Always add the detergen t jus t b efore start ing each wa sh c ycle.
Only use branded detergent aid for d ishw asher.
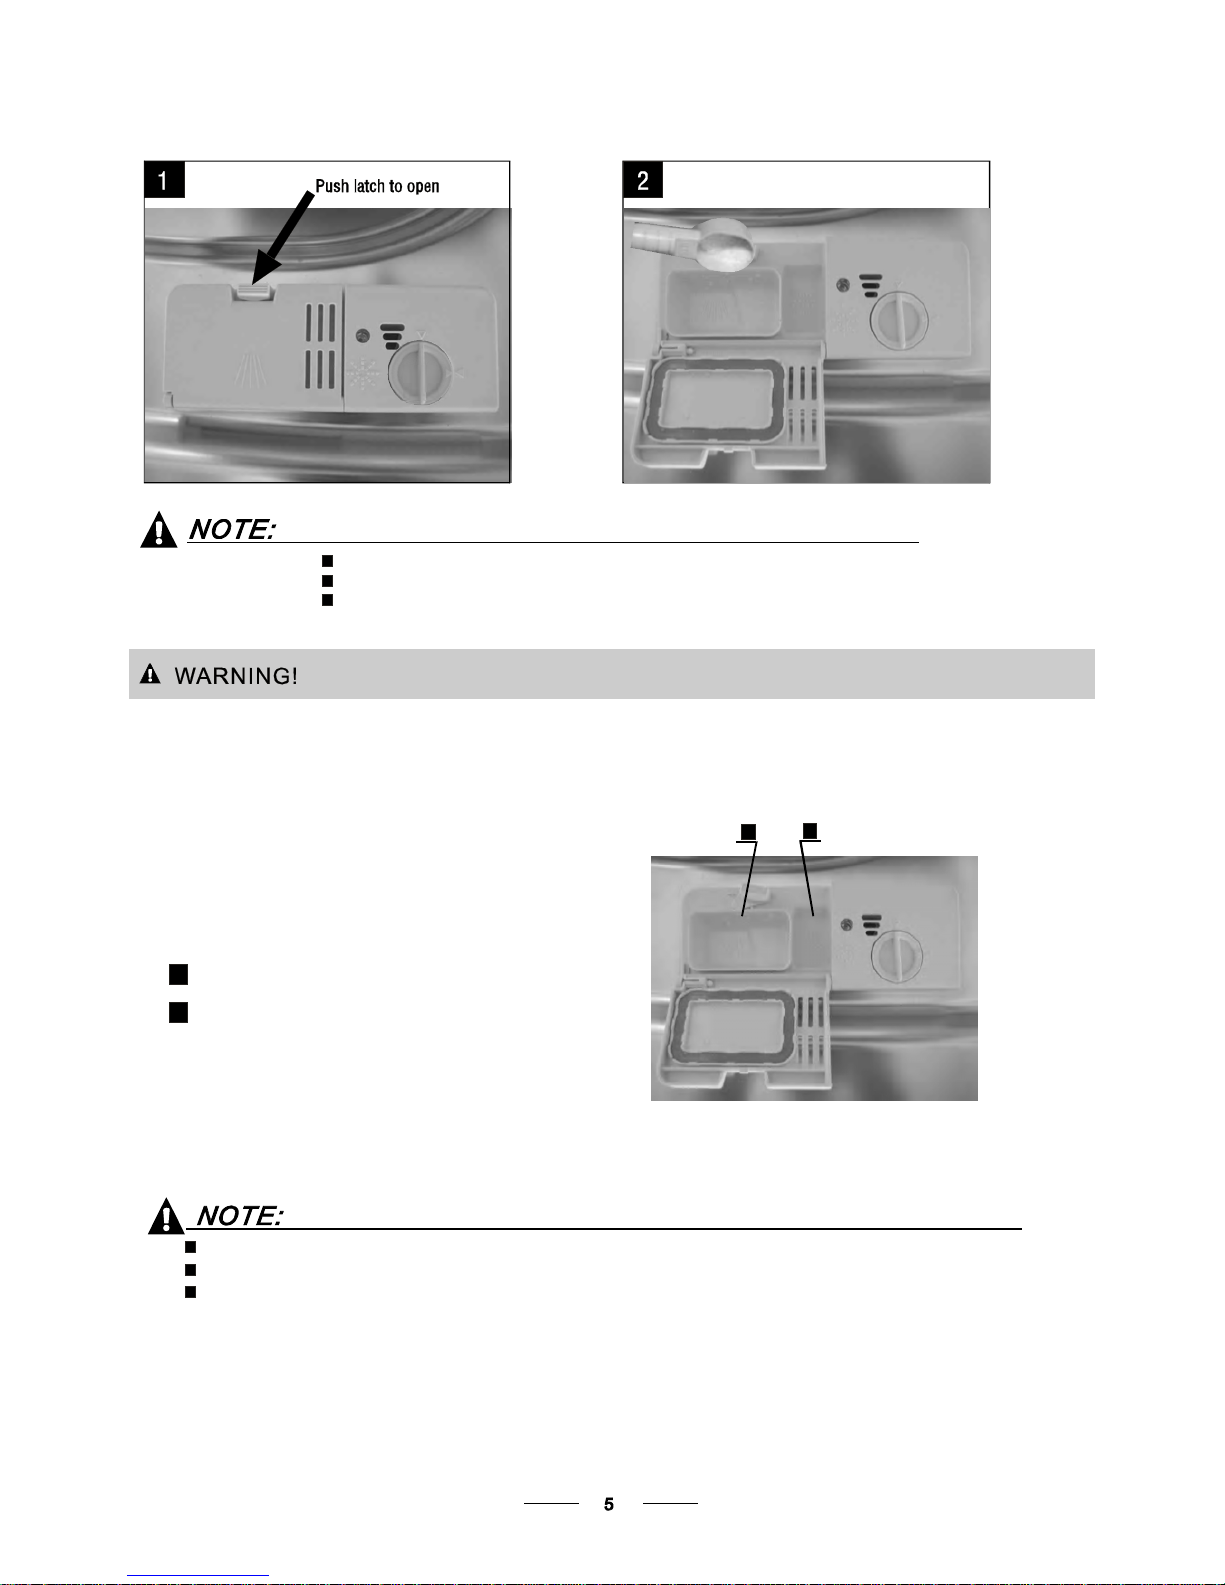
If the lid is cl osed: press releas e but ton. The lid w i ll s pring open.
Fill the detergen t di spen ser with detergent.
The markingindicates the dosinglevels,as
illustrated o nthe right:
The pla ce o f main wa sh cycle de tergent placed.
The pla ce of pr e-wash cycle detergent placed.
Please obs erve the man ufacture rs d osing an d storage
Rec omme nda t ions as s tate d on t he deter gen t pack a gin g .
Close t he li d and press until i t locks in pla ce.
Ifthe dishes are heavily soiled, placean additional
detergent d ose in th e pr e-wash deter gent ch amber.This deterge nt w ill take e ffect during the pr e-wash phase.
A
B
Fill i n De tergent
You find information about the a moun t of deter gent for the sing le programm e on the last pag e.
Pleasea ware, t hat according to the le vel soiling and the sp ecif ic ha rdness of w ater differences are possible.
Pleaseo bserve the man ufact urer's re com mendations on the dete rgent packaging.
A
B
Page 10

Cutlery with w ooden,hornchina or
mother-of-pearl handle s
Plastic items that are not heat resist ant
Older c utlery with glued parts t hat are n ot
temperature resistant
Bonded c utlery item s or dish es
Pewter or coop er items
Crystal gla ss
Steel items su bject to rusting
Wooden pl atters
Items madefrom synthetic fibres
Some ty pes of gl asses can b ecome
dull aft er a la rge n u m ber of washe s
Silver and alumi num par ts have a
tendencytodiscolourduring washing
Glazed patterns may fadeifmachine
washed frequently
Are not s uitab le
Are o flimitedsuitability
Dishes anditems of cutlery mustnotlieins ide oneanother, orcover each other.
To avoid d ama ge to gl asses, they must not touch.
Load large items w hich are most di fficult to c lean into the lower bask et.
The u pper basket is de signed to hold m ore delicate and lighter d ishwa re such as glasses , coffee
and t eacups
Long bladed k nives sto red i n an upright po sition are a p otenti al hazard!
Long and/or sharp items o f cutlery such as carving knives must be positi oned
horizon tally i n the upper basket.
Please do not overload your dishwasher. This is important for good results and f or
reasonab le consumption of energy.
Load h ollow it ems such as cups, gl asses, pans etc. W ith the opening facing downwards s o that
wat er canno t c o lle c t i n the c ont a i n er or a dee p b a se.
Considerbuying utensils whichareidentified as dishwasher-proof.
Use a milddetergent thatis describedas 'kindto dishes'. If necessary, seekfurther
information fromthedetergent manufacturers.
Forparticular items, selectaprogramwithaslowa temperature as possible.
Topr ev ent dama ge, do not take gla ss and cutl ery out of the dish wash er immed iat ely
after the progr amm e has ende d.
(For b est performance of t he dishwasher, follow the se l oading guide lines.
Features and ap pearance of baskets and cutl ery baskets may vary from your model.)
Scrape off any larg e amount s of le ftover food. Soften remnants of b urnt food in pans.
It i s no t necessary to ri nse the d ishes under running water.
Place objects in the dishwa sher in following way:
1.Itemssuch as cups, glasses, pots /pans, e tc. a re faced downwards.
2.Curveditems, or ones wi th recesses, should b e loaded a slant so that w ater can run off.
3.Allutensils are stacked securely and can not ti p ov er.
4.Allutensils are placed in t he way t hat the s pray arms can rot ate freely during washing.
Very sm all it ems s hould not be w ashed in the dishwasher as they could easily fall out o f the basket.
To prevent water dripping from the uppe r basket into the lower basket, w e recommend that you
empty the lower ba sket first and the n the upp er basket.
Page 11

The u pper basket is designed t o hold m ore delicate
and li ghter d ishware such as gl asses, coffee and
teacups and saucers, as wellasplates, smallbowls
and s hallowpans(aslongas theyarenottoo dirty).
Positionthedishes and co okwares o that they will
notget moved bythesprayofw ater.
We sug ges t that you pla ce large i tems and t he most
difficult toclean items are to be placed into the lower
basket: su ch a s p ots, pans, lids, serving di shes and
bowls, as sh own in the f igu re be low. It is prefer ab l e to
pla ce ser vin g dish es and lids on the s id e of the r a cks
in orde r to a void bl ocking the rotation of the top spray
arm .
Pots,servingbowls,etc,mustalwaysbeplacedtopdown.
D eep pot s sh ould be slant ed t o allow water to f low out.
Please be reminded that :
The Botto m Bask et f eatu r es foldin g spikes so that la rge r or more pots and pans can be lo ade d.
Foldin g Spikes of Lower Basket
For bet ter stacking of pots and pa ns,
the spi kes can b e f olded down as
show in the p ict ure right.
Foldin g back t he cup shelives
For bet ter s tacking of po ts and p ans ,
the spikes can b e fol ded do w n as
show in the pic t u re ri gh t.
Cutlery should be placed in the cutlery rack separately
from each oth er i n the appropriate position s, a nd d o
make sure th e ute nsils do not nest together,this m ay
cause badperformance.
Adjust ing the Upper Bask et
The height of the upper ba sket can be adjus ted in ord er to
create morespace forlarge utensils bothfortheupper
/lower basket. The height of the uppe r ba sket can b e
adjusted by lift up the basket for the uppe r position, and up
press the handle to lower the upper baske t, see the pict ure
below:
Page 12

Detergent
pre/main
Detergent
pre/main
Cycle Selection
Information
Cycle Selection
Information
Normal
ProgramProgram
Intensive
Heavy
Running
time(min)
Running
time(min)
Water
(L)
Water
(L)
Energy
(Kwh)
Energy
(Kwh)
Rinse
Aid
Rinse
Aid
5/27.5g
5/27.5g
Pre-wash(50 )
Wash (65 )
Rinse
Rinse
Rinse(55 )
Drying
Pre-wash(45 )
Wash (55 )
Rinse
Rinse (60 )
Drying
Pre-wash
Wash (45 )
Rinse
Rinse(50 )
Drying
180
160
150
40
1.15
0.71
1.3
0.5
16.5
13
13
10
Description
of Cycle
Description
of Cycle
Pre-wash(50 )
Wash(60 )
Rinse (50 )
Drying
60
9
0.8
NOTE:NOTE:
5/27.5g
20g
5.Starting a washing program5.Starting a washing program
Wash Cycle TableWash Cycle Table
NOTE:NOTE:
Means: need to fill rinse into the Rinse-Aid Dispenser.
( )
88
(*AS/NZS 2007.1)
For heavily soiled loads,
such as pots, plates, glasses
and lightly soiled pans.
* : This program is the test cycle. The information for comparability test
in accordance with , as follows:
Capacity: 14 setting
Position Upper basket: upper wheels on rails
Rinse aid setting: 6
Open the door slightly 50mm to assist in drying of the dishes after every wash
Turning On the ApplianceTurning On the Appliance
Starting a cycle wash
Draw out the lower and upper basket, load the dishes and push them back.
It is commended to load the lower basket first, then the upper one (see the section entitled
Loading the Dishwasher ).
Pour in the detergent (see the section entitled Detergent and Rinse Aid ).
Insert the plug into the socket. The power supply is 220-240 VAC /50 HZ, the specification
of the socket is 10A 250VAC. Make sure that the water supply is turned on to full pressure.
Open the door, press the ON/OFF Button, and the display will turn on.
Press the program Button to selected your desired program.
If a program is selected, the response light will light. Then close the door, the dishwasher begins
to start.
1
2
3
4
5
Rapid
1Hour
Glass
For the heaviest soiled
loads, such as pots, pans,
casserole dishes and dishes
that have been sitting with
dried food on them for a
while.
Standard daily cycle for
normally soiled loads, such
as pots plates glasses.
For lightly soiled loads that
do not need excellent drying
efficiency.
A shorter wash for lightly
soiled loads and quick wash.
For lightly soiled crockery
and glass
Pre-wash
wash(40 )
Rinse
Rinse(60 )
Drying
120
0.85
13
Wash (40 )
Rinse
Rinse (45 )
5/27.5g
5/27.5g
A shorter wash for lightly
soiled loads that do not
need drying.
Soak
Pre-wash
8
0.01
3.5
Page 13

When t he wo rking cycle has finished, the buzzer of the dishwasher will sound f or 8 sec onds, then st op. Turnoff
the appliance u sing the ON/OFF button, shut off the water supply and op en the door of the dishwashe r.
Waitfor a f ew minutes b efore unloadi ng the dishw asher to a void handling the dishes and utensils w hile they
are s till hot and more suscept ible to br eakage. They will al so dry bet ter.
SwitchOffthe Dishwasher
The program light is on bu t i s not b linkin g , onl y in th is case the programme has ende d.
1.Switch off the di shwasher by pressing the ON/OFF button.
2.Turn off the water tap!
Openthedoorcarefully.
Hot d ish e s a re se ns it i ve to knocks. The dishe s sho u ld the re fo re be allow ed to co ol dow n aro und 1 5 m inu t es
before r emoving from the app liance.
Ope n t he dish was her' s door, leave it ajar and wait a f ew m i n ute s bef ore removin g t he di shes. In this way they
will be cooler and the drying will b e i mprov ed.
Unloadingthedishwasher
It is n orm al th at the dish was he r is wet i n s id e.
Empty thelowerbasket firstandthen the upper one.Thiswill avoidwater dripping from theupperBasketonto
thedishesinthelowerone.
Ify ouopen the doord uringa wash cycle , the machinewill pause. The program light will
stopblinkingan dthe buzzerwill mooing everyminuteunless you closethe do or. Aft er
youclose the d oor ,the machinewill keepon working after10 seconds.
Premise:
Acycle thatisunderway canonlybemodifiedifit has onlybeenrunning fora shorttime. Otherwise, the
detergent may have already been released, and the appliance may have already drained the was h w ater.
If thisisthecase, thedetergentdispensermustberefilled (seethe sectionentitled " Loading the
Detergent").
Open the door , t he machine will p ause, press th e p rogram button more than
3sthenyoucanchange theprogram to thedesiredcycle setting(see thesection entitled " Startinga wash
cycle. ..").
1
2
A forgotten dish can be added any time before the detergent cup opens.
Add forgotten dishes.
Close the door, the dishwasher will run
after 10 seconds.
After the spray arms stop working, you can open the door
completely.
2
3
Openthe door a little .
1
4
Washthe arms insoap y an d wa rm w ater and use asoft brush to
clean thejets. Repl ace them af ter r i nsing them th orough ly.
When following this procedure from step1 to step 3, the filter system will be removed;
when following it from Step 3 to Step 1, the filter system will be installed.
Itis dangerous to openthedoor when washing,becausethe hot watermay scald you.
Page 14

The filter prevents l arger remn ants of food or other objects from getting inside the pum.
Theresiduesmayblock thefilter, inthis casetheymustberemoved.
The filter system consists of a coarse filter,a flat (Main f ilter)
And a mi c ro fi lter( F i ne fi l ter).
Foodand soilparticlestrappedinthis filterarepulverized by a
special jet onthe lower spray arm a nd washed down to d rain.
Larger items, suc h as p ie c es of bon e s or glass, tha t could block
the drain are trappedinthecoarsefilter.To removethe items
caught by the filter,gently squeeze the tap on the top of t his
filter andlift out.
This filterholds soil andfoodresidues in thesump areaand
preventsitfrombeing r edepositonthedishesduring washcycle.
Main filter
1
Coarse filter
2
Fine filter
3
2
3
1
Filterassembly
Thefilter efficiently
For b est performance and results, the filter must b e cleane d re gularly. this r easo n, it i s a goo d ide a t o
remove the la rger food particl es tr apped in the f ilter after e ach was h cyc le by rin sing the semicircular filte r an d
cup u nder running water. Tore move the fil ter device, pull the c up handle in t he upward d irection.
removes f ood particles from the wa sh water,allowin g it to be recycled d ur ing the cycle.
For
The dishw as her must never be us ed witho ut th e fil t er s.
Improper replacemen t of thefilter may reduce the performance level of t he appliance
anddamagedishes andutensils.
Step 1 Turn the filter in anti-clockwis e d irection,:
Step 2 lift the filter assy up:
When following this procedure from step1 to step 2, the filter system will be removed;
when followingit from Step 2 to Step 1, the filter systemwill be installed.
1
2
Page 15

The cont rol panel can be clea ned by u sing a lig htly dampened cloth.
After cle aning, make sure to dry it thoroughly.
For t he ext e ri or, use a good appl ia nc e polis h wax.
Neveruse sharp objects, scouring pads or h arsh cleaners on a ny part of the dis hwasher.
Protec tA gainst Freez ing
1.Cut offtheelectrical powertothedishwasher.
2.Turnoff the water supply and disconnec t the wat er i nlet pipe from the w ater valve.
3.Drain the water from the inlet p ipe and w ater valve. (Use a p an to gathe r the w ater)
4.Reconnect t he water i nlet pipe to the wate r valve.
5.Remove the filter at the bottom of the tub and use a spong e to soak up water in t he sump.
please take frost protection measures on t he dishwasher in winter.Every fter washing c ycles,
please operate as follows
timea
:
Cleaning the Filter
Cleaning The Door
To cle an the c o a rse fil t er and the fine fil t e r, use a c l ean i n g bru sh. R e ass e mbl e t he filter parts as sho wn in the figures
on th e last page and r eins ert the enti re assem bly in the dis hwa sher, positio ning it in it s s eat and pres sing downwar ds.
Whencleaning the filters,don't knockon them.Otherwise,the filterscould b e
contortedand theperformanceof the dishwasher could bedecreased.
To clean thee dge around t he door,you should use o nly a soft wa rm, d amp cloth.
To avoid penetration o f water into the d oor l ock and el ectrical component s, d o not
usea spray cleaner of any ki nd.
Never u se a spray cleaner t ocle an t he door panel as it may damage the door loc k
andelectrical components.
Abrasive ag ents o r some paper towels s hould not b e u sed because o f the ri sk of
scra t ching or leav in g spot s on th e s tain less ste el su rface.
Cleani ng the SprayArms
If your dishwasher cannot w ork because of the ice,
please contact professiona l service persons.
It is neces s ary to cl e an the s p ray a rms regula r l y for hard
wate rchemicalswill clog thespray armjetsandbearings.
- Inspec t the filters for blo cking a fter every time t he dishwasher has been used.
- By unscrew ing the c oarse filter, you can remove the filter system. Remove a ny f oo d re mnants and
clean the filters under running water.
Remarks:
Theentirefilter assemblyshouldbe cleanedoncea week.
Toremove thelower spray arm, pulloutthe sprayarm u pwa rd.
Tor e m ov e th e up per s p ray a rm , ho l d the nu t, r ot ate the arm
clockwise to remove it.
Washthe arms in soap y and war m water an d use a soft brush to
clean t he j ets. Replace them after rinsing t hem thoroughly.
Page 16

It isrecommend t hat yourun a wash cycle with the
dishwasher e mpty an d then r emove the plug fr om the
socket, t urn o ff t he water supply and l eave the door of
the a pplian c e s l ig ht ly ope n. T h i s wil l hel p the door
seals to lastlonger andprevent odours from forming
withinth e appliance.
If the applian ce must be move d, t ry to keep it in the
verticalposition.Ifabsolutelynecessary, it can be
positioned on its back .
Oneofthefactorsthatcauseodourstoforminthe
dishwasher i s food th at remains t rappe d in the seals .
Periodic cleaning with a d amp sponge will prevent this
fro m occurrin g.
Ensure the v oltage and fr equency of the p ower be ing corresponds to
those on the ratin g plate . Only in sert the plug i nto an elect rical socket which i s ea rthed
properly.If t he electrical socket to which thea ppliance must b e connected is not
appropriate fortheplug, replace the socket, rather thanusing a a daptors orthelikeas
theycould causeoverheating and burns.
Please look at the r ating label to know the rating voltage and connect the dishwasher to the appropriate power supply.
Use the r equired fuse 1 0 amp, time d elay fuse or c ircui t br eake r rec ommended and provide separate circuit servi ng
only this appliance.
Position the ap pli ance i n the d esired locati on. T he back s hould rest against the wall behind it, and the side s,
along t he adjacent cabinets or walls. T he dishwasher is equipped with water supply and d rain hoses that can
be pos itioned either to the right or the left sides to facilitate proper install ation.
Once the appl iance is positioned for levelling, the height of the dishwashe r
may be altered via adjustment of the scre wing level of the fee t. In any case,
the appl iance should not be inclin ed mo re than 2 .
For personal safety:
DO NOT USE AN EXTENSION CORD OR AN ADAPTER PLUG WITH THIS APPLIANCE.
DONOT, UNDER ANY CIRCUMSTANCES, CUT OR REMOVETHE EARTHING
CONNECTION FROM THE POWER CORD.
Before cleaning or p erforming mainten ance, always
remove the plug from the socket .
To clean the exterior and rubberparts of the dishwasher,
donotusesolvents or abrasive cleaning products.
Only use a cloth with w arm soapy wate r.
Tore m ove spots o r stains f rom the sur face ofth e
interi or, u se a cloth da mpened wit h w a ter an a little
vinegar,or a c leaning product made s peci fically for
dishwashers.
Removethe Plug
No Solvent s orAbras ive Clea ning
Moving the Ap plia nce
Seals
After every wash, t urn off t he w ater supply to the
appliance and leave t he door slightly op en so t hat
moisture and odours are no t trapped inside.
AfterEveryWash
Whennot in Use for aLongTime
This appliance must be earthed. In the event of a malfunction or breakdown, earthing will reduce the risk of
electric shock by providing a path of least resistance for the electric current. This appliance is equipped with a
cord havingan equipment-earthing conductor and an earthing plug. The plug must be plugged into an
appropriate outlet that is installed and earthed in accordance with all local standards and requirements.
Page 17

for personal safety:
DO NOT USE AN EXTENSION CORD OR AN ADAPTER PLUG WITH THIS APPLIANCE.
DO NOT, UNDER ANY CIRCUMSTANCES, CUT OR REMOVE THE
FROM THE POWER CORD.
EARTHING
CONNECTION
Improper connection of the equipment earthing conductor can result in the risk of an
electric shock.
Check with a qualified electrician or service representative if you are in doubt whether the
appliance is properly earthed.
Do not modify the plug provided with the appliance. If the plug does not fit properly to the
outlet, please have a qualified electrician to install a proper outlet.
Pull The safety supply hoses completely out from storage compartment located at rear of dishwasher.
Turn water fully on before starting the dishwasher.
1
Tighter the screws of the safety supply hose to the faucet with thread 3/4inch.
2
3
The appliance must be connected to the water mains using new hose-sets.
The old hose-sets should not be reused.
Water pressure must be between 0,04 MPa and 1 MPa. If the pressure is below theminimum
consult our Service Department for advice.
Please close t he hydrant afterusing.
Turn off the water.
Release the water pressure by depressing the pressure release button. This relieves water pressure and protects you, and
the room, from severe splashing.
Unscre w The safety supply hose from the faucet..
2
1
Connect the cold water supply hose to a threaded 3/4(inch) connector and make sure that it is fastened tightly in place.
If the water pipes are new or have not been used for an extended period of time, let the water run to make sure that the
water is clearandfree of impurities. If thisprecautionis not taken,there is a risk that the water inlet can get blocked and
damage the appliance.
A hose that attaches to a sink spray can burst if it is installed on the same water line as the dishwasher. If your sink has one, it
is recommended thet the hose be disconnected and the hole plugged.
The safety supply hose consists of the double walls. The hose's system guarantees its intervention by blocking the flow of water
in case of the supply hose breaking and whenthe air spacebetween the supply hoseitselfandthe outer corrugated hose is full
of water.
Page 18

Thefollowingthingsshould be checked beforestartingthe dishwasher.
The content of this manual is very helpful to the users.
After installation, please make sure tokeep this manual.
1
Thedishwasheris level and fixed properly
2
The inle t valv e i s open
3
Thereis a leakageat the connectionsofthe conducts
4
Thewiresaretightlyconnected
5
The power is switched on
6
The inlet an d drain hoses are k notte d
7
Allpackingmaterialsandprintingsshould be taken out from the dishwasher
Extension Hose
Ifyouneed a drain hoseextension,make suretousea similar drain hose.
It must be no longer t han 4 m etres; otherwise the cleaning effect of the dishw asher could be reduced.
Wat e r O u t l et
Connect t he water d rain hose. Th e drain hose must be corr ectly f itte d t o avoid w ater leaks.
Ensure that thewate r drain h ose is not kinked or s quashed .
If th e s i nk is 1000 hig her f rom t he fl oor, th e excess wat e r i n h o ses canno t be dra ined direc tl y
into thesink. It willbenecessarytodrain excess water fromhoses intoa bowl o rsuitable
container that is held outside and lower than t he s ink.
How to Drain ExcessWater FromHoses
Syphon Conn ection
The w ast e connec tio n m ust b e at a he i ght less t han 100 0 m m ( max imum) fr om the bo t tom of the d i s h.
The wat er dr ain hose should be f ixed .
Insert t he drain hose into a drain pip e wi th a minimum dia meter of 40mm, orlet it run in to the si nk, making sure to
avoid bending o r crimping it. Th e to p of t he h ose must be less than 1000m m.
A
Counter
Front
Drain pipe
NOTE
The top of the hose
must be l ess than
1000mm.
φ 40mm
B
Page 19

Fuse blown, or the
circuit breakeracted
Replace fuse or reset circuit breaker. Remove any other
appliances sharing the same circuit with the dishwasher
Spilled rinse-aid
Always wipe up rinse-aid spills immediately.
Hard water minerals
The affected items are
notcorrosion resistant.
The lid of the softer
is loose
Aspayarmis
knocking against
an itemin a basket
r
Items of crockery
are loose in the
wash cabinet
This may be caused
by on-site installation
or the cross-section of
the piping.
A programmewas not
run after dishwasher
salt was added.
Traces of salt have
gotten into the wash cycle.
To clean the interior, use a damp sponge with
dishwasher detergent and wear rubber gloves.
Never use any other cleaner than dishwasher
detergent for the risk of foaming or suds.
Always run the quick wash programme .
without any crockery in the dishwasher and
without selecting the Turbo function (if present),
after adding dishwasher salt.
Check the lip .Ensure the fix is fine.
Interrupt the programme, and rearrange the items
which are obstructing the sp ay arm.r
Interrupt the programme,
and rearrange the items of crockery.
This has no influence on the dishwasher function.
if in doubt, contact a suitably qualified plumber.
Detergent with
colourant was used
Make sure that the detergent is the one without
colourant.
Improper detergent
Make sure the dishwasher is turned on and the door is
closed securely.
Check that the water supply is connected properly and
the water is turned on.
Make sure to close the door properly and latch it.
Make sure the power cord is properly plugged into the
wall socket.
Power supply is not
turned on
Error code:E1;
Water pressure is low
Door of dishwasher
not properly closed.
Kink in drain hose
Filter clogged
Kitchen sink clogged
Check drain hose.
Check coarse the filter
(see section titled )" Cleaning The Filter "
Check the kitchen sink to make sure it is draining well.
If the problem is the kitchen sink not draining ,you may
need a plumber rather than a serviceman for dishwashers.
Use only the special dishwasher detergent to avoid suds.
If this occurs, open the dishwasher and let suds evaporate.
Add 1 gallon of cold water to the tub. Close and latch the
dishwasher, thenselect any cycle. Dishwasher will drain
outthe waterat the first step.Open the doorafter draining
is stop and check if the suds is disappeared.
Repeat if necessary.
Page 20

The dishes were not
loaded correctly.
See notes in " Loading the Dishwasher Baskets ".
Select a more intensive programme.
See" Wash Cycle Table ."
Use more detergent, or change your detergent.
Rearrange the items so that the sp ay can rotate freely.r
Clean and/or fit the filter combination correctly.
Clean the sp ay arm jets. See "Cleaning the Spray
Arms".
r
Use less detergent if you have soft water and select
a shortest cycle to wash the glassware and to get
them clean.
Use a mild abrasive cleaner to eliminate those marks.
Re-loading the dishes properly.
Load the dishwasher as suggested in the directions.
Increase the amount of rinse-aid/refill the rinse-aid
dispenser.
Do not empty your dishwasher immediately after
washing. Open the door slightly so that the steam can
escape. Begin unloading the dishwasher only once t
he dishes are barely warm to the touch. Empty the low
basket first.This prevents water form dropping off
dishes in the upper basket.
In short program the washing temperature is lower.
This also lowers cleaning performance. Choose
a program with a long washing time.
Water drainage is more difficult with these items.
Cutlery or dishes of this type are not suitable for
washing in the dishwasher.
Theprogramme was
notpowerful enough.
Not enough detergent
wasdispensed.
Items are blocking
the path of sp ay arms.r
The filter combination
inthebaseofwash
cabinet is not clean or
is not correctly fitted.
This may cause
the sp ay arm jets
to get blocked.
r
Combination of soft
water and toomuch
detergent.
Aluminum utensils
have rubbed against
dishes.
Dishes block
detergent c ups.
Improper loading
Too little rinse-aid
Dishes are removed
too soon
Wrong program
has been selected
Use of cutlerywith
a low-quality coating
Overflow.
When some malfunctions come on, the appliance will display error codes to warn you:
Longer inlet time.
Faucets is not opened, or water intake is
restricted,or water pressure is too low.
Some element of dishwasher leaks .
E4
E1
E8
Open circuit or break of distributary valve.
Failure of orientation of distributary valve.
Page 21

Height: 845mm
Width : 598mm
Depth : 600mm
(with th e door close d)
Waterpressure: 0.04-1.0MPa
Power s upply: see ratin g label
Capacity: 14pl ace settings
If overflow occurs, turn off the main water supply before calling a service.
If there is water in the base pan because of an overfill or small leak,
the water should be removed before restarting the dishwasher.
Page 22

1.Upper basket:1.Upper basket:
Loading the baskets according to (*AS/NZS 2007.1) : Loading the baskets according to :
a
a
a
a
a
c
c
c
c
c
c
c
c
c
a
a
a
a
a
a
a
a
a
c
Glasses
Saucers
b
Cups
a
IN
b
c
c
c
c
c
2
.
L
o
w
e
r
b
a
s
k
e
t
:2
.
L
o
w
e
r
b
a
s
k
e
t
:
d
Dinner plates
e
Soup plates
Dessert dishes
f
b
IN
e
f
f
f
d
3
.
C
u
tte
rl
y
b
a
ske
t:
3
.
C
u
tt
e
rl
y
b
a
ske
t:
IN
1
1
Forks
1
Soup spoons
2
3
Dessert spoons
Teaspoons
4
Knives
5
V
olt
age:
23
0V
/
50
H
z
V
olt
age
:
23
0V
/
50H
z
I
n
f
or
m
at
ion
f
or
c
o
m
p
ar
abilit
y
t
es
t
s
in
ac
c
or
danc
e
w
it
h
(
*
AS/
N
Z
S
200
7.
1
)
C
apac
it
y
:
1
4
plac
e
s
e
t
t
in
gs
C
apac
it
y
:
1
4
plac
e
s
e
t
t
in
gs
P
os
it
ion
of
t
he
u
pp
e
r
bas
k
e
t
:
low
er
P
os
it
ion
of
t
he
u
pp
er
bas
k
e
t
:
low
er
2
2
3
3
4
4
5
5
P
r
ogr
am
m
e:
N
o
r
m
al
P
r
ogr
am
m
e:
N
or
m
al
R
ins
e
aid
s
et
t
ing:
6
R
ins
e
aid
s
et
t
ing:
6
D
et
er
gent
(
P
r
e
/
m
ain)
:
5
g/
27.
5
g
D
et
er
ge
nt
(
P
r
e/
m
ain)
:
5
g/
27.
5
g
Page 23

IMPORTANT: If your appliance appears not to be
operating correctly, then you should disconnect it
from your mains supply and then contact the
Customer Service Department.
DO NOT ATTEMPT TO REPAIR THE APPLIANCE
YOURSELF.
Please note that if an engineer is asked to attend whilst the product is
under guarantee and finds that the problem is not the result of an
appliance fault, then you may be liable for the cost of the call out charge.
The appliance must be accessible for the service technician to
perform any necessary repair. If your appliance is installed in
such a way that a service technician is concerned that damage will
be caused to the appliance or your kitchen, then he will not
complete a repair.
This includes situations where appliances have been tiled in,
sealed in with sealant, have wooden obstructions placed in front
of the appliance, like plinths. Or any installation other than the
one specified by Baumatic Ltd has been completed.
IMPORTANT: The manufacturer operates a policy of continuous
improvement and reserves the right to adjust and modify its
products without prior notification.
Page 24

Page 25

Page 26

Page 27

(AUS
)
Think Appliances Pty Ltd.
416-424 Barry Rd
Coolaroo VIC 3048
Sales Telephone
1300 132 824
Service Telephone
1800 444 357
Website
www.thinkappliances.com
(NZ)
Applico Ltd.
Private Bag 92900
Onehunga, Auckland,
New Zealand 1061
Website
www.baumatic.co.nz
(UK)
United Kingdom
Baumatic Ltd.,
Baumatic Buildings,
6 Bennet Road,
Reading, Berkshire
RG2 0QX
United Kingdom
Sales Telephone
(0118) 933 6900
Website:
www.baumatic.co.uk
Page 28

40
 Loading...