


BCG900SS
90 cm Single cavity
gas cooker
1y
User Manual for your Baumatic
BCG900SS
90 cm Single cavity gas
cooker
NOTE: This User Instruction Manual contains important
information, including safety & installation points, which will
enable you to get the most out of your appliance. Please keep it
in a safe place so that it is easily available for future reference; for
you or any person not familiar with the operation of the appliance.
GS 19/10/10
2

Contents
Environmental note 4
Important safety information 5 – 9
Specifications 9 – 11
Dimensions 9
Specifications 9 - 10
Electrical details 10
Gas details 10
Control panel 11
Using the hob top 12 - 15
Hob surface layout 12
Before first use 12
Lighting a burner 12 - 13
Optimum use of the burners 13
Hob guidelines 14 - 15
Using the oven 15 - 20
Before first use 15
Using the main oven 16
Cooking guidelines 17
Warnings 17
Cooking guide 18 – 19
Cooking tips for cakes and bread 19 – 20
Cooking tips for meat 20
Cleaning and maintenance 21 – 25
Cleaning the gas hob top 22
After each use 22
Cleaning the burners 22
Cleaning the oven 22
Replacing the oven bulb 23
Removing the oven door for cleaning 23 - 24
Removing the inner door glass for cleaning 24
Removing the side guide rails for cleaning 25
Installation 25 - 37
Positioning 25 – 27
Ventilation 27 – 28
Securing the back-guard 28
Fitting the safety chain and hook 28 - 29
Electrical connection 29 - 30
Connecting the main supply cable 30
Gas connection 31 – 33
Gas conversion to LPG 33 - 37
My appliance isn’t working correctly 37 – 39
Contact details 40
3
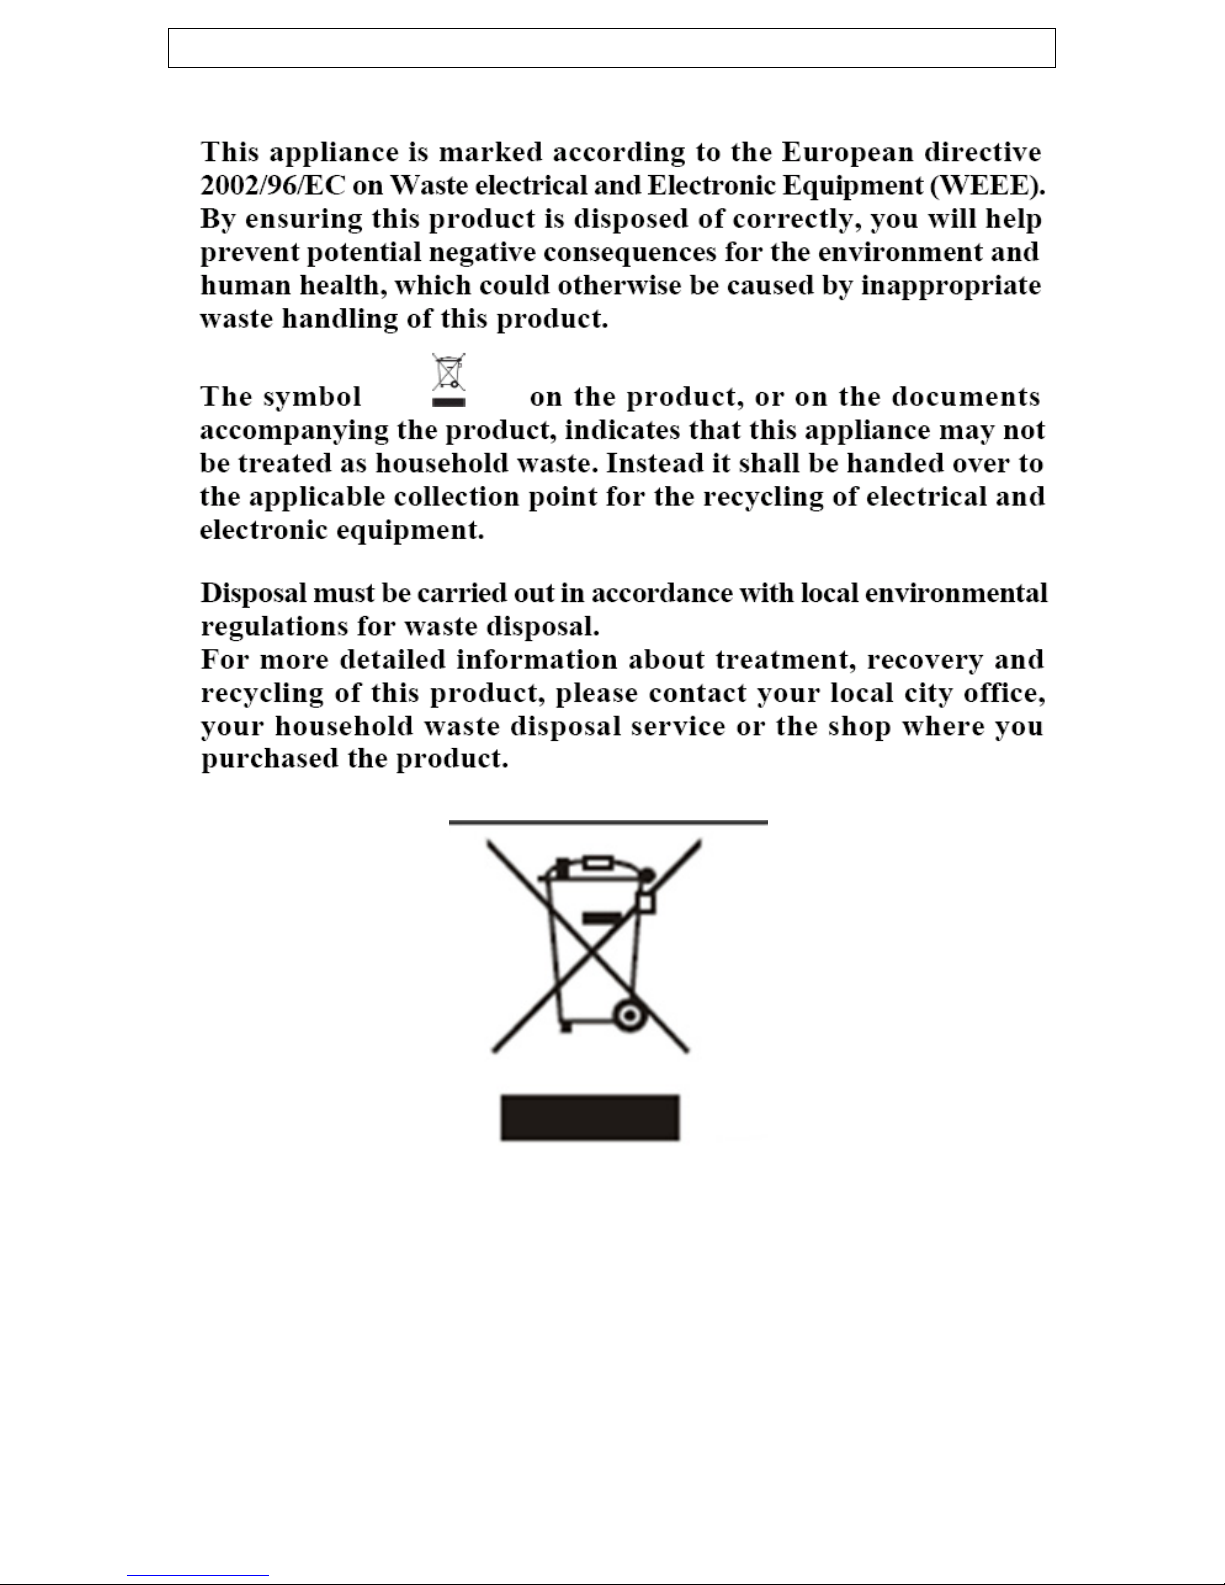
Environmental note
o The packaging materials that Baumatic uses are environmentally
friendly and can be recycled.
o Please discard all packaging material with due regard for the
environment.
4

Important safety information
Your safety is of the utmost importance to Baumatic.
Please make sure that you read this instruction booklet
before attempting to install or use the appliance. If you
are unsure of any of the information contained in this
booklet, please contact the Baumatic Advice Line.
General Information
o This appliance is designed for domestic household use and for
the cooking of domestic foodstuffs.
o IMPORTANT: The adjacent furniture and all materials used in
the installation must be able to withstand a minimum
temperature of 85°C above the ambient temperature of the
room it is located in, whilst in use.
o Certain types of vinyl or laminate kitchen furniture are
particularly prone to heat damage or discolouration at
temperatures below the guidelines given above.
o Any damage caused by the appliance being installed in
contravention of this temperature limit, or by placing adjacent
cabinet materials closer than 25 mm to the appliance, will be
the liability of the owner.
o IMPORTANT: Baumatic Ltd. DO NOT recommend that this
appliance is installed on any type of marine vessel.
o The use of this appliance for any other purpose or in any other
environment without the express agreement of Baumatic Ltd.
will invalidate any warranty or liability claim.
o Your new appliance is guaranteed against electrical or
mechanical defects, subject to certain exclusions that are noted
in Baumatic’s Conditions Of Guarantee. The foregoing does not
affect your statutory rights.
o Repairs may only be carried out by Baumatic service
engineers or their authorised service agents.
5

Warning and safety instructions
o This appliance complies with all current European safety
legislation. Baumatic do wish to emphasise that this compliance
does not remove the fact that the appliance surfaces will
become hot during use and retain heat after operation.
Child Safety
o Baumatic strongly recommend that babies and young children
are prevented from being near to the appliance and not allowed
to touch the appliance at any time. During and after use, all
surfaces will become hot.
o If it is necessary for younger family members to be in the
kitchen, please ensure that they are kept under close supervision
at all times.
General Safety
Make sure that you understand the controls before using the
appliance.
Check that all of the controls on the appliance are turned off
after use.
Always stand back when opening the oven door, this will allow
heat to disperse.
Take care when removing items from the oven, as the contents
may be hot.
Always keep the oven doors closed when the oven is not in use.
Always follow the basic principles of food handling and hygiene;
this will prevent the possibility of bacterial growth.
Always keep ventilation slots clear of obstructions.
Keep fingers away from the hinge areas when closing the door,
otherwise you may trap them.
Oven gloves should be used when placing food in the oven cavity
and when removing it. Care should be taken to avoid direct
contact with any of the elements in the appliance.
o DO NOT LEAVE THE APPLIANCE UNATTENDED WHILST IN
USE.
6

o Do not place heavy objects on the oven door or lean on the
oven door when it is open, as this can cause damage to the oven
door hinges. Nobody should be allowed to sit or stand on any
part of the cooker.
o Do not store chemicals, food stuffs, pressurised containers in or
on the cooker or in cabinets immediately above or next to the
cooker.
o Do not heat up unopened food containers, as pressure can build
up which may cause the container to burst.
o Do not place flammable or plastic items on or near the hob
burners, these types of materials should also not be placed in
the oven or the compartment below the oven.
o Do not leave heated oil or fat unattended, as this is a fire risk.
You should not fill a deep fat frying pan more than one third full
of fat or oil; you should also not use a lid.
o Do not allow fat or oil to build up in the oven trays, grill pan or
oven base.
o Do not place pans or baking trays directly on the base of the
oven cavity, or line it with aluminium foil.
o Do not grill food containing fat without using a grill trivet. The
grill trivet should never be covered with aluminium foil.
o Do not place hot parts in water, leave them to cool first.
o Do not allow vinegar, coffee, milk, saltwater, lemon, tomato
juice or any liquid with high sugar content to remain in contact
with the enamel parts of the appliance. Spillages should be
wiped up immediately.
o Do not allow electrical fittings or cables to come into contact
with areas on the appliance that get hot.
o Do not use the appliance to heat the room it is located in or to
dry clothing. No clothing should be placed over or near to the
hob burners or oven door.
o Do not install the appliance next to curtains or soft furnishings.
7
o Do not attempt to lift or move cooking appliances by using the
oven door or handle, as this may cause damage to the appliance
or result in injury to the person lifting the appliance.
Cleaning
o Cleaning of the oven should be carried out on a regular basis.
o Great care should be taken whilst using this appliance and when
following the cleaning procedure.
o IMPORTANT: The appliance must be disconnected from the
mains before following the cleaning procedure.
o IMPORTANT: Care must be taken when cleaning between
the door glasses, and inside the inner frame as some of
the edges maybe sharp due to the manufacturing process.
Installation
This appliance must be correctly installed by a
suitably qualified person, strictly in accordance
with the manufacturer’s instructions. Please see
the specific section of this booklet that refers to
installation.
o Baumatic Ltd. declines any responsibility for injury or
damage, to person or property, as a result of improper
use or installation of this appliance.
o Heat, steam and moisture will be created during use of the
appliance, take care to avoid injury and ensure that the room is
adequately ventilated. If the appliance is going to be used for
prolonged periods of time, then additional ventilation may be
required.
o Please consult with your qualified installer if you are in any doubt
about the amount of ventilation that you will require.
Declaration of conformity
This appliance complies with the following European Directives:
2006/95/EC regarding “low voltage”
2004/108/EC regarding “electromagnetic disturbances”
-89/109/EEC regarding “materials in contact with food”.
8

o The above directives comply with 93/68/EEC regarding CE
marking.
o The manufacturer declares that the oven is built using certified
materials and requires the appliance to be installed in
accordance with the standards currently in force. This appliance
must be used by a trained person for domestic purposes only.
Specifications
h= 760 mm
H = 920 - 980 mm
W = 900 mm
D = 600 mm
J = 60 mm
Product specifications:
o 5 zone gas hob:
o 1 x 3.80 kW triple crown wok burner
o 1 x 3.00 kW rapid burner
o 2 x 1.80 kW semi-rapid burners
o 1 x 1.00 kW auxiliary burner
o Flame failure safety device on each burner
o Automatic ignition
o Heavy duty cast iron pan stands
o Flame failure safety device (oven)
o Fixed grill
9

o Separate light button
o Double-glazed removable “cool touch” door
o Removable full inner glass
o Wipe Clean enamelled cavity
o Adjustable feet
Gas oven with electric grill
o 2 functions
o Net oven capacity: 89 litres
o Gross oven capacity: 112 Litres
Standard accessories:
o Trivet
o WipeClean enamelled baking tray with handle
o 2 x Safety shelves
o Removable side racks
o LPG conversion jets
o Wok stand
Optional extra:
o BPS2 Pizza Stone
o BT2GRID Griddle Plate With Handles
Electrical details
Rated Voltage: 220 - 240 Vac 50 Hz
Supply Connection: 13 A (double pole switched fused
outlet with 3mm contact gap)
Max Rated Inputs: 2.20 kW
Mains Supply Lead: 3 core x 1.5 mm² (not supplied)
Oven Light Bulb: E14 15 W/300°C screw type pygmy
Gas details
Gas Connection Type: 1/2” BSP
Gas Type (Natural Gas): 20 mbar
For future reference please record the following information which can
be found on the rating plate and the date of purchase which can be
found on your sales invoice. The rating plate for your oven can be
located by opening the door of the storage compartment.
Model Number ……………………………….
Serial Number ……………………………….
Date of Purchase ……………………………….
10
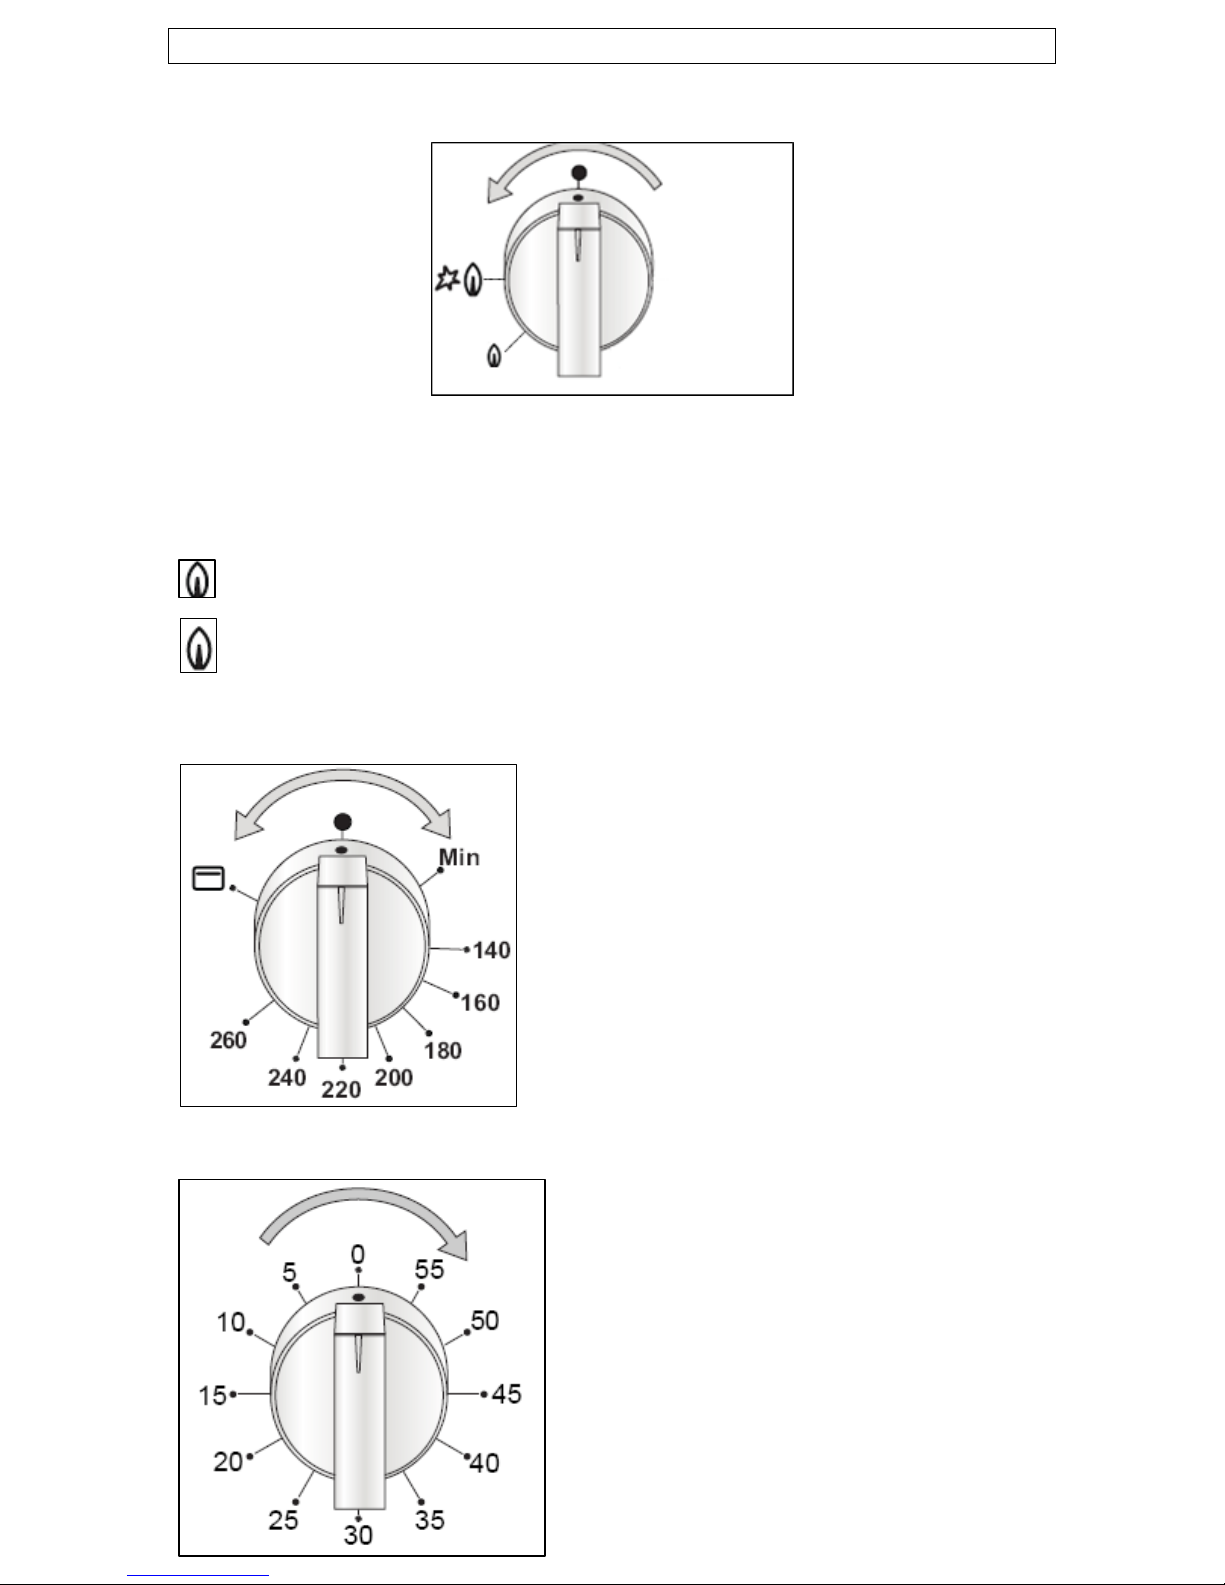
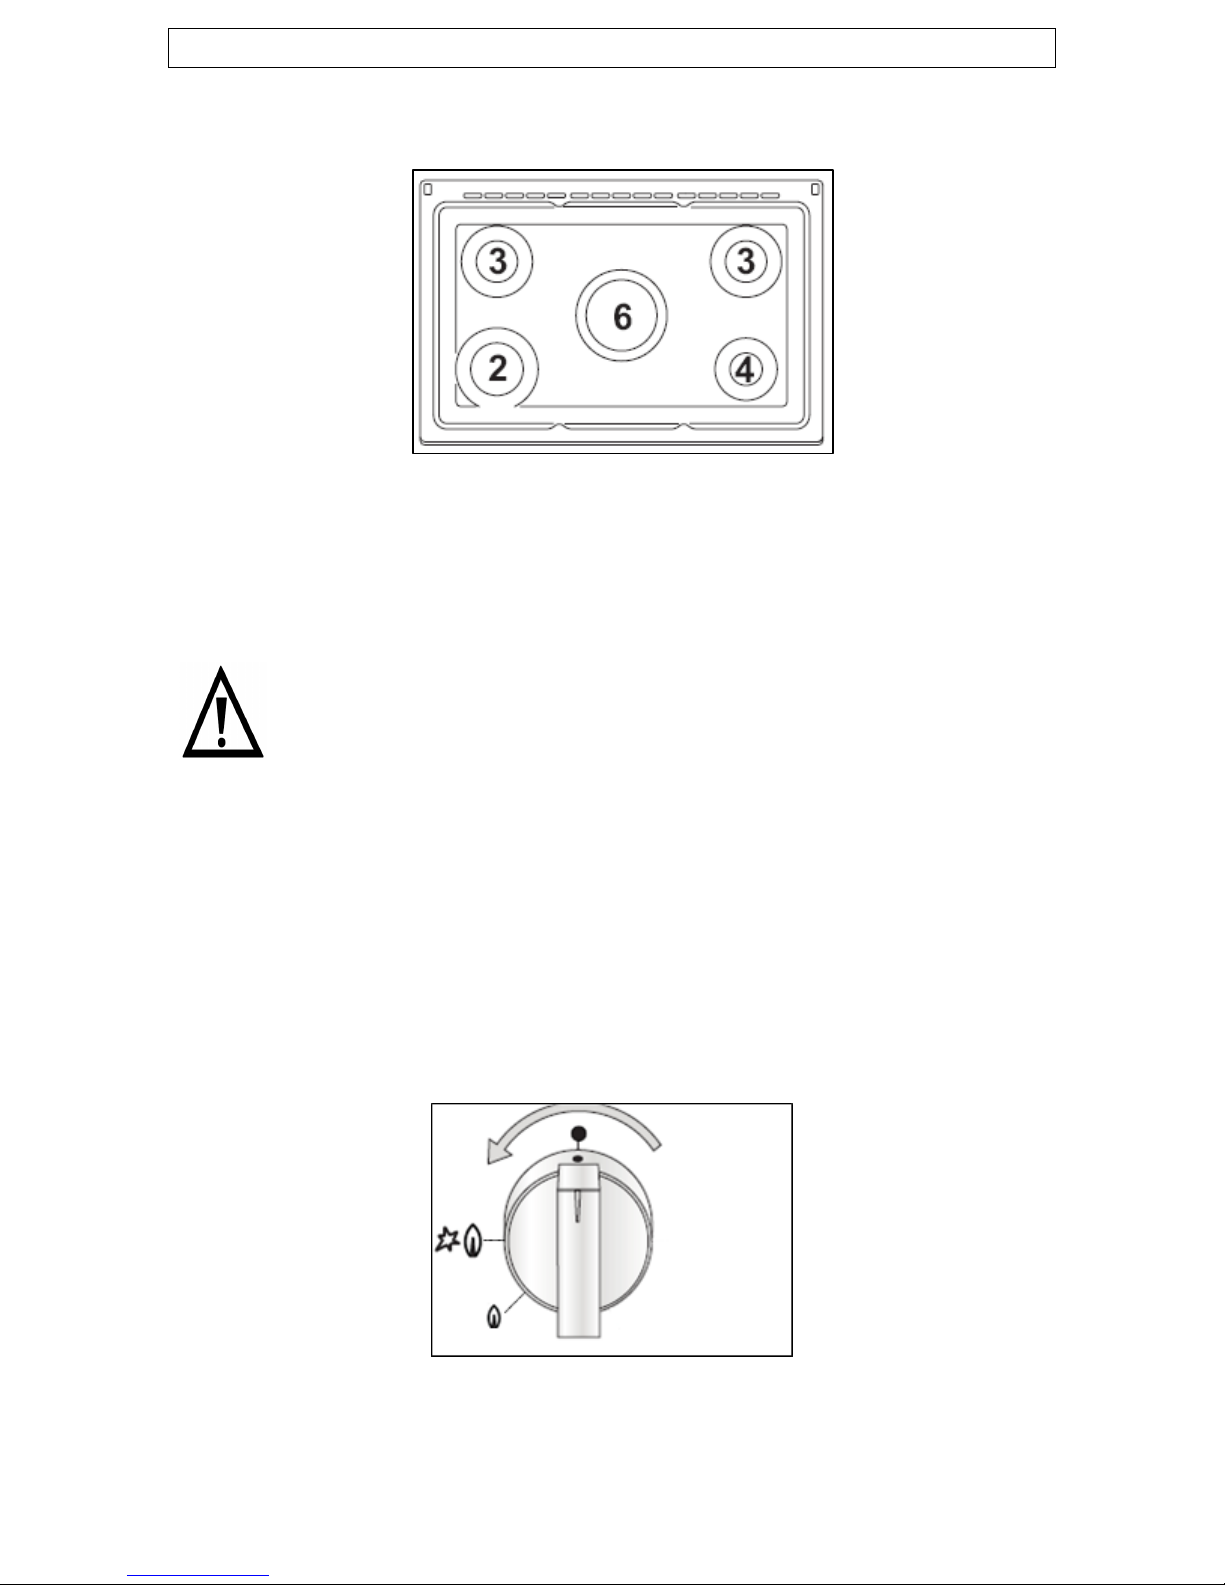
Control Panel
Cooking zone dial
o Turn the relevant dial anticlockwise to select a power level for a
chosen burner.
0 = Burner OFF position
– Low temperature
– High temperature
Gas oven and grill knob
o Turn the dial anti-clockwise to
select the fixed grill function.
o Turn the dial clockwise to switch on
the gas oven and continue turning
to set the oven temperature.
The minute-minder
o To set a cooking time, first wind
the timer up by turning it
completely once from left to right
and then back to the number of
minutes you require the timer to
be set for.
o The timer will sound when the
set time has been reached.
11
Using the hob top
Hob surface layout
2) 3.00 kW rapid burner
3) 1.80 kW semi-rapid burners
4) 1.00 kW auxiliary burner
6) 3.80 kW triple crown (wok) burner
Before first use
IMPORTANT: You should clean the hob surface (see
“Cleaning and maintenance” section).
o You should switch on one cooking zone at a time, for 5 minutes
at the maximum setting. This will help to eliminate any new
smell that exists and evaporate any humidity that has formed on
the heating elements during transit.
o Do not burn off more than one zone at once.
o You must place a saucepan filled half full with cold water on
each zone as you burn it off.
Lighting a burner
o Press the relevant burner dial and rotate anticlockwise to the
large flame icon. Release the dial and the burner will
automatically ignite.
12
o Matches can also be used to light the burner during a power cut.
Simply follow the previous step but place a lit match to the
burner as you press the dial. Once lit, keep the dial pressed for
about ten seconds.
WARNING: Extra care should be taken when lighting a burner
with matches. There is a risk of burning as the cooking zone
ignites so take necessary precautions.
Optimum use of the burners
o In order to achieve maximum results with the minimum
consumption of gas, it is important to adjust the flame according
to your needs and to use the appropriate size pans (see table
below).
o When the contents of a pan begin to boil it is recommended that
you adjust the dial to the small flame position.
o Always place a lid on the pan in use.
Burner Diameter of pan (cm)
Triple crown
22 – 24
Rapid 20 – 22
Semi-rapid 16 – 18
Auxiliary 12 - 14
o Always remember to turn the control knob to OFF when cooking
is completed.
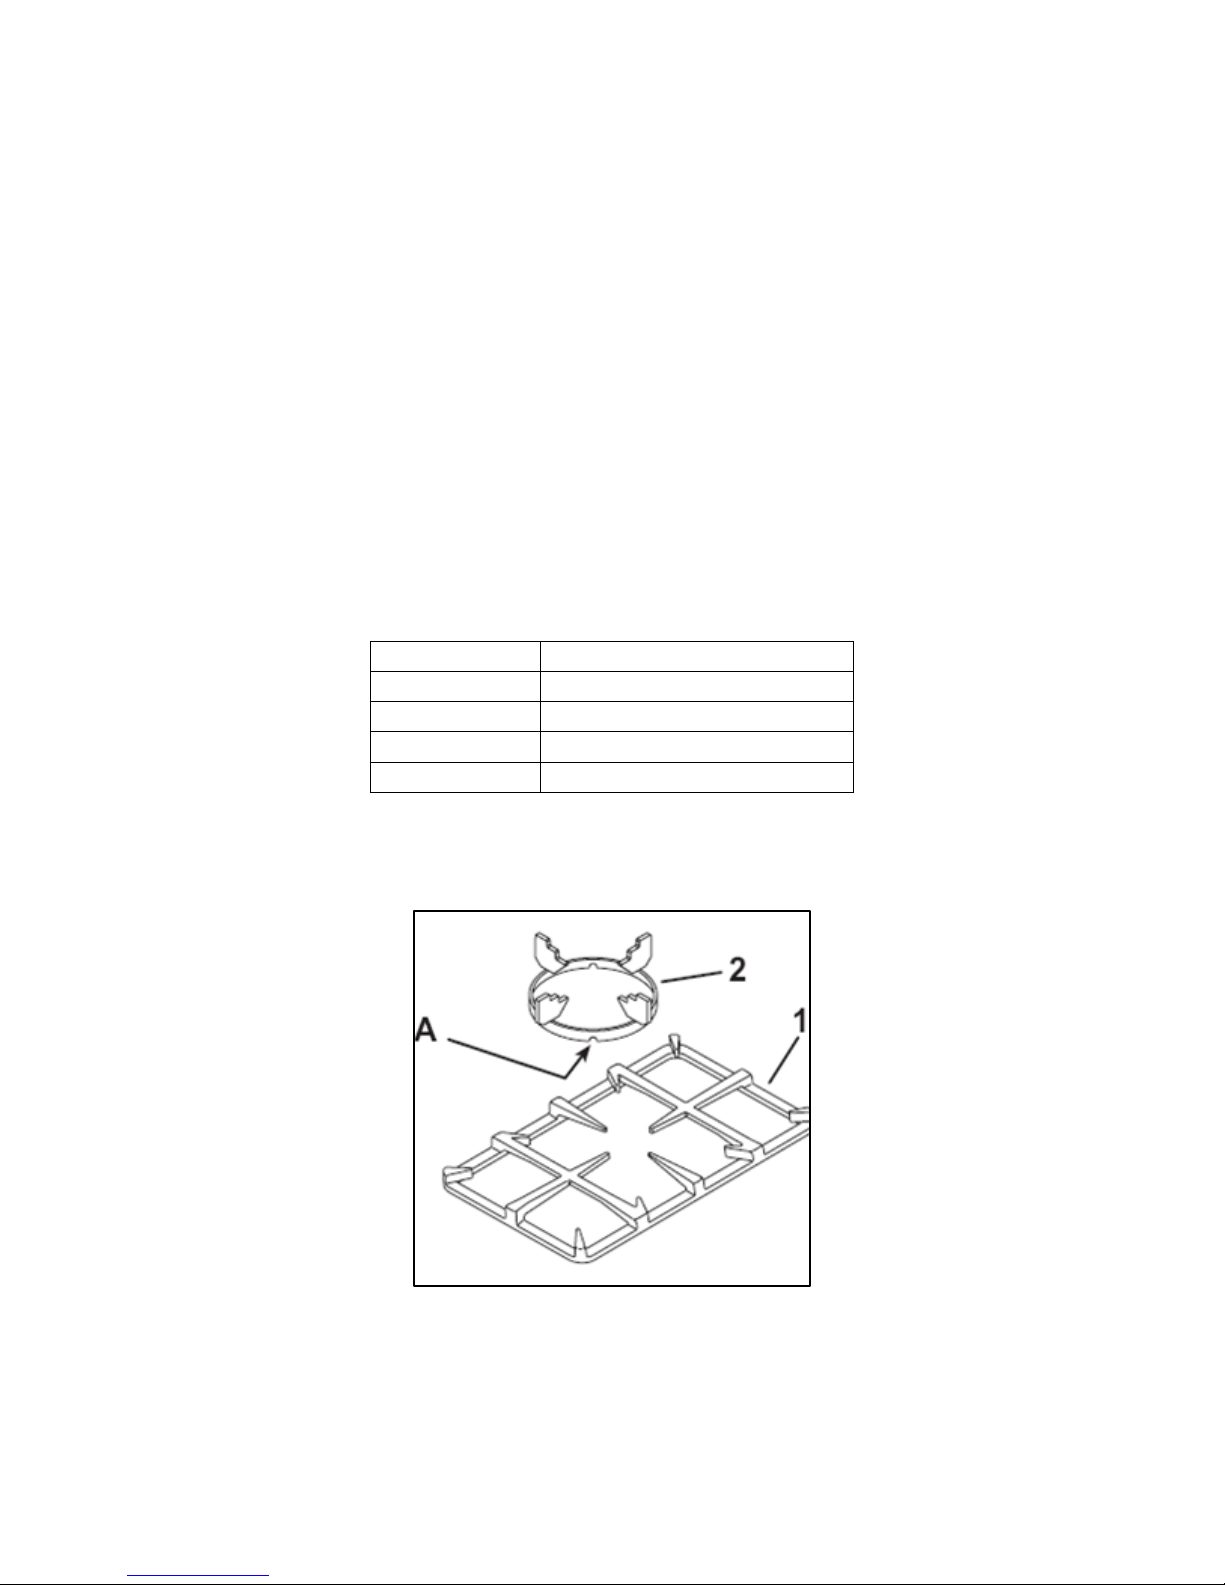
o The appliance is equipped with pan supports (1), on which the
wok support (2) must be placed. To ensure stability, position the
notch (A) of the wok support on the pan support fingers as
indicated in the diagram above.
13
Hob guidelines
o The first few times the hob top is used, it may give off an acrid,
burning smell. This smell will disappear completely with repeated
use.
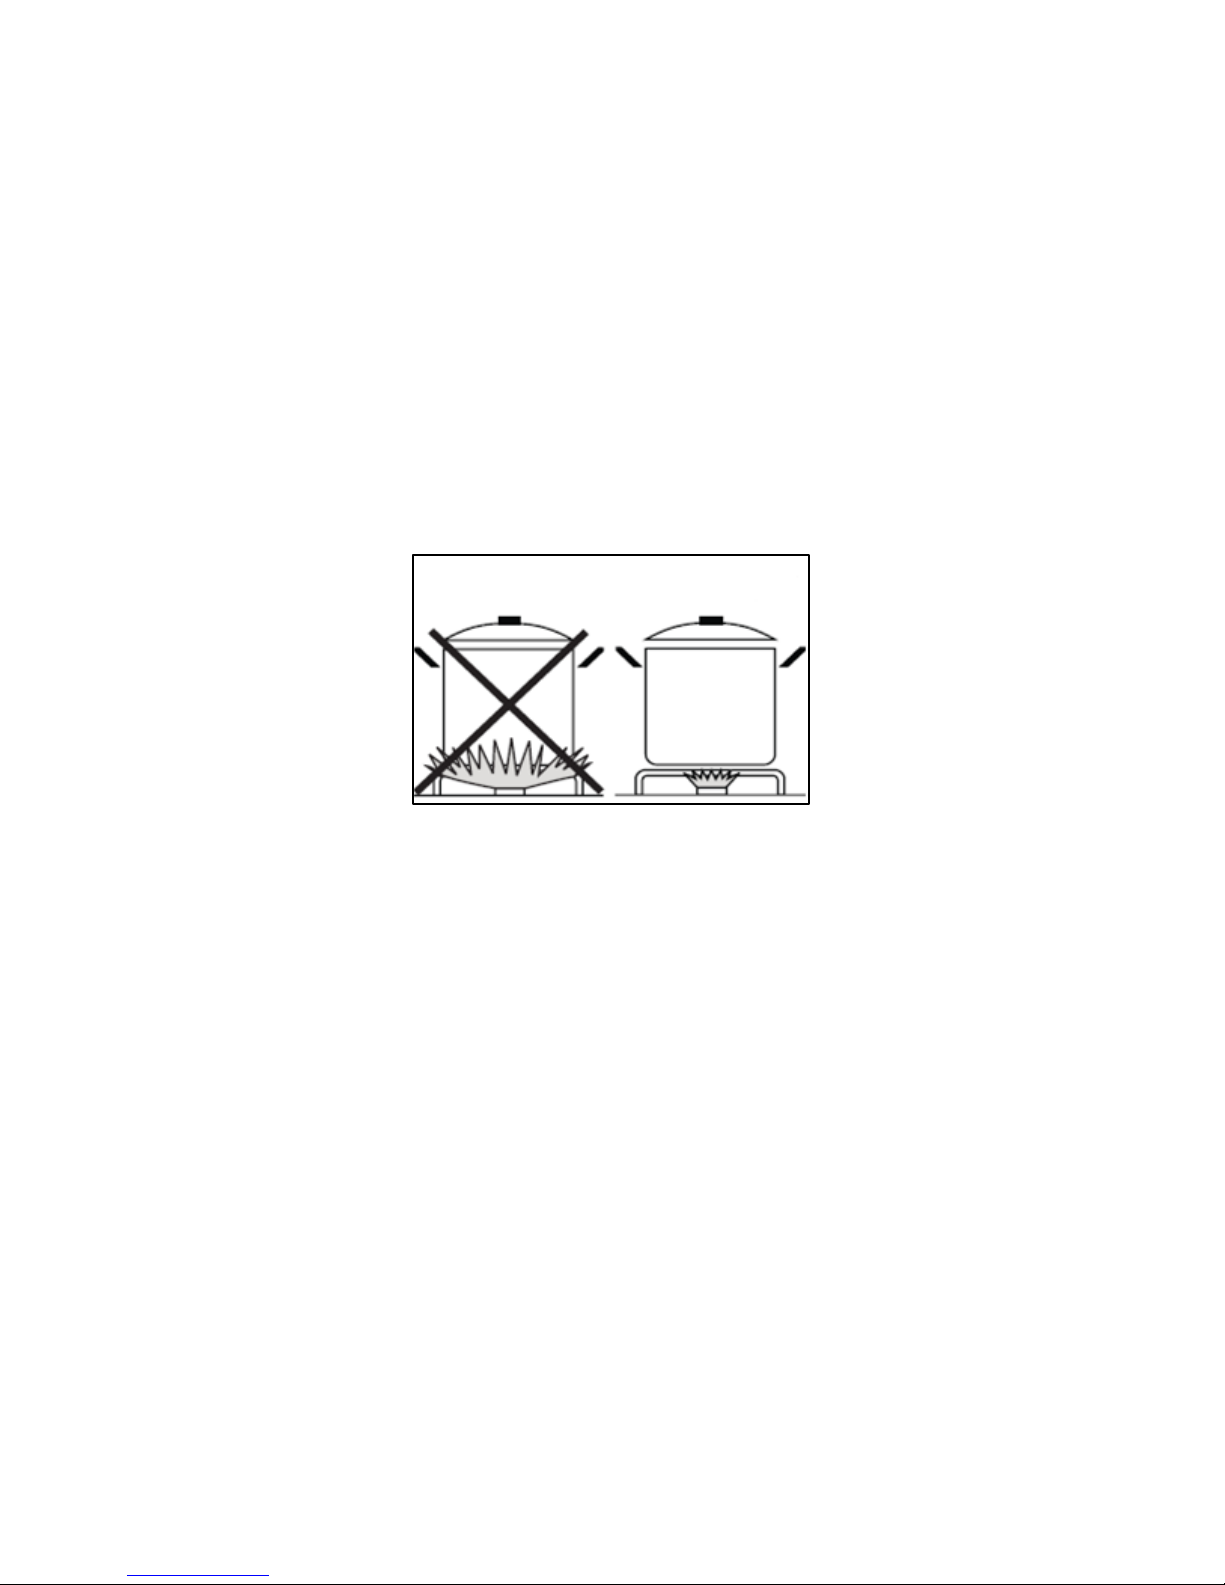
o The worktop is fitted with cooking areas of different diameter
and power.
o The positions where the heat will radiate from are clearly marked
on the hob top. The saucepans must be positioned exactly on
these zones for efficient heating to occur. Pans should have the
same diameter as the cooking zone that they are being used on.
o You should not use saucepans with rough bottoms, as this can
scratch the surface.
o Before use, make sure that the bottoms of the saucepans are
clean and dry.
o When cold, the bottom of the pans should be slightly concave, as
they expand when hot and lie flat on the surface of the hob. This
will allow the heat to transfer more easily.
o The best thickness for the bottom of the pans is 2 – 3 mm of
enamelled steel and 4 – 6 mm for stainless steel with sandwich
type bottoms.
o If these rules are not followed, then there will be a great loss of
heat and energy. Heat not absorbed by the saucepan, will spread
to the hob, frame and surrounding cabinets.
o Preferably cover pans with a lid to permit cooking at a lower
heat.
o Always cook vegetables and potatoes, etc. in as little water as
possible to reduce cooking times.
14
 Loading...