

Page 1
User Manual
EN
1730243-a
BCG 22
Page 2

EN
Contents
Safety Information .............................................................................................................................. 2
Safety Instructions ............................................................................................................................. 5
The advantages of microwaves ......................................................................................................... 6
Description of your oven .................................................................................................................... 7
Description of your oven .................................................................................................................... 8
Basic settings ..................................................................................................................................... 9
Basic Functions ................................................................................................................................ 10
Special functions .............................................................................................................................. 13
Using the Browning Plate ................................................................................................................ 15
When the oven is working... ............................................................................................................. 16
Defrosting .......................................................................................................................................... 17
Cooking with a microwave oven ..................................................................................................... 19
Cooking with the grill ....................................................................................................................... 21
What kind of ovenware can be used? ............................................................................................. 22
Oven Cleaning and Maintenance ..................................................................................................... 24
What should I do if the oven doesn’t work? ................................................................................... 26
Technical characteristics ................................ ................................ ................................................. 27
Installation instructions ................................................................................................................... 28
Installation ......................................................................................................................................... 29
Dear Customer,
Thank you for choosing this BAUMATIC product.
We ask you to read the instructions in this booklet very carefully as this will allow you to get the best
results from using it.
KEEP THE DOCUMENTATION OF THIS PRODUCT FOR FUTURE REFERENCE.
Always keep the instruction manual handy. If you lend the appliance to someone else give them
the manual as well!
The user manual is also available for download at www.baumatic.co.uk
1
Page 3

EN
Safety Information
Before the installation and use of the appliance, carefully read the supplied
instructions. The manufacturer is not responsible if an incorrect installation and use
causes injuries and damages. Always keep the instructions with the appliance for
future reference.
CHILDREN AND VULNERABLE PEOPLE SAFETY
Warning! Risk of suffocation, injury or permanent disability.
This appliance can be used by children aged from 8 years and above and
persons with reduced physical, sensory or mental capabilities or lack of
experience and knowledge if they are supervised by an adult or a person who
is responsible for their safety.
Do not let children play with the appliance.
Keep all packaging away from children.
WARNING: Keep children away from the appliance when it operates or when it
cools down. Accessible parts are hot.
If the appliance has a child safety device, we recommend that you activate it.
Children under 3 years must not be left unsupervised in the vicinity of the
appliance.
Cleaning and user maintenance shall not be made by children without
supervision.
GENERAL SAFETY
This appliance is intended to be used in household and similar applications
such as:
– staff kitchen areas in shops, offices and other working environments;
– farm houses;
– by clients in hotels, motels and other residential environments;
– bed and breakfast type environments.
Internally the appliance becomes hot when in operation. Do not touch the
heating elements that are in the appliance. Always use oven gloves to remove
or put in accessories or ovenware.
WARNING: Do not heat liquids and other foods in sealed containers. They are
liable to explode.
Only use utensils that are suitable for use in microwave ovens.
When heating food in plastic or paper containers, keep an eye on the
appliance due to the possibility of ignition.
The appliance is intended for heating food and beverages. Drying of food or
clothing and heating of warming pads, slippers, sponges, damp cloth and similar
may lead to risk of injury, ignition or fire.
2
Page 4

EN
Safety Information
Warning! The oven cannot be used if:
- The door is not closed correctly;
- The door hinges are damaged;
- The surfaces of the contact between the door and the oven front are
damaged;
- The door window glass is damaged;
- There is frequent electrical arcing inside the oven even though there is no
metal object inside.
The oven can only be used again after it has been repaired by a Technical
Assistance Service technician.
If smoke is emitted, switch off or unplug the appliance and keep the door
closed in order to stifle any flames.
Microwave heating of beverages can result in delayed eruptive boiling. Care
must be taken when handling the container.
The contents of feeding bottles and baby food jars shall be stirred or shaken
and the temperature checked before consumption, in order to avoid burns.
Eggs in their shell and whole hard-boiled eggs should not be heated in the
appliance since they may explode, even after microwave heating has ended.
INSTALLATION
The electrical installation is to be set up so that the appliance can be isolated
from the mains with a minimum 3mm all-pole contact separation.
Suitable separation devices include e.g. cutouts, fuses (screw fuses are to be
taken out of the holder), RCD’s and contactors. This installation must comply
with current regulations.
If the electrical connection is done through a plug and this remains accessible
after installation, then it is not necessary to provide the mentioned separation
device.
Protection against electric shock must be provided by the electrical installation
Warning: The oven must be earthed.
CLEANING
The appliance should be cleaned regularly and any food deposits removed.
Failure to maintain the appliance in a clean condition could lead to
deterioration of the surface that could adversely affect the life of the appliance
and possibly result in a hazardous situation.
3
Page 5

EN
Safety Information
Do not use harsh abrasive cleaners or sharp metal scrapers to clean the glass
door since they can scratch the surface, which may result in shattering of the
glass.
Do not use a steam cleaner to clean the appliance.
The door contact surfaces (the front of the cavity and the inside part of the
doors) must be kept very clean in order to ensure the oven functions correctly.
Please follow the instructions regarding cleaning in the section "Oven Cleaning
and Maintenance".
REPAIRS
WARNING: Before maintenance cut the power supply.
WARNING: Only a competent person can carry out any service or repair
operation that involves the removal of a cover which gives protection against
exposure to microwave energy.
WARNING: If the door or door seals are damaged, the appliance must not be
operated until it has been repaired by a competent person.
If the power cable is damaged it should be substituted by the manufacturer,
authorized agents or technicians qualified for this task in order to avoid
dangerous situations. Furthermore, special tools are required for this task.
Repair and maintenance work, especially of current carrying parts, can only be
carried out by technicians authorized by the manufacturer.
4
Page 6
EN
Safety Instructions
Warning! Do not heat pure alcohol or
alcoholic drinks in the microwave. FIRE
RISK!
Beware!
To avoid food overheating or burning it is
very important not to select long time
periods or power levels that are too high
when heating small quantities of food. For
example, a bread roll can burn after 3
minutes if the power selected is too high.
For toasting, use just the grilling function and
watch the oven all the time. It you use a
combined function to toast bread it will catch
fire in a very short time.
Make sure you never catch the power cables
of other electrical appliances in the hot door
or the oven. The cable insulation may melt.
Danger of short-circuiting!
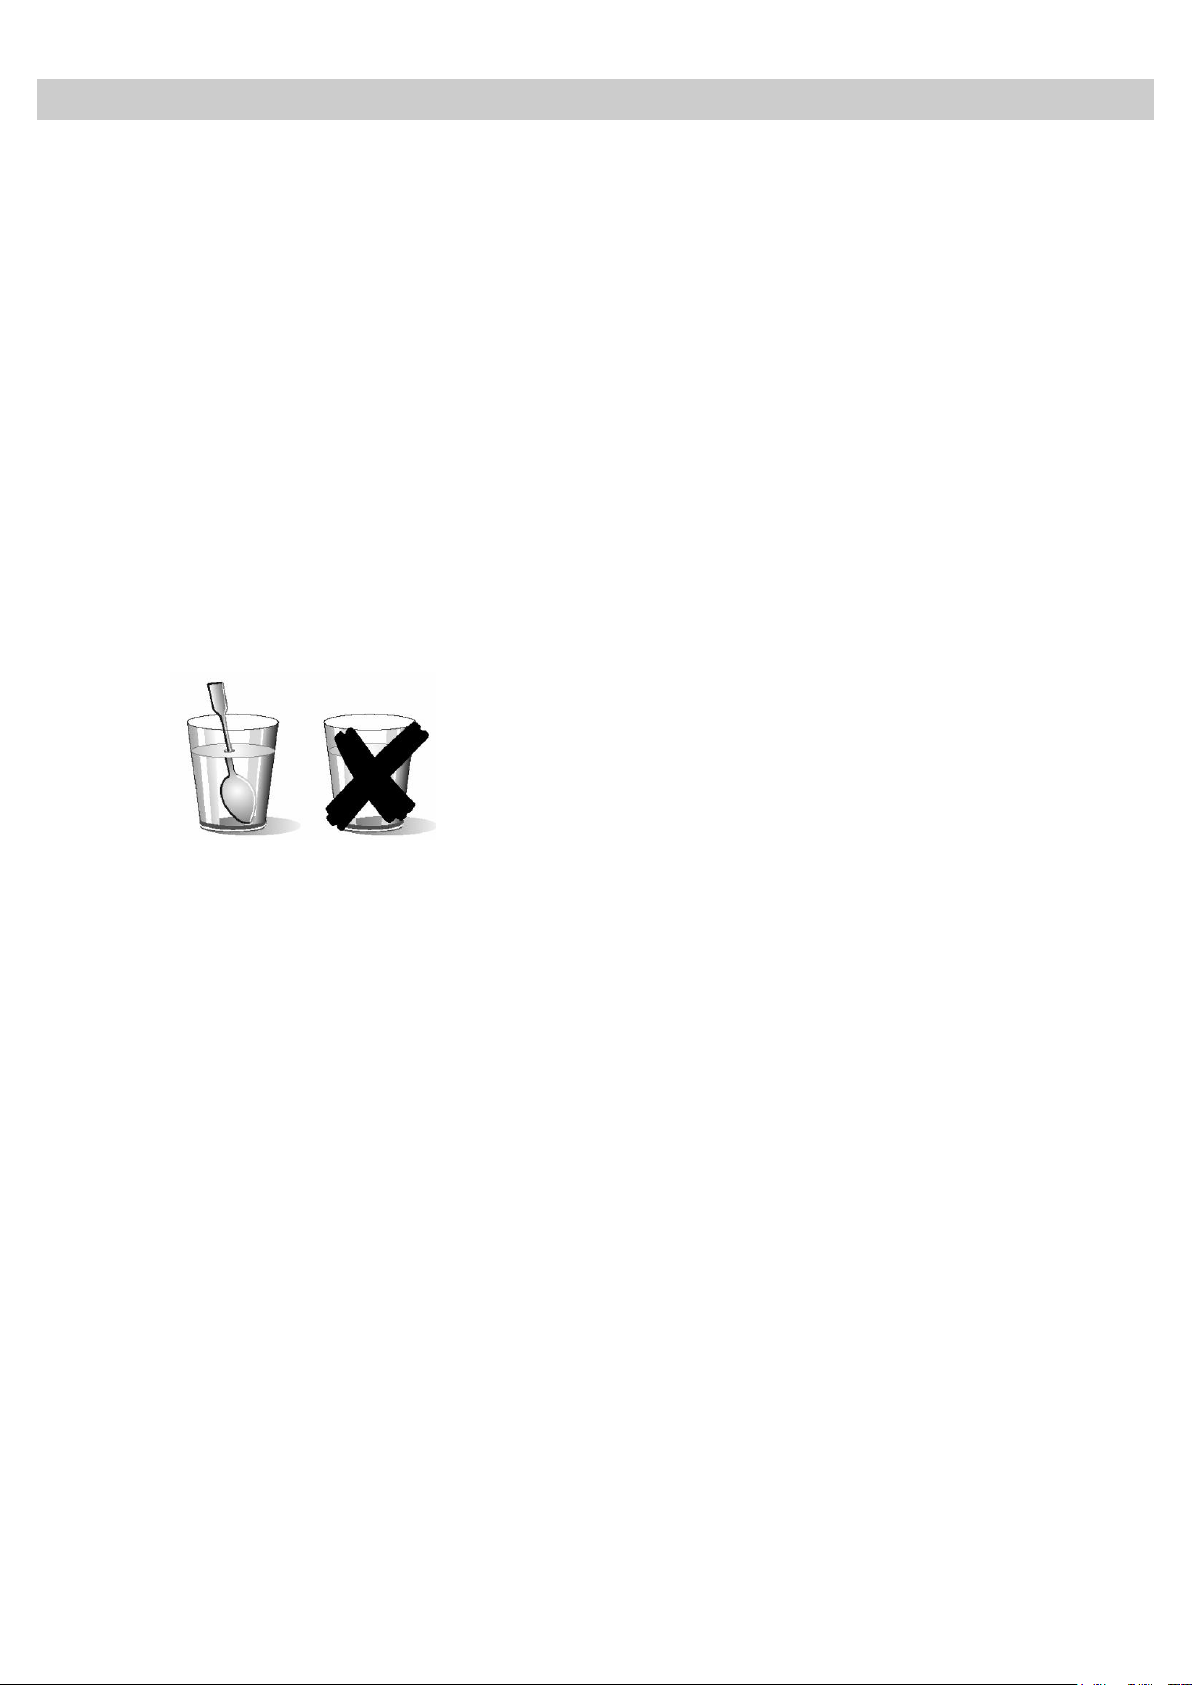
Take care when heating liquids!
When liquids (water, coffee, tea, milk, etc.)
are nearly at boiling point inside the oven
and are taken out suddenly, they may spurt
out of their containers.
DANGER OF INJURIES AND BURNS!
To avoid that type of situation when heating
liquids, put a teaspoon or glass rod inside
the container.
Avoid damaging the oven or other
dangerous situations by following these
instructions:
Do not switch on the oven without the
turntable support, the turntable ring and the
respective plate being in place.
Never switch on the microwave when it is
empty. If there is no food inside there may
be an electrical overcharge and the oven
could be damaged.
RISK OF DAMAGE!
For carrying out oven programming tests put
a glass of water inside the oven. The water
will absorb the microwaves and the oven will
not be damaged.
Do not cover or obstruct the ventilation
openings.
Use only dishes suitable for microwaves.
Before using dishes and containers in the
microwave, check that these are suitable
(see the section on types of dishes).
Never remove the mica cover on the ceiling
of the oven interior! This cover stops fat and
pieces of food damaging the microwave
generator.
Do not keep any inflammable object inside
the oven as it may burn if the oven is
switched on.
Do not use the oven as a pantry.
Do not use the oven for frying as it is
impossible to control the temperature of oil
heated by microwaves.
Do not lean or sit on the open oven door.
This may damage the oven, especially in the
hinge zone. The door can bear a maximum
weight of 8 kg.
The turntable and the grills can bear a maximum
load of 8 kg. To avoid damaging the oven, do not
exceed this load.
5
Page 7
EN
The advantages of microwaves
In conventional ovens, heat radiated by electrical
elements or gas burners slowly penetrates the
food from outside to inside. On account of this
major amount of energy is wasted heating the air,
the oven components and the food containers.
In a microwave oven, heat is generated by the
food itself and the heat travels from inside to
outside. No heat is lost to the air, the walls of the
oven cavity or the dishes and containers (if these
are suitable for use in microwave oven), in other
words, only the food is heated.
Microwave ovens have the following advantages:
1. Shorter cooking times; in general these are
up to 3/4 less than the time required for
conventional cooking.
2. Ultra-fast food defrosting, thus reducing the
danger of bacterial development.
3. Energy savings.
4. Conservation of the nutritional value of foods
due to the shorter cooking times.
5. Easy to clean.
Why food heats up
Most foods contain water and water molecules
vibrate when subjected to microwaves.
The friction between molecules produces heat
which raises the temperature of the food,
defrosting it, cooking it or keeping it hot.
Since the heat arises inside the food:
This can be cooked with little or no liquid or
fats/oils;
Defrosting, heating or cooking in a microwave
oven is quicker than in a conventional oven;
The vitamins, minerals and nutritional
substances in the food are conserved;
The natural colour and aroma of the food are
unchanged.
Microwaves pass through china, glass, cardboard
or plastic but do not go through metal. For this
reason, metal containers or ones with metal parts
must not be used in a microwave oven.
Microwaves are reflected by metal...
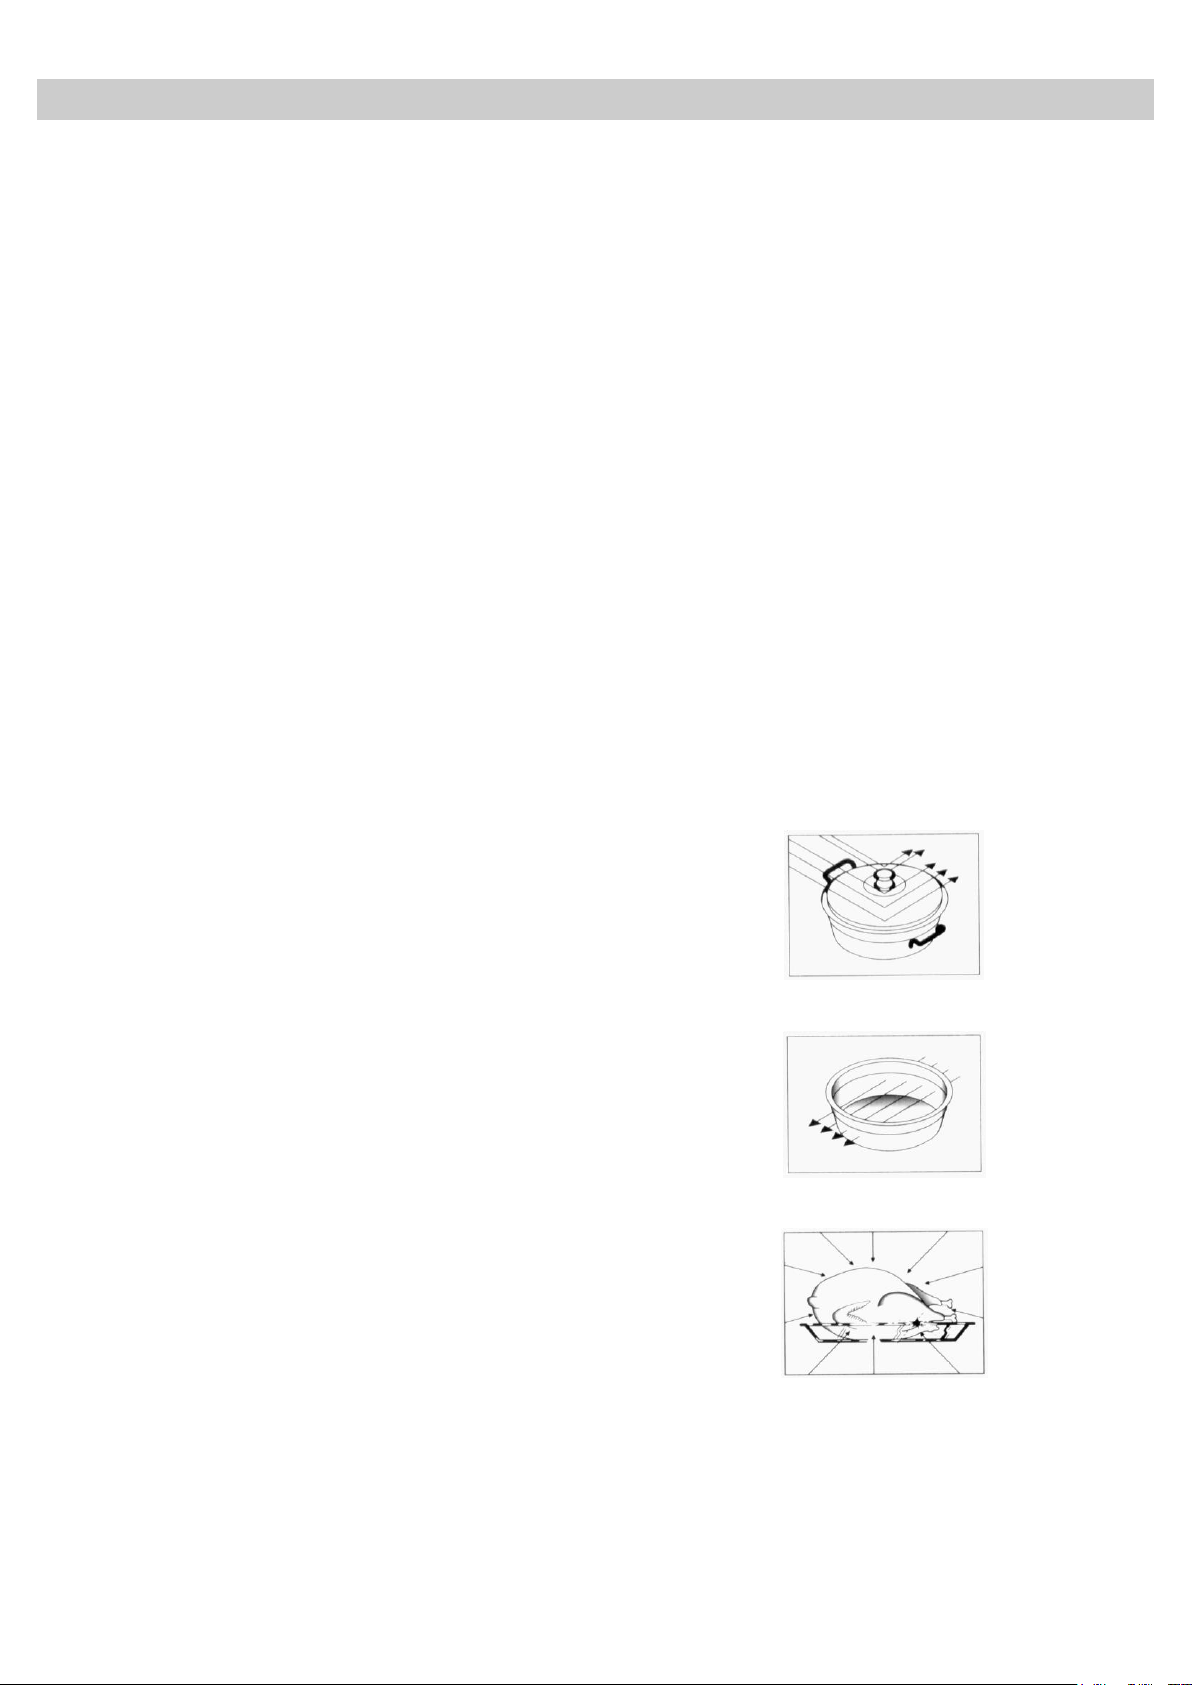
How a microwave oven works
In a microwave oven there is a high tension valve
called a magnetron which converts electrical
energy into microwave energy. These
electromagnetic waves are channelled to the
interior of the oven through a wave guide and
distributed by a metallic spreader or through a
ceramic base.
Inside the oven the microwaves propagate in all
directions and are reflected by the metal walls,
uniformly penetrating the food.
... but go through glass and china...
... and are absorbed by foods.
6
Page 8
7
EN
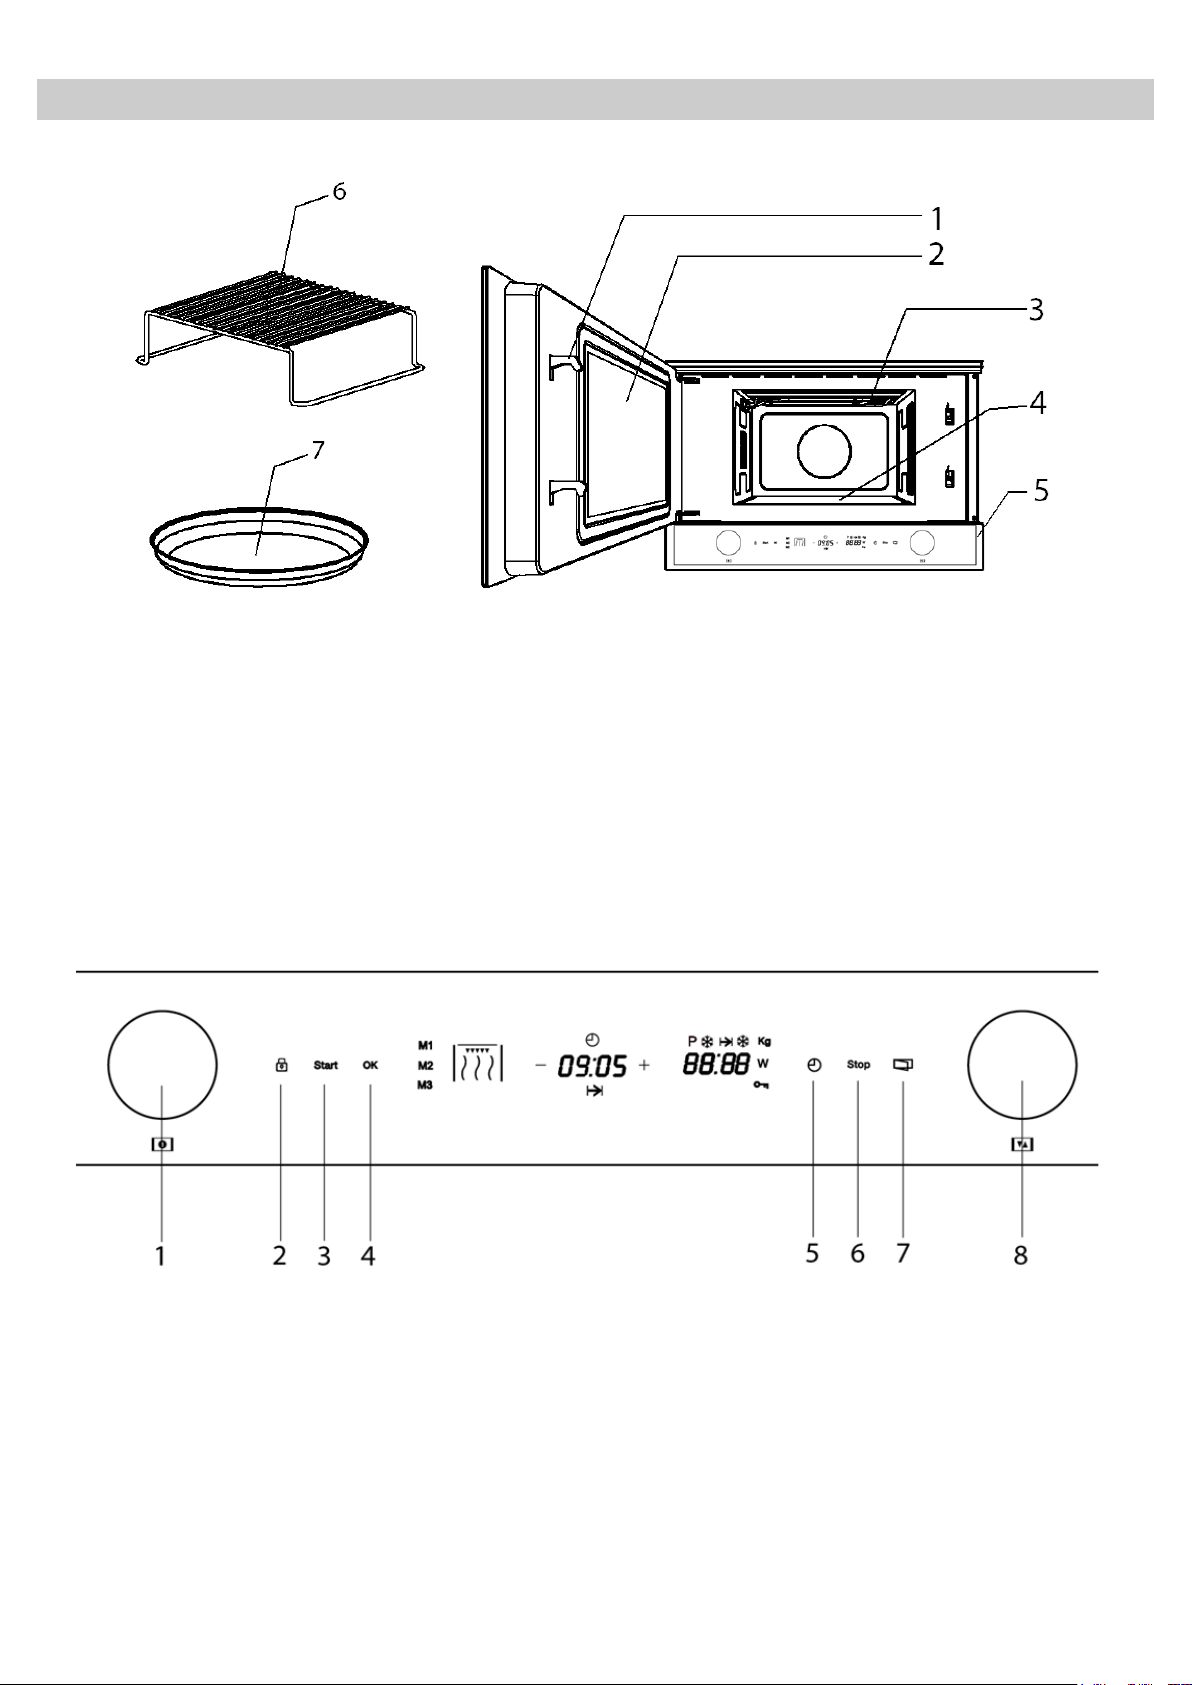
1.
Catches
4.
Ceramic base
2.
Door window glass
5.
Control panel
3.
Drop-down grill
6.
Rack
7.
Browning Plate
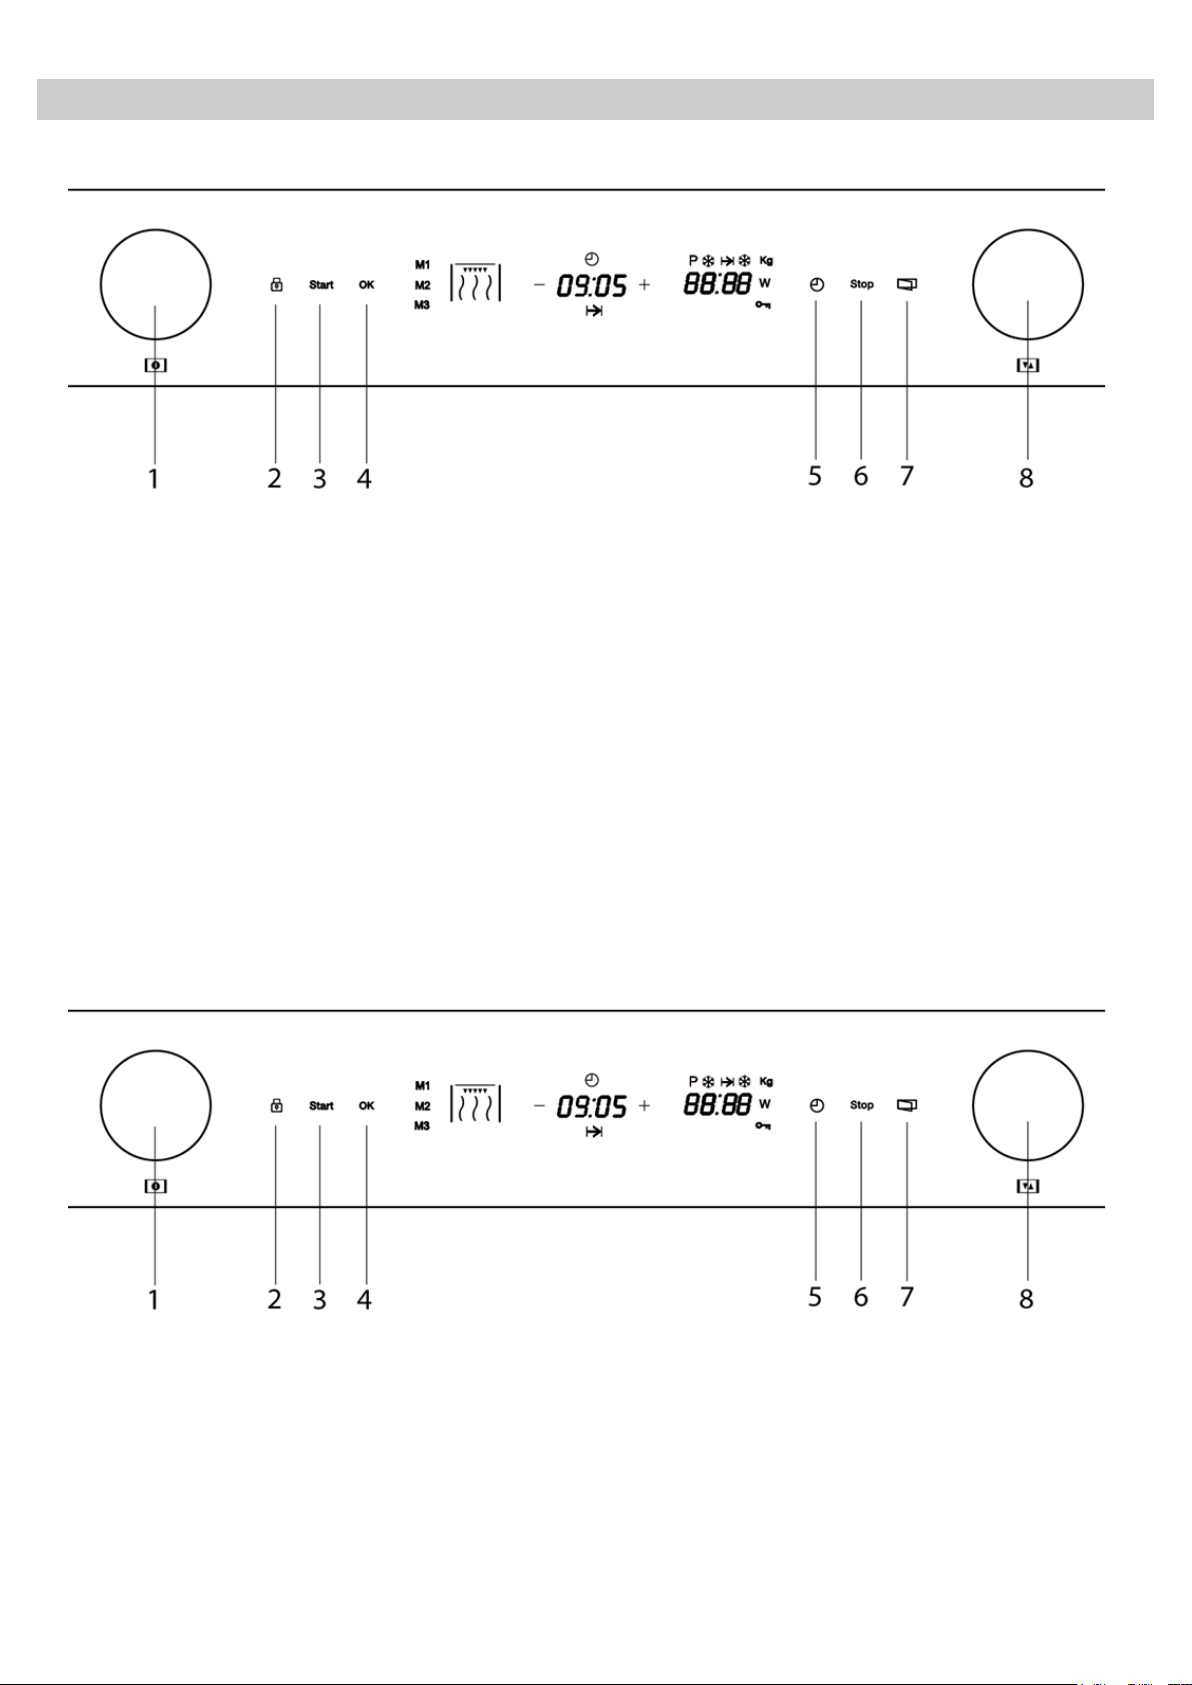
1. Function selection knob
2. Safety Block key
5. Clock key
6. Stop Key
3. Start key
7. Door Open key
4. OK key
8. Rotating Knob
Description of your oven
Page 9
EN
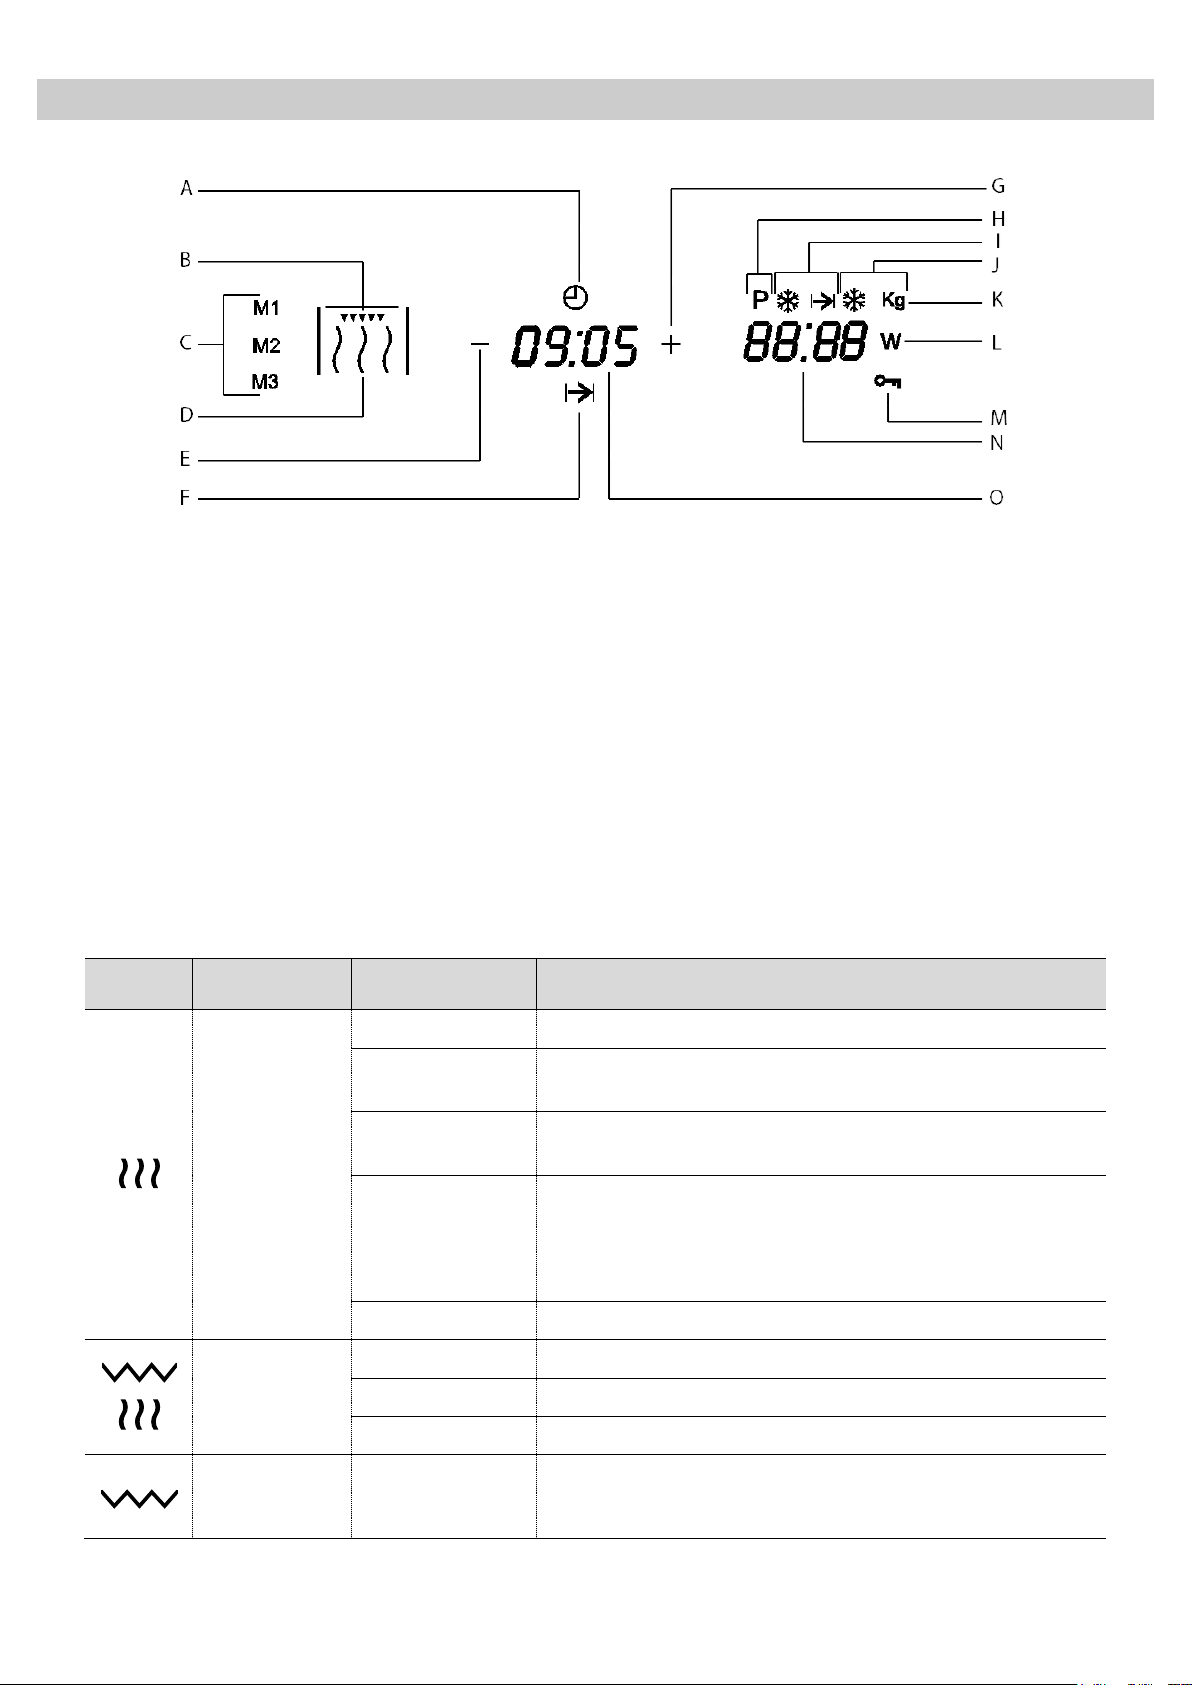
A. Clock indicator
H. Special Function indicator
B. Grill Function indicator
I. Defrost by time indicator
B+D. Grill + Microwave Function indicator
J. Defrost by weight indicator
C. Cooking Memories indicators
K. Weight indicator
D. Microwave Function indicator
L. Power indicator
E. “Minus” key
M. Safety Block indicator
F. Duration indicator
N. Power/Weight display
G. “Plus” key
O. Clock/Duration display
Symbol
Function
Microwave
Power Output
Foods
Microwave
90 W
Slow defrosting for delicate foods; keeping food hot
180 W
Cooking with little heat; boiling rice
Rapid defrosting
360 W
Melting butter
Heating baby food
600 W
Cooking vegetables and food
Cooking and heating carefully,
Heating and cooking small portions of food
Heating delicate food
850 W
Cooking and rapidly heating liquids and pre-cooked foods
Microwave
+ Grill
90 W
Toasting food
180 W
Grilling poultry and meat
360 W
Cooking pies and cheese-topped dishes
Grill
Grilling food
Description of your oven
Description of Functions
8
Page 10
9
EN
Basic settings
Setting the clock
After your microwave oven is first plugged in or
after a power failure, the clock display will flash to
indicate that the time shown is not correct. To set
the clock, proceed as follows:
1. Press the Clock key (5) when the
Clock/Duration display is showing the clock.
The hour numbers will start to flash.
Hiding/Displaying the Clock
If the clock display disturbs you, you can hide it by
pressing the Clock key for 3 seconds. The dots
that separate the hours and minutes will flash but
the rest of the clock display will be hidden.
Safety blocking
2. Press the “+” and “-” keys to set the correct
hour value.
3. Press again the Clock key (5) to set the
minutes. The minute numbers will start to
flash.
4. Press the “+” and “-” keys to set the correct
minute value.
5. To finish, press the Clock key (5) again.
If you want to see the clock display again, press
the Clock key again for 3 seconds.
The oven operation can be blocked (for example,
to stop it from being used by children).
1. To block the oven, press the Safety Block
key (2) for 3 seconds. You will hear a sound
signal and Safety Block indicator will
illuminate. The oven is blocked in this state
and cannot be used.
2. To unblock the oven, press the Safety Block
key (2) again for 3 seconds. You will hear a
sound signal and the Safety Block indicator
will turn off.
Page 11

EN
Basic Functions
Microwaves
Use this function to cook and heat vegetables, potatoes, rice, fish and meat.
1. Turn the Function Selector knob (1) until the
Microwave function indicator flashes. The
Duration display shows 1:00 flashing.
not turn this knob, the oven operates at 850
W power.
5. Press the OK key (4) to validate.
2. Turn the Rotating knob (8) in either direction
to set the duration.
3. Press the OK key (4) to validate. The
microwaves power value flashes on the
Power display. The microwaves power
indicator starts to flash.
4. Turn the Rotating knob (8) in either direction
to set the microwaves power level. If you do
Grill
Use this function to brown the top of food quickly.
6. Press the Start key (3). The oven will start to
operate.
NOTE:
The start button may be pressed at anytime
in the above sequence and the oven will
start the cooking process with the displayed
parameters.
1. Turn the Function Selector knob (1) until the
Grill function indicator flashes. The Duration
display shows 10:00 flashing.
2. Turn the Rotating knob (8) in either direction
to set the duration.
3. Press the OK key (4) to validate.
4. Press the Start key (3). The oven will start to
operate.
10
Page 12

11
EN
Basic Functions
Microwave + Grill
Use this function to cook lasagne, poultry, roast potatoes and toasted foods.
1. Turn the Function Selector knob (1) until the
Microwave + Grill function indicator flashes.
The Duration display shows 10:00 flashing.
360 W power. The maximum power that can
be selected is 360 W.
5. Press the OK key (4) to validate.
2. Turn the Rotating knob (8) in either direction
to set the duration.
3. Press the OK key (4) to validate. The
microwaves power value flashes on the
Power display. The microwaves power
indicator starts to flash.
4. Turn the Rotating knob (8) in either direction
to set the microwaves power level. If you do
not turn this knob, the oven operates at
Defrosting by time (manual)
Use this function to defrost any type of food quickly.
6. Press the Start key (3). The oven will start to
operate.
NOTE:
The start button may be pressed at anytime
in the above sequence and the oven will
start the cooking process with the displayed
parameters.
1. Turn the Function Selector knob (1) until the
Defrost by Time function indicator flashes.
The Duration display shows 10:00 flashing.
2. Turn the Rotating knob (8) in either direction
to set the duration.
3. Press the OK key (4) to validate.
4. Press the Start key (3). The oven will start to
operate.
5. Turn the food whenever the oven lets out a
beep and the display flashes the word.
Page 13

EN
Programme
Food
Weight (g)
Time (min)
Standing time (min)
Pr 1
Meat
100 – 2000
2 – 43
20 – 30
Pr 2
Poultry
100 – 2500
2 – 58
20 – 30
Pr 3
Fish
100 – 2000
2 – 40
20 – 30
Pr 4
Fruit
100 – 500
2 – 13
10 – 20
Pr 5
Bread
100 – 800
2 – 19
10 – 20
Basic Functions
Defrosting by weight (automatic)
Use this function to defrost meat, poultry, fish, fruit and bread quickly.
1. Turn the Function Selector knob (1) until the
Defrost by Weight function indicator flashes.
The Duration display shows the food type
“Pr 1” flashing.
2. Turn the Rotating knob (8) in either direction
to set the food type. If you do not turn this
knob, the oven operates with food type
“Pr 1”.
3. Press the OK key (4) to validate. The food
weight value flashes on the Weight display.
The weight indicator starts to flash.
4. Turn the Rotating knob (8) in either direction
to set the food weight. If you do not turn this
knob, the oven operates with 200 g.
5. Press the OK key (4) to validate.
6. Press the Start key (3). The oven will start to
operate.
7. Turn the food whenever the oven lets out a
beep and the Weight display flashes the
word: .
The following table shows the defrosting by weight function programmes, indicating weight intervals, and
defrosting and standing times (in order to ensure the food is of a uniform temperature).
Important Note: see “General instructions for defrosting”.
12
Page 14

13
EN
Programme
Food Type
Weight
(g)
Time
(min.)
Added
water
(ml)
Instructions
P1.1
Cook
Potatoes
250
7
100
Put the sliced potatoes (15-20 mm) with the water
in a heat resistant container with a lid and place
them on the ceramic base in the microwave.
P1.2
500
10
150
P1.3
1000
15
200
P2.1
Risotto
(ready to
cook)
150
42
600
Put the ingredients to be slow cooked in a heat
resistant container with a lid and place them on
the ceramic base in the microwave.
P2.2
400
45,5
800
P2.3
Cake
batter
(ready to
cook)
550
22
---
P3.1
Fish
(frozen)
700
30
300
Put the ingredients to be cooked and gratin in a
heat resistant container and place them on the
ceramic base in the microwave.
P3.2
Fish
(fresh)
800
30
300
P3.3
Vegetables
(frozen)
1000
30
300
Put the ingredients to be cooked in a heat
resistant container with a lid and place them on
the ceramic base in the microwave.
Special functions
Special Function: Heating food
Use this function to heat various types of food.
1. Turn the Function Selector knob (1) until
the Special Function indicator flashes.
The Duration display shows the program
“P1” flashing.
2. Turn the Rotating knob (8) in either
direction to set the program. If you do not
turn this knob, the oven operates with
program “P1”.
3. Press the OK key (4) to validate.
4. The Power/Weight Display shows the
sub-function”P1.1” flashing. Turn the
Rotating Knob (8) in either direction to
set the Sub-function. The Duration
Display shows the time of each SubFunction.
5. Press the OK Key (4) to validate.
6. Press the Start key (3). The oven will
start to operate.
7. Turn the food whenever the oven lets out
a beep and the Weight display flashes
the word: . Press the Start Key (3),
the oven starts to operate again. If you
not open the door after one minute, the
oven starts to operate automatically.
The following table shows the Special Function program, indicating weight intervals, and cooking and
standing times (in order to ensure the food is of a uniform temperature).
Page 15

EN
Special functions
Important Notes:
Always use dishes for use in the microwave
oven and a lid or cover to avoid loss of
liquids.
Stir or mix the foods several times during
heating, especially when the oven emits a
beep and the display is flashing as follows:
.
The time required to heat the food will depend
on its initial temperature. Food taken straight
from the fridge will take longer to heat up
Memory function
than food that is at room temperature.
If the food temperature is not what is wanted,
select a greater or lesser weight next time you
heat up the food.
After heating, stir the food and then leave the
food to stand for some time to allow the
temperature to become uniform throughout the
food.
Warning! After heating the container may be very
hot. Although microwaves do not heat up most
containers, these may heat up through heat
transmission from food.
Define and store a memory
1. With the Function Selector (1), Select one
of the Basic functions.
2. Set the desired parameters with the
Rotating Knob (8)
3. Press the Clock key (5) for 5 seconds. The
memory symbol “M1” starts blinking.
4. With the Rotating Knob (8) select in which
memory you want to store the defined
parameters (M1, M2 or M3)
5. Press the Ok Key (4) to confirm and store
the memory.
Recalling a memorized function
1. Rotate the function Selector (1) to select
the stored memory.
2. Press the start Key (3). The oven will start
to operate.
Delete a memory:
1. With the oven in stand-by select the desired
memory by turning the Function Selector
(1).
2. Press the Clock key (5) for 3 seconds. The
power/weight display shows the message
“DEL” for 3 seconds.
14
Page 16

15
EN
Food
Weight
Cooking
Time
Standing Time
Recommendation
Pizza
200 g
5 min
2 min
If the pizza is thin.
If the pizza is high increase the time
by 1 – 2 minutes
300 g
6 min
2 min
400 g
7 min
2 min
Quiches and
Pies
200 g
5 min
2 min
A temperature compensation is
achieved through the standing time
300 g
6 min
2 min
Hamburgers
---
8 min
2 min
Turn 2 x
Oven chips
400 g
5 min
---
Turn 1 x
Using the Browning Plate
Normally when cooking food, such as pizzas or
pies, on a grill or in a microwave oven, the dough
or pastry becomes soggy. This can be avoided
by using a browning plate. As a high temperature
is reached quickly on the bottom of the browning
plate, the crust turns crisp and brown.
The browning plate can also be used for bacon,
eggs, sausages, etc.
VERY IMPORTANT NOTES:
Use oven gloves at all times as the browning
plate will become very hot.
Do not place any recipients on the browning
plate that are not heat-resistant (plastic
bowls for example).
How to cook with the browning plate:
1. Preheat the browning plate by selecting the
Microwave and Grill function for 3 to 5
minutes with a 360 W microwaves power
level.
2. Brush the browning plate with oil in order to
brown the food nicely.
3. Place the fresh or frozen food directly on
the browning plate. You can place defrost
food (like frozen pizza) without a previous
defrosting.
4. Place the browning plate on the glass
turntable in the microwave oven.
5. Select the Microwaves and Grill function
and the cooking time as described below.
How to clean the browning plate
The best way to clean the browning plate is to
wash it with hot water and detergent and rinse off
with clean water. Do not use a scrubbing brush or
a hard sponge otherwise the top layer will be
damaged.
VERY IMPORTANT NOTES:
As the browning plate has a Teflon layer, if
you use it incorrectly, it can be damaged.
Never cut the food on the plate. Remove the
food from the plate prior to cutting. Turn the
food over preferably with a plastic or wooden
spatula.
Always place the browning plate in the center
of the ceramic base
Warning! Make sure that the browning plate
never touches the walls of the oven cavity, in
order to avoid damages in the oven.
Page 17

EN
When the oven is working...
Interrupting a cooking cycle
You can stop the cooking process at any time by
pressing the Stop key once or by opening the
oven door.
In both cases:
Microwave emission is stopped immediately.
The grill is de-activated but is still very hot.
Danger of burning!
The timer stops and the display shows the
remaining amount of operating time.
If you wish, at this time you can:
1. Turn or stir the food to ensure it will be
evenly cooked.
2. Change the process parameters.
3. Cancel the process by pressing the Stop
key.
To restart the process, close the door and press
the Start key
Cancelling a cooking cycle
If you wish to cancel the cooking process, press
the Stop key twice.
You will then hear a beep and the time will appear
on the display.
End of a cooking cycle
At the end of the process you will hear three
beeps and the display will show the word “End”.
The beeps are repeated every 30 seconds until
the door is opened or the Stop key is pressed.
Altering parameters
The operating parameters (time, weight, power,
etc.) can be altered when the oven is operating or
when the cooking process has been interrupted
by proceeding as follows:
1. To modify the time, turn the rotating knob
(8). The new time defined is immediately
valid.
2. To modify the power, (only when the cooking
process is interrupted) press the OK key (4).
The respective indicator starts to flash. Alter
the parameter by turning the rotating knob
(8) and confirm by pressing the OK key (4).
3. To modify the function, (only when the
cooking process is interrupted) turn the
Function selection knob (1) and change
the parameter.
4. To modify the weight, (only for the function
“Defrosting by weight” and when its process
cooking is interrupted) press the OK key (4)
and modify the parameter with the rotating
knob (8).
16
Page 18

17
EN
Food
Weight
Defrosting Time
Resting time
Comment
Pieces of meat, veal, beef,
pork
100 g
3-4 min
5-10 min
Turn once
200 g
6-7 min
5-10 min
Turn once
500 g
14-15 min
10-15 min
Turn twice
700 g
20-21 min
20-25 min
Turn twice
1000 g
29-30 min
25-30 min
Turn twice
1500 g
42-45 min
30-35 min
Turn three times
Stewed meat
500 g
12-14 min
10-15 min
Turn twice
1000 g
24-25 min
25-30 min
Turn three times
Minced meat
100 g
4-5 min
5-6 min
Turn twice
300 g
8-9 min
8-10 min
Turn three times
500 g
12-14 min
15-20 min
Turn once
Sausage
125 g
3-4 min
5-10 min
Turn twice
250 g
8-9 min
5-10 min
Turn once
500 g
15-16 min
10-15 min
Turn twice
Poultry, poultry parts
200 g
7-8 min
5-10 min
Turn three times
500 g
17-18 min
10-15 min
Turn once
Chicken
1000 g
34-35 min
15-20 min
Turn once
1200 g
39-40 min
15-20 min
Turn once
1500 g
48-50 min
15-20 min
Turn twice
Fish
100 g
3-4 min
5-10 min
Turn once
200 g
6-7 min
5-10 min
Turn once
Trout
200 g
6-7 min
5-10 min
Turn twice
Shrimps
100 g
3-4 min
5-10 min
Turn once
500 g
12-15 min
10-15 min
Turn once
Fruit
200 g
4-5 min
5-8 min
Turn twice
300 g
8-9 min
10-15 min
Turn once
500 g
12-14 min
15-20 min
Turn once
Bread
100 g
2-3 min
2-3 min
Turn twice
200 g
4-5 min
5-6 min
Turn twice
500 g
10-12 min
8-10 min
Turn twice
800 g
15-18 min
15-20 min
Turn three times
Butter
250 g
8-10 min
10-15 min
Turn once, keep covered
Cottage cheese
250 g
6-8 min
5-10 min
Turn once, keep covered
Cream
250 g
7-8 min
10-15 min
Remove the lid
Defrosting
The table below shows different defrosting and
standing times (in order to ensure the food
temperature is evenly distributed) for different
types and weights of food, plus recommendations.
Page 19

EN
Defrosting
General instructions for defrosting
1. When defrosting, use only dishes that are
appropriate for microwaves (china, glass,
suitable plastic).
2. The defrost function by weight and the tables
refer to the defrosting of raw food.
3. The defrosting time depends on the quantity
and thickness of the food. When freezing
food keep the defrosting process in mind.
Distribute the food evenly in the container.
4. Distribute the food as best as possible inside
the oven. The thickest parts of fish or
chicken drumsticks should be turned towards
the outside. You can protect the most
delicate parts of food with pieces of
aluminium foil. Important: The aluminium
foil must not come into contact with the oven
cavity interior as this can cause electrical
arcing.
5. Thick portions of food should be turned
several times.
6. Distribute the frozen food as evenly as
possible since narrow and thin portions
defrost more quickly than the thicker and
broader parts.
8. Place poultry on an upturned plate so that
the meat juices can run off more easily.
9. Bread should be wrapped in a napkin so that
it does not become too dry.
10. Turn the food whenever the oven lets out a
beep and the display flashes the word:
.
11. Remove frozen food from its wrapping and
do not forget to take off any metal twist-tags.
For containers that are used to keep frozen
food in the freezer and which can also be
used for heating and cooking, all you need to
do is take off the lid. For all other cases you
should put the food into containers that are
suitable for microwave use.
12. The liquid resulting from defrosting,
principally that from poultry, should be
discarded. In no event should such liquids be
allowed to come into contact with other
foods.
13. Do not forget that by using the defrosting
function you need to allow for standing time
until the food is completely defrosted.
7. Fat-rich foods such as butter, cream cheese
and cream should not be completely
defrosted. If they are kept at room
temperature they will be ready to be served
in a few minutes. With ultra-frozen cream, if
you find small pieces of ice in it, you should
mix these in before serving.
18
Page 20

19
EN
Cooking with a microwave oven
Warning! Read the section “Microwave Safety”
before cooking with your microwave.
Follow these recommendations when cooking with
your microwave:
Before heating or cooking foods with peel or
skin (e.g. apples, tomatoes, potatoes,
sausages) prick them so that they do not
burst. Cut the food up before starting to
prepare it.
Before using a container or dish make sure that
it is suitable for microwave use (see the
section on types of ovenware).
When cooking food with very little moisture
(e.g. defrosting bread, making popcorn, etc.)
evaporation is very quick. The oven then
works as if it was empty and the food may
burn. The oven and the container may be
damaged in such a situation. You should
therefore set just the cooking time necessary
and you must keep a close eye on the cooking
process.
It is not possible to heat large quantities of oil
(frying) in the microwave.
Remove pre-cooked food from the containers
they come in since these are not always heat
resistant. Follow the food manufacturer’s
instructions.
If you have several containers, such as cups,
for example, set them out uniformly on the
ceramic base.
Do not close plastic bags with metal clips. Use
plastic clips instead. Prick the bags several
times so that the steam can escape easily.
When heating or cooking foods, check that they
reach at least a temperature of 70°C.
During cooking, steam may form on the oven
door window and may start to drip. This
situation is normal and may be more
noticeable if the room temperature is low. The
oven’s safe working is not affected by this.
After you have finished cooking, clean up the
water coming from the condensation
When heating liquids, use containers with a
wide opening, so that the steam can
evaporate easily.
Prepare the foods as per the instructions and
keep in mind the cooking times and power levels
indicated in the tables.
Keep in mind that the figures given are only
indicative and can vary depending on the initial
state, temperature, moisture and type of food. It is
advisable to adjust the times and power levels to
each situation. Depending on the exact
characteristics of the food you may need to
increase or shorten the cooking times or increase
or decrease the power levels.
Cooking with microwaves...
1. The greater the amount of food, the longer the
cooking time. Keep in mind that:
Double the quantity » double the time
Half the quantity » half the time
2. The lower the temperature, the longer the
cooking time.
3. Foods containing a lot of liquid heat up more
quickly.
4. Cooking will be more uniform if the food is
evenly distributed on the ceramic base. If you put
dense foods on the outside part of the plate and
less dense ones on the centre of the plate, you
can heat up different types of food simultaneously.
5. You can open the oven door at any time. When
you do this the oven switches off automatically.
The microwave will only start working again when
you close the door and press the start key.
6. Foods that are covered require less cooking
time and retain their characteristics better. The
lids used must let microwaves pass through and
have small holes that allow steam to escape.
Page 21

EN
Food
Quantity (g)
Addition of
liquids
Power
(Watt)
Time
(min.)
Standing
Time (min.)
Instructions
Cauliflower
Broccoli
Mushrooms
500
300
250
100 ml
50 ml
25 ml
850
850
850
9-11
6-8
6-8
2-3
2-3
2-3
Cut into slices.
Keep covered.
Peas & carrots
Frozen carrots
300
250
100 ml
25 ml
850
850
7-9
8-10
2-3
2-3
Cut into chunks or slices.
Keep covered.
Potatoes
250
25 ml
850
5-7
2-3
Peel and cut into equal
sized pieces. Keep
covered.
Paprika
Leek
250
250
25 ml
50 ml
850
850
5-7
5-7
2-3
2-3
Cut into chunks or slices
Keep covered.
Frozen Brussel
sprouts
300
50 ml
850
6-8
2-3
Keep covered.
Sauerkraut
250
25 ml
850
8-10
2-3
Keep covered.
Food
Quantity (g)
Power
(Watt)
Time
(min.)
Standing
Time (min.)
Instructions
Fish fillets
500
600
10-12
3
Cook covered over. Turn after half of
cooking time.
Whole fish
800
850
400
2-3
7-9
2-3
Cook covered over. Turn after half of
cooking time. You may wish to cover up the
small edges of the fish.
Cooking with a microwave oven
Tables and suggestions – Cooking vegetables
Tables and suggestions – Cooking fish
20
Page 22

21
EN
Food
Quantity (g)
Dish
Power
(Watt)
Time (min.)
Standing
time (min.)
Cheese topped pasta
500
Low dish
180
17-20
3-5
Cheese topped potatoes
800
Low dish
600
24-28
3-5
Lasagne
approx. 800
Low dish
600
15-20
3-5
Grilled cream cheese
approx. 500
Low dish
180
18-20
3-5
2 fresh chicken legs
(grilled)
200 each
Low dish
360
15-20
3-5
Chicken
approx. 1000
Low and wide dish
360
40-45
3-5
Cheese topped onion
soup
2 x 200 g cups
Soup bowls
360
4-8
3-5
Cooking with the grill
For good results with the grill, use the rack
supplied with the oven.
Fit the rack in such a way that it doesn’t come
into contact with the metal surfaces of the
oven cavity since if it does there is a danger of
electric arcing which may damage the oven.
IMPORTANT POINTS:
1. When the grill is used for the first time there
will be some smoke and a smell coming from
the oils used during oven manufacture.
2. The oven door window becomes very hot
when the grill is working. Keep children
away.
3. Heat up the grill beforehand for 2 minutes.
Unless indicated otherwise, use the rack.
4. When the grill is operating, the cavity walls
and the rack become very hot. You should
use oven gloves.
5. If the grill is used for extended period of
time it is normal to find that the elements
will switch themselves off temporarily due
to the safety thermostat.
6. Important! When food is to be grilled or
cooked in containers you must check that
the container in question is suitable for
microwave use. See the section on types
of ovenware!
7. When the grill is used it is possible that
some splashes of fat may go onto the
elements and be burnt. This is a normal
situation and does not mean there is any
kind of operating fault.
8. After you have finished cooking, clean the
interior and the accessories so that
cooking remains do not become
encrusted.
Table and suggestions – Microwave + Grill
The microwave + grill function is ideal for cooking
quickly and, at the same time, browning foods.
Furthermore, you can also grill and cook cheese
covered food.
Before using a dish in the microwave oven make
sure that it is suitable for microwave use. Only use
dishes or containers that are suitable for
microwave use.
The dish to be used in the combined function
must be suitable for microwave and grill use. See
the section on types of ovenware!
Keep in mind that the figures given are merely
indicative and can vary as a function of the initial
state, temperature, moisture and type of food.
The microwave and the grill work simultaneously.
The microwave cooks and the grill toasts.
If the time is not enough to brown the food well,
put it under the grill for another 5 or 10 minutes.
Please follow the standing times and don’t forget
to turn the meat pieces.
Unless indicated to the contrary, use the ceramic
base for cooking.
The values given in the tables are valid when the
oven cavity is cold (it is not necessary to pre-heat
the oven).
Page 23

EN
What kind of ovenware can be used?
Microwave function
For the microwave function, keep in mind that
microwaves are reflected by metal surfaces.
Glass, china, clay, plastic, and paper let
microwaves pass.
For this reason, metal pans and dishes or
containers with metal parts or decorations
cannot be used in the microwave. Glass ware
and clay with metallic decoration or content
(e.g. lead crystal) cannot be used in microwave
ovens.
The ideal materials for use in microwave ovens
are glass, refractory china or clay, or heat
resistant plastic. Very thin, fragile glass or china
should only be used for short period of times (e.g.
heating).
Hot food transmits heat to the dishes which can
become very hot. You should, therefore, always
use an oven glove!
How to test ovenware you want to use
Put the item you want to use in the oven for 20
seconds at maximum microwave power. After that
time, if it is cold and just slightly warm, it is
suitable to use. However, if it heats up a lot or
causes electric arcing it is not suitable for
microwave use.
Grill function
Keep in mind the manufacturer’s
recommendations written on the packaging.
The aluminium containers cannot be more than
3 cm high or come in contact with the cavity
walls (minimum distance 3 cm). Any
aluminium lid or top must be removed.
Put the aluminium container directly on top of
the ceramic base. If you use the rack, put the
container on a china plate. Never put the
container directly on the rack!
The cooking time is longer because the
microwaves only enter the food from the top. If
you have any doubts, it is best to use only
dishes suitable for microwave use.
Aluminium foil can be used to reflect
microwaves during the defrosting process.
Delicate food, such as poultry or minced meat,
can be protected from excessive heat by
covering the respective extremities/edges.
Important: aluminium foil cannot come into
contact with the cavity walls since this may
cause electrical arcing.
Lids
We recommend you use glass or plastic lids or
cling film since:
1. This will stop excessive evaporation (mainly
during very long cooking times);
In the case of the grill function, the ovenware must
be resistant to temperature of at least 300°C.
Plastic dishes are not suitable for use in the grill.
Combined functions
In the microwave + grill function, the ovenware
used must be suitable for use in both the
microwave and the grill.
Aluminium containers and foil
Pre-cooked food in aluminium containers or in
aluminium foil can be put in the microwave if the
following aspects are respected:
2. The cooking times are shorter;
3. The food does not become dry;
4. The aroma is preserved.
The lid should have holes or openings so that no
pressure develops. Plastic bags must also be
opened. Baby feeding bottles or jars with baby
food and similar containers can only be heated
without their tops / lids otherwise they can burst.
22
Page 24

23
EN
Operating mode
Type of
ovenware
Microwave
Grill
Microwave +
Grill
Defrosting /
heating
Cooking
Glass and china 1)
Home use, not flame resistant, can
be used in dish washer
yes
yes
no
no
Glazed china
Flame resistant glass and china
yes
yes
yes
yes
China, stone ware 2)
Unglazed or glazed without metallic
decorations
yes
yes
no
no
Clay dishes 2)
Glazed
Unglazed
yes
no
yes
no
no
no
no
no
Plastic dishes 2)
Heat resistant to 100°C
Heat resistant to 250°C
yes
yes
no
yes
no
no
no
no
Plastic films 3)
Plastic film for food
Cellophane
no
yes
no
yes
no
no
no
no
Paper, cardboard, parchment 4)
yes
No
no
no
Metal
Aluminium foil
Aluminium wrappings 5)
Accessories (rack)
yes
no
yes
no
yes
yes
yes
yes
yes
no
yes
yes
What kind of ovenware can be used?
Table of Ovenware
The table below gives you a general idea of what type of ovenware is suitable for each situation.
1. Without any gold or silver leaf edging; no
lead crystal.
2. Keep the manufacturer’s instructions in
mind!
3. Do not use metal clips for closing bags.
Make holes in the bags. Use the films only to
cover the food.
4. Do not use paper plates.
5. Only shallow aluminium containers without
lids/tops. The aluminium cannot come into
contact with the cavity walls.
Page 25

EN
Oven Cleaning and Maintenance
Cleaning is the only maintenance normally
required.
Warning! Your microwave oven should be
cleaned regularly, with all food remains being
removed. If the microwave is not kept clean its
surfaces may deteriorate, reducing the oven’s
working life and possibly resulting in a
dangerous situation.
Warning! Cleaning should be done with the
oven power switched off. Take the plug out of
the socket or switch off the oven’s power
circuit.
Do not use aggressive or abrasive cleaning
products, scourers that scratch surfaces or
sharp objects, since stains may appear.
Do not use high pressure or stream jet
cleaning appliances.
Front surface
Normally you just need to clean the oven with a
damp cloth. If it is very dirty, add a few drops of
dishwashing liquid to the cleaning water.
Afterwards, wipe the oven with a dry cloth.
Immediately remove lime, fat, starch or egg white
stains. Corrosion can occur under these stains.
Do not let any water get inside the oven.
Oven interior
After each time the oven is used, clean the inside
walls with a damp cloth since this is the easiest
way to remove splashes or spots of food that may
have stuck to the inside.
To remove dirt that is harder to shift, use a nonaggressive cleaning product. Do not use oven
sprays or other aggressive or abrasive
cleaning products.
Always keep the door and the oven front very
clean to ensure that the door opens and
closes properly.
Make sure water does not enter the microwave
ventilation holes.
Regularly clean the cavity base, especially after
any liquid spillage.
If the oven cavity is very dirty, put a glass of water
on the cavity base and switch on the microwave
oven for 2 or 3 minutes at maximum power. The
steam released will soften the dirt which can then
be cleaned easily using a soft cloth.
Unpleasant odours (e.g. after cooking fish) can be
eliminated easily. Put a few drops of lemon juice
in a cup with water. Put a small spoon in the cup
to avoid the water boiling over. Heat the water for
2 to 3 minutes at maximum microwave power.
24
Page 26

25
EN
Oven Cleaning and Maintenance
Oven ceiling
If the oven ceiling is dirty, the grill can be lowered
to make cleaning easier.
this happens, insert the grill heating element
support (1) into the slot in the ceiling of the cavity
and rotate it 90º to the grill heating element
support (2) position.
To avoid the danger of burning, wait until the grill
is cold before lowering it. Proceed as follows:
1. Turn the grill support by 180º (1)
2. Lower the grill gently (2). Do not use
excessive force as this may cause damage.
3. After cleaning the ceiling, put the grill (2)
back in its place, carrying out the previous
operation.
IMPORTANT WARNING: The grill heating
element support (1) may fall when it is rotated. If
Accessories
Clean the accessories after each use. If they are
very dirty, soak them first of all and then use a
brush and sponge. The accessories can be
washed in a dish washing machine.
Make sure that the ceramic base and the
respective support are always clean. Do not
switch on the oven unless the ceramic base and
the respective support are in place.
Page 27

EN
What should I do if the oven doesn’t work?
WARNING! Any type of repair must only be
done by a specialised technician. Any repair
done by a person not authorised by the
manufacturer is dangerous.
You do not need to contact Technical Assistance
to resolve the following questions:
The display is not showing! Check if:
- The time indication has been switched off
(see section on Basic Settings).
Nothing happens when I press the keys!
Check if:
- The Safety Block is active (see section on
Basic Settings).
The oven does not work! Check if:
- The plug is correctly fitted in the socket.
- The oven’s power is switched on.
The food is too hot, dried out or burnt!
Check if you selected the correct operating
time and power level.
I hear some noises after the cooking
process is finished! This is not a problem.
The cooling fan keeps on working for some
time. When the temperature has dropped
sufficiently, the fan will switch itself off.
The oven switches on but the interior light
does not go on! If all the functions work
properly it is probable that the lamp has blown.
You can keep on using the oven.
The display shows “cErr”!
Disconnect the plug and wait approximately 5
seconds. After that, you can plug in the
Microwave again, the “cErr” message
disappears and the appliance is fully
operational.
- The door is completely closed. The door
should close with an audible click.
- There are any foreign bodies between the
door and the cavity front.
When the oven is operating I can hear some
strange noises! Check if:
- There is an electrical arcing inside the oven
caused by foreign metallic objects (see
section on type of ovenware).
- The ovenware is touching the oven walls.
- There are any loose items of cutlery or
cooking tools inside the oven.
The food doesn’t heat up or heats very
slowly! Check if:
- You have inadvertently used metal
ovenware.
- You have selected the correct operating
times and power level.
Substitution of light bulb
If the light bulb needs substitution call the
Technical Assistance since it is necessary to
uninstall the oven to replace it.
- The food you have put inside the oven is a
larger amount or colder than you usually put
in.
26
Page 28

27
EN
Technical characteristics
Specifications
AC Voltage .......................................................................................... (see rating plate)
Power required .................................................................................... 2500 W
Grill power. .......................................................................................... 1200 W
Microwave output power. ..................................................................... 850 W
Microwave frequency… ....................................................................... 2450 MHz
Exterior dimensions (WHD). ............................................................ 595 390 334 mm
Interior dimensions (WHD). ............................................................. 350 210 280 mm
Oven capacity. ..................................................................................... 22 ltr
Weight ................................................................................................. 22 kg
Environmental protection
Disposal of the packaging
The packaging bears the Green Point mark.
Dispose of all the packaging materials such as
cardboard, expanded polystyrene and plastic
wrapping in the appropriate bins. In this way you
can be sure that the packaging materials will be
re-used.
Disposal of equipment no longer used
According to European Directive 2002/96/EC on
the management of waste electrical and
electronic equipment (WEEE), home electrical
appliances should not be put into the normal
systems for disposal of solid urban waste.
Outdated appliances should be collected
separately to optimise component material
recovery and re-cycling rates and to prevent
potential harm to human health and the
environment. The symbol of a rubbish container
superimposed by a diagonal cross should be put
on all such products to remind people of their
obligation to have such items collected
separately.
Consumers should contact their local authorities
or point of sale and request information on the
appropriate places to leave their old home
electrical appliances.
Before disposing of your appliance, render it nonusable by pulling out the power cable, cutting this
and disposing of it.
Page 29

EN
Installation instructions
Before installation
Check that the input voltage indicated on the
characteristics plate is the same as the voltage of
the power outlet you are going to use.
Open the oven door and take out all the
accessories and remove the packing material.
Warning! The front surface of the oven may be
wrapped with a protective film. Before using the
oven for the first time, carefully remove this film,
starting on the inside.
Make sure that the oven is not damaged in any
way. Check that the oven door closes correctly
and that the interior of the door and the front of
the oven opening are not damaged. If you find any
damage contact the Technical Assistance
Service.
DO NOT USE THE OVEN if the power cable or
the plug are damaged, if the oven does not
function correctly or if it has been damaged or
dropped. Contact the Technical Assistance
Service.
After installation
The oven is equipped with a power cable and a
plug for single phase current.
If the oven is to be installed on a permanent
basis it should be installed by a qualified
technician. In such a case, the oven should be
connected to a circuit with an all-pole circuit
breaker with a minimum separation of 3 mm
between contacts.
WARNING: THE OVEN MUST BE EARTHED.
The manufacturer and retailers do not accept
responsibility for any damage that may be
caused to people, animals or property if these
installation instructions are not observed..
The oven only functions when the door is closed
correctly.
Before the first use, clean the inside of the oven
and the accessories, following the cleaning
instructions given in the section “Oven cleaning
and maintenance”.
Put the oven on a flat and stable surface. The
oven must not be put close to any sources of
heat, radios or televisions.
During installation, make sure that the power
cable does not come into contact with any
moisture or objects with sharp edges behind
the oven. High temperatures can damage the
cable.
Warning: after the oven is installed you must
make sure you can access the plug.
During installation, follow the instructions supplied separately.
28
Page 30

29
EN
Push oven completely into the cabinet and centre
it.
Open microwave door and fasten the appliance to
the cabinet using the four screws provided. Insert
the screws through the front holes.
Installation
Page 31

Page 32

(AUS)
Home Appliances Pty Ltd
20 Carlotta St
Artarmon NSW 2064
Sales Telephone
1800 805 300
Service Telephone
1800 444 357
Website
www.baumatic.com.au
 Loading...