

Page 1

Brush Mulcher iMS760
OPERATOR’S MANUAL
Issue Date: August 2017
Page 2

TABLE OF CONTENTS
1 INTRODUCTION ��������������������������������������������������������������������������������������������������������������������������������� 1
1�1 Overview ������������������������������������������������������������������������������������������������������������������������������������� 1
1�2 Intended Use And Foreseeable Misuse ����������������������������������������������������������������������������������� 1
2 SAFETY ������������������������������������������������������������������������������������������������������������������������������������������������ 2
2�1 Safety Alert Symbol And Safety Words ������������������������������������������������������������������������������������ 2
2�2 Operational Hazards ������������������������������������������������������������������������������������������������������������������� 2
Prepare for Emergencies ����������������������������������������������������������������������������������������������������������� 3
Replace Safety Signs ����������������������������������������������������������������������������������������������������������������� 3
Do Not Allow Riders ������������������������������������������������������������������������������������������������������������������� 3
Lower Operating Speed ������������������������������������������������������������������������������������������������������������� 3
Avoid Rollover ���������������������������������������������������������������������������������������������������������������������������� 4
Avoid Powerlines & Underground Utilities ������������������������������������������������������������������������������ 4
Detach Brush Mulcher Safely ���������������������������������������������������������������������������������������������������� 4
Hazards From Modifying Equipment ���������������������������������������������������������������������������������������� 5
2�3 Maintenance Hazards ����������������������������������������������������������������������������������������������������������������� 6
3 SAFETY SIGNS ����������������������������������������������������������������������������������������������������������������������������������� 8
4 INITIAL SETUP ���������������������������������������������������������������������������������������������������������������������������������� 10
4�1 Hydraulics ��������������������������������������������������������������������������������������������������������������������������������� 10
4�2 Motor Pressure Port ����������������������������������������������������������������������������������������������������������������� 10
4�3 Maximum Allowable Case Pressure ��������������������������������������������������������������������������������������� 10
5 OPERATION ���������������������������������������������������������������������������������������������������������������������������������������11
5�1 Preparation For Use ������������������������������������������������������������������������������������������������������������������11
5�2 Pre-Operation Check List ���������������������������������������������������������������������������������������������������������11
5�3 Machine Components �������������������������������������������������������������������������������������������������������������� 12
5�4 Attach To Skid Steer ����������������������������������������������������������������������������������������������������������������� 13
5�5 Detach From Skid Steer ����������������������������������������������������������������������������������������������������������� 13
5�6 Transporting ������������������������������������������������������������������������������������������������������������������������������ 14
5�7 Carbide Teeth Break-In������������������������������������������������������������������������������������������������������������ 14
5�8 First Time User Tips ����������������������������������������������������������������������������������������������������������������� 15
5�9 Field Operation ������������������������������������������������������������������������������������������������������������������������� 16
5�10 Clearing Jams ������������������������������������������������������������������������������������������������������������������������� 17
6 SERVICE AND MAINTENANCE ������������������������������������������������������������������������������������������������������ 18
6�1 Maintenance ������������������������������������������������������������������������������������������������������������������������������ 18
6�2 Inspections �������������������������������������������������������������������������������������������������������������������������������� 18
6�3 Check Belt Tension������������������������������������������������������������������������������������������������������������������� 19
6�4 Replace Belt ������������������������������������������������������������������������������������������������������������������������������ 20
6�5 Replace Cutting Teeth �������������������������������������������������������������������������������������������������������������� 21
7 TROUBLESHOOTING ���������������������������������������������������������������������������������������������������������������������� 22
8 STORAGE ������������������������������������������������������������������������������������������������������������������������������������������ 23
8�1 Storing Mulcher ������������������������������������������������������������������������������������������������������������������������ 23
8�2 Removing Mulcher From Storage ������������������������������������������������������������������������������������������� 23
9 WARRANTY ��������������������������������������������������������������������������������������������������������������������������������������� 24
ii
Page 3

1 INTRODUCTION
1�1 Overview
Congratulations on your choice of a Baumalight
Brush Mulcher to complement your mulching
operation. This equipment has been designed and
manufactured to meet the needs of a discriminating
buyer for efcient mulching of brush.
The rotor is hydraulic powered by the hydraulic
system on your skid steer.
Replaceable bearings are provided at major pivot
points for extended service life.
Safe, efcient and trouble free operation of your
brush mulcher requires that you and anyone
else who will be operating or maintaining the
brush mulcher, read and understand the Safety,
Operation, Maintenance and Troubleshooting
information contained within the Operator’s
Manual.
1�2 Intended Use And Foreseeable
Misuse
The brush mulcher is designed to be used
by experienced operators, trained in the safe
operation of a skid steer and trained in the hazards
related to using the brush mulcher and the safe use
of the mulcher for the intended purpose. Operators
will require personal protective equipment to
reduce the risk from some hazards that cannot be
completely eliminated or controlled by the design
of the tool.
Care is required to ensure that the brush mulcher
tool will not come across metallic objects, stones
or other materials.
Brush mulcher tools are not designed for use in
hazardous atmospheres where there is a risk
of re or explosion due to ammable gases or
vapors. Use in hazardous, explosive atmospheres
is prohibited.
This manual covers the Baumalight Brush Mulcher,
model iMS760. Use the Table of Contents as a
guide to locate required information.
Keep this manual handy for frequent reference
and to pass on to new operators or owners. Call
your Baumalight dealer, distributor or the factory
if you need assistance, information or additional
copies of the manuals.
When this machine is worn out and no longer in
use, it should be returned to the retailer or other
party for recycling.
OPERATOR ORIENTATION - The directions left,
right, front and rear, as mentioned throughout this
manual, are as seen from the skid steer driver’s
seat and facing in the direction of travel.
Serious injury or death of the operator or bystanders
may be caused if the tool is misused. Misuse may
also cause damage to the machine carrying the
implement.
1
Page 4

2 SAFETY
2.1 Safety Alert Symbol
And Safety Words
You must read, understand and follow the
instructions given by the operating unit
manufacturers, as well as the instructions in this
manual.
The safety information in this manual is denoted
by the safety alert symbol:
^
This symbol means ATTENTION! BECOME
ALERT! YOUR SAFETY IS INVOLVED!
The level of risk is indicated by the following signal
words:
^ DANGER
DANGER - Indicates a hazardous
situation, which, if not avoided, WILL
result in death or serious injury�
2.2 Operational Hazards
^ WARNING
Prevent serious injury or death�
Read and understand this manual before
operating brush mulcher�
Always stop engine and remove key
before leaving operators seat�
Never allow anyone near the brush
mulcher during operation�
Travel at a safe speed�
^ WARNING
Prevent serious injury or death from
moving parts�
^ WARNING
WARNING - Indicates a hazardous
situation, which, if not avoided, could
result in death or serious injury�
^ CAUTION
CAUTION - Indicates a hazardous
situation, which, if not avoided, could
result in minor or moderate injury�
NOTICE
NOTICE - Indicates a situation that could
result in damage to the equipment or
other property�
Moving parts can crush and dismember�
Do not operate without guards and
shields in place�
Disconnect and lock out power source
before adjusting or servicing�
^ WARNING
Use brush mulcher only for the designed
applications�
Any other use may result in personal
injury, damage to equipment and may
void the warranty�
^ WARNING
Prevent serious injury or death�
Verify brush mulcher is attached to skid
steer before operation or transport�
2
Page 5
^ WARNING
Prepare for Emergencies
Protect from ying debris.
Wear proper safety glasses, goggles,
or a face shield to protect from ying
debris�
Carefully read all safety messages in this manual
and on equipment safety signs. Keep safety signs
in good condition and replace missing or damaged
safety signs.
New equipment components and repair parts must
include the current safety decal.
Learn how to properly operate equipment.
NEVER operate or work around this equipment
without proper instruction, while fatigued or under
the inuence of alcohol, prescription or non-
prescription medication or if feeling ill.
Keep your equipment in proper working condition.
Know the regulations and laws that apply to you
and your industry. This manual is not to replace
any regulations or laws. Additional information
may be found at: www.asae.org or www.osha.gov.
If you do not understand any part of this manual,
contact Baumalight at 866-820-5603.
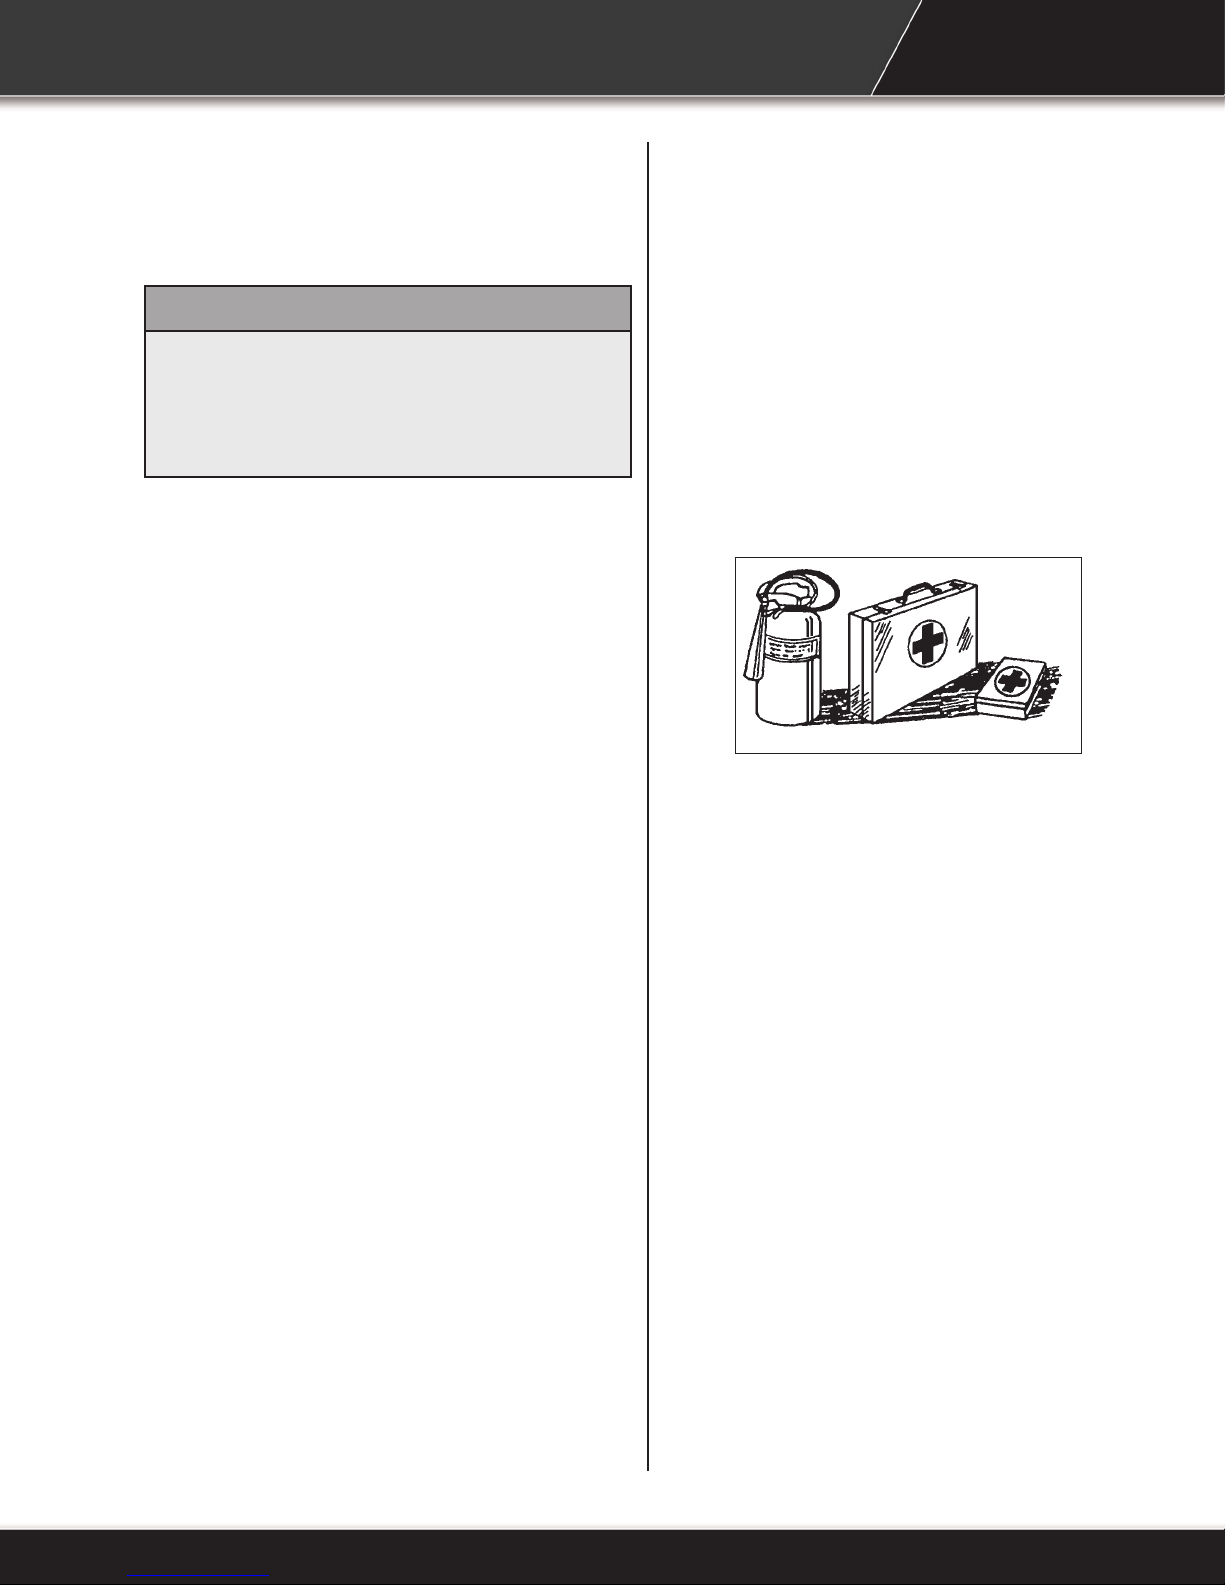
• Be prepared in case of emergencies.
• Keep a re extinguisher and rst aid kit close
to the machine.
• Keep emergency phone numbers close to your
phone.
• Know your address so emergency services
can locate you if an emergency arises.
Replace Safety Signs
• Replace missing or damaged safety signs.
• Safety signs are identied in Section 3 of this
manual.
• Replacement safety signs are available from
your Baumalight dealer.
Do Not Allow Riders
• NEVER lift or carry anyone with brush mulcher.
• NEVER use brush mulcher as a work
platform.
• NEVER allow passengers on brush mulcher.
Lower Operating Speed
• Lower operating speed while loading,
unloading or performing heavy operations.
• Keep load low and move at slow speeds on
rough or uneven terrain.
3
Page 6

Avoid Rollover
Detach Brush Mulcher Safely
The equipment may rollover, resulting in death or
serious injury. To help prevent rollover:
• Travel at a slow speed.
• Avoid sharp turns & sudden movement on
slopes.
• Carry loads close to the ground.
• Avoid holes, ditches and other obstructions
which may cause equipment to rollover.
• Balance load so weight is evenly distributed
and load is stable.
• Use caution when operating on slopes and do
not operate on excessively steep slopes.
• Do not exceed load capacity of equipment.
Avoid Powerlines & Underground
Utilities
^^ DANGER
Prevent electrocution�
Death or serious injury can result if
equipment comes near or contacts
power lines�
Electrocution can occur without direct
contact�
Detach brush mulcher on a rm and level surface.
Brush mulcher may fall over if detached on sloping
or soft surface. Be sure people, livestock and pets
are clear of machinery.
Relieve hydraulic pressure before disconnecting
hydraulic hoses. See your skid steer Operator’s
Manual.
Raised Attachment
^ WARNING
Crushing hazard�
Raised, unsupported brush mulcher can
fall, resulting in death or serious injury�
Never enter the area under a raised
brush mulcher�
A raised brush mulcher can lower unexpectedly,
resulting in death or serious injury.
NEVER enter area under a raised brush mulcher.
Lower brush mulcher to ground, engage parking
brake, shut off engine and remove key before
servicing.
Avoid Loud Noise
DO NOT leave the operator’s seat if any part of the
equipment contacts electric lines or cables.
4
^ WARNING
Prolonged exposure to loud noise can
cause impairment or loss of hearing�
Wear a suitable hearing protective
device such as earmuffs or earplugs
to protect against objectionable or
uncomfortable loud noises�
Page 7

Hazards From Modifying Equipment
Do not make any alterations to your brush
mulcher. Altering the equipment may cause unsafe
conditions and may void the manufacturer’s
warranty.
Escaping uid under pressure can penetrate the
skin causing serious injury.
Prevent the hazard by relieving pressure (See skid
steer Operator’s Manual.) before connecting or
disconnecting hydraulic lines. Verify all connections
are tight before applying pressure.
Avoid Wood Dust Inhalation
^ WARNING
Wear an approved respirator (N95 Type
as a minimum)�
Follow local, state and federal
regulations�
The health effects from exposure to wood dust
are due to chemicals in the wood or chemical
substances in the wood created by bacteria, fungi,
or molds.
Avoid High Pressure Fluids
^ WARNING
Pressurized uids can penetrate the
skin�
Search for leaks with a piece of cardboard or wood.
Protect hands and body from high pressure uids.
If an accident occurs, see a doctor immediately.
Any uid injected into the skin must be surgically
removed within a few hours or serious infection
may result.
Hydraulic hoses can fail from age,
damage and exposure�
Use body and face protection while
searching for leaks� A tiny, almost
invisible leak can penetrate the skin,
thereby requiring immediate medical
attention�
Use wood or cardboard to detect
hydraulic leaks, never use your hands�
5
Page 8

2.3 Maintenance
Hazards
Before servicing, park machine on a rm and
level surface, set parking brake, chock wheels,
and place a “Do Not Operate” tag on control
panel. Read and understand this manual. If you
do not understand any part of the manual, contact
Baumalight at 866-820-5603.
^ WARNING
Crushing hazard�
Before performing inspections, service
or maintenance:
Always wear face and/or eye protection, safety
shoes, and other protective equipment appropriate
for the job.
Do not make unauthorized modications. Contact
Baumalight at 866-820-5603 before you weld, cut/
drill holes, or make any other modications.
Always use Baumalight replacement parts.
^ WARNING
Moving parts can crush and cut�
Keep clear of moving components�
Follow lockout procedure before
servicing�
^ WARNING
Entanglement hazard�
Park machine on rm, level surface.
Engage parking brake�
Turn engine off and remove key�
Place “Do Not Operate” tag on control
panel�
^ WARNING
Burn hazard�
Hot and high pressure hydraulic oil�
Allow oil to cool before servicing�
Keep clear of moving components�
Wear proper protective equipment
appropriate for the job�
6
Page 9

This page intentionally left blank.
7
Page 10
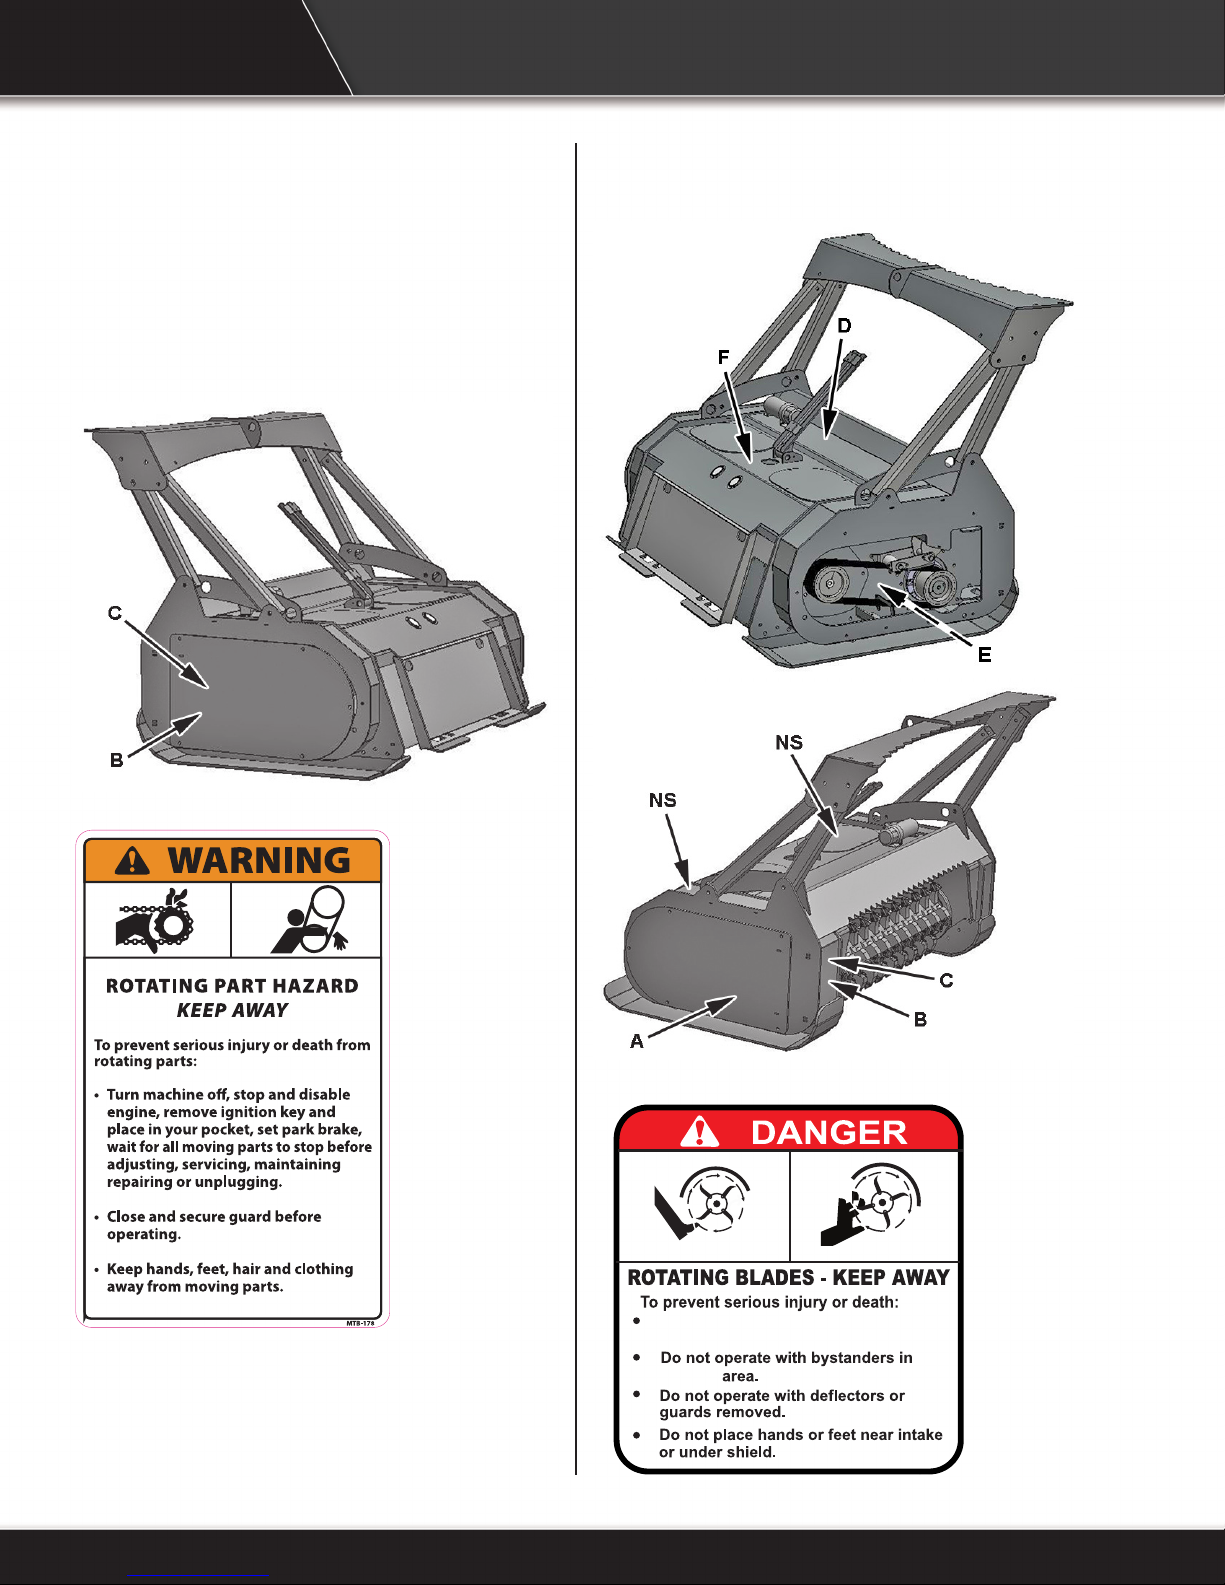
3 SAFETY SIGNS
Dashed line indicates item hidden from view unless
cover is removed.
NS - Non-Slip Pad
A. MTB-178 Safety Sign
B. MTB-176 Safety Sign
Never allow riders; especially children
on carrier or cutter.
cutting
8
Page 11
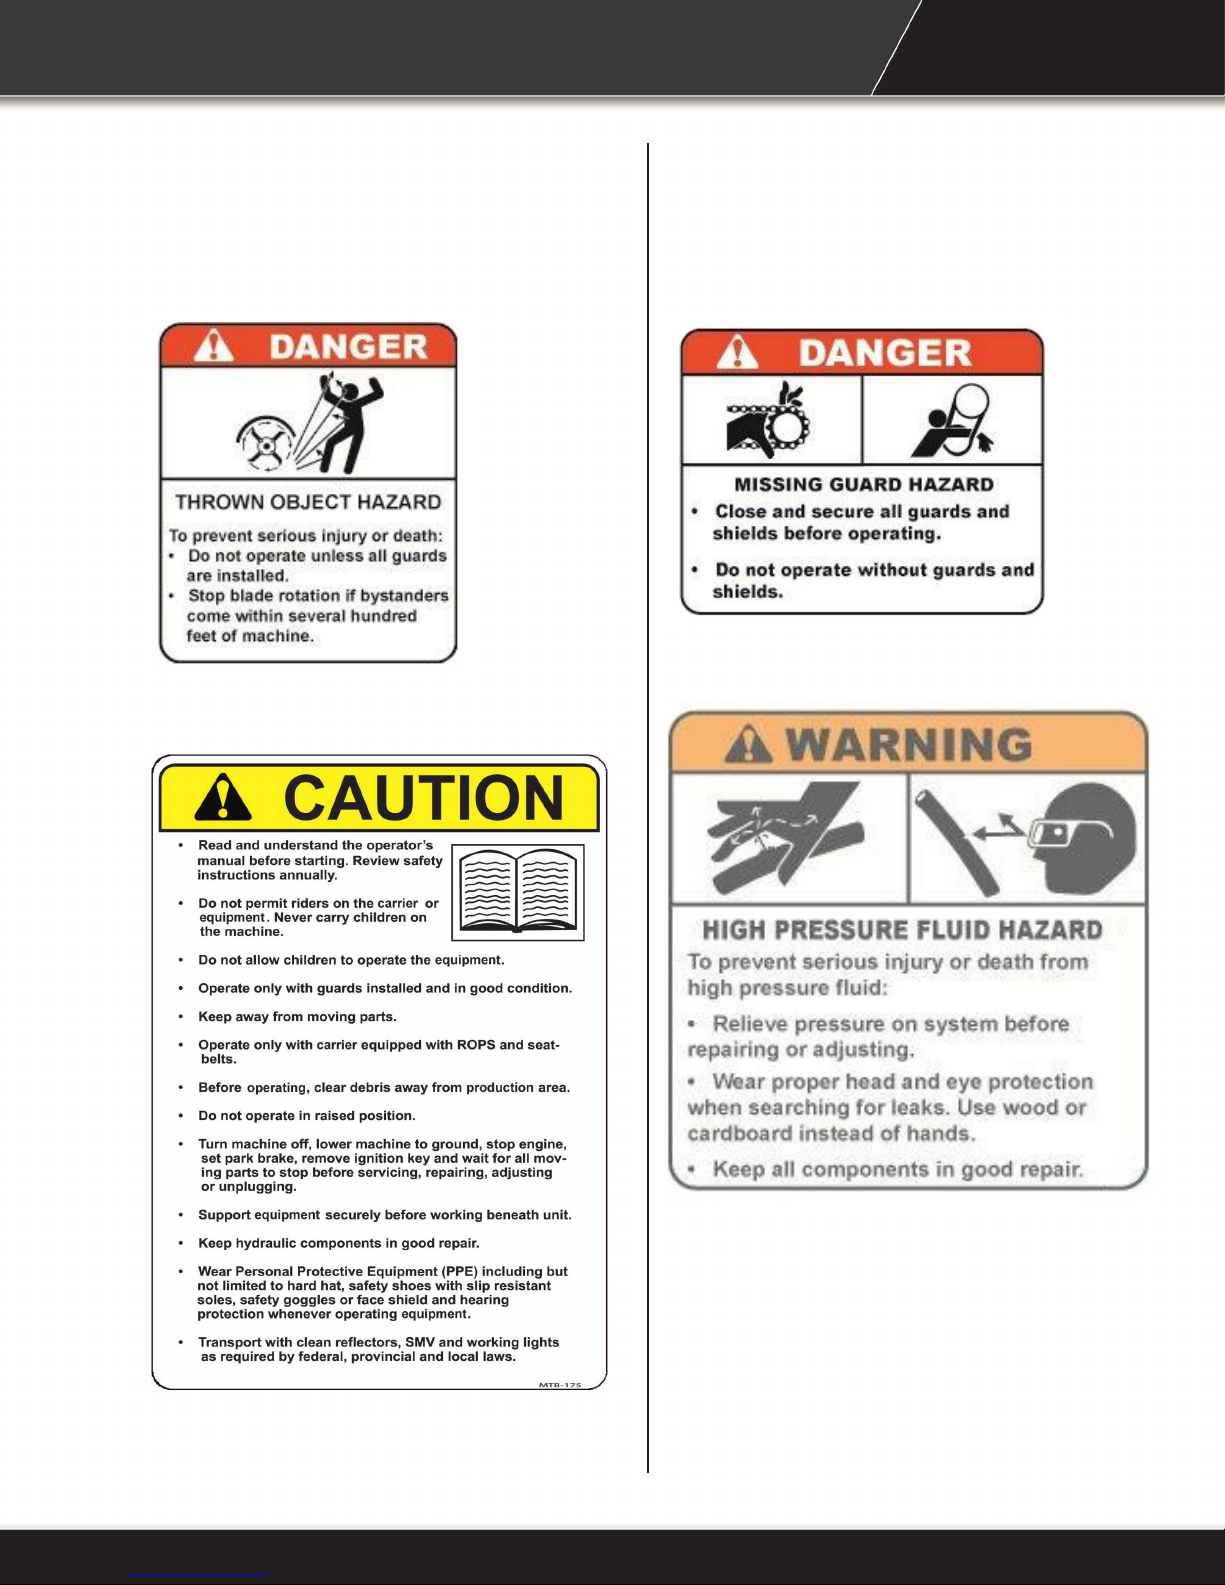
C. MTB-177 Safety Sign
D. MTB-175 Safety Sign
E. MTB-185 Safety Sign
F. MTB-182 Safety Sign
9
Page 12

4 INITIAL SETUP
4.1 Hydraulics
^ WARNING
Pressurized uids can penetrate the
skin�
Disconnect and lock out power source
before disconnecting and/or connecting
hydraulic hoses�
The mulcher is equipped with short hoses that
are connected to the hydraulic motor. You must
connect your skid steer hoses to these hoses.
All mulcher motors will have pressure, return and
case drain connections. Identify the pressure port
hose from the following chart and connect your
hoses to the mulcher hoses. Skid steer hoses
must be the same size as the mulcher hoses.
Using smaller diameter hoses will decrease
hydraulic ow.
4�2 Motor Pressure Port
C740 - A port on block (B port on motor)
C750 - A port on block (B port on motor)
C770 - A port on block (B port on motor)
C790 - A port on block (B port on motor)
4�3 Maximum Allowable Case
Pressure
C740 - 100 psi, case drain required.
C750 - 100 psi, case drain required.
C770 - 100 psi, case drain required.
C790 - 100 psi, case drain required.
10
Page 13
5 OPERATION
5.1 Preparation For Use
^ WARNING
Wear an approved respirator (N95 Type
as a minimum)�
Follow local, state and federal
regulations�
The health effects from exposure to
wood dust are due to chemicals in the
wood or chemical substances in the
wood created by bacteria, fungi, or
molds�
Although the brush mulcher has been carefully
inspected and checked prior to shipment from
manufacturer, it is recommended that the unit be
thoroughly inspected.
Check all bolts for tightness and remove all
shipping tags, bags, skids, and blocking.
Review and understand this manual and operating
unit manual.
Remove any masking materials afxed during
painting. Inspect the mulcher and any accessory
equipment to verify that nameplates and all safety
warning, caution signs and decals provided with
the equipment are in place and clearly visible.
Visually inspect the unit before each start up.
Check for loose or missing parts and any damage
that may have occurred during moving or shipping.
Review all skid steer pre-start instructions, and be
sure that all recommended steps and procedures
have been followed.
Note: Always keep the weight of the machine in
mind. Never position body in line of impact.
5.2 Pre-Operation Check List
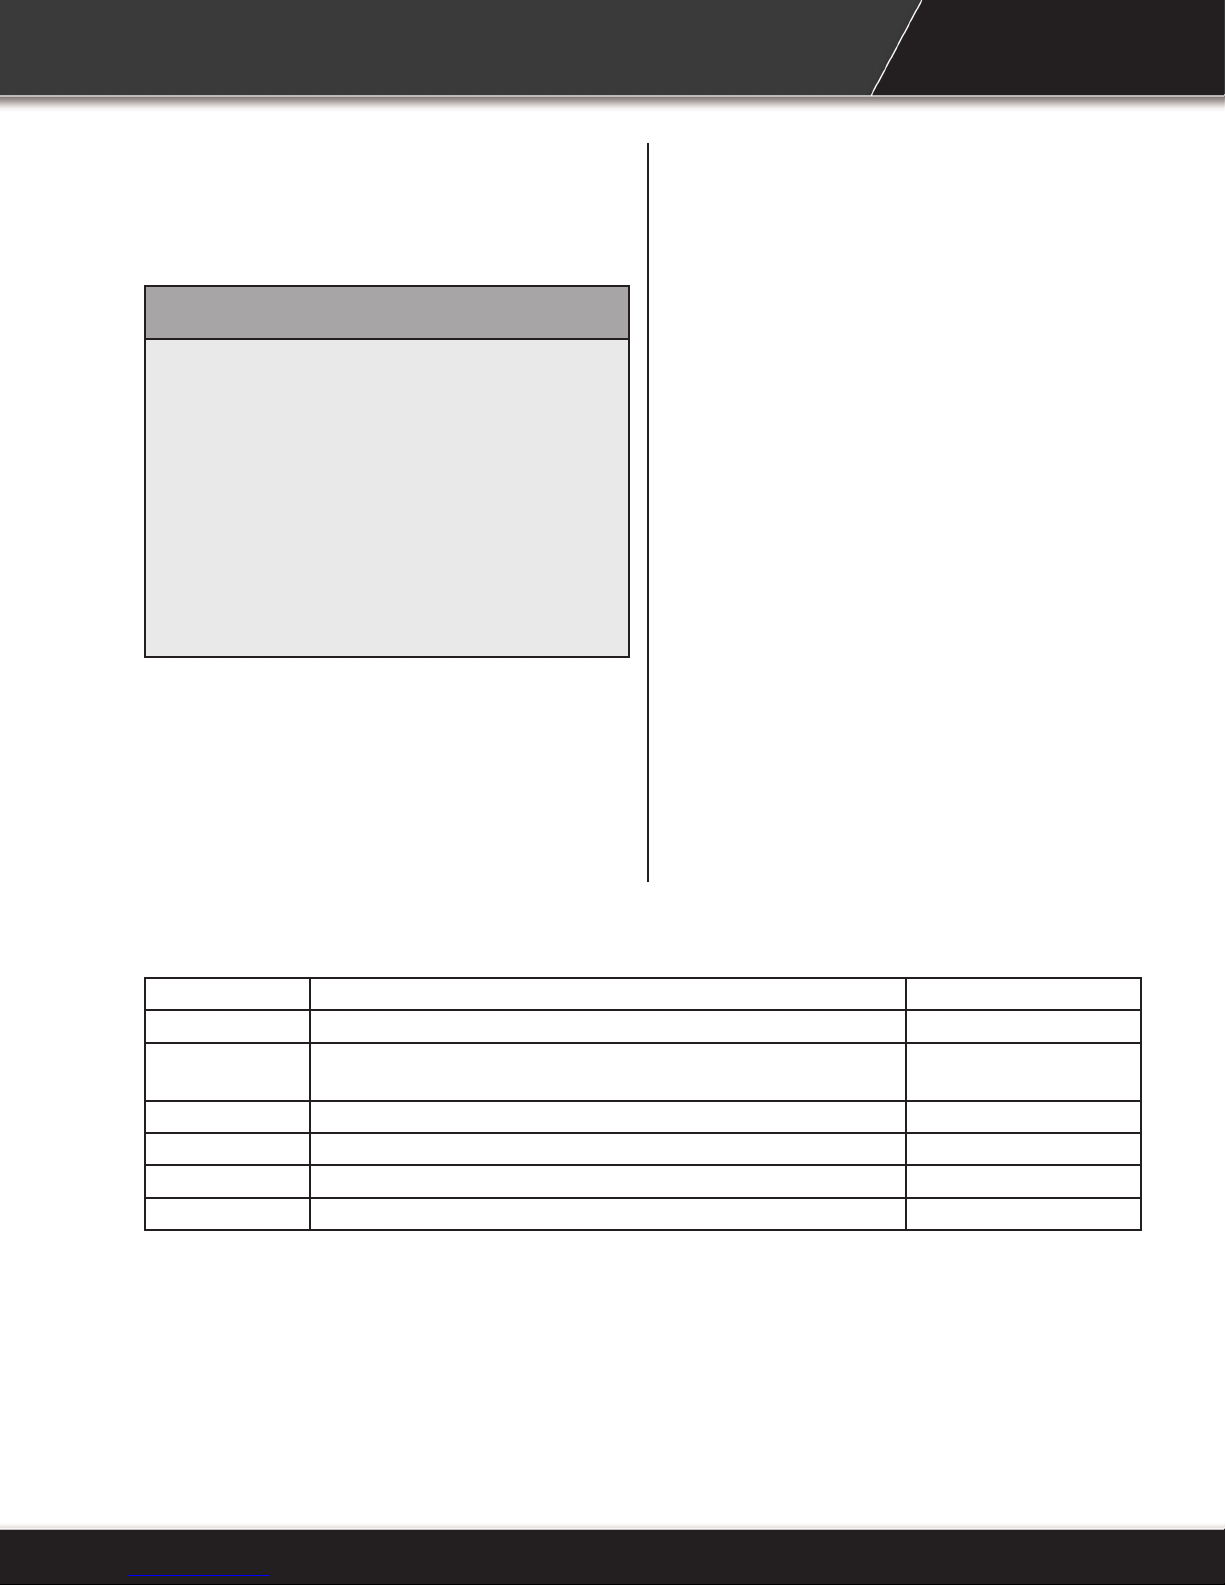
Check-mark Check these items: Frequency
Verify that mulcher is properly attached to skid steer. Each operation.
Verify that hydraulic hoses are connected to skid steer
hydraulic couplers.
Check for entangled material on rotor. Each operation.
Verify all guards, doors and covers are installed and secured. Each operation.
Verify cutting teeth on the rotor are tight. Every 4 hours.
Check belt chamber. Every 4 hours.
Each operation.
11
Page 14
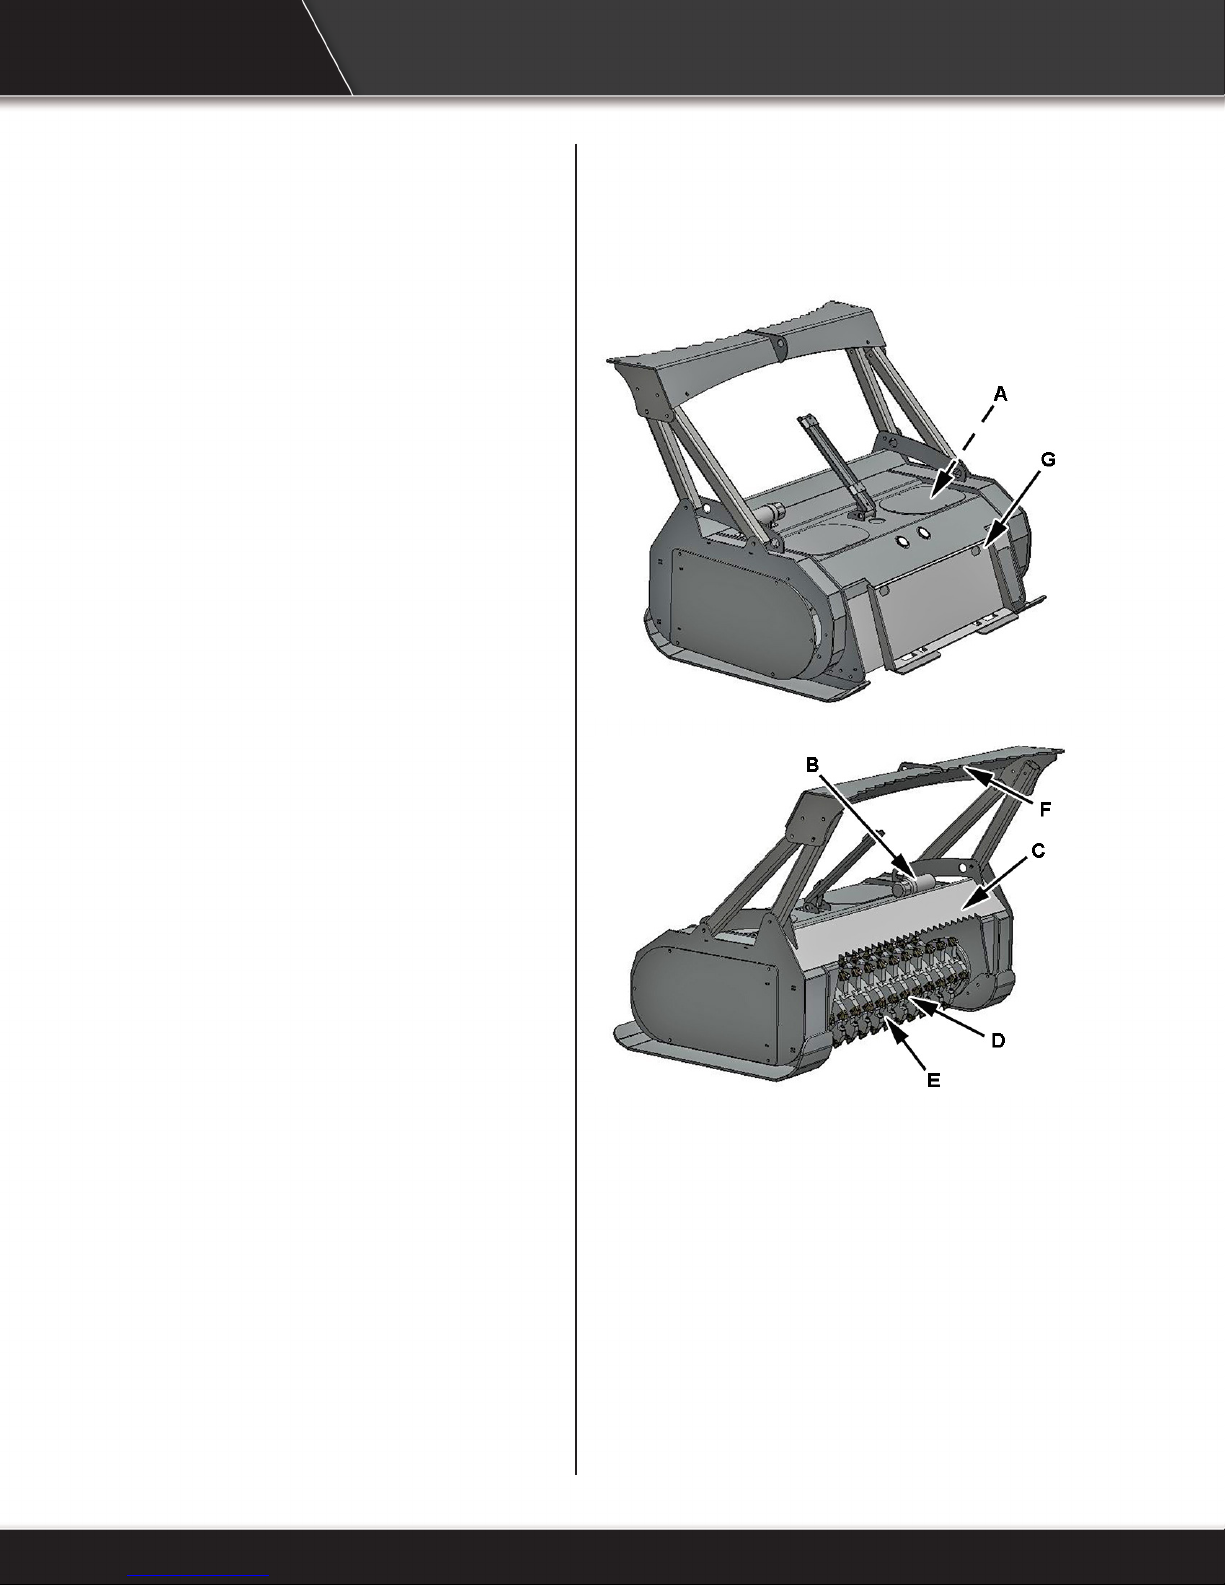
5.3 Machine Components
Dashed line indicates item hidden from view unless
cover is removed.
A. Hydraulic Motor
B. Operators Manual Storage Tube
C. Push Plate
D. Cutting Teeth
E. Rotor
F. Push Bar
G. Quick Attach
12
Page 15

5.4 Attach To Skid Steer
5.5 Detach From Skid
Steer
^ WARNING
To prevent injury or machine damage
put transmission in “Park”�
Never position yourself between skid
steer and brush mulcher�
Only experienced and properly trained
operator’s should operate the skid steer
and brush mulcher�
1. Read and follow all safety instructions.
2. Attach mulcher to skid steer. See skid steer
Operator’s Manual.
3. Verify pins are secure in the correct position.
4. Connect hydraulic hoses. Verify hydraulic
hoses are clear of pinch areas and moving
parts.
5. Move to a clear open area to test functions
^ WARNING
Prevent serious injury or death caused
by unexpected movement:
1� Park skid steer on a level surface�
2� Engage skid steer park brake�
3� Disconnect hydraulic drive�
4� Shut off engine and remove key�
1. Park skid steer on a level surface.
2. Lower mulcher to the ground.
3. Shut off engine and remove key.
4. Disconnect hydraulic hoses.
5. Detach mulcher from skid steer. See skid steer
Operator’s Manual.
13
Page 16
5.6 Transporting
1. Verify all reectors and Slow Moving Vehicle
(SMV) sign are visible.
2. Raise brush mulcher slightly off ground.
3. Verify hydraulics are disengaged.
4. Travel at a reasonable and safe speed.
^ WARNING
To prevent bodily injury from rotating
cutting wheel, be sure to disengage
hydraulics before transporting mulcher�
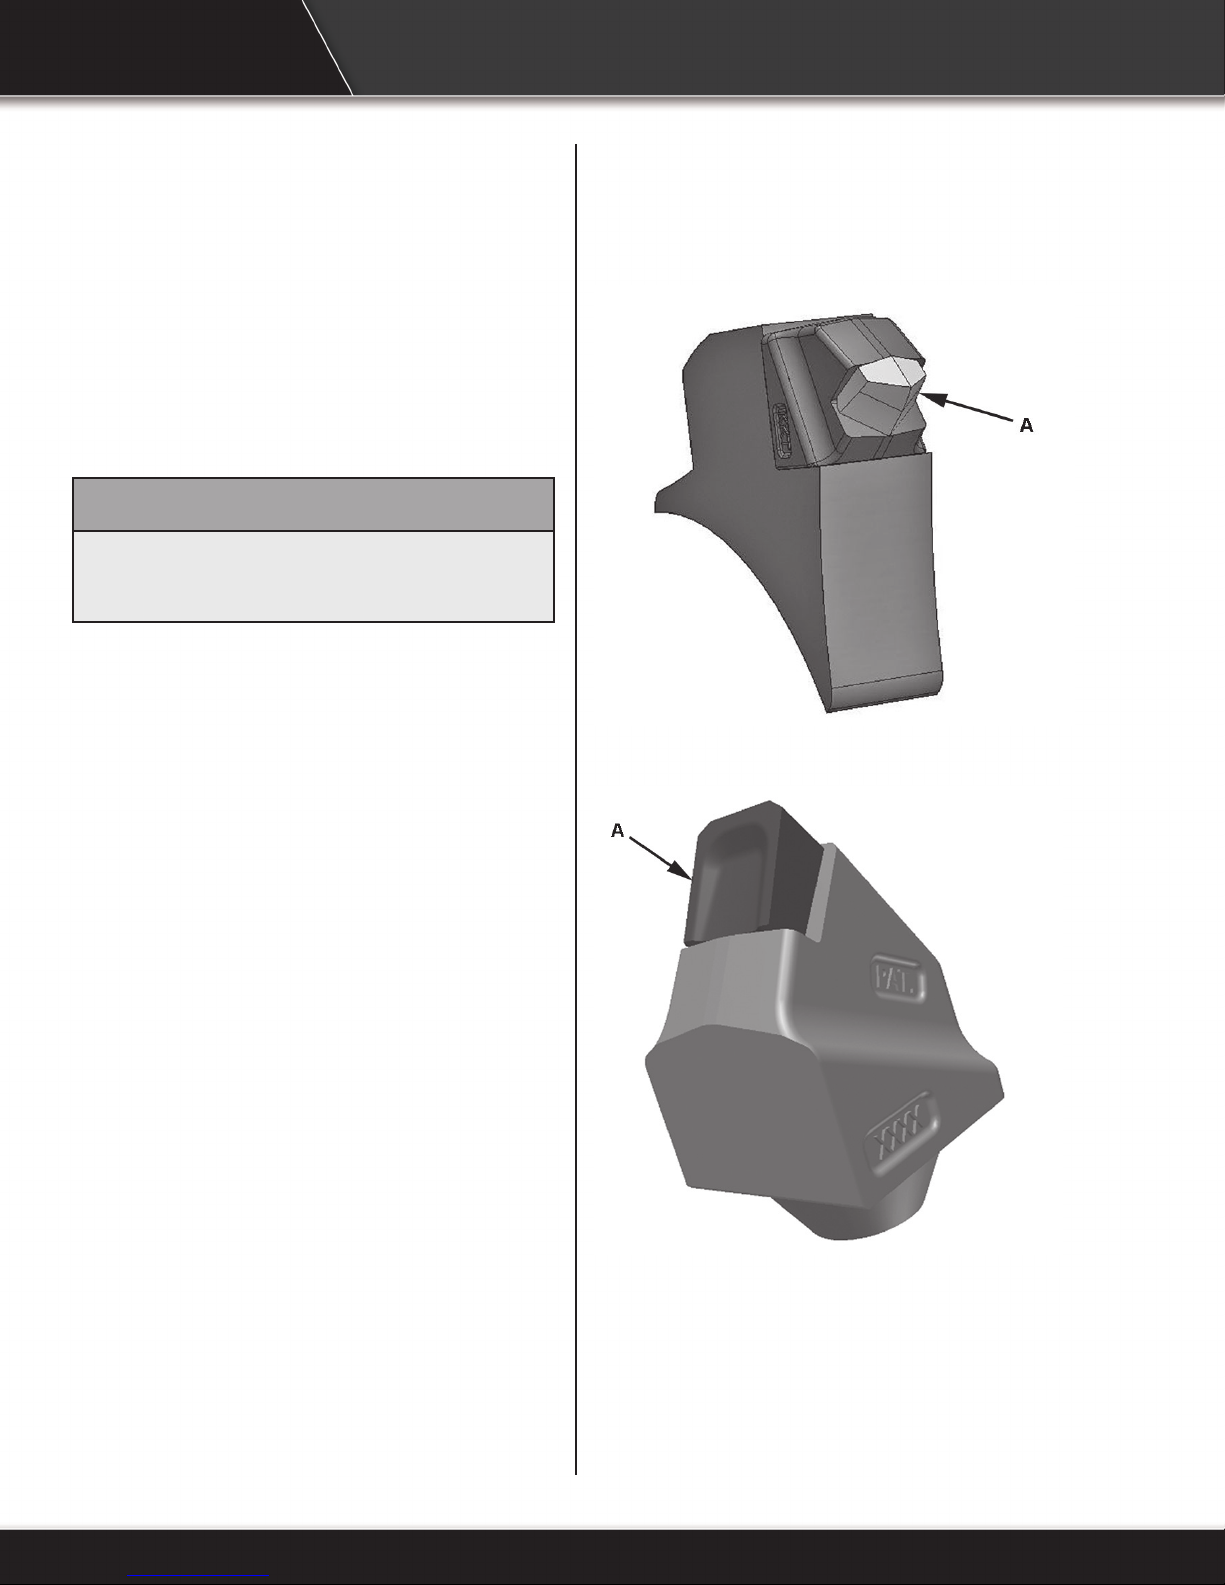
5�7 Carbide Teeth Break-In
During the rst few hours of use, avoid hitting
stones as much as possible to allow the carbide
teeth (A) to wear slightly. This can be done by
keeping the cutting wheel above ground level.
Brand new carbide tips are razor sharp and can
chip and shatter easily when they hit hard objects.
Once the razor sharpness has worn away, the tips
do not chip as easily. Observing these precautions
will extend the life of the carbide teeth and reduce
operating expenses.
The teeth bolts must be retighten every ten minutes
for the rst hour of use on a new mulcher.
Ripper Tooth
Planer Tooth
14
Page 17

5.8 First Time User Tips
• First, operate all functions in a clear area with
skid steer at idle speed to get a good feel for
the controls before you actually move into any
brush.
• Choose low density brush and move into it
slowly, do not expect to get the rst area done
fast.
• Slow travel speed if pressure surges up close
to max psi, doing this will greatly reduce rotor
jams, and with practice, will almost eliminate
jams.
• Run throttle only at half speed for rst time
users.
• Operate with mulcher slightly raised until you
have a better feel how much the unit can take.
• The machine is equipped with a push plate and
a push bar to push brush or small trees over.
This will allow the mulcher teeth to contact the
lower portion of the brush and mulch it or cut
it off. The rest of the plant will be mulched as
the machine moves through the working area.
^ WARNING
Wear an approved respirator (N95 Type
as a minimum)�
Follow local, state and federal
regulations�
The health effects from exposure to
wood dust are due to chemicals in the
wood or chemical substances in the
wood created by bacteria, fungi, or
molds�
• For tall brush, you can use the push plate
and push bar to push the brush over and cut
it off close to ground. Each operator must
experiment to nd a technique that works for
them in their application.
• Although it is best to mulch when it is dry, the
machine works well in wet conditions.However,
you must travel slower to do the same quality
mulching. It will also be necessary to clean the
machine more frequently to prevent caking
and clogging of the rotor area.
^ WARNING
Always turn off the skid steer and
disengage hydraulic drive before
getting off the seat and approaching the
cutting wheel�
15
Page 18

5.9 Field Operation
^ WARNING
Prevent serious injury or death caused
by unexpected movement:
1� Park skid steer on a level surface�
2� Engage skid steer park brake�
3� Disengage hydraulic drive�
4� Shut off engine and remove key�
^ WARNING
Never operate brush mulcher when
other people are in the vicinity�
Do not allow riders on skid steer�
^ WARNING
Never operate brush mulcher when
other people are in the vicinity� Debris
can be thrown several feet from cutting
area� Keep all shields in place�
1. Attach brush mulcher to skid steer. See Attach
Brush Mulcher To Skid Steer in this section.
^ WARNING
Prevent serious injury or death�
Operating unit must be equipped with a
forestry guard to protect the operator�
2. Lower mulcher so skid plates are on ground.
3. Set engine speed to low idle and engage
mulcher.
4. Slowly increase engine speed to high idle.
Verify mulcher is operating smoothly and start
travel.
5. If mulcher stalls, stop movement, slightly raise
mulcher and allow rotor to regain speed. Slow
ground speed to prevent further stalling.
^ WARNING
Moving parts can crush and cut�
^ WARNING
Clean machine thoroughly before
service or maintenance procedures�
The health effects from exposure to
wood dust are due to chemicals in the
wood or chemical substances in the
wood created by bacteria, fungi, or
molds�
Keep clear of moving components�
Lockout operating unit before clearing
jams�
^ WARNING
Never approach brush mulcher before
cutting wheel has come to a complete
stop�
16
Page 19
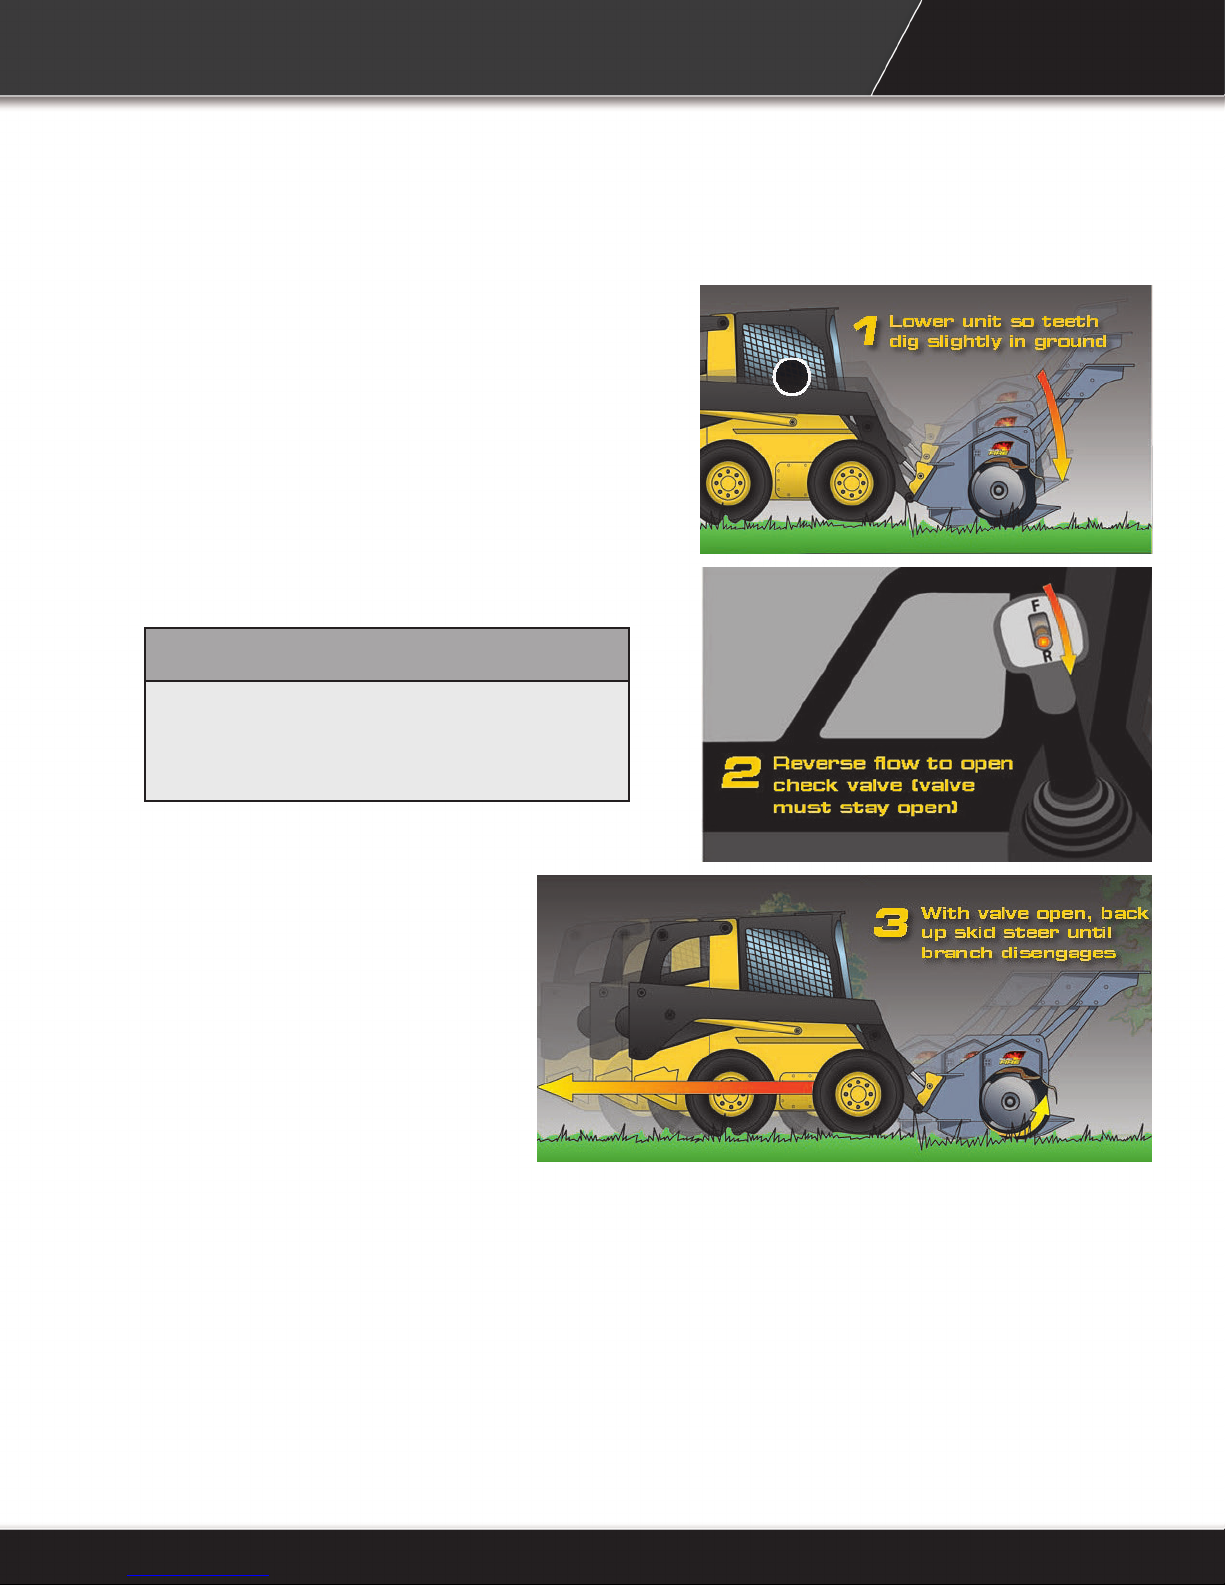
5.10 Clearing Jams
If the rotor stalls, stop rotor motion and raise
slightly and try again.
1. If still stalled, lower unit so teeth tips dig slightly
into sod.
2. Reverse hydraulic ow. A freewheeling check
valve will let the pressure pass, but you still
must do this to open the hydraulic lock on the
rotor.
3. Back up skid steer and the branch will
disengage.
^ WARNING
Always turn off the skid steer and
disengage hydraulic drive before getting
off the seat and approaching the cutting
wheel�
17
Page 20

6 SERVICE And MAINTENANCE
6.1 Maintenance
Maintenance Chart
General Inspection Inspect the unit for any buildup of contamination
(dirt, stones, etc.).
Cutting Teeth The teeth bolts must be retighten every ten
minutes for the rst hour of use on a new
mulcher.
Cutting Teeth Check and replace one at a time as necessary.
With daily use expect to replace 4 to 6 teeth per
day. See Replace Cutting Teeth in this section.
Drive Belt Check belt tension, alignment and inspect belt
for wear or damage. Replace damaged or worn
belt.
Rotor Bearings Check bearings for side-to-side and up/down
movement. Replace bearings if movement is
found.
6.2 Inspections
^ WARNING
Prevent serious injury or death caused
by unexpected movement:
1� Park skid steer on a level surface�
2� Engage skid steer park brake�
Inspect the unit for any buildup of contamination
(dirt, stones, etc.).
Check cutting teeth every 4 hours of use. Keep
cutting teeth in good condition. Unit will cut faster
and remaining teeth will last longer if broken teeth
are replaced.
Daily
First hour of use.
Every 4 hours.
Daily.
Every week.
3� Disengage hydraulic drive�
4� Shut off engine and remove key�
^ WARNING
Clean machine thoroughly before
service or maintenance procedures�
The health effects from exposure to
wood dust are due to chemicals in the
wood or chemical substances in the
wood created by bacteria, fungi, or
molds�
18
Page 21
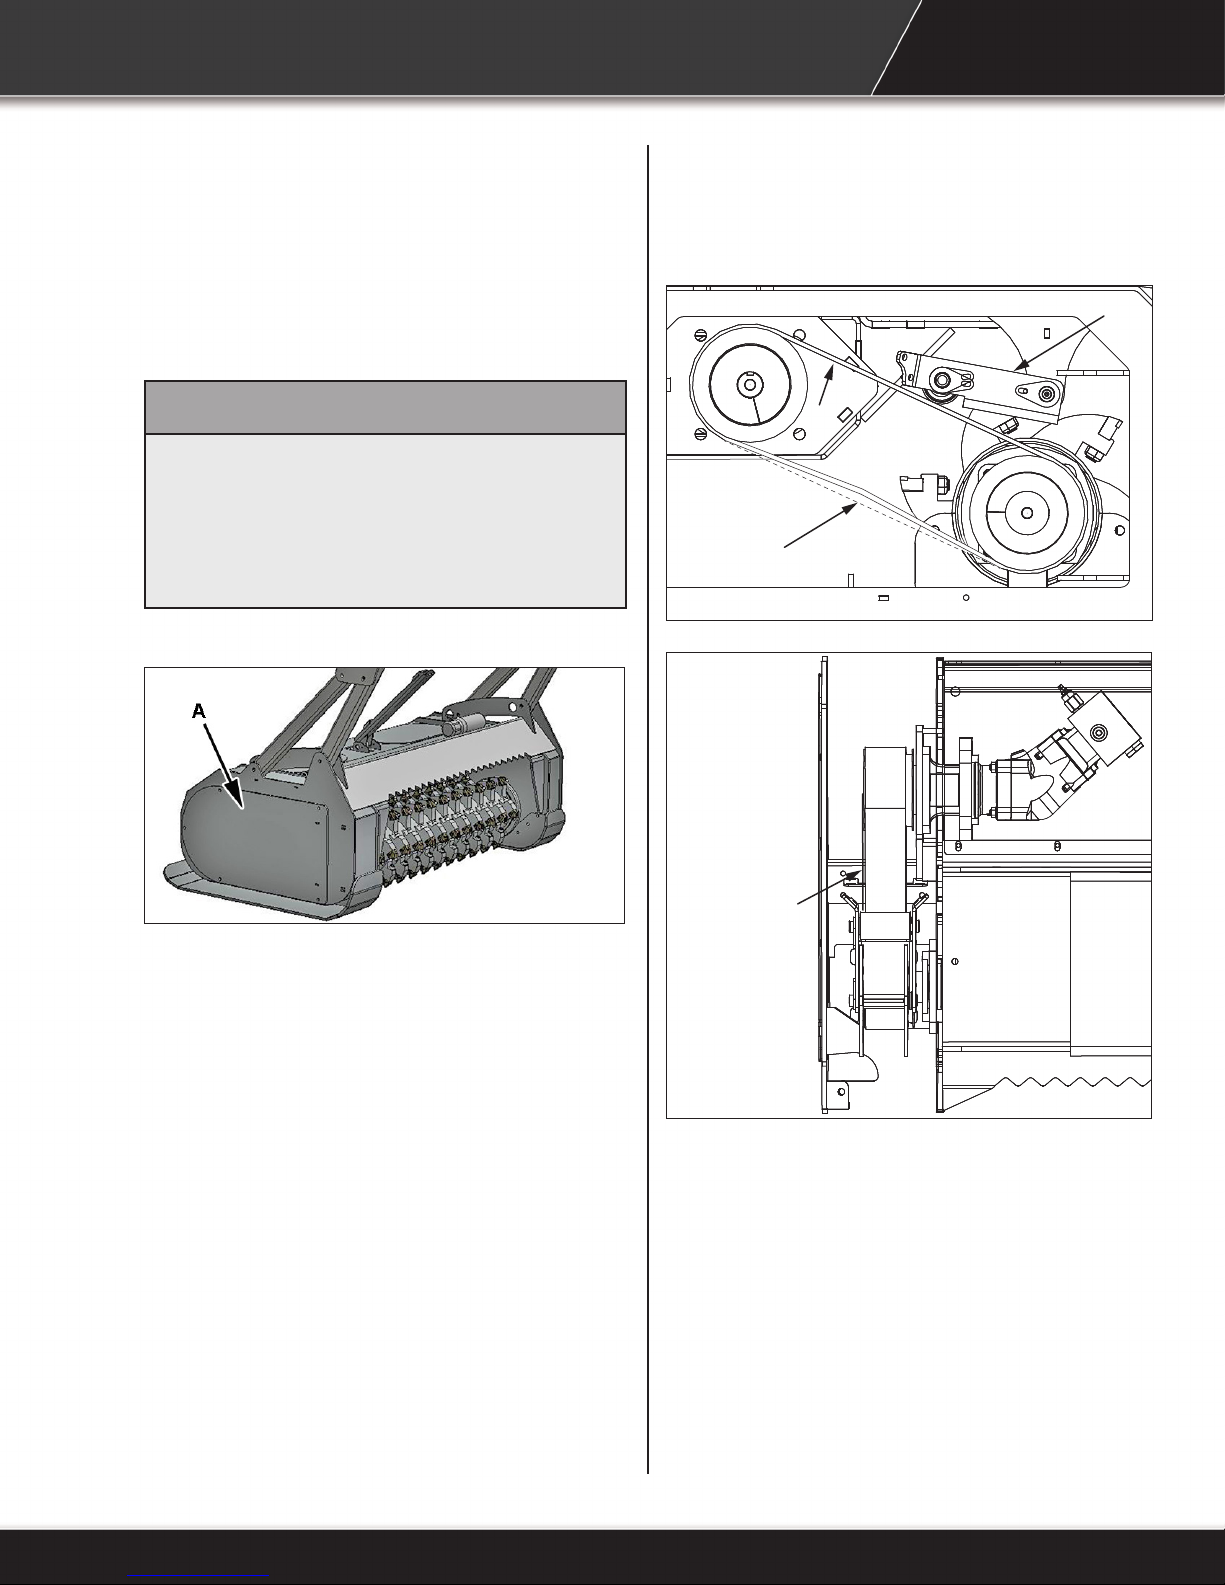
6.3 Check Belt Tension
1. Lower mulcher to ground.
2. Set parking brake, stop engine and remove
key.
^ WARNING
Moving parts can crush and cut�
Keep clear of moving components�
Follow lockout procedure before
servicing�
3. Open inspection cover (A).
C
B
D
4. Inspect belt (B) for wear, damage, alignment
and proper tension.
5. Adjust tension and tighten belt idler bracket
(C).
6. Belt deection (D) should be 0.5 in. (13 mm)
at 3.0 lbs of force for a used belt or 4.25 lbs of
force for a new belt.
7. Place a straight edge (E) on drive pulley and
rotor pulley. Pulleys must be aligned or belt will
wear quickly. Adjust pulleys if necessary.
8. Close inspection cover (A). Do not operate
mulcher with cover (A) open or removed.
E
19
Page 22
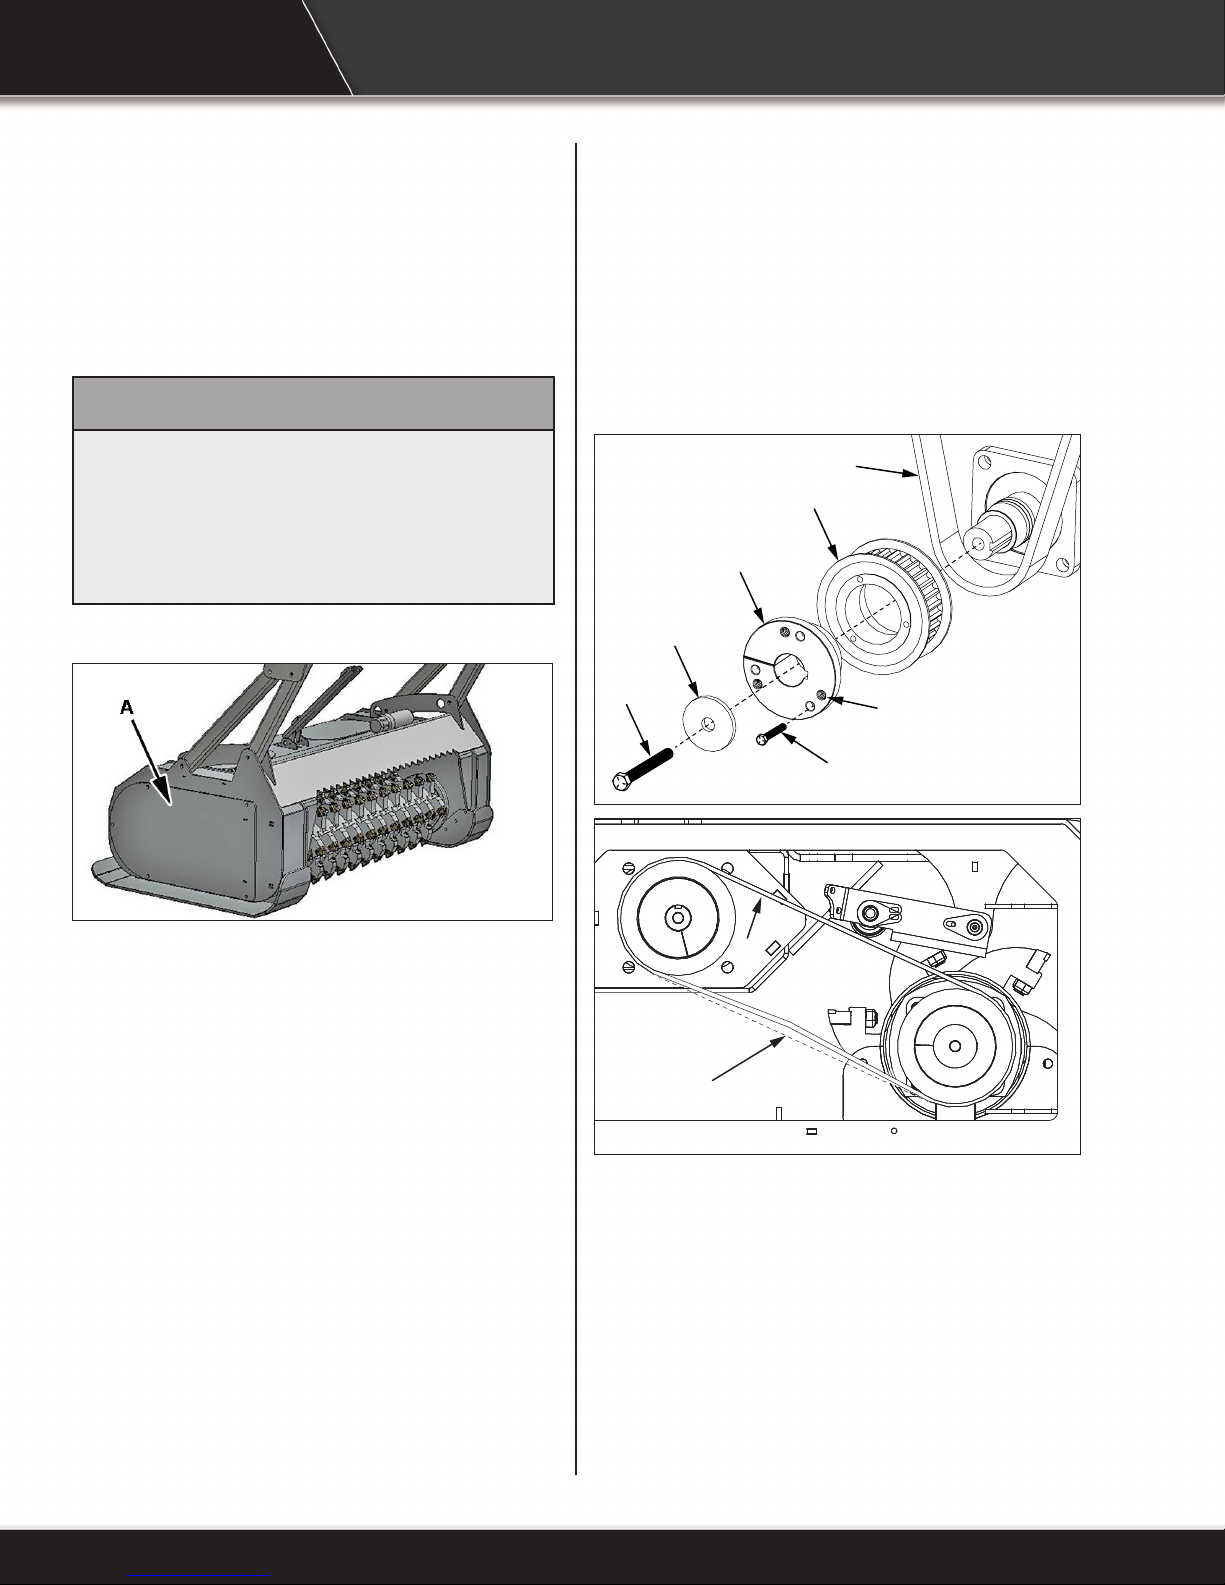
6.4 Replace Belt
1. Lower mulcher to ground.
2. Set parking brake, stop engine and remove
key.
^ WARNING
Moving parts can crush and cut�
Keep clear of moving components�
Follow lockout procedure before
servicing�
3. Open inspection cover (A).
13. Belt deection (I) should be 0.5 in. (13 mm) at
4.25 lbs of force.
14. Adjust tension and tighten belt idler bracket.
15. Close inspection cover (A). Do not operate
mulcher with cover (A) open or removed.
H
G
F
C
B
E
D
4. Loosen belt idler bracket.
5. Remove shaft pulley bolt (B) and washer (C).
6. Remove three hub bolts (D). Place hub bolts
into threaded holes (E) in hub (F).
7. Evenly tighten bolts to push pulley (G) off of
hub (F).
8. Remove hub, pulley and belt (H). If hub is stuck
to shaft, a puller may be required to remove
hub from shaft.
9. Install belt, pulley and hub onto shaft.
10. Install washer (C) and shaft bolt (B). Tighten
bolt.
11. Align pulley holes with non threaded holes in
hub (F) and install bolts (D).
12. Place a straight edge on drive pulley and rotor
pulley. Pulleys must be aligned or belt will wear
quickly. Adjust pulley alignment as necessary
and tighten bolts (D).
H
I
20
Page 23
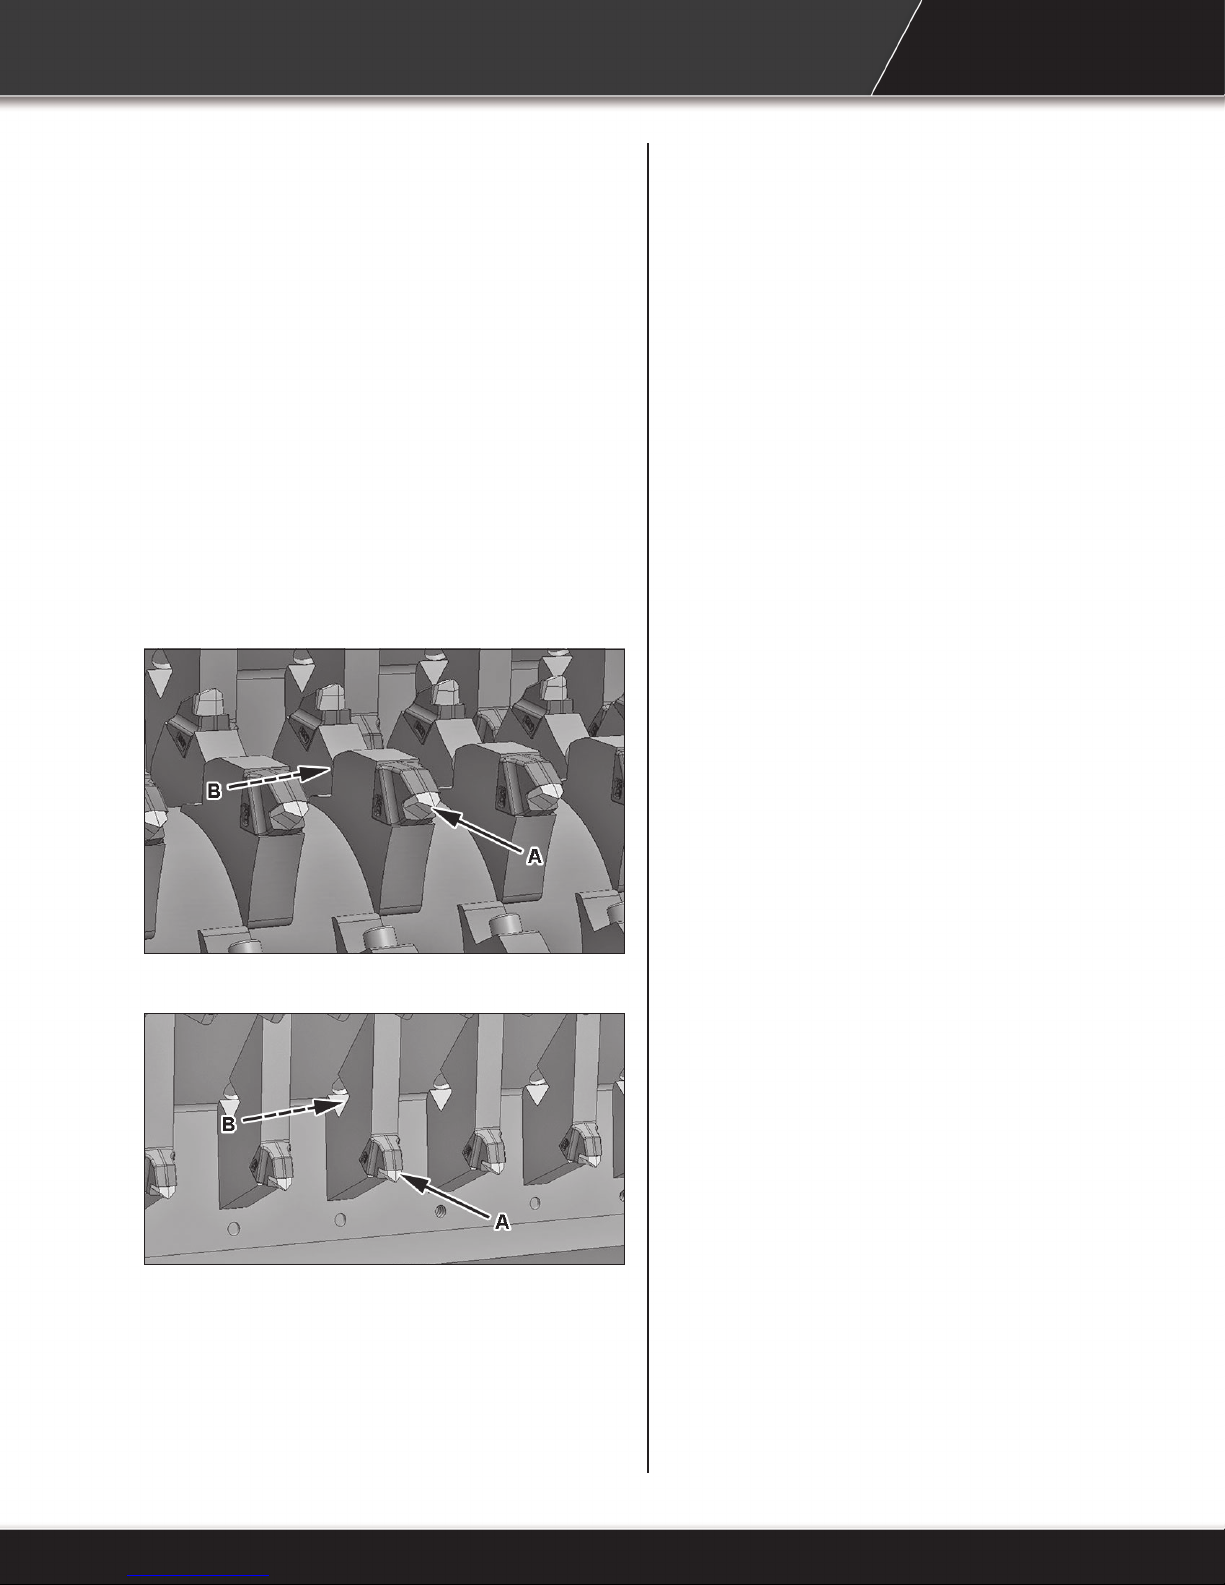
6.5 Replace Cutting
Teeth
1. Park skid steer and mulcher on a level surface.
2. Lower mulcher to the ground.
3. Shut off engine and remove key.
4. Inspect cutting teeth (A) for damage and wear.
Replace individual teeth as needed.
5. Remove socket head cap screw (B) and tooth
(A). Install new tooth.
6. Tighten socket head cap screw (B) to 170 lb/ft
(231 Nm) of torque.
Note: Parts breakdown can be found on
Baumalight’s website. www�baumalight�com
Rotor Tooth
Fixed Tooth (Rotor Removed For Clarity)
21
Page 24

7 TROUBLESHOOTING
PROBLEM CHECK SOLUTION
Rotor does not spin. Rotor jammed. Remove material from rotor. See
Clearing Jams.
Low oil level.
Low oil ow.
Low pressure.
Rotor rotates slow or sluggish. Low oil.
Check oil level in skid steer. Add if
necessary.
Check ow control on skid steer. See
your dealer.
Check valve open. See 5.10 Clearing
Jams.
Check oil level in skid steer. Add if
necessary.
Oil lter plugged.
Relief valve not set
properly.
Low oil ow.
Drive belt loose.
Excessive vibration. Cuting teeth worn or
missing.
Debris lodged in rotor.
Replace skid steer oil lter.
Set relief pressure to motor
specication.
Check ow control on skid steer. See
your dealer.
Tighten drive belt.
Replace worn, broken or missing teeth.
Remove debris.
22
Page 25

8 STORAGE
8.1 Storing Mulcher
1. Store mulcher in a dry place.
2. Clean mulcher thoroughly. Dirt and wood chips
will draw moisture and cause rust.
3. Check condition of cutting teeth. Replace as
necessary. (See Service and Maintenance
section.)
4. Check for loose or missing hardware.
5. Paint parts as necessary.
8.2 Removing Mulcher
From Storage
1. Review Operator’s manual and check
adjustments.
2. If parts have been replaced, verify they run
properly.
23
Page 26

9 WARRANTY
This product is warranted to be free of defects in materials and workmanship under normal use and
service, for a period of one year from the date of purchase, when operated and maintained in accordance
with the Operating and Maintenance Instructions supplied with this unit. This warranty does not cover
misuse or negligence.
Under no circumstances will the manufacturer be liable for any consequential damage or expense of any
kind, including loss of prots. The manufacturer is under no circumstances liable for skid steer damage
of any kind. The manufacturer is not liable for the maintenance of the product.
This warranty is extended only to the original purchaser. Warranty is void if repairs are attempted by
anyone other than an Authorized Service Center.
If a difculty develops with the product, you should contact your nearest Authorized Repair Center, or
distributor. Only these locations are authorized to make repairs to the product or affect the replacement of
defective parts, which will be done at no charge within a reasonable time after the receipt of the product.
Units or parts should be returned at the customer’s expense to the nearest repair location or Authorized
Service Center. Pack unit in a strong carton and pad tightly to avoid damage. Damage in-transit is not
covered by warranty. Include original purchase receipt with any claim (keeping a copy for your les).
The Manufacturer’s Liability is limited to repair of the product and/or replacement of parts and is given to
the purchaser in lieu of all other remedies including incidental and consequential charges. There are no
warranties, expressed or implied other than those specied herein. For the nearest Authorized Service
Center call the manufacturer.
Please note the following details and le this information in an appropriate place.
Model Number: ___________ S/N:_______________
Date of Purchase: _____________ Owner’s Name__________________________________
24
Page 27

25
Page 28

For parts, specications and the latest machine information please visit our website.
www�baumalight�com
26
MTB MFG INC.
CORPORATE HEADQUARTERS
4575 Powell Rd.,
Wallenstein, Ontario Canada
N0B 2S0
Phone - 519.698.9864
Toll Free - 866.820.5603
Fax - 519.698.1087
www�baumalight�com
 Loading...