

Page 1

VisioDesk
User Guide
Item number: 106010H04
User guide version: 1.5
English 06/2017
Page 2

Page 3

About BAUM 3
About BAUM
BAUM Retec AG has been a leading provider of products and services
for blind and visually impaired people for more than 35 years. The high
quality and innovative braille products, desktop magnifiers, reading
machines, and software solutions are developed and manufactured in
Germany, and are ideal for educational, professional and private use.
Our Mission
“We believe in independence for every person who is blind or visually
impaired. We passionately apply our skills and experiences toward
developing solutions that reinforce success at school and work, and
improve quality of life.
We always question the way things have been done in the past. We
explore new and innovative ways to solve problems. Our approach
includes ergonomics, thoughtful design, and materials that meet the
highest quality standards. We care deeply about our customers, and help
and support them as much as we can. We care about our employees
too, and support them to reach their highest potential, ensuring a secure
and lasting working environment.
We develop innovative technology solutions that provide independence
for people who are blind or visually impaired. Our high-quality solutions
allow visually impaired people to magnify their world, and blind people to
access electronic and print content with speech or braille output.”
Wolfgang Baum, Chief Executive
Page 4

Contents 4
Contents
1 ABOUT THIS USER GUIDE ............................................................................................. 5
2 ABOUT .............................................................................................................................. 6
3 BEFORE YOU BEGIN ...................................................................................................... 7
W
HAT COMES IN THE BOX? ........................................................................................ 7 3.1
4 HOW TO POSITION VISIODESK ON YOUR DESK ........................................................ 8
5 CAMERA POSITIONS .................................................................................................... 11
6 POWER ADAPTOR ........................................................................................................ 12
7 VISIODESK CONTROL PANEL ..................................................................................... 13
8 VISIODESK CONTROL PANEL BUTTONS – QUICK REFERENCE ............................ 14
9 BECOMING FAMILIAR WITH YOUR NEW VISIODESK ............................................... 15
S
WITCH OFF LIGHT .................................................................................................. 18 9.1
A
UTOFOCUS ........................................................................................................... 19 9.2
A
LTERNATIVE SET OF FALSE COLOURS ..................................................................... 20 9.3
10 EXTERNAL CONNECTIONS OF VISIODESK ............................................................... 21
USB
OUTPUT ......................................................................................................... 21 10.1
V
IDEO OUTPUT ........................................................................................................ 21 10.2
V
IDEO INPUT ........................................................................................................... 22 10.3
11 COMMON PROBLEMS AND SOLUTIONS ................................................................... 23
12 DEFECTS AND REPAIR ................................................................................................ 24
13 SERVICE BOX ................................................................................................................ 25
14 COMPLIANCES .............................................................................................................. 26
CE
CONFORMITY .................................................................................................... 26 14.1
FCC
CONFORMITY .................................................................................................. 26 14.2
E
NVIRONMENTALLY FRIENDLY DISPOSAL ACCORDING TO EU-DIRECTIVE 2012/19/EU27 14.3
15 WARRANTY ................................................................................................................... 29
16 FOR YOUR SAFETY ...................................................................................................... 30
17 TECHNICAL SPECIFICATIONS .................................................................................... 33
Page 5

About this user guide 5
1 About this user guide
Thank you for purchasing a VisioDesk from BAUM Retec. The purpose
of this manual is to provide the end user and/or their service provider
with details on how to use VisioDesk.
VisioDesk is a high-quality, German-made portable video magnifier,
which will provide you many years of reliable service. This manual
contains everything you need to know to use your new device.
As you will learn, VisioDesk is very easy to use. In addition to
instructions on how to operate VisioDesk, this manual also includes
recommendations for how to position your device, what to do if anything
goes wrong with the device, and important safety guidelines.
We suggest that you store this manual in a safe place for future
reference.
Notice for End Users in Germany/Europe
This manual is a part of the VisioDesk product, and should be kept with
the product at all times. In the event your VisioDesk is ever sold to a new
end user, this manual must be provided to them.
Copyright Notice
Copyright © 2017 BAUM Retec AG, Industriestr. 15, 74909
Meckesheim, Germany. All rights reserved. No part of this publication
may be reproduced or distributed in any form or by any means, or stored
in a database or retrieval system, without prior written permission from
BAUM Retec AG.
All efforts have been made to ensure that information contained in this
document is correct at the time of issue. Neither BAUM Retec AG nor its
representatives assume any responsibility for errors or omissions. Nor is
any liability assumed for damages resulting from the use of information
contained herein.
Licenses and trademarks
All licenses and trademarks are the property of their respective owners.
Page 6

About 6
2 About
Beautifully designed, high quality, very portable, simple to use, yet
powerful – this is the definition of VISIO. VisioBook and VisioDesk are
the smallest and most flexible members of the VISIO family.
VisioDesk can be folded flat when not in use, which combined with being
lightweight (10.5 lbs. / 4.8 kg) makes for an extremely portable device.
Best of all, VisioDesk is battery powered, running for 6 hours before you
need to recharge it.
VisioDesk features a full HD camera, a 15.6” display (16:9 format, full
HD), with high contrast and power saving LED backlight. Thanks to the
full HD camera VisioDesk provides a bright and crisp image even at the
smallest magnification level. This is especially helpful for users with
retinitis pigmentosa (RP).
Despite being one of the smallest and lightweight devices, VisioDesk
provides the type of functionality you expect from a basic CCTV reader.
VisioDesk displays magnified text and images in your choice of full
colour, black on white, or white on black and a variety of false colours.
Autofocus is provided as well as optional fix focus for hand writing and
filling in forms. Thanks to its image optimizer feature VisioBook will
always provide an optimum image quality, ensuring that text is always
crisp and clear.
The VisioDesk camera can be pivoted in 4 four positions. So besides
viewing down on a sheet of paper, you may also use the distance view or
mirror positions of the camera. The display screen can be easily adjusted
to the height and angle you prefer.
VisioDesk will, in most cases, take documents of poor quality (e.g. faint
print, crumpled or dirty paper, etc.) and magnify them in high contrast.
However, despite all of our technical efforts, there will be some
documents that cannot be displayed properly. In these rare instances,
the full colour setting is the best setting.
Page 7

Before you begin 7
3 Before you begin
Please read the safety instructions at the end of this manual and check
the contents of the packaging.
What comes in the box? 3.1
1 VisioDesk
1 carrying bag
1 Power Adaptor
1 User Manual
1 Cleaning cloth for camera window and display
Page 8
How to position VisioDesk on your desk 8
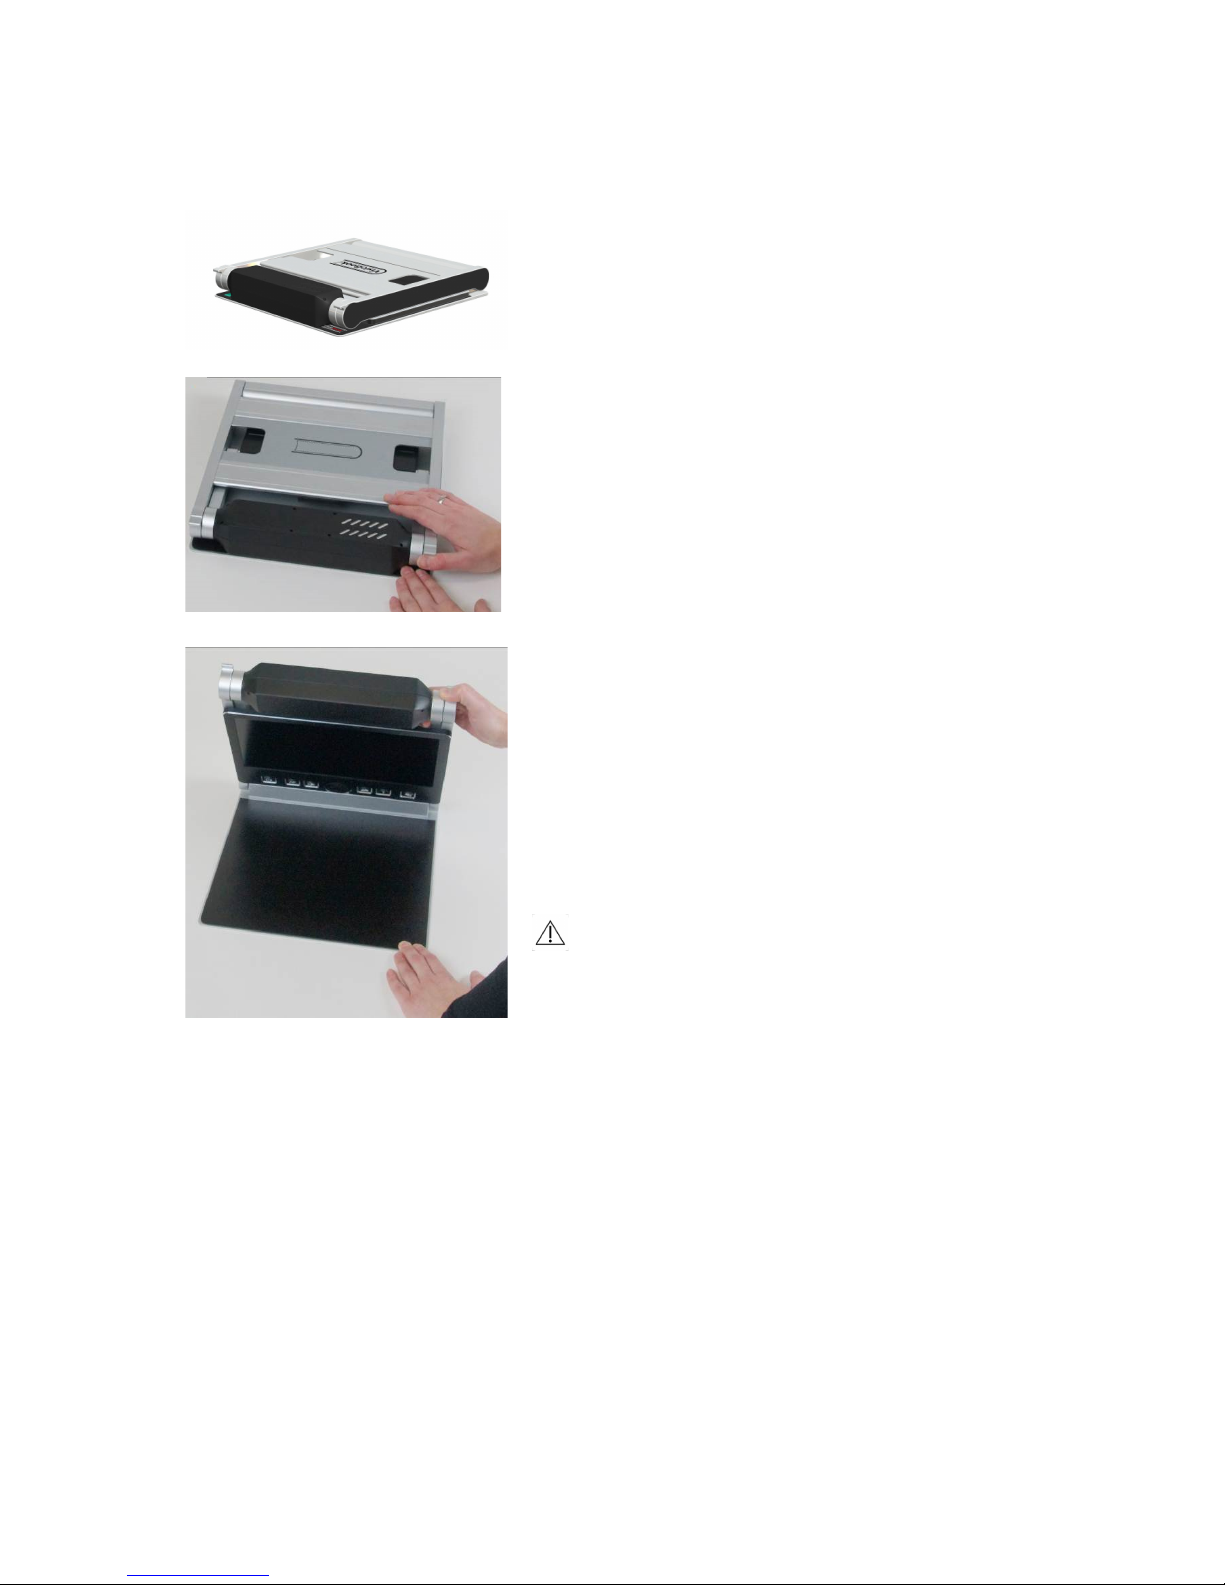
4 How to position VisioDesk on your desk
Place folded VisioDesk on the table, with
the front end approximately 8 inches (20
cm) from the edge of table.
Hold down base plate with one hand while
thumb of other hand grabs front corner of
one of the arms.
Lift arm until you feel it snap into position.
Warning: To avoid touching the
camera window, do not lift from the
camera housing!
Page 9
How to position VisioDesk on your desk 9
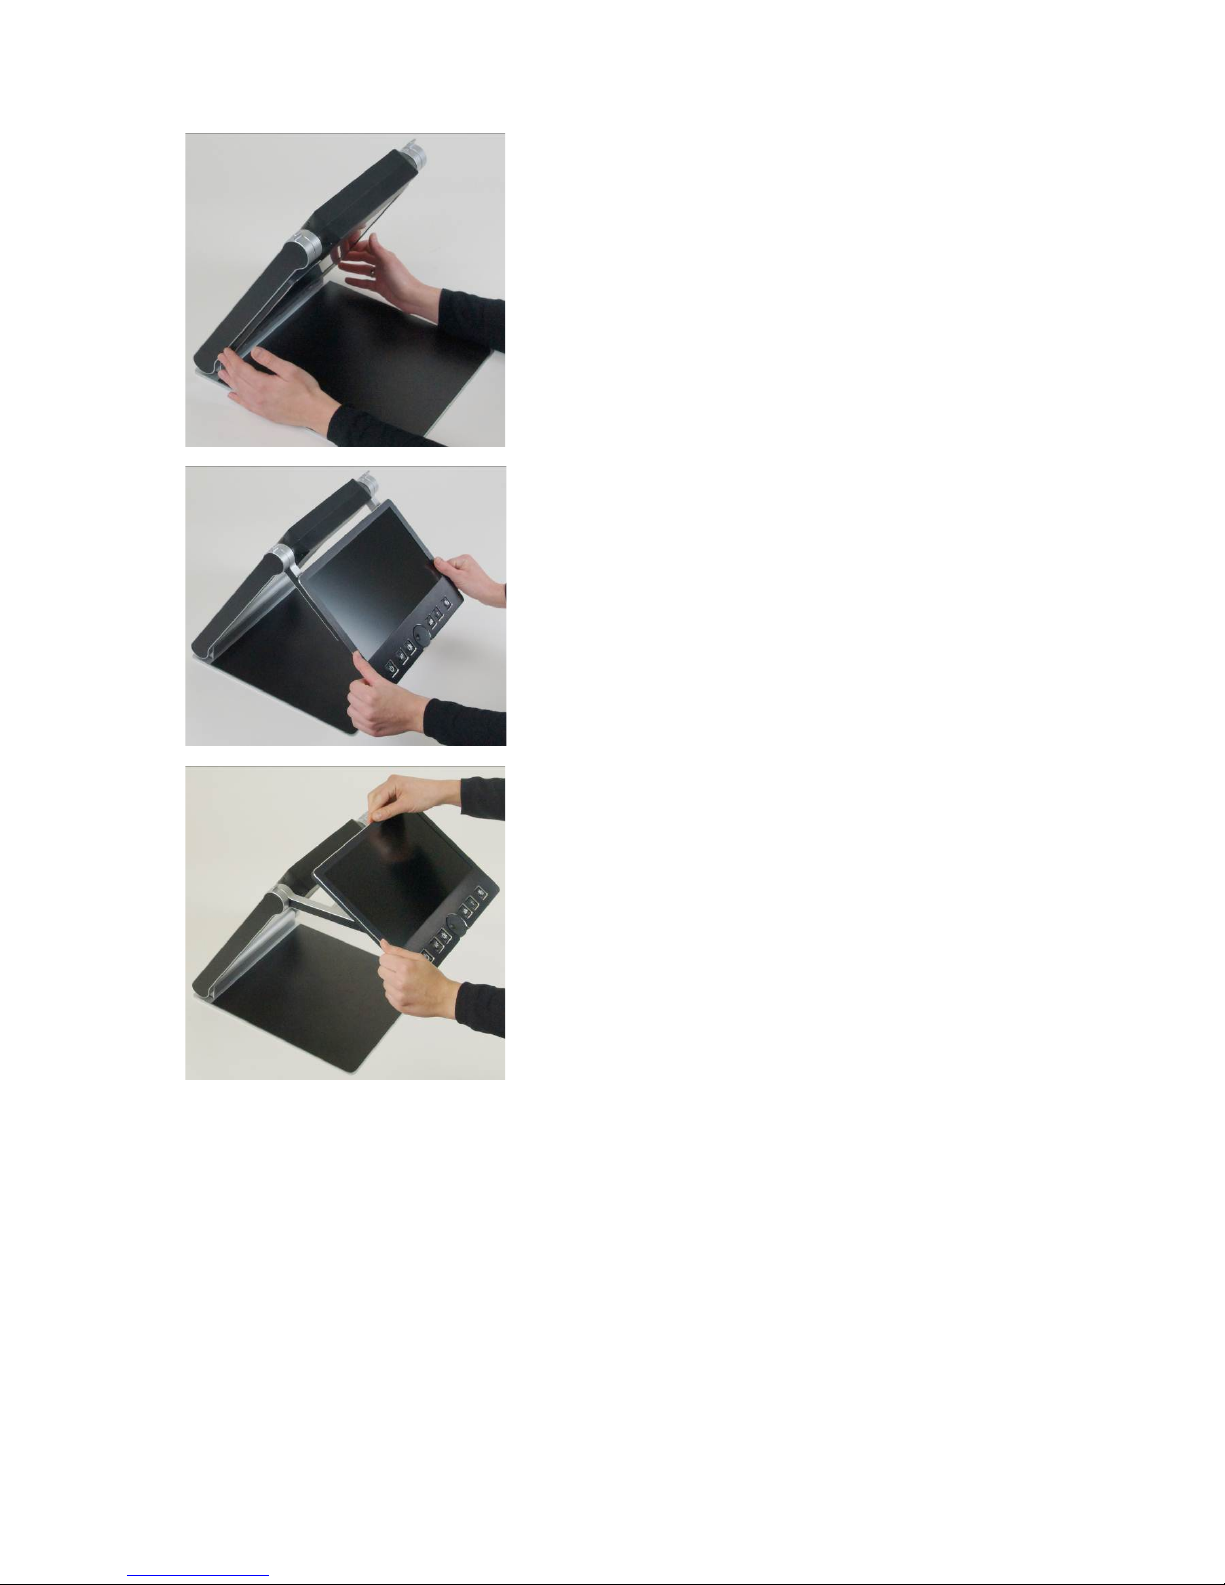
Now place your hands on both sides of
display.
Pull display towards your body…
…while swinging it slightly upwards.
Page 10
How to position VisioDesk on your desk 10
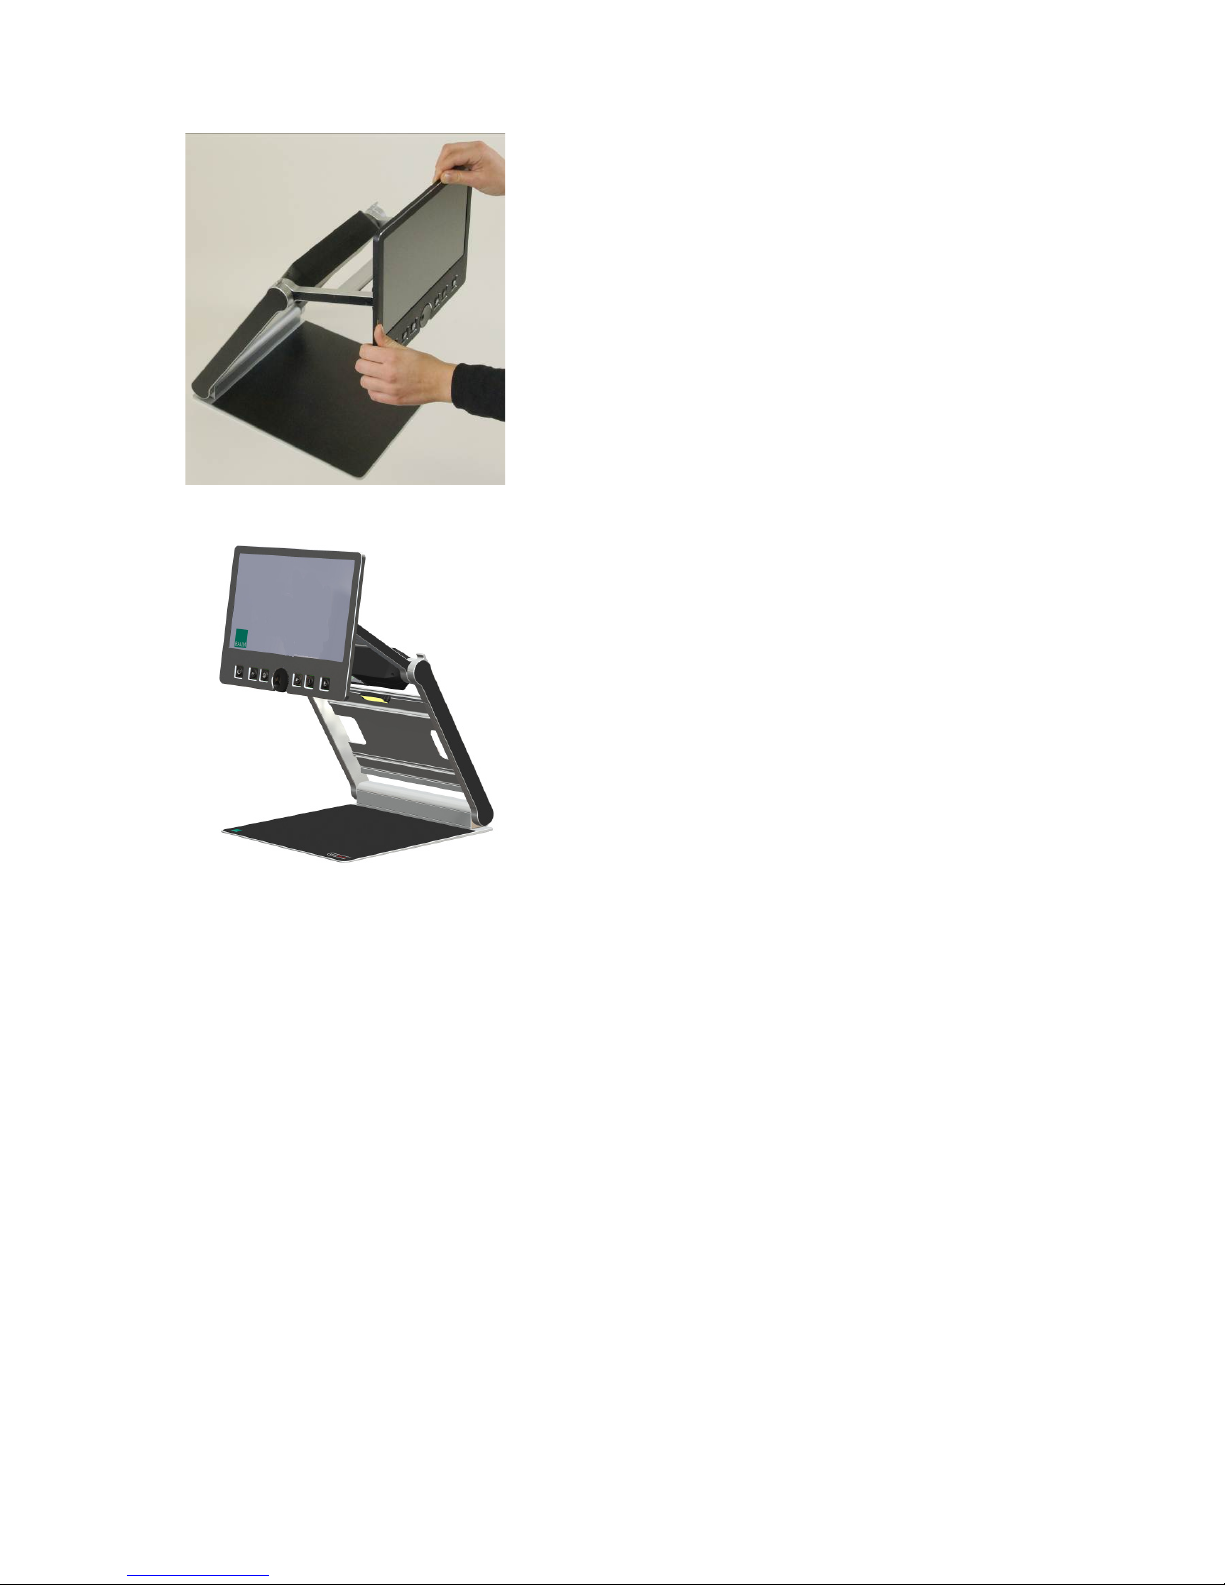
Adjust display to your preferred height and
tilt.
Grab side of camera and pivot camera
from transport position in downward
position directing slightly to you. Camera
now faces towards front edge of base.
From transport position, this is the second
snap in position.
If you want to fold VisioDesk shut, proceed in reverse order. Pivot the
VisioDesk camera unit to the transport position for folding. This is the
second snap in position. The two rubber straps will then rest on the
bottom plate when shut. VisioDesk will switch off automatically once the
device is folded shut.
Page 11
Camera positions 11
5 Camera positions
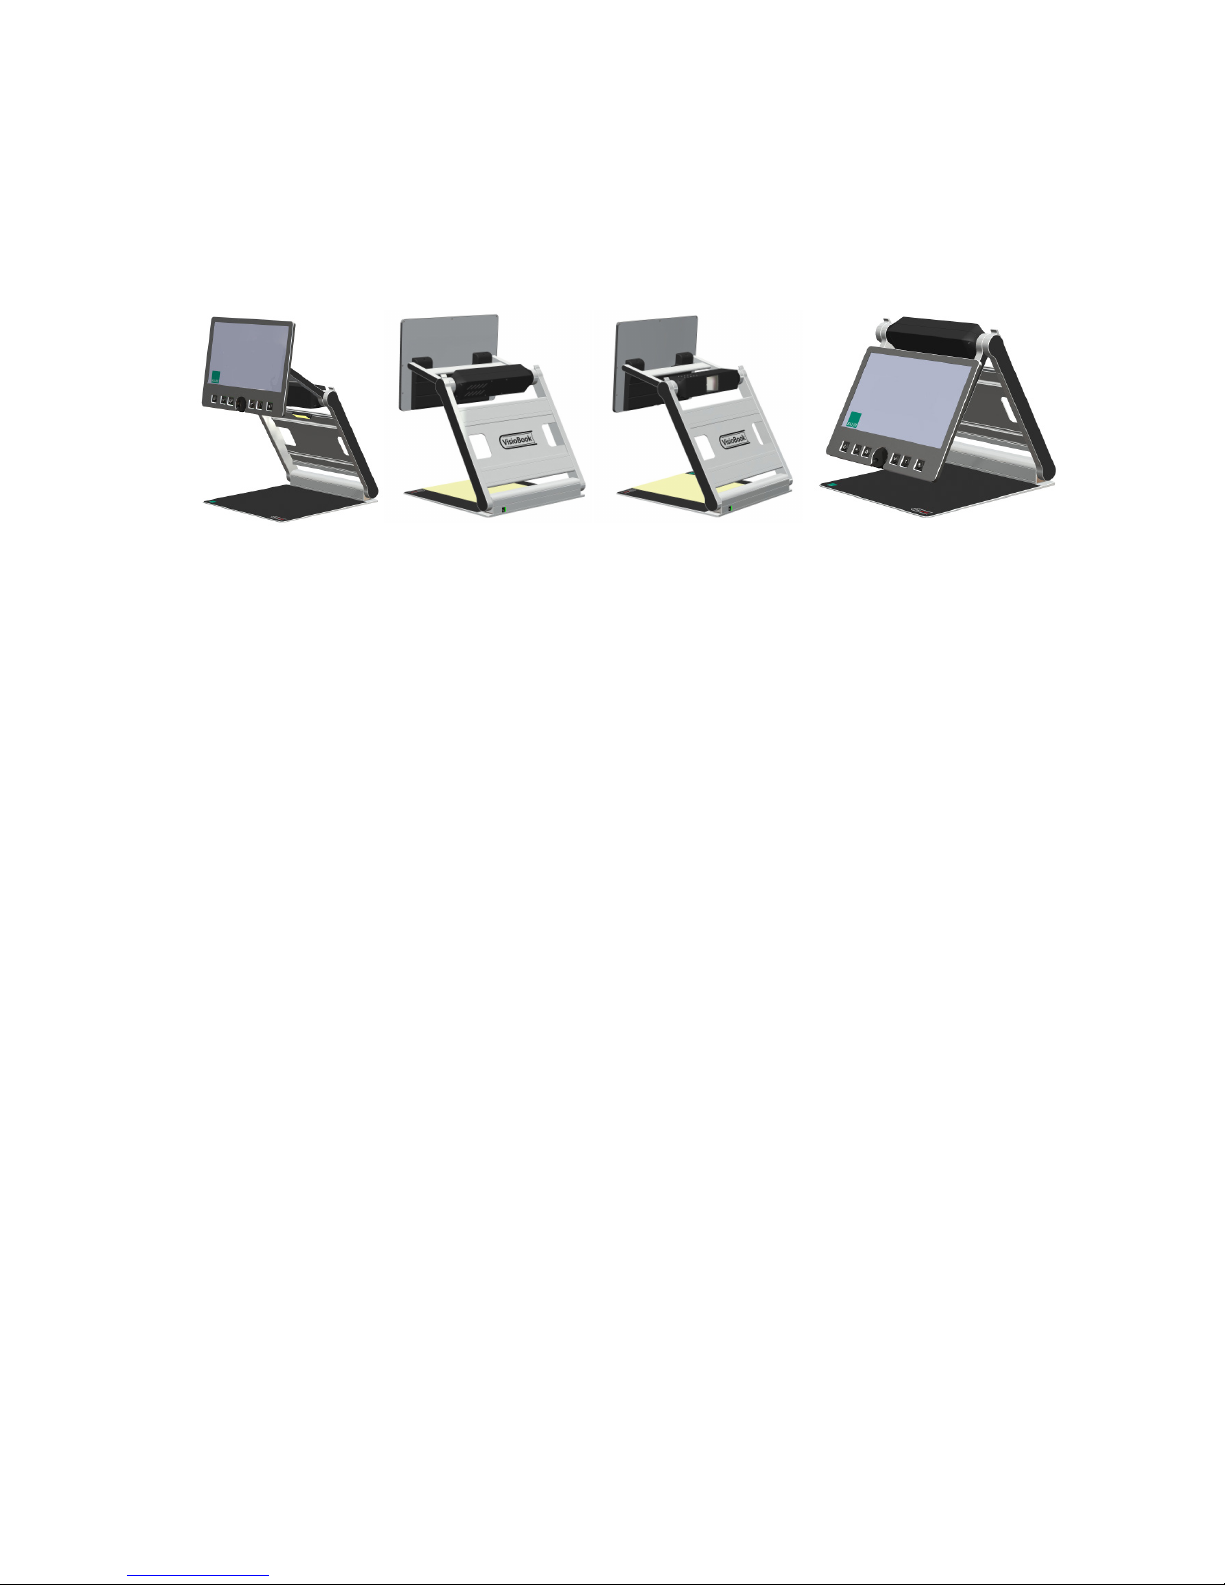
After unfolding VisioDesk, the camera can be pivoted to 4 positions. The
close up lens will slide in automatically if required.
Snap in position directing straight down on ground plate. For viewing
small objects.
The next snap in position is the normal reading position. The camera
unit is tilted slightly to the front. This is for normal reading (any image
distortion will automatically be corrected as the autofocus takes
effect). The camera looks toward the front edge of the base. In other
words, if you put a page on the base, the camera will look at the
bottom of the page. Thus by moving the paper (up, down, left, right),
you can read the entire page.
Far view position to the front, camera facing away from user, for
reading from a black board etc. Camera does not snap in allowing you
to adjust viewing angle.
Mirror position. Pull display down below camera and pivot camera
window to front, so your face will be shown on display. This position
also does not snap in.
The third snap in position is the transport position. Camera faces
down parallel to the arm. Wen folded shut, the two rubber straps on
camera will rest on the base, preventing it from scratches.
Page 12
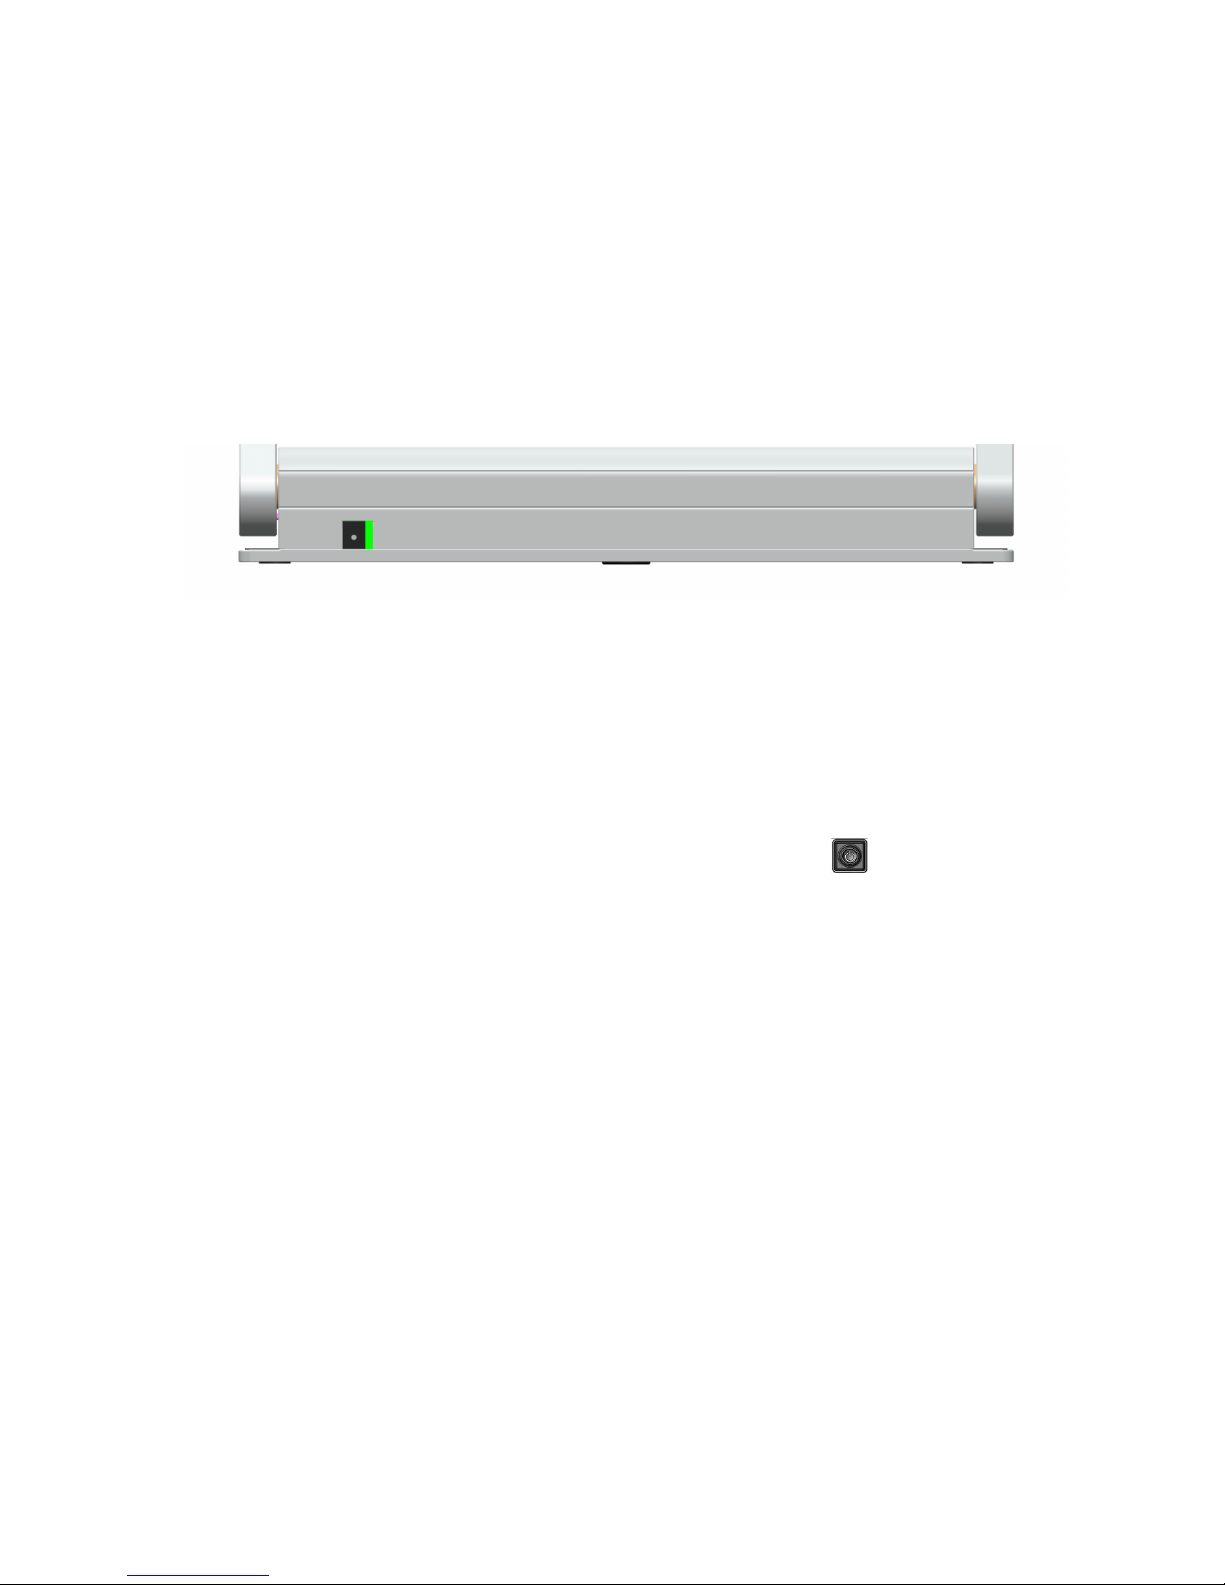
Power Adaptor 12
6 Power Adaptor
If you want to use VisioDesk for an extended period of time, or if you
need to charge the battery, connect one end of the power adaptor into
the back of your VisioDesk, and then plug the other end in to a power
outlet. The power control light on VisioDesk will turn orange while
charging of the battery takes place, and turn green when charging is
complete.
VisioDesk can be operated while charging of the battery takes place.
Charging will automatically end once the battery is full, so you can leave
it connected as long as you like.
When fully charged, the battery in VisioDesk provides about 5 hours of
continuous operation before you need to connect to a power outlet.
After power on or on a short press on the power button the battery
level will be shown as a battery symbol on the right side oft he display.
Battery is full, if symbol is filled completely. If power supply is connected
and charging, the battery symbol is filled with a flash sign.
Page 13
VisioDesk Control Panel 13
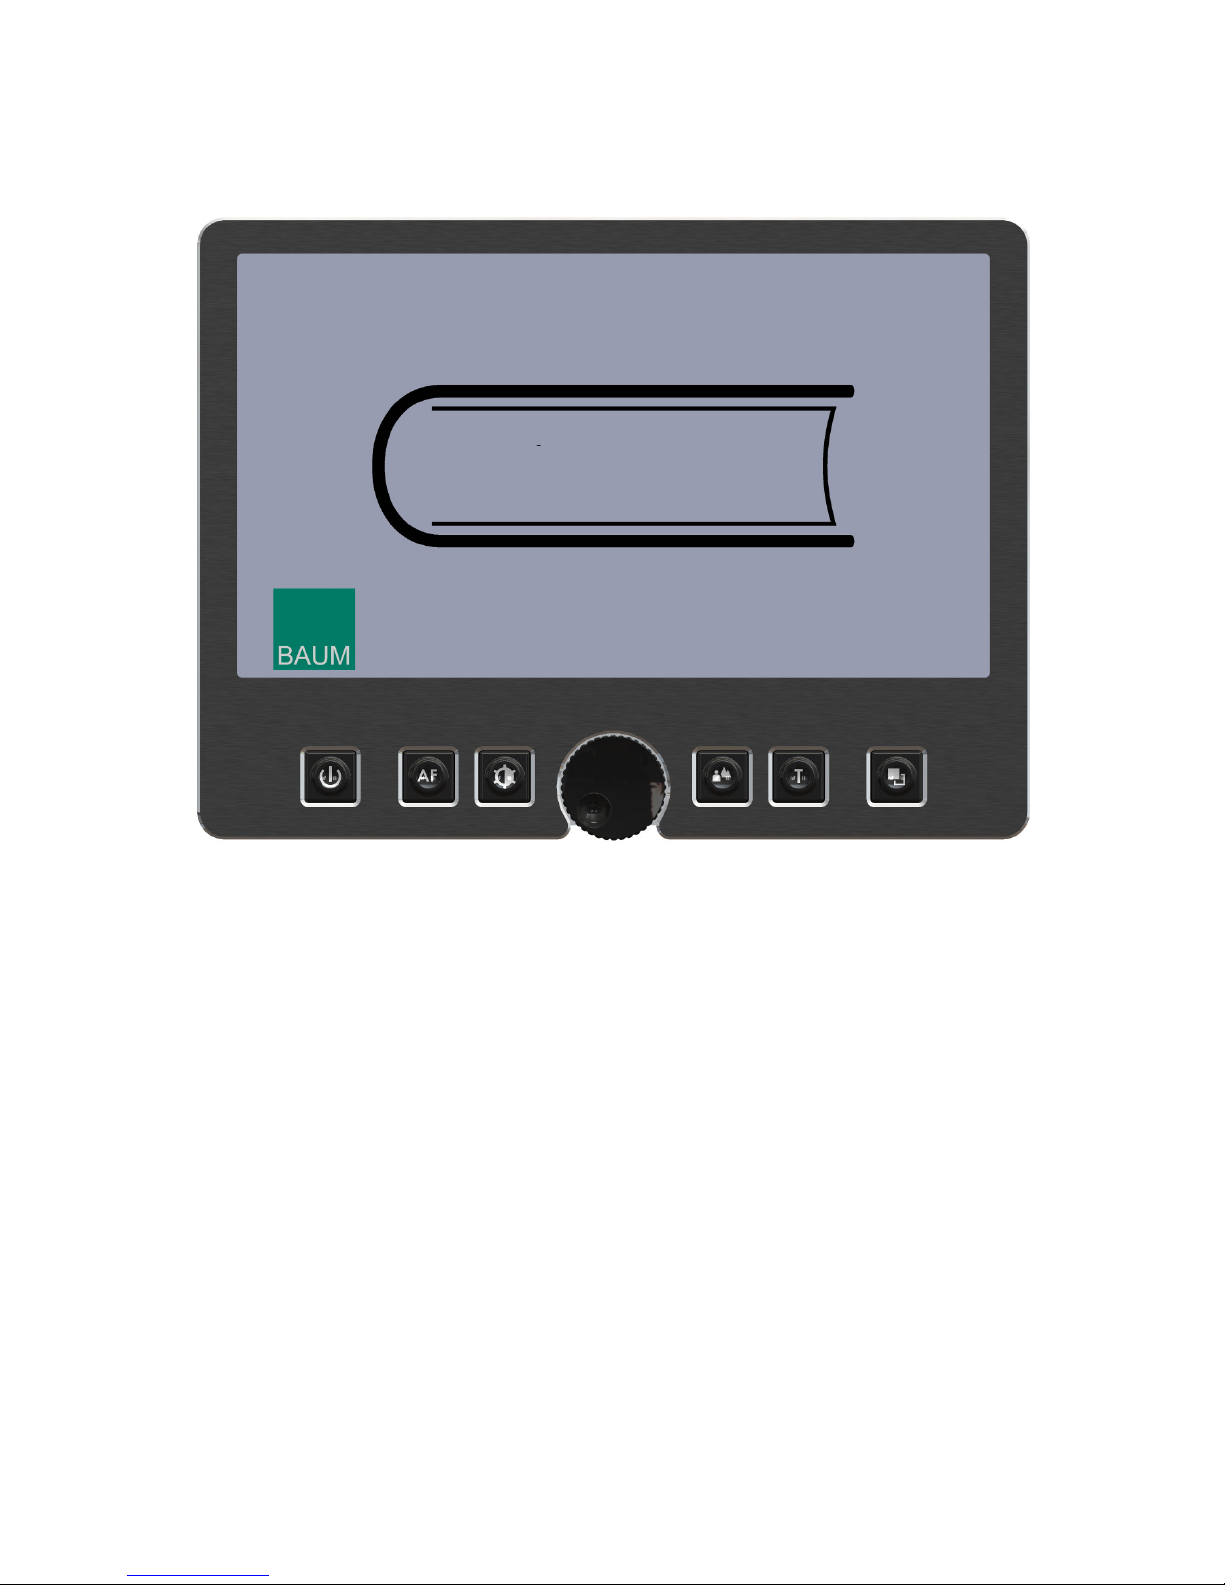
7 VisioDesk Control Panel
Page 14
VisioDesk Control panel buttons – quick reference 14
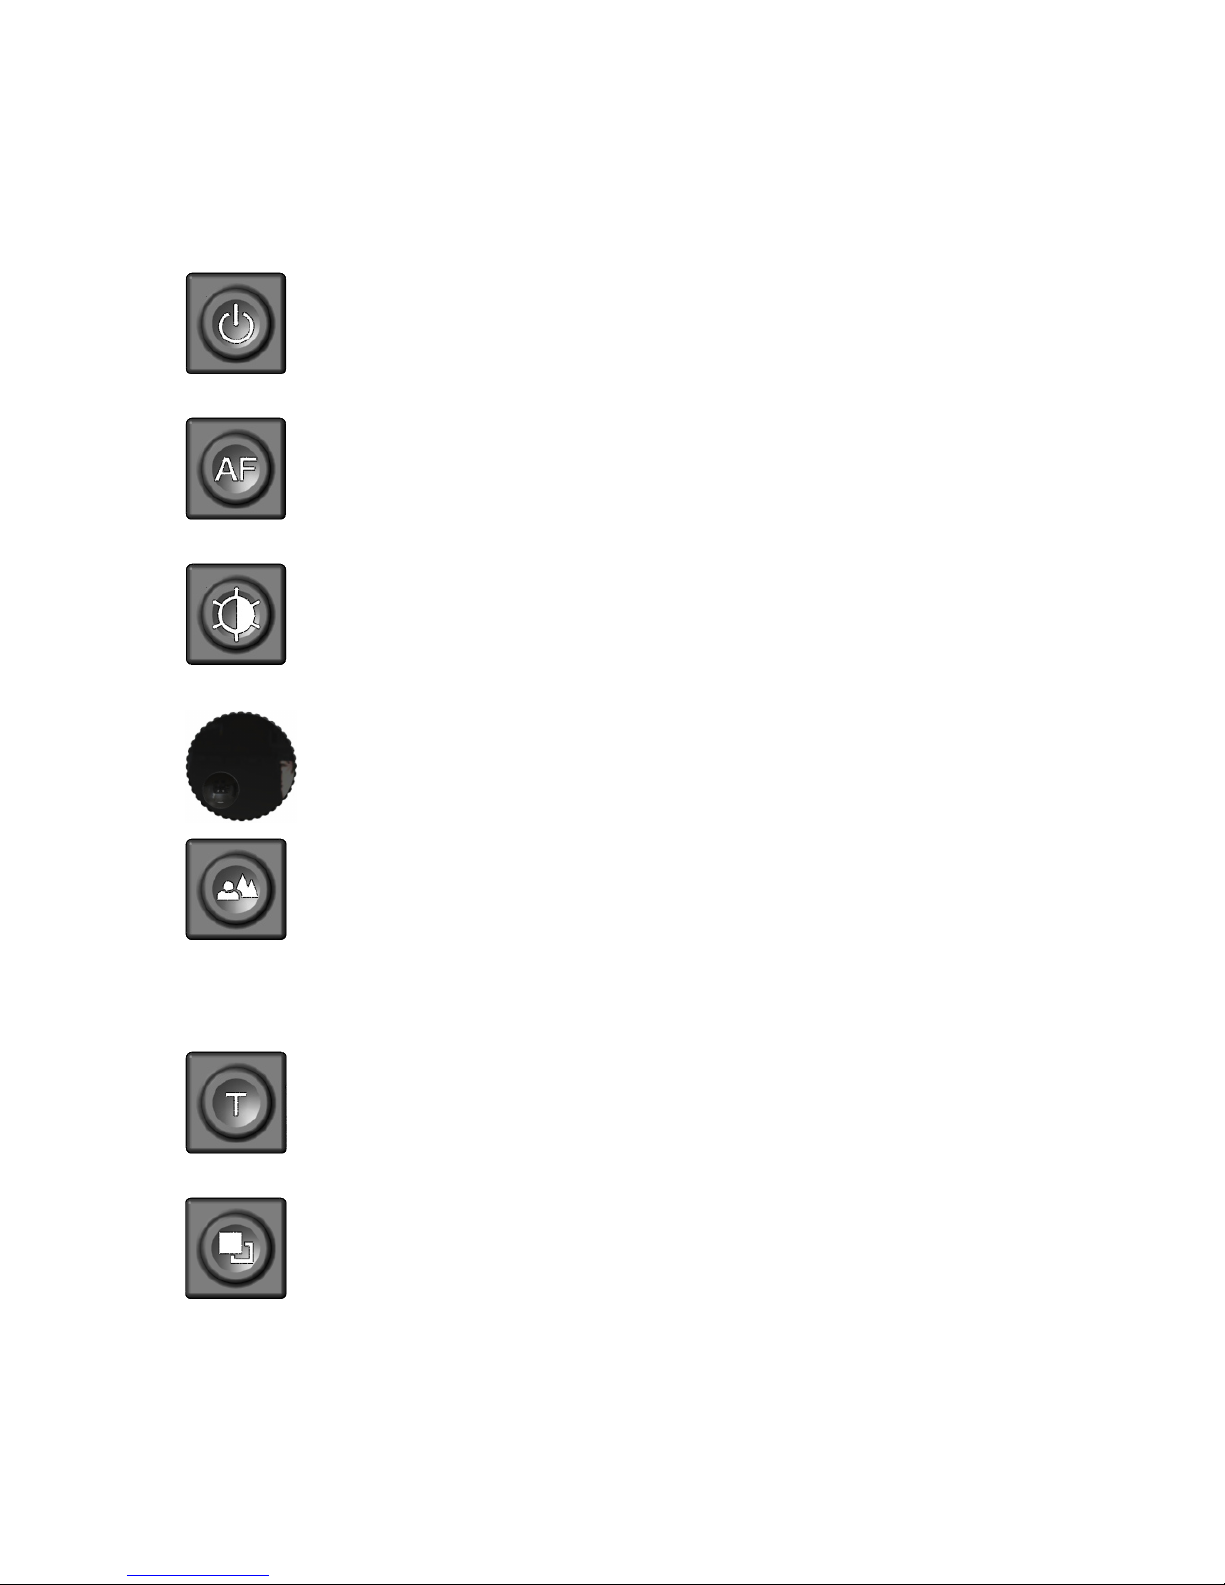
8 VisioDesk Control panel buttons – quick
reference
Power
Short press (until lights are on) will power up device.
Short press to show battery level.
Long press will switch off.
Auto Focus
Toggles Auto Focus on and off.
Auto focus on has always a sharp image.
Auto Focus off is for taking handwritten notes.
Image optimizer
selects one of five image quality optimizer settings for
viewing critical documents with low contrast or bad print.
Long press turns on/off light.
Zoom
Turn the circular dial counter-clockwise to decrease
magnification, and clockwise to increase magnification.
Picture
For viewing pictures or reading documents in true colours.
Also recommended for reading poor quality print and for
writing.
If PC is connected, toggle between PC image and camera
image.
Text - Reverse
Use text mode for reading. Contrast is enhanced so
reading is easier. Press again to toggle foreground and
background colours.
False Colours
In text mode: Press to cycle through 7 false colour modes.
(Use text button to reverse foreground and background).
White on black is recommended for reading.
In picture mode: toggle white balance between warm
reddish white, neutral white and cold bluish white.
Page 15
Becoming Familiar With Your New VisioDesk 15
9 Becoming Familiar With Your New
VisioDesk
You have already learned how to position VisioDesk on your desk, and
how to connect VisioDesk to the power adaptor. You can adjust height
and tilt of the display to your preferred position so that you can
comfortably view the screen.
Now, switch on VisioDesk and use it for the first time.
The control panel is located right below the screen. It consists of only
six buttons and a circular dial.
The power button is located in the lower left corner. A short press of
this button will switch VisioDesk on. As soon as the lights turn on, you
can release the power button. The display shows a start-up screen, after
a few seconds VisioDesk shows a magnified image. the battery level is
shown for a few seconds.
A short press on the power button will show the battery level again at
any time. The battery is full if the battery symbol is completely filled. A
flash sign on the battery symbol shows it is charging.
You can switch VisioDesk off by pressing the power button for more
than one second. This helps avoid accidentally switching off VisioDesk.
Now, let’s practice switching the device on and off a couple of times, and
then leave it switched on to proceed to the next step.
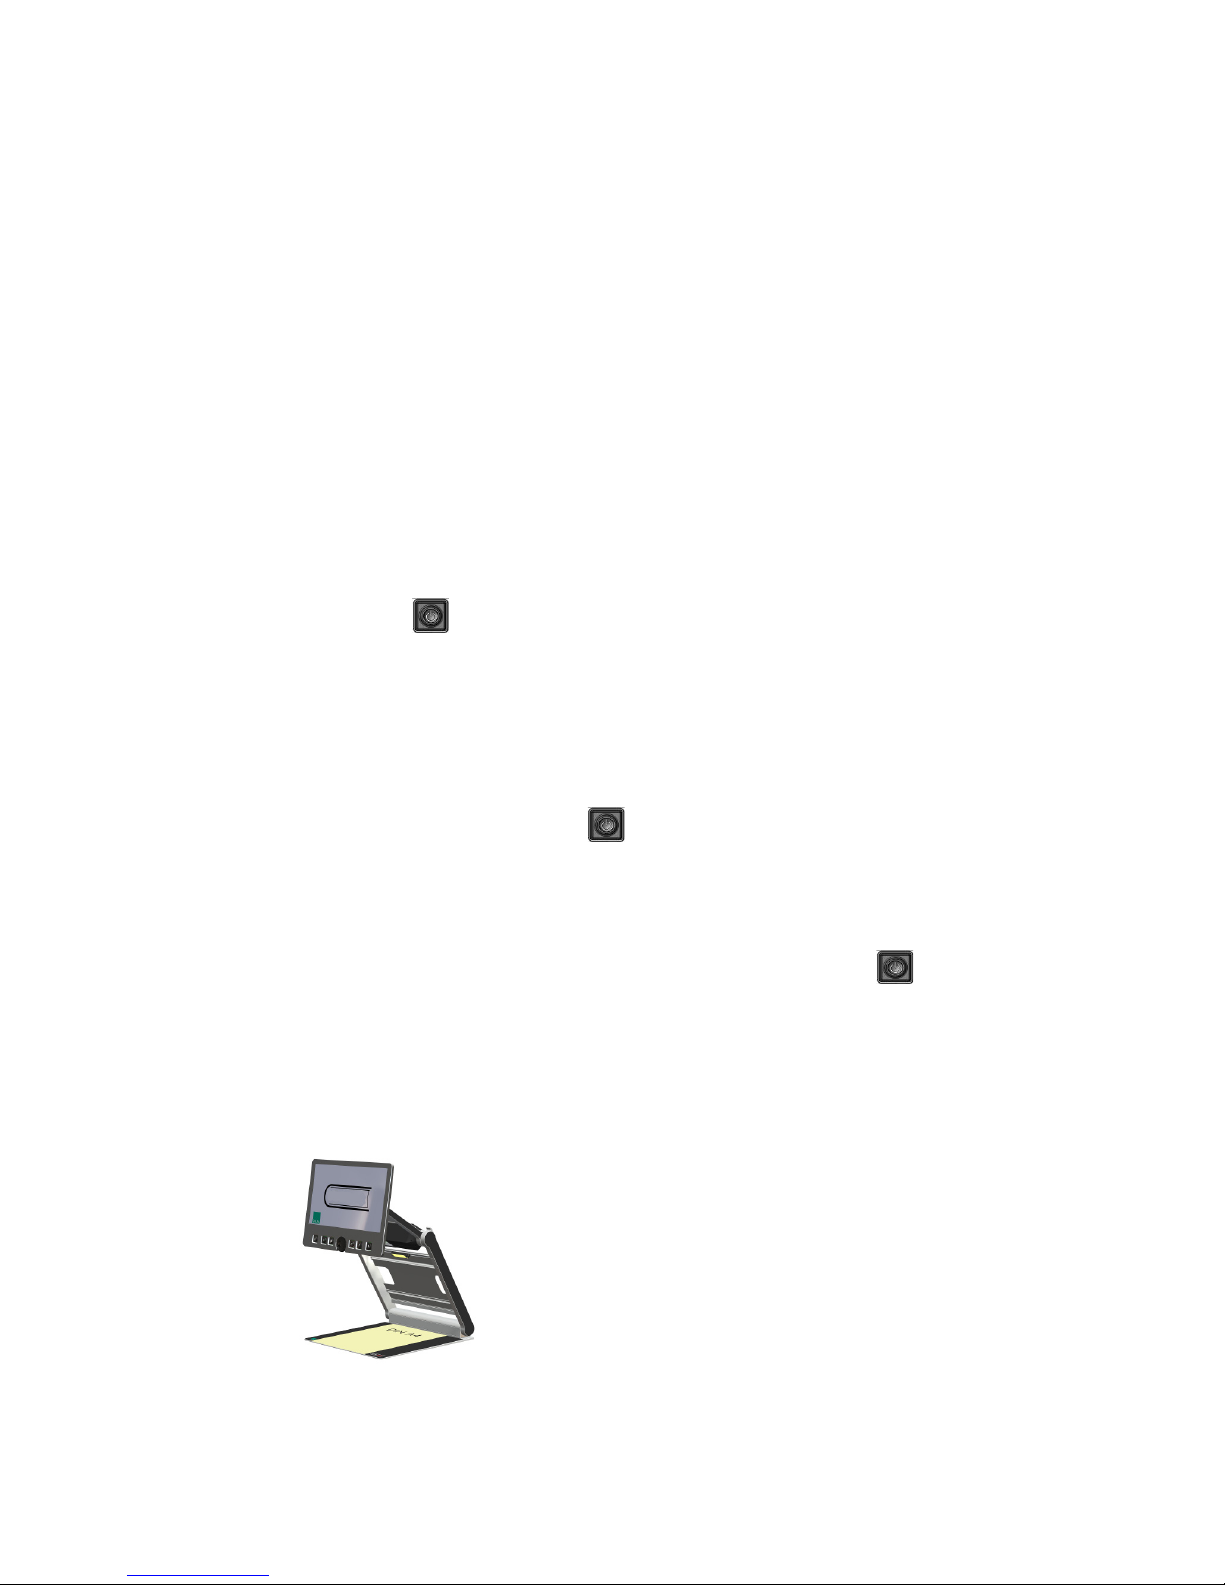
Place a document on the base
plate. We suggest something
coloured, such as a brochure or
magazine with text and images.
You can align a document
horizontally by moving it against
the silver rim in the back of the
base plate.
Page 16

Becoming Familiar With Your New VisioDesk 16
Let’s try the other buttons on the control panel. We have already learned
the power button, which you found in the lower left corner.
Direct your attention toward the lower middle part of the control panel.
There you will find a circular dial with a ridged edge. You may also notice
a small indented circle on the front face of the dial. This is the zoom
control dial, which controls magnification. Turning this dial clockwise
will increase magnification, while turning it counter clockwise will
decrease magnification. Turn the zoom control counter clockwise to the
start position to obtain minimum magnification now. The indented circle
will be at the 7 o’clock position when the dial is at the start position.
The minimum zoom level is not primarily intended for reading; rather, it
provides you with a better overview on the document structure. Thus you
can easily find the position you want to view at higher magnifications.
Now, press the picture button . This button is located to the right of
the zoom control dial. Pressing this button will set VisioDesk to true
colour.
The true colours are ideal for viewing images and also serves well for
reading poor quality print, and for writing or filling in forms. It provides all
natural colours in all shades.
Now, move the paper until you see one of the images of your document
appear on the screen. If the image is too small, increase the
magnification by turning the zoom control clockwise. If you get lost and
do not know where you are on the document, decrease magnification,
find your place on the page, and then increase magnification again.
NOTE: if you are using high levels of magnification, you may find it
easier to increase magnification in increments, make adjustments to the
placement of your document, and then repeat. If you move quickly from
the smallest to the largest magnification, what was once in the middle of
the screen will have disappeared.
Page 17

Becoming Familiar With Your New VisioDesk 17
Move the paper to a position where you see some text on the display.
Now press the text button . The text button is located to the right of
the picture button it is the second button to the right of the zoom control
dial.
The image will be displayed in high contrast now and in two false colours
only.
Press the text button again to reverse the image. In this mode, letters are
much clearer and brighter with higher contrast, whereas in true colours
you see all colours and shades of grey.
You see the difference? Black on white and white on black or any other
false colours in Text mode will show crisper characters in higher
contrast, whereas the true colour mode shows you real colours and all
shades of grey.
You do not like the colours shown in text mode? No problem! Let us
change them. You have a selection of seven false colour combinations
and with reversing foreground and background you will have 14 different
colour options. Try out by pressing the false colour button . This is
the rightmost button on the control panel. Each time you press it, the
colours will change. After you went through all 7 options it will start over
again. If you want to reverse foreground and background, press the text
button.
The available false colours are black-white, black-yellow, black-cyan,
black-green, black-magenta, blue-white and blue-yellow.
Select the colours you prefer with the false colour button and press the
text button for reversing foreground and background until you find the
option you prefer.
In picture mode, the false colour button has a different function. There
you may change the white balance. Press this button to toggle between
a warm reddish white, especially for viewing photos, a neutral white or a
cold bluish white that is good for reading coloured texts.
Page 18
Becoming Familiar With Your New VisioDesk 18
Now choose the setting you prefer for reading. Take all the time you
need to find out the best setting for your needs. Most users prefer white
characters on black background.
Note: VisioDesk remembers the last used colour setting that you made
before you turned it off.
Now that you have found your preferred settings, let us try to read some
more complex examples with poor quality print. In most cases, the
automatic contrast feature in VisioDesk will magnify your document and
present it in high contrast with crisp characters. Sometimes however, the
automatic contrast will not find the best setting. That may likely happen
with documents where the print quality is poor, or with coloured
characters that are printed on a coloured background. In these cases
you may want to experiment with the image optimiser button to find
the best settings. This is the third button from the left, directly left to the
zoom knob. The image optimiser button selects one of five levels of
optimisation. So if you do not get a good quality representation on
VisioBook’s display, simply press this button several times until you get
the best result.
This button works in picture mode as well as in text mode.
Note: You will often find the previous setting was the best one, so the
trick to get one step back is by pressing the button four more times.
Switch off light 9.1
When reading glossy paper or self-lighted displays like such of mobile
phones, then VisioBook’s light may cause reflections or blinding effects
on the camera image. In such cases you should switch off the light by a
long press on the image optimizer button . One more long press will
switch the light back on again.
Page 19

Becoming Familiar With Your New VisioDesk 19
Autofocus 9.2
VisioDesk has a permanent autofocus which is always active at power
on. That means, no matter how thick a book or how curved a page might
be, VisioDesk will always focus on the part displayed and thus always
present a sharp image on the display. This feature is also helpful when
reading text on a curved surface, such as a can or a medicine bottle. So
this is the setting you usually will prefer.
However, sometimes you want to fill in forms or crossword puzzles or
you want to paint your nails or view three-dimensional objects. This is
where fixed focus comes into play.
First, let us find that button. The auto focus button is the second
button from the left. Press it to toggle auto focus on and off. On the
screen “AF ON“ or “AF OFF” will be displayed for a few seconds
respectively.
Let us test how this works. If you have already played with this button,
press the auto focus button once or twice and check for “AF ON” being
displayed to make sure, automatic focus is on. VisioBook will magnify the
document on the base plate and display a sharp image. Put your hand
on the document now. VisioBook will magnify your hand and you see the
skin of your hand is focused now while the characters on your document
are blurred. The same may happen when you want to fill in a form.
Instead of showing sharp letters, VisioBook may focus on the back of
your hand holding a pencil. If you remove your hand, the characters are
sharp again.
So let us try the same with fixed focus now. Place a form on the base
plate. If VisioBook does not show sharp characters, press the auto focus
button. “AF ON“ will be displayed. Now that the characters are sharp,
press the auto focus button again to switch it off. “AF OFF“ will be
displayed. If you fill in the form with a pencil now, VisioBook will always
stay in focus on the characters and not on your hand. Once finished, do
not forget to turn auto focus on again by pressing the auto focus button.
Page 20
Becoming Familiar With Your New VisioDesk 20
Alternative set of false colours 9.3
VisioBook comes with two sets of 7 false colours each. The standard set
has very bright intense colours, with high contrast. This is appropriate for
most users.
The standard colours are: black-white, black-yellow, black-cyan, blackgreen, black-magenta, blue-white and blue-yellow.
For special needs, there is a second set of softer colours with less
contrast. This is especially helpful if you are sensitive to blinding effects
from high intensity light.
The alternative colours are: black-white, black-ivory, black-soft yellow,
black-soft peach, black-soft pink, blue-ivory, blue-white.
To switch between the two sets, press picture button and text button
simultaneously while pressing the power button on power on.
VisioBook will remember this setting, so you only have to do this once.
Page 21
External connections of VisioDesk 21
10 External connections of VisioDesk
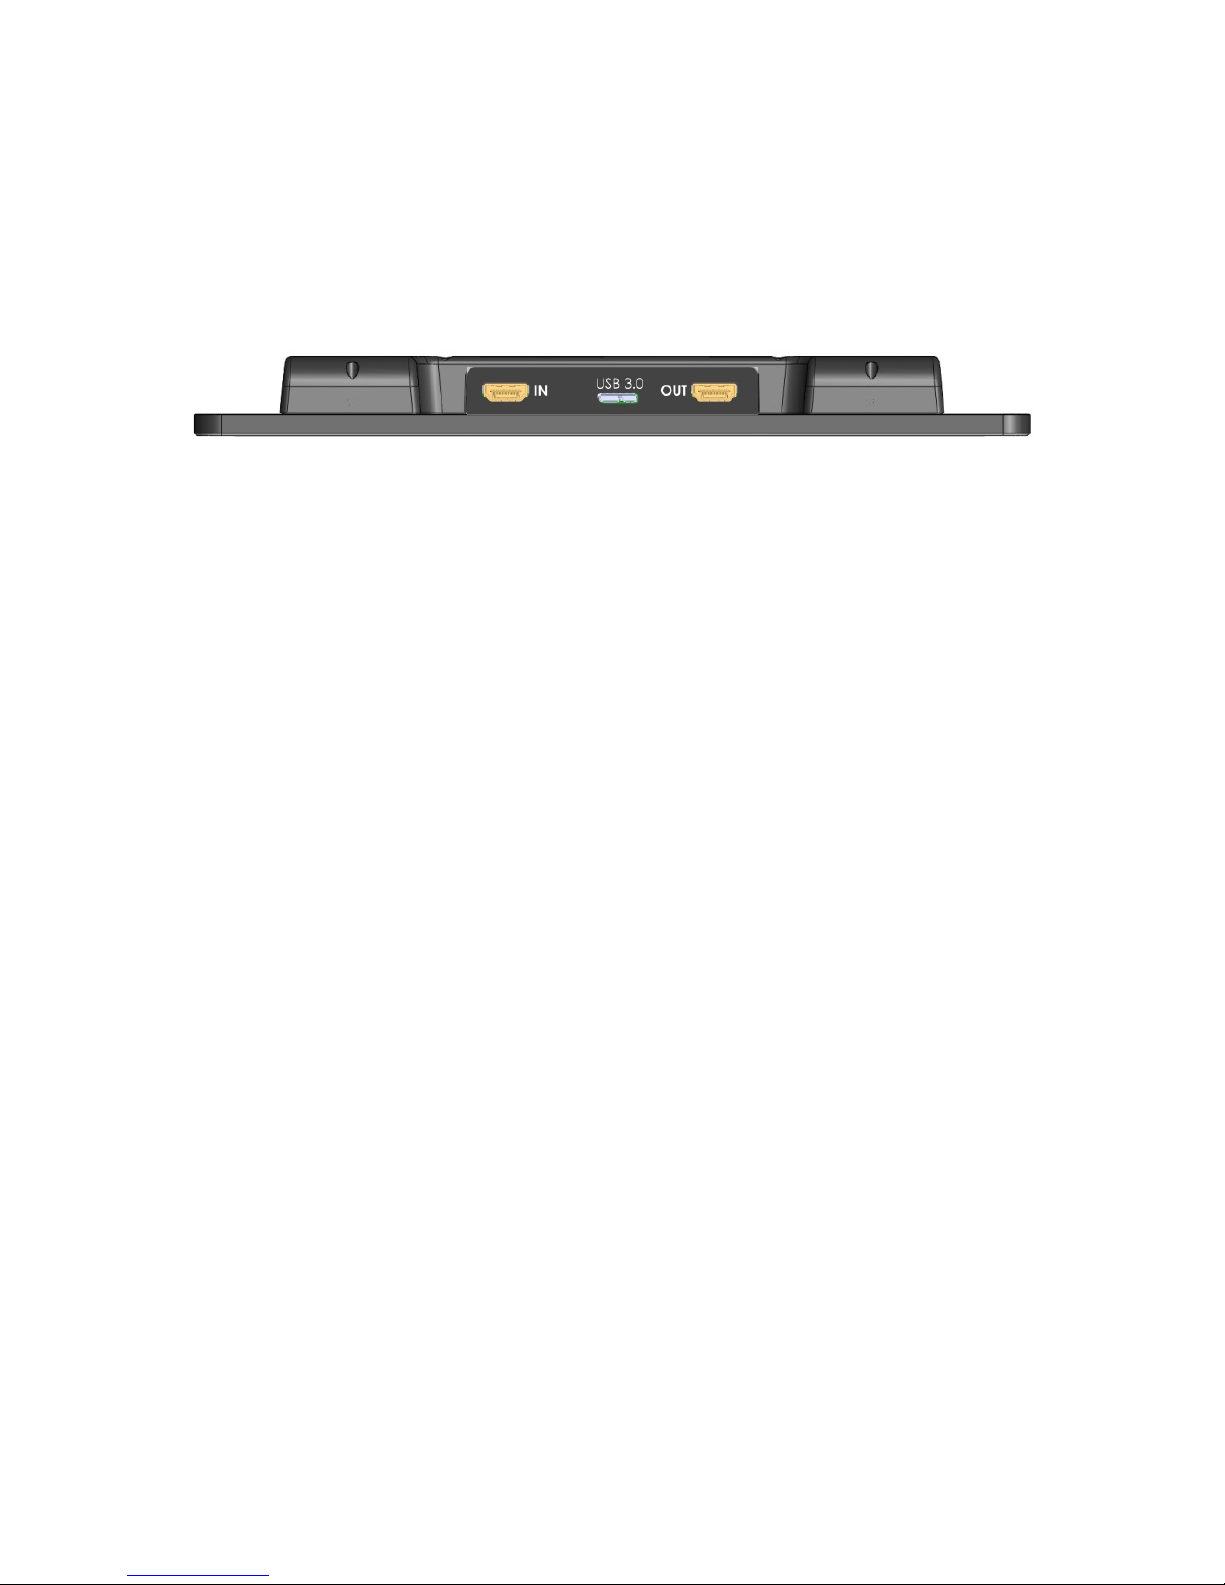
VisioDesk provides three sockets to connect external devices. In the
middle there is the USB 3 output, to the left a video input and to the right
a video output. All three sockets are located at the rear of the display.
USB Output 10.1
This micro USB 3.0 socket (labeled “USB”) is for connecting a PC.
VisioBook will be recognized as a standard camera device by Windows
XP, VISTA, 7, 8 and a MAC. No special drivers are required.
The video signal is full HD 1920 by 1080 pixels at a full frame rate of
60Hz. Smaller resolution are available for slower devices which cannot
handle full HD video.
Use a standard program like Amcap or VLC player or Media player
classic for Windows to view images transferred from VisioBook. You may
also save still images and videos. A special video software is not part of
VisioBook.
Video output 10.2
This HDMI socket (labeled “OUT”) provides a DVI-D signal with a
resolution of full HD 1920x1080 Pixels at a full framerate of 60Hz. It is for
connecting an appropriate display with HDMI input or – by using an
adaptor – DVI-D input. The monitor must support the above resolution.
The image will be shown on the external display as well as on
VisioDesk’s display.
Page 22

External connections of VisioDesk 22
Video input 10.3
This HDMI socket is for connecting a PC or another video source with
DVI-D signal in full HD 1920x1080 Pixel resolution at a full frame rate of
60Hz. The image will be shown on VisioBook’s display. (Copy protected
video signals are not supported).
Use the picture button to switch between camera image and external
video source.
You’re Ready!
You have now learned all there is to know about using VisioDesk. We
hope you will enjoy your new magnifier for many years to come.
Page 23

Common problems and solutions 23
11 Common problems and solutions
In the unlikely event that VisioDesk is not working properly, first try some
of the solutions below in order to address the problem. If this does not
help, please switch VisioDesk off, unplug the power cable from any
power source, and contact our service department.
Display and light remain dark
Please try to switch VisioDesk off and on again. If this does not help,
make sure the power adaptor is connected to both VisioDesk and wall
outlet and that wall outlet is live. You may want to connect another
device to the wall outlet to check.
Are all plugs seated properly in their sockets?
Are you using the correct power adaptor?
Image is blurred
Check if camera window is dirty. Turn the magnification control dial to the
middle position.
Press Auto Focus button. It must show „AF ON“, else wise press again.
Document cannot be read
Turn magnification dial clockwise to make sure the problem is not
magnification set to a level that is too low. Try changing the False
Colours - Picture button to view your document in a different setting.
Try different settings of image optimiser button.
Letters are flickering
Increase the magnification by turning the magnification control clockwise.
Try different settings of the False Colours - Picture button.
Try different settings of the Image optimiser button.
Page 24

Defects and Repair 24
12 Defects and Repair
What to do if VisioDesk stops working properly:
Did you check all settings and connections according to the manual?
Did you remove the protective plastic film from the camera lens?
Is VisioDesk plugged into a live power outlet?
If VisioDesk is not working, please disconnect from any power outlet,
discontinue using the device, and contact BAUM Retec or your
authorized BAUM Retec dealer.
To contact BAUM Retec please refer to the contact information below.
BAUM Retec, Inc. is your contact for any VisioDesk purchased/sold in
the USA. For all other customers, please contact BAUM Retec AG in
Germany.
We will help you first troubleshoot your VisioDesk. If we determine that
your device needs to be returned to us for repair, you will need to pack
the VisioDesk in its original packaging. If someone is assisting you,
please show them this manual so that they can refer to the proper
instructions for folding and packing VisioDesk, which can be found
further down this page.
Service Contact Information:
USA
BAUM Retec, Inc.
13 Branch Street, Suite 205
Methuen, MA 01844
USA
Tel: +1 855 620-7985
Email: [email protected]
World Headquarters
BAUM Retec AG - Service,
Industriestraße 15
74909 Meckesheim
Germany
Tel.: +49 6223 4909-0
E-Mail: [email protected]
Page 25

Service box 25
13 Service box
For shipping VisioDesk in the service box, proceed as follows:
Switch off VisioDesk
Unplug from any power source
Put display in upright position, swing it down and back against arms.
Then fold arms down to base.
Put VisioDesk into transport bag and put transport bag in service box.
Put 4 corrugated cardboard covers around transport bag and do not
forget power supply and cable.
Close the box.
Page 26
Compliances 26
14 Compliances
CE Conformity 14.1
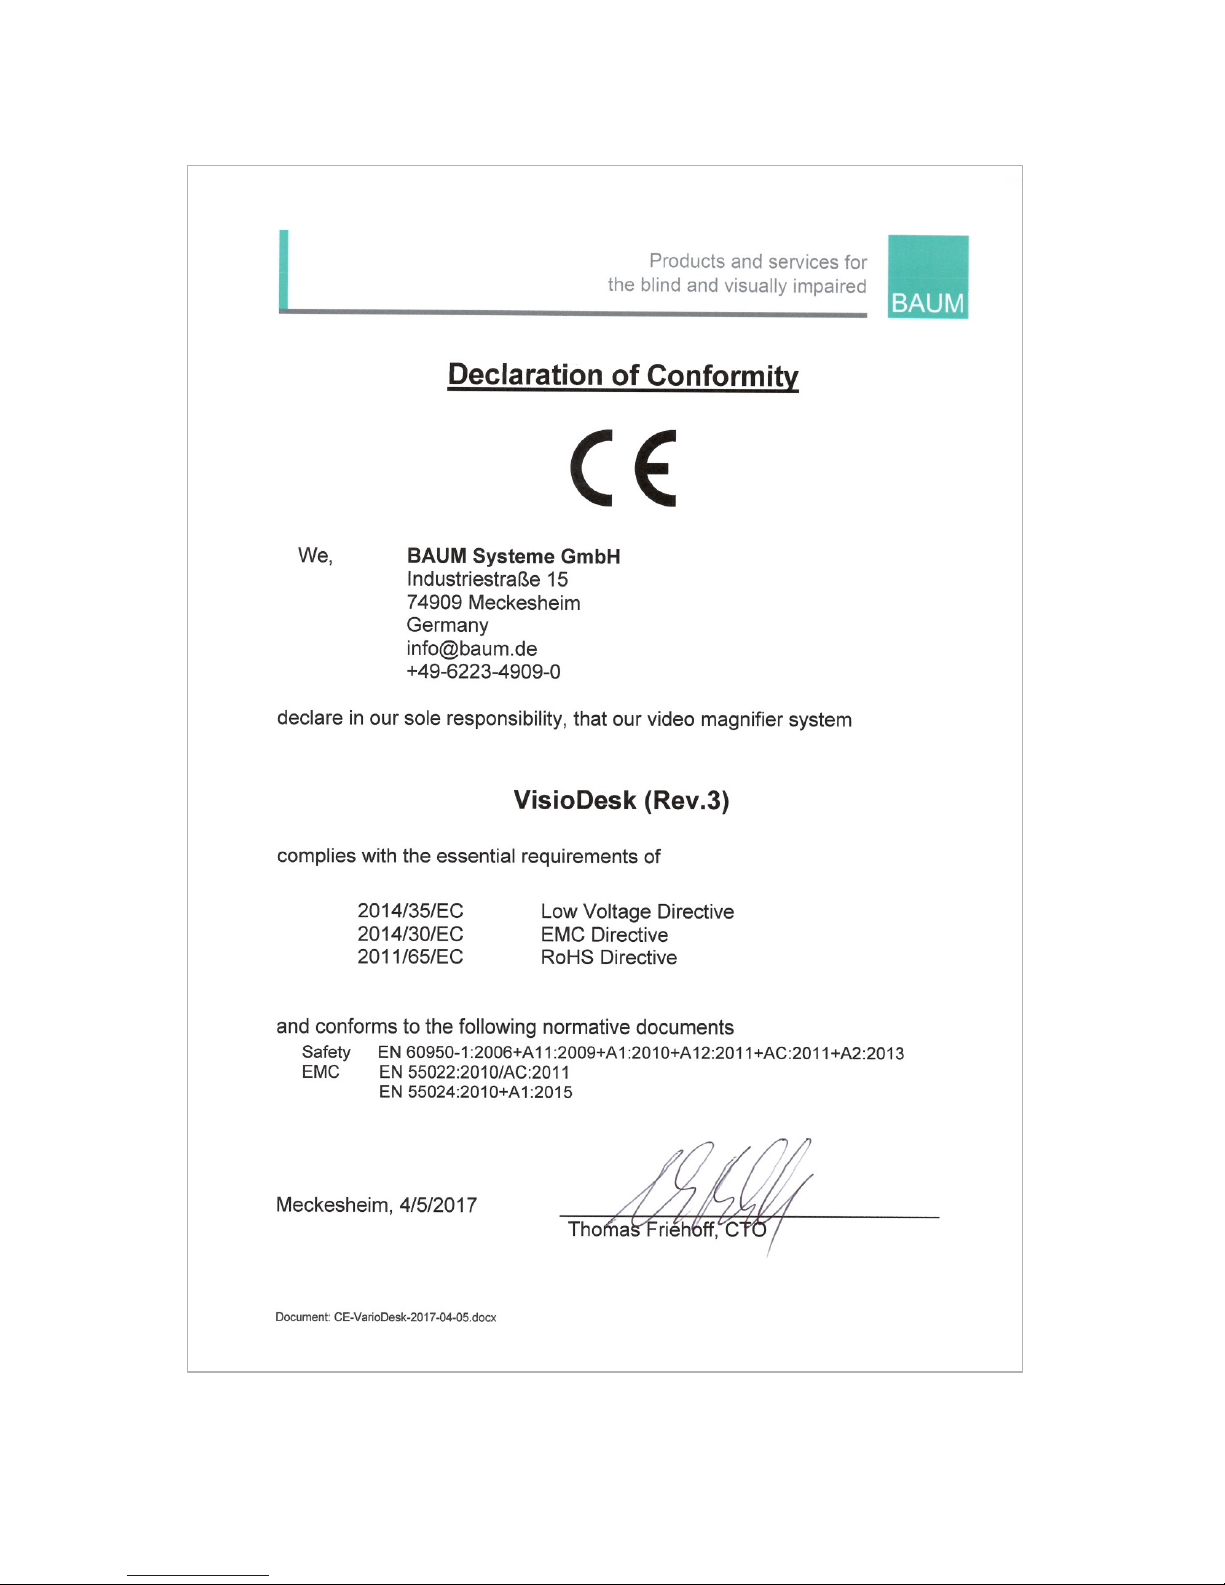
This product conforms to the guidelines of the European
Union and takes the CE- and ROHS Marking.
FCC Conformity 14.2
1. This device complies with Part 15 of the FCC Rules.
Operation is subject to the following two conditions:
(1) This device may not cause harmful interference,
and
(2) This device must accept any interference
received, including interference’s that may cause
undesirable operation
2. Changes or modifications not expressly approved by
the party responsible for compliance could void the
user’s authority to operate the equipment.
NOTE: This equipment has been tested and found to
comply with the limits for a Class B digital device,
pursuant to Part 15 of the FCC Roles. These limits are
designed to provide reasonable protection against harmful
interference in a residential installation.
Page 27

Compliances 27
Environmentally friendly disposal according 14.3
to EU-Directive 2012/19/EU
The symbol (crossed garbage can), which is also attached to
the device, states that this device and its accessories, once
come to the end of its lifetime, should not be regarded as
household waste. An environmentally friendly way of final
disposal is compulsory.
This device contains electronic components. In order to avoid risks or
dangers for the environment through non-professional waste disposal,
the disposal of this device and its accessories must correspond to the
valid EC-Directives or other local regulations. Please check your local
regulations for proper disposing of this device or consult your local
distributor.
For data privacy protection reasons, please remove all personal data
from the device prior to disposal.
Page 28
Compliances 28
Page 29

Warranty 29
15 Warranty
BAUM Retec AG warrants the device, effective from the date of delivery,
to be free of any defects in material and workmanship. Warranty is not
transferable and does not apply to groups, multi users or agencies. This
device has been designed for the individual purchaser to be used in
home or office environments. BAUM Retec AG reserves the right to
repair or replace with a similar or better product. In no event shall BAUM
Retec AG or its distributors be liable for indirect or consequential
damages. The original users’ remedies are limited to replacement of
devices modules/parts. This warranty is valid only when service is done
in the country of original purchase and with intact warranty seals. For
additional warranty claims or service during or after warranty period,
please refer to your distributor. BAUM Retec AG does not take
responsibility for use of this device other than described in this manual.
Warranty on new devices is 24 months.
Warranty on used or refurbished devices is 12 months.
Warranty on Consumable parts (Batteries, Braille Pins, Data carriers
etc.) is 6 months.
Warranty on repairs and spare parts is 12 months.
All defects caused by improper use or users fault are not covered by this
warranty.
Ownership of parts replaced during repair become the property of BAUM
Retec AG, and will not be returned to the customer.
In the event device repair is required, the VisioDesk must be properly
packed into its original shipping box or service box.
Costs for packing, shipping and insurance are not covered by BAUM
Retec AG.
Page 30

For your safety 30
16 For your safety
WARNING: Failure to observe the following warnings may invalidate
the guarantee and could cause damage of the device or serious injury.
Please check contents of package before you use the device. If parts are
damaged or missing, contact BAUM Retec or your local dealer.
Please retain the shipping box so that you can safely pack the device in
the unlikely event that it needs to be returned for service, etc. Improper
packaging could void the product warranty. In case you need a new
shipping box, BAUM Retec or your dealer can provide one for a small
fee.
Please carefully read the user manual and safety instructions before you
use the device for the first time.
This device may only be used in a home or office environment.
Do not place on an uneven surface, as the device may fall causing
serious damage to the device and/or injury to you or another person.
Follow the instructions on how to position the device, especially with
respect to keeping proper spacing from the edge of the table surface;
this will help prevent the device from tilting or falling.
VisioDesk contains moving parts. Please take care when adjusting
the display or moving the arms to fold the device. Injury may occur if
fingers or clothing are caught in the operating mechanism. If you have
difficulties in operating the unit safely, please seek advice from BAUM
Retec or your local dealer.
Connect the power adaptor to a grounded power outlet only.
Do not use the device if you find any damage of the device itself, or
any wires.
If the device appears to be operating abnormally, or appears to be
damaged in any way, please unplug from any power source, and
contact BAUM Retec or your local dealer as soon as possible.
If you smell smoke or an odor coming from the device, turn off the
power immediately.
Page 31

For your safety 31
Do not attempt to repair the device yourself. Opening or removal of
housing may cause damage or injury, and will void the warranty.
Do not allow sand or dust to come into contact with the device as this
may lead to serious damage and could make repair impossible.
Use the device with clean hands only.
Do not use in locations where strong radio waves are emitted or
where there is radiation. Try to maintain a distance of at least 12
inches (30 cm) from mobile phones.
Only use original factory supplied accessories. Use of second source
accessories may damage the device or cause malfunction or safety
issues.
Do not use a third-party power adaptor not made for this device. Only
use the original power adaptor!
Do not use the VisioDesk power adaptor with other devices.
Keep liquids and food away from VisioDesk. It should only be fed
electricity from time to time.
Do not use or store the device in any of the following places as this
may cause damage:
- Inside cars parked with the windows closed in the hot sun.
- In direct sunlight or close to heaters, radiators, etc.
- Locations subject to severe vibration such as on top of a washing
machine.
- Locations subject to strong magnetism such as near loudspeakers.
- Humid places (bath room), in water, or near water.
- In rain or snow
- Do not use or store below 32°F or above 104°F (0°C or above
40°C)
- Humidity that is below 20% to above 80%
- Avoid fast temperature changes
- If you bring the device from a cold place into a warm room,
humidity may condensate. Wait until the device is dry and at room
temperature before use.
Unplug from power source before cleaning.
Page 32

For your safety 32
Wipe dust and dirt from the device with a soft cloth dampened with a
diluted neutral detergent, then wipe dry with a cloth. Do not bring in
contact with water.
Do not insert objects into openings.
Do not use device during thunderstorms. Unplug from any power
outlet during thunderstorms.
- We recommend use of a surge protector, which can be bought
from your local electronics store, or possibly through your local
dealer. Note that this does not provide a 100% protection from a
voltage surge.
Do not insert or remove the plug with wet hands.
Do not heat in a microwave oven, place on a stove, or similar.
Never disassemble, attempt to repair or modify VisioDesk yourself.
If liquids or metal fragments should enter device, switch it off and
remove the power cord immediately.
Do not pull the plug out by the cable when removing the power plug.
Do not throw, or allow the device to fall.
Repairs may only be carried out by BAUM Retec service personnel or
by service technicians authorized by BAUM Retec AG.
Care and maintenance
Avoid damp and water.
Use only a clean, dry cloth to clean the housing. Do not use any cleaning
fluids or solvents.
With extreme cold and frost the device becomes inoperable and must be
brought slowly back to room temperature. Under no circumstances must
the device be warmed up or “thawed out” in a conventional oven,
microwave oven or any other heating device!
Avoid any mechanical damage to the housing or accessories.
Use only the power supply provided.
Page 33

Technical Specifications 33
17 Technical Specifications
Foldable HD CCTV with full HD1920x1080p/60Hz resolution
4 camera positions: direct down view to base, pivoted down view to
front base with auto distortion correction, Far view, and Mirror view.
Automatic distortion correction.
Screen size: Approximately 15.6“ (39,3 cm) 16:9 widescreen with LED
backlight
Full colour mode
Two sets of 7 false colour settings each with enhanced contrast and
reverse image giving 14 combinations each.
Standard set: (black-white, black-yellow, black-cyan, black-green,
black-magenta, blue-white and blue-yellow)
Alternative set: black-white, black-ivory, black-soft yellow, black-soft
peach, black-soft pink, blue-ivory, blue-white.
Autofocus
Fix focus for hand writing
Automatic exposure
Magnification range: approximately 1.7x to 35x
Camera distance to base 11.4” (290mm)
Ports: USB 3 out (Micro USB 3.0) (Standard camera device), Input for
external video source like PC’s DVI-D Signal on HDMI plug
(Resolution 1920x1080p60Hz), Video out DVI-D on HDMI plug
(Resolution 1920x1080p/60Hz)
Light weight: 10.5 lbs (4.8kg)
Dimensions:
In operation/unfolded: 14.7” (375mm) wide x 14.7” (375mm) deep x
13,7”- 23,6 (350-600mm) high depending on display position
Folded: 14.7” (375mm) wide by 14.7” (375mm) deep by 2.3” (60mm)
high
Power supply 100-240V AC 50/60 Hz AC-Adaptor 19 V / 60 W
Rechargeable Battery
Power consumption in operation: < 15 W
Battery Life (Fully charged): 5 hours of continuous operation
Page 34

Page 35

Page 36

© 2017 Copyright by BAUM Retec AG
Manufacturer:
BAUM Systeme GmbH
Industriestr. 15
74909 Meckesheim
Germany
Sales and Support:
BAUM Retec AG
Industriestr. 15
74909 Meckesheim
Germany
Phone: +49 6223 4909-0
Fax:
+49 6223 4909-397
Email:
Web:
www.baum.de
BAUM (USA) Inc.
13 Branch Street, Suite 205
Methuen, MA 01844
USA
Phone: +1 855 620-7985
Email:
Web:
www.baumusa.com
BAUM Retec (UK) Ltd
Hamilton House
Mabledon Place
London, WC1H 9BB
United Kingdom
Phone: +44 800 043 3199
Email:
Web:
www.baumuk.com
Please be advised that this user guide may contain errors, and is therefore
subject to being changed or updated without prior notice..
 Loading...