

Page 1
Gebrauchsanweisung
Instructions for use
Mode d’emploi
Gebruiksaanwijzing
Istruzioni per l’uso
Brugsanvisning
Bruksanvisning
Käyttöohje
Manual de utilização
Instrucciones para el uso
Οδηγίες χρήσης
Instrukcje użytkowania
Használati utasítás
Инструкция за употреба
Қолдану бойынша нұсқаулық
Návod k použití
Návod na použitie
Instrucțiuni de utilizare
Инструкции по эксплуатации
Інструкція з експлуатації
Page 2

Page 3

ENGLISH Instructions for use Page 4
DEUTSCH Gebrauchsanweisung Seite 28
ESPAÑOL Instrucciones para el uso Página 52
ITALIANO Istruzioni per l’uso Pagina 76
ČESKY Návod k použití Strana 100
Page 4
SAFETY INSTRUCTIONS
IMPORTANT to be read and observed
Before using the appliance, read
these safety instructions. Keep them
nearby for future reference.
These instructions and the appliance
itself provide important safety
warnings, to be observed at all times.
The manufacturer declines any
liability for failure to observe these
safety instructions, for inappropriate
use of the appliance or incorrect
setting of controls.
Very young children (0-3 years)
should be kept away from the
appliance. Young children (3-8
years) should be kept away from
the appliance unless continuously
supervised. Children from 8 years
old and above and persons with
reduced physical, sensory or mental
capabilities or lack of experience and
knowledge can use this appliance
only if they are supervised or have
been given instructions on safe
use and understand the hazards
involved. Children must not play
with the appliance. Cleaning and user
maintenance must not be carried out
by children without supervision.
PERMITTED USE
CAUTION: The appliance is not
intended to be operated by means
of an external switching device,
such as a timer, or separate remote
controlled system.
This appliance is intended to
be used in household and similar
applications such as: staff kitchen
areas in shops, offices and other
working environments; farm houses;
by clients in hotels, motels, bed
& breakfast and other residential
environments.
professional use. Do not use the
appliance outdoors.
is specifically designed for domestic
appliances and is not suitable for
general room lighting within the
home (EC Regulation 244/2009).
operation in places where the
ambient temperature comes within
the following ranges, according to
the climatic class given on the rating
plate. The appliance may not work
properly if it is left for a long time at
a temperature outside the specified
range.
Climatic Class Amb. T. (°C)
SN: From 10 to 32 °C
ST: From 16 to 38 °C;
N: From 16 to 32 °C
T: From 16 to 43 °C
CFCs. The refrigerant circuit
contains R600a (HC). Appliances
with Isobutane (R600a): isobutane is
a natural gas without environmental
impact, but is flammable. Therefore,
make sure the refrigerant circuit
pipes are not damaged, especially
when emptying the refrigerant
circuit.
appliance refrigerant circuit pipes.
openings, in the appliance enclosure
or in the built-in structure, clear of
obstruction.
This appliance is not for
The bulb used inside the appliance
The appliance is designed for
This appliance does not contain
WARNING: Do not damage the
WARNING: Keep ventilation
4
Page 5
WARNING: Do not use
mechanical, electric or chemical
means other than those
recommended by the Manufacturer
to speed up the defrost process.
WARNING: Do not use or place
electrical devices inside the appliance
compartments if they are not of the
type expressly authorised by the
Manufacturer.
WARNING: Ice makers and/
or water dispensers not directly
connected to the water supply must
be filled with potable water only.
WARNING: Automatic ice-makers
and/or water dispensers must be
connected to a water supply that
delivers potable water only, with
mains water pressure between 0.17
and 0.81 MPa (1.7 and 8.1 bar).
Do not store explosive substances
such as aerosol cans with a flammable
propellant in this appliance.
Do not swallow the contents
(non-toxic) of the ice packs (provided
with some models). Do not eat ice
cubes or ice lollies immediately after
taking them out of the freezer since
they may cause cold burns.
For products designed to use
an air filter inside an accessible fan
cover, the filter must always be in
position when the refrigerator is in
function.
Do not store glass containers with
liquids in the freezer compartment
since they may break.
Do not obstruct the fan (if included)
with food items.
After placing the food check that the
door of the compartments closes
properly, especially the freezer door.
Damaged gaskets must be
replaced as soon as possible.
Use the refrigerator compartment
only for storing fresh food and the
freezer compartment only for storing
frozen food, freezing fresh food and
making ice cubes.
Avoid storing unwrapped food in
direct contact with internal surfaces
of the refrigerator or freezer
compartments.
Appliances could have special
compartments (Fresh Food
Compartment, Zero Degree Box,
etc.). Unless specified in the specific
booklet of product, they can be
removed, maintaining equivalent
performances.
C-Pentane is used as blowing
agent in the insulation foam and it is a
flammable gas.
INSTALLATION
The appliance must be handled
and installed by two or more persons
- risk of injury. Use protective gloves
to unpack and install - risk of cuts.
Installation, including water supply
(if any) and electrical connections,
and repairs must be carried out by
a qualified technician. Do not repair
or replace any part of the appliance
unless specifically stated in the user
manual. Keep children away from the
installation site. After unpacking the
appliance, make sure that it has not
been damaged during transport. In
the event of problems, contact the
dealer or your nearest After-sales
Service. Once installed, packaging
waste (plastic, styrofoam parts etc.)
must be stored out of reach of
children - risk of suffocation. The
5
Page 6
appliance must be disconnected
from the power supply before any
installation operation - risk of electric
shock. During installation, make sure
the appliance does not damage the
power cable - risk of fire or electric
shock. Only activate the appliance
when the installation has been
completed.
Be careful not to damage the
floors (e.g. parquet) when moving
the appliance. Install the appliance
on a floor or support strong enough
to take its weight and in a place
suitable for its size and use. Make
sure the appliance is not near a
heat source and that the four feet
are stable and resting on the floor,
adjust as required, and check that
the appliance is perfectly level using
a spirit level. Wait at least two hours
before switching the appliance on, to
ensure that the refrigerant circuit is
fully efficient.
WARNING: To avoid a hazard
due to instability, positioning or fixing
of the appliance must be done in
accordance with the manufacturer
instructions. It is forbidden to place
the refrigerator in such way that the
metal hose of gas stove, metal gas or
water pipes, or electrical wires are
in contact with the refrigerator back
wall (condenser coil).
All dimensions and spacing needed
for installation of the appliance are in
the Installation instruction booklet.
ELECTRICAL WARNINGS
It must be possible to disconnect
the appliance from the power
supply by unplugging it if plug is
accessible, or by a multi-pole switch
installed upstream of the socket in
accordance with the wiring rules
and the appliance must be earthed
in conformity with national electrical
safety standards.
Do not use extension leads,
multiple sockets or adapters. The
electrical components must not
be accessible to the user after
installation. Do not use the appliance
when you are wet or barefoot. Do
not operate this appliance if it has a
damaged power cable or plug, if it
is not working properly, or if it has
been damaged or dropped.
If the supply cord is damaged, it
must be replaced with an identical
one by the manufacturer, its service
agent or similarly qualified persons
in order to avoid a hazard - risk of
electric shock.
CLEANING AND
MAINTENANCE
WARNING: Ensure that the
appliance is switched off and
disconnected from the power supply
before performing any maintenance
operation; never use steam cleaning
equipment - risk of electric shock.
Do not use abrasive or harsh
cleaners such as window sprays,
scouring cleansers, flammable
fluids, cleaning waxes, concentrated
detergents, bleaches or cleansers
containing petroleum products
on plastic parts, interior and door
liners or gaskets. Do not use paper
towels, scouring pads, or other harsh
cleaning tools.
DISPOSAL OF PACKAGING
MATERIALS
The packaging material is 100% recyclable and is
marked with the recycle symbol .
6
Page 7
The various parts of the packaging must therefore
be disposed of responsibly and in full compliance
with local authority regulations governing waste
disposal.
DISPOSAL OF HOUSEHOLD
APPLIANCES
This appliance is manufactured with recyclable or
reusable materials.
Dispose of it in accordance with local waste
disposal regulations. For further information
on the treatment, recovery and recycling of
household electrical appliances, contact your local
authority, the collection service for household
waste or the store where you purchased the
appliance. This appliance is marked in compliance
with European Directive 2012/19/EU, Waste
Electrical and Electronic Equipment (WEEE). By
ensuring this product is disposed of correctly,
you will help prevent negative consequences
for the environment and human health.negative
sull’ambiente e sulla salute umana.
The symbol on the product or on the
accompanying documentation indicates that it
should not be treated as domestic waste but
must be taken to an appropriate collection center
for the recycling of electrical and electronic
equipment.
Frequent door opening might cause an increase in
Energy Consumption.
The internal temperature of the appliance and the
Energy Consumption may be affected also by the
ambient temperature, as well as location of the
appliance. Temperature setting should take into
consideration these factors.
Reduce door opening to a minimum.
When thawing frozen food, place in the
refrigerator. The low temperature of the frozen
products cools the food in the refrigerator. Allow
warm food and drinks to cool down before
placing in the appliance.
Positioning of the shelves in the refrigerator has
no impact on the efficient usage of energy. Food
should be placed on the shelves in such way to
ensure proper air circulation (food should not
touch each other and distance between food and
rear wall should be kept).
You can increase storage capacity of frozen food
by removing baskets and, if present, Stop Frost
shelf.
Do not worry about noises coming from the
compressor which are described as normal noises
in this product’s Quick Guide.
ENERGY SAVING TIPS
To guarantee adequate ventilation follow
installation instructions. Insufficient ventilation
at the back of the product increases energy
consumption and decreases cooling efficiency.
7
Page 8
PROPER USE OF REFRIGERATORS
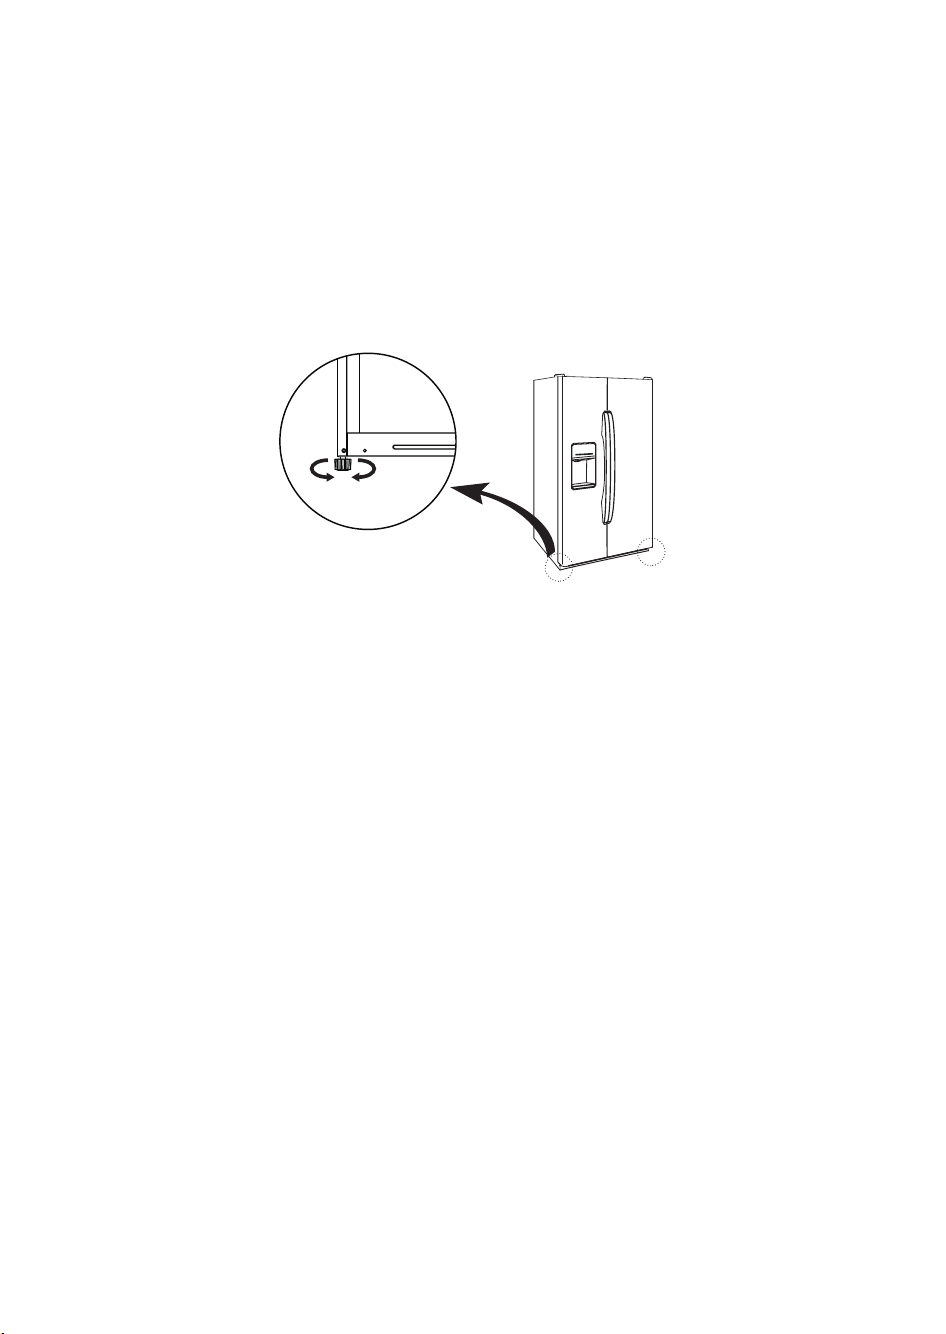
Leveling feet
1. Precautions before installation:
Information in the Instruction Manual is only for reference. The physical product may differ.
Before installation of accessories, it shall be ensured that the refrigerator is disconnected from
power.
Before adjusting the leveling feet, precautions shall be taken to prevent any personal injury.
2. Schematic diagram of the leveling feet.
LH
The actual configuration will depend on the physical product or statement by the distributor
3. Adjusting procedures:
a. Turn the feet clockwise to raise the refrigerator;
b. Turn the feet counterclockwise to lower the refrigerator;
c. Adjust the right and left feet based on the procedures above to a horizontal level.
The picture above is only for reference.
8
Page 9
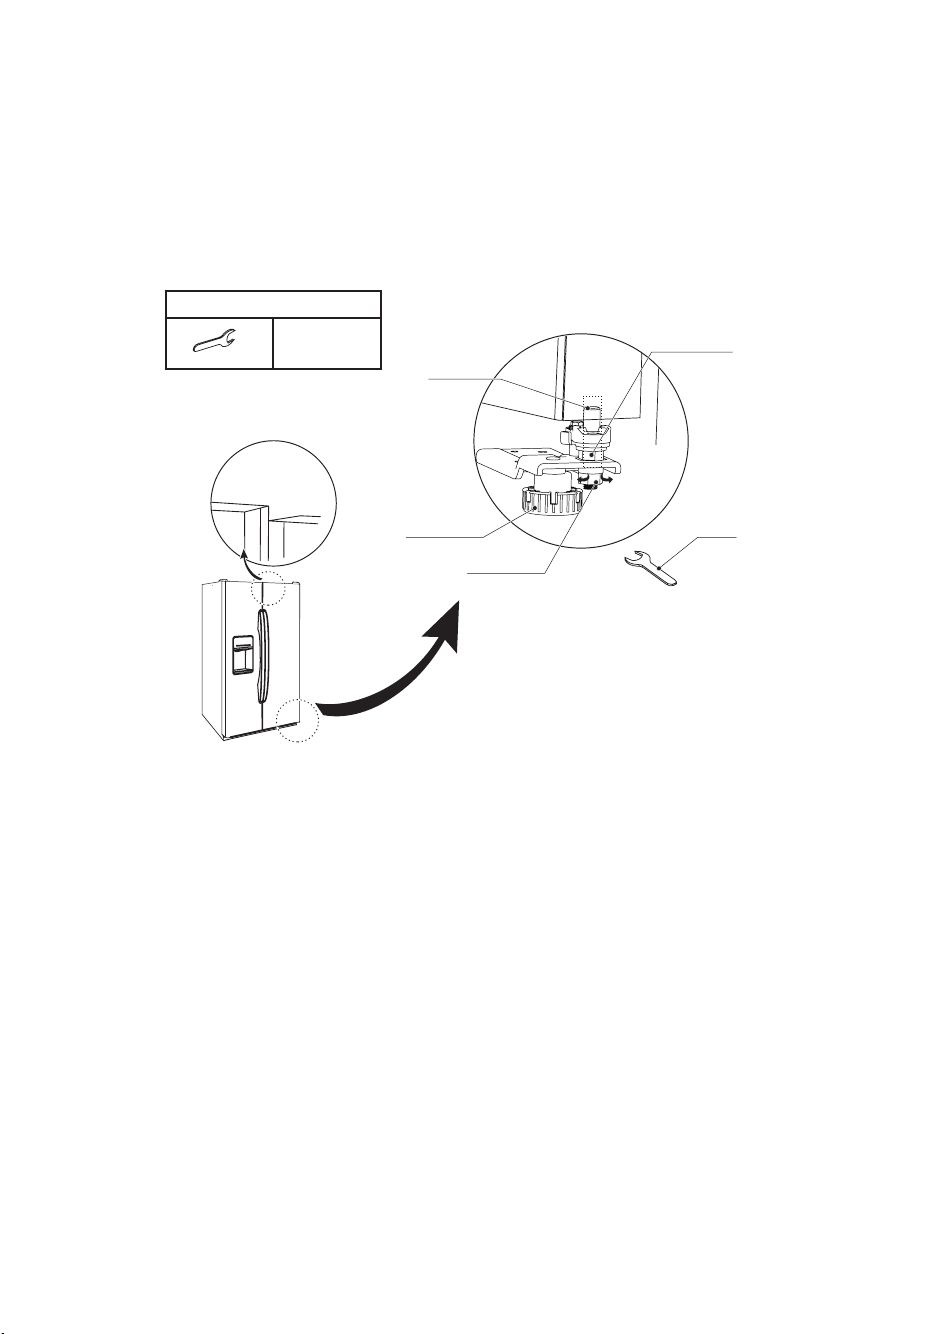
Leveling door
1. Precautions before installation:
Before installation of accessories, it shall be ensured that the refrigerator is disconnected from
power.
Before adjusting the , precautions shall be taken to prevent a door ny personal injury.
2. Schematic diagram of leveling the door
List of tools to be provided by the user
wrench
Fixed shaft
Leveling feet
Loocking nut
The picture above is only for reference.
The actual configuration will depend on the physical product or statement by the distributor
Adjusting nut
Wrench
When the fridge door is low:
Open the door, use a wrench to loosen the locking nut and to rotate the adjusting nut anti-clockwise
to raise the height of the door. Once the doors are aligned, then tighten the locking nut by rotating it
anti-clockwise.
When the fridge door is high:
Open the door, use a wrench to rotate the adjusting nut clockwise to lower the height of the door.
Once the doors are aligned, then tighten the locking nutby rotating it anti-clockwise.
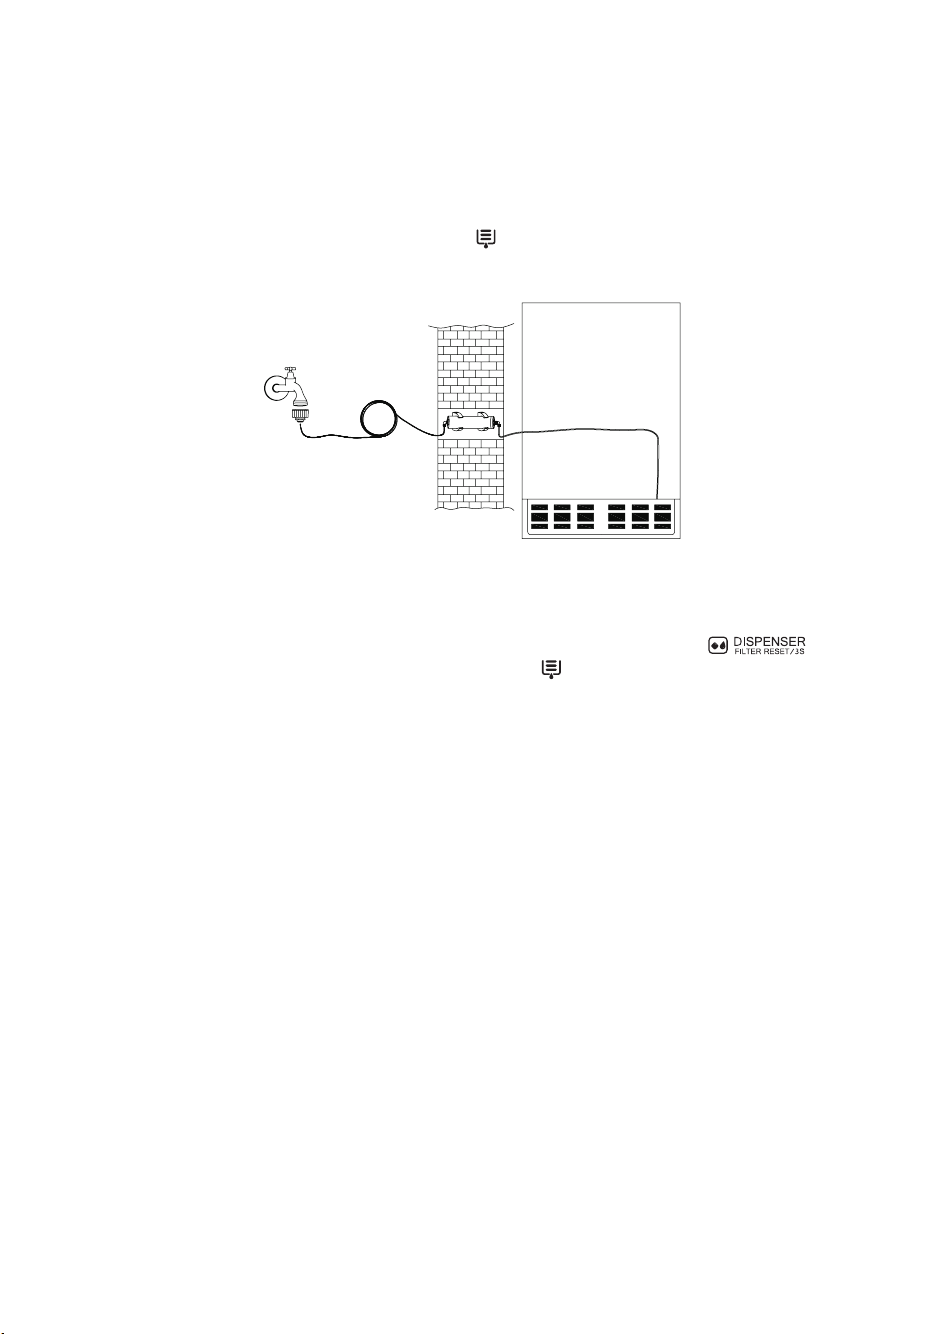
Connection of the Water Facility
1.
Precautions before installation:
Information in the Instruction Manual is only for reference. The physical product may differ.
Before installation of accessories, it shall be ensured that the refrigerator is disconnected from
power.
Water hazards!
The water pressure of the combined fridge-freezer is 2-7 bars. If the water pressure is too high,
please install a decompressor.
Please do not connect combined fridge-freezers to a tap or a tap of water heater.
Please do not bend inlet pipes and drain-pipes when placing, and shall carefully connect water pipes.
Do not use any old and used water pipes.
Please purchase the joint to connect the pipe and the faucet and install it according to the schematic
diagram.
9
Page 10
2. Schematic diagram
Joint
Connecting hose Hose connector
Snap ring
nut
3. Installing procedures
a. Push the end of the connecting hose into the joint. Fasten the joint to the faucet.
b. Pull out the nut from white flexible hose. Push the terminal of white flexible hose into the hose
connector, fastened with snap ring. If necessary, please rivet the flexible hose onto wall to avoid
stumbling.
c. Carefully unscrew the tap to check whether the pipeline is sealed.
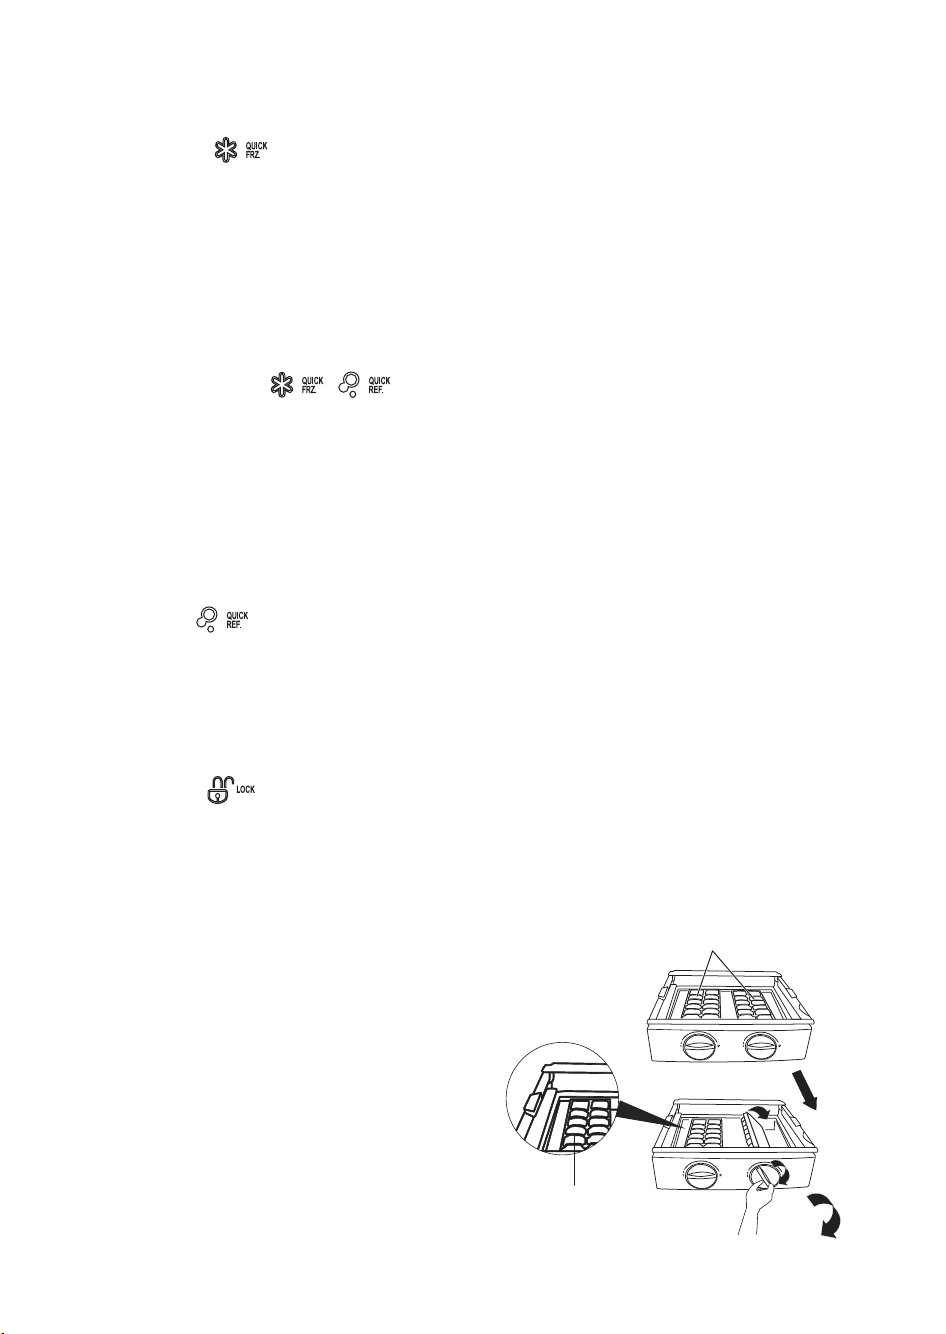
Assembly and Fixing of Filter
List of tools to be provided by the user
screwdriver
1 2
1.
Fix the single clamps on the wall with screws
2.
Put the cartridge into the single clamps;
Snap ring
Location mark
3 4
Water supply
3. Insert one end of the quick-connect elbow to the inlet of the filter cartridge, with the other
end of the quick-connect elbow inserted to the inlet water pipe against the position mark and
fastened with snap ring;
4. Using the same way as mentioned above, insert one end of the quick-connect elbow to the outlet
of the filter cartridge, with the other end of the quick-connect elbow inserted to the outlet water
pipe against the position mark.
10
Page 11
Replace Water Filter
1. Precautions before installation:
Before installation of accessories, it shall be ensured that the refrigerator is disconnected from
power.
After being used for 6 consecutive months, the indicator will flash.
If that happens, please replace.
2. Schematic diagram
3. Procedures:
Pull out the plug. Turn off the water intake. Take off the filter and the snap ring on the quick
connector and then pull out the water pipe. Insert the new filter into the quick connector and
then install the snap ring. Re-supply water and check whether there is water flowing out.
If necessary, please repeat above steps. Insert the plug again. Keep pressing the
button for 3 seconds to start up the filter. The display of disappears.
11
Page 12
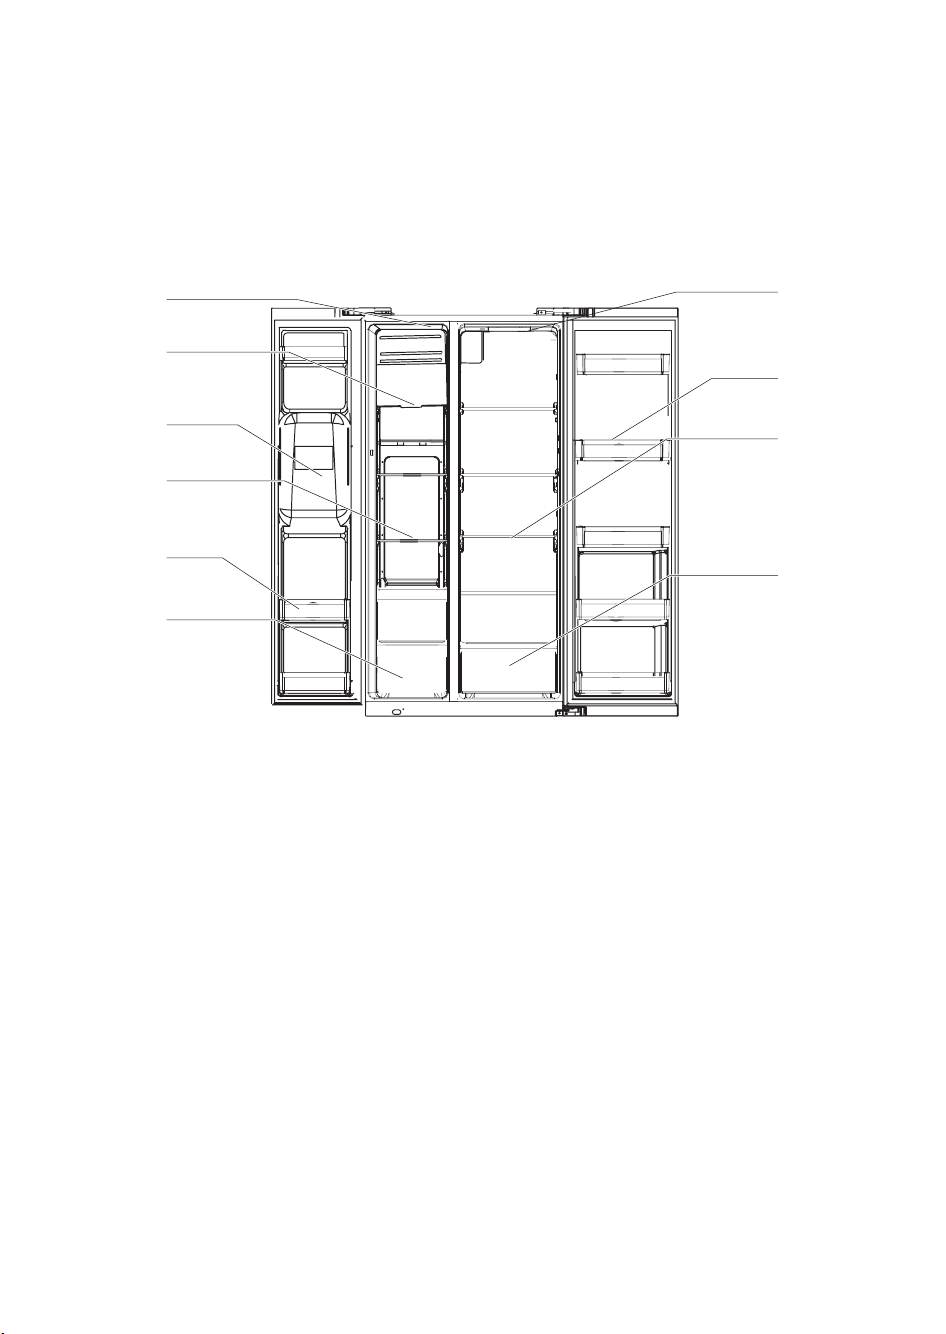
STRUCTURE AND FUNCTIONS
For I&W (Ice and Water) version
Freezing chamber
LED lighting
Ice Container
(Removeable)
Ice maker
water dispenser
Glass shelf
Door tray
Drawer
The picture above is only for reference.
The actual configuration will depend on the physical product or statement by the distributor
Refrigerating chamber
LED lighting
Door tray
Glass shelf
Box for keeping
fruits and
vegetables
Refrigerating chamber
• The Refrigerating Chamber is suitable for storage of a variety of fruits, vegetables, beverages and
other food consumped in the short term.
• Cooking foods shall not be put in the refrigerating chamber until cooled to room temperature.
• Foods are recommended to be sealed up before putting into the refrigerator.
• The glass shelves can be adjusted up or down for a reasonable amount of storage space and easy
use.
Freezing chamber
• The low temperature freezing chamber may keep food fresh for a long time and it is mainly used
to store frozen foods and making ice.
• The freezing chamber is suitable for storage of meat, fish, rice balls and other foods not to be
consumed in short term.
• Chunks of meat are preferably to be divided into small pieces for easy access. Please be noted
food shall be consumed within the shelf time.
• The temperature should be set to “QUICK-FREEZE”, when you want to refrigerate foods
quickly.
Note: Storage of too much food during operation after the initial connection to power may adversely
affect the freezing effect of the refrigerator. Foods stored shall not block the air outlet; or otherwise
the freezing effect will also be adversely affected.
12
Page 13
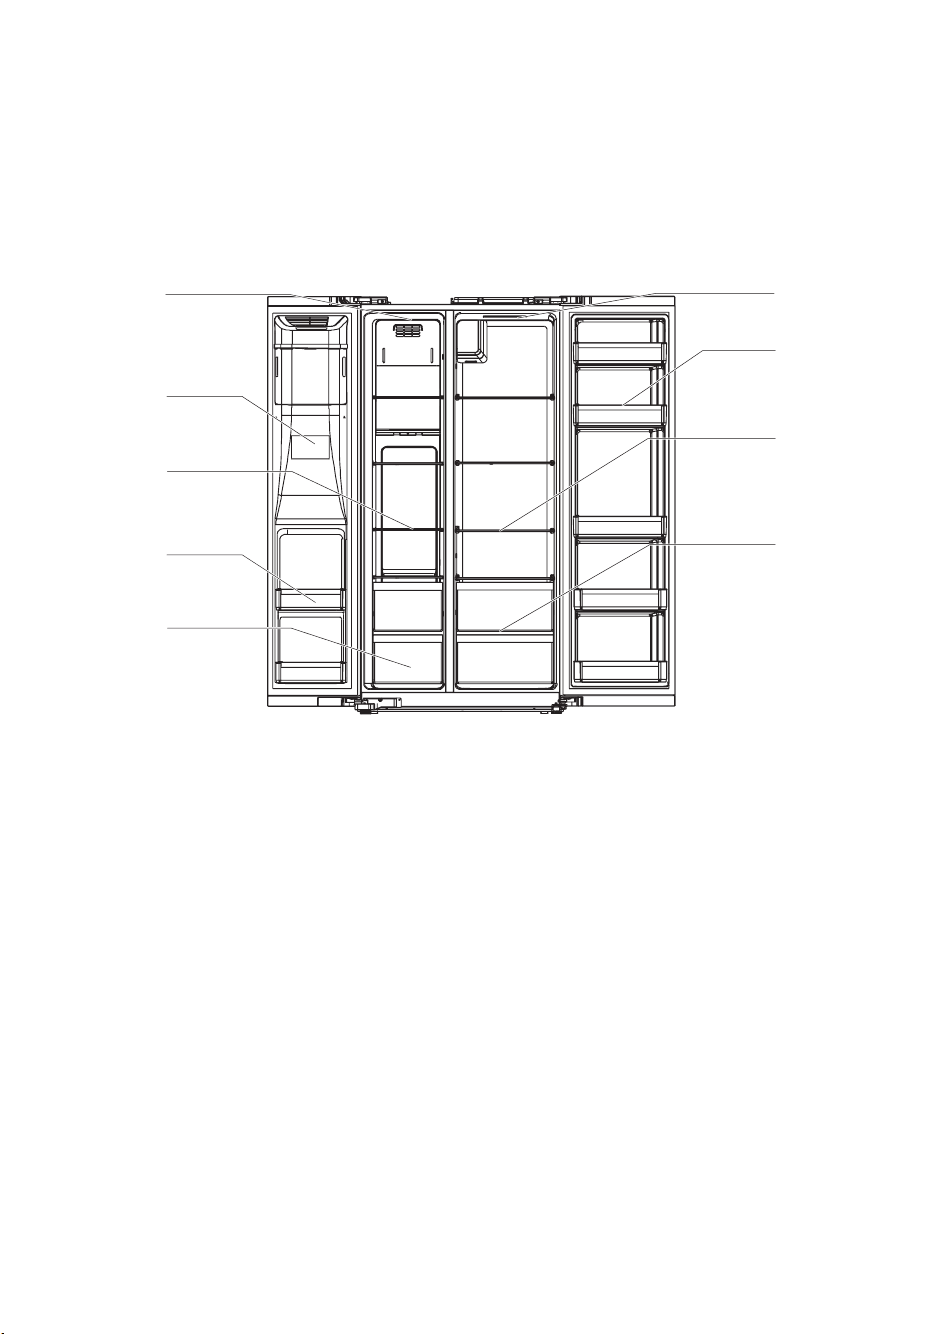
STRUCTURE AND FUNCTIONS
For IDI (In Door Ice) version
Freezing chamber
LED lighting
Ice maker
water dispenser
Glass shelf
Door tray
Drawer
The picture above is only for reference.
The actual configuration will depend on the physical product or statement by the distributor
Refrigerating chamber
LED lighting
Door tray
Glass shelf
Box for keeping
fruits and
vegetables
Refrigerating chamber
• The Refrigerating Chamber is suitable for storage of a variety of fruits, vegetables, beverages and
other food consumped in the short term.
• Cooking foods shall not be put in the refrigerating chamber until cooled to room temperature.
• Foods are recommended to be sealed up before putting into the refrigerator.
• The glass shelves can be adjusted up or down for a reasonable amount of storage space and easy
use.
Freezing chamber
• The low temperature freezing chamber may keep food fresh for a long time and it is mainly used
to store frozen foods and making ice.
• The freezing chamber is suitable for storage of meat, fish, rice balls and other foods not to be
consumed in short term.
• Chunks of meat are preferably to be divided into small pieces for easy access. Please be noted
food shall be consumed within the shelf time.
• The temperature should be set to “QUICK-FREEZE”, when you want to refrigerate foods
quickly.
Note: Storage of too much food during operation after the initial connection to power may adversely
affect the freezing effect of the refrigerator. Foods stored shall not block the air outlet; or otherwise
the freezing effect will also be adversely affected.
13
Page 14
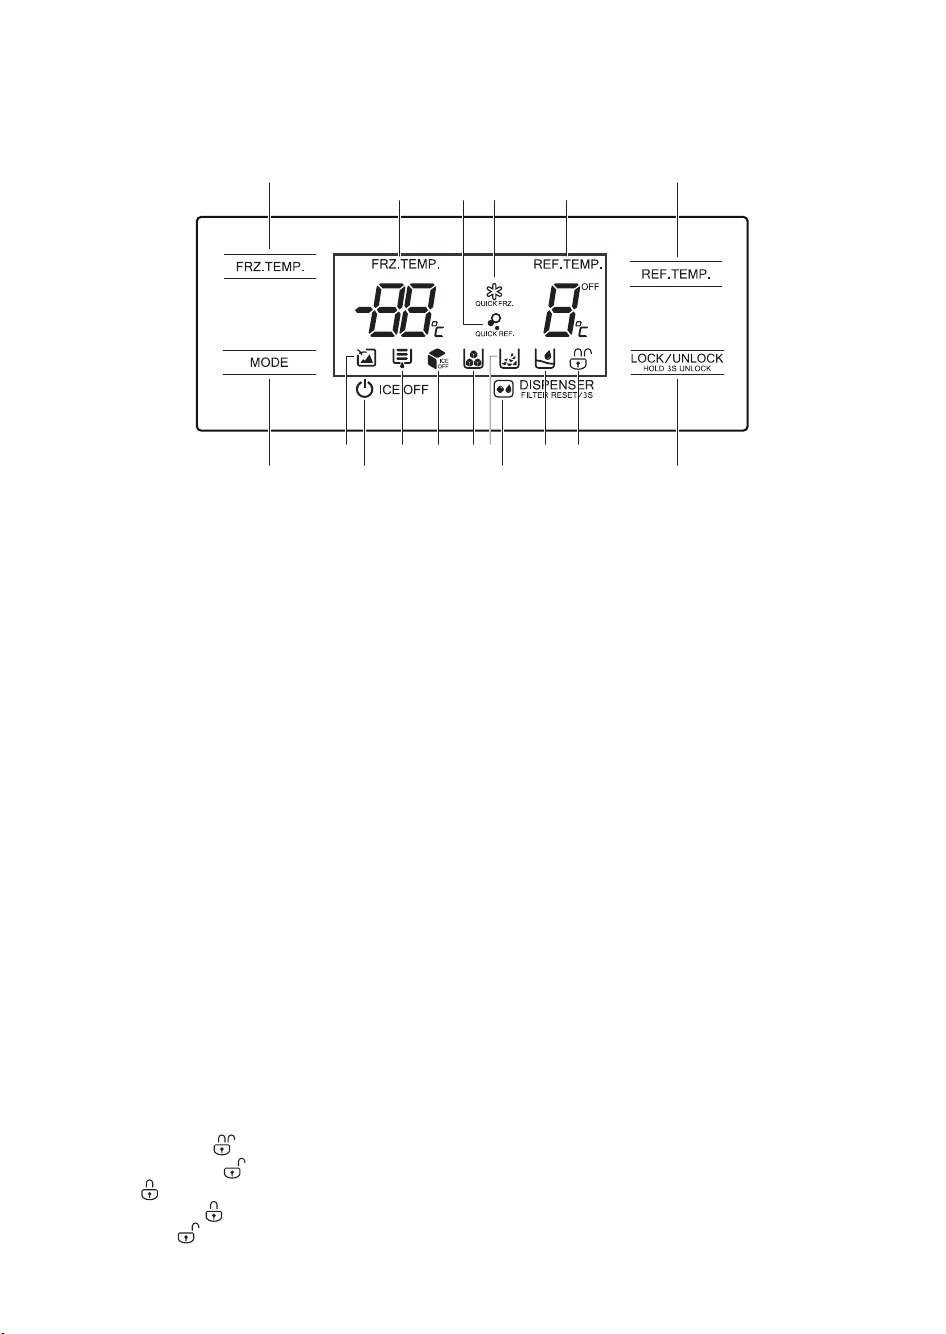
Functions
A B
1
5 6 7 8 10 119
C
The picture above is only for reference.
The actual configuration will depend on the physical product or statement by the distributor
Display
1. Freezer compartment temperature
2. Quick REF.
3. Quick FRZ
4. Refrigerate compartment temperature
5. Vacation icon
6. Water Filter
Button operation
A. Freezer compartment temperature adjustment
B. Refrigerate compartment temperature adjustment
C. Mode setting
D. Ice OFF/ ON botton
E. Fetching ice/ Fetching water/Filter set
F. Lock/unlock controls
3 42
FD E
7. Ice off
8. Fetching ice cubes
9. Fetching crushed ice (IDI version has not
the feature of crushed ice)
10. Fetching cold water
11. Lock/unlock icon
Operation instructions
The first time the power was turn on for the refrigerator, the display screen will total display for 3
seconds. Meanwhile the starting up bell rings and then the screen enters the normal display of the
operation.The first time for using the refrigerator, temperatures of refrigerating chamber,
temperature and freezing chamber should be set at 5° C/-18 °C respectively.
When the error occurs, the display shows the error code (see next page); during normal operation,
the display shows the set temperature of the cooling compartment.
Under normal circumstances, the refrigerator stops operating for 30 seconds, then the display shows
the lock state, and the display goes out after the lock state continued for 30s.
Lock /unlock
In the unlocked state, continue to press the button LOCK/UNLOCK for 3 seconds, enter the
lock state;
In the locked state, continue to press the button LOCK/UNLOCK for 3 seconds, enter the
unlocked state.
All the following functions must be operated in the unlocking status.
14
Page 15

Mode setting
Press mode button MODE to select different control mode.
Vacation mode
Press the button MODE to enter the vacation mode. Icon lights up, the vacation mode will start
after locking.
Press the button FRZ.TEMP. or REF.TEMP. to exit the vacation mode.
Quick REF. mode
Press the button MODE to enter the quick cooling mode. Icon lights up, the quick cooling mode
will start after locking.
Press the button REF.TEMP. to exit the Quick cooling mode.
Quick FRZ. mode
Press the button MODE to enter the quick freezing mode. Icon lights up, the quick freezing
mode will start, after locking.
Press the button FRZ.TEMP. to exit the Quick freezing mode.
Temperature setting of refrigerating chamber
Press temperature adjusting button of the refrigerating chamber REF.TEMP., cold storage region will
make flashing indication. Then press the button REF.TEMP. again to set the temperature, and will
hear one beep. Setting scope is between 2°C and 8°C.Every time you press the button, the
temperature will change 1°C. After adjusting,the digital tube will keep flashing for 5 seconds. New
temperature setting will come into effect after locking.
Temperature setting of freezing chamber
Press temperature adjusting button of the freezing chamber FRZ.TEMP., quick freezing region will
make flashing indication. Then press the button FRZ.TEMP. again to set the temperature, and you
will hear one beep. Setting scope is between -16°C and -24°C. Every timeyou press the button, the
temperature will change 1°C. After adjusting, the digital tube will keep flashing for 5 seconds. New
temperature setting will come into effect after locking.
Quick-freeze time setting
Choose the quick-freeze mode and press the FRZ.TEMP button continuously for 3 seconds to
enter the quick-freeze time setting mode; with a short press on FRZ.TEMP, set the circulating mode
of “26-48-26-48” after the quick-freeze time is shown on the freezer chamber temperature display
unit
The quick-freeze mode works separately under the 26H and 48H quick-freeze quitting modes.
With the quick-freeze time setting mode on, lock the mode or press the FRZ.TEMP for 3s to quit
the quick-freeze time setting mode.
The 48H quick-freeze mode is used for overall performance test and not recommendable for
customers.
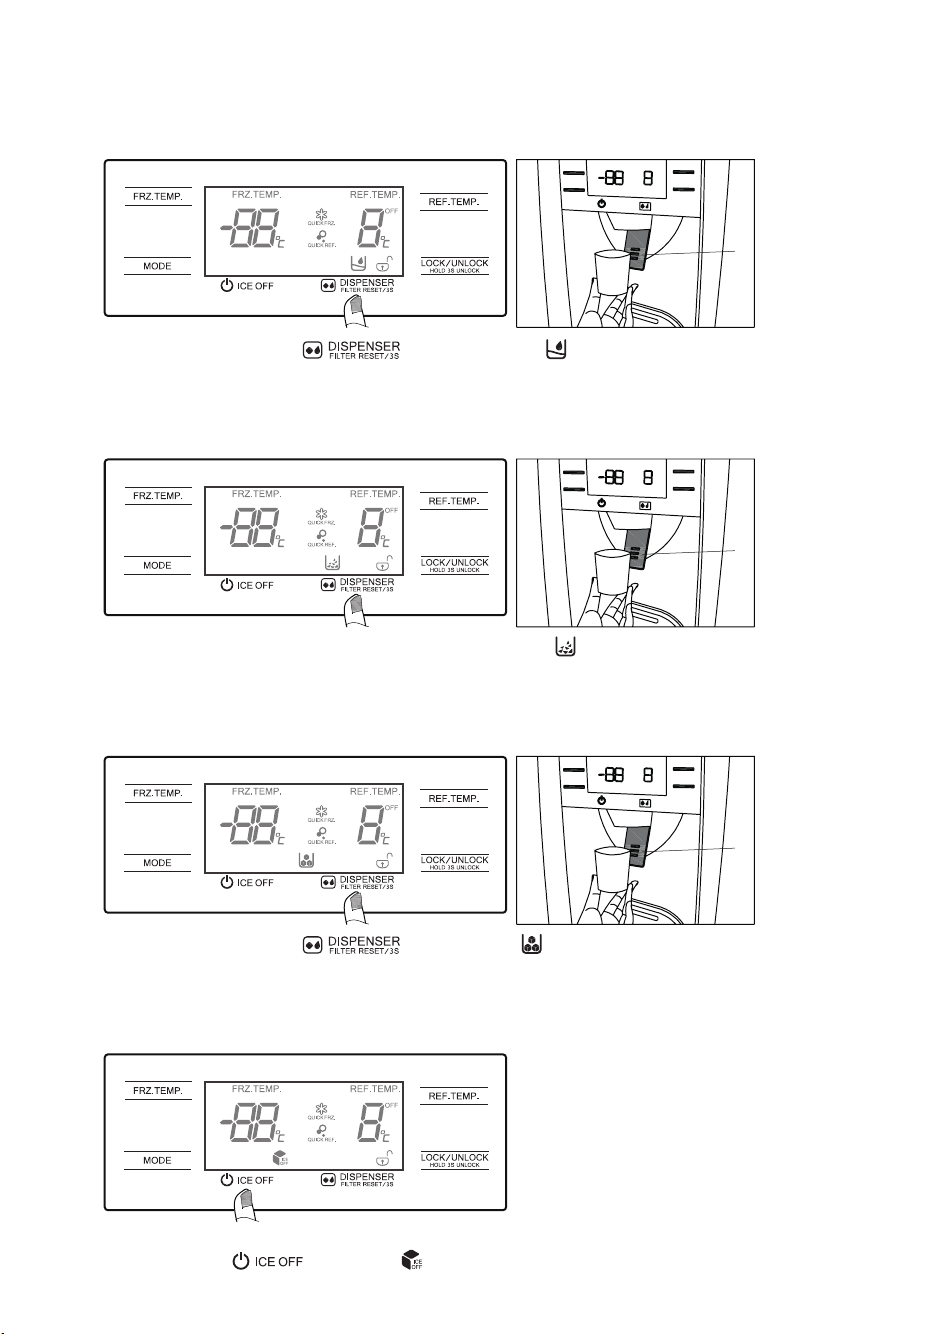
ICE OFF
Press the button and the icon is illuminated or distinguished in order to start/switch
icing function.
DISPERNSER
Press the button to enter the ice/water selection condition; choose the circulating
condition of “Fetching ice cubes /Fetching crushed ice/ Fetching water / none”, and then the
corresponding icon on the panel will be illuminated successively.
When the system is in operation, the working time of the filter will be added up; after 150 days, the
filter icon will be displayed, and 180 days, the filter icon flashed; press and hold the button
for 3s to utilize FILTER RESET function with which the working time of the filter is
reset.
After replace the filter, the flashed icon distinguished.
15
Page 16

Storage upon power failure
In case of power failure, the instant working state will be locked and maintained until reelectrification.
Opening warning and alarm control
When the refrigerator chamber door gets open, the warning tone will play. If the door is not closed in
two minutes, the buzzer will sound once every minute until the door is closed.
Fault indication
The following warnings appearing on the display indicate corresponding faults of the refrigerator.
Though the refrigerator may still haverefrigerator and freezing function with the following faults, the
user shall contact a maintenance specialist for maintenance, so as to ensure normal use of the
refrigerator.
Error code Error description
E0 Icemaker error
E1 Temperature sensor detection circuit error of refrigerating chamber
E2 Temperature sensor detection circuit error of freezing chamber
E5 Freezing defrost sensor detection circuit error
E6 Communication error
E7 Circulation of temperature sensor detection circuit error
EE Icemaker sensor circuit
EH Moisture sensor error
Fetching water and Ice
• Sounds will be produced during making ice cubes and crushed ice: Water valve will produce
buzzing sounds water’s flowing into ice vessel will produce sounds; grinding machine’s grinding
ice into small pieces or product ice’s falling into the container will produce sounds. The sounds
are normal.
• Scratching noises may be produced when taking out the ice cubes. Nothing to worry about this.
The ice in the container may be stuck together. In such cases, please take out the ice container
and separate stuck ice into pieces by means of, for instance, using plastic or wooden spoons to
push hard on the ice carefully.
• Other possibilities are illustrated in the chapter “ice container cleaning”To avoid overheating of
the ice-making machine’s engine, please fetch ice about 1 minute after the stopping. Please wait
for a while until the engine’s temperature reaches working temperature. Please fetch the ice
from the ice container if you need a lot of ice.
• The chapter “ice container cleaning” explains how to remove ice container from freezer
compartment.
If there is no enough ice in the ice container, the ice cannot be taken out.Please wait for a while
until new ice is made.To prevent ice smell or bad taste of the ice, please clean the ice container
regularly.
• Ice and water can only be fetched when the door of freezer compartment is closed. In the
process of fetching water and ice, if you open the freezer door, that process will automatically
end.
• When it displays or goes out, you click the buttons of water dispenser again.
16
Page 17
Fetching cold water
Keep pressing the buttons until the indicator turns on.
Push the container in the direction of fetching water cushion, Cold water starts to flow into the
container.
Remove the container from fetching water cushion and end the exporting of water.
Fetching crushed icer
Keep pressing the buttons of Water Dispenser until the signal turns up.
Make the container tight with mouth of water dispenser to prevent the side jet.
Press the container in the direction of fetching water cushion. Fill the container with crushed ice.
Remove the container from fetching water cushion and end the exporting of water.
Fetching ice cubes
Keep pressing the buttons until the signal lights up.
Push the container in the direction of fetching water cushion.
Ice cubes start to fall into the container.
Remove the container from fetching water cushion and end the exporting of ice.
Lock the ice-making machine
If the function of fetching water and ice is not used for long, you can lock the ice-making machine:
Press the button , the display lights up.
17
Page 18
Temperature setting
Important note: The display will only be illuminated when a button is pressed or a compartment
door opened, at all other times the display will be in a standby state.
Important note: The control panel will automatically lock itself. Before adjusting the temperature or
selecting any mode the panel must be unlocked by pressing and holding the lock button for 3 seconds
until the lock symbol disappears from the display.
Note: The standard operating temperature for the fridge compartment should be between 0°C and
4°Cand the standard operating temperature for the freezer compartment should be between -18°C
and -25°C.
Note: The temperature of the freshly stored food and how often the door is opened affects the
temperature in the refrigerator compartment. If required, change the temperature setting.
Freezer compartment temperature adjustment
To change the temperature of the freezer compartment, press the freezer temperature adjustment button.
The temperature of the freezer can be set between -16°C and -24°C.
Press the freezer temperature adjustment button until the required temperature is shown on the display.
Please note that during the temperature setting process the freezer temperature on the display will flash.
Once the required temperature is set the freezer temperature will flash for a few seconds, the display will
be automatically locked and then after approximately 30 seconds the display will disappear.
Freezer compartment temperature
The freezer compartment temperature will be shown on the display when a compartment door is opened
or a button is pressed.
Fridge compartment temperature adjustment
To change the temperature of the fridge compartment, press the fridge temperature adjustment button.
The temperature of the fridge can be set between 2°Cand 8°C.
Press the fridge temperature adjustment button until the required temperature is shown on the display.
Please note that during the temperature setting process the fridge temperature on the display will flash.
Once the required temperature is set the fridge temperature will flash for a few seconds, the display will be
automatically locked and then after approximately 30 seconds the display will disappear.
Fridge compartment temperature
The fridge compartment temperature will be shown on the display when a compartment door is opened or
a button is pressed.
Mode settings
The appliance has 4 pre-set modes that can be selected by pressing the mode button and these are:
• Vacation (holiday)
• Quick freeze
• Quick freeze and cool
• Quick cool
Vacation mode (holiday mode)
This mode is designed to prevent your appliance from wasting energy during times when it’s not in
regular use (when you are on vacation/holiday for example).
By selecting this function the temperature of the freezer compartment will automatically be set to
-18°Cand the fridge compartment will be turned off.
To use the vacation mode you must press the mode button until the vacation icon is lit on the display.
To exit the vacation mode press the mode button until no mode icon is lit on the display.
Important note: If this mode is selected then all food and drinks must be removed from the fridge
compartment
18
Page 19
Quick freeze
This mode is designed for when freezing items that are not already pre-frozen.
If you are placing fresh food inside the freezer then ideally you should have lowered the temperature
beforehand ready to accommodate it and facilitate as quick a freeze as possible. You may need to pre
select the quick freeze mode as early as 12 hours before. By selecting this function the temperature
of the freezer compartment will automatically be set to -24 °C for a maximum of 26 hours (after this
time the temperature will revert to what it was previously set at). If the temperature of freezer goes
below -24°C during the 26 hours then the appliance will exit the quick freeze mode automatically.
To use the quick freeze mode you must press the mode button until the quick freeze icon is lit on the
display. To exit the quick freeze mode press the mode button until no mode icon is lit on the display.
Quick freeze & cool
In order to have a colder temperature in the refrigerator, put the quick freeze & cool setting on to
set the unit to the coolest temperature. By selecting this function the temperature of the freezer
and fridge compartments will automatically be set to -24°Cand 2°Cfor a maximum of 26 hours for
the freezer setting and 2 hours 30 minutes for the fridge setting (after this time the temperature will
revert to what it was previously set at). If the temperature of freezer goes below -24°C during the 26
hours then the appliance will exit the quick freeze mode automatically.
To use the quick freeze and cool modes together you must press the mode button until the quick
freeze and cool icons are lit on the display. To exit the quick freeze and cool mode press the mode
button until no mode icon is lit on the display.
Quick cool
In order to have a colder temperature in the refrigerator, put the quick cool setting on to set the unit
to the coolest temperature. By selecting this function the temperature of the fridge compartment
will automatically be set to 2°C for a maximum of 2 hours and 30 minutes (after this time the
temperature will revert to what it was previously set at).
To use the quick cool mode you must press the mode button until the quick cool icon is lit on the
display. To exit the quick cool mode press the mode button until no mode icon is lit on the display.
Lock/unlock
To use the lock function you must press the lock button (the symbol on the display will be lit). This
will cause all actions to be ignored, until the lock is removed.
To unlock the display and functions, hold the lock button for 3 seconds (the symbol on the display will
be disappear).
How to make ice
Ice tray
1. Gently pull out the ice tray and fill the ice
tray with water to the water level line.Then
carefully replace the ice tray horizontally.
2. When the ice cubes are ready, turn the knob
clockwise (turn to the end and release), the
ice cubes will drop from the ice tray into the
ice box.
Water level line
* Picture is only for illustration
19
Page 20
Notes:
• In order to make ice cubes quickly, set the freezer to the lowest temperature, or select the Quick
Freeze Mode.This will make the temperature of the freezer lower.
• Do not over-fill with wate . It may become difficult to remove the ice cubes from ice tray and any
trickle of water into the ice box will make the ice cubes freeze together.
• If the knob is turned before the ice cubes are ready, any remaining water will trickle into the ice
box and cause the ice cubes to freeze together.
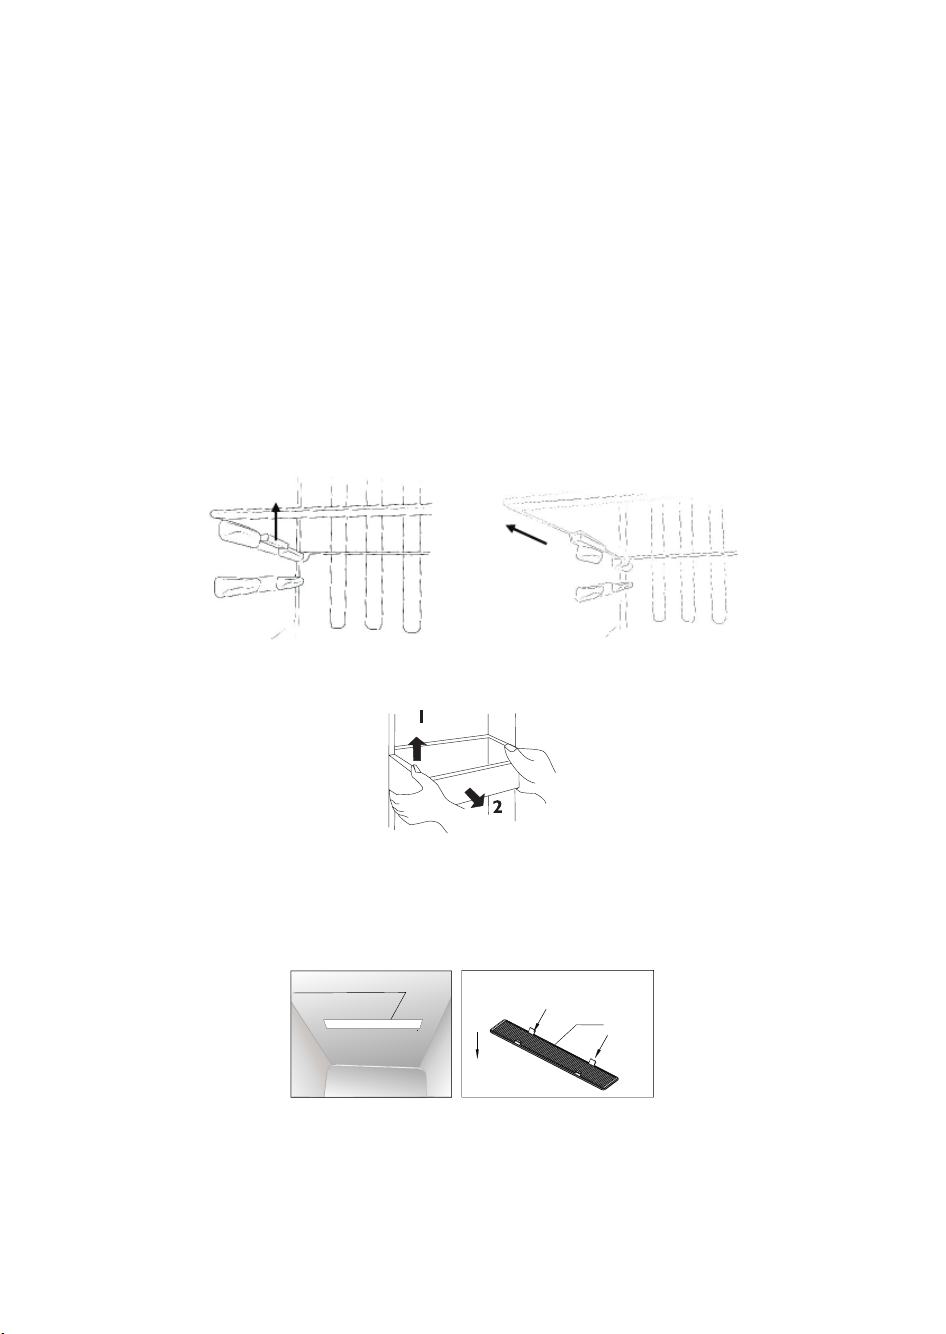
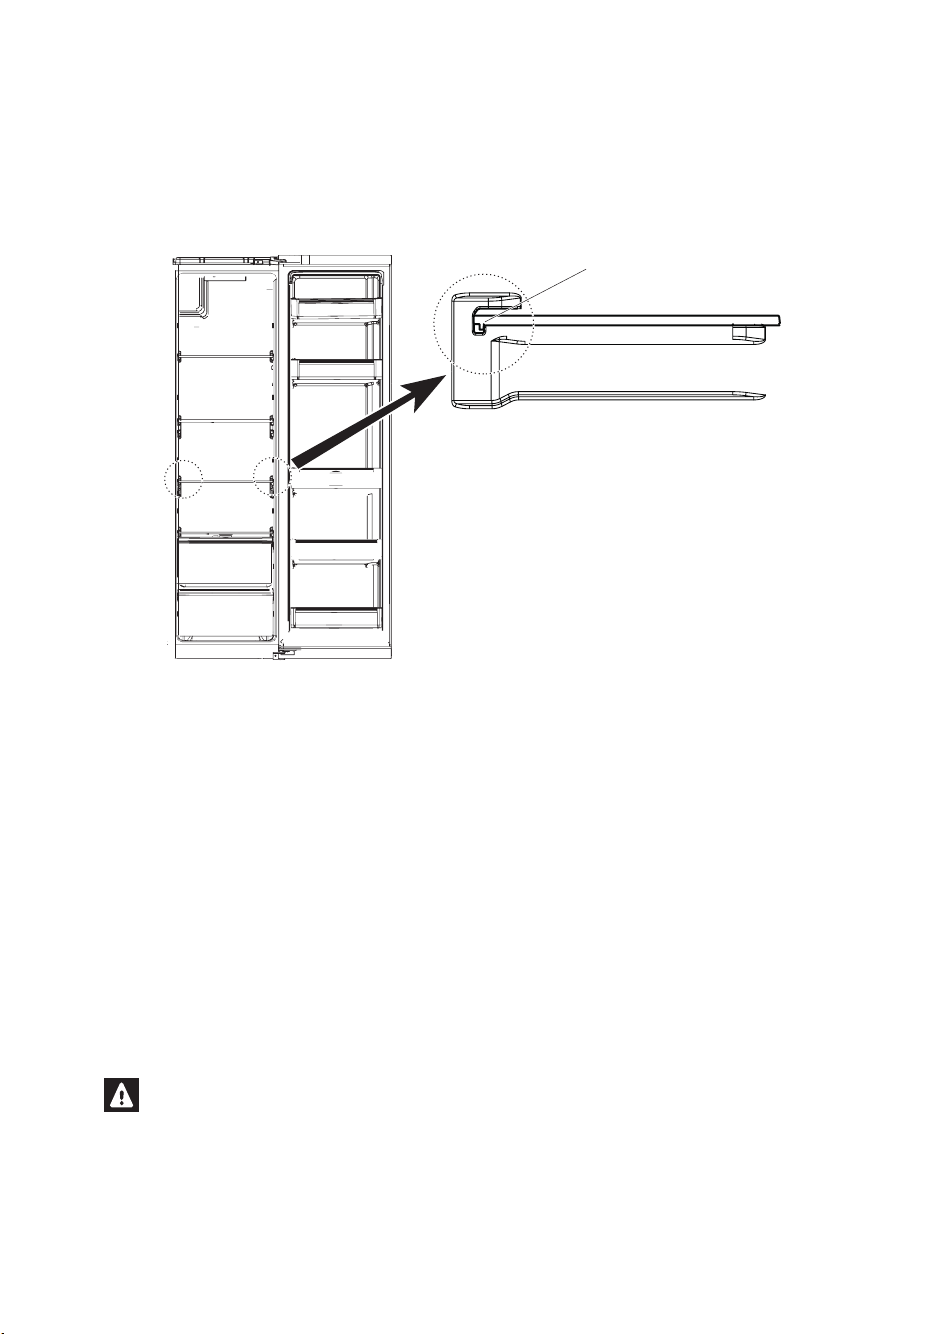
Shelving and rack adjustment
Important note: all food and drink should be removed from all shelves and racks before adjusting or
removing them
You can adjust the shelving in the fridge compartment to your required configuration. To remove a
shelf, lift it up slightly so the plastic stabilisers that on either side of the shelf are above the shelf rails
and then pull it towards you.
You can adjust the racks in the fridge and freezer compartments to yourrequired configuration. To
remove a rack hold both sides of the rack, lift it upwards (1) and then pull it towards you (2).
Bulb Replacement
The fridge and freezer lights are energy efficient, long life LEDs. Therefore, they should not need
replacing through out the life of the product.
The bulb is a direct current 12V LED module and in the unlikely event it does fail then it will need to
be replaced by a qualified engineer.
refrigerator lamp
lamp shade
Reversing the Door
The doors cannot be reversed.
20
Page 21

ENERGY SAVING ADVICE
• Do not install the appliance close to sources of heat, such as a cooker, dishwasher or radiator.
• Locate the appliance in a cool well-ventilated room and make sure that the air vents are clear.
• Try to avoid keeping the doors open for a long time, as warm air will enter the cabinet and
may cause a build-up of ice as well as affecting the energy consumption. Ensure there are no
obstructions preventing the doors from closing properly.
• Ensure that the door seals are clean and there are no tears or splits.
• Keep the most perishable foods, (those with a short shelf-life, such as cooked meats), in the
coldest part of the fridge. The Salad Crisper Box is the warmest part of your fridge and should be
used for vegetables, salads and fruits etc.
• Do not overload the appliance: the cooling air that circulates and keeps the appliance cold gets
blocked, and pockets of warm air form.
• Do not put hot food into the fridge or freezer –let it cool down first.
FREEZER STORAGE ADVICE
• Store fresh food in airtight boxes or wrap in bags or foil which are suitable for freezing.
• Do not allow frozen food to come in to direct contact with food to be frozen.
• Pre-frozen food must be placed in the freezer as quickly as possible after purchasing.
• To prevent frost damage to fresh vegetables or fruits they must be processed appropriately before
being placed into the freezer compartment.
• You must always follow the storage guidelines printed on all food packaging.
However, below is some suggested maximum storage times at -18°C (4 star freezer rating) for a
variety of foods:
- Fresh meat & poultry –up to 12 months
- Cooked meat –up to 2 months
- Fresh fish –up to 6 months
- Fruit & vegetables –up to 12 months
- Bread & cakes –up to 6 months
POWER FAILURE
If there is a power failure during the storage of frozen foods, keep the door closed. If the
temperature within your freezer should rise, do not refreeze the food without checking it’s
condition.
• Ice Cream: Once thawed should be discarded.
• Fruit and Vegetables: If soft should be cooked and used up.
• Bread and Cakes: Can be refrozen without danger.
• Shellfish:Should be refrigerated and used up quickly.
• Cooked Dishes: i.e. casseroles should be refrigerated and used up.
• Large Pieces of Meat: Should be refrigerated and used up quickly
• Small Joints: Should be refrigerated and used up quickly
• Chicken: Should be refrigerated and used up quickly
21
Page 22

MAINTENANCE & CLEANING
Disconnect the appliance from the power supply before cleaning.
Internal Cleaning
• Do not pour water over the appliance.
• The cavity should be cleaned periodically using a solution of bicarbonate of soda and lukewarm
water (5ml to 0.5 litre of water)
• Clean the accessories separately with soap and water. Do not put them in the dishwasher.
• Do not use abrasive products, detergents or soaps.
• After washing, rinse with clean water and dry carefully.
• When you have finished cleaning reconnect the plug with dry hands.
External Cleaning
• Wash the outer cabinet with warm soapy water. Do NOT use abrasive products.
• There are sharp edges on the underside of the product so care should be taken when cleaning.
• Once or twice a year dust the rear of the appliance and the compressor at the back of the
appliance, with a brush or vacuum cleaner, as an accumulation of dust will affect the performance
of the appliance and cause increased energy consumption.
When the appliance is not in use
When the appliance is not in use for long periods, disconnect from the electricity supply, empty all of
the food and clean the inside. Leave the door open to prevent the build-up of odours.
Defrosting
Note: Care must be taken when performing the following procedure.
• The appliance is frost free, so there shouldn’t be any requirement to defrost the freezer. However,
in the unlikely event the appliance does need defrosting please follow the below steps:
• Try to use as much as possible of the food in the freezer, before defrosting. However, any food
that is left, wrap in newspaper and place aside until ready to place back after cleaning.
• Switch the appliance off at the wall socket and remove the plug.
• Open the freezer door.
• Place a suitable container to collect the water created from the defrosted ice.
• After defrosting, clean and dry the interior.
• Switch the appliance on and replace any frozen food.
Defrosting can be accelerated by putting bowls of hot (not boiling) water in the freezer and loosening
the frost with a suitable plastic scraper.
Never use sharp metal tools as it may damage the appliance.
Never use an electrical heater, this may cause an electric shock.
22
Page 23
For I&W (Ice and Water) version
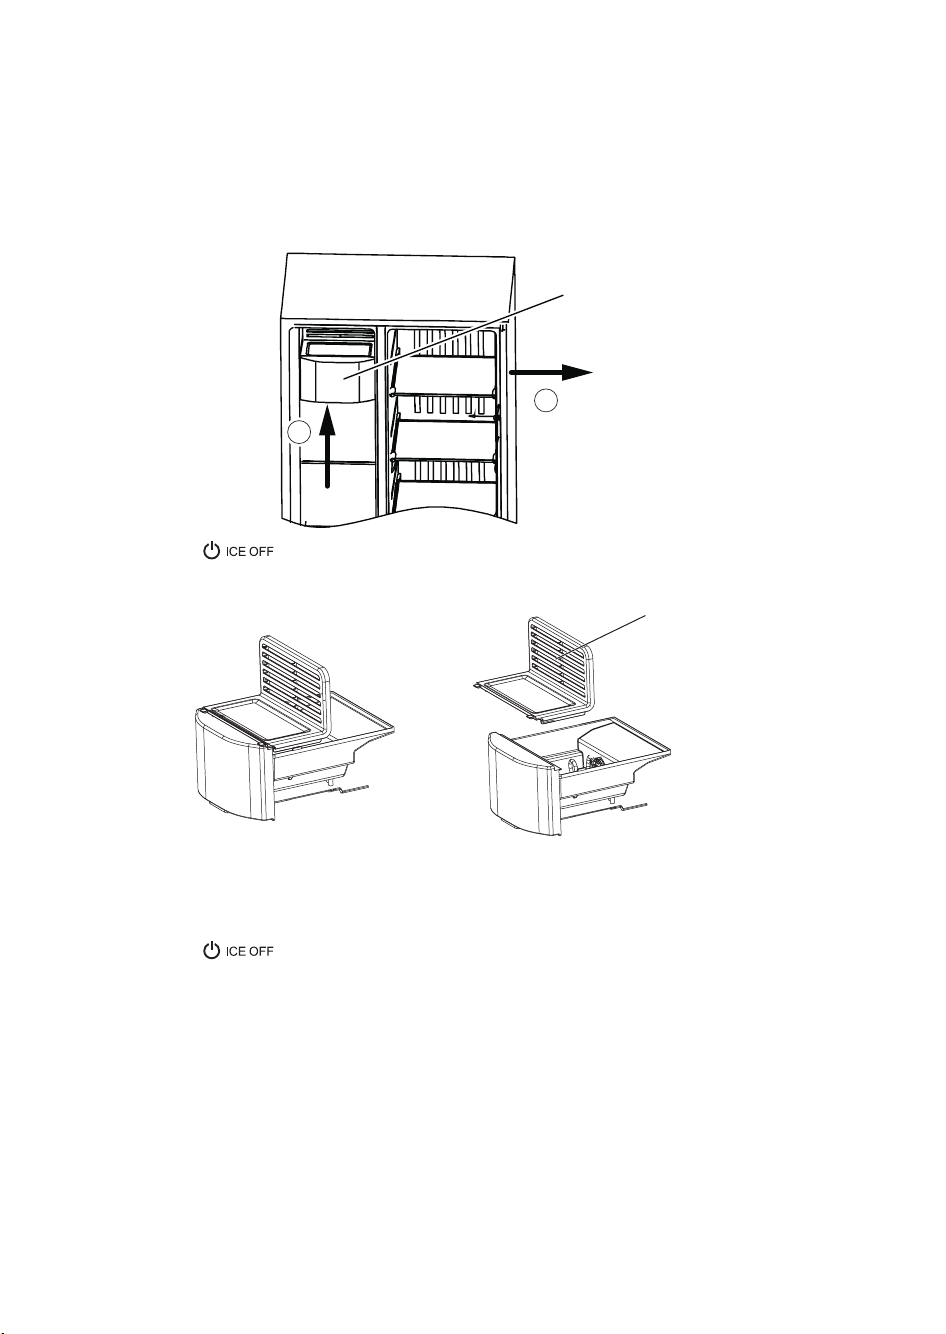
Clean the Ice Container
Ice in the ice container may block the outlet because of lumping or other reasons. In this case
the ice container needs cleaning or eliminating block.
Ice Container
2
1
1. Press the button to lock the icemaker,Pull out the plug.Hold up the components of ice
storage box by both hands and pull them out upwards and outwards horizontally.
Ice Container cover
2. Please take out Ice Container cover and clean Ice Container.
According to the Ice Container to take down the reverse direction of the installation can be.
3. Close the door of freezer compartment.
Insert the plug again.
Press the
button to unlock the icemaker.
23
Page 24

For IDI (In Door Ice) version
Clean the Ice Container
Ice in the ice container may block the outlet because of lumping or other reasons. In this case
the ice container needs cleaning or eliminating block.
Ice Container
1. Press the button to lock the icemaker,Pull out the plug.Hold up the components of ice
storage box by both hands and pull them out upwards and outwards horizontally.
Ice Container
ice spiral
2. Please take out it if there is any ice in the outlet.If necessary, please remove
ice spiral in clockwise or anticlockwise direction,in order to take out ice that is tilt or stuck.
Motor shaft
3. Put back the ice container. If necessary, please rotate the ice spiral in order to gear it into motor
shaft. Close the door of freezer compartment.Insert the plug again.
Press the
button to unlock the icemaker.
24
Page 25
Cleaning of Glass shelfr
• As the innermost part of the refrigerator liner where contacting the shelves has a backstop, you
shall raise the shelves upward, then you can be able to take it out.
• Adjust or clean the shelves according to your requirement.
backstop
6
5
6
The actual configuration will depend on the physical product or statement by the distributor
The picture above is only for reference.
Defrosting
• The refrigerator is made based on the air-cooling principle and thus has automatic defrosting
function. Frost formed due to change of season or temperature may also be manually removed
by disconnection of the appliance from power supply or by wiping with a dry towel.
Out of operation
• Power failure: In case of power failure, even if it is in summer, foods inside the appliance can be
kept for several hours; during the power failure, the times of door opening shall be reduced, and
no more fresh food shall be put into the appliance.
• Long-time nonuse: The appliance shall be unplugged and then cleaned; then the doors are left
open to prevent odor.
• Moving: Before the refrigerator is moved, take all objects inside out, fix the glass partitions,
vegetable holder, freezing chamber drawers and etc. with tape, and tighten the leveling feet;
close the doors and seal them with tape. During moving, the appliance shall not be laid upside
down or horizontally, or be vibrated; the inclination during movement shall be no more than 45°.
The appliance shall run continuously once it is started. Generally, the operation of the appliance
shall not be interrupted; or otherwise the service life may be impaired
25
Page 26

TROUBLE SHOOTING
Problem Solution
Check whether the appliance is connected to power or whether the
Failed operation
Odor
Long-time operation
of the compressor
Light fails to get lit
Doors cannot be
properly closed
Loud noise
Door seal fails to be
tight
Water pan overflows
Hot housing
Surface condensation
Abnormal noise
plug is in well contact
Check whether the voltage is too low
Check whether there is a power failure or partial circuits have tripped
Odorous foods shall be tightly wrapped
Check whether there is any rotten food
Clean the inside of the refrigerator
Long operation of the refrigerator is normal in summer when the
ambient temperature is high
It is not suggestible having too much food in the appliance at the same
time
Food shall get cool before being put into the appliance
The doors are opened too frequently
Check whether the refrigerator is connected to power supply and
whether the illuminating light is damaged
Have the light replaced by a specialist
The door is stuck by food packages Too much food is placed
The refrigerator is tilted
Check whether the floor is level and whether the refrigerator is placed
stably
Check whether accessories are placed at proper locations
Remove foreign matters on the door seal
Heat the door seal and then cool it for restoration
(or blow it with an electrical drier or use a hot towel for heating)
There is too much food in the chamber or food stored contains too
much water,resulting in heavy defrosting
The doors are not closed properly, resulting in frosting due to entry of
air and increased water due to defrosting
Heat dissipation of the built-in condenser via the housing, which is
normal
When housing becomes hot due to high ambient temperature, storage
of too much food or shutdown of the compressor is shut down, provide
sound ventilation to facilitate heat dissipation
Condensation on the exterior surface and door seals of the refrigerator
is normal when the ambient humidity is too high. Just wipe the
condensate with a clean towel.
Buzz: The compressor may produce buzzes during operation, and the
buzzes are loud particularly upon start or stop. This is normal.
Creak: Refrigerant flowing inside of the appliance may produce creak,
which is normal.
26
Page 27
AFTER-SALES SERVICE
Before contacting After-Sales Service:
1. See if you can solve the problem yourself with
the help of the “Troubleshooting guide”).
2. Switch the appliance on again to see if the
problem has been solved. If it has not,
disconnect the appliance from the power
supply and wait for about an hour before
switching on again.
3. If the problem persists after this course of
action, contact After-sales Service.
Specify:
• the nature of the problem
• the appliance model,
• the Service number (the number after the
word SERVICE on the rating plate on the
inside of the appliance)
• your full address
• your telephone number and area code.
27
Page 28
SICHERHEITSHINWEISE
DIESE MÜSSEN DURCHGELESEN UND BEACHTET WERDEN
Diese Sicherheitshinweise vor dem
Gebrauch durchlesen.
Diese für spätere
Nachschlagezwecke in der Nähe
aufbewahren.
In diesen Anweisungen sowie
auf dem Gerät selbst werden
wichtige Sicherheitshinweise
angegeben, die durchgelesen und
stets beachtet werden müssen.
Der Hersteller übernimmt keine
Haftung für die Nichtbeachtung
dieser Sicherheitshinweise, für
unsachgemäße Verwendung
des Gerätes oder falsche
Bedienungseinstellung.
Babys und Kleinkinder (0-3 Jahre)
müssen vom Gerät fern gehalten
werden. Jüngere Kinder (3-8 Jahre)
müssen vom Gerät fern gehalten
werden, es sei denn, sie werden
ständig beaufsichtigt. Dieses Gerät
darf von Kindern ab 8 Jahren sowie
Personen mit herabgesetzten
physischen, sensorischen oder
geistigen Fähigkeiten und Mangel an
Erfahrung und Kenntnissen nur unter
Aufsicht oder nach ausreichender
Einweisung durch eine für ihre
Sicherheit verantwortliche Person
verwendet werden. Kinder dürfen
nicht mit dem Gerät spielen. Die
Reinigung und Pflege des Gerätes
darf von Kindern nicht ohne Aufsicht
durchgeführt werden.
ZULÄSSIGE NUTZUNG
VORSICHT! Das Gerät ist nicht
für den Betrieb mit einer externen
Schaltvorrichtung, z. B. einem Timer
oder einer separaten Fernbedienung,
ausgelegt.
Dieses Gerät ist für
Haushaltsanwendungen und
ähnliche Anwendungen konzipiert,
zum Beispiel: Mitarbeiterküchen
im Einzelhandel, in Büros oder
in anderen Arbeitsbereichen;
Gasthäuser; für Gäste in Hotels,
Motels, Bed-and-BreakfastAnwendungen und anderen
Wohnumgebungen.
Dieses Gerät eignet sich nicht
für den professionellen Einsatz.
Verwenden Sie das Gerät nicht im
Freien.
Die im Gerät verwendete
Lampe ist speziell für Elektrogeräte
konzipiert und ist nicht für die
Beleuchtung von Räumen geeignet
(EU-Verordnung 244/2009).
Das Gerät ist für den Einsatz
in Räumen mit nachstehenden
Umgebungstemperaturbereichen
ausgelegt, die ihrerseits von der
Klimaklasse auf dem Typenschild
abhängig sind. Wird der vorgegebene
Temperaturbereich für das Gerät
für einen längeren Zeitraum unteroder überschritten, kann es zu
Funktionsstörungen kommen.
Klimaklasse Raumtemp. (°C)
SN: Von 10 auf 32 °C
ST: Von 16 auf 38 °C;
N: Von 16 auf 32 °C
T: Von 16 auf 43 °C
Dieses Gerät ist FCKW-frei.
Der Kältemittelkreislauf enthält
R600a (HC). Hinweis zu Geräten
mit Isobutan (R600a): Isobutan
ist ein umweltverträgliches,
natürliches Gas, es ist jedoch leicht
entflammbar. Aus diesem Grund
sicherstellen, dass die Leitungen des
Kühlmittelkreislaufs nicht beschädigt
sind, insbesondere beim Entleeren
des Kühlmittelkreislaufs.
ACHTUNG: Beschädigen Sie
28
Page 29
auf keinen Fall die Leitungen des
Kältemittelkreises.
ACHTUNG: Lüftungsöffnungen
in der Geräteverkleidung oder im
Einbaumöbel sind von Behinderungen
frei zu halten.
ACHTUNG: Zum Beschleunigen
des Abtauvorganges niemals zu
anderen mechanischen, elektrischen
oder chemischen Hilfsmitteln
greifen als zu den vom Hersteller
empfohlenen.
ACHTUNG: Verwenden Sie
keine elektrischen Geräte in den
Fächern des Gerätes, wenn deren
Einsatz nicht explizit vom Hersteller
zugelassen worden ist.
ACHTUNG: Eisbereiter und/oder
Wasserspender, die nicht direkt mit
der Wasserleitung verbunden sind,
dürfen nur mit Trinkwasser befüllt
werden.
ACHTUNG: Automatische
Eisbereiter und/oder Wasserspender
müssen an eine Wasserleitung
angeschlossen werden, die
nur Trinkwasser mit einem
Wasserleitungsdruck zwischen 0,17
und 0,81 MPa (1,7 und 8,1 bar)
liefert.
Lagern Sie keine explosiven
Substanzen, wie Sprühdosen mit
brennbarem Treibmittel in diesem
Gerät.
Die in den Kühlakkus (bei
manchen Modellen vorhanden)
enthaltene (ungiftige) Flüssigkeit
darf nicht verschluckt werden.
Verzehren Sie Eiswürfel oder
Wassereis nicht unmittelbar nach der
Entnahme aus dem Gefrierfach, da
sie Kälteverbrennungen hervorrufen
können.
Bei Produkten, die für den
Gebrauch eines Luftfilters hinter
einer zugänglichen Lüfterabdeckung
ausgelegt sind, muss der Filter
bei laufendem Kühlschrank stets
eingesetzt sein.
Bewahren Sie keine Glasbehälter
mit Flüssigkeiten im Gefrierfach, sie
könnten zerbrechen. Blockieren Sie
das Gebläse (falls inbegriffen) nicht
mit Lebensmitteln. Prüfen Sie nach
dem Ablegen von Lebensmitteln, ob
die Tür der Fächer korrekt schließt,
besonders die Tür des Gefrierfachs.
Beschädigte Dichtungen müssen
so schnell wie möglich ausgetauscht
werden.
Verwenden Sie das Kühlfach nur
zur Aufbewahrung von frischen
Lebensmitteln und das Gefrierfach
nur zur Aufbewahrung von
gefrorenen Lebensmitteln, zum
Einfrieren von frischen Lebensmitteln
und zur Herstellung von Eiswürfeln.
Unverpackte Lebensmittel
so lagern, dass sie nicht mit den
Innenwänden des Kühl- bzw.
Gefrierfachs in Berührung kommen.
Möglicherweise verfügt das Gerät
über Sonderfächer (Frischefach,
Null-Grad-Box, usw.). Falls nicht
anderweitig in der Anleitung des
Gerätes angegeben, können diese
für eine gleichmäßige Funktion im
gesamten Gerät herausgenommen
werden.
Das brennbare Gas C-Pentan
wird als Treibmittel im Isolierschaum
eingesetzt.
INSTALLATION
Zum Transport und zur Installation
des Gerätes sind zwei oder
mehrere Personen erforderlich Verletzungsgefahr. Schutzhandschuhe
zum Auspacken und zur
Installation verwenden - Risiko von
Schnittverletzungen.
29
Page 30
Die Installation, einschließlich der
Wasserversorgung (falls vorhanden)
und elektrische Anschlüsse und
Reparaturen müssen von einem
qualifizierten Techniker durchgeführt
werden. Reparieren Sie das
Gerät nicht selbst und tauschen
Sie keine Teile aus, wenn dies
vom Bedienungshandbuch nicht
ausdrücklich vorgesehen ist. Kinder
vom Installationsort fern halten.
Prüfen Sie das Gerät nach dem
Auspacken auf Transportschäden.
Bei auftretenden Problemen
wenden Sie sich bitte an Ihren
Händler oder den Kundendienst.
Nach der Installation müssen
Verpackungsabfälle (Kunststoff,
Styroporteile usw.) außerhalb der
Reichweite von Kindern aufbewahrt
werden - Erstickungsgefahr. Das
Gerät vor Installationsarbeiten
von der Stromversorgung trennen
- Stromschlaggefahr. Während
der Installation sicherstellen, das
Netzkabel nicht mit dem Gerät
selbst zu beschädigen - Brandoder Stromschlaggefahr. Das
Gerät erst starten, wenn die
Installationsarbeiten abgeschlossen
sind.
Achten Sie beim Bewegen des
Gerätes darauf, den Boden (z. B.
Parkett) nicht zu beschädigen. Stellen
Sie das Gerät auf dem Boden oder
einer für sein Gewicht ausreichend
starken Halterung auf. Der Ort sollte
der Größe und der Nutzung des
Geräts entsprechen. Sicherstellen,
dass sich das Gerät nicht in der
Nähe einer Wärmequelle befindet
und dass die vier Füße fest auf
dem Boden aufliegen. Die Füße
entsprechend einstellen und mit
einer Wasserwaage kontrollieren,
dass das Gerät vollkommen eben und
standfest ist. Warten Sie mindestens
zwei Stunden, bevor Sie das Gerät
einschalten, um sicherzustellen, dass
der Kältemittelkreislauf einwandfrei
funktioniert.
ACHTUNG: Um Gefahren
aufgrund von Instabilität zu
verhindern, muss das Gerät gemäß
Herstelleranweisungen platziert oder
befestigt werden.
Der Kühlschrank darf nicht so
aufgestellt werden, dass das
Metallrohr eines Gasherdes, Metallbzw. Wasserrohre oder elektrische
Verkabelungen mit der Rückwand
des Gerätes in Berührung kommen
(oder mit der Kondensatorschlange).
Alle Abmessungen und
Abstandsflächen die für die
Installation des Gerätes erforderlich
sind, befinden sich in dem
Installationshandbuch.
HINWEISE ZUR ELEKTRIK
Es muss gemäß den
Verdrahtungsregeln möglich sein,
den Netzstecker des Gerätes
zu ziehen, oder es mit einem
Trennschalter, welcher der Steckdose
vorgeschaltet ist, auszuschalten.
Das Gerät muss im Einklang
mit den nationalen elektrischen
Sicherheitsbestimmungen geerdet
sein.
Verwenden Sie keine
Verlängerungskabel, Mehrfachstecker
oder Adapter. Nach der Installation
dürfen Strom führende Teile für
den Benutzer nicht mehr zugänglich
sein. Das Gerät nicht in nassem
Zustand oder barfuß verwenden.
Das Gerät nicht verwenden, wenn
das Netzkabel oder der Stecker
beschädigt sind, wenn es nicht
einwandfrei funktioniert, wenn
es heruntergefallen ist oder in
irgendeiner Weise beschädigt wurde.
Wenn das Netzkabel beschädigt
30
Page 31

ist, muss es aus Sicherheitsgründen
vom Hersteller, von seinem
Kundendienstvertreter oder einer
ähnlich qualifizierten Fachkraft mit
einem identischen Kabel ersetzt
werden - Stromschlaggefahr.
REINIGUNG UND WARTUNG
WARNUNG : Vor dem
Durchführen von Wartungsarbeiten
ist sicherzustellen, dass das
Gerät ausgeschaltet und
von der Stromversorgung
getrennt ist; Verwenden Sie
keine Dampfreinigungsgeräte Stromschlaggefahr.
Verwenden Sie keine
Scheuermittel wie Fensterspray,
Entfetter, entzündbare Flüssigkeiten,
Reinigungspaste, konzentrierte
Reinigungsmittel, Bleichmittel oder
benzinhaltige Reinigungsmittel
auf Kunststoffteilen, Innen- oder
Türablagen oder Dichtungen.
Benutzen Sie keine Papiertücher,
Topfreiniger oder scharfen
Gegenstände.
ENTSORGUNG VON
VERPACKUNGSMATERIALIEN
Das Verpackungsmaterial ist zu 100 %
wiederverwertbar und trägt das Recycling-Symbo
.
Werfen Sie das Verpackungsmaterial deshalb nicht
einfach weg, sondern entsorgen Sie es gemäß den
geltenden örtlichen Vorschriften.
ENTSORGUNG VON
HAUSHALTSGERÄTEN
Dieses Gerät wurde aus recycelbaren oder
wiederverwendbaren Werkstoffen hergestellt.
Entsorgen Sie das Gerät gemäß den regionalen
Vorschriften zur Abfallbeseitigung. Genauere
Informationen zu Behandlung, Entsorgung und
Recycling von elektrischen Haushaltsgeräten
sind bei der örtlichen Behörde, der Müllabfuhr
oder dem Händler erhältlich, bei dem das
Gerät gekauft wurde. Dieses Gerät ist gemäß
der Europäischen Richtlinie 2012/19/EU für
Elektro- und Elektronik- Altgeräte (WEEE)
gekennzeichnet. Durch Ihren Beitrag zur
korrekten Entsorgung dieses Produkts schützen
Sie die Umwelt und die Gesundheit Ihrer
Mitmenschen.
Das Symbol auf dem Gerät bzw. auf dem
beiliegenden Informationsmaterial weist
darauf hin, dass dieses Gerät kein normaler
Haushaltsabfall ist, sondern in einer Sammelstelle
für Elektro- und Elektronik-Altgeräte entsorgt
werden muss.
ENERGIESPARTIPPS
Befolgen Sie die Aufstellanweisungen, um
angemessene Belüftung sicherzustellen. Eine
unzureichende Belüftung hinten am Gerät
erhöht den Energieverbrauch und verringert die
Kühlkapazität.
Häufiges Öffnen der Tür kann zu einem erhöhten
Energieverbrauch führen.
Die Innentemperatur des Gerätes und der
Energieverbrauch können sowohl von der
Umgebungstemperatur als auch vom Standort
des Gerätes beeinflusst werden. Bei der
Temperatureinstellung sind diese Faktoren zu
berücksichtigen.
Öffnen Sie die Tür nur so weit wie notwendig.
Platzieren Sie Lebensmittel zum Auftauen im
Kühlschrank. Die niedrige Temperatur der
gefrorenen Lebensmittel kühlt das Essen im
Kühlschrank.
Lassen Sie warme Speisen und Getränke
abkühlen, bevor Sie diese im Gerät platzieren.
Die Position der Ablageflächen im Kühlschrank
hat keinen Einfluss auf den effizienten
Energieverbrauch. Lebensmittel müssen so auf
den Ablageflächen platziert werden, dass eine
korrekte Luftzirkulation sichergestellt wird
(Lebensmittel dürfen sich nicht berühren und
zwischen Lebensmitteln und Rückwand muss
Abstand gehalten werden).
Sie können die Lagerkapazität der gefrorenen
Lebensmittel durch Entnahme der Körbe
und, wenn vorhanden, der Stop-Frost-Ablage,
erhöhen.
Es gibt keinen Grund zur Beunruhigung im Falle
von Geräuschen durch das Gebläse, die in dieser
Produkt-Kurzanleitung als normal beschrieben
werden.
31
Page 32

ORDNUNGSGEMÄSSE NUTZUNG VON
KÜHLSCHRÄNKEN
Stellfüße
1. Vorkehrungen vor der Aufstellung:
Informationen in der Bedienungsanleitung sind nur als Referenz zu betrachten. Das fertige Produkt kann
abweichen.
Vor der Installation von Zubehörteilen muss sichergestellt werden, dass der Kühlschrank von der
Stromversorgung getrennt ist.
Vor Einstellen der Stellfüße müssen Vorkehrungen getroffen werden, um Verletzungen zu vermeiden.
2. Schematische Darstellung der Stellfüße.
LH
Die tatsächliche Konfiguration ist abhängig von dem fertigen Produkt oder der Erklärung des Händlers
3. Einstellvorgänge:
a. Drehen Sie die Füße im Uhrzeigersinn, um den Kühlschrank zu erhöhen;
b. Drehen Sie die Füße entgegen dem Uhrzeigersinn, um den Kühlschrank zu senken;
c. Stellen Sie die rechten und linken Füße gemäß den oben beschriebenen Verfahren ein, so dass sie eine
horizontale Ebene bilden.
Das oben abgebildete Bild dient nur als Referenz.
32
Page 33

Nivellierung der Tür
1. Vorkehrungen vor der Aufstellung:
Vor der Installation von Zubehörteilen muss sichergestellt werden, dass der Kühlschrank von der
Stromversorgung getrennt ist.
Vor Anpassen der Tür, müssen Vorkehrungen getroffen werden, um Verletzungen zu vermeiden.
2. Schematische Darstellung der Nivellierung der Tür
Liste der Werkzeuge, die durch den Nutzer
bereit gestellt werden müssen
Schraubenschlüssel
Das oben abgebildete Bild dient nur als Referenz.
Die tatsächliche Konfiguration ist abhängig von dem fertigen Produkt oder der Erklärung des Händlers
Befestigte
Welle
Stellfüße
Feststellmutter
Feststellmutter
Schraubenschlüssel
Wenn die Kühlschranktür tief ist:
Öffnen Sie die Tür, verwenden Sie einen Schraubenschlüssel, um die Feststellmutter zu lösen und drehen
Sie die Stellmutter entgegen dem Uhrzeigersinn, um die Höhe der Tür zu erhöhen. Wenn die Türen
ausgerichtet sind, die Feststellmutter anziehen, indem sie entgegen dem Uhrzeigersinn gedreht wird.
Wenn die Kühlschranktür hoch ist:
Öffnen Sie die Tür, verwenden Sie einen Schraubenschlüssel, um die Feststellmutter im Uhrzeigersinn
zu drehen, um die Höhe der Tür zu senken. Wenn die Türen ausgerichtet sind, die Feststellmutter
anziehen, indem sie entgegen dem Uhrzeigersinn gedreht wird.
Anschluss an die Wasseranlage
1. Vorkehrungen vor der Aufstellung:
Informationen in der Bedienungsanleitung sind nur als Referenz zu betrachten. Das fertige Produkt kann
abweichen.
Vor der Installation von Zubehörteilen muss sichergestellt werden, dass der Kühlschrank von der
Stromversorgung getrennt ist.
Wassergefahren!
Der Wasserdruck des kombinierten Kühl-/Gefrierschranks beträgt 2-7 Bar. Wenn der Wasserdruck zu
hoch ist, bitte einen Druckminderer installieren.
Bitte die kombinierten Kühl-/Gefrierschränke nicht an einen Wasserhahn oder einen Hahn eines
Warmwasserbereiters anschließen.
Die Zulaufrohre und Ablaufrohre beim Aufstellen nicht biegen und Wasserleitungen vorsichtig
anschließen.
33
Page 34

Keine alten und gebrauchten Wasserleitungen verwenden.
Das Anschlussstück zur Verbindung der Leitung und dem Wasserhahn kaufen und es gemäß der
schematischen Darstellung installieren.
2. Schematische Darstellung
Anschlussstück
Anschlussschlauch Schlauchanschluss
Sicherungsring
Mutter
3. Installationsverfahren
a. Das Ende des Anschlussschlauch in das Anschlussstück drücken. Das Anschlussstück an dem
Wasserhahn befestigen.
b. Die Mutter aus dem weißen Schlauch ziehen. Das Ende des weißen Schlauch in den Schlauchanschluss
schieben, mit einem Sicherungsring befestigt. Bei Bedarf den Schlauch an der Wand vernieten, um
Stolpern zu verhindern.
c. Vorsichtig den Wasserhahn abschrauben, um zu prüfen, ob die Rohrleitung abgedichtet ist.
Aufbau und Befestigung des Filters
Liste der Werkzeuge, die durch den Nutzer
bereit gestellt werden müssen
Schraubenzieher
1 2
1. Die einzelnen Klammern an der Wand mit Schrauben befestigen
2. Die Patrone in die einzelnen Klammern geben;
Sicherungsring
Standortmarkierung
Wasserversorgung
3 4
3. Ein Ende des Schnellanschluss-Winkelstücks in den Zulauf der Filterpatrone einsetzen, mit dem anderen
Ende des Schnellanschluss-Winkelstücks in das Zulaufwasserrohr gegen die Positionsmarkierung
eingesetzt, und befestigt mit dem Sicherungsring;
4. Wie oben beschrieben verfahren, ein Ende des Schnellanschluss-Winkelstücks in den Ablauf
der Filterpatrone einsetzen, mit dem anderen Ende des Schnellanschluss-Winkelstücks in das
Ablaufwasserrohr gegen die Positionsmarkierung eingesetzt.
34
Page 35

Wasserfilter austauschen
1. Vorkehrungen vor der Aufstellung:
Vor der Installation von Zubehörteilen muss sichergestellt werden, dass der Kühlschrank von der
Stromversorgung getrennt ist.
Nach Verwendung von 6 aufeinanderfolgenden Monaten, blinkt die Anzeige.
Dann bitte austauschen.
2. Schematische Darstellung
3. Verfahren:
Netzstecker ziehen. Wasserzulauf schließen. Entnehmen Sie den Filter und den Sicherungsring an dem
Schnellanschluss und ziehen Sie dann die Wasserleitung heraus. Geben Sie den neuen Filter in den
Schnellanschluss ein und installieren Sie dann den Sicherungsring. Schalten Sie die Wasserversorgung
wieder an und prüfen Sie, ob Wasser heraus fließt.
Bei Bedarf, die oben aufgeführten Schritte wiederholen. Den Stecker erneut einsetzen. Die
Tasten 3 Sekunden lang gedrückt halten, um den Filter zu starten. Das Display
verschwindet.
35
Page 36

STRUKTUR UND FUNKTIONEN
Für I&W-Version (Eis und Wasser)
Gefrierraum
LED Beleuchtung
Eiswürfelfach
(Abnehmbar)
Eisbereiter
Wasserspender
Glasablage
Türablage
Schale
Das oben abgebildete Bild dient nur als Referenz.
Die tatsächliche Konfiguration ist abhängig von dem fertigen Produkt oder der Erklärung des Händlers
Kühlraum
LED Beleuchtung
Türablage
Glasablage
Obst- und
Gemüsefach
Kühlraum
• Der Kühlraum ist geeignet zum Aufbewahren von Obst, Gemüse, Getränken und anderen , in
kurzer Zeit konsumierten, Lebensmitteln.
• Gekochte Speisen sollten erst in den Kühlraum gegeben werden, wenn sie auf Raumtemperatur
abgekühlt sind.
• Es wird empfohlen die Speisen vor der Aufbewahrung im Kühlschrank zu verschließen.
• Die Glasablagen können nach oben oder unten verstellt werden, um eine angemessene Menge an
Stauraum und einen einfachen Gebrauch zu ermöglichen.
Gefrierraum
• Die niedrige Temperatur in dem Gefrierraum ermöglicht die Aufbewahrung von frischen
Lebensmitteln über einen langen Zeitraum und wird hauptsächlich zur Aufbewahrung von
gefrorenen Lebensmitteln und zur Herstellung von Eiswürfeln verwendet.
• Der Gefrierraum ist geeignet zum Aufbewahren von Fleisch, Fisch, Reisbällchen und anderen
Lebensmitteln, die nicht in kurzer Zeit verbraucht werden.
• Es wird empfohlen große Fleischstücke in kleine Teile aufzuteilen. Bitte beachten, dass die
Lebensmittel innerhalb der Haltbarkeitszeit aufgebraucht werden müssen.
• Die Temperatur sollte auf “QUICK-FREEZE” (Schnellgefrierfunktion) gestellt werden, wenn Sie
Lebensmittel schnell einfrieren möchten.
Hinweis: Das Aufbewahren von zu vielen Lebensmitteln nach dem ersten Anschluss kann sich negativ
auf die Kühlleistung des Kühlschranks auswirken. Die Lebensmittel im Kühlschrank sollten nicht den
Luftauslass blockieren; oder dies wirkt sich auch negativ auf die Kühlleistung aus.
36
Page 37

STRUKTUR UND FUNKTIONEN
Für IDI-Version (In der Tür integrierter Eisspender)
Gefrierraum
LED Beleuchtung
Eisbereiter
Wasserspender
Glasablage
Türablage
Schale
Das oben abgebildete Bild dient nur als Referenz.
Die tatsächliche Konfiguration ist abhängig von dem fertigen Produkt oder der Erklärung des Händlers
Kühlraum
LED Beleuchtung
Türablage
Glasablage
Obst- und
Gemüsefach
Kühlraum
• Der Kühlraum ist geeignet zum Aufbewahren von Obst, Gemüse, Getränken und anderen , in
kurzer Zeit konsumierten, Lebensmitteln.
• Gekochte Speisen sollten erst in den Kühlraum gegeben werden, wenn sie auf Raumtemperatur
abgekühlt sind.
• Es wird empfohlen die Speisen vor der Aufbewahrung im Kühlschrank zu verschließen.
• Die Glasablagen können nach oben oder unten verstellt werden, um eine angemessene Menge an
Stauraum und einen einfachen Gebrauch zu ermöglichen.
Gefrierraum
• Die niedrige Temperatur in dem Gefrierraum ermöglicht die Aufbewahrung von frischen
Lebensmitteln über einen langen Zeitraum und wird hauptsächlich zur Aufbewahrung von
gefrorenen Lebensmitteln und zur Herstellung von Eiswürfeln verwendet.
• Der Gefrierraum ist geeignet zum Aufbewahren von Fleisch, Fisch, Reisbällchen und anderen
Lebensmitteln, die nicht in kurzer Zeit verbraucht werden.
• Es wird empfohlen große Fleischstücke in kleine Teile aufzuteilen. Bitte beachten, dass die
Lebensmittel innerhalb der Haltbarkeitszeit aufgebraucht werden müssen.
• Die Temperatur sollte auf “QUICK-FREEZE” (Schnellgefrierfunktion) gestellt werden, wenn Sie
Lebensmittel schnell einfrieren möchten.
Hinweis: Das Aufbewahren von zu vielen Lebensmitteln nach dem ersten Anschluss kann sich negativ
auf die Kühlleistung des Kühlschranks auswirken. Die Lebensmittel im Kühlschrank sollten nicht den
Luftauslass blockieren; oder dies
wirkt sich auch negativ auf die Kühlleistung aus.
37
Page 38

Funktionen
A B
1
3 42
5 6 7 8 10 119
C
Das oben abgebildete Bild dient nur als Referenz.
Die tatsächliche Konfiguration ist abhängig von dem fertigen Produkt oder der Erklärung des Händlers
Anzeige
1. Freezer compartment temperature
(Gefrierfachtemperatur)
2. Quick REF. (Schnellübersicht).
3. Quick FRZ (Schnellgefrierfunktion)
4. Refrigerate compartment temperature
(Kühlfachtemperatur)
5. Vacation icon (Symbol Urlaubsfunktion)
6. Water Filter (Wasserfilter)
7. Ice off (Eis aus)
8. Fetching ice cubes (Eiswürfelentnahme)
9. Fetching crushed ice (Die IDI-Version hat keine
Funktion für zerstoßenes Eis)
10. Fetching cold water (Kaltwasserentnahme)
11. Lock/unlock icon (Symbol Blockieren/
Freigeben)
FD E
Tastenfunktion
A. Freezer compartment temperature adjustment (Einstellung der Innentemperatur des Gefrierraums)
B. Refrigerate compartment temperature adjustment (Einstellung der Kühlfachtemperatur)
C. Mode setting (Einstellung der Betriebsweise)
D. Ice OFF/ ON button (Eis AUS/EIN-Taste)
E. Fetching ice/ Fetching water/Filter set (Entnahme von Eis/ Entnahme von Wasser/Filtergruppe)
F. Lock/unlock controls (Steuerungen blockieren/freigeben)
Betriebsanweisungen
Beim ersten Einschalten des Kühlschranks, schaltet sich das Display 3 Sekunden lang ein.
Währenddessen ertönt die Startglocke und der Bildschirm ruft das normale Display auf. Bei der ersten
Verwendung des Kühlschranks, sollten die Temperaturen des Kühlraums und die Temperaturen des
Gefrierraums auf jeweils 5° C/-18 °C eingestellt werden.
Wenn dieser Fehler auftritt, zeigt das Display den Fehlercode (siehe nächste Seite); während dem
normalen Betrieb zeigt das Display die eingestellte Temperatur des Kühlfachs.
Unter normalen Bedingungen stoppt der Kühlschrank für 30 Sekunden, dann zeigt das Display den
Zustand der Blockierung an und das Display schaltet sich aus, nachdem der Zustand der Blockierung 30
Sekunden anhält.
Lock/unlock (blockieren/freigeben)
Im freigegebenen Zustand , die Taste LOCK/UNLOCK 3 Sekunden lang drücken, der blockierte
Zustand wird aufgerufen;
Im blockierten Zustand , die Taste LOCK/UNLOCK 3 Sekunden lang drücken, der freigegebene
Zustand wird aufgerufen;.
Die folgenden Funktionen müssen im freigegebenen Zustand durchgeführt werden.
38
Page 39

Mode setting (Einstellung der Betriebsweise)
Die Taste MODE drücken, um die verschiedenen Betriebsweisen auszuwählen.
Vacation mode (Urlaubsmodus)
Die Taste MODE drücken, um den Urlaubsmodus aufzurufen. Symbol leuchtet auf, der
Urlaubsmodus startet nach der Blockierung.
Die Taste FRZ.TEMP. oder REF.TEMP. drücken, um den Urlaubsmodus zu verlassen.
Quick REF. mode (Schnellübersicht)
Die Taste MODE drücken, um die Schnellkühlung aufzurufen. Symbol leuchtet auf, der Modus
Schnellkühlung startet nach der Blockierung.
Die Taste REF.TEMP. drücken, um die Schnellkühlung aufzurufen.
Quick FRZ. mode (Schnellgefrierfunktion)
Die Taste Mode drücken, um die Schnellgefrierfunktion aufzurufen. Symbol leuchtet auf, der
Modus Schnellgefrierfunktion startet nach der Blockierung.
Die Taste FRZ.TEMP. drücken, um die Schnellgefrierfunktion aufzurufen.
Temperature setting of refrigerating chamber (Temperatureinstellung des Kühlraums)
Die Taste zur Einstellung der Temperatur des Kühlraums REF.TEMP. drücken, der Bereich der kühlen
Lagerung blinkt. Dann die Taste REF.TEMP. erneut drücken, um die Temperatur einzustellen, ein
Piepton ertönt. Der Einstellungsbereich liegt zwischen 2°C und 8°C. Bei jedem Drücken der Taste
ändert sich die Temperatur um 1°C. Nach der Einstellung, blinkt das digitale Rohr 5 Sekunden weiter.
Die neue Temperatureinstellung wird nach der Blockierung wirksam.
Temperature setting of freezing chamber (Temperatureinstellung des Gefrierraums)
Die Taste zur Einstellung der Temperatur des Gefrierraums FRZ.TEMP. drücken, der Bereich der
Schnellgefrierfunktion blinkt. Dann die Taste FRZ.TEMP. erneut drücken, um die Temperatur
einzustellen, ein Piepton ertönt. Der Einstellungsbereich liegt zwischen -16°C und 24°C. Bei jedem
Drücken der Taste ändert sich die Temperatur um 1°C. Nach der Einstellung, blinkt das digitale Rohr
5 Sekunden weiter. Die neue Temperatureinstellung wird nach der Blockierung wirksam.
Quick-freeze time setting (Zeiteinstellung der Schnellgefrierfunktion)
Wählen Sie die Schnellgefrierfunktion und drücken Sie die Taste FRZ.TEMP 3 Sekunden lang, um
die Zeiteinstellung der Schnellgefrierfunktion aufzurufen; Durch kurzes Drücken von FRZ.TEMP
wird die Umlaufschaltung von “26-48-26-48” eingestellt, nachdem die Zeit der Schnellgefrierfunktion
auf dem Temperaturdisplay des Gefrierraums angezeigt wird
Die Schnellgefrierfunktion funktioniert separat in den Betriebsweisen 26H und 48H zum Verlassen
der Schnellgefrierfunktion.
Wenn die Zeiteinstellung der Schnellgefrierfunktion eingeschaltet ist, die Betriebsweise blockieren
oder die Taste FRZ.TEMP 3s lang drücken, um die Zeiteinstellung der Schnellgefrierfunktion zu
verlassen.
Die 48H Schnellgefrierfunktion wird verwendet zum Gesamtleistungstest und ist nicht empfohlen für
Kunden.
ICE OFF (Eis aus)
Die Taste drücken und das Symbol wird beleuchtet oder hervorgehoben, um die
Eisbildungsfunktion zu starten.
DISPENSER (Spender)
Die Taste drücken, um die Eis/Wasser-Auswahl aufzurufen; die Umlaufbedingung
"Eiswürfelentnahme/Entnahme von zerstoßenem Eis/Entnahme von Wasser/Keine" auswählen und
das entsprechende Symbol auf der Bedientafel leuchtet aufeinanderfolgend.
Wenn das System in Betrieb ist, wird die Betriebszeit des Filters zugefügt; nach 150 Tagen erscheint
das Filtersymbol und nach 180 Tagen blinkt das Filtersymbol; die Taste 3s lang gedrückt
halten, um die Funktion FILTER RESET anzuwenden, womit die Betriebszeit des Filters zurückgestellt
wird.
Nach dem Austausch des Filters, wird das blinkende Symbol hervorgehoben.
39
Page 40

Lagerung nach Stromausfall
Bei einem Stromausfall wird der laufende Betriebszustand blockiert und bis zur Wiederherstellung
des Stroms beibehalten.
Öffnungshinweis und Alarmkontrolle
Wenn sich die Tür des Kühlraums öffnet, ertönt ein Hinweiston. Wenn die Tür nicht innerhalb von
zwei Minuten geschlossen wird, ertönt der Summer jede Minute, bis die Tür geschlossen wird.
Fehlerangabe
Die folgenden Warnungen erscheinen auf dem Display und geben die entsprechenden Störungen des
Kühlschranks an. Obwohl der Kühlschrank weiter die Kühl- und Gefrierfunktion ausführen kann bei
den folgenden Störungen, sollte der Benutzer einen Wartungstechniker kontaktieren, um den
normalen Gebrauch des Kühlschranks sicherzustellen.
Fehlercode Fehlerbeschreibung
E0 Fehler des Eiswürfelbereiters
E1 Temperatursensor Erkennung eines Schaltfehlers des Kühlraums
E2 Temperatursensor Erkennung eines Schaltfehlers des Gefrierraums
E5 Abtausensor Erkennung eines Schaltfehlers
E6 Kommunikationsfehler
E7 Umlauf des Temperatursensor Erkennung eines Schaltfehlers
EE Eiswürfelbereiter Sensorkreis
EH Feuchtigkeitssensor Fehler
Entnahme von Wasser und Eis
• Während der Zubereitung von Eiswürfeln und zerstoßenem Eis entstehen Geräusche: Das
Wasserventil erzeugt ein summendes Geräusch, wenn das Wasser in den Eisbehälter fließt
entstehen Geräusche; Zerkleinerungsmaschine, die das Eis in kleine Stücke zerstößt oder wenn
Eis in den Behälter fällt, erzeugen Geräusche. Diese Geräusche sind normal.
• Kratzende Geräusche können entstehen, wenn die Eiswürfel entnommen werden. Dies ist kein
Grund zur Beunruhigung. Das Eis in dem Behälter kann zusammenkleben. In diesen Fällen das
Eiswürfelfach entnehmen und mit einem Kunststoff- oder Holzlöffel kräftig auf die Eiswürfel
drücken, um sie zu teilen.
• Weitere Möglichkeiten sind in dem Kapitel “Reinigung des Eiswürfelfach” aufgeführt. Um
Überhitzung des Eiswürfelbereiters zu vermeiden, das Eis ungefähr 1 Minute nach dem Stopp
entnehmen. Bitte etwas warten bis die Motortemperatur die Betriebstemperatur erreicht. Bitte
das Eis aus dem Eiswürfelfach nehmen, wenn Sie große Mengen benötigen.
• In dem Kapitel “Reinigung des Eiswürfelfach" wird erklärt wie das Eiswürfelfach aus dem
Gefrierfach entfernt wird.
Wenn sich nicht ausreichend Eiswürfel in dem Eiswürfelfach befinden, können keine Eiswürfel
entnommen werden. Bitte etwas warten, bis neue Eiswürfel zubereitet wurden. Um Eisgeruch
oder schlechten Geschmack der Eiswürfel zu vermeiden, das Eiswürfelfach regelmäßig reinigen.
• Eiswürfel und Wasser können nur entnommen werden, wenn die Tür des Gefrierfachs
geschlossen ist. Während der Entnahme von Wasser und Eis, stoppt der Vorgang automatisch,
wenn Sie die Gefrierertür öffnen.
• Wenn angezeigt wird oder aus geht, klicken Sie die Tasten des Wasserspenders erneut.
40
Page 41

Kaltwasserentnahme
Die Tasten gedrückt halten, bis sich die Anzeige einschaltet.
Den Behälter in die Richtung des Wasserentnahmepolsters drücken, kaltes Wasser beginnt in den
Behälter zu fließen.
Den Behälter von dem Wasserentnahmepolster entfernen und die Wasserausgabe stoppen.
Entnahme von zerstoßenem Eis
Die Tasten des Wasserspenders gedrückt halten, bis das Signal erscheint.
Den Behälter mit der Öffnung des Wasserspenders abdecken, um seitliches Spritzen zu vermeiden.
Den Behälter in die Richtung des Wasserentnahmepolsters drücken. Den Behälter mit zerstoßenem Eis
füllen.
Den Behälter von dem Wasserentnahmepolster entfernen und die Wasserausgabe stoppen.
Eiswürfelentnahme
Die Tasten gedrückt halten, bis das Signal leuchtet.
Den Behälter in die Richtung des Wasserentnahmepolsters drücken.
Die Eiswürfel beginnen in den Behälter zu fallen.
Den Behälter von dem Wasserentnahmepolster entfernen und die Eiswürfelausgabe stoppen.
Den Eiswürfelbereiter blockieren
Wenn die Funktion der Wasser- und Eiswürfelentnahme längere Zeit nicht verwendet wird, können Sie
den Eiswürfelbereiter blockieren:
Die Taste drücken, das Display leuchtet auf.
41
Page 42

Temperatureinstellung
Wichtiger Hinweis: Das Display ist nur erleuchtet, wenn eine Taste gedrückt oder die Tür eines
Fachs geöffnet wird; in allen andern Fällen ist die Anzeige auf Standby geschaltet.
Wichtiger Hinweis: Das Bedienfeld wird automatisch gesperrt. Vor der Temperatureinstellung
oder der Auswahl einer Betriebsart muss das Bedienfeld entriegelt werden; dazu die Sperrtaste 3
Sekunden drücken, bis das Sperrymbol auf dem Display erlischt.
Hinweis: Die normale Betriebstemperatur des Kühlfachs sollte zwischen 0 °C und 4 °C liegen, die
Betriebstemperatur des Gefrierfachs dagegen zwischen -18 °C und -25 °C.
Hinweis: Die Temperatur von frisch eingelagerten Lebensmitteln und die Häufigkeit
der Türöffnungen beeinträchtigen die Temperatur im Kühlraum. Ändern Sie ggf. die
Temperatureinstellung.
Temperatureinstellung des Gefrierraums
Die Taste Temperatureinstellung des Gefrierraums drücken, um die Gefrierteiltemperatur einzustellen. Die
Gefrierteiltemperatur kann im Bereich von -16 °C bis -24 °C eingestellt werden.
Drücken Sie die Taste Temperatureinstellung des Gefrierteils, bis das Display die gewünschte Temperatur
anzeigt. Hinweis: Während der Temperatureinstellung blinkt die Gefrierteiltemperatur auf dem Display.
Nach Einstellung der gewünschten Temperatur blinkt die Gefrierteiltemperatur für einige Sekunden, das
Bedienfeld wird automatisch gesperrt und nach 30 Sekunden erlischt die Anzeige.
Gefrierteiltemperatur
Die Gefrierteiltemperatur wird auf dem Display angezeigt, wenn eine Tür des Gefrierfachs geöffnet oder
eine Taste gedrückt wird.
Einstellung der Kühlteiltemperatur
Die Taste Temperatureinstellung des Kühlteils drücken, um die Kühlteiltemperatur einzustellen. Die
Kühlteiltemperatur kann im Bereich von 2 °C bis 8 °C eingestellt werden.
Drücken Sie die Taste Temperatureinstellung des Kühlraums, bis das Display die gewünschte Temperatur
anzeigt. Hinweis: Während der Temperatureinstellung blinkt die Kühlteiltemperatur auf dem Display. Nach
Einstellung der gewünschten Temperatur blinkt die Kühlteiltemperatur für einige Sekunden, das Bedienfeld
wird automatisch gesperrt und nach 30 Sekunden erlischt die Anzeige.
Kühlteiltemperatur
Die Kühlteiltemperatur wird auf dem Display angezeigt, wenn eine Tür des Kühraums geöffnet oder eine
Taste gedrückt wird.
Modus-Auswahl
Das Gerät verfügt über 4 voreingestellte Betriebsarten, die mit der Modus-Taste ausgewählt werden
können:
• Vacation (Urlaub)
• Schockfrosten
• Tiefgefrieren und Tiefkühlen
• Schnellkühlen
Vacation (Funktion Urlaub)
Dieser Modus dient zur Vermeidung von Energieverschwendung, wenn das Gerät nicht auf normale
Weise benutzt wird (z. B. wenn Sie im Urlaub sind).
Bei Auswahl dieser Funktion werden die Gefrierteiltemperatur automatisch auf -18 °C gesetzt und
der Kühlraum abgeschaltet.
Für die Auswahl dieser Funktion müssen Sie die Modus-Taste drücken, bis das Symbol Vacation auf
dem Display aufleuchtet. Für die Abwahl der Funktion die Modus-Taste drücken, bis das Symbol
Vacation auf dem Display erlischt.
42
Page 43

Wichtiger Hinweis: Wenn dieser Modus ausgewählt wird, müssen alle Lebensmittel und Getränke
aus dem Kühlraum entfernt werden.
Tiefgefrieren
Dieser Modus ist für die Einlagerung von nicht bereits tiefgefroreren Lebensmitteln bestimmt.
Wenn Sie frische Lebensmittel in das Gefrierteil legen, müssten Sie eigentlich zuvor die Temperatur
senken und anpassen, um das Tiefgefrieren so weit wie möglich zu erleichtern. Sie sollten daher den
Modus Tiefgefrieren 12 Stunden zuvor einstellen. Nach Auswahl dieser Funktion wird die Temperatur
des Gefrierteils für maximal 26 Stunden automatisch auf -24 °C gesetzt (danach wird die Temperatur
wieder auf den zuvor eingestellten Wert geschaltet). Wenn die Temperatur während der 26 Stunden
unter -24 °C absinkt, wird der Modus Tiefgefrieren automatisch aufgehoben.
Für die Auswahl dieser Funktion müssen Sie die Modus-Taste drücken, bis das Symbol Tiefgefrieren
auf dem Display aufleuchtet. Für die Abwahl der Funktion die Modus-Taste drücken, bis das Symbol
Tiefgefrieren auf dem Display erlischt.
Tiefgefrieren und Tiefkühlen
Wenn Sie eine tiefere Temperatur für den Kühlteil wünschen, wählen Sie den Modus Tiefgefrieren
und Tiefkühlen, um das Gerät auf die tiefste Temperatur zu schalten. Nach Auswahl dieser Funktion
wird die Temperatur des Gefrier- und Kühlteils automatisch auf -24 °C und 2 °C gesetzt, für maximal
26 Stunden im Gefrierraum und für 2 Stunden und 30 Minuten im Kühlraum (danach wird die
Temperatur wieder auf die zuvor eingestellten Werte geschaltet). Wenn die Temperatur während der
26 Stunden unter -24 °C absinkt, wird der Modus Tiefgefrieren automatisch aufgehoben.
Für die Auswahl dieser Funktion müssen Sie die Modus-Taste drücken, bis das Symbol Tiefgefrieren
und Tiefkühlen auf dem Display aufleuchtet. Für die Abwahl der Funktion die Modus-Taste drücken,
bis das Symbol Tiefgefrieren und Tiefkühlen auf dem Display erlischt.
Tiefkühlen
Wenn Sie eine tiefere Temperatur für den Kühlteil wünschen, wählen Sie den Modus Tiefkühlen, um
das Gerät auf die tiefste Temperatur zu schalten. Nach Auswahl dieser Funktion wird die Temperatur
des Gefrierteils für maximal 2 Stunden und 30 Minuten automatisch auf 2 °C gesetzt (danach wird die
Temperatur wieder auf den zuvor eingestellten Wert geschaltet).
Für die Auswahl dieser Funktion müssen Sie die Modus-Taste drücken, bis das Symbol Tiefkühlen
auf dem Display aufleuchtet. Für die Abwahl der Funktion die Modus-Taste drücken, bis das Symbol
Tiefkühlen auf dem Display erlischt.
Sperren/Entsperren
Um die Sperrfunktion zu benutzen, müssen Sie die Sperr-Taste drücken (das Symbol auf dem Display
leuchet auf). Damit sind bis zur Aufhebung der Sperre alle Betätigungen des Bedienfelds gesperrt.
Um das Bedienfeld und die Funktionen zu entsprerren, die Sperrtaste für 3 Sekunden drücken (das
Symbol auf dem Bedienfeld erlischt).
Bereiten von Eiswürfeln
Eiswürfelschale
1. Die Eiswürfelschale vorsichtig herausziehen
und bis zur Markierung mit Wasser füllen.
Danach wieder waagerecht einsetzen.
2. Wenn die Eiswürfel fertig sind, den Knopf
bis zum Anschlag nach rechts drehen und
loslassen; die Eiswürfel fallen aus der Schale in
das Eiswürfelfach.
Markierung Wasserfüllstand
* Die Abbildung dient nur zur Veranschaulichung
43
Page 44

Hinweise:
• Für eine schnellere Herstellung von Eiswürfeln das Gefrierfach auf die tiefste Temperatur
einstellen oder die Funktion Tiefgefrieren wählen, um die Gefrierraumtemperatur zu senken.
• Nicht zu viel Wasser in die Schale füllen. Das Entnehmen der Eiswürfel aus der Eiswürfelschale
kann schwierig werden; Wassertropfen im Eiswürfelfach führen dazu, dass die Eiswürfel
zusammenfrieren.
• Wenn der Knopf betätigt wird, bevor die Eiswürfeln fertig sind, tropft das restliche Wasser in das
Eiswürfelfach und lässt die Eiswürfel zusammenfrieren.
Einstellen der Ablagen und Roste
Wichtiger Hinweis: alle Lebensmittel und Getränke vor dem Einstellen oder Ausbau der Roste und
Ablagen entnehmen
Die Ablagen im Kühlteil können entsprechend Ihren Anforderungen eingesetzt werden. Zum Ausbau
der Ablagen diese etwas anheben, sodass die Plastikzungen auf jeder Seite der Ablagen über den
Schienen liegen und dann die Ablagen herausziehen.
Die Ablagen im Kühl- und Gefrierteil können entsprechend Ihrem Bedarf angeordnet werden. Zum
Ausbau den Rost auf beiden Seiten fassen, anheben (1) und nach vorn herausziehen (2).
Ersetzen von Lampen
Die Lampen des Gefrier- und Kühlteils sind energieeffiziente langlebige LED-Leuchten. Ein Ersetzen
der Lampen sollte daher während der gesamten Lebenszeit des Produktes nicht erforderlich sein.
Die Lampe ist ein 12-V-Gleichstrommodul; in dem unwahrscheinlichen Fall eines Defektes muss es
von einem Fachmann ausgewechselt werden.
Kühlfachlampe
Lampenschirm
Türanschlagwechsel
Der Türanschlag kann nicht gewechselt werden.
44
Page 45

ENERGIESPARTIPPS
• Das Gerät nicht in der Nähe von Wärmequellen wie Herde, Geschirrspüler oder Heizkörper
aufstellen.
• Das Gerät in einem kühlen gut belüfteten Raum aufstellen und darauf achten, dass die
Lüftungsschlitze frei von Hindernissen sind.
• Die Türen nur für kurze Zeit öffnen, sonst dringt warme Luft in das Innere ein, führt zur
Eisbildung auf den Wänden und erhöhnt den Stromverbrauch. Achten Sie darauf, dass keine
Hindernisse das Schließen der Türen behindern.
• Stellen Sie sicher, dass die Türdichtungen sauber sind und keine Risse oder Spalten aufweisen.
• Lagern Sie die verderblichsten Lebensmittel (solche mit kurzer Haltbarkeit wie gekochtes Fleisch)
im kältesten Teil des Kühlraums. Das Gemüsefach ist der wärmste Teil des Kühlraums und sollte
nur für Salat, Gemüse und Obst verwendet werden.
• Das Gerät nicht überlasten: die umlaufende Kühlluft kann aussetzen und es können sich
Warmluftblasen bilden.
• Keine warme Speisen in den Kühl- oder Gefrierteil stellen - lassen Sie die Speisen zuvor abkühlen.
HINWEISE ZUM EINLAGERN VON
GEFRIERGUT
• Lagern Sie frische Lebensmittel in luftdichten Behältern oder wickeln Sie diese in Beuteln oder
Folien zum Tieffrieren.
• Vermeiden Sie, dass Tiefkühlware mit einzufrierenden Lebensmittel in Berührung kommt.
• Tiefkühlware muss nach dem Kauf so schnell wie möglich in das Gefrierfach gelegt werden.
• Um Frostschäden an frischem Gemüse oder Obst zu vermeiden, müssen diese vor dem Einlagern
im Gefrierfach sachgemäß behandelt werden.
• Beachten Sie immer die Hinweise zur Aufbewahrung auf der Gefriergutpackung.
Im Folgenden finden Sie jedoch die empfohlenen maximalen Lagerzeiten bei -18 °C (4-Stern-
Gefrierschrank) für verschiedene Lbensmittel:
- Frisches Fleisch und Geflügel - bis zu 12 Monaten
- Gekochtes Fleisch - bis zu 2 Monaten
- Frischer Fisch - bis zu 6 Monaten
- Obst und Gemüse - bis zu 12 Monaten
- Brot und Gebäck - bis zu 6 Monaten
STROMAUSFALL
Bei einem Stromausfall, wenn Gefriergut eingelagert ist, die Tür geschlossen halten. Wenn die
Temperatur im Gefrierraum ansteigt, die Waren nicht ohne Kontrolle ihres Zustands wieder
einfrieren.
• Speiseeis: Ist nach dem Auftauen wegzuwerfen.
• Obst und Gemüse: Kann nach dem Auftauen gekocht und verzehrt werden.
• Brot und Gebäck: Kann gefahrlos wieder eingefroren werden.
• Schalentiere: können gekühlt und sollten umgehend verbraucht werden.
• Gekochte Speisen: geschmorte Gerichte sollten gekühlt und aufgebraucht werden.
45
Page 46

• Große Fleischstücke: Können gekühlt und sollten umgehend verbraucht werden.
• Kleine Stücke: Können gekühlt und sollten umgehend verbraucht werden.
• Huhn: Kann gekühlt und sollte umgehend verbraucht werden.
WARTUNG UND REINIGUNG
Trennen Sie das Gerät vor der Reinigung von der Stromversorgung.
Reinigen des Innenraums
• Kein Wasser auf das Gerät gießen.
• Den Innenraum regelmäßig mit einer Lösung aus Natron und warmem Wasser (5 ml in 0,5 Liter
Wasser) säubern.
• Das Zubehör separat mit Seifenwasser reinigen. Das Zubehör nicht im Geschirrspüler reinigen.
• Keine Scheuer-, Reinigungsmittel oder Seife verwenden.
• Nach dem Reinigen mit sauberem Wasser spülen und trocknen.
• Nach dem Reinigen das Gerät mit trockenen Händen wieder anschließen.
Reinigen des Äußeren
• Das äußere Gehäuse mit warmem Seifenwasser reinigen. KEINE Scheuermittel benutzen.
• Achten Sie beim Reinigen auf die scharfen Kanten auf der Unterseite des Gerätes.
• Ein- oder zweimal pro Jahr die Geräterückseite und den Kompressor auf der Rückwand des
Gerätes mit einer Bürste oder einem Staubsauger reinigen; der angesammelte Staub beeinträchtigt
die Geräteleistung und erhöht den Stromverbrauch.
Längere Nichtbenutzung des Gerätes
Das Gerät vom Netz trennen, alle Lebensmittel entfernen und den Innenraum reinigen, wenn es
für längere Zeit nicht benutzt wird. Die Tür etwas offen lassen, um die Bildung von unangenehmen
Gerüchen zu vermeiden.
Abtauen
Hinweis: Seien Sie sehr vorsichtig bei der Ausführung dieser Arbeit.
• Das Gerät ist frostfrei, daher besteht keine Notwendigkeit, den Gefrierteil abzutauen. In dem
unwahrscheinlichen Fall, dass es notwendig ist, das Gerät abzutauen, wie folgt vorgehen:
• Verbrauchen Sie vor dem Abtauen so viel wie möglich des eingelagerten Gefrierguts. Wickeln Sie
die restliche Tiefkühlware in Zeitungspapier und legen Sie diese beiseite, bis sie nach dem Reingen
wieder eingelagert werden kann.
• Schalten Sie das Gerät ab, indem Sie den Netzstecker ziehen.
• Öffnen Sie die Gefrierraumtür.
• Platzieren Sie einen ausreichenden Behälter für die Aufnahme des Tauwassers.
• Nach dem Abtauen den Innenraum reinigen und trocknen.
• Das Gerät wieder einschalten und das Gefriergut wieder einlagern.
Das Abtauen kann beschleunigt werden, wenn Sie einen Topf mit heißem (nicht kochendem) Wasser
in den Innenraum stellen und den Reif mit einem Plastikschaber entfernen.
Nie scharfe Metallwerkzeuge benutzen, die das Gerät beschädigen können.
Auf keinen Fall ein elektrisches Heizgerät verwenden. Stromschlaggefahr!
46
Page 47

Für I&W-Version (Eis und Wasser)
Das Eiswürfelfach reinigen
Eiswürfel in dem Eiswürfelfach können den Ausgang durch Zusammenkleben oder aus anderen
Gründen blockieren. In diesem Fall
muss das Eiswürfelfach gereinigt oder die Blockierung beseitigt werden.
Eiswürfelfach
2
1
1. Die Taste drücken, um den Eiswürfelbereiter zu blockieren. Den Stecker herausziehen.
Die Komponenten des Eiswürfelfach mit beiden Händen hochheben und sie nach oben und außen
horizontal herausziehen.
Eiswürfelfachabdeckung
2. Die Eiswürfelfachabdeckung entnehmen und das Eiswürfelfach reinigen.
Je nach Eiswürfelfach kann die Installationsrichtung umgekehrt sein.
3. Schließen Sie die Gefrierfachtür.
Den Stecker erneut einsetzen.
Die Taste
drücken, um den Eiswürfelbereiter freizugeben.
47
Page 48

Für IDI-Version (In der Tür integrierter Eisspender)
Das Eiswürfelfach reinigen
Eiswürfel in dem Eiswürfelfach können den Ausgang durch Zusammenkleben oder aus anderen
Gründen blockieren. In diesem Fall
muss das Eiswürfelfach gereinigt oder die Blockierung beseitigt werden.
Eiswürfelfach
1. Die Taste drücken, um den Eiswürfelbereiter zu blockieren. Den Stecker herausziehen.
Die Komponenten des Eiswürfelfach mit beiden Händen hochheben und sie nach oben und außen
horizontal herausziehen.
Eiswürfelfach
Eisspirale
2. Wenn sich Eis in dem Ausgang befindet, bitte entfernen. Bei Bedarf, die Eisspirale im
Uhrzeigersinn und entgegen dem Uhrzeigersinn entfernen, um feststeckendes Eis zu entnehmen.
Motorwelle
3. Das Eiswürfelfach wieder einfügen. Bei Bedarf die Eisspirale drehen, um sie in die Motorwelle
einzurücken. Die Gefrierfachtür schließen. Den Stecker wieder einsetzen.
Die Taste
drücken, um den Eiswürfelbereiter freizugeben.
48
Page 49

Reinigung der Glasablagen
• In dem innersten Teil des Kühlschranks, wo die Ablageflächen den Anschlag berühren, müssen Sie
die Ablageflächen nach oben heben, dann können Sie sie entnehmen.
• Die Ablageflächen einstellen oder reinigen, je nach Bedarf.
Anschlag
6
5
6
Die tatsächliche Konfiguration ist abhängig von dem fertigen Produkt oder der Erklärung des Händlers
Das oben abgebildete Bild dient nur als Referenz.
Auftauen
• Der Kühlschrank ist hergestellt gemäß dem Luftkühlungsprinzip und hat eine automatische
Abtaufunktion. Frost der sich bildet durch den Wechsel der Jahreszeiten oder Temperaturen
kann auch manuell entfernt werden durch Trennen des Gerätes von der Stromversorgung oder
durch Trockenwischen mit einem trockenen Tuch.
Außer Betrieb
• Stromausfall: Bei einem Stromausfall, selbst im Summer, können Lebensmittel einige Stunden
im Gerät aufbewahrt werden; während dem Stromausfall sollten die Zeiten der Türöffnung
reduziert werden und keine frischen Lebensmittel in das Gerät gelegt werden.
• Lange Gebrauchspause: Das Gerät muss ausgesteckt und dann gereinigt werden; dann die Türen
offen lassen, um Geruch zu verhindern.
• Verschiebung: Bevor der Kühlschrank verschoben wird, alle Gegenstände darin entfernen,
die Glasteile, Gemüseablage, Gefrierfächer usw. mit Klebeband befestigen und die Stellfüße
anziehen; die Türen schließen und mit Klebeband befestigen. Während dem Verschieben, sollte
das Gerät nicht umgedreht oder horizontal gelegt, oder Schwingungen ausgesetzt werden; Die
Neigung während dem Verschieben sollte 45° nicht überschreiten.
Nach dem Start sollte das Gerät dauerhaft laufen. Im Allgemeinen sollte der Betrieb des
Gerätes nicht unterbrochen werden; andernfalls kann die Lebensdauer beeinträchtigt werden
49
Page 50

ERST EINMAL SELBST PRÜFEN
Fehler Abhilfemaßnahme
Prüfen, ob das Gerät an die Stromversorgung angeschlossen ist oder der
Fehlgeschlagener
Vorgang
Geruch
Lange Betriebszeiten
des Kompressors
Licht geht nicht an
Türen können nicht
richtig geschlossen
werden
Starke Geräusche
Türverschluss nicht
dicht
Wasserwanne voll
Heißes Gehäuse
Kondenswasserbildung auf den Oberflächen
Ungewöhnliche
Geräusche
Stecker richtig eingesetzt ist
Prüfen, ob die Spannung zu niedrig ist
Prüfen, ob ein Stromausfall vorliegt oder Teilschaltkreise ausgelöst wurden
Stark riechende Lebensmittel sollten gut eingewickelt werden
Prüfen, ob es verdorbene Lebensmittel gibt
Das Innere des Kühlschranks reinigen
Ein langer Betrieb des Kühlschranks ist normal im Sommer, wenn die
Außentemperatur hoch ist
Es wird empfohlen, nicht zu viele Lebensmittel gleichzeitig in dem Gerät
aufzubewahren
Lebensmittel sollten abgekühlt sein, bevor sie in das Gerät gegeben werden
Die Türen wurden zu häufig geöffnet
Prüfen, ob der Kühlschrank an das Stromnetz verbunden ist und ob die
Beleuchtung beschädigt ist
Die Lichter durch einen Spezialisten austauschen lassen
Die Tür klemmt durch Lebensmittelpackungen fest. Zu viele Lebensmittel in
dem Gerät
Der Kühlschrank ist gekippt
Prüfen, ob der Boden eben ist und ob der Kühlschrank stabil steht
Prüfen, ob die Zubehörteile an der richtigen Stelle sind
Fremdkörper an der Türdichtung entfernen
Die Türdichtung erwärmen und dann zur Wiederherstellung abkühlen lassen
(oder mit einem Föhn oder einem heißen Handtuch trocknen)
Es befinden sich zu viele Lebensmittel in dem Kühlraum oder die
Lebensmittel enthalten zu viel Wasser, dies erschwert das Abtauen
Die Türen sind nicht richtig geschlossen, dies führt zu Frostbildung durch
den Lufteintritt und vermehrtes Wasser durch Frostbildung
Wärmeableitung des eingebauten Kondensators durch das Gehäuse ist
normal
Wenn das Gehäuse heiß wird durch hohe Außentemperaturen, durch zu
viele Lebensmittel in dem Gerät oder durch Abschalten des Kompressors,
für eine Belüftung sorgen, um die Wärmeableitung zu erleichtern
Kondensation auf den Außenflächen und Türdichtungen des Kühlschranks ist
normal, wenn die Feuchtigkeit zu hoch ist. Einfach das Kondenswasser mit
einem sauberen Tuch weg wischen.
Summen: Der Kompressor kann während dem Betrieb ein Summen
erzeugen, diese sind besonders laut nach dem Start oder Stopp. Das ist
normal.
Knarren: Kühlmittel, das in das Gerät fließt kann Knarren verursachen.
Das ist normal.
50
Page 51

KUNDENDIENST
Bevor Sie den Kundendienst rufen:
1. Prüfen Sie erst, ob Sie die Störung selbst
beheben können (siehe “Störung - was tun?”).
2. Schalten Sie das Gerät nochmals ein, um zu
prüfen, ob die Störung anhält. Haben Sie
keinen Erfolg, so schalten Sie das Gerät aus
und wiederholen Sie den Versuch nach einer
Stunde.
3. Bleibt das Ergebnis negativ, benachrichtigen
Sie den Kundendienst.
Machen Sie bitte folgende Angaben:
• Art der Störung,
• Gerätemodell,
• die Servicenummer (die Zahl hinter dem
Wort SERVICE auf dem Typenschild im
Geräteinnern),
• Ihre vollständige Adresse,
• Ihre Telefonnummer mit Vorwahl.
51
Page 52

INSTRUCCIONES DE SEGURIDAD
Es IMPORTANTE que lea y siga las siguientes recomendaciones
Antes de usar el aparato, lea
atentamente estas instrucciones de
seguridad. Téngalas a mano para
consultarlas más adelante.
Este manual y el propio aparato
contienen advertencias de seguridad
que se deben leer y seguir en todo
momento.
El fabricante declina cualquier
responsabilidad derivada
del incumplimiento de estas
instrucciones de seguridad, del uso
indebido del aparato o del ajuste
incorrecto de los mandos.
Los niños muy pequeños (0-3
años) deben mantenerse alejados del
aparato. Los niños pequeños (3-8
años) deben mantenerse alejados
del aparato, a menos que estén bajo
vigilancia constante. Tanto los niños
a partir de 8 años como las personas
cuyas capacidades físicas, sensoriales
o mentales estén disminuidas o
que carezcan de la experiencia y
conocimientos necesarios pueden
utilizar este aparato si reciben la
supervisión o las instrucciones
necesarias para utilizarlo de forma
segura y comprenden los riesgos a
los que se exponen. Los niños no
deberán jugar con el aparato. Los
niños no deben encargarse de la
limpieza y el mantenimiento, a menos
que estén supervisados.
USO PERMITIDO
PRECAUCIÓN: El aparato
no está destinado a ponerse en
funcionamiento por medio de un
dispositivo de encendido externo,
como un temporizador, o de
un sistema de control remoto
independiente.
Este aparato está destinado a un
uso en ambientes domésticos o en
ambientes similares como: áreas de
cocina en oficinas, tiendas y otros
entornos laborales; granjas; por los
clientes de hoteles, moteles y otros
entornos residenciales.
Este aparato no es para uso
profesional. No utilice este aparato al
aire libre.
La bombilla que se usa
dentro del aparato está
diseñada específicamente para
electrodomésticos y no es adecuada
para la iluminación general de
habitaciones en una vivienda
(Normativa CE 244/2009).
El aparato puede funcionar en
sitios en los que la temperatura esté
dentro de los límites siguientes,
según la clase climática indicada
en la placa de características.
El electrodoméstico podría no
funcionar correctamente si se deja
durante bastante tiempo a una
temperatura distinta de los límites
especificados.
Clase climática T. amb. (°C)
SN: Entre 10 y 32 °C
ST: Entre 16 y 38 °C;
N: Entre 16 y 32 °C
T: Entre 16 y 43 °C
Este aparato no contiene CFC.
El circuito de refrigeración contiene
R600a (HC). Electrodomésticos
con isobutano (R600a): el isobutano
es un gas natural sin impacto
52
Page 53

medioambiental, pero que resulta
inflamable. Por este motivo,
compruebe que las tuberías del
circuito de refrigeración no estén
dañadas, especialmente cuando vacíe
el circuito de refrigeración.
ADVERTENCIA: No dañe las
tuberías del circuito de refrigeración
del electrodoméstico.
ADVERTENCIA: Mantenga
despejadas los orificios de ventilación
del aparato o la estructura.
ADVERTENCIA: No use medios
mecánicos, eléctricos o químicos,
excepto los indicados por el
fabricante, para acelerar el proceso
de descongelación.
ADVERTENCIA: No use ni
coloque dispositivos eléctricos
dentro de los compartimentos
del electrodoméstico, salvo que
se trate de aquellos autorizados
expresamente por el fabricante.
ADVERTENCIA: Las máquinas de
hielo o los dispensadores de agua que
no estén conectados directamente
a la toma de agua deben llenarse
solamente con agua potable.
ADVERTENCIA: Los productores
automáticos de hielo y los
dispensadores de agua deben estar
conectados a una toma de agua que
solo suministre agua potable con una
presión del agua comprendida entre
0,17 y 0,81 MPa (1,7 y 8,1 bar).
No deje sustancias explosivas
como aerosoles inflamables en el
aparato.
No ingiera el contenido (no es
tóxico) de los paquetes de hielo
(suministrado con algunos modelos).
No coma cubitos de hielo ni polos
inmediatamente después de sacarlos
del congelador, ya que pueden
provocar quemaduras por frío.
Para los productos diseñados
para funcionar con un filtro de
aire integrados en una cubierta del
ventilador accesible, el filtro debe
estar siempre bien colocado si el
frigorífico está en funcionamiento.
No guarde recipientes de cristal
con líquidos en el compartimento del
congelador ya que podrían romperse.
No obstruya el ventilador (si se
incluye) con los alimentos.
Después de colocar los alimentos
compruebe que las puertas de
los compartimentos cierran
correctamente, especialmente la
puerta del congelador.
Las juntas dañadas deben
sustituirse lo antes posible.
Utilice el compartimento
frigorífico solamente para conservar
alimentos frescos y el compartimento
del congelador solamente para
conservar alimentos congelados,
congelar alimentos frescos y hacer
cubitos de hielo.
Envuelva los alimentos para
guardarlos; de este modo se evita
que entren en contacto directo
con las superficies interiores del
frigorífico o del congelador.
Los aparatos podrían incluir
compartimentos especiales
(compartimento de alimentos
frescos, compartimento de cero
grados, etc.). Si no se especifica lo
contrario en el folleto específico
del producto pueden retirarse,
manteniendo rendimientos
equivalentes.
53
Page 54

El pentano C se utiliza como
agente expansor en la espuma
aislante y es un gas inflamable.
INSTALACIÓN
La manipulación e instalación del
aparato la deben realizar dos o más
personas: hay riesgo de lesionarse.
Utilice guantes de protección para
desembalar e instalar el aparato: hay
riesgo de cortarse.
Asegúrese de que la instalación,
incluido el suministro de agua (si lo
hay) y las conexiones eléctricas y las
reparaciones sean efectuadas por
un técnico cualificado. No realice
reparaciones ni sustituciones de
partes del electrodoméstico no
indicadas específicamente en el
manual del usuario.
Impida que los niños se acerquen
a la zona de la instalación. Tras
desembalar el aparato, compruebe
que no ha sufrido daños durante
el transporte. Si observa algún
problema, póngase en contacto
con el distribuidor o el Servicio
Postventa más cercano. Una vez
instalado, los residuos del embalaje
(plástico, porexpan, etc.) se deben
guardar fuera del alcance de los
niños: hay riesgo de asfixia. El
aparato debe desconectarse del
suministro eléctrico antes de efectuar
cualquier operación de instalación:
hay riesgo de descarga eléctrica.
Durante la instalación, compruebe
que el aparato no dañe el cable de
alimentación: hay riesgo de descarga
eléctrica. No ponga en marcha el
aparato hasta que no haya terminado
el proceso de instalación.
Tenga cuidado de no dañar el
piso (por ejemplo, parquet) al
mover el aparato. Instale el aparato
sobre una superficie o soporte
capaz de soportar su peso y en un
lugar adecuado a su tamaño y uso.
Asegúrese de que el aparato no esté
cerca de una fuente de calor y de
que las cuatro patas sean estables y
descansen sobre el suelo, ajústelas
si es necesario y, a continuación,
compruebe si el aparato está
perfectamente nivelado usando un
nivel de burbuja.
Espere al menos dos horas antes
de encender el electrodoméstico
para garantizar que el circuito de
refrigerante funciona correctamente.
ADVERTENCIA: Para evitar
accidentes debido a la inestabilidad,
el posicionamiento o la fijación del
aparato deben realizarse según las
instrucciones del fabricante. Está
prohibido colocar el frigorífico de tal
modo que el conducto metálico de la
cocina de gas, o los conductos del gas
o el agua o de los cables eléctricos
estén en contacto con la parte
trasera del frigorífico (serpentín del
condensador).
Todas las dimensiones y las
separaciones necesarias para la
instalación del aparato se encuentran
en la guía de instrucciones de
instalación.
ADVERTENCIAS SOBRE
ELECTRICIDAD
Debe ser posible desconectar el
aparato de la alimentación eléctrica
desenchufándolo si el enchufe es
accesible o mediante un interruptor
omnipolar instalado antes del enchufe,
de conformidad con las normativas de
cableado y el aparato debe conectarse
54
Page 55

a una toma de tierra de acuerdo con
las normativas de seguridad vigentes en
materia de electricidad.
No utilice alargadores, regletas ni
adaptadores.
Una vez terminada la instalación, los
componentes eléctricos no deberán
quedar accesibles para el usuario. No
use el aparato si está mojado o va
descalzo. No use este aparato si tiene un
cable o un enchufe de red dañado, si no
funciona bien, o si se ha dañado o se ha
caído.
Si el cable de alimentación está
dañado, sólo debe sustituirlo por otro
idéntico por el fabricante, personal
cualificado del servicio de asistencia
técnica del fabricante o similar para
evitar daños, existe riesgo de descarga
eléctrica.
LIMPIEZA Y MANTENIMIENTO
ADVERTENCIA: Asegúrese
de que el aparato esté apagado
y desconectado del suministro
eléctrico antes de realizar cualquier
operación de mantenimiento; no
utilice aparatos de limpieza con
vapor, hay riesgo de descarga
eléctrica.
No use limpiadores abrasivos
o agresivos como limpiacristales,
polvos limpiadores, fluidos
inflamables, ceras limpiadoras,
detergentes concentrados, lejías
o limpiadores con derivados del
petróleo para las partes de plástico,
los revestimientos interiores y de la
puerta o las juntas. No use papel de
cocina, estropajos metálicos u otras
herramientas de limpieza agresivas.
ELIMINACIÓN DEL MATERIAL
DE EMBALAJE
El material de embalaje es 100% reciclable y está
marcado con el símbolo de reciclaje .
Por lo tanto, deberá desechar las diferentes piezas
del embalaje de forma responsable, respetando
siempre las normas locales sobre eliminación de
residuos.
ELIMINACIÓN DE LOS
ELECTRODOMÉSTICOS
Este producto ha sido fabricado con material
reciclable o reutilizable. Debe desecharse de
acuerdo con la normativa local al respecto. Para
obtener información más detallada sobre el
tratamiento, recuperación y reciclaje de aparatos
eléctricos domésticos, póngase en contacto con
las autoridades locales, con el servicio de recogida
de residuos urbanos, o con la tienda en la que
adquirió el aparato. Este aparato lleva la marca
CE en conformidad con la Directiva 2012/19/UE
del Parlamento Europeo y del Consejo, sobre
residuos de aparatos eléctricos y electrónicos
(RAEE). La correcta eliminación de este producto
evita consecuencias negativas para el medio
ambiente y la salud.
El símbolo que se incluye en el aparato o en la
documentación que lo acompaña indica que no
puede tratarse como un residuo doméstico, sino
que debe entregarse en un punto de recogida
adecuado para el reciclado de aparatos eléctricos
y electrónicos.
CONSEJOS PARA AHORRAR
ENERGÍA
Para garantizar una ventilación adecuada,
siga las instrucciones de instalación. Una
ventilación insuficiente en la parte trasera del
electrodoméstico incrementa el consumo de
energía y reduce la eficiencia de la refrigeración.
La abertura frecuente de la puerta puede
provocar un aumento del consumo de energía.
La temperatura interior del aparato y el consumo
de energía también pueden depender de la
temperatura ambiente y de la ubicación del
aparato.
Cuando ajuste la temperatura, tenga en cuenta
todos estos factores.
Reduzca al mínimo el tiempo que la puerta
permanece abierta.
55
Page 56

Para descongelar alimentos, colóquelos en el
frigorífico. La baja temperatura de los productos
congelados enfría los alimentos del frigorífico.
Deje enfriar los alimentos y las bebidas antes de
introducirlos en el electrodoméstico.
La posición de los estantes en el frigorífico no
tiene efecto en la eficiencia energética. Los
alimentos deben colocarse en los estantes de
forma que se asegure una adecuada circulación
de aire (los alimentos no deben tocarse entre sí y
deben estar separados de la pared posterior).
Puede aumentar la capacidad de almacenamiento
de comida congelada retirando cestas o el estante
Stop Frost, si lo hay.
No se preocupe por los sonidos procedentes del
compresor, están descritos como ruidos normales
en la Guía rápida de este producto.
USO ADECUADO DE LOS FRIGORÍFICOS
Pies niveladores
1. Precauciones antes de la instalación:
La información del Manual de instrucciones sirve sólo como referencia. El producto físico podría ser
distinto.
Antes de instalar los accesorios, debe asegurarse que el frigorífico esté desconectado de la corriente.
Antes de ajustar los pies niveladores debe tomar precauciones para evitar daños personales.
2. Diagrama esquemático de los pies niveladores.
LH
La configuración real dependerá del producto físico o del informe del distribuidor
3. Procedimiento de ajuste:
a. Gire los pies en el sentido de las agujas del reloj para elevar el frigorífico;
b. Gire los pies en sentido contrario al de las agujas del reloj para bajar el frigorífico;
c. Ajuste los pies derecho e izquierdo siguiendo los procedimientos anteriores hasta nivelarlo en
sentido horizontal.
La imagen anterior sirve solo como referencia.
56
Page 57

Nivelar la puerta
1. Precauciones antes de la instalación:
Antes de instalar los accesorios, debe asegurarse que el frigorífico esté desconectado de la corriente.
Antes de ajustar la puerta debe tomar precauciones para evitar daños personales.
2. Diagrama esquemático para nivelar la puerta
Lista de herramientas que deberá
facilitar el usuario
llave inglesa
Eje fijo
Pies niveladores
Tuerca de seguridad
La imagen anterior sirve solo como referencia.
La configuración real dependerá del producto físico o del informe del distribuidor
Tuerca de ajuste
Llave inglesa
Si la puerta del frigorífico está demasiado baja:
Abra la puerta, afloje la tuerca de seguridad y gire la tuerca de ajuste con una llave inglesa en sentido
contrario al de las agujas del reloj para elevar la altura de la puerta. Cuando las puertas estén alineadas,
apriete la tuerca de ajuste rotándola en sentido contrario al de las agujas del reloj.
Si la puerta del frigorífico está demasiado alta:
Abra la puerta, gire la tuerca de ajuste en el sentido de las agujas del reloj con una llave inglesa para
rebajar la altura de la puerta. Cuando las puertas estén alineadas, apriete la tuerca de ajuste rotándola
en sentido contrario al de las agujas del reloj.
Conectar la instalación de agua
1.
Precauciones antes de la instalación:
La información del Manual de instrucciones sirve sólo como referencia. El producto físico podría ser
distinto.
Antes de instalar los accesorios, debe asegurarse que el frigorífico esté desconectado de la corriente.
Peligros ocasionados por el agua!
La presión del agua del frigorífico-congelador combinado es de 2-7 bares. Si la presión del agua es
demasiado alta, instale un descompresor.
No conecte frigoríficos-congeladores combinados a un grifo o a un grifo del calentador de agua.
No doble los tubos de entrada ni los tubos de desaguado cuando los coloque y conecte con cuidado
los tubos de agua.
No utilice ninguna tubería de agua antiguo o usado.
Adquiera la junta para conectar la tubería y el grifo e instálela según se indica en el diagrama esquemático.
57
Page 58

2. Diagrama esquemático
Junta
Manguera de conexión
Conector de la manguera
Anillo de retención
tuerca
3. Procedimiento de instalación
a. Introduzca el extremo de la manguera de conexión en la junta. Asegure la junta en el grifo.
b. Extraiga la tuerca de la manguera flexible blanca. Introduzca el extremo de la manguera flexible
blanca en el conector de la manguera, fijada con un anillo de retención. En caso de necesidad,
fije la manguera flexible en la pared para evitar tropiezos.
c. Afloje con cuidado el grifo para comprobar que la tubería esté sellada.
Montaje y fijación del filtro
Lista de herramientas que deberá
facilitar el usuario
destornillador
1 2
1.
Fije las abrazaderas individuales en la pared con tornillos
2.
Coloque el cartucho dentro de las abrazaderas individuales;
Anillo de
Marca de
ubicación
retención
3 4
Suministro de agua
3. Introduzca un extremo del codo de conexión rápida en la entrada del cartucho del filtro y el
otro extremo del codo de conexión rápida en la tubería de entrada de agua frente a la marca de
posición y apriételo con un anillo de retención;
4. Siguiendo el procedimiento anterior, introduzca un extremo del codo de conexión rápida en la
salida del cartucho del filtro y el otro extremo del codo de conexión rápida en la tubería de salida
de agua frente a la marca de posición.
58
Page 59

Sustituir el filtro de agua
1. Precauciones antes de la instalación:
Antes de instalar los accesorios, debe asegurarse que el frigorífico esté desconectado de la corriente.
Después de usarlo durante 6 meses consecutivos, el indicador parpadeará.
Si esto sucede, sustitúyalo.
2. Diagrama esquemático
3. Procedimiento:
Desenchufe el aparato. Corte la entrada de agua. Extraiga el filtro y el anillo de retención del conector
rápido y después extraiga la tubería de agua. Introduzca el nuevo filtro en el conector rápido y
después coloque el anillo de retención. Restituya el suministro de agua y compruebe que el agua sale
correctamente.
Si es necesario, repita los pasos descritos más arriba. Vuelva a introducir el cable. Mantenga apretado
el botón durante 3 segundos para iniciar el filtro. El símbolo desaparecerá.
59
Page 60

ESTRUCTURA Y FUNCIONES
Para la modalidad HyA (Hielo y agua)
Cámara de
congelación
Iluminación LED
Recipiente de
hielo
(Extraíble)
Productor de
hielo
dispensador de
agua
Estante de cristal
Repisa
Cajón
La imagen anterior sirve solo como referencia.
La configuración real dependerá del producto físico o del informe del distribuidor
Cámara de refrigeración
Iluminación LED
Repisa
Estante de cristal
Cajón para
frutas y
verduras
Cámara de refrigeración
• La cámara de refrigeración es apta para conservar una gran variedad de frutas, verduras, bebidas
y otros alimentos de consumo a corto plazo.
• Los alimentos cocinados no deben introducirse en la cámara de refrigeración hasta que hayan
alcanzado una temperatura ambiente.
• Se recomienda sellar los alimentos antes de introducirlos en el frigorífico.
• Los estantes de cristal pueden ajustarse hacia arriba o hacia abajo para facilitar el uso del aparato
y conseguir más espacio de almacenamiento.
Cámara de congelación
• La cámara de congelación a baja temperatura puede mantener los alimentos frescos durante
mucho tiempo y se utiliza principalmente para almacenar alimentos congelados y hacer hielo.
• La cámara de congelación es apta para almacenar carne, pescado, bolas de arroz y otros
alimentos que no se planea consumir a corto plazo.
• Es mejor dividir las piezas de carne en trozos pequeños para acceder a ellas más fácilmente.
Tenga en cuenta que los alimentos deberán consumirse antes de su fecha de caducidad.
• Si desea enfriar alimentos rápidamente, debe configurar la temperatura como «QUICK-FREEZE»
(congelación rápida).
Nota: Si almacena demasiada comida durante su funcionamiento después de la conexión inicial, el
efecto de congelación del frigorífico podría verse afectado negativamente. Los alimentos almacenados
no deben obstruir la salida de aire; de lo contrario el efecto de congelación también se verá
perjudicado.
60
Page 61

ESTRUCTURA Y FUNCIONES
Para la modalidad HeP (Hielo en Puerta)
Cámara de
congelación
Illuminación LED
Productor de
hielo
dispensador
de agua
Estante de cristal
Repisa
Cajón
La imagen anterior sirve solo como referencia.
La configuración real dependerá del producto físico o del informe del distribuidor
Cámara de refrigeración
Illuminación LED
Repisa
Estante de cristal
Cajón para
frutas y
verduras
Cámara de refrigeración
• La cámara de refrigeración es apta para conservar una gran variedad de frutas, verduras, bebidas
y otros alimentos de consumo a corto plazo.
• Los alimentos cocinados no deben introducirse en la cámara de refrigeración hasta que hayan
alcanzado una temperatura ambiente.
• Se recomienda sellar los alimentos antes de introducirlos en el frigorífico.
• Los estantes de cristal pueden ajustarse hacia arriba o hacia abajo para facilitar el uso del aparato
y conseguir más espacio de almacenamiento.
Cámara de congelación
• La cámara de congelación a baja temperatura puede mantener los alimentos frescos durante
mucho tiempo y se utiliza principalmente para almacenar alimentos congelados y hacer hielo.
• La cámara de congelación es apta para almacenar carne, pescado, bolas de arroz y otros
alimentos que no se planea consumir a corto plazo.
• Es mejor dividir las piezas de carne en trozos pequeños para acceder a ellas más fácilmente.
Tenga en cuenta que los alimentos deberán consumirse antes de su fecha de caducidad.
• Si desea enfriar alimentos rápidamente, debe configurar la temperatura como «QUICK-FREEZE»
(congelación rápida).
Nota: Si almacena demasiada comida durante su funcionamiento después de la conexión inicial, el
efecto de congelación del frigorífico podría verse afectado negativamente. Los alimentos almacenados
no deben obstruir la salida de aire; de lo contrario el efecto de congelación también se verá
perjudicado.
61
Page 62

Funciones
C
A B
FD E
1
3 42
5 6 7 8 10 119
La configuración real dependerá del producto físico o del informe del distribuidor
La imagen anterior sirve solo como referencia.
Pantalla
1. Freezer compartment temperature
(Temperatura del compartimento congelador)
2. Quick REF. (Refrigeración rápida)
3. Quick FRZ (Congelación rápida)
4. Refrigerate compartment temperature
(Temperatura del compartimento frigorífico)
5. Vacation icon (Icono de vacaciones)
6. Water Filter (Filtro de agua)
7. Ice off (Hielo desactivado)
8. Fetching ice cubes (Dispensando cubitos de
hielo)
9. Fetching crushed ice (La versión IDI no tiene la
función de hielo picado)
10. Fetching cold water (Dispensando agua fría)
11. Lock/unlock icon (Icono de bloqueo/desbloqueo)
Funcionamiento de los botones
A. Freezer compartment temperature adjustment (Ajuste de temperatura del compartimento del
congelador)
B. Refrigerate compartment temperature adjustment (Ajuste de temperatura del compartimento del
frigorífico)
C. Mode setting (Configuración del modo)
D. Ice OFF/ ON botton (Botón para encender/apagar el hielo)
E. Fetching ice/ Fetching water/Filter set (Dispensando hielo / Dispensando agua / Configuración del filtro)
F. Lock/unlock controls (Controles de bloqueo/desbloqueo)
Instrucciones de funcionamiento
La primera vez que se encienda el frigorífico, la pantalla mostrará todos los iconos durante 3 segundos.
Mientras tanto, sonará la campana de inicio y la pantalla mostrará su estado normal de funcionamiento. La
primera vez que se utilice el frigorífico, las temperaturas de la cámara de refrigeración y la temperatura de la
cámara de congelación se configurarán a 5 °C/-18 °C respectivamente.
Cuando se produzca un error, la pantalla mostrará el código del error (consulte la página siguiente); durante el
funcionamiento normal, la pantalla muestra la temperatura seleccionada del compartimento de refrigeración.
En circunstancias normales, después de 30 segundos sin funcionamiento, la pantalla muestra el aparato en
modo de bloqueo y se apaga si el bloqueo continúa durante 30 segundos.
Lock /unlock (Bloqueo/Desbloqueo)
En modo desbloqueado , mantenga pulsado el botón LOCK/UNLOCK durante 3 segundos hasta entrar
en el modo bloqueado ;
En modo bloqueado , mantenga pulsado el botón LOCK/UNLOCK durante 3 segundos hasta entrar en el
modo desbloqueado .
Todas las funciones siguientes deben activarse en el modo desbloqueado.
62
Page 63

Mode setting (Configuración del modo)
Pulse el botón de modo MODE para seleccionar un modo de control diferente.
Vacation mode (Modo vacaciones)
Pulse el botón MODE para entrar en el modo vacaciones. El icono se ilumina y el modo vacaciones se
iniciará una vez bloqueado.
Pulse el botón FRZ.TEMP. o REF.TEMP. para salir del modo vacaciones.
Quick REF. mode (Modo de refrigeración rápida)
Pulse el botón MODE para entrar en el modo de refrigeración rápida. El icono se ilumina y el modo de
refrigeración rápida se iniciará una vez bloqueado.
Pulse el botón REF.TEMP. para salir del modo de refrigeración rápida.
Quick FRZ. mode (Modo de congelación rápida)
Pulse el botón MODE para entrar en el modo de congelación rápida. El icono se ilumina y el modo de
congelación rápida se iniciará una vez bloqueado.
Pulse el botón FRZ.TEMP. para salir del modo de congelación rápida.
Temperature setting of refrigerating chamber (Configuración de temperatura de la cámara de
refrigeración)
Pulse el botón de ajuste de temperatura de la cámara de refrigeración REF.TEMP., la zona de almacenamiento
frío hará parpadear un indicador. Después vuelva a pulsar el botón REF.TEMP. para seleccionar la
temperatura y oirá una señal acústica. El rango de selección va desde los 2 °C hasta los 8 °C. Cada vez que
pulse el botón, la temperatura cambiará 1 °C. Una vez ajustado, el tubo digital seguirá parpadeando durante 5
segundos. La nueva configuración de temperatura se aplicará una vez bloqueado el aparato.
Temperature setting of freezing chamber ( Configuración de temperatura de la cámara de
congelación)
Pulse el botón de ajuste de temperatura de la cámara de congelación FRZ.TEMP., la zona de congelamiento
rápido hará parpadear un indicador. Después vuelva a pulsar el botón FRZ.TEMP. para seleccionar la
temperatura y oirá una señal acústica. El rango de selección va desde los -16 °C hasta los -24 °C. Cada vez
que pulse el botón, la temperatura cambiará 1 °C. Una vez ajustado, el tubo digital seguirá parpadeando
durante 5 segundos. La nueva configuración de temperatura se aplicará una vez bloqueado el aparato.
Quick-freeze time setting (Configuración del tiempo de la congelación rápida)
Escoja el modo de congelación rápida y pulse el botón FRZ.TEMP continuamente durante 3 segundos
para entrar en el modo de configuración de tiempo de congelación rápida; con una pulsación breve del botón
FRZ.TEMP, seleccione el modo de circulación entre «26-48-26-48», después en la pantalla de la temperatura
de la cámara del congelador se muestra el tiempo de congelación rápida
El modo de congelación rápida puede establecerse durante plazos de 26H y 48H, tras los cuales el modo de
congelación rápida se apagará.
Con el modo de configuración del tiempo de congelación rápida activado, bloquee el modo o pulse el botón
FRZ.TEMP durante 3 segundos para salir del modo de configuración del tiempo de congelación rápida.
El modo de congelación rápida de 48 horas se utiliza para probar el funcionamiento general y no se
recomienda para los usuarios.
ICE OFF (Hielo desactivado)
Pulse el botón y el icono se iluminará o se distinguirá para iniciar/cambiar la función de hielo.
DISPENSER (Dispensador)
Pulse el botón para entrar en el modo de selección hielo/agua; seleccione el modo de
circulación entre «Dispensar cubitos de hielo / Dispensar hielo triturado / Dispensar agua / ninguno» y después
se iluminará el icono correspondiente del panel.
Cuando el sistema está en funcionamiento, se añadirá el tiempo de operación del filtro; pasados 150 días, se
mostrará el icono del filtro y pasados 180 días el icono del filtro parpadeará; mantenga pulsado el botón
durante 3 segundos para utilizar la función FILTER RESET, con la que se restablece el tiempo
de operación del filtro.
Una vez sustituido el filtro, el icono se apagará.
63
Page 64

Almacenamiento en caso de corte de corriente
En caso de corte de corriente, el estado de funcionamiento actual se bloqueará y se mantendrá hasta que
vuelva a haber suministro eléctrico.
Control de advertencia y alarma de apertura
Cuando la cámara del frigorífico se abre suena un tono de advertencia. Si la puerta no se cierra pasados dos
minutos, la señal sonará una vez cada minuto hasta que la puerta se cierre.
Indicación de fallos
Las siguientes advertencias mostradas en la pantalla indican los errores correspondientes del frigorífico. A
pesar de que las propiedades de refrigeración y congelación del frigorífico podrían seguir funcionando con los
siguientes errores, el usuario deberá ponerse en contacto con un especialista para llevar a cabo tareas de
mantenimiento y garantizar el funcionamiento normal del frigorífico.
Código de error Descripción del error
E0 Error de la máquina de hielo
E1 Error del circuito de detección del sensor de temperatura de la cámara de
refrigeración
E2 Error del circuito de detección del sensor de temperatura de la cámara de
congelación
E5 Error del circuito de detección del sensor de descongelación
E6 Error de comunicación
E7 Error del circuito de detección del sensor de temperatura de circulación
EE Circuito del sensor de la máquina de hielo
EH Error del sensor de humedad
Dispensando agua y hielo
• Mientras se esté fabricando cubitos de hielo y hielo triturado se oirán ruidos: La válvula de agua producirá
zumbidos, y la entrada de agua en el recipiente de hielo hará ruido; la máquina de triturado de hielo o la
caída del hielo producido en el recipiente harán ruido. Estos ruidos son normales.
• Al sacar los cubitos de hielo pueden producirse ruidos de rascado. No tiene por qué preocuparse. El hielo
del recipiente podría haberse quedado pegado. En estos casos, extraiga el recipiente de hielo y separe el
hielo en trozos usando, por ejemplo, cucharas de plástico o madera para hacer palanca en el hielo con
cuidado.
• Otras posibilidades se muestran en el capítulo «limpieza del recipiente de hielo». Para evitar el
sobrecalentamiento del motor de la máquina de hielo, dispense hielo un minuto después de que haya
parado. Espere un rato hasta que el motor alcance la temperatura adecuada. Tome el hielo del recipiente
de hielo si necesita mucha cantidad.
• El capítulo «limpieza del recipiente de hielo» explica cómo extraer el recipiente de hielo del
compartimento del congelador.
Si no hay suficiente hielo en el recipiente, no se puede sacar. Espere un rato hasta que se prepare más
hielo. Para evitar malos olores o sabores en el hielo, limpie el recipiente regularmente.
• El hielo y el agua solo pueden dispensarse con la puerta del compartimento del congelador cerrada. Si
abre la puerta del congelador mientras se está dispensando agua y hielo, el proceso se detendrá
automáticamente.
• Cuando se muestra o se apaga, vuelva a pulsar los botones del dispensador de agua.
64
Page 65

Dispensar agua fría
Mantenga pulsados los botones hasta que el indicador se encienda.
Empuje el recipiente contra el amortiguador dispensador de agua. Empezará a caer agua fría en el recipiente.
Retire el recipiente del amortiguador dispensador de agua y la salida de agua finalizará.
Dispensar hielo triturado
Mantenga pulsados los botones del Dispensador de agua hasta que se encienda la señal .
Acerque el recipiente a la boca del dispensador de agua para evitar salpicaduras.
Empuje el recipiente contra el amortiguador dispensador de agua. Llene el recipiente de hielo triturado.
Retire el recipiente del amortiguador dispensador de agua y la salida de agua finalizará.
Dispensar cubitos de hielo
Mantenga pulsados los botones hasta que se encienda la señal .
Empuje el recipiente contra el amortiguador dispensador de agua.
Empezarán a caer cubitos de hielo en el recipiente.
Retire el recipiente del amortiguador dispensador de agua y la salida de hielo finalizará.
Bloquear la máquina de hielo
Si no va a dispensar agua y hielo durante periodos largos, puede bloquear la máquina de hielo:
Pulse el botón , se encenderá en la pantalla.
65
Page 66

Ajuste de la temperatura
Nota importante: La pantalla sólo se ilumina cuando se pulsa un botón o se abre una de las puertas; el
resto del tiempo la pantalla permanece en modo de espera.
Nota importante: El panel de control se bloquea automáticamente. Para ajustar la temperatura o
seleccionar un modo, primero desbloquee el panel. Para ello, pulse y mantenga pulsado el botón del
candado durante 3 segundos hasta que desaparezca el icono de la pantalla.
Nota: La temperatura estándar en el interior del frigorífico debe estar comprendida entre 0 y 4 °C y en
el interior del congelador entre -18 y -25°C.
Nota: La temperatura de los alimentos almacenados y la frecuencia con la que se abre la puerta afecta
a la temperatura del compartimento frigorífico. Si fuera necesario, cambie la temperatura ajustada.
Regulación de la temperatura interior del congelador
Para modificar la temperatura programada dentro del congelador, pulse el botón de ajuste de temperatura del
congelador. La temperatura interna del congelador puede regularse entre -16 y -24 °C.
Pulse el botón de ajuste de temperatura del congelador hasta que en el visor aparezca la temperatura
deseada. Tenga en cuenta que durante el proceso de ajuste de la temperatura, la temperatura del congelador
parpadea en la pantalla. Una vez ajustada, la temperatura del congelador parpadea durante unos segundos, la
pantalla se bloquea automáticamente y, tras aproximadamente 30 segundos, la pantalla se apaga.
Temperatura del compartimento congelador
La temperatura del interior del congelador aparece en la pantalla cuando se abre una puerta o se pulsa un
botón.
Regulación de la temperatura en el compartimento frigorífico
Para modificar la temperatura programada dentro del frigorífico, pulse el botón de ajuste de temperatura del
compartimento frigorífico. La temperatura interna del frigorífico puede regularse entre 2 °C y 8 °C.
Pulse el botón de ajuste de temperatura del frigorífico hasta que en el visor aparezca la temperatura deseada.
Tenga en cuenta que durante el proceso de ajuste de la temperatura, la temperatura del frigorífico parpadea
en la pantalla. Una vez ajustada la temperatura, la temperatura del frigorífico parpadea durante unos
segundos, la pantalla se bloquea automáticamente y, tras aproximadamente 30 segundos, la pantalla se apaga.
Temperatura del compartimento frigorífico
La temperatura del compartimento frigorífico aparece en la pantalla cuando se abre una puerta o se pulsa un
botón.
Modos
Este aparato dispone de 4 modos prefijados que se pueden seleccionar pulsando el botón del modo y
son:
• Vacation (Modo Vacaciones)
• Congelación rápida
• Enfriamiento y congelación rápida
• Enfriamiento rápido
Modo Vacation (Modo Vacaciones)
Este modo está diseñado para evitar el consumo energético durante la época vacacional o cuando no se
utiliza el aparato.
Cuando se selecciona esta función, la temperatura del congelador automáticamente se regula en -18 °C
y el compartimento frigorífico se apaga.
Para activar el modo de vacaciones, pulse el botón del modo hasta que se ilumine el icono
correspondiente en la pantalla. Para salir del modo de vacaciones, pulse el botón del modo hasta que se
apague el icono correspondiente en la pantalla.
Nota importante: Si selecciona este modo, saque todos los alimentos y bebidas del compartimento
frigorífico.
66
Page 67

Congelación rápida
Este modo está diseñado para congelar alimentos que no están congelados previamente.
Si va a introducir alimentos frescos en el congelador, reduzca la temperatura previamente para facilitar
la congelación rápida. Puede ser necesario seleccionar el modo de congelación rápida hasta 12 horas
antes. Al seleccionar esta función, la temperatura interior del congelador se regula automáticamente
a -24 °C durante un máximo de 26 horas (transcurrido este tiempo, la temperatura vuelve a la
establecida anteriormente). Si la temperatura del congelador alcanza los -24 °C antes de que
transcurran 26 horas, el aparato sale del modo de congelación rápida automáticamente.
Para utilizar el modo de congelación rápida, pulse el botón del modo hasta que se ilumine el icono
correspondiente en la pantalla. Para salir del modo de congelación rápida, pulse el botón del modo
hasta que se apague el icono correspondiente en la pantalla.
Enfriamiento y congelación rápida
Para tener una temperatura más fría en el frigorífico, active este modo. Al seleccionar esta función, la
temperatura interior del congelador y del frigorífico se regula automáticamente a -24 °C y 2 °C
respectivamente, durante un máximo de 26 horas, en el caso del congelador y, 2 horas y 30 minutos en
el caso del frigorífico (transcurrido este tiempo, la temperatura vuelve a la establecida anteriormente).
Si la temperatura del congelador alcanza los -24 °C antes de que transcurran 26 horas, el aparato sale
del modo de congelación rápida automáticamente.
Para utilizar los modos de enfriamiento y congelación rápida al mismo tiempo, pulse el botón del
modo hasta que se iluminen los iconos correspondientes en la pantalla. Para salir de los modos
de enfriamiento y congelación rápida, pulse el botón del modo hasta que se apaguen los iconos
correspondientes en la pantalla.
Enfriamiento rápido
Para tener una temperatura más fría en el frigorífico, active este modo. Al seleccionar esta función,
la temperatura interior del compartimento frigorífico se regula automáticamente a 2 °C durante un
máximo de 2 horas y 30 minutos (transcurrido este tiempo, la temperatura vuelve a la establecida
anteriormente).
Para utilizar el modo de enfriamiento rápido, pulse el botón del modo hasta que se ilumine el icono
correspondiente en la pantalla. Para salir del modo de enfriamiento rápido, pulse el botón del modo
hasta que se apague el icono correspondiente en la pantalla.
Bloqueo/desbloqueo
Para utilizar la función de bloqueo, pulse el botón del candado (se ilumina el símbolo correspondiente
en la pantalla). Una vez activada esta función, se ignora cualquier acción, hasta que se desbloquea la
función.
Para desbloquear la pantalla y las funciones, pulse y mantenga pulsado el botón del candado durante 3
segundos (el símbolo desaparecerá de la pantalla).
Cómo elaborar hielo
1. Extraiga con cuidado la bandeja para hielo y
llénela de agua hasta la línea de nivel. Después
vuelva a colocar la bandeja horizontalmente.
2. Cuando estén listos los cubitos de hielo, gire el
mando hacia la derecha (hasta el límite) y los
cubitos de hielo caerán de la bandeja al cajón
para la recogida de hielo.
Bandeja para hielo
Nivel de llenado del agua
* La imagen es orientativa
67
Page 68

Notas:
• Para hacer cubitos de hielo con rapidez, reduzca la temperatura del congelador al máximo o
seleccione el modo de congelación rápida para reducir la temperatura del congelador.
• No llene la bandeja de agua en exceso. Esto puede dificultar la extracción de los cubitos de la
bandeja y, si se derrama agua en el cajón para la recogida de hielo, los cubitos se pegarán formando
un bloque.
• Si se gira el mando antes de que estén listos los cubitos de hielo, el agua se derramará en el cajón
para el hielo y los cubitos se pegarán formando un bloque.
Ajuste de los estantes y anaqueles
Nota importante: antes de ajustar o extraer los estantes y anaqueles, quite todos los alimentos.
Los estantes del compartimento frigorífico se pueden ajustar a la altura deseada. Para quitar un
estante, levántelo ligeramente para sacar los estabilizadores de plástico de los rieles situados a ambos
lados y tire del estante hacia fuera.
Los estantes del compartimento frigorífico y congelador se pueden ajustar a la altura deseada. Para
quitar un anaquel, sujete el anaquel por ambos lados, levántelo (1) y tire hacia fuera (2).
Sustitución de la bombilla
Las bombillas del frigorífico y congelador son de LED de larga duración (eficientes energéticamente).
Por tanto, no será necesario cambiarlas a lo largo de la vida útil del producto.
La bombilla es de LED de 12 V de corriente continua y en el muy improbable caso de se funda,
deberá cambiarlo un técnico cualificado.
bombilla del frigorífico
pantalla de
la lámpara
Cambio de dirección de apertura de la puerta
No se puede cambiar la dirección de apertura de la puerta.
68
Page 69

CONSEJOS PARA AHORRAR ENERGÍA
• No instale el aparato cerca de fuentes de calor como cocinas, lavavajillas o radiadores.
• Coloque el aparato en un lugar fresco y bien ventilado y compruebe que los orificios de ventilación
no están bloqueados.
• No deje las puertas abiertas durante mucho tiempo. Al entrar aire caliente se forma hielo y afecta
al consumo energético. Compruebe que no haya nada que impida cerrar bien las puertas.
• Asegúrese de que las juntas de las puertas están limpias y no están rotas o rasgadas.
• Coloque los alimentos más perecederos (con caducidad breve, como las carnes cocinadas) en la
parte más fría del frigorífico. El cajón para frutas y verduras es el compartimento con temperatura
más elevada y debe utilizarse para almacenar frutas, verduras, ensaladas, etc.
• No sobrecargue el aparato: el aire de refrigeración que circula y mantiene frío el interior del
aparato se bloquea y se forman bolsas de aire caliente.
• No introduzca alimentos calientes en el frigorífico o congelador; deje que se enfríen previamente.
CONSEJOS PARA LLENAR EL CONGELADOR
• Almacene los alimentos frescos en recipientes herméticamente cerrados aptos para congelar o
envuélvalos en film transparente o papel de aluminio.
• Impida que los alimentos congelados entren en contacto con alimentos que se van a congelar.
• Los alimentos precongelados deben introducirse en el congelador lo antes posible.
• Para evitar que el hielo dañe las frutas y verduras frescas, es necesario procesarlas adecuadamente
antes de introducirlas en el compartimento congelador.
• Siga las indicaciones impresas en el envase.
A continuación se especifican los tiempos de almacenamiento máximos a -18 °C (congelador de 4
estrellas) de distintos alimentos:
- Carne y pollo fresco: hasta 12 meses
- Carne cocinada: hasta 2 meses
- Pescado fresco: hasta 6 meses
- Frutas y verduras: hasta 12 meses
- Panes y pasteles: hasta 6 meses
INTERRUPCIÓN DEL SUMINISTRO
ELÉCTRICO
Si se produce una interrupción en el suministro eléctrico y hay alimentos congelados en el congelador,
mantenga la puerta cerrada. Si sube la temperatura del congelador, compruebe el estado de los
alimentos antes de volver a congelarlos.
• Helados: Deséchelos una vez descongelados.
• Frutas y verduras: Si están blandas, cocínelas y consúmalas.
• Pan y pasteles: Pueden volver a congelarse sin riesgos.
• Marisco: debe mantenerse refrigerado y consumirse lo antes posible.
• Platos cocinados: por ejemplo, guisados deben mantenerse refrigerados y consumirse.
• Grandes trozos de carne: deben mantenerse refrigerados y consumirse lo antes posible.
• Pequeños trozos de carne: deben mantenerse refrigerados y consumirse lo antes posible.
• Pollo: debe mantenerse refrigerado y consumirse lo antes posible.
69
Page 70

Antes de realizar cualquier tarea de limpieza, desconecte el aparato de la red eléctrica.
Limpieza del interior
• No vierta agua sobre el aparato.
• Limpie regularmente la cavidad con una solución de bicarbonato de sodio y agua tibia (5 ml para
0,5 litros de agua).
• Limpie los accesorios por separado con agua y jabón. No los limpie en el lavavajillas.
• No utilice productos, detergentes o jabones abrasivos.
• Una vez lavados, aclárelos con agua limpia y séquelos con cuidado.
• Cuando haya terminado de limpiar los accesorios, vuelva a enchufar el aparato con las manos
secas.
Limpieza del exterior
• Limpie la parte exterior del aparato con agua jabonosa tibia. NO utilice nunca sustancias abrasivas.
• Hay bordes afilados en la parte inferior del aparato: tenga cuidado al limpiarlos.
• Una o dos veces al año, limpie la parte posterior del aparato, incluido el compresor, con un cepillo
o un aspirador, ya que la acumulación de polvo afecta al rendimiento del aparato y aumenta el
consumo eléctrico.
Cuando no se usa el aparato
Si no se va a utilizar el aparato durante un largo periodo de tiempo, desconecte el suministro
eléctrico, vacíe el aparato y limpie la cavidad interior. Deje las puertas abiertas para evitar la
formación de malos olores.
Descongelación
Nota: Tenga cuidado al realizar el procedimiento siguiente.
• El aparato posee un sistema libre de escarcha, por tanto, no debería ser necesario descongelar el
congelador. Sin embargo, en el muy improbable caso de que fuera necesario descongelarlo, siga
estos pasos:
• Intente consumir la mayor parte de los alimentos del congelados antes de descongelar el aparato.
Envuelva los alimentos restantes en papel de periódico y guárdelos hasta que vuelva a introducirlos
después de limpiar el congelador.
• Desenchufe el aparato.
• Abra la puerta del congelador.
• Coloque un recipiente adecuado para recoger el agua de la descongelación.
• Una vez descongelado, limpie y seque el interior.
• Ponga en marcha el aparato y vuelva a introducir los alimentos congelados.
Para acelerar la descongelación, coloque recipientes con agua caliente (que no hierva) en el
congelador y suelte el hielo con una espátula de plástico adecuada.
No utilice nunca herramientas metálicas afiladas; pueden dañar el aparato.
No utilice nunca calentadores eléctricos, pueden provocar una descarga eléctrica.
70
Page 71

Para la modalidad HyA (Hielo y agua)
Limpiar el recipiente de hielo
El hielo del recipiente podría obstruir la salida debido a aglomeraciones u otras razones. En este caso
debe limpiar el recipiente de hielo o eliminar la obstrucción.
Recipiente de hielo
2
1
1. Pulse el botón para bloquear la máquina de hielo. Tire del cable. Sujete los
componentes de la caja de almacenamiento de hielo con ambas manos y tire de ellos hacia arriba
y hacia fuera en dirección horizontal.
Tapa del recipiente de hielo
2. Retire la tapa del recipiente de hielo y límpielo.
Dependiendo del recipiente de hielo, a continuación se indica el procedimiento inverso de la
instalación.
3. Cierre la puerta del compartimento congelador.
Vuelva a introducir el cable.
Pulse el botón
para desbloquear la máquina de hielo.
71
Page 72

Para la modalidad HeP (Hielo en Puerta)
Limpiar el recipiente de hielo
El hielo del recipiente podría obstruir la salida debido a aglomeraciones u otras razones. En este caso
debe limpiar el recipiente de hielo o eliminar la obstrucción.
Recipiente de hielo
1. Pulse el botón para bloquear la máquina de hielo. Tire del cable. Sujete los
componentes de la caja de almacenamiento de hielo con ambas manos y tire de ellos hacia arriba
y hacia fuera en dirección horizontal.
Recipiente de hielo
espiral de hielo
2. Extráigalo si hay hielo en la salida. Si es necesario, retire
la espiral de hielo en el sentido de las agujas del reloj o en el sentido opuesto para retirar el hielo
pegado o atascado.
Eje del motor
3. Vuelva a colocar el recipiente de hielo. Si es necesario, gire la espiral de hielo para encajarla en el
eje del motor. Cierre la puerta del compartimento del congelador. Vuelva a introducir el cable.
Pulse el botón
para desbloquear la máquina de hielo.
72
Page 73

Limpiar el estante de cristal
• La parte más profunda del interior del compartimento del frigorífico donde descansan los
estantes tiene un tope, por lo que deberá levantar los estantes antes de poder extraerlos.
• Ajuste o limpie los estantes según sus necesidades.
tope
6
5
6
La configuración real dependerá del producto físico o del informe del distribuidor
La imagen anterior sirve solo como referencia.
Descongelación
• El frigorífico está diseñado según el principio de refrigeración de aire, por lo que tiene una
función de descongelación automática. La escarcha que se forma debido al cambio de estación o
temperatura también se puede retirar de forma manual desconectando el aparato del suministro
eléctrico o pasando un trapo seco.
Interrupción del funcionamiento
• Corte de corriente: En caso de que se produzca un corte de corriente, incluso si es en verano,
los alimentos pueden conservarse varias horas en el interior del aparato; durante el corte de
corriente se recomienda no abrir la puerta demasiadas veces y no introducir más alimentos
frescos en el aparato.
• Dejar de usar el aparato durante periodos largos: Debe desconectar y limpiar el aparato;
después las puertas deben dejarse abiertas para evitar los malos olores.
• Mudanzas: Antes de mover el frigorífico, extraiga todos los elementos de su interior, fije las
particiones de cristal, el cajón de las verduras, los cajones de la cámara del congelador, etc.
con cinta adhesiva y apriete los pies niveladores; cierre las puertas y séllelas con cinta adhesiva.
Durante la mudanza, el aparato no debe colocarse hacia abajo o en posición horizontal ni ser
sometido a vibración; la inclinación durante el desplazamiento no debe superar los 45 °.
El aparato debe permanecer activado una vez iniciado. En general, el funcionamiento del
aparato no debe interrumpirse; de lo contrario, podría reducirse su vida útil
73
Page 74

SOLUCIÓN DE PROBLEMAS
Problema Solución
Compruebe que el aparato esté conectado al suministro eléctrico o que
Fallo de
funcionamiento
Malos olores
El compresor se
mantiene en marcha
durante mucho
tiempo
La luz no se enciende
Las puertas
no cierran
correctamente
Demasiado ruido
La junta de la puerta
no cierra bien
La bandeja de agua
rebosa agua
Cubierta caliente
Condensación en la
superficie
Ruido anormal
el cable esté bien enchufado
Compruebe si el voltaje es demasiado bajo
Compruebe si hay un corte de corriente o si se ha soltado algún circuito
Los alimentos más olorosos deben almacenarse bien envueltos
Compruebe que no haya ningún alimento podrido
Limpie el interior del frigorífico
El funcionamiento prolongado del frigorífico es normal en verano,
cuando la temperatura ambiente es alta
No es recomendable almacenar demasiados alimentos en el aparato
Los alimentos deben enfriarse antes de introducirse en el aparato
Las puertas se abren con demasiada frecuencia
Compruebe que el frigorífico esté conectado al suministro eléctrico y
que la bombilla no esté dañada
Llame a un especialista para que sustituya la bombilla
La puerta está obstruida por algún recipiente de comida. Se ha
introducido demasiados alimentos
El frigorífico está inclinado
Compruebe que el suelo sea uniforme y que el frigorífico esté
estabilizado
Compruebe que los accesorios estén correctamente colocados en su
sitio
Elimine cualquier material extraño de la junta de la puerta
Caliente la junta de la puerta y luego enfríela para restablecerla
(aplique un secador eléctrico o utilice una toalla caliente para calentarla)
Hay demasiados alimentos en la cámara o los alimentos almacenados
contienen demasiada agua que hace que se descongele
Las puertas no están bien cerradas, la entrada de aire y el exceso de
agua debido al descongelamiento forman más hielo
El calor procede del condensador integrado a través de la cubierta, lo
cual es normal
Cuando la cubierta se calienta debido a una alta temperatura ambiente o
al almacenamiento de demasiada comida, o mientras el compresor está
apagado, garantice una buena ventilación para que el calor se disipe
La condensación en la superficie exterior y en las juntas de la puerta del
frigorífico es normal cuando la humedad del ambiente es demasiado alta.
Limpie la condensación con una toalla limpia.
Zumbido: El compresor puede producir zumbidos durante su
funcionamiento, y estos zumbidos suelen ser más ruidosos al encenderse
y al apagarse. Esto es normal.
Chirrido: El fluido de refrigerante por el interior del aparato puede
producir chirridos, y esto es normal.
74
Page 75

SERVICE APRÈS-VENTE
Antes de contactar con el Servicio de
Asistencia:
1. Compruebe si puede solucionar el problema
(consulte “Guía para la solución de
problemas”).
2. Vuelva a poner en marcha el aparato para
comprobar si la avería se ha solucionado. Si el
resultado es negativo, desconecte el aparato y
repita la operación al cabo de una hora.
3. Si el resultado sigue siendo negativo, póngase
en contacto con el Servicio de Asistencia
Técnica.
Comunique:
• el tipo de problema,
• el modelo,
• el número de servicio (número que aparece
después de la palabra SERVICE, en la placa
de características situada en el interior del
aparato),
• su dirección completa,
• su número y prefijo telefónico.
75
Page 76

NORME DI SICUREZZA
IMPORTANTE: da leggere e rispettare
Prima di utilizzare l’apparecchio,
leggere le seguenti norme di
sicurezza. Conservarle per eventuali
consultazioni successive.
Questo manuale e l’apparecchio
sono corredati da importanti
avvertenze di sicurezza, da leggere
e rispettare sempre. Il fabbricante
declina qualsiasi responsabilità che
derivi dalla mancata osservanza delle
presenti istruzioni di sicurezza, da usi
impropri dell’apparecchio o da errate
impostazioni dei comandi.
Tenere i bambini di età inferiore a
3 anni lontani dall’apparecchio. Senza
la sorveglianza costante di un adulto,
tenere l’apparecchio fuori dalla
portata dei bambini di età inferiore a
8 anni. L’uso di questo apparecchio
da parte di bambini di età superiore
agli 8 anni, di persone con ridotte
capacità fisiche, sensoriali o mentali
o di persone sprovviste di esperienza
e conoscenze adeguate è consentito
solo con un’adeguata sorveglianza,
o se tali persone siano state istruite
sull’utilizzo sicuro dell’apparecchio e
siano consapevoli dei rischi. Vietare ai
bambini di giocare con l’apparecchio.
La pulizia e la manutenzione ordinaria
non devono essere effe ttuate da
bambini senza la supervisione di un
adulto.
USO CONSENTITO
ATTENZIONE: l’apparecchio
non è destinato ad essere messo in
funzione mediante un dispositivo
esterno o un sistema di comando a
distanza separato.
L’apparecchio è destinato all’uso
domestico e ad applicazioni analoghe,
quali: aree di cucina per il personale
di negozi, uffici e altri contesti
lavorativi; agriturismi; camere di
hotel, motel, bed & breakfast e altri
ambienti residenziali.
Questo apparecchio non è
destinato all’uso professionale. Non
utilizzare l’apparecchio all’aperto.
La lampadina utilizzata
nell’apparecchio è progettata
specificatamente per gli
elettrodomestici e non è adatta
per l’illuminazione domestica
(Regolamento CE 244/2009).
L’apparecchio è predisposto
per operare in ambienti in cui la
temperatura sia compresa nei
seguenti intervalli, a seconda della
classe climatica riportata sulla
targhetta.
L’apparecchio potrebbe non
funzionare correttamente se
lasciato per un lungo periodo ad una
temperatura superiore o inferiore
all’intervallo previsto.
Classe climatica T. amb. (°C)
SN: Da 10 a 32 °C
ST: Da 16 a 38 °C;
N: Da 16 a 32 °C
T: Da 16 a 43 °C
Questo apparecchio non contiene
CFC. Il circuito refrigerante contiene
R600a (HC). Apparecchi con
isobutano (R600a): l’isobutano è
un gas naturale senza effetti nocivi
sull’ambiente, tuttavia è infiammabile.
È perciò indispensabile assicurarsi
che i tubi del circuito refrigerante
non siano danneggiati, in particolare
durante lo svuotamento del circuito
refrigerante.
AVVERTENZA: Non danneggiare
i tubi del circuito refrigerante
76
Page 77

dell’apparecchio.
AVVERTENZA: Mantenere
libere da ostruzioni le aperture di
ventilazione nello spazio circostante
l’apparecchio o nella nicchia di
incasso.
AVVERTENZA: Non usare
dispositivi meccanici, elettrici o
chimici diversi da quelli raccomandati
dal produttore per accelerare il
processo di sbrinamento.
AVVERTENZA: Non usare
o introdurre apparecchiature
elettriche all’interno degli scomparti
dell’apparecchio se queste non sono
del tipo espressamente autorizzato
dal produttore.
AVVERTENZA: i produttori
di ghiaccio e/o i distributori
d’acqua non direttamente collegati
all’alimentazione idrica devono
essere riempiti unicamente con
acqua potabile.
AVVERTENZA: I produttori di
ghiaccio e/o distributori d’acqua
devono essere collegati a un
condotto di alimentazione che
fornisca soltanto acqua potabile, con
una pressione dell’acqua compresa
tra 0,17 e 0,81 MPa (1,7 e 8,1 bar).
Non conservare all’interno
dell’apparecchio sostanze esplosive
quali bombolette spray con
propellente infiammabile.
Non ingerire il liquido (atossico)
contenuto negli accumulatori di
freddo (presenti in alcuni modelli).
Non mangiare cubetti di ghiaccio
o ghiaccioli subito dopo averli tolti
dal congelatore poiché potrebbero
causare bruciature da freddo.
Per i prodotti che prevedono
l’uso di un filtro aria all’interno di un
coperchio ventola accessibile, il filtro
deve essere sempre in posizione
quando il frigorifero è in funzione.
Non conservare nel comparto
congelatore alimenti liquidi in
contenitori di vetro, perché questi
potrebbero rompersi.
Non ostruire la ventola (se presente)
con gli alimenti.
Dopo avere introdotto gli alimenti,
assicurarsi che le porte dei comparti
si chiudano bene, in particolare la
porta del comparto congelatore.
Sostituire non appena possibile le
guarnizioni danneggiate.
Utilizzare il comparto frigorifero
solo per la conservazione di alimenti
freschi e il comparto congelatore
solo per la conservazione di alimenti
congelati, la congelazione di cibi
freschi e la produzione di cubetti di
ghiaccio.
Non conservare alimenti senza
confezione a contatto diretto con
le superfici del frigorifero o del
congelatore. Gli apparecchi possono
essere dotati di comparti speciali
(comparto cibi freschi, comparto
zero gradi, ecc.). Se non altrimenti
indicato nel libretto del prodotto,
questi comparti possono essere
rimossi mantenendo prestazioni
equivalenti.
Il c-pentano è utilizzato come
agente dilatante nella schiuma
isolante ed è un gas infiammabile.
INSTALLAZIONE
Per evitare il rischio di lesioni
personali, le operazioni di
movimentazione e installazione
dell’apparecchio devono essere
eseguite da almeno due persone.
Per evitare rischi di taglio, utilizzare
guanti protettivi per le operazioni di
77
Page 78

disimballaggio e installazione.
L’installazione, comprendente
anche eventuali raccordi per
l’alimentazione idrica e i collegamenti
elettrici, e gli interventi di riparazione
devono essere eseguiti da personale
qualificato. Non riparare né sostituire
alcuna parte dell’apparecchio a
meno che ciò non sia espressamente
indicato nel manuale d’uso.
Tenere i bambini a distanza dal luogo
dell’installazione.
Dopo aver disimballato l’apparecchio,
assicurarsi che non sia stato
danneggiato durante il trasporto.
In caso di problemi, contattare il
rivenditore o il Servizio Assistenza
più vicino. A installazione completata,
conservare il materiale di imballaggio
(parti in plastica, polistirolo,
ecc.) al di fuori della portata dei
bambini per evitare possibili rischi
di soffocamento. Per evitare rischi
di scosse elettriche, prima di
procedere all’installazione scollegare
l’apparecchio dalla rete elettrica.
Durante l’installazione, accertarsi che
l’apparecchio non possa danneggiare
il cavo di alimentazione e causare
così rischi di scosse elettriche.
Attivare l’apparecchio solo dopo
avere completato la procedura di
installazione.
Nello spostare l’apparecchio, fare
attenzione per evitare di danneggiare
i pavimenti (ad esempio di parquet).
Installare l’apparecchio su un
pavimento in grado di sostenerne
il peso e in un ambiente adatto alle
sue dimensioni e al suo utilizzo.
Controllare che l’apparecchio non
sia vicino a una fonte di calore e che i
quattro piedini siano stabili e bene in
appoggio sul pavimento, regolandoli
se necessario; controllare inoltre
che l’apparecchio sia perfettamente
in piano usando una livella a bolla
d’aria. Attendere almeno due ore
prima di attivare l’apparecchio, per
dare modo al circuito refrigerante di
essere perfettamente efficiente.
AVVERTENZA: per evitare
pericoli dovuti all’instabilità
dell’apparecchio, posizionarlo o
fissarlo attenendosi alle istruzioni del
produttore. È vietato posizionare il
frigorifero in modo che la sua parete
posteriore (bobina del condensatore)
entri a contatto con il tubo metallico
di un piano di cottura a gas, con
le tubazioni metalliche del gas o
dell’acqua o con cavi elettrici.
Le dimensioni e le distanze da
rispettare per l’installazione
dell’apparecchio sono riportate nelle
istruzioni di installazione.
AVVERTENZE ELETTRICHE
Deve essere possibile scollegare
l’apparecchio dalla rete elettrica
disinserendo la spina, se questa è
accessibile, o tramite un interruttore
multipolare installato a monte della
presa nel rispetto dei regolamenti
elettrici vigenti; inoltre, la messa a
terra dell’apparecchio deve essere
conforme alle norme di sicurezza
elettrica nazionali.
Non utilizzare cavi di prolunga,
prese multiple o adattatori. Una
volta terminata l’installazione, i
componenti elettrici non dovranno
più essere accessibili. Non
utilizzare l’apparecchio quando si
è bagnati oppure a piedi nudi. Non
accendere l’apparecchio se il cavo
di alimentazione o la spina sono
danneggiati, se si osservano anomalie
di funzionamento o se l’apparecchio
è caduto o è stato danneggiato.
78
Page 79

Se il cavo di alimentazione
è danneggiato, deve essere
sostituito con uno dello stesso tipo
dal produttore, da un centro di
assistenza autorizzato o da un tecnico
qualificato per evitare situazioni di
pericolo o rischi di scosse elettriche.
PULIZIA E MANUTENZIONE
AVVERTENZA: Per evitare
rischi di folgorazione, prima di
qualsiasi intervento di manutenzione
accertarsi che l’apparecchio sia
spento e scollegato dall’alimentazione
elettrica; inoltre, non usare in nessun
caso pulitrici a getto di vapore.
Non usare detergenti abrasivi o
aggressivi quali ad esempio spray
per vetri, creme abrasive, liquidi
infiammabili, cere, detergenti
concentrati, sbiancanti o detersivi
contenenti prodotti derivati dal
petrolio sulle parti in plastica, gli
interni, i rivestimenti delle porte o
le guarnizioni. Non utilizzare carta
da cucina, spugnette abrasive o altri
strumenti di pulizia aggressivi.
SMALTIMENTO DEL
MATERIALE DI IMBALLAGGIO
Il materiale di imballaggio è riciclabile al 100% ed
è contrassegnato dal simbolo del riciclaggio .
Le varie parti dell’imballaggio devono pertanto
essere smaltiteresponsabilmente e in stretta
osservanza delle norme stabilite dalleautorità
locali.
SMALTIMENTO DEGLI
ELETTRODOMESTICI
Questo prodotto è stato fabbricato con materiale
riciclabile o riutilizzabile.
Smaltire il prodotto rispettando le normative
locali in materia. Per ulteriori informazioni sul
trattamento, il recupero e il riciclaggio degli
elettrodomestici, contattare l’ufficio locale
competente, il servizio di raccolta dei rifiuti
domestici o il negozio presso il quale il prodotto
è stato acquistato. Questo apparecchio è
contrassegnato in conformità alla Direttiva
Europea 2012/19/UE sui rifiuti di apparecchiature
elettriche ed elettroniche (RAEE). Provvedendo al
corretto smaltimento del prodotto si contribuirà
ad evitare potenziali conseguenze negative
sull’ambiente e sulla salute umana.
Questo simbolo sul prodotto o sulla
documentazione di accompagnamento indica che
il prodotto non deve essere trattato come rifiuto
domestico, ma deve essere consegnato presso
l’idoneo punto di raccolta per il riciclaggio di
apparecchiature elettriche ed elettroniche.
CONSIGLI PER IL RISPARMIO
ENERGETICO
Per garantire un’adeguata ventilazione, seguire le
istruzioni di installazione.
Una ventilazione insufficiente sul retro
dell’apparecchio provoca un aumento
del consumo energetico e una riduzione
dell’efficienza del raffreddamento.
L’apertura frequente delle porte può causare un
aumento del consumo di energia.
La temperatura interna dell’apparecchio e il
consumo energetico possono variare anche in
funzione della temperatura ambiente e del luogo
di installazione. Questi fattori devono essere presi
in considerazione quando si imposta il termostato.
Ridurre allo stretto necessario l’apertura delle
porte.
Per scongelare prodotti surgelati, collocarli nel
comparto frigorifero.
La bassa temperatura dei prodotti surgelati
raffredda gli alimenti nel comparto frigorifero.
Fare raffreddare alimenti e bevande calde prima
di introdurli nell’apparecchio.
Il posizionamento dei ripiani nel frigorifero non
ha effetto sull’utilizzo efficiente dell’energia.
Collocare gli alimenti sui ripiani in maniera da
assicurare un’appropriata circolazione dell’aria
(gli alimenti non devono essere a contatto tra di
loro e non devono essere a contatto con la parete
posteriore interna).
Si può aumentare la capacità dell’area di
conservazione di alimenti surgelati togliendo i
cestelli e, se presente, il ripiano Stop Frost.
I rumori provenienti dal compressore che
sono descritti come rumori normali nella
Guida rapida del prodotto non devono destare
preoccupazione.
79
Page 80

USO CORRETTO DEI FRIGORIFERI
Piedini di regolazione dell'altezza
1. Precauzioni da osservare prima dell'installazione:
Il contenuto delle Istruzioni per l'uso è da considerarsi solo come riferimento. Le caratteristiche
effettive del prodotto potrebbero differire da quelle illustrate.
Prima di installare gli accessori, si raccomanda di staccare il frigorifero dalla rete elettrica.
Prima di regolare i piedini, adottare le precauzioni necessarie per evitare il rischio di lesioni personali.
2. Schema dei piedini di regolazione dell'altezza.
LH
La configurazione effettiva dipenderà dal prodotto fisico o da quanto dichiarato dal distributore
3. Procedure di regolazione:
a. Ruotare i piedini in senso orario per alzare il frigorifero;
b. Ruotare i piedini in senso antiorario per abbassare il frigorifero;
c. Regolare i piedini sinistro e destro con la procedura descritta per portare il frigorifero in orizzontale.
L'immagine è da considerarsi solo come riferimento.
80
Page 81

Regolazione della porta
1. Precauzioni da osservare prima dell'installazione:
Prima di installare gli accessori si raccomanda di staccare il frigorifero dalla rete elettrica.
Prima di regolare la porta, adottare le precauzioni necessarie per evitare il rischio di lesioni personali.
2. Schema della regolazione della porta
Utensili richiesti (non in dotazione)
Chiave
Piedino fisso
Piedino
regolabile
Controdado
Dado di regolazione
Chiave
La configurazione effettiva dipenderà dal prodotto fisico o da quanto dichiarato dal distributore
L'immagine è da considerarsi solo come riferimento.
Se la porta del frigorifero è bassa:
Aprire la porta; usando una chiave, allentare il controdado e ruotare il dado di regolazione in senso
antiorario per alzare la porta. Quando le porte sono allineate, serrare il controdado ruotandolo in
senso antiorario.
Se la porta del frigorifero è alta:
Aprire la porta; usando una chiave, ruotare il dado di regolazione in senso orario per abbassare la
porta. Quando le porte sono allineate, serrare il controdado ruotandolo in senso antiorario.
Collegamento idraulico
1.
Precauzioni da osservare prima dell'installazione:
Il contenuto delle Istruzioni per l'uso è da considerarsi solo come riferimento. Le caratteristiche
effettive del prodotto potrebbero differire da quelle illustrate.
Prima di installare gli accessori si raccomanda di staccare il frigorifero dalla rete elettrica.
Pericolo di allagamento!
La pressione dell'acqua del frigorifero-congelatore combinato è di 2-7 bar. Se la pressione dell'acqua è
troppo alta, installare un decompressore.
Non collegare il frigorifero-congelatore combinato a un rubinetto o al rubinetto di un radiatore ad
acqua.
Non piegare i tubi di mandata e i tubi di scarico durante la posa, e prestare estrema attenzione nei
collegamenti idraulici.
Non utilizzare tubi dell'acqua vecchi o usati.
Acquistare il raccordo adatto per il collegamento del tubo al rubinetto e installarlo seguendo lo schema.
81
Page 82

2. Schema
Raccordo
Tubo di collegamento
Raccordo del tubo
Anello elastico
Dado
3. Procedure di installazione
a. Spingere l'estremità del tubo di collegamento nel raccordo. Stringere il raccordo sul rubinetto.
b. Estrarre il dado dal tubo flessibile bianco. Spingere l'estremità del tubo flessibile bianco nel raccordo
del tubo, fissato con un anello elastico. Se necessario, rivettare il tubo flessibile alla parete per
evitare rischi di inciampo.
c. Svitare lentamente il rubinetto per controllare che la tubazione non presenti perdite.
Montaggio e fissaggio del filtro
Utensili richiesti (non in dotazione)
Cacciavite
1 2
1.
Fissare le fascette singole alla parete con le viti
2.
Inserire la cartuccia nelle fascette singole;
Segno di
posizionamento
Anello elastico
3 4
Fornitura d’acqua
3. Inserire un'estremità del gomito con raccordo rapido nell'ingresso della cartuccia del filtro; l'altra
estremità sarà inserita nel tubo di mandata dell'acqua, in corrispondenza del segno di posizionamento,
fissata con un anello elastico;
4. Usando la procedura sopra descritta, inserire un'estremità del gomito con raccordo rapido nell'uscita
della cartuccia del filtro; l'altra estremità sarà inserita nel tubo di uscita dell'acqua, in corrispondenza del
segno di posizionamento.
82
Page 83

Sostituzione del filtro dell'acqua
1. Precauzioni da osservare prima dell'installazione:
Prima di installare gli accessori si raccomanda di staccare il frigorifero dalla rete elettrica.
Dopo sei mesi consecutivi di utilizzo, l'indicatore lampeggia.
In questo caso, sostituire il filtro.
2. Schema
3. Procedure:
Estrarre la spina dalla presa elettrica. Chiudere il rubinetto dell’acqua. Staccare il filtro e l'anello elastico
dal raccordo rapido ed estrarre il tubo dell'acqua. Inserire il nuovo filtro nel raccordo rapido e installare
l'anello elastico. Riaprire il rubinetto dell'acqua e controllare che non vi siano perdite.
Se necessario, ripetere la procedura sopra descritta. Reinserire la spina nella presa elettrica. Premere il
pulsante per 3 secondi per avviare il filtro. L'indicatore si spegne.
83
Page 84

STRUTTURA E FUNZIONI
Per la versione I&W (Ice & Water)
Comparto congelatore
Illuminazione a LED
Cassetto del
ghiaccio
(amovibile)
Produttore di
ghiaccio
Distributore
d'acqua
Ripiano di vetro
Balconcino
Cassetto
L'immagine è da considerarsi solo come riferimento.
La configurazione effettiva dipenderà dal prodotto fisico o da quanto dichiarato dal distributore
Comparto frigorifero
Illuminazione a LED
Balconcino
Ripiano di vetro
Cassetto
per frutta
e verdura
Comparto frigorifero
• Il comparto frigorifero è indicato per la conservazione di frutta, verdura, bevande e altri alimenti da
consumare a breve termine.
• Per gli alimenti cucinati, farli raffreddare a temperatura ambiente prima di introdurli nel comparto
frigorifero.
• Si raccomanda di avvolgere gli alimenti in una pellicola o di chiuderli in un recipiente prima di
introdurli nel frigorifero.
• I ripiani di vetro possono essere regolati in altezza per rendere più comodo e versatile l'uso dello
spazio di conservazione.
Comparto congelatore
• Il comparto congelatore a bassa temperatura permette di conservare a lungo termine gli alimenti
freschi ed è usato soprattutto per la conservazione dei surgelati e la produzione di ghiaccio.
• Il comparto congelatore è indicato per la conservazione di carne, pesce, polpette o qualsiasi altro
alimento che non si prevede di consumare a breve scadenza.
• Si consiglia di dividere i tagli di carne per facilitarne il prelievo. Si osservi che gli alimenti devono
essere consumati entro la durata di conservazione consigliata.
• Per congelare gli alimenti velocemente si consiglia di attivare la funzione “QUICK-FREEZE”
(Congelamento rapido).
Nota: l'introduzione di una quantità eccessiva di alimenti alla prima accensione dell'apparecchio può
influire negativamente sull'efficacia del congelamento. Disporre gli alimenti in modo che non ostruiscano
l'apertura di sfiato dell'aria, perché ciò potrebbe ridurre l'efficacia del congelamento.
84
Page 85

STRUTTURA E FUNZIONI
Per la versione IDI (In Door Ice)
Comparto congelatore
Illuminazione a LED
Produttore di
ghiaccio
Distributore
d’acqua
Ripiano di vetro
Balconcino
Cassetto
L'immagine è da considerarsi solo come riferimento.
La configurazione effettiva dipenderà dal prodotto fisico o da quanto dichiarato dal distributore
Comparto frigorifero
Illuminazione a LED
Balconcino
Ripiano di vetro
Cassetto
per frutta
e verdura
Comparto frigorifero
• Il comparto frigorifero è indicato per la conservazione di frutta, verdura, bevande e altri alimenti
da consumare a breve termine.
• Per gli alimenti cucinati, farli raffreddare a temperatura ambiente prima di introdurli nel comparto
frigorifero.
• Si raccomanda di avvolgere gli alimenti in una pellicola o di chiuderli in un recipiente prima di
introdurli nel frigorifero.
• I ripiani di vetro possono essere regolati in altezza per rendere più comodo e versatile l'uso dello
spazio di conservazione.
Comparto congelatore
• Il comparto congelatore a bassa temperatura permette di conservare a lungo termine gli alimenti
freschi ed è usato soprattutto per la conservazione dei surgelati e la produzione di ghiaccio.
• Il comparto congelatore è indicato per la conservazione di carne, pesce, polpette o qualsiasi altro
alimento che non si prevede di consumare a breve scadenza.
• Si consiglia di dividere i tagli di carne per facilitarne il prelievo. Si osservi che gli alimenti devono
essere consumati entro la durata di conservazione consigliata.
• Per congelare gli alimenti velocemente si consiglia di attivare la funzione “QUICK-FREEZE”
(Congelamento rapido).
Nota: l'introduzione di una quantità eccessiva di alimenti alla prima accensione dell'apparecchio può
influire negativamente sull'efficacia del congelamento. Disporre gli alimenti in modo che non
ostruiscano l'apertura di sfiato dell'aria, perché ciò potrebbe ridurre l'efficacia del congelamento.
85
Page 86

Funzioni
A B
5 6 7 8 10 119
C
L'immagine è da considerarsi solo come riferimento.
La configurazione effettiva dipenderà dal prodotto fisico o da quanto dichiarato dal distributore
Display
1. Freezer compartment temperature
(Temperatura comparto congelatore)
2. Quick REF. (Raffreddamento rapido)
3. Quick FRZ (Congelamento rapido)
4. Refrigerate compartment temperature
(Temperatura comparto frigorifero)
5. Vacation icon (Icona Vacanza)
1
3 42
FD E
6. Water Filter (Filtro acqua)
7. Ice off (Produttore di ghiaccio spento)
8. Fetching ice cubes (Prelievo cubetti di
ghiaccio)
9. Fetching crushed ice (La versione IDI non
comprende la funzione tritaghiaccio)
10. Fetching cold water (Prelievo acqua fredda)
11. Lock/unlock icon (Icona di blocco/sblocco)
Funzionamento dei pulsanti
A. Freezer compartment temperature adjustment (Regolazione della temperatura del comparto
congelatore)
B. Refrigerate compartment temperature adjustment (Regolazione della temperatura del comparto
frigorifero)
C. Mode setting (Selezione della modalità)
D. Ice OFF/ ON button (Accensione/spegnimento del produttore di ghiaccio)
E. Fetching ice/ Fetching water/Filter set (Prelievo di ghiaccio / Prelievo di acqua / Ripristino filtro)
F. Lock/unlock controls (Comandi di blocco/sblocco)
Istruzioni d'uso
Alla prima accensione del frigorifero, tutti gli indicatori sul display si accendono per 3 secondi e viene emesso
un segnale acustico di avvio. Il display entra quindi nella modalità operativa normale. Al primo utilizzo
dell'apparecchio, si consiglia di regolare la temperatura del comparto frigorifero e del comparto congelatore
rispettivamente a 5° C e -18 °C.
Quando si verifica un errore, il display mostra il codice di errore corrispondente (vedere alla pagina
successiva); durante il funzionamento normale, il display mostra la temperatura impostata per il comparto
frigorifero.
In condizioni normali, se il frigorifero smette di funzionare per 30 secondi, il display mostra lo stato di blocco;
dopo 30 secondi consecutivi di blocco, il display si spegne.
Blocco/sblocco
Se l'apparecchio è sbloccato , è possibile premere il pulsante LOCK/UNLOCK per 3 secondi per
bloccarlo ;
86
Page 87

Se l'apparecchio è bloccato , è possibile premere il pulsante LOCK/UNLOCK per 3 secondi per
sbloccarlo ;
Tutte le funzioni sotto descritte possono essere utilizzate solo con l'apparecchio sbloccato.
Mode setting (Selezione della modalità)
Il pulsante MODE permette di selezionare una modalità di comando differente.
Vacation mode (modalità Vacanza)
Premere il pulsante MODE per attivare la modalità Vacanza. L'icona si accende; la modalità Vacanza si
attiverà allo sblocco dell'apparecchio.
Premere il pulsante FRZ.TEMP. o REF.TEMP. per uscire dalla modalità Vacanza.
Quick REF. mode (modalità Raffreddamento rapido)
Premere il pulsante MODE per attivare la modalità di raffreddamento rapido. L'icona si accende; la
modalità di raffreddamento rapido si attiverà allo sblocco dell'apparecchio.
Premere il pulsante REF.TEMP. per uscire dalla modalità di raffreddamento rapido.
Quick FRZ. mode (modalità Congelamento rapido)
Premere il pulsante Mode per attivare la modalità di congelamento rapido. L'icona si accende; la modalità
di congelamento rapido si attiverà allo sblocco dell'apparecchio.
Premere il pulsante FRZ.TEMP. per uscire dalla modalità di congelamento rapido.
Temperature setting of refrigerating chamber (Regolazione della temperatura del comparto
frigorifero)
Premere il pulsante REF.TEMP. per regolare la temperatura del comparto frigorifero: la parte del display
corrispondente lampeggerà. Premere nuovamente REF.TEMP. per impostare la temperatura: verrà emesso
un segnale acustico. La temperatura può essere regolata tra 2°C e 8°C. Ad ogni pressione del pulsante, la
temperatura cambia di 1°C. Dopo l'impostazione della temperatura, l'indicazione sul display digitale continua
a lampeggiare per 5 secondi. La nuova temperatura impostata sarà applicata allo sblocco dell'apparecchio.
Temperature setting of freezing chamber (Regolazione della temperatura del comparto
congelatore)
Premere il pulsante FRZ.TEMP. per regolare la temperatura del comparto congelatore: la parte del display
corrispondente lampeggerà. Premere nuovamente FRZ.TEMP. per impostare la temperatura: verrà emesso
un segnale acustico. La temperatura può essere regolata tra -16°C e -24°C. Ad ogni pressione del pulsante, la
temperatura cambia di 1°C. Dopo l'impostazione della temperatura, l'indicazione sul display digitale continua
a lampeggiare per 5 secondi. La nuova temperatura impostata sarà applicata allo sblocco dell'apparecchio.
Quick-freeze time setting (Regolazione del tempo di congelamento rapido)
Scegliere la modalità di congelamento rapido e premere il pulsante FRZ.TEMP per 3 secondi per
accedere alla modalità di regolazione del tempo di congelamento rapido; premendo brevemente FRZ.
TEMP, nella parte del display indicante la temperatura del comparto congelatore compaiono in modo
ciclico i valori “26-48-26-48”.
La modalità di congelamento rapido opera separatamente nelle modalità di disattivazione a 26H e a 48H.
Mentre è attiva la modalità di regolazione del tempo di congelamento rapido, bloccare la modalità o premere
FRZ.TEMP per 3 secondi per uscire dalla modalità di regolazione.
La modalità di congelamento rapido 48H viene usata per scopi di controllo delle prestazioni e non è
consigliata per l'uso normale.
ICE OFF (Produttore di ghiaccio spento)
Premere il pulsante : l'icona si accende o si spegne per indicare l'attivazione o la disattivazione
del produttore di ghiaccio.
DISPENSER (Distributore)
Premere il pulsante per accedere alla modalità di selezione ghiaccio/acqua; vengono
presentate in modo ciclico le opzioni “Prelievo di cubetti di ghiaccio / Prelievo di ghiaccio tritato / Prelievo di
acqua / Nessuno”, indicate dall'accensione delle icone corrispondenti sul display.
Quando il sistema è in funzione, il tempo di funzionamento del filtro viene conteggiato in modo cumulativo;
dopo 150 giorni si accende l'icona del filtro, e dopo 180 giorni l'icona inizia a lampeggiare; premere il pulsante
87
Page 88

per 3 secondi per utilizzare la funzione FILTER RESET e resettare il tempo di funzionamento
del filtro.
Dopo la sostituzione del filtro, l'icona si spegne.
Memoria in caso di interruzione della corrente
In caso di interruzione della corrente elettrica, lo stato di funzionamento viene salvato e mantenuto fino al
ripristino della corrente.
Segnale e allarme di porta aperta
Quando si apre la porta del comparto frigorifero viene emesso un segnale acustico. Se la porta non viene
chiusa entro due minuti, il segnale acustico viene emesso una volta al minuto fino alla chiusura della porta.
Indicazione di errore
La comparsa delle seguenti avvertenze sul display indica errori corrispondenti del frigorifero. Anche se gli
errori segnalati non disattivano le funzioni di raffreddamento e congelamento dell'apparecchio, si raccomanda
di rivolgersi a un tecnico di manutenzione per avere conferma del corretto funzionamento del frigorifero.
Codice di errore Descrizione dell'errore
E0 Errore del produttore di ghiaccio
E1
E2
E5 Errore nel circuito di rilevamento del sensore di sbrinamento del congelatore
E6 Errore di comunicazione
E7 Errore nel circuito di rilevamento del sensore di distribuzione della temperatura
EE Errore nel circuito del sensore del produttore di ghiaccio
EH Errore del sensore di umidità
Errore nel circuito di rilevamento del sensore di temperatura del comparto frigorifero
Errore nel circuito di rilevamento del sensore di temperatura del comparto
congelatore
Prelievo di ghiaccio e acqua
• Durante la produzione di cubetti di ghiaccio e ghiaccio tritato, l'apparecchio emette dei rumori: questi
possono essere prodotti dalla valvola dell'acqua, dallo scorrimento dell'acqua nel cassetto del ghiaccio,
dall'azione del tritaghiaccio o dalla caduta del ghiaccio nel cassetto, e sono tutti da considerarsi normali.
• Durante il prelievo dei cubetti di ghiaccio si potranno sentire dei rumori striduli. Questi rumori sono da
considerarsi normali e possono essere dovuti all'aderenza del ghiaccio nel cassetto. In questi casi, si
consiglia di estrarre il cassetto e separare i pezzi di ghiaccio, ad esempio usando un cucchiaio di plastica o
di legno.
• Altre possibilità sono descritte nella sezione “Pulizia del cassetto del ghiaccio”. Per evitare d surriscaldare
il motore del produttore di ghiaccio, aspettare circa un minuto dal suo arresto prima di prelevare il
ghiaccio. Attendere qualche istante per dare tempo al motore di raggiungere la temperatura di lavoro. Se
si desidera prelevare una quantità di ghiaccio considerevole, si consiglia di estrarlo direttamente dal
cassetto.
• La sezione “Pulizia del cassetto del ghiaccio” spiega come rimuovere il cassetto del ghiaccio dal
comparto congelatore.
Se il ghiaccio nel cassetto è troppo poco, il prelievo non sarà possibile. Attendere la formazione di altro
ghiaccio. Per evitare che il ghiaccio assuma un gusto o un odore sgradevole, si raccomanda di pulire
regolarmente il cassetto del ghiaccio.
• Il ghiaccio e l'acqua possono essere prelevati solo se la porta del comparto congelatore è chiusa. Se
durante il prelievo di acqua o ghiaccio si apre la porta del comparto congelatore, l'erogazione viene
automaticamente interrotta.
• Quando le icone o si spengono sul display, premere nuovamente i pulsanti del distributore d'acqua.
88
Page 89

Prelievo di acqua fredda
Tenere premuto il pulsante finché si accende l'indicatore .
Spingere il recipiente contro la leva di prelievo dell'acqua: l'acqua fredda inizierà a scendere nel recipiente.
Allontanare il recipiente dalla leva di prelievo dell'acqua per interrompere l'erogazione.
Prelievo di ghiaccio tritato
Tenere premuto il pulsante del distributore d'acqua finché si accende l'icona .
Disporre il recipiente il più vicino possibile all'apertura di erogazione per evitare fuoriuscite laterali.
Spingere il recipiente contro la leva di prelievo dell'acqua. Riempire il recipiente di ghiaccio tritato.
Allontanare il recipiente dalla leva per interrompere l'erogazione.
Prelievo di cubetti di ghiaccio
Tenere premuto il pulsante finché si accende l'icona .
Spingere il recipiente contro la leva di prelievo dell'acqua.
I cubetti di ghiaccio iniziano a scendere nel recipiente.
Allontanare il recipiente dalla leva per interrompere l'erogazione.
Blocco del produttore di ghiaccio
Se si prevede di non utilizzare la funzione di prelievo di acqua e ghiaccio per un periodo prolungato, è
possibile bloccare il produttore di ghiaccio.
Premere il pulsante : sul display si accende l'icona .
89
Page 90

Regolazione della temperatura
Avvertenza: il display si illumina solo quando si preme un tasto o quando viene aperta una porta; in
ogni altro momento il display è in stato di attesa.
Avvertenza: il pannello comandi si blocca automaticamente. Prima di regolare la temperatura o di
selezionare qualsiasi modalità, è necessario sbloccare il pannello tenendo premuto il tasto di blocco per
3 secondi, fino a quando il simbolo ‘blocco’ non scompare dal display.
Nota: la temperatura di esercizio standard per il comparto frigorifero deve essere compresa tra 0°C
e 4°C, mentre la temperatura di esercizio standard per il comparto congelatore deve essere compresa
tra -18°C e -25°C.
Nota: la temperatura degli alimenti freschi introdotti nell’apparecchio e la frequenza di apertura della
porta influiscono sulla temperatura nel comparto frigorifero. Se necessario, modificare l’impostazione
della temperatura.
Regolazione della temperatura del comparto congelatore
Per modificare la temperatura del comparto congelatore, premere il tasto di regolazione della temperatura
del congelatore. La temperatura del congelatore può essere impostata su un valore compreso tra -16°C e
-24°C.
Premere il tasto di regolazione della temperatura del congelatore finché sul display non compare la
temperatura desiderata. Si noti che, durante il processo di regolazione della temperatura, la temperatura
del congelatore indicata sul display lampeggia. Dopo che la temperatura desiderata è stata impostata, la
temperatura del congelatore lampeggia per alcuni secondi, il display si blocca automaticamente e quindi, dopo
circa 30 secondi, il display scompare.
Temperatura del comparto congelatore
La temperatura del comparto congelatore compare sul display ogni volta che viene aperta una porta o viene
premuto un tasto.
Regolazione della temperatura del comparto frigorifero
Per modificare la temperatura del comparto frigorifero, premere il tasto di regolazione della temperatura del
frigorifero. La temperatura del frigorifero può essere impostata su un valore compreso tra 2°C e 8°C.
Premere il tasto di regolazione della temperatura del frigorifero finché sul display non compare la
temperatura desiderata. Si noti che, durante il processo di regolazione della temperatura, la temperatura
del frigorifero indicata sul display lampeggia. Dopo che la temperatura desiderata è stata impostata, la
temperatura del frigorifero lampeggia per alcuni secondi, il display si blocca automaticamente e quindi, dopo
circa 30 secondi, il display scompare.
Temperatura del comparto frigorifero
La temperatura del comparto frigorifero compare sul display ogni volta che viene aperta una porta o viene
premuto un tasto.
Impostazioni della modalità
L’apparecchio presenta 4 modalità predefinite che è possibile selezionare premendo il tasto MODE:
• Vacanza
• Congelamento rapido
• Congelamento e raffreddamento rapido
• Raffreddamento rapido
Modalità vacanza
Questa modalità consente di risparmiare energia nei periodi in cui l’apparecchio non viene usato
regolarmente (ad esempio quando si è in vacanza).
Se si seleziona questa funzione la temperatura del comparto congelatore viene impostata
automaticamente su -18°C e il comparto frigorifero viene spento.
Per impostare la modalità di vacanza, premere il tasto MODE finché l’icona di vacanza non si illumina
sul display. Per uscire dalla modalità di vacanza, premere il tasto MODE finché sul display non è
illuminata alcuna icona di modalità.
90
Page 91

Avvertenza: se questa modalità è selezionata è necessario rimuovere tutti gli alimenti e le bevande dal
comparto frigorifero.
Congelamento rapido
Questa modalità è adatta per congelare gli alimenti che non sono già precongelati.
Idealmente prima di introdurre alimenti freschi nel congelatore sarebbe opportuno ridurre la
temperatura al fine di favorire il congelamento più rapido possibile. Potrebbe essere necessario
selezionare la modalità di congelamento rapido fino a 12 ore prima. Se si seleziona questa funzione la
temperatura del comparto congelatore viene impostata automaticamente su -24°C per un massimo
di 26 ore (trascorso questo periodo la temperatura torna al valore precedentemente impostato). Se
la temperatura del congelatore scende al di sotto di -24°C durante le 26 ore, l’apparecchio disattiva
automaticamente la modalità di congelamento rapido.
Per impostare la modalità di congelamento rapido, premere il tasto MODE finché l’icona di
congelamento rapido non si illumina sul display. Per uscire dalla modalità di congelamento rapido,
premere il tasto MODE finché sul display non è illuminata alcuna icona di modalità.
Congelamento e raffreddamento rapido
Per ottenere una temperatura inferiore all’interno del frigorifero, attivare la modalità di congelamento
e raffreddamento rapido; questo consente di impostare la temperatura più bassa possibile per
l’apparecchio. Se si seleziona questa funzione la temperatura dei comparti congelatore e frigorifero
viene impostata automaticamente su -24°C e 2°C per un massimo di 26 ore per il congelatore e 2 ore e
30 minuti per il frigorifero (trascorso questo periodo le temperature tornano ai valori precedentemente
impostati). Se la temperatura del congelatore scende al di sotto di -24°C durante le 26 ore,
l’apparecchio disattiva automaticamente la modalità di congelamento rapido.
Per usare le modalità di congelamento rapido e di raffreddamento rapido simultaneamente, premere
il tasto MODE finché le icone di congelamento e raffreddamento rapido non si illuminano sul display.
Per uscire dalla modalità di congelamento e raffreddamento rapido, premere il tasto MODE finché sul
display non è illuminata alcuna icona di modalità.
Raffreddamento rapido
Per ridurre la temperatura all’interno del frigorifero, attivare la modalità di raffreddamento rapido;
questo consente di impostare la temperatura più bassa possibile per l’apparecchio. Se si seleziona
questa funzione la temperatura del comparto frigorifero viene impostata automaticamente su 2°C
per un massimo di 2 ore e 30 minuti (trascorso questo periodo la temperatura torna al valore
precedentemente impostato).
Per impostare la modalità di raffreddamento rapido, premere il tasto MODE finché l’icona di
raffreddamento rapido non si illumina sul display. Per uscire dalla modalità di raffreddamento rapido,
premere il tasto MODE finché sul display non è illuminata alcuna icona di modalità.
Blocco/sblocco
Per usare la funzione di blocco, premere il tasto di blocco (il simbolo si illumina sul display). Se questa
funzione è selezionata, tutte le azioni vengono ignorate finché il blocco non viene rimosso.
Per sbloccare il display e le funzioni, tenere premuto il tasto di blocco per 3 secondi (il simbolo sul
display scompare).
Vaschetta del ghiaccio
Come produrre ghiaccio
1. Estrarre delicatamente la vaschetta del
ghiaccio e riempirla con acqua fino alla linea
che indica il livello dell’acqua. Con cautela,
riposizionare la vaschetta del ghiaccio in senso
orizzontale.
2. Quando i cubetti di ghiaccio sono pronti,
ruotare la manopola in senso orario (ruotare
fino in fondo e rilasciare); i cubetti di ghiaccio
si staccano dalla vaschetta e cadono nella
scatola del ghiaccio.
Linea del livello dell'acqua
91
* L’immagine ha solo scopo illustrativo
Page 92

Note:
• Per produrre cubetti di ghiaccio velocemente, impostare il congelatore sulla temperatura più bassa
possibile oppure selezionare la modalità di congelamento rapido. In questo modo la temperatura del
congelatore si abbassa.
• Non riempire la vaschetta con una quantità eccessiva di acqua. La rimozione dei cubetti di ghiaccio
dalla vaschetta potrebbe risultare difficile e il gocciolamento di acqua nella scatola del ghiaccio
provocherebbe la fusione dei cubetti.
• Se si ruota la manopola prima che i cubetti di ghiaccio siano pronti, l’acqua residua si riversa nella
scatola del ghiaccio provocando la fusione dei cubetti.
Regolazione dei ripiani e dei balconcini
Avvertenza: prima di regolare o estrarre i ripiani e i balconcini, rimuovere tutti gli alimenti e le
bevande dagli stessi.
È possibile regolare i ripiani del comparto frigorifero nel modo desiderato. Per estrarre un ripiano,
sollevarlo leggermente in modo che i supporti in plastica ad entrambi i lati del ripiano siano al di sopra
delle guide, quindi tirare il ripiano verso di sé.
È possibile regolare i balconcini dei comparti frigorifero e congelatore nel modo desiderato. Per
rimuovere un balconcino, afferrarne entrambi i lati, fare scorrere verso l’alto (1) e quindi tirare verso
di sé (2).
Sostituzione della lampadina
Le luci del frigorifero e del congelatore sono lampade a LED a risparmio energetico di lunga durata.
Pertanto non dovrebbe essere necessario sostituirle per l’intero ciclo di vita del prodotto.
La lampadina è un modulo LED 12V CC e, nell’improbabile caso in cui si guasti, deve essere sostituita
da un tecnico qualificato.
lampada del frigorifero
coprilampada
Reversibilità della porta
Le porte non sono reversibili.
92
Page 93

CONSIGLI PER IL RISPARMIO DI ENERGIA
• Non installare l'apparecchio vicino a fonti di calore, come ad esempio fornelli, lavastoviglie o
termosifoni.
• Collocare l'apparecchio in un luogo fresco dotato di adeguata ventilazione e accertarsi che le prese
d'aria non siano ostruite.
• Evitare di tenere le porte aperte per lunghi periodi, poiché l'aria calda che penetra nell'apparecchio
potrebbe causare la formazione di ghiaccio e influire sul consumo di energia. Accertarsi che non vi
sia nulla che possa impedire la corretta chiusura delle porte.
• Verificare che le guarnizioni delle porte siano pulite e prive di lacerazioni o tagli.
• Conservare gli alimenti più deperibili (quelli con scadenza ravvicinata, come ad esempio le carni
cotte) nella parte più fredda del frigorifero. Il Cassetto verdure è la parte meno fredda del
frigorifero e deve essere utilizzato per ortaggi, insalate, frutta e così via.
• Non sovraccaricare l'apparecchio, poiché ciò potrebbe causare il blocco dell'aria di raffreddamento
che circola e mantiene freddo l'apparecchio, con la conseguente formazione di tasche di aria calda.
• Non introdurre cibi caldi nel frigorifero o nel congelatore; attendere che si siano raffreddati.
CONSIGLI PER LA CONSERVAZIONE NEL
CONGELATORE
• Conservare gli alimenti freschi in contenitori ermetici o avvolti in sacchetti o pellicola adatti al
congelamento.
• Impedire che gli alimenti congelati vengano a contatto con gli alimenti ancora da congelare.
• Gli alimenti precongelati devono essere introdotti nel congelatore prima possibile dopo l'acquisto.
• Per evitare che ortaggi e frutta freschi vengano danneggiati dal ghiaccio, è necessario trattare tali
alimenti in modo appropriato prima di introdurli nel comparto congelatore.
• Osservare sempre le istruzioni di conservazione riportate sulle confezioni degli alimenti.
Di seguito sono indicati i tempi di conservazione consigliati alla temperatura di -18°C (comparto
congelatore a 4 stelle) per diversi tipi di alimenti:
- Carne e pollame freschi: fino a 12 mesi
- Carne cotta: fino a 2 mesi
- Pesce fresco: fino a 6 mesi
- Frutta e verdura: fino a 12 mesi
- Pane e torte: fino a 6 mesi
INTERRUZIONE DI CORRENTE
In caso di interruzione dell'erogazione di corrente durante la conservazione di alimenti congelati,
tenere la porta del congelatore chiusa. Se la temperatura all'interno del congelatore aumenta, non
ricongelare gli alimenti senza prima verificarne le condizioni.
• Gelato: una volta scongelato va buttato via.
• Frutta e verdura: se rammollite devono essere cucinate e consumate.
• Pane e torte: possono essere ricongelati senza rischi.
• Frutti di mare: devono essere refrigerati e consumati in breve tempo.
• Pietanze cotte (es. stufati): devono essere refrigerate e consumate.
• Tagli di carne grandi: devono essere refrigerati e consumati in breve tempo.
• Tagli di carne piccoli: devono essere refrigerati e consumati in breve tempo.
• Pollo: deve essere refrigerato e consumato in breve tempo.
93
Page 94

MANUTENZIONE E PULIZIA
Prima di eseguire la pulizia scollegare l'apparecchio dalla rete di alimentazione.
Pulizia della parte interna
• Non versare acqua sull'apparecchio.
• La cavità deve essere pulita periodicamente con una soluzione di bicarbonato di soda e acqua
tiepida (5 ml per 0,5 litri di acqua).
• Pulire gli accessori separatamente con acqua e sapone. Non introdurli nella lavastoviglie.
• Non usare prodotti, detergenti o saponi abrasivi.
• Dopo la pulizia, risciacquare con acqua pulita e asciugare accuratamente.
• Al termine della pulizia ricollegare l'apparecchio inserendo la spina con le mani asciutte.
Pulizia della parte esterna
• Lavare l'involucro esterno con acqua calda e sapone. NON utilizzare prodotti abrasivi.
• Sul lato inferiore del prodotto vi sono bordi taglienti, prestare quindi la massima attenzione
durante la pulizia.
• Una o due volte all'anno pulire la parte posteriore dell'apparecchio e il compressore situato
sul retro dell'apparecchio con una spazzola o un aspirapolvere, poiché un accumulo di polvere
influisce sulle prestazioni dell'apparecchio e provoca un maggiore consumo di energia elettrica.
Quando l'apparecchio non è in uso
Quando l'apparecchio non viene utilizzato per un lungo periodo, scollegarlo dalla rete di
alimentazione, rimuovere tutto il contenuto e pulire l'interno. Lasciare aperte le porte per impedire la
formazione di cattivi odori.
Sbrinamento
Nota: eseguire le operazioni indicate di seguito con estrema cautela.
• L'apparecchio è Frost Free, pertanto non dovrebbe essere necessario sbrinare il congelatore.
Tuttavia, qualora occorra sbrinare l'apparecchio, osservare le istruzioni indicate di seguito.
• Prima di sbrinare il congelatore, cercare di consumare la maggiore quantità possibile di alimenti.
Avvolgere i restanti alimenti in carta di giornale e conservarli a parte, finché non è possibile
rimetterli nel congelatore dopo la pulizia.
• Spegnere l'apparecchio in corrispondenza della presa di corrente e disinserire la spina.
• Aprire la porta del congelatore.
• Posizionare un recipiente adatto a raccogliere l'acqua prodotta dal ghiaccio sciolto.
• Dopo lo sbrinamento, pulire e asciugare l'interno.
• Accendere l'apparecchio e reintrodurre gli alimenti congelati.
Per accelerare lo sbrinamento, è possibile introdurre ciotole di acqua calda (non bollente) nel
congelatore e rimuovere il ghiaccio con un raschietto di plastica.
Non usare mai utensili metallici appuntiti poiché potrebbero danneggiare
l'apparecchio.
Non usare mai un dispositivo di riscaldamento elettrico, poiché potrebbe provocare
scosse elettriche.
94
Page 95

Per la versione I&W (Ice & Water)
Pulizia del cassetto del ghiaccio
L'accumulo di ghiaccio nel cassetto può bloccare l'apertura di uscita. In questo caso,
è necessario pulire il cassetto del ghiaccio o eliminare la causa dell'ostruzione.
Cassetto del ghiaccio
2
1
1. Premere il pulsante per bloccare il produttore di ghiaccio. Estrarre la spina dalla
presa elettrica. Afferrare il cassetto del ghiaccio con entrambe le mani, sollevarlo e tirarlo
orizzontalmente verso l'esterno.
Coperchio del cassetto
del ghiaccio
2. Togliere il coperchio dal cassetto del ghiaccio e pulire il cassetto.
Per reinserire il cassetto del ghiaccio, seguire la procedura descritta in ordine inverso.
3. Chiudere la porta del comparto congelatore.
Reinserire la spina nella presa elettrica.
Premere il pulsante
per sbloccare il produttore di ghiaccio.
95
Page 96

Per la versione IDI (In Door Ice)
Pulizia del cassetto del ghiaccio
L'accumulo di ghiaccio nel cassetto può bloccare l'apertura di uscita. In questo caso,
è necessario pulire il cassetto del ghiaccio o eliminare la causa dell'ostruzione.
Cassetto del ghiaccio
1. Premere il pulsante per bloccare il produttore di ghiaccio. Estrarre la spina dalla
presa elettrica. Afferrare il cassetto del ghiaccio con entrambe le mani, sollevarlo e tirarlo
orizzontalmente verso l'esterno.
Cassetto del ghiaccio
Spirale
2. Rimuovere il ghiaccio eventualmente presente vicino all'apertura di uscita. Se necessario, ruotare
la spirale in senso orario o antiorario per rimuovere il ghiaccio incastrato o bloccato.
Albero del motore
3. Reinserire il cassetto del ghiaccio. Se necessario, ruotare la spirale per inserirla correttamente
nell'albero del motore. Chiudere la porta del comparto congelatore e reinserire la spina nella
presa elettrica.
Premere il pulsante
per sbloccare il produttore di ghiaccio.
96
Page 97

Pulizia dei ripiani di vetro
• Poiché i ripiani sono agganciati alla parete posteriore interna del frigorifero, per estrarli è prima
necessario sollevarli per sbloccare le sporgenze di aggancio.
• La possibilità di estrarre i ripiani semplifica le operazioni di regolazione e pulizia.
sporgenza di aggancio
6
5
6
La configurazione effettiva dipenderà dal prodotto fisico o da quanto dichiarato dal distributore
L'immagine è da considerarsi solo come riferimento.
Sbrinamento
• Il funzionamento del frigorifero si basa su un circuito di raffreddamento dell'aria che è provvisto
di una funzione di sbrinamento automatico. La brina che si forma al cambio di stagione o al
variare della temperatura può anche essere rimossa manualmente, staccando l'apparecchio dalla
rete elettrica e passando un panno asciutto sulle superfici interne.
Spegnimento dell'apparecchio
• Interruzione della corrente elettrica: in caso di interruzione della corrente elettrica, gli alimenti
all'interno dell'apparecchio rimangono al fresco per riverse ore, anche d'estate; durante
l'interruzione di corrente, si raccomanda di ridurre al minimo l'apertura delle porte e di non
introdurre altri alimenti nell'apparecchio.
• Inutilizzo prolungato: staccare l'apparecchio dalla rete elettrica e pulirlo; lasciare le porte aperte
per impedire la formazione di odori sgradevoli.
• Trasloco: prima di spostare il frigorifero, vuotarlo completamente, fissare i ripiani di vetro, il
cassetto per frutta e verdura, i cassetti del comparto congelatore e gli altri componenti con
del nastro adesivo e stringere i piedini di regolazione; chiudere le porte e fissarle con del
nastro adesivo. Durante il trasloco, evitare di appoggiare l'apparecchio sul fianco o in posizione
capovolta, ed evitare di esporlo a vibrazioni; l'angolazione massima durante lo spostamento non
dovrà superare i 45°.
Dopo l'accensione, si raccomanda di tenere l'apparecchio in funzione in modo continuo, senza
interruzioni. Un funzionamento discontinuo potrebbe ridurre la durata utile del frigorifero
97
Page 98

GUIDA ALLA RICERCA GUASTI
Anomalia Soluzione
Controllare che l'apparecchio sia collegato alla rete elettrica e che la spina sia
L'apparecchio non si
accende
Cattivo odore
Funzionamento
prolungato del
compressore
Le luci non si
accendono
Le porte non
si chiudono
correttamente
Rumorosità
Le guarnizioni delle
porte non chiudono
ermeticamente
L'acqua tracima dalla
vaschetta di raccolta
Calore sulle pareti
esterne
Formazione di
condensa sulle
superfici
Rumori anomali
bene inserita
Controllare che la tensione della rete elettrica sia sufficiente
Controllare che non vi sia un'interruzione della corrente elettrica e che non
sia intervenuto un dispositivo di protezione in una parte del circuito
Gli alimenti con odori forti dovrebbero essere avvolti in una pellicola o chiusi
in un recipiente
Controllare che non vi siano alimenti guasti
Pulire l'interno del frigorifero
Un funzionamento prolungato del frigorifero è normale nella stagione estiva,
quando la temperatura esterna è elevata
Si raccomanda di non caricare eccessivamente l'apparecchio
Lasciare raffreddare gli alimenti prima di introdurli nell'apparecchio
Le porte vengono aperte troppo spesso
Controllare che il frigorifero sia collegato alla rete elettrica e che le luci non
siano danneggiate
Far sostituire le luci da un tecnico qualificato
L'eccessiva quantità di alimenti impedisce la chiusura della porta
L'apparecchio è inclinato
Controllare che il pavimento sia in piano e che il frigorifero sia appoggiato
stabilmente
Controllare che gli accessori siano posizionati correttamente
Rimuovere i materiali estranei dalle guarnizioni delle porte
Riscaldare le guarnizioni (usando un asciugacapelli o un panno caldo) e
raffreddarle nuovamente
La quantità di alimenti è eccessiva, oppure gli alimenti conservati hanno un
contenuto d'acqua molto elevato che causa un intenso sbrinamento
Le porte non si chiudono correttamente; l'ingresso d'aria causa la formazione
di brina che, a sua volta, attiva con frequenza la funzione di sbrinamento
La dissipazione di calore del condensatore avviene attraverso le pareti
esterne, e questo è normale
Se le pareti esterne diventano troppo calde a causa dell'elevata temperatura
ambiente, di un'eccessiva quantità di alimenti o dell'arresto del compressore,
predisporre un sistema di ventilazione aggiuntivo per facilitare la dissipazione
del calore
La formazione di condensa sulle superfici esterne e sulle guarnizioni delle
porte è normale quando l'ambiente è molto umido. È sufficiente rimuovere la
condensa con un panno pulito.
Ronzio: il compressore può produrre un ronzio durante il funzionamento,
che può diventare particolarmente intenso nelle fasi di avvio e di arresto.
Questi rumori sono normali.
Scricchiolio: la circolazione del refrigerante nell'apparecchio può produrre
uno scricchiolio, che è da considerarsi normale.
98
Page 99

SERVIZIO ASSISTENZA TECNICA
Prima di contattare il Servizio Assistenza:
1. Verificare se non è possibile eliminare da soli i
guasti (vedere “Guida ricerca guasti”).
2. Riavviare l’apparecchio per accertarsi
che l’inconveniente sia stato ovviato. Se il
risultato è negativo, disinserire nuovamente
l’apparecchio e ripetere l’operazione dopo
un’ora.
3. Se il risultato è ancora negativo, contattare il
Servizio Assistenza.
Comunicare:
• il tipo di guasto,
• il modello,
• il numero Service (la cifra che si trova dopo
la parola SERVICE, sulla targhetta matricola
posta all’interno dell’apparecchio),
• il Vostro indirizzo completo,
• il Vostro numero e prefisso telefonico.
99
Page 100

BEZPEČNOSTNÍ POKYNY
JE DŮLEŽITÉ SI JE DŮKLADNĚ PŘEČÍST A ŘÍDIT SE JIMI
Před použitím spotřebiče si
přečtěte tento návod k použití.
Uschovejte si jej pro pozdější
použití.
V tomto návodu a na samotném
spotřebiči jsou uvedena důležitá
bezpečnostní upozornění, která
je nutné si přečíst a řídit se
jimi. Výrobce se zříká jakékoli
odpovědnosti za nedodržení
těchto bezpečnostních pokynů,
nevhodné používání spotřebiče
nebo nesprávné nastavení
ovladačů.
Velmi malé děti (0−3 roky)
je třeba držet v bezpečné
vzdálenosti od spotřebiče.
Nejsou-li malé děti (3−8 let)
pod dohledem, je třeba je držet
v bezpečné vzdálenosti od
spotřebiče. Děti starší 8 let a
osoby s fyzickým, smyslovým či
duševním postižením nebo bez
patřičných zkušeností a znalostí
mohou tento spotřebič používat
pouze pod dohledem nebo tehdy,
pokud obdržely informace o
bezpečném použití spotřebiče a
pokud rozumějí rizikům, která s
používáním spotřebiče souvisejí.
Nedovolte dětem, aby si se
spotřebičem hrály. Nedovolte
dětem, aby bez dohledu
prováděly čištění a běžnou
údržbu spotřebiče.
POVOLENÉ POUŽITÍ
POZOR: Tento spotřebič
není určen k ovládání pomocí
externího spínacího zařízení,
jako je časovač, či samostatného
systému dálkového ovládání.
Tento spotřebič je určen
k použití v domácnostech a
zařízeních, jako jsou: kuchyňské
kouty pro zaměstnance v
obchodech, kancelářích a na
jiných pracovištích; statky; klienty
hotelů, motelů, zařízení typu bed
& breakfast a jiných rezidenčních
prostředích.
Tento spotřebič není určen k
profesionálnímu použití. Spotřebič
nepoužívejte na otevřeném
prostranství.
Žárovka použitá uvnitř
spotřebiče je speciálně navržena
pro domácí spotřebiče a není
vhodná pro všeobecné osvětlení
místnosti v domácnosti (nařízení
ES 244/2009).
Spotřebič je určen k provozu v
prostředích, ve kterých se teplota
pohybuje v následujícím rozmezí
v závislosti na klimatické třídě
uvedené na výrobním štítku.
Při dlouhodobém ponechání
spotřebiče v nižší či vyšší teplotě
nemusí spotřebič správně
fungovat.
Klimatická třída, teplota
prostředí. (°C)
SN: Od 10 do 32 °C
ST: Od 16 do 38 °C;
N: Od 16 do 32 °C
T: Od 16 do 43 °C
Tento spotřebič neobsahuje
CFC. Chladicí okruh obsahuje
látku R600a (HC). Spotřebiče
obsahující isobutan (R600a):
isobutan je přírodní plyn bez
škodlivých účinků na životní
prostředí, který je nicméně
hořlavý. Je tedy třeba se
přesvědčit, že nedošlo k
poškození trubek chladicího
okruhu, zvláště při vypouštění
chladicí kapaliny.
100
 Loading...