

Bauknecht KVI 1103, KVI 11211, KRI 2103 User Manual [de]
Gebrauchsanweisung
Instructions for use
Mode d’emploi
Gebruiksaanwijzing
Istruzioni per l’uso
Brugsanvisning
Bruksanvisning
Käyttöohje
Manual de utilização
Instrucciones para el uso
Instrukcje użytkowania
Használati utasítás
ИнструкциЯ за употреба
Návod k použití
Návod na použitie
Instruc∑iuni de utilizare
Инструкции по эксплуатации

DEUTSCH Gebrauchsanweisung Seite 4
ENGLISH Instructions for use Page 10
FRANÇAIS Mode d’emploi Page 17
NEDERLANDS Gebruiksaanwijzing Pagina 23
ESPAÑOL Instrucciones para el uso Página 29
PORTUGUÊS Manual de utilização Página 35
ITALIANO Istruzioni per l’uso Pagina 41
47
SVENSKA Bruksanvisning Sidan 53
NORSK Bruksanvisning Side 59
DANSK Brugsanvisning Side 65
SUOMI Käyttöohje
3
3
Sivu 71

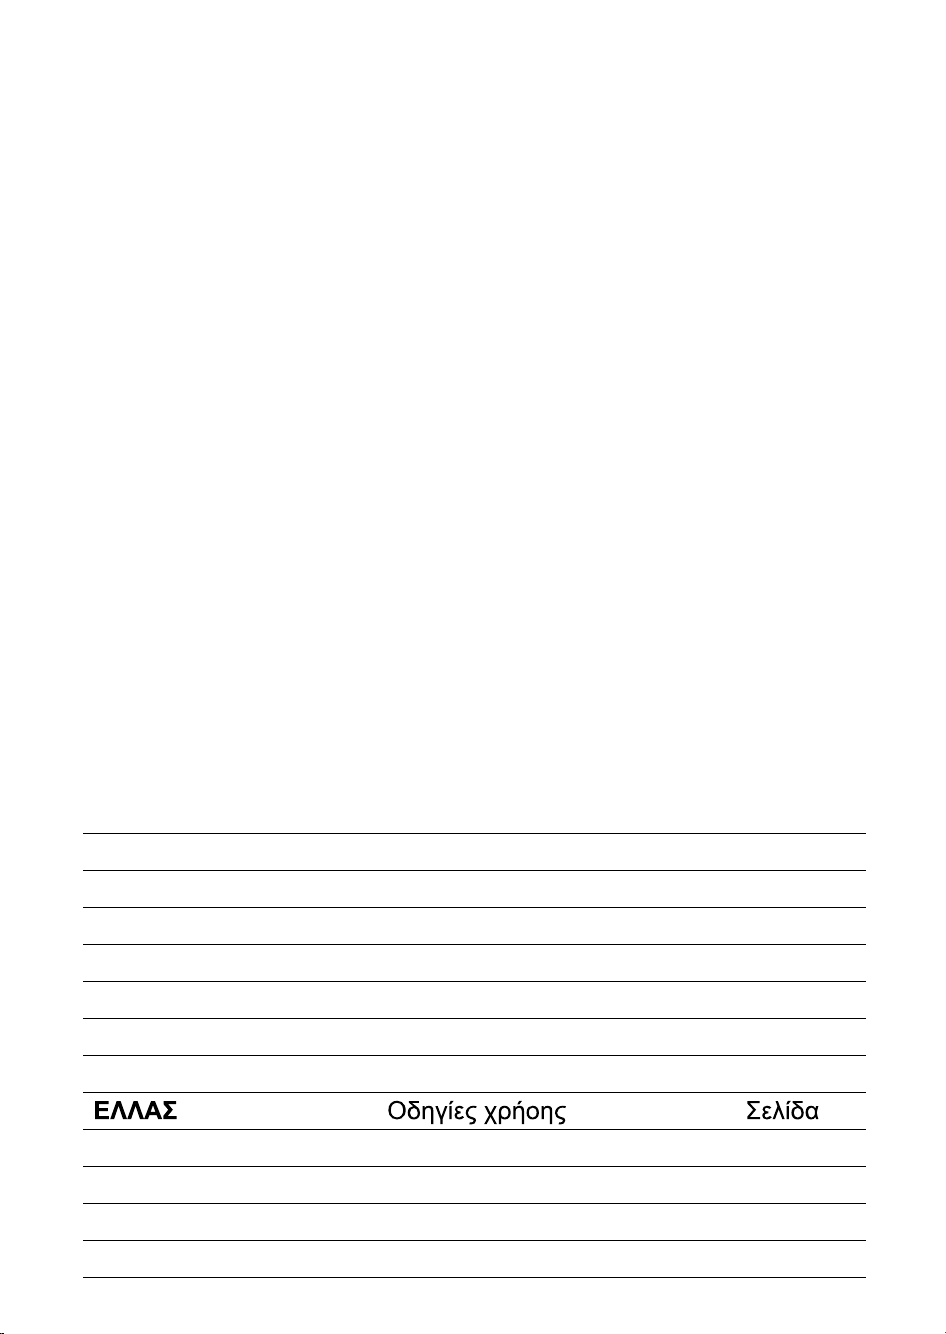
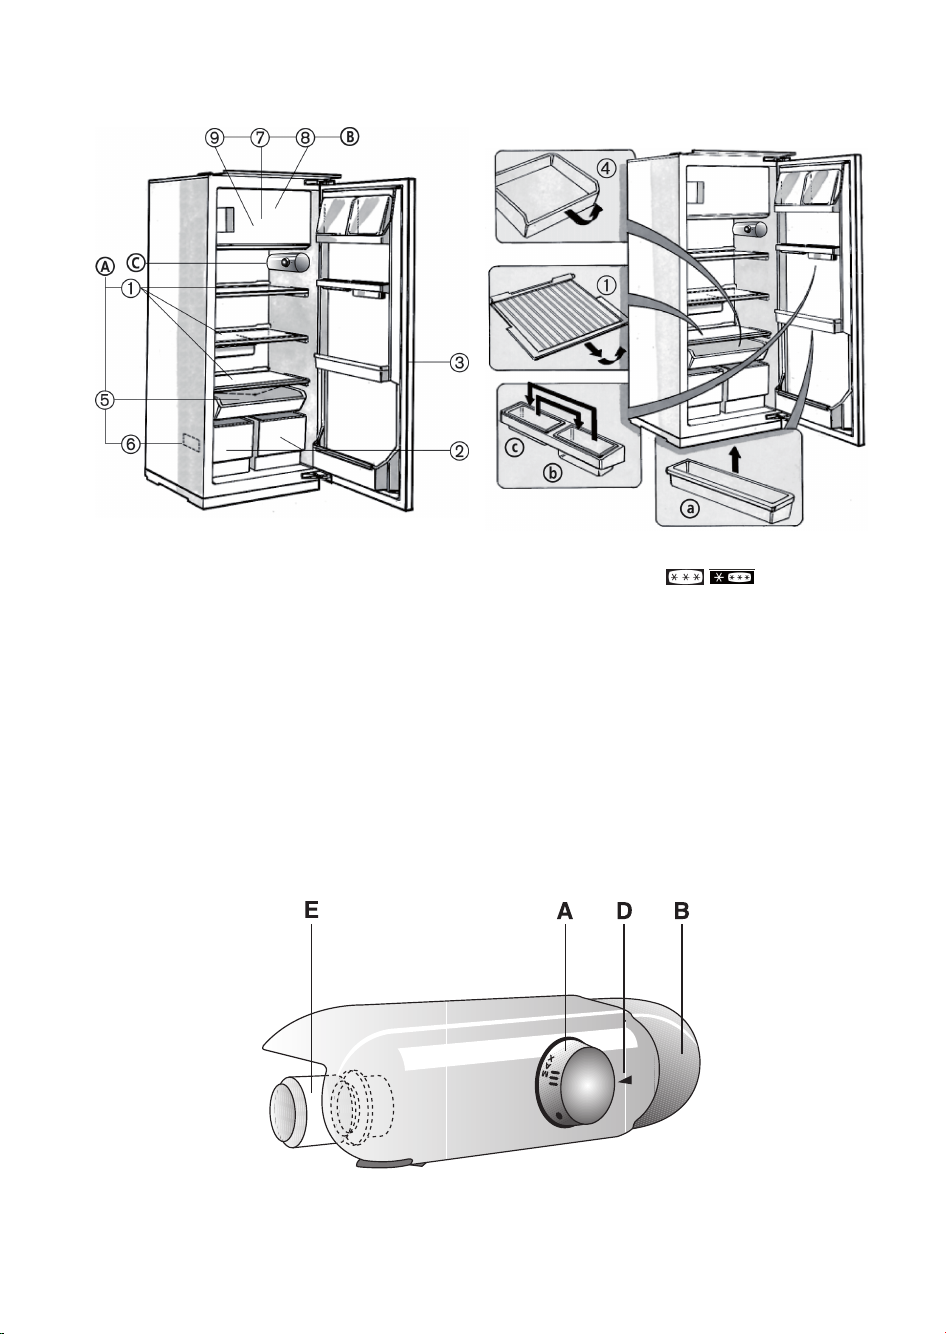
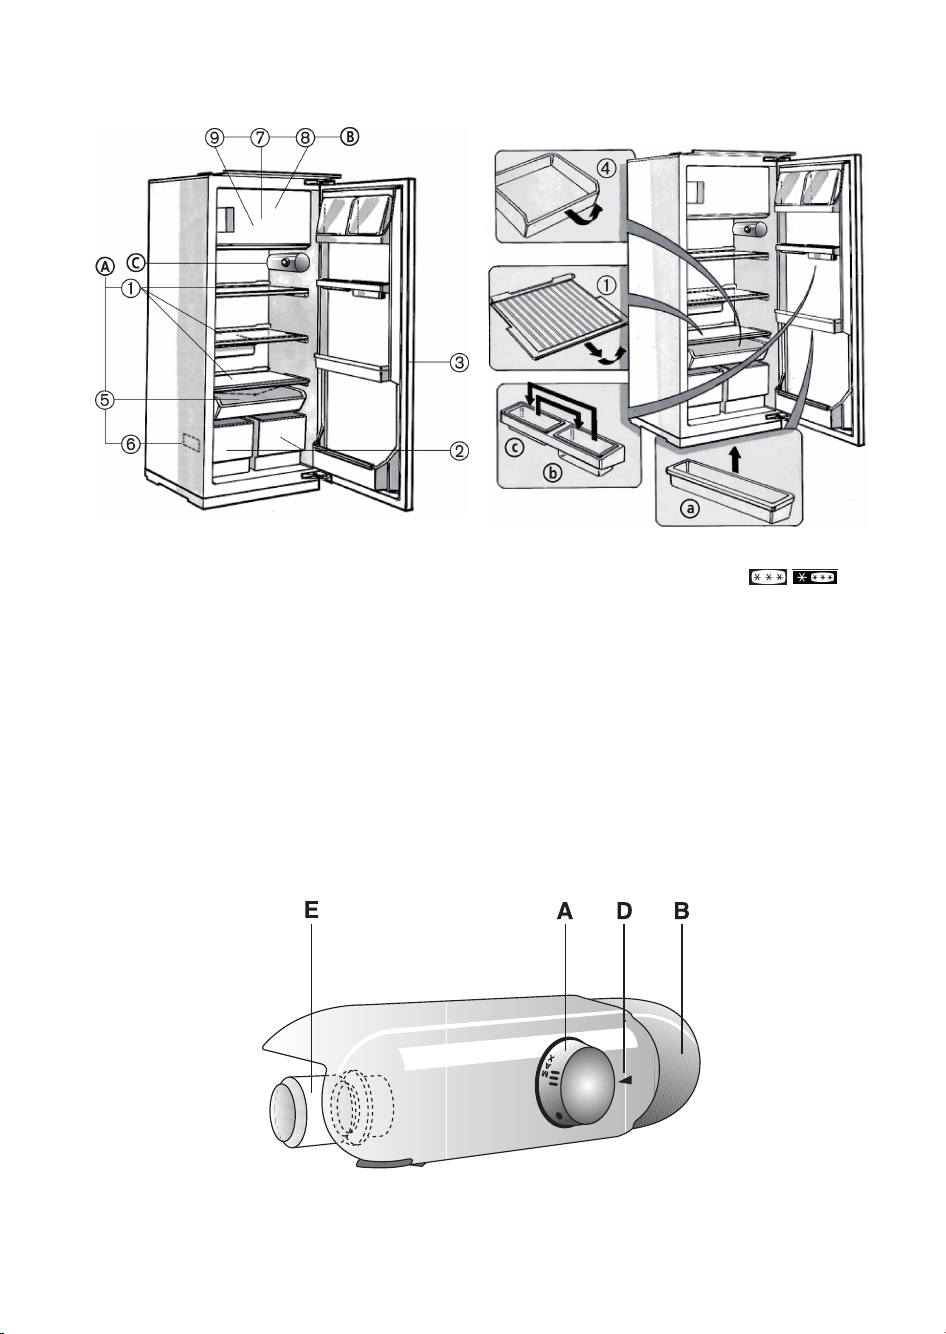
GERÄTEBESCHREIBUNG
A) Kühlraum
(zur Aufbewahrung von frischen Lebensmitteln)
Abstellflächen (zum Teil höhenverstellbar)
1.
Obst- und Gemüsefächer
2.
Innentür Kühlteil mit:
3.
(falls eingebaut:)
a. Verstellbare Fächer
b. Oberer Innentürbehälter
c. Unterer Innentürbehälter
Schale (nach oben ausziehbar) (falls eingebaut)
4.
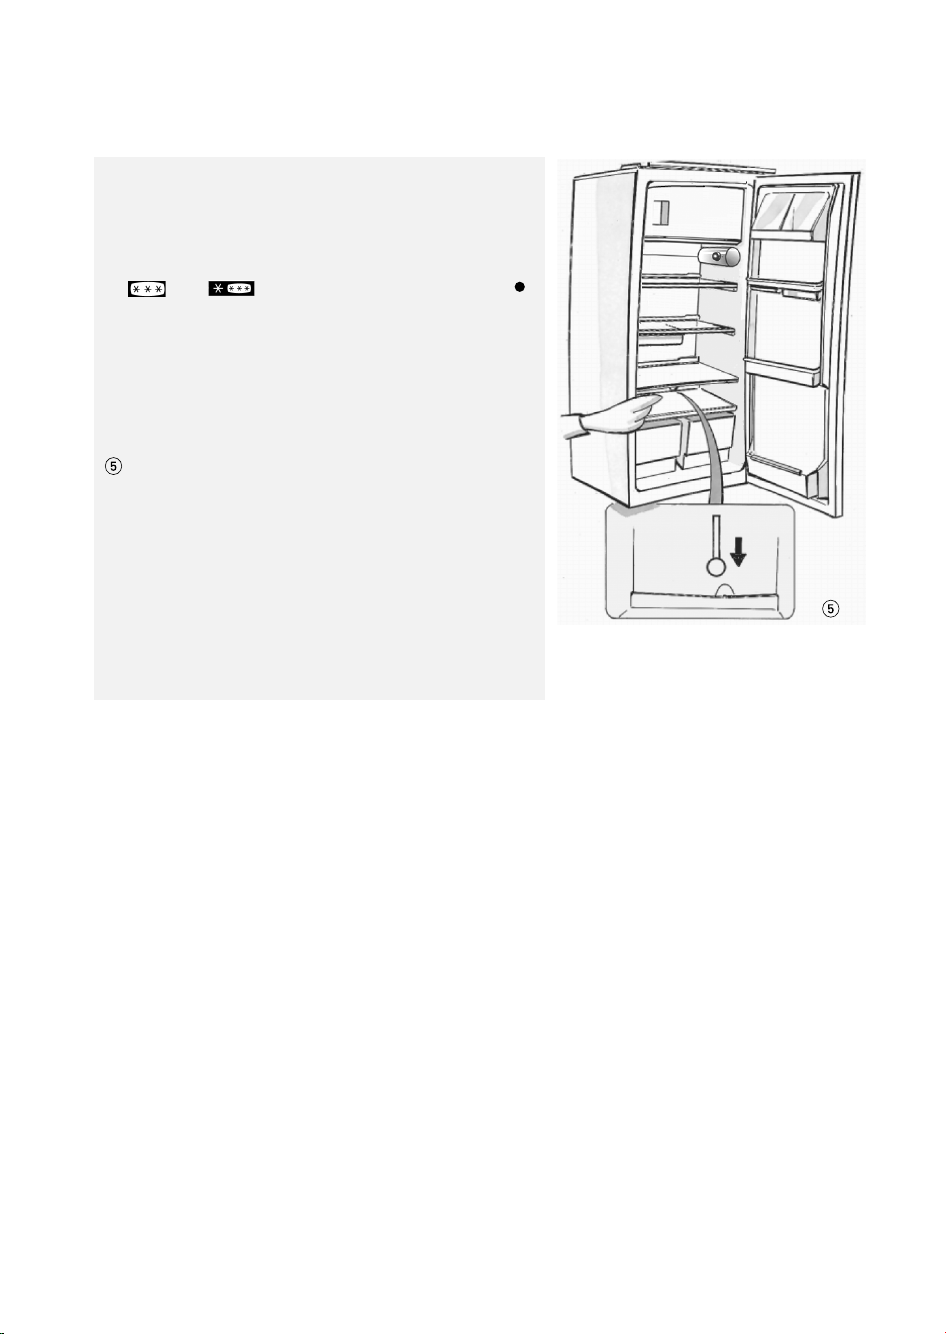
Tauwasserauffang
5.
Typenschild
6.
BEDIENUNG
B) Gefrierfach (falls eingebaut)
(mit dem Symbol gekennzeichnet,
für das Einfrieren frischer Lebensmittel, die
Aufbewahrung von Tiefkühlkost und die
Eiswürfelerzeugung
Rost (auf der Abbildung nicht sichtbar, falls
7.
verfügbar)
Einfrierbereich
8.
Eiswürfelschalen
9.
C) Bedienung
Thermostatknopf
A.
Lichttaste
B.
Thermostat-Anzeigekerbe
D.
Glühlampe/LED - Lampe
E.
4
BENUTZUNG DES KÜHLTEILS
Dieses Gerät ist ein Kühlschrank mit Sterne Gefrierfach.
Oder ist ein Kühlschrank mit Sterne - Gefrierfach.
Die Leistungen des Gerätes sind optimal, wenn die
Umgebungstemperatur zwischen +10°C und +38°C liegt.
Inbetriebnahme des Gerätes
Wenn der Netzstecker in der Steckdose steckt und der
Temperaturregler
sich die Innenbeleuchtung jedes Mal, wenn die Tür geöffnet wird,
ein.
Sobald die Temperatur – wie im folgenden Kapitel beschrieben
eingestellt ist, – ist das Gerät betriebsbereit.
Temperatureinstellung
- Zur Änderung der Temperatur im Kühlraum den
Thermostatknopf wie folgt drehen:
• auf niedrigere Zahlen
Kühlraumtemperatur erwünscht ist;
• auf
3-4/MED
wünschen;
• auf höhere Zahlen
sein soll.
Thermostat auf
Innenbeleuchtung sind unterbrochen.
Hinweis
Die Raumtemperatur, die Häufigkeit der Türöffnungen und der
Aufstellungsort des Geräts können die Innentemperatur des
Kühlgeräts beeinflussen. Bei der Temperatureinstellung müssen
diese Faktoren berücksichtigt werden.
Bitte beachten
• Die Einstellung des Thermostats
:
des Geräts, der Umgebungstemperatur und der Häufigkeit der
Türöffnungen ab.
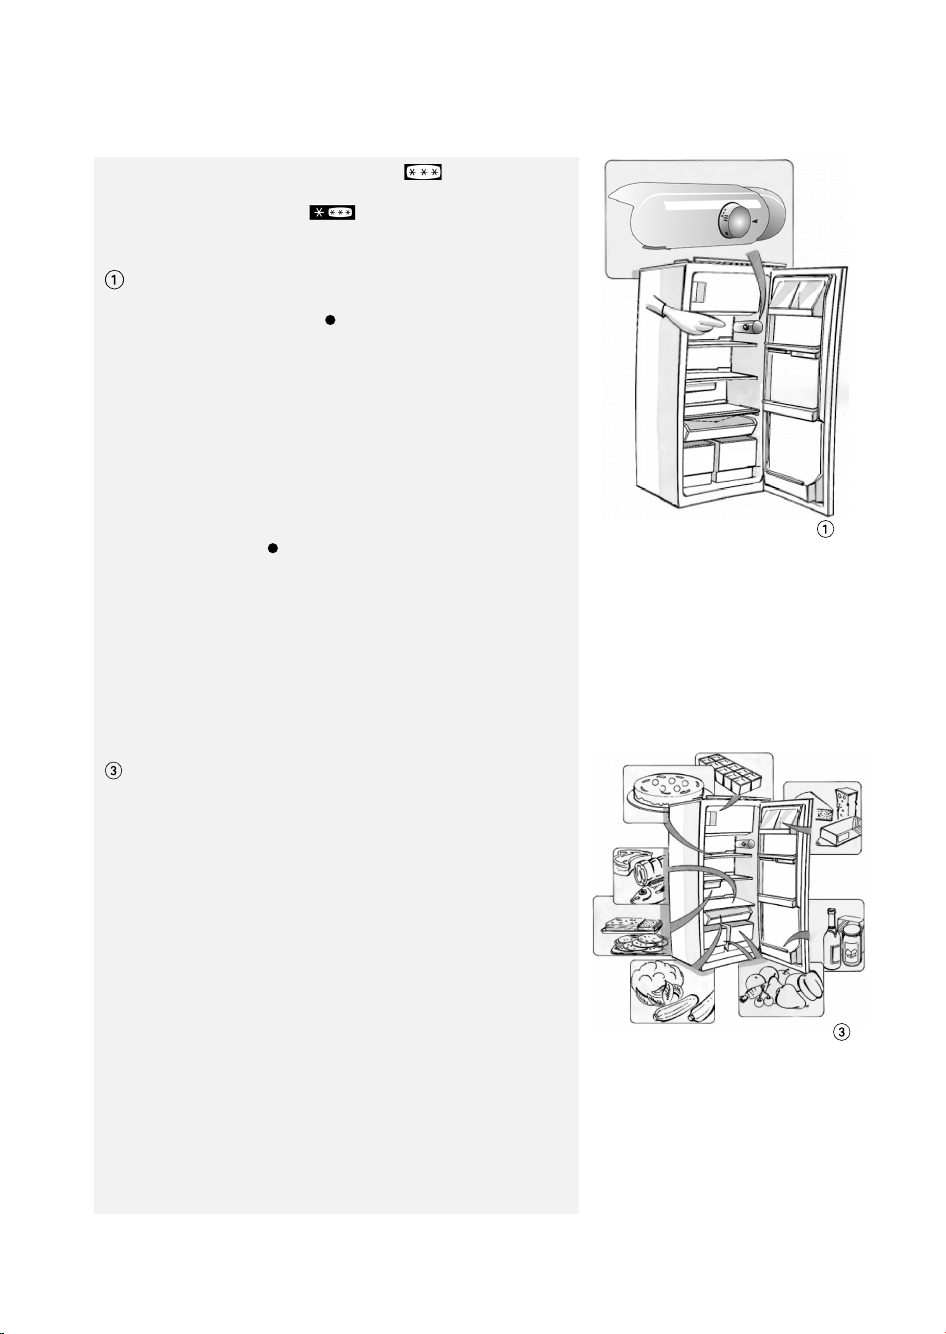
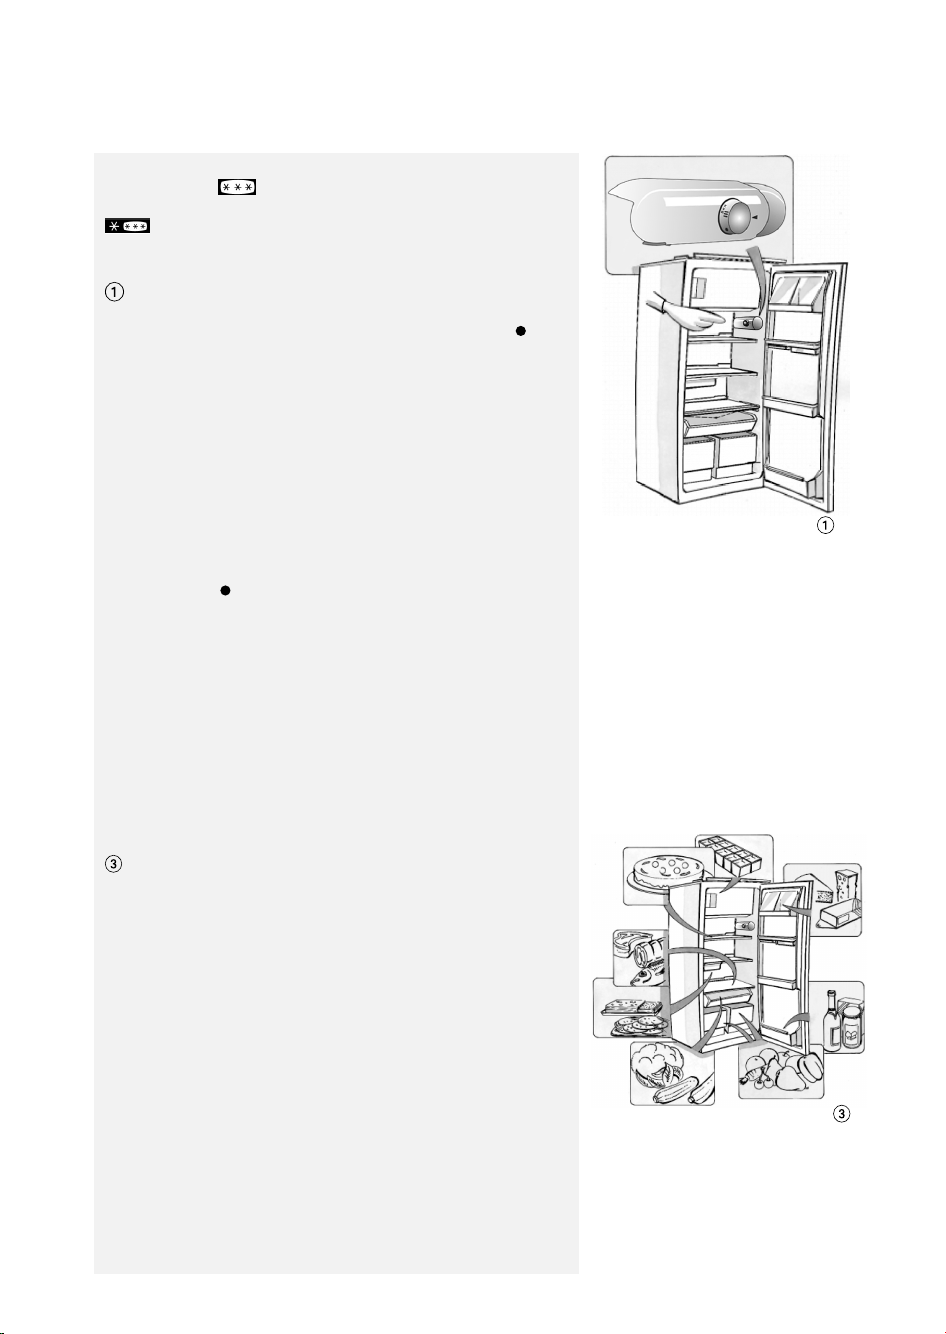
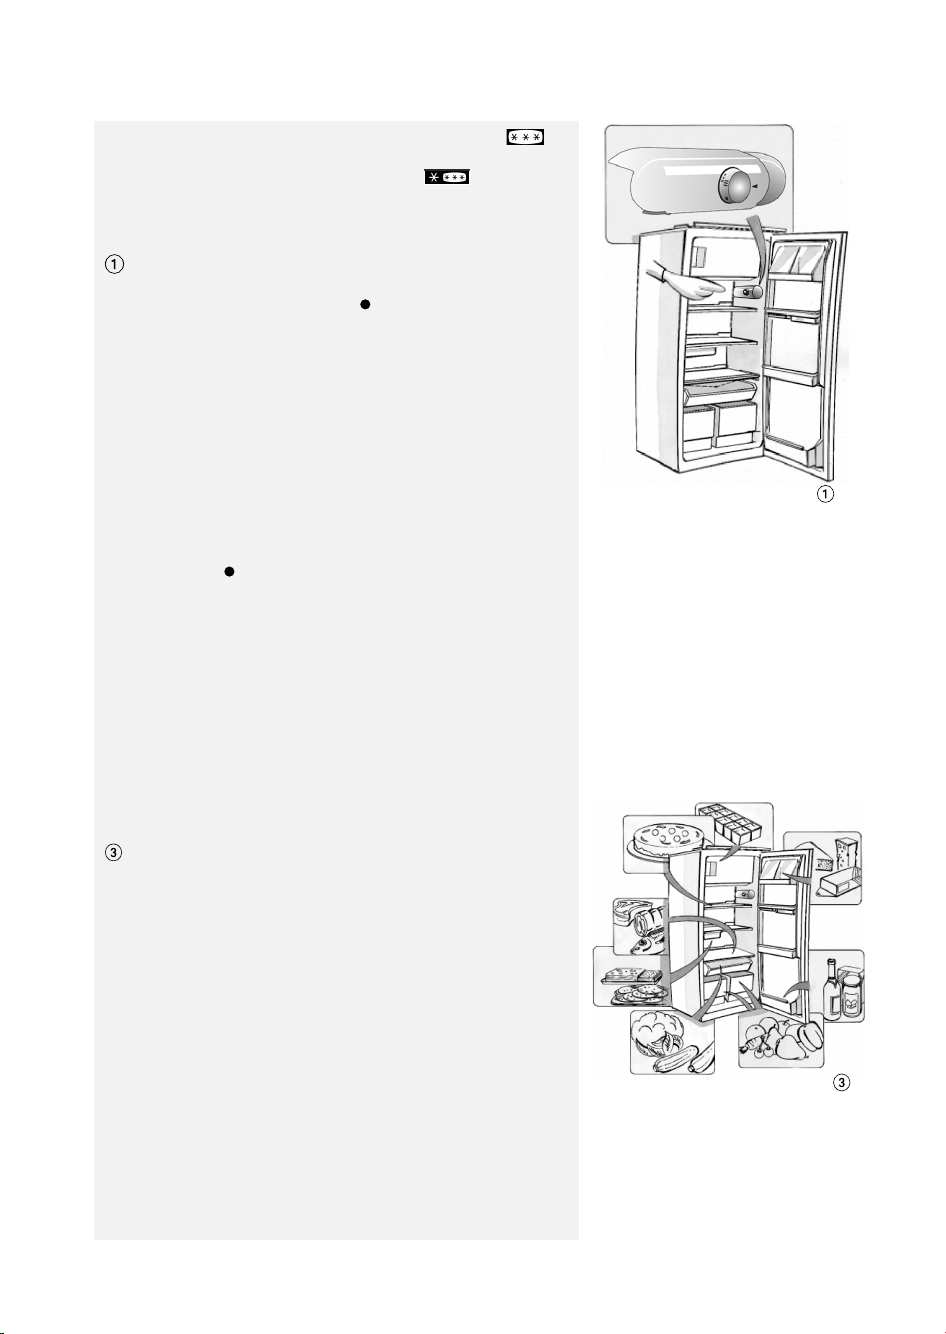
Aufbewahrung von Lebensmitteln im Kühlraum:
Lagern Sie die Lebensmittel wie auf der Abbildung gezeigt ein:
Gekochte Speisen
1.
Milchprodukte, Konserven, Käse, Butter
2.
Fisch, Fleisch
3.
Aufschnitt
4.
Obst, Gemüse, Salate
5.
Kleine Konserven, Eier
6.
Tuben, kleine Konserven
7.
Kleine Flaschen
8.
Flaschen
9.
Hinweis
• Die Speisen immer zudecken, um sie vor dem Austrocknen zu
• Heiße Speisen müssen auskühlen, bevor sie in den Kühlschrank
• Sorgen Sie für eine freie Luftzirkulation zwischen den
Das Abtauen des Kühlraums erfolgt vollautomatisch.
:
bewahren.
gegeben werden.
Lebensmitteln im Kühlraum.
nicht auf das Symbol
(1)
1-2/MIN
, wenn Sie eine
5-7/MAX
: die Gerätefunktionen und die
, falls eine
MITTLERE
, wenn die Temperatur
hängt vom Aufstellungsort
(1)
gestellt ist, schaltet
WENIGER TIEFE
Temperaturstufe
KÄLTER
5
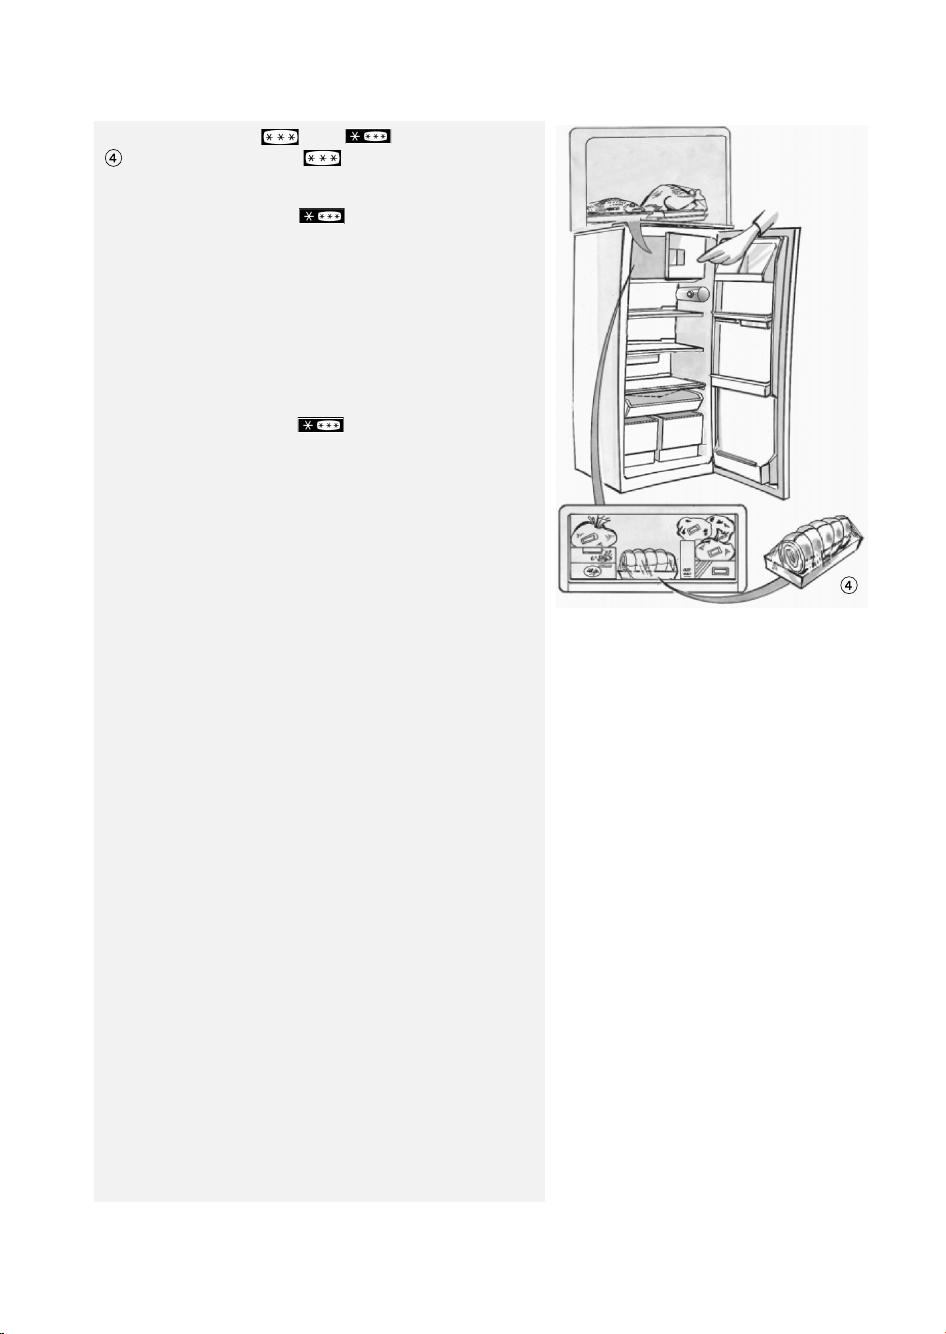
BENUTZUNG DES GEFRIERFACHS
Nur für Geräte mit oder :
Wenn das Gefrierfach Sterne hat, können Sie
darin bereits eingefrorene Lebensmittel
aufbewahren.
Wenn das Gefrierfach Sterne hat, können Sie
darin bereits eingefrorenen Lebensmittel
monatelang aufbewahren und außerdem frische
Lebensmittel einfrieren. Auf dem Typenschild (siehe
Abschnitt “Gerätebeschreibung”, Pos. 6) ist die
Menge frischer Lebensmittel, die innerhalb von 24
Stunden eingefroren werden kann, angegeben.
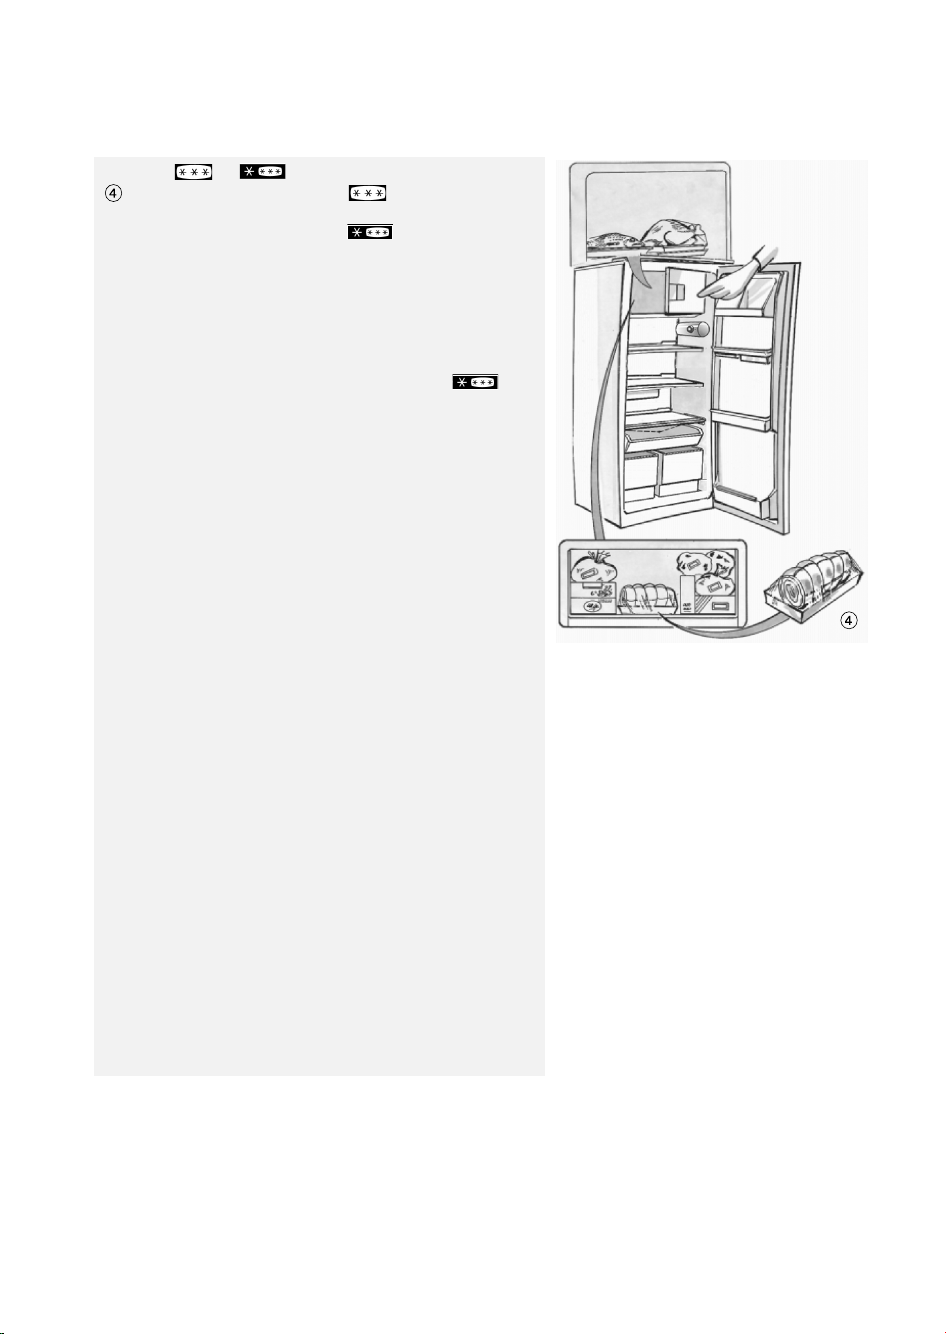
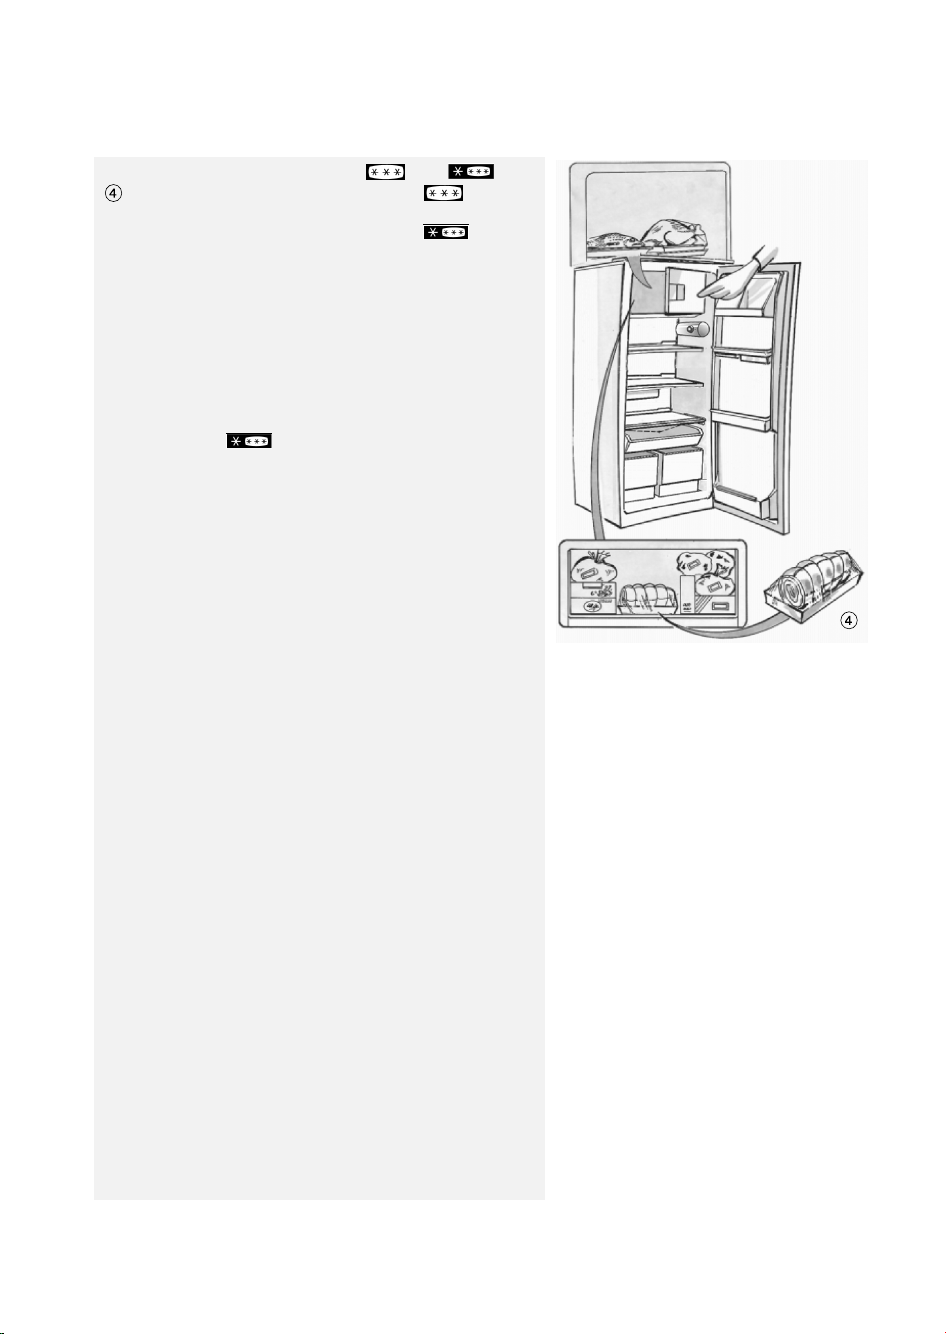
Einfrieren von Lebensmitteln
• Stellen Sie den Thermostat
• Legen Sie die einzufrierenden Lebensmittel in das
Gefrierfach mit Sternen .
• Bereits tiefgefrorene Speisen dürfen nicht mit den
einzufrierenden Lebensmitteln in Berührung kommen
(Mindestabstand ca. 20 mm).
• Stellen Sie nach 24 Stunden den Thermostat
auf die Normalposition.
Bitte beachten:
Wickeln Sie die einzufrierenden Lebensmittel ein oder
verschließen Sie dieselben in Behältern:
• Aluminium- oder Klarsichtfolie, wasserundurchlässige
Kun
ststoffverpackungen, Polyäthylenbehälter mit Deckel,
Tiefkühlbehälter.
Beim Einkaufen von Tiefkühlware auf Folgendes
achten:
• Die Verpackung darf nicht beschädigt sein, da sonst der
Inhalt leicht ungenießbar werden könnte. Wenn die
Verpackung aufgebläht ist oder feuchte Flecken aufweist,
ist das Produkt nicht optimal gelagert worden und der
Inhalt könnte angetaut sein.
• Für den Transport stets Kühltaschen verwenden.
• Die Tiefkühlware als letztes in den Korb legen.
• Die Tiefkühlware zu Hause sofort ins Gefrierfach legen.
• Angetaute Tiefkühlware nie wieder einfrieren, sondern
innerhalb von 24 Stunden verwerten.
• Temperaturschwankungen vermeiden bzw. auf ein
Minimum reduzieren.
Das auf der Verpackung angegebene Verfa
beachten.
• Für die Konservierung von Tiefkühlware stets die
Anweisungen auf der Verpackung befolgen.
Herstellen von Eiswürfeln
• Füllen Sie die Eiswürfelschale
stellen Sie sie ins Gefrierfach.
• Lösen Sie festgefrorene Schalen bitte nur mit einem
Löffelstiel.
Verwenden Sie keine spitzen oder scharfen
Gegenstände.
auf die Position
(1)
sdatum
ll
zu 3/4 mit Wasser und
(9)
3-4
(1)
.
wieder
6
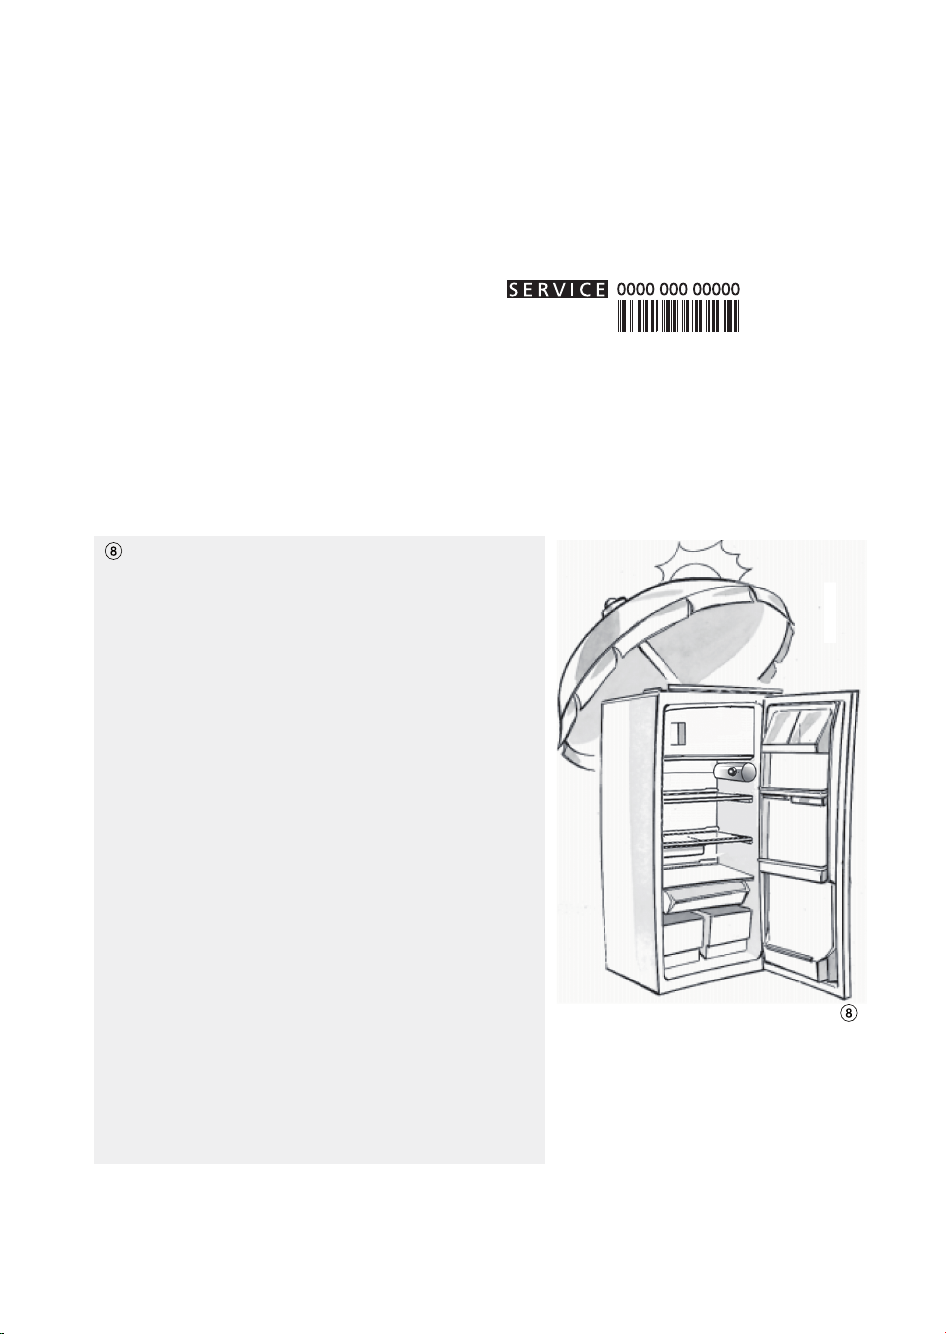
ABTAUEN UND REINIGEN DES
KÜHLSCHRANKS
Vor jeder Reinigungs- und Wartungsarbeit den
Netzstecker ziehen oder die Stromversorgung
abschalten. Es wird empfohlen, das Gefrierfach dann
abzutauen, wenn sich an den Wänden eine Eisschicht
von 3 mm gebildet hat.
• Entnehmen Sie alle Lebensmittel aus dem Gefrierfach mit
• Tiefkühlware in Zeitungspapier (oder in eine Decke)
• Reinigen Sie das Gefrierfach mit einem Schwamm und
• Sorgfältig nachspülen und trocken reiben.
• Der Kühlteil taut automatisch ab.
Nach der Reinigung den Stromanschluss des Geräts
wieder herstellen.
Keine Scheuermittel verwenden.
Bei längerer Abwesenheit.
• Entleeren Sie Kühl- und Gefrierraum.
• Gerät vom Stromnetz abschalten.
• Das Gerät abtauen und Innenraum reinigen.
• Die Türen offen lassen, um unangenehme Geruchsbildung
oder und drehen Sie den Thermostat auf
einwickeln und eng aneinander an einen kühlen Ort
bringen.
lauwarmem Wasser und/oder einer Lösung aus
Neutralreiniger.
Die Abflussöffnung regelmäßig reinigen, damit das
Tauwasser konstant und ungehindert abfließen kann.
zu vermeiden.
.
7

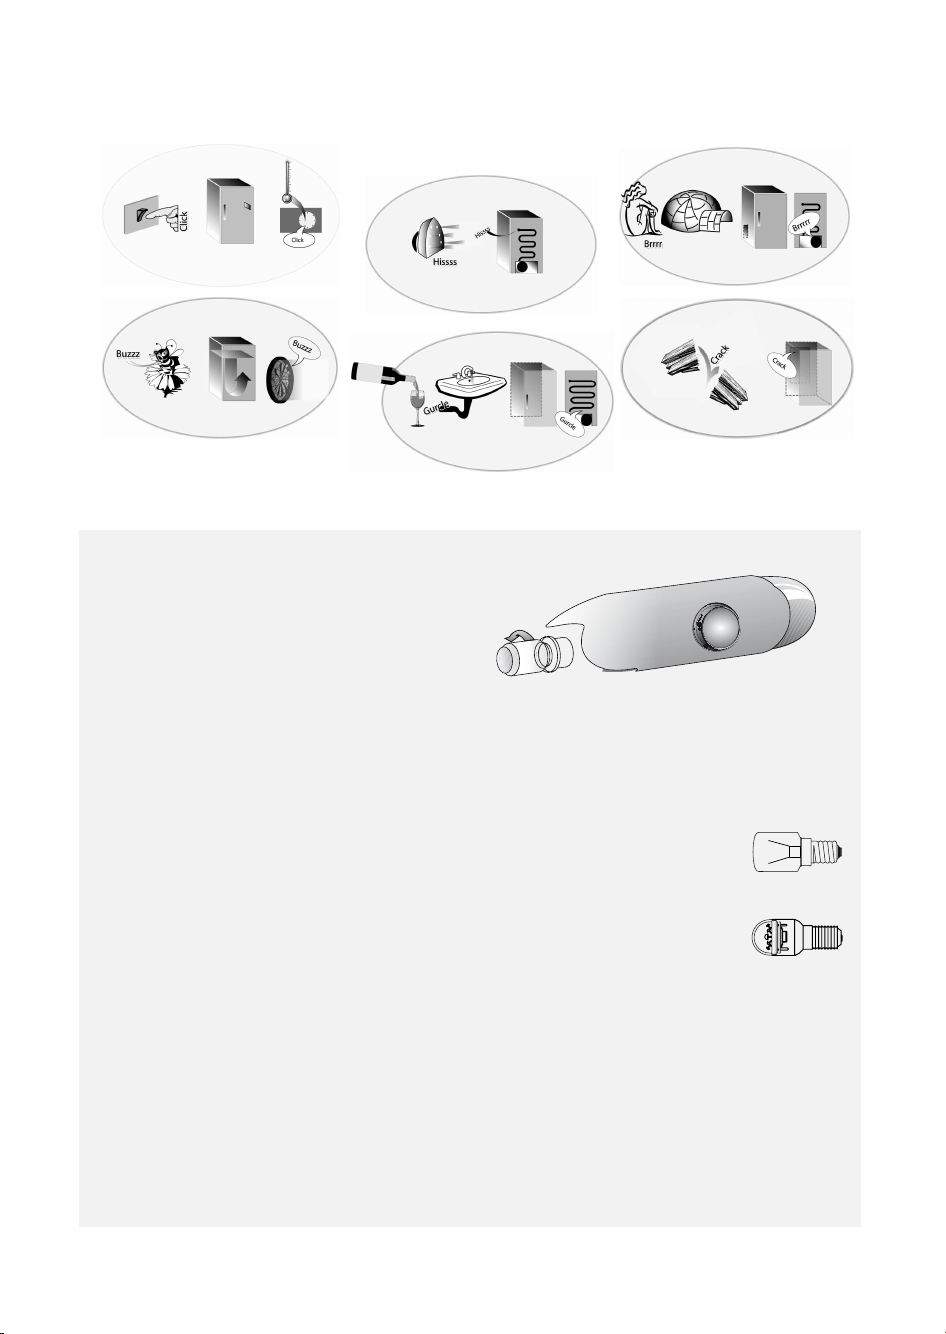
STÖRUNG - WAS TUN
Wenn Sie diese Geräusche hören
..dann entspannen Sie sich: das ist ganz normal!!!
1. Die Temperatur in den Gerätefächern ist nicht tief
genug.
• Wird das Schließen der Tür durch falsch gelagerte
Lebensmittel verhindert?
• Ist der Thermostat richtig eingestellt?
• Wird die Luftzirkulation behindert?
2. Die Temperatur im Kühlteil ist zu tief.
• Ist der Thermostat richtig eingestellt?
y
3. Das Gerät verursacht ein zu lautes
Betriebsgeräusch.
• Wurde das Gerät fachgerecht installiert?
• Berühren sich die Leitungen an der Geräterückseite
oder vibrieren sie?
• Es ist normal, dass man das Geräusch des Kältekreises
hört.
4. Das Gerät funktioniert nicht?
• Liegt ein Stromausfall vor?
• Ist der Netzstecker richtig angeschlossen?
• Ist der Zweipolschalter eingeschaltet?
• Funktionieren die Schutzvorrichtungen des
Hausstromnetzes korrekt?
• Ist das Stromkabel beschädigt?
5. Wasser steht auf dem Boden des Kühlraums.
• Ist der Thermostat richtig eingestellt?
• Ist der Tauwasserabfluss verstopft?
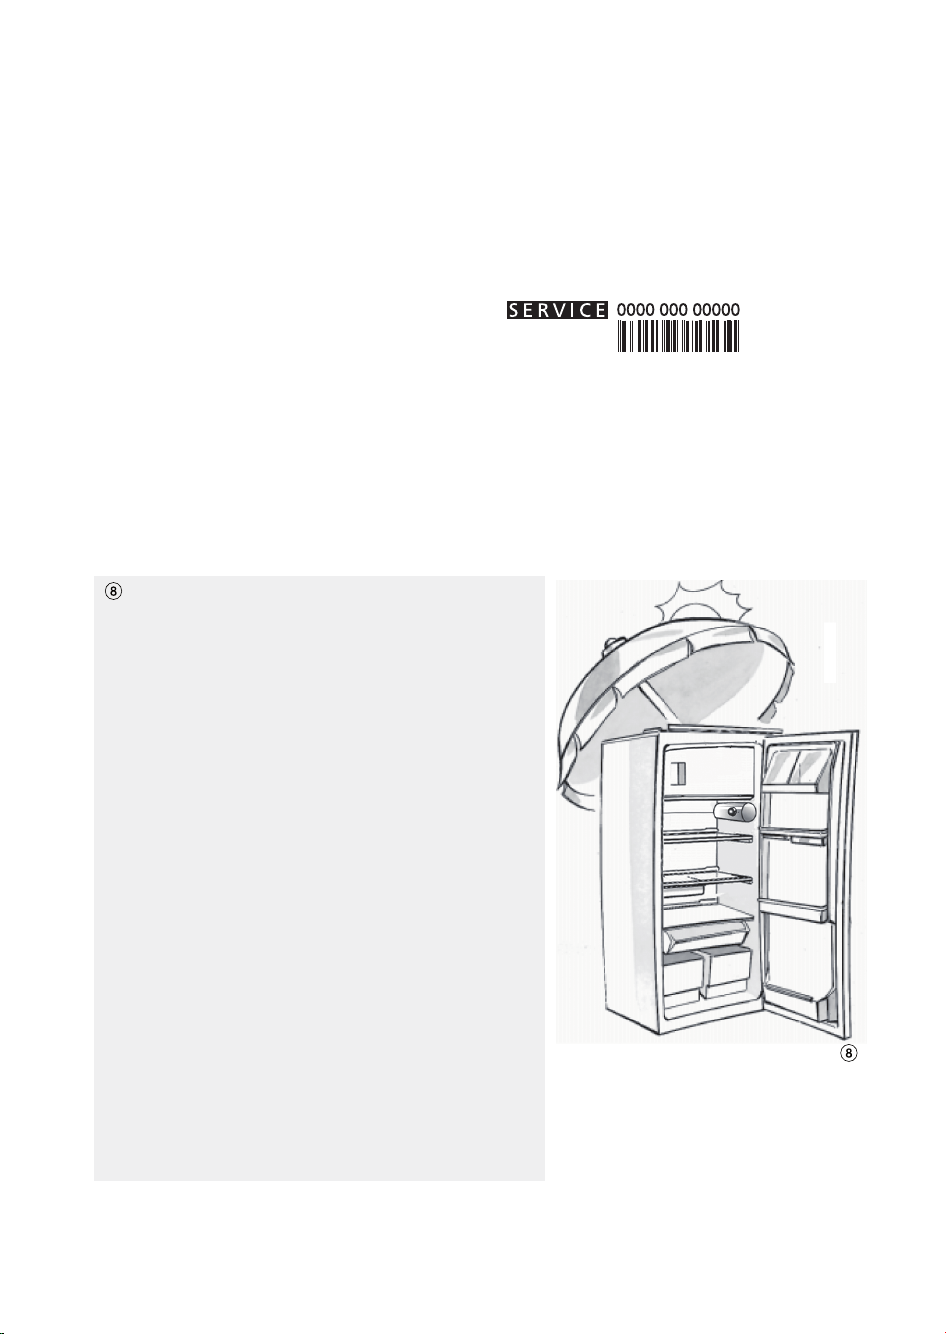
6. Die Innenbeleuchtung funktioniert nicht.
Punkt 4 prüfen, dann:
• Das Gerät vom Stromnetz trennen, die Lampe
kontrollieren und ggf. durch eine neue ersetzen.
- Konventionelle Glühlampe
(max 25W)
Oder
- LED - Lampe
(mit denselben Merkmalen),
die nur beim Kundendienst erhältlich ist.
• Entfernen der Lampe: Drehen Sie die Glühlampe wie in
der Abbildung gegen den Uhrzeigersinn heraus.
8
y Zuerst
KUNDENDIENST
Bevor Sie den Kundendienst rufen:
Erst prüfen, ob Sie die Störung selbst beheben
1.
können (siehe “Störung - Was tun”).
Schalten Sie das Gerät nochmals ein, um zu prüfen,
2.
ob die Störung immer noch vorliegt. Haben Sie
keinen Erfolg, schalten Sie das Gerät aus und
wiederholen Sie den Versuch nach einer Stunde.
Bleibt das Ergebnis negativ, benachrichtigen Sie
3.
den Kundendienst.
Geben Sie bitte folgende Daten an:
•
•
•
•
•
Hinweis:
Der vom Kundendienst ausgeführte
Türanschlagwechsel fällt nicht unter die
Garantieleistung.
INSTALLATION
Den Gefrierschrank fern von Wärmequellen aufstellen.
Installationen in warmen Räumen, in der Nähe von
Wärmequellen (Heizungen, Öfen) oder die direkte
Sonnenlichteinstrahlung erhöhen den Stromverbrauch
und sollten deshalb zu vermieden werden.
Falls dies nicht möglich ist, müssen folgende
Mindestabstände eingehalten werden:
30 cm von Kohle- oder Ölöfen
3 cm von Elektroherden.
• Das Gerät an einem trockenen und gut belüfteten Ort
aufstellen.
• Das Geräteinnere reinigen (siehe Abschnitt “Abtauen und
Reinigen des Kühlschranks”).
• Das Zubehör einsetzen.
• Überprüfen Sie die Türdichtung, vor allem nach der
Montage und nach einem eventuellen
Türanschlagwechsel.
Elektrischer Anschluss
• Vergewissern Sie sich, dass die auf dem Typenschild
angegebene Spannung mit der Netzspannung Ihrer
Wohnung übereinstimmt.
• Die Erdung des Gerätes ist gesetzlich vorgeschrieben. Der
Hersteller haftet nicht für eventuelle
Personenverletzungen oder
Nichtbeachtung der vorgenannten Vorschriften
entstehen sollten.
• Falls Stecker und Steckdose nicht vom selben Typ sind, die
Steckdose von einer Fachkraft auswechseln lassen.
• Keine Verlängerungskabel, Mehrfachsteckdosen oder
Adapter verwenden.
äden, die aus der
Sachsch
Art der Störung,
das Gerätemodell,
die Servicenummer (die Nummer hinter dem Wort
SERVICE auf dem Typenschild im Geräteinnern),
Ihre vollständige Anschrift,
Ihre Telefonnummer mit Vorwahl.
9

PRODUCT DESCRIPTION
A) Refrigerator compartment
(for storage of fresh food and beverages)
Shelves (partly height adjustable)
1.
Crispers
2.
Refrigerator inner door with:
3.
(if supplied)
a. Adjustable door trays
b. Top door tray
c. Bottom door tray
Drawer (telescopic extraction) (if supplied)
4.
Pull-out defrost water drain
5.
Rating plate
6.
CONTROLS
B) Freezer compartment (if supplied)
(marked with the symbol for storing
fresh food, frozen food and making ice cubes)
Grid (not shown in the figure, if available)
7.
Freezer section
8.
Ice cube trays
9.
C) Controls
Thermostat knob
A.
Li
ght switch
B.
Thermostat control reference
D.
Light bulb/LED bulb
E.
10
HOW TO OPERATE THE REFRIGERATOR
COMPARTMENT
This appliance is a refrigerator with a star freezer
compartment.
OR is a refrigerator with a star freezer compartment.
Optimal appliance performance is obtained at ambient
temperatures between +10°C and +38°C.
Switching on the appliance
Once the power plug is inserted in the mains socket, unless the
thermostat
time the door is opened.
Once the temperature has been set – see next chapter – the
appliance is ready for use.
Adjusting the temperature
- To adjust the temperature in the compartment, turn the
thermostat control knob:
• to lower numbers
temperatures;
• to
3-4/MED
• to
5-7/MAX
Thermostat setting on
:
Note
The ambient air temperature, frequency of door opening and the
position of the appliance can affect internal temperatures. These
factors must be taken into account when setting the thermostat.
Important
• Thermostat adjustment
appliance is installed, ambient temperature and frequency of
door opening.
How to use the refrigerator compartment:
Position the food as illustrated in the figure:
Cooked food
1.
Dairy products, preserves, cheese, butter
2.
Fish, meat
3.
Sliced cold meat
4.
Fruit, vegetables, salad
5.
Small jars, eggs
6.
Tubes, small jars
7.
Small bottles
8.
Bottles
9.
:
Note
• Cover food to prevent it drying out.
• Hot food must be allowed to cool properly before being placed
in the refrigerator.
• Make sure sufficient space is left for air to circulate around the
food.
Defrosting of the refrigerator compartment is completely
automatic.
is set to symbol
(1)
1-2/MIN
for a
MEDIUM
for the
the inside light switches on each
for the
LEAST COLD
temperature;
COLDEST
: no operation, no light.
(1)
temperature.
will depend on where the
internal
11
HOW TO OPERATE THE FREEZER
COMPARTMENT
Only for or appliances:
Appliances with the symbol can be used to
store already frozen food.
Appliances with the symbol can be used to
store food for months and also to freeze food. The
amount of fresh food (in kg) that can be frozen in 24
hours is indicated on the appliance rating plate
(see paragraph “Product description”, point 6).
Freezing food
• Set the thermostat knob
• Arrange the food to be frozen centrally in the
freezer compartment.
• Avoid contact between already frozen food and food that
has yet to be frozen (approx. 20 mm distance).
• After 24 hours turn the thermostat knob
normal position.
Important:
Wrap and seal the food in:
• Aluminium foil, cling film, watertight plastic bags,
polythene containers with lids or special freezer
containers.
When purchasing frozen food products:
• Ensure that the packaging is not damaged
damaged packaging may have deteriorated). If the package
is swollen or has damp patches, it may not have been
stored under optimal conditions and defrosting may have
already begun.
• Transport products in a thermally insulated cool bag.
• When shopping, leave frozen food purchases until last.
• Once at home, place the frozen foods immediately in the
freezer.
• If food has defrosted even partially, do not re-freeze it.
Consume within 24 hours.
• Avoid subjecting foods to temperature variations.
Observe the "best before" date on the package.
• Always observe the storage information on the package.
Making ice cubes
• Fill the ice cube trays
the bottom of the freezer compartment.
• Use a spoon handle to remove i
to the compartment.
Do not use sharp or pointed instruments.
to
(1)
3/4 with water and place them at
(9)
.
3-4
back to the
(1)
(frozen
cube trays which stick
ce
food in
12

HOW TO DEFROST AND CLEAN THE
APPLIANCE
Before carrying out any maintenance or cleaning
operations, unplug the appliance from the mains
socket. Defrost the freezer compartment when the ice
on the walls reaches a thickness of 3 mm.
• Remove foodstuffs from the or freezer and
turn the thermostat knob to
• The frozen food must be wrapped in sheets of newspaper
(or a cover) and kept in a cool place.
• Clean the freezer compartment using a sponge dampened
in a solution of lukewarm water and/or neutral detergent.
• Rinse and dry carefully.
• Defrosting of the refrigerator compartment is fully
automatic.
Clean the defrost water drain outlet regularly in order to
ensure that defrost water is removed correctly.
After cleaning, reconnect the appliance to the power
supply.
Do not use abrasive products.
Prolonged disuse.
• Empty the compartments.
• Disconnect the appliance from the mains power supply.
• Defrost and clean.
• Leave the doors open to prevent formation of unpleasant
odours.
.
13

TROUBLESHOOTING GUIDE
When you hear these noises
1. Temperature inside the compartments is not low
enough.
• Is food preventing the doors from closing properly?
• Is the thermostat setting correct?
• Are the air circulation vents blocked?
..your appliance is alive!!!
2. Temperature inside the refrigerator compartment
is too low.
• Is the thermostat setting correct?
3. The appliance is excessively noisy.
• Has the appliance been installed correctly?
• Are the pipes at the back touching or vibrating?
• It is normal to hear the noise of the refrigerant liquid in
circulation.
4. The appliance is not working?
• Is there a power failure?
• Is the plug properly inserted in the socket?
• Is the double-pole switch on?
• Do the household electrical system protection devices
work correctly?
• Is the power cord damaged?
5. Water collects at the bottom of the refrigerator
compartment.
• Is the thermostat setting correct?
• Is the defrost water drain blocked?
y
6. The inside light is not working.
checks for point 4, and then:
• Disconnect the appliance from the power supply, check
the light bulb and, if necessary, replace it with a new
one:
- traditional light bulb
(max 25W)
Or
- LED bulb
(with the same characteristics),
only available from the After-Sales Service
• Removing the light bulb: Unscrew the bulb
anticlockwise as shown in the figure.
y Perform the
14

AFTER-SALES SERVICE
Before contacting After-Sales Service:
See if you can solve the problem yourself with the
1.
help of the “Troubleshooting guide”).
Switch the appliance on again to see if the problem
2.
has been solved. If it has not, disconnect the
appliance from the power supply and wait for
about an hour before switching on again.
If the problem persists after this course of action,
3.
contact After-sales Service.
Specify:
•
•
•
•
•
Note:
The direction of door opening can be changed.
If this operation is performed by After-sales
Service it is not covered by the warranty.
INSTALLATION
Install the freezer away from heat sources.
Installation in a hot environment, direct exposure to the
sun or installation near heat sources (heaters, radiators,
cookers) will increase power consumption and should
therefore be avoided.
If this is not possible, the following minimum distances
must be respected:
30 cm from coal or paraffin stoves
3 cm from electric stoves.
• Install the appliance in a dry, well-ventilated place.
• Clean the interior (see “How to defrost and clean the
appliance”).
• Fit the accessories.
• Check the door seal is not damaged or deformed,
especially after installation or reversal of door opening.
Electrical connection
• Ensure that the voltage indicated on the appliance rating
plate corres
• Regulations require that the appliance is earthed. The
Manufacturer declines all liabilities for injury to persons or
damage to property resulting from failure to observe these
regulations.
• If the plug and socket are not of the same type, have the
socket replaced by a qualified electrician.
• Do not use extension cables, multiple sockets or adapters.
ponds to the domestic supply voltage.
the nature of the problem,
the model,
the Service number (the number after the word
SERVICE on the rating plate on the inside of the
appliance),
your full address,
your telephone number and area code.
15
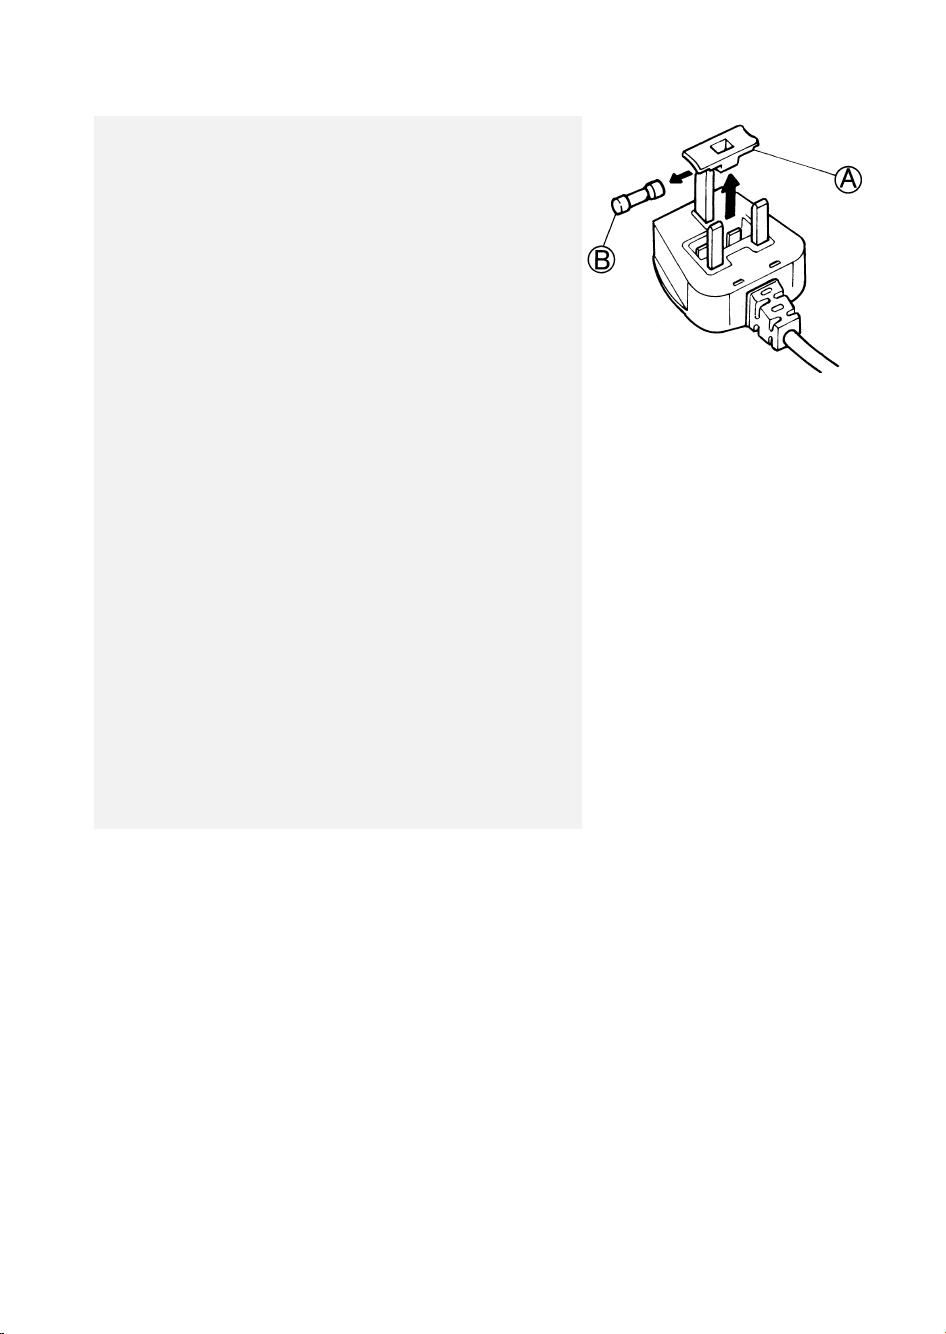
ELECTRICAL CONNECTION
1) For Great Britain only
Warning - this appliance must be earthed
Fuse replacement
If the mains lead of this appliance is fitted with a BS 1363A 13amp
fused plug, to change a fuse in this type of plug use an A.S.T.A.
approved fuse to BS 1362 type and proceed as follows:
Remove the fuse cover (A) and fuse (B).
1.
Fit replacement 13A fuse into fuse cover.
2.
Refit both into plug.
3.
Important:
The fuse cover must be refitted when changing a fuse and if the
fuse cover is lost the plug must not be used until a correct
replacement is fitted.
Correct replacement are identified by the colour insert or the
colour embossed in words on the base of the plug.
Replacement fuse covers are available from your local electrical
store.
2) For the Republic of Ireland only
The information given in respect of Great Britain will frequently
apply, but a third type of plug and socket is also used, the
2-pin, side earth type.
3) Socket outlet / plug (valid for both countries)
If the fitted plug is not suitable for your socket outlet, please
contact Whirlpool Service for further instruction. Please do not
attempt to change plug yourself. This procedure needs to be
carried out by a qualified Whirlpool technician in compliance with
the manufactures instructions and current standard safety
regulations.
16
DESCRIPTION DE L’APPAREIL
A) Compartiment réfrigérateur
(pour la conservation des aliments frais)
Clayettes (partiellement réglables en hauteur)
1.
Bacs à fruits et légumes
2.
Contre-porte réfrigérateur avec :
3.
(s’ils sont fournis)
a. Compartiments réglables
b. Balconnet supérieur
c. Balconnet inférieur
Bac (à extraction télescopique) (s’il est fourni)
4.
Orifice d’évacuation de l’eau de dégivrage
5.
Plaque signalétique
6.
COMMANDES
B) Compartiment congélateur (s’il est fourni)
(portant le symbole pour la
congélation d’aliments frais, la conservation
d’aliments surgelés et la fabrication de glaçons
Grille (non illustrée dans la figure, si elle est
7.
fournie)
n congélation
Sectio
8.
Bacs à glaçons
9.
C) Commandes
Bouton du thermostat
A.
Bouton de l’
B.
éclairage
Repère pour le réglage du thermostat
D.
Ampoule/Ampoule à LED
E.
17
COMMENT FAIRE FONCTIONNER LE
COMPARTIMENT RÉFRIGÉRATEUR
Cet appareil est un réfrigérateur avec compartiment
congélateur à étoiles.
O est un réfrigérateur avec compartiment congélateur à
étoiles.
L’appareil fonctionne dans des conditions optimales si la
température ambiante se situe entre +10°C et +38°C.
Mise en service de l’appareil
Lorsque la fiche de l’appareil est branchée dans la prise de courant,
et si le thermostat
l’éclairage intérieur s’allume à chaque ouverture de la porte.
Dès que la température a été réglée – conformément à ce qui est
décrit au chapitre suivant, – l’appareil est prêt à fonctionner.
n’est pas positionné sur le symbole
(1)
Réglage de la température
- Pour régler la température à l’intérieur du compartiment
réfrigérateur, tournez le bouton de réglage du thermostat :
• sur les numéros plus petits
température
• sur les numéros
MOYENNE
• sur les numéros plus grands
température
Thermostat sur
de même que l’éclairage.
Remarque
La température ambiante, la fréquence d’ouverture de la porte et
la position de l’appareil peuvent influer sur la température
intérieure du réfrigérateur. Les positions du thermostat doivent
varier en fonction de ces facteurs.
Attention
• Le réglage du thermostat
installé l’appareil, de la température de la pièce et de la
fréquence d’ouverture de la porte.
MOINS FROIDE
3-4/MED
;
PLUS FROIDE
: les fonctions de l’appareil sont interrompues,
:
1-2/MIN
pour obtenir une température
5-7/MAX
(1)
pour obtenir une
à l’intérieur du compartiment ;
pour avoir une
.
dépend de l’endroit où est
Conservation des aliments dans le compartiment
réfrigérateur :
Chargez les aliments comme indiqué sur la figure ci-contre :
Aliments cuits
1.
Produits laitiers, aliments en conserve, fromages, beurre
2.
Poissons, viandes
3.
Charcuterie
4.
Fruits, légumes, salades
5.
Aliments en conserve de petites dimensions, oeufs
6.
Aliments en tubes, conserves de petites dimensions
7.
Bouteilles de petites dimensions
8.
Bouteilles
9.
Remarque
• Les aliments doivent être recouverts afin d’empêcher leur
• Laissez refroidir les aliments encore chauds avant de les
• Assurez-vous que l’air circule librement entre les aliments à
Le dégivrage du compartiment réfrigérateur est
entièrement automatique.
:
déshydratation.
introduire dans le réfrigérateur.
conserver.
,
18
COMMENT FAIRE FONCTIONNER LE
COMPARTIMENT CONGÉLATEUR
Uniquement pour les appareils à ou à :
Si le compartiment congélateur est à , des
aliments déjà congelés peuvent y être conservés.
Si le compartiment congélateur est à , il est
aussi possible d’y conserver des aliments pendant
plusieurs mois et de congeler des aliments frais.
La quantité d’aliments frais qu’il est possible de
congeler en 24 heures est indiquée sur la plaque
signalétique (voir le paragraphe “Description de
l’appareil”, réf. 6).
Comment congeler des aliments
• Placez le thermostat
• Placez les aliments à congeler au milieu du compartiment
congélateur à .
• Veillez à ce que les aliments surgelés n’entrent pas en
contact avec les aliments à congeler (assurez une distance
de plus ou moins 20 mm).
• Après un délai de 24 heures, replacez le thermostat
la position normale.
Attention :
Enveloppez hermétiquement l’aliment avec :
• des feuilles de papier aluminium, une pellicule
transparente, des emballages plastiques imperméables,
des récipients en polyéthylène munis de couvercle, des
récipients adaptés à la con
Au
moment de l’achat d’aliments surgelés, vérifiez que :
• L’emballage ou le paquet sont intacts, car l’aliment peut se
détériorer. Si un paquet est gonflé ou s’il présente des
taches d’humidité, il n’a pas été conservé dans les
conditions optimales et peut avoir subi un début de
décongélation.
• Utilisez des sacs isothermes pour le transport.
• Achetez les aliments congelés en dernier lieu.
• Dès l’arrivée à la maison, mettez immédiatement les
aliments congelés dans le compartiment congélateur.
• Ne recongelez pas les aliments partiellement décongelés,
mais
consommez-les dans un délai de 24 heures.
• Évitez ou réduisez au minimum les variations de
température.
Respectez la date de péremption ind
• Suivez toujours les instructions relatives à la conservation
des aliments congelés figurant sur l’emballage.
Production de glaçons
• Remplissez le bac à glaçons
sur le fond du compartiment de congélation.
• Utilisez le manche d’une cuillère pour détacher les bacs à
glaçons s’ils restent collés au compartiment.
N’utilisez pas d’objets pointus ou tranchants.
sur la position
(1)
gélation des aliments.
aux 3/4 d’eau et posez-le
(9)
.
3-4
sur
(1)
iquée sur l’emballage.
19

COMMENT DÉGIVRER ET NETTOYER
L’APPAREIL
Avant d’entreprendre toute opération d’entretien ou
de nettoyage, débranchez l’appareil. Nous vous
suggérons de dégivrer le compartiment congélateur
lorsque la formation de glace sur les parois a atteint 3
mm d’épaisseur.
• Retirez les aliments du congélateur à ou et
positionnez le thermostat sur
• Enveloppez les aliments surgelés dans du papier journal
(ou dans une couverture) et déposez-les dans un endroit
frais, bien serrés les uns contre les autres.
• Nettoyez le compartiment congélateur à l’aide d’une
éponge imbibée d’une solution d’eau tiède et/ou de
détergent neutre.
• Rincez et essuyez avec soin.
• Le compartiment réfrigérateur se dégivre
automatiquement.
Nettoyez régulièrement l’intérieur de l’orifice
d’évacuation, afin de garantir l’écoulement correct de l’eau
de dégivrage.
Une fois le nettoyage terminé, rebranchez l’appareil.
N’utilisez pas de substances abrasives.
En cas d’absence prolongée.
• Videz les compartiments.
• Débranchez l’appareil.
• Dégivrez et nettoyez l’intérieur de l’appareil.
• Laissez la porte ouverte afin d’éviter la formation de
mauvaises odeurs.
.
20
DIAGNOSTIC RAPIDE
Si vous entendez ces bruits
1. La température à l’intérieur des compartiments
n’est pas assez froide.
• Les aliments empêchent-ils la porte de se fermer
correctement ?
• Le thermostat est-il sur la bonne position ?
• La circulation de l’air est-elle gênée ?
2. La température à l’intérieur du réfrigérateur est
trop froide.
• Le thermostat est-il sur la bonne position ?
3. L’appareil fait trop de bruit.
• L’installation de l’appareil a-t-elle été réalisée
correctement ?
• Les tuyaux à l’arrière se touchent-ils ou vibrent-ils ?
• Il est tout à fait normal d’entendre le bruit produit par la
circulation du fluide réfrigérant.
4. L’appareil ne fonctionne pas ?
• Y a-t-il une coupure de courant ?
• La fiche est-elle correctement introduite dans la prise
de courant ?
• L'interrupteur bipolaire est-il enclenché ?
• Les dispositifs de sécurité du circuit électrique
fonctionnent-ils correctement ?
• Le câble d’alimentation est-il endommagé ?
..votre appareil fonctionne parfaitement!!!
y
6. L’éclairage intérieur ne fonctionne pas.
y Contrôlez d’abord le point 4, puis :
• Débranchez l'appareil du réseau électrique, contrôlez
l'ampoule et remplacez-la, au besoin:
- ampoule de type traditionnel
(max 25W)
Ou
- ampoule à LED
(aux caractéristiques identiques)
disponible uniquement auprès du Service d'assistance
technique
5. Il y a de l’eau au fond du compartiment
réfrigérateur.
• Le thermostat est-il sur la bonne position ?
• La goulotte d’évacuation de l’eau de dégivrage est-elle
bouchée ?
• Comment remplacer l’ampoule : Dévissez dans le sens
inverse des aiguilles d’une montre, comme illustré par la
figure
21
SERVICE APRÈS-VENTE
Avant de contacter le Service Après-vente :
Vérifiez s’il n’est pas possible d’éliminer les pannes
1.
sans aide (voir “Diagnostic rapide”).
Remettez l’appareil en marche pour vous assurer
2.
que l’inconvénient a été éliminé. Si le problème
persiste, débranchez à nouveau l’appareil et
répétez l’opération une heure plus tard.
Si le résultat est encore négatif, contactez le
3.
Service Après-vente.
Communiquez :
•
•
•
•
•
Remarque :
Le changement du sens de l’ouverture de la
porte de l’appareil effectué par le Service
Après-vente n’est pas considéré comme une
intervention sous garantie.
INSTALLATION
N’installez pas le congélateur près d’une source de chaleur.
Les appareils installés dans un endroit chaud, exposés aux
rayons directs du soleil ou près d’une source de chaleur
(radiateur, cuisinière) consomment plus d’énergie, ce qui
doit être évité.
Si ce n’est pas possible, il convient de respecter les
distances minimales suivantes :
30 cm des cuisinières à charbon ou à mazout
3 cm des cuisinières électriques.
• Placez l’appareil dans un endroit sec et bien aéré.
• Nettoyez l’intérieur (voir le chapitre “Comment dégivrer
et nettoyer l’appareil”).
• Montez les accessoires.
• Contrôlez l’étanchéité du joint de la porte, en particulier
après le montage et la modification évent
l’ouverture de la porte.
Branchement électrique
• Contrôlez que le voltage indiqué sur la plaque signalétique
correspond à la tension de réseau de l’installation
électrique de votre habitation.
• La mise à la terre de l’appareil est obligatoire aux termes
de la loi. Le fabricant décline toute responsabilité pour
tous dommages éventuels subis par des personnes ou des
biens, résultant de la non-observation de la consigne
mentionnée ci-dessus.
• Si la prise et la fiche ne sont pas du même type, faites-les
remplacer par un technicien qualifié.
• N’utilisez pas d’adaptateurs, de prises multiples ni de
rallonges.
uelle du sens de
le type de panne,
le modèle,
le numéro de Service (numéro qui se trouve après
le mot SERVICE sur la plaque signalétique placée à
l’intérieur de l’appareil),
votre adresse
votre numéro de téléphone avec l’indicatif.
complète,
22
BESCHRIJVING VAN HET APPARAAT
A) Koelvak
(voor het bewaren van verse levensmiddelen)
Schappen (gedeeltelijk in hoogte verstelbaar)
1.
Groente- en fruitladen
2.
Binnendeur koelkast met:
3.
(indien bijgeleverd)
a. Verstelbare vakken
b. Bovenste deurvak
c. Onderste deurvak
Lade (uitschuifbaar) (indien bijgeleverd)
4.
Afvoer voor het dooiwater
5.
Typeplaatje
6.
BEDIENINGEN
B) Vriesvak (indien bijgeleverd)
(gekenmerkt door het symbool
voor het bewaren van verse levensmiddelen en
diepvriesproducten en het maken van ijsblokjes
Rooster (niet op de afbeelding weergegeven,
7.
indien leverbaar)
Invrieszone
8.
IJsbakjes
9.
C) Bedieningen
Thermostaatknop
A.
Lichtknop
B.
Referentieteken thermostaatstand
D.
Lampje/Ledlampje
E.
23
GEBRUIK VAN HET KOELVAK
Dit apparaat is een koelkast met een vriesvak met
sterren.
Of is een koelkast met een vriesvak met sterren.
Het apparaat levert optimale prestaties als de
omgevingstemperatuur er omheen tussen +10°C en +38°C
ligt.
Ingebruikneming van het apparaat
Als de stekker van het apparaat in het stopcontact gestoken is, en de
thermostaat
binnenverlichting telkens branden wanneer de deur geopend wordt.
Nadat de temperatuur is ingesteld – zoals beschreven wordt in het
volgende hoofdstuk – is het apparaat gereed om te werken.
Temperatuurinstelling
- Als u de temperatuur in het vak wilt wijzigen, draait u de
thermostaatknop:
• op de lagere cijfers
temperatuur in het vak
• op de middencijfers
temperatuur;
• op de hogere cijfers
temperatuur.
Thermostaat op
worden onderbroken.
Opmerking
De omgevingstemperatuur, de frequentie waarmee de deur
wordt geopend en de plaats van het apparaat kunnen van invloed
zijn op de binnentemperatuur van de koelkast. De
thermostaatstand dient op grond van deze factoren te worden
aangepast.
Belangrijk
• De instelling van de thermostaat
waar het apparaat geïnstalleerd is, van de temperatuur van het
vertrek en de frequentie waarmee de deur geopend wordt.
Bewaren van levensmiddelen in het koelvak:
Plaats de levensmiddelen zoals in de afbeelding hiernaast:
Gekookt voedsel
1.
Zuivel, conserven, kaas, boter
2.
Vis, vlees
3.
Vleeswaren
4.
Fruit, groente, salades
5.
Kleine conserven, eieren
6.
Tubes, kleine conserven
7.
Kleine flessen
8.
Flessen
9.
Opmerking
• De voedingsmiddelen moeten worden afgedekt om te
voorkomen dat ze uitdrogen.
• Warm voedsel moet eerst afkoelen, voordat het in de koelkast
gezet mag worden.
• Zorg ervoor dat de lucht goed kan circuleren tussen de
levensmiddelen.
Het koelvak wordt geheel automatisch ontdooid.
niet op het symbool
(1)
1-2/MIN
MINDER KOUD
3-4/MED
5-7/MAX
: de functies van het apparaat en de verlichting
:
:
staat, gaat de
wanneer u wilt dat de
voor een
voor een
(1)
is;
GEMIDDELD HOGE
KOUDERE
is afhankelijk van de plaats
24
 Loading...